poweredge_2950
DELLEDGE2950服务器LED显示代码说明
DELLEDGE2950服务器LED显示代码说明DellEdge 2950 LCD Messages(2950前面版信息显示)The following table provides detail on error messaged that may be displayed on the system LCD.NOTE:If the user presses and holds the ID button for approximately 5 seconds, the LCD will enter the BIOS Progress Code state. This feature is very useful when troubleshooting a no POST or no video situations.Cable and Board Presence - Message Code: x1Axx ?Voltages - Message Code: x12xxProcessors - Message Code: x14xxPower Supplies - Message Code: x16xxHard Drives - Message Code: x18xxBIOS Progress Codes - Message Code: N/A ?Temperature - Message Code: x11xxFans - Message Code: x13xxSystem Memory - Message Code: x21xxBIOS - Message Code: x17xxMiscellaneous - Message Code: x19xxBIOS Fatal Error Codes - Message Code: x20xx ?Special Exceptions - Message Code: x10xxLCD 状态信息系统的控制面板LCD 可以提供状态信息,以表示系统何时运行正常,何时需要注意。
PowerEdge 2950 用户指南说明书

用户指南注和注意本说明文件中的信息如有更改,恕不另行通知。
© 2007 Dell Inc. 版权所有,翻印必究。
未经 Dell Inc. 书面许可,严禁以任何形式进行复制。
本文中用到的商标:Dell 、DELL 徽标、Dell OpenManage 和 PowerEdge 是 Dell Inc. 的商标;Microsoft 、Active Directory 、Internet Explorer 、Windows 、Windows NT 、Windows Server 和 Windows Vista 是 Microsoft 公司在美国和其他国家/地区的商标或注册商标;Red Hat 是 Red Hat, Inc. 的注册商标;Novell 和 SUSE 是 Novell Corporation 的注册商标。
Intel 是 Intel 公司的注册商标;UNIX 是 The Open Group 在美国和其他国家/地区的注册商标。
Avocent 是 Avocent 公司的商标; OSCAR 是 Avocent 公司或其子公司的注册商标。
版权 1998-2006 The OpenLDAP Foundation 。
版权所有,翻印必究。
无论修改与否,以源代码和二进制的形式重新分发或使用都必须经过 OpenLDAP Public License 的授权许可。
此许可证的副本包括在分发目录顶层中的 LICENSE 文件中,您也可以在 /license.html 中找到。
OpenLDAP 是 The OpenLDAP Foundation 的注册商标。
一些单独文件和/或附送软件包的版权可能归其它方所有,受其它条款的制约。
此软件系根据 University of Michigan LDAP v3.3 分发版本开发出来。
此软件还包含来自公共资源的材料。
有关 OpenLDAP 的信息可以从 / 获得。
部分版权 1998-2004 Kurt D 。
2950交换机简要配置手册(中文)

2950交换机简明配置维护手册目录说明 (3)产品特性 (3)配置端口 (4)配置一组端口 (4)配置二层端口 (6)配置端口速率及双工模式 (6)端口描述 (7)监控及维护端口 (8)监控端口和控制器的状态 (8)刷新、重置端口及计数器 (10)关闭和打开端口 (10)配置VLAN (11)理解VLAN (11)可支持的VLAN (12)配置正常范围的VLAN (12)生成、修改以太网VLAN (13)删除VLAN (14)将端口分配给一个VLAN (15)配置VLAN Trunks (16)使用STP实现负载均衡 (19)配置Cluster (23)说明本手册只包括日常使用的有关命令及特性,其它未涉及的命令及特性请参考英文的详细配置手册。
产品特性2950是只支持二层的交换机支持VLAN•到250 个VLAN•支持VLAN ID从1到4094(IEEE 802.1Q 标准)•支持ISL及IEEE 802.1Q封装安全•支持IOS标准的密码保护•支持标准及扩展的访问列表来定义安全策略•支持基于VLAN的访问列表监视•交换机LED指示端口状态•SPAN及远端SPAN (RSPAN) 可以监视任何端口或VLAN的流量•内置支持四组的RMON监控功能(历史、统计、告警及事件)配置端口配置一组端口当使用interface range命令时有如下的规则:•有效的组范围:o vlan从1 到4094o fastethernet槽位/{first port} - {last port}, 槽位为0o gigabitethernet槽位/{first port} - {last port},槽位为0o port-channel port-channel-number - port-channel-number, port-channel号从1到64•端口号之间需要加入空格,如:interface range fastethernet 0/1 – 5是有效的,而interface range fastethernet 0/1-5是无效的.•interface range命令只能配置已经存在的interface vlan•所有在同一组的端口必须是相同类别的。
Dell PowerEdge 2950 系统硬件用户手册
返回目录页面关于系统Dell™ PowerEdge™ 2950 系统硬件用户手册您可能需要的其它信息在系统启动过程中访问系统配置前面板部件和指示灯背面板部件和指示灯电源指示灯代码NIC 指示灯代码LCD 状态信息系统信息警告信息诊断程序信息警报信息本节介绍物理、固件和软件接口部件,它们提供了系统的必备功能,确保系统能够正常运行。
系统的前面板和背面板上的物理连接器提供了方便的连接和系统扩充功能。
系统的固件、应用程序和操作系统监测系统和组件状态并在出现问题时发出警报。
以下指示灯、信息均可以报告系统情况:•前面板或背面板指示灯•系统信息•警告信息•诊断信息•警报信息本节将介绍每一类信息,并列出可能的原因以及解决信息所指示问题的步骤。
本节说明了系统指示灯和部件。
您可能需要的其它信息警告:《产品信息指南》,提供了重要的安全信息和管制信息。
保修信息可能包括在该说明文件中,也可能作为单独的说明文件提供。
•您的机架解决方案附带的《机架安装指南》或《机架安装说明》,介绍了如何将系统安装到机架中。
•《使用入门指南》,概要介绍了系统功能、如何设置系统以及技术规格。
•系统附带的 CD 提供了配置和管理系统时可使用的说明文件和工具。
•系统管理软件说明文件,介绍了软件的功能、要求、安装和基本操作。
•操作系统说明文件,介绍了如何安装(如果有必要)、配置和使用操作系统软件。
•单独购买的任何组件所附带的说明文件,提供了有关配置和安装这些选件的信息。
•系统有时附带更新,用于说明对系统、软件和/或说明文件所作的更改。
注:请经常访问以获得更新,并首先阅读这些更新,因为这些更新通常用于替代其它说明文件中的信息。
•系统可能附带版本注释或自述文件,提供系统或说明文件的最新更新,或者为有经验的用户或技术人员提供高级技术参考资料。
在系统启动过程中访问系统配置表 1-1介绍了在系统启动过程中访问系统配置可能需要输入的击键。
如果输入击键之前已开始载入操作系统,请让系统完成引导过程,然后重新启动系统并再试一次。
cisco2950交换机简单配置2950是只支持二层的交换机支持VLAN第1步

cisco2950交换机简单配置2950是只支持二层的交换机支持VLAN第1步cisco2950 交换机简单配置2950 是只支持二层的交换机支持VLAN 第1 步:单击“开始”按钮,在“程序”菜单的“附件”选项中单击“超级终端” 第2 步:在“名称”文本框中键入“Cisco” 第3 步:在“连接时使用”下拉列表框中选择与交换机相连的计算机的串口。
台式机为“com 1”,笔记本为“com 3 或者com 5”。
第4 步:在“波特率”下拉列表框中选择“9600”-确定. 如果通信正常的话就会出现类似于如下所示的主配置界面,并会在这个窗口中就会显示交换机的初始配置情况。
enter enter enter no!1)配置交换机姓名switch>ena switch#configure enter switch#configure terminal (进入配置状态) Switch(config)#hostname 配置的交换机姓名如:30FLoor-2960-1 30FLoor-2960-1(config)#end 30FLoor-2960-1# 2)配置交换机的ip 30FLoor-2960-1#configure terminal (进入配置状态) 30FLoor-2960-1(config)#interface vlan 1 30FLoor-2960-1(config)#ip address ip 地址子网掩码例如:30FLoor-2960-1(config)#ip address 10.11.90.10 255.255.255.0 30FLoor-2960-1(config)#no shutdown 30FLoor-2960-1(config)#end 30FLoor-2960-1# 30FLoor-2960-1# 3)配置交换机的默认网关30FLoor-2960-1(config)#ip default-gateway 网关ip 例如:30FLoor-2960-1(config)#ip default-gateway 10.11.90.254 4)设置路由30FLoor-2960-1(config)#ip route 0.0.0.0 X.X.X.X 5)设置console 口密码30FLoor-2960-1(config)#line console 0 30FLoor-2960-1(config-line)#password 输入密码30FLoor-2960-1(config-line)#login 30FLoor-2960-1(config-line)#end 6)设置telnet 的密码30FLoor-2960-1(config)#line vty 0 10 30FLoor-2960-1(config-line)#password 输入密码(yuxuan)30FLoor-2960-1(config-line)#login 30FLoor-2960-1(config-line)#end7)设置交换机的enable 密码30FLoor-2960-1(config)#enablepassword 输入密码(xuan)30FLoor-2960-1(config)#enable secret 输入密码(yuxuan)30FLoor-2960-1(config)#end 8)将当前配置信息保存到闪存中30FLoor-2960-1(config)#write 9)查看交换机信息30FLoor-2960-1# show version 查看交换机版本信息show ip interfaces 查看交换机的ip 地址show interface vlan 1 验证管理ip 地址已经配置并开启show ip redirect 查看交换机的网关show running-configure 查看交换机当前的配置信息show configure 查看交换机保存的配置信息switch#write ;保存配置信息switch#show vtp ;查看vtp 配置信息switch#show run ;查看当前配置信息switch#show vlan ;查看vlan 配置信息switch#show interface ;查看端口信息switch#show int f0/0 ;查看指定端口信息10)交换机基本配置步骤1.登陆到交换机2.进入特权模式命令:enable 3.进入全局配置模式命令:configure terminal 4.进入相应的配置子模式如:接口子模式命令:interface vlan 1 交换机基本状态:switch: ;ROM 状态,路由器是rommon> hostname> ;用户模式hostname# ;特权模式hostname(config)# ;全局配置模式hostname(config-if)# ;接口状态交换机口令设置:switch>enable ;进入特权模式switch#config terminal ;进入全局配置模式switch(config)#hostname ;设置交换机的主机名switch(config)#enable secret xxx ;设置特权加密口令switch(config)#enable password xxa ;设置特权非密口令switch(config)#line console 0 ;进入控制台口switch(config-line)#line vty 0 4 ;进入虚拟终端switch(config-line)#login ;允许登录switch(config-line)#password xx ;设置登录口令xx switch#exit ;返回命令交换机VLAN 设置:switch#vlan database ;进入VLAN 设置switch(vlan)#vlan 2 ;建VLAN 2 switch(vlan)#no vlan 2 ;删vlan 2 switch(config)#int f0/1 ;进入端口 1 switch(config-if)#switchport access vlan 2 ;当前端口加入vlan 2 switch(config-if)#switchport mode trunk ;设置为干线switch(config-if)#switchport trunk allowed vlan 1,2 ;设置允许的vlan switch(config-if)#switchport trunk encap dot1q ;设置vlan 中继switch(config)#vtp domain ;设置发vtp 域名switch(config)#vtp password ;设置发vtp 密码switch(config)#vtp mode server ;设置发vtp 模式switch(config)#vtp mode client ;设置发vtp 模式交换机设置IP 地址:switch(config)#interface vlan 1 ;进入vlan 1 switch(config-if)#ip address ;设置IP 地址switch(config)#ip default-gateway ;设置默认网关switch#dir flash: ;查看闪存交换机显示命令:switch#write ;保存配置信息switch#show vtp ;查看vtp 配置信息switch#show run ;查看当前配置信息switch#show vlan ;查看vlan 配置信息switch#show interface ;查看端口信息switch#show int f0/0 ;查看指定端口信息思科2950 交换机VLAN 划分cisco 首先配置一下交换机SC-2950> SC-2950>en SC-2950#conf t Enter configuration commands, one per line. End with CNTL/Z. SC-2950(config)#config-register 0x2102 SC-2950(config)#end 添加三个VLAN SC-2950#vlan data SC-2950(vlan)#vlan 10 name v1 VLAN 10 added: Name: v1 SC-2950(vlan)#vlan 20 name v2 VLAN 20 added: Name: v2 SC-2950(vlan)#vlan 30 name v3 VLAN 30 added: Name: v3 SC-2950(vlan)#exitAPPLY completed. Exiting.... SC-2950# 划分接口到各个VLAN SC-2950#conf t Enter configuration commands, one per line. End with CNTL/Z. SC-2950(config)#int fa0/1 //留给管理员SC-2950(config-if)#switchport mode access SC-2950(config-if)#sw acc vlan 10 SC-2950(config-if)#no shutdown SC-2950(config-if)#exit SC-2950(config)#int range f0/2 - 15 SC-2950(config-if-range)#sw mode acc SC-2950(config-if-range)#sw acc vlan 20 SC-2950(config-if-range)#no sh SC-2950(config-if-range)#exit SC-2950(config)#int range f0/16 - 24 SC-2950(config-if-range)#sw mode acc SC-2950(config-if-range)#sw acc vlan 30 SC-2950(config-if-range)#no sh SC-2950(config-if-range)#exit 激活VLAN,并且给VLAN 10 加个IP 以便管理SC-2950(config)#int vlan 10 SC-2950(config-if)#ip add 192.168.1.1 255.255.255.0 SC-2950(config-if)#no sh SC-2950(config-if)#exit SC-2950(config)#int vlan 20 SC-2950(config-if)#no sh SC-2950(config-if)#exit SC-2950(config)#int vlan 30 SC-2950(config-if)#no sh SC-2950(config-if)#exit 将交换机指向网关SC-2950(config)#ip default-gateway 192.168.1.254 SC-2950(config)#end SC-2950# 检测配置SC-2950#sh vlan brief VLAN Name Status Ports ---- -------------------------------- --------- ------------------------------1 default active 10 v1 active Fa0/1 20 v2 active Fa0/2, Fa0/3, Fa0/4,Fa0/5 Fa0/6, Fa0/7, Fa0/8,Fa0/9 Fa0/10, Fa0/11, Fa0/12,Fa0/13 Fa0/14, Fa0/1530v3activeFa0/16, Fa0/17, Fa0/18, Fa0/19 Fa0/20, Fa0/21, Fa0/22, Fa0/23 Fa0/24 Prot down down down up up downSC-2950#sh ip int b Interface IP-Address ocol FastEthernet0/23 unassigned FastEthernet0/24 unassigned Vlan1 unassigned Vlan10 192.168.1.1 Vlan20 unassigned Vlan30 unassigned SC-2950#sh run Building configuration... Current configuration : 1482 bytes ... ! interface FastEthernet0/24 switchport access vlan 30 ! interface Vlan1 no ip address ! interface Vlan10 ip address 192.168.1.1 255.255.255.0 ! interface Vlan20 no ip address ! interface Vlan30 no ip address ! ip default-gateway 192.168.1.254 ip http server ! ... 保存配置SC-2950#write Building configuration... [OK] cisco 2960 交换机安装配置基础新设备配置内容:1. interface vlan 1 的ip,gateway conf t int vlan 1 ip address xx.xx.xx.xx 255.255.255.0OK? Method Status YES unset up YES unset up YES unset up YES manual up YES unset up YES unset upip default-gateway ip-address no shutdown exit 2.en 的密码3.line vty 0-4 telnet 的密码4.wr 存盘show interface vlan 1 show run 将F0/1-10 端口加入到VLAN20 中,对应以下命令interface range f0/1 -10 switchport mode acccess switchport access vlan 20 注意,f0/1 后面有个空格,然后才是-10 cisco 2950 常用配置命令产品相关命令1、配置IP 地址交换机要能够被网管,必须给它标识一个管理IP 地址,默认情况下CISCO 交换机的VLAN 1 为管理VLAN,为该VLAN 配上IP 地址,交换机就可以被网管了。
思科2950交换机配置说明

0 watchdog, 0 multicast, 0 pause input
0 input packets with dribble condition detected
1 packets output, 64 bytes, 0 underruns
2,从配置模式下创建VLAN,如图:
我们可以看到,从配置模式创建VLAN时只要直接输入vlan命令加VLAN号就可以创建VLAN
上图为成功创建VLAN后的下一个界面,用“?”号同样可以查询到在此VLAN配置模式下可以使用的所有命令。
2.2.3
不同交换机相同VLAN间如需要互访,需要将交换机相连端口设置为中继模式,并且各接口封装模式要相同(在2950上只支持802.1q封装,端口配置为中继后自动开启802.1q协议),否则中继将不起作用。
在配置模式下可以给交换机命名、配置VLAN、STP、VTP、VLAN中继、访问控制列表、以太通道(端口绑定)、SNMP、AAA认证等高级特性,从而达到满足不同用户不同需求的目的。
举例如下:
1,给交换机命名
使用命令“hostname“加欲命名的名字,就能够修改交换机的名字。
如图:
输入“hostname2950_test”命令回车后,交换机的名字立刻由原来的“cisco2950”变为“2950_test”。
1 default active
2 VLAN2 active Fa0/1, Fa0/2, Fa0/3, Fa0/4
Fa0/5
3 VLAN3 active Fa0/6, Fa0/7, Fa0/8, Fa0/9
Fa0/10
Pacs需求规格说明书
Pacs需求规格说明书1.服务器选DELL PowerEdge 2950。
机架式结构 2UDELL PowerEdge 2950 (Xeon 3.0GHz/1GB/146GB) 处理器CPU类型 XeonCPU频率(MHz) 3000处理器描述标配处理器数量1个支持CPU个数 2CPU二级缓存2×2048KBDELL PowerEdge 2950 (Xeon 3.0GHz/1GB/146GB) 主板主板芯片组 Intel 5000XFSB(总线) 1066MHz扩展槽 3DELL PowerEdge 2950 (Xeon 3.0GHz/1GB/146GB) 内存内存类型 ECC DDRII内存大小 1GB最大内存容量 32GBDELL PowerEdge 2950 (Xeon 3.0GHz/1GB/146GB) 存储硬盘大小(GB) 146GB硬盘类型/描述 SAS硬盘最大容量 1.8TB最大热插拔硬盘数 6个热插拔硬盘位磁盘阵列卡 RAID 0、1、5、10、50IDE控制器 ATA 100光驱 CD-ROMDELL PowerEdge 2950 (Xeon 3.0GHz/1GB/146GB) 网络网络控制器双内置Broadcom 10/100/1000 Gigabit NICDELL PowerEdge 2950 (Xeon 3.0GHz/1GB/146GB) 显示性能显示芯片集成ATI RN50控制器、含16MB SDRAMDELL PowerEdge 2950 (Xeon 3.0GHz/1GB/146GB) 接口类型标准接口背面:2个RJ-45、1个9针串口、2个通用串行总线(USB) 2.0、Video、带蓝色/黄色LED灯光的ID按键、用于可选 DRAC 45/I管理控制器的RJ-45,正面:两个通用串行总线(USB) 2.0、带蓝色/黄色LED灯光的ID按键、15针视屏接口、系统开/关按钮DELL PowerEdge 2950 (Xeon 3.0GHz/1GB/146GB) 其他参数散热系统热插拔、冗余散热风扇DELL PowerEdge 2950 (Xeon 3.0GHz/1GB/146GB) 电源性能电源热插拔冗余电源电源数量 1电压 110/220V功率(W) 750DELL PowerEdge 2950 (Xeon 3.0GHz/1GB/146GB) 外观特征尺寸712.3×444.3×86.4mm 重量 23Kg2.采用三级存储方式:在线存储对于日常工作所需的信息进行保存,配置高,存储介质:光纤硬盘,裸容量32TB,因为RAID的关系,故实际容量小于该值,该层信息保存1年。
dell2950raid配置
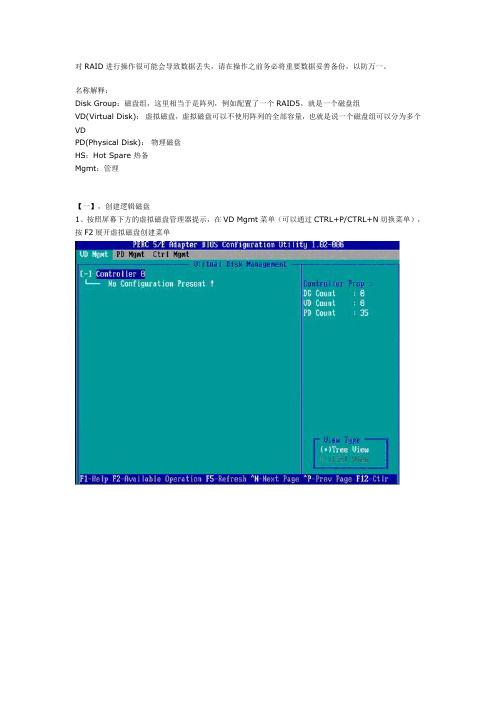
对RAID进行操作很可能会导致数据丢失,请在操作之前务必将重要数据妥善备份,以防万一。
名称解释:Disk Group:磁盘组,这里相当于是阵列,例如配置了一个RAID5,就是一个磁盘组VD(Virtual Disk):虚拟磁盘,虚拟磁盘可以不使用阵列的全部容量,也就是说一个磁盘组可以分为多个VDPD(Physical Disk):物理磁盘HS:Hot Spare 热备Mgmt:管理【一】,创建逻辑磁盘1、按照屏幕下方的虚拟磁盘管理器提示,在VD Mgmt菜单(可以通过CTRL+P/CTRL+N切换菜单),按F2展开虚拟磁盘创建菜单2、在虚拟磁盘创建窗口,按回车键选择”Create New VD”创建新虚拟磁盘3、在RAID Level选项按回车,可以出现能够支持的RAID级别,RAID卡能够支持的级别有RAID0/1/5/10/50,根据具体配置的硬盘数量不同,这个位置可能出现的选项也会有所区别。
选择不同的级别,选项会有所差别。
选择好需要配置的RAID级别(我们这里以RAID5为例),按回车确认。
4、确认RAID级别以后,按向下方向键,将光标移至Physical Disks列表中,上下移动至需要选择的硬盘位置,按空格键来选择(移除)列表中的硬盘,当选择的硬盘数量达到这个RAID级别所需的要求时,Basic Settings的VD Size中可以显示这个RAID的默认容量信息。
有X标志为选中的硬盘。
选择完硬盘后按Tab键,可以将光标移至VD Size栏,VD Size可以手动设定大小,也就是说可以不用将所有的容量配置在一个虚拟磁盘中。
如果这个虚拟磁盘没有使用我们所配置的RAID5阵列所有的容量,剩余的空间可以配置为另外的一个虚拟磁盘,但是配置下一个虚拟磁盘时必须返回VD Mgmt创建(可以参考第13步,会有详细说明)。
VD Name根据需要设置,也可为空。
注:各RAID级别最少需要的硬盘数量,RAID0=1 RAID1=2 RAID5=3 RAID10=4 RAID50=65、修改高级设置,选择完VD Size后,可以按向下方向键,或者Tab键,将光标移至Advanced Settings 处,按空格键开启(禁用)高级设置。
DELL PowerEdge 2950 服务器 RAID 的详细配置方法(附图)

本文记录了一次由三块SAS 硬盘组建RAID-5 并完成WINDOWS 2003 SERVER 系统的完整过程。
1、开机,到RAID卡自检画面时,按提示按“CTRL+R”键打开RAID卡配置界面。
(注:如果增减了硬盘或调整了硬盘位置,开机到RAID自检时会出现如下画面,按任意键保持这种改变继续;按“C”键加载RAID配置工具重新配置。
如果你是要重新配置RAID就按“C”,这样完成后,磁盘上的全部数据都会被删除)因为磁盘排列已经改变,打开的RAID配置工具显示虚拟硬盘0出错,见下图:2、打开RAID配置工具,如下图,这台服务器只有一个虚拟硬盘Disk 0,由三块硬盘组成,容量272.250GB。
3、按上下光标键选中“Disk Group 0”,按“F2”键弹出配置菜单,通过光标键选择“Delete Disk Group”,按回车,删除此虚拟磁盘排列。
4、弹出警告确认框。
光标键定位“OK”按钮后回车执行删除。
(回车确定后,磁盘上的全部数据将被删除!)5、服务器上已没有任何硬盘排列存在了。
6、在“No Configuration Present”上按“F2”键弹出配置菜单,通过光标键选中“Create New VD”,回车,创建新的硬盘排列。
7、之后会打开如下所示硬盘排列配置对话框。
首先选择RAID类型:光标键(上、下、左、右、TAB)定位在“RAID Level”右侧蓝色矩形按钮上选择一个RAID类型后回车。
(到底允许组成哪种类型的RAID决定于你已插入的硬盘数量,如果下拉菜单中没有你想组建的RAID类型,说明接入计算机的硬盘数量不够或硬盘数量没有按规定必须成双数)8、选择好RAID类型后,在下方“Physical Disks”区选择挂入的硬盘:用上下光标键选中硬盘再按空格键挂载或卸载硬盘。
磁盘序号前的中扩号里内容为空表示卸载,内容是“X”表示挂载。
组建RAID-5必须至少三块硬盘,所以三块硬盘都需要挂载上,此时窗口中部上方会显示出未来组建好的虚拟硬盘容量,请见下图所示。
Dell2950_Raid配置
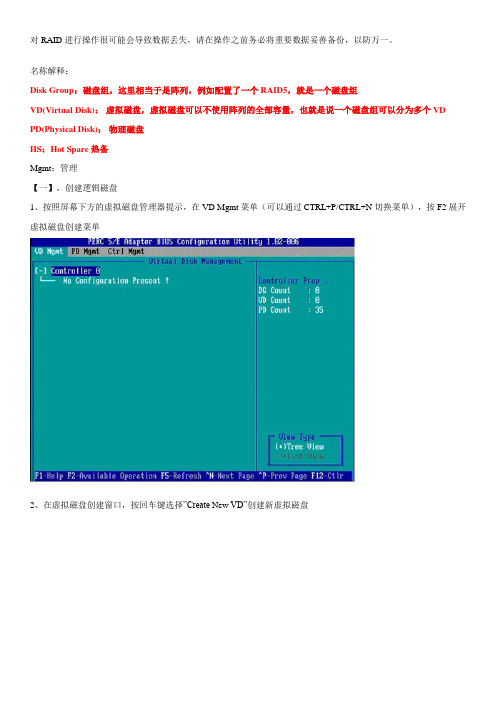
对RAID进行操作很可能会导致数据丢失,请在操作之前务必将重要数据妥善备份,以防万一。
名称解释:Disk Group:磁盘组,这里相当于是阵列,例如配置了一个RAID5,就是一个磁盘组VD(Virtual Disk):虚拟磁盘,虚拟磁盘可以不使用阵列的全部容量,也就是说一个磁盘组可以分为多个VDPD(Physical Disk):物理磁盘HS:Hot Spare 热备Mgmt:管理【一】,创建逻辑磁盘1、按照屏幕下方的虚拟磁盘管理器提示,在VD Mgmt菜单(可以通过CTRL+P/CTRL+N切换菜单),按F2展开虚拟磁盘创建菜单2、在虚拟磁盘创建窗口,按回车键选择”Create New VD”创建新虚拟磁盘3、在RAID Level选项按回车,可以出现能够支持的RAID级别,RAID卡能够支持的级别有RAID0/1/5/10/50,根据具体配置的硬盘数量不同,这个位置可能出现的选项也会有所区别。
选择不同的级别,选项会有所差别。
选择好需要配置的RAID级别(我们这里以RAID5为例),按回车确认。
4、确认RAID级别以后,按向下方向键,将光标移至Physical Disks列表中,上下移动至需要选择的硬盘位置,按空格键来选择(移除)列表中的硬盘,当选择的硬盘数量达到这个RAID级别所需的要求时,Basic Settings的VD Size 中可以显示这个RAID的默认容量信息。
有X标志为选中的硬盘。
选择完硬盘后按Tab键,可以将光标移至VD Size栏,VD Size可以手动设定大小,也就是说可以不用将所有的容量配置在一个虚拟磁盘中。
如果这个虚拟磁盘没有使用我们所配置的RAID5阵列所有的容量,剩余的空间可以配置为另外的一个虚拟磁盘,但是配置下一个虚拟磁盘时必须返回VD Mgmt创建(可以参考第13步,会有详细说明)。
VD Name根据需要设置,也可为空。
注:各RAID级别最少需要的硬盘数量,RAID0=1 RAID1=2 RAID5=3 RAID10=4 RAID50=65、修改高级设置,选择完VD Size后,可以按向下方向键,或者Tab键,将光标移至Advanced Settings处,按空格键开启(禁用)高级设置。
dell 2950 故障排除

故障现象服务器前面板或背面板指示灯报警,第二块硬盘黄色灯闪烁,故障代码ID E0 B3 FO ,经过查询为RAID卡故障.处理过程1.启动电脑,ctrl+c进入SAS 5/IR,可以查看SAS5/ir 的固件版本号和启动的顺序,按+/- 号可以更改启动顺序,ins/del 键可以更改启动列表,直接按回车进入SAS 5IR 的配置界面,查看/设置 RAID (RAID Properties ),硬盘全部正常。
2.怀疑硬件连接松动,马上关机,拔出第二块硬盘重新插上,启动后现象依旧。
3. 下载版本dset1.7版本的诊断工具运行后点NEXT、接受协议后,您可以看到如下的这个界面1.第一项,可以创建日志信息文件,了解机器的运行状态。
2.第二个选项安装DSET软件3.第三个选项获取日志并且清除原有记录日志,可以解决状态灯不正常但机器使用正常的情况。
选择next(只选择第一个选项,其它的SKIP的都不要选择,否则会无法抓取到日志)运行后会看到如下界面,大约几分钟至十几分钟的时间,日志收集后产生的文件名和保存的路径如下图红色部分.也可以通过搜索dset*.zip查找经过分析,选择第三项清除原有记录日志,重新启动后第二块硬盘灯依旧黄色,但黄色报警代码改变,这说明RAID卡故障排除。
出现新报警1. E1810 HDD ## Fault2. E1614 PS # Status3. E161C PS # Input lost4. I1911 >3 EERs Chk Log经过分心发现2、3、4为电源问题,把第二块电源通电后问题解决,1明显第二块硬盘出现问题,down掉了。
解决过程重新启动电脑ctrl+c进入SAS 5/IR在RAID 配置界面中有三个选择项查看已经存在的阵列配置(此选项只有在已经存在阵列配置的情况下才出会现)通常在第一次配置阵列时,只会出现下面两项创建 IM (镜像) 卷 (做RAID 1 ) (最多只允许两块硬盘做RAID1)创建IS ( 条带)卷(做RAID 0 )(最少2块,最多4块硬盘做RAID0)进入后发现硬盘掉线, 选择“Synchronize Mirror”(同步镜像)后,问题依然存在.目前唯一方法,只能对硬盘进行热插拔,注意这个步骤非常危险,虽然RAID支持这样做,但最好先备份数据,开机进入系统后,拔掉第二块报警硬盘,等待8-10分钟左右后,插上硬盘,灯光颜色为绿色,硬盘工作正常.并且开始同步数据,到此为止硬件故障完全解除.整个过程花费2个半小时左右。
Dell poweredge 2950 服务器添加新硬盘

5、再进入操作系统应该就能识别到使用了。
Dell poweredge 2950 服务器添加新硬盘
1、2950支持SAS/SATA硬盘,支持热拔插;原有3块SAS硬盘为RAID 0,现有一块SATA 西数 2T硬盘,需要添加。
2、抽出硬盘托架,放入硬盘(如果托架松了,造成硬盘前后移动,可以在侧面上个螺丝);
3、把托架插入服务器,保证硬盘灯是亮的,此时在操作系统里是看不到硬盘的;
4、关机、重启、按CTRL+R 进入服务器RAID管理;(如果提示键盘失灵,可以按开机键重启)
(1)ctr+p看看是否识别到硬盘,正常应该看到4块硬盘,前3块有dg显示online的,是原来的硬盘,新盘如果没有数据应该显示为foreign;
(2)crt+n返回controller,光标移到controller 0上按f2---》foreign---》foreing config----》clear确认;
(3)ctr+p看看新加的硬盘是否由foreign显示为Ready,如果是就正常,crt+n返回controller;
(4)光标移到controller 0上按f2 ---》Create new vd;
(5)raid level选RAID-0,把新要加入raid-0的硬盘用空格选上,然后按tab到ok确认即可;
DELL2950 故障实例

故障实例:1、RAID5 一块硬盘掉线2950 在0,1,2 三个硬盘槽位分别接入了 ST 1TB SATA 硬盘,配置成RAID 5 。
开机后发现有一块硬盘指示灯不亮,显示器上并提示如下:some configured disks have been removed from your system or are no longer accessible.please check you cables and also ensure all disk are present.press any key to continue,or'C' to load the configuration utility.按键盘上的 C 键后,出现提示如下:Entering the configuration uility in this state will result in drive configuration changes .press 'Y' to continue loading the configuration utility or power off your systemand check your cables to ensure all disk are present and reboot按键盘上的 Y 键后进入RAID配置界面,没有看到在1 号位的硬盘,提示:MISSING ,RAID 5 状态为Degraded然后重启机器后,发现原来指示灯不亮的硬盘,指示灯开始变为橙色,后又变成绿色提示:Fw package:6.0.2--00022 virtual Driver(s) found on the host adapter1 virtual Driver(s) Degraded2 virtual Driver(s) handled by BIOSforeign configuration(s) found on adapterpress any key to continue or 'C' load the configuration utility or 'F' to import foreign configuration (s) and continue然后,在RAID配置界面里将掉线的,导入。
服务器故障

服务器故障
服务器12错误:I1912 SEL FULL PowerEdge 2900
系统事件日志中的事件已满,无法再记录更多事件。
服务器2、3错误:E2111 SBE LOG PowerEdge 2950
系统 BIOS 已禁用内存单位错误 (SBE) 记录,在重新引导系统之前,不会再记录更多的 SBE。
“##”表示 BIOS 指示的 DIMM。
如果没有内存提升卡,则“Crd #”字符串将留在信息外。
服务器7、8错误:E1614 PS 2 Status 指定的电源设备中没有电;指定的电源设备安装错误或出现故障。
E161c PS 2 INPUT LOST 指定的电源设备的电源不可用,或超出了允许范围。
E1624 PS Redundancy 电源设备子系统不再有冗余。
如果仅有的电源设备出现故障,系统将关闭。
PowerEdge 2950。
Dell PowerEdge 2950 系统 硬件用户手册说明书

Dell™ PowerEdge™ 2950系统硬件用户手册w w w.d e l l.c o m|s u p p o r t.d e l l.c o m注、注意和警告注:注表示可以帮助您更好地使用计算机的重要信息。
注意:注意表示可能会损坏硬件或导致数据丢失,并告诉您如何避免此类问题。
警告:警告表示可能会导致财产损失、人身伤害甚至死亡。
____________________本说明文件中的信息如有更改,恕不另行通知。
© 2006 Dell Inc.。
版权所有,翻印必究。
未经 Dell Inc.书面许可,严禁以任何形式进行复制。
本文中使用的商标:Dell、DELL徽标、Inspiron、Dell Precision、Dimension、OptiPlex、Latitude、PowerEdge、PowerVault、PowerApp、PowerConnect、XPS和Dell OpenManage是 Dell Inc. 的商标;Intel、Pentium和Celeron是 Intel Corporation 的注册商标,Xeon是 Intel Corporation 的商标;Microsoft和Windows是 Microsoft Corporation 的注册商标;EMC是 EMC Corporation 的注册商标。
本说明文件中述及的其它商标和产品名称是指拥有相应商标和产品名称的公司或其制造的产品。
Dell Inc. 对其它公司的商标和产品名称不拥有任何所有权。
型号:EMS012006 年 1 月目录1关于系统 (11)您可能需要的其它信息 (11)在系统启动过程中访问系统配置 (12)前面板部件和指示灯 (12)硬盘驱动器指示灯代码 (14)背面板部件和指示灯 (15)连接外部设备 (16)电源指示灯代码 (16)NIC 指示灯代码 (17)LCD 状态信息 (18)解决 LCD 状态信息描述的问题 (24)删除 LCD 状态信息 (24)系统信息 (24)警告信息 (32)诊断程序信息 (32)警报信息 (32)2使用系统设置程序 (33)进入系统设置程序 (33)响应错误信息 (33)使用系统设置程序 (33)系统设置程序选项 (34)主屏幕 (34)CPU 信息屏幕 (36)“Integrated Devices”(集成设备)屏幕 (37)串行通信屏幕 (38)“System Security”(系统安全保护)屏幕 (39)“Exit Screen”(退出屏幕) (40)目录3系统密码和设置密码功能 (40)使用系统密码 (41)使用设置密码 (43)禁用已忘记的密码 (44)底板管理控制器配置 (44)进入 BMC 设置模块 (44)“BMC Setup Module”(BMC 设置模块)选项 (44)3安装系统组件 (45)建议使用的工具 (46)系统内部组件 (46)前挡板 (47)卸下前挡板 (48)装回前挡板 (49)打开及合上主机盖 (49)打开主机盖 (49)合上主机盖 (49)硬盘驱动器 (50)开始之前 (51)卸下驱动器挡片 (51)安装驱动器挡片 (51)卸下热插拔硬盘驱动器 (52)安装热插拔硬盘驱动器 (52)更换硬盘驱动器托盘 (53)从驱动器托盘中卸下硬盘驱动器 (53)将 SAS 硬盘驱动器安装到 SATAu 驱动器托盘中 (54)将 SATA 硬盘驱动器安装到 SATA 驱动器托盘中 (55)将 SATA 硬盘驱动器和插入器卡安装到 SATAu 硬盘驱动器托盘中..56电源设备 (58)卸下电源设备 (58)更换电源设备 (59)卸下电源设备挡片 (59)安装电源设备挡片 (60)4目录系统风扇 (60)卸下系统风扇 (60)装回冷却风扇 (61)冷却导流罩 (61)卸下冷却导流罩 (62)安装冷却导流罩 (62)风扇支架 (63)卸下风扇支架 (63)装回风扇支架 (64)SAS 控制器子卡 (65)安装 SAS 控制器子卡 (65)SAS 和 SAS RAID 控制器子卡布线原则 (67)卸下 SAS 控制器子卡 (69)RAID 电池 (69)安装 RAID 电池 (69)卸下 RAID 电池 (71)配置引导设备 (71)扩充卡 (71)扩充卡安装原则 (71)安装扩充卡 (71)卸下扩充卡 (73)扩充卡固定框架 (73)卸下扩充卡固定框架 (73)装回扩充卡固定框架 (74)安装 RAC 卡 (75)光盘驱动器 (76)卸下光盘驱动器 (76)安装光盘驱动器 (78)“Diskette Drive”(软盘驱动器) (78)从系统卸下软盘驱动器 (78)将软盘驱动器安装到系统中 (79)从驱动器托盘中卸下软盘驱动器 (80)将软盘驱动器安装到驱动器托盘中 (80)目录5SCSI 磁带驱动器 (81)卸下和安装内部 SCSI 磁带驱动器 (81)卸下和装回磁带驱动器电缆固定支架 (82)“System Memory”(系统内存) (83)一般内存模块安装原则 (84)非优化的内存配置 (84)内存备用支持 (84)内存镜像支持 (85)安装内存模块 (85)卸下内存模块 (87)启用集成 NIC TOE (87)处理器 (87)卸下处理器 (87)安装处理器 (89)系统电池 (90)更换系统电池 (90)扩充卡提升板 (92)卸下左扩充卡提升板 (92)安装左提升板 (93)卸下中央提升板 (93)安装中央提升板 (94)侧板 (94)卸下侧板 (94)安装侧板 (95)SSA 背板 (96)卸下 SAS 背板 (96)安装 SAS 背板 (97)控制面板部件(仅提供服务的过程) (98)卸下控制面板部件 (98)安装控制面板部件 (99)系统板(仅提供服务的过程) (100)卸下系统板 (100)安装系统板 (102)6目录4排除系统故障 (103)安全第一 — 为您和您的系统着想 (103)启动例行程序 (103)检查设备 (104)排除 IRQ 分配冲突故障 (104)排除外部连接故障 (105)排除视频子系统故障 (105)排除键盘故障 (106)排除鼠标故障 (106)排除基本 I/O 功能故障 (107)排除串行 I/O 设备故障 (107)排除 USB 设备故障 (108)排除 NIC 故障 (108)排除受潮系统的故障 (109)排除受损系统的故障 (109)排除系统电池故障 (110)排除电源设备故障 (111)排除系统冷却故障 (112)排除风扇故障 (112)排除系统内存故障 (113)排除软盘驱动器故障 (114)排除光盘驱动器故障 (115)排除外部 SCSI 磁带驱动器的故障 (116)排除硬盘驱动器故障 (117)排除 SAS 或 SAS RAID 控制器子卡故障 (118)排除扩充卡故障 (119)排除微处理器故障 (120)5运行系统诊断程序 (123)使用服务器管理员诊断程序 (123)目录7系统诊断程序功能 (123)何时使用系统诊断程序 (124)运行系统诊断程序 (124)系统诊断程序检测选项 (124)使用自定义检测选项 (125)选择要检测的设备 (125)选择诊断程序选项 (125)查看信息和结果 (125)6跳线和连接器 (127)系统板跳线 (127)系统板连接器 (129)SAS 背板连接器 (131)侧板连接器 (134)扩充卡提升板组件和 PCI 总线 (135)禁用已忘记的密码 (136)7获得帮助 (139)技术帮助 (139)在线服务 (139)自动技术支持服务 (140)订单状态自动查询服务 (140)技术支持服务 (140)Dell 企业培训与认证 (141)订购时遇到的问题 (141)产品信息 (141)退回项目以要求保修或信用退回 (141)致电之前 (141)与 Dell 联络 (143)8目录词汇表 (161)索引 (167)目录910目录关于系统本节介绍物理、固件和软件接口部件,它们提供了系统的必备功能,确保系统能够正常运行。
DELL2950WINDOWS操作系统安装指南
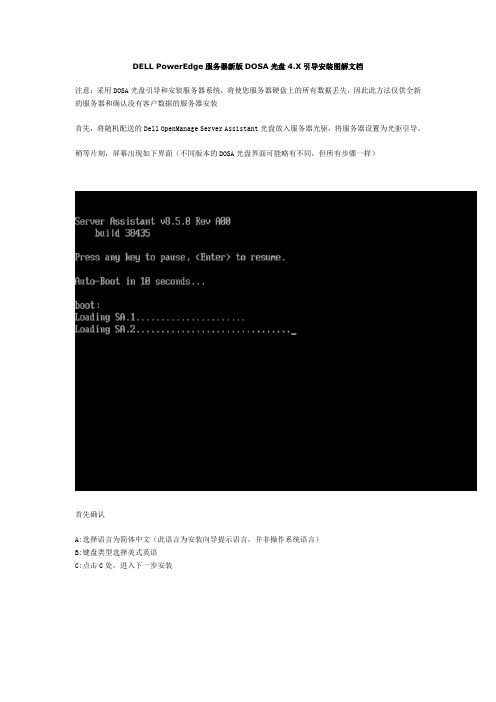
DELL PowerEdge服务器新版DOSA光盘4.X引导安装图解文档注意:采用DOSA光盘引导和安装服务器系统,将使您服务器硬盘上的所有数据丢失,因此此方法仅供全新的服务器和确认没有客户数据的服务器安装首先,将随机配送的Dell OpenManage Server Assistant光盘放入服务器光驱,将服务器设置为光驱引导。
稍等片刻,屏幕出现如下界面(不同版本的DOSA光盘界面可能略有不同,但所有步骤一样)首先确认A:选择语言为简体中文(此语言为安装向导提示语言,并非操作系统语言)B:键盘类型选择美式英语C:点击C处,进入下一步安装进入服务器设置;第一步:设置好服务器的时间和日期以及时区,然后选择继续第二步:在配置RAID项,请选择跳过RAID配置第三步:根据您的需要选择操作系统。
(如果选项中没有您所需要的系统,则您所需要的系统没有通过DELL 在该机型上的可用性测试,可能出现驱动程序装不上的情况,除非您改变操作系统,否则DELL将无法对您提供系统安装的技术支持)第四步:选择您的分区格式和分区大小,默认大小为4G,本文以8G为例。
此分区为引导分区,就是系统安装后的C盘第五步:可以跳过此设置,网络配置可以等系统安装完成后再进行配置,如果您已经知道您公司的IT分配的IP地址,可以在此设置(DELL提醒您安装操作系统时请拔除网线,待打好系统补丁后再插上网线,以防止病毒入侵)第六步:根据页面提示,填入相应的操作系统信息,包括操作系统语言,注册的组织,用户名,安装序列号ProductID为您所购买的操作系统的安装系列号请勿选择加入域,除非您请出您的网络环境为域环境,并且您知道您的域环境设置,否则请安装完系统后请你公司的IT部门设置第七步:确认安装摘要后,确认弹出CD已选中,然后选择继续。
第八步:放入您的操作系统光盘,文件复制将开始,如果提示复制错误或者光盘错误,请更换你的系统光盘此安装方式仅支持零售版操作系统,如果是盗版光盘,如市面上常见的WINDOWS2000 3IN1版本则无法使用(DELL强烈建议您采用正版软件)系统安装完成后,您将发现所有驱动程序均已加载,磁盘驱动器只有C盘,请在“我的电脑”右键“管理”在“磁盘管理”中将未划分的磁盘空间划出,并分配盘符(注:可编辑下载,若有不当之处,请指正,谢谢!)。
DELL EDGE2950服务器LED显示代码说明
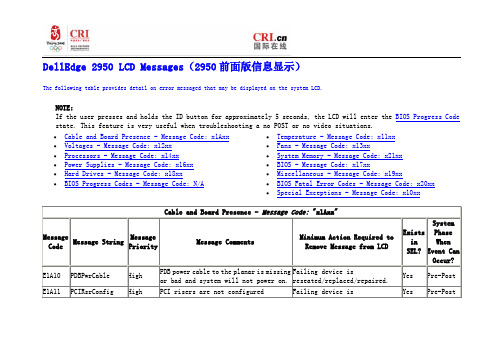
DellEdge 2950 LCD Messages(2950前面版信息显示)The following table provides detail on error messaged that may be displayed on the system LCD.NOTE:If the user presses and holds the ID button for approximately 5 seconds, the LCD will enter the BIOS Progress Code state. This feature is very useful when troubleshooting a no POST or no video situations.∙Cable and Board Presence - Message Code: x1Axx ∙Voltages - Message Code: x12xx∙Processors - Message Code: x14xx∙Power Supplies - Message Code: x16xx∙Hard Drives - Message Code: x18xx∙BIOS Progress Codes - Message Code: N/A ∙Temperature - Message Code: x11xx∙Fans - Message Code: x13xx∙System Memory - Message Code: x21xx∙BIOS - Message Code: x17xx∙Miscellaneous - Message Code: x19xx∙BIOS Fatal Error Codes - Message Code: x20xx ∙Special Exceptions - Message Code: x10xxLCD 状态信息系统的控制面板LCD 可以提供状态信息,以表示系统何时运行正常,何时需要注意。
Dell PowerEdge PE2950升级BIOS及BMC

上传文件到服务器,执行以下步骤,切记先升BMC再升BIOS官方说明:Dell Update Package Instructions for Linux DUP:Download1. Click the "Download Now" link to download the file.2. When the File Download window appears, click "Save" to save the file to your hard drive. Installation1.Read over the release information presented by executing the"./[model]_BIOS_LX_[revision].BIN --version" command from the shell.2. Download and install any prerequisites identified in the above step before proceeding.3. Install any necessary Embedded Systems Management firmware prior to this BIOS update.4. Run the update by executing "./[model]_BIOS_LX_[version].BIN" from the shell.5. Follow the remaining prompts to perform the update.[root@localhost ~]# ./2950_ESM_Firmware_4NNNG_LN32_2.50_A00.BINDell Update Package 7.1.1 (BLD_8)Copyright (c) 2003-2012 Dell, Inc. All Rights Reserved.Release Title:BMC Firmware, 2.50, A00Release Date:October 10, 2012Default Log File Name:4NNNGX01-00Supported System(s):PowerEdge 2950Description:Critical Security Update --Dell BMC Firmware, v.2.50, A00Supported Device(s):BMC FirmwareFixes / Enhancements:Critical Security Update --Urgent BMC ReleaseCollecting inventory.......Running validation...Baseboard Management ControllerThe version of this Update Package is newer than the currently installed version.Software application name: BMCPackage version: 2.50Installed version: 1.27Continue? Y/N:yExecuting update...WARNING: DO NOT STOP THIS PROCESS OR INSTALL OTHER DELL PRODUCTS WHILE UPDATE IS IN PROGRESS.THESE ACTIONS MAY CAUSE YOUR SYSTEM TO BECOME UNSTABLE!...sh: /etc/init.d/instsvcdrv: No such file or directory ...................................................................................................Update Successful.[root@localhost ~]#[root@localhost ~]#[root@localhost ~]# ./PE2950_BIOS_LX_2.7.0.BINDell Update Package 7.1.1 (BLD_8)Copyright (c) 2003-2012 Dell, Inc. All Rights Reserved.Release Title:Dell Server BIOS, 2.7.0Release Date:December 08, 2010Default Log File Name:R290178Supported System(s):PowerEdge 2950Description:PowerEdge 2950, BIOS, 2.7.0Supported Device(s):Server BIOSFixes / Enhancements:* Updated Dual-Core Intel(R) Xeon(R) Processor 5100 series B2 Stepping Microcode (Patch ID=D2) * Updated Dual-Core Intel(R) Xeon(R) Processor 5100 series G0 Stepping Microcode (Patch ID=BC)* Updated Quad-Core Intel(R) Xeon(R) Processor 5300 series B3 Stepping Microcode (Patch ID=6B)Collecting inventory.......Running validation...BIOSThe version of this Update Package is the same as the currently installed version.Software application name: BIOSPackage version: 2.7.0Installed version: 2.7.0Continue? Y/N:yY entered; update was forced by userExecuting update...WARNING: DO NOT STOP THIS PROCESS OR INSTALL OTHER DELL PRODUCTS WHILE UPDATE IS IN PROGRESS.THESE ACTIONS MAY CAUSE YOUR SYSTEM TO BECOME UNSTABLE!.....The BIOS image file is successfully loaded. To apply the BIOS update successfully, the OMSA data managerservice is stopped in case it is already running. Do not shutdown, cold reboot, power cycle, or switch offthe system before the BIOS update is completed. Restart the system for the update to take effect. The updateremains incomplete until the system is rebooted.Would you like to reboot your system now?Continue? Y/N:yBroadcast message from root (pts/0) (Sun Sep 1 19:44:40 2013):The system is going down for reboot NOW!BMC下载地址/FOLDER00928606M/1/2950_ESM_Firmware_4NNNG_LN32_2.50_A0 0.BINBMC签名文件:/FOLDER00928609M/1/2950_ESM_Firmware_4NNNG_LN32_2.50_A00.BIN.signBIOS下载地址:/FOLDER54396M/2/PE2950_BIOS_LX_2.7.0.BIN BIOS签名文件:/FOLDER53997M/2/PE2950_BIOS_LX_2.7.0.BIN.sign。
- 1、下载文档前请自行甄别文档内容的完整性,平台不提供额外的编辑、内容补充、找答案等附加服务。
- 2、"仅部分预览"的文档,不可在线预览部分如存在完整性等问题,可反馈申请退款(可完整预览的文档不适用该条件!)。
- 3、如文档侵犯您的权益,请联系客服反馈,我们会尽快为您处理(人工客服工作时间:9:00-18:30)。
Dell PowereDge2950 ServerIn a rack-optimized 2U form factor, the Dell™ Poweredge™ 2950 server deliversan excellent balance of outstanding performance, availability and flexibility for growing network infrastructure applications as well as web, messaging, database and file/print consolidation.Dell PowerEdge 2950 D ell’s Innovative 9th generation Poweredge ServersThrough innovative hardware design, software commonality and continued focus on fewer system updates, Dell’s 9th generation PowerEdge servers help reduce the complexity involved in managing data, whether you are a large enterprise or a small business. These servers are designed to a Dell™-developed Behavioral Specification that defines consistent hardware layout and user interaction across all server models in this and future PowerEdge generations. Plus, a shared master system image with 1950 and 2900 enables updates to BIOS, system drivers, firmware, operating systems and applications from one easy-to-copy template for simplified software management. Featuring the latest Intel® Xeon® processors, the 9th generation PowerEdge servers offer the power and performance you expect from Dell.Dell Poweredge 2950 Packs Flexibility and Storage Capacity in 2U FormatThe Dell PowerEdge 2950 Server offers configuration flexibility in a 2U chassis for organizations that require space-conscious internal storage capacity rather than an external storage system. Six internal hard drive bays provide up to 4.5TB1of internal storage helping to conserve valuable data center space while supplying enough storage space to accommodate growing applications.Designed to help organizations keep up with changing requirements, the server includes several embedded functions, like dual Gigabit NIC‘s and integrated SAS storage controller, which allows three available PCI Express™ slots. These enable flexible expansion to support a wide variety of data center workloads.High Performance and Availability to Maximize UptimeThe Dell PowerEdge 2950 server supports up to two of the latest Quad-Core Intel Xeon processors and the Intel 5000X chipset. These latest processors provide increased performance and performance/watt2. With the new capability to support eight 2.5” SAS drives, the 2950 also provides enough room to stripe data onto multiple drives for high performance in demanding environments.Additionally, exceptional memory throughput and capacity is achieved with as much as 32GB of fully-buffered DIMM memory. The server includes PCI Express technology for excellent I/O throughput, and TCP/IP Offload Engine (TOE) which offloads the TCP/IP processing to a dedicated processor on the embedded NIC‘s for CPU performance gains. And with features like hot plug power supplies/fans, RAID configurations with battery backed cache, and an internal tape drive option for local data backup, the Dell PowerEdge 2950 helps ensure your data is protected and accessible.Manageability for reduced ComplexityThe Dell PowerEdge 2950 server is equipped with a Baseboard Management Controller (BMC) that includes a complete set of tools that monitors server hardware, alerts you when server faults occur and enables basic remote operations. For environments with servers located in secure data centers or in sites with no IT staff, Dell offers an optional feature for PowerEdge servers, the Dell Remote Access Controller (DRAC). Operated through a Web-based graphic user interface, DRAC can enable remote access, monitoring, troubleshooting, repair and upgrades independent of the operating system status. Common software with the same family of PowerEdge 9th generation servers further helps simplify management. Plus, the Dell Behavioral Specification means one familiar platform for less complex deployment, management and serviceability as well as lower Total Cost of Ownership (TCO) over multiplegenerations of PowerEdge servers.FeATUreS Form factor ProcessorsFront side busCacheChipset Memory I/o slotsDrive controllerrAID controller Drive baysMaximum internal storageHard drives 1external storage Tape backup options Network interface cardPower supplyAvailabilityvideoremote management Systems managementrack support operating systemsDell PowereDge 2950 ServerDell IT INFrASTrUCTUre ServICeSDell brings pure execution to IT Services. The planning, implementation and maintenance of your IT infrastructure deserves nothing less. Variability in execution can compromise user productivity, IT resources and ultimately, your reputation. By leveraging our heritage of process driven excellence, Dell Services can deliver a smarter way.We don’t claim to do everything. We focus on IT infrastructure services. And we take a customer led approach, grounded in the philosophy that you know your business better than anyone. That’s why Dell does not try to take key business decisions out of your hands, or lock you into more than you need. Instead, we apply our world-class process management and “no excuses” culture to deliver what customers today most need – flexibility and repeatable quality. That’s absolute execution. That’s Dell.Assessment, Design and Implementation ServicesIT departments are continually challenged to evaluate and implement new technologies. Dell’s assessment, design and implementation services can restructure your IT environment to enhance performance, scalability and efficiency while helping to maximize your return on investment and minimize disruption to your business.Deployment ServicesSystem deployment is a necessary evil that plagues nearly every organization. You must deploy new systems to help improve performance and meet user demand. With Dell’s deployment services, we help simplify and speed up the deployment and utilization of new systems to maximize uptime throughout your IT environment .Asset recovery and recycling ServicesProper disposal, reselling and donation of computer equipment is a time-consuming task that typically falls to the bottom of many IT to-do lists. Dell simplifies the end of life processes for IT equipment in a way that can maximize value for customers. Training ServicesArm your employees with the knowledge and skills they need to be as productive as possible. Dell offers comprehensive training services which include hardware and software training, as well as PC skills and professional development classes. With Dell training you can help improve system reliability, maximize productivity and reduce end user requests and downtime.enterprise Support ServicesWith Dell, you can get maximum performance and availability of your Dell server and storage systems. Our Enterprise Support services offer proactive maintenance to helpprevent problems as well as rapid response and resolution of problems when they do occur. We have built a robust global infrastructure that offers multiple levels of enterprise support for systems throughout your infrastructure.To help you get the most from your Dell systems, visit /services.Services vary by region.Dell ™ PowereDge ™ 2950 Server2U rack heightUp to two Quad-Core Intel Xeon 5300 sequence processors at up to 3.0GHz;Up to two Quad-Core Intel Low Volt Xeon 5300 sequence processors at up to 2.0 GHz;Up to two Dual-Core Intel Xeon 5100 sequence processors at up to 3.0GHz;Up to two Dual-Core Intel Low Volt Xeon 5100 sequence processors at 2.33GHz; or Up to two Dual-Core Intel Xeon 5000 sequence processors at up to 3.0GHz Intel Xeon 5300 Sequence: Dual Independent 1066MHz or 1333MHz; Intel Xeon 5100 Sequence: Dual Independent 1066MHz or 1333MHz; Intel Xeon 5000 Sequence: Dual Independent 667MHz Intel Xeon 5300 Sequence: 2x4MB; Intel Xeon 5100 Sequence: 4MB; Intel Xeon 5000 Sequence: 2x2MB Intel 5000XUp to 32GB (8 FBD DIMM slots): 256MB/512MB/1GB/2GB/4GB Fully Buffered DIMMs (FBD) in matched pairs, 533MHz or 667MHzThree PCI slots, either PCIe riser with three PCI Express slots (one x4 (x8 connector) and two x8) or two PCI-X 64-bit/133MHz and one PCI Express x8 slot4 port SAS 5/i integrated SAS controller (no RAID)Optional PERC 5/i integrated SAS/SATA daughtercard controller with 256MB cache,PERC 4e/DC, PERC 5/e adapter3 hard drive base options:8 x 2.5” Hard Drive Option: 2.5” HD Option: up to 8 SAS HDs (10K);4 x 3.5” Hard Drive Option: 3.5” HD Option: up to 4 SAS (10K/15K) or SATA (7.2K) drives; 6 x 3.5” Hard Drive Option: 3.5” HD Option: up to 6 SAS (10K/15K) or SATA (7.2K) drives; Peripheral bay options; Floppy Drive, DAT72 Tape Drive (not available with 6 x 3.5” hard drive base); Slim optical drive bay with choice of CD-ROM, DVD-ROM or Combo CD-RW/DVD-ROM Up to 4.5TB: six 750GB hot-plug SATA (7.2 K RPM)2.5” SAS (10K RPM): 36GB, 73GB;or 3.5” SAS (10K RPM): 73GB, 146GB, 300GB, or 400GB; or 3.5” SAS (15K RPM): 36GB, 73GB, 146GB;or 3.5” SATA (7.2K RPM): 80GB, 160GB, 250GB, 500GB, 750GB SATAu SAS, SCSI and fibre channel storage systemsInternal: PV100T (DAT 72) with multibayExternal: PowerVault DAT 72, 110T, 114T, 122T, 124T, 132T, 136T, 160T and ML6000Dual embedded Broadcom ® NetXtreme II ™ 5708 Gigabit 2 Ethernet NIC with fail-over and load balancing. TOE (TCPIP Offload Engine) supported on Microsoft Windows Server 2003, SP1 or higher with Scalable Networking PackAC configuration with standard single or redundant 750W hot-plug auto-switching universal 110/220V AC power suppliesDC configuration with redundant hot plug -48 to -60 V20 A DC power suppliesECC FBD memory, SDDC, Spare Bank; hot-plug hard drives; optional hot-plug redundant power supplies; dual embedded NICs with failover and load balancing support; optional PERC5/i integrated daughtercard controller with battery-backed cache; hot-plug redundant cooling; tool-less chassis; fibre and SCSI cluster support; validated for Dell/EMC SAN Embedded ATI ES1000 with 16MB memoryStandard Baseboard Management Controller with IMPI 2.0 support; optional DRAC5 for advanced capabilities Dell OpenManage ™4-post (Dell rack), 2-post and 3rd party Versa rails, sliding rails and Cable Management Arm Microsoft ® Windows Server 2003 R2, Standard, Enterprise and Web Edition, x64, Standard and Enterprise Edition;Microsoft ® Windows ® Storage Server 2003 R2, Workgroup, Standard, Enterprise Edition; Red Hat ® Linux ® Enterprise v4, ES and ES EM64T; SUSE Linux Enterprise Server 9 EM64T1 For hard drives, GB means 1 billion bytes, actual capacity varies with preloaded material and operating environment and will be less.2This term does not connote an actual operating speed of 1 Gb/sec. For high speed transmission, connection to a Gigabit Ethernet server and network infrastructure is required.Dell is not responsible for errors in typography or photography. Dell, the Dell logo and PowerEdge are trademarks of Dell Inc. Intel is a registered trademark and Xeon is a trademark of Intel Corporation. PCI Express is a trademark and PCI-X is a registered trademark of PCI-SIG. Other trademarks and trade names may be used in this document to refer to either the entities claiming the marks and names or their products. Dell disclaims proprietary interest in the marks and names of others. © Copyright 2007 Dell Inc. All rights reserved. Reproduction in any manner whatsoever without the express written permission of Dell Inc. is strictly forbidden. For more information contact Dell.July 2007. Kolar. A2G.。
