Installing the SCCM Client with a GPO
SECURITY COMPLIANCE MANAGER NIST安全合规经理NIST
h
Page 20
Current Requirements
Security Compliance Manager:
- Enough free disk space/memory
-Bring together multiple government agencies to collaborate and produce a unified guide
h
Page 14
Evolution of the Security Guide
h
Page 15
Security Compliance Management Toolkit Series
FDCC SCAP
content
SCAP2DCM
Conversion tool
SCCM DCM
configuration pack
SCAP reports Output logs
Command line tool that converts SCCM DCM assessments to
SCAP format
Customer satisfaction
158 NSAT currently NSAT uplift 24 w/use of SA 87% accelerated adoption
Partner satisfaction
128 NSAT currently 91% accelerated adoption 60.9% used by Partners
Products & Technologies
Practice CS 基本安装指南说明书
PRACTICE CS INSTALLATION INSTRUCTIONSInstalling Practice CS (1)Downloading and installing the license (2)Obtaining and installing licenses via CS Connect (2)Installing licenses received via email (2)Running desktop setup (for network installations only) (3)Use this document to do the following:▪install Practice CS®▪download and install the license and software updates, and▪run desktop setup (for network installations only)Installing Practice CSYou can install Practice CS to a network or to a standalone computer using the product installation file downloaded from our website or from a CD.Notes▪The installation process may require you to restart the computer. If you are installing the program ona network, be sure that all other users have logged off the network.▪Installation must be performed at the computer that you want to designate as the Database Server.▪The computer where the shared files are installed must be turned on in order for the program files to be available to users (workstations).1. From the computer on which the database will reside, verify that you are logged in to your computeror server as an administrator.2. Close all open applications, including background virus protection software.3. Do one of the following:▪If you downloaded the product installation file from our website — Navigate to and double-click the EXE file that you downloaded to extract the files to the default folder (C:\Practice CS<version> Download) or to another folder of your choosing. If the installation wizard does not start automatically, navigate to the folder to which you extracted the files and double-click Setup.exe.▪If you are installing from a CD — Insert the CD into the disc drive on your computer. If the installation program does not start automatically, click Start on the Windows taskbar, choose Run, enter the command D:\SETUP (where D represents the letter of your disc drive), and click OK. 4. When Practice CS Setup starts, click the Install Practice CS link. The wizard will guide you throughthe rest of the installation.5. Practice CS uses Microsoft® SQL Server® (including 2008 Express Edition and later) for storing data.The computer on which the data is located (the SQL server) must be turned on in order for others to access the data. In addition, you must create an exception within the firewall for the instance of SQLServer you are using (recommended) or disable the firewall (not recommended) to run Practice CS. If you need assistance in creating an exception for the instance of SQL Server you are using, please refer to your firewall’s documentation or Microsoft knowledgebase article ID 841251(/kb/841251/).Downloading and installing the licenseAfter you install the program files, use CS Connect™ to download and install the license. In rare cases, you may receive a license file via email. If you received a license file via email, please skip the following procedure and proceed to “Installing licenses received via email” on page 2. Otherwise, complete the following procedure to install the licenses for your Practice CS software.Obtaining and installing licenses via CS ConnectComplete the following procedure to open Practice CS and use CS Connect to obtain and install the licenses electronically.1. Verify that you are logged in to your computer or server as an administrator.2. Start Practice CS.3. Click Cancel to close the login dialog.4. To open CS Connect, choose Help > About Practice CS, and click the Download Licenses button.5. Enter your firm ID (listed on your CS web account and on your mailing label) and your firm mailingaddress ZIP code, or PIN, and click Next.Note: If the Connect – Communications Setup dialog opens, verify or select the applicablecommunications settings, and then click OK to close the dialog.6. In the CS Connect dialog, click OK. CS Connect logs in to the Thomson Reuters data center anddownloads your licenses.7. Follow the remaining prompts to install the licenses.Installing licenses received via email1. If you received a Practice CS license file via email, please follow the instructions in that emailmessage and then follow the steps below.2. The installation wizard prompts you to choose the destination location for Practice CS. You need tochoose the folder where the shared files are installed. (The final destination for the program should bea folder called \WINCSI. For example, you may have installed your shared files in F:\APPS\WINCSI.)3. After you have verified the destination path, click Next to continue with the installation.Important! Even if you received your original license files via email, all updates to your Practice CS license information are available only via CS Connect. If you require an updated license in the future (for example, if you purchase a license for an optional add-on module later), you will need to download and install the updated license via CS Connect, as described in “Obtaining and installing licenses via CS Connect” on page 2.Running desktop setup (for network installations only) Important! If you installed the shared files on a network, you must also run the desktop setup program on each workstation.The desktop setup program ensures that each workstation meets the minimum operating system requirements and confirms that all required components are installed. When you run the desktop setup program, a shortcut to the single network installation of Practice CS (on your firm’s server) is added to each desktop. This keeps all firm-wide files and data in a single location on the server. We recommend that network users do not install the full program on their local computers.1. Verify that you are logged in to your computer as an administrator.2. Close all open applications.3. Click Start on the Windows taskbar and choose Run.4. In the Run dialog, enter Z:\path\Practice CS\Desktop\Setup.exe (where Z represents the mappeddrive letter for the network path to the server on which you installed the shared files, and path is the path to your Practice CS folder). For example, if you installed the shared files inF:\WINAPPS\WINCSI, you would need to enter F:\WINAPPS\WINCSI\Practice CS\Desktop\Setup.exe in the Run dialog or \\<name of server>\WINAPPS\WINCSI\Practice CS\Desktop\Setup.exe.Note: If you need to uninstall the Practice CS desktop setup from a workstation, choose Start > Settings > Control Panel > Add/Remove Programs, select Practice CS, and then click theChange/Remove button.5. Click OK and follow the prompts.6. Remote Entry requires a local installation of Microsoft SQL Server, version 2008 or later. If you choseto enable Remote Entry, you will be prompted to select an existing instance of SQL Server, or to install a new instance. Select an existing instance of SQL Server to use for Remote Entry, or click the option to install a new instance. Then click Next.7. When prompted that the Practice CS setup has been successfully completed, click Finish.。
常见sccm客户端无法部署问题
常见sccm客户端无法部署问题1.sms client config manage 提示客户端无法安装成功,1003,依存服务无法启动客户端的BITS ,WMI 服务没有启动2. 启动安装客户端的命令客户端Remote Registry无法启动3.如果windows firewall启用,一些端口需要设置例外客户端请求安装为了成功使用客户端请求来安装Configuration Manager 2007 客户端,您必须将下列项目作为例外添加到 Windows 防火墙:文件和打印机共享 Windows 管理规范 (WMI)客户端请求为了使客户端计算机与 Configuration Manager 2007 站点系统通信,您必须将下列项目作为例外添加到 Windows 防火墙:TCP 端口 80(用于 HTTP 通信)TCP 端口 443(用于 HTTPS 通信)这些是默认端口号,可以在 Configuration Manager 2007 中更改。
有关详细信息,请参阅如何为 Configuration Manager 客户端配置请求端口。
如果这些端口已更改,您还必须在Windows 防火墙上配置匹配的例外。
网络访问保护为了使客户端计算机与系统健康验证程序点成功通信,您需要允许下列端口:UDP 67 和 UDP 68,用于 DHCPTCP 80/443,用于 IPSec远程控制为了使用 Configuration Manager 2007 的远程工具功能,您需要允许下列端口:TCP 端口 2701TCP 端口 2702远程协助和远程桌面要支持从SMS 管理员控制台启动远程协助,请将自定义程序helpsvc.exe 和自定义端口 TCP 135 添加到客户端计算机上 Windows 防火墙中的许可程序和服务列表中。
此外,还必须配置Windows 防火墙以允许远程协助和远程桌面。
如果用户从该计算机启动远程协助请求,Windows 防火墙将自动配置为允许远程协助和远程桌面Modifying the Ports and Programs Permitted by Windows FirewallTo modify the ports and programs permitted by Windows Firewall:1.On the computer running Windows Firewall, open Control Panel.2.Right-click Windows Firewall and click Open.3.On the Exceptions tab of the Windows Firewall Settings dialog box, select enable any required exceptions in the list box, or Click Add Program or Add Port to create custom programs or portsPrograms and Ports Required by Configuration Manager 2007The following Configuration Manager 2007 features require exceptions to be made on the Windows Firewall:QueriesIf you are running the Configuration Manager console on a computer running Windows Firewall, queries will fail the first time they are run.After failing to run the first time, the operating system displays a dialog box asking if you want to unblock statview.exe. If you unblock statview.exe, future queries will run without errors. You can also manually add statview.exe to the list of programs and services on the Exceptions tab of the Windows Firewall prior to running a query.Client Push InstallationIn order to successfully use client push to install the Configuration Manager 2007 client, you must add the following as exceptions to the Windows Firewall:•File and Printer Sharing••Windows Management Instrumentation (WMI)•Client Installation using Group PolicyIn order to successfully use Group Policy to install the Configuration Manager 2007 client, you must add File and Printer Sharing as an exception to the Windows Firewall. Client RequestsIn order for client computers to communicate with Configuration Manager 2007 site systems, you must add the following as exceptions to the Windows Firewall:TCP Port 80 (for HTTP communication)TCP Port 443 (for HTTPS communication)Network Access ProtectionIn order for client computers to successfully communicate with the system health validator point, you need to allow the following ports:•UDP 67 and UDP 68 for DHCP••TCP 80/443 for IPsec•Remote ControlIn order to use the remote tools features of Configuration Manager 2007, you need to allow the following ports:•TCP port 2701••TCP port 2702••TCP port 135•Remote Assistance and Remote DesktopTo enable Remote Assistance to be initiated from the SMS Administrator console, add both the custom program helpsvc.exe and the custom port TCP 135 to the list of permitted programs and services in Windows Firewall on the client computer. Also, Windows Firewall must be configured to permit Remote Assistance and Remote Desktop. If a user initiates a request for Remote Assistance from that computer, Windows Firewall will automatically be configured to permit Remote Assistance and Remote Desktop. Windows Event Viewer, Windows Performance Monitor and Windows DiagnosticsTo enable Windows event viewer, Windows performance monitor and Windows diagnostics to be accessed from the Configuration Manager console, you must enable File and Printer Sharing as an exception on the Windows Firewall.============客户端批准方式怎么选的, 自动批准全部还是自动批准信任域? 如果是只批准信任域,站点又是跨域的,需要在Management Point上设置信任域。
NXP SCM-i.MX 6 Series Yocto Linux 用户指南说明书
© 2017 NXP B.V.SCM-i.MX 6 Series Yocto Linux User'sGuide1. IntroductionThe NXP SCM Linux BSP (Board Support Package) leverages the existing i.MX 6 Linux BSP release L4.1.15-2.0.0. The i.MX Linux BSP is a collection of binary files, source code, and support files that can be used to create a U-Boot bootloader, a Linux kernel image, and a root file system. The Yocto Project is the framework of choice to build the images described in this document, although other methods can be also used.The purpose of this document is to explain how to build an image and install the Linux BSP using the Yocto Project build environment on the SCM-i.MX 6Dual/Quad Quick Start (QWKS) board and the SCM-i.MX 6SoloX Evaluation Board (EVB). This release supports these SCM-i.MX 6 Series boards:• Quick Start Board for SCM-i.MX 6Dual/6Quad (QWKS-SCMIMX6DQ)• Evaluation Board for SCM-i.MX 6SoloX (EVB-SCMIMX6SX)NXP Semiconductors Document Number: SCMIMX6LRNUGUser's GuideRev. L4.1.15-2.0.0-ga , 04/2017Contents1. Introduction........................................................................ 1 1.1. Supporting documents ............................................ 22. Enabling Linux OS for SCM-i.MX 6Dual/6Quad/SoloX .. 2 2.1. Host setup ............................................................... 2 2.2. Host packages ......................................................... 23.Building Linux OS for SCM i.MX platforms .................... 3 3.1. Setting up the Repo utility ...................................... 3 3.2. Installing Yocto Project layers ................................ 3 3.3. Building the Yocto image ....................................... 4 3.4. Choosing a graphical back end ............................... 4 4. Deploying the image .......................................................... 5 4.1. Flashing the SD card image .................................... 5 4.2. MFGTool (Manufacturing Tool) ............................ 6 5. Specifying displays ............................................................ 6 6. Reset and boot switch configuration .................................. 7 6.1. Boot switch settings for QWKS SCM-i.MX 6D/Q . 7 6.2. Boot switch settings for EVB SCM-i.MX 6SoloX . 8 7. SCM uboot and kernel repos .............................................. 8 8. References.......................................................................... 8 9.Revision history (9)Enabling Linux OS for SCM-i.MX 6Dual/6Quad/SoloX1.1. Supporting documentsThese documents provide additional information and can be found at the NXP webpage (L4.1.15-2.0.0_LINUX_DOCS):•i.MX Linux® Release Notes—Provides the release information.•i.MX Linux® User's Guide—Contains the information on installing the U-Boot and Linux OS and using the i.MX-specific features.•i.MX Yocto Project User's Guide—Contains the instructions for setting up and building the Linux OS in the Yocto Project.•i.MX Linux®Reference Manual—Contains the information about the Linux drivers for i.MX.•i.MX BSP Porting Guide—Contains the instructions to port the BSP to a new board.These quick start guides contain basic information about the board and its setup:•QWKS board for SCM-i.MX 6D/Q Quick Start Guide•Evaluation board for SCM-i.MX 6SoloX Quick Start Guide2. Enabling Linux OS for SCM-i.MX 6Dual/6Quad/SoloXThis section describes how to obtain the SCM-related build environment for Yocto. This assumes that you are familiar with the standard i.MX Yocto Linux OS BSP environment and build process. If you are not familiar with this process, see the NXP Yocto Project User’s Guide (available at L4.1.15-2.0.0_LINUX_DOCS).2.1. Host setupTo get the Yocto Project expected behavior on a Linux OS host machine, install the packages and utilities described below. The hard disk space required on the host machine is an important consideration. For example, when building on a machine running Ubuntu, the minimum hard disk space required is about 50 GB for the X11 backend. It is recommended that at least 120 GB is provided, which is enough to compile any backend.The minimum recommended Ubuntu version is 14.04, but the builds for dizzy work on 12.04 (or later). Earlier versions may cause the Yocto Project build setup to fail, because it requires python versions only available on Ubuntu 12.04 (or later). See the Yocto Project reference manual for more information.2.2. Host packagesThe Yocto Project build requires that the packages documented under the Yocto Project are installed for the build. Visit the Yocto Project Quick Start at /docs/current/yocto-project-qs/yocto-project-qs.html and check for the packages that must be installed on your build machine.The essential Yocto Project host packages are:$ sudo apt-get install gawk wget git-core diffstat unzip texinfo gcc-multilib build-essential chrpath socat libsdl1.2-devThe i.MX layers’ host packages for the Ubuntu 12.04 (or 14.04) host setup are:$ sudo apt-get install libsdl1.2-dev xterm sed cvs subversion coreutils texi2html docbook-utils python-pysqlite2 help2man make gcc g++ desktop-file-utils libgl1-mesa-dev libglu1-mesa-dev mercurial autoconf automake groff curl lzop asciidocThe i.MX layers’ host packages for the Ubuntu 12.04 host setup are:$ sudo apt-get install uboot-mkimageThe i.MX layers’ host packages for the Ubuntu 14.04 host s etup are:$ sudo apt-get install u-boot-toolsThe configuration tool uses the default version of grep that is on your build machine. If there is a different version of grep in your path, it may cause the builds to fail. One workaround is to rename the special versi on to something not containing “grep”.3. Building Linux OS for SCM i.MX platforms3.1. Setting up the Repo utilityRepo is a tool built on top of GIT, which makes it easier to manage projects that contain multiple repositories that do not have to be on the same server. Repo complements the layered nature of the Yocto Project very well, making it easier for customers to add their own layers to the BSP.To install the Repo utility, perform these steps:1.Create a bin folder in the home directory.$ mkdir ~/bin (this step may not be needed if the bin folder already exists)$ curl /git-repo-downloads/repo > ~/bin/repo$ chmod a+x ~/bin/repo2.Add this line to the .bashrc file to ensure that the ~/bin folder is in your PATH variable:$ export PATH=~/bin:$PATH3.2. Installing Yocto Project layersAll the SCM-related changes are collected in the new meta-nxp-imx-scm layer, which is obtained through the Repo sync pointing to the corresponding scm-imx branch.Make sure that GIT is set up properly with these commands:$ git config --global "Your Name"$ git config --global user.email "Your Email"$ git config --listThe NXP Yocto Project BSP Release directory contains the sources directory, which contains the recipes used to build, one (or more) build directories, and a set of scripts used to set up the environment. The recipes used to build the project come from both the community and NXP. The Yocto Project layers are downloaded to the sources directory. This sets up the recipes that are used to build the project. The following code snippets show how to set up the SCM L4.1.15-2.0.0_ga Yocto environment for the SCM-i.MX 6 QWKS board and the evaluation board. In this example, a directory called fsl-arm-yocto-bsp is created for the project. Any name can be used instead of this.Building Linux OS for SCM i.MX platforms3.2.1. SCM-i.MX 6D/Q quick start board$ mkdir fsl-arm-yocto-bsp$ cd fsl-arm-yocto-bsp$ repo init -u git:///imx/fsl-arm-yocto-bsp.git -b imx-4.1-krogoth -m scm-imx-4.1.15-2.0.0.xml$ repo sync3.2.2. SCM-i.MX 6SoloX evaluation board$ mkdir my-evb_6sxscm-yocto-bsp$ cd my-evb_6sxscm-yocto-bsp$ repo init -u git:///imx/fsl-arm-yocto-bsp.git -b imx-4.1-krogoth -m scm-imx-4.1.15-2.0.0.xml$ repo sync3.3. Building the Yocto imageNote that the quick start board for SCM-i.MX 6D/Q and the evaluation board for SCM-i.MX 6SoloX are commercially available with a 1 GB LPDDR2 PoP memory configuration.This release supports the imx6dqscm-1gb-qwks, imx6dqscm-1gb-qwks-rev3, and imx6sxscm-1gb-evb. Set the machine configuration in MACHINE= in the following section.3.3.1. Choosing a machineChoose the machine configuration that matches your reference board.•imx6dqscm-1gb-qwks (QWKS board for SCM-i.MX 6DQ with 1 GB LPDDR2 PoP)•imx6dqscm-1gb-qwks-rev3 (QWKS board Rev C for SCM-i.MX 6DQ with 1GB LPDDR2 PoP) •imx6sxscm-1gb-evb (EVB for SCM-i.MX 6SX with 1 GB LPDDR2 PoP)3.4. Choosing a graphical back endBefore the setup, choose a graphical back end. The default is X11.Choose one of these graphical back ends:•X11•Wayland: using the Weston compositor•XWayland•FrameBufferSpecify the machine configuration for each graphical back end.The following are examples of building the Yocto image for each back end using the QWKS board for SCM-i.MX 6D/Q and the evaluation board for SCM-i.MX 6SoloX. Do not forget to replace the machine configuration with what matches your reference board.3.4.1. X11 image on QWKS board Rev C for SCM-i.MX 6D/Q$ DISTRO=fsl-imx-x11 imx6dqscm-1gb-qwks-rev3 source fsl-setup-release.sh -b build-x11$ bitbake fsl-image-gui3.4.2. FrameBuffer image on evaluation board for SCM-i.MX 6SX$ DISTRO=fsl-imx-fb MACHINE=imx6sxscm-1gb-evb source fsl-setup-release.sh –b build-fb-evb_6sxscm$ bitbake fsl-image-qt53.4.3. XWayland image on QWKS board for SCM-i.MX 6D/Q$ DISTRO=fsl-imx-xwayland MACHINE=imx6dqscm-1gb-qwks source fsl-setup-release.sh –b build-xwayland$ bitbake fsl-image-gui3.4.4. Wayland image on QWKS board for SCM-i.MX 6D/Q$ DISTRO=fsl-imx-wayland MACHINE=imx6dqscm-1gb-qwks source fsl-setup-release.sh -b build-wayland$ bitbake fsl-image-qt5The fsl-setup-release script installs the meta-fsl-bsp-release layer and configures theDISTRO_FEATURES required to choose the graphical back end. The –b parameter specifies the build directory target. In this build directory, the conf directory that contains the local.conf file is created from the setup where the MACHINE and DISTRO_FEATURES are set. The meta-fslbsp-release layer is added into the bblayer.conf file in the conf directory under the build directory specified by the –e parameter.4. Deploying the imageAfter the build is complete, the created image resides in the <build directory>/tmp/deploy/images directory. The image is (for the most part) specific to the machine set in the environment setup. Each image build creates the U-Boot, kernel, and image type based on the IMAGE_FSTYPES defined in the machine configuration file. Most machine configurations provide the SD card image (.sdcard), ext4, and tar.bz2. The ext4 is the root file system only. The .sdcard image contains the U-Boot, kernel, and rootfs, completely set up for use on an SD card.4.1. Flashing the SD card imageThe SD card image provides the full system to boot with the U-Boot and kernel. To flash the SD card image, run this command:$ sudo dd if=<image name>.sdcard of=/dev/sd<partition> bs=1M && syncFor more information about flashing, see “P reparing an SD/MMC Card to Boot” in the i.MX Linux User's Guide (document IMXLUG).Specifying displays4.2. MFGTool (Manufacturing Tool)MFGTool is one of the ways to place the image on a device. To download the manufacturing tool for the SCM-i.MX 6D/Q and for details on how to use it, download the SCM-i.MX 6 Manufacturing Toolkit for Linux 4.1.15-2.0.0 under the "Downloads" tab from /qwks-scm-imx6dq. Similarly, download the manufacturing tool for the SCM-i.MX 6SoloX evaluation board under the "Downloads" tab from /evb-scm-imx6sx.5. Specifying displaysSpecify the display information on the Linux OS boot command line. It is not dependent on the source of the Linux OS image. If nothing is specified for the display, the settings in the device tree are used. Find the specific parameters in the i.MX 6 Release Notes L4.1.15-2.0.0 (available at L4.1.15-2.0.0_LINUX_DOCS). The examples are shown in the following subsections. Interrupt the auto-boot and enter the following commands.5.1.1. Display options for QWKS board for SCM-i.MX 6D/QHDMI displayU-Boot > setenv mmcargs 'setenv bootargs console=${console},${baudrate} ${smp}root=${mmcroot} video=mxcfb0:dev=hdmi,1920x1080M@60,if=RGB24'U-Boot > run bootcmd5.1.2. Display options for EVB for SCM-i.MX 6SXNote that the SCM-i.MX 6SX EVB supports HDMI with a HDMI accessory card (MCIMXHDMICARD) that plugs into the LCD connector on the EVB.Accessory boards:•The LVDS connector pairs with the NXP MCIMX-LVDS1 LCD display board.•The LCD expansion connector (parallel, 24-bit) pairs with the NXP MCIMXHDMICARD adapter board.LVDS displayU-Boot > setenv mmcargs 'setenv bootargs console=${console},${baudrate} ${smp}root=${mmcroot} ${dmfc} video=mxcfb0:dev=ldb,1024x768M@60,if=RGB666 ldb=sep0'U-Boot > run bootcmdHDMI display (dual display for the HDMI as primary and the LVDS as secondary)U-Boot > setenv mmcargs 'setenv bootargs console=${console},${baudrate} ${smp}root=${mmcroot} video=mxcfb0:dev=hdmi,1920x1080M@60,if=RGB24video=mxcfb1:dev=ldb,LDBXGA,if=RGB666'U-Boot > run bootcmdLCD displayu-boot > setenv mmcargs 'setenv bootargs ${bootargs}root=${mmcroot} rootwait rw video=mxcfb0:dev=lcd,if=RGB565'u-boot> run bootcmd6. Reset and boot switch configuration6.1. Boot switch settings for QWKS SCM-i.MX 6D/QThere are two push-button switches on the QWKS-SCMIMX6DQ board. SW1 (SW3 for QWKS board Rev B) is the system reset that resets the PMIC. SW2 is the i.MX 6Dual/6Quad on/off button that is needed for Android.There are three boot options. The board can boot either from the internal SPI-NOR flash inside the SCM-i.MX6Dual/6Quad or from either of the two SD card slots. The following table shows the switch settings for the boot options.Table 1.Boot configuration switch settingsBoot from top SD slot (SD3)Boot from bottom SD slot (SD2)Boot from internal SPI NORDefault1.References6.2. Boot switch settings for EVB SCM-i.MX 6SoloXThis table shows the jumper configuration to boot the evaluation board from the SD card slot SD3.7. SCM uboot and kernel repositoriesThe kernel and uboot patches for both SCM-i.MX 6 QWKS board and evaluation board are integrated in specific git repositories. Below are the git repos for SCM-i.MX 6 uboot and kernel:uBoot repo: /git/cgit.cgi/imx/uboot-imx.gitSCM Branch: scm-imx_v2016.03_4.1.15_2.0.0_gakernel repo: /git/cgit.cgi/imx/linux-imx.gitSCM branch: scm-imx_4.1.15_2.0.0_ga8. References1.For details about setting up the Host and Yocto Project, see the NXP Yocto Project User’s Guide(document IMXLXYOCTOUG).2.For information about downloading images using U-Boot, see “Downloading images usingU-Boot” in the i.MX Linux User's Guide (document IMXLUG).3.For information about setting up the SD/MMC card, see “P reparing an SD/MMC card to boot” inthe i.MX Linux User's Guide (document IMXLUG).9. Revision historyDocument Number: SCMIMX6LRNUGRev. L4.1.15-2.0.0-ga04/2017How to Reach Us: Home Page: Web Support: /supportInformation in this document is provided solely to enable system and softwareimplementers to use NXP products. There are no express or implied copyright licenses granted hereunder to design or fabricate any integrated circuits based on the information in this document. NXP reserves the right to make changes without further notice to any products herein.NXP makes no warranty, representation, or guarantee regarding the suitability of its products for any particular purpose, nor does NXP assume any liability arising out of the application or use of any product or circuit, and specifically disclaims any and all liability, including without limitation consequentia l or incidental damages. “Typical”parameters that may be provided in NXP data sheets and/or specifications can and do vary in different applications, and actual performance may vary over time. All operating parameters, including “typicals,” must be valida ted for each customer application by customer’s technical experts. NXP does not convey any license under its patent rights nor the rights of others. NXP sells products pursuant to standard terms and conditions of sale, which can be found at the following address: /SalesTermsandConditions .NXP, the NXP logo, NXP SECURE CONNECTIONS FOR A SMARTER WORLD, Freescale, and the Freescale logo are trademarks of NXP B.V. All other product or service names are the property of their respective owners.ARM, the ARM Powered logo, and Cortex are registered trademarks of ARM Limited (or its subsidiaries) in the EU and/or elsewhere. All rights reserved. © 2017 NXP B.V.。
SCCM客户端安装发现配置及客户端的安装
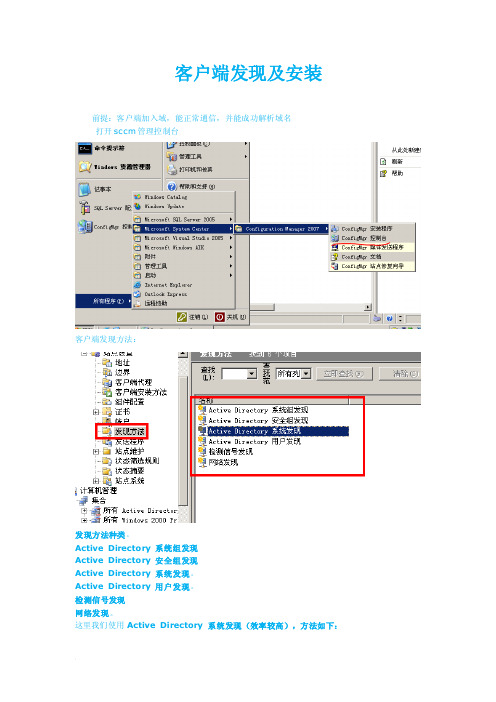
客户端发现及安装
前提:客户端加入域,能正常通信,并能成功解析域名
打开sccm管理控制台
客户端发现方法:
发现方法种类。
Active Directory 系统组发现
Active Directory 安全组发现
Active Directory 系统发现。
Active Directory 用户发现。
检测信号发现
网络发现。
这里我们使用Active Directory 系统发现(效率较高),方法如下:
定义轮询时间
设置好后点击“应用”然后“确定”在计算机集合里查看被查找到的计算机
提示是否继续选择“是”
这样既可以实现在服务器上发现客户端
接下来配置客户端的安装
客户端的安装配置
设置“客户端请求安装属性”
添加域帐户
单击“确定”—“应用“,完成
在服务器控制台上选择要安装客户端的计算机(注意安装检查项)
单击“下一步“
完成,等待客户端的自动安装
在客户端的安装过程中会在客户端的进程中出现红框中的进程
安装完成后便可在客户端的计算机的控制面板上看见新多出的四个选项。
waters质谱masslynx软件使用说明
Copyright Notice
Micromass UK Limited believes that the information in this publication is accurate. However the information is subject to change without notice and should not be construed as a contractual undertaking by Micromass UK Limited. Despite the care that has been given to the preparation of this publication, Micromass UK Limited accepts no responsibility for any loss or any other matter that may arise from any error or inaccuracy that may inadvertently have been included. Copyright 1993-2002 Micromass Ltd. All Rights Reserved. No part of this publication may be copied without the express written permission of Micromass UK Limited.
Page ii
MassLynx NT Users Guide
Contents
MassLynx NT User’s Guide............................................................................
赛门铁克产品中文知识库文档列表

1. 赛门铁克产品中文知识库文档列表 (1)2. Symantec Endpoint Protection (SEP) 简体中文文档汇总(持续更新) (2)3. Symantec Endpoint Protection 11.0 主要文章 (8)4. NetBackup (NBU) 简体中文文档汇总(持续更新) (12)5. Backup Exec for Windows Servers (BEWS) 简体中文文档汇总(持续更新) (20)6. Backup Exec System Recovery (BESR) 简体中文文档汇总(持续更新) (30)7. Symantec Brightmail Gateway (SBG) 简体中文文档汇总(增加中) (34)8. Symantec Information Foundation 产品简体中文文档归总(持续更新) (35)9. Cluster Server (VCS) 简体中文文档汇总(持续更新) (38)10. Enterprise Vault (EV) 简体中文文档汇总(持续更新) (39)11. Storage Foundation (SF) 简体中文文档汇总(持续更新) (41)12. Volume Manager(VxVM)简体中文文档汇总(持续更新) (44)13. Volume Replicator (VVR) 简体中文文档汇总(持续更新) (45)1.赛门铁克产品中文知识库文档列表service1.symantec./SUPPORT/INTER/ent-securitysimplifiedchinesekb.nsf/cn_docid/本文档翻译自英文文档。
原英文文档可能在本翻译版发布后进行过修改更新。
赛门铁克对本翻译文档的准确度不做保证。
情形按照产品分类,将现有中文知识库文档汇总,以方便各位查阅。
解释Security (安全产品)•Symantec Endpoint Protection (SEP)•Symantec Brightmail Gateway (SBG)•Symantec Mail Security for SMTP (SMS)Availability (存储产品)•Symantec Backup Exec (BEWS)•Symantec Backup Exec System Recovery (BESR)•Symantec Cluster Server (VCS)•Symantec Enterprise Vault (EV)•Symantec NetBackup (NBU)•Storage Foundation (SF)•Symantec Volume Manager (VxVM)•Symantec Volume Replicator (VVR)•文档号:最近更新: 2009-12-02Date Created: 2009-10-15产品: All Products2.Symantec Endpoint Protection (SEP) 简体中文文档汇总(持续更新)本文档翻译自英文文档。
利用LabWindows CVI实时模块将台式计算机作为实时目标使用说明书
Using Desktop PCs as RT Targets with the LabWindows /CVI Real-Time Module The LabWindows/CVI Real-Time Module can execute applications on real-time (RT) targets running a real-time operating system, including a desktop PC converted to an RT system. This document describes the three methods you can use to configure a desktop PC as an RT target and contains information about installing software on the desktop PC.Note Refer to the Programmer Reference»Creating and Downloading DLLs to Real-Time Targets section of the LabWindows/CVI Help for more information about using LabWindows/CVI with RT targets.ContentsSystem Requirements (2)Configuring a Desktop PC Using a Utility USB Drive (2)Boot from the USB Drive (2)Format a Drive or Partition (3)Configuring a Desktop PC Using a Boot Disk (4)Configuring a Desktop PC Using a Format Disk (5)Installing Software (7)Resources (8)™™System RequirementsTo configure a desktop PC as an RT target, ensure that the PC meets thefollowing requirements:•Processor based on the x86 architecture.•Supported Ethernet chipset, the Ethernet device from the Real-TimeDeployment License Bundle for Standard PCs, or a supported Ethernetcard.•Formatted hard drive or boot partition on the desktop PC with theFAT32 file system.• 3.5 inch floppy drive or bootable USB port on the desktop PC.etspc for up-to-date information about supported hardware and the specific desktop PCspecifications that National Instruments recommends.Configuring a Desktop PC Using a Utility USB DriveYou can use a utility USB drive in the following ways:•Boot from the USB drive every time.•Use the USB drive to format the hard drive. After you format the harddrive, the RT target boots directly from the hard drive.Create a desktop PC utility USB drive using NI Measurement &Automation Explorer (MAX). Select Tools»RT Disk Utilities»CreateDesktop PC Utility USB Drive in MAX to create the utility USB drive. Boot from the USB DriveYou can use a utility USB drive to boot from the USB drive and launch theReal-Time Module software on the hard drive of the desktop PC. If there isno Real-Time Module software installed on the hard drive, the utility USBdrive boots the PC into safe mode, where you can install software.Complete the following steps to configure a desktop PC to boot using autility USB drive.1.If the desktop PC does not include a motherboard with a supportedEthernet chipset, install a supported Ethernet card or the Ethernetdevice included with the Real-Time Deployment License Bundle forStandard PCs in an available PCI slot of the PC.2.Connect a monitor and keyboard to the desktop PC to display andrespond to BIOS configuration utility prompts.Using Desktop PCs as RT © National Instruments Corporation 3Using Desktop PCs as RT TargetsNote National Instruments recommends that you remove from the desktop PC anyPCI boards not supported by the Real-Time Module to reduce the possibility of resource conflicts. For example, remove sound cards, SCSI adapters, and modems from the desktop PC.3.Turn on the desktop PC and access the BIOS configuration utility.Note BIOS configurations and configuration interfaces for desktop PCs vary among different manufacturers and system models. Consult the motherboard or system manual for information about accessing and configuring the BIOS settings of the desktop PC.4.Set the boot configuration to use a USB drive as the first boot device.5.Disable legacy USB support.6.Disable any unnecessary integrated peripherals that use an interruptrequest line (IRQ). For example, disable unused serial ports orintegrated sound on the desktop PC.7.Save the configuration changes and exit the BIOS configuration utility.8.Insert the utility USB drive into an empty USB port on the desktop PCand reboot the desktop PC.9.Select the Boot using software installed on the hard-disk optionfrom the utility USB drive menu. The desktop PC boots into thereal-time operating system or into safe mode. Refer to the InstallingSoftware section for information about installing the Real-TimeModule software on the hard drive if the PC boots into safe mode.Format a Drive or PartitionYou can use a utility USB drive to permanently install the Real-TimeModule software on the hard drive of the desktop PC. A format option ofthe utility USB drive resets a previously formatted and partitioned harddrive and installs files to the desktop PC to allow you to start the PC withouta boot disk or USB drive.Caution The format utility of the utility USB drive overwrites the hard drive boot sector and master boot record, erasing all pointers to data on the drive. If you have a dual-boot configuration, the changes to the master boot record remove the ability to boot into the secondary operating system.Complete the following steps to format the hard drive and configure adesktop PC using a utility USB drive.1.If the desktop PC does not include a motherboard with a supportedEthernet chipset, install a supported Ethernet card or the Ethernetdevice included with the Real-Time Deployment License Bundle forStandard PCsin an available PCI slot of the PC.Using Desktop PCs as RT Targets 2.Connect a monitor and keyboard to the desktop PC to display andrespond to BIOS configuration utility prompts.Note National Instruments recommends that you remove any PCI boards not supported by the Real-Time Module to reduce the possibility of resource conflicts. For example, remove sound cards, SCSI adapters, and modems from the desktop PC.3.Turn on the desktop PC and access the BIOS configuration utility.Note BIOS configurations and configuration interfaces for desktop PCs vary among different manufacturers and system models. Consult the motherboard or system manual for information about accessing and configuring the BIOS settings of the desktop PC.4.Set the boot configuration to use a USB drive as the first boot device. 5.Disable legacy USB support.6.Disable any unnecessary integrated peripherals that use an interruptrequest line (IRQ). For example, disable unused serial ports orintegrated sound on the desktop PC.7.Save the configuration changes and exit the BIOS configuration utility.8.Insert the utility USB drive into an empty USB port on the desktop PCand reboot the desktop PC.9.Select the Format hard disk option from the utility USB drive menuand follow the directions on the screen.10.Remove the utility USB drive and reboot the desktop PC to boot intothe real-time operating system. The desktop PC boots into safe modethe first time the system boots from the hard drive. Refer to theInstalling Software section for information about installing theReal-Time Module software on the hard drive if the PC boots intosafe mode.Configuring a Desktop PC Using a Boot DiskYou can use a boot disk to launch the Real-Time Module software that youinstall on the hard drive of a desktop PC. If there is no Real-Time Modulesoftware installed on the hard drive, the desktop PC boots into safe mode,where you can install software.Create a desktop PC boot disk using NI Measurement & AutomationExplorer (MAX). Select Tools»RT Disk Utilities»Create Desktop PCBoot Diskin MAX to create the desktop PC boot disk.© National Instruments Corporation 5Using Desktop PCs as RT TargetsComplete the following steps to configure a desktop PC using a boot disk.1.If the desktop PC does not include a motherboard with a supportedEthernet chipset, install a supported Ethernet card or the Ethernetdevice included with the Real-Time Deployment License Bundle forStandard PCs in an available PCI slot of the PC.2.Connect a monitor and keyboard to the desktop PC to display andrespond to BIOS configuration utility prompts.Note National Instruments recommends that you remove from the desktop PC anyPCI boards not supported by the Real-Time Module to reduce the possibility of resource conflicts. For example, remove sound cards, SCSI adapters, and modems from the desktop PC.3.Turn on the desktop PC and access the BIOS configuration utility.Note BIOS configurations and configuration interfaces for desktop PCs vary among different manufacturers and system models. Consult the motherboard or system manual for information about accessing and configuring the BIOS settings of the desktop PC.4.Set the boot configuration to use the floppy drive as the first boot device. 5.Disable legacy USB support. 6.Disable any unnecessary integrated peripherals that use an interruptrequest line (IRQ). For example, disable unused serial ports orintegrated sound on the desktop PC.7.Save the configuration changes and exit the BIOS configuration utility.8.Insert the desktop PC boot disk in the floppy drive and reboot thedesktop PC. The desktop PC boots into the real-time operating systemor into safe mode. Refer to the Installing Software section forinformation about installing the Real-Time Module software on the hard drive if the PC boots into safe mode.Configuring a Desktop PC Using a Format DiskYou can use a format disk to permanently install the Real-Time Modulesoftware on the hard drive of the desktop PC. A format disk resets apreviously formatted and partitioned hard drive and installs files to thedesktop PC to allow you to start the PC without a boot disk.Create a desktop PC format disk using NI Measurement & AutomationExplorer (MAX). Select Tools»RT Disk Utilities»Create Desktop PCFormat Hard Drive Diskin MAX to create the desktop PC format disk.Using Desktop PCs as RT Targets Caution A format disk overwrites the hard drive boot sector and master boot record, erasing all pointers to data on the drive. If you have a dual-boot configuration, the changes to the master boot record remove the ability to boot into the secondary operating system.Complete the following steps to configure a desktop PC using a formatdisk.1.If the desktop PC does not include a motherboard with a supportedEthernet chipset, install a supported Ethernet card or the Ethernetdevice included with the Real-Time Deployment License Bundle forStandard PCs in an available PCI slot of the PC.2.Connect a monitor and keyboard to the desktop PC to display andrespond to BIOS configuration utility and format prompts.Note National Instruments recommends that you remove from the desktop PC anyPCI boards not supported by the Real-Time Module to reduce the possibility of resource conflicts. For example, remove sound cards, SCSI adapters, and modems from the desktop PC.3.Turn on the desktop PC and access the BIOS configuration utility.Note BIOS configurations and configuration interfaces for desktop PCs vary among different manufacturers and system models. Consult the motherboard or system manual for information about accessing and configuring the BIOS settings of the desktop PC.4.Set the boot configuration to use the floppy drive as the first boot device. 5.Disable legacy USB support. 6.Disable any unnecessary integrated peripherals that use an interruptrequest line (IRQ). For example, disable unused serial ports orintegrated sound on the desktop PC.7.Save the configuration changes and exit the BIOS configuration utility.8.Insert the desktop PC format disk in the floppy drive and reboot the PC.9.Follow the directions that appear on the screen. 10.Remove the desktop PC format disk from the floppy drive and rebootthe desktop PC to boot into the real-time operating system. Thedesktop PC boots into safe mode the first time the system boots fromthe hard drive. Refer to the Installing Software section for informationabout installing the Real-Time Module software to the hard drive if thePC boots into safe mode.Installing SoftwareComplete the following steps to install software on the desktop PC.1.Boot the desktop PC into the real-time operating system. The desktopPC loads with the basic real-time operating system and a null IPaddress of 0.0.0.0.2.Open MAX on another computer in the same subnet and expand theRemote Systems category. MAX lists the desktop PC as 0.0.0.0 inthe Remote Systems category.3.Click on the 0.0.0.0 entry to access the Network Settings tab.4.Enter a name for the RT target in the Name text box.5.Set the network configuration options of the RT target in theIP Settings section and click the Apply button. Refer to theConfiguring Network Settings book, accessible by browsing toMAX Remote Systems Help»LabVIEW Real-Time TargetConfiguration»Configuring Network Settings from the Contentstab of the MAX Help.6.Reboot the RT target. The RT target appears in the Remote Systemscategory with the assigned name.7.Expand the RT target in the Remote Systems category and select theSoftware category.8.Click the Add/Remove Software button in the toolbar to launch theLabVIEW Real-Time Software Wizard.9.Install the LabWindows/CVI Real-Time Module software and devicedrivers that you require on the RT target. Refer to the NI Web site at/info and enter the info code etspc for the latest informationabout supported software.© National Instruments Corporation7Using Desktop PCs as RT TargetsResources•Refer to the NI Web site at /info and enter the info codeetspc for more information about using desktop PCs as RT targets.•Refer to the CVIRTreadme.html file on the LabWindows/CVIReal-Time Module installation CD for information about known issuesregarding the use of desktop PCs as RT targets.•Refer to the LabWindows/CVI Help for more information aboutthe LabWindows/ Real-Time Module features. Access theLabWindows/CVI Help from LabWindows/CVI by selectingHelp»Contents.National Instruments, NI, , and LabVIEW are trademarks of National Instruments Corporation.Refer to the Terms of Use section on /legal for more information about NationalInstruments trademarks. Other product and company names mentioned herein are trademarks or tradenames of their respective companies. For patents covering National Instruments products, refer to theappropriate location: Help»Patents in your software, the patents.txt file on your CD, or/patents.© 2007National Instruments Corporation. All rights reserved.374709A-01Jul07。
IBM SPSS Statistics Version 27授权用户许可管理员指南说明书
Before you start............................................................................................................................................1 Ghosting.................................................................................................................................................. 1 Citrix and Terminal Services...................................................................................................................1
Before you start
You will need your authorization code. The authorization code enables you and your end users to get a license for IBM SPSS Statistics.
IBM SPSS Modeler Premium 18.3 安装和配置指南说明书
3、SCCM系列之三SCCM客户机发现以及客户端软件安装
SCCM系列之三SCCM客户机发现以及客户端软件安装在前面的两篇文章中,试验SCCM主站点的安装与主站点的配置,今天试验如何在SMS的站点内发现被管理的客户机以及给这些客户机安装客户端软件。
客户机是SCCM服务器管理的最重要的资源,在站点内发现客户机是SCCM服务器实现客户机管理的前提。
SCCM服务器可以利用物理或逻辑方法来发现客户机,发现客户机之后再为客户机安装客户端代理软件,然后SMS服务器就可以利用客户端软件实现远程控制,软件分发,资产统计等功能。
客户端请求安装旨在将 Configuration Manager 2007 客户端软件请求到发现的计算机或资源。
可以配置站点的客户端请求安装,客户端安装将在站点的已配置边界内发现的计算机上自动启动;也可以使用客户端请求安装向导,通过将集合内的特定集合或资源作为目标来启动客户端请求安装。
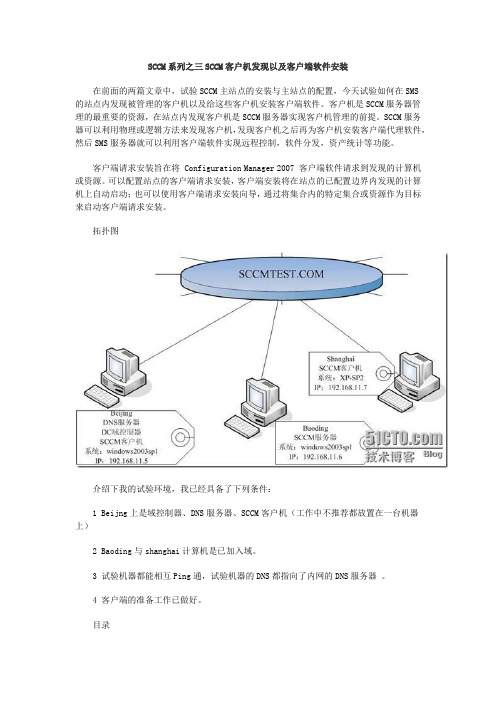
拓扑图介绍下我的试验环境,我已经具备了下列条件:1 Beijng上是域控制器、DNS服务器、SCCM客户机(工作中不推荐都放置在一台机器上)2 Baoding与shanghai计算机是已加入域。
3 试验机器都能相互Ping通,试验机器的DNS都指向了内网的DNS服务器。
4 客户端的准备工作已做好。
目录第一步:热身准备工作第二步:SCCM客户机的发现第三步:SCCM客户端软件的安装具体步骤第一步:热身准备工作1.)Configuration Manager 2007 的外部依赖关系及安装过程中的自动下载Configuration Manager 2007 客户端有许多潜在的外部依赖关系,确切的依赖关系取决于客户端的操作系统、安装的软件及客户端计算机的处理器类型。
如果需要这些依赖关系来完成客户端安装,则它们将随客户端软件一起自动安装。
Microsoft 后台智能传输服务 (BITS) 2.5 版(需要允许客户端计算机和Configuration Manager 2007 站点系统之间的受限数据传输,如果在运行 Windows 2000 的计算机上,将安装 BITS 2.0 版)Microsoft Windows Installer 版(需要支持 Microsoft Windows Installer 更新文件(.msp) 的使用以更新包和软件)Microsoft Windows Update 代理 7.0.6000.363 版(Windows 要求支持更新检测和部署)Microsoft Core XML Services (MSXML) 6.0.3883.0 版(要求支持在 Windows 中处理XML 文档)Microsoft WMI 可再发行组件 5.2.3790.1830 版(Windows 2000 Service Pack 4 计算机所需的 WMI 组件)Microsoft 远程差分压缩 (RDC) :优化网络上的数据传输。
SCCM客户端的手动安装
SCCM客户端的安装及其设置安装SCCM客户端有3种方式:1.从SCCM Console 将客户端推到客户机.2.在客户机手动执行安装.3.用代码形式安装客户端.在这里, 我只谈如何 从客户机手动执行安装SCCM客户端.一.测试环境:AD: AD.sccm.localSCCM: SCCM2007.sccm.local客户机: SSS二.手动安装SCCM客户端过程1.在客户机SSS里手动安装SCCM客户端连接到SCCM服务器, 打开SCCM安装目录下Client文件夹, 手动执行ccmsetup.exe. 安装完毕后控制面板里将会出现4个新图标: Configuration Manager, Remote Control, Run Advertised Program, Program Download Monitor.2.检查System 中有没创建System Management容器a.在运行中键入ADSIEDIT.msc, 确定并打开ADSI. (如果提示错误请安装SUPPORT TOOLS,在系统光盘下SUPPORT\TOOLS路径下). 依次打开System, 右键选择New, object, 如图,在列表中选择container并下一步, 如图,在Value中键入System Management.注: 必须为这个名字。
下一步, 确认后关闭该窗口.b.设置权限:右键打开System,并选择属性,单击security, 单击Add添加SCCM服务器, 图中SCCM2007$为我添加的SCCM服务器.SCCM服务器出现在列表中以后给于该服务器Full Control权限.点击Advanced, 找到SCCM服务器后双击打开, 将Apply Onto后面的下拉菜单选择成This object and all child objects.如图,确定并关闭窗口。
此时System Management 容器中无任何内容.3.设置站点在SCCM服务器上打开SCCM Console, 依次打开Site Database, Site Management, 右键打开站点, 选择properties,选择Advancd, 勾选Publish this site in Active Directory Domain Services. 确定并且关闭, 如果已经被勾选了, 则先取消勾选, 确定后再次打开该窗口并且勾上该选项. 片刻后打开System Management, 确认已经有内容被写入, 如图. 如果没出现任何内容, 请参照第2步重新设置.4.更新Discovery Methods双击Discovery Methods右边需要更新的选项, 点击Pooling Schedule, 选中Run Discovery as soon as possible并选择确定. 如图,更新完所有需要更新的选项之后, 右键打开collection中的All Systems, 选择update Collection Membership, 如图,选择OK开始行进更新, 如图,更新完毕后, 新安装SCCM客户端的客户机会出现在列表中, 如图, SSS是新加入的.图中已经列出SSS对应的Site Code 是S01.5.客户机端设置在客户机SSS, 打开控制面板中的Configuration Manager, 点击Advanced, 如图,单击Discover, 等会客户端会自动显示已发现站点并提示成功连接.到此设置过程就全部结束了. 如果有什么问题和不懂的地方可以与本人联系. 若要转载请注明出处.。
SCCM客户端安装问题集锦
SCCM客户端安装问题及解决方法在SMS-client-config-manage上提示如下:“客户端无法安装成功,1003,依存的服务无法启动”。
解决过程:到客户端上查看服务,发现在服务中存在一个ccmsetup的服务,但是启动类型为自动,但是启动状态为未启动。
手动启动这个服务,出现1003报错,意思是依存的服务未启动。
解决办法:查看ccmsetup服务的依赖关系选项,发现依赖于BITS服务和WMI服务,查看发现Bits服务是在客户端上是禁用的,改为自动启动,问题解决。
SCCM 2007 启动安装客户端的命令后没反应。
解决过程:排查后发现把客户端的Remote Registry服务禁用了。
解决办法:在组策略里改成自动后,或者手动启动该服务,安装客户端成功。
ccmsetup.log报错解决过程:setup failed due to unexpected circumstances.The error code is 80070534解决办法:/kb/9098471在运行对话框中输入“lusrmgr.msc”,点击确定。
在本地用户和组管理单元中,单击用户,然后验证$ 本地IUSR 和IWAM 帐户存在。
是否存在这些帐户。
2警告如果本地IUSR 和IWAM 帐户不存在,不要继续这篇文章中的步骤。
重新启动IIS 管理服务时,会重新创建IUSR 和IWAM 帐户。
3在运行对话框中输入“cmd”,打开命令提示符。
命令提示符将移动到C:\Inetpub\Adminscripts 目录。
3.1Adsutil.vbs set w3svc/wamusername IWAM_ Computer_Name,然后按ENTER 键。
3.2Adsutil.vbs set w3svc/wamuserpass Password,然后按ENTER 键。
单击在所有警告消息。
3.3Adsutil.vbs set w3svc/anonymoususername IUSR_ Computer_Name,然后按ENTER 键。
SCCM部署更新快速指南v1.0

-过了配置的截止时间之后,软件更新客户端代理将安装软件更新。若要立即便自动进行安装可选”as soon as possible”.
一般情况下这两个选项都请选择“as soon as possible”.
5.下拉框选择在软件中心显示所有通知(Display in Software Center, show all notifications), 或只在系統重啟時显示通知(Display in Software Center, and only show notifications for computer res新启动行为)
指定安装软件更新后是否在服务器和工作站上抑制系统重启.在不希望默认重启安装软件更新的计算机的情况下,这里应选Server和Workstation皆抑制系统重启.但注意要尽快安排重启,否则整个软件更新也未算完成.
Commit changes at deadline or during a maintenance windows (requires restarts)
SCCM部署更新快速指南
1.选择要部署的安装包.
2.给部署设定一个名称,选择设备集合进行部署.
注: 安装新的集合组,请参考“设置集合组快速指南”。
3.部署类型选择。可跟随默认选择.
4.配置部署计划。
Software available time
-客户端代理在收到部署后不久会将分发点中所需软件更新的内容下载到本地客户端缓存,但会等到部署的“软件可用时间software available time”设置之后才能安装软件更新。 在用户手动启动安装之前,不会下载可选部署(没有安装截止时间的部署installation deadline)中的软件更新。
WebSphere 迁移策略步骤说明书
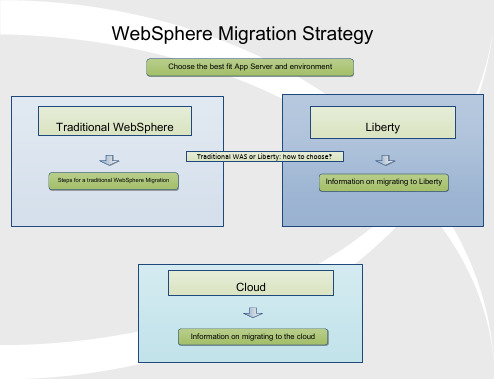
Target Version New Features PlanningTarget Version Potential ImpactsYour Current VersionProduct Documentation Target Version Planning Guide 7.08.0v8.5PlanningGuide v8.0PlanningGuide v8.5Planning Guide What s newv8.5What s newv8.0What s newv8.5Task 1 – Determine Your Migration Path What s Changed 8.5Special considerations:Migration from 6.0: If your current version of WebSphere Application Server is 6.0 and you wish to migrate to 8.5, you must first migrate to 7.0 or 8.0, then migrate from 7.0 or 8.0 to 8.5.Migration from 6.1: If your current version of WebSphere Application Server is 6.1 and you wish to migrate to 9.0, you must first migrate to 8.5, then migrate from 8.5 to 9.0.When choosing your target version take into account the features included in the new version and weigh up the benefits of migrating to the latest version to decrease how often a migration may be required.When skipping versions (for example migrating from v7 to v8.5) ensure you look at the What s New for each release you skip to ensure you know all the new features you will gain.Handling certain out of memory conditions when migrating, if you are migrating a large amount of applicationsTake a full system backup of your source before beginning the migrationBackWhat s Changed 8.5What s Changed 8.08.5What s newv9.0V9.0PlanningGuide What s Changed 9.0What s newv9.0V9.0PlanningGuide What s Changed 9.0What s Changed 9.0V9.0PlanningGuide What s newv9.0Liberty Liberty Migration InformationThe Liberty zero migration visionMaking the move to the Liberty Profile, Part 1Making the move to the Liberty Profile, Part 2Moving WebSphere and 3rd Party ApplicationsMoving Application BinariesConfiguration Scanning for migrationWebSphere Application Server – Migration Discovery ToolTotal Economic Impact of Migration From Open Source ApplicationServers to IBM WAS LibertyNotes :The Liberty product does not have a specific tool as traditional WebSphere has to migrate your configuration from one version to another. A combination of the tools listed above will assist you with moving your configurations and/or applications from WebSphere and/ or 3rd Party products to a Liberty Installation.BackCloud Cloud Migration Path Back Choose the best fit App Server and environmentCalculate savings on the Cloud using IBM WebSphereMoving WebSphere and 3rd Party ApplicationsMoving Application BinariesWAS Liberty in the cloudWebSphere Application Server v9 Update: On Premise and In theCloud - videoWebSphere on Cloud T otal C ost of O wnership CalculatorWebSphere Application Server – Migration Discovery ToolWebSphere Configuration Migration Tool for IBM Cloud - OverviewWebSphere Configuration Migration Tool for IBM Cloud - DownloadTarget VersionGeneral Migration Considerationsv8.5Preparing for Migration v8.0Preparing for Migration Task 2 – Preparing for your migrationPlanning Migration Type ConsiderationsBackMore information about planningfor a migrationv7.0Preparing forMigration V9.0Preparing for MigrationExecution Task 1 – Installation Download the appropriate versionfrom IBM Passport Advantage (orobtain media) for runtime andtoolkitPerform Installation v8.5 Target Environment Installation Guide v8.0 Target Environment Installation Guide Notesv8.0,v8.5 and v9.0 require the InstallationManager to install. Use the latest versionof the Installation Manager rather than theone delivered with the binaries.If you are performing a local migration, besure to change the WebSphere file pathsfrom the defaults during installation.Ensure that you follow all relevantinstructions for setting up the targetenvironment for your migration, found atthe links to the left.Verify that on a Unix target machine theulimit setting for the number of open files isset to 10000 or higher, unlimited ifpossible. To see the current setting runfrom the command lineulimit -a Backv7.0 Target Environment Installation Guide Image Numbersfor v8.0Image Numbers for v8.5.5Image Numbers for v9.0V9.0 Target Environment Installation GuideTask 2a – Migration to 7.0Migrating to WebSphere 7.0Migrating a standaloneappserver Migration using command line remote Migration using commandRollbackMigrationMigrating a Network Deployment ManagerLocal Remote Local Remote Migration using the Wizard Migration using command line Migration usingthe Wizard remote Migration using commandTask 2b – Migrating to 8.0Migrating to WebSphere 8.0Migration using command line remote Migration using commandRollbackMigrationMigrating a standaloneappserver Migrating a Network Deployment ManagerLocal Remote Remote Local remote Migration using commandMigration using the Wizard Migration usingthe Wizard Migration using command lineTask 2c – Migration to 8.5Migrating to WebSphere 8.5Migration using command line remote Migration using commandRollbackMigrationMigrating a Network Deployment ManagerMigrating a standaloneappserver Remote Remote Local Local Migration using the Wizard remote Migration using commandMigration using command line Migration usingthe WizardUseful Links。
轻松解决scclient scguardc sccltui顽固进程问题
轻松解决scclient、scguardc、sccltui顽固进程问题
以上3个进程由网络监控软件产生,主要用于监控计算机上网,财政系统内网常用此软件,登录特定网络自动提示安装,默认安装到C:\WINDOWS\system32\pcclien,是个垃圾软件,很难卸载。
网上推荐方法:比如360强力删除、强力粉碎、删除注册表、登录安全模式等。本人亲测,无一产生效果。
飞鹰总结:制作U盘启动盘,可参考《老毛桃WinPe U盘版》指南,之后用U盘启ien删除pcclient文件夹即可。解决此问题居然如此简单。
VPN GlobalProtect for Mac Client Quick Guide
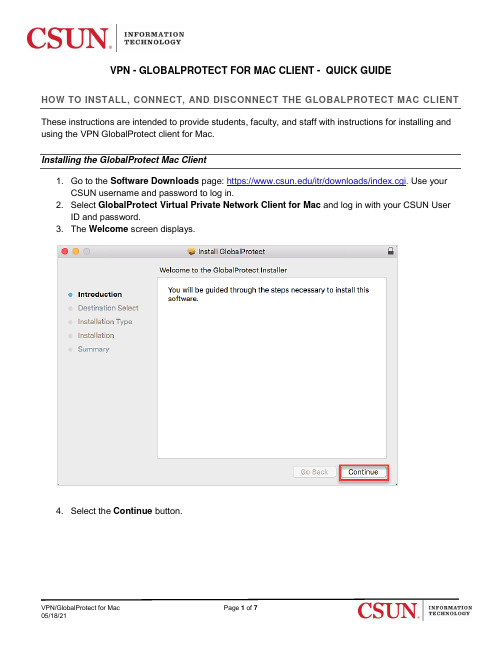
VPN - GLOBALPROTECT FOR MAC CLIENT - QUICK GUIDEHOW TO INSTALL, CONNECT, AND DISCONNECT THE GLOBALPROTECT MAC CLIENT These instructions are intended to provide students, faculty, and staff with instructions for installing and using the VPN GlobalProtect client for Mac.Installing the GlobalProtect Mac Client1. Use your CSUN username and password to log in.2. Select GlobalProtect Virtual Private Network Client for Mac and log in with your CSUN User ID and password.3. The Welcome screen displays.4. Select the Continue button.5. The Destination Select screen displays.6. Select the desired option by clicking on it. In this example, there is only one option available.Once you make your selection, the Continue button will become active. Select the Continue button.7. The Installation Type screen displays. Make sure the GlobalProtect checkbox is selected, andthen select the Continue button.8. Select the Change Install Location… button to change the installation location (optional). Selectthe Install button when ready to install.9. If asked for your password, enter your CSUN password, and then select Install Software.10. The Summary screen displays. Select the Close button.11. The Welcome to GlobalProtect screen displays.12. In the Portal Address field, enter , and then select the Connect button.13. The CSUN Login screen displays. Enter your CSUN User ID and Password, and then select theLogin button.14. If you are enrolled in Duo, you will be prompted to select a Duo notification method. Onceselected, a Duo notification will be sent. Accept the Duo notification on the default device you have registered. Please be aware that your work station will not notify you to check for a phone call or push-notification. For this reason, please make sure to have your device in hand.15. The Connecting screen displays.16. The Connected screen displays.17. You are now connected. The small GlobalProtect icon displays in the Status menu on the Menubar.LAUNCH AND CONNECT1. Select the GlobalProtect icon in the Status menu.2. Select Connect.3. Enter your CSUN User ID and Password in the CSUN Login window, and then select the Loginbutton.4. If you are enrolled in Duo, you will be prompted to select a Duo notification method. Onceselected, a Duo notification will be sent. Accept the Duo notification on the default device youhave registered. Please be aware that your work station will not notify you to check for a phone call or push-notification. For this reason, please make sure to have your device in hand.5. You are now connected to the CSUN VPN GlobalProtect.DISCONNECT1. Select the GlobalProtect icon in the Status menu.2. Select Disconnect. Your Mac is now disconnected from the CSUN VPN.NEED HELP?Contact the IT Help Center by phone (818-677-1400), online at (https:///) or in person in (University Library, First Floor, Learning Commons).。
如何通过GPO部署安装SCCM客户端
Installing the ConfigMgr 2007Client with a GPONOTE: In doing the research for this deployment method it was discovered that this will only deploy the client once. If you wanted to redeploy the client to a machine that already received the deployment you would have to go into the GPO and choose to redeploy the software. This causes every machine in the OU to re-run the application. It is recommended that this only be used as a once and done policy if at all. Personally I would recommend using a “Startup Script” as was used in SMS 2003. This way there is some logic build into the deployment.Files neededIn order to use a GPO to install SCCM you will need the following files: ∙Microsoft provides 2 ADM files for installing the ConfigMgr 2007 client. They are located here:∙ConfigMgr_install_CD\TOOLS\ConfigMgrADMTemplateso The files are called:▪ConfigMgr2007Assignment.adm▪ConfigMgr2007Installation.admNote: Copy these files to the system where you are going to run GPMC from. The best place to copy them is the default location for ADM files %windir%\infNote: More information about the ADM files can be found here∙Microsoft also provides an MSI for the installed located here:o(Install location)\Microsoft Configuration Manager\bin\i386\ccmsetup.msi Note: More information on using AD to deploy an MSI can be found hereOnce you’ve gathered these files you are ready to create a GPO for the installation. In order to setup the GPO do the following steps:1.Copy ccmsetup.msi to a share that is accessable to everyone. I will use theConfigMgr server in this examplea.Create share herei.{ConfigMgr Install Location}\Client1.Set security so that the group everyone has read accessii.Copy the ccmsetup.msi to the Client Share2.Create a new GPOa.Open the Group PolicyManagement Console (GPMC)b.Right click Group policy objectsand choose new it “ConfigMgr_Install”d.Right Click the new object andchoose edite.Import the ADM Filesi.Right click theadministrative templatesand choose Add/RemoveTemplatesii.Click Add and browse tothe ADM files we retrievedearlieriii.Once imported close thewindow.Once the GPO is created you will need to configure the GPO. Do the following:1.With the GPO created above open Click View and chooseFiltering2.Uncheck “Only show policy settings that can be fully managed”3.Now open the administrator templatesa.Select Configuration manager 2007 Clientsi.You should see 2 items, one has a red box and theother has a blue boxii.The 2 policies should be1.Configure ConfigMgr2007 SiteAssignment2.Configure ConfigMgr2007 ClientDeployment settings.b.Open the site assignment item and choose enable thenenter your site code.Note: this will help keep clients assigned to the correct site in your infrastructure.c.Open the Client Deployment Settings and enable it.i.Enter the command line parameters that you wantto do.Note: Only do step C if you have not extended your AD schema and published your site to AD. If you have already done this then the install command line is already published to AD based on the command linethat you used for the client install parameters.For more information of publishing to AD read this4.Create Client Installa.Click Computer configuration Softwaresettings—Software installationb.Enter the UNC path to the CCMSetup.MSIi.Example:\\SCCMServer.domain\SCCM_Client\CCMSetup.MSINote: Make sure you use the FQDN in the UNC if you have multiple domains. This will make finding the file easier.c.Click opend.Choose Assignede.Click OKNote: There is no need to modify this install. It will becreated correctly for you.5.Save and Close the policyGPO Policy ReportIf you open your GPO Settings tab it should look similar to this.Name SMS Client Setup Bootstrap Version 4.0Language English (United States) PlatformIntel General Setting Deployment type AssignedDeployment source\\oaconfigmgr01.smslab.oa\SCCM_Client\ccmsetup.msi Uninstall this application when it falls out of the scope of management DisabledAdvanced Deployment OptionsSetting Ignore language when deploying this package Disabled Make this 32-bit X86 application available to Win64 machinesEnabledInclude OLE class and product information EnabledDiagnostic Information SettingProduct code {52468fb8-50d0-41f9-afc7-6bd0da224a6b}Upgrades SettingPackages in the current GPO that will upgrade this package NoneCategoriesNoneTransformsPolicy SettingApply PolicyOnce the policy is created you will need to link it to an OU in GPMC.Troubleshooting PolicyOnce you apply the policy it should replicate to your systems. In GPMC you can use the Group Policy Results checker to verify that the policy is applied.Once you know the policy is replicated to the system, reboot the system. On boot-up before your logon screen appears you will see a window that looks like this.Open the application event log and you should see this:************************************************************Event Type: InformationEvent Source: MsiInstallerEvent Category: NoneEvent ID: 11728Date: 11/19/2008Time: 10:58:26 AMUser: NT AUTHORITY\SYSTEMComputer: OASMSLABXP03Description:Product: SMS Client Setup Bootstrap -- Configuration completed successfully.For more information, see Help and Support Center at /fwlink/events.asp.Data:0000: 7b 35 32 34 36 38 46 42 {52468FB0008: 38 2d 35 30 44 30 2d 34 8-50D0-40010: 31 46 39 2d 41 46 43 37 1F9-AFC70018: 2d 36 42 44 30 44 41 32 -6BD0DA20020: 32 34 41 36 42 7d 24A6B}************************************************************Event Type: InformationEvent Source: Application ManagementEvent Category: NoneEvent ID: 305Date: 11/19/2008Time: 10:58:26 AMUser: NT AUTHORITY\SYSTEMComputer: OASMSLABXP03Description:The reinstall of application SMS Client Setup Bootstrap from policy SCCM-CM1 succeeded.For more information, see Help and Support Center at /fwlink/events.asp.************************************************************Event Type: InformationEvent Source: Application ManagementEvent Category: NoneEvent ID: 308Date: 11/19/2008Time: 10:58:26 AMUser: NT AUTHORITY\SYSTEMComputer: OASMSLABXP03Description:Changes to software installation settings were applied successfully.For more information, see Help and Support Center at /fwlink/events.asp.************************************************************If you have everything listed above and still need to troubleshoot the install, look at the ccmsetup\ccmsetup.log and the client.log for problems.。
- 1、下载文档前请自行甄别文档内容的完整性,平台不提供额外的编辑、内容补充、找答案等附加服务。
- 2、"仅部分预览"的文档,不可在线预览部分如存在完整性等问题,可反馈申请退款(可完整预览的文档不适用该条件!)。
- 3、如文档侵犯您的权益,请联系客服反馈,我们会尽快为您处理(人工客服工作时间:9:00-18:30)。
Installing the ConfigMgr 2007Client with a GPONOTE: In doing the research for this deployment method it was discovered that this will only deploy the client once. If you wanted to redeploy the client to a machine that already received the deployment you would have to go into the GPO and choose to redeploy the software. This causes every machine in the OU to re-run the application. It is recommended that this only be used as a once and done policy if at all. Personally I would recommend using a “Startup Script” as was used in SMS 2003. This way there is some logic build into the deployment.Files neededIn order to use a GPO to install SCCM you will need the following files:•Microsoft provides 2 ADM files for installing the ConfigMgr 2007 client. They are located here:•ConfigMgr_install_CD\TOOLS\ConfigMgrADMTemplateso The files are called:ConfigMgr2007Assignment.admConfigMgr2007Installation.admNote: Copy these files to the system where you are going to run GPMC from. The best place to copy them is the default location for ADM files %windir%\infNote: More information about the ADM files can be found here•Microsoft also provides an MSI for the installed located here:o(Install location)\Microsoft Configuration Manager\bin\i386\ccmsetup.msi Note: More information on using AD to deploy an MSI can be found hereOnce you’ve gathered these files you are ready to create a GPO for the installation. In order to setup the GPO do the following steps:1.Copy ccmsetup.msi to a share that is accessable to everyone. I will use theConfigMgr server in this examplea.Create share herei.{ConfigMgr Install Location}\Client1.Set security so that the group everyone has read accessii.Copy the ccmsetup.msi to the Client Share2.Create a new GPOa.Open the Group PolicyManagement Console (GPMC)b.Right click Group policy objectsand choose new it “ConfigMgr_Install”d.Right Click the new object andchoose edite.Import the ADM Filesi.Right click theadministrative templatesand choose Add/RemoveTemplatesii.Click Add and browse tothe ADM files we retrievedearlieriii.Once imported close thewindow.Once the GPO is created you will need to configure the GPO. Do the following:1.With the GPO created above open Click View and chooseFiltering2.Uncheck “Only show policy settings that can be fully managed”3.Now open the administrator templatesa.Select Configuration manager 2007 Clientsi.You should see 2 items, one has a red box and theother has a blue boxii.The 2 policies should be1.Configure ConfigMgr2007 SiteAssignment2.Configure ConfigMgr2007 ClientDeployment settings.b.Open the site assignment item and choose enable thenenter your site code.Note: this will help keep clients assigned to the correct site in your infrastructure.c.Open the Client Deployment Settings and enable it.i.Enter the command line parameters that you wantto do.Note: Only do step C if you have not extended your AD schema and published your site to AD. If you have already done this then the install command line is already published to AD based on the command linethat you used for the client install parameters.For more information of publishing to AD read this4.Create Client Installa.Click Computer configuration Softwaresettings—Software installationb.Enter the UNC path to the CCMSetup.MSIi.Example:\\SCCMServer.domain\SCCM_Client\CCMSetup.MSINote: Make sure you use the FQDN in the UNC if you have multiple domains. This will make finding the file easier.c.Click opend.Choose Assignede.Click OKNote: There is no need to modify this install. It will becreated correctly for you.5.Save and Close the policyGPO Policy ReportIf you open your GPO Settings tab it should look similar to this.Computer Configuration (Enab Computer Configuration (Enabled)led)hide Software SettingsSoftware Settingshide Assigned ApplicationsAssigned Applicationshide SMS Client Setup Bootstrap SMS Client Setup Bootstraphide Product Information Product Informationhide Name SMS Client Setup Bootstrap Version 4.0Language English (United States) PlatformIntel Support URLDeployment Information General General Setting Setting Deployment type AssignedDeployment source\\oaconfigmgr01.smslab.oa\SCCM_Client\ccmsetup.msi Uninstall this application when it falls out of the scope of management DisabledAdvanced Deployment Options Advanced Deployment OptionsSetting Setting Ignore language when deploying this package Disabled Make this 32-bit X86 application available to Win64 machinesEnabledInclude OLE class and product information EnabledDiagnostic Information Diagnostic Information Setting SettingProduct code {52468fb8-50d0-41f9-afc7-6bd0da224a6b} Deployment Count 0 SecuritySecurityhide Permissions Permissions Type NamePermission Inherited Allow SMSLAB\Domain Admins Full control No AllowNTAUTHORITY\Authenticated UsersReadNoAllow NT AUTHORITY\SYSTEM Full control No Allow SMSLAB\Domain AdminsRead, WriteYes AllowSMSLAB\Enterprise Admins Read, WriteYesAllow NTAUTHORITY\ENTERPRISE DOMAIN CONTROLLERSRead YesAllow NTAUTHORITY\Authenticated UsersRead YesAllow NT AUTHORITY\SYSTEM Read, Write Yes AllowCREATOR OWNERRead, Write YesAllow inheritable permissions from the parent to propagate to this object and all child objects EnabledAdvanced Advancedhide Upgrades UpgradesSetting Setting Required upgrade for existing packages EnabledPackages that this package will upgrade GPONonePackages in the current GPO that will upgrade this package NoneCategories Categories NoneTransforms TransformsNoneAdministrative TemplatesAdministrative Templateshide Configuration Manager 2Configuration Manager 2007/Configuration Manager 2007 Client 007/Configuration Manager 2007 Client 007/Configuration Manager 2007 Clienthide Policy PolicySetting Setting Configure Configuration Manager 2007 Site AssignmentEnabled Assigned SiteCM1 Site Assignment Retry Interval (Mins) 60 Site Assignment Retry Duration (Hours)12Apply PolicyOnce the policy is created you will need to link it to an OU in GPMC.Troubleshooting PolicyOnce you apply the policy it should replicate to your systems. In GPMC you can use the Group Policy Results checker to verify that the policy is applied.Once you know the policy is replicated to the system, reboot the system. On boot-up before your logon screen appears you will see a window that looks like this.Open the application event log and you should see this:************************************************************Event Type: InformationEvent Source: MsiInstallerEvent Category: NoneEvent ID: 11728Date: 11/19/2008Time: 10:58:26 AMUser: NT AUTHORITY\SYSTEMComputer: OASMSLABXP03Description:Product: SMS Client Setup Bootstrap -- Configuration completed successfully.For more information, see Help and Support Center at /fwlink/events.asp.Data:0000: 7b 35 32 34 36 38 46 42 {52468FB0008: 38 2d 35 30 44 30 2d 34 8-50D0-40010: 31 46 39 2d 41 46 43 37 1F9-AFC70018: 2d 36 42 44 30 44 41 32 -6BD0DA20020: 32 34 41 36 42 7d 24A6B}************************************************************Event Type: InformationEvent Source: Application ManagementEvent Category: NoneEvent ID: 305Date: 11/19/2008Time: 10:58:26 AMUser: NT AUTHORITY\SYSTEMComputer: OASMSLABXP03Description:The reinstall of application SMS Client Setup Bootstrap from policy SCCM-CM1 succeeded.For more information, see Help and Support Center at /fwlink/events.asp.************************************************************Event Type: InformationEvent Source: Application ManagementEvent Category: NoneEvent ID: 308Date: 11/19/2008Time: 10:58:26 AMUser: NT AUTHORITY\SYSTEMComputer: OASMSLABXP03Description:Changes to software installation settings were applied successfully.For more information, see Help and Support Center at /fwlink/events.asp.************************************************************If you have everything listed above and still need to troubleshoot the install, look at the ccmsetup\ccmsetup.log and the client.log for problems.。
