FS7VS-5中文资料
Panasonic DMC-FP5 FP7 说明书

Product identifi cation markingProduct Location Digital camera BottomBattery charger BottomAbout the battery packCAUTIONBattery pack (Lithium ion battery pack)• Use the specifi ed unit to recharge the battery pack.• Do not use the battery pack with equipment other than the specifi ed unit.• Do not get dirt, sand, liquids, or other foreign matter on theterminals.• Do not touch the plug terminals (+ and –) with metal objects.• Do not disassemble, remodel, heat or throw into fi re.If any electrolyte should come into contact with your hands or clothes, wash it off thoroughly with water.If any electrolyte should come into contact with your eyes, never rub the eyes. Rinse eyes thoroughly with water, and then consult a doctor. CAUTIONDanger of explosion if battery is incorrectly replaced. Replace only with the same or equivalent type recommended by the manufacturer.Dispose of used batteries according to the manufacturer’sinstructions.• Do not heat or expose to fl ame.• Do not leave the battery(ies) in an automobile exposed to directsunlight for a long period of time with doors and windows closed. WarningRisk of fi re, explosion and burns. Do not disassemble, heat above 60°C (140°F) or incinerate.4VQT3F03 (ENG)Keep this unit as far away as possible from electromagnetic equipment (such as microwave ovens, TVs, video games etc.).• If you use this unit on top of or near a TV, the pictures and/or sound on this unit may be disrupted by electromagnetic wave radiation.• Do not use this unit near cell phones because doing so may result in noise adversely affecting the pictures and/or sound.• Recorded data may be damaged, or pictures may be distorted, by strong magnetic fi elds created by speakers or large motors.• Electromagnetic wave radiation generated by microprocessors may adversely affect this unit, disturbing the pictures and/or sound.• If this unit is adversely affected by electromagnetic equipment and stops functioning properly, turn this unit off and remove the battery or disconnect AC adaptor (DMW-AC5PP: optional). Then reinsert the battery or reconnect AC adaptor and turn this unit on.Do not use this unit near radio transmitters or high-voltage lines.• If you record near radio transmitters or high-voltage lines, therecorded pictures and/or sound may be adversely affected.6VQT3F03 (ENG)ContentsInformation for Y our Safety (2)Standard Accessories (8)Names of the Components (9)How to Use the Touch Panel (11)Charging the Battery (13)About the Built-in Memory / the Card (16)Inserting and Removing the Card (optional) / the Battery (17)Setting Date / Time (Clock Set) (18)• Changing the clock setting (18)Setting the Menu (19)Recording Sequence (20)Taking Pictures Using the Automatic Function(4: Intelligent Auto Mode) (21)• Scene Detection (22)• Tracking moving subjects and focus (AF Tracking) (22)Recording Motion Pictures (23)Playing Back Pictures ([Normal Play]) (24)Deleting Pictures (24)Reading the Owner’s Manual (PDF format) (25)Specifi cations (27)Digital Camera Accessory System (30)Digital Camera Accessory Order Form (31)Limited Warranty (ONL Y FOR U.S.A. AND PUERTO RICO) (32)7(ENG) VQT3F03Use this to select icons or Use this to see the next/previous• Depending on the item, some settings may not be displayed or2x the focusCAB Double click the “Owner’s Manual” shortcut icon onSpecifi cationsDigital Camera:Information for your safetyPower Source:DC 5.1 VPower Consumption:1.2 W (When recording) (DMC-FP7) /1.1 W (When recording) (DMC-FP5)0.7 W (When playing back) (DMC-FP7/DMC-FP5) Camera Effective pixels:16,100,000 pixels (DMC-FP7) /14,100,000 pixels (DMC-FP5)Image sensor:1/2.33˝ CCDTotal pixels:16,600,000 pixels (DMC-FP7) /14,500,000 pixels (DMC-FP5)Primary color fi lterLens:Optical 4 × zoom, f=6.3 to 25.2 mm [35 mmfi lm camera equivalent: 35 to 140 mm] / F3.5(Wide) to F5.9 (T ele)Digital zoom:Max. 4 ×Extended opticalzoom:Max. 9.0 × (DMC-FP7) / Max. 8.4 × (DMC-FP5) Focus range:Normal :50 cm (1.64 feet) to 7Macro / Intelligent auto / Motion Picture:10 cm (0.33 feet) (Wide) / 50 cm (1.64 feet)(Tele) to 7Scene mode: settings may be different tothose shown aboveShutter system:Electronic shutter + Mechanical shutterBurst recordingBurst speed:Approx. 1.7 pictures/secondNumber ofrecordable pictures:Depends on the remaining capacity of thebuilt-in memory or the card.27(ENG) VQT3F03Hi-speed burstBurst speed:Approx. 4 pictures/secondPicture size:3M (4:3), 2.5M (3:2, 1:1) or 2M (16:9) isselected as the picture size.Number ofrecordable pictures:Approx. 15 to 100Shutter speed:8 seconds to 1/1,600th of a second[Starry Sky] mode:15 seconds, 30 seconds,60 secondsExposure (AE):Auto (Program AE)Exposure compensation (1/3 EV Step, -2 EVto +2 EV)Metering mode:MultipleLCD monitor:TFT LCD 3.5˝ (16:9) (DMC-FP7) / TFT LCD3.0˝ (3:2) (DMC-FP5) (Approx. 230,000 dots)(fi eld of view ratio about 100%)Touch panelFlash:Flash range:Approx. 0.3 m (0.99 feet) to 4.9 m (16.08 feet)(Wide [,])AUTO, AUTO / Red-eye reduction, Forced ON(Forced ON / Red-eye reduction), Slow sync. /Red-eye reduction, Forced OFFMicrophone:MonauralSpeaker:MonauralRecording media:Built-in Memory (Approx. 70 MB) /SD Memory Card / SDHC Memory Card /SDXC Memory CardRecording fi le formatStill Picture:JPEG (based on “Design rule for Camera Filesystem”, based on “Exif 2.3” standard) / DPOFcorrespondingMotion pictures:“QuickTime Motion JPEG” (motion pictureswith audio)28VQT3F03 (ENG)InterfaceDigital:USB 2.0 (High Speed)Analog video /audio:NTSCAudio line output (monaural)TerminalAV OUT/DIGITAL:Dedicated jack (8 pin)Dimensions:Approx. 101.0 mm (W) × 58.9 mm (H) ×18.2 mm (D)(3.98˝ (W) × 2.32˝ (H) × 0.72˝ (D))(excluding the projection part)Mass (Weight):Approx. 147 g/0.32 lb (DMC-FP7)Approx. 141 g/0.31 Ib (DMC-FP5)(with Memory Card and battery)Approx. 130 g/0.29 lb (DMC-FP7)Approx. 124 g/0.27 Ib (DMC-FP5)(excluding Memory Card and battery) OperatingTemperature:0 °C to 40 °C (32 °F to 104 °F)Operating Humidity:10%RH to 80%RHLanguage select:[English] / [Español]Battery Charger(PanasonicDE-A91B):Information for your safetyInput: 110 V to 240 V, 50/60 Hz, 0.2 AOutput: 4.2 V, 0.43 AEquipment mobility:MovableBattery Pack(lithium-ion)(PanasonicNCA-YN101G):Information for your safetyVoltage/capacity(Minimum): 3.6 V/660 mAh29(ENG) VQT3F03THERE ARE NO EXPRESS WARRANTIES EXCEPT AS LISTED UNDER “LIMITED WARRANTY COVERAGE”.THE WARRANTOR IS NOT LIABLE FOR INCIDENTAL OR CONSEQUENTIAL DAMAGES RESULTING FROM THE USE OF THIS PRODUCT, OR ARISING OUT OF ANY BREACH OF THIS WARRANTY.(As examples, this excludes damages for lost time, travel to and from the servicer, loss of or damage to media or images, data or other memory or recorded content. The items listed are not exclusive, but for illustration only.)ALL EXPRESS AND IMPLIED WARRANTIES, INCLUDING THE WARRANTY OF MERCHANTABILITY, ARE LIMITED TO THE PERIOD OF THE LIMITED WARRANTY.Some states do not allow the exclusion or limitation of incidental or consequential damages, or limitations on how long an implied warranty lasts, so the exclusions may not apply to you.This warranty gives you specific legal rights and you may also have other rights which vary from state to state. If a problem with this product develops during or after the warranty period, you may contact your dealer or Service Center. If the problem is not handled to your satisfaction, then write to the warrantor's Consumer Affairs Department at the addresses listed for the warrantor.PARTS AND SERVICE, WHICH ARE NOT COVERED BY THIS LIMITED WARRANTY, ARE YOUR RESPONSIBILITY.34VQT3F03 (ENG)。
欧师傅、优耐美、谢兰系列微型机床标书参数

欧师傅、优耐美、谢兰系列微型机床标书参数图片名称参数欧师傅砂带机OSF-A20 特点:砂带工作台可调整至90度垂直方向;双工作台设计空载转速(砂带):7.6m/s(砂盘):2400RPM砂带尺寸:100 X 914mm砂盘直径:152mm工作台尺寸:158 X 225mm工作台倾斜范围:0º -45º电压:220V,50Hz欧师傅线锯床OSF-S10 特点:工作台可调整角度;工作速度可调;安全防护设计电机功率:90W,230V/50Hz主轴转速:400~1600RPM工作台尺寸:380X250mm工作台倾斜范围:-15~45度最大切削高度:50mm;最大切割宽度:406mm锯片尺寸:133 X 2.6 X 0.25mm欧师傅砂轮机OSF-A10 特点:可进行刀具研磨电压:220V频率:50Hz空载转速:2850RPM 电机功率:1/3HP砂轮外径:125mm厚度;16mm孔径:13mm欧师傅台钻OSF-D10 最大钻孔直径:13mm工作台尺寸:160 X 160mm 立柱直径:Φ46mm底座尺寸:314 X 200 mm电机功率:350W,230V/50Hz 空载速度:580~2650RPM调速档位:5 speeds欧师傅带锯OSF-S20 特点:工作台可调整角度线速度:14.5m/s功率:250W最大切削厚度:40mm最大切削宽度:150mm工作台可调角度:0~45度工作台尺寸:240 X 200mm 锯片尺寸:1085 X 3.5mm欧师傅木工车床OSF-L10 特点:操作灵活、简便;带有低压释放的人性化IP54安全开关最大工件加工长度:330mm最大工件加工直径:250mm功率:350W空载转速:500~3500RPM欧师傅小型车床OSF-L20 特点:可以自动走刀;安全保护装置马达转速:150-3000RPM功率:350W最大工件加工长度:250mm床身最大工件回转直径:140mm主轴孔径:11mm主轴锥度;MT1尾架套筒锥度:MT1净重:19kg包装箱尺寸:450 X 370 X 250mm欧师傅小型钻铣床OSF-M10 最大钻孔直径:16mm最大铣削能力(平铣):50mm最大铣削能力(立铣):16mmX轴行程:220mmY轴行程:160mmZ轴行程:210mm主轴锥度;MT2/M10主轴转速:100-3000RPM主轴手动升降行程:175mm工作台尺寸:400 X 120mmT型槽尺寸/长度/数量:10mm/35mm/3 电机功率:500W/ 230V/50Hz净重:60kg包装箱尺寸:510 X 450 X 760mm欧师傅线锯床OSF-S30 特点:安全/强力工作模式切换,特有供风集尘系统,工作台快速装卸,无级调速一体式旋钮,适用多种锯条;安全防护设计电机功率:DC24V 60W,AC 230V/50Hz 主轴转速:500~1650RPM工作台尺寸:220X220mm最大加工高度:60mm;最大加工吼深:240mm锯条尺寸:133 X 2.6 X 0.25mm优耐美锯床UJS-001 特点:特殊安全设计,只锯材料不锯手;直线、曲线任意切割锯条冲程:4mm(不伤手)台面尺寸:90×90mm马达:直流12V,2A;功率:24W转速:12000RPM变压器:输入A.C.220-240V 50-60Hz输出直流12V,12A内附过温自动保护装置。
zbrush的中英文对照表
zbrush的中英文对照表Zbrush基本操作*界面定义:隐藏SHELF:tab键恢复标准/自定界面:最上方,standar/custom优先设置(prferene>interface)iconized:图标显示,不显示文字auto collapes:自动折叠paletteleft/right tray:左右tray只展开一个paletteaccelerated 加速滚动float menu=tab*edit工具的视角调整:转动:右平面转动:shift+右平移:alt+右缩放:1,ALT+右2,放开ALT不松鼠标3,拖动鼠标回到中心:ALT+右,单击空白处*轴向:右,tray中local:所选部分的轴向PTsele:匡选/碰选sPivot:设置轴向,在mesh部分可见时,以可见部分中心为轴向CPivot:还原轴向转动、移动、缩放的轴向:内空白,吸附灰色,平面轴向,无Z轴彩色,环所在的平面彩交,自身单方向外面,Z方向*部分的隐藏和显示:只显示匡选部分:CTROL+Shift+右匡选隐藏匡选部分:1,CTROL+Shift+右2,松键盘,不松鼠标3,继续拖也可以单点一个poly组显示全部:CTROL+Shift+右点空白*曲线编辑:打开曲线:在斜线上单击加点:在线上单击,可拖动去点:把点拖到外面改变点的硬度:拖动点外面的圈局部放大显示单击一个激活的点水平调节:focal shift (焦点调节)噪音:noise滑块曲线可以save load copy paste*draw的设置rbg和material的切换mrgb材质和颜色rgb只有颜色m只有材质zadd加高zub减低zitensitiy z的多少无论2D还是3D,画了一笔后上述设置均可调整按contrl时画的数个笔划可同时调整设置快捷键填充:contrl+f清除画布:contrl+n拾取颜色:alt+左部分遮蔽:ctrl+右放大画布“+”缩小画布“-”缩小笔刷“[ ”放大笔刷“]”反选“CTRL+i”细化“CTRL+D“清除选择“CTRL+SHIFT+A”画笔工具——2d(Tool>modify)*sphere brush:球体笔刷modi/soft colorblend:允许混合颜色*alpha brush:alpha画笔,可使用alpha纹理modi/soft color*simple brush:普通画笔*smudge:涂抹工具,按control键变为普通笔刷modi/ Retain center:混合颜色的程度Retain center:保持中心*Hook Brush:变形线,拉出直线modi/混合颜色分辨率*fiber brush:纤维,毛发modi/D密度G重力G梳毛T紊乱F普通色Back color延缓色S颜色来源R抗锯齿T浓度Shape普通色*snke Hook brush: 蛇形线,拉出一条modi: 分辨率,多边形细分度*Bump Brush: 凹凸,类似于单层画笔,但垂直于表面modi /constant: 移动color bland颜色混合sample size高值时光滑*depth brush:层次笔刷,在法线方向上绘画*singlelaye brush:单层画笔,一笔之中效果不重叠modi/双边*paintbrush:画笔modi/毛刺*cloner:橡皮图章 control 键取样modi/:层模式,着色,保持中心,z偏移*MRGB:抓取器,用于抓图modi/shaded RGB: 材质+基本色Auto Crop:自动去除空画布*Blur模糊*Sharpen Brush锐化*Noise噪波*Hight light高光modi/自动,相反,白色,主要色*Glow发光*intensity强度*shaping enhancer brush着色增强器,增减亮度modi/强度*colorize:彩色化,着色工具modi/最大强度,重复使用时不变暗*saturation Brushi 饱和度*Hueshifter: 色调移动器,微调色调modi/转换比例,alpha转换*Highlight:高光*contrast:对比度*custom filter: 自定义过滤器,变为“立体”modi/强度,自动大小,附加画笔工具--3d*MultiMarkers多重标记工具mody/make polygmesh 制作多边形网格Texture size纹理尺寸,制作多边形时贴图大小Reposition改变位置,重新定位使用方法:1,marker板中打开Texture和Material2,建立多个多边形物体并在每建好一个后,transform板中点m+(标记)3,Ctrl+N4,用MultiMarker在画布上拖,不要碰到标记5,用transform板进行编辑然后转为多边形:1,modi中make poly mesh2,退出编辑器3,Ctrl+N4,用新的3d工具在网格上拖拉,储存工具*Z sphere 工具先绘制出root球,其本身是敞开的在编辑模式中draw出球体在Draw size中改变子球的大小在edit状态下A键预览蒙皮效果z球的编辑:按住SHIFT键建立子球,和上个子球相同大小在draw的情况下,alt+右键删除子球体移动,缩放和转动shift+右 45度约束alt+右“ik式”移动无子级z球可洼入其他网格,!变换z球本身和变换耦合球的效果不同吸引球体:draw时,用alt+右键单击一个末级z球的结合部耦合球,且对称值(intersection x/y/z reslution)为0,这时,末级子球及其结合部变为透明的吸引球体,其远近大小将影响蒙皮形态再用alt+右点结合部,恢复为普通球体和z球有关的tool选项:*disply properties显示Density:耦合球密度color:耦合球的明暗度size:显示关联的大小*Unified skin统一蒙皮Resolution蒙皮分辨率,一般很小的值就够了sdns球体不透明,耦合球体数量smt球体光滑度,0时为方形Auto size自动调整预览窗口,一定要选Make Unified Skin制作蒙皮*Adaptive skin自适应蒙皮Preview预览(A)Density网格密度Ires交叉分辨率,如果值为3,则任何拥有多于3个子球的Z球将被转为高多边形Mbr薄膜Mc子球网格最小化Mp母球网格最小化Make adapitve skin生成Insert local mesh在Z球上插入多边形,将激活的Z球转为其他3D物体Insert comector mesh在耦合球上插入多边形,将耦合球转为其他3D物体*Geometry多边形lower Res转入更低一层Highter Res转入更高一层sDiv层级转换滑块cage细分笼子ssmt细分平滑Dellower删除较低一层Del higher删除较高一层(Reconstruct subdiv surface)重建细分面Divide再次细化一个层smt细化时平滑sym细分平滑的三角面(subdivide Merge Triangle)(Inner Extrude)Refitsuv平滑UVI-grp内部重组o-grp外部重组Edge loop在隐藏的边缘加线crispDisplace AmountDelet HiddenCrease生成硬边Crease crease lvl硬边硬度Un crease清除硬边!局部细分:在ZB中按住CTRL拖动鼠标左键把想要细分的部分用蒙板档住,再按CTRL在画布空白出单击鼠标左键反选,然后细分!*DisplacementDpsubpixDPResAdaptivesmoothuvcreate DispMapIntensityMidmodeApply DisplaysmentProjection Master 投射控制器可将3d物体变为画布的一部分(drop)在2d绘制后拾取为3d物体(pick up)然后清空画布可绘制:Color颜色Shade质感Materal材质Double双面Fade边缘退色Deformation:3d编辑Normalized:按法线方向stroke笔划调控板Dot:R:Direstional:定向,只认第一个方向Replaylast:重复上次Spacing:间距placement variance:飞沫型笔刷的飞溅度color Intensity:颜色变化度Flow Variance:流量Main Repeat count:Secondary Reapeat Count:mouse:*InventoryRecord:纪录笔刷Add:添加入纪录strokes Count:当前纪录的笔刷数Exportlast:输出最后的Export all:输出所有的document调控板Revert Document:Back:用当前色设置背景Border:用当前色设置画布周边颜色Half:一半大小Double:双倍大小Pro:宽高比例crop:调整为新比例resize:恢复大小Store Depth history:存储深度历史Delete Depth history:删除深度历史Transform调控板Draw:绘制Edit:编辑Move:移动scal:缩放Rotate:旋转照相机:快照一个三维物体作为二维图案的一部分m+箭头:标记物体位置m-箭头:取消标记物体位置std:标准笔刷std Dot:点状标准笔刷Inflat:膨胀笔刷InflatDot:点状笔刷Inflat Dot:点状膨胀笔刷aalayer:单层笔刷pinch:压缩笔刷Nudge:推拉涂抹smooth:平滑化Edit curve:笔刷外形spin:平转Quick:快速交互Frame.:网格Dots:(空box图标)点local:局部中心ptsel:匡选/碰选:设置目前显示部分的中心点:清除中心点>x<,>y<,>z<,>m<:对称(R):多个对称半径Radial count:对称轴的数量x/y/z res:新z球转为多边形的密度(可以保证其他地方的线不要太多)*modifiers:xyz:雕刻的有效方向画笔外形*info:移动缩放旋转的数量输入x/y/z component:3个方向的变动量3d copy:3维复制,将画布上的纹理投射到3d物体上s:着色,只用基本色:自动强度Z spinner: 转动物体spinIt:转速!用3d复制投射纹理的方法:1,marker板中打开texture2,导入一个模型3,在texure板中建立一个新纹理4,把物体移动到适当位置5,Transform板中"m+箭头"标记位置6,3dcopy转动平移物体再copy直到投射完毕7,ctrol+nZscript调控板Load:载入Reload:重载Previos:上一个Next:下一个Hide zscript:隐藏播放窗口Show action:高亮显示&Notes:文字注解skip notes:跳过注解skip AudioBeg:开始记录End:结束记录Rec:显示记录Cmd:显示命令Txt:显示文本Run:运行Repeat show actions:重复显示命令次数Reply dely:每一步的停顿Minimal stroke:最小笔划Minimal update:最小更新Export command:输出命令Zplugin调控板Zplugin*Zbrush Help*Misc Utilites*Multi DisplacementGet mesh IngoCreat MissingUdimInitial File IndexMax Map sizeMapsize AdjustDosubpixBorder*Projection Mastr投射控制器,用于将物体在2d和3d之间转换*Web Access网络帮助layer调控板Clear:Fill:填充Creat:Dup:复制<</>>:上/下移动Mrg:向下合并Bake:烘培B blend:烘培混合量FlipH:水平翻转FlipV:W:包裹模式,循环空间,(用来做无缝贴图不错呀)Displace H:水平位移Displace V:垂直位移Display Z:z位移Auto select:自动选择stencil蒙板(编辑区域)调控板创建模板:alpha调控板>make st stencil on:打开模板Invr:反相Interative:相互strech:伸展(视配)Horiz:水平视配Actual:实际大小Vert:垂直视配Wrap Mode:视配它下面的物体外形wrap Resolution:分辨率smooth:光滑度show/hid:显示模板rgb:elevation made:只显示结果Tool调控板clone:make polymesh3d:转为3d网格clone3d:R:重新导入架构*Display Properties:显示方式sh水平平滑bh水平导角sv垂直平滑bv垂直导角Dres笔划分辨率Double双面显示Flip翻转法线*Geometry几何体lower Res转入更低一层Highter Res转入更高一层sDiv层级转换滑块cage细分笼子ssmt细分平滑Dellower删除较低一层Del higher删除较高一层(Reconstruct subdiv surface)重建细分面Divide再次细化一个层smt细化时平滑sym细分平滑的三角面(subdivide Merge Triangle)(Inner Extrude)Refitsuv平滑UVI-grp内部重组o-grp外部重组Edge loop在隐藏的边缘加线crispDisplace AmountDelet HiddenCrease生成硬边Crease crease lvl硬边硬度Un crease清除硬边!局部细分:在ZB中按住CTRL拖动鼠标左键把想要细分的部分用蒙板档住,再按CTRL在画布空白出单击鼠标左键反选,然后细分!*Deformation变换(可用于单一笔划)Unify在预览中统一物体比例为理想大小Mirror镜像Resym对齐offset偏移 Rotate转动size大小 Bend弯曲sbend平滑弯曲 Skew平滑偏斜R Flatten压平 Flatten径向压平S Flatten球状压平 Twist扭曲Taper锥化 Squeeze压缩Noise噪波 smooth平滑inflat膨胀 spherize球化Gravity重力 perspective透视morph变化 optimize优化细分*Masking遮蔽(在中名为SELECTION用于局部的编辑,建立遮蔽区,可用ctrol+右键,可绘制,可匡选)viewmaske:观察遮蔽区域Inverse:反相Clear:清除Mask All:遮蔽全部Row:撤销遮蔽区的行Col:撤销遮蔽区的列Crd:撤销遮蔽区的行和列(网格)Sel:选择,撤销时影响行和列的宽度Skp:跳过,撤销时跳过行和列的宽度Intens:强度,撤销时执行的强度Blend:新的遮蔽和旧的遮蔽的混合Int:应用纹理的强度Hue:应用纹理的色调Sat:应用纹理的饱和度Alp:生成来自当前alpha位图上的遮蔽Creat Alpha:用当前遮蔽区创建alpha位图HidePt:隐藏被遮蔽的部分ShowPt:显示被隐藏的分部*polygroups多边形分组auto groups 自动分组Uv groups 根据uv所在象限分组Group visible将当前可见多边形分为一组*Texture纹理colorize:用所选的颜色填充每个面Grd:混合相邻面之间的颜色Txr>col:纹理>颜色UV>Txr:uv>纹理UV check:UVc:圆柱形uvUVp:平面型uvUVs:圆球形uvUV Title:指定相同的图像到每个面Guv Titles:成组的自动uvAuv Tiles:改变uv贴图,自适应uv平铺,仅用于多边形Auv Radio:自适应评不比率,值大于1时,较大的面得到较大纹理空间Hrepeat:水平重复次数Vrepeat:垂直重复次数Adju:Adjv:(apply uv adjustment)Fix seam (border):合并固定接缝边界,uv接风的最大合并值(Fix Tetur seam):合并固定接缝,uv无接缝*Moph Target变化(相当于maya的blend,在transform调控板中调整moph值)StoreMT:储存当前几何体为变化目标Switch:储存当前几何体为变化目标而还原其为先前目标DeIMT:删除变化目标Creat Diff:根据存储的目标生成不同的网格结构Morph:向目标变化的程度(Morph distanse)!目标变化的使用方法:1,建立或导入一个3维物体2,storeMT存为目标3,进行雕刻4,Creat Diff5,在morph里调整变化度*Unified skin统一蒙皮Resolution蒙皮分辨率,一般很小的值就够了sdns球体不透明,耦合球体数量smt球体光滑度,0时为方形Auto size自动调整预览窗口,一定要选Make Unified Skin制作蒙皮*Adaptive skin自适应蒙皮Preview预览(A)Density网格密度Ires交叉分辨率,如果值为3,则任何拥有多于3个子球的Z球将被转为高多边形Mbr薄膜Mc子球网格最小化Mp母球网格最小化Make adapitve skin生成Insert local mesh在Z球上插入多边形,将激活的Z球转为其他3D物体Insert comector mesh在耦合球上插入多边形,将耦合球转为其他3D物体*Displacement置换贴图(丛zb的雕刻导出为置换贴图)Dpsubpix 像素精确度DPRes 贴图分辨率Adaptive 自动扫描分辨率smoothuv 平滑uvcreate DispMap 生成置换贴图Intensity 置换强度Mid 置换中间量mode 置换模式Apply Displaysment!生成置换贴图的过程:1,在导入3d物体时,在编辑之前就要用Moph Target>StoreMT,存储变化目标2,进行细化和雕刻后(有时需要点击Switch),调整参数,点击smooth uv和create dismap生成alpha,3,将alpha转换为texture并输出*Alpha Bump*Initialize初始化x/y/z size:各个方向的大小H Divide:水平细分V Divide:垂直细分Coverage:覆盖范围Tcurve:曲度Twist:扭曲S Divide:剖面细分L Divide:长度细分Itwist:初始扭曲*Import:Mrg:合并相同空间的点add:添加导入下一个网格Tri2quad:转换一定角度内的三角面为四边面weld:合并一定距离内的点*Export:obj:四边多边形Dxf:三边Qud: 四边Tri:三边Txr: 包括uv坐标Flp:翻转纹理顶底Mrg:合并相同空间的电Grp:成组Scale:缩放Export:导出light调控板单击球体,变为背光load:save:Intensity:强度Intensity curve:强度曲线,竖:边缘,横:强度通用环境光,可贴图Gdm:漫反射Gdi:漫反强度Gsm:镜面反射Gsi:镜反强度GdioGsio:*type灯光类型sun:太阳point:点spot:斑点Glow:发光Radial:镜像*Palcement方位P:局部灯光位置x/y/z Pos:x/y/z位置Radius:半径*shadow阴影shadow:开关Intersity:强度Length:长度zMode:z模式优良效果Blur:模糊Rays:准确性Aperture:孔径,阴影边缘柔化Texture纹理调控板import:emport:clear:Grad:Transparent:width:Height:clone:New:clone:New:Make Alpha:生成alpha纹理remove:cd:清除深度crop and fill:用当前纹理填充画布GradDoc:用当前画布生成纹理render调控板再渲染:ctrol+RCursor:最佳渲染,拖到工作区某处Render:渲染Best:最佳Rreview:预览Fast:快速Flat:普通Fog:雾Shadow:阴影Depth Cue:深度Fiber:SoftZ:Soft rgb:Flatten:压平层,渲染所有的层,无法显示透明3d shading 100:着色度*Antialiasing:抗锯齿Blur:模糊edge:边缘Size:大小Supersample:多次渲染,选最好,值为“次方”*Depth cue:深度模糊Intensity:强度Softness:柔化Depth1/2:近端点/远端点*fog:雾*fast Render:快速渲染*Environment:环境*Adjustments调节是否可调对比度亮度曲线级别Picker拾取器模板(在绘画过程中比划拾取当前位置的信息方式) Active:只拾取当前层other:包括其他层All:所有层Dynamic:动力学,评估一到两个图像来指定数值Selected Orientation:自己选择的方向Once Ori:拾取笔划第一次接触画布时的方向Cont ori:连续拾取笔划所在的画布方向Z:设定的z值once z:一次z值cont z:连续z值once col:一次颜色contcol:连续颜色once Mat:一次材质cont mat:连续材质Marker调控板优先设置>marker>marker Radius(标记半径) Transfer中进行标记on/off:所有标记的开关Reorder Markes:重排,反向产生标记顺序Delete Markes:删除show:显示标记tool:创建工具Draw /psition/Normal/color:允许获取这些信息Draw调控板Draw size:绘制大小Focal shift:边缘模糊Mrgb/Rgb/M:材质+颜色/颜色/材质Rgb/Z Inensity:rgb/z的强度z add/ub/cut:加/减/移走内部Width:笔刷2d宽度Heigh:笔刷2d高度Depth:笔刷3d深度refract-intensity:-Blur:Imbed:嵌入,画笔在表面和物体中心的相对位置Perspective Distortion:透视变形Refract:折射强度Blur:折射模糊*channls通道Infront:近遮蔽Behind:远遮蔽Z Tolerance:z误差Mat overwrite:材质覆盖*笔刷预览窗口:弯箭头:上一步+:观看方向ALPHA调控板可以根据画布上的alpha创建3d地形import:bmp psd jpg pickEP:输出R:MRes:产生创建的3d网格蒙皮的网格分辨率MDep:产生创建的3d网格蒙皮的层次,设置网格平滑度MS:创建的3d网格蒙皮的网格平滑度Dbls:创建的3d网格蒙皮为双面Mske 3D:创建3d网格蒙皮,沿z轴对称,自动指定auv平铺坐标Make Tx:创建一个纹理到tecture调控板Make st:创建并激活蒙板Make modified alpha:Cc:清除颜色Cropandfill:获取alpha并填充GrabDoc:获取文件中的新alphaAlpha Depth Factorcolor调控板swith color:切换颜色Fill 3D object:填充物体Fill layer:填充层SysPalette:系统调色板clear:清除。
57MM步进电机资料说明书(玖洋)

57系列二相步进电机◆步进电机详细信息◆步进电机性能参数注:1. 以上仅为代表性产品,如需其它非代表性产品可以根据客户需求定制。
2.根据客户不同需求可以定制4线,6线,8线步进电机3.两相步进电机基本步距角是1.8°,三相步进电机步距角是1.2°。
◆步进电机安装尺寸(单位:mm)57 FH系列步进电机标准出轴为光轴,直径6.35mm,直径8mm,伸出轴长度21mm。
可按用户要求铣单扁、做双出轴、变更出轴长度;也可按用户要求定制电气参数,例如电流大小;或根据用户使用环境做参数调整,例如供电电压36V 要求低速大力矩;还可按用户提供样品仿制步进电机。
◆步进电机曲线图说明◆步进电机接线图说明注意:◆电机特性数据和技术数据都是在匹配我公司驱动器驱动YBM86的情况下测得,测试电压为DC28V。
◆步进电机力矩测试数据与驱动器型号、参数设置、驱动器供电电压密切相关;同规格步进电机因定转子间隙不同,饶线方式不同,其矩频特性也不同。
◆电机安装前务必用电机前端盖安装止口定位,并注意公差配合,严格保证电机轴与负载轴的同心度,不同心会导致断轴。
◆电机与负载连接时,严禁敲击,电机轴与轴承受敲击后可能影响电机性能,甚至损坏。
◆电机与驱动器连接时,请勿接错相,错相或缺相时电机不能正常运转,可能损伤步进电机驱动器。
◆无电机接线图时,用万用表测量,电机线两两相通,分别接A+A-、B+B-。
无万用表时,挑两根电机线短接,若电机轴旋转阻力增大,则这两根线是一组线圈。
电机旋转初始方向与所需方向相反时,把A+A-两线换位即可57BYGH系列步进电机说明书步距角:0.9/1.8度绝缘电阻:500 V DC 100MΩ绝缘强度:500V AC 1 Minute温升:65K环境温度:-10℃~+55℃绝缘等级:B二相混合式步进电机型号相数电压(V)额定电流(A)电阻(Ω)电感(mH)静转矩(Kg.cm)定位转矩(kg.cm)重量(Kg)机身长(mm)出轴长(mm)接线图57BYGH10143 1.3 2.3 2.2 4.90.30.454521a 57BYGH1022 5.10.75 6.812.550.30.454521b 57BYGH2014120.717.5228.50.70.655521a 57BYGH2022 2.4 1.5 1.6 4.080.70.655521b 57BYGH20345 1.5 3.3 3.68.50.70.655521a 57BYGH2044 2.730.9 1.48.50.70.655521a 57BYGH2052 4.4 1.15 3.8890.70.655521b 57BYGH20644 1.6 2.5 3.58.50.70.655521a 57BYGH207432 1.528.50.70.655521a 57BYGH2082 1.830.6 1.38.50.70.655521b 57BYGH2092 4.5 1.53 5.490.70.655521b 57BYGH3014 3.03 1.0 1.8140.9 1.07621a 57BYGH3024 2.6 2.4 1.1 1.9140.9 1.07621a 57BYGH3034 5.4 1.5 3.6 6.8140.9 1.07621a 57BYGH30447 1.5 4.77.4140.9 1.07621a 57BYGH3062 2.730.9 2.2150.9 1.07621b 57BYGH3084 2.430.8 1.7140.9 1.07621a 57BYGH4014 2.730.9 1.920 1.1 1.59621a型号相数电压(V)额定电流(A)电阻(Ω)电感(mH)静转矩(Kg.cm)定位转矩(kg.cm)重量(Kg)机身长(mm)出轴长(mm)接线图接线说明:步进电机与步进电机驱动器的接法很简单:只要能分清楚电机的A+,A-,B+,B-端就可以了。
美国网件公司介绍

About NETGEAR Inc.
美国网件公司介绍
©Copyright by NETGEAR Inc., Feb 24, 2006
NETGEAR NCPE © 1996-2006 . All rights reserved .
1
“成为以客户满意度至上和领先创新的 成为以客户满意度至上和领先创新的 世界级家庭与企业网络品牌!” 世界级家庭与企业网络品牌
25 IPSec 4 port Gig LAN Firewall
200 IPSec Dual WAN + Gig LAN Rackmount Firewall w/ Trend Micro
Q304
NETGEAR NCPE © 1996-2006 . All rights reserved .
Q404
36% 55% 9%
NETGEAR NCPE © 1996-2006 . All rights reserved .
17
NETGEAR在CES的展位 NETGEAR在CES的展位
NETGEAR NCPE © 1996-2006 . All rights reserved .
18
西南地区某电脑商场 内的一个分销商店面
NETGEAR NCPE © 1996-2006 . All rights reserved .
Identity
20
南京办事处
中国客户服务 中心800电话 中心 电话 (GZ)
广州办事处
物流中心 (香港 香港) 香港
NETGEAR NCPE © 1996-2006 . All rights reserved .
5
NETGEAR 交换机
GSM7352S GSM7328S GSM7328FS
LVR中文资料

Wirewound Resistors, Precision Power, Low Value,Commercial, Military, MIL-PRF-49465 Type RLV , Axial LeadLVRVishay Dale For technical questions, contact: ww2aresistors@Document Number: 30206152Revision: 29-Feb-08FEATURES•Ideal for all types of current sensing applications including switching and linear power supplies,instruments and power amplifiers•Proprietary processing technique produces extremely low resistance values •Excellent load life stability •Low temperature coefficient •Low inductance•Cooler operation for high power to size ratioNotes(1)Resistance is measured 3/8" [9.52 mm] from the body of the resistor, or at 1.183" [30.05 mm], 1.315" [33.40 mm], 1.675" [42.545 mm] or 2.575" [65.405 mm] spacing for the LVR01, LVR03, LVR05 and LVR10 respectively(2)Standard resistance values are 0.01 Ω, 0.015 Ω, 0.02 Ω, 0.025 Ω, 0.03 Ω, 0.033 Ω, 0.04 Ω, 0.05 Ω, 0.051 Ω, 0.06 Ω, 0.068 Ω, 0.07 Ω, 0.08 Ω,0.09 Ω and 0.1 Ω with 1 % tolerance. Other resistance values may be available upon request* Pb containing terminations are not RoHS compliant, exemptions may apply STANDARD ELECTRICAL SPECIFICATIONSGLOBAL MODEL HISTORICAL MODEL MIL-PRF-49465TYPE POWER RATING P 25 °C W RESISTANCE RANGE Ω (1)± 1 %, ± 3 %, ± 5 %, ± 10 %TECHNOLOGYLVR01LVR-1-10.01 - 0.1 (2)Metal Strip LVR03LVR-3-30.005 - 0.2Metal Strip LVR03...26LVR-3-26RLV30 (M4946506)30.01 - 0.2Metal Strip LVR05LVR-5-50.005 - 0.3Metal Strip LVR05...26LVR-5-26RLV31 (M4946507)50.01 - 0.3Metal Strip LVR10LVR-10-100.01 - 0.8Coil Spacewound TECHNICAL SPECIFICATIONSPARAMETERUNIT LVR01LVR03LVR05LVR10Rated Power at + 25 °CW 13510Operating Temperature Range °C - 65 to + 175- 65 to + 275Dielectric Withstanding Voltage V AC 1000100010001000Insulation Resistance Ω10 000 M Ω minimum dryShort Time Overload- 5 x rated power for 5 s 10 x rated power for 5 sTerminal Strength (minimum)lb 5101010Temperature Coefficient ppm/°C See TCR vs. Resistance Value chartMaximum Working Voltage V (P x R )1/2Weight (maximum)g22511GLOBAL PART NUMBER INFORMATIONNew Global Part Numbering: LVR055L000FS73 (preferred part number format)GLOBAL MODELVALUETOLERANCE PACKAGINGSPECIAL LVR01LVR03LVR05LVR10R = Decimal L = m Ω(values < 0.010 Ω)R1500 = 0.15 Ω7L000 = 0.007 ΩD = ± 0.5 %F = ± 1.0 %G = ± 2.0 %H = ± 3.0 %J = ± 5.0 %K = ± 10.0 %E12 = Lead (Pb)-free bulkE03 = Lead (Pb)-free lacer pack (LVR10)E70 = Lead (Pb)-free, tape/reel 1000 pieces (LVR01, 03)E73 = Lead (Pb)-free, tape/reel 500 pieces (Dash Number)(up to 3 digits)From 1 - 999as applicableB12 = Tin/lead bulkL03 = Tin/lead lacer pack (LVR10)S70 = Tin/lead, tape/reel 1000 pieces (LVR01, 03)S73 = Tin/lead, tape/reel 500 piecesHistorical Part Number Example: LVR-50.005 Ω 1 %S73 (will continue to be accepted for tin/lead product only)LVR-50.005 Ω1 %S73HISTORICAL MODELRESISTANCE VALUETOLERANCE CODEPACKAGING V R 055L000F S73LLVRWirewound Resistors, Precision Power, Low Value,Commercial, Military, MIL-PRF-49465 Type RLV, Axial LeadVishay DaleDocument Number: 30206For technical questions, contact: ww2aresistors@Revision: 29-Feb-08153DIMENSIONS in inches [millimeters]Note(1) On some standard reel pack methods, the leads may be trimmed to a shorter length than shownMATERIAL SPECIFICATIONSElement: Self-supporting nickel-chrome alloy (LVR10 also utilizes manganin)Encapsulation: High temperature mold compound Terminals: Tinned copperPart Marking: DALE, model, wattage, value, tolerance,date codeThe improved TCR characteristics of these LVR models from - 55 °C to + 125 °C (reference to + 25 °C) are as follows:MODEL DIMENSIONS in inches [millimeters]A ± 0.010 [0.254]B ± 0.010 [0.254]C± 0.002 [0.051]LVR010.427 [10.85]0.115 [2.92]0.020 [0.508]LVR030.560 [14.22]0.205 [5.21]0.032 [0.813]LVR050.925 [23.50]0.330 [8.38]0.040 [1.02]LVR101.828 [46.43]0.392 [9.96]0.040 [1.02]PERFORMANCETESTCONDITIONS OF TESTTEST LIMITS Thermal Shock - 65 °C to + 125 °C, 5 cycles, 15 min at each extrem± (0.2 % + 0.0005 Ω) ΔR Short Time Overload 5 x rated power (LVR01, 03, 05), 10 x rated power (LVR10) for 5 s ± (0.5 % + 0.0005 Ω) ΔR Low Temperature Storage - 65 °C for 24 h± (0.2 % + 0.0005 Ω) ΔR High T emperature Exposure 250 h at + 275 °C (+ 175 °C for LVR01)± (2.0 % + 0.0005 Ω) ΔR Dielectric Withstanding Voltage 1000 V rms , 1 min± (0.1 % + 0.0005 Ω) ΔR Insulation Resistance MIL-STD-202 Method 302, 100 V1000 M Ω minimum Moisture Resistance MIL-STD-202 Method 106, 100 7b not applicable ± (0.2 % + 0.0005 Ω) ΔR Shock, Specified Pulse MIL-STD-202 Method 213, 100 g's for 6 ms, 10 shocks± (0.1 % + 0.0005 Ω) ΔR Vibration, High Frequency Frequency varied 10 to 2000 Hz, 20 g peak, 2 directions 6 h each ± (0.1 % + 0.0005 Ω) ΔR Load Life 2000 h at rated power, + 25 °C, 1.5 h “ON”, 0.5 h “OFF”± (2.0 % + 0.0005 Ω) ΔRSolderability ANSI J-STD-00295 % coverage Bias Humidity+ 85 °C, 85 % RH, 10 % bias, 1000 h± (1.0 % + 0.0005 Ω) ΔRDocument Number: 91000Revision: 18-Jul-081DisclaimerLegal Disclaimer NoticeVishayAll product specifications and data are subject to change without notice.Vishay Intertechnology, Inc., its affiliates, agents, and employees, and all persons acting on its or their behalf (collectively, “Vishay”), disclaim any and all liability for any errors, inaccuracies or incompleteness contained herein or in any other disclosure relating to any product.Vishay disclaims any and all liability arising out of the use or application of any product described herein or of any information provided herein to the maximum extent permitted by law. The product specifications do not expand or otherwise modify Vishay’s terms and conditions of purchase, including but not limited to the warranty expressed therein, which apply to these products.No license, express or implied, by estoppel or otherwise, to any intellectual property rights is granted by this document or by any conduct of Vishay.The products shown herein are not designed for use in medical, life-saving, or life-sustaining applications unless otherwise expressly indicated. Customers using or selling Vishay products not expressly indicated for use in such applications do so entirely at their own risk and agree to fully indemnify Vishay for any damages arising or resulting from such use or sale. Please contact authorized Vishay personnel to obtain written terms and conditions regarding products designed for such applications.Product names and markings noted herein may be trademarks of their respective owners.元器件交易网。
FS7VS-14A中文资料
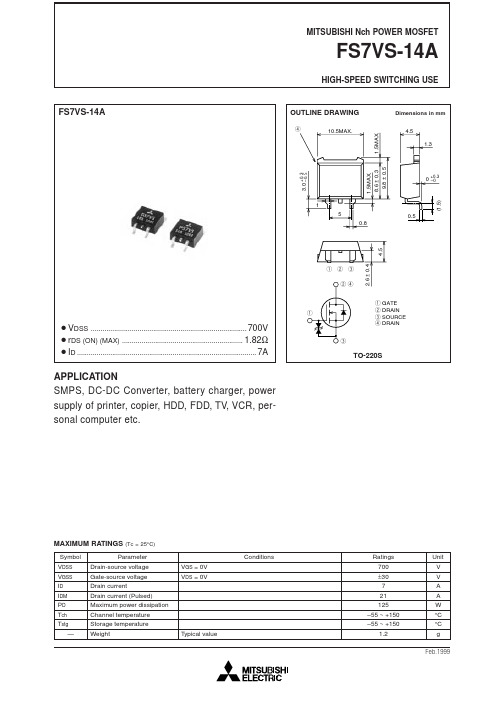
12
6
5V
8
5V
4
4.5V 4V
4
4V
2ห้องสมุดไป่ตู้
0
0
10
20
30
40
50
0
0
4
8
12
16
20
DRAIN-SOURCE VOLTAGE VDS (V)
DRAIN-SOURCE VOLTAGE VDS (V)
Feb.1999
元器件交易网
MITSUBISHI Nch POWER MOSFET
元器件交易网
MITSUBISHI Nch POWER MOSFET
FS7VS-14A
HIGH-SPEED SWITCHING USE
FS7VS-14A
OUTLINE DRAWING
r
Dimensions in mm 4.5 1.3
1.5MAX. 8.6 ± 0.3 9.8 ± 0.5
Ciss Tch = 25°C VDD = 200V VGS = 10V RGEN = RGS = 50Ω
SWITCHING TIME (ns)
103 7 5 3 2 102 7 5 3 2 Tch = 25°C
f = 1MHZ
3 2
td(on)
Coss
102 7 5 3 2 101 10–1 2 3 5 7 100 2 3
MAXIMUM RATINGS
Symbol VDSS VGSS ID IDM PD Tch Tstg —
(Tc = 25°C)
Parameter Drain-source voltage Gate-source voltage Drain current Drain current (Pulsed) Maximum power dissipation Channel temperature Storage temperature Weight VGS = 0V VDS = 0V
翡叶5FS 三相同步伺服电机产品目录

Catalogue of 5FS three-phase synchronous servo motors
公司准则
诚之为本、信之为上、快慰天下、乐在其中
Company guideline
Truth and reliability describe our basic guideline. We are striving to satisfy our customers and to find as much fun as possible in our work.
N :常规同步伺服电机 Normal Synchronous servo motors
D:低速直驱同步伺服电机 Low speed direct-driven Synchronous servo motors
冷却方式: Cooling type
A:自冷却 self-cooling F:强制风冷 air cooling W:水冷 water cooling
2
伺服电机、电缆型号说明 - Servo Motors and Cables Order Key
伺服电机型号说明 - Servo Motors Order Key
5FS X X n n - nnn Xab Xn n - n
同步伺服电机 分类: Type of Synchronous servo motors
高功效和高动态性能 -High efficiency and dynamic performance
高精度的生产设备需要配备具有高动态响应特性的电机,这就要求电机不仅要有较高的额定转速,更要具 有极低的转动惯量。
5FS 电机修长光滑的结构设计,使其成为各种应用的理想选择。同时,常规的风冷装置可方便地安装到电 机上,可大幅提高电机功效。
施耐德空调安装手册 中文

安全提示 ............................................................................ 5 概述 ............................................................................ 5 吊装和搬运的警告 .................................................... 6 安装警告 .................................................................... 6 设计用途 .................................................................... 6 使用警告 .................................................................... 6 使用环境限制 ............................................................ 6 维护期间的安装工作 ................................................ 6
VS7 无缝切换器 用户手册说明书

版权所有©2019 西安诺瓦星云科技股份有限公司。
保留一切权利。
非经本公司书面许可,任何单位和个人不得擅自摘抄、复制本文档内容的部分或全部,并不得以任何形式传播。
商标声明是诺瓦科技的注册商标。
声明欢迎您选用西安诺瓦星云科技股份有限公司(以下简称诺瓦科技)的产品,如果本文档为您了解和使用产品带来帮助和便利,我们深感欣慰。
我们在编写文档时力求精确可靠,随时可能对内容进行修改或变更,恕不另行通知。
如果您在使用中遇到任何问题,或者有好的建议,请按照文档提供的联系方式联系我们。
对您在使用中遇到的问题,我们会尽力给予支持,对您提出的建议,我们衷心感谢并会尽快评估采纳。
目录1产品概述 (1)产品简介 (1)产品特性 (1)2外观说明 (3)前面板 (3)后面板 (4)产品尺寸 (5)3应用场景 (6)4液晶屏菜单操作 (7)操作说明 (7)主界面 (7)屏体配置 (9)4.3.2 输出模式 (9)4.3.3 屏体结构 (9)4.3.4 输出设置 (10)4.3.5 输出接口配置 (10)窗口设置 (11)4.4.1 窗口分屏模板 (11)4.4.2 BKG配置 (11)4.4.3 窗口配置 (12)场景设置 (13)输入设置 (14)画面控制 (14)测试画面 (14)预监选择 (15)高级设置 (16)4.10.1 同步模式 (16)4.10.2 Fn键设置 (16)4.10.3 返回主界面时长 (17)4.10.4 工厂复位 (17)4.10.5 HDCP开关 (17)4.10.6 硬件版本 (17)4.10.7 设备自检 (17)4.10.8 关于我们 (17)通讯设置 (18)语言设置 (19)5 V-CAN控制 (20)6常见问题 (21)7规格参数 (22)1 产品概述产品简介VS7是由诺瓦科技自主研发的集视频处理,画面拼接,特效切换和多画面显示的高性能无缝切换器。
VS7具备强大的视频信号接收和处理能力,支持4K×2K@30Hz视频输入,并最大可同时支持7路输入和5个独立窗口,并由4路DVI拼接输出,单机最大带载可达8KK。
STEP7V55中文版简介5%d6%d0%ce%c4%b0%e6%bc%f2%bd%e9

SIMATIC编程软件件用于SIMATIC S7 / M7 / C7的STEP 7 V5.5编程软安装与使用注意事项该注意事项中包含的信息相对于其它文档来说是最新的。
请仔细阅读,此文本中包含了有关STEP 7 V5.5的安装与使用信息。
对该版本的重要修订以斜体显示,并标有注释“从该版本开始新增的内容”。
请注意,对于A4格式,所要打印文件的左右边距都设置成25 mm。
目录安装注意事项1发货清单2硬件要求3软件要求3.1运行环境3.2需要的存储空间3.3与其它软件产品的兼容性3.3.1Rational ClearCase配置管理工具3.3.2使用其它软件产品时的网络设置3.4在线文档4安装4.1安装STEP 7 V5.54.2升级旧版STEP 74.3STEP 7 V5.5许可证密钥4.4删除STEP 7 V5.54.5安装时的其它注意事项4.5.1使用滚轮鼠标4.5.2使用PC/PG通信卡时的注意事项使用注意事项(版本注释)5新版软件的新特性和所作的修改6组态和操作软件时的注意事项6.1STEP 7如何满足IEC标准6.2常规注意事项6.3使用网络驱动器6.4多用户操作6.5多重项目6.6交换不同版本的STEP 76.7库文件和实例项目6.8SIMATIC管理器6.9使用符号名6.10硬件配置(中央机架)6.11硬件配置(PROFIBUS DP)6.12硬件配置(PROFINET IO)6.13冗余I/O:通道间隔冗余6.14硬件诊断6.15MPI / PROFIBUS网络设置6.16SIMATIC M76.17梯形图、功能块图、语句表和参考数据6.18翻译文本6.19管理多语言文本6.20将S5程序转换成S7程序6.21将TI程序转换成S7程序6.22容错系统6.23使用外文字符集时的注意事项6.24使用SIMATIC Logon的注意事项6.25命令接口6.26TCI –工具调用接口6.27MS Windows 7操作系统的特性7文档注意事项8使用STEP 7中文版时的重要特性安装注意事装注意事项项以前请务本注意事项中包含您在安装STEP 7 V5.5时所需的重要信息,在安装该软件以前以前必详细阅读该注意事项。
API 7K 第5版中文版
7.7质量控制要求...................................................................15
8.2 质量控制人员资格...............................................................16
8.3测试设备.......................................................................16
5设计验证..........................................................................8
5.1总则............................................................................8
7焊接要求.........................................................................15
7.1总则...........................................................................15
9.7 活塞泥浆泵零部件...............................................................31
9.8绞车零部件.....................................................................55
Fiery XF 7 说明书
Fiery XF 7© 2018 Electronics For Imaging, Inc. 此产品的《法律声明》适用于本出版物中的所有信息。
2018 年 12 月 19 日目录Fiery Command WorkStation 概述 (11)Job Center (11)用于管理队列中作业的命令 (12)工具栏图标 (12)作业搜索 (13)Job Editor (14)Server Manager (14)系统维护 (14)配置 Command WorkStation (16)登录到多个 Fiery 服务器 (16)移除 Fiery server (16)添加更多打印机 (16)配置网络打印机 (17)配置通过 USB 连接的打印机 (17)配置打印到文件输出 (18)承印材料和工作流程 (18)配置承印材料 (19)配置工作流程 (19)配置用户帐户 (23)登录到 Command WorkStation (24)注销 Command WorkStation (24)导入作业 (25)直接导入作业到 Job Center (25)在导入时自动处理作业 (26)热文件夹和虚拟打印机 (26)配置热文件夹 (27)配置虚拟打印机 (27)Fiery XF Universal Driver (28)安装 Universal Driver (28)登录到 Universal Driver 并打印 (28)Universal Driver 设定 (29)配置打印机设定 (30)开始打印 (30)取消作业处理 (31)PostScript 和 PDF 作业 (32)切换到不同的 PDF 打印引擎 (32)EPS 作业检测 (33)为 EPS 作业检测设置时间推移或更改输入分辨率 (33)采用 RIP 自动分色 (33)设置 Command WorkStation 如何处理 in-RIP 信息 (34)页面框定义 (34)指定页面框 (35)工作色彩空间 (35)应用工作色彩空间 (35)在合成作业中套印 (36)在合成作业中模拟套印 (36)管理 PDF 作业中的非嵌入字体 (36)将多页 PDF 作业作为单页加载 (36)编辑作业 (38)旋转作业 (38)翻转作业 (38)缩放作业 (38)对齐印张上的作业 (39)裁切作业 (39)撤销作业编辑 (40)将作业设定另存为工作流程 (40)可视辅助工具 (40)更改测量单位 (41)放大 (41)打开对齐 (42)设置标尺坐标 (42)使用参考线 (42)显示可视辅助工具 (42)作业标签 (43)创建或编辑作业标签 (43)打印作业标签 (43)调整作业标签的大小 (44)控制栏 (45)选择控制栏 (45)创建动态楔入 (45)跨两行打印作业标签 (46)嵌入 (47)嵌入所有作业 (47)强制嵌入以打印 (48)嵌入所选作业 (48)添加、移除或删除套叠式作业 (48)克隆套叠式作业 (49)重命名嵌入 (49)排列套叠式作业 (49)在印张上将所有套叠式作业对齐 (49)编辑套叠式作业 (50)缩放套叠式作业 (50)在印张的固定位置锁定套叠式作业 (50)添加套叠式作业周围的边距 (51)打印多页 PDF 的所选页面 (51)平铺 (52)创建平铺 (52)创建具有重叠效果的图素 (53)打印具有粘合区域的图素 (53)调整图素大小 (54)将图素边缘锁定到固定位置 (54)合并或拆分图素 (54)显示和保存平铺预览 (55)拆分图素以进行打印 (55)对平铺作业进行后期编辑 (56)步骤和重复 (57)创建步骤和重复 (57)修改步骤和重复 (58)作业合并 (59)设置自动作业合并的工作流程 (59)手动合并作业 (60)校准和生成特性档工具 (61)启动 Color Tools (61)校准打印机 (61)非 EFI 宽幅打印机的校准过程 (62)EFI 宽幅打印机的校准过程 (68)打印机优化 (75)为承印材料特性档优化进行设定 (76)选择一个 L*a*b* 优化文件。
一汽奔腾FS5A-EL自动变速器维修手册 原厂 175页
维修程序 检查与调整
• 检查与调整分步骤进行。 重要保养规程的操作部 位及内容本手册有详细说明,并配有插图。
ᰒ冫㓈ׂᑣⱘ乎ᑣ
⎆ԧय़ⱘẔᶹ 1. བ᠔冫㒘㺙དSSTDŽ
ᢻ㋻ᡁⶽ 39—49 N·m {4.0—5.0 kgf·m, 29—36 ft·lbf}
49 1232 670A
49 H002 671
一汽轿车销售有限公司对使用 本手册可能引起的任何问题均不 负责任。这些问题的原因包括缺乏与维修相关的培训,使用不正确 的工具,采用比奔腾汽车原装替换零部件质量差的零部件,或者对 本手册的修订不了解,以及其它的原因。 Nhomakorabea 基本信息
00
SECTION
00
T概oc述of .SCT. . . . . . . . . . .00-00
(খ㾕02-14-5Ϟ㒉㞖⧗ᔶ༈ⱘᢚौ䇈ᯢ) 10 㶎↡ 11 Ϟ㒉㞖 12 䰆ᇬ㔽(Ϟ㒉㞖)
ϟ㒉㞖⧗ᔶ༈ˈϞ㒉㞖
⧗ᔶ༈ⱘᢚौ䇈ᯢ ⫼SSTᢚϟ⧗ᔶ༈
49 T028 304 49 T028 305
Ϟ㒉㞖 ϟ㒉㞖
ᰒ冫ϧ⫼㓈ׂᎹ ˄SST˅㓪ো
警告
维修汽车是一项危险的工作。如果没有接受与维修相关的培训, 受伤、财产损失以及无法正确维修的风险就会增加。本维修手册所推 荐的汽车维修程序,是经过一汽专业技术人员精心制定的。本手册对 未经过一汽培训的技术人员是非常有帮助的,但对接受过我们维修培 训的和有经验的技术人员来说,在进行维修操作时所承受的风险会 小很多。但是,本手册的所有使用者都应该掌握最基本的安全防护措 施。
zbrush的中英文对照表
zbrush的中英文对照表Zbrush基本操作*界面定义:隐藏SHELF:tab键恢复标准/自定界面:最上方,standar/custom优先设置(prferene>interface)iconized:图标显示,不显示文字auto collapes:自动折叠paletteleft/right tray:左右tray只展开一个paletteaccelerated 加速滚动float menu=tab*edit工具的视角调整:转动:右平面转动:shift+右平移:alt+右缩放:1,ALT+右2,放开ALT不松鼠标3,拖动鼠标回到中心:ALT+右,单击空白处*轴向:右,tray中local:所选部分的轴向PTsele:匡选/碰选sPivot:设置轴向,在mesh部分可见时,以可见部分中心为轴向CPivot:还原轴向转动、移动、缩放的轴向:内空白,吸附灰色,平面轴向,无Z轴彩色,环所在的平面彩交,自身单方向外面,Z方向*部分的隐藏和显示:只显示匡选部分:CTROL+Shift+右匡选隐藏匡选部分:1,CTROL+Shift+右2,松键盘,不松鼠标3,继续拖也可以单点一个poly组显示全部:CTROL+Shift+右点空白*曲线编辑:打开曲线:在斜线上单击加点:在线上单击,可拖动去点:把点拖到外面改变点的硬度:拖动点外面的圈局部放大显示单击一个激活的点水平调节:focal shift (焦点调节)噪音:noise滑块曲线可以save load copy paste*draw的设置rbg和material的切换mrgb材质和颜色rgb只有颜色m只有材质zadd加高zub减低zitensitiy z的多少无论2D还是3D,画了一笔后上述设置均可调整按contrl时画的数个笔划可同时调整设置快捷键填充:contrl+f清除画布:contrl+n拾取颜色:alt+左部分遮蔽:ctrl+右放大画布“+”缩小画布“-”缩小笔刷“[ ”放大笔刷“]”反选“CTRL+i”细化“CTRL+D“清除选择“CTRL+SHIFT+A”画笔工具——2d(Tool>modify)*sphere brush:球体笔刷modi/soft colorblend:允许混合颜色*alpha brush:alpha画笔,可使用alpha纹理modi/soft color*simple brush:普通画笔*smudge:涂抹工具,按control键变为普通笔刷modi/ Retain center:混合颜色的程度Retain center:保持中心*Hook Brush:变形线,拉出直线modi/混合颜色分辨率*fiber brush:纤维,毛发modi/D密度G重力G梳毛T紊乱F普通色Back color延缓色S颜色来源R抗锯齿T浓度Shape普通色*snke Hook brush: 蛇形线,拉出一条modi: 分辨率,多边形细分度*Bump Brush: 凹凸,类似于单层画笔,但垂直于表面modi /constant: 移动color bland颜色混合sample size高值时光滑*depth brush:层次笔刷,在法线方向上绘画*singlelaye brush:单层画笔,一笔之中效果不重叠modi/双边*paintbrush:画笔modi/毛刺*cloner:橡皮图章 control 键取样modi/:层模式,着色,保持中心,z偏移*MRGB:抓取器,用于抓图modi/shaded RGB: 材质+基本色Auto Crop:自动去除空画布*Blur模糊*Sharpen Brush锐化*Noise噪波*Hight light高光modi/自动,相反,白色,主要色*Glow发光*intensity强度*shaping enhancer brush着色增强器,增减亮度modi/强度*colorize:彩色化,着色工具modi/最大强度,重复使用时不变暗*saturation Brushi 饱和度*Hueshifter: 色调移动器,微调色调modi/转换比例,alpha转换*Highlight:高光*contrast:对比度*custom filter: 自定义过滤器,变为“立体”modi/强度,自动大小,附加画笔工具--3d*MultiMarkers多重标记工具mody/make polygmesh 制作多边形网格Texture size纹理尺寸,制作多边形时贴图大小Reposition改变位置,重新定位使用方法:1,marker板中打开Texture和Material2,建立多个多边形物体并在每建好一个后,transform板中点m+(标记)3,Ctrl+N4,用MultiMarker在画布上拖,不要碰到标记5,用transform板进行编辑然后转为多边形:1,modi中make poly mesh2,退出编辑器3,Ctrl+N4,用新的3d工具在网格上拖拉,储存工具*Z sphere 工具先绘制出root球,其本身是敞开的在编辑模式中draw出球体在Draw size中改变子球的大小在edit状态下A键预览蒙皮效果z球的编辑:按住SHIFT键建立子球,和上个子球相同大小在draw的情况下,alt+右键删除子球体移动,缩放和转动shift+右 45度约束alt+右“ik式”移动无子级z球可洼入其他网格,!变换z球本身和变换耦合球的效果不同吸引球体:draw时,用alt+右键单击一个末级z球的结合部耦合球,且对称值(intersection x/y/z reslution)为0,这时,末级子球及其结合部变为透明的吸引球体,其远近大小将影响蒙皮形态再用alt+右点结合部,恢复为普通球体和z球有关的tool选项:*disply properties显示Density:耦合球密度color:耦合球的明暗度size:显示关联的大小*Unified skin统一蒙皮Resolution蒙皮分辨率,一般很小的值就够了sdns球体不透明,耦合球体数量smt球体光滑度,0时为方形Auto size自动调整预览窗口,一定要选Make Unified Skin制作蒙皮*Adaptive skin自适应蒙皮Preview预览(A)Density网格密度Ires交叉分辨率,如果值为3,则任何拥有多于3个子球的Z球将被转为高多边形Mbr薄膜Mc子球网格最小化Mp母球网格最小化Make adapitve skin生成Insert local mesh在Z球上插入多边形,将激活的Z球转为其他3D物体Insert comector mesh在耦合球上插入多边形,将耦合球转为其他3D物体*Geometry多边形lower Res转入更低一层Highter Res转入更高一层sDiv层级转换滑块cage细分笼子ssmt细分平滑Dellower删除较低一层Del higher删除较高一层(Reconstruct subdiv surface)重建细分面Divide再次细化一个层smt细化时平滑sym细分平滑的三角面(subdivide Merge Triangle)(Inner Extrude)Refitsuv平滑UVI-grp内部重组o-grp外部重组Edge loop在隐藏的边缘加线crispDisplace AmountDelet HiddenCrease生成硬边Crease crease lvl硬边硬度Un crease清除硬边!局部细分:在ZB中按住CTRL拖动鼠标左键把想要细分的部分用蒙板档住,再按CTRL在画布空白出单击鼠标左键反选,然后细分!*DisplacementDpsubpixDPResAdaptivesmoothuvcreate DispMapIntensityMidmodeApply DisplaysmentProjection Master 投射控制器可将3d物体变为画布的一部分(drop)在2d绘制后拾取为3d物体(pick up)然后清空画布可绘制:Color颜色Shade质感Materal材质Double双面Fade边缘退色Deformation:3d编辑Normalized:按法线方向stroke笔划调控板Dot:R:Direstional:定向,只认第一个方向Replaylast:重复上次Spacing:间距placement variance:飞沫型笔刷的飞溅度color Intensity:颜色变化度Flow Variance:流量Main Repeat count:Secondary Reapeat Count:mouse:*InventoryRecord:纪录笔刷Add:添加入纪录strokes Count:当前纪录的笔刷数Exportlast:输出最后的Export all:输出所有的document调控板Revert Document:Back:用当前色设置背景Border:用当前色设置画布周边颜色Half:一半大小Double:双倍大小Pro:宽高比例crop:调整为新比例resize:恢复大小Store Depth history:存储深度历史Delete Depth history:删除深度历史Transform调控板Draw:绘制Edit:编辑Move:移动scal:缩放Rotate:旋转照相机:快照一个三维物体作为二维图案的一部分m+箭头:标记物体位置m-箭头:取消标记物体位置std:标准笔刷std Dot:点状标准笔刷Inflat:膨胀笔刷InflatDot:点状笔刷Inflat Dot:点状膨胀笔刷aalayer:单层笔刷pinch:压缩笔刷Nudge:推拉涂抹smooth:平滑化Edit curve:笔刷外形spin:平转Quick:快速交互Frame.:网格Dots:(空box图标)点local:局部中心ptsel:匡选/碰选:设置目前显示部分的中心点:清除中心点>x<,>y<,>z<,>m<:对称(R):多个对称半径Radial count:对称轴的数量x/y/z res:新z球转为多边形的密度(可以保证其他地方的线不要太多)*modifiers:xyz:雕刻的有效方向画笔外形*info:移动缩放旋转的数量输入x/y/z component:3个方向的变动量3d copy:3维复制,将画布上的纹理投射到3d物体上s:着色,只用基本色:自动强度Z spinner: 转动物体spinIt:转速!用3d复制投射纹理的方法:1,marker板中打开texture2,导入一个模型3,在texure板中建立一个新纹理4,把物体移动到适当位置5,Transform板中"m+箭头"标记位置6,3dcopy转动平移物体再copy直到投射完毕7,ctrol+nZscript调控板Load:载入Reload:重载Previos:上一个Next:下一个Hide zscript:隐藏播放窗口Show action:高亮显示&Notes:文字注解skip notes:跳过注解skip AudioBeg:开始记录End:结束记录Rec:显示记录Cmd:显示命令Txt:显示文本Run:运行Repeat show actions:重复显示命令次数Reply dely:每一步的停顿Minimal stroke:最小笔划Minimal update:最小更新Export command:输出命令Zplugin调控板Zplugin*Zbrush Help*Misc Utilites*Multi DisplacementGet mesh IngoCreat MissingUdimInitial File IndexMax Map sizeMapsize AdjustDosubpixBorder*Projection Mastr投射控制器,用于将物体在2d和3d之间转换*Web Access网络帮助layer调控板Clear:Fill:填充Creat:Dup:复制<</>>:上/下移动Mrg:向下合并Bake:烘培B blend:烘培混合量FlipH:水平翻转FlipV:W:包裹模式,循环空间,(用来做无缝贴图不错呀)Displace H:水平位移Displace V:垂直位移Display Z:z位移Auto select:自动选择stencil蒙板(编辑区域)调控板创建模板:alpha调控板>make ststencil on:打开模板Invr:反相Interative:相互strech:伸展(视配)Horiz:水平视配Actual:实际大小Vert:垂直视配Wrap Mode:视配它下面的物体外形wrap Resolution:分辨率smooth:光滑度show/hid:显示模板rgb:elevation made:只显示结果Tool调控板clone:make polymesh3d:转为3d网格clone3d:R:重新导入架构*Display Properties:显示方式sh水平平滑bh水平导角sv垂直平滑bv垂直导角Dres笔划分辨率Double双面显示Flip翻转法线*Geometry几何体lower Res转入更低一层Highter Res转入更高一层sDiv层级转换滑块cage细分笼子ssmt细分平滑Dellower删除较低一层Del higher删除较高一层(Reconstruct subdiv surface)重建细分面Divide再次细化一个层smt细化时平滑sym细分平滑的三角面(subdivide Merge Triangle)(Inner Extrude)Refitsuv平滑UVI-grp内部重组o-grp外部重组Edge loop在隐藏的边缘加线crispDisplace AmountDelet HiddenCrease生成硬边Crease crease lvl硬边硬度Un crease清除硬边!局部细分:在ZB中按住CTRL拖动鼠标左键把想要细分的部分用蒙板档住,再按CTRL在画布空白出单击鼠标左键反选,然后细分!*Deformation变换(可用于单一笔划)Unify在预览中统一物体比例为理想大小Mirror镜像Resym对齐offset偏移 Rotate转动size大小 Bend弯曲sbend平滑弯曲 Skew平滑偏斜R Flatten压平 Flatten径向压平S Flatten球状压平 Twist扭曲Taper锥化 Squeeze压缩Noise噪波 smooth平滑inflat膨胀 spherize球化Gravity重力 perspective透视morph变化 optimize优化细分*Masking遮蔽(在中名为SELECTION用于局部的编辑,建立遮蔽区,可用ctrol+右键,可绘制,可匡选)viewmaske:观察遮蔽区域Inverse:反相Clear:清除Mask All:遮蔽全部Row:撤销遮蔽区的行Col:撤销遮蔽区的列Crd:撤销遮蔽区的行和列(网格)Sel:选择,撤销时影响行和列的宽度Skp:跳过,撤销时跳过行和列的宽度Intens:强度,撤销时执行的强度Blend:新的遮蔽和旧的遮蔽的混合Int:应用纹理的强度Hue:应用纹理的色调Sat:应用纹理的饱和度Alp:生成来自当前alpha位图上的遮蔽Creat Alpha:用当前遮蔽区创建alpha位图HidePt:隐藏被遮蔽的部分ShowPt:显示被隐藏的分部*polygroups多边形分组auto groups 自动分组Uv groups 根据uv所在象限分组Group visible将当前可见多边形分为一组*Texture纹理colorize:用所选的颜色填充每个面Grd:混合相邻面之间的颜色Txr>col:纹理>颜色UV>Txr:uv>纹理UV check:UVc:圆柱形uvUVp:平面型uvUVs:圆球形uvUV Title:指定相同的图像到每个面Guv Titles:成组的自动uvAuv Tiles:改变uv贴图,自适应uv平铺,仅用于多边形Auv Radio:自适应评不比率,值大于1时,较大的面得到较大纹理空间Hrepeat:水平重复次数Vrepeat:垂直重复次数Adju:Adjv:(apply uv adjustment)Fix seam (border):合并固定接缝边界,uv接风的最大合并值(Fix Tetur seam):合并固定接缝,uv无接缝*Moph Target变化(相当于maya的blend,在transform调控板中调整moph值)StoreMT:储存当前几何体为变化目标Switch:储存当前几何体为变化目标而还原其为先前目标DeIMT:删除变化目标Creat Diff:根据存储的目标生成不同的网格结构Morph:向目标变化的程度(Morph distanse)!目标变化的使用方法:1,建立或导入一个3维物体2,storeMT存为目标3,进行雕刻4,Creat Diff5,在morph里调整变化度*Unified skin统一蒙皮Resolution蒙皮分辨率,一般很小的值就够了sdns球体不透明,耦合球体数量smt球体光滑度,0时为方形Auto size自动调整预览窗口,一定要选Make Unified Skin制作蒙皮*Adaptive skin自适应蒙皮Preview预览(A)Density网格密度Ires交叉分辨率,如果值为3,则任何拥有多于3个子球的Z球将被转为高多边形Mbr薄膜Mc子球网格最小化Mp母球网格最小化Make adapitve skin生成Insert local mesh在Z球上插入多边形,将激活的Z球转为其他3D物体Insert comector mesh在耦合球上插入多边形,将耦合球转为其他3D物体*Displacement置换贴图(丛zb的雕刻导出为置换贴图)Dpsubpix 像素精确度DPRes 贴图分辨率Adaptive 自动扫描分辨率smoothuv 平滑uvcreate DispMap 生成置换贴图Intensity 置换强度Mid 置换中间量mode 置换模式Apply Displaysment!生成置换贴图的过程:1,在导入3d物体时,在编辑之前就要用Moph Target>StoreMT,存储变化目标2,进行细化和雕刻后(有时需要点击Switch),调整参数,点击smooth uv和create dismap生成alpha,3,将alpha转换为texture并输出*Alpha Bump*Initialize初始化x/y/z size:各个方向的大小H Divide:水平细分V Divide:垂直细分Coverage:覆盖范围Tcurve:曲度Twist:扭曲S Divide:剖面细分L Divide:长度细分Itwist:初始扭曲*Import:Mrg:合并相同空间的点add:添加导入下一个网格Tri2quad:转换一定角度内的三角面为四边面weld:合并一定距离内的点*Export:obj:四边多边形Dxf:三边Qud: 四边Tri:三边Txr: 包括uv坐标Flp:翻转纹理顶底Mrg:合并相同空间的电Grp:成组Scale:缩放Export:导出light调控板单击球体,变为背光load:save:Intensity:强度Intensity curve:强度曲线,竖:边缘,横:强度通用环境光,可贴图Gdm:漫反射Gdi:漫反强度Gsm:镜面反射Gsi:镜反强度GdioGsio:*type灯光类型sun:太阳point:点spot:斑点Glow:发光Radial:镜像*Palcement方位P:局部灯光位置x/y/z Pos:x/y/z位置Radius:半径*shadow阴影shadow:开关Intersity:强度Length:长度zMode:z模式优良效果Blur:模糊Rays:准确性Aperture:孔径,阴影边缘柔化Texture纹理调控板import:emport:clear:Grad:Transparent:width:Height:clone:New:clone:New:Make Alpha:生成alpha纹理remove:cd:清除深度crop and fill:用当前纹理填充画布GradDoc:用当前画布生成纹理render调控板再渲染:ctrol+RCursor:最佳渲染,拖到工作区某处Render:渲染Best:最佳Rreview:预览Fast:快速Flat:普通Fog:雾Shadow:阴影Depth Cue:深度Fiber:SoftZ:Soft rgb:Flatten:压平层,渲染所有的层,无法显示透明3d shading 100:着色度*Antialiasing:抗锯齿Blur:模糊edge:边缘Size:大小Supersample:多次渲染,选最好,值为“次方”*Depth cue:深度模糊Intensity:强度Softness:柔化Depth1/2:近端点/远端点*fog:雾*fast Render:快速渲染*Environment:环境*Adjustments调节是否可调对比度亮度曲线级别Picker拾取器模板(在绘画过程中比划拾取当前位置的信息方式) Active:只拾取当前层other:包括其他层All:所有层Dynamic:动力学,评估一到两个图像来指定数值Selected Orientation:自己选择的方向Once Ori:拾取笔划第一次接触画布时的方向Cont ori:连续拾取笔划所在的画布方向Z:设定的z值once z:一次z值cont z:连续z值once col:一次颜色contcol:连续颜色once Mat:一次材质cont mat:连续材质Marker调控板优先设置>marker>marker Radius(标记半径)Transfer中进行标记on/off:所有标记的开关Reorder Markes:重排,反向产生标记顺序Delete Markes:删除show:显示标记tool:创建工具Draw /psition/Normal/color:允许获取这些信息Draw调控板Draw size:绘制大小Focal shift:边缘模糊Mrgb/Rgb/M:材质+颜色/颜色/材质Rgb/Z Inensity:rgb/z的强度z add/ub/cut:加/减/移走内部Width:笔刷2d宽度Heigh:笔刷2d高度Depth:笔刷3d深度refract-intensity:-Blur:Imbed:嵌入,画笔在表面和物体中心的相对位置Perspective Distortion:透视变形Refract:折射强度Blur:折射模糊*channls通道Infront:近遮蔽Behind:远遮蔽Z Tolerance:z误差Mat overwrite:材质覆盖*笔刷预览窗口:弯箭头:上一步+:观看方向ALPHA调控板可以根据画布上的alpha创建3d地形import:bmp psd jpg pickEP:输出R:MRes:产生创建的3d网格蒙皮的网格分辨率MDep:产生创建的3d网格蒙皮的层次,设置网格平滑度MS:创建的3d网格蒙皮的网格平滑度Dbls:创建的3d网格蒙皮为双面Mske 3D:创建3d网格蒙皮,沿z轴对称,自动指定auv平铺坐标Make Tx:创建一个纹理到tecture调控板Make st:创建并激活蒙板Make modified alpha:Cc:清除颜色Cropandfill:获取alpha并填充GrabDoc:获取文件中的新alphaAlpha Depth Factorcolor调控板swith color:切换颜色Fill 3D object:填充物体Fill layer:填充层SysPalette:系统调色板clear:清除。
F-35 Lightning Flight Controller User Manual
F-35 LIGHTNINGFLIGHT CONTROLLERUSER MANUAL VERSION 1.5ContentsManual user log (3)Introduction (4)Features (4)Pinouts (5)Dimensions (5)Connections (6)Connection with ESCs and Servos: (6)1.Flying Wing: (6)2.Airplane: (6)Connection With Receivers: (9)I.TBS Receiver (9)1. TBS Crossfire Micro Rx V2 (Plug and play with Micro Rx Cable) (9)2. TBS Crossfire Micro Rx V2 (Plug and Play with Micro Rx and TBS-Ext Cable forWireless Connection) (9)3. TBS Crossfire Diversity Rx Only Use CRSF Protocol (10)4. TBS Crossfire Diversity Rx Use PPM + Serial TX-RX (11)II.FrSky Receiver (12)1.XSR (Plug and Play with F-RX Cable) (12)2.R-XSR (12)3.R9 (13)4.R9 Slim (13)5.L9R (14)6.SPD15 (14)7.XM+ (15)III.Futaba Receiver (15)IV.DJI Ocussync Air Unit (16)V.Spektrum Receiver (16)VI.Dragon Link Micro UHF Receiver (17)Connection with VTX: (19)1. Using with Stealth Long Range VTX (Plug and Play with VTX Cable) (19)ing with Tramp HV (20)ing with TBS Unify Pro 5G8 HV: (20)ing with TBS Unify 2G4: (21)Connection with Furious AirSpeed Sensor (21)Connection with Furious FPV GPS Module (Plug and Play with GPS Cable) (22)Connection with RadioLink M8N GPS (23)Connection with Camera (Plug and Play with CAM Cable) (24)1. RunCam Eagle 2 (24)2. RunCam Swift 2 (24)3. RunCam Split 2 (25)4. Foxeer Arrow Mini (25)How To Set Up Wing With INAV Configurator (26)How To Calibrate Sensor (27)How To Connect INAV Wireless To F-35 Via TBS Crossfire TX (29)How To Connect Smartphone To F-35 Lightning FC Via FuriousFPV Bluetooth Module (31)How To Setup Failsafe (33)How To Use NAV LAUNCH (Auto Take Off) Function (34)INAV MODE (35)How to assembly silicone for airspeed sensor (36)Video Guide (36)Frequently Asked Questions (37)Manual user logV1.5:Update configure with DJI OcuSync Air Unit*Please note: In this manual, BLUE Texts have hyperlinks to check out guideline.IntroductionFurious FPV F-35 Lightning FC - Elevate Your Horizons.Step into the all new F-35 Lightning FC - Furious FPV's 1st dedicated wing flight controller, ready and waiting to open all new worlds to winged FPV.Encompassed by a robust aluminum case for maximum levels of protection and strength, the F-35 FC offers the ultimate levels of FPV capability that is dedicated & purpose built for the demands and capabilities of FPV winged flight.Ultra easy to install with a massively powerful MCU STM F4 micro controller, the F-35 Lightning FC supports a full (6) UART's for GPS, VTX Control, S.PORT Telemetry, Crossfire RX, RX, Bluetooth functionality. With these systems in play, the F-35 offers worlds of capability & performance for maximum levels of FPV flight.Integrating a built in 5V@3A BEC, buzzer port, anti-vibration silicone dampeners and battery monitor with current sensor, the F-35 Lightning FC packs a massive punch in an ultra-compact form. Pair this with a built in Barometer & OSD system, the F-35 FC is the game changing flight controller that is ready for anything and everything a pilot could possibly desire.Take your winged FPV flight to new worlds and beyond with the Furious FPV F-35 Lightning FC - the ultimate winged FPV flight control system.Features∙Flight Controller 6DOF + 3DOF MAG∙MCU STM F4 high performance∙Built-in OSD∙Support up to 6 UARTs (GPS, VTX Control, S.PORT Telemetry,Crossfire RX, RX, Bluetooth)∙Built-in Driver Inverter for SBUS and S.PORT connections∙Built-in Battery Voltage and Current monitor∙Camera and VTX port built-in Peripheral pass∙Built-in 5V@3A BEC for small Digital servos, can be easily changed to External BEC for bigger Servos∙Built-in Buzzer port∙High quality silicone wires with optimized lengths are included∙Support INAV firmware∙Vertical USB and ports => easy to install∙Pro version has GPS module, AirSpeed Sensor, Buzzer and Bluetooth Module∙Weight: 34g∙Voltage Range: 2S-6S LiPoPinoutsDimensionsConnectionsConnection with ESCs and Servos: 1.Flying Wing:-Location ESC: 1, 2-Location Servos: 3, 4Ex: Reptile S800 Sky Shadow Flying Wing2.Airplane:-Location ESC: 1, 2-Location Servos: 3, 4, 5, 6Ex1: Volantex RangerEx2: Twin DreamOpen INAV Configurator Go to CLI tab and paste this strings as the picture above. Then, hit Enter:# mixermixer CUSTOMAIRPLANEmmix resetmmix 0 1.000 0.000 0.000 0.300 #Left motormmix 1 1.000 0.000 0.000 -0.300 #Right motor# servo mixsmix resetsmix 0 3 0 100 0 #servo 3 takes Stabilised ROLL (PWM 4)smix 1 4 0 100 0 #servo 4 takes Stabilised ROLL (PWM 5)smix 2 5 2 100 0 #servo 5 takes Stabilised YAW (PWM 6)smix 3 2 1 100 0 #servo 2 takes Stabilised PITCH (PWM 3)saveEx 3: V-TailOpen INAV Configurator Go to CLI tab and paste this strings. Then, hit Ente r: # mixermixer CUSTOMAIRPLANEmmix resetmmix 0 1.0 0.0 0.0 0.0 # motorsmix resetsmix 0 2 0 -100 0 # servo 2 takes Stabilised ROLLsmix 1 3 0 -100 0 # servo 3 takes Stabilised ROLLsmix 2 4 1 100 0 # servo 4 takes Stabilised PITCHsmix 3 5 1 -100 0 # servo 5 takes Stabilised -PITCHsmix 4 4 2 -100 0 # servo 4 takes Stabilised YAWsmix 5 5 2 -100 0 # servo 5 takes Stabilised YAWsmix 6 6 8 -100 0 # servo 6 takes RC AUX 1 (camera yaw)smix 7 7 9 -100 0 # servo 7 takes RC AUX 2 (drop bomb)saveConnection With Receivers:*Warning: Only support power is 5V for receiverI.TBS Receiver1.TBS Crossfire Micro Rx V2 (Plug and play with Micro Rx Cable)2.TBS Crossfire Micro Rx V2 (Plug and Play with Micro Rx and TBS-Ext Cablefor Wireless Connection)Video: Wireless connection to INAV via TBS Crossfire Tx + TBS Micro Rx V23.TBS Crossfire Diversity Rx Only Use CRSF Protocol4.TBS Crossfire Diversity Rx Use PPM + Serial TX-RX*Note:To using PPM, you need to open INAV Configurator Go to Configuration tab and drag to Receiver Mode. Then, select PPM RX input as the picture belowII.FrSky Receiver1.XSR (Plug and Play with F-RX Cable)2.R-XSR4.R9 Slim6.SPD15III.Futaba ReceiverIV.DJI Ocussync Air UnitV.Spektrum ReceiverVI.Dragon Link Micro UHF ReceiverOpen INAV Configurator Go to Configuration tab and drag to Receiver Mode. Then, select like as the picture below*Note:With Dragon Link V2 Rx, please use the Dragon Link GUI software to configure CH7 port from PPM (default) to SBUSDownload software:DragonLink GUIConnection with VTX:ing with Stealth Long Range VTX (Plug and Play with VTX Cable)ing with Tramp HV*Note: If using our VTX Cable, please swap wires the same as pin outs of this VTX ing with TBS Unify Pro 5G8 HV:ing with TBS Unify 2G4:Connection with Furious AirSpeed Sensor Check out How to assembly silicone tube for Airspeed sensorConnection with Furious FPV GPS Module (Plug and Play with GPS Cable)*Warning:For the first time set up and whenever you change your location. You need to leave the Wing or Airplane on the field for approximately 5 minutes so that the GPS is updatedOpen INAV Configurator →Click Configuration tab → Drag to GPS and configure as the picture below:Connection with RadioLink M8N GPSOpen INAV Configurator →Click Configuration tab → Drag to GPS and configure as the picture below:Connection with Camera (Plug and Play with CAM Cable)1.RunCam Eagle 22.RunCam Swift 23.RunCam Split 24.Foxeer Arrow MiniHow To Set Up Wing With INAV ConfiguratorStep1:Calibrate Sensor(Click double to go to How to calibrate Sensor page)INAV requires you to follow the accelerometer calibration steps. These steps are different to Cleanflight & Betaflight. So don't skip reading this section, it's vitally important. But we have wireless so you should do this in the final step.Step2:Set up “Ports” tabIf use TBS Crossfire Micro receiver, you don’t need to change anything. Because we have ready configuredIf use XSR receiver, Please turn on Serial Rx of UART3 to use Receiver Mode Step3:Set up “Configuratios” tabIf use TBS Crossfire Micro receiver,you don’t need to change anything. Because we have ready configuredIf use XSR receiver, drag to Receiver Mode and select SBUS in the Serial Receiver ProviderChange model: There are two models that you can choose: Airplane and Flying WingStep4:Configure “Receiver” tabCheck range and value: Your transmitter should use NO mixing at all (so separate channels for Thr, Ail, Rud, Ele).Check that when moving the sticks, the rightchannels moves in the receiver window. Also, everything should be centered at 1500us, and full stick movement should be 1000-2000us. Use sub trim and travel range on your TX to set this up.Check Channel Map: Please set correctly channel map with the channel on your transmitterStep5:Set up “Servos” tab-If reverse Servo, change "Direction and rate" from +100 to -100-If Servo exceed maximum wanted deflection reduce min/max-If control surfaces are not perfectly centered adjust servo midpoint. (This is after setting them up as close as possible mechanically)*Note:In the Servos tab servos are counted from 0-7 while in the Motors tab they run from 1-8.Step6: Set up Mode(click MODE to check mode’s description table)1.Select Mode tab2.Drag to mode that you want to use. Then, click Add Range and select CHchannel for switch that you want to use this modeStep7:Set FailsafeHow To Calibrate SensorAfter building new an Airplane, you must calibrate Magnetometer and Accelerometer sensor. With F-35 Lightning FC, we don't need to plug USB cable that can use wireless connection with FuriousFPV Bluetooth Module or TBS Crossfire TX. Step 1: Connect F-35 Lightning FC with INAV configuratorStep 2: At Setup tab1.Calibrate Accelerometer: Please click Calibrate Accelerometer to calibrate 6points Accelerometer sensor like the below pictures:pass Calibrate:Please click Calibrate Magnetometer then You have 30seconds to hold the copter in the air and rotate it so that each side (front, back, left, right, top and bottom) points down towards the earth.3.Board Orientation: If you have your board rotated in any way, change boardalignment to match- please check the below pictures:(1) (2)(3) (4)How To Connect INAV Wireless To F-35 Via TBS Crossfire TXThe Device:-TBS Micro RX V2 + TBS Crossfire TX-Micro RX cable for F-35 + TBS-External Cable for F-35 (Include in the package)-App: INAV Configurator on PC, EZ-Gui on Android.-Video: Wireless connection to INAV via TBS Crossfire Tx + TBS Micro Rx V2Step 1: Using TBS-Ext cable plug to Micro RX cable like bellow picture:Step 2: Mapping Output channels for TBS Micro RX.-Output 1: CRSF TX-Output 2: CRSF RX-Output 3: Serial RX-Output 4: Serial TXStep 3: Configure your TBS Crossfire Module.Please select Bluetooth protocol of TBS TX module is BRIDGE.*Note: Verify that you turn on Telemetry on ReceiverStep 4: Connect your device to use Configurator app.Option1: Connect with PC:e Bluetooth on PC search and add your TBS Module Bluetooth. NormallyTBS have name is Crossfire#### (# is number).2.Open INAV Configurator on PC, then check new number using toconnect TBS Crossfire TX and select it. (You can check it in Device Manager).And select Baud rate is 57600.3.Turn on WIRELESS mode of INAV at the Right-Top interface of app. Then, clickConnect button to connect.Now you can do anything with a wireless connection same when you connect with USB cable.Option2: Connect with EZ-Gui on Android app:1.Download and install app at here: DOWNLOAD2.Turn On Bluetooth on your mobile3.Open EZ Gui:Click icon 3 Vertical dots the Top-Right screen and click Settings to go to page setting and configure for Connections. At here, we will selectconnection is Bluetooth then click SELECT BT DEVICE to search you TBSCrossfire module and select it when detected your module.-Click next icon and select Firmware is Cleanflight/Betaflight/INAV.-Click next and select option same as units or another options. After app will come back home screen.4.At Home Screen, please click CONNECTS to connect your app to FC.How To Connect Smartphone To F-35 Lightning FC Via FuriousFPV Bluetooth ModuleThe Device:-FuriousFPV Bluetooth Module-App: INAV Configurator on PC, EZ-Gui on Android.-Video: Calibrate sensor with wireless connection Via Bluetooth moduleStep 1: Plug FuriousFPV module into F-35 Lightning FC. Then, go into Ports tab on the INAV Configurator and configure as the pictures below:Step 2: Connect with EZ-Gui on Android app1.Download and install app at here: DOWNLOAD2.Turn On Bluetooth on your mobile3.Open EZ Gui:Click icon 3 Vertical dots the Top-Right screen and click Settings to go to page setting and configure for Connections. At here, we will selectconnection is Bluetooth then click SELECT BT DEVICE to search you TBS Crossfire module and select it when detected your module.-Click next icon and select Firmware is Cleanflight/Betaflight/INAV.-Click next and select option same as units or another options. After app will come back home screen.4.At Home Screen, please click CONNECT to connect your app to FC. How To Setup FailsafeSetting up Return Home for Failsafe to purpose: when Wing lost signal with Transmitter, Wing will auto return home afterwardStep 1: Configure ReceiverThere are two options to configure:Option 1: Cut off the channelOption 2: Set Position1.Go into Modes tab and select a switch for Failsafe2.Set Switches and Sticks on your transmitter to the following below-Throttle: 0% (No throttle)-Aileron: 50% (No input, Stick center)-Rudder: 50% (No input, Stick center)-Elevator: 50% (No input, Stick center)-Failsafe mode: activated-Arm switch: Disarmed (If you use stick arming you can skip this)Step 2: Configure INAV Configurator1.Open INAV Configurator and go into Failsafe tab2.Enable RTH on the setting stageHow To Use NAV LAUNCH (Auto Take Off) Function Video: How to use NAV LAUNCH (Auto Take off) with F-35 Lightning FCStep1: Open “INAV Configurator”→Select “Mode” tab → drag to NAV LAUNCH function, click Add Range and select CH channel for switch that you want to use this modeStep2: Set switch to NAV LAUNCH mode prior to arming (note that it won't actually enable until arming)Step3: ARM the plane. Motor should start spinning at min_throttle (if MOTOR_STOP is active, motor won't spin)*Note:-NAV LAUNCH is automatically aborted after 5 seconds or by any pilot touch on PITCH/ROLL stick-Verify that motor don't respond to throttle stick motionStep4: Put throttle stick to desired throttle value to be set after launch is finished. Step5: Throw the airplane.*Note:It must be thrown leveled or thrown by slinging it by wingtipStep6: Launch sequence will finish when pilot switch off the NAV LAUNCH mode or move the sticksHow to assembly silicone for airspeed sensorVideo GuideVideo 1: Wireless connection to INAV via TBS Crossfire Tx + TBS Micro Rx V2 Video 2: Calibrate sensor with wireless connection Via Bluetooth module Video 3: How to use NAV LAUNCH (Auto Take off) with F-35 Lightning FC Video 4: How to flash firmware and calibrate AcceloremeterVideo 5: Calibrations sensor and active Compass Calibrate button on INAV 1.9 Video 6: Setup TBS Nano RX and set RSSI to F-35 LightningFrequently Asked QuestionsQ: Why don’t the Hardware Health work?A: In the (P1) picture, the Hardware Health is not working. The reason is that you don’t plug GPS module or don’t power on the FC. To solve this issue, you need to plug GPS module and verify that plugged battery for FC. Then, this function will work afterward as the (P2) picture.(P1)(P2)Q: Cannot Calibrate Acceloremeter or the Pitch and Roll values are not correctA: Please flash latest firmware and setup as the manualQ: How can I switch from External BEC to Internal BEC?A: Open your plastic case and refer the picture below Array Q: Is there a way to directly connect and configure LED Strips on the F-35 Lightning?A: F-35 Lightning don’t support LED StripsThanks for using our product。
光纤激光切割原理

光纤激光切割原理7轴联动工业机器人光纤激光切割机与五轴机床CO2激光切割机对比三维切割系统的技术优势:1.因为采用了业内最高精度的史陶比尔机械手,本体较轻,切割速度快,在小弧度的精细切割和大边的高速切割方面具有明显优势,实际切割速度可以达到18米/分钟而无抖动,综合加工效率是其他品牌机械手组合的两倍,性价比高,还可以节约一组的耗材和人工,后期可以少追加设备也能满足产能要求。
还可24小时持续工作。
一次性投入相对较少,在一个很短的折旧期内(两班8小时工作制),史陶比尔机器人激光解决方案就可回收投资。
同时能耗少,体积小,维护需求低。
2.切割精度高。
采用史陶比尔专利齿轮减速系统JCS和JCM,独一无二的驱动技术,确保了无可匹敌的轨迹控制精度和速度。
即使是要求极高的小圆,或复杂立体几.何图形的加工,也可精确和快速完成,从而提升您的产品品质。
系统重复定位精度高达±0.05M,完全可以满足钣金件行业的精度需求。
可切割直径小至2MM的小圆,切割效果圆滑美观,目测无形变和毛刺。
3.切割幅面大,实际死角小。
选配臂长2.01米的机械手,除了实现直径达3米的半球形三维加工区域外,还可实现较大的二维平面切割,配合我公司配套生产的可移动工作台2.5mX5m(2m 的运动行程),可实现2mX5m的二维平面切割。
4. 根据实际需要选配离线编程软件,可读取UG,SOLIDWORK等三维作图软件导出的vda,igs,x_t,sldprt,prt,stp,ipt,par等格式的数模,修改后直接生成切割轨迹,代替人工示教,简单易用。
5. 工业控制理念,模块化设计,全系统的防护等级为IP55,机械手防护等级更是高达IP65,系统集成度高,故障少,抗冲击振动,抗灰尘,无须光学调整或维护,真正适合于工业加工领域的应用用于恶劣的激光环境。
结构坚固,动态性更佳。
而其他同类产品为简单集成,设备的稳定性较差。
6.系统的工艺性和易用性较好。
57步进电机低频共振转速范围
57步进电机低频共振转速范围57步进电机低频共振转速范围步进电机(Stepper Motor)是一种电磁驱动设备,通过控制电流方向和大小,使得电机旋转固定角度,常用于需要精确定位和控制的设备中。
而低频共振转速范围则是指步进电机在特定频率范围内能够实现较高效率和较低振动的旋转速度。
低频共振转速范围通常与步进电机的结构和特性有关。
下面将对57步进电机的低频共振转速范围进行详细介绍。
57步进电机,指的是步进电机的外形尺寸,直径为57mm。
它常用于需要较大扭矩和较高精度的应用中,如纺织机械、印刷机械、医疗设备等。
由于其结构和特性不同于其他类型的步进电机,其低频共振转速范围也具有一定独特性。
低频共振转速范围通常与步进电机的结构和电机驱动器相关。
57步进电机通常采用双半桥驱动方式,通过交流驱动方式控制电流的方向和大小。
在低频共振范围内,电机可以实现较高效率和较低振动,提供较稳定的运行状态。
对于57步进电机,其低频共振转速范围一般在100-800rpm之间,具体取决于电机的结构和特性以及外部驱动器的控制方式。
其中,低频共振转速范围与电机的谐振频率相关。
当电机的谐振频率与驱动器的输出频率接近时,电机会出现共振现象,容易引发振动和噪音,甚至导致失步。
因此,低频共振转速范围的确定对于步进电机的性能和使用寿命至关重要。
为了降低低频共振的影响,减少振动和噪音,提高步进电机的性能和稳定性,可以采用以下措施:1.选用优质的驱动器和控制系统,能够提供精确的电流和脉冲控制,减小共振频率的影响。
2.采用降低衰减率的方法,通过适当调整驱动器输出频率,使其与电机的谐振频率有所偏离,降低共振的发生。
3.在电机轴上增加盘形负载,增加负载的惯性矩,减缓转速的变化,降低共振的影响。
4.采用减振器或减振支撑结构,通过吸收和分散振动能量,减小振动和噪音的传播。
5.在设计和制造过程中,考虑电机的结构和材料对共振转速范围的影响,尽量避免共振频率与工作频率的接近。
i5车床系统编程手册

车床系统编程手册NC编程基础 1 准备功能19 刀具补偿45 变量51 固定循环53 附录97法律资讯警告提示为了您的人身安全以及避免财产损失,本手册使用了下述符号,标注了安全符号的语句,所叙述的都是重要内容。
表示如果在使用中发生错误时会导致危险,将会导致死亡或者严重的人身伤害。
表示如果在使用中发生错误时会导致危险,可能导致死亡或者严重的人身伤害。
注意表示如果不注意相应的提示,可能会出现不希望的结果或状态。
合格的专业人员本文件所描述的产品/系统只允许由符合各项工作要求的合格人员进行操作。
其操作必须遵照本手册和机床厂商提供的文件的各项规定,尤其要遵守其中的安全及警告提示。
合格人员必须具备相关培训和操作经验,以便及时察觉本产品/系统的风险,并避免可能的危险。
产品说明该数控系统只允许在相关技术文件中规定的情况下使用。
如果要应用于其它情况,必须得到数控系统厂家允许。
在本产品的使用过程中,必须保证正确的运输、储存、组装、装配、安装、调试、操作和维护,否则系统可能运行不正常。
必须保证系统在允许的环境条件下工作,并注意相关文件中的安全提示。
责任免除我们已对手册中所述内容与硬件和软件的一致性作过严格检查,然而并不排除存在偏差的可能性,因此我们不保证印刷品中所述内容与硬件和软件完全一致。
前言文献类别相关文献分为2个类别:●用户文献●制造商/维修文献目标使用人群适合于安装有本车床系统的机床操作者使用。
目的本手册可以使用户熟悉车床系统的编程指令。
标准功能在本手册中描述了车床系统的标准功能,不包含全部类型产品和所有详细信息,也无法考虑到产品在安装、运行和维护中可能出现的各种情况。
对于机床制造商增添或者更改的功能,由机床制造商提供资料进行说明。
倘若用户使用本产品执行本文献中未描述的某些功能,我们对此不负任何责任,也不会提供相关的维修服务。
目录1 NC编程基础 (1)1.1坐标系定义 (1)1.2NC程序的结构和内容名称规定 (2)1.2.1 程序名称 (2)1.2.2 程序段和结构 (2)1.2.3 字结构及地址 (3)1.2.4 运算/计算功能 (4)1.2.5 比较运算符和逻辑运算符 (5)1.2.6 信息编程 (5)1.2.7 程序字体颜色 (5)1.3 子程序 (6)1.3.1 子程序的分类和定义 (6)1.3.2 子程序调用 (6)1.3.3 程序嵌套深度 (7)1.3.4 子程序参数传递 (8)1.4 程序跳转 (8)1.4.1 绝对跳转 (9)1.4.2 有条件跳转 (9)1.5 变量定义 (10)1.5.1 定义格式和变量类型 (10)1.5.2 数组定义 (10)1.6 程序结构 (12)1.6.1 CASE语句 (12)1.6.2 IF语句 (12)1.6.3 WHILE语句 (13)1.7 指令表 (13)1.8 G功能分组 (17)1.9 M功能分组 (18)2 准备功能 (19)2.1 绝对/增量G90/G91 (19)目录2.2 英制/公制G70/G71 (19)2.3 半径/直径DIAMOF/DIAMON (20)2.4 零点偏置G53, G54~G59, G500, G501 (21)2.5 可编程的工作区域限制G25,G26,WALIMON,WALIMOF (23)2.6 坐标平面G17/G18/G19 (24)2.7 坐标轴运动 (25)2.7.1 快速定位G00 (25)2.7.2 直线插补G01 (25)2.7.3 圆弧插补G02/G03 (27)2.7.4 恒螺距螺纹切削G33 (31)2.7.5 返回固定点G75 (34)2.7.6 回参考点G74 (34)2.7.7 倒圆/倒角CHF/CHR/RND (34)2.8 进给率G94,G95,G96,G97 (41)2.9 准确定位/连续路径加工G09/G60/G64 (43)2.10 暂停G04 (44)3 刀具补偿 (45)3.1 刀具T (45)3.2 刀具补偿号D (45)3.3 刀具偏置表 (46)3.4 刀具半径补偿G40/G41/G42 (48)3.4.1 刀具半径补偿步骤 (48)3.4.2 指令格式 (48)3.4.3 干涉检查 (50)4 变量 (51)4.1 R参数 (51)4.2 系统变量 (51)5 固定循环 (53)5.1 固定循环汇总表 (53)5.2 钻、镗削循环 (54)5.2.1 中心钻钻削CYCLE81 (54)目录5.2.2 锪平面钻削CYCLE82 (55)5.2.3 深孔钻削CYCLE83 (57)5.2.4 刚性攻丝CYCLE84 (59)5.2.5 铰孔1(镗孔1)CYCLE85 (61)5.2.6 镗孔(镗孔2)CYCLE86 (63)5.2.7 停止1钻孔(镗孔3)CYCLE87 (65)5.2.8 停止2钻孔(镗孔4)CYCLE88 (67)5.2.9 铰孔2(镗孔5)CYCLE89 (68)5.3 车削循环 (70)5.3.1 凹槽CYCLE93 (70)5.3.2 退刀槽CYCLE94 (76)5.3.3 毛坯切削CYCLE95 (79)5.3.4 螺纹退刀槽CYCLE96 (88)5.3.5 螺纹切削CYCLE97 (90)附录 (97)1 NC编程基础1.1 坐标系定义机床中使用右手笛卡尔直角坐标系,如图1.1。
手册Fanuc的铣削应用光盘
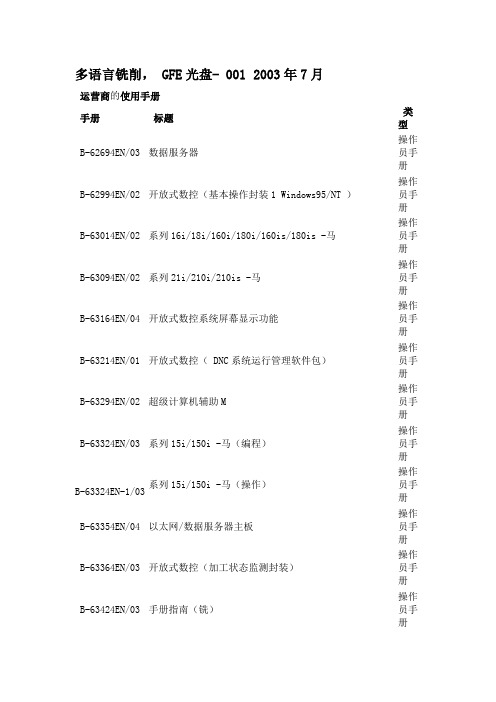
多语言铣削, GFE 光盘- 001 2003年7月运营商的使用手册 手册标题类型 B-62694EN/03 数据服务器操作员手册 B-62994EN/02 开放式数控(基本操作封装1 Windows95/NT )操作员手册 B-63014EN/02 系列16i/18i/160i/180i/160is/180is -马操作员手册 B-63094EN/02 系列21i/210i/210is -马操作员手册 B-63164EN/04 开放式数控系统屏幕显示功能操作员手册 B-63214EN/01 开放式数控( DNC 系统运行管理软件包)操作员手册 B-63294EN/02 超级计算机辅助M操作员手册 B-63324EN/03 系列15i/150i -马(编程)操作员手册B-63324EN-1/03系列15i/150i -马(操作)操作员手册 B-63354EN/04 以太网/数据服务器主板操作员手册 B-63364EN/03 开放式数控(加工状态监测封装)操作员手册 B-63424EN/03 手册指南(铣)操作员手册B-63534EN/02系列16i/160i/160is/18i/180i/180is -手机,18i/180i/180is - MB5操作员手册 B-63614EN/01 系列21i/210i -手机操作员手册 B-63644EN/02 局快速以太网/快速数据服务器操作员手册 B-63844EN/02 系列0i -手机操作员手册 B-63864EN/03 系列0i 伴侣-手机操作员手册 B-66234EN/04 阶梯FAPTE 三操作员手册 GFKE - 0046 -中文 M 手册指南操作员手册维修手册 手册标题类型B-63005EN/0216i/18i/20i/21i/160i/180i/210i/160is/180is/210is 系列-型号A 维修手册 B-63085EN/01 21i/210i 系列-型号A 维修手册 B-63325EN/03 15i/150i 系列-型号A维修手册B-63525EN/02系列16i/160i/160is/18i/180i/180is / 21i/210i/210is - B 型 维修手册 B-63835EN/02 系列0i/0i 伴侣- B 型 维修手册 B-65165EN/02 阿尔法系列伺服电机 维修手册 B-65195EN/01 阿尔法系列伺服放大器单元 维修手册 B-65235EN/02 贝塔系列伺服电动机维修B-65245EN/02 贝塔系列伺服电机(的I / O 链接选项)维修手册B-65285EN/03交流伺服电机阿尔法的I /是系列交流主轴电机阿尔法i 系列伺服放大器阿尔法i 系列 维修手册参数手册 手册标题类型 B-63010EN/02 16i/18i/160i/180i/160is/180is 系列-型号A 参数手册 B-63090EN/02 21i/210i/210is 系列-型号A参数手册 B-63530EN/02 16i/160i/160is/18i/180i/180is 系列- B 型 参数手册 B-63840EN/03 系列0i/0i 伴侣- B 型 参数手册 B-65150E/04 交流伺服电机系列阿尔法 参数手册 B-65160E/02 交流主轴电机阿尔法系列 参数手册 B-65160EN/02 交流主轴电机系列阿尔法 参数手册 B-65270EN/03 交流伺服电机阿尔法的I /是系列 参数手册 B-65280EN/03 交流主轴电机阿尔法i 系列 参数手册连接手册 手册标题类型B-63523EN/0316i/160i/160is/18i/180i/180is/21i/210i/210is 系列- B 型 连接手册(硬体) B-63523EN-1/02 16i/160i/160is/18i/180i/180is/21i/210i/210is 系列- B 型连接手册(功编程手册 手册标题类型 B-61863E/14 PMC 梯形图语言 编程手册概览 手册标题类型 B-65192EN/02 阿尔法系列伺服放大器单元 概览 B-65222EN/03 直线电机系列 概览 B-65232EN/03 贝塔系列伺服电机 概览 B-65282EN/05 伺服放大器阿尔法i 系列 概览操作和维护手册 手册标题类型 B-63007EN/01 16i/18i/160i/180i 系列-型号A操作和维护手册B-63527EN/0116i/18i/21i/160i/180i/210i/160is/180is/210is 系列- B 型 操作和维护手册。
- 1、下载文档前请自行甄别文档内容的完整性,平台不提供额外的编辑、内容补充、找答案等附加服务。
- 2、"仅部分预览"的文档,不可在线预览部分如存在完整性等问题,可反馈申请退款(可完整预览的文档不适用该条件!)。
- 3、如文档侵犯您的权益,请联系客服反馈,我们会尽快为您处理(人工客服工作时间:9:00-18:30)。
FS7VS-5
HIGH-SPEED SWITCHING USE
GATE-SOURCE VOLTAGE VS.GATE CHARGE (TYPICAL) 20 20 SOURCE-DRAIN DIODE FORWARD CHARACTERISTICS (TYPICAL) VGS = 0V Pulse Test 75°C 12 25°C
3.0 +0.3 –0.5
Байду номын сангаас
0
+0.3 –0
1 5 0.8 0.5
q w e wr
2.6 ± 0.4
q
¡VDSS ................................................................................ 250V ¡rDS (ON) (MAX) .............................................................. 0.80Ω ¡ID ............................................................................................ 7A
tw=10µs 100µs 1ms 10ms TC = 25°C Single Pulse DC
80
60
40
20
0
0
50
100
150
200
10–1 7 5 100 2 3 5 7 101 2 3 5 7 102 2 3 5 7 103 DRAIN-SOURCE VOLTAGE VDS (V) OUTPUT CHARACTERISTICS (TYPICAL) 10 VGS = 20V 10V 7V PD = TC = 25°C 75W Pulse Test
GATE-SOURCE VOLTAGE VGS (V)
16
SOURCE CURRENT IS (A)
Tch = 25°C ID = 7A
VDS = 50V 100V 16
TC = 125°C
12
200V
8
8
4
4
0
0
4
8
12
16
20
0
0
0.8
1.6
2.4
3.2
4.0
GATE CHARGE Qg (nC)
Coss
Crss
td(off) tf tr td(on) 2 3 5 7 101
3 5 7 100 2 3 5 7 101 2 3 5 7 102 2 3 DRAIN-SOURCE VOLTAGE VDS (V)
DRAIN CURRENT ID (A)
Feb.1999
元器件交易网
SWITCHING CHARACTERISTICS (TYPICAL) 103 7 5 3 2 102 7 5 3 2 101 –1 10 2 3 5 7 100 Tch = 25°C VDD = 150V VGS = 10V RGEN = RGS = 50Ω
CAPACITANCE Ciss, Coss, Crss (pF)
MAXIMUM RATINGS
Symbol VDSS VGSS ID IDM PD Tch Tstg —
(Tc = 25°C)
Parameter Drain-source voltage Gate-source voltage Drain current Drain current (Pulsed) Maximum power dissipation Channel temperature Storage temperature Weight VGS = 0V VDS = 0V
元器件交易网
MITSUBISHI Nch POWER MOSFET
FS7VS-5
HIGH-SPEED SWITCHING USE
FS7VS-5
OUTLINE DRAWING
r
1.5MAX.
Dimensions in mm 4.5 1.3
10.5MAX.
1.5MAX. 8.6 ± 0.3 9.8 ± 0.5
VDD = 150V, ID = 3A, VGS = 10V, RGEN = RGS = 50Ω
IS = 3A, VGS = 0V Channel to case
PERFORMANCE CURVES
POWER DISSIPATION DERATING CURVE 100 POWER DISSIPATION PD (W) MAXIMUM SAFE OPERATING AREA 5 3 2 DRAIN CURRENT ID (A) 101 7 5 3 2 100 7 5 3 2
q GATE w DRAIN e SOURCE r DRAIN e
TO-220S
APPLICATION SMPS, DC-DC Converter, battery charger, power supply of printer, copier, HDD, FDD, TV, VCR, personal computer etc.
THRESHOLD VOLTAGE VS. CHANNEL TEMPERATURE (TYPICAL) VDS = 10V ID = 1mA 4.0
GATE-SOURCE THRESHOLD VOLTAGE VGS (th) (V)
3.0
2.0
1.0
0
–50
0
50
100
150
CHANNEL TEMPERATURE Tch (°C)
CHANNEL TEMPERATURE Tch (°C)
DRAIN-SOURCE BREAKDOWN VOLTAGE V (BR) DSS (25°C)
TRANSIENT THERMAL IMPEDANCE Zth (ch–c) (°C/W)
DRAIN-SOURCE BREAKDOWN VOLTAGE V (BR) DSS (t°C)
0
GATE-SOURCE VOLTAGE VGS (V)
TRANSFER CHARACTERISTICS (TYPICAL) 10 TC = 25°C VDS = 50V Pulse Test 101 7 5
FORWARD TRANSFER ADMITTANCE yfs (S)
FORWARD TRANSFER ADMITTANCE VS.DRAIN CURRENT (TYPICAL)
(Tch = 25°C)
Test conditions ID = 1mA, VGS = 0V IG = ±100µA, VDS = 0V VGS = ±25V, VDS = 0V VDS = 250V, VGS = 0V ID = 1mA, VDS = 10V ID = 3A, VGS = 10V ID = 3A, VGS = 10V ID = 3A, VDS = 10V VDS = 25V, VGS = 0V, f = 1MHz
FS7VS-5
HIGH-SPEED SWITCHING USE
ELECTRICAL CHARACTERISTICS
Symbol V (BR) DSS V (BR) GSS IGSS IDSS VGS (th) rDS (ON) VDS (ON) yfs Ciss Coss Crss td (on) tr td (off) tf VSD Rth (ch-c) Parameter
Limits Min. 250 ±30 — — 2 — — 2.3 — — — — — — — — — Typ. — — — — 3 0.63 1.90 3.5 370 80 16 15 22 50 26 1.5 — Max. — — ±10 1 4 0.80 2.40 — — — — — — — — 2.0 1.67
BREAKDOWN VOLTAGE VS. CHANNEL TEMPERATURE (TYPICAL) 1.4 VGS = 0V ID = 1mA 1.2
DRAIN CURRENT ID (A)
CAPACITANCE VS. DRAIN-SOURCE VOLTAGE (TYPICAL) 103 7 5 3 2 102 7 5 3 2 101 7 5 3 2 100 Tch = 25°C f = 1MHz VGS = 0V Ciss
SWITCHING TIME (ns)
FS7VS-5
HIGH-SPEED SWITCHING USE
ON-STATE VOLTAGE VS. GATE-SOURCE VOLTAGE (TYPICAL) 40
DRAIN-SOURCE ON-STATE VOLTAGE VDS (ON) (V) DRAIN-SOURCE ON-STATE RESISTANCE rDS (ON) (Ω)
Conditions
Ratings 250 ±30 7 21 75 –55 ~ +150 –55 ~ +150 1.2
4.5
Unit V V A A W °C °C g
Feb.1999
Typical value
(1.5)
元器件交易网
MITSUBISHI Nch POWER MOSFET
CASE TEMPERATURE TC (°C) OUTPUT CHARACTERISTICS (TYPICAL) 20 PD = 75W DRAIN CURRENT ID (A) 16 VGS = 20V 10V DRAIN CURRENT ID (A) TC = 25°C Pulse Test 7V 8
SOURCE-DRAIN VOLTAGE VSD (V)
