realtek网卡teaming配置方法 及 软件下载地址
team软件配置手册
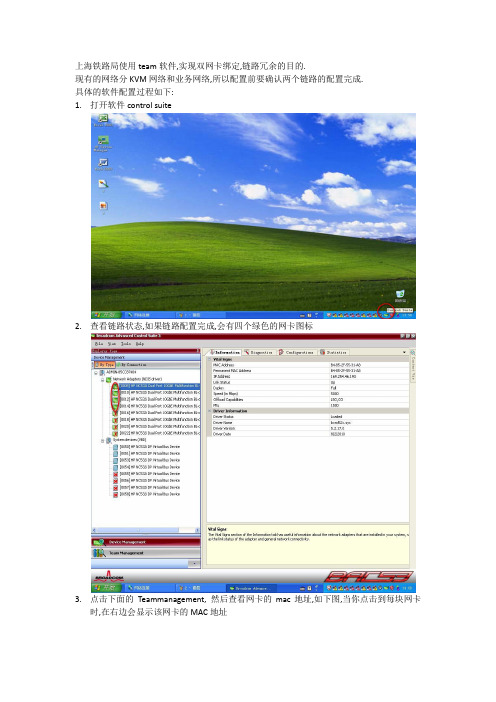
上海铁路局使用team软件,实现双网卡绑定,链路冗余的目的.现有的网络分KVM网络和业务网络,所以配置前要确认两个链路的配置完成.具体的软件配置过程如下:1.打开软件control suite2.查看链路状态,如果链路配置完成,会有四个绿色的网卡图标3.点击下面的Teammanagement,然后查看网卡的mac地址,如下图,当你点击到每块网卡时,在右边会显示该网卡的MAC地址四个网卡的MAC的最后两位会是两两相连的,比如:A8和A9,AC和AD等等,绑定的规则是将两组的字母或数字靠前的两个绑定在一块,如果是上面的例子中的网卡,就是A8和AC绑定为KVM网,A9和AD绑定为PROD网。
每块网卡前,会有一个数字,比如上图中就是008,以该数字来确定每块网卡。
等绑定时就以该数字来判断是那个网卡。
4.右键单击Teams,点击Create Team5.在出现的配置界面中点击next,修改team名称,选择需要绑定在一起的网卡6.绑定完成后,软件界面显示如下,再次查看MAC地址,却是绑定关系正确。
7.同理,绑定另一对网卡。
8.打开网络连接,给team kvm和team prod 配置网卡,其中KVM网不配置网关。
9.点击开始运行,为KVM网配置静态路由,其中win7的系统CMD命令必须在管理员权限下10.输入命令:route –p add 192.0.0.0 mask 255.0.0.0 192.168.X.X metric 1,192.168.X.X即本机KVM的地址。
回车执行。
11.完成之后ping一下别的主机,确认网络畅通,没问题后重启主机,开机看见F9的提示,按F9进bios配置.12.进入后按照System Options--→Remote console Mode--→User mode的顺序依次按回车键选择,修改完成后,按F10保存退出。
重启后,主机会无法看见系统界面,只能用远程连接,配置完成。
锐起RDV操作手册

目录第一章软件介绍 (5)1.1 软件简介 (5)1.2 系统运行平台 (5)1.2.1 硬件需求 (5)1.2.2 软件需求 (5)第二章快速部署说明 (6)2.1制作母盘镜像 (6)2.1.1 准备服务器 (6)2.1.2 模板工作站 (6)2.1.3 确认网络配置 (6)2.1.4 安装主服务端 (7)2.1.5 配置主服务端 (7)2.1.6 添加模板工作站 (9)2.1.7 设置超级用户 (10)2.1.8 安装客户端 (11)2.1.9 上传系统 (12)2.1.10 远程启动模板工作站 (12)2.2添加其他工作站(与模板工作站硬件配置一样) (12)2.2.1 选项设置 (12)2.3同步到本地硬盘启动 (14)2.4优先从网络启动 (16)第三章功能说明 (17)3.1免加密锁试用 (17)3.1.1 申请试用 (17)3.1.2 在线续时 (18)3.1.3 离线注册 (18)3.1.4 试用转正式授权 (19)3.2工作站列表项说明 (19)3.3工作站列表导出/导入 (19)3.4远程管理 (20)3.5 分组管理 (20)3.6系统镜像管理 (21)3.6.1 系统管理 (21)3.6.2 配置管理 (22)3.6.3 快照管理 (23)3.7单系统多配置(推荐) (24)3.8多系统多配置 (26)3.9系统导出与导入 (26)3.9.1 系统导出 (26)3.9.2 系统导入 (27)3.11自动负载均衡 (29)3.11.1 设置了首选服务器 (29)3.11.2 设置了自动负载均衡 (30)3.12启用工作站写缓存 (31)3.13启用工作站网卡智能加速 (32)3.15启动菜单 (35)3.16工作站系统不复原 (36)第四章个性化磁盘 (37)4.1个性化磁盘服务端 (37)4.1.1 登录界面 (37)4.1.2 申请试用 (38)4.1.3 默认账户密码 (39)4.1.4 默认设置 (39)4.1.5 新建用户 (40)4.1.6 编辑用户 (41)4.1.7 删除用户 (41)4.1.8 批量新建用户 (42)4.1.9 修改密码 (43)4.1.10 备份数据库 (43)4.2 个性化磁盘客户端 (44)4.2.1 登录界面 (44)4.2.3 修改用户密码 (45)4.2.4 登录设置 (45)4.2.5 桌面、文档、收藏夹漫游 (45)第五章辅助工具 (48)5.1内存缓存 (48)5.2将工作站加入域 (49)5.3个性化目录 (49)5.3.1 服务端配置 (49)5.3.2 客户端配置 (50)第一章软件介绍1.1 软件简介锐起RDV(Rich Desktop Virtualization)基于桌面虚拟化技术,将终端操作系统和用户数据集中管控在服务器上,并充分利用终端硬件资源,最大限度满足各种复杂应用需求,如高强度运算、离线应用、多硬件配置环境等。
网卡XfastLan与Teaming设置
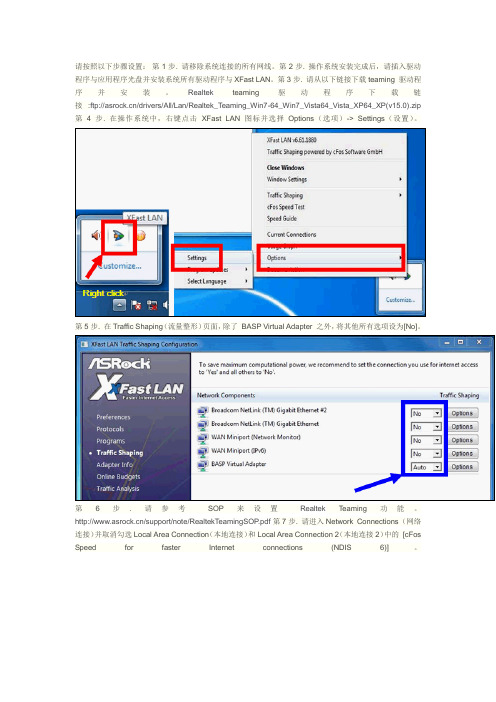
请按照以下步骤设置:第1步. 请移除系统连接的所有网线。
第2步. 操作系统安装完成后,请插入驱动程序与应用程序光盘并安装系统所有驱动程序与XFast LAN。
第3步. 请从以下链接下载teaming 驱动程序并安装。
Realtek teaming 驱动程序下载链接:ftp:///drivers/All/Lan/Realtek_Teaming_Win7-64_Win7_Vista64_Vista_XP64_XP(v15.0).zip 第4步. 在操作系统中,右键点击XFast LAN 图标并选择Options(选项)-> Settings(设置)。
第5步. 在Traffic Shaping(流量整形)页面,除了BASP Virtual Adapter 之外,将其他所有选项设为[No]。
第6步. 请参考SOP 来设置Realtek Teaming 功能。
/support/note/RealtekTeamingSOP.pdf第7步. 请进入Network Connections(网络连接)并取消勾选Local Area Connection(本地连接)和Local Area Connection 2(本地连接2)中的[cFos Speed for faster Internet connections (NDIS 6)]。
第8步. 重新启动系统一次,并将网线重新连接到系统。
HP Proliant 系列服务器做网卡绑定 Teaming
HP Proliant 系列服务器做网卡绑定Teaming
适用范围:
Proliant ML ,DL 系列服务器,案例为HP Proliant DL360 G7
操作系统
Windows server2003 R2 E x64 SP2
操作步骤:
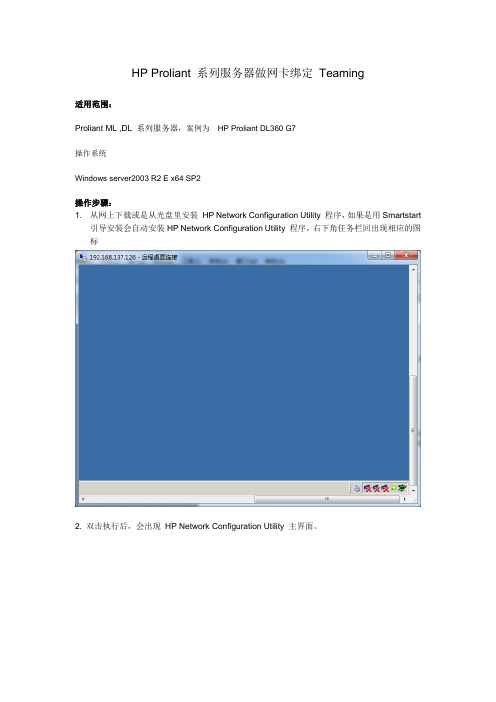
1. 从网上下载或是从光盘里安装HP Network Configuration Utility 程序,如果是用Smartstart
引导安装会自动安装HP Network Configuration Utility 程序,右下角任务栏回出现相应的图标
2. 双击执行后,会出现HP Network Configuration Utility 主界面。
3.用鼠标分别点中两块网卡,点击右上角的“ Team ” ,接着会出现HP Network Team #1 。
4.可以在“ Properties” 选项里配置查看相关信息,可以根据自己的需要来配置Team type selecting,此案例为Network Fault tolerance with preference order,只是链路备份不错负载均衡。
5.点击确定返回上级菜单,再点击确定弹出以下对话框,点是(Y)
6.等待配置
7.配置完毕后会弹出下面的对话框,点击确定。
8.下图是配置成功对话框。
9.在网络连接里面会多出一个本地连接,为HP Network Team #1
10.配置完成后,网络连接里会出现“ 本地连接2 ” (本地连接名字可能会与别的本地连接名字冲突,配置完了改了即可),这就是HP Network Team #1 ,可以进行IP 设置。
管理站软件 版本 7.3 安装指南说明书

管理站软件版本 7.3 安装指南注、小心和警告注: “注”表示可以帮助您更好地使用计算机的重要信息。
小心: “小心”表示可能会损坏硬件或导致数据丢失,并说明如何避免此类问题。
警告: “警告”表示可能会造成财产损失、人身伤害甚至死亡。
版权© 2013 Dell Inc. 保留所有权利。
本文中使用的商标:Dell™、Dell 徽标、Dell Boomi™、Dell Precision™、OptiPlex™ Latitude™、PowerEdge™、PowerVault™、PowerConnect™、OpenManage™、EqualLogic™、Compellent™、KACE™、FlexAddress™、Force10™及 Vostro™是 Dell Inc. 的商标。
Intel®、Pentium®、Xeon®、Core®及 Celeron®是 Intel Corporation 在美国和其他国家或地区的注册商标。
AMD®是 Advanced Micro Devices,Inc. 的注册商标,AMD Opteron™、AMD Phenom™及 AMD Sempron™是 Advanced Micro Devices,Inc. 的商标。
Microsoft®、Windows®、Windows Server®、MS-DOS®、Windows Vista®及 Active Directory®是 Microsoft Corporation 在美国和/或其他国家或地区的商标或注册商标。
Red Hat Enterprise Linux®与 Enterprise Linux®是 Red Hat,Inc. 在美国和/或其他国家或地区的注册商标。
Novell®是 Novell Inc. 在美国和其他国家或地区的注册商标,SUSE™是 Novell Inc. 在美国和其他国家或地区的商标。
Netsarang
Netsarang下载建议直接下载 xmanager-power-suite,⾥⾯包含了 Xmanager、Xshell、Xftp 和 Xlpd,下载时选择 30 天试⽤,输⼊邮箱和⽤户名就⾏打开邮件中的下载页⾯直接下载的为试⽤版,⽆法输⼊注册码,在下载的⽂件名后加上⼀个 r 再下载就是可注册版# 不可输⼊注册码https:///38b8dc08/XmanagerPowerSuite-6.0.0017.exe# 可输⼊注册码https:///38b8dc08/XmanagerPowerSuite-6.0.0017r.exe其它⽅式下载https:///NetSarang/产品/版本产品:xshell, xmanager, xlpd, xftp版本:p(个⼈版), r(企业版), key(⾮官⽅密钥)例:https:///NetSarang/xmanager/r安装之前若安装过就先清理下注册表再安装REG DELETE HKEY_CURRENT_USER\Software\NetSarang /fCodeXmanager Enterprise6:190408-116982-999566屏蔽更新(Code 验证)1.hosts ⽅式127.0.0.1 127.0.0.1 127.0.0.1 127.0.0.1 sarang.co.kr127.0.0.1 2.注册表⽅式# 将每个软件都打开⼀次(会在注册表中⽣成LiveUpdate)# 去掉读取权限HKEY_CURRENT_USER\Software\NetSarang\Xshell\6\LiveUpdateHKEY_CURRENT_USER\Software\NetSarang\Xftp\6\LiveUpdateHKEY_CURRENT_USER\Software\NetSarang\Xmanager\6\LiveUpdateHKEY_CURRENT_USER\Software\NetSarang\Xlpd\6\LiveUpdateKey 获取(Xmanager-keygen.py)import datetimeimport randomProductCode = {'Xmanager' : 0,'Xshell' : 1,'Xlpd' : 2,'Xfile' : 3,'Xftp' : 4,'Xmanager 3D' : 5,'Xmanager Enterprise' : 6,'Xshell Plus' : 7}LicenseType = [[ ProductCode['Xmanager'], 0x0B, 0, 'Standard', 2],[ ProductCode['Xmanager'], 0x0C, 0, 'Educational', 2],[ ProductCode['Xmanager'], 0x0F, 0, 'Standard', 1],[ ProductCode['Xmanager'], 0x10, 0, 'Educational', 1],[ ProductCode['Xmanager'], 0x16, 2, 'Student 2-year Subscription', 2],[ ProductCode['Xmanager'], 0x18, 4, 'Student 4-year Subscription', 2],[ ProductCode['Xmanager'], 0x20, 2, 'Student 2-year Subscription', 1],[ ProductCode['Xmanager'], 0x22, 4, 'Student 4-year Subscription', 1],[ ProductCode['Xmanager'], 0x3D, 0, 'Standard Subscription', 2],[ ProductCode['Xmanager'], 0x3E, 0, 'Educational Subscription', 2],[ ProductCode['Xmanager'], 0x41, 0, 'Standard Subscription', 1],[ ProductCode['Xmanager'], 0x42, 0, 'Educational Subscription', 1],[ ProductCode['Xmanager'], 0x47, 0, 'Standard Subscription', 2], # Concurrent Registered [ ProductCode['Xmanager'], 0x48, 0, 'Educational Subscription', 2], # Concurrent Registered [ ProductCode['Xmanager'], 0x4B, 0, 'Standard Subscription', 1], # Concurrent Registered [ ProductCode['Xmanager'], 0x4C, 0, 'Educational Subscription', 1], # Concurrent Registered [ ProductCode['Xmanager'], 0x51, 0, 'Standard', 2], # Concurrent Registered[ ProductCode['Xmanager'], 0x52, 0, 'Educational', 2], # Concurrent Registered[ ProductCode['Xmanager'], 0x55, 0, 'Standard', 1], # Concurrent Registered[ ProductCode['Xmanager'], 0x56, 0, 'Educational', 1], # Concurrent Registered[ ProductCode['Xmanager'], 0x60, 0, 'Standard', 1],[ ProductCode['Xmanager'], 0x61, 0, 'Standard', 2],[ ProductCode['Xmanager'], 0x62, 0, 'Standard', 1],[ ProductCode['Xmanager'], 0x63, 0, 'Standard', 2],[ ProductCode['Xmanager'], 0x29, 1, 'CLS Class A', 2],[ ProductCode['Xmanager'], 0x2A, 1, 'CLS Class B', 2],[ ProductCode['Xmanager'], 0x2B, 1, 'CLS Class C', 2],[ ProductCode['Xmanager'], 0x2C, 1, 'DLS', 2],[ ProductCode['Xmanager'], 0x2D, 1, 'SLS', 2],[ ProductCode['Xmanager'], 0x33, 1, 'CLS Class A', 1],[ ProductCode['Xmanager'], 0x34, 1, 'CLS Class B', 1],[ ProductCode['Xmanager'], 0x35, 1, 'CLS Class C', 1],[ ProductCode['Xmanager'], 0x36, 1, 'DLS', 1],[ ProductCode['Xmanager'], 0x37, 1, 'SLS', 1],[ ProductCode['Xshell Plus'], 0x0B, 0, 'Standard', 2],[ ProductCode['Xshell'], 0x0B, 0, 'Standard', 2],[ ProductCode['Xshell'], 0x0C, 0, 'Educational', 2],[ ProductCode['Xshell'], 0x0F, 0, 'Standard', 1],[ ProductCode['Xshell'], 0x10, 0, 'Educational', 1],[ ProductCode['Xshell'], 0x16, 2, 'Student 2-year Subscription', 2],[ ProductCode['Xshell'], 0x18, 4, 'Student 4-year Subscription', 2],[ ProductCode['Xshell'], 0x20, 2, 'Student 2-year Subscription', 1],[ ProductCode['Xshell'], 0x22, 4, 'Student 4-year Subscription', 1],[ ProductCode['Xshell'], 0x3D, 0, 'Standard Subscription', 2],[ ProductCode['Xshell'], 0x3E, 0, 'Educational Subscription', 2],[ ProductCode['Xshell'], 0x41, 0, 'Standard Subscription', 1],[ ProductCode['Xshell'], 0x42, 0, 'Educational Subscription', 1],[ ProductCode['Xshell'], 0x47, 0, 'Standard Subscription', 2],[ ProductCode['Xshell'], 0x48, 0, 'Educational Subscription', 2],[ ProductCode['Xshell'], 0x4B, 0, 'Standard Subscription', 1],[ ProductCode['Xshell'], 0x4C, 0, 'Educational Subscription', 1],[ ProductCode['Xshell'], 0x51, 0, 'Standard', 2],[ ProductCode['Xshell'], 0x52, 0, 'Educational', 2],[ ProductCode['Xshell'], 0x55, 0, 'Standard', 1],[ ProductCode['Xshell'], 0x56, 0, 'Educational', 1],[ ProductCode['Xshell'], 0x60, 0, 'Standard', 1],[ ProductCode['Xshell'], 0x61, 0, 'Standard', 2],[ ProductCode['Xshell'], 0x62, 0, 'Standard', 1],[ ProductCode['Xshell'], 0x63, 0, 'Standard', 2],[ ProductCode['Xlpd'], 0x0B, 0, 'Standard', 2],[ ProductCode['Xlpd'], 0x0F, 0, 'Standard', 1],[ ProductCode['Xlpd'], 0x3D, 0, 'Standard Subscription', 2],[ ProductCode['Xlpd'], 0x3E, 0, 'Educational Subscription', 2],[ ProductCode['Xlpd'], 0x41, 0, 'Standard Subscription', 1],[ ProductCode['Xlpd'], 0x42, 0, 'Educational Subscription', 1],[ ProductCode['Xlpd'], 0x47, 0, 'Standard Subscription', 2],[ ProductCode['Xlpd'], 0x48, 0, 'Educational Subscription', 2],[ ProductCode['Xlpd'], 0x4B, 0, 'Standard Subscription', 1],[ ProductCode['Xlpd'], 0x4C, 0, 'Educational Subscription', 1],[ ProductCode['Xlpd'], 0x51, 0, 'Standard', 2],[ ProductCode['Xlpd'], 0x55, 0, 'Standard', 1],[ ProductCode['Xlpd'], 0x60, 0, 'Standard', 1],[ ProductCode['Xlpd'], 0x61, 0, 'Standard', 2],[ ProductCode['Xlpd'], 0x62, 0, 'Standard', 1],[ ProductCode['Xlpd'], 0x63, 0, 'Standard', 2],[ ProductCode['Xfile'], 0x0F, 0, 'Standard', 1],[ ProductCode['Xftp'], 0x0B, 0, 'Standard', 2],[ ProductCode['Xftp'], 0x0F, 0, 'Standard', 1],[ ProductCode['Xftp'], 0x3D, 0, 'Standard Subscription', 2],[ ProductCode['Xftp'], 0x3E, 0, 'Educational Subscription', 2],[ ProductCode['Xftp'], 0x41, 0, 'Standard Subscription', 1],[ ProductCode['Xftp'], 0x42, 0, 'Educational Subscription', 1],[ ProductCode['Xftp'], 0x47, 0, 'Standard Subscription', 2],[ ProductCode['Xftp'], 0x48, 0, 'Educational Subscription', 2],[ ProductCode['Xftp'], 0x4B, 0, 'Standard Subscription', 1],[ ProductCode['Xftp'], 0x4C, 0, 'Educational Subscription', 1],[ ProductCode['Xftp'], 0x51, 0, 'Standard', 2],[ ProductCode['Xftp'], 0x55, 0, 'Standard', 1],[ ProductCode['Xftp'], 0x60, 0, 'Standard', 1],[ ProductCode['Xftp'], 0x61, 0, 'Standard', 2],[ ProductCode['Xftp'], 0x62, 0, 'Standard', 1],[ ProductCode['Xftp'], 0x63, 0, 'Standard', 2],[ ProductCode['Xmanager 3D'], 0x0B, 0, 'Standard', 2],[ ProductCode['Xmanager 3D'], 0x0C, 0, 'Educational', 2],[ ProductCode['Xmanager 3D'], 0x0F, 0, 'Standard', 1],[ ProductCode['Xmanager 3D'], 0x10, 0, 'Educational', 1],[ ProductCode['Xmanager Enterprise'], 0x0B, 0, '', 2],[ ProductCode['Xmanager Enterprise'], 0x0C, 0, 'Educational', 2],[ ProductCode['Xmanager Enterprise'], 0x0F, 0, '', 1],[ ProductCode['Xmanager Enterprise'], 0x10, 0, 'Educational', 1],[ ProductCode['Xmanager Enterprise'], 0x3D, 0, 'Standard Subscription', 2],[ ProductCode['Xmanager Enterprise'], 0x3E, 0, 'Educational Subscription', 2],[ ProductCode['Xmanager Enterprise'], 0x41, 0, 'Standard Subscription', 1],[ ProductCode['Xmanager Enterprise'], 0x42, 0, 'Educational Subscription', 1],[ ProductCode['Xmanager Enterprise'], 0x47, 0, 'Standard Subscription', 2],[ ProductCode['Xmanager Enterprise'], 0x48, 0, 'Educational Subscription', 2],[ ProductCode['Xmanager Enterprise'], 0x4B, 0, 'Standard Subscription', 1],[ ProductCode['Xmanager Enterprise'], 0x4C, 0, 'Educational Subscription', 1],[ ProductCode['Xmanager Enterprise'], 0x51, 0, '', 2],[ ProductCode['Xmanager Enterprise'], 0x52, 0, 'Educational', 2],[ ProductCode['Xmanager Enterprise'], 0x55, 0, '', 1],[ ProductCode['Xmanager Enterprise'], 0x56, 0, 'Educational', 1],[ ProductCode['Xmanager Enterprise'], 0x60, 0, 'Standard', 1],[ ProductCode['Xmanager Enterprise'], 0x61, 0, 'Standard', 2],[ ProductCode['Xmanager Enterprise'], 0x62, 0, 'Standard', 1],[ ProductCode['Xmanager Enterprise'], 0x63, 0, 'Standard', 2],]ProductPublishList = ({ 'ProductName' : 'Xmanager', 'Version' : 2, 'PublishDate' : datetime.date(2003, 1, 1) },{ 'ProductName' : 'Xshell', 'Version' : 2, 'PublishDate' : datetime.date(2004, 10, 1) },{ 'ProductName' : 'Xmanager', 'Version' : 3, 'PublishDate' : datetime.date(2007, 1, 1) },{ 'ProductName' : 'Xshell', 'Version' : 3, 'PublishDate' : datetime.date(2007, 1, 1) },{ 'ProductName' : 'Xlpd', 'Version' : 3, 'PublishDate' : datetime.date(2007, 1, 1) },{ 'ProductName' : 'Xftp', 'Version' : 3, 'PublishDate' : datetime.date(2007, 1, 1) },{ 'ProductName' : 'Xmanager Enterprise', 'Version' : 3, 'PublishDate' : datetime.date(2007, 1, 1) }, { 'ProductName' : 'Xmanager', 'Version' : 4, 'PublishDate' : datetime.date(2010, 8, 1) },{ 'ProductName' : 'Xshell', 'Version' : 4, 'PublishDate' : datetime.date(2010, 8, 1) },{ 'ProductName' : 'Xlpd', 'Version' : 4, 'PublishDate' : datetime.date(2010, 8, 1) },{ 'ProductName' : 'Xftp', 'Version' : 4, 'PublishDate' : datetime.date(2010, 8, 1) },{ 'ProductName' : 'Xmanager Enterprise', 'Version' : 4, 'PublishDate' : datetime.date(2010, 8, 1) }, { 'ProductName' : 'Xmanager', 'Version' : 5, 'PublishDate' : datetime.date(2014, 4, 28) },{ 'ProductName' : 'Xshell', 'Version' : 5, 'PublishDate' : datetime.date(2014, 4, 28) },{ 'ProductName' : 'Xlpd', 'Version' : 5, 'PublishDate' : datetime.date(2014, 4, 28) },{ 'ProductName' : 'Xftp', 'Version' : 5, 'PublishDate' : datetime.date(2014, 4, 28) },{ 'ProductName' : 'Xmanager Enterprise', 'Version' : 5, 'PublishDate' : datetime.date(2014, 4, 28) }, { 'ProductName' : 'Xmanager', 'Version' : 6, 'PublishDate' : datetime.date(2018, 4, 29) },{ 'ProductName' : 'Xshell', 'Version' : 6, 'PublishDate' : datetime.date(2018, 4, 29) },{ 'ProductName' : 'Xshell Plus', 'Version' : 6, 'PublishDate' : datetime.date(2018, 4, 29) },{ 'ProductName' : 'Xlpd', 'Version' : 6, 'PublishDate' : datetime.date(2018, 4, 29) },{ 'ProductName' : 'Xftp', 'Version' : 6, 'PublishDate' : datetime.date(2018, 4, 29) },{ 'ProductName' : 'Xmanager Enterprise', 'Version' : 6, 'PublishDate' : datetime.date(2018, 4, 29) } )def GetChecksum(preProductKey : str):Checksum = 1for i in range(0, len(preProductKey)):if preProductKey[i] != '-'and preProductKey[i] != '8'and preProductKey[i] != '9':place = int(preProductKey[i])Checksum = (9 - place) * Checksum % -1000Checksum = (Checksum + int(preProductKey[9])) % 1000return Checksumdef GenerateProductKey(IssueDate : datetime.date,ProductName : str,ProductVersion : int,NumberOfLicense : int):if IssueDate.year < 2002:raise ValueError('IssueDate cannot be earlier than 2002.')if IssueDate > datetime.date.today() + datetime.timedelta(days = 7):raise ValueError('IssueDate cannot be later than today after a week.')if NumberOfLicense < 0 or NumberOfLicense > 999:raise ValueError('NumberOfLicense must vary from 0 to 999.')for item in ProductPublishList:if item['ProductName'] == ProductName and item['Version'] == ProductVersion:if item['PublishDate'] > IssueDate:raise ValueError('IssueDate cannot be earlier than the publish date.')breakif item == ProductPublishList[-1]:raise ValueError('Invalid product.')preProductKey = '%02d%02d%02d-%02d%d%03d-%03d' % (IssueDate.year - 2000, IssueDate.month,IssueDate.day,0x0B,ProductCode[ProductName],random.randint(0, 999),NumberOfLicense)Checksum = GetChecksum(preProductKey)ProductKey = preProductKey + '%03d' % Checksumreturn ProductKeyprint(GenerateProductKey(datetime.date(2017, 12, 15), 'Xmanager Enterprise', 5, 999)) View Code。
realtek网卡teaming配置方法及软件下载地址
realtek网卡teaming配置方法及软件下载地址
Realtek网卡teaming配置方法
说明:
使用两块Realtek网卡进行teaming配置
1.为系统添加两块相同的Realtek网卡,并正常安装网卡驱动。
2.安装Realtek Teaming文件夹中的AsusSetup.exe。
/pub/ASUS/mb/socket1366/P6T_W
S_PRO/Driver/Teaming_Win_100000 0.zip
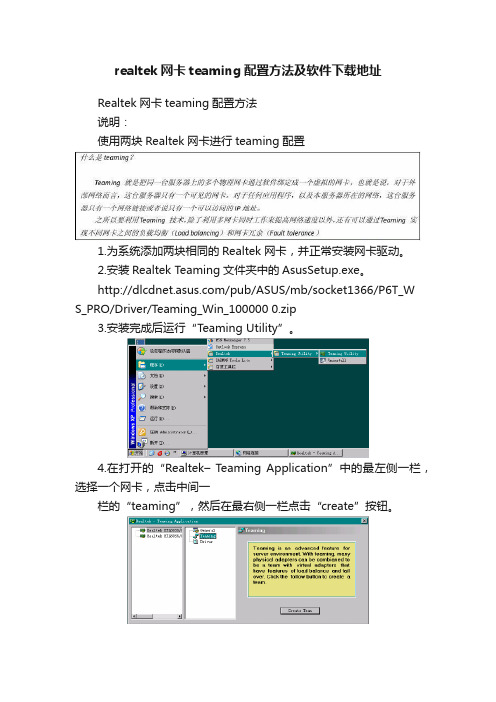
3.安装完成后运行“Teaming Utility”。
4.在打开的“Realtek–Teaming Application”中的最左侧一栏,选择一个网卡,点击中间一
栏的“teaming”,然后在最右侧一栏点击“create”按钮。
5.弹出新窗口,选中两块网卡,点击OK
6.完成两块网卡teaming配置,如下图:
7.验证安装
设备管理器中出现一块新的虚拟网卡:
网络连接管理中出现一个新的连接
使用ipconfig命令仅能查看到一块网卡(虚拟网卡),该IP即为当前系统的IP。
teaming配置完成。
注:本例中使用了两块完全相同的realtek 8169网卡进行teaming配置。
理论上该方法支持使用两块及两块以上的realtek网卡进行配置。
Realtek方案无线路由器快速安装指南

快速安装指南适合Realtek 方案无线路由器深圳市宏成数字科技股份有限公司1.硬件连接如图所示,将运营商提供的RJ45网络线或者调制解调器连到路由器的WAN 口,电脑连到路由器的LAN口,开启路由器电源。
注意:这个安装指导适合KW55293,KW55193,KW55295,KW55195,KW5513等产品,不同型号产品,后面板接口,接口位置或者命名可能有一些不一样,参照您的设备的实际接口进行正确连接。
2.电脑TCP/IP设置: 保证电脑本地连接的DHCP开启,通常电脑的DHCP都是开启的。
如果您的电脑DHCP没有开启,请参考常见问题1开启。
3.路由器设置(1) 电脑上打开浏览器, 比如IE浏览器。
在地址栏输入http://192.168.1.1即可登录到路由器的快速设定界面。
这里点击下一步先进行快速设置。
(若点击手动设置,需要先登录路由器账户,用户名为admin,密码为admin。
)(2)上网方式设置,如下图所示。
路由器提供三种常见的上网方式:PPPoE,动态IP,静态IP. 选择您的运营商提供的上网方式,可参考常见问题2。
然后点击下一步。
(3) 若上一步选择的是PPPoE,需要输入运营商提供的上网账号和上网口令。
然后点击下一步。
若上一步选择的是动态IP, 直接到无线网络设置页面,可参考步骤4进行设置。
若上一步选择的是静态IP, 需要输入运营商提供的IP地址,子网掩码,网关,DNS 服务器,备用DNS服务器。
然后点击下一步。
(4) 无线设置,如下图所示。
无线默认是开启的,给您的无线网络设置好SSID(无线名称);选择无线安全选项,通常建议选择WPA-PSK/WPA2-PSK AES, 然后设置PSK密码(无线密码),之后点击下一步。
(5)设置完成,点击完成按钮保存和应用您的设置。
路由器常见问题1.如何开启电脑本地连接的DHCP设置?Win7: 开始--控制面板--网络和Internet--网络和共享中心--更改适配器设置(左边)--本地连接(右键点击)--属性--Internet 协议版本4(选中)--属性:选择“自动获得IP地址”和“自动获得DNS服务器地址”。
NetNummenN31-V4中兴统一网管系统安装说明(win+sql)
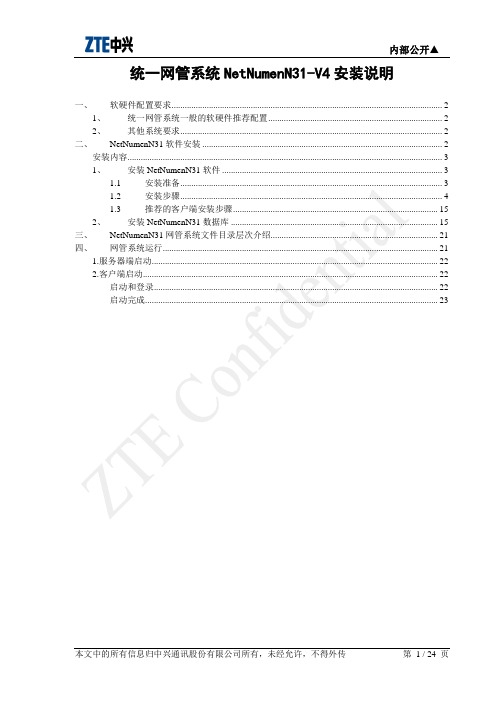
统一网管系统NetNumenN31-V4安装说明一、软硬件配置要求 (2)1、统一网管系统一般的软硬件推荐配置 (2)2、其他系统要求 (2)二、NetNumenN31软件安装 (2)安装内容 (3)1、安装NetNumenN31软件 (3)1.1 安装准备 (3)1.2 安装步骤 (4)1.3 推荐的客户端安装步骤 (15)2、安装NetNumenN31数据库 (15)三、NetNumenN31网管系统文件目录层次介绍 (21)四、网管系统运行 (21)1.服务器端启动 (22)2.客户端启动 (22)启动和登录 (22)启动完成 (23)一、软硬件配置要求1、统一网管系统一般的软硬件推荐配置网管系统安装盘文件系统:NTFS。
二、NetNumenN31软件安装摘要本章将介绍NetNumenN31软件的安装过程。
安装内容安装NetNumenN31软件;安装NetNumenN31数据库;1、安装NetNumenN31软件1.1安装准备在安装此软件前,要求系统已经安装:对网管服务器要求:A) 操作系统Windows 2000/2003如果安装Windows 2000,要求如下:Windows 2000 Server 中文版或Windows 2000 Advanced Server 中文版,打w2ksp4补丁,并已经通过Windows Update从微软的网站更新了最新的关键补丁;如果安装Windows 2003,要求如下:Windows 2003 Server 中文版,打w2k3sp1补丁,并已经通过Windows Update 从微软的网站更新了最新的关键补丁;B) 数据库SQL Server 2000 / SQL Server 2005如果安装SQL Server 2000,要求如下:MS SQL Server 2000 Standard Edition 中文版,打sql2ksp3或者sp4补丁。
通过windows2012 NIC Teaming实现网卡负载均衡

什么是NIC组合简单来讲,NIC组合就是把同一台服务器上的多个物理网卡通过软件绑定成一个虚拟的网卡,也就是说,对于外部网络而言,这台服务器只有一个可见的网卡。
对于任何应用程序,以及本服务器所在的网络,这台服务器只有一个网络链接或者说只有一个可以访问的IP地址。
之所以要利用NIC组合技术,除了利用多网卡同时工作来提高网络速度以外,还有可以通过NIC组合实现不同网卡之间的负载均衡(Load balancing)和网卡冗余(Fault tolerance)。
微软NIC组合,也称为负载平衡/故障转移(LBFO),允许多个网络适配器组合成一个,这样做的目的可以带来带宽聚合、解决网络连接失败过程中的故障转移;它应用于Windows Server 2012的所有版本中,包括核心版和图形界面完全版;NIC组合在Windows 8 中是不可用的,但是 NIC组合的用户界面和 NIC组合的 Windows PowerShell Cmdlet命令行都可以运行 Windows 8,以便于 Windows 8 PC 可以用于管理一个或多个Windows Server 2012主机上的NIC组合。
下面就NIC组合的相关配置及参数做一个简单介绍:默认情况下,NIC组合是禁用的,如下:这个时候,我们来查看一下网络情况:三块网卡NIC组合前两个要参与组合的网卡的IP和MAC地址:组-任务-新建组组名称:键入:NEW NIC 因为第一块网卡用于远程桌面,如果新建组会改变IP,所以我不让它参与组合,只让第二块和第三块网组成一个新的组合。
其它属性——成组模式:1、静态成组(IEEE 802.3ad draft v1):此模式配置交换机和主机之间需要哪种链接组合形式,由于这是一个静态配置的解决方案有任何附加协议,所以就不会因为交换机或主机因为电缆的插入错误或其它错误而导致组合的形成。
此种模式中,网卡可以工作于不同的速度,就是说可以用不通速度的网卡建立组合, 但同样要求交换机完全支持IEEE 802.3ad 标准,一般情况下,服务器级别的交换机通常支持此模式。
双网卡流量汇聚
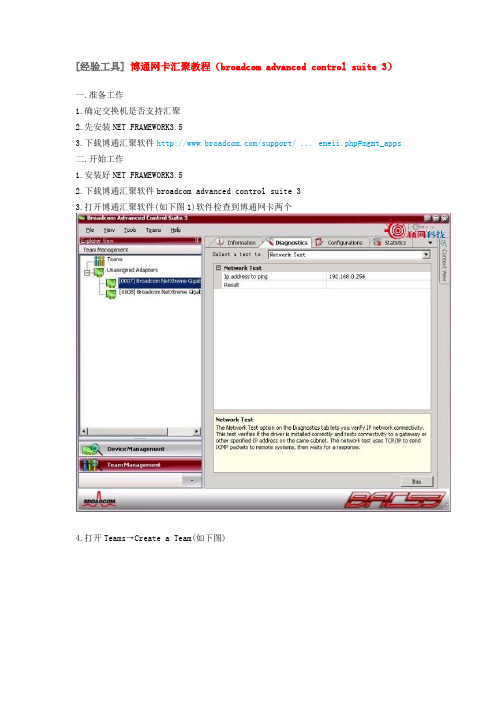
[经验工具]博通网卡汇聚教程(broadcom advanced control suite 3)一.准备工作1.确定交换机是否支持汇聚2.先安装NET FRAMEWORK3.53.下载博通汇聚软件/support/ ... emeii.php#mgmt_apps二.开始工作1.安装好NET FRAMEWORK3.52.下载博通汇聚软件broadcom advanced control suite 33.打开博通汇聚软件(如下图1)软件检查到博通网卡两个4.打开Teams→Create a Team(如下图)5.选择802.3ad Link Aggregatio using Link Aggregatio Control Protocol (LACP)选择Next6.选择要汇聚的网卡然后Add(注意两个网卡都选择)选择Next7.选择好要汇聚的网卡然后Next8.Do not configure a standby member 选择Next9.No选择Next10.Skip manage VLAN 选择Nextmit changes to system and Exit the wizard选择Finish完成12.选择是即可完成[经验工具] intel网卡汇聚教程对于intel网卡汇聚,相信大部分人对具体的做法已经都很清楚了,但是对于汇聚的限制条件可能还不是太清楚,所以今天借教程顺便说明下做网卡汇聚的一些条件,在条件不满足的情况下,汇聚可能也可以正常设置,但是未必能正常使用,因此强烈建议大家注意这个问题.1.两块网卡型号必须是一样的.2.网卡必须是PCI-E接口标准的,因为普通的PCI借口总的带宽一共就133MB/S,无法满足汇聚要求.3.网卡汇聚是需要交换机支持802.3AD协议的,否则汇聚后可能效果一般,而且可能会出兼容性问题.基本上注意到以上3点,做网卡汇聚一般就不太可能出问题了.下面是具体做法.下载intel网卡驱动与管理工具:/drivers-2301-490-Intel/某些精简系统安装完网卡驱动后,并没有管理工具,因此可能无法看到下图的截面,您只需要重新下载一份完整的intel网卡驱动即可.对于网卡接口检测,大家可以借助EVEREST这个工具来检查,一些SH3200系列的主板,看上去是2块网卡,但是型号不一样,而且有块是PCI接口的,这种情况下做汇聚实际上是没啥效果的,因为压根就不符合汇聚的要求.Everest下载:/search.asp?action=s&;sType=ResName&catalog=&keyw ord=everest下载 (61.42 KB)2010-10-9 12:23收藏分享[经验工具] Marvell网卡汇聚教程控制台及驱动下载:/product.aspx?P_ID=4zanuPTONhbnijk4控制台和驱动的安装方法就不说了,“下一步下一步”就可以了!现在打开控制台软件:单击“add team”按钮,弹出下面窗口:注:"teaming mode"选择"static"OK分组创建完毕:最后将网卡添加进刚刚建立的分组即可:4网卡汇聚最终图:。
LA NETWORK MANAGER 1.1.0.45中文指南
•在联机模式下运行的 LA NETWORK MANAGER PC 机与 L- NET 网络同步: 该软件用户界面( IP 地址,选择的预置,组和组参数)上显示的数据是那些对物理系统的单位。它们被发送和改性 的全双工*数据内传输协议。 在这种模式下,用户可以前和事件执行期间控制物理系统。 当系统从网络发送或检索(参见 6.6.3 节)的联机模式被激活。
的 IP 地址单元的颜色代码是:粉红色 图 14)。
的离线模式,绿色
为联机模式,和 蓝色 的 待机模式(参见图 13 和
单元号没有连接到的 IP 地址。
•设备类型 Unit Type (8 放大控制器。
smarteam软件安装ok
SmarTeam V5R11安装手册注意事宜:1、安装服务器的时候,最好是使用新安装的系统。
2、客户端的安装,以超级管理员的身份登陆,进行链接数据库。
3、Windows补丁程序要在安装smartam服务器后再打。
4、先安装License 。
并检测后,才可以安装。
5、保证网络畅通。
服务器安装一、操作系统(包括硬件驱动程序)安装步骤特别建议:服务器最少要划分为2个分区,分区格式为NTFS。
C区安装操作系统以及某些通用的应用程序,D区安装数据库程序、SmarTeam程序。
1、服务器连接到以太局域网络的交换机上。
(如果不连接,Windows 2000 server将不能正常安装。
)2、调整BIOS为CD-ROM启动,将Windows 2000 server安装光盘放入,开始依照提示安装。
在提示设置Administrator的密码时,最好设置。
在网络组件安装时,注意选择“不在有域的网络上”一项(在操作系统安装完成后再配置)。
3、操作系统启动正常后,安装相应的硬件驱动程序(显卡、网卡是必须的)。
再按统一规则配置网卡的IP地址、子网掩码、默认网关、DNS。
4、启动Windows2000配置服务器,打开Active Directory向导,依照提示设置本服务器的域名(例如pdmserver),并安装DNS服务。
6、启动管理工具Active Directory用户和计算机,设置客户机需要的登录帐号、口令和权限。
例如(pdmuser …… )注意:安装过程中,根据提示勤快地重新启动机器是必要的,有时候即使没有提示也要重启。
7、对于涉密电脑要另外设置登陆域的用户名。
二、应用程序安装步骤1、运行LUM安装光盘winintel目录下的arkwin465.exe文件,默认安装在C:\IFOR下,同时在开始\程序菜单下增加了License Use Runtime项,主要的License配置程序就在这里。
第一步,启动Windows开始菜单License Use Runtime里的Configuration Tool 工具,在选择configure As页中选择Network License(NetworkLS);(取消系统默认的选项),在Direct binding页中Server Configuration\栏中选择TCP/IP,并在Name框中填写服务器的IP地址,再点击Add按钮;在Start up页中选择Start services at system startup。
戴尔部署和配置指南网卡组队工具 (Gen1) for Wyse 5070 瘦客户端配置指南说明书

NIC Teaming Tool (Gen1) for Wyse 5070 thin clientConfiguration GuideDell EngineeringJanuary 2019RevisionsVersion Date Description1.0 January 2019 Initial release© 2019 Dell Inc. All rights reserved. Reproduction of this material in any manner whatsoever without the express written permission of Dell Inc. is strictly forbidden. For more information, contact Dell.Dell, the DELL logo, and the DELL badge are trademarks of Dell Inc. Microsoft, Windows, and Windows Server are registered trademarks of Microsoft Corporation in the United States and/or other countries. Other trademarks and trade names may be used in this document to refer to either the entities claiming the marks and names or their products. Dell disclaims any proprietary interest in the marks and names of others.Table of contentsRevisions (2)1Introduction (4)2NIC Teaming (5)3Realtek Ethernet CLI Tool (6)3.1Parameters of CLI Tool for NIC Teaming (6)3.2USAGE NOTICE (7)4Steps to configure NIC Teaming (8)4.1Create NIC Team (8)4.2Remove NIC Team (9)5Uninstallation (11)1IntroductionThis document provides the information on how to use Realtek Ethernet CLI (Command-Line Interface) Tool -8169DiagV2.exe, to create NIC Team on Wyse 5070 thin clients running Windows 10 IoT Enterprise operating systems.2NIC TeamingNIC Teaming, also known as Load Balancing/Failover (LBFO), enables you to combine multiple Ethernet adapters andbehave as a single logical NIC. If your Wyse 5070 thin client has dual RJ45 ports, you can create the NIC Team to group two ethernet adapters in a system for fault tolerance and load balancing to increase throughput and reliability.Figure 1Wyse 5070 with Dual RJ45Figure 2Two NICs Link Aggregation to 2 Gbps Speed3Realtek Ethernet CLI ToolRealtek Ethernet CLI Tool supports 2 teaming modes - FEC/GEC and LACP.When a NIC team is configured in LACP mode, Realtek NIC teaming always operates in LACP's active mode and nooption is available to change to the LACP’s passive mode.Features Teaming Modes of Realtek Ethernet ToolFEC/GEC FEC/GEC LACPFault Tolerance V V V Link Aggregation V V V Load Balancing Tx Tx/Rx Tx/RxSwitch Dependent No Yes, need to configure theswitch’s LAG type toFEC/GEC (Static)Yes, need to configure theswitch’s LAG type to802.3ad (LACP)3.1Parameters of CLI Tool for NIC TeamingDefault Installed Path in Dell-Wyse-Windows 10-IoT-Enterprise: “C:\Program Files\Realtek\Teaming\”Function CommandListList all physical network adapter namesand virtual network adapter names forNIC Team and VLAN8169DiagV2.exe -ListAdd TeamAdd physical network adapters to a NIC team 8169DiagV2.exe-AddTeamType < team type > -TeamName < team name > -TeamList < adapter name1, adapter name2, ... >•Team Type:1: FEC/GEC2: LACP•Example:8169DiagV2.exe -AddTeamType 1 -TeamName MyTeam -TeamList "Ethernet","Ethernet 2"Delete TeamDelete a NIC team by virtual adapter name 8169DiagV2.exe -DelTeam -Name < virtual adapter name > •Example:8169DiagV2.exe -DelTeam -Name "Ethernet 3"3.2USAGE NOTICE•Dell recommends not to install the GUI tool and use GUI and CLI tool alternately. It causes NIC behavior abnormal or system crash.•Administrative privilege is required for this tool.•IGNORE the message highlighted in the image when executing “8169DiagV2.exe -List”.Figure 3Message displayed when executing “8169DiagV2.exe -List”.4Steps to configure NIC TeamingFor information on the command definition, see Parameters of CLI Tool for NIC Teaming.4.1Create NIC Teame List command to ensure that there is no NIC Team in TEAMING list.If there is an adapter name in the list, the NIC team is already created.e Add Team command to create a NIC team.Ensure that the message Completed is displayed before executing the next command to prevent undesired NICbehavior or system crash.3.Verify that the Realtek Virtual Teaming Adapter is displayed in Network Connections.You can also use the List command to confirm the new virtual teaming adapter in the TEAMING list.4.2Remove NIC Team1.Search the Realtek Virtual Teaming Adapter in the Network Connections. (ex: Ethernet 3)You can also find the name in the TEAMING list by using the List command.e the Delete Team command with the name of Realtek Virtual Teaming Adapter to remove the NIC team.Ensure that the message Completed is displayed before executing the next command to prevent undesired NIC behavior or system crash.e the List command to ensure that there is no NIC Team in the TEAMING list.5UninstallationFor new tool updates, you must uninstall the current version to prevent undesired NIC behavior or system crash.1. Ensure that there are no Realtek Virtual (Teaming) Adapter in Device Manager.If the Realtek Virtual Teaming Adapter is present, please refer Remove NIC Team section and delete theadapter.Delete the Realtek Virtual Adapter. This may be present if you have created a VLAN.2. Delete the Teaming folder from C:\Program Files\Realtek.11 NIC Teaming Tool (Gen1) for Wyse 5070 thin client | Configuration Guide v1.0。
基恩士IG系列说明书
基恩士IG系列说明书---------------------------------------------------------------------------------------------------基恩士IG系列说明书96083CCCD光透过型激光传感器IG 系列用户手册使用前请阅读本手册以期实现最佳性能。
阅读后请妥善保存本手册,以便随时参考。
前言本说明书描述了 IG 系列的基本操作和信息。
请仔细阅读本手册以确保安全使用 IG 系列并发挥其性能和功能。
请妥善保管本说明书以备参考。
确保此说明书最终由终端用户持有。
??标示以下标示是提醒您有关防止人体伤害和产品损坏之事宜。
注为正确操作提供额外信息。
为操作提供进一步的有用信息。
提供参考页。
IG 系列的安全信息一般注意事项?在启动和操作期间,请务必监控本产品的功能和性能,并确认能够正常运作。
?我们建议您采取充分的安全措施,以免发生问题时造成任何损失。
———————————————————————————————————————————————---------------------------------------------------------------------------------------------------?如果产品的改装与使用和规格中所描述的有出入,则无法保证其功能和性能可以正常发挥。
?当本产品与其他仪器一起使用时,其功能和性能可能会降低,视操作条件和周围环境等情况而定。
?本产品不能用于保护人体的用途。
?切勿使包括周边装置在内的每一个装置处于温度剧变的环境中。
水气凝结可能会导致产品发生故障。
激光产品的安全注意事项?本产品使用半导体激光作为其光源。
?控制,调整或各步骤性能的使用若与此处指定的方法有出入,可能会导致曝露在有害的辐射中。
?请遵守本说明书中的指示。
-否则,可能会对人体(眼睛和皮肤)造成伤害。
1 类激光产品注意事项?切勿拆卸本产品。
Intel网卡Teaming模式配置
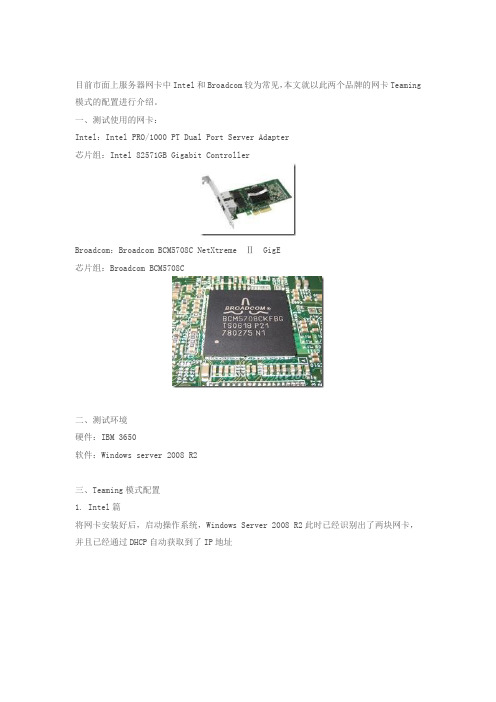
目前市面上服务器网卡中Intel和Broadcom较为常见,本文就以此两个品牌的网卡Teaming 模式的配置进行介绍。
一、测试使用的网卡:Intel:Intel PRO/1000 PT Dual Port Server Adapter芯片组:Intel 82571GB Gigabit ControllerBroadcom:Broadcom BCM5708C NetXtreme Ⅱ GigE芯片组:Broadcom BCM5708C二、测试环境硬件:IBM 3650软件:Windows server 2008 R2三、Teaming模式配置1. Intel篇将网卡安装好后,启动操作系统,Windows Server 2008 R2此时已经识别出了两块网卡,并且已经通过DHCP自动获取到了IP地址但是此时点击网卡的属性发现,驱动程序虽然是09年3月份的,但是相关的高级属性配置选项却没有,看来还是要去Intel官方下载相关驱动管理程序才可以呀。
在官网中找到Intel Ethernet Drivers and Software for Multiple Operating Systems从描述中知道该程序支持多种OS及数种Intel网卡。
下载到本地后,运行Autorun,选择【安装驱动程序和软件】弹框提示选择需要安装的功能驱动程序安装好后,再次点击网卡属性发现,驱动程序已更新至09年6月,并且相应的高级功能选项也出现了。
此时点击【分组】,勾选【将此适配器与其他适配器组合】,并单击【新组】,来创建一个Teaming先给新组起个名字,这里我就叫【Team 1#】然后勾选要组成Team的网卡下一步就要选择网卡组的类型了,这里Intel一共支持5中类型的组模式,分别是:适配器容错、适应性负载均衡、静态链接聚合、IEEE802.3 ad动态链接聚合、交换机容错。
其中适配器容错和交换机容错主要是为了防止硬件设备的单点故障。
使用NIC Teaming实现网卡冗余
59责任编辑:赵志远 投稿信箱:netadmin@ 2019.08特别企划Special Project主流的2U 或4U 机架式或塔式服务器通常配置4端口千兆网卡,但大多数的只使用其中的一个端口。
要将多个网卡绑定成一个网卡使用,可以使用从Windows Server 2012版本操作系统开始支持的“网卡组合”(NIC Teaming)功能。
实验案例介绍为了介绍NIC Teaming,我们准备一台安装了一块4端口千兆网卡的PC 机,2台华为交换机,通过以下3个示例进行介绍。
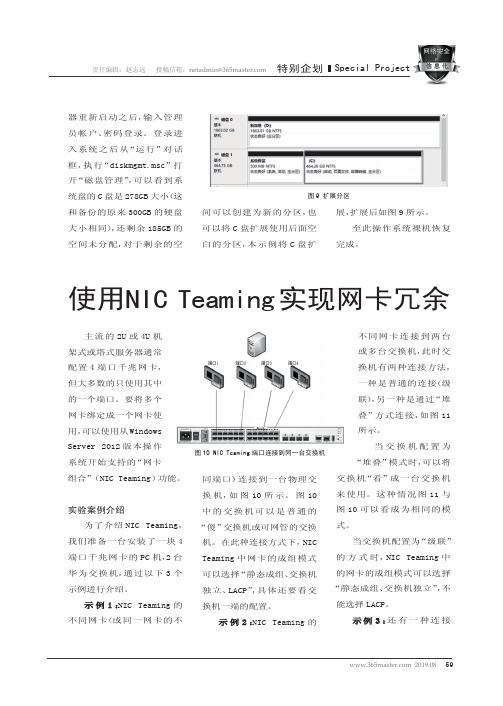
示例1:NIC Teaming 的不同网卡(或同一网卡的不使用NIC Teaming实现网卡冗余同端口)连接到一台物理交换机,如图10所示。
图10中的交换机可以是普通的“傻”交换机或可网管的交换机。
在此种连接方式下,NIC Teaming 中网卡的成组模式可以选择“静态成组、交换机独立、LACP”,具体还要看交换机一端的配置。
示例2:NIC Teaming 的不同网卡连接到两台或多台交换机,此时交换机有两种连接方法,一种是普通的连接(级联),另一种是通过“堆叠”方式连接,如图11所示。
当交换机配置为“堆叠”模式时,可以将交换机“看”成一台交换机来使用。
这种情况图11与图10可以看成为相同的模式。
当交换机配置为“级联”的方式时,NIC Teaming 中的网卡的成组模式可以选择“静态成组、交换机独立”,不能选择LACP。
示例3:还有一种连接器重新启动之后,输入管理员帐户、密码登录。
登录进入系统之后从“运行”对话框,执行“diskmgmt.msc”打开“磁盘管理”,可以看到系统盘的C 盘是278GB 大小(这和备份的原来300GB 的硬盘大小相同),还剩余185GB 的空间未分配,对于剩余的空间可以创建为新的分区,也可以将C 盘扩展使用后面空白的分区,本示例将C 盘扩展,扩展后如图9所示。
至此操作系统裸机恢复完成。
图9 扩展分区图10 NIC Teaming端口连接到同一台交换机602019.08 特别企划Special Project 责任编辑:赵志远 投稿信箱:netadmin@方式,主机网卡连接到两台或多台(接入)物理交换机,但物理交换机之间没有级联或堆叠,接入交换机连接到核心交换机,如图12所示。
- 1、下载文档前请自行甄别文档内容的完整性,平台不提供额外的编辑、内容补充、找答案等附加服务。
- 2、"仅部分预览"的文档,不可在线预览部分如存在完整性等问题,可反馈申请退款(可完整预览的文档不适用该条件!)。
- 3、如文档侵犯您的权益,请联系客服反馈,我们会尽快为您处理(人工客服工作时间:9:00-18:30)。
Realtek网卡teaming配置方法
说明:
使用两块Realtek网卡进行teaming配置
1.为系统添加两块相同的Realtek网卡,并正常安装网卡驱动。
2.安装Realtek Teaming文件夹中的AsusSetup.exe。
/pub/ASUS/mb/socket1366/P6T_WS_PRO/Driver/Teaming_Win_100000 0.zip
3.安装完成后运行“Teaming Utility”。
4.在打开的“Realtek– Teaming Application”中的最左侧一栏,选择一个网卡,点击中间一
栏的“teaming”,然后在最右侧一栏点击“create”按钮。
5.弹出新窗口,选中两块网卡,点击OK
6.完成两块网卡teaming配置,如下图:
7.验证安装
设备管理器中出现一块新的虚拟网卡:
网络连接管理中出现一个新的连接
使用ipconfig命令仅能查看到一块网卡(虚拟网卡),该IP即为当前系统的IP。
teaming配置完成。
注:本例中使用了两块完全相同的realtek 8169网卡进行teaming配置。
理论上该方法支持使用两块及两块以上的realtek网卡进行配置。
