TL-SG2216WEB_TL-SG2224WEB_TL-SG2248WEB用户手册
锐捷 RG-EW系列路由器Web配置指南说明书
Ruijie Reyee RG-EW Series Routers Web-Based Configuration GuideCopyright StatementRuijie Networks©2021Ruijie Networks reserves all copyrights of this document. Any reproduction, excerption, backup, modification, transmission, translation or commercial use of this document or any portion of this document, in any form or by any means, without the prior written consent of Ruijie Networks is prohibited.Exemption StatementThis document is provided “as is”. The contents of this document are subject to change without any notice. Please obtain the latest information through the Ruijie Networks website. Ruijie Networks endeavors to ensure content accuracy and will not shoulder any responsibility for losses and damages caused due to content omissions, inaccuracies or errors.PrefaceThank you for using our products.AudienceThis manual is intended for:●Network engineers●Technical support and servicing engineers●Network administratorsObtaining TechnicalAssistance●Ruijie Networks Website: https:///●Technical Support Website: https:///support ●Case Portal: https://●Community: https://●Technical Support Email: *****************************●Skype: *****************************Related DocumentsConventionsThis manual uses the following conventions:Configuration Guide Overview 1 OvervieweWeb is a Web-based network management system that manages or configures devices. You can access eWeb via browsers such as Google Chrome.Web-based management involves a Web server and a Web client. The Web server is integrated in a device, and is used to receive and process requests from the client, and return processing results to the client. The Web client usually refers to a browser, such as Google Chrome IE, or Firefox.1.1 ConventionsIn this document, texts in bold are names of buttons (for example, OK) or other graphical user interface (GUI) elements (for example, DHCP Security).2 Configuration Guide2.1 PreparationScenarioAs shown in the figure below, an administrator can access the device from a browser and configure the device through the eWeb management system.Figure 2-1-1 Data Exchange PrincipleDeliver or requestcommandsthrough AJAX.Administrator Return dataWebserviceDeviceDeployment↘Configuration Environment RequirementsClient requirements:●An administrator can log into the eWeb management system from a Web browser to manage devices. The client refersto a PC or some other mobile endpoints such as laptops or tablets.●Google Chrome, Firefox, IE10.0 and later versions, and some Chromium-based browsers (such as 360 ExtremeExplorer) are supported. Exceptions such as garble or format error may occur if an unsupported browser is used.●1024 x 768 or a higher resolution is recommended. If other resolutions are used, the page fonts and formats may not bealigned and the GUI is less artistic, or other exceptions may occur.●The client IP address is set in the same LAN network as the device IP address, such as 192.168.120.X. The subnetmask is 255.255.255.0. The default management address of the device is 192.168.120.1. Alternatively, you can set the IP assignment mode to Obtain an IP address automatically.Server requirements:●You can log into the eWeb management system through a LAN port or from Ruijie Cloud on an external network.●The device is enabled with Web service (enabled by default).The device is enabled with login authentication (enabled by default).To log into the eWeb management system, open the Google Chrome browser, and enter 192.168.120.1 into the address bar, and press Enter .Figure 2-1-2 Login PageEnter the password and click Login .2.2 Network SetupYou will enter the Network Setup page without login at initial setup.2.2.1 Discover DeviceThe page displays online device count and network status.You can add the device to My Network before configuring the network. If the device works in the standalone mode, this feature is not supported.Figure 2-2-1 Discover Device2.2.2 Add to My NetworkSelect the target device and click Add to My Network. If the target device is not configured yet, you can add the device directly without a password.Figure 2-2-2 Add Device to My Network2.2.3 Create Network & ConnectIf the device is configured for the first time, the network name, management password and SSID are required. If the device is already configured, the management password will not be displayed here. You can navigate to Network> Password to change the management password.If the device is detected disconnected to Ruijie Cloud, the Ruijie Cloud page will be embedded for you to bind your account after the device accesses the Internet successfully. If the device is already connected to Ruijie Cloud, the eWeb homepage will be displayed after this step.Figure 2-2-3 Create NetworkClick Create Network & Connect, and it takes about 60 seconds to deliver and activate settings. The following message will appear after Internet connection is set up.Figure 2-2-4 Connect to InternetIf the Internet connection failed, please follow the instruction in the prompt message.Figure 2-2-5 Failed Connection2.2.4 Cloud ServiceThe Network Setup module requires a Ruijie Cloud account. If you are a new user, please register an account first at the Ruijie Cloud website.Figure 2-2-6 Log In with Ruijie Cloud AccountIf the device works in the standalone mode, log in and the account will be bound with Ruijie Cloud automatically. If the device works in the self-organizing network mode, the following page will appear.Figure 2-2-7 Select TemplateFigure 2-2-8 Confirm Device StatusFigure 2-2-9 Enable ServicesClick Apply Config. The following page will appear after configuration is delivered successfully.Figure 2-2-10 CompleteAfter the above step, click Ruijie Cloud to configure the device on Ruijie Cloud. Then exit from Ruijie Cloud and enter the eWeb page again.Upon the configuration, check the network and wireless settings of each device for consistency.2.3 Work ModeThe eWeb menu varies with different work modes. The EG device works in the Router mode and the EAP device works in the AP mode by default. The work mode is displayed on the Route > Overview page.Figure 2-3-1 Device OverviewFigure 2-3-2 Work Mode2.3.1 Router ModeThe Router mode indicates NAT forwarding.The EG device in the Router mode of a router contains networking, network setup and routing features including VPN and behavior management.The AP in the Router mode contains networking, network setup and some radio features.2.3.2 AP ModeThe AP mode refers to fit AP mode. All WAN ports are enabled with DHCP by default. You can configure a WAN port with a static IP address or enable PPPoE manually.2.4 Self-Organizing NetworkClick the current work mode, and the following page will appear. You can enable or disable self-organizing network here.Figure 2-4-1 Self-Organizing Network2.4.1 EnableIf self-organizing network is enabled, the device in the network will be discovered and discover other devices. These devices will form a network and be synchronized with network settings.The menu on the left contains all network settings, including wireless management, switch management and system management.Figure 2-4-2 Enable Self-Organizing NetworkIf there is a wireless router enabled with self-organizing network in the network, the Router module will appear in the menu on the left. Click Router , and a horizontal menu will be displayed. Figure 2-4-3 Router Menu2.4.2DisableIf self-organizing network is disabled, the device will work in the standalone mode.After self-organizing network is disabled, a horizontal menu will be displayed vertically on the left. Figure 2-4-4 Disable Self-Organizing Network3 eWeb Configuration3.1 OverviewThe Overview page displays login device, wireless information and network status. Figure 3-1 Overview3.2 Basic WirelessThe APs module allows you to group, upgrade and delete APs.Figure 3-2-1 AP ListA. Group ManagementClick Expand, and all groups will be displayed on the left column. You can add, delete, edit and search groups. Up to 8 groups can be added.Figure 3-2-2 Group ManagementB. Advanced Search and List FilterClick Advanced Search, and you can search APs by SN, model, software version, MAC address and IP address.Click List Filter, and you can select columns to be displayed in the list.C. Batch ActionSelect the target devices and click Batch Action. The following actions are available:Figure 3-2-3 Batch ActionUpgrade Device: If there is a new version available, you can upgrade the devices in batches.Delete Device: You can delete the devices in batches.Change Group: You can move the devices from one group to another. The devices will be applied with the new group settings.3.2.1 ConfigurationFigure 3-2-4 ConfigurationSelect the target device and click Manage in the Action column, and the AP management page will be displayed.3.2.2 OverviewThe Overview page displays the information including memory usage, online clients, status, device details, wireless information and interface details.Figure 3-2-5 Overview3.2.3 Basics3.2.3.1 WANThe WAN module allows you to configure WAN settings. WAN settings support multiple lines, and you can configure a specific line as needed.Figure 3-2-6 WAN Settings3.2.3.2 LANThe LAN module contains LAN Settings, Port VLAN, DHCP Clients and Static IP Addresses. LAN SettingsThe LAN module allows you to set the IP address of the LAN port and DHCP status.Figure 3-2-7 LAN SettingsFigure 3-2-8 Add IP AddressIn the AP mode, the Port VLAN function is available on page for the AP supporting Port VLAN. Figure 3-2-9 Port VLAN↘Port VLANThe Port VLAN page displays VLAN information. This page is displayed only when the AP is enabled with port VLAN in the AP mode.Figure 3-2-10 Port VLAN↘DHCP ClientsThe DHCP Clients page displays DHCP clients. This page is displayed only in the router mode.Figure 3-2-11 DHCP ClientsClick Convert to Static IP in the Action column to convert a DHCP-assigned IP address to a static IP address. Alternatively, select DHCP-assigned IP addresses and click Batch Convert to convert more than one IP address.Static IP AddressesThe Static IP Addresses module allows you to add, delete and edit static IP addresses. This page is displayed only in the router mode.Figure 3-2-12 Static IP AddressesClick Add to add a static IP address manually. In the displayed dialog box, configure settings and click OK.Figure 3-2-13 Add Static IP Address3.2.3.3 PoEThe PoE page displays PoE status and power consumption. Figure 3-2-14 PoE3.2.4 Security3.2.4.1 ARP ListThe ARP List page displays ARP entries.Figure 3-2-15 ARP ListClick Add to add an IP-MAC binding. In the displayed dialog box, enter or select an IP address and a MAC address and click OK.Figure 3-2-16 Add IP-MAC Bindingdialog box, click OK. The message "Delete operation succeeded." is displayed.3.2.5 Advanced3.2.5.1 Local DNSThe Local DNS module allows you to configure a local DNS server.Figure 3-2-17 Local DNS3.2.5.2 PoE SettingsThe PoE Settings module allows you to configure the PoE mode.Figure 3-2-18 PoE Settings3.2.5.3 Other SettingsThe Other Settings module allows you to perform other settings, such as Enable RIP&RIPng, Enable Advanced and Disable ICMPv6 Error.Figure 3-2-19 Other Settings3.2.6 Diagnostics3.2.6.1 Network Check Figure 3-2-20 Network CheckClick Start, and click OK in the confirmation box. After the test finishes, the result will be displayed. Figure 3-2-21 ResultIf any problem occurs, the result will be displayed as follows:Figure 3-2-22 Issue & AdvicePlease fix the problem by taking the suggested action.3.2.6.2 AlarmsThe Alarms module allows you to view and manage alarms in the network.Figure 3-2-23 AlarmsClick Unfollow in the Action column to unfollow an alarm. In the confirmation box, click OK. Figure 3-2-24 Unfollow AlarmClick View Unfollowed Alarm, and you can view and follow the alarm again.Figure 3-3-25 Re-follow Alarm3.2.6.3 Network ToolsThe Network Tools module provides the following network tools to detect the network status: Ping, Traceroute, and DNS Lookup.Figure 3-2-26 Ping Test and ResultFigure 3-2-27 Traceroute Test and ResultFigure 3-2-28 DNS Lookup Test and Result3.2.6.4 Fault CollectionThe Fault Collection module allows you to collect faults by one click and download the fault information to the local device. Figure 3-2-29 Fault Collection3.2.7 System3.2.7.1 Session TimeoutThe Session Timeout module allows you to set the session timeout period.Figure 3-2-30 Session Timeout3.2.7.2 Backup & Import & ResetBackup & ImportThe Backup & Import module allows you to import a configuration file and apply the imported settings. It also allows exporting the configuration file to generate a backup.Figure 3-2-31 Backup & ImportRestoreThe Restore module allows you to restore the device to factory settings. Figure 3-2-32 RestorePlease exercise caution if you want to restore the factory settings. Figure 3-2-33 Confirm RestoreClick OK to restore all default values. This function is recommended when the network configuration is incorrec t or the network environment is changed.3.2.7.3 UpgradeOnline UpgradeClick Upgrade Now. The device downloads the upgrade package from the network, and upgrades the current version. The upgrade operation retains configuration of the current device. Alternatively, you can select Download File to the local device and import the upgrade package on the Local Upgrade page.Figure 3-2-34 Online UpgradeFigure 3-2-35 Upgrade PromptLocal UpgradeClick Browse to select an upgrade package, and click Upload. After uploading and checking the package, the device displays the upgrade package information and a prompt asking for upgrade confirmation. Click OK to start the upgrade.Figure 3-2-36 Local Upgrade3.2.7.4 RebootThe Reboot module allows you to reboot the device immediately.Figure 3-2-37 RebootClick Reboot, and click OK in the confirmation box. The device is rebooted and you need to log into the eWeb management system again after the reboot. Do not refresh the page or close the browser during the reboot. After the device is successful ly rebooted and the eWeb service becomes available, you will be redirected to the login page of the eWeb management system.3.3 WiFiThe WiFi module allows you to configure WiFi settings for all devices.3.3.1 WiFi SettingsThe WiFi Settings module allows you to configure the primary WiFi.Figure 3-3-1 WiFi Settings3.3.2 Guest WiFiThe guest WiFi is disabled by default. You can enable guest WiFi on this page or homepage.AP isolation is enabled by default and cannot be edited.Set a schedule, and the guest WiFi will be enabled only during this period time. When the time expires, the guest WiFi will be disabled.Figure 3-3-2 Guest WiFiFigure 3-3-3 Enable Guest WiFi3.3.3 WiFi ListThe WiFi List displays all WiFi networks. The primary WiFi is also listed here and cannot be deleted.Figure 3-3-4 WiFi ListClick Add to add a WiFi network. In the displayed dialog box, configure settings and click OK. Figure 3-3-5 Add WiFiYou can click in the upper right corner to see description about each configuration item.3.3.4 Healthy ModeThe Healthy Mode module allows you to enable health mode and set a schedule. Figure 3-3-6 Healthy Mode3.4 Wireless ClientsThe Clients module displays the wireless clients.Figure 3-4-1 Wireless Client ListClick Advanced Search, and you can search clients by SN and MAC address. This is a fuzzy search. You can enter an incomplete MAC address or part of an SN. Figure 3-4-2 Advanced Search3.5 Blacklist/WhitelistThe Blacklist/Whitelist module allows you to configure wireless global or SSID-based client blacklist and whitelist. Blacklist and whitelist can achieve full match or prefix match (OUI).3.5.1 Global Blacklist/WhitelistFigure 3-5-1 Global Blacklist/WhitelistClick Add to add a blacklisted or whitelisted client. In the displayed dialog box, configure settings and click OK.。
tplink交换机资料
tplink交换机资料TL-SG1016全千兆以太⽹交换机提供16个10/100/1000Mbps ⾃适应端⼝,所有端⼝均⽀持⾃动翻转功能(AutoMDI/MDIX),既可⽤作普通⼝,也可⽤作Uplink ⼝。
TL-SG1016提供了⼀个简单、经济、⾼性能、⽆缝隙、标准的迁移到1000M ⽹络的解决⽅法,在提⾼⼯作组性能上提供了很⼤的灵活性,具有使⽤简单灵活,安装⽅便,性能优越,性价⽐⾼的特点,是您提⾼服务速度的理想选择。
TL-SG101616⼝全千兆以太⽹交换机产品特点:符合IEEE 802.3、IEEE 802.3u、IEEE 802.3ab 标准16个10/100/1000M ⾃适应RJ45端⼝ ? ⽀持端⼝⾃动翻转(Auto MDI/MDIX)功能 ? ⽀持MAC 地址⾃学习;⽀持全双⼯⼯作模式 ?内置电源,1U 钢壳,19英⼨标准机架结构符合IEEE 802.3、IEEE 802.3u、IEEE 802.3ab 标准;流控⽅式:全双⼯采⽤IEEE 802.3x 标准,半双⼯采⽤Backpressure 标准; ? 存储-转发体系结构;16个10/100/1000M ⾃适应RJ45端⼝,⽀持端⼝⾃动翻转(Auto MDI/MDIX); ? 16个端⼝均⽀持10M 全/半双⼯、100M 全/半双⼯、1000M 全双⼯; ? UTP 端⼝⽀持⾃动协商功能,⾃动调整传输⽅式和传输速率; ? ⽀持MAC 地址⾃学习;动态LED 指⽰灯,提供简单的⼯作状态提⽰及故障排除; ?内置通⽤电源,19英吋标准机架钢壳结构设计。
⽀持的标准和协议 IEEE 802.3、IEEE 802.3u、IEEE 802.3ab、IEEE 802.3x端⼝ 16个10/100/1000M ⾃适应RJ45端⼝(Auto MDI/MDIX)10Base-T:3类或3类以上UTP100Base-TX:5类UTP1000Base-T:超5类UTP ⽹络介质 10Mbps:14880pps100Mbps:148800pps1000Mbps:1488000pps过滤和转发速率背板带宽32G MAC 地址表 8K每个端⼝Link/Act(连接/⼯作),1000Mbps(1000M 速度)LED 指⽰其它 Power(电源)外形尺⼨(LxWxH)440mm x 180mm x 44mm⼯作温度:0oC~40oC;存储温度:-40oC~70oC⼯作湿度:10%~90% RH 不凝结;存储湿度:5%~90% RH 不凝结使⽤环境输⼊:100-240VAC,50/60Hz(内部通⽤电源)功耗:最⼤26W电源及功耗TL-SG10088⼝全千兆以太⽹交换机产品特点:符合IEEE 802.3、IEEE 802.3u、IEEE 802.3ab 标准8个10/100/1000M ⾃适应RJ45端⼝ ? ⽀持端⼝⾃动翻转(Auto MDI/MDIX)功能 ? ⽀持MAC 地址⾃学习;⽀持全双⼯⼯作模式 ?内置电源,1U 钢壳,可安装于19英⼨标准机架TL-SG1008提供8个10/100/1000M ⾃适应以太⽹端⼝,为10M 以太⽹、100M 快速以太⽹和千兆以太⽹提供⽆缝连接,每端⼝最⾼可提供2000Mbps 的传输速率,是提升部门和⼯作组性能的理想选择。
无线路由器CPU闪存内存芯片列表
TR-966D
RealtekRTL8305SC
TR-965DA
EN29LV160AB闪存2MB
S29AL908D70TE102不明芯片
TL-R480T
TL-R4000
TL-R480T÷
TL-R488T
TL-R4000+
TL-SG3109
TL-SG3216
TL-SG3224
TL-SG3248
TL-SL3428
TL-SL3452
TL-SG2109WEB
IntelFWIXP420BB(CPU)+MarVell88E6063(Switch)
Marvell88E6092(MAC)+88E1111(PHY)+88E6218(CPU)
Marvell88E6092(MAC)+88E1111(PHY)+88E6218(CPU)
Marvell88E6182+88E6092(MAC)+88E1111(PHY)+88E6218(CPU)
Marvell88E6182+88E6092(MAC)+88E1111(PHY)+88E6218(CPU)
品牌规格
cpu
主频
闪存/内存
无线芯片
参考价
迅捷FVVR300T+
AtherosAR9132
400MHZ
4/32
Atheros
AR9103
90
水星MWR300T+
(旧款长方形的)
AtherosAR9132
400MHZ
4/32Vl版新款可能有缩水
Atheros
AR9103
90
网络冗余技术
网络冗余技术网络冗余二层STP (802.1D 802.1W 802.1S)三层路由冗余RIP OSPF EIGRP网关冗余HSRP VRRP GLBP以太网信道EtherChannel (2 3)双机热备HSRP主机访问外网,发向网关。
网关故障,中断HSRP是CISCO的专用协议,让多台R提供同一个IP网关服务。
一主,一备,主故障,备自动提供服务。
选举优先级(0-255),默认100,最高成为主R(config )# int e0# standby 1 priority 120 高于100,将成为主R例:一在R1、R2、R3上配置osfp协议,实现全网互通。
二配置HSRP协议, 将R1的优先级设为120,使其成为活动R.配置:R1(config )# int e0# ip add 172.16.1.199 255.255.255.0# standby 1 ip 172.16.1.200 加入虚拟组172.16.1.200# standby 1 priority 120将优先级设为120# standby 1 authentication 123明文验证# standby 1 preempt 抢占,优先级高成为主# standby 1 track s0 30跟踪S0接口,DOWN优先级降30# no shutR3(config )# int e0# ip add 172.16.1.201 255.255.255.0# standby 1 ip 172.16.1.200 加入虚拟组172.16.1.200# standby 1 authentication 123明文验证# standby 1 preempt 抢占,优先级高成为主# no shut三测试1. PC Ping 172.16.100.1 –t , 然后R# sh standby ,则R1优先级为120,活动RR3优先级为100,备用PC Tracert 172.16.100.1 经R1 到目标2.将R1的E0关闭,ping中断后自动恢复,经R3到目标。
无线路由器CPU 闪存 内存 芯片 列表【VIP专享】

品牌规格cpu主频闪存/内存无线芯片参考价迅捷FWR300T+Atheros AR9132400MHZ4/32AtherosAR910390水星MWR300T+(旧款长方形的)Atheros AR9132400MHZ4/32 V1版新款可能有缩水AtherosAR910390TP-LINK TL-WR941N Atheros AR9132400MHZ4/32AtherosAR9103D-LINK DIR618RealtekRTL8196B 400MHZ2/16RealtekRTL8192SE华硕RT-N56U RalinkRT3662F+RT3092500MHZ8/128主芯片集成TOTOLINK N5004BroadcomBCM4718A533 MHZ4/16主芯片集成贝尔金畅享版BroadcomBCM4718A533 MHZ8/64主芯片集成华硕RT-N16BroadcomBCM4718A533 MHZ32/128主芯片集成型号&版本CPU主频无线芯片RAMSize Flash天线数TP-LINK/MW/FWTL-WR843N AR9341200mhz32M4MTL-WR841N V8AR9341200mhz16M4M2 TL-WR841N V7AR7241-AH1A360AR928732M4M2 TL-WR740N V4AR7240400AR928532M4M1 TL-WR2543ND AR7242400AR938064M8MTL-WR1041N AR9342-AL1A550AR832732M4MTL-WR800N AR934120016MTL-WA901NDV2.xAR9132400AR541632M4MTL-WA901NDV1.xAR7240400AR928532M4MTL-WA801NDv1.1AR724x查不了AR9238-AL1A 32M4MTL-WA701ND v1AR724040032M4M MW310R V1AR934120016M4M3MW300R V4AR934120016M2M MW300R V3AR934120016M4M2 MW300r v2AR72416802 TL-WDR4310AR9344 533AR9580128M8MTL-WDR7500QCA9880[AC]600QCA9558[N]128MMW150R V8.4AR9331400D-LINKDir615-1 F2RTL8196B 400RTL8192SEDIR615 C1AR9130400AR8216DIR615L J1RTL8196C 400RTL8192SEDIR600NW A1RT3050F320腾达W811R RT3050F320N300R BCM5357C0533N308R BCM5357500N309R BCM5357500N3000BCM5357500W311R_2011RT3050F320W311R V2BCM5356333W311R V3BCM5356333A5S RT5350F360A6RT5350F360N4RT5350F360W268R RT3050F320W307R RT2880F266W837R BCM5357500磊科NW614RTL8196C400NW714RTL8196C400RTL8192CENW715P BCM5357B0533超频NW736BCM5357200NW735BCM5357200NR235W BCM5357C0300超频NW716RTL8196C400RTL8192CENW762NW765BCM5358500BCM4323NW705+ V1.1RTL8196C400RTL8188RENW705同上NW604不明牌子400 TP-link(以下均是)TL-R860+ v2.08口有线路由9vcpu 88E6218-LG01 150MHZis42s16400B-7TL 内存64MBEN29LV160AB 闪存2MBS29AL908D70TE102 不明芯片TL-WR641G Athreos AR2316 + Marvell 88E6060 TL-WR641G+ Athreos AR2318 + Marvell 88E6060 TL-WR642G Athreos AR2316 + Marvell 88E6060 TL-WR642G+ Athreos AR2318 + Marvell 88E6060 TL-WN610G Athreos AR2414TL-WN620G Athreos AR5523TL-WN650G Athreos AR2414TL-WN651G Athreos AR2414TL-WN660G Athreos AR2414TL-WN612AG Athreos AR5414TL-WN652AG Athreos AR5414TL-WN653AG Athreos AR5414TL-WN662AG Athreos AR5414TL-WR541G Athreos AR2413 + Marvell 801012 TL-WR541G+ Athreos AR2317 + Marvell 88E6060 TL-WR542G Athreos AR2317 + Marvell 88E6060 TL-WA501G Athreos AR2315 + Realtek RTL8201 TL-WN510G Athreos AR2413TL-WN550G Athreos AR2413TL-WN551G Athreos AR2413TL-WN321G Ralink RT2571WTL-WN321G Ralink RT2571WTL-WN560G Athreos AR2413TL-WN512AG Athreos AR5413TL-WN552AG Athreos AR5413TL-WN553AG Athreos AR5413TL-WN562AG Athreos AR5413TL-ANT2402A N/ATL-ANT2405C N/ATL-ANT2406A N/ATL-ANT2409A N/ATL-ANT2414A N/ATD-8610 Annex A) Broadcom BCM6338 + BCM6301TD-8610 Annex B) Broadcom BCM6338 + BCM6301TD-8810 (Annex A) Broadcom BCM6338 + BCM6301TD-8810 (Annex B) Broadcom BCM6338 + BCM6301TD-8811 (Annex A) Broadcom BCM6338 + BCM6301TD-8811 (Annex B) Broadcom BCM6338 + BCM6301TD-8840 (Annex A) Broadcom BCM6338 + BCM6301TD-8840 (Annex B) Broadcom BCM6338 + BCM6301TD-8841 (Annex A) Broadcom BCM6338 + BCM6301TD-8841 (Annex B) Broadcom BCM6338 + BCM6301TL-W8910G Atheros AR2413TL-W8920G Atheros AR2414TL-R402M Marvell 88E6218TL-R460 Marvell 88E6218TL-R860 Marvell 88E6218+Marvell 88E6060(Switch)TL-R860+ Marvell 88E6218 is42s16400B-7TL 内存64MB EN29LV160AB 闪存2MB S29AL908D70TE102不明芯片TL-R480T Intel FWIXP420BB (CPU) + Marvell 88E6063 (Switch)TL-R4000 Intel FWIXP420BB (CPU) + Marvell 88E6063 (Switch)TL-R480T+ Intel FWIXP420BB (CPU) + Marvell 88E6063 (Switch)TL-R488T Intel FWIXP425BD (CPU) + Marvell 88E6063 (Switch)TL-R4000+ Intel FWIXP425BD (CPU) +Marvell 88E6063 (Switch)TL-SG3109 Marvell 88E6185 (MAC) + 88E1145 (PHY) + 88E6218 (CPU)TL-SG3216 Marvell 98DX160 (MAC) + 88E1145 + 88E1111 + 88E1112 (PHY) + 88E6218 (CPU)TL-SG3224 Marvell 98DX240 (MAC) + 88E1145 + 88E1111 + 88E1112 (PHY) + 88E6218 (CPU)TL-SG3248 Marvell 98DX26x (MAC) + 88E1145 + 88E1111 + 88E1112 (PHY) + 88E6218 (CPU)TL-SL3428 Marvell 88E6185 + 88E6095 (MAC) + 88E1111 (PHY) + 88E6218 (CPU)TL-SL3452 Marvell 88E6185 + 88E6095 (MAC) + 88E1111 (PHY) + 88E6218 (CPU)TL-SG2109WEB Marvell 88E6182 (MAC) + 88E1145 (PHY) + 88E6218 (CPU)TL-SG2216WEB Marvell 98DX162 (MAC) + 88E1145 + 88E1111 + 88E1112 (PHY) + 88E6218 (CPU)TL-SG2224WEB Marvell 98DX242 (MAC) + 88E1145 + 88E1111 + 88E1112 (PHY) + 88E6218 (CPU)TL-SG2248WEB Marvell 98DX262 (MAC) + 88E1145 + 88E1111 + 88E1112 (PHY) + 88E6218 (CPU)TL-SL2210WEB Marvell 88E6092 (MAC) + 88E1111 (PHY) + 88E6218 (CPU)TL-SL2218WEB Marvell 88E6092 (MAC) + 88E1111 (PHY) + 88E6218 (CPU)TL-SL2428WEB Marvell 88E6182 + 88E6092 (MAC) + 88E1111 (PHY) + 88E6218 (CPU)TL-SL2452WEB Marvell 88E6182 + 88E6092 (MAC) + 88E1111 (PHY) + 88E6218 (CPU)TL-SG1005D Vitesse VSC7385TL-SG1008D Vitesse VSC7388TL-SG1008 Vitesse VSC7388TL-SG1016 Vitesse VSC7389 (MAC) + VSC8538 (PHY)TL-SG1016 Marvell 98DX161 (MAC) + 88E1149 (PHY)TL-SG1016D Marvell 98DX161 (MAC) + 88E1149 (PHY)TL-SG1024 Vitesse VSC7390 (MAC) + VSC8538 (PHY)TL-SG1024 Marvell 98DX241 (MAC) + 88E1149 (PHY)TL-SL1109 Realtek RTL8310 (MAC) + RTL8208B (PHY)TL-SL1117 Realtek RTL8318 (MAC) + RTL8208B (PHY)TL-SL1226 Realtek RTL8326(MAC)+ RTL8208-VF(PHY)+ Cicada CIS8201(PHY) TL-SL1351 Marvell 88E6182 + 88E6092 (MAC) + 88E1111 (PHY) + 88E6218 (CPU) TL-SF1005D Realtek RTL8305SCTL-SF1005D Marvell 88E6060TL-SF1008D Realtek RTL8309SBTL-SF1016D Realtek RTL8309SBTL-SF1016 Realtek RTL8316B (MAC) + RTL8208(PHY)TL-SF1016 Realtek RTL8316B (MAC) + RTL8208(PHY)TL-SF1024 Realtek RTL8324 (MAC) + RTL8208B (PHY)TL-SF1048 Realtek RTL8326 (MAC) + RTL8208-VF(PHY)TL-SM201CM Altima AC101TL-SM201CS Altima AC101TL-SM311LM N/ATL-SM311LS N/ATR-966D Realtek RTL8305SCTR-965DA Realtek RTL8305SCTR-965DB Realtek RTL8305SCTR-932D Realtek RTL8305SCTR-962D Realtek RTL8305SCTG-3269 Realtek RTL8169SCTG-3201 Marvell 88E8001TF-3239D Realtek RTL8139DTF-3239DL Realtek RTL8139DTF-5239 Realtek RTL8139CLTM-IP5600 Motorola PCI 3 (Si3052+Si3007)TM-EC5658V Intel MD5660 + MD4450 + MD1724。
交换路由端口镜像功能

3870 是
SuperStack3 Switch (3CR17450-91)
3870 是
SuperStack3 Switch (3CR17501-91)
3250 是
SuperStack3 Switch (3CR17500-91)
3226 是
Baseline Switch (3C16478)
2816 是
OfficeConnect (3C16793)
Switch
5是
SuperStack 3 (3C17401)
Switch
3800 是
SuperStack 3 (3C17400)
Switch
3800 是
OfficeConnect (3C1670500)
是
OfficeConnect (3C1670108)
是
D-Link DIR-605
否
ZXR10 2618
是
端口镜像配置方法
[H3C]monitor-port Ethernet 0/8 [H3C]mirroring-port Ethernet 0/1 to Ethernet 0/5 inbound [H3C]display mirror
SwitchA相关配置】 1. 将端口E0/2配置为监控端口 [SwitchA]monitor-port Ethernet 0/2 2. 配置acl,定义符合监控的数据流规则 [SwitchA]acl number 4000 [SwitchA-acl-link-4000]rule permit ingress interface e0/1 egress any [SwitchA-acl-link-4000]rule permit ingress any egress interface e0/1 3. 将匹配acl规则的报文镜像到监控端口E0/2 [SwitchA]mirroed-to link-group 4000 interface Ethernet 0/2
普联全千兆Web网管交换机安装手册说明书
安装手册全千兆Web网管交换机Enterprise Networking SolutionTL-SG2048TL-SG2226/TL-SG2218TL-SG2024/TL-SG2016TL-SG2024D/TL-SG2016D TL-SG2422F/TL-SG2414F全千兆Web网管PoE交换机TL-SG2226PE/TL-SG2226P TL-SG2218PE/TL-SG2218P TL-SG2024MP声明Copyright © 2020 普联技术有限公司版权所有,保留所有权利未经普联技术有限公司明确书面许可,任何单位或个人不得擅自仿制、复制、誊抄或转译本手册部分或全部内容,且不得以营利为目的进行任何方式(电子、影印、录制等)的传播。
为普联技术有限公司注册商标。
本手册提及的所有商标,由各自所有人拥有。
本手册所提到的产品规格和资讯仅供参考,如有内容更新,恕不另行通知。
除非有特殊约定,本手册仅作为使用指导,所作陈述均不构成任何形式的担保。
I声明相关文档除本安装手册外,我们还提供以下文档的电子版本。
如需获取最新产品资料,请登心,我们将为您提供技术支持服务。
安装手册简介《全千兆Web网管交换机安装手册》主要介绍交换机的硬件特性、安装方法以及在安装过程中应注意事项。
本手册包括以下章节:第1章:产品介绍。
简述交换机的基本功能特性并详细介绍外观信息。
第2章:产品安装。
指导交换机的硬件安装方法以及注意事项。
第3章:硬件连接。
指导交换机与其他设备之间的连接及注意事项。
第4章:登录Web管理界面。
指导通过Web登录配置交换机。
附录A:常见故障处理。
附录B:技术参数规格。
II相关文档附录C:连接SFP端口补充说明。
本手册适合下列人员阅读:网络工程师网络管理员约定在本手册以下部分,如无特别说明,均以TL-SG2226机型为例介绍,所提到的交换机是指全千兆Web网管交换机。
本手册采用了如下几种醒目标志来表示操作过程中应该注意的地方,这些标志的III阅读对象目录第1章 产品介绍 ———————————011.1 产品简介 (01)1.2 产品外观 (02)第2章 产品安装 ———————————092.1 物品清单 (09)2.2 安装注意事项 (09)2.3 安装工具准备 (11)2.4 产品安装 (11)第3章 硬件连接 ———————————133.1 连接至RJ45端口 (13)3.2 连接SFP端口 (13)3.3 连接电源线 (14)3.4 设备初始化 (14)3.5 安装后检查 (14)第4章 登录Web管理界面 ———————15附录A 故障处理 ———————————16附录B 技术参数规格 —————————17附录C 连接SFP端口补充说明 —————18IV目录01全千兆Web网管交换机安装手册产品介绍第1章 产品介绍1.1 产品简介普联技术有限公司全新开发推出的Web网管交换机,采用高性能硬件和软件平台,提供灵活、高性价比的全千兆端口,支持802.1Q VLAN、端口监控、端口汇聚、QoS等常用功能,易于管理维护,适用于校园、酒店及企业园区网络接入应用场景。
DPtech LSW2300系列以太网交换机安装手册v1.2

DPtech LSW2300系列以太网交换机 安装手册
i
DPtech LSW2300系列以太网交换机安装手册
杭州迪普科技股份有限公司为客户提供全方位的技术支 持。 通过杭州迪普科技股份有限公司代理商购买产品的用 户,请直接与销售代理商联系;直接向杭州迪普科技股 份有限公司购买产品的用户,可直接与公司联系。 杭州迪普科技股份有限公司 地址: 杭州市滨江区通和路68号中财大厦6层 邮编:310052
1.1 产品概述 .................................................................................................................................. 1-1 1.2 产品型号及规格介绍 .............................................................................................................. 1-1 1.3 前后面板介绍 .......................................................................................................................... 1-3 1.3.1 LSW2300-8T4GP-I/LSW2300-8T4GP-I-DC产品外观 ....................................................... 1-3 1.3.2 LSW2300-8GT4GP-I/LSW2300-8GT4GP-I-DC产品外观.................................................. 1-7 1.3.3 LSW2300-16GT2GP-I/ LSW2300-16GT2GP-I-DC 产品外观 .......................................... 1-11 1.4 端口介绍 ................................................................................................................................ 1-14 1.4.1 CONSOLE口 ......................................................................................................................... 1-14 1.4.2 百兆/千兆以太网电接口 .................................................................................................... 1-15 1.4.3 SFP口 .................................................................................................................................. 1-17
烽火S2224ME-PAF交换机基本配置V3.0

烽火S2224ME-PAF交换机基本配置举例V3.01、连接配置第一步:将PC通过串口电缆与交换机的Console口相连;第二步:在微机上运行仿真程序(如超级终端或SecureCRT),设备终端参数为9600bps,8位数据位、1位停止位、无校验和无流控;第三步:交换机第一次上电,设备按照缺省的参数自动启动,直到用户登录界面。
2、基本配置举例假设:本交换机1-15口接有AP,AP采用交换机POE供电功能供电;16-23口,25、26空闲,局方要求关闭;24口作为上行级联口。
AP的管理vlan【用户业务vlan】为2031;交换机管理vlan为30,IP为192.168.206.100/21,网关为192.168.200.1/21。
另,局方要求创建用户名为cmcc,密码也为cmcc的账户。
【彩色底色部分为变量】配置命令如下:admin 【默认管理员账户】12345 【默认登录密码】conf 【进入配置模式】hostname QHXN-WLAN-SW001-ChangYunShiJiCun【设置交换机主机名】adduser cmcc password cmcc 【创建用户名为cmcc,密码为cmcc的账户】int vlan 30 【创建交换机管理vlan 30,并进入配置】member 24 tagged 【24口透传交换机管理vlan 30】exit 【返回到配置模式】system 【进入系统配置模式】management vlan 30 【设置交换机管理VLAN为30】ip address 192.168.206.100/21 【配置交换机管理地址及掩码】gate 192.168.200.1 【配置交换机网关地址】exit 【返回到配置模式】int vlan 2031 【创建vlan 2031,并进入配置】member 1-15 untagged 【将1-15口,以untagged模式加入vlan 2031】app 1-15 【将1-15口pvid设为AP管理VLAN相同ID】member 24 tagged 【24口透传交换机管理vlan 2031】exit 【返回到配置模式】port 16-23,25,26 shutdown 【关闭空闲端口】port 1-15 pse enable 【开启接AP端口的POE供电功能】exit 【返回到特权模式】wr f 【保存配置】y 【确定保存】3、查看命令介绍3.1 sh vlan说明:在#模式下执行sh vlan可以看到如上相关vlan的信息。
h3c配置清单
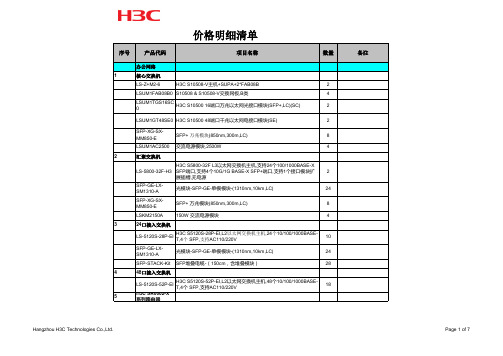
办公网络1核心交换机LS-Z+M2-6H3C S10508-V主机+SUPA+2*FAB08B2LSUM1FAB08B0S10508 & S10508-V交换网板,B类4LSUM1TGS16SCH3C S10500 16端口万兆以太网光接口模块(SFP+,LC)(SC)2 LSUM1GT48SE0H3C S10500 48端口千兆以太网电接口模块(SE)2SFP-XG-SX-MM850-ESFP+ 万兆模块(850nm,300m,LC)8 LSUM1AC2500交流电源模块,2500W4 2汇聚交换机LS-5800-32F-H3H3C S5800-32F L3以太网交换机主机,支持24个100/1000BASE-XSFP端口,支持4个10G/1G BASE-X SFP+端口,支持1个接口模块扩展插槽,无电源2SFP-GE-LX-SM1310-A光模块-SFP-GE-单模模块-(1310nm,10km,LC)24 SFP-XG-SX-MM850-ESFP+ 万兆模块(850nm,300m,LC)8 LSKM2150A150W 交流电源模块4 324口接入交换机LS-5120S-28P-EI H3C S5120S-28P-EI,L2以太网交换机主机,24个10/100/1000BASE-T,4个 SFP,支持AC110/220V10SFP-GE-LX-SM1310-A光模块-SFP-GE-单模模块-(1310nm,10km,LC)24 SFP-STACK-Kit SFP堆叠电缆-(150cm,含堆叠模块)28 448口接入交换机LS-5120S-52P-EI H3C S5120S-52P-EI,L2以太网交换机主机,48个10/100/1000BASE-T,4个 SFP,支持AC110/220V185H3C SR6602-X 系列路由器RT-SR6604-X+2 RSE-X2+2AC650W SR6604-X路由器+2 RSE-X2主控+2 AC650W电源模块(0235A0VE+0231A1U5*2+0231A0BK*2)2备注序号产品代码项目名称数量序号产品代码项目名称数量备注序号产品代码项目名称数量备注序号产品代码项目名称数量备注序号产品代码项目名称数量备注序号产品代码项目名称数量备注序号产品代码项目名称数量备注。
RG-S6220系列数据中心与云计算交换机产品介绍

面向下一代数据中心与云计算交换机RG-S6220系列产品介绍1 产品图片RG-S6220-48XS4QXSRG-S6220-48XT4QXS图1-1RG-S6220-24XS图1-2RG-S6220-48XS6QXS-H图1-3RG-S6220-48XT6QXS-H图1-4RG-S6220-32QXS-H图1-5RG-S6220-48XS4QXS-L2 产品概述数据中心是通过网络提供服务的“生产工厂”。
近年来,以移动互联网、Web2.0应用、云计算为代表的新型业务迅速发展,数据中心规模开始迅速扩大,并呈现出动态、弹性、灵活、按需调用的特点。
传统网络设备作为数据中心内部最重要的基础设施之一,却由于无法满足弹性、灵活的业务需求而成为当前数据中心发展的瓶颈。
针对当前的问题及趋势,锐捷网络率先推出真正面向下一代数据中心与云计算的交换机产品,将“无阻塞交换、统一交换、虚拟化交换、透明交换、绿色交换”作为下一代数据中心的发展方向,解决传统数据中心网络设备数量多,成本高、流量突增等问题,为构建云计算网络奠定基础。
其中RG-S6220系列交换机是锐捷网络在国内率先推出的面向融合FC/FCoE/IP网络的全万兆云计算特性数据中心交换机。
围绕数据中心与云计算网络虚拟化的趋势,RG-S6220系列交换机采用业界领先的VSU 2.0(Virtual Switch Unit,虚拟交换单元)虚拟化技术将多台物理设备虚拟化为一台逻辑设备,大幅简化网络结构,提高设备可靠性。
RG-S6220系列支持数据中心边缘虚拟交换VEPA、虚拟机发现及安全策略自动迁移等下一代数据中心虚拟化特性。
硬件支持IPv4/IPv6双协议栈多层线速交换和功能特性,并为IPv6网络之间的通信提供丰富的Tunnel技术,可灵活应用于纯IPv4网络、纯IPv6网络、IPv4到IPv6共存的网络,满足当前网络从IPv4向IPv6过渡的需要。
同时,伴随着数据中心融合网络的趋势,RG-S6220系列可为服务器提供FC(Fibre Channel)与FCoE(Fibre Channel over Ethernet)接入和以太网接入服务,同时为传统IP SAN用户提供无损以太网传输,增加IP SAN的可靠性,并且帮助用户轻松整合异构的存储网和数据网,减少数据中心建设成本和复杂性。
TP-LINK TL-SG2216WEB SG2224WEB SG2248WEB交换机 说明书

用户手册TL-SG2216WEB16口全千兆Web管理交换机TL-SG2224WEB24口全千兆Web管理交换机TL-SG2248WEB48口全千兆Web管理交换机选择知名品牌品质更有保障 REV:1.0.11910040116商标、版权声明为深圳市普联技术有限公司注册商标。
本产品的所有部分,包括配件和软件,其版权都归深圳市普联技术有限公司所有,未经深圳市普联技术有限公司许可,不得任意仿制、拷贝、誊抄或转译。
本手册所提到的产品规格和资讯仅供参考,如内容更新,恕不另行通知,可随时查阅我们的万维网页http:// 。
版权所有,不得翻印目录物品清单 (1)第一章用户手册简介 (2)1.1 用途 (2)1.2 约定 (2)1.3 用户手册概述 (2)第二章产品概述 (3)2.1 产品简介 (3)2.2 主要特性 (3)第三章安装指南 (5)3.1 安装 (5)3.1.1 安装在桌面上的方法 (5)3.1.2 安装在机架上的方法 (5)3.1.3 加电 (6)3.2 交换机的外观 (6)3.2.1 前面板 (6)3.2.2 后面板 (8)3.2.3 可选的SFP模块 (8)3.3 注意事项 (9)第四章交换机功能描述 (10)4.1 系统配置 (10)4.1.1 系统信息 (10)4.1.2 文件传输 (10)4.1.3 重启与复位 (10)4.1.4 用户配置 (10)4.2 端口管理 (11)4.2.1 端口参数 (11)4.2.2 端口统计与端口状态 (12)4.2.3 广播风暴抑制 (13)4.2.4 端口描述 (13)4.3 网络 (13)4.3.1 IP地址参数 (13)4.3.2 最大老化时间与动态地址表 (14)4.3.3 静态地址表 (15)4.3.4 过滤地址表 (15)4.3.5 动态地址绑定 (15)4.3.6 Ping工具 (16)4.4 VLAN(虚拟局域网)管理 (16)4.4.1 VLAN模式配置 (16)4.5 T runk配置 (18)4.6 优先级管理 (19)4.6.1 优先级配置 (19)4.6.2 端口优先级表 (19)4.6.3 端口缺省优先级T ag (19)4.6.4 802.1p优先级 (19)4.7 端口监控 (20)4.8 电缆检测 (20)第五章 Web管理 (21)5.1 概述 (21)5.2 Web管理的连接 (21)5.2.1 准备工作 (21)5.2.2 连接 (24)5.3 Web管理界面及操作方法 (25)5.3.1 系统配置 (29)5.3.2 端口管理 (32)5.3.3 网络 (40)5.3.4 VLAN管理 (48)5.3.5 T runk 配置 (53)5.3.6 优先级 (55)5.3.7 端口监控 (58)5.3.8 电缆检测 (58)附录A RJ45插座/连接器引脚详细说明 (60)附录B 交换机的出厂设置 (62)附录C 各机型功能差异表 (64)附录D 规格说明 (65)1物品清单小心打开包装盒,检查包装盒里应有的配件: 1台交换机1根交流电源线1本《用户手册》(光盘或印刷本)1张保修卡2个用来固定在机架上的L 型支架及其它配件如果发现包装箱内有任何物品的缺失或损坏,请立即与销售该产品的经销商或者与最近的本公司的销售人员联系。
安全隔离与信息交换系统双向网闸需求说明
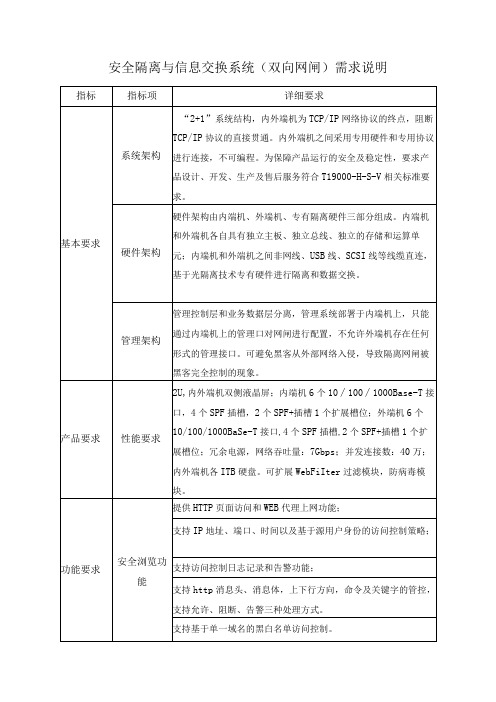
安全VOIP
功能
提供音视频通话访问功能,支持SIP和H323协议;
支持代理、透明、路由三种接入方式;
支持IP地址、端口、时间以及基于源用户身份的访问控制策略;
支持访问控制日志记录和告警功能;
内置VO1P安全模块,内置VO1P安全引擎,支持主被叫用户黑名单的控制。
支持JavaScript脚本、ActiveX插件、App1et插件过滤。
内置HTTP安全模块,支持UR1过滤引擎、内容过滤引擎、文件过滤引擎、病毒过滤引擎、网页过滤引擎安全防护及单独启停控制。
文件传输功能
提供基于FTP协议和TFTP协议的文件传输功能;
支持代理、透明、路由三种接入方式;
支持IP地址、端口、时间以及基于源用户身份的访问控制策略;
产品要求
性能要求
2U,内外端机双侧液晶屏;内端机6个10∕100∕1000Base-T接口,4个SPF插槽,2个SPF+插槽1个扩展槽位;外端机6个10/100/1000BaSe-T接口,4个SPF插槽,2个SPF+插槽1个扩展槽位;冗余电源,网络吞吐量:7Gbps;并发连接数:40万;内外端机各ITB硬盘。可扩展WebFiIter过滤模块,防病毒模块。
提供有客户端和无客户端两种数据据库同步方式。
无客户端方式无需在用户服务器上安装任何插件,网闸不开放任何服务端口;有客户端方式可提供专用文件同步客户端安装在用户服务器上,提供安全的数据库同步服务。
提供多种主流数据库系统如:ORAC1E、SQ1SERVER.MYSQ1、达梦数据库的同步。
支持一对一、一对多、多对一方式的数据库同步;支持同构、异构数据库之间的同步,同步可具体设置到字段级别。
TP-LINK TL-SG2216 工业级以太网交换机 安装手册说明书
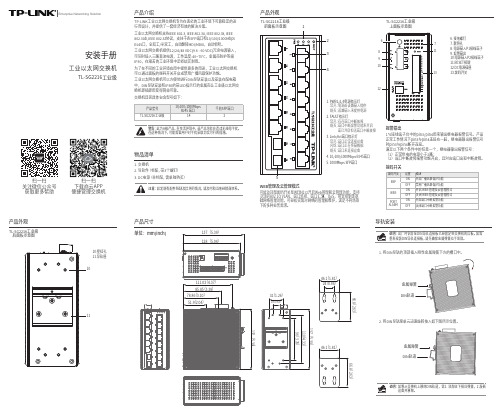
物品清单1. 交换机2. 导轨件(标配,带3个螺钉)产品介绍安装手册工业以太网交换机TL-SG2216工业级产品外观产品尺寸产品外观TL-SG2216工业级TL-SG2216工业级后面板示意图TP-LINK工业以太网交换机专为在恶劣的工业环境下可靠稳定的运行而设计,并提供了一套经济有效的解决方案。
工业以太网交换机支持IEEE 802.3, IEEE 802.3u, IEEE 802.3x, IEEE 802.3ab, IEEE 802.3z协议,支持千兆SFP端口和10/100/1000Mbps RJ45口,全双工/半双工,自动翻转MDI/MDIX,自动侦听。
工业以太网交换机提供12/24/48 VDC(9.6 - 60 VDC)冗余电源输入,可同时接入三路直流电源,工作温度-40~75°C,金属壳防护等级IP30,在艰苦的工业环境中足够结实耐用。
为了在不同的工业环境应用中提供更多的用途,工业以太网交换机可以通过面板的拨码开关开启或禁用广播风暴保护功能。
工业以太网交换机可以方便地进行DIN导轨安装以及安装在配电箱中,DIN导轨安装和IP30的带LED指示灯的金属壳让工业级以太网交换机即插即用变得简单可靠。
交换机目前具体包含型号如下:报警输出1*6接线端子台中的pin3/pin4用来输出继电器报警信号。
产品正常工作情况下pin3与pin4连接在一起,继电器输出报警信号时pin3与pin4断开连接。
满足以下两个条件中的任意一个,继电器输出报警信号:(1)正常供电的电源小于2路;(2)端口中断故障报警功能开启,且对应端口出现中断故障。
TL-SG2216工业级电源由该路输入提供该路输入未提供电源T指示灯常亮:存在端口中断故障端口中断报警功能未开启端口正常连接设备端口正在传输数据端口未连接设备89 6. 接地螺钉7. 散热孔8. 电源输入P1接线端子9. 报警输出10.电源输入P2接线端子11.RESET按键12.DC电源插座13.拨码开关10.壁挂孔11.导轨座单位:mm(inch)137(5.39)128(5.04)导轨安装2. 将DIN导轨座单元迅速旋转按入如下图所示位置。
万兆交换机Web配置手册(适用于S4700-48G-4TF、S4700E-48G-4TF)

万兆交换机Web配置手册(适用于S4700-48G-4TF、S4700E-48G-4TF)目录1.1 通过Web访问交换机 (3)1.2 Web界面介绍 (3)第2章系统状态 (5)2.1 系统信息 (5)2.2 系统日志 (5)2.3 端口统计 (5)2.4 详细统计 (6)2.5 二层转发表 (6)2.6 环路保护状态 (7)第3章系统设置 (8)3.1 IP配置 (8)3.2 日志配置 (8)3.3 用户配置 (10)第4章端口配置 (11)4.1 端口配置 (11)4.2 端口镜像 (13)第5章高级配置 (15)5.1 链路聚合 (15)5.2 VLAN管理 (18)第6章网络安全 (23)6.1 MAC地址表 (23)6.2 风暴抑制 (25)6.3 环路保护 (26)第7章系统维护 (27)7.1 设备重启 (27)7.2 恢复出厂 (27)7.3 固件升级 (27)7.4 配置导出 (27)7.5 配置导入 (28)7.6 PING诊断 (28)配置准备1.1通过Web访问交换机通过Web浏览器访问交换机,请确保您所使用的浏览器能够符合以下几点要求:●HTML版本7.0●HTTP版本1.1●JavaScript™版本1.5此外,请确保交换机运行的主程序文件支持Web访问,且您的计算机已经连接到交换机所在的网络。
如果是第一次使用交换机,无需额外配置,您已经可以使用Web访问:1、修改您计算机网络适配器的IP地址为“192.168.255.2”,子网掩码为“255.255.255.0”。
2、打开Web浏览器,在地址栏中输入“192.168.255.1”。
注意“192.168.255.1”是交换机的缺省管理地址。
3、在登录验证对话框中输入用户名和密码,初始的用户名和密码均为“admin”,请注意区分字母的大小写。
4、若认证成功,浏览器中会显示交换机的系统信息页。
1.2W eb界面介绍整个页面又分为顶部显示区、导航栏和配置区等部分。
TP-LINK 简单网管交换机 用户手册

7103500681
R
TP-LINK TECHNOLOGIES CO., LTD. 技 术 支 持 热 线 :400-8863-400 技 术 支 持E-mail:fae@ 网 址 :http// 地址:深圳市南山区西丽镇红花岭工业区二区7栋
Байду номын сангаас
目
录
物品清单 .........................................................................................1
第一章 用户手册简介 ....................................................................2 1.1 用 途 ................................................................................................. 2 1.2 约 定 ................................................................................................. 2 1.3 用户手册概述 ..................................................................................... 2 第二章 产品概述 ...........................................................................3 2.1 产品简介 ............................................................................................ 3 2.2 主要特性 ......................................................................................... 3 第三章 安装指南 ............................................................................5 3.1 安 装 ................................................................................................. 5 3.1.1 安装在桌面上的方法 ....................................................................... 5 3.1.2 安装在机架上的方法 ....................................................................... 5 3.1.3 加 电 .............................................................................................. 6 3.2 交换机的外观 ..................................................................................... 6 3.2.1 前面板............................................................................................. 6 3.2.2 后面板............................................................................................. 8 3.2.3 可选的SFP模块............................................................................... 8 3.3 注意事项 ............................................................................................ 9 第四章 交换机功能描述................................................................10 4.1 系统配置 .......................................................................................... 10 4.1.1 系统信息 ....................................................................................... 10 4.1.2 文件传输 ....................................................................................... 10 4.1.3 重启与复位.................................................................................... 10 4.1.4 用户配置 ....................................................................................... 10 4.2 端口管理 ........................................................................................ 11 4.2.1 端口参数 ....................................................................................... 11
锐捷汇聚级交换机系列产品

汇聚级交换机目录RG-S5760系列------------------------------------------------------------------------1RG-S5750-E系列---------------------------------------------------------------------8RG-S5750-L系列---------------------------------------------------------------------17RG-S5750系列------------------------------------------------------------------------24RG-S3760E系列----------------------------------------------------------------------33RG-S3250E系列----------------------------------------------------------------------39RG-S5760系列产品概述RG-S5760系列是锐捷网络推出的融合了高性能、高安全的全千兆智能机架式多层交换机,十分适合在企业网的接入层或者汇聚层使用。
同时支持IPv4/IPv6双栈,为IPv4网络的建设、IPv4向IPv6网络过渡、以及IPv6网络的建设和通信提供了最直接和最方便灵活的技术实现和方案保障。
全千兆的端口形态,机身自带4个复用的SFP千兆光纤接口,不仅满足网络的弹性扩展,和高带宽传输需要,也满足网络建设中不同传输介质的连接需要。
特别适合高带宽、高性能和灵活扩展的大型网络汇聚层、中型网络核心层、以及数据中心服务器群的接入使用。
硬件支持IPv4/IPv6双协议栈多层线速交换和功能特性,为IPv6网络之间的通信提供了丰富的Tunnel技术,可灵活应用于纯IPv4网络、纯IPv6网络、IPv4与IPv6共存的网络,能充分满足当前园区网从IPv4向IPv6过渡的需要。
中兴配置命令
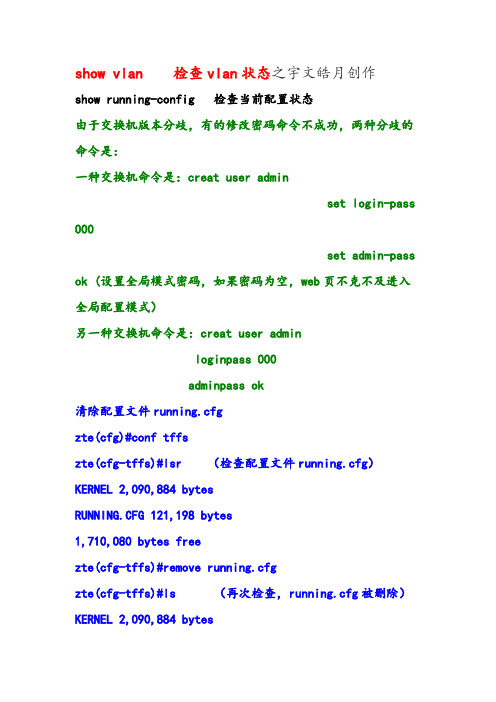
show vlan 检查vlan状态之宇文皓月创作show running-config 检查当前配置状态由于交换机版本分歧,有的修改密码命令不成功,两种分歧的命令是:一种交换机命令是:creat user adminset login-pass 000set admin-pass ok (设置全局模式密码,如果密码为空,web页不克不及进入全局配置模式)另一种交换机命令是:creat user adminloginpass 000adminpass ok清除配置文件running.cfgzte(cfg)#conf tffszte(cfg-tffs)#lsr (检查配置文件running.cfg)KERNEL 2,090,884 bytesRUNNING.CFG 121,198 bytes1,710,080 bytes freezte(cfg-tffs)#remove running.cfgzte(cfg-tffs)#ls (再次检查,running.cfg被删除)KERNEL 2,090,884 bytes1,832,960 bytes freezte(cfg)#reboot使用clear iproute 命令可以用来删除一条或多条静态路由用户可以通过show iproute 命令对交换机上的直连路由和静态路由进行检查忘记密码进boot模式清除配置文件Press any key to stop auto-boot...76倒计时的时候,按任意键进入BOOT模式。
[ZXR10 Boot]: zte输入ZTE,系统将加载wbdEndLoad wbdEnd BeginW90N740 MAC0: 10MB - Half Duplex[PASSWORD]:输入密码 zxr10进入BOOTMANAGER模式。
[BootManager]:lskernel.z 1203948snmpboots.v3 35startcfg.txt 667running.cfg 198723删除running.cfg文件,即可恢复默认配置。
- 1、下载文档前请自行甄别文档内容的完整性,平台不提供额外的编辑、内容补充、找答案等附加服务。
- 2、"仅部分预览"的文档,不可在线预览部分如存在完整性等问题,可反馈申请退款(可完整预览的文档不适用该条件!)。
- 3、如文档侵犯您的权益,请联系客服反馈,我们会尽快为您处理(人工客服工作时间:9:00-18:30)。
Hale Waihona Puke 目录物品清单 .........................................................................................1
第一章 用户手册简介 ....................................................................2 1.1 用 途 ................................................................................................. 2 1.2 约 定 ................................................................................................. 2 1.3 用户手册概述 ..................................................................................... 2 第二章 产品概述 ...........................................................................3 2.1 产品简介 ............................................................................................ 3 2.2 主要特性 ......................................................................................... 3 第三章 安装指南 ............................................................................5 3.1 安 装 ................................................................................................. 5 3.1.1 安装在桌面上的方法 ....................................................................... 5 3.1.2 安装在机架上的方法 ....................................................................... 5 3.1.3 加 电 .............................................................................................. 6 3.2 交换机的外观 ..................................................................................... 6 3.2.1 前面板............................................................................................. 6 3.2.2 后面板............................................................................................. 8 3.2.3 可选的SFP模块............................................................................... 8 3.3 注意事项 ............................................................................................ 9 第四章 交换机功能描述................................................................10 4.1 系统配置 .......................................................................................... 10 4.1.1 系统信息 ....................................................................................... 10 4.1.2 文件传输 ....................................................................................... 10 4.1.3 重启与复位.................................................................................... 10 4.1.4 用户配置 ....................................................................................... 10 4.2 端口管理 ........................................................................................ 11 4.2.1 端口参数 ....................................................................................... 11
4.2.2 端口统计与端口状态 ..................................................................... 12 4.2.3 广播风暴抑制 ................................................................................ 13 4.2.4 端口描述 ....................................................................................... 13 4.3 网 络 ............................................................................................... 13 4.3.1 IP地址参数.................................................................................... 13 4.3.2 最大老化时间与动态地址表 .......................................................... 14 4.3.3 静态地址表.................................................................................... 15 4.3.4 过滤地址表.................................................................................... 15 4.3.5 动态地址绑定 ................................................................................ 15 4.3.6 Ping工具 ....................................................................................... 16 4.4 VLAN(虚拟局域网)管理 ............................................................... 16 4.4.1 VLAN模式配置 .............................................................................. 16 4.5 Trunk配置......................................................................................... 18 4.6 优先级管理....................................................................................... 19 4.6.1 优先级配置.................................................................................... 19 4.6.2 端口优先级表 ................................................................................ 19 4.6.3 端口缺省优先级Tag....................................................................... 19 4.6.4 802.1p优先级................................................................................ 19 4.7 端口监控 .......................................................................................... 20 4.8 电缆检测 .......................................................................................... 20 第五章 Web管理 ..........................................................................21
