Sun QFS文件系统配置手册
SUN小型机操作手册
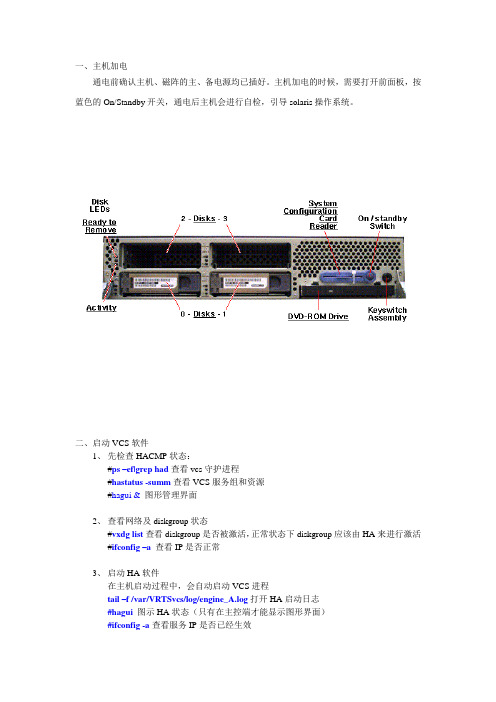
一、主机加电通电前确认主机、磁阵的主、备电源均已插好。
主机加电的时候,需要打开前面板,按蓝色的On/Standby开关,通电后主机会进行自检,引导solaris操作系统。
二、启动VCS软件1、先检查HACMP状态:#ps –ef|grep had查看vcs守护进程#hastatus -summ查看VCS服务组和资源#hagui &图形管理界面2、查看网络及diskgroup状态#vxdg list查看diskgroup是否被激活,正常状态下diskgroup应该由HA来进行激活#ifconfig –a 查看IP是否正常3、启动HA软件在主机启动过程中,会自动启动VCS进程tail –f /var/VRTSvcs/log/engine_A.log打开HA启动日志#hagui 图示HA状态(只有在主控端才能显示图形界面)#ifconfig -a查看服务IP是否已经生效#vxdg list查看VG是否被HA激活#df –k 查看文件系统是否已经被挂接4、关闭(切换)HAhastop -local停止当前节点HAhastop –all 停止所有接点HA三、日常维护操作oslevel –r查看当前AIX版本及补丁级别df –k检查文件系统状态,是否有使用率在80%以上的文件系统smitty chjfs2改变文件系统大小(慎用)/var/adm/messages查看错误日志errpt –a|more查看错误日志详细信息errpt –a >/tmp/2005-04-05errpt.out将当前错误日志详细信息保存至指定位置mail查看有无系统报错通知lppchk –v查看是否少文件包,如无输出则为正常vxprint -ht查看物理卷磁盘信息format查看逻辑磁盘信息四、对7133-D40的操作在有的情况下,会在共享VG上添加新的逻辑卷,这时需要做以下的同步操作。
1、假设无双机情况下,在node1上给共享VG添加了lv,此时共享Vg的状态是激活的(可用lsvg –o查看)。
SUN操作系统安装说明1

SUN操作系统安装说明一、安装solaris 8基本操作系统(SUN Blade 100)注:需要Solaris 8 software光盘两张准备:将Solaris 8操作系统software 1/2光盘放入光驱,在OK提示符下(可按stop+A出现),键入boot cdrom。
1、在“Select a Language”窗口下,选择0 : English2、在“Select a Locals”窗口下: 选择0 : English3、在“The Solaris Installation Program”窗口下,选择Continue4、在“Identify This System”窗口下,选择Continue5、在“Network Connectivity”窗口下,选择yes Continue6、在“DHCP”窗口下,选择no Continue7、在“Host name”窗口下,输入节点名,如:gtxmain1 选择Continue8、在“Ip Address”窗口下,输入IP地址,如192.9.200.101 选择Continue9、在“Subnets”窗口下,选择yes Continue10、在“Netmask”窗口下,输入掩码地址,255.255.255.0 选择Continue11、在“Ipv6”窗口下,选择no Continue12、在“Comfirm Information”窗口下,选择Continue13、在“Configure Security Policy”窗口下,选择No Continue14、在“Comfirm Information”窗口下,选择Continue15、在“Name Service”窗口下,选择None Continue16、在“Confirm Information”窗口下,选择Continue17、在“Time zone”窗口下,选择Geographic region set….18、在“Geographic Region”窗口下,选择Regions栏: Asia,EastenTime zone栏:HongKong Continue19、在“Date and Time”窗口下,输入Year,Month,Day,Hour,Minute选择Continue20、在“Confirm Information”窗口下,选择Continue21、在“Solaris Interactive Installation”窗口下,选择Initial Contince22、在“Select Geographic Region”窗口下,选择Asia Continue23、在“Select Software”窗口下,选择Entire Distribution plus OEM support Continue 24、在“Select Disks”窗口下,选择Select Boot Disk Continue25、在“Preserve Data”窗口下,选择Continue26、在“Automatically Layout File System”窗口下,选择Manual Layout27、在“File System and Disk Layout”窗口下,选择Customize28、在“Customize Disks”窗口下手动分区,指定各区空间大小,单位MB 例:0 / 5121 swap 512 (内存的2倍)2overlap5 /opt 10246 /usr 15367/export/home 剩余空间大小选择OK29、在“File System and Disk Layout”窗口下,选择Continue30、在“Mount Remote File Systems”窗口下,选择Continue31、在“Profile”窗口下,选择Begin Installation若出现“Warning: unused disk space (c0t0d0) , 选择OK32、选择Auto Reboot33、安装完后,设置root用户口令34、在“Sepecify Media”窗口下,选择CD Next35、在“Insert CD”窗口下,放入Solaris 8 Software 2/2 光盘, 选择OK36、在“Installation Summary”窗口下,选择Next37、在“Sepecify Media”窗口下,选择Skip38、在“Reboot”窗口下,选择Reboot Now二、安装workshop5.0开发系统1、在root用户下,将workshop5.0光盘放入光驱2、“File Manager”窗口中,双击workshop_install选择OK选择Y3、“Workshop Install”窗口下Software栏选择:FLEXLm License Manager Software and UtilitiesWS compiler C/C++/SPARC 5.0WS AnswerBook2 Document Collections 5.04、选择Install;开始安装,直至“Installation Complete ”窗口出现,按OK5、选择Install Licenses“License Installation Tool”窗口下选择“Loaded From an Email Message Sared to File”选择“Load File”指定Licenses文件为/tmp/lic.dat (lic.dat文件内容见《六、C语言license安装补充说明》)选择“Install”选择“Exit”6、选择Exit三、SUN操作系统加nari用户及组1、root用户下,输入admintool2、“Adminitool:Users”窗口下“Browse”菜单选择Groups“Edit”菜单选择add3、“Admintool : Add Group”窗口下输入Group Name: narigrpGroup ID: 200选择OK4、“Browse”菜单选择User“Edit”菜单选择add5、“Admintool : Add User”窗口下,选择或输入以下栏目:User name:nariUser ID : 268Primary Group : 200Secondary Group : rootLogin shell : cshPassword : Normal Passord,输入两次口令:选择OKPath : /export/home/nariOK6、“File”菜单选择exit四、自启动配置文件1、~/.login文件内容为:./.start2、~/.start文件内容为:if [ -f /export/home/nari/NARI ]then/usr/bin/rm –f /export/home/nari/NARI/usr/openwin/bin/openwinfi改变文件属性chmod +x .start3、~/.xinitrc文件内容为:cpu=`hostname | sed -e 's/\..*//'`if [ -z $DISPLAY ]; thenDISPLAY=$cpu:0fi/usr/dt/bin/dtwm &cd /export/home/nari/exe./startmain > /dev/null 2>&1xterm -g 80x25+1500+1200 -sb -C4.~/.dt/dtwmrc, ~/Dtwm, ~/.cshrc, ~/.Xdefaults在ss3:/data3/sun/config/下。
Sun Microsystems SAM-FS与SAM-QFS存储与备份管理指南说明书
Sun Microsystems, Inc.4150 Network CircleSanta Clara, CA 95054 U.S.A.650-960-1300請將關於此文件的意見傳送到﹕*******************Sun™ SAM-FS 與 Sun™SAM-QFS 儲存與歸檔管理指南零件編號816-7696-10 2002 年 10 ㈪,修訂 A 版請進行© 2002 年 Sun Microsystems, Inc. 著作權所有,4150 Network Circle, Santa Clara, CA 95054 U.S.A. 所有權利均予保留。
Sun Microsystems, Inc. 對於本產品或文件所含的技術擁有智慧財產權。
這些智慧財產權可能包含㆒項或以㆖列於/patents 的美國專利,以及㆒項或以㆖在美國及其他國家的專利或申請㆗專利,特此聲明。
本文件及相關產品受著作權法保護,並在合法著作權的發行㆘限制其使用、複製、發佈與解譯。
未經 Sun 及其授權㆟(如果適用)事前核准,本產品與文件之所有部份均不得重製。
協力廠商軟體,包含字型技術,其著作權歸 Sun 供應商所有,經授權後使用。
本產品㆗的某些部分可能衍生自加州大學授權的 Berkeley BSD 系統的開發成果。
UNIX 為美國和其他國家的註冊商標,已獲得 X/Open Company , Ltd. 專屬授權。
Sun 、Sun Microsystems 、Sun 標誌、AnswerBook2、 、Sun Enterprise 、Ultra 、Java 、OpenWindows 、Solaris 、SunSolve 和 Sun StorEdge 是 Sun Microsystems, Inc. 在美國及其他國家的商標、註冊商標或服務標誌。
所有 SPARC 商標都是 SPARC International, Inc. 在美國及其他國家的商標或註冊商標,經授權後使用。
SUN 小型机操作系统安装指导书
资料编码产品名称SUN小型机使用对象华为工程师产品版本通用版本编写部门集成产品部资料版本SUN 小型机操作系统安装指导书拟制:陈文日期:20050803审核:陈文日期:20050803审核:日期:批准:日期:华为技术有限公司版权所有侵权必究修订记录日期修订版本描述作者2005-8-3 V1.0 陈文目录第1章安装简介 (1)1.1 前言 (1)1.2 软件安装前提 (1)第2章操作系统安装和配置 (2)2.1 操作系统安装过程 (2)第3章后期设置 (24)3.1 安装系统补丁 (24)第4章常用命令 (27)第5章常用网址 (28)关键词:SUN SOLARIS安装指导书摘要:缩略语清单:参考资料清单:第1章1.11.2 安装简介前言Solaris 操作系统系统是SUN公司专为 SPARC主机服务器开发的unix操作系统。
基于BSD UNIX System V为基础开发。
我公司主要应用的版本有:solaris2.6/solaris8/solaris9软件安装前提Solaris 系统的安装通常有两种方式,第一种是通过在SUN主机的串口上连接一个终端来进行安装,我们把这种安装方式称为suninstall,第二种方式是通过在SUN主机上接显示器,鼠标和键盘进行系统安装,我们把这种方式称为webstart。
两种安装方式的共同点是:安装的主要步骤和提示信息基本是一致。
两种安装方式的不同点是:第一种方式是字符终端界面,第二种方式是图形界面。
就第一种suninstall的安装方式,在SUN主机的串口连接设备上又分为两种情况:第一种情况是,将SUN主机的第一个串口与PC机或者终端的串口,直接用串口线互连起来。
在PC机或者终端上使用终端管理软件,比如超级终端,netterm等,设置串口的连接参数如下:9600,8,no,1,no第二种情况是,将SUN主机的第一个串口与TC的串口,用TC带的串口线互连起来,然后再把TC接到LAN上,在lan上的任意一台主机上通过telnet方式远程登陆到TC上,然后再选择相应的串行端口,即可。
安装及SAN阵列环境下文件系统相关配置手册
安装及SAN阵列环境下文件系统相关配置手册1. 环境准备在进行文件系统相关配置之前,确保已经完成以下环境准备工作:•操作系统已经安装在SAN阵列上•已经创建好文件系统所需的卷组和逻辑卷•已经加载并识别了相关的存储驱动器2. 挂载文件系统1.首先,使用命令fdisk -l确认系统识别的磁盘设备和分区信息。
2.如果磁盘设备已经分区,使用命令mkfs -t <文件系统类型>/dev/sdX对分区进行格式化,其中<文件系统类型>为相应文件系统的类型,sdX为设备ID。
3.创建一个目录作为挂载点,例如/mnt/data。
4.使用mount命令将文件系统挂载到挂载点上:mount /dev/sdX/mnt/data。
5.可以使用df -h命令确认文件系统是否成功挂载。
3. 文件系统优化配置在SAN阵列环境下,为了获得更好的性能和稳定性,可以进行一些文件系统优化配置:3.1 添加挂载选项在/etc/fstab文件中为挂载的文件系统添加一些选项,例如:/dev/sdX /mnt/data ext4 defaults,noatime 0 0其中noatime选项可以减少文件系统的读取操作,提高性能。
3.2 关闭写入缓存为了确保数据的安全,可以考虑设置文件系统为同步写入模式。
在/etc/fstab 中为文件系统添加sync选项。
/dev/sdX /mnt/data ext4 defaults,noatime,sync 0 03.3 调整inode分配可以通过调整inode分配的密度来提高文件系统的性能。
使用mkfs命令时可以指定-i参数来设置inode的密度。
4. 文件系统监控为了及时发现文件系统的问题并采取相应的措施,建议设置文件系统的监控和报警机制。
可以使用工具如diskfree、diskstat等进行文件系统监控。
5. 性能优化除了文件系统的优化配置外,还可以通过调整系统内核参数、优化IO调度算法等方式进一步提高SAN阵列环境下文件系统的性能。
神州数码数据库安全审计系统安装配置手册说明书

2022年4月7目录1前言 (3)1.1 (3)1.2 (3)2 (4)2.1 (4)2.2 (5)3WEB UI (6)3.1 (7)3.2系统UI访问页面使用需求开发的端口 (7)3.3云数据库安全审计模式配置 (8)3.3.1开启接口审计功能 (8)3.3.2Agent (8)3.3.3Agent (10)3.3.4 (11)3.3.5 (11)3.3.6 (13)3.3.7 (17)3.3.8策略规则配置示例 (18)3.4 (32)3.4.1 (32)3.4.2 (34)4AGENT (35)5附录:防火墙代理模式配置手册 (44)1前言本手册主要介绍神州数码数据库安全审计系统的安装、配置、使用和管理。
通过阅读本文档,用户可以了解该系统的主要功能,并根据实际应用环境进行安装和配置。
1.1通过阅读本文档,能够快速地部署实施神州数码数据库安全审计系统,配置管理员达到对该系统主体功能熟悉和理解,有效地管理该防护设备,实现高效可靠的统一管理。
1.2本用户手册适用于具有基本网络、安全知识的系统管理员和运维人员。
2本章就神州数码数据库安全审计系统的系统架构、部署模式以及所涉及的基本概念进行简单介绍。
本章内容主要包括:产品概述:介绍产品的主要功能和适用对象。
部署模式:介绍系统在应用场景中的部署示意图。
2.1神州数码数据库安全审计系统是主动、实时监控数据库安全,集应用压力分析与访问控制为一体的专业产品。
在数据库安全审计方面系统采用有效的数据库安全审计方式,针对数据库漏洞攻击、风险操作、SQL注入等数据库风险操作行为,通过不同的审计规则发生记录和告警。
面向企业级用户,集应用压力分析与SQL监控审计为一体的产品。
它以旁路的方式部署在网络中,不影响网络的性能。
具有实时的网络数据采集能力、强大的审计分析功能以及智能的信息处理能力。
通过使用该系统,可以实现如下目标:分析数据库系统压力。
可审计Oracle、MySQL、SQL Server、HBase、Hive、Sybase、DM7等多种数据库。
SUN设备及系统维护手册

SUN设备及系统维护手册目录1概述 (4)2SUN设备介绍 (5)2.1S UN E NTERPRISE 3500服务器 (5)2.1.1技术细则 (5)2.2S UN E NTERPRISE 450服务器 (9)2.2.1优点 (9)2.2.2技术细则 (10)2.3S UN E NTERPRISE 250服务器 (13)2.3.1产品定位 (13)2.3.2技术细则 (14)2.4S UN F IRE 280服务器 (17)2.4.1特性 (17)2.4.2环境配置指标 (18)2.5S UN U LTRA 60工作站 (19)2.5.1要点 (19)2.5.2Sun Ultra 60规格 (20)2.6S UN S TOR E DGE A1000 (22)2.6.1特点 (22)3SOLARIS初级系统管理 (24)3.1系统启动和测试 (24)3.1.1OK提示符 (24)3.1.2在串口状态测试 (24)3.1.3重启SUN的工作站 (24)3.1.4测试系统 (25)3.2系统管理硬盘 (26)3.2.1逻辑硬盘地址 (26)3.2.2分区 (27)3.2.3意外错误记录 (27)3.2.4示例 (28)3.2.5可移动设备 (29)3.2.6复制硬盘 (31)3.2.7使用SDS软件将系统硬盘镜像 (31)3.3交换分区 (32)3.3.1在vfstab文件中永久修改 (32)3.3.2临时添加swap分区 (32)3.4系统的安装和维护 (33)3.4.1从光盘安装 (33)3.4.2软件包的安装 (33)3.4.3系统补丁的安装 (34)3.5X-S ERVER和CDE用户使用界面 (34)3.5.1综合设置 (34)3.5.2定制登陆界面 (34)3.5.3双屏显示,双屏连接和24位深色的设置 (35)3.6系统管理 (36)3.6.1主机名 (36)3.6.2串口连接 (36)3.6.3打印机 (36)3.6.4用户建立 (36)3.7网络连接 (37)3.7.1/etc-files (37)3.7.2ifconfig (38)3.7.3路由 (38)3.7.4NIS客户端 (38)3.7.5DNS客户端 (38)3.7.6DHCP客户端 (39)3.7.7sys-unconfig (39)3.7.810兆和百兆,全双工和半双工 (39)3.8提示收集 (39)3.8.1提示 (39)3.8.2分析硬件管理 (40)3.8.3分析运行时间数据 (40)3.8.4调试工具 (41)3.9网络资源 (41)3.9.1网络资源 (41)1概述随着互联网的飞速发展,网络系统在今天的生活中的作用越来越重要,网络已经成为一切经济活动的基础。
Sun Fire系列服务器系统管理指南说明书

Powering Off the System1.Refer to the system administration manual for your product for complete step-by-step commands for powering off the domains and the system.2.If your Sun Fire™system is not mounted in a Sun Fire cabinet,skip to Step 4.3.Turn the keyswitch on the FrameManager to the Off position.FrameManager keyswitchSun Fire ™Midrange Systems Powering On and Off GuideSun Fire E6900/E4900 SystemsSun Fire 6800/4800 Systems4.Turn off the AC input box(es)(Sun Fire6800system shown).5.If your SunFire system is not mounted in a Sun Fire cabinet,ignoreStep6.6.Turn off the Redundant Transfer Switches(RTS).AC input boxesRTS switchesPowering On the System1.If your Sun Fire system is not mounted in a Sun Fire cabinet,skip toStep4.2.Turn on the RTS switches,if you are working on a system that has RTSmodules.It will take30seconds to one minute for the RTS modules to power on.3.Check that all of the circuit breakers on each side of the RTU are on.4.Turn on the AC input box(es).5.Make sure that the rack fan trays are switched on.This switch is located in the back of the cabinet,below the power cord socket on each rack fan tray.6.If your Sun Fire system is not mounted in a Sun Fire cabinet,skip toStep8.7.Turn the keyswitch on the FrameManager to the On position.Refer to the system administration manual for your product for complete procedures for powering on the system.8.Power on the remaining domains.Accessing Sun DocumentationYou can view,print,or purchase a broad selection of Sun documentation, including localized versions,at:/documentationContacting Sun Technical SupportIf you have technical questions about this product that are not answered in this document,go to:/service/contactingSun Welcomes Your CommentsSun is interested in improving its documentation and welcomes your comments and suggestions.You can submit your comments by going to: /hwdocs/feedbackPlease include the title and part number of your document with your feedback: Sun Fire Midrange Systems Powering On and Off Guide,part number806-2956-13Copyright2004Sun Microsystems,Inc.All rights e is subject to license terms.Third-party software,including font technology,is copyrighted and licensed from Sun suppliers.Portions may be derived from Berkeley BSD systems,licensed from U.of CA.Sun,Sun Microsystems,the Sun logo,Sun Fire,and Solaris are trademarks or registered trademarks of Sun Microsystems,Inc.in the U.S.and in other countries.All SPARC trademarks are used under license and are trademarks or registered trademarks of SPARC International,Inc.in the U.S.and in other ernment Rights—Commercial ernment users are subject to the Sun Microsystems,Inc.standard license agreement and applicable provisions of the FAR and its supplements.Copyright2004Sun Microsystems,Inc.Tous droits réservés.Distribuépar des licences qui en restreignent l’utilisation.Le logiciel détenu par des tiers,et qui comprend la technologie relative aux polices de caractères,est protégépar un copyright et licenciépar des fournisseurs de Sun.Des parties de ce produit pourrontêtre dérivées des systèmes Berkeley BSD licenciés par l’Universitéde Californie.Sun,Sun Microsystems,le logo Sun,Sun Fire,et Solaris sont des marques de fabrique ou des marques déposées de Sun Microsystems,Inc.aux Etats-Unis et dans d’autres pays.Toutes les marques SPARC sont utilisées sous licence et sont des marques de fabrique ou des marques déposées de SPARC International,Inc.aux Etats-Unis et dans d’autres pays.Sun Microsystems, Inc.Part No. 806-2956-13, Rev. AFebruary 2004。
SUN主机磁带库(Legato管理)的配置过程
SUN主机磁带库(Legato管理)的配置过程首先,需要将磁带库连接到主机上。
确认连接正常的情况下修改主机的/kernel/drv/st.conf。
修改的内容如下:tape-config-list ="IBM ULTRIUM-TD1","IBM Ultrium","LTO_Ultrium","IBM ULT3580-TD1","IBM 3580 Ultrium","LTO_Ultrium";LTO_Ultrium =1,0x24,0,0x45863d,2,0x00,0x01,0;"HP Ultrium 1-SCSI", "HP Ultrium", "ULTRIUM",ULTRIUM = 1,0x3b,0,0xd639,4,0x00,0x00,0x00,0x40,3;name="st" class="scsi"target=0 lun=0;name="st" class="scsi"target=0 lun=1;name="st" class="scsi"target=0 lun=2;name="st" class="scsi"target=0 lun=3;name="st" class="scsi"target=0 lun=4;name="st" class="scsi"target=1 lun=0;name="st" class="scsi"target=1 lun=1;name="st" class="scsi"target=1 lun=2;name="st" class="scsi"target=1 lun=3;name="st" class="scsi"target=1 lun=4;# This line adds support for Fibre Channel Tapes#name="st" parent="fp" target=0;name="st" parent="fp" target=0 lun=0;name="st" parent="fp" target=0 lun=1;name="st" parent="fp" target=0 lun=2;name="st" parent="fp" target=0 lun=3;name="st" parent="fp" target=0 lun=4;name="st" parent="fp" target=0 lun=5;fpname="st" parent="fp" target=1 lun=0;name="st" parent="fp" target=1 lun=1;name="st" parent="fp" target=1 lun=2;name="st" parent="fp" target=1 lun=3;name="st" parent="fp" target=1 lun=4;name="st" parent="fp" target=1 lun=5;(本人是全部添加了,在这里只是去了一小部分的例子)软件包的安装过程root@happy # cd /cdrom/networker_vol_1/solarisroot@happy # pkgadd -d .The following packages are available:1 LGTOclnt NetWorker for Solaris (Backup/Recover) Client(sparc) 6.1.1.Build.2382 LGTOdrvr NetWorker for Solaris (Backup/Recover) Device Drivers(sparc) 6.1.1.Build.2383 LGTOlicm NetWorker for Solaris (Backup/Recover) Licensing Manager(sparc) 6.1.1.Build.2384 LGTOman NetWorker for Solaris (Backup/Recover) Man(sparc) 6.1.1.Build.2385 LGTOnode NetWorker for Solaris (Backup/Recover) Storage Node(sparc) 6.1.1.Build.2386 LGTOserv NetWorker for Solaris (Backup/Recover) Server(sparc) 6.1.1.Build.238Select package(s) you wish to process (or 'all' to processall packages). (default: all) [?,??,q]:Processing package instance <LGTOclnt>; from </cdrom/networker_vol_1/solaris>;NetWorker for Solaris (Backup/Recover) Client(sparc) 6.1.1.Build.238Legato Systems, Inc.NetWorker(TM) - Release 6.1.1.Build.238Copyright (c) 1990-2001, Legato Systems, Inc. All rights reserved.This product includes software developed by the University ofCalifornia, Berkeley and its contributors.To set up a NetWorker storage node, licensing manager or client, youneed to supply a directory for the nsrexecd state file.Below is a list of some of the filesystems, with their free space, which youmight consider:/home :14200365/oracle : 8176003/ : 6509292Directory to use for client, licensing and server information [/home/nsr]?The nsrexecd program restricts access to a select set of NetWorkerservers. Please enter the names of each computer running a NetWorkerserver that will back up this computer, one name at a time. If acomputer has more than one network interface, please enter eachinterface's name (one at a time).Enter the first NetWorker server's name [no more]:Allowing access to all NetWorker servers.Start NetWorker daemons at end of install [yes]? noUsing </usr>; as the package base directory.## Processing package information.## Processing system information.## Verifying disk space requirements.## Checking for conflicts with packages already installed.## Checking for setuid/setgid programs.This package contains scripts which will be executed with super-userpermission during the process of installing this package.Do you want to continue with the installation of <LGTOclnt>; [y,n,?] yInstalling NetWorker for Solaris (Backup/Recover) Client as <LGTOclnt>;## Installing part 1 of 1./lib/X11/app-defaults/Networker/usr/bin/networker <symbolic link>;/usr/bin/nsrfile/usr/bin/nsrports/usr/bin/nsrwatch/usr/bin/nwadmin/usr/bin/nwarchive <symbolic link>; /usr/bin/nwbackup/usr/bin/nwrecover/usr/bin/nwretrieve/usr/bin/preclntsave/usr/bin/pstclntsave/usr/bin/recover/usr/bin/save/usr/bin/savepnpc <symbolic link>; /usr/lib/X11/app-defaults/Networker /usr/lib/nsr/C/nsr.help/usr/lib/nsr/client.nsrrequest/usr/lib/nsr/de_de/nsr.help/usr/lib/nsr/gls/cm/registry/usr/lib/nsr/gls/lc/os/portable/C/usr/lib/nsr/nw_client.txt/usr/lib/nsr/nw_server.txt/usr/lib/nsr/nw_snode.txt/usr/lib/nsr/poin.cln/usr/lib/nsr/poin.snd.gems/usr/lib/nsr/poin.srv/usr/lib/nsr/product.res/usr/lib/nsr/prrm.cln/usr/lib/nsr/prrm.snd.gems/usr/lib/nsr/prrm.srv/usr/lib/nsr/server.nsrrequest/usr/lib/nsr/snode.nsrrequest/usr/lib/nsr/uasm/usr/sbin/LGTO.clnt.rtr/usr/sbin/LGTO.serv.rtr/usr/sbin/lcmap.sc30/usr/sbin/mminfo/usr/sbin/mmlocate/usr/sbin/mmpool/usr/sbin/networker.cluster/usr/sbin/nsr_shutdown/usr/sbin/nsr_support <symbolic link>; /usr/sbin/nsradmin/usr/sbin/nsralist/usr/sbin/nsrarchive/usr/sbin/nsrclone/usr/sbin/nsrdmpix/usr/sbin/nsrexec/usr/sbin/nsrexecd/usr/sbin/nsrinfo/usr/sbin/nsrmm/usr/sbin/nsrndmp_2fh/usr/sbin/nsrndmp_recover/usr/sbin/nsrndmp_save/usr/sbin/nsrretrieve <symbolic link>; /usr/sbin/nsrsup/usr/sbin/preclntsave <symbolic link>; /usr/sbin/pstclntsave <symbolic link>; /usr/sbin/save <symbolic link>;/usr/sbin/savefs/usr/sbin/savepnpc <symbolic link>; [ verifying class <none>; ]## Executing postinstall script.Installing NetWorker home directory in /home/nsrnsr-izing system filesnsr-izing system filesInitializing //nsr/res/serversCreating /etc/init.d/networkerCreating /etc/rc2.d/S95networkerCreating /etc/rc0.d/K05networkerCompleting InstallationNetWorker successfully installed on `happy'!Installation of <LGTOclnt>; was successful.Processing package instance <LGTOdrvr>; from </cdrom/networker_vol_1/solaris>;NetWorker for Solaris (Backup/Recover) Device Drivers(sparc) 6.1.1.Build.238Copyright (c) 1990-2001, Legato Systems, Inc.All Rights Reserved.Using </>; as the package base directory.## Processing package information.## Processing system information.## Verifying disk space requirements.## Checking for conflicts with packages already installed.## Checking for setuid/setgid programs.This package contains scripts which will be executed with super-userpermission during the process of installing this package.Do you want to continue with the installation of <LGTOdrvr>; [y,n,?] yInstalling NetWorker for Solaris (Backup/Recover) Device Drivers as <LGTOdrvr>;## Executing preinstall script.## Installing part 1 of 1./etc/LGTOuscsi/algnelem/etc/LGTOuscsi/ascdcode/etc/LGTOuscsi/changers/etc/LGTOuscsi/dpy120/etc/LGTOuscsi/dpy210/etc/LGTOuscsi/erase/etc/LGTOuscsi/exacln/etc/LGTOuscsi/format/etc/LGTOuscsi/hpflip/etc/LGTOuscsi/ielem/etc/LGTOuscsi/inquire/etc/LGTOuscsi/ldunld/etc/LGTOuscsi/lrescan/etc/LGTOuscsi/lreset/etc/LGTOuscsi/lus_add_fp_devs /etc/LGTOuscsi/lusbinfo/etc/LGTOuscsi/lusdebug/etc/LGTOuscsi/msense/etc/LGTOuscsi/ndmpjbconf/etc/LGTOuscsi/pmode/etc/LGTOuscsi/rcap/etc/LGTOuscsi/rdyinp/etc/LGTOuscsi/relem/etc/LGTOuscsi/sjiielm/etc/LGTOuscsi/sjiinq/etc/LGTOuscsi/sjimm/etc/LGTOuscsi/sjirdp/etc/LGTOuscsi/sjirdtag/etc/LGTOuscsi/sjirelem/etc/LGTOuscsi/sjirjc/etc/LGTOuscsi/tur/etc/LGTOuscsi/wipe64/etc/LGTOuscsi/writebuf/usr/kernel/drv/lus/usr/kernel/drv/lus.conf/usr/kernel/drv/lus32/usr/kernel/drv/op/usr/kernel/drv/op.conf/usr/kernel/drv/sparcv9/lus/usr/kernel/drv/sparcv9/op/usr/lib/nsr/libscsi.so <symbolic link>;/usr/lib/nsr/libscsi.so.1/usr/lib/nsr/libscsi27.so.1/usr/lib/nsr/libsji.so <symbolic link>;/usr/lib/nsr/libsji.so.1/usr/lib/nsr/libstlemass.so/usr/lib/nsr/libstlibm.so/usr/lib/nsr/libstlstk.so[ verifying class <none>; ]## Executing postinstall script./usr/kernel/drv/lus/usr/kernel/drv/lus32/usr/lib/nsr/libscsi.so.1/usr/lib/nsr/libscsi27.so.1Legato SCSI passthrough driver configured and loadedLegato optical driver configured - will load at next boot.Installation of <LGTOdrvr>; was successful.Processing package instance <LGTOlicm>; from </cdrom/networker_vol_1/solaris>;NetWorker for Solaris (Backup/Recover) Licensing Manager (sparc) 6.1.1.Build.238Legato Systems, Inc.NetWorker(TM) - Release 6.1.1.Build.238Copyright (c) 1990-2001, Legato Systems, Inc. All rights reserved.This product includes software developed by the University ofCalifornia, Berkeley and its contributors.To set up a NetWorker storage node, licensing manager or client, youneed to supply a directory for the nsrexecd state file.Directory /nsr exists, it will be used as the default.Below is a list of some of the filesystems, with their free space, which youmight consider:/home :14200274/oracle : 8176003/ : 6457297Directory to use for client, licensing and server information [/nsr]?Start NetWorker daemons at end of install [yes]? noUsing </usr>; as the package base directory.## Processing package information.## Processing system information.## Verifying package dependencies.## Verifying disk space requirements.## Checking for conflicts with packages already installed.## Checking for setuid/setgid programs.This package contains scripts which will be executed withpermission during the process of installing this package.Do you want to continue with the installation of <LGTOlicm>; [y,n,?] yInstalling NetWorker for Solaris (Backup/Recover) Licensing Manager as <LGTOlicm>;## Installing part 1 of 1./nsr/lic/res/lictype.res/usr/nsr/lic/res/lictype.res/usr/sbin/lgtolic/usr/sbin/lgtolmd[ verifying class <none>; ]## Executing postinstall script.nsr-izing system files/etc/rpc already nsr-izedCompleting InstallationNetWorker successfully installed on `happy'!Installation of <LGTOlicm>; was successful.Processing package instance <LGTOman>; from </cdrom/networker_vol_1/solaris>;NetWorker for Solaris (Backup/Recover) Man(sparc) 6.1.1.Build.238Legato Systems, Inc.Using </usr>; as the package base directory.## Processing package information.## Processing system information.## Verifying disk space requirements.## Checking for conflicts with packages already installed.## Checking for setuid/setgid programs.This package contains scripts which will be executed withpermission during the process of installing this package.Do you want to continue with the installation of <LGTOman>; [y,n,?] yInstalling NetWorker for Solaris (Backup/Recover) Man as <LGTOman>;## Installing part 1 of 1./usr/share/man/man1m/EMASS_silo.1m/usr/share/man/man1m/IBM_silo.1m/usr/share/man/man1m/STK_silo.1m/usr/share/man/man1m/ansrd.1m/usr/share/man/man1m/changers.1m/usr/share/man/man1m/dasadmin.1m/usr/share/man/man1m/ddmgr.1m/usr/share/man/man1m/emcdiscover.1m/usr/share/man/man1m/erase.1m/usr/share/man/man1m/hpflip.1m/usr/share/man/man1m/ielem.1m/usr/share/man/man1m/inquire.1m/usr/share/man/man1m/jbconfig.1m/usr/share/man/man1m/jbexercise.1m/usr/share/man/man1m/jbinfo.1m/usr/share/man/man1m/jbverify.1m/usr/share/man/man1m/ldunld.1m/usr/share/man/man1m/lgtolic.1m/usr/share/man/man1m/lgtolmd.1m/usr/share/man/man1m/libscsi.1m/usr/share/man/man1m/libsji.1m/usr/share/man/man1m/libstlemass.1m/usr/share/man/man1m/libstlibm.1m/usr/share/man/man1m/lrescan.1m/usr/share/man/man1m/lreset.1m/usr/share/man/man1m/lusbinfo.1m/usr/share/man/man1m/lusdebug.1m/usr/share/man/man1m/lusmode.1m/usr/share/man/man1m/mini_el.1m/usr/share/man/man1m/mminfo.1m/usr/share/man/man1m/mmlocate.1m/usr/share/man/man1m/mmpool.1m/usr/share/man/man1m/mmrecov.1m/usr/share/man/man1m/msense.1m/usr/share/man/man1m/ndmpjbconf.1m /usr/share/man/man1m/networker.1m/usr/share/man/man1m/nsr.1m/usr/share/man/man1m/nsr_crash.1m/usr/share/man/man1m/nsr_ize.1m/usr/share/man/man1m/nsr_shutdown.1m /usr/share/man/man1m/nsradmin.1m/usr/share/man/man1m/nsralist.1m/usr/share/man/man1m/nsrarchive.1m/usr/share/man/man1m/nsrcap.1m/usr/share/man/man1m/nsrcat.1m/usr/share/man/man1m/nsrck.1m/usr/share/man/man1m/nsrclone.1m/usr/share/man/man1m/nsrd.1m/usr/share/man/man1m/nsrexec.1m/usr/share/man/man1m/nsrexecd.1m/usr/share/man/man1m/nsrhsmck.1m/usr/share/man/man1m/nsrhsmclear.1m/usr/share/man/man1m/nsrhsmls.1m/usr/share/man/man1m/nsrhsmnfs.1m/usr/share/man/man1m/nsrhsmrc.1m/usr/share/man/man1m/nsrhsmrecall.1m/usr/share/man/man1m/nsrib.1m/usr/share/man/man1m/nsriba.1m/usr/share/man/man1m/nsrim.1m/usr/share/man/man1m/nsrindexasm.1m/usr/share/man/man1m/nsrindexd.1m/usr/share/man/man1m/nsrinfo.1m/usr/share/man/man1m/nsrjb.1m/usr/share/man/man1m/nsrlic.1m/usr/share/man/man1m/nsrls.1m/usr/share/man/man1m/nsrmig.1m/usr/share/man/man1m/nsrmm.1m/usr/share/man/man1m/nsrmmd.1m/usr/share/man/man1m/nsrmmdbasm.1m/usr/share/man/man1m/nsrmmdbd.1m/usr/share/man/man1m/nsrmon.1m/usr/share/man/man1m/nsrndmp_recover.1m /usr/share/man/man1m/nsrndmp_save.1m /usr/share/man/man1m/nsrpmig.1m/usr/share/man/man1m/nsrports.1m/usr/share/man/man1m/nsrretrieve.1m/usr/share/man/man1m/nsrssc.1m/usr/share/man/man1m/nsrstage.1m/usr/share/man/man1m/nsrtrap.1m/usr/share/man/man1m/nsrwatch.1m/usr/share/man/man1m/nwadmin.1m/usr/share/man/man1m/nwbackup.1m /usr/share/man/man1m/nwrecover.1m /usr/share/man/man1m/nwretrieve.1m /usr/share/man/man1m/oraemcasm.1m /usr/share/man/man1m/oraemcmap.1m /usr/share/man/man1m/pmode.1m/usr/share/man/man1m/preclntsave.1m /usr/share/man/man1m/pstclntsave.1m /usr/share/man/man1m/recover.1m/usr/share/man/man1m/relem.1m/usr/share/man/man1m/save.1m/usr/share/man/man1m/savefs.1m/usr/share/man/man1m/savegrp.1m/usr/share/man/man1m/savepnpc.1m /usr/share/man/man1m/scanner.1m/usr/share/man/man1m/sjidopen.1m/usr/share/man/man1m/sjiielm.1m/usr/share/man/man1m/sjiinq.1m/usr/share/man/man1m/sjirdp.1m/usr/share/man/man1m/sjirdtag.1m/usr/share/man/man1m/sjirelem.1m/usr/share/man/man1m/sjirjc.1m/usr/share/man/man1m/ssi.1m/usr/share/man/man1m/stk_eject.1m/usr/share/man/man1m/stli.1m/usr/share/man/man1m/sym2xdm.1m /usr/share/man/man1m/tapeexercise.1m /usr/share/man/man1m/tur.1m/usr/share/man/man1m/uasm.1m/usr/share/man/man3/nsr_getdate.3/usr/share/man/man5/mm_data.5/usr/share/man/man5/nsr.5/usr/share/man/man5/nsr_archive_request.5 /usr/share/man/man5/nsr_client.5/usr/share/man/man5/nsr_data.5/usr/share/man/man5/nsr_device.5/usr/share/man/man5/nsr_directive.5/usr/share/man/man5/nsr_group.5/usr/share/man/man5/nsr_jukebox.5/usr/share/man/man5/nsr_label.5/usr/share/man/man5/nsr_layout.5/usr/share/man/man5/nsr_license.5/usr/share/man/man5/nsr_migration.5/usr/share/man/man5/nsr_notification.5/usr/share/man/man5/nsr_policy.5/usr/share/man/man5/nsr_pool.5/usr/share/man/man5/nsr_regexp.5/usr/share/man/man5/nsr_resource.5/usr/share/man/man5/nsr_schedule.5/usr/share/man/man5/nsr_service.5/usr/share/man/man5/nsr_stage.5/usr/share/man/man5/nsr_storage_node.5 /usr/share/man/man5/pathownerignore.5 /usr/share/man/man5/resource.5[ verifying class <none>; ]## Executing postinstall script.Creating /usr/lib/nsr/nsr_man Installation of <LGTOman>; was successful.Processing package instance <LGTOnode>; from </cdrom/networker_vol_1/solaris>;NetWorker for Solaris (Backup/Recover) Storage Node(sparc) 6.1.1.Build.238Legato Systems, Inc.NetWorker(TM) - Release 6.1.1.Build.238Copyright (c) 1990-2001, Legato Systems, Inc. All rights reserved.This product includes software developed by the University ofCalifornia, Berkeley and its contributors.Start NetWorker daemons at end of install [yes]? noUsing </usr>; as the package base directory.## Processing package information.## Processing system information.## Verifying package dependencies.## Verifying disk space requirements.## Checking for conflicts with packages already installed.## Checking for setuid/setgid programs.This package contains scripts which will be executed with super-userpermission during the process of installing this package.Do you want to continue with the installation of <LGTOnode>; [y,n,?] yInstalling NetWorker for Solaris (Backup/Recover) Storage Node as <LGTOnode>;## Installing part 1 of 1./usr/sbin/dasadmin/usr/sbin/jb_config/usr/sbin/jbconfig/usr/sbin/jbexercise/usr/sbin/jbverify/usr/sbin/mini_el/usr/sbin/nsrcnct/usr/sbin/nsrjb/usr/sbin/nsrmmd/usr/sbin/scanner/usr/sbin/ssi/usr/sbin/stk_eject/usr/sbin/tapeexercise[ verifying class <none>; ]## Executing postinstall script.Completing InstallationNetWorker successfully installed on `happy'!Installation of <LGTOnode>; was successful.Processing package instance <LGTOserv>; from </cdrom/networker_vol_1/solaris>;NetWorker for Solaris (Backup/Recover) Server(sparc) 6.1.1.Build.238Legato Systems, Inc.NetWorker(TM) - Release 6.1.1.Build.238Copyright (c) 1990-2001, Legato Systems, Inc. All rights reserved.This product includes software developed by the University ofCalifornia, Berkeley and its contributors.Start NetWorker daemons at end of install [yes]? Using </usr>; as the package base directory.## Processing package information.## Processing system information.1 package pathname is already properly installed.## Verifying package dependencies.## Verifying disk space requirements.## Checking for conflicts with packages already installed.## Checking for setuid/setgid programs.This package contains scripts which will be executed with super-userpermission during the process of installing this package.Do you want to continue with the installation of <LGTOserv>; [y,n,?] yInstalling NetWorker for Solaris (Backup/Recover) Server as <LGTOserv>;## Installing part 1 of 1./usr/lib/nsr/nsrindexasm/usr/lib/nsr/nsrmmdbasm/usr/lib/nsr/oldindexasm/usr/lib/nsr/oldmmdbasm/usr/lib/nsr/v5xindexasm/usr/lib/nsr/v5xmmdbasm/usr/sbin/ansrd/usr/sbin/mmrecov/usr/sbin/networker.fm_start/usr/sbin/networker.fm_stop/usr/sbin/networker.start/usr/sbin/networker.stop/usr/sbin/nsrcap/usr/sbin/nsrcat/usr/sbin/nsrck/usr/sbin/nsrd/usr/sbin/nsrim/usr/sbin/nsrindexd/usr/sbin/nsrlic/usr/sbin/nsrlmc/usr/sbin/nsrls/usr/sbin/nsrmmdbd/usr/sbin/nsrmon/usr/sbin/nsrssc/usr/sbin/nsrstage/usr/sbin/nsrtrap/usr/sbin/nw_ux.lc/usr/sbin/nw_ux.lc.imp/usr/sbin/savegrp[ verifying class <none>; ]## Executing postinstall script.Modifying /etc/rpcModifying /etc/syslog.confRestarting syslog daemonCompleting InstallationStarting NetWorker daemonsNetWorker successfully installed on `happy'!Installation of <LGTOserv>; was successful.The following packages are available:1 LGTOclnt NetWorker for Solaris (Backup/Recover) Client(sparc) 6.1.1.Build.2382 LGTOdrvr NetWorker for Solaris (Backup/Recover) Device Drivers(sparc) 6.1.1.Build.2383 LGTOlicm NetWorker for Solaris (Backup/Recover) Licensing Manager(sparc) 6.1.1.Build.2384 LGTOman NetWorker for Solaris (Backup/Recover) Man(sparc) 6.1.1.Build.2385 LGTOnode NetWorker for Solaris (Backup/Recover) Storage Node(sparc) 6.1.1.Build.2386 LGTOserv NetWorker for Solaris (Backup/Recover) Server(sparc) 6.1.1.Build.238Select package(s) you wish to process (or 'all' to processall packages). (default: all) [?,??,q]: q到这里软件就安装完成了。
SunStorEdgeQFSan...
Sun Microsystems, Inc. Sun StorEdge™ QFS 和Sun StorEdge™ SAM-FS 文件系统管理指南版本 4.2文件号码 817-7385-102004 年 10 月,修订版 A请将有关本文档的意见或建议提交至:/hwdocs/feedback版权所有 2004 Sun Microsystems, Inc., 4150 Network Circle, Santa Clara, California 95054, U.S.A. 保留所有权利。
对于本文档中介绍的产品,Sun Microsystems, Inc. 对其所涉及的技术拥有相关的知识产权。
需特别指出的是(但不局限于此),这些知识产权可能包含在 /patents中列出的一项或多项美国专利,以及在美国和其他国家/地区申请的一项或多项其他专利或待批专利。
本文档及其所述产品按照限制其使用、复制、分发和反编译的许可证进行分发。
未经 Sun 及其许可方(如果有)的事先书面许可,不得以任何形式、任何手段复制本产品或文档的任何部分。
第三方软件,包括字体技术,均已从 Sun 供应商处获得版权和使用许可。
本产品的某些部分可能是从 Berkeley BSD 系统衍生出来的,并获得了加利福尼亚大学的许可。
UNIX 是 X/Open Company, Ltd. 在美国和其他国家/地区独家许可的注册商标。
Sun、Sun Microsystems、Sun 徽标、AnswerBook2、、Solaris 和 StorEdge 是 Sun Microsystems, Inc. 在美国和其他国家/地区的商标或注册商标。
所有 SPARC 商标的使用均已获得许可,它们是 SPARC International, Inc. 在美国和其他国家/地区的商标或注册商标。
标有 SPARC 商标的产品均基于由 Sun Microsystems, Inc. 开发的体系结构。
SUN中端服务器系统管理手册笔记
SUN中端服务器系统管理手册笔记第三章系统开关和设置这一章的目标是使你能够使用系统操纵器命令来进行第一次的软件安装处理。
注意:当你第一次设置你的系统时,强烈建议你停止域设置,在建立附加的域之前,先从DOMAIN A 引导SOLARIS操作系统。
这一章的内容包括:安装、连接电缆、打开硬件开关打开电源组开关设置平台(Platform)设置域A(DOMAIN A)储备当前的配置到一个服务器安装和引导SOLARIS操作系统要紧的步骤摘要如下:1、连接硬件电缆2、设置服务3、打开硬件电源开关4、为平台(Platform)设置日期和时刻5、为平台(Platform)设置口令6、使用setupPlatform命令设置平台参数7、为DOMAIN A设置日期和时刻8、为DOMAIN A设置口令9、使用setupdomain命令设置域参数10、使用dumpconfig命令储备系统配置11、把健开关keyswitch设置为ON12、如果SOLARIS没有安装,那么就开始安装13、引导SOLARIS操作系统安装电缆和打开硬件1、安装硬件电缆(详见系统安装指南)2、使用一个终端连接到系统操纵器的串口系统操纵板的默认串口设置为速率9600数据位8校验位无停止位 1由于系统操纵器的Platform console被连接,这时信息开始显示在你第一次打开系统电源开关之前,先设置服务,需要设的服务如下所示:下面对所要设置的服务参考引用了Philmoon的SUN F4800安装步骤中的服务讲明DNS 服务系统操纵器使用DNS来简化与其它系统的通信Sun Management Center 软件* 通过Sun Management Center 治理和监控系统.我们建议使用此软件来治理和监控系统网络终端服务器(NTS) 网络终端服务器(NTS, Network Terminal Server) 用于关心治理多个串行连接。
至少应使用密码来爱护NTS 的安全引导/安装服务器* 承诺你从网络服务器而不是使用CD-ROM 驱动器中安装Solaris 操作环境HTTP/FTP 服务器* 为了执行固件升级你必须设置HTTP或FTP服务器。
U1系统管理指南
Sun Cluster3.0U1系统管理指南Sun Microsystems,Inc.901San Antonio RoadPalo Alto,CA94303-4900U.S.A.650-960-1300部件号码816-1968-102001年8月,Revision ACopyright版权2001Sun Microsystems,Inc.901San Antonio Road,Palo Alto,California94303-4900U.S.A.版权所有。
本产品或文档受版权保护,其使用、复制、分发和反编译均受许可证限制。
未经Sun及其授权者事先的书面许可,不得以任何形式、任何手段复制本产品及其文档的任何部分。
包括字体技术在内的第三方软件受Sun供应商的版权保护和许可证限制。
本产品的某些部分可能是从Berkeley BSD系统衍生出来的,并获得了加利福尼亚大学的许可。
在美国和其它国家,UNIX是通过X/Open Company,Ltd.独家特许的注册商标。
对于Netscape Communicator TM,适用以下声明:(c)版权1995Netscape Communications Corporation。
保留所有权利。
Sun、Sun Microsystems、Sun标志、AnswerBook2、、Solstice DiskSuite、Sun Enterprise、Sun Enterprise SyMON、JumpStart、StorEdge、Sun Management Center、OpenBoot和Solaris是Sun Microsystems,Inc.在美国和其它国家的商标、注册商标或服务标志。
所有SPARC商标均按许可证授权使用,它们是SPARC International,Inc.在美国和其它国家的商标或注册商标。
带有SPARC商标的产品均以Sun Microsystems,Inc.开发的体系结构为基础。
Sun StorEdge QFS 安装与升级指南说明书
Sun Microsystems, Inc.請將您對本文件的意見提交至:/hwdocs/feedback Sun StorEdge™ QFS 安裝與升級指南版本 4 Update 5文件號碼 819-6331-10 2006 年 6 月,修訂版 A請回收Copyright 2006 Sun Microsystems, Inc., 4150 Network Circle, Santa Clara, California 95054, U.S.A. 版權所有。
Sun Microsystems, Inc. 對於本文件所述技術擁有智慧財產權。
這些智慧財產權包含 /patents 上所列的一項或多項美國專利,以及在美國及其他國家/地區擁有的一項或多項其他專利或申請中專利,但並不以此為限。
本文件及相關產品在限制其使用、複製、發行及反編譯的授權下發行。
未經 Sun 及其授權人 (如果有) 事先的書面許可,不得使用任何方法、任何形式來複製本產品或文件的任何部分。
協力廠商軟體,包含字型技術,其版權歸 Sun 供應商所有,經授權後使用。
本產品中的某些部分可能源自加州大學授權的 Berkeley BSD 系統的開發成果。
UNIX 是在美國和其他國家/地區之註冊商標,已獲得 X/Open Company, Ltd. 專屬授權。
Sun 、Sun Microsystems 、Sun 標誌、AnswerBook2、 、Solaris 、SunOS 、SunSolve 、Java 、JavaScript 、Solstice DiskSuite 與 Sun StorEdge 是 Sun Microsystems, Inc. 在美國及其他國家/地區的商標或註冊商標。
所有 SPARC 商標都是 SPARC International, Inc. 在美國及其他國家/地區的商標或註冊商標,經授權後使用。
凡具有 SPARC 商標的產品都是採用 Sun Microsystems, Inc. 所開發的架構。
Sun QFS Sun SAM-FS 和 Sun SAM-QFS 4.0 版本说明说明书
Sun QFS Sun SAM-FS 和 Sun SAM-QFS 4.0 版本说明=============================================2002 年 7 月 25 日Sun QFS Sun SAM-FS 和 Sun SAM-QFS 4.0 版采用了上一版本的设计和性能改进增强功能和错误更正熟悉本软件的系统管理员和程序员应了解任何影响日常操作的更改以及那些为与 Sun QFS Sun SAM-FS 或 Sun SAM-QFS 软件配合工作而编写的自动脚本出于上述原因Sun Microsystems, Inc. 建议您在将系统升级到 4.0 软件版本之前仔细阅读本 README 文件以及相关的 CHANGES 文件4.0 版本说明概要===============* Sun QFS Sun SAM-FS 和 Sun SAM-QFS 4.0 软件在 Solaris 78 和 9 操作环境中运行* Sun QFS Sun SAM-FS 和 Sun SAM-QFS 4.0 软件由 Sun Microsystems分销商或 Sun 授权的服务供应商销售此外用户也可通过网络下载这些软件4.0 版本的功能=============*新增 Sun QFS 共享文件系统原因此更改可在 Solaris 主机系统中实施分布式读取器/写入器文件系统在 Sun QFS 共享文件系统环境中一个 Solaris 主机用作元数据服务器而其它主机将配置为客户机用户既可在 Sun QFS 环境中配置 Sun QFS 共享文件系统也可在 Sun SAM-QFS 环境中配置 Sun QFS 共享文件系统如果在 Sun SAM-QFS 环境中配置 Sun QFS 共享文件系统则活动元数据服务器是唯一包含活动登台 (sam-stagerd) 和存档(sam-archiverd) 后台程序的主机Sun QFS 共享文件系统只能在 Solaris 8 和 9 操作环境中运行这一限制是由于系统要求安装 Sun SAN 3.0/3.1 造成的如果您希望可以更改元数据服务器如在Sun SAM-QFS 故障接管环境中则要配置为潜在元数据服务器的 Sun Solaris 系统必须通过存储区域网络如 Sun SAN 3.0 或更高版本或网络附件连接至包含存档介质仓库的自动化库和/或安装点这可以使 Sun QFS 共享文件系统中的其它潜在元数据服务器能够访问存档映像有关详细信息请参阅Sun QFS Sun SAM-FS 和 Sun SAM-QFS 文件系统管理员指南用户影响当 sam-fsd 后台程序发现 Sun QFS 共享文件系统时将会启动共享文件系统后台程序(sam-sharefsd)BSD 接口用于服务器与客户机主机之间的通信可以支持 IPv4 和 IPv6您必须将与每一个共享文件系统关联的唯一端口的名称配置为 samsock.fs_name您可以在/etc/services 中定义此端口如果您已配置 NIS则可以在/etc/yp/src/services 中定义此端口跟踪文件用于记录连接和关闭情况它位于/var/opt/SUNWsamfs/trace/sam-sharefsd 中对于 Sun QFS 和 SAM-QFS 共享文件系统拆分宽度的默认设置为 stripe=0即采用循环方式对于 Sun QFS 和 SAM-QFS 共享文件系统最小分配大小的默认设置为 8*DAU如果您只有较小的文件则应将它设置为您的文件大小的平均值对于 Sun QFS 和 SAM-QFS 共享文件系统最大分配大小的默认设置为 32*DAU如果您的站点既有大文件也有小文件则应将它设置为最小分配大小的 2-4 倍对于 Sun QFS 和 SAM-QFS 共享文件系统stage_n_window 的默认设置为最小分配大小如果 stage_n_window 的值太小则会造成缆线中存在大量的元通信数据对于 Sun QFS 共享文件系统必须在 /etc/vfstab 文件中指定共享安装选项执行 mountall 脚本不能安装共享文件系统但可以安装本地 samfs 文件系统已知负面影响samfsrestore(1M) 命令不能在 Sun QFS 共享文件系统客户机上正常运行管理员不可以在客户机上尝试运行 samfsrestore(1M) 命令* Sun QFS 共享文件系统使用更为广泛的配置信息通过运行 samsharefs(1M) 命令及其-Ru选项可以更新早期版本的系统主机文件有关详细信息请参阅samsharefs(1M) 联机资料/opt/SUNWsamfs/examples/hosts.*.local.* 文件以及Sun QFS Sun SAM-FS 和 Sun SAM-QFS 文件系统管理员指南原因这是为了指定并使用 Sun QFS 共享文件系统通信的专用网络连接以及在多种环境下限制进入的连接*在 Sun QFS 共享文件系统中mount(1M) 命令可以接受下列关于文件租借的选项o‘-o rdlease=n’读租借o‘-o wrlease=n’写租借o‘-o aplease=n’附加租借原因这些选项与 Sun QFS 共享文件系统的实施有关用户影响无适用对象共享文件系统站点已知负面影响无文档改动:已更新 mount_samfs(1M) 联机资料* mount(1M) 命令的shared_reader和shared_writer选项已更改为reader和writer其shared_前缀已被删掉现在装有单个写入器和多个阅读器的文件系统称为多阅读器文件系统多阅读器文件系统和 Sun QFS 共享文件系统的主要区别在于多阅读器主机从磁盘读取元数据而 Sun QFS 共享文件系统的客户机通过网络读取元数据为保持向后兼容性本版本保留了shared_reader和shared_writer安装选项语法原因这些选项被重新命名的目的是为了避免混淆 Sun QFS 共享文件系统与具有多个阅读器和单个写入器的文件系统用户影响无为保持向后兼容性本版本保留了旧语法适用对象多阅读器文件系统站点已知负面影响无文档改动已更新 mount_samfs(1M) 联机资料*存档程序改进1. sam-archiverd 后台程序现可执行全部存档副本安排计划以前由于每一个sam-arfind 后台程序各自独立安排存档副本计划因而产生了一些不协调的驱动器和卷使用情况现在每一个 sam-arfind 后台程序均向 sam-archiverd 后台程序发送 ArchReq-s要存档的文件清单以便统一安排存档副本计划2. 当 archiver.cmd 文件发生更改时sam-archiverd 后台程序会重新读取该文件sam-archiverd 不会重新启动自身及其所有子进程archiver.cmd 文件可能会发生下列更改视更改属性而定a. 如果存档组定义发生了更改则只重新启动受影响的文件系统中的 sam-arfind 后台程序b. 如果只更改了卷(VSN)分配则不会重新启动任何进程由于 sam-archiverd正在进行副本安排因此 sam-archiverd 可以内部处理更改的信息c. 如果存档组参数发生了更改则不会重新启动任何进程大部分参数只对sam-arcopy 安排有影响并且可由 sam-archiverd 内部处理d. 更改日志文件名称VSN 分配和其它全局参数不会导致重新启动3. sam-archiverd 后台程序由 sam-fsd 启动这样可在不运行 sam-initd 和库后台程序的情况下执行磁盘存档4. 如果要检查的文件不是默认文件 (/etc/opt/SUNWsamfs/archiver.cmd)则您必须指定 archiver(1M) 命令的-c archive_cmd选项5. samu A显示选项已被删除没有存档程序共享内存段* Sun QFS Sun SAM-FS 和 Sun SAM-QFS 环境现在支持文件系统限额限额可以依据用户群组或管理员组进行设置您可以设置文件数量和块数量的限制限额只适用于磁盘而不适用于可移动介质原因用户要求用户影响用户应知道管理员可能为他们设置了限额并且会被告知用于检查其限额的samquota(1) 命令适用对象希望实施限额的站点已知负面影响无文档改动Sun QFS Sun SAM-FS 和 Sun SAM-QFS 文件系统管理员指南介绍了此功能另外请参阅以下联机资料samedquota.sh(1M)saminitfsquota.sh(1M)samquota(1)samquota(1M) 和samquotastat(1M)示例 4.0 版文档中提供了数个示例*跟踪文件控制数个 Sun QFS Sun SAM-FS 和 Sun SAM-QFS 后台程序可将消息写入至跟踪文件这些消息包含后台程序所执行工作的状态和进程信息这些消息主要供Sun 工程师和支持人员使用以便提高系统的性能和诊断问题的原因同样消息内容和格式随错误更正和功能版本的更改而变化下列后台程序可以向跟踪文件写入消息sam-archiverd sam-catserverdsam-fsd sam-ftpd sam-recycler sam-sharefsd 和 sam-stagerd默认情况下后台程序不会向跟踪文件写入消息用户可以在 defaults.conf 配置文件中指定跟踪文件的名称和选项有关说明请参阅 defaults.conf(4)联机资料执行期间您可以使用 samu dtrace命令进行更改用户影响archiver.cmd 文件中的跟踪指令已失效artrace 和 cattrace samu(1M) 命令已失效*循环更新跟踪文件为防止跟踪文件不断地增加sam-fsd 后台程序会监控跟踪文件的大小并且定期对其运行 /opt/SUNWsamfs/sbin/trace_rotate.sh 脚本该脚本可将跟踪文件移动至编有连续号码的副本当跟踪文件超过指定的大小或时限时即会执行该脚本跟踪文件的大小和时限在 defaults.conf 文件中指定您可以修改此脚本以适合自己的操作此外您还可以使用 cron(1) 或其它一些工具来提供此项功能如果 /opt/SUNWsamfs/sbin/trace_rotate.sh 脚本不存在则 sam-fsd 不会执行任何操作*已将 Access Control List (ACL)功能添加至 Sun SAM-FS 文件系统现在Solaris ACL 功能在 Sun QFS Sun SAM-FS 和 Sun SAM-QFS 文件系统中的工作方式与其在 Solaris 文件系统中的工作方式完全一样该功能允许您为一个或一组文件定义范围更窄的更有针对性的访问组而不是通过设置标准的 UNIX 权限来获得访问组原因Sun QFS Sun SAM-FS 和 Sun SAM-QFS 文件系统在支持文件系统 ACL 功能方面已显示出其不足之处用户影响该功能可以使用户控制对文件和目录的访问所用的命令和系统调用与在Solaris 下用于 UFS 文件系统的命令和系统调用相同适用对象任何希望以更好的尺度而不是由普通 Solaris 权限提供的尺度来控制文件和目录访问权限的用户已知负面影响无文档改动无有关详细信息请参阅下列 Solaris 联机资料getfacl(1)setfacl(1)acl(2)aclcheck(3)aclsort(3)acltomode(3)acltopbits(3) 和 acltotext(3)另请参阅 Solaris 系统管理文件示例参阅 Solaris 文档*新增 sam-fsd 文件系统后台程序原因进行此更改的目的是为了实施 Sun QFS 共享文件系统和磁盘存档功能另外它还允许产品转向分布式结构用户影响系统管理员应注意输入samd stop或samd start命令已不再可以停止或启动所有后台程序相反samd(1M) 命令只会影响自动后台程序其中包括sam-initd sam-catserverd sam-robotsd 以及任何基于库类型的相关自动后台程序例如 sam-stkd sam-stk_helper ssi_so 等这将影响启动和关闭进程sam-fsd 是与 Sun QFS Sun SAM-FS 和 Sun SAM-QFS 相关的启动后台程序sam-fsd 位于 /usr/lib/fs/samfs/sam-fsd 中第一次操作文件系统时例如第一次对文件系统运行 mount(1M)samfsck(1M)sammkfs(1M) 等命令系统会修改 /etc/inittab 文件以自动启动 sam-fsd/etc/inittab 文件中将添加下面的条目sf:23:respawn:/usr/lib/fs/samfs/sam-fsdsam-fsd 的父标识为 1而它又是 sam-initd 的父项sam-fsd 可以自动启动下列子后台程序sam-archiverd 存档程序后台程序扫描文件系统(sam-arfind)并复制文件(sam-arcopy)从而将文件存档至可移动介质和磁盘sam-stagealld 关联登台后台程序sam-stagerd 登台后台程序从可移动介质或磁盘登台文件sam-ftpd 用于磁盘存档的通信后台程序sam-sharefsd Sun QFS 共享文件系统后台程序在使用 sammkfs(1M) 命令的shared选项初始化文件系统时启用此外sam-fsd 还可以通知存档程序有关文件系统安装和卸载的情况sam-fsd 在启动时会读取库配置文件并在收到 HUP 信号时再次读该文件库配置文件包括:o LICENSE.4.0必需o mcf必需o diskvols.conf如果可用o samfs.cmd如果可用o defaults.conf如果可用当收到 TERM 信号时sam-fsd 会退出有关 HUP 信号的信息请参阅signal(5) 联机资料sam-fsd 还可以用作语法检查器从命令行运行该后台程序可以检查配置文件或报告系统的状态sam-fsd 按列出的顺序检查配置文件中的语法当发现错误时sam-fsd 将停止检查配置文件若要检查所有语法您必须多次执行 sam-fsd直到没有语法错误为止例如对于错误配置的 mcf 文件它会生成以下错误消息# /usr/lib/fs/samfs/sam-fsd 26: /dev/rmt/1cbn 101 sg stk9738 off *** Error in line 26: Equipment ordinal 101 already in use 1 error in ‘/etc/opt/SUNWsamfs/mcf’ sam-fsd: Read mcf/etc/opt/SUNWsamfs/mcf failed.错误消息将写入至 /var/adm/messages 文件适用对象从 3.5.0 升级到 4.0 的所有站点都会受到这些更改的影响已知负面影响应注意在发出 samd stop 命令之后仍然运行的后台程序文档改动已对下列文档进行了更新以反映这一新的后台程序o sam-fsd(1M) 联机资料o samd(1M) 联机资料o Sun QFS Sun SAM-FS 和 Sun SAM-QFS 文件系统管理员指南o mcf(4) 联机资料o defaults.conf(4)其它更改weight_size=和weight_age=mount(1M) 选项已失效这些是释放程序参数它们必须在释放程序命令文件/etc/opt/SUNWsamfs/releaser.cmd 中进行设置磁盘的原始专用文件的路径例如 /dev/rdsk/c?t?d?s?已不再是/etc/opt/SUNWsamfs/mcf 文件中的必需项*新增磁盘存档功能存档是指将文件从 SAM-FS 文件系统复制到存档卷的过程存档卷可以位于库的可移动介质卡盒中也可以位于已安装文件系统的文件中应用磁盘存档功能时磁盘上的每一个卷必须使用唯一的 VSN 标识符进行标识/etc/opt/SUNWsamfs/diskvols.conf 文件中列出了用于磁盘存档的卷用户可以对磁盘存档功能进行配置以将文件存档至远程机器上的文件系统如果存档至远程系统则在定义磁盘 VSN 时必须指定主机名并且该主机系统中至少应安装一个SAM-FS 或 Sun SAM-QFS 文件系统-disk_archive 指令是在 archiver.cmd 文件 params 子部分中的存档组处理指令这是一个用于定义磁盘存档组的指令原因用户要求用户影响无已知负面影响无文档改动有关详细信息请参阅Sun SAM-FS 和 Sun SAM-QFS 存储及存档管理指南另请参阅以下联机资料diskvols.conf(4) 和 archiver.cmd(4)示例如果文件 /sam2/my_proj/filea 属于存档组 arset0.1则存档程序会将该文件的内容存档至远程服务器 mars 中名为 /sam_arch1 的目的地路径文件 diskvols.conf 中包含下面的条目disk01 mars:/sam_arch1archiver.cmd 文件的 params 子部分包含下面的条目params arset0.1 -disk_archive disk01 endparams*新增系统错误工具(SEF, System Error Facility)报告机制该功能可以使您获取并编辑由 Sun SAM-FS 和 Sun SAM-QFS 环境中外围磁带设备的日志检测页生成的报告启用此功能后日志检测数据将写入至日志文件默认位置/var/opt/SUNWsamfs/sef/sefdata以最终包含在报告中您可以使用sefreport(1M) 命令自定义报告中的日志检测数据有关使用此功能的详细信息请参阅 sefreport(1M) 联机资料sefdata(4) 联机资料以及Sun SAM-FS 和Sun SAM-QFS 存储及存档管理指南原因根据日志检测页中的数据管理员可以跟踪磁带设备操作和卷使用中出现的错误这使管理员可以确定出现问题的设备或卷管理员甚至可以在形成严重事件之前预测设备或卷的故障用户影响无适用对象需要详细了解与 Sun SAM-FS 和 Sun SAM-QFS 系统配合使用的磁带设备及特定卷的错误信息的系统管理员已知负面影响无文档改动增加了 sefreport(1M) 和 sefdata(4) 联机资料并在Sun SAM-FS 和 Sun SAM-QFS 存储及存档管理指南中添加了有关此方面的信息* sam_trace(1M)命令的名称已更改为 samtrace(1M)同时还更改了相关的联机资料进行此更改的目的是使命令与联机资料之间的命名保持一致原因与其它带有sam前缀的命令名称保持一致用户影响命令和联机资料现已更改为 samtrace(1M)下划线字符已删除适用对象全部已知负面影响无文档改动sam_trace(1M) 联机资料现已更改为 samtrace(1M) 联机资料*已删除文档中未列出的存档程序指令reserve =该指令出现在 3.5.0 之前的版本中 3.5.0 版本的文档中未对此指令加以说明但它仍可在 archiver.cmd 文件中使用其功能已由allsets定义中的-reserve参数取代* archive(1) 命令的-c选项已更改为-C-C选项用于指定当前的存档sls(1) 命令已作了相应更改以反映这一变更原因与用于指定存档副本的其它命令保持一致用户影响已更改命令和联机资料适用对象全部已知负面影响无文档改动archive(1)sls(1) 和 sam_archive(3) 联机资料*删除 sam-notifyd 后台程序及其相关 fifo通知功能由使用 UNIX Domain Socket 的 sam-fsd 后台程序执行原因减少后台程序数量用户影响无适用对象全部已知负面影响无文档改动已删除通知后台程序联机资料* sam-clientd 和 sam-serverd 后台程序的文档已从 sam-robotsd(1M) 联机资料中删除现在包括在新的 sam-remote(7) 联机资料中原因这些后台程序的文档更适合归入 Sun SAM-Remote 联机资料用户影响已添加新的联机资料适用对象Sun SAM-Remote 用户已知负面影响无文档改动新增联机资料 sam-remote(7)示例无*将文件存档的驱动器的设备序数添加到存档日志信息中原因客户要求进行此更改用户影响应检查用于处理存档程序日志的脚本由于新字段添加到最后一列因此改动很小适用对象需要将介质错误与特定驱动器关联起来的站点已知负面影响无文档改动参阅 sam-archiverd(1M)* Sun QFS 文件系统增加了 md 设备支持功能文档改动参阅Sun QFS Sun SAM-FS 和 Sun SAM-QFS 文件系统管理员指南另请参阅 mcf(4)联机资料* samu(1M) 新增w显示选项以显示正在等待介质的登台请求*卷保留功能从 ReservedVSNs 文件移至库目录现在已不再使用 ReservedVSNs 文件存档程序最初将根据其内容在目录中创建卷保留系统提供了 reserve(1M) 和unreserve(1M) 这两个命令以便更改目录条目dump_cat(1M) 命令可以生成文本输出必要时可以用该输出创建 ReservedVSNs 文件原因简化保留存档卷的管理用户影响如果站点需要从 4.0 版降级到以前的版本则必须运行 backto350.sh 脚本以重新创建保留 VSN 的信息当前保存在 4.0 目录中该脚本可以使用由dump_cat(1M) 命令生成的目录信息来创建 ReservedVSNs 文件已知负面影响无文档改动已对Sun SAM-FS 和 Sun SAM-QFS 存储及存档管理指南进行了更新以反映这一更改另外已删除 ReservedVSNs(4) 联机资料同时增加了reserve(1M) 和 unreserve(1M) 联机资料* hwm_archive 选项已添加到 mount(1M) 命令该选项指导文件系统在达到阈值上限时启动存档程序默认情况下存档程序不会在达到阈值上限时启动原因技术支持人员要求进行此更改用户影响无适用对象有大量进入文件保存在文件系统中的站点其原因可能是设置的存档时间间隔太长而造成文件系统在存档程序运行前已满已知负面影响无文档改动参阅 mount_samfs(1M)*-n和--newer_than_existing选项已添加到 star(1M) 命令这两个选项只从存档映像中抽取文件系统中相对较新的文件这样可从一系列存档磁带中重新装入相对较新的文件而杜绝了抽取较旧文件的可能性原因技术支持人员要求进行此更改用户影响无适用对象需要使用 star(1M) 来恢复因故障而丢失的文件系统的站点已知负面影响无文档改动参阅 star(1M)示例以下示例命令从 vsn YYY 上 0x286 处的存档映像中抽取相对较新的文件request -p 0x286 -m lt -v YYY xxx star xvnf xxx*-g logfile选项已添加到 samfsrestore(1M) 命令此选项可在运行samfsdump(1M) 命令前生成一个列出部分或全部联机文件的日志文件完成恢复操作之后此文件可以用作 restore.sh(1M) 脚本的输入项以重新登台这些文件原因技术支持人员要求进行此更改用户影响无适用对象需要在运行 samfsrestore(1M) 命令之后恢复文件系统先前状态的站点已知负面影响无文档改动参阅 sammkfs(1M) 和 samfsdump(1M) 联机资料*已更改 Sun QFS 和 Sun SAM-QFS 系统中的默认 DAU 大小而没有更改 SAM-FS 文件系统中的默认 DAU 大小DAU 大小由 sammkfs(1M) 命令的-a allocation_unit选项指定对于 Sun QFS 和 Sun SAM-QFS 文件系统已为 QFS 文件系统更改的默认值包括o ms 文件系统16ko 不带拆分组的 ma 文件系统64ko 带有拆分组的 ma 文件系统256k原因技术支持人员要求进行此更改同先前的默认值相比这些默认值可产生更高效的I/O进而产生更高的 I/O 速率sammkfs(1M) 命令继续使用可以指定 DAU 的-a allocation_unit变量默认值越大就越对包含大容量文件且要求更高I/O 速率的文件系统有利用户影响具有小文件的 ma 文件系统用户需要将默认 DAU 设置为较小的值对于 ma 拆分组由于最小分配单元较大因此很可能造成更多的磁盘空间无法使用拆分组通常用于具有大容量文件且要求较高 I/O 速率的场合已知负面影响无文档改动sammkfs(1M) 联机资料以及Sun QFS Sun SAM-FS 和 Sun SAM-QFS 文件系统管理员指南示例无*-copy_r n和-any_copy_r选项已添加到 sfind(1) 命令原因在 sfind(1) 命令中保持一致用户影响无适用对象所有最终用户已知负面影响无文档改动sfind(1) 联机资料*命令文件中的等于符号 (=) 两侧不再需要空格*min_residence_age = time指令已添加到 releaser.cmd 文件这可以使你为释放程序调节最短驻留时限原因客户要求进行此更改用户影响无适用对象需要将文件释放的最短驻留时限设置为其它时间而不是默认值10 分钟的站点已知负面影响无文档改动参阅 sam-releaser(1M) 和 releaser.cmd(4) 联机资料示例下面是 releaser.cmd 文件中的指令示例行它将最短驻留时限设置为 1小时min_residence_age = 3600*新增 load_notify.sh(1M) shell 脚本该脚本可在系统请求访问已导出的介质或手动装载介质时通知操作员当系统请求载入不在自动化库中的可用卷且操作员的状态为有人看管时将会运行此脚本该默认脚本会向超级用户发送一封说明此VSN 的电子邮件原因客户要求进行此更改用户影响无适用对象当系统请求访问手动装载介质或已导出的介质时要求通知操作员的站点已知负面影响无文档改动参阅 load_notify.sh(1M) 联机资料示例若要启用此功能请输入下面的命令cp /opt/SUNWsamfs/examples/load_notify.sh /opt/SUNWsamfs/sbin然后根据需要修改脚本*新增 samfsconfig(1M) 命令和联机资料在重新分配控制器编号或在控制器之间移动磁盘后可用该命令分析超级块并帮助重建 mcf 文件原因这是一个故障恢复功能用户影响无适用对象系统管理员已知负面影响无文档改动新增 samfsconfig(1M) 联机资料示例参阅 samfsconfig(1M) 联机资料*存档复制命令现在支持只指定元数据的 -M 选项如果不指定 -M 则该命令只复制标准文件如果指定 -M该命令只复制元数据文件目录符号链接可移动介质文件和段索引现在支持 -M 选项的存档复制命令包括damage(1M)exarchive(1M)rearch(1M)unarchive(1M)undamage(1M)和 unrearch(1M)原因这可以使系统管理员在不影响数据存档的情况下进行元数据存档用户影响无适用对象系统管理员已知负面影响无文档改动已将 -M 选项添加到每一个命令的联机资料*新增登台程序后台程序 sam-stagerd除添加新的登台程序后台程序之外还添加了其它一些功能这些新功能包括更为强大的登台日志工具和登台程序后台程序配置文件原因该功能可以提高登台程序的可支持性和可用性用户影响defaults.conf(4) 中的下列命令已作废lock_stage_bufferstage_retries stages 和 tp_stage_buffer_size有关与这些命令等效的功能请参阅 stager.cmd(4) 联机资料适用对象希望自定义文件登台活动的站点已知负面影响已删除 sammkfs(1M) -r 这一故障恢复方法参阅 4.0 版其它方面的更改下的附加注释文档改动除后台程序之外还添加了下列新的联机资料sam-stagerd(1M)sam-stagerd_copy(1M) 和 stager.cmd(4)下面的联机资料已作废sam-logd(1M)新的文本已添加到Sun SAM-FS 和 Sun SAM-QFS 存储及存档管理员指南中用以介绍新的后台程序示例无*新增对下列硬件的支持o库ADIC Scalar 100 AIT 库ADIC Scalar 1000 AIT 库Exabyte X80磁带库IBM 3584 UltraScalable 磁带库有关配置清洁功能的详细信息请参阅ibm3584(7) 联机资料StorageTek L20L40 和 L80 磁带库Qualstar82xx 系列磁带库o驱动器IBM 3580 (LTO) 磁带驱动器Quantum SDLT220 (SuperDLT) 磁带驱动器Seagate Viper 200 (LTO) 磁带驱动器ADIC 库中使用 DAS/ACI 接口的Sony AIT 驱动器StorageTek T9940B 磁带驱动器o介质STK 9840 VolSafe 单写磁带文档改动有关这些设备的附加信息请参阅 mcf(4)inquiry.conf(4) 和intro_devices(7) 联机资料原因根据销售商要求或 Sun Microsystems 的商业决策添加所有这些设备。
Sun StorEdge QFS 和 Sun StorEdge SAM-FS 4.2 版本说明书
Sun Microsystems, Inc.請將關於本文件的意見傳送至:/hwdocs/feedbackSun StorEdge ™ QFS 和Sun StorEdge ™ SAM-FS 4.2版本說明發行版本 4.2文件號碼:817-7401-102004 年 10 月,修訂版 ACopyright 2004 Sun Microsystems, Inc., 4150 Network Circle, Santa Clara, California 95054, U.S.A. 版權所有。
Sun Microsystems, Inc. 對本文件所述的相關技術擁有智慧財產權。
這些智慧財產權可能包含一項或以上列於/patents的在美國及其他國家的專利或申請中專利,特此聲明。
本文件及相關產品在限制其使用、複製、發行及反編譯的授權下發行。
未經 Sun 及其授權人(如果適用)事先的書面許可,不得使用任何方法以任何形式來複製本產品或文件的任何部分。
協力廠商軟體,包含字型技術,其著作權歸 Sun 供應商所有,經授權後使用。
本產品中的某些部分可能衍生自加州大學授權的 Berkeley BSD 系統的開發成果。
UNIX 為美國及其他國家地區之註冊商標,獨家透過 X/Open Company, Ltd. 取得授權。
Sun、Sun Microsystems、Sun 標誌、AnswerBook2、、Solaris、Sun OS、Sun Solve、Java、JavaScript、Solstice DiskSuite 和 Sun StorEdge 是 Sun Microsystems, Inc. 在美國及其他國家的商標或註冊商標。
所有 SPARC 商標皆取得授權之下使用,並且為 SPARC International, Inc. 於美國及其他國家地區之商標或註冊商標。
具有 SPARC 商標的產品都基於 Sun Microsystems, Inc. 開發的架構。
Sun ZFS Storage 7000 系统管理指南说明书
Sun ZFS Storage7000系统管理指南文件号码E38996–012012年12月版权所有©2009,2011,2012,Oracle和/或其附属公司。
保留所有权利。
本软件和相关文档是根据许可证协议提供的,该许可证协议中规定了关于使用和公开本软件和相关文档的各种限制,并受知识产权法的保护。
除非在许可证协议中明确许可或适用法律明确授权,否则不得以任何形式、任何方式使用、拷贝、复制、翻译、广播、修改、授权、传播、分发、展示、执行、发布或显示本软件和相关文档的任何部分。
除非法律要求实现互操作,否则严禁对本软件进行逆向工程设计、反汇编或反编译。
此文档所含信息可能随时被修改,恕不另行通知,我们不保证该信息没有错误。
如果贵方发现任何问题,请书面通知我们。
如果将本软件或相关文档交付给美国政府,或者交付给以美国政府名义获得许可证的任何机构,必须符合以下规定:ERNMENT END USERS:Oracle programs,including any operating system,integrated software,any programs installed on the hardware,and/or documentation,delivered to U.S. Government end users are"commercial computer software"pursuant to the applicable Federal Acquisition Regulation and agency-specific supplemental regulations.As such,use,duplication,disclosure,modification,and adaptation of the programs,including any operating system,integrated software,any programs installed on the hardware,and/or documentation,shall be subject to license terms and license restrictions applicable to the programs.No other rights are granted to the ernment.本软件或硬件是为了在各种信息管理应用领域内的一般使用而开发的。
SunSoft Action Request System 管理员指南说明书
© 1991, 1992, 1993, 1994, 1995, 1996 by Remedy Corporation. All rights reserved. This documentation may not be copied in whole or in part without the prior written consent of Remedy Corporation.Printed in the U.S.A.Action Request System and AR System are trademarks of Remedy Corporation.Apple and Macintosh are registered trademarks and MacTCP is a trademark of Apple Computer, Inc.AT&T is a registered trademark of American Telephone and Telegraph Company.CA-OpenINGRES is a trademark of Computer Associates, IncChameleon NFS and NET MANAGE are trademarks of NET MANAGE, Inc.HP, HP-UX, and OpenView are trademarks of Hewlett-Packard Company.HyperHelp is a trademark of Bristol Technology Inc.IBM, OS/2, and RISC System/6000 are registered trademarks, and RS/6000, NetView and AIX are trademarks ofInternational Business Machines Corporation.INFORMIX is a registered trademark of Informix Software, Inc.LAN WorkPlace and Novell are registered trademarks of Novell, Inc.Microsoft, MS, MS-DOS, and XL design (the Microsoft Excel logo) are registered trademarks, and Windows and Windows NT are trademarks of Microsoft Corporation.Motif, OSF, and OSF/Motif are trademarks of the Open Software Foundation, Inc.Motorola mc88100 is a registered trademark of Motorola Corporation.ORACLE and SQL*Plus are registered trademarks, and ORACLE7 is a trademark of Oracle Corporation.PC/TCP is a registered trademark of FTP Software, Inc.Reflection and Reflection Network Series are registered trademarks of Walker Richer & Quinn, Inc.Silicon Graphics and IRIS are registered trademarks and IRIX is a trademark of Silicon Graphics, Inc.Sun Microsystems, NFS, and PC-NFS are registered trademarks of Sun Microsystems, Inc. SunOS, Solaris,SunSelect, OpenWindows, and SunNet are trademarks of Sun Microsystems, Inc. SPARCstation is a trademark of SPARC International, Inc., licensed exclusively to Sun Microsystems, Inc.SuperTCP for Windows is a trademark of Frontier Technologies Corporation.SYBASE is a registered trademark of Sybase, Inc.UNIX is a registered trademark in the United States and other countries, licensed exclusively throughX/Open Company Ltd.Verity and TOPIC are registered trademarks of Verity, Inc.All other products mentioned in this document are identified by the trademarks or service marks of their respective companies or organizations. Use, duplication, or disclosure by the Government is subject to restrictions as set forth in subparagraph (c) (1) (ii) of the Rights in Technical Data and Computer Software clause in DFAR 52.227-7013 or the equivalent clause in FAR 52.227-19, whichever is applicable.Cover design by Carlick Advertising.Part Number: AGM-210-001Mouse Button ActivitiesFigure1-1Admin Tool Main WindowAfter starting the Administrator Tool, refer to the appropriate chapter forFigure1-7Server Information — PlatformThe following display-only fields are available:Server Version Information field displaying the version number of theFigure1-8Server Information — Timeouts3.Enter values for the following timeout settings as required:Process Timeout(seconds) A filter or escalation can perform a Set Fields action thatFigure1-10Server Information — Configuration3.Select from the following options or enter settings as required:Allow Guest Users This field lets you specify whether or not the AR System will。
SUN服务器系统管理
reset-all
重新启动主机
9
PROM模式下的常用命令
PROM模式下的指令集:
boot device [option]: -r 系统重新配置硬件 -s 启动到单用户模式 (类似于windows下的安全模式
,可以进行一些系统修复的工作)
set-defaults : 恢复prom的参数到出厂值
10
系统引导过程
solaris硬盘管理
solaris系统管理 solaris硬盘管理 solaris文件系统管理 solaris网络配置与管理
19
磁盘分区
在SUN系统中,磁盘被分成 多个(0-7)slice分区。其中Slice 0在引导盘上作为根 (root)文件 系统。Slice 2代表整个磁盘,不可 将Slice2挪做它用。用户数据通常 存放在Slice7上。
安装步骤:将系统安装光盘放入光驱,在ok提示符号下, 键入
ok >boot cdrom
装
表示从光驱启动系统,进行OS的安
然后根据安装要求进行系统参数的设置
13
系统的启动和关机
solaris系统的启动:
常见的启动主机系统的方式:
– 打开主机电源,主机加电自动启动系统
– Ok > boot
从默认设备启动系统
➢ /etc/vfstab文件系统引导时读/etc/vfstab文件,以自动挂接文 件系统,该文件包含本地和远程文件资源的设置项:
范例:# cat /etc/vfstab
#device device
mount
FS
#to mount to fsck point
type
#
fd - /dev/fd fd - no -
阳光企业资源管理系统

阳光“企业资源管理系统”操作说明书撰写人:吴继勇日期:2003-10-30文档编号:版本号: V1.1第一章系统概述略第二章系统的安装2.1 升级浏览器系统使用最新的XML及JSP技术进行开发,因此要求客户端必须使用“Internet Explorer 6.0及以上”。
请在科技人员指导下通过以下两种方式升级。
在联接互网下使用在线升级,在“开始”菜单上点击“Window Update”进行升级。
下载。
通常情况下升级好了IE之后系统会提示重新启动机器。
启动IE浏览器,在地址栏输入,如果能正常出现以下画面而无任何提示,则表示系统可以使用了。
图1 登录画面请在“登录画面”的“用户名”及“用户密码”栏输入相应的用户及密码点击“登录”。
2.2 安装打印控件系统中有很多报表需要打印出来,但传统的直接在IE浏览器上的打印效果差强人意,因此该系统整合了最新的WEB打印控件,该控件在用户第一次登录系统时将会自动安装,用户在第一次登录系统时首先不要马上操作系统,而先等10几秒钟,出现以下画面后,点击“是”。
该控件安装一次以后,以后都不会提示再安装。
图2 控件安装画面2.3 更新JavaScript程序为了加块系统的运行及运算速度,我们在将很大一部份程序放在JavaScript脚本当中随用户使用系统时一同下载,脚本程序通常也是下载一次,只到超过历史记录保存天数以后才会重新下载。
目前系统正处在开发与运行并轨的方式,会经常修改JavaScript脚本程序,但用户客户机上的脚本程序有些时候并没有和服务器同步(这样的问题极少出现)。
应此可以通过以下方式来同步。
点击“下载脚本1”、“下载脚本2”,出现以下画面以后,点击“取消”即可。
第三章公共资料3.1 公司组织关系系统在启用后,首先需要进行部门的设置和公司基本资料的维护,因为这些数据将会在其它模块中调用到,如操作员维护、人事维护、生产安排等,同时公司的基本资料将会在每一份报表中自动添加。
SunWize 商业用户 residential 网格式系统说明书

• Generate your own electricity and reduce your electric bill• Protect against future rate increases • Produce electricity from free sunlight and watch your meter spin backwards • Reduce the burning of fossil fuels contributing to a healthier environment • Increase the value of your home • Save money on your system puchase with state rebates and incentives • Solar modules have a 25-year warranty• Systems typically have a lifetime of 40+ yearsSunWize Residential Grid-Tie Systems generate clean energy from the sun reducing your dependency on utilities. In many states, when the system is generating more electricity than is being used, you can sell the excess electricity to the local utility. You’ll take comfort in knowing you've made the right choice that helps to preserve the environment and leaves a cleaner world for your children.SunWize systems are easy to operateSunWize Residential Grid-Tie Systems are quiet and operate automatically. The system “wakes up” and begins to deliver power as the sun rises and “goes to sleep” as the sun sets. On-site installation can be completed within a few days. Because there are no moving parts, SunWize systems are virtually maintenance free. All components carry an Underwriters Laboratory (UL) listing and meet the National Electrical Code ®, the benchmark for safe and efficient electrical installations.Your system includes everything you needSolar Modules with roof mounting structure. Solar modules convert sunlight into DC power and are attractively mounted on the roof of your home.SunWize Power Center – mounted in your garage, basement or on the outside of your home and includes:• Inverter with LCD meter – converts DC power produced by the solar modules to household AC power.• AC/DC Disconnect Switches – allows the modules to be disconnected from the inverter and the inverter to be disconnected from the utility grid.• Optional kWh Electric Meter – displays netpower produced by your system.Complete Documentationand owner's manuals.SunWize Residential Grid-Tie SystemsHomeowners can generate their own electricity from the sunRELIABLE PEOPLE ::: RELIABLE PRODUCTS ::: RELIABLE POWER1155 Flatbush Road, Kingston NY USA 12401 • Tel: 845-336-0146 • Fax: 845-336-0457 • PV Powered PVP1800 or PVP2800 grid-tie inverter, aluminum back panel, NEMA 3R–UL listed, AC and DC disconnect switches and an optional cumulative kWh utility-grade meter.4. PVP UL Listed Grid-Tie Inverter:PV Powered PVP1800 or PVP2800 features avacuum fluorescent display, data tracking andmonitoring capabilities, a 5-year comprehensive warranty and an aluminum NEMA 3R enclosure. Inverter ships separately.5. Wiring – Includes MC interconnect extension cords and wire clips, PV grounding system, junction and pull boxes. The home-run wiring from the solar array to the main panel is supplied by the installer.6. Documentation - Includes electrical drawings, comprehensive and detailed documentation and owner's manual.SUNWIZE CORPORATE HEADQUARTERS: 1155 Flatbush Road, Kingston, NY , USA 12401Tel:(845)336-0146•Fax:(845)336-0457•e-mail:********************•GTS Options: M – Utility grade kWh meter (adds to power center); T – For tile roof (add tile-trac sets); Z – without mounting structurePower Center with PV Powered StarinverterR e l i a b l e P e o p l e . . . R e l i a b l e P r o d u c t s . . . R e l i a b l e P o w e r !。
- 1、下载文档前请自行甄别文档内容的完整性,平台不提供额外的编辑、内容补充、找答案等附加服务。
- 2、"仅部分预览"的文档,不可在线预览部分如存在完整性等问题,可反馈申请退款(可完整预览的文档不适用该条件!)。
- 3、如文档侵犯您的权益,请联系客服反馈,我们会尽快为您处理(人工客服工作时间:9:00-18:30)。
/dev/dsk/c5t600015D0000706000000000000002F07d0s271 mmfx1 on
/dev/dsk/c5t600015D0000706000000000000002F1Ad0s6 72 mr fx1 on
/dev/dsk/c5t600015D0000706000000000000002F20d0s6 73 mr fx1 on
配置文件hosts.fx*
对于每个QFS文件系统有文件hosts.<文件系统名>,用于指定服务器/客户端的关系。由于服务器/客户端关系相同,三个文件系统的该文件内容相同,内容如下。4台主机上的文件内容也相同。
Sun40z110.10.10.1 - -
Sun40z210.10.10.2 - -
Sun40z310.10.10.3 2 -
/dev/dsk/c5t600015D0000706000000000000002F32d0s6 62 mr fx2 on
/dev/dsk/c5t600015D0000706000000000000002F38d0s6 63 mr fx2 on
/dev/dsk/c5t600015D0000706000000000000002F3Ed0s6 64 mr fx2 on
1.636TB
600015D0000706000000000000002F6C
1.636TB
600015D0000706000000000000002F74
1.636TB
文件系统fx4应用数据
600015D000070600000000000000510B
700GB
600015D000070600000000000000510F
/dev/dsk/c5t600015D0000706000000000000002F6Cd0s6 56 mr fx3 on
/dev/dsk/c5t600015D0000706000000000000002F74d0s6 57 mr fx3 on
#
Fx4 40 ma fx4 on shared
/dev/dsk/c5t600015D0000706000000000000005107d0s641 mmfx4 on
/dev/dsk/c5t600015D0000706000000000000002F54d0s6 53 mr fx3 on
/dev/dsk/c5t600015D0000706000000000000002F5Cd0s6 54 mr fx3 on
/dev/dsk/c5t600015D0000706000000000000002F64d0s6 55 mr fx3 on
400GB
600015D0000706000000000000005113
100GB
Fx1的metadata数据
600015D0000706000000000000002F07
100GB
Fx2的metadata数据
600015D0000706000000000000002F0B
100GB
Fx3的metadata数据
/dev/dsk/c5t600015D0000706000000000000002F32d0s6 62 mr fx2 on
/dev/dsk/c5t600015D0000706000000000000002F38d0s6 63 mr fx2 on
/dev/dsk/c5t600015D0000706000000000000002F3Ed0s6 64 mr fx2 on
启动服务进程:在两台主机上用下面的命令启动服务进程,将更改的文件系统配置通知服务进程
#samd config
#samsharefs–-u–-R <文件系统名>
/dev/dsk/c5t600015D0000706000000000000002F44d0s6 65 mr fx2 on
#
fx3 50 ma fx3 on shared
nodev51 mmfx3 on
/dev/dsk/c5t600015D0000706000000000000002F4Cd0s6 52 mr fx3 on
文件系统
磁盘WWN
容量
文件系统fx1应用数据
600015D0000706000000000000002F1A
1.636TB
600015D0000706000000000000002F20
1.636TB
600015D0000706000000000000002F26
1.636TB
600015D0000706000000000000002F2C
Sun QFS文件系统
配置手册
Sun QFS文件系统配置手册
Sun StorEdge QFS软件可保证在收到一个或多个用户请求时,将数据以设备额定的速率传输给用户。可以在Sun StorEdge QFS文件系统中实施磁盘配额以及共享的文件系统。
Sun StorEdge QFS共享文件系统是一种分布式、多主机的文件系统,可以将其安装到多台主机上。在操作管理中心数据分发系统中将两台安装了Solaris OS的V40z作为元数据服务器,SUN V40z4为主,SUN V40z3为备,在主元数据服务器出现故障时可以手动切换。其他的4台V40z作为客户机。
600015D0000706000000000000002F0F
100GB
Fx4的metadata数据
600015D0000706000000000000005107
100GB
2.
将有QFS文件系统软件的光盘放入驱动器。进入到有软件包SUNWqfsr和SUNWqfsu的目录。执行安装命令
#pkgadd–d . SUNWqfsr SUNWqfsu
/dev/dsk/c5t600015D0000706000000000000002F26d0s6 74 mr fx1 on
/dev/dsk/c5t600015D0000706000000000000002F2Cd0s6 75 mr fx1 on
#
fx2 60 ma fx2 on shared
/dev/dsk/c5t600015D0000706000000000000002F0Bd0s261 mmfx2 on
/dev/dsk/c5t600015D0000706000000000000002F6Cd0s6 56 mr fx3 on
/dev/dsk/c5t600015D0000706000000000000002F74d0s6 57 mr fx3 on
#
Fx4 40 ma fx4 on shared
nodev41 mmfx4 on
1.
使用QFS文件系统的主机有,sunv40z1,sunv40z2,sunv40z3,sunv40z4,sunv40z5,sunv40z6。每台主机上又两个光纤同适配器,有两条光纤通道和光线交换机连接。主机端用format命令确认能识别到存储6920提供的逻辑磁盘。系统共构造4个QFS文件系统,fx1,fx2,fx3,fx4。磁盘的WWN号、容量及所属文件系rver
Sun40z510.10.10.5 - -
Sun40z610.10.10.6 - -
启动服务进程:在两台主机上用下面的命令启动服务进程,将更改的文件系统配置通知服务进程
#samd config
#samsharefs-u–-R <文件系统名>
生成文件系统:在sunv40z4上用下面的命令生成QFS文件系统
#sammkfs-S-a512 <文件系统名>
4.
配置文件mcf,两台主机上内容相同,如下
fx1 70 ma fx1 on shared
nodev71 mmfx1 on
/dev/dsk/c5t600015D0000706000000000000002F1Ad0s6 72 mr fx1 on
/dev/dsk/c5t600015D0000706000000000000002F20d0s6 73 mr fx1 on
/dev/dsk/c5t600015D0000706000000000000002F54d0s6 53 mr fx3 on
/dev/dsk/c5t600015D0000706000000000000002F5Cd0s6 54 mr fx3 on
/dev/dsk/c5t600015D0000706000000000000002F64d0s6 55 mr fx3 on
/dev/dsk/c5t600015D000070600000000000000510Bd0s6 42 mr fx4 on
/dev/dsk/c5t600015D000070600000000000000510Fd0s6 43 mr fx4 on
/dev/dsk/c5t600015D0000706000000000000005113d0s6 44 mr fx4 on
1.636TB
文件系统fx3应用数据
600015D0000706000000000000002F4C
1.636TB
600015D0000706000000000000002F54
1.636TB
600015D0000706000000000000002F5C
1.636TB
600015D0000706000000000000002F64
/dev/dsk/c5t600015D000070600000000000000510Bd0s6 42 mr fx4 on
/dev/dsk/c5t600015D000070600000000000000510Fd0s6 43 mr fx4 on
/dev/dsk/c5t600015D0000706000000000000005113d0s6 44 mr fx4 on
