中国版BB-Black快速指南_V1.2
Quick Bayt Fly Bait 快速飞兽胸毒胶版1.2版说明书

Revision Date 04/15/2011
Other protective measures: Wear suitable protective equipment.
9. PHYSICAL AND CHEMICAL PROPERTIES
Form: Colour: Odour: Melting point: Density:
Emergency Overview CAUTION! Colour: red Form: solid granular Odour: weak, characteristic. May cause mechanical irritation (abrasion). Highly toxic to aquatic invertebrates Highly toxic to bees. May cause respiratory tract irritation.
Product information Product Name: MSDS Number:
Quick Bayt Fly Bait 122000006093
Use
: Pest control
Company BAYER HEALTHCARE LLC Animal Health Division 12707 Shawnee Mission Parkway (West 63rd) Shawnee, KS 66216-1846 UNITED STATES (800) 633-3796
In case of emergency: (800) 422-9874 Chemtrec: (800) 424-9300 BAYER INFORMATION PHONE:(800) 633-3796 INTERNATIONAL:(703) 527-3887
BB教学平台教师操作手册

Blackboard®教学平台《教师操作手册》浙江传媒学院2009年4月目录第一部分:平台使用说明 (3)(一)平台简介 (3)(二)适用对象 (3)(三)教师需做的准备工作(必要操作) (3)(四)教师使用BB 平台流程图 (4)第二部分:平台入门操作 (5)(一)平台入口与登陆平台(必要操作) (5)(二)认识平台 (5)(三)修改密码(可选操作) (6)(四)定制个人首页界面(可选操作) (7)(五)进入教授的课程(必要操作) (8)第三部分:课程建设 (9)(一)课程结构设计(必要操作) (9)(二)添加课程内容(必要操作) (11)●教学大纲(必要操作) (11)●授课讲义(必要操作) (12)●网络课件(可选操作)..................................................... 错误!未定义书签。
●精品课程网站(可选操作) (12)●课外补充材料(可选操作) (12)●随堂测验(可选操作) (12)●课后作业(必要操作) (15)(三)课程存档和导入以及循环使用(有重复班的必要操作) (17)●课程存档 (17)●在新课程中导入课程文档 (17)●课程循环 (18)第四部分:互动教学 (19)(一)更新教师信息(必要操作) (19)(二)课程通知(必要操作) (20)(三)课程讨论板(可选操作) (21)(四)设定助教(可选操作) (24)(五)管理学习小组(可选操作) (25)第五部分:学习跟踪与教学评价 (26)(一)学习跟踪;(必要操作) (26)(二)作业批改;(必要操作) (27)(三)试卷批改;(可选操作) (32)(四)教学评价;(可选操作) (33)第六部分:常见问题及如何获得帮助 (35)(一)温馨提示 (35)(二)常见问题 (35)(三)如何获得帮助 (37)第一部分:平台使用说明(一)平台简介Blackboard®教学平台是国际领先的教学平台及服务提供商专门为教育机构开发研制的软件平台,是目前全球市场上唯一支持百万级用户的教学平台。
Datalogic Matrix 120 快速参考指南说明书

During the reader startup (reset or restart phase), all the LEDs blink for one second.
The single push button gives immediate access to the following relevant functions:
For quick access, from the home page click on the search icon
, and type
in the name of the product you’re looking for. This allows you access to
download Data Sheets, Manuals, Software & Utilities, and Drawings.
NPN/Open Collector
PNP/Open Emitter
NPN and PNP Output Wiring to CBX
I/O Using CAB-1051:
CAUTION: If output devices are powered externally (separate from Matrix 120 power), it is always advised to maintain the same voltage levels used for the Matrix 120 device.
Hover over the Support & Service menu for access to Services and Technical Support.
INSTALLATION PROCEDURE
Bb平台常见问题
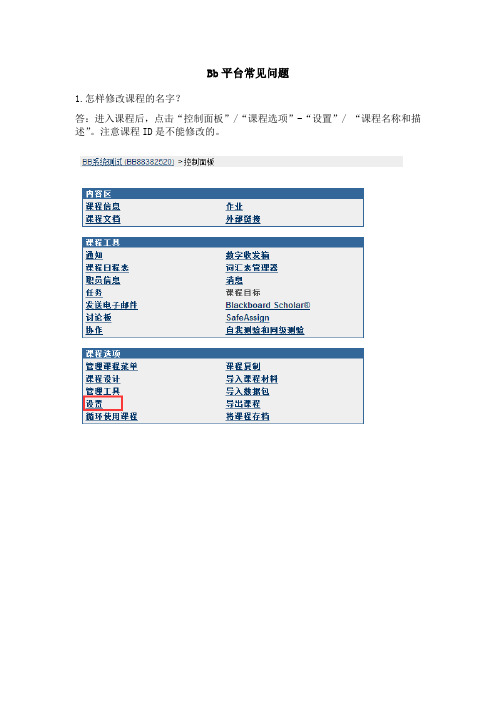
Bb平台常见问题1.怎样修改课程的名字?答:进入课程后,点击“控制面板”/“课程选项”-“设置”/ “课程名称和描述”。
注意课程ID是不能修改的。
2.怎样修改课程各个菜单项目的名字,以及添加或去掉某些项目?答:点击“控制面板”/“课程选项”-“管理课程菜单”,即可看到默认或已有的菜单项,教师可以通过点击页面上的“+”(添加)、“修改”、“删除”按钮来设计菜单。
在修改时请注意菜单名称左下角的斜体字,它说明了菜单的类型。
3.怎样修改课程菜单样式?答:点击“控制面板”/“课程选项”-“课程设计”/“课程菜单设计”。
4.Blackboard教学平台可以支持哪些格式的课件?答:图像(常见格式)、音视频(MPEG 或 AVI 、Quicktime、音频)、FLASH、文本文件、网页格式文件。
5.怎样设置课程中的教师信息和修改密码?答:点击“我的机构”/“个人信息”在当前页面编辑个人信息、修改密码。
6.我不喜欢BB登陆后的默认界面设置,我应该在哪里修改呢?答:您可以修改首页的显示内容和风格,登陆平台后,点击“我的机构与”右上角的“修改内容”按钮可以设置在首页显示的模块,注意红色打勾的模块为必需,不能更改。
点击“修改布局”按钮可以设置模块出现在首页的左边栏还是右边栏,还可以设置网页的配色风格。
7.我的同一门课给好几个班上,需要重复建多门BB课程吗?答:不需要,BB平台提供课程的存档和导入的功能,教师只需集中精力做好一个班的课程,将课程存档后系统会生成一个数据包,再在另一个班的课程中导入该数据包,即可完成多个班级同一门课程的同步建设。
具体操作方法请参看有关课程存档和导入的操作。
8.我已经制作了网上课程,为什么其他人看不到我的课程呢?答:需要把课程设置为可用,请查看您的课程是否可用:点击“控制面板”/“课程设置”-“设置”/“课程可用性”。
9. 管理课程菜单”中每个项目的“允许访客访问”是什么意思?答:访客是指没有注册的访问者,如果将某一区域置为不允许访客访问,则该区域只有注册了您课程的人(一般为开课教师及选课学生)才能访问,访客看不到该区域的内容。
BBFlashBack(一款屏幕操作录制软件)使用说明
BBFlashBack(⼀款屏幕操作录制软件)使⽤说明BB FlashBack使⽤⼿册●简介BB FlashBack Professional 是⼀个强⼤易⽤的屏幕录制⼯具(不是简单的抓图),它能录制屏幕上所有动态图像,包括⿏标动作、视频、⾳频、游戏、Flash动画。
它还带有⼀个编辑器,对录制的视频、⾳频进⾏添加、删除、剪裁、插⼊操作,可以插⼊⽂字、图像、视频、摄像头视频(画中画)、箭头、⽔印、标题等。
也可以进⾏放⼤镜、淡⼊淡出、定时录制等特效处理。
同时软件还带有批处理、⾃置播放机。
●软件安装⽬前软件的最新版本是V4.0.1.2421。
试⽤版本有⽔印和视频时间长度的限制。
可以直接在百度搜索软件的名称并下载软件。
下载地址安装过程⾮常简单,以下是安装步骤:1.下载完毕解压,双击bbflbk4.exe开始安装。
2.单击Next继续。
3.勾选“I accept……Agreement”(我同意以上条款),点击Next继续。
4.选择软件安装路径。
5.单击Next继续。
6.单击Next继续。
7.选择是否勾选“创建桌⾯快捷⽅式”以及“创建开始菜单快捷⽅式”。
8.单击“确定”继续。
9.单击Next继续。
10.选择是否勾选“现在就启动软件”以及“向Blueberry发送匿名使⽤数据”。
软件的使⽤1.双击下图选中的桌⾯快捷⽅式启动软件进⾏视频的录制。
2.单击左上⾓“Record your screen”(红⾊圆圈)继续,左下⾓“Open a recording”(打开已有的视频录制⽂件),右侧是使⽤帮助。
3.进⼊视频录制设置界⾯。
4.“Record”选项中选择“Full screen”表⽰录制全屏,选择“Region”和“Window”表⽰指定屏幕⼤⼩录制。
5.选择是否勾选“Record Sound”(录制声⾳)。
6.单击正下⽅红⾊按钮开始录制。
7.快捷键“Shift+Ctrl+S”停⽌视频的录制。
8.可以把录制窗⼝最⼩化到任务栏。
bb-black手册
2013 英蓓特科技有限公司版权所有©
中国版 BB Black 用户手册
英蓓特科技有限公司
iii
3.1 软件系统介绍 ....................................................................................................... 15 3.2 更新前的准备 ....................................................................................................... 15 3.3 开始更新系统 ....................................................................................................... 16 第 4 章 系统开发 ................................................................................................................ 17 4.1 获取源代码 ........................................................................................................... 17 4.2 编译系统............................................................................................................... 17 技术支持和保修服务 .......................................................................................................... 19
bb使用说明

此贴为黑莓新手上路、实用装机秘笈,内含黑莓隐藏、非隐藏快捷键大全,简单实用哦,以8900为例,适用全系列BB,当然特殊个别情况不可照搬。
一、让你的黑莓8900能够打出电话:要让你手中的黑莓8900能打出电话,我们需要将国家/地区代码改成未知1.按菜单键,进入黑莓待机界面,如下图:2.按绿色拨号键,进入拨号界面3.按Menu键(轨迹球左边那个键),弹出电话选项菜单4.将光标定位到“选项”菜单并且按下轨迹球,进入选项界面如下:5.将“国家/地区代码”项改成“未知”(按下滚轮,弹出选项,上下拨动滚轮到未知选择,按下滚轮)6.按返回键(轨迹球右边的键),选择保存,退出即可7.如果通话声音太小,可以在常规选项--默认呼叫音量中调节默认呼出的音量这里建议设置成“上一次”或者“75%”二、关闭主屏幕拨号,拥有快捷键操作既然是全键盘操作,就让我们去掉默认的主屏幕拨号,开启更加方便的主屏幕快捷键操作吧...Follow me...1.同样在电话选项--常规选项,将“从主屏幕拨号”选项设置为“否”(默认是“是”)2.退出保存,下面我们来试试快捷键操作的效果按L就可以进入日历选项,说明设置成功记住常用的快捷方式,便可以隐藏桌面上的图标,让第一次接触黑莓的人无法找到你的隐私消息3.主屏幕界面有“消息”和“短信和彩信”两个选项,以往的快捷方式M进入的是消息,而不是短信,需要按alt+s才能进入短信界面,这给习惯了传统黑莓操作方式的朋友往往带来一些不便解决方法:进入短信--选项--收件箱,勾选“短信和彩信”即可自动隐藏“消息图标”(不同的ROM可能操作有所区别,本操作是在5.0rom下),如下:三、设置时区、时间、日期1、进入选项-时间/日期,选择+8时区2、如果是5.0 os。
你可能看到无法修改日期。
其实只需要关闭使用网络时间即可将时间修改成本地的时间,保存,退出即可!四、网络接入点设定如果你的是移动的手机卡,建议开通cmnet,可以实现在线视频呢。
博克操作手册

第一部分基础篇一、系统介绍系统界面介绍 (2)二、系统操作模式 (4)三、纸样中心智能模式1、绘图功能用法 (5)2、编辑功能用法 (8)3、特殊功能用法 (11)4、右键功能切换 (13)四、裁片中心智能模式1、缝边标记 (14)2、逢角处理 (15)3、工艺线及内部线设置 (16)4、裁片分割 (17)5、裁片移动 (17)6、点放码 (17)7、曲线放码 (19)8、裁片右键功能菜单 (19)9、空白处右键功能采单 (21)10、裁片中心智能模式快捷键 (22)五、尺码表 (22)六、纸样中心常用工具 (22)七、纸样中心专用工具1、画线 (24)2、求点 (26)3、专用工具 (27)4、点线编辑 (28)5、省褶 (30)6、生成裁片 (32)八、输入1、数字化仪输入 (32)2、图片输入 (32)九、素材库1、保存素材库 (33)2、打开素材库 (33)3、常用素材............................................34 十、裁片中心常用工具 (34)十一、裁片中心专用工1、裁片标识 (36)2、工艺线 (38)3、裁片分割 (38)4、褶裥 (39)5、旋转修整 (40)6、放码 (40)十二、系统设置 (41)十三、排料中心1、设置 (43)2、排料 (44)3、显示 (44)4、检测 (44)5、清除 (44)6、对条格 (44)7、排料报告 (45)8、其它 (45)9、待排区操作 (46)10、排料区 (46)11、混排 (47)十四、打印输出1、绘图仪输出 (47)2、切割机输出 (48)3、打印机输出 (48)十五、格式转换 (48)十六、快捷键列表 (49)第二部分实战篇一、女短裙 (50)二、女裤 (53)三、女衬衫 (57)---目录 ---第一部分基础篇博克BOKE智能服装CAD系统是由博克国际(香港)有限公司与美国科研人员合作开发的最新一代智能型服装CAD系统,也是目前智能化程度最高的服装CAD系统。
BB-400快速入门指南说明书
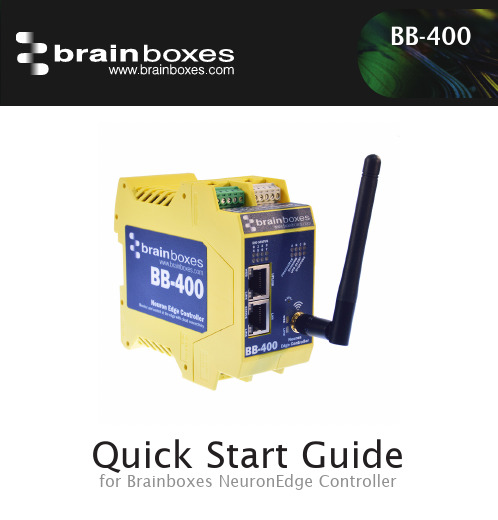
BB-400Quick Start Guidefor Brainboxes NeuronEdge ControllerThis product comes with Brainboxes' Lifetime Warranty and SupportFor full terms and conditions, as well as information on accreditations, and correct disposal of this product can be found on our website:This guide will help you set up your BB-400. Out of the box your BB-400comes with sensible defaults to help you get started fast.For more detailed information, the product manual, and a host of resources for programming and software integrationvisit our website:Risk of injury from energy stored in capacitors.Wait at least 5 minutes after shutdown of device before opening case.BB-400Uplink LANWi-Fi AntennaResetPower StateSerialDIO 0-3DIO 4-7 C Serial D Bluetooth B NFC*A Admin DIO Status*Coming soon via software updateBattery not included121,23,4Real Time ClockOptional Accessory ItemPW-400 (UK/EU/US/AUS)- Suitable for use with BB-400Power Supply+5VDC to +30VDC15W Max TypicalUPLINKLANWi-Fi Hot Spot192.168.127.2/24SSID: BB-400-XXXXMAC: 00:0A:4F:05:XX:XXSecure webpages require an SSL certificate.This can only be applied for once an IPaddress or name has been assigned. This is the case for all IoT devices.The connection however is encrypted andsecureNPNPNPJumpers for NPN/PNPDIO 0-3DIO 4-7D i g i t a l I n p u t s NPN/PNP Jumper selectable pull up for NPN, active low, type sensors and pull down for PNP , active high, type sensorsLogic Level 0:0V to +1V maximum Logic Level 1:+2.0V to +30V maximumLatched Inputs:Triggered by user programmable positive or negative edges, staystrue until acknowledgedCounter Inputs:User programmable – counts positive or negative transitions, up to250Hz count rate. 16-bit (65335 count) or 32-bit (4.2 billion count)counters. Counter values persist over power-off periods D i g i t a l O u t p u t sMax output currentSinks up to 0.85 Amp per pin, 30V max loadMax combined load 4 Amps per BB deviceMax output loadVoltage30VESD Protection Protection to 16kVRESTRequest REST Verb Responsehttp://bb400-xxxx:9000/io GET{"inputs": [1, 1, 1, 1, 1, 1, 1, 1],"outputs": [0, 0, 0, 0, 0, 0, 0, 0]}http://bb400-xxxx:9000/io/inputs GET[1, 1, 1, 1, 1, 1, 1, 1]http://bb400-xxxx:9000/io/inputs/0 GET1http://bb400-xxxx:9000/io/outputs GET[0, 0, 0, 0, 0, 0, 0, 0]POST header: 200 OKhttp://bb400-xxxx:9000/io/outputsbody: [1, 1, 1, 1, 0, 0, 0, 0]http://bb400-xxxx:9000/io/outputs GET[1, 1, 1, 1, 0, 0, 0, 0]Coming soon via software update:NFC - Tap your smartphone or NFC enabled device to get device status information and IP address.Modbus - Coming soon support for Modbus TCPIt is recommended to install all updates when you first use the device. This will ensure you are running thelatest version of the operating system and software.Closed OpenRS422-485 FD RS485 HDRS232PARKDefaultBaud Rate Any custom Baud rate between 60 - 920,000Baud Data Bits 5,6,7 or 8 Parity Odd, Even, None Stop Bits 1, 1.5 or 2Flow ControlRTS/CTSRESThttp://bb400-xxxx:9000/io WebSocket ws://bb400-xxx:8989ASCII TCPbb400-xxxx:9500/bb-400 provides a range of resources and example code to get you started with some common machine monitoring scenarios.Sample code is available in the following languages; • .NET C# & VB• Python• Node.js• Node-RED (visual coding interface)Raspbian Lite- based on Debian LinuxDocker is an online repository forsecure/isolated apps that can run onyour BB-400.To get started search for Brainboxes and find prebuilt containers.Brainboxes Limited18 Hurricane Drive, Liverpool International Business Park, Speke, Liverpool, Merseyside, L24 8RL,United Kingdom Brainboxes LLC4500 140th Avenue North Suite 101,ClearwaterFL 33762,USA******************************************80BBQSG_190228。
【资料下载】BB-Black入门

1、中国版BB-Black硬件资源2、BB-Black开发环境搭建/link?url=FKdsStT4f1-F5Gf3hH7OEFaqEEHw8BO hT-KamXOtk7h9si9OjmUfTZgJDeeOMHk72NU4RkOjWU7NVLstBRPIGPj04 LS5sstXkedkoZn6THu入门:/Getting%20StartedCCS linux版本下载:/index.php/Download_CCSVMware Tools安装:3、连接调试方法一:使用SecrueCRT连接调试1)安装SecureCRT软件,SecureCRT是一款不错的工具,大家可以下载绿色版使用,或者按照下列的信息填写“许可向导”完成注册。
名字:Windows公司:IC序列号:03-50-006248许可密钥:ADPUSB W3DQ5B ZC35EJ 99AG3T ACM47V SAK5W68CD1YZ GJU7JK发布日期:27-06-20062)打开后输入BB的地址192.168.7.2,协议选SSH2,前提是给BB上电并连接好网线3)输入用户名Root4)口令默认为空5)点击确定,就连接上BB-Black了,接下来就可以调试了方法二:串口连接调试1)BB-Black板卡上提供了调试串口,为了能在PC机上调试,我们需要一个RS232模块和一个串口线或一个USB转串口线。
其中PIN1为GND,PIN4为RX,PIN5为TX,TTL转RS232模块的TTL端接BB-Black的调试串口,另一端与PC机相连。
2)为了方便,我们还是基于上面使用的SecureCRT讲解,点击“连接”弹出连接对话框,点击“New Session”,然后选择Serial继续“下一步”,设置好端口和波特率,点击“下一步”、“完成”、“连接”。
3)给BB-Black上电就可以打印信息了。
相关设置如下:。
黑莓手机完美操作指南

8820刷机教程 (2)刷机第一步——准备刷机需要的软件 (2)刷机第二步——安装Desktop Software及ROM (2)刷机第三步——修改vendor文件名称 (9)刷机第四步——备份篇 (10)刷机第五步——正式刷机 (12)基本设置篇 (23)在后台程序间切换 (25)设置单键拨号 (25)快速查看黑莓手机的状态 (25)电话功能和SMS短信息 (26)蓝牙发送与接收 (26)文件浏览与管理 (27)开关机与重新启动 (27)待机时间和省电 (27)更改配置文件 (28)关于黑莓桌面管理器 (28)关于黑莓的电话本 (30)黑莓手机的休眠功能。
(30)黑莓手机的定时开关机。
(31)软件的安装与卸载 (32)黑莓智能手机的中文输入 (32)黑莓手机的网络设置。
(33)BlackBerry 基础快捷方式 (33)8700蓝牙的使用方法 (36)黑莓错误代码一览表 (36)8820的一般设置 (44)黑莓刚入手后需要做的事 (45)安装软件的工具BerryBox (49)黑莓blackberry8700使用快捷方式大全 (51)不能使用桌面快捷键 (53)更改电话铃声或信息铃声 (54)联通手机激活自带浏览器 (56)硬启或者叫格式化手机 (57)BB的无主题模式 (58)大小写的问题 (59)中文输入失效问题 (60)小红灯问题解决方法 (60)铃声制作教程 (64)ServiceBook导入方法(不用删除和重启) (66)第三方程序中使用点讯黑莓输入法的方法: (68)用手机安装直接安装软件 (68)QQ的使用技巧 (70)opera mini 浏览器的使用 (75)开机状态下选黑莓手机 (77)安装乐图GPS导航过程 (79)乐图导航地图使用方法 (91)黑莓乐图的使用方法 (91)8820刷机教程刷机第一步——准备刷机需要的软件下载WIPE工具(如果不想格式化,可以下载后备用)。
Bb blackboard 说明书

出版日期:2005 年 11 月
国际总部 Blackboard International B.V. Keizersgracht 62/64 1015 CS Amsterdam The Netherlands
+31 20 5206884 (NL) 电话 +31 20 5206885 (NL) 传真
使用资料库内容
资料库区域 eReserve 文件夹 将资料库内容添加到课程
目录
284 285 286 287 288 289 290 291 292 293 294
295
297
297 298 299 301
303
303 305 307 309 313 314
315
315 316 317
© 2005 Blackboard Inc. 所有权及保密权
vii
设置课程入口
复制、导入、存档和循环
循环使用课程 复制课程 将课程资料复制到新课程中 将课程资料复制到现有课程中 复制课程 - 含用户(精确复制) 导入数据包 导出/档案管理器 导出课程 将课程存档
课程材料
导入课程材料 关于 Chalk Title 管理 Chalk Title
用户管理
列出/修改用户 更改密码 创建用户和修改用户 “批创建课程用户”页面 注册用户 从课程中删除用户 管理小组 添加小组/小组属性 修改小组 将用户添加到小组中 列出小组中的用户 从小组中删除用户 关于测验 测试管理器 如何创建或修改测试 测试信息 测试画布 测试创建设置 问题完成状态 问题元数据 多项选择题 判断正误题 多项选择题 填空题 多项回答题
x
教师手册
关于 BLACKBOARD ACADEMIC SUITE 教师手册
IdeaTab A1000 快速入门指南说明书

IdeaTab A1000 Quick Start Guide v1.0Please read this guide carefully before using your IdeaTab. The guide will help you learn tips on setting and using IdeaTab.The information in this guide is based on default settings. Illustrations and screenshots used here may differ from the actual product appearance andscreen displays.Screen lock/unlockIn standby mode, press the Power button to lock your IdeaTab.To unlock the screen, press the Power button, and then drag the on-screen slider to enter the interface displayed before it locks. Sleep/WakeIf you do not touch the screen for a while, IdeaTab dims its screen to enter sleep mode for power saving. Turning IdeaTab offEarphone jackL × W × H: 199x121x10.7mm 3500mAh *Weight: 350g *Color: Black/White7", 16:9 TN, 1,024 x 600 dpi Micro USB 0.3 MP (front)32 GB (max.)American National StandardsWi-FiMTK 8317, dual-core, 1.2GHz Model:IdeaTab A1000-TDimensions/Weight/Color Integrated camera ScreenBattery CPUGPS3.5 mm earphone jack SD card slot InterfaceCommunicationVersion: Wi-Fi+2GSIM cardTechnical specificationsYou can charge your IdeaTab whether it is on or off.When the battery level falls below the threshold, IdeaTab will alert you with a tone and the battery status icon will change into . We recommend you plug the AC power adapter into your IdeaTab in the direction of the orange arrow as shown above figure.If your IdeaTab is being charged while it is on, the battery status icon (located on the status bar of the screen) will appear as . After the battery has finished charging, the status bar will show the fully charged icon .SD card and SIM card , do the following:1. Open the SD card and SIM card cover.2. Insert the SD card and SIM card as shown by the arrow.3. Close the SD card and SIM card cover.You can connect IdeaTab to the PC's USB port with the cable provided for battery charging or data transferring with the PC.Installing apps and gamesTransfer the APK setup file from the PC to IdeaTab, and then open it in the file manager on IdeaTab. The installer will run automatically.There are three connection methods available: USB storage, Media device (MTP) and Camera (PTP).Touch > Phone . Now you can input your number or choose a numberfrom the call history or Contacts.138****0000PhoneOptionsHide dial padShow dial pad Mute on/off Microphone on/offSuspend callAdd call *Multiparty service is required to use the teleconference function.Teleconference*PhoneNew message Send message OptionsTouch > Messaging . Now you can use the messaging function tokeep contact with your family or friends.Add attachment Search138****0000MessagingAdding apps/widgets to the desktopTap and hold the icon of your desired application or widget, until the desktop background pattern appears on the screen, and then place the icon wherever you wish.Touch >WIDGETS . You can drag your favorite applications and widgets onto the desktop.Tap and hold any icon on the desktop and then drag it to your preferred location or delete it from the desktop.Editing the desktopCustomizing the desktopCommunicationWi-Fi connectionYou can connect your tablet to the Internet using Wi-Fi. When Wi-Fi is on, your IdeaTab will automatically scan for Wi-Fi hotspots within range. Select the Wi-Fi hotspot you want to connect to.Mobile networksYou can enable/disable mobile data connection and change the network mode and access point in SIM manager or Mobile data settings.Bluetooth connectionIf your computer has an integrated Bluetooth adapter card, it can connect to and transfer data wirelessly with other Bluetooth enabled devices, such as notebook computers, PDAs and cell phones. You can transfer data between these devices without cables and up to 10 meters range in open space. The actual maximum range may vary due to interference and transmission barriers.Add a bookmarkSearch or type a URLBookmarks, history and saved pagesThe above functions require your IdeaTab to connect to the Internet viaWireless network.Touch >Browser. Now you can browse the Web and download applications.Browsing the webCamera There are two modes available for the camera: photo and video. Touch > Camera . Now you can record the wonderful moments ofyour life with the camera. Touch > Gallery. Now you can view photos/videos from your IdeaTab. Album You can zoom in/out a photo by double-tapping or moving your two fingers apart/together while touching the screen.Learn moreFor more information about IdeaTab functions and useful manuals, go to /. To read this manual on your IdeaTab, please access “User Guide” from the Browser favorites in your IdeaTab.Getting support For support on network service and billing, please contact your wireless network operator. For instructions on how to use your IdeaTab, go to /.Legal notices Lenovo, the Lenovo logo, and IdeaTab are trademarks of Lenovo in the United States, other countries, or both. Other company, product, or service names may be trademarks or service marks of others.First Edition (April 2013)© Copyright Lenovo 2013.LIMITED AND RESTRICTED RIGH TS NOTICE: If data or software is delivered pursuant a General Services Administra-tion “GSA” contract, use, reproduction, or disclosure is subject to restrictions set forth in Contract No. GS-35F-05925.Printed in China Radio and Telecommunications Terminal Equipment Directive This product is in compliance with the essential requirements and other relevant provisions of the Radio and Telecommuni-cations Terminal Equipment Directive, 1999/5/EC.。
BB教学平台操作指南(学生用户版)

BB教学平台操作指南(学生版)平台简介Blackboard教学平台是国际领先的教学平台及服务提供商专门为教育机构开发研制的软件平台, 以“教学”、“联系”、“分享”为核心目标,提供一套综合、完整、优化的解决方案。
Blackboard教学平台是以课程为中心集成网络“教”、“学”的网络教学环境。
教师可以在平台上开设网络课程,学习者可以在教师的引导下,自主选择要学习的课程内容。
不同学生之间,以及教师和学生之间可以根据“教和学”的需要进行讨论、交流。
开始使用1、登录Blackboard教学平台1)启动浏览器;2)在地址栏处输入:/,然后按下键盘上的回车键Enter。
出现教学平台首页3)学生用户登录教学平台的用户名为本人学号,初始密码与用户名相同4) 在用户名输入框输入用户名如2010XXXXXXXX。
5) 在密码输入框中输入密码;6) 单击登录按钮。
初步了解教学平台——认识我的主页登录Blackboard 教学平台后页面上部会有一系列的选项卡,点击不同的选项,可见不同的内容,了解一个选项卡下的内容,对您能够尽快使用该教学平台将有很大帮助。
1.我的主页登录Blackboard 教学平台后,首先看到的应是默认的选项卡“我的主页”,在此选项卡下用户可以看到自己可用的工具,自己学习的课程,系统及相关课程最新的通知,以及系统提供的日程表及快速指南等模块2.认识选项卡是平台内划分不同区域的标识。
位于 Blackboard 教学平台的左上方。
作为学生用户可以看到的选项卡有:我的主页,课程、院系工具● 我的主页:汇集了教师用户所教授和参与的课程信息以及可以使用的一些工具。
● 课程:汇集了我校Blackboard 教学平台现有的所有在线课程。
工具栏 选项卡 注销按钮 模块3、模块模块是平台内基本功能组合,通过这些模块课直接访问某些功能。
比如,“我的课程”显示用户的所有课程(注册为学生的课程);“我的通知”显示平台上所有和用户有关的通知。
Pearson MyTest快速指南说明书

My Test Quick Start GuideProgram Access:Go to Educator access to MyTest is now automatically included with all Instructor Resource Center (IRC) accounts, as well as with many other Pearson online products.−If you have a pre-existing account, simply Sign In as a Returning Instructor.−If you need to request access, click “Request access” to submit your information and receive a digital access code through email.−If you have an instructor access code but have not set up your account, click “Register” and follow the prompts.Adopt Your Testbank Content:1. Log into (or your MyLab website powered by Pegasus)2. Click “Search by Textbook, Author, Title or ISBN” and enter your criteria.-or-Click “Browse by Discipline” and select your discipline from the list that appears.3. Click Search.4. Scroll down to browse all results: Look for the MyTest listing for the correct edition of your book. Thenclick “Select Testbank.”5. Enter the name for your testbank and the calendar dates. Click “Create Testbank” on the MyTesttoolbar.6. Your MyTest is now added to your personal account! While your content is being “prepared” (thisshould just take a minute or so if you refresh your browser), you may:1. Add another MyTest testbank or a MyLab to your gallery (simply repeat steps)2. Log out and come back later!Create a Test:1. Log into (or any MyLab website powered by Pegasus)2. Under “MyCourses and Testbanks,” click the link for the name of your testbank.3. On the right side of your screen, click “Create New Test” and name it.4. On the left side of the screen, you will see the available testbank content; simply click the + toexpand and view the assessments for each chapter / topic.5. To add a question to your test, click and drag it from the left to the right.6. To add multiple questions at one time, click the checkbox for each question you want, and thenclick the “Add” button in the center of the screen.7. Click "Show Question Details" (in the blue bar) to show/hide any question data such as level ofdifficulty or page reference.8. Click “Create Test” on the MyTest Toolbar to save your work so far. This test will be kept online inyour account.Edit and Format:1. To delete a question from the test, click the icon next to the question and click “Delete.”2. To edit a question in the test, click the icon and select “Edit.” Use the editing tools to modify thequestion, then click “Save and Close” at the bottom.3. Using the MyTest toolbar, you can easily create your own question, scramble the test, or click “EditHeader” to add a header, footer, or page numbers.4. To change the font or font size, or margins, click the “Preferences” tab under the MyTest logo (besure to click “Save” to save font changes).5. To go back to your test from Preferences, click “MyTest” on the top left navigation and then click thename of the test you have saved test (on the right).Tip: Please remember – after completing your MyTest, save your test before moving on to any other activity so you don’t lose any work.Download a Test:Tests may be downloaded and saved to the following formats: Word, PDF, Blackboard or WebCT.1. To download a test that you do not have open, from Manage Your Tests on the right of the MyTestpage, select the appropriate option from the options menu:as Word (doc): You can edit and print the test from Microsoft Word.- Downloadas PDF (pdf): You can send the test via an email message. Users will need Adobe® - DownloadAcrobat® Reader to view the test.- Download Blackboard (Pool Manager 6, 7, 8 & 9): You can import the test questions into Blackboard Pool Manager Version 6, 7, 8, and 9.- Download Blackboard (Test manager 6, 7, 8 & 9): You can import the test questions into Blackboard Test Manager Versions 6, 7, 8, and 9.- Download WebCT (CE 6 & VISTA 4): You can import the test questions into WebCT Campus Edition 6 and VISTA 4.- or -To download an open test, click Download and select the appropriate option.Next steps in the process will depend on you initial selection:- Word or PDF - look at the Completing the download process for Word and PDF.- Blackboard or WebCT - look at the Completing the download process for Blackboard and WebCT.Completing the download process for Word and PDF:2. If you selected Word or PDF you then have a popup box with selection choices of things and optionsyou can do with your file, such as Multiple Versions of the test, adding an area for StudentResponses, or Including Answer Key. Make your selections, then click “Download” at the bottomof the window.3. In the Download window, click the “Download” button for item you want to download.- If you chose to download the answer key as a separate file, there are two columns of download buttons: one for Test files and one for Answer Key files.- If you created multiple versions of the same test, there is a separate file for each test version. You need to download each version.- You can click “Download all (zip)” to download all of the listed files at once.4. You are prompted to open or save the file. Select “Save.”You can select a destination for the file, rename the file, and click “Save.”Completing the download process for Blackboard and WebCT:2. You are prompted to open or save the file. Select Save.You can select a destination for the file, rename the file, and click “Save.” By default the ZIP file nameincludes the test name, file type (BBpoolmgr, BBtestmgr, or WebCT), date it was created, and uniqueidentifier.Printing a TestAfter you download tests to Word or PDF you can print or distribute them in paper or electronic format.1. Open your downloaded test.2. Print as you normally would.When you download to Word the text is formatted in tables. To make editing easier in Word, you should ensure that you have table gridlines displayed. If you do not make any edits to the test, you do not need to save your test in Microsoft Word because your test is always available in MyTest, and you can access it from any computer. However, you may want to save a copy to share with others or to do further formatting. For details on how to edit your test in Word, go to /pegasus/Help/TipsforMyTest.htmlHelp & Technical SupportAt any point in the MyTest program, you may click “HELP” (on the top right) for details and more info about building tests.For technical concerns:•Chat with a live representative 24/7, 365 days a year at (click “Chat” on the top navigation).•Search the Knowledge Base for answers to frequently asked questions, or submit a question online.•Contact our Educator Support at 1-888-433-8435 during the following hours:Monday - Friday: 08:00 AM - 08:00 PM EDT.。
十大指南针品牌排行榜 指南针哪个牌子好

十大指南针品牌排行榜指南针哪个牌子好指南针是户外爱好者的必备之物。
对于指南针生产企业来说,只有不断提升自己的产品品质,才会得到消费者的青睐。
因而,为自己的品牌做宣传是必不可少的。
高端营销推广平台鹿豹座深知这些指南针生产企业的难题所在,为他们策划出了一系列行之有效的网络推广方式,从而得到了指南针生产企业的一致欢迎。
高端营销推广平台鹿豹座总结指南针十大品牌如下,如果您有更好的品牌推荐,请联系鹿豹座。
以下排名不分先后。
在鹿豹座看来,以下这些品牌代表了指南针中的上品,值得大家选购和使用。
诺可文诺可文品牌由托马斯·汉森(Thomas Hansen)先生于上个世纪70年代在美国创立。
品牌迅速成长自今,Rocvan(诺可文)国际化团队应用自身的专业知识和经验,采用高科技的功能型材料,不断推出更加适合旅游爱好者的产品。
凭借卓越的品质和多元化的产品路线,畅销美国市场并已成功进军欧洲、东亚、澳洲,受到世界户外爱好者的喜爱和推崇,其设计的“卡罗两件套冲锋衣系列”“精鹰1.2.3”系列旅行帐篷畅销至今。
今天Rocvan作为户外知名品牌,已成为户外产品功能化的代表之一,为户外爱好者们提供了广泛而又高质的产品选择。
布鲁顿美国著名的户外品牌,产品线包括:指南针、GPS、户外便携太阳能电池、望远镜、野外炉具和其他户外电子仪器。
经过一个世纪的持续革新,美国知名品牌Brunton始终是全世界专业户外运动员和户外运动狂热爱好者的首选。
迪卡侬迪卡侬来自于法国,是体育用品零售商,由米歇尔·雷勒克于1976年创立,第一家店开在法国里尔附近的小村庄恩洛斯。
对于初学者和专业运动者,迪卡侬都能提供运动服饰、装备以及各种创意类运动产品,其全产业链掌控的模式让其产品具有较高的性价比。
Suuntosuunto是登山、徒步、定向、训练、潜水、滑雪、航海和高尔夫运动等领域世界领先之运动测量装备的设计和制造商。
suunto运动测量装备一直以其产品的前沿设计,精准性和可靠性被消费者所推崇。
MCM238 快速启动指南说明书
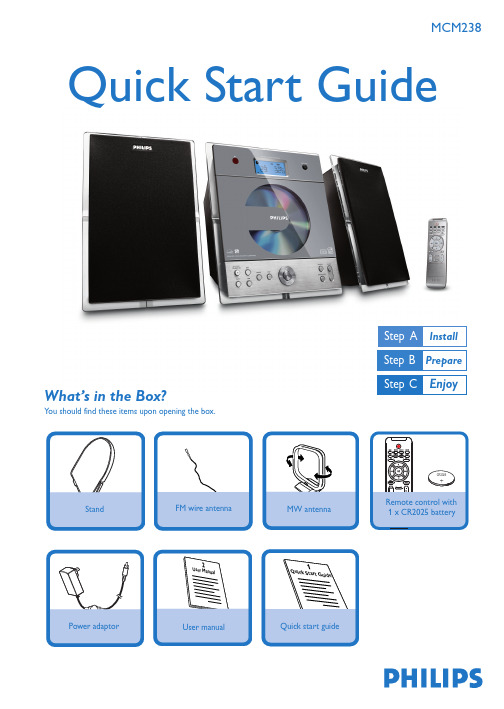
MCM238 Quick Start GuideWhat’s in the Box? You should find these items upon opening the box.2Mounting the stand onto the set 1Rear connections3Connect the cable of the left speaker to LEFT (red and black) and the cable of the right speaker to RIGHT (red and black).Extend the wire antenna and fit it to FM ANTENNA.Insert the MW antenna to MW ANTENNA jacks.Connect the AC power cord to the wall socket.41Locate the bottom of the main unit and find the slot, then slide the standin the slot until it stops, as indicated in the figure.Tip– To receive optimal radio reception, put themain unit and the antennas as far away aspossible from the power adaptor.Setting the clock23 4 5 6In the standby mode, press and hold CLOCK on the remote control.➜24 HR or 12 HR appears for the initial clock setting. To select 12-hour clock or24-hour clock,1.Press VOLUME +/-once or more.2.Press CLOCK to confirm.➜The hours digits start flashing.Hold down or press VOLUME+/-repeatedly to set the hours.Press CLOCK to confirm.Hold down or press VOLUME+/-repeatedly to set the minutes.Press CLOCK to confirm.Notes for remote control:–First, select the source you wish tocontrol by pressing one of the sourceselect keys on the remote control (CDor TUNER, for example).–Then select the desired function(2;, 4, ¢for example).1Press and hold ST ANDBY-ON/ ECO POWER y to switch the set to Standby mode.➜The display shows the set time.➜-- --:-- -- flashes by default if you have not set the clock.Helpful hints:- To set the clock automatically by using a time signal which is broadcasttogether with the RDS signal,s ee the User Manual, RDS: Setting the RDS clock.Tuning to radio stations 123Press SOURCE once or more to select TUNER (or TUNER on the remote control).Press and hold PROGRAM until AUTO appears➜ Available stations are programmed in order of waveband reception strenght: RDS, FM followed by MW .Press the ALBUM/ PRESET buttons once or more until the desired preset station isdisplayed.12345Playing discsWith this system, you can play all pre-recorded audio CDs (CDDA), all finalized audio CD-Rsand CD-RWs, MP3/WMA-CDs (CD-Rs/CD-RWs with MP3/WMA files)Press DOOR OPEN to open the CD compartment.Insert a disc with the printed side facing up. Then close the CD door.Press ÉÅ to start playback.T o stop playback, press STOP Ç.Press SOURCE once or more to select CD (or CD on the remote control).PDCC-JH-JiaW-07332007 C Koninklijie Philips Electronics N.V.All rights reserved. Detailed playback features andadditional functions are described in theaccompanied owner's manual.。
搭建bbpress的详细教程

搭建bbpress的详细教程
bbpress的搭建其实比较简单,不过2.0是英文版的,1.0有中文版的可以下一下。
我安装的是bbpress_v1.0.2中文版,所谓的中文版是通过mo语言包实现的,以后会提到mo语言包有多恶心!!
把bbpress程序上传后,打开域名,会出现安装界面(如图示),若是英文界面看着不顺眼,建议大家使用chrome浏览器,然后在网页空白处右键选择翻译!
1.直接点击下一步,bbPress安装页面默认只有三项:数据库名称;数据库用户;密码。
(与织梦cms不同,bbpress需要事先建好了数据库,然后此处输入数据库名)
2.再点击下一步,是WordPress整合选项,此处是可选,偶不需要,点击跳过。
3.在完成站点相关之后,就安装完成了,站点设置详情。
此处邮箱地址必须写自己常用的邮箱地址(默认注册是随机密码发至注册人填写的邮箱中,安装完毕后可用插件改变此注册机制)
4.安装bbpress完成之后,会有相关信息提示并且会受到系统邮箱提示
ok!bbpress安装完毕,大家可以登陆后台设置了,后台界面和wordpress同一风格,相信大家不会太陌生。
移动梦网(monternet)

移动梦网(monternet)黑莓手机论坛 移动梦网(monternet)移动梦网(monternet)黑莓手机网接连几日为专家带来有关中挪动转移blackberry8310的各方面信息先容:[图文]中国挪动转移黑莓8310黑莓手机网国…挪动转移黑莓8310盒码和机器…应网友央求,这里51blackberry为专家提供一组黑莓8310的开机组图,请欣赏之。
和大多blackberry8310不同,挪动转移版黑莓手机在放上电池后并不会主动开机,看看中国移动黑莓8310。
需要用户按住"开机键(赤色挂机键)"才没关系启起头机。
什么是黑莓手机,黑莓业务 中国移动黑莓套餐开机后经过20秒左右的守候,我们首先看到挪动转移"心机"的开机画面,如下图进入体例后,我们没关系看到主界面背景有中国挪动转移的标志logo,如下图体例功用图标界面,之前其他版本的黑莓8310有的功用图标,挪动转移版都有并且还多出两个挪动转移签入的功用图标,分别是"中国挪动转移服务"、"客户服务"。
挪动转移嵌入的"中国挪动转移服务"功用图标,如下图在我们掀开"中国挪动转移服务"功用图标后,进入子功用界面,我们没关系看到八个子功用图标,他们分别是:无线音乐(Music)游戏社区(Games)信息天气(News&weather)中国移动 黑莓业务.中国移动的指令大全!(不再需要人工手机视频(Mobile&TV)新业务推选(whatsnew)Sim卡使用(Simapplications)我的梦网(MYmonternet)挪动转移梦网(monternet)在发动这些功用时,都会进入挪动转移梦网对应的频道,并且部门功用发动后并无法正常涉猎挪动转移版黑莓内嵌的"客户服务",如下图我们掀开挪动转移嵌入的"客户服务"功用图标后,没关系看到六个子功用图标,分别为:/heimeiyewu/2011/0228/1535.html心机服务指南掌上买卖厅客户服务热线客户经理号码我的梦网客户服务设置发动这些功用图标后,进入对应的功用界面,以来会为专家注意先容。
BB教学平台操作指南(成教学生版-基础篇)
BB教学平台操作指南(成教学生版-基础篇)一、平台简介Blackboard教学平台是国际领先的教学平台及服务提供商专门为教育机构开发研制的软件平台, 是以Blackboard教学管理平台、Blackboard门户社区平台和Blackboard资源管理平台这三个平台构成是目前全球市场上唯一支持百万级用户的教学平台。
以“教学”、“联系”、“分享”为核心目标,提供一套综合、完整、优化的解决方案。
Blackboard教学平台是以课程为中心集成网络“教”、“学”的网络教学环境。
教师可以在平台上开设网络课程,学习者可以在教师的引导下,自主选择要学习的课程内容。
不同学生之间,以及教师和学生之间可以根据“教和学”的需要进行讨论、交流。
开展基于网络的辅助教学活动,提高课堂教学效率,减少重复劳动,提高整体教学质量。
二、入门操作1、平台入口:在地址栏输入 进入网络教学平台。
或者进入上师大教育学院网站,点击右边“BB教学平台”大图标。
出现如下登录界面:输入用户名:自己的学号(全部,包括字母“E”,E不分大小写)输入密码:初始密码为111111 (6个1)2、界面介绍选项卡:用户登录后界面上端显示一系列可以选择的项目,称为选项卡。
选项卡的名称、数目和显示风格,可由系统管理员设定并修改。
模块:将信息分类显示的区域,称为模块。
模块的数目、内容和显示风格,可由用户自己设定并修改。
工具:用户登录后,会由一套开展教学与学习活动的个人工具显示在界面左侧,用户可以对这些个人工具进行设置。
3、退出平台为了保证帐户安全,在离开平台时,点击页面上方的“注销”按钮,退出平台后,再关闭浏览器窗口。
三、首次登录的必要操作:1、个人信息的补充修改:登录后,在左边工具栏,依次点击“个人信息”——“编辑个人信息”。
按照提示,请至少输入自己的E-mail 和联系电话等栏目,以便教师与你及时联系, 输入后,点击“提交”,完成操作。
2、密码修改:为了保护自己的信息,请各位学生务必修改自己的密码。
- 1、下载文档前请自行甄别文档内容的完整性,平台不提供额外的编辑、内容补充、找答案等附加服务。
- 2、"仅部分预览"的文档,不可在线预览部分如存在完整性等问题,可反馈申请退款(可完整预览的文档不适用该条件!)。
- 3、如文档侵犯您的权益,请联系客服反馈,我们会尽快为您处理(人工客服工作时间:9:00-18:30)。
英蓓特科技有限公司
2
快速启动
1) 使用随产品提供的 USB 线缆将中国版 BB-Black 连接到您的电脑上, USB 接口 可以同时提供电源和作为开发接口;或外购 5V@1A 电源适配器为开发板供电。
Figure 2 连接 BB-Black、电源与 PC
2) 3)
中国版 BB-Black 将从板载的 2GB eMMC 启动 Linux 系统。 您将看到电源 LED 指示灯常亮。 然后在 10 秒内其他的 LED 灯将以默认配置的方 式闪烁。 USRO 在启动后以心跳灯的形式闪烁 USR1 在启动后当读写微型 SD 卡时亮起 USR2 在启动后当 CPU 进行操作时亮起 USR3 在启动后当读写 eMMC 时亮起
2013 英蓓特科技有限公司版权所有©
中国版 BB Black 快速指南
英蓓特科技有限公司
1
产品概述
1 包装内容
中国版 BB-Black 评估板×1 Mini USB 线缆×1
2 接口/按钮/LED
图 1 接口/按钮/LED
2013 英蓓特科技有限公司版权所有©
中国版 BB Black 快速指南
以下情况不在我们的免费技术支持服务范围内,但我们将根据情况酌情处理: 用户自行开发中遇到的软硬件问题; 用户自行修改嵌入式操作系统遇到的问题; 用户自己的应用程序遇到的问题; 用户自行修改本公司提供的软件代码遇到的问题。
保修服务
1) 产品自出售之日起,在正常使用状况下为印刷电路板提供 12 个月的免费保修 服务; 2) 以下情况不属于免费服务范围,英蓓特科技将酌情收取服务费用:
1 更新前的准备
在更新系统前,请按照以下步骤下载最新的映像文件、压缩工具和 SD 卡烧写工具。
表 1 准备工作 步骤 1 2 3* 4 操作 下载映像文件 下载和安装压缩工具 下载和安装 SD 卡烧写工具 MicroSD 卡 地址或备注 /latest-images /projects/sevenzip /projects/win32diskimager 不小于 4G
G. 非经授权渠道购得此产品者。 H. 非英蓓特科技对用户做出的超出保修服务范围的承诺(包括口头及书面等) 由承诺方负责兑现,英蓓特科技恕不承担任何责任; 3) 保修期内由用户发到我们公司的运费由用户承担, 由我们公司发给用户的运费 由我们承担;保修期外的全部运输费用由用户承担。 4) 若板卡需要维修,请联系技术支持服务部。
注意:
中国版 BB-Black 出厂默认的系统版本是 BBB-eMMC-flasher-2013.09.04.img.xz。 如果您 在使用最新版本的映像时出现问题,请从英蓓特官网找到并下载默认的系统版本。 英蓓特官网提供已经下载好的用于中国版 BB-Black 工具和映像,但不保证是最新版本。
2013 英蓓特科技有限公司版权所有©
中国版 BB Black 快速指南
英蓓特科技有限公司
6
技术支持和保修服务
技术支持
英蓓特科技对所销售的产品提供一年的免费技术支持服务,技术支持服务范围: 提供英蓓特科技嵌入式平台产品的软硬件资源; 帮助用户正确地编译和运行我们提供的源代码; 用户在按照本公司提供的产品文档操作的情况下,如本公司的嵌入式软硬件产品 出现异常问题,我们将提供技术支持; 帮助用户判定是否存在产品故障。
中国版 BB-Black
快速指南
版本 1.2– 2014 年 3 月 20 日
英蓓特科技有限公司
i
目录
产品概述 ............................................................................................................................... 1 1 包装内容.................................................................................................................... 1 2 接口/按钮/LED .......................................................................................................... 1 系统更新 ............................................................................................................................... 4 1 软件系统介绍 ............................................................................................................ 4 2 更新前的准备 ............................................................................................................ 4 3 开始更新系统 ............................................................................................................ 4 技术支持和保修服务 ............................................................................................................ 6
2013 英蓓特科技有限公司版权所有©
中国版 BB Black 快速指南
2013 英蓓特科技有限公司版权所有©
中国版 BB Black 快速指南
英蓓特科技有限公司
4)
5
将 MicroSD 卡插入中国版 BB-Black 的卡槽中, 然后按住 uSD BOOT 按钮 (请 参考第 1 页上的图 1 接口/按钮/LED)并使用 USB 线缆接通电源;
5)
当 4 个 User LED 同时持续亮起时,表示已成功完成系统更新(需耗时 45 分 钟左右) 。请断开电源并取出 MicroSD 卡,然后再次接通电源即可。
注意:
未经本公司许可私自将产品寄回的,英蓓特科技公司不承担任何责任。
联系方式
技术支持 电话:+86-755-25635626-872/875/897 Emai:support@ 销售信息 电话:+86-755-25635626-860/861/862 传真:+86-755-25616057 Emai:sales@ 公司信息 网站: 地址:深圳市南山区留仙大道 1183 号南山云谷创新产业园山水楼 4 楼 B(518055)
2013 英蓓特科技有限公司版权所有©
中国版 BB Black 快速指南
英蓓特科技有限公司
3
Figure 3 eMMC 及 LED 灯位置说明
2013 英蓓特科技有限公司版权所源自©中国版 BB Black 快速指南
英蓓特科技有限公司
4
系统更新
系 统 在 出 厂 时 已 烧 写 好 Angstrom 系 统 , 映 像 版 本 为 BBB-eMMC-flasher-2013.09.04.img.xz,如需升级系统,或开发板内系统映象被破坏,请 参考以下步骤进行更新。
英蓓特科技有限公司
7
D. 因供电、磕碰、房屋漏水、动物、潮湿、杂 / 异物进入板内等原因导致的产 品外观及功能损坏; E. 用户擅自拆焊零件或修改而导致不良或授权非英蓓特科技认可的人员及机构 进行产品的拆装、维修,变更产品出厂规格及配置或扩充非英蓓特科技公司 销售或认可的配件及由此引致的产品外观及功能损坏; F. 用户自行安装软件、系统或软件设定不当或由电脑病毒等造成的故障;
A. 无法提供产品有效购买凭证、产品识别标签撕毁或无法辨认,涂改标签或标 签与实际产品不符; B. 未按用户手册操作导致产品损坏的; C. 因天灾 (水灾、火灾、地震、雷击、台风等) 或零件之自然耗损或遇不可抗 拒力导致的产品外观及功能损坏;
2013 英蓓特科技有限公司版权所有©
中国版 BB Black 快速指南
* 访问 https:///community/Installation/FromImgFiles 可以找到关于 SD 卡烧写的帮助信息。
2 开始更新系统
准备工作完成后,请按照以下步骤进行系统更新。 1) 2) 3) 使用 7-zip 压缩工具解压刚才下载的映像文件; 用一个 MicroSD 卡卡套或者 USB 读卡器将一张 MicroSD 卡连接到 PC; 使用刚才安装的 Win32 Disk Imager 工具将解压后映像文件写入 MicroSD 卡;
