ubuntu 12.10 server -rsync备份到windows
HP LaserJet MFP M72630dn打印机的数据说明书

Data sheet HP LaserJet MFP M72630dn printerCount on legendary HP performance and reliability at a low price. Help increase value and decrease budget with low running costs. This easy–to–use MFP is ready to take on your business printing with robust paperhandling and versatile options.HP Quality, Affordable PricePrint premium, professional-quality documents with sharp text and crisp graphics for a low cost.Print premium, professional-quality documents with sharp text and crisp graphics.Get consistent, professional-quality and performance you count on with Original HP toner cartridges and drums.Solid ProductivitySend scans to email or your PC, right from the MFP. Capture and send for simple ling and sharing.Load up to 100 pages into the auto document feeder. Optional inner nishing can increase office productivity.Solid Productivity Easy-to-use 7" intuitive touchscreen color graphic display helps keep business movingPrint and share documents from mobile devices via Airprint™, Mopria® and Google Cloud Print™.Identify new devices and gain insight into printing with HP Web Jetadmin remote discovery and monitoring.Security Capabilities Help ensure important documents and con dential information stay secure.Help regulate printing costs by assigning which users have authorized permissions.Protect data and network from unauthorized access with encryption, overwriting, industry standard security.1Product walkaroundAccessories, Supplies and SupportSupplies W1002YC HP W1002YC Black Contract LaserJet Toner Cartridge (33,000 pages)W9006MC HP W9006MC Black Managed LaserJet Imaging Drum (~200,000 pages)W9007MC HP W9007MC Managed LaserJet Toner Collection Unit (100,000 pages)Z9M06A HP LaserJet 110V Fuser AssemblyZ9M07A HP LaserJet 220V Fuser AssemblyZ7Y83A HP LaserJet E7 Trays 2-x RollersZ7Y88A HP LaserJet MP RollerZ9M08A HP LaserJet Transfer RollerZ9M05A HP LaserJet Black Developer Unit3KR68A HP ADF Separation Pad3KR69A HP ADF Pick Roller AssemblyAccessories6KW89A HP LaserJet MFP Analog Fax Accessory 160Y1F97A HP LaserJet Dual Cassette Workgroup FeederY1G00A HP LaserJet Inner FinisherY1G02A HP LaserJet Inner Finisher Hole 2/3 PunchY1G03A HP LaserJet Inner Finisher Hole 2/4 PunchY1G13A HP LaserJet Inner/Booklet StaplesY1G15A HP LaserJet Workgroup Job SeparatorY1G17A HP LaserJet Printer CabinetY1G23A HP LaserJet Second Exit AccessoryService and Support U9VU4E HP 1 year Next Business Day w/Defective Media Retention Service for LaserJet M726xx MFPU9VV1E HP 1 year Parts Exchange Service for LaserJet M726xx MFP (Managed Component Only)U9VV2E HP 3 year Parts Exchange Service for LaserJet M726xx MFP (Managed Component Only)U9VV3E HP 4 year Parts Exchange Service for LaserJet M726xx MFP (Managed Component Only)U9VV4E HP 5 year Parts Exchange Service for LaserJet M726xx MFP (Managed Component Only)U9VV9PE HP 1 year Post Warranty Parts Exchange Service for LaserJet M726xx MFP (Managed Component Only)U9VW0PE HP 2 year Post Warranty Parts Exchange Service for LaserJet M726xx MFP (Managed Component Only)Technical speci cationsModel HP LaserJet MFP M72630dn printerProduct number2ZN50AFunctions Print, Copy, Scan (fax and wireless optional)Control panel 4 LED Lights (Power/Wakeup, Interrupt, Status, ECO); 24 Buttons (Power/Wakeup, Interrupt, Stop, Start, Job Status, Counter, Eco, Clear, Redial/Pause, Logout/ID, On Hook Dial, Reset, 12 Numeric Keypad (0~9, *, #)PrintPrint technology LaserPrint speed Black (A4, normal): Up to 30 ppm ; Black (A4, duplex): Up to 20 ipmFirst page out Black (A4, ready): As fast as 8 sec ; Black (A4, sleep): As fast as 31 secPrint resolution Black (best): Up to 1200 x 1200 dpi (with reduced speed)Monthly duty cycle Up to 80,000 pages (per month) A4; Recommended monthly page volume: Up to 45,000 pages (per month)Standard print languages PCL6, Postscript 3, PDF (v1.7)Fonts and typefaces PCL: 95 Scalable Fonts (Include OCR-A / OCR-B); 1 Bitmap. PS3: 136 Scalable FontsPrint area Print margins Top: 4 mm, Bottom: 4 mm, Left: 4 mm, Right: 4 mm; Maximum print area : 297 x 432 mmDuplex printing Automatic (standard)CopyCopy speed Black (A4): Up to 30 cpmCopier speci cations ID Copy, N-Up, Booklet, Auto Fit, Book Copy, Watermark, Stamp, Job Build, Edge Erase, Image Shift, Image Adjustment, Background Adjustment, Preset Programs; Maximum number of copies: Up to 9999 copies; Copy resolution: Up to 600 x 600 dpi; Reduce/Enlarge: 25 to 400%ScanScan speed Normal (A4): Up to 45 ipm (b&w), up to 45 ipm (color) ;Duplex (A4): Up to 18 ipm (b&w), up to 18 ipm (color)Scan le format PDF, JPG, TIFF, XPS, Searchable PDF (with optional HDD), Compact PDF, PDF/A, PDF Encryption, Digital Signature in PDFScanner speci cations Scanner type Flatbed, Reverse ADF, Mirror Moving Type(MMT) Scanner with Color CCD; Scan technology: Color CCD; Scan input modes: Front panel applications: Copy; E-mail; Fax; Save to Network Folder; Save to USB; Save to Device Memory (with optional HDD); Save to PC Scan software: user application via TWAIN or WIA; Twain version: Version 1.9; Duplex ADF scanning: Yes; Scan size maximum ( atbed, ADF): 297 x 437 mm; Optical scan resolution: Up to 600 x 600 dpiScanner advanced features Scan destinations: Email; FTP; SMB; USB; WSD; PCScannable area Minimum media size ( atbed): 25.4 x 25.4 mm Maximum media size ( atbed): 297 x 437 mm ;Minimum media size (ADF): 140 x 130 mm Maximum media size (ADF): 297 x 437 mmBit depth/ Grey scale levels 2 -bit / 256FaxFax Yes, 33.6 kbpsFax speci cations Fax memory: Up to 320 pages; Fax resolution: Standard: 203 x 98 dpi; Fine: 203 x 196 dpi, 256 levels of gray; Super ne: 300 x 300 dpi, 256 levels of gray; Quick dialing: Up to 500Fax smart software features Auto Redial; Caller ID; Secure Reception; Fax forwarding to Fax/Email/SMB/FTP; Job BuildProcessor speed 1 GHz (dual core)ConnectivityStandard Hi-Speed USB 2.0; Host USB; built in Gigabit Ethernet 10/100/1000 Base-TX network portOptional Wireless LAN/NFC kit (China SS474E#AB2); (India SS474F#ACJ);(RoAP SS474B#EEE); Foreign Device Interface Kit (China SS421C#AB2); (India SS421D#ACJ); (RoAP SS421B#EEE); Fax kit (China SS411E#AB2); (India SS411F#ACJ); (Taiwan SS411C#ABD); (Vietnam SS411F#ACJ); (RoAP SS411B#EEE)Mobile printing capability Apple AirPrint, Mopria-certi ed, Google Cloud Print, PrinterOn Cloud PrintSupported network protocols TCP/IPv4; IPv6; DHCP; BOOTP; AutoIP; DNS; DDNS; WINS; Standard TCP/IP; LPR/LPD; IPP; ThinPrint; Google Cloud Print; AirPrint; WSD print; FTP print; HTTP; SNMP(V1/2c/3);Telnet; SLP; Bonjour; UPnP(SSDP);WSD Discovery;SMTP; FTP; LDAP; SMB; KerberosNetwork capabilities Standard (built-in Gigabit 10/100/1000T Ethernet)Hard disk Optional 320 GB (user available 300) hard disk driveMemory Standard: 1.5 GB ;Maximum: 1.5 GBMedia handlingNumber of paper trays Standard: 3 ;Maximum: 5Media types Paper (Plain, HP EcoEFICIENT, HP Matte 90g, Light 60-74g, Bond, Recycled, HP Matte 105g, HP Matte 120g, Mid-Weight 96-110g, Heavy 111-130g, HP Matte 150g, Extra Heavy 131-175g, HP Matte 200g, Cardstock 176-220g, Labels, Letterhead, Envelope, Preprinted, Prepunched, Colored)Media size Custom (metric): Tray 1: 98 x 148 to 297 x 432 mm; Tray 2: 148 x 210 to 297 x 354 mm; Tray 3: 148 x 210 to 297 x 432 mm Supported (metric): A3; A4; A5; A6; B4 (JIS); B5 (JIS); 8K; 16K; O cio 216x340mm ADF: A3; A4; A5;B4; Legal; Letter; 11 x 17; Statement; Width: 148 to 297 mm (5.8 to 11.7 in); Length: 148 to 432 mm (5.8 to 17 in)Media handling Standard input: 1140 sheets: 100-sheet multi-purpose tray, 2 x 520-sheet input tray STD Standard output: 500 sheet face-down output bin Optional input: Optional 2 x 520 Dual Cassette Feeder ADF: Up to 100 sheets Media weight Tray 1: 60 to 175 g/m²; Tray 2, 3: 60 to 220 g/m²Input capacity Tray 1: Sheets: 100; Envelopes: 40 Tray 2: Sheets: 520 Tray 3: Sheets: 520 Maximum: Up to 2280 sheets ADF: Up to 100 sheetsOutput capacity Standard: Up to 500 sheets Envelopes: Up to 40 envelopes Maximum: Up to 550 sheets (with optional inner nisher)Compatible operating systems Windows XP (32/64 bit), Vista (32/64 bit), 2003 Server (32/64 bit), 2008 Server (32/64 bit), Win7 (32/64 bit), 2008 Server R2 (64 bit), Win8 (32/64 bit), Win8.1 (32/64 bit), 2012 Server (64 bit), 2012 Server R2 (64 bit) / Mac OS 10.6~ 10.10 / Linux: Red Hat Enterprise Linux 5, 6, 7 / Fedora 13, 14, 15, 16, 17, 18, 19, 20, 21 / openSUSE 11.3, 11.4, 12.1, 12.2, 12.3, 13.1 ,13.2 / Ubuntu 10.04, 10.10, 11.04, 11.10, 12.04, 12.10, 13.04, 13.10, 14.04, 14.10 / SUSE Linux Enterprise Desktop 11, 12 / Debian 6, 7 / Mint 13, 14, 15, 16, 17Compatible network operating systems Windows XP Service Pack 3, Windows Server 2003, Windows Vista, Windows 7/8, Windows Server 2008 R2, Windows 10, Windows Sever 2016, Mac OS X 10.6-10.10, Linux: Red Hat Enterprise Linux (5, 6, 7), Fedora (15, 16, 17, 18, 19, 20, 21, 22), openSUSE (11.4, 12.1, 12.2, 12.3, 13.1, 13.2), Ubuntu (11.04, 11.10, 12.04, 12.10, 13.04, 13.10, 14.04, 14.10, 15.04, 15.10), SUSE Linux Enterprise Desktop (11, 12), Debian (6, 7, 8), Mint (13, 14, 15, 16, 17)Minimum system requirements Windows: Windows XP Service Pack 3 and Windows XP SerServer 2003: Intel Pentium III 1 GHz (Pentium IV 2 GHz), RAM: 512 MB (1 GB), Free HDD Space: 1.5 GB; Windows XP SerServer 2008: Intel Pentium III 1 GHz (Pentium IV 2 GHz), RAM: 512 MB (2 GB), Free HDD Space: 10 GB; Windows Vista, Intel Pentium IV 3 GHz, RAM: 512 MB (1 GB), Free HDD Space: 15 GB; Windows 7: Intel Pentium IV 1 GHz 32-bit or 64-bit processor or higher, RAM: 1 GB (2 GB), Free HDD Space: 16 GB; Windows Server 2008 R2: Intel Pentium IV 1.4 GHz (x64) processors (2 GHz or faster), RAM: 512 MB (2 GB),Free HDD Space: 10 GB; Windows 8, Windows 8.1, Windows 10, Windows Server 2016: Intel Pentium IV 1 GHz 32-bit or 64-bit processor or higher, RAM: 2 GB (2 GB), Free HDD Space: 20 GB; Windows Server 2012, Windows Server 2012 R2: Intel Pentium IV 1.4 GHz (x64) processors (2 GHz or faster), RAM: 512 MB (2 GB), Free HDD Space: 32 GBMac: CPU: Intel® processors; RAM: 1 GB (2 GB); Free HDD space: 1 GB; Operating system: Mac OS X 10.6. CPU: Intel® processors; RAM: (2 GB); Free HDD space: 4 GB; Operating system: Mac OS X 10.7-10.10Software included HP LJ Network PC Fax, HP MFP Scan, HPMFP Scanto PC Setup, HP OCR Software, HP LaserJet Printer Software UninstallerSecurity management Embedded Web Server: password protection, con gurable login failure policy, con gurable auto logout, secure browsing via SSL/TLS; Security Management: IP and Mac Filtering; Security protocol: 802.1x (EAP-MD5, EAP-MSCHAPv2, PEAP, TLS), IPSec, SNMPv3, User authentication: LDAP, SMB, KerberosPrinter management HP Web Jetadmin - discover and monitorDimensions and weightPrinter dimensions (W x D x H)Minimum 566 x 620 x 820 mm; Maximum: 977 x 620 x 1080 mmPrinter weight59.5 kgOperating environment Temperature: 15 to 30ºC Humidity: 20 to 80% RHStorage conditions Temperature: -10 to 40ºCHumidity: 10 to 80% RHAcoustics Acoustic power emissions: 6.8 B(A) (printing mono simplex, A4 at 30 ppm) Acoustic pressure emissions: 51 dB(A) (printing mono simplex, A4 at 30 ppm)Power Requirements: Input voltage: 110 to 127Vac (+/- 10%), 220 to 240Vac (+/- 10%), 50/60 Hz (+/- 3%). Not dual voltage, power supply varies by part number with # Option code identi er.; Consumption: 590 watts (printing), 590 watts (copying), 100 watts (ready mode), 1.5 watts (sleep);Power supply type: Internal (Built-in) power supplyCerti cations Electromagnetic emission standard: CISPR 32: 2012/EN 55032: 2012 Class A, EN 61000-3-2: 2014, EN 61000-3-3:2013, EN 55024:2010, GB9254-2008, GB17625.1-2012, EMC Directive 2014/30/EU with CE Marking (Europe), other EMC approvals as required by individual countries.ENERGY STAR® quali ed; CECPBlue Angel compliant No; Please refer to the ECI documentSustainable impact speci cations Mercury-freeCountry of origin Made in ChinaWhat's in the box2ZN50A LaserJet MFP M72630dn Printer; Power Cable; Hardware Install Guide; Software CD (Includes User Guide)Warranty90 day parts only. Extended Warranty and support options vary by product, country and local legal requirements. Go to /support to learn about HP award winning service and support options in your region.FootnotesNot all HP Web Jetadmin features are supported on the HP LaserJet MFP M72625dn and HP LaserJet MFP M72630dn. HP Web Jetadmin is available for download at no additional charge at /go/webjetadmin Exact speed varies depending on the system con guration, software application, driver, document complexity and time in sleep.Purchase of optional paper tray required to reach maximum input capacity. Installation from HP Authorized service provider only.Technical speci cations disclaimersAverage color composite (C/M/Y) and black declared yields based on ISO/IEC 19752 and continuous printing. Actual yields vary considerably based on images printed and other factors. For details see/go/learnaboutsupplies© Copyright 2022 HP Development Company, L.P. The information contained herein is subject to change without notice. The only warranties for HP products and services are set forth in the express warranty statements accompanying such products and services. Nothing herein should be construed as constituting an additional warranty. HP shall not be liable for technical or editorial errors or omissions contained herein. ENERGY STAR and the ENERGY STAR logo are registered U.S. marks. Microsoft and Windows are registered trademarks of Microsoft Corporation. AirPrint and the AirPrint logo are trademarks of Apple Inc. registered in the U.S. and other countries. Linux is a U.S. registered trademark of Linus Torvalds. UNIX is a registered trademark of The Open Group. ap-en June 20221231。
鼠标键盘共享工具Synergy的使用方法图文教程

鼠标键盘共享工具Synergy的使用方法图文教程Synergy允许你轻松地在你办公桌上多台计算机之间共享你的鼠标和键盘,它免费并且开放源代码。
你只要将鼠标(指针)从一台计算机的屏幕边缘移出到另一个屏幕就行了。
甚至可以共享你的剪贴板。
你所需要的仅仅是一个网络连接。
Synergy是跨平台的(可以运行于Windows,Mac OS X和Linux)。
先介绍本人机器环境,机器两台,Windows 7 x64, Ubuntu 12.10 x64.由于工作中需要使用Windows查看邮件,故使用Windows 7作为主机。
Server端配置在 Windows 上安装 Synergy ,不多说了,电脑,主界面如下。
主界面上点击Configure Server。
从右上角拖拽到网格上,双击配置,最多可以配置15个。
然后点击Start运行serverClient配置Ubuntu源里有,电脑技术,直接安装:1sudo apt-get install synergy同时建议安装quicksynergy,synergy的GUI工具1sudo apt-get install quicksynergy运行quicksynergy,在Server hostname/IP address 中填入server 的 IP 或 hostname ,建议使用 hostname.点击 Execute 执行。
注意两个名字都需要在 Server 端配置。
Ubuntu开机自启动在Startup Application Perferences中加入如下配置。
具体参数可以man之。
如果成功连上的话,server端的log中会有类似信息:1NOTE: accepted client connection2NOTE: client "TELENAV-90171" has connected效果如图:(责任编辑:admin)。
详解UbuntuServer下启动停止重启MySQL数据库的三种方式

详解UbuntuServer下启动停⽌重启MySQL数据库的三种
⽅式
Ubuntu Server下启动/停⽌/重启MySQL数据库的三种⽅式
系统环境:ubuntu server 12.10 x64(mysql为系统⾃带)
当我们需要修改MySQL的配置⽂件f(windows 下为 my.ini)来进⾏⼀些设置的时候,修改完之后我们需要重启MySQL。
f⽂件位置为:/ect/mysql/f
Waring:如果该⽂件配置错误,MySQL将⽆法启动。
下⾯介绍三种⽅式对MySQL进⾏启动/停⽌/重启操作:
启动mysql:
⽅式⼀:
sudo /etc/init.d/mysql start
⽅式⼆:
sudo start mysql
⽅式三:
sudo service mysql start
停⽌mysql:
⽅式⼀:
sudo /etc/init.d/mysql stop
⽅式⼆:
sudo stop mysql
⽅式三:
sudo service mysql stop
重启mysql:
⽅式⼀:
sudo/etc/init.d/mysql restart
⽅式⼆:
sudo restart mysql
⽅式三:
sudo service mysql restart
以上就是本⽂的全部内容,希望对⼤家的学习有所帮助,也希望⼤家多多⽀持。
Avamar自动备份解决方案
• 作业管理控制功能
– 停止、启动、重新启动备份作业
• 支持最新的 Avamar、Data Domain 和 NetWorker 版本
© 版权所有 2014 EMC Corporation。保留所有权利。
25
客户心声
“如果没有 Avamar 提供的一流备份和恢复功能,我们根本不可能实现虚拟 化目标。”
14
针对 VMware 备份进行了优化
• 来宾级备份
– 提供应用程序一致性
虚拟化
• 映像级备份
– 支持 vStorage API for Data Protection (VADP) – 在备份和恢复过程中都会使用数据块更改跟踪 – 通过智能多线程代理进行虚拟机负载平衡
• 与 VMware vCenter Server 紧密集成,此外还可通 过多租户方式使用同一 vCenter 上的各个虚拟机 • Plug-In for vCloud Director • 从映像备份一步完成文件级恢复 • 通过 VCE Vblock 和 VSPEX 认证 • 可使用 Avamar Virtual Edition for Vmware 部署 为虚拟应用装置
• 小型远程办公室只需在服务 器(客户端)上部署 Avamar 代理
大型远程办公室
虚拟应用 装置
直接备份到数据中心内的 Avamar Data Store
小型远程办公室
© 版权所有 2014 EMC Corporation。保留所有权利。
20
Avamar 可简化企业备份和恢复
主数据中心
Avamar 代理仅直接备份到 主数据存储区
Avamar Virtual Edition 虚拟应用装置 VMware 环境 • 采用虚拟机形式的 Avamar Server • 来宾级和映像级备份 • 仅恢复更改数据块,可快速完成
VMware-Ubuntu中安装Openstack
花了几天时间尝试在VMWare Workstation的Ubuntu虚拟机中安装OpenStack,多次失败,最后还是用DevStack安装成功,这里记录一下最后总结的安装步骤和一些问题的解决方法。
创建虚拟机创建虚拟机时的一些注意事项:1.虚拟机的Type选择Custom,以自己定制一些选项;2.“Install from”选择“I will install operating system later”,这样能够自己控制Ubuntu的安装过程;3.Guest operating system选择Linux,V ersion选择“Ubuntu 64-bit”(64位虚拟机需要硬件支持;如果无法创建64位虚拟机,请选择Ubuntu);4.“Network connection”选择“Use bridged networking”,这样虚拟机将连接到你的物理网络,方便管理;其余的设置使用默认项就可以。
安装Ubuntu Server 12.10安装镜像下载从/download/server下载安装镜像,这里需要的是Ubuntu Server版本,而不是Desktop版本;如果能够用BT下载,建议到/download/desktop/alternative-downloads 下载.torrent种子进行下载,速度会比直接HTTP下载快;如果需要安装64位的Ubuntu,请下载ubuntu-12.10-server-amd64.iso,否则请下载ubuntu-12.10-server-i386.iso。
安装Ubuntu Server1.回到VMWare Workstation中,编辑在上一步中创建的虚拟机的属性,在Hardware列表中选中“CD/DVD”,在右侧设置中确认选中了“Connect at power on”,在“Connection”中选中“Use ISO image file:”,点击“Browse…”选择上一部下载的ISO镜像文件,点击OK保存设置。
IDOL OmniGroupServer软件版本12.10.0发布说明说明书
Document Release Date: October 2021 Software Release Date: October 2021Legal noticesCopyright notice© Copyright 2021 Micro Focus or one of its affiliates.The only warranties for products and services of Micro Focus and its affiliates and licensors (“Micro Focus”) are as may be set forth in the express warranty statements accompanying such products and services. Nothing herein should be construed as constituting an additional warranty. Micro Focus shall not be liable for technical or editorial errors or omissions contained herein. The information contained herein is subject to change without notice.Documentation updatesThe title page of this document contains the following identifying information:l Software Version number, which indicates the software version.l Document Release Date, which changes each time the document is updated.l Software Release Date, which indicates the release date of this version of the software.To check for updated documentation, visit https:///support-and-services/documentation/. SupportVisit the MySupport portal to access c ontact information and details about the products, services, and support that Micro Focus offers.This portal also provides customer self-solve capabilities. It gives you a fast and efficient way to access interactive technical support tools needed to manage your business. As a valued support customer, you can benefit by using the MySupport portal to:l Search for knowledge documents of interestl Access product documentationl View software vulnerability alertsl Enter into discussions with other software customersl Download software patchesl Manage software licenses, downloads, and support contractsl Submit and track service requestsl Contact customer supportl View information about all services that Support offersMany areas of the portal require you to sign in. If you need an account, you can create one when prompted to sign in. To learn about the different access levels the portal uses, see the Access Levels descriptions.ContentsNew in this Release4 Resolved Issues5 Supported Operating System Platforms6 Notes7 Documentation8New in this ReleaseNew in this ReleaseThe following new features were released in OmniGroupServer version 12.10.0.l The ogs_azure library, which retrieves security information from Azure Active Directory, has been improved:o OmniGroupServer uses the Microsoft Graph API to retrieve information from Azure Active Directory. Earlier versions of OmniGroupServer used the Azure Active Directory Graph API,which has been deprecated. To authenticate with the Microsoft Graph API you must create anOAuth service application. For information about how to do this refer to the IDOL DocumentSecurity Administration Guide.o When retrieving information from Azure Active Directory, OmniGroupServer can process contacts and directory roles. Contacts are processed only whenImportExternalUsers=TRUE. The default value of this parameter is now TRUE.o The configuration parameter UseOnPremises has been added, so that you can store users and groups by the value of their OnPremisesSamAccountName property (orOnPremisesSecurityIdentifier when you also set UseIDs=TRUE).l The third-party libraries libxml2 and libxslt have been updated, to versions 2.9.11 and 1.1.34 respectively.l The third-party OpenSSL library has been updated to 1.1.1.j.l ACI servers can now communicate with a License Server that requires a GSSAPI authenticated connection (that is, where the License Server configuration has RequireGSSAuth set to True). To allow this communication, you must set GSSServiceName in the [License] section of theconfiguration file t o the GSSAPI service name of the License Server. For example:[License]GSSServiceName=LICENSESERVERl The Admin, Help, LoadDoc, and LoadImage actions now set the HTTP response header Content-Security-Policy, to improve security against cross-site scripting. If the Content-Type headeris set, these actions also set the header X-Content-Type-Options: nosniff.Resolved IssuesResolved IssuesThe following issues were resolved in OmniGroupServer version 12.10.0.l The QueueInfo action (with QueueAction=GetStatus) would return an error when the total number of actions exceeded 999.l The server could terminate unexpectedly when an authorization role was configured and the list of Clients included a hostname with a wildcard, such as *. The Clientsparameter accepts wildcards only in IP addresses.l Various GetRequestLog (GRL) HTML issues have been fixed:o Actions were not properly escaped in some places, which could allow malicious users to inject some alternative HTML in the GetRequestLog response.o The Open link in new window option did not work.o The auto refresh option would modify the selected open link option.o Links to the obsolete confighelp action have been removed.o The HTML page now uses a Content-Security-Policy to protect against malicious data injection by crafted actions sent to the server.Supported Operating System PlatformsSupported Operating System Platforms OmniGroupServer 12.10.0 is supported on the following platforms.Windows (x86-64)l Windows Server 2019l Windows Server 2016l Windows Server 2012Linux (x86-64)The minimum supported versions of particular distributions are:l Red Hat Enterprise Linux (RHEL) 6l CentOS 6l SuSE Linux Enterprise Server (SLES) 12l Ubuntu 14.04l Debian 8Solaris (x86-64 and SPARC 64)l Solaris 11l Solaris 10NotesNotesl The autpassword command-line tool has been updated to provide hardened AES encryption for passwords. Micro Focus strongly recommends that you reencrypt all passwords in configuration files by using the updated tool.The older AES encryption format and basic encryption methods are now deprecated. Passwords that you have encrypted with older versions continue to work, but the server logs a warning.Support for these older encryption methods will be removed in future.DocumentationDocumentationThe following documentation was updated for this release.l OmniGroupServer Reference。
Wifidog和Authpuppy认证页面的配置

Wifidog+Authpuppy认证页面的配置路由器上用的是wifidog client,服务器后端管理用的是authpuppy。
首先,选择自己的操作系统,在/doc/Main_Page网站里面,我的操作系统是Linux。
然后到这个网站/doc/Getting_Started去下载check_configuration.php这个文件是检测你的电脑安装authpuppy需要哪些环境,下面是我配置好的环境。
然后到这个/authpuppy下载authpuppy的源码,然后把解压后的authpuppy目录放到apache2的站点目录,我的是ubuntu12.10,安装后的apache2目录是/etc/apache2/sites-available/default,打开的内容是<VirtualHost*:80>ServerAdmin webmaster@localhostDocumentRoot/var/www/<Directory/>Options FollowSymLinksAllowOverride All</Directory><Directory/var/www/authpuppy/web/>Options Indexes FollowSymLinks MultiViewsAllowOverride AllOrder allow,denyallow from all</Directory>ScriptAlias/cgi-bin//usr/lib/cgi-bin/<Directory“/usr/lib/cgi-bin”>AllowOverride NoneOptions+ExecCGI-MultiViews+SymLinksIfOwnerMatchOrder allow,denyAllow from all</Directory>ErrorLog${APACHE_LOG_DIR}/error.log#Possible values include:Debug,info,notice,warn,error,crit, #alert,emerg.LogLevel warnCustomLog${APACHE_LOG_DIR}/access.log combined</VirtualHost>由于刚开始什么都不懂,都不知道里面目录是什么意思,所以就挑几个来说明下DocumentRoot/var/www这个目录是apache2服务器的根目录,也就是说当你打开浏览器在地址栏输入127.0.0.1时,就是进入/var/www/这个目录里面<Directory/var/www/>Options Indexes FollowSymLinks MultiViewsAllowOverride AllOrder allow,denyallow from all</Directory>这个是你在apache里面架设服务器的根目录,比如我架设的是authpuppy,当我一进入authpuppy是/var/www/authpuppy/web/这个目录下的文件,其他的也没什么好讲的。
Ubuntu各版本代号简介

Ubuntu各版本代号简介Ubuntu中,每个版本都有⼀个更为特⾊的名字,这个名字由⼀个形容词和⼀个动物名称组成,并且,形容词和名词的⾸字母都是⼀致的。
从D版本开始⼜增加了⼀个规则,⾸字母要顺延上个版本,如果当前版本是 D ,下个版本就要以 E 来起头Ubuntu历史版本与代号⼀览:Ubuntu 发布版本的官⽅名称是 Ubuntu X.YY ,其中 X 表⽰年份(减去2000),YY 表⽰发布的⽉份。
Ubuntu 没有像其它软件⼀样有 1.0 版本,是因为其第⼀个版本是发布于 2004 年。
所以Ubuntu的⽣⽇是10⽉20⽇。
版本别名(codename)发布⽇期4.10Warty Warthog(长疣的疣猪)2004年10⽉20⽇5.04Hoary Hedgehog(灰⽩的刺猬)2005年4⽉8⽇5.10Breezy Badger(活泼的獾)2005年10⽉13⽇6.06Dapper Drake(整洁的公鸭)2006年6⽉1⽇(LTS)6.10Edgy Eft(急躁的⽔蜥)2006年10⽉6⽇7.04Feisty Fawn(坏脾⽓的⼩⿅)2007年4⽉19⽇7.10Gutsy Gibbon(勇敢的长臂猿)2007年10⽉18⽇8.04Hardy Heron(耐寒的苍鹭)2008年4⽉24⽇(LTS)8.10Intrepid Ibex (勇敢的野⼭⽺)2008年10⽉30⽇9.04Jaunty Jackalope(得意洋洋的怀俄明野兔)2009年4⽉23⽇9.10Karmic Koala(幸运的考拉)2009年10⽉29⽇10.04Lucid Lynx(清醒的猞猁)2010年4⽉29⽇11.10Oneiric Ocelot(梦幻的豹猫)2010年10⽉13⽇11.04Natty Narwhal(敏捷的独⾓鲸)2011年4⽉28⽇12.04Precise Pangolin(精准的穿⼭甲)2012年的4⽉26⽇(LTS)12.10Quantal Quetzal(量⼦的绿咬鹃)2012年的10⽉20⽇13.04Raring Ringtail(铆⾜了劲的猫熊)2013年4⽉25⽇13.10Saucy Salamander(活泼的蝾螈)2013年10⽉17⽇14.04Trusty Tahr (可靠的塔尔⽺)2014年4⽉18⽇ (LTS)14.10Utopic Unicorn(乌托邦独⾓兽)2014年10⽉23⽇15.04Vivid Vervet (活泼的⼩猴)2015年4⽉15.10Wily Werewolf (狡猾的狼⼈)2015年10⽉16.04Xenial Xerus (好客的⾮洲地松⿏)2016年4⽉(LTS)16.10Yakkety Yak(牦⽜)2016年10⽉17.04Zesty Zapus(开⼼的跳⿏)2017年4⽉17.10Artful Aardvark(机灵的⼟豚)2017年10⽉18.04Bionic Beaver(仿⽣海狸)即将发布2018年4⽉(LTS)每两年的 4 ⽉份,都会推出⼀个长期⽀持版本(LTS),其⽀持期长达五年,⽽⾮ LTS 版本的⽀持期通常只有半年。
unity修改快捷键的方法(Ubuntu12.10)

unity修改快捷键的⽅法(Ubuntu12.10)
注:我在ubuntu 12.10下设置成功
转⾃:
Ubuntu 使⽤Gnome做为默认桌⾯环境时,下⽅⾯板最左边都会有⼀个“显⽰桌⾯”图标,⿏标放在该图标上,即会提⽰您“单击此处隐藏所有的窗⼝并显⽰桌⾯”,⾮常实⽤的⼀个功能。
但是,⾃从采⽤unity做为默认的桌⾯环境,此图标的启动器并没有被默认放在⾯板上,切换到桌⾯⼀般都会使⽤Alt+Tab这个组合键在正在打开的应⽤程序之间切换,应⽤程序少还可以,⽐较容易切换,遇到打开了多个应⽤程序的时候,此操作便变的⾮常繁琐,怎么办呢?
嘿嘿,此时,使⽤“显⽰桌⾯”快捷键直接隐藏全部窗⼝⾮常突显优势,在unity中快速的切换到桌⾯我们可以使⽤“隐藏所有正常窗⼝”操作,它的快捷键是:Ctrl+Super+D
当然您如果觉得这个组合键仍然有些⿇烦,您当然可以⾃定义它。
在ubuntu 12.04中是这样设置的:
a.打开系统设置>键盘,点击第⼆个选项页快捷键
b.点击左侧列表的导航分类
c.左键点击右边列表的“隐藏所有的窗⼝”选项
d.要编辑快捷键,请单击相应的⾏,然后输⼊新按键组合,或按Backspace清除。
ubuntu 12.10 GLPI最新版安装
Ubuntu 12.10 +GLPI 0.84.3(最新版)前言:ubuntu 12.0的修改版(第三次修改),望与大家一起共同进步!今天偶然需要用到GLPI,按照原来的步骤发现最后OCS的那个步骤没有了,决定再次做一份最新版,方便大家学习使用,目前的最新版2013.12.30说明:本文共分五步:1、安装支持模块2、安装OCS服务端(linux)3、安装GLPI4、安装OCS插件(最新更改,官方取消原有的OCS mode)5、测试一、安装支持模块老样子update 和upgrade# apt-get install libapache2-mod-php5# apt-get install php5-cli# apt-get install php5-common# apt-get install php5-cgi# apt-get install mysql-server //会要求输入数据库密码,用户是root(这个在下面会用到)# apt-get install php5-mysql# apt-get install build-essential# apt-get install libapache2-mod-perl2# apt-get install php5-gd# apt-get install libxml-simple-perl# apt-get install libcompress-raw-zlib-perl# apt-get install libdbi-perl# apt-get install libdbd-mysql-perl# apt-get install libapache-dbi-perl# apt-get install php-pear# apt-get install php5-dev# apt-get install libnet-ip-perl# apt-get install libsoap-lite-perl# apt-get install libyaml-perl# apt-get install libmysqlclient-dev(你也可以这样来#apt-get install libapache2-mod-php5 php5-cli php5-common ......)到此为止,模块安装结束二、安装OCSOCS服务端还是要安装1、下载OCS服务端#wget https:///136538282/OCSNG_UNIX_SERVER-2.1rc1.tar.gz //最新版服务端,你可以在linux中通过上述方式下载(https:///136709722/OCSNG-Windows-Agent-2.1RC1.zip//这是最新版windows客户端,你可以通过windows平台下载,测试的时候会用到)2、开始安装# tar zxvf OCSNG_UNIX_SERVER-2.1rc1.tar.gz //这是解压#cd OCSNG_UNIX_SERVER-2.1rc1 //进入目录#sh setup.sh //开始安装,会有一系列的选项,除了我下面列出来的其余的一律默认回车3、安装完成后,在windows浏览器下输入http://主机的IP/ocsreports/root /1234564、再次刷新浏览器,就可以看到下图,这个地方默认admin/admin5、安装完成到此OCS服务端(linux)安装完成三、安装GLPI下载地址:https:///attachments/download/1615/glpi-0.84.3.tar.gz #tar zxvf glpi-0.84.3.tar.gz //解压#mv glpi/ /var/www/#cd /var/www#chown –R www-data:www-data glpi在浏览器输入http://主机IP/glpi/1、选择中文(界面改观了一点)2、“接受条款”3、“安装”4、继续5、输入数据库的root密码(123456)6、选择ocsweb7、glpi/glpi帐号和密码,其它的可以进入查看到此GLPI安装完成四、安装OCS插件最新版的已经改成插件模式,下载插件,继续看下面/wiki/doku.php?id=en:plugins(官方插件安装教程)1、登录到GLPI系统,默认的密码上面已经告诉我们了2、“设置”—“插件”3、点击“查看插件目录”4、界面往下拉,找到“OCS INVENTORY NG”,点击它5、点击“TELECHARGER”6、下载它(这个界面难不成是redmine?)下载连接是:https:///attachments/download/1564/glpi-ocsinventoryng-1.0.2.tar.gz7、解压,剪切到“/var/www/glpi/plugins/”#tar zxvf glpi-ocsinventoryng-1.0.2.tar.gz#mv ocsinventoryng/ /var/www/glpi/plugins/8、再次刷新下浏览器,或者重新进入插件页就可以看到刚刚上传的插件,点击“安装”9、安装后,别忘记“启用”10、“启用”后也并非完事,因为还需要我们去配置它,看下图,多了“插件”这个标签,点击“OCS Inventory NG”11、感觉又回到熟悉的地方了,呵呵,填入下列内容(默认没有),小白注意了,如果你是按我的步骤来的,那么就是按我下面的这样写12、添加成功,点击“localhost”13、继续我们熟悉的步骤,我们要选择我们想看哪些东西,“插件”—“OCS Inventory NG”,“导入选项”和“常规信息”,自己选想要看哪些内容,在下图的地方,希望看到的选“是”就行了,别忘了页面最下放的“保存”14、之前说过的,如果客户端选择使用“导入选项”—“OCS词典”,那么将看不到客户端安装的软件,这个版本我没有试,各位自行尝试五、测试客户端下载页上面已经给出,下载后开始安装,也不多说废话了,只把需要改的步骤贴出来,看下图1、下图,填入服务器的IP(小红框),然后下一步2、按照自己的要求选1、//enable verbose log:启用详细日志2、//do not scan for installed software:不扫描已安装的软件3、//never ask for TAG:忽略标签4、//do not register service - agent must be launched manually:不注册服务- 代理必须手动启动5、//do not register systray applet to automatically start:不注册系统托盘小程序自动启动6、//immediately launch inventory:立刻启动库存3、让它直接运行吧4、“插件”—“OCS Inventory NG”,选择“添加新计算机的导入”5、下图中看到了我电脑的信息,点击“导入”(一开始不显示,我等了有一会,后来把服务端给重启了,再等了一会才看到,不知道是不是有检测时间间隔,还是其它问题,在这里就不追究了)6、导入成功7、“资产”—“电脑”8、上面的信息都有,很不错9、如果导入的电脑不在了,要去ocsreports页面把PC删除,在GLPI页面好像删不了,反正我是没有找到删除的方法。
Rainbow系统迁移工具介绍

4. Rainbow离线镜像转换原理
5. Rainbow在线迁移界面 6. Rainbow 离线镜像界面 7. 迁移方案介绍 8. 问题求助
第16页
文件级迁移方式
exclude
system32
data
Program files
system32
system32
Program files
data
Program files
块级
文件级
Step 1 : 完整数据 迁移
Step2:增量数据 同步
块级
第7页
Rainbow特性
特性 特性描述 主要改进项 通过调用FS5.1产品接口,实现以下改进: 自动化 1. 向导式界面。 迁移步骤由之前的15步 2. 迁移前目的VM规格自动规划和目的VM自动创建。 减少为4步 3. 迁移前自动在目的VM挂载WinPE和LiveCD。 4. 迁移程中自动配置WinPE和LiveCD的IP地址。 5. 迁移后自动挂载TOOLS(仅挂载,需要手动安装)。 新增OS和源虚拟化平台支持。 增加对源端启动方式为 UEFI 以及分区格式为 GPT的Redhat 6.0-6.4 64bit、 Suse11SP0-SP3 64bit、 Ubuntu_12.04.2 64bit、 WinSrv2008 R2的支持。 增加 RAW/VHD( MS) /QCOW/QCOW2( KVM) 到华为镜像格式的转换。 新增RHEL6.3向FSOpenStack 5.1版本的迁移。 优化Windows迁移过程 减少对源端磁盘空间的依赖,源端只需要有1G剩余空间即可进行迁移。 对源端环境检测 增加多项源端环境校验,提前识别出源端主机是否满足迁移条件(如源端主机是 否oem、是否包含迁移所需要的组件、快照相关的服务是否开启)。 修复之前格式化分区概率性失败的问题。 增加进程状态检测、对光驱挂载状态的检测。 网络断开检测,断开后尝试重连。 修复目的端多项启动相关的注册表项,避免windows启动蓝屏。 常见错误信息转义,错误提示更加准确易读。 提供一键收集日志功能。
ceph分布式存储介绍
Ceph分布式存储1Ceph存储概述Ceph 最初是一项关于存储系统的PhD 研究项目,由Sage Weil 在University of California, Santa Cruz(UCSC)实施。
Ceph 是开源分布式存储,也是主线Linux 内核(2.6.34)的一部分。
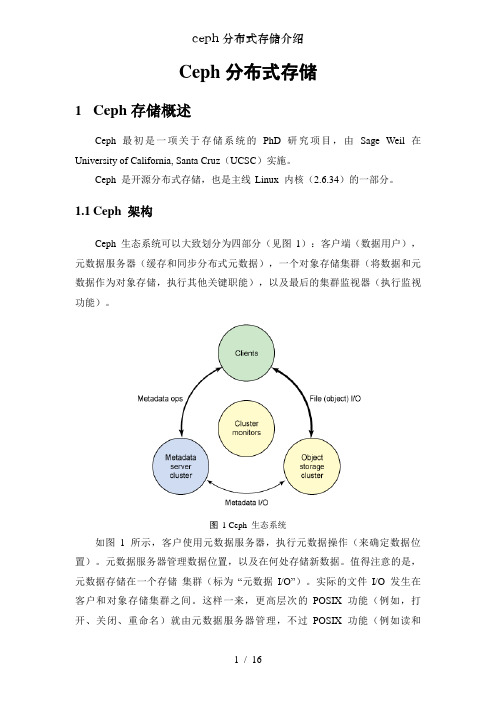
1.1Ceph 架构Ceph 生态系统可以大致划分为四部分(见图1):客户端(数据用户),元数据服务器(缓存和同步分布式元数据),一个对象存储集群(将数据和元数据作为对象存储,执行其他关键职能),以及最后的集群监视器(执行监视功能)。
图1 Ceph 生态系统如图1 所示,客户使用元数据服务器,执行元数据操作(来确定数据位置)。
元数据服务器管理数据位置,以及在何处存储新数据。
值得注意的是,元数据存储在一个存储集群(标为“元数据I/O”)。
实际的文件I/O 发生在客户和对象存储集群之间。
这样一来,更高层次的POSIX 功能(例如,打开、关闭、重命名)就由元数据服务器管理,不过POSIX 功能(例如读和写)则直接由对象存储集群管理。
另一个架构视图由图2 提供。
一系列服务器通过一个客户界面访问Ceph 生态系统,这就明白了元数据服务器和对象级存储器之间的关系。
分布式存储系统可以在一些层中查看,包括一个存储设备的格式(Extent and B-tree-based Object [EBOFS] 或者一个备选),还有一个设计用于管理数据复制,故障检测,恢复,以及随后的数据迁移的覆盖管理层,叫做Reliable Autonomic Distributed Object Storage(RADOS)。
最后,监视器用于识别组件故障,包括随后的通知。
图2 ceph架构视图1.2Ceph 组件了解了Ceph 的概念架构之后,您可以挖掘到另一个层次,了解在Ceph 中实现的主要组件。
Ceph 和传统的文件系统之间的重要差异之一就是,它将智能都用在了生态环境而不是文件系统本身。
ubuntu12.10安装iNodeClient
Ubuntu12.10下载安装iNodeClient的方法和错误的解决.1.下载iNodeClient(/download/explain.php?fileid=18060085)2.打开终端提升root权限 sudo -i3.在usr目录下创建文件夹cd /usrmkdir iNode4.把下载好的文件复制 cp iNodeClient_Linux.tar.gz /usr/iNode5.进入安装文件夹所在目录 cd /usr/iNode 使用命令tar –zxvfiNodeClient_linux.tar.gz解压安装文件,解压后的文件会放在iNode下的iNodeClient中6.iNodeClient目录 cd iNodeClient,运行命令sudo ./install.sh 安装成功之后,运行命令 ps –e | grep A查看服务器AuthenMngService是否成功启用,到此安装成功,不需要重启。
7.输入命令 ldd iNodeClient看看那个文件后边是写not found8.下载必备的两个库文件/s/1q53x下载完成后得到文件:libtiff.so.4/s/g2_4X下载完成得到:libjpeg.so.629.把这两个文件复制到/usr/lib/i386-linux-gnu/sudo ln -s /usr/lib/i386-linux-gnu/libjpeg.so.62 /usr/lib/i386-linux-gnu/libjpeg.so.62sudo ln -s /usr/lib/i386-linux-gnu/libtiff.so.4 /usr/lib/i386-linux-gnu/libtiff.so.310.点击运行iNodeClient。
戴尔多路UPS管理控制台和UPS本地节点管理器软件版本01.06用户指南说明书

Dell Multi-UPS Management Console and UPS Local Node Manager SoftwareVersion 01.06User Guide UpdateOperating Systems supported by MUMC and ULNM MUMC and ULNM v01.06 support the following systems:Operating systemMUMC ULNMServicePackPlatform Softwareversion ServicePackPlatform Softwareversion x86 x64 V1.04 V1.06 x86 x64 V1.04 V1.06Windows Server 2012Windows SmallBusiness Server 2012StandardLatest √√Latest √√Windows Server 2011Windows SmallBusiness Server 2011StandardLatest √√√Latest √√√Windows Server 2008Windows Server 2008R2 Standard,Enterprise, DatacenterSP1 √√√SP1 √√√Windows Server 2008R1 Standard, Enterprise,DatacenterSP2 √√√√SP2 √√√√Windows Server 2008Small Business ServerR2Latest √√√√Latest √√√√Windows Server 2008Small Business ServerLatest √√√√Latest √√√√Windows Server 2003Windows Server 2003Standard, Enterprise,Datacenter R2SP2 √√√√SP2 √√√√Windows Server 2003Standard, Enterprise,Datacenter R1SP1 √√√√SP1 √√√√Windows SmallBusiness Server 2003Standard, Enterprise,Premium R2Latest √√√Latest √√√Windows 8Windows 8 (Enterprise,Premium, Professional,Ultimate, Basic)Latest √√Latest √√Windows 7Windows 7 (Enterprise,Premium, Professional,Ultimate, Basic)SP1 √√√√SP1 √√√√Windows Vista Windows Vista(Enterprise, Ultimate,Business)SP2 √√√√SP2 √√√√Windows XP Windows XPProfessionalSP3 √√√SP3 √√√RedHat Enterprise Linux Red Hat EnterpriseLinux 6.3√√√Red Hat EnterpriseLinux 6.2√√√√Red Hat EnterpriseLinux 5.9√√√√Red Hat EnterpriseLinux 5.8√√√√Red Hat EnterpriseLinux 5.7√√√√Red Hat EnterpriseLinux AdvancedPlatform 5.4 (LatestU7 √√√√Update)Red Hat EnterpriseLinux Base Server5.4 (Latest Update)U7 √√√√Red Hat EnterpriseLinux Version 5U6 √√√√Fedora core 15 √√√√Fedora core 14 √√√√SUSE/Novel SuSE Linux EnterpriseServer 11SP2 √√√√SuSE Linux EnterpriseServer 11SP1 √√√√SuSE Linux EnterpriseServer 10SP4 √√√√OpenSuse 11.4 √√√√OpenSuse 11.2 √√√√Debian GNU Linux Debian 6 (Squeeze) √√√√Debian 5 (Lenny) √√√Ubuntu 12.10 √√√√12.04 LTS √√√√11.04 LTS √√√√10.04 LTS √√√√Virtualization environments supported by MUMC and ULNM MUMC and ULNM v01.06 support the following environments:Virtualization EnvironmentMUMC ULNMServicePackPlatform Softwareversion ServicePackPlatformSoftwareversion x86 x64 V1.04 V1.06 x86 x64 V1.04 V1.06VMware ESXi 5.1 (pay versiononly)√√√√ESXi 5.0 (pay versiononly)U1 √√√U1 √√√ESX 4.0 (pay versiononly)U4 √√√U4 √√√ESXi 4.1 (pay versiononly)U4 √√√U4 √√√ESX 4.0 (pay versiononly)√√√√√√ESXi 4.1 (pay versiononly)√√√√√√Microsoft HyperV Windows Hyper-VServer 2012√√√√Windows Hyper-VServer 2008 R2√√√√√√Windows Hyper-VServer 2008√√√√√√Citrix XenServer 6.0 √√√√√√√√XenServer 5.6 √√√√√√√√OpenSource Xen 2.6on RHEL 5√√√√√√OpenSource Xen 3.2on Debian 5√√√√√√KVM KVM 0.12.1.2 on RHEL6 and Debian 5√√√√√√Virtualization consoles and features supported by MUMC and ULNM MUMC and ULNM v01.06 support the following virtual environment consoles and features:Virtualization consoles and featuresMUMC ULNMServicePackPlatform Softwareversion ServicePackPlatformSoftwareversion x86 x64 V1.04 V1.06 x86 x64 V1.04 V1.06VMwareconsolevCenter √√√√VMware feature vMotion √√√√vSphere √MicrosoftHyperVconsoleSCVMM 2012 √√√√MicrosoftHyperVfeatureLiveMigration √√√√CitrixconsoleXenCenter √√√√Citrix feature XenMotion LiveMigration√√√√Release notesMUMC and ULNM version 01.06Operating systems updates compatibility:∙Windows 8∙Add new etoast notification tool for operating system providing Metro interface.∙SCVMM 2012∙ESXi 5.1∙RedHat 6.3Bug fixes:∙Remove vCenter plugin does not remove MUMC tab in vCenter∙Fix issue with IE10 (Windows 8) compatibility∙Fix bad icon in Windows 8 task bar when notification popup is displayed∙Fix a crash when special network interfaces are set. This crash has been reported in Red Hat 5.6 usinga tuned interface created via openvpn.MUMC and ULNM version 01.04Usability enhancements to the graphical user interface∙System tray menu added (Windows) including ability to stop/start service from the tray icon contextual menu∙Improved alarm acknowledgement options, and audible alarm added to notification events∙Improved event sorting options∙Display of active power in watts, not Volt‐Amps∙UPS shutdown settings menu now available in shutdown menu locationNew functionality in the graphical user interface∙Improved mass configuration of multiple Dell UPS Network Cards and ULNM agents∙XML v4 implementation for improved security∙Improved reverse name resolution capabilities for ULNM agents and hardware nodes∙Enhanced detection of communication loss, which is now available as a shutdown criteria∙Added ability to force UDP or TCP subscription for NMC∙MUMC now can be registered as “powered application” in NMC Web interface.∙Database logs optimized to handle larger installationsExpanded virtualization platform support and integration∙XenCenter plugin∙Force VM shutdown in HA clusters using Remote Virtual Machine Shutdown (RVMS)∙Smoother operation of host management shutdown∙Improved documentation for VMware setupSupport for two or more UPSs powering redundant power supply unit (PSU) devices∙UPS software considers multiple UPS battery status before reaching “low battery” status and shutting down servers.∙Ability to create virtual composite groups of UPSs to manage redundant installations as one deviceSupport of Dell’s unique power metrics∙Peak headroom, peak consumption, all metrics now in Watts (W) and not Volt‐Amps (VA).Virtualization∙Subscribe MUMC is shown as a “notified application” in the UPS NMC card when a VM host node has a UPS configured in MUMC.Microsoft Integration∙Trigger vCenter vMotion™ and SCVMM Live Migration™ applications∙Transparently move virtual machines from a server affected by a power interruption to a non‐affected serverCitrix integration∙XenServer: Remote shutdown from MUMC, remote maintenance from MUMC, can Add/Protect a XenServer in MUMC∙XenCenter: C reate an MUMC XenCenter plug‐in, agent‐less host management from MUMC, agent‐less XenMotionVMware integration∙Removed the prerequisite of Pearl SDK installation for MUMC to communicate with VMware vCenter ∙New power events and alarms logs created in VMware vCenter console∙Added ability to force VM shutdown for HA clusters∙Can now Add/Protect a standalone ESX/ESXi in MUMC without vCenterLinux Support∙Added support for latest Linux distributions (see User Guide for full list)Bug fixes:∙Crash when emc2 runs out of resources (memory)∙ULNM does not detect UPS connected with USB connectivity∙Transfer to high efficiency mode not visible in the events list∙MUMC may lose nodes, and generates alarms on non‐UPS SNMP devices∙When a proxy client reaches shutdown time, all other proxy clients along with server get shut down ∙No communication lost after network cable is removed∙Make sure Scan and communication behaves correctly when USB module is not present∙Proxy: when changing power source, previous endpoint is not removed∙MUMC upgrade will disable the "Set as Power Source"∙ULNM in connected mode in Notified Applications of NMC∙Event Pane in Power Source View is Off by One∙Detect Lansafe, Netwatch, Lansafe Web View in the installer∙Silent uninstall does not remove the install folderOther bug fixes and improvements:∙Outlet management improvements∙Scan sometime never stops∙Removing devices hangs the server。
ubuntu 12.10 菜鸟使用手册 三

Ubuntu12.10菜鸟使用手册(三)作者:Suruibin 最近老听到群里的菜鸟各种抱怨Longege Wine QQ2012动不动就容易卡死!导致对Wine Qq失去了信心,去尝试webqq或者lwqq.其实这种做法笔者不提倡!问题不是通过回避就可以得到解决的.笔者以前也和菜鸟一样认为Wine QQ 很失败,有时候老爱在打字时莫名的卡死而且字打快了也要卡死,很是无语!但我发现当你在QQ里面打字时速度慢一点的话QQ 就不那么容易卡死. 但这种方法没有彻底地解决QQ卡死的问题.于是就想到了换个输入法Fcitx就是个很不错的选择,自从笔者用了Fcitx 腰不酸了,腿也不痛了QQ卡死问题也从未出现过了!Fcitx输入法截图如下,有点windows 下搜狗输入法的感觉!Ubuntu Killer No1:安装fcitx输入法!1)先卸载系统自带的ibus 输入法!终端输入sudo apt-get remove --purge ibus 或者sudo dpkg -P ibus然后安装fcitx输入法sudo apt-get install fcitx 2)配置环境,终端输入:gedit ~/.bashrc在里面增加一行语句:export XMODIFIERS="@im=fcitx"完了在终端输入. .bashrc 或者source .bashrc或者注销一下也是可以的!终端输入sudo gedit /etc/X11/xinit/xinput.d/zh_CN在里面添加如下内容:XIM=fcitxXIM_PROGRAM=/usr/local/bin/fcitxXIM_ARGS=""GTK_IM_MODULE=XIMQT_IM_MODULE=XIMDEPENDS="fcitx"如果上面内容添加进文件后,还工作不正常,请添加如下内容:(英文版的可以不用,笔者就没以下配置)LANGUAGE=zh_CN.UTF-8LANG=zh_CN.UTF-8LC_ALL=zh_CN.UTF-8export LANGUAGE LANG LC_ALL保存并关闭。
实验1_安装与配置Ubuntu

实验1 安装与配置Ubuntu Linux实验目标1.掌握安装Ubuntu Desktop的详细步骤;2.掌握配置Ubuntu Desktop系统基本参数的详细步骤;实验准备ubuntu_12.10_desktop_x86.iso实验步骤任务1:安装前准备工作1.Ubuntu简介Ubuntu是一个以桌面应用为主的Linux操作系统,其名称来自非洲南部祖鲁语或豪萨语的“ubuntu”一词(译为吾帮托或乌班图),意思是“人性”、“我的存在是因为大家的存在”,是非洲传统的一种价值观,类似华人社会的“仁爱”思想。
Ubuntu 是一个社区开发的基于Debian GNU/Linux的操作系统,适合笔记本、桌面计算机和服务器使用。
它包含了所有您需要的应用程序——网页浏览器、幻灯片演示、文档编辑和点子表格软件,即时通讯软件等等。
2004年10月,Ubuntu 的第一个版本正式发布。
此后 Ubuntu 每六个月发布一个新版本,用户可以免费升级到最新版本。
Ubuntu 鼓励用户及时地升级到新版本,以便享用最新的功能和软件。
Ubuntu 的命名遵从“Y.MM (开发代号)”格式,Y 代表年份,MM 代表月份。
在括号里的名字是预发布版时确定的开发代号。
每一个普通版本都将被支持 18 个月,长期支持版(Long Term Support, LTS)的桌面版本支持 3 年,服务器版本则是 5 年。
(1)Ubuntu正式支援的衍生版本包括:1、Kubuntu:使用和Ubuntu一样的软件库,但不采用GNOME,而使用更为美观的KDE为其预定桌面环境。
2、Edubuntu:是Ubuntu的教育发行版。
这是为了使教育工作者可以在短于一小时的时间内设计电脑教室,或建立网上学习环境,并且可即时控制该环境而不用在家学习而创作的。
3、Xubuntu:属于轻量级的发行版,使用Xfce4作为桌面环境,与Ubuntu采用一样的软件库。
4、Ubuntu Server Edition:其提供了服务器的应用程序,如一个电邮服务器、一个LAMP网页服务器平台、DNS设定工具、档案服务器与数据库管理。
[Linux]ubuntu的介绍百科
![[Linux]ubuntu的介绍百科](https://img.taocdn.com/s3/m/f600bf17eef9aef8941ea76e58fafab069dc4419.png)
[Linux]ubuntu的介绍百科UbuntuUbuntu(中⽂名:友帮拓)是⼀个以桌⾯应⽤为主的Linux操作系统,其名称来⾃⾮洲南部祖鲁语或豪萨语的“ubuntu”⼀词,意思是“⼈性”、“我的存在是因为⼤家的存在”,是⾮洲传统的⼀种价值观,类似华⼈社会的“仁爱”思想。
Ubuntu基于Debian发⾏版和GNOME桌⾯环境,与Debian的不同在于它每6个⽉会发布⼀个新版本。
Ubuntu的⽬标在于为⼀般⽤户提供⼀个最新的、同时⼜相当稳定的主要由⾃由软件构建⽽成的操作系统。
Ubuntu具有庞⼤的社区⼒量,⽤户可以⽅便地从社区获得帮助。
中⽂名:友帮拓外⽂名: Ubuntu开发商: Canonical公司、Ubuntu基⾦会发⾏商: Canonical公司发⾏时间:2004年10⽉20⽇系统家族:类Unix、Linux源码模式:⾃由与开放源代码软件内核类型:宏内核(Linux)软件管理: dpkg(Debian Packager)软件许可:主要为GNU GPL⽬录Ubuntu简介桌⾯安装驱动安装中⽂输⼊软件管理默认软件Ubuntu简介 Ubuntu是基于Debian GNU/Linux,⽀持x86、amd64(即x64)和ppc架构,由全球化的专业开发团队(Canonical Ltd)打造的开源GNU/Linux操作系统。
Ubuntu对GNU/Linux的普及特别是桌⾯普及作出了巨⼤贡献,由此使更多⼈共享开源的成果与精彩。
Ubuntu是⼀个南⾮的民族观念,该词来⾃于祖鲁语和科萨语,意为⼈们之间的忠诚和联系。
被视为⾮洲⼈的传统理念,也是建⽴新南⾮共和国的基本原则之⼀,与⾮洲复兴的理想密切相关。
Ubuntu 精神的⼤意是“⼈道待⼈”。
另⼀种翻译可以是:“天下共享的信念,连接起每个⼈”。
具有 Ubuntu 精神的⼈⼼胸开阔,乐于助⼈,见贤思齐⽽不忌妒贤能,因为他/她拥有适度的⾃信。
⽽这源⾃如下认识: “⾃⼰乃是属于⼀个更⼤的整体,当他⼈受到伤害或死去时,当他⼈受到折磨或压迫时,这个整体就会消失。
WinVNC使用教程
WinVNC使用教程Ubuntu 2011-05-06 18:42:09 阅读67 评论0 字号:大中小订阅winvnc远程控制绿色版一winvnc是一个安全实用的远程控制软件,而且是绿色免安装版,但由于作者提供的安装程序采用了多语言方式,所以反而给使用带来不便。
为了精简和方便使用,我们进行了新的包装,程序仍然是绿色,是用方法简介如下:被控制端(服务器端):1.关闭防火墙或开启5800端口,外网需要影射该端口到局域网某台机子,启用被控制端程序;2.在任务栏出现vnc图标,再双击,在密码处设置你的密码,确定即可。
3.鼠标放在任务栏上的“vnc”图标,记下看到的ip地址,告诉控制端的用户你的IP或计算机名、动态域名等和刚设置的密码。
控制端(查看端):1. 启动控制端填入对方的IP,确定,如果提示密码框,说明连接成功,输入密码就可以实现远程连接。
2. 在被控制端如果开启了JA V A查看器,在浏览器中打开“http://对方IP:5800”同上面一样连接;二我们只要在两台计算机上都装上WinVNC,就可以使用“服务器/客户端”的模式从控制端(客户端)连接到被控端(服务器端),然后两台计算机就会同步显示被控端的桌面,我们就可以在控制端对被控端进行操作控制了。
下面我们就具体来看看如何使用该软件。
将下载的压缩文件解压,进入“winvnc”目录,找到安装程序并执行它就可以了。
安装完成后会出现一个程序组,其中,“RunWinVNC(AppMode)”是在被控端运行的,而“RunVNCviewer”和“RunVNCviewer(listenmode)”是在控制一端运行的。
在被控端,在VNC程序组中执行“RunWinVNC(AppMode)”命令,运行后会在屏幕右下角显示一个带“VNC”字样的小图标,双击后在设置窗口中的“Password”框中设置认证密码,然后点击“Apply”按钮使之生效。
实施远程控制,在确定WinVNC(AppMode)已在被控端进行了设置,并运行正常后,控制端执行“RunVNCviewer”命令,出现对话框,在对话框中输入你要控制的计算机的IP地址,点“OK”后,系统还会提示你输入认证密码,这时输入在被控端设置的认证密码,确认后,控制端就会出现被控端的桌面。
在 Ubuntu12.10 版本下安装Sypnatic新立得(图文)
Ubuntu12.10下安装Synaptic新立得(图文)Ubuntu12.10自带有Softer Center来下载和更新软件,但是仍然有推荐使用Synaptic(新立得)。
但是在使用Synaptic之前需要更新源。
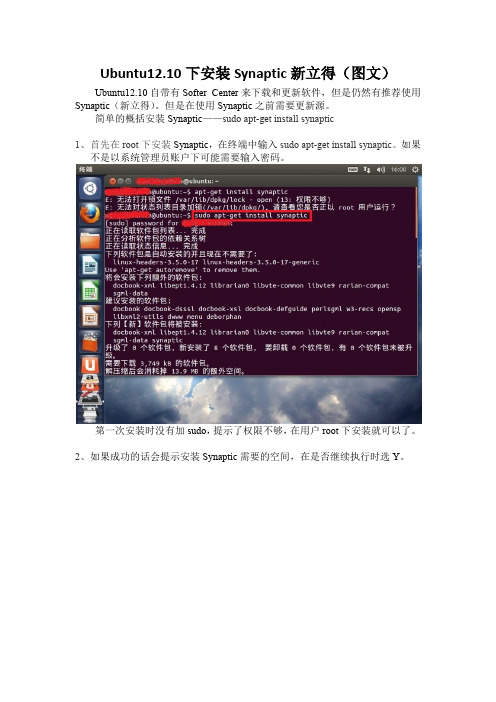
简单的概括安装Synaptic——sudo apt-get install synaptic1、首先在root下安装Synaptic,在终端中输入sudo apt-get install synaptic。
如果不是以系统管理员账户下可能需要输入密码。
第一次安装时没有加sudo,提示了权限不够,在用户root下安装就可以了。
2、如果成功的话会提示安装Synaptic需要的空间,在是否继续执行时选Y。
3、在安装完成后会提示ldconfig deferred processing now taking place大概意思是重启之后才能生效吧。
我隐约记得在试图打开Synaptic时弹出来一个界面,整个界面只有restart一个可选项,我才被迫重启。
4、登录Synaptic,在终端输入gksu synaptic.这里使用的是gksu而不是sudo。
作为初学者我也是第一次用到gksu,其实在我眼里他们看起来都像乱码一样。
gksu用来执行命令行(GUI)程序GUI = Graphical User Interfacesudo用来执行图形的(CLI)程序CLI = Command Line Interface先这么看吧,以后用到再说。
5、输入密码之后就可以打开新立得管理器了现在就可以安装或者删除各种软件或者依赖库了。
对于Ubuntu官方支持的软件Synaptic会给出Ubuntu标志。
其中Ctrl+F为查找快捷键。
- 1、下载文档前请自行甄别文档内容的完整性,平台不提供额外的编辑、内容补充、找答案等附加服务。
- 2、"仅部分预览"的文档,不可在线预览部分如存在完整性等问题,可反馈申请退款(可完整预览的文档不适用该条件!)。
- 3、如文档侵犯您的权益,请联系客服反馈,我们会尽快为您处理(人工客服工作时间:9:00-18:30)。
Rsync
Rsync是一款备份工具,需要主机与备份机都安装相应的软件,今天主讲从linux备份到windows,过程是比较简单的,所以我就直接2步来说了
1、rsync安装与配置
2、Windows客户端的安装与配置
第一步:Ubuntu 安装配置rsync
一、安装,如果有了就不用安装了
#apt-get install rsync
二、编辑配置文件,在/etc/default/rsync
#Vi /etc/default/rsync
把false改成true
三、在/etc/下创建rsyncd.conf文件,这个文件默认是没有的,需要自己创建
1、#Vi /etc/rsyncd.conf
2、在rsyncd.conf里添加下面内容
log file = /var/log/rsyncd.log //日志文件位置
[public_back] //我需要备份的文件夹叫public
path = /public
comment = public //模块名称
uid = root
gid = root
port = 873
read only = yes //cwrsync是否可以上传文件,yes是不允许。
write only = no //设置为no时客户端可以下载文件(也就是允许备份)auth users = zqy //执行同步的用户名,多个用英文逗号隔开
secrets file = /etc/rsync.pass //用户配置文件,里面保存用户名和密码
#hosts allow = //这个是允许同步的客户端地址,根据需要,我注释了#hosts deny = //不允许的地址
list = yes 显示rsync服务端的资源列表
四、用户认证
配置pass文件内容
#vi /etc/rsync.pass
zqy:1 //帐号和密码,每个帐号和密码为一行
五、设置文件权限
chmod 600 /etc/rsyncd.conf #设置文件所有者读取、写入权限
chmod 600 /etc/rsync.pass #设置文件所有者读取、写入权限
六、可以启动了
#service rsync start
启动成功
第二步:客户端安装cwrsync
貌似下载的地方在这里:https://www.itefix.no/i2/cwrsync
不过这个版本是4.0.5,而我在网上下载到的版本是4.1.0,一开始没注意版本后来做完测试才发现原来我客户端用的是server版,才知道原来其实server版也可以做客户端,但是用
4.0.5的版本发现在检查文件备份的时候老是提示未完成,用4.1.0没有这个情况。
一、安装软件
过程我就不再叙述了,就一直下一步,没有其它选项,也没有要输入密码的步骤。
安装好后,目录在C:\Program Files\ICW
二、测试
1、运行——cmd——进入ICW\bin目录
2、下图输入telnet 172.16.3.182 873进行测试(3.182是linux端地址,873是端口号)
3、看到下图就是连接成功了
三、开始正式的同步数据,在同步前,我在里面放了一个ubuntu 13.10server版的镜像和一些文件
1、首先先进bin目录,看上一步,然后执行rsync -vzrtopg --progress --delete zqy@172.16.3.182::public_back /cygdrive/d/1
解释
####################################
d/1 代表D:\1
public_backup //代表/etc/rsyncd.conf文件中自定义的模块名称
172.16.3.182 //rsync服务端IP地址
zqy //执行数据同步的用户
-vzrtopg --progress //显示同步过程详细信息
--delete //从cwRsync客户端D:\1目录中删除与Rsync服务端/public目录中不相同的数据,即保证两边的数据完全一致
######################################
2、效果如下图,可以看到正在进行备份,等它备份完
3、备份完后如下图
4、备份完后我查下d盘的1文件夹下有没有文件,正好是linux服务器上的文件
四、对于这种备份我们不可能每次都手动执行一次,最好的办法就是让它自动运行
1、首先在ICW\bin下新建一个passwd.txt的文本文档,里面写上密码,就是zqy的密码
2、然后在该目录创建一个public_backup.bat文件,在里面写入如下内容,自己的配置要相应的更改
@echo off
echo.
echo 开始同步数据
echo.
cd C:\Program Files\ICW\Bin
rsync -vzrtopg --port=873 --progress --delete zqy@172.16.3.182::public_backup /cygdrive/d/1 < passwd.txt
echo.
echo 数据同步完成
echo.
3、再下一步就是添加计划任务了,我们进行测试,现在14:02,我设定14:10进行备份在控制面板——计划任务——添加计划任务——浏览
4、然后找到ICW\bin\下的public_backup
5、每天
6、时间修改好
7、输入administrator账户的密码
8、最后完成,把刚才测试的已经复制的文件删除,等待14:10进行备份
9、等了几分钟,开始备份了,时间很准时嘛。
10、如果我们担心备份被中断或者出现其它问题,我们可以去看一下备份的结果,下图中0x0就代表了任务正常完成。
代码 0 或 0x0:操作成功完成。
代码 1 或 0x1:调用的函数不正确或调用了未知函数。
代码 10 或 0xa:环境不正确
zqy 参考:/os/Ubuntu/88907.html。
