Apex AppM监控金蝶Aqusic脚本配置说明
杰美康机电伺服调试软件使用说明书

感谢您使用本产品,本使用操作手册提供AC/DC伺服驱动器的配置、调试、控制相关信息。
内容包括。
l伺服驱动器和伺服电机的安装与检查l试转操作步骤l伺服驱动器控制功能介绍及调整方法l检测与保养l异常排除本使用操作手册适合下列使用者参考l伺服系统设计者l安装或配线人员l试转调机人员l维护或检查人员在使用之前,请您仔细详读本手册以确保使用上的正确。
此外,请将它妥善放置在安全的地点以便随时查阅。
下列在您尚未读完本手册时,请务必遵守事项:l安装的环境必须没有水气,腐蚀性气体及可燃性气体l接线时禁止将电源接至电机 U、V、W 的接头,一旦接错时将损坏伺服电机l在通电时,请勿拆解驱动器、电机或更改配线l在通电运作前,请确定紧急停机装置是否随时启动l在通电运作时,请勿接触散热片,以免烫伤如果您在使用上仍有问题,请咨询本公司客服技术支持中心目录1.安全注意事项1-1接收检验1-2 安装注意1-3 配线注意1-4 操作注意1-5 保养及检查1-6 电路配线1-7 电路端子座配线2.连接2-1 确认驱动器是否与电机配对2-2 硬件构成2-3 软件构成2-4 通信电缆2-5 硬件连接3.软件安装4.软件操作4-1 软件功能介绍4-2 配置通讯端口4-3 电机配置4-4 控制模式,输入信号类型选择4-5 示波器4-6 控制面板4-7 位置环参数设置4-8 速度环参数设置4-9 电流环参数设置4-10 存取驱动器参数4-11 故障处理4-12 恢复出厂设置5.运动控制功能及快速调试5-1 运动控制功能简单介绍5-2 快速调试5-3 PID参数的调整方法6.常见问题及故障处理1安全注意事项伺服系统应用于工业现场,且建议安装于配线(电)箱环境。
伺服驱动器、线材及电机都必须安装于符合UL环境等级1的安装环境最低要求规格)。
在接收检验、安装、配线、操作、维护及检查时,应随时注意以下安全注意事项。
1-1 接收检验请依照指定的方式搭配使用伺服驱动器及伺服电机,否则可能会导致火灾或设备故障备故障。
标准ERP配置Asterisk服务器使用指南说明书

CONFIGURING AN ASTERISK SERVERFrom Standard ERP's T elephony module, it is possible to fully configure an Asterisk server, whether it is installed locally on the same server as Standard ERP (only applicable on a Linux-based server) or on a separate remote server.It is also possible to integrate Standard ERP with an existing Asterisk server without managing its configuration directly from Standard ERP. Below are the steps required for a full integration, and will not explain what steps are required for local, remote, and existing servers.PBX ConnectionThe basic setting for integrating your Standard ERP system with an Asterisk server is a PBX Connection. A PBX Connection represents a connection to a unique actual VoIP Server.T o start with, you should create a new PBX Connection from the T elephony module in the PBX Connection register.A PBX Connection is defined primarily by:Code: The PBX unique identifier.Comment: A descriptive text.Type: The type of VoIP server to connect to; this can be chosen from a variety of Asterisk versions, TrixBox, Digium Switchvox, VPBX and 3CX Phone System 12 etc.Hostname: The hostname for the server being used.Host IP address: The IP address for the server being used.Port: The port through which the Asterisk's Management Interface (AMI) can be reached (5038 by default for Asterisk)Username: Username to connect to the AMI.Password:Password to connect to the AMI.Closed: A PBX Connection can be closed when it is no longer in use or valid.In the case of a locally or remotely installed Asterisk server, the T ype should be Asterisk 1.8 (AMI). The username and password can be freely set as they will be configured in the server for you.In case you are connecting to an existing server, the port, username, and password should match the content of your server's manager.conf file. Here is an example of manager configuration usable with Standard ERP:[general]enabled=yesport=5038bindaddr=0.0.0.0allowmultiplelogin=yesdisplayconnects=yestimestampevents=yes[myadmin]secret=passwordxyzdeny=0.0.0.0/0.0.0.0permit=1.2.3.4read=system,call,originatewrite=system,call,originateIn this case Port would be 5038, username myadmin and password passwordxyz. You should replace 1.2.3.4 by the IP address of your Standard ERP server.A PBX Connection has other fields organised in four tabs, and which are used when managing a local or remote server entirely from Standard ERP. Administrators using an existing server fully managed by some external means should skip over to the Contact records section.Dialling SettingsUnder this tab, you can configure the various telephony prefixes in use in your system.International Dial Prefix: T o dial out of your country.Country Code: T o dial in your country.Default Area Code: T o dial in your local area.External Line Prefix: T o dial out of your organisation.Skip Digit for International Calls:As its name indicates, you may also define digits to skip when dialling internationally.These parameters are used to place and receive calls, and to identify contacts based on their caller ID, including when using IAX (see below).RulesThis T ab allows to define a number of rules from various types:Ignore SIP Channel:In case of an existing server, this will ignore possible intermediary SIP channels to handle calls and instead only care about the end points. The Identifier is the name of the intermediary SIP channel to ignore.No Act For Calls Between Extensions Shorter Than: Disables the automatic Activity creation for internal calls (detected by the short length of internal extensions). This is only applicable for PBX Connections of the T ype Digium SwitchVox. The Identifier is the maximum length.Track number: Not used.Unique callers only: With this option, only one call will be displayed in Communicator even if there is more than one call from or to the number configured in Identifier.Remote AdministrationFrom this tab, you can define the following:Remote User: Linux user that will be used to copy the Asterisk configuration files to a remote serverRemote Configuration Directory: The path where to copy said configuration files. As such, it is important that the directory is writable by the Linux user and that your Standard ERP server has been set up to be able to connect directly to the remote Asterisk server without needing to enter a password (namely set up a Public Key Authentication between both servers).AsteriskFrom this final tab, you can enable the connection of your Asterisk server to other Asterisk server using IAX (Inter-Asterisk eXchange).Enable Inter-Asterisk eXchange(IAX):By ticking this option, you will allow all other PBX Connections configured in Standard ERP and set to use IAX to connect to this particular server as well as allow this server to connect to all other servers enabled for IAX and configured in Standard ERP.IAX Password: The password used by this server to connect to other IAX servers.Sending configuration to the serverThis section only applies to the local and remote servers situations.After completing the above configuration of a PBX Connection, you can already send the configuration to an Asterisk server.If you are running a local server, you can dump the configuration files by using the Local Asterisk Server settings from the T elephony module.First, you will need to install the Asterisk server by selecting Setup Asterisk Server in the Operation Menu. This will give you a warning pop-up reading “Starting download and installation of Asterisk server”. Click OK. This will download the binaries for the Asterisk Server from the HansaWorld servers and install them on your local server. The server will then be started. You should never have to use Setup Asterisk Server again after this.If you close the Local Asterisk Inspect window and reopen it, you will see the path where your server is installed.From the Operation Menu, you can also select “Update Asterisk Server Configuration” (which will dump the current configuration on the Asterisk server configuration directory and restart the Asterisk server so that the configuration is applied), Start Asterisk Server, and Stop Asterisk Server (which should both only rarely be used, for instance for external maintenance purposes).If you are running a remote server which is fully configured using Standard ERP, you should instead head to the Asterisk SIP Configuration Files maintenance in the Routines of the T elephony module.Use Paste Special in the PBX Connection to select the server you want to update, and tick Send Files to Server before running. If you do not tick this option, then the files will only be generated locally on your Standard ERP server.Note that this will only work if you have properly setup your PBX Connection and the Linux environment of your Asterisk server (see above).You can also select from the following other Maintenance Routines:!Asterisk SIP trunks.!Asterisk Users.These routines will generate respectively only the configuration files for the SIP trunks of a PBX Connection, or for its users, instead of regenerating all the files.Note that the files are only sent to the server but not applied. An administrator needs to connect manually to the Asterisk server and reload them. For instance by issuing a 'core reload' command from Asterisk's command line interface.Asterisk usersThe next step in setting up your Asterisk server is to create a number of users.This section is applicable for local and remote servers.From the T elephony module, you can create new Asterisk Users for your employees or partners.For each user, you can define:PBX Connections: One or more servers on which the user will be created and allowed to connect to. Leave blank to create the user on all PBX Connections configured.Name: A descriptive name.Username: Will be used to configure their SIP client.Password:Will be used to configure their SIP client.Group: No longer used.Caller ID number: The display number that might be shown to the party this user is calling. Note that this can easily be overridden by the configuration of a SIP client or SIP trunk. Especially when dialling out to international telephone numbers, Caller ID numbers are likely to get lost.Caller ID name: The display name that might be shown to the party this user is calling. Note that this can easilybe overridden by the configuration of a SIP client or SIP trunk.Especially when dialling out to a mobile or landline telephone number, plain text display names will be lost.Closed: A closed user will simply not be configured on the server and as such, it will not be possible to connect to the server using that user.No Queue Fallback: If an Asterisk User is marked as not being part of Queue Fallback, then that user will not be called when a queue is not staffed but is receiving a phone call.Note that after creating one (or more) Asterisk users, it is necessary to send the configuration to the server, as described above.Contact recordsThis section is applicable for all types of servers: local, remote, and existing.As of now, Asterisk users and Standard ERP users (Persons), and their contact cards are not connected and as such, Contact cards for your users will need to be filled in manually with their SIP contact details.In the SIP field of the contact record pertaining to your Asterisk user should be filled in as username@host name. Where username comes from the Asterisk User record, and hostname from the PBX Connection record.SIP TrunksThis section is applicable for local and remote servers.At this point of the configuration, you can place calls between users of your Asterisk server. T o reach out to the outside world, you will need a SIP trunk or VoIP trunk. Each country usually has several providers that can help you get started. As Asterisk is a commonly used VoIP server platform, it is easy to get help from your provider in general.A simple Internet search should allow you to find a number of SIP providers for your country.Using the information provided by your subscriber, you will be able to fill in the SIP Trunk record necessary for you to place calls to the rest of the world. A SIP provider will usually be able to sell you the usage of one, or more phone numbers that your contacts will be able to call to reach you. In some cases, your SIP provider might also allow you to place outgoing calls. Make sure to carefully select the SIP provider that is able to provide you with the capabilities you need to run your business smoothly.Setting up a SIP trunk comes with a wide array of technical possibilities, a number of which are supported inStandard ERP. We will detail some of those here but it is not possible to list all the possible technical configurations one can encounter.Code: Select a unique code for your SIP trunk.PBX Connection: Paste Special the PBX connection on which you want this SIP trunk to be terminated.Host: Fill in the host name or IP address provided by your SIP provider here. It might be that host and domain have the same value.Domain: Fill in the domain name provided by your SIP provider here. It might be that host and domain have the same value.Username: Fill in the username provided by your SIP provider here.Password: Fill in the information provided by your SIP provider here.Skip Digit for International Calls: This parameters operates similarly to that set in the PBX Connection but will apply to calls using the SIP trunk.Country Code:This parameters operates similarly to that set in PBX Connection but will apply to calls using the SIP trunk.Caller ID: The caller ID of your SIP trunk provider (optional).Allow anonymous calls: Lets the system accept anonymous calls coming from your providers.Allowed IPs: Only incoming calls coming from these IP addresses will be allowed. Please check with your SIP provider to only open the minimum number of addresses. (optional but important security point).Inbound phone numbers: A SIP provider may very well provide you several telephone numbers using the same SIP trunks. In certain cases, you will be given unique identifiers for each one of them. They should be filled in here. It might be that the usernames and passwords are the same as above.Trunk type:Set to Outbound calls only if you intend to input a separate configuration for Inbound Phone Numbers in the matrix as described just above. Set to In- and outbound calls if you do not have a separate configuration for Inbound Phone Numbers.IAX: Select this if your SIP trunk provider is providing you services using an Asterisk IAX trunk.Queues and MenusThis section is applicable for local and remote servers.Most of us are familiar with the telephony lines operated by large companies. A welcome Menu plays when you call into the support line of a company, after pushing a few digits on your phone and listening to a few more voice Menu messages, you are placed in a Queue. Thanks to Standard ERP's integration with Asterisk, your company can easily benefit from such technology.In Standard ERP's terminology, a Menu is used to select between different queues or menus; and a Queue is used to put in relation agents answering calls and external callers. Queues and Menus share a number of settings (Phone Numbers, Opening Times) and capabilities (Playing a sound upon arrival, when closed, etc.).Instructions for users to use queues can be found earlier in the document.A Queue contains the following information:Code: A unique identifier in Standard ERPQueue ID: A unique identifier in Asterisk which will be used by your employees to connect to the queue and start answering calls.SIP Trunk: The SIP trunk from where the calls will be arriving.Description: A free-text comment.Phone Number: (Optional) in the case where you want a direct number for callers to reach the queue without going through a Menu. Note: you can play a greetings message even in the case where callers go straight toa queue. You do not need a Menu to play a welcome message.Fallback number: An optional number to call in the case i) no agent is available in the queue AND ii) no one is logged in to the Asterisk server or everyone who is logged in is marked with “No Queue Fallback”.Open from/until: it is possible to define two sets of opening hours (to include the possibility of a lunch break for instance). In case only one set of opening hours is needed, use the first pair of “Open from”/”Open until”fields and leave the second pair blank.A Menu contains the following information:Code: A unique identifier.SIP Trunk: T he SIP trunk from where the calls will be arriving.Description: A free-text comment.Phone Number: The phone number for your contacts to dial in order to access the Menu. Optional in case the Menu is accessed via another Menu.Open from/until:It is possible to define two sets of opening hours (to include the possibility of a lunch break for instance). In case only one set of opening hours is needed, use the first pair of “Open from”/”Open until”fields and leave the second pair blank.Repeat every (s): The number of seconds between repeats of the message explaining to the caller his or her possible choices.A matrix finally allows you to configure the different Menus and Queues reachable from this Menu:Number: The digit to press for the user to enter the selected Queue or Menu. Note that in the case pressing the digit leads to entering a Queue, the digit need not be the same as the Queue ID defined in the Queue.Queue: Paste Special to an existing Queue (note, if you select this, you should not select a Menu as well).Menu: Paste Special to an existing Menu (note, if you select this, you should not select a Queue as well).Comment: A free-text comment as a reminder of what the selected Queue or Menu might be.Using Menus, you can cascade multiple levels of Menus. However, once a caller has joined a Queue, he or she will not be able to go back to another Queue or Menu.The last remaining part of the configuration is now to assign sound files to be played to guide your callers through your Menus and Queues.Whereas all the previous configuration was done in Registers of the T elephony module, sounds will be configured from the Settings of the T elephony module. More precisely, from the PBX Sounds setting.First, create a new PBX Sound. Then in Event, use Paste Special to select the type of Event that will trigger the sound file to play. The Event you select will affect whether you are selecting a Queue or a Menu in the following field. Available Events are:Initial Queue Message: Played as an initial greeting when a caller reaches a Queue.Line Busy: Played after 30 seconds of a caller waiting in a Queue.Menu Closed: Played whenever a caller arrives to a Menu outside of the defined opening hoursMenu Message: Played as an initial greeting when a caller enters a Menu (should also describes the options available from the Menu and the digits associated with each function).Music on Hold:Music to play while the caller is waiting in a Queue.Queue Closed: Played whenever a caller arrives to a Queue outside of the defined opening hours.Once an Event is selected, use Paste Special to select the Queue/Menu where the sound file should be used. Only one Queue or Menu can be selected. After Saving the Record, you can now attach a file to the Record following the usual way of dragging and dropping the file over the paperclip icon or into the Document Manager window which you can open by double-clicking the paperclip icon.Note: the attached sound file must be a mono.wav file, sampled at 8kHz.Remember to send the configuration to the server once done. The sound files will be copied during that stage a s well.。
脚本精灵函数说明

目录1 脚本精灵控制条 (7)1.1 改变控制条状态 (7)1.1.1 展开态 (7)1.1.2 缩放态 (8)1.1.3 吸附态 (8)1.2 脚本管理 (9)1.2.1 二进制脚本 (11)1.2.1 明文脚本 (12)1.2.3 导入脚本 (13)1.2.4 退出脚本管理面板 (14)1.3 播放脚本 (14)1.3.1 开始播放 (14)1.3.2 播放一次 (14)1.3.3 循环播放 (15)1.3.4 停止播放 (15)1.4 录制脚本 (15)1.4.1 开始录制 (15)1.4.2 停止录制 (16)1.4.3 保存脚本 (16)1.5 取素材 (16)1.5.1 全屏截图 (16)2 脚本精灵开发工具 (19)2.1 基本介绍 (19)2.1.1 开发工具介绍 (19)2.1.2 各组成部分介绍 (19)2.1.3 二进制脚本结构 (19)2.1.4 明文格式脚本 (20)2.2 工程管理 (20)2.2.2 删除工程 (21)2.2.3 脚本编辑 (21)2.2.4 图片路径 (21)2.3 远程设备管理 (21)2.3.1 远程导入脚本 (22)2.3.2 远程屏幕 (22)2.3.3 远程截图 (22)2.3.4 远程取色 (23)2.3.5 远程取坐标 (23)2.4 脚本编辑器 (23)2.4.1 关键字高亮 (23)2.4.2 脚本检错 (24)2.4.3 编译脚本 (24)3 脚本语言 (25)4 脚本精灵库函数 (27)4.1 基本函数 (27)4.1.1 触摸点击 (27)4.1.2 触摸按下 (27)4.1.3 触摸弹起 (28)4.1.4 触摸滑动 (29)4.1.5 输入文本 (30)4.1.6 模拟按键 (31)4.1.7 获取颜色 (31)4.1.8 普通寻色 (32)4.1.9 模糊寻色 (33)4.1.10 RGB颜色合成 (34)4.1.11 获取颜色RGB (35)4.1.12 判断颜色 (36)4.1.13 精确寻图 (37)4.1.14 点击图片 (38)4.1.15 范围寻图 (39)4.1.16 模糊寻图 (40)4.1.17 范围模糊寻图 (41)4.1.18 不规则寻图 (43)4.1.19 范围不规则寻图 (44)4.1.24 获取屏幕色位 (49)4.1.25 弹出文本提示 (50)4.1.26 震动 (51)4.1.27 记录日志 (51)4.1.28 记录错误日志 (52)4.1.29 查找某应用是否安装 (53)4.1.30 判断某应用是否正在运行 (54)4.1.31 启动指定应用 (55)4.1.32 结束一个应用 (56)4.1.33 退出当前脚本 (56)4.1.34 获取SD卡路径 (57)4.1.35 截图到文件 (58)4.1.36 拷贝文本到剪切板 (59)4.1.37 暂停指定应用 (60)4.1.38 恢复指定应用的运行 (60)4.2 高级函数 (61)4.2.1 获取设备UDID唯一串 (61)4.2.2 获取网卡MAC (62)4.2.3 获取蓝牙设备MAC (63)4.2.4 获取IMEI (64)4.2.5 获取设备信息串 (65)4.2.9 随机触摸滑动 (70)4.2.10 http访问 (71)4.3 兼容模式相关函数 (71)4.3.1 强制设置兼容模式 (72)4.3.2 判断当前模式 (72)4.3.3 设置自定义截屏 (74)4.3.4 截取屏幕 (74)5 使用技巧 (77)5.1 如何模拟触摸操作 (77)5.2 如何寻图 (77)5.3 如何找色 (78)5.4 如何记录日志 (78)5.5 开发平台如何与手机建立连接 (78)5.6 如何进行远程调试 (78)5.7 如何输入中文文本 (79)5.8 脚本优化原则 (79)5.9 处理意外逻辑 (79)6 附录 (82)6.1 虚拟键对照表 (82)7 UI说明 (84)7.1脚本结构 (84)7.6创建文本编辑框 (87)7.7创建复选框 (88)7.8创建单选框 (88)7.9创建按钮 (89)7.10 UI换行 (90)7.11创建扩展窗口 (90)7.12在扩展窗口中创建控件 (90)7.13动态设置UI文本 (91)7.14动态获取UI文本 (92)7.15动态设置选中 (92)7.16动态获取选择状态 (92)7.17设置是否显示循环播放设置UI (93)8、获取配置项 (94)1 脚本精灵控制条为方便使用,脚本精灵所有的功能都集中在控制条上,控制条可任意拖动,缩小,吸附。
金蝶EAS使用手册

万科企业股份有限公司金蝶E A S管理系统资料和安全设置公司系统管理员使用作者:金蝶软件EAS实施小组建立日期: 2006/12/12确定日期: 2006/12/29版本号: V 1.0Kingdee Software (China) Co.,Ltd目录1.管理员工作总体流程32.管理员安装EAS系统43.管理员登陆EAS系统103.1管理员设置原则10 3.2登陆EAS系统10 3.3修改管理员密码124.建立基础资料134.1建立部门资料(组织单元)13 4.2设置部门资料属性(组织单元属性)14 4.2.1地产公司部门属性(重点)14 4.2.2物业公司本部部门属性15 4.2.3物业公司服务中心属性15 4.3建立职位资料15 4.4建立职员资料175.建立操作用户195.1建立操作用户19 5.2为新增用户授权22 5.3本阶段用户权限的分配表24 5.3.1基础数据管理权限24 5.3.2财务会计-总帐权限26 5.3.3财务会计-报表权限27 5.3.4财务会计-固定资产权限27 5.3.5系统平台权限28 5.3.6成本系统权限(地产公司)296.凭证特殊数据权限设置307.报表特殊数据权限设置328.其他日常维护方面331.管理员工作总体流程l系统初始化所需要工作1.建立部门资料2.建立职位资料3.建立职员资料4.建立操作用户5.为新增用户进行权限管理l日常业务工作1.安全管理2.编码原则3.工作流管理2.管理员安装EAS系统l进入集团规定软件安装目录,点击“Eassetup.exe”文件(对于EAS安装来说,升级过程不需要客户端进行调整,集团总部服务器更新之后子公司的系统自动更新);l点击“金蝶EAS客户端”按钮;l选择“中文简体”,按“OK”按钮;l选择“下一步”按钮;l选择“本人接受许可协议条款”,点击“下一步”按钮;l本处列出了客户端配置的硬件需求:PIII 550M或以上的CPU、256M以上的内存(推荐512M)、硬盘400兆以上自由空间、网卡、宽行针式打印机、喷墨打印机或激光打印机;软件需求为操作系统:32位Windows 平台,包括Windows 98、Windows ME、Windows 2000、Windows XP,推荐用Windows 2000及以上版本,点击“下一步”按钮;l选择客户端的安装目录(建议不要跟K3系统安装在同样的目录下),点击“下一步”;l在“EAS服务器地址”中输入集团规定的正式服务器的IP地址,对于“EAS服务器端口”和“文件更新服务器端口”不需要修改,点击“下一步”按钮;(IP地址:10.0.11.15)l选择“安装电子文档版使用手册”(若客户端的硬盘空间不够,则可以不选择),点击“下一步”按钮;l选择快捷方式的存放地点,若第一安装EAS系统,可以默认为“其他”,点击“下一步”按钮;l点击“安装”按钮;l安装完毕之后,点击“完成”按钮,完成安装过程。
金蝶KWISE创新管理平台PLMV研发物料管理操作手册

金蝶K/3 WISE创新管理平台PLM V12.2 研发物料管理操作手册金蝶软件(中国)有限公司2011年01月目录1概述 (5)2名词解释 (5)3物料管理基本约定 (5)4前期配置 (6)4.1物料业务类型 (6)4.2物料规则的设置 (6)4.3新建物料业务类型 (7)4.4物料业务类型属性设置 (8)4.4.1分配规则 (8)4.4.2分配显示字段 (9)4.4.3设置扩展字段 (10)4.4.4关联流程模板 (10)4.4.5物料属性配置 (11)4.4.6完整性规则 (11)5物料库 (12)5.1分类视图 (12)5.2物料类型的配置 (13)5.3物料权限设置 (13)5.4物料生命周期说明 (15)5.5物料界面 (15)5.6新建物料 (16)5.7导入物料 (16)5.8删除 (17)5.9刷新 (17)5.10启动流程 (18)5.11提交 (18)5.12归档和解除归档 (18)5.13发布 (19)5.14回收 (20)5.15其他 (20)5.15.1复制 (20)5.15.2版本变更 (21)5.15.3批量更换物料 (21)5.15.4批量修改属性 (22)5.15.5批量匹配文档 (23)5.15.6批量链接设计文档 (24)5.15.7批量修改冻结状态 (24)5.15.8物料比较 (25)5.15.9创建快捷方式 (26)5.15.10批量创建工厂物料 (26)5.16物料属性 (28)5.16.1基本信息 (28)5.16.2组成 (29)5.16.3用途 (33)5.16.4版本 (33)5.16.5相关对象 (34)5.16.6替代件 (36)5.16.7相关信息 (40)5.16.8相关过程 (41)5.16.9关联信息 (41)5.16.10BOM (42)5.16.11研发仓存信息 (44)6物料查询 (44)6.1功能定义 (44)6.2常规字段组合查询 (45)6.3扩展字段组合查询 (47)6.4个人搜索器 (47)6.5导出查询结果 (48)7客户库 (48)7.1客户查询 (49)7.2新建客户 (49)7.3客户相关物料 (50)7.4客户相关对象 (50)8供应商库 (51)8.1供应商查询 (52)8.2新建供应商 (52)8.3供应商相关物料 (53)8.4供应商相关对象 (53)9物料比较 (53)9.1基本属性比较 (54)9.2BOM结构比较 (55)10物料更改 (56)10.1物料创建新版修改 (56)11物料申请 (57)11.1物料申请单设置 (57)11.2设定申请模板 (58)11.3物料申请 (60)12物料标准化管理 (61)12.1数据字典 (61)12.2物料属性配置 (61)12.2.1项配置 (62)12.2.2物料属性配置 (63)12.2.3绑定申请单 (64)12.2.4物料的申请 (65)12.3集成应用 (66)13驱动表单 (67)13.1驱动表单设置 (68)13.2新建驱动表单 (69)14物料属性变更单 (72)14.1物料变更单设置 (72)14.2新建物料属性变更单 (73)15替代组管理 (74)15.1替代组库架构 (75)15.2新建替代组 (76)15.3增加替代组成员 (77)16厂牌库 (78)16.1配置信息 (79)16.2新建厂牌 (80)1概述物料管理模块以成组技术的思想组织企业的物料库,对物料进行分类管理,将与物料有关的全部信息集成在一起,包括零部件属性、图纸文档、工艺文档、相关模具、变更历史、替换物料、供应商、客户、库存、工艺路线等。
金蝶项目管理系统使用说明书
金蝶项目管理系统使用说明书金蝶项目管理系统使用说明书1. 概述1.1 目的本文旨在为金蝶项目管理系统的使用者提供详细的操作指南,以便能够正确地使用该系统进行项目管理工作。
1.2 适用范围本文适用于金蝶项目管理系统的所有用户,包括项目经理、团队成员、领导和相关利益相关者。
1.3 定义1.3.1 金蝶项目管理系统(Kingdee Project Management System)金蝶项目管理系统是由金蝶软件开发的一套用于项目管理的软件工具,提供了项目计划制定、资源分配、进度跟踪等功能。
1.3.2 项目经理(Project Manager)项目经理是负责规划、执行和控制项目的人员,负责项目的整体管理和协调。
2. 系统登录与权限管理2.1 系统登录2.1.1 访问网址打开浏览器,输入金蝶项目管理系统的网址(例如:)。
2.1.2 用户名和密码输入正确的用户名和密码,登录按钮进行系统登录。
2.2 权限管理2.2.1 用户角色根据用户的权限不同,可以拥有不同的用户角色,如项目经理、团队成员等。
2.2.2 权限设置系统管理员可以根据实际需要为用户设置相应的权限,包括项目查看、任务分配、进度更新等。
3. 项目管理3.1 项目创建3.1.1 新建项目登录系统后,在项目管理界面“新建项目”按钮,填写项目相关信息,如项目名称、描述、负责人等。
3.1.2 项目计划在项目创建完成后,根据项目需求,制定项目计划,包括里程碑、任务、资源分配等。
3.2 任务管理3.2.1 创建任务在项目计划中,“新建任务”按钮,填写任务名称、描述、负责人等信息。
3.2.2 任务分配项目经理可以根据任务的性质和团队成员的能力,将任务分配给相应的成员。
3.3 进度跟踪3.3.1 进度更新团队成员可以在完成任务后,登录系统更新任务进度,包括任务完成情况、耗时等。
3.3.2 进度查看项目经理可以随时查看项目的进度情况,对未完成的任务进行跟踪和调整。
4. 报表与分析4.1 项目报表4.1.1 项目进展报表系统可以根据项目的进度情况自动项目进展报表,可用于项目评估和决策。
艾赛视频监控系统使用说明书
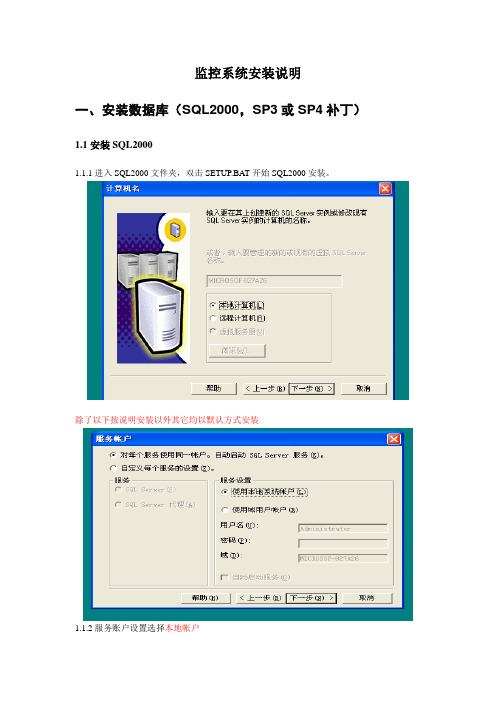
监控系统安装说明一、安装数据库(SQL2000,SP3或SP4补丁)1.1安装SQL20001.1.1进入SQL2000文件夹,双击SETUP.BA T开始SQL2000安装。
除了以下按说明安装以外其它均以默认方式安装1.1.2服务账户设置选择本地帐户1.1.3 身份验证模式选择混合模式,添加SA的密码(密码自己设置,程序不会用到该密码),然后下一步。
请注意这二个地方需要有所更改,其它均默认1.2安装SQL2000的SP3或SP4补丁(SP4补丁设置同SP3)。
1.2.1进入SP3文件夹,还是双击statup.bat开始安装,除以下面这一步之外,其它均默认安装。
这里把这二个选项都选上,然后按继续。
后面的均以默认方式的安装,开始后请耐心等待安装完成。
1.3创建数据库双击运行程序包中的“创建数据库”文件夹下的“CreateDataBase.bat”。
二、中心服务程序配置(egdvstat.ini)进入中心服务文件夹EGDVServer,找到egdvstat.ini文件,用记事本打开,然后修改DBServer=192.168.0.117中的IP为数据库所在电脑IP。
保存并关闭此文件,运行EGDVServer.exe,出现下面的提示(如果没有出现下面的提示,则有可能是数据库安装和配置不正确,请对照上面的数据库安装部分。
)有注释的可根据需要修改,其它项请不要修改[Set]DBServer=127.0.0.1 //数据库IPMach=EC244EEE//根据硬盘生成mach值Key=1204778568 //密匙根据mach值生成密匙,本密匙原本需向软件开发方获取,//现在提供密匙生成软件,先运行Server会提示“序列号不对”,确定后运行key.exe生成key.txt,//然后拷贝key值到本处,在运行Server。
LoadGroupID=1LoadType=0ManServersPerThr=50 //每个线程管理的设备数主要是管理设备上下线(一般不用配置) MultiAlarm=0EnableAlarmLog=1AlarmDelay=10UpAlarmServer=192.168.1.222DBName=EGServerDB2008RaidSwitch=0RaidIP=0.0.0.0AutoUpdate=1AlarminPort=8000 //设备告警上传端口WebServerPort=8080SaveDriver=D:\server_video//保存视频目录(运行前最好先配置,因为默认目录并不一定适用)SavePhotoDriver=D:\server_photo//保存图片目录(运行前最好先配置,因为默认目录并不一定适用)运行EGDVServer.exe成功画面:安装ftp服务器:(用于录制在服务器上的视频回放和下载)拷贝“Home Ftp Server”到服务器任意目录,运行“HomeFtpServer.exe”选中“ftp Server”的“Setting”然后修改如上,目录选择告警视频在服务器录制的目录,参考服务器配置文件的“SaveDriver”,然后点击“Applay”,单击主界面的“Start Server“运行ftp服务器,ftp服务器状态在左下角。
亚安网络监控系统软件使用手册

感谢您选用本公司的产品,请您在使用本产品前仔细阅读用户手册,本用户手册将为 您提供正确的安装和使用说明。 版权声明: 本用户手册版权归天津市亚安科技电子有限公司所有,未经本公司许可,任何机构和 个人不得抄录,转载其中全部或部分内容。 “天津市亚安科技电子有限公司保留因产品性能改进而对本用户手册修改和更新的权 利,更新内容恕不一一通知用户。”您在使用过程中如遇到本手册未能述及的问题, 请与本公司或本公司的合法经销商联系。 您可以随时登录本公司的网站 ,了解相关产品的最新消息。
5 菜单操作..........................................................................................................................13
5.1 文件菜单 ...................................................................................................................13 5.1.1 锁定/解锁屏幕 ....................................................................................................13 5.1.2 保存当前状态 .....................................................................................................13 5.1.3 登陆系统 ............................................................................................................14 5.1.4 退出....................................................................................................................14
CLA Epic插件用户指南说明书

User GuideWaves CLA EpicIntroduction (3)Quick Start (4)Interface (5)Controls (6)Input Section (6)Effect Fader Section (7)Modulator (8)Delay Processors (9)Tape Delay (9)Throw Delay (10)Slap Delay (11)Crowd Delay (12)Reverb Processors (13)Plate, Room, and Hall (13)Space Reverb (15)Routing Panel (16)Routing Panel Main View (16)Controlling Delay Send Levels (19)Output Section (20)WaveSystem Toolbar (20)IntroductionThank you for choosing Waves! In order to get the most out of your new Waves plugin, please take a moment to read this user guide.To install software and manage your licenses, you need to have a free Waves account. Sign up at . With a Waves account you can keep track of your products, renew your Waves Update Plan, participate in bonus programs, and keep up to date with important information.We suggest that you become familiar with the Waves Support pages: /support. There are technical articles about installation, troubleshooting, specifications, and more. Plus, you’ll find company contact information and Waves Support news.CLA Epic takes tracks and mixes and makes them sound, well, epic. It’s a tool long used by veteran rock music mixer Chris Lord-Alge to create his signature sound. CLA Epic matches four of Chris’s go-to delays with carefully matched reverbs to create sounds that are more impressive and more exciting, with greater depth. Any type of sound, from individual instruments to full mixes, will simply sound better.CLA Epic’s modules were designed to deliver the sound of Chris’s favorite reverb and delay studio gear, which he uses in various combinations in all of his mixes. Think of CLA Epic as the coupling of a big mid-1980s analog mixing console with a collection of early digital delays and reverbs. Combine up to four very different delays and reverbs and you’ll quickly hear what Epic sounds like.CLA Epic was designed with legendary mix engineer Chris Lord-Alge (Green Day, Muse, Bruce Springsteen, Keith Urban), who long ago discovered that chaining delays with just the right reverbs and then modulating the signalresults in E pic tracks.Quick StartEpic signal flows from the delays on the left to the reverbs on the right, so it makes sense to start by adjusting atleast one delay and then experimenting with the reverbs.Set Delays1.Click on a delay fader to view its control panel. If you’re familiar with delays, the controls will be quite clear. If not,read the “Controls” section later in this user guide.2.Adjust one or more delays. Before you commit to tweaking the processor that you plan to use, take a quick listento the other delays. You may find a better starting point.e the fader to set the output level of the delay.Even when a fader is set to zero, the CLA effect is still active.Route Delay OutputA delay can be sent directly to the output or to any of the reverb inputs.e the A, B, C, and D buttons above each delay fader to route its output to a specific reverb. The Out buttonroutes the delay directly to the plugin output2.When the A, B, C, or D buttons are On, signal processing is in series from the delay to one or more reverbs. Whendelays A, B, C, or D are not routed to a reverb and Out is selected, the delay and reverb are processed in parallel.When the delay is routed to a reverb and the output, processing is both parallel and serial.e the routing faders to adjust the level of each delay send.Each effect has locking mutes and solos. If a delay that is routed to one or more reverbs is muted, the reverbs glow to indicate that they are not receiving signal from the selected delay.Reverb outputs are always routed directly to the plugin’s output.Adjust Reverbs1.Click on a reverb fader strip to open its control panel. Adjust the reverb as you like.2.Note how the reverb is influenced by the delay or delays that are feeding it. This is where the magic is created. We suggest that you begin by loading a CLA preset from the Load menu. This provides a good starting point for youradjustments and it shows you how best to achieve the CLA sound in different circumstances.InterfaceInput Meters Processors On/Off Input Fader Delay Processor Strips (1–4) Reverb Processor Strips (A–D) Output Fader Wet/Dry Mix Output Meters There are two CLA Epic components: Stereo and Mono-to-Stereo. Their interfaces and functionality are the same, except that the Mono-to-Stereo component has a single mono input meter.ControlsThere are five control sections: input, output, delay processors, reverb processors, and routing. Each delay processor can be assigned to any reverb processor or sent directly to the output mixer. Reverbs are routed directly to the mixer and cannot be sent back to the delay processors.Input SectionThe input meter shows the plugin’s input gain, post-fader.its own mute button or from the panel.Note: if you must adjust the input fader to a very high or very low position in order to attain areasonable gain (as seen on the input meter), you should correct the level sent from the DAW. Thismay be done in the DAW channel or in the plugins that occur earlier than Epic in the signal flow.Effect Fader SectionThe bottom section is common to all delays and reverbs. Touch a fader to select a processor.Effect ID highlights the processor that is currently beingcontrolled.Fader adjusts the output gain of the processor (-inf to +10 dB).Solo and Mute for each processor. A flashing mute button means that another processor is in solo. A steady mute light indicates that the effect has been muted.Hi-pass and Lo-pass filters remove unwanted low and high frequencies at the output of the processor.Fader position value shows the position of the fader. Hoverover the HP or LP filter control to display its value.Tape Slap Throw CrowdModulatorThe modulator adds motion to the output of the plugin. Used in a subtle manner, it gently adds width to a sound. At more aggressive settings, it creates a distinct warbling effect. The modulation knob controls the two essential aspects of modulation: rate and depth.R ATE is the speed at which the modulator oscillates: the amount of time the effect takes to complete a cycle.D EPTH is the amount of modulation. In other words, depth defines how much the signal moves or changesA single rotary control sets modulation rate and depth for a processor. The outer band is divided intofour sections. As you turn the control clockwise, each section yields a greater modulation depth. Modulation rate runs from 0–100 within each section. For example, setting the control marker near the top of the first section will result in low modulation depth with a high rate. When the control marker is in the low part of the highest section, the depth will be high and the rate low.M ODULATOR D ISPLAY S ETTING1–25 Low depth, rate: 1–100 51–75 High-medium depth, rate: 1–10026–50 Low-medium depth, rate: 1–100 76–100 High depth, rate: 1–100Modulating the taps produces variation in the delay times, which changes the pitch of each tap.Delay ProcessorsCLA Epic has four very different delays, each with its own personality. Tape, Throw, and Slap delays are well-known types of processors, whose familiar controls are reflected here. Crowd delay is a bit of a CLA invention—you’ll soon hear how useful it can be.Tape DelayThe Tape delay is a rich, fat delay effect. It was originally created by taking advantage of the gaps between the record and play heads on analog tape machines to create small, predictable echoes when mixed with the original input. Later, engineers would string between tape machines to create very long delays. It’s thumpy at the beginningand falls off relatively quickly. It has a signature EQ that reflects its tape origins.T AP C ONTROLSD ELAY T IME sets Tap delay time manuallyS YNC sets the delay time in musical subdivisionsF EEDBACK sets the amount of signal returned to theinputO FFSET I nversely links Tap 1 and Tap 2 delay timeS YNC sets the delay time value for each Tap. Epic is always synced with the host. Use the drop-down menu to set musical subdivision. Turn Sync off to enter delay values that are independent of the host.O FFSET lets you “pivot” the tap delay settings by up to 20%. If, for example, Tap 1 delay is 100 ms and Tap 2 delayis 200 ms, then increasing Offset to 20% will raise Tap 1 to 120, while lowering Tap 2 to 160. Offset is useful whenthe tap delays are relatively similar, and the resulting effect feels too monophonic. Pivoting slightly between the two tap values opens up some space.F EEDBACK controls the amount of output of the delay that is fed back to the input of the processor and is added tothe signal. The result is “delays of delays.” Each tap has its own feedback control.Throw DelayA Throw delay is similar to a Tape delay, but its tap inputs can be triggered manually or with automation. Use thiscontrol when you want to apply a delay to a specific note, word, or sound.T AP C ONTROLSD ELAY T IME sets Tap delay time manuallyS YNC sets the delay time in musical subdivisionsF EEDBACK sets the amount of signal returned to the inputOFFSET I nversely links Tap 1 and Tap 2 delay timeTRIGGER O N/O FF E nables manual tap triggeringMT AP 1 AND T AP 2 DELAY set the length of the tap grid, ranging from 1 ms to 5000 ms. Tap 1 delay is sent to the left channel. Tap 2 goes to the right channel.S YNC sets the delay time value for each Tap. Epic is always synced with the host. Use the drop-down menu to set musical subdivision. Turn Sync off to enter delay values that are independent of the host.O FFSET lets you “pivot” the tap delay settings by up to 20%. If, for example, Tap 1 delay is 100 ms and Tap 2 delayis 200 ms, then increasing the Offset to 20% will raise Tap 1 to 120, while lowering Tap 2 to 160. Offset is usefulwhen the taps are relatively similar, and the resulting effect feels too monophonic. Pivoting slightly between the twotap values opens up some space.F EEDBACK sets the percent of the tap signal that is returned to the input. The result is “delays of delays.”T RIGGER lets you manually start and stop the effect. When Trigger is On, clicking the adjacent Trigger button willopen the input to the taps— the delay will be fed constantly. Release the Triger button to close the input and stopthe effect. When Trigger is Off, the input signal is always sent to the effect.Slap DelaySlap delay is similar to a short reverb, but it doesn’t have a continuous release. A real-world example is shouting inan alleyway between two buildings and hearing one pronounced echo.DELAY T IME:tape emulation (VSO) or manualmusical subdivisionsF EEDBACK sets the amount of signalreturned to the inputM ODULATION adjusts depth and speed ofD ELAY T IME sets the delay (in ms) before the onset of the slap. Range: 1 ms to 5000 ms.VSO controls the simulated speed of the tape as it moves between the record and play heads. This determines thetiming of the slap. Delay can be entered at the set speeds (7½ IPS, 15 IPS, and 30 IPS), or manually (in ms).When you select a tape speed (VSO), a corresponding EQ curve is loaded in the background. This speed/EQ curve pair is part of what creates the CLA sound. Adjust the delay manually or turn on Sync to assign musical subdivisions of the host tempo. The EQ curve will not change until a new tape speed is selected.F EEDBACK controls the percent of the tap signal that is returned to the input. The result is repeating and diminishing echo.Crowd DelayThe Crowd delay creates a series of increasingly longer delays that diminish over time to make the source richer and lusher.There is only one control: Tight to Wide. As the control approaches Wide, tap delay time increases. The resultingwide sound is more complex and articulate than a reverb.Reverb ProcessorsThere are four reverb types, designed to complement the Epic delays.Plate, Room, and HallThese are classic reverb effects that have the same controls. Each, however, has its own distinctive EQ curve.P RE-D ELAYPre-delay refers to the amount of time offset there is between the original dry sound and the onset of the reverb tail. Lengthening pre-delay time will retard the beginning of the reverb tail, thus providing a bit more space for a voice or an instrument before the reverb begins. Pre-delay times set too long can result in an unnatural sound.Range: 0 ms to 1000 msR EVERB T IMEThe Reverberation Time (RT) is the time it takes for the sound pressure to decrease by 60 dB, which is effectively the end of the reverb tail.Range: 0.1 second to 20.0 secondsRT L OW (LOW-FREQUENCY DAMPING)RT Low controls the decay time of low frequencies in the reverb, relative to the Reverb Time value. Higher settings yield spaces that are warmer and roomier, while lower RT Low settings tend to result in spaces that are more articulate sounding.RT H IGH (H IGH-FREQUENCY DAMPING)RT Low controls the decay time of high frequencies in the reverb, relative to the Reverb Time value. The higher thesetting, the brighter the sound of the Reverb tail.Space ReverbThe Space Reverb adds a Depth control, which allows you to trim the reverb tail before its defined length.P RE-D ELAYPre-delay refers to the amount of time offset there is between the original dry sound (plus the early reflections) and the onset of the reverb tail. Lengthening pre-delay time will retard the beginning of the reverb tail, thus providing a bit more space for a voice or an instrument. Pre-delay times set too long can result in an unnatural sound.Range 0 ms to 1000 msDECAYThe Decay control can make the reverb tail behave in a non-linear manner by ending the tail before the Reverb Time setting. At its highest setting (non-linear) the Space reverb behaves like a gated reverb. The Reverb Time must be long enough to be gated (i.e., more than one second).Range: 0.04 to 3.5 (non-linear)R EVERB T IMEThe Reverberation Time (RT) is the time it takes for the sound pressure to decrease by 60 dB, which is effectively the end of the reverb tail.Range: 0.1 second to 20.0 secondsRT L OW (LOW-FREQUENCY DAMPING)RT Low controls the decay time of low frequencies in the reverb, relative to the Reverb Time value. For example, a “warm” room may have a value slightly above x 1.00; a room with better intelligibility usually has a value below x 1.00. RT H IGH (H IGH-FREQUENCY DAMPING)RT Low controls the decay time of high frequencies in the reverb, relative to the Reverb Time value. For example, a concert hall might have settings between x 0.25 and x 1.5. The higher the setting, the brighter the sound of the Reverb.Routing PanelEach delay output can be routed to any reverb or directly to the plugin output. This makes it easy to create complex delay/reverb combinations.Routing Panel Main ViewDelay-to-Reverb sends selectDirect-to-Output selectD ELAY-TO-R EVERB M ATRIXEach delay output has five send assignment buttons. This lets you send the output of the delay to any of the fourreverbs and the plugin output.In the example above, each delay has its own assignments:•Tape is sent to Room (B) and Hall (C) reverbs.•Throw is sent to Plate (A) and Hall (C) reverbs and to the Output.•Slap is sent only to the Output.•Crowd is sent to Plate (A), Room (B), and Space (D).Routing determines whether delay and reverb processing is carried out inseries or in parallel. When a delay is sent only to a reverb, that processing is inseries. The delay goes straight to the reverb rather than to the plugin output, soreverb processing is directly affected by the delay that precedes it.The delay fader serves as a wet/dry control of the delay signal sent to thereverb input.PA delay can also be sent directly to the plugin output, rather than to reverbWhen a delay is sent only to the plugin output, delay processing and reverbprocessing are independent of each other, which is parallel processing.The delay fader serves as a wet/dry control of the delay signal sent to theplugin output.DA delay can be sent to the reverb and the plugin output simultaneously.The delay fader serves as a wet/dry control of the signal sent to the pluginoutput. The small value box next to the OUT button is used to adjust the levelof the signal being sent directly to the plugin output.If no routing is selected, then the input signal is routed to all delays and all reverbs.Controlling Delay Send LevelsClick on the Routing arrow to open the Delay sends panel.Adjust the send level for each assignment using the small faders.Sends Mute BehaviorWhen a delay that is patched to one or more reverbs is muted, the mute buttons of the “target” reverbs will flashgray. This indicates that the reverbs are not receiving the expected input,Output SectionMeter Range: -36 dB to 0 dBContinuous hold clip lights. Click on the meter to clear clip indicators.W ET/D RY M IXControls the mix between the processed path and the wet path. To help achieve Chris’s signaturesound, the wet signal is internally down-sampled to 44.1 Hz for processing and then up-sampled tothe session sample rate. Range: 0% (dry) to 100% (wet)Click the W ET/D RY M IX L OCK BUTTON to prevent the wet/dry balance from changing when loading anew preset.O UTPUT F ADER P OSITIONTouch the fader to show its value.O UTPUT F ADERTrims the plugin output level.Range: -12 dB to +12 dBWaveSystem ToolbarUse the bar at the top of the plugin to save and load presets, compare settings, undo and redo steps, and resize theplugin. To learn more, click the icon at the upper-right corner of the window and open the WaveSystem Guide.。
APUSIC应用服务器配置管理

线程
ApusicCore内核
基础架构平台专家
P9
演示
WebAdmin运行与访问 AdminConsole安装运行与访问 CommandTools部分命令的运行
基础架构平台专家
P10
前言 服务器域的管理 J2EE应用的部署及配置 数据库连接池的配置管理 日志服务的配置管理 HTTP服务的配置管理
Contents
组件类文件; 组件接口类文件和组件Home接口的类文件; 如组件是Entity Bean,则还必须包含主键类文件; 组件依存的其他Java类文件; 一个模块的部署描述文件,ejb-jar.xml文件; 金蝶Apusic应用服务器相关装配信息的部署描述文件apusicapplication.xml,EJB-JAR单独部署时需要提供;
基础架构平台专家
P5
AdminConsole
启动命令:adminconsole.cmd 注册服务器
基础架构平台专家
P6
CommandTools
启动停止命令:startapusic stopapusic 部署打包命令:dep 域创建命令:config 预编译命令:jspc
占位符说明默认值 JAVA_HOME APUSIC_HOME DOMAIN_HOME
线程池服务配置
提 纲
Apusic服务器、域、实例 服务器、 服务器
Apusic服务器(Apusic Server) 服务器( 服务器 )
Apusic Server是应用服务器的物理部署单元。直观的来说,就是金蝶 Apusic应用服务器6.0在一台用户机器上的一个物理安装。
Apusic域(Apusic Domain) 域 )
删除域
为该服务器删除一个不需要的域空间 。
5.2金蝶EAS系统权限用户手册
用户手册
第1章
安全管理是负责整个系统的安全问题的模块,包括有系统用户管理、权限管理、在线用户监控、网络控制等功能。EAS的所有模块和其它基于EAS的应用扩展、工作流、数据接口、数据交换等,都需要经过EAS权限管理系统的验证和授权。系统禁止任何绕过安全认证平台的非授权访问。安全管理涵盖从用户建立到用户授权到用户监控之间的所有功能。操作程序比较复杂,请用户使用之前仔细阅读这部分用户手册。
在金蝶EAS主界面,选择【系统平台】→【安全管理】→【权限管理】→【角色管理】进入“角色管理”主界面,如图1-8:
图1-8
角色的增查删改直接通过工具条上的各个功能按钮进行操作即可,在此即不用细讲了。
在这个序时簿界面显示的角色,是当前控制单元定义的角色,不包含其它控制单元定义的角色。
在“角色管理”主界面,单击【 】,即可进入“角色授权”界面,如图1-9:
用户实名
公司内部职员,对应人力资源系统的职员。
所属控制单元
创建该用户的控制单元就是所属控制单元,默认给出,不允许用户修改。
所属用户组
界定用户属于哪个用户组。
用户密码
用户登录系统所使用的口令。以加密形式存放。账套管理员可以修改用户口令,但不能查看用户口令。
密码策略
下拉框中显示密码策略备选。
生效日期
生效日期之前禁止用户登录,缺省为当前日期。
1.1.2
角色管理是为系统授权的一个中间环节,也是一个快捷的批量授权的功能,对用户比较多,角色职责分明的公司特别有帮助。对于系统用户比较少,角色分得过于明细的公司,可以直接绕过角色定义,直接给用户授权以达到授权的目的,角色管理功能比较简单,角色授权和用户的授权管理相似,在此就只介绍一下两者的区别,相同的地方就不介绍了。角色管理的角色定义非常灵活,用户可以根据职位的不同来定义角色,也可以根据职务的不同来定义,也可以根据用户的类型等等标准来定义角色。一个角色可以分配给多个用户,一个用户也可以分配多个角色,给授权带来了很大的方便。
艾佩特APK-0086使用说明书
第一节系统简介 (2)1.1系统特征及规格 (2)1.2外观及按键说明 (3)1.3端口说明 (3)1.4防区连接方式 (3)1.5安装说明 (4)1.6系统重新初始化 (4)第二节使用说明 (4)2.1如何布防、撤防及消警 (5)2.2遥控器使用 (5)2.3功能键F1—F4及紧急按钮 (6)2.4【*】键命令 (6)2.4.1【*】【0】单独布防防区 (6)2.4.2【*】【1】手动避用防区 (6)2.4.3【*】【2】故障查询 (7)2.4.4【*】【3】警报查询 (7)2.4.5【*】【4】事件查询 (7)2.4.6【*】【5】密码设置 (7)2.4.7【*】【6】时间设置 (8)2.4.8【*】【7】可编程电源操作 (10)2.4.9【*】【8】安装模式 (10)2.4.10【*】【F1】有线防区设置 (11)2.4.11【*】【F2】无线设备设置 (13)2.4.12【*】【F3】电话设置 (13)2.5电话操作 (14)第三节如何进行编程 (15)3.1进入安装模式 (15)3.2编辑十进制编程段 (15)3.3编辑十六进制编程段 (16)3.4编辑选项段 (16)3.5查看编程段数据 (16)第四节编程说明 (16)4.1安全代码编程 (16)4.2防区编程说明 (16)4.3无线设备设置说明 (17)4.4电话设置说明 (17)4.5电源输出端口PGM1及PGM2 (18)4.6警铃选项 (18)4.7蜂鸣器选项 (18)4.8火警、医疗和紧急键及背光灯选项 (19)4.9密码开关及遥控器选项 (19)4.10进入/退出延迟时间 (19)4.11防区事件传送限制 (19)4.12按键锁定及电话锁定 (20)4.13电话延迟时间 (20)4.14时钟调整 (20)第五节编程工作表 (20)第一节系统简介**************************************************************************************************** 1.1系统特征及规格APK系列安防主机采用先进的设计理念,精心设计而成。
金蝶k3erp系统参数设置手册

金蝶K3系统参数设置手册内销K3项目组2009-06-16审核:会签:1.前言 (3)2.内销参数设置及相关说明 (3)2.1系统总体参数设置 (3)2.2单据类型设置 (4)2.3供应链总体参数设置 (10)2.4采购管理参数设置 (11)2.5销售管理参数设置 (13)2.6仓存管理参数设置 (15)2.7存货核算参数设置 (16)2.8总帐参数设置 (17)2.9应收款管理参数设置 (23)2.10应付款管理参数设置 (29)2.11固定资产参数设置 (33)2.12现金管理参数设置 (35)3.系统参数维护说明 (36)1.前言本设置手册是在内销K3项目组成员讨论基础上确定的本设置手册主要说明内销K3目前各模块系统参数设置情况,并对重要参数作出详细解释;对参数维护流程进行说明。
2.内销参数设置及相关说明2.1 系统总体参数设置①公司地址、名称、系统名称等设置会出现在需要打印的单据、报表中,应按实际情况进行设置或修改;专用发票精度不考虑物料属性中设置的精度,而只考虑此处设置的“专用发票精度”。
设置完成后,该设置会直接应用到相关的单据数据处理里;折扣率精度位数会影响到采购、销售系统中使用到折扣率的单据及供应商供货信息、折扣资料。
②公司名称等信息由财务根据实际情况录入③专用发票精度:6④折扣率精度位数:62.2 单据类型设置①单据类型系统预设有“分销调拨”、“库存转换”、“组装”和“批次转换”四种,预设的类型不能修改和删除②新增两种单据类型,“办公用品领用”和“固定资产”2.3 单据编号设置①目前单据编号设置全部按照系统默认设置2.4 供应链单据打印控制设置①目前单据打印控制全部按照系统默认设置,不控制打印次数。
这些参数可以随时修改2.5 供应链总体参数设置①审核人与制单人可为同一人:不选择②使用双计量单位:不选择③基础资料录入与显示采用短代码:选择说明:由于内销商品都是使用短代码,所以必须选择④打印(打印预览)前自动保存单据:选择说明:如果选中该选项,系统提供打印、打印预览单据前将单据自动保存的功能。
金蝶项目管理系统使用说明书

金蝶项目管理系统使用说明书金蝶项目管理系统使用说明书1.系统概述1.1 介绍本章节介绍金蝶项目管理系统的概述和目的。
1.2 功能特点本章节详细描述金蝶项目管理系统的主要功能特点,包括但不限于:1.2.1 项目创建和管理功能1.2.2 任务和进度管理功能1.2.3 团队协作和沟通功能1.2.4 文档和文件管理功能1.2.5 报表和数据分析功能2.系统安装和配置2.1 硬件和软件要求本章节详细描述金蝶项目管理系统的硬件和软件要求,包括但不限于:2.1.1 服务器要求2.1.2 客户端要求2.1.3 数据库要求2.2 安装步骤本章节详细描述金蝶项目管理系统的安装步骤并提供相应的截图和操作指南。
2.3 配置步骤本章节详细描述金蝶项目管理系统的配置步骤,包括但不限于服务器配置、数据库连接配置等。
3.用户管理本章节详细描述金蝶项目管理系统的用户管理功能,包括但不限于用户注册、登录、权限管理等。
4.项目管理4.1 创建项目本章节详细描述金蝶项目管理系统的创建新项目的操作步骤和注意事项。
4.2 项目设置本章节详细描述金蝶项目管理系统的项目设置功能,包括但不限于项目名称、起止时间、成员设置等。
4.3 任务管理本章节详细描述金蝶项目管理系统的任务管理功能,包括但不限于任务创建、分配、进度跟踪等。
4.4 日程管理本章节详细描述金蝶项目管理系统的日程管理功能,包括但不限于日程安排、提醒设置等。
5.团队协作和沟通本章节详细描述金蝶项目管理系统的团队协作和沟通功能,包括但不限于团队讨论、文件共享、在线会议等。
6.文档和文件管理6.1 创建文档本章节详细描述金蝶项目管理系统的创建文档的操作步骤和注意事项。
6.2 文件共享本章节详细描述金蝶项目管理系统的文件共享功能,包括但不限于文件、权限管理等。
7.报表和数据分析本章节详细描述金蝶项目管理系统的报表和数据分析功能,包括但不限于项目进度报表、资源分配报表等。
8.常见问题解答本章节了使用金蝶项目管理系统过程中可能遇到的常见问题,并给出了详细解答和解决方法。
金蝶KIS远程服务器端和远程客户端配置说明

金蝶KIS远程服务器端和远程客户端配置说明目录服务器端配置 (2)配置路由和远程访问 (2)新建一个VPN连接用户 (6)远程服务器站点设置 (9)客户端配置 (10)新建客户端VPN连接 (10)连接VPN服务器 (15)初始化远程客户端基础数据 (15)远程客户端加密策略 (19)服务器端配置注意事项 (19)服务器端配置(服务器环境以WINDOWS2003 SERVER为例)配置路由和远程访问1.打开控制面板,选中管理工具,如下图。
图一2.双击管理工具,如下图。
3.双击路由和远程访问,如下图:在左边的"树"栏中可以看到一个红色标识,说明处于停止(未配置)状态。
图三4.右键点击的LLL-JIISS2H2HD9(本地),在弹出的菜单中选择配置并启用路由和远程访问,如下图。
5.点击下一步,如下图。
图五6.选择自定义配置,点击下一步,如下图。
图六7.选择VPN访问,点击下一步,如下图。
图七8.点击完成,如下图。
图八9.点击<是>按钮,出现下图所示,左边的"树"栏中从红色标识变成绿色,说明服务器端配置成功。
图九新建一个VPN连接用户1.打开控制面板,进入管理工具,选择计算机管理,如下图。
图十2.双击计算机管理,如下图。
图十一3.右键点击左侧树型目录中”用户”:在弹出的菜单中选择新用户,如下图。
图十二4.仿照上图输入:点击创建,新用户kis被创建成功,如下图。
图十三5.右键点击刚才新建的用户kis,在弹出的菜单中选择属性,如下图。
图十四6.选择拨入选项卡,并选择远程访问权限(拨入或VPN)框的允许访问,如下图。
图十五7.点击确定,新建VPN连接用户完成。
远程服务器站点设置1.点击开始――程序――金蝶KIS远程应用――金蝶远程站点管理工具,如下图。
图十六2.点击确定,如下图:输入站点代号,密码等。
图十七3.点击保存,远程服务器站点设置完成。
客户端配置(客户端环境以WINDOWS2000 SERVER为例)新建客户端VPN连接1.控制面板――网络和拨号连接――新建连接,如下图。
金蝶食神应用设置-20150102

金蝶食神设置注意事项1、总部点菜器ID开启【选项配置】-【点菜】-【是否有点菜笔功能】-选择“是”2、点菜器如何进入管理员模式?a)主菜单按“#”进入设置,密码20031121b)设置信道,机号c)调到更新状态,更新菜品即可3、如出现打印端口错误a)客户端配置程序- 咨客台- 管理设置- 修改COM口4、收银无法退菜、转更、清机a)金蝶后台- 账单管理- 取消原因- 添加取消原因5、空密码也可以登录a)权限管理- 员工资料- 工号卡不填6、拼盘菜后面点的任何菜都和拼盘菜出在同一张出品单上a)拼盘做法设置- 属性- 修改为普通,不要使用“拼菜”7、汤锅不能打总单a)汤锅“打印出品单取消”,只勾选打印总单b)食品大类- 汤锅分类- 设置下面的总单打印机即可。
8、金蝶食神供应链、客户管理在WIN7系统下出现时间错误a)修改WIN7系统时间为yyyy-mm-dd9、集团菜牌下发问题a)集团菜牌管理- 选中要更新的门店- 点右上查询- 先反选要更新的菜牌,再勾选,点击下发注意:如果不先反选再勾选,那么系统默认没有选择10、金蝶食神供应链总部配送单中的制单人、审核人没有人名字,只为员工编号a)把[Table0."FMaker] 等字段后面添加Name,为[Table0."FMakerName"] 即可。
11、埋脚单(预结单)显示领取发票的提示a)系统设置- 选项配置- 结账单最后显示客人取发票串- 数据值那里写上自定义的“温馨提示:请凭本小票兑换发票,即日起一个月内有效,逾期无效。
”b)系统设置- 选项配置- 埋脚单是否包含结账单部分- 更改为“是”c)重启系统12、禁用并隐藏食品后,点菜器上依然可以看到菜品a)食品管理中选中禁用的食品,“是否在点菜器上显示”的勾去掉,再重新下发13、会员价功能开启(返回食品原价)a)使用数据库管理员DBADM 登录(密码向金蝶要)b)【系统设置】- 【选项配置】- 搜索【会员价】c)是否【有按会员价功能】- 修改为“是”d)是否【显示食品原价和食品会员价】- 修改为“是”e)会员价级别设置- 会员级别折扣设置- 新增级别折扣- 折扣类型(会员价)- 会员级级别(选择要使用会员价的级别)f)会员价设置,食品管理,如果菜品没有会员价,则会员价=售价(总部设置下发)g)会员价结账操作- 前台先进行结账操作,选择“折扣”-“会员”,刷会员卡,则此时会提示【是否按会员价结账】。
Guide Me Accelerator 安装与设置指南说明书

Guide Me Accelerator Setup GuidePublication date 05/10/2023Table of ContentsGeneral Installation and Setup Notes (2)Setup Guide Version (3)Salesforce Product Compatibility (4)Installation (5)Access (6)Overview (7)Prerequisites (8)Component Setup (10)7S Guide Me Properties (11)Licensed Materials - Property of IBM© Copyright IBM Corp. 2023 All Rights Reserved.US Government Users Restricted Rights - Use, duplication or disclosure restricted by GSA ADP schedule Contract with IBM Corp.General Installation and Setup NotesGreetings! Thank you for using free, managed apps and components from IBM Consulting, availablevia AppExchange. To ensure a smooth installation and setup experience, please review the following guidelines before proceeding.Note on Support:IBM Consulting does not provide any official support on our free applications that are available via Ap-pExchange. However, we are absolutely interested in your feedback, whether regarding opportunities for improvement or just general input.Full-featured Accelerators & Premium Support:IBM Consulting does sell many additional accelerators that are not listed on AppExchange. Please contact us directly to learn more.Setup Guide VersionApplication features and functionality may change over time. The contents of this setup guide are applica-ble to the most current version of the application as of the time the guide is published.Salesforce Product CompatibilityThis application can be used in both the Lightning Experience (LEX) and Experience Cloud (community). LWR Sites are currently not supported at this time.InstallationPrerequisitesSome products require certain configuration to be completed prior to executing an install. If you install prior to completing these steps, you may encounter errors that prevent installation.You may need to update the following general settings:•Enable Communities•Enable ChatterOfficial DocumentationPlease review the official Salesforce notes on package installation.AccessApplication AccessSalesforce enforced significant modifications to the sharing of @AuraEnabled Apex classes in the Winter‘21 release:•Restrict Access to @AuraEnabled Apex Methods for Guest and Portal Users Based on User Profile (Update, Enforced)•Restrict Access to @AuraEnabled Apex Methods for Authenticated Users Based on User Profile (Update, Enforced)These changes mean that you may need to grant explicit access to certain Apex classes for corresponding profiles. To do that, you will need to grant access via profiles or permission sets. For profiles, you will enable Apex classes at the profile level. For permission sets, you will create a permission set with the relevant access and then add that permission set to relevant users and/or permission set groups. NOTE: Guest users are handled via the guest user profile at the community level.Object and Field AccessMany IBM Consulting applications include custom objects. Please ensure that object and field level security is set for any users (including guest users) who will be using the application.OverviewGuide Me is an application that provides a set of quick, step-by-step instructions that guide a user through any process related to the current page. You can configure up to six steps with clear text and graphics to visually guide users.When a user clicks the Guide Me button, a window displays steps that provide guidance for completing a process. You can provide users up to six stepsfor a process, each with their own image and description.Key Features•Three available layouts to provide the best user experience. Each layout determines the order of the step, its description, and its image.•Prominent use of images to provide visuals to the user.•Responsive design available in Experience Cloud, Lightning Experience and Mobile.PrerequisitesBefore installation, the following prerequisite configuration must be completed to ensure the application properly functions.Content Security PoliciesVisuals, including the images that are displayed on each step, must be sourced from CSP trusted websites that are approved for use in your org.To create a CSP trusted site on your org, follow the steps:1.In Setup, go to Security > CSP Trusted Sites to display the Content Security Policy Trusted Sitespage.2.Click New Trusted Site. The CSP Trusted Site Definition Page is displayed.3.Enter a name for the CSP site listing in the Trusted Site Name field.4.In the Trusted Site URL field, enter the URL for the site you want whitelist. Content from this site willbe approved for use in your org.5.If not already, check the Active checkbox.6.Click Save. The site is saved in your org as a CSP trusted site.Component SetupThe application contains a single component, 7S Guide Me, that allows you to customize the steps inthe guided process you provide to users. The component contains properties for entering the text that is displayed for each step (including the step's title itself) and the step's image URL.When the component is initially placed on a page, a Guide Me button is displayed. The guided steps are displayed when the button is clicked. 7S Guide Me provides properties for customizing the text on the button.To locate and place the 7S Guide Me component on a page, follow these steps:1.Navigate to the page where you want to place the component.2.Click in the top-left corner to display the Components menu.3.Enter 7S Guide Me in the search bar to display the 7S Guide Me custom component.4.Click and drag the component to the desired location on the page. When it is placed, the Guide Mebutton is displayed.5.The component’s property manager is displayed when it is placed on the page. These propertiesdetermine the component’s appearance and functionality. Refer to the 7S Guide Me Properties section for details of each property.7S Guide Me PropertiesThe following properties are included with the 7S Guide Me component:2 - Step/Description/Image3 - Step/Image/DescriptionDetermines the height of the guided flow window. Options are Small - 390 px, and Large -600 pxWhen checked, a border is displayed around the images in the guided flow. When unchecked, the border is hidden.When checked, the step’s description is aligned to the left in the guided flow. When unchecked, the text is aligned to the center.Enter the text you want to display for the title in the first step. No title is displayed if this field is left blank.Enter the URL for the image you want to display on the first step.Enter the text you want to display as a description of the first step. Rich text is supported for additional formatting options. No text is displayed if this field is left blank.Enter the text you want to display for the title in the second step. No title is displayed if this field is left blank.Enter the URL for the image you want to display on the second step.。
金蝶创新管理平台产品配置操作手册

金蝶K/3 WISE创新管理平台PLMV12.2产品配置操作手册金蝶软件(中国)有限公司2011年01月目录1概述................ . (4)2名词解释............ . (4)3前期配置............ . (5)3.1 物料业务类型54物料族库............ . (5)4.1 新建物料族..54.2 删除物料族..54.3 成员管理 (5)4.4 创建快捷方式55物料族操作.......... . (6)5.1 基本属性操作65.2 事务特征操作66.5 决策测试及保存 (15)6.5.1 创建测试用例 (15)6.5.2修正结果 (15)6.5.3保存实例 (16)7其他注意事项167.1嵌套决策 (16)7.2复制决策表 (16)7.3常见问题 (17)3.1物料业务类型PLM系统中,数据都是基于业务类型进行后面的配置和使用的,物料族及产品族的物料业务类型与物料库的业务类型一致,可以直接使用已有物料库的业务类型。
具体操作方式可以参照物料库操作手册。
4物料族库选择【系统】,【物料管理】,进入【物料管理】的【物料族库】,可以看见如下页面:整体视图与物料库标准视图一致。
物料族库权限受物料库权限控制。
4.1新建物料族点击【新建】,就会弹出新建物料页面,在此页面需要填写新物料族的相关属性(此属性页显示字段由相关业务类型中所定义的分配显示字段决定),操作方式与物料库一致,如下图:4.2删除物料族点击【删除】,可以删除未被使用的物料族,如果物料族已经被使用,则不能删除。
4.3成员管理点击【成员管理】,直接进入物料族决策表4.4创建快捷方式通过【创建快捷方式】,可以把正在配置或者经常使用的物料族发送快捷方式到PLM个人桌面,方便使用。
配置成员【注】配置成员一般是通过产品族进行配置时需要配置成员,一般不单独允许物料族配置成员。
具体操作请参考产品族配置成员。
删除【注意】删除成员时不检查该成员是否被使用,同时删除后的成员再添加进成员里面, 特征需要手动配置。
iMC APM 使用APM监视MySQL应用配置举例

使用APM监视MySQL应用配置举例产品版本:iMC APM 7.3 (E0504)Copyright © 2017 新华三通信技术有限公司版权所有,保留一切权利。
非经本公司书面许可,任何单位和个人不得擅自摘抄、复制本文档内容的部分或全部,并不得以任何形式传播。
本文档中的信息可能变动,恕不另行通知。
目录1 特性介绍 (1)2 特性使用指南 (1)2.1 适用场合 (1)2.2 配置前提 (1)3 配置举例 (1)3.1 组网需求 (1)3.2 配置步骤 (2)3.2.1 增加MySQL监视 (2)3.2.2 配置MySQL监视全局阈值 (4)3.3 配置验证 (5)3.3.1 查看MySQL应用监控报表 (5)1 特性介绍MySQL是一个关系型数据库管理系统(RDBMS)。
APM可监控的MySQL版本包括MySQL 5.x。
本文将对APM监控MySQL 5.5.28的配置过程和监视报表进行介绍。
2 特性使用指南2.1 适用场合本文主要用于介绍APM在数据中心环境下MySQL应用的监视。
2.2 配置前提•MySQL配置、部署和启动正常。
•APM服务器安装和部署完成,并且可以和MySQL之间正常通信。
•只有在APM中配置了流量采集器,应用报表中流量相关的数据才会显示。
3 配置举例3.1 组网需求某公司数据中心有台MySQL数据库服务器,专为企业提供数据库管理服务,如图1所示。
服务器管理员现在要使用iMC APM对MySQL服务器进行监视,组网明细如表1所示。
图1 组网图表1 组网明细主机名IP 地址应用用途NMS 172.50.2.139 • Windows Server 2008 R2• iMC PLAT 7.3 (E0506)• iMC APM 7.3 (E0501)网管系统(集中式部署)Host 192.168.7.205• Windows Server 2012 •MySQL_5.5.28提供数据库管理服务3.2 配置步骤3.2.1 增加MySQL 监视(1) 登录iMC 控制台。
ASE12.5的参数配置.

三、ASE12.5的参数配置.以2G内存为例:1、修改LINUX的共享内存参数:其中nnn为系统的实际内存(以字节为单位nnn=2147483647)修改文件:/etc/rc.local 加入一行:echo nnn > /proc/sys/kernel/shmmax启动后生效2、isql –Usaa) 配置内存sp_configure ‗max memory‘,mmm (单位为2K mmm=786432)gosp_configure ‗allocate max shared mem‘,1go上面的命令配置sybase使用mmm*2K的内存,通常配置为系统内存的60-70%,重起生效。
如SYBASE无法正常启动,请调整SYBASE.cfg文件将max memory参数调小。
b) 上述参数生效后,配置data cache 和procedure cache:sp_cacheconfig ‗default data cache‘,‘xxxM‘ (xxx=768)go通常配置为max memory的50%,以M为单位,重起生效sp_confi gure ‗procedure cache size‘,xxx (xxx=157286)go通常配置为max memory的20%,以2K为单位sp_configure ‗allocate max shared mem‘,0goc) number of devices(40), open databases(20), number of locks(20000),number of user connections(50),open objects(5000)参数可在中石化帐套设置中调整参数。
d) 调整bcp 配置1.调整扩展分配sp_configure ‗number of pre-allocated extent‘,20go2.配置I/O的缓冲池sp_poolconfig ‗default data cache‘,‘256M‘,‘16K‘e) 调整改开的索引数量sp_configure ‗number of open indexes‘, 4000四、配置TELNET 服务:1、改/etc/xinetd.d/telnet文件:将disable选项改为no修改/etc/hosts.allow文件,增加一行ALL: Ip.*.*2、开放root 登录,修改/etc/pam.d/login文件,将第二行加#注释3、启动telnet服务cd /etc/rc.d/init.d./xinetd start用netstat –tl 看是否激活服务五、启动FTP服务:cd /usr/sbin./proftpd restart六、如何修改本地BACKUP SERVER的名称1、修改interfaces文件,将backup server的名称换成新名称2、进入isql 工具sp_configure ‗allow updates‘,1update sysservers set wheresp_configure ‗allow updatses‘,0七、如何实现SYBASE的远程备份(通过本地的BACKUP SERVRE服务连接到远程的BACKUP SERVER服务,将远程的数据库备份到远程机器上。
- 1、下载文档前请自行甄别文档内容的完整性,平台不提供额外的编辑、内容补充、找答案等附加服务。
- 2、"仅部分预览"的文档,不可在线预览部分如存在完整性等问题,可反馈申请退款(可完整预览的文档不适用该条件!)。
- 3、如文档侵犯您的权益,请联系客服反馈,我们会尽快为您处理(人工客服工作时间:9:00-18:30)。
下面是APPM默认支持的sybase的指标。
如果要监控这些指标以外的指标,可以通过APPM 的数据库查询监视器实现,如监控锁,需要提供相关的SQL语句,可以对执行的结果进行监控。
连接统计
参数描述
连接时间连接到Sybase数据库ASE服务器所需要的时间
活动远程连接数ASE重启动后的活动远程连接数
最大远程连接数ASE服务器中最大远程连接数
活动用户连接数ASE重启动后的活动用户连接数
最大用户连接数ASE服务器中的最大用户连接数
数据库明细
参数描述
数据库名数据库实例的名称
总尺寸所分配的数据库的空间(单位MB)
使用尺寸数据库所使用的空间(单位MB)
使用尺寸% 使用尺寸的百分比
创建者创建数据库的用户名
健康数据库的健康状态
当前进程
参数描述
进程名当前连接到ASE服务器的进程名
主机/IP地址连接到ASE的进程的主机名/IP地址
用户名连接到ASE的进程的用户名
DB名连接到ASE的进程中的数据库名
连接到ASE的进程中所执行的命令(所显示的命令字符数限制为255个
命令
字符以下)
状态进程的当前状态
物理IO 进程的物理IO
内存使用率进程的内存使用率
封锁时间(秒)被进程所封锁的时间(单位秒)
当前事务
参数描述
类型事务的类型
协调人事务的协调人
状态当前事务的状态,例如启动中、执行中或者中止。
连接连接的类型
DB名事务所执行的数据库名称
进程名事务中执行的进程
事务名事务的名称
开始时间事务启动时的时间
Apex AppM监控金蝶Aqusic脚本配置说明
第一步:配置runApusic.bat
设置JA V A_HOME变量:请首先查看客户金蝶Aqusic服务器的JDK版本,确保apex脚本的JDK与金蝶JDK一致。
在runApusic.bat 中配置相应版本JDK.
JDK1.5(金蝶自带jdk)set JA V A_HOME=D:\Apusic-5.1\jdk1.5.0_11
JDK1.6 (ApexNM自带jdk)set JA V A_HOME=D:\tekview\ApexNM\jdk1.6.0_01
设置金蝶服务器参数:最后一行,
"%JA V A%" -Djava.security.policy=%PULGIN_HOME%\policy.properties com.tekview.appm.apusic.ApusicParamsFetcher 192.168.0.20 6888 admin admin
根据客户实际情况配置红色部分:
●IP:192.168.0.20
●端口:6888
●用户名(默认):admin
●密码(默认):admin
第二步,测试runApusic.bat
DOS窗口中运行runApusic.bat,运行成功如下图,同时生成最新的output.txt文件。
下图为运行失败,可能是由于JDK问题。
登录Apex AppM,在“管理”—“管理自定义监视器类型”—“创建新类型”
Output.txt中共有7个表,每个表格式如下:
<--table Java虚拟机starts-->
类型堆大小已启动时间(秒) 活动线程数目
main 4797648 1371 30
<--table Java虚拟机ends-->
红色部分为表名,填写在“表格名”,蓝色部分为属性列,相应的填写在“数字属性”和“字
符属性”(此脚本中,只有“类型”是字符属性),在“识别栏”填写“类型”,将类型列作
为识别。
栏分隔符填写“\t”,因为此脚本中属性列之间用tab分隔。
请逐个添加7个表。
第四步:添加金蝶监视器
点击“新建监视器”—“自定义监视器:金蝶Aqusic”
填写脚本信息即可。
注意:如果有多个金蝶Aqusic服务器,则建立多脚本目录,分别配置相关参数。
第五步,监测金蝶Aqusic服务器
可检测指标:69个。
提供功能:
●点击某数值指标,查看性能趋势图
●禁用和开启某一行的监测
●删除某一行监测
●多行某指标对比
●针对某行某指标做阈值,关联动作
●健康状态和根源分析
●等等
69个指标明细如下:
连接响应时间
Java虚拟机:
类型堆大小已启动时间(秒) 活动线程数目
Http:
类型已发送字节数客户端连接数请求命中数
事务:
类型活动数提交数回滚数超时数事务总数平均使用时间(毫秒) 总使用时间(毫秒) 最大使用时间(毫秒) 最小使用时间(毫秒)
JDBC数据源:
类型等待次数总等待时间(毫秒) 最大等待时间(毫秒) 最小等待时间(毫秒) 使用次数总使用时间(毫秒) 最大使用时间(毫秒) 最小使用时间(毫秒) 关闭次数创建次数空闲连接数总连接数等待线程数
线程池:
类型线程创建数线程销毁数工作线程个数平均工作耗费时间(毫秒) 总工作耗费时间(毫秒) 最大工作耗费时间(毫秒) 最小工作耗费时间(毫秒) 线程池容量上限当前线程数备用线程容量下限备用线程容量上限备用线程当前个数工作队列上限工作队列当前值
消息主题:
类型消息数未处理消息数过期消息数消息接收数消息发送数重发消息数等待次数总等待时间(毫秒) 最小等待时间(毫秒) 最大等待时间(毫秒)
消息队列:
类型消息数未处理消息数过期消息数消息接收数消息发送数重发消息数等待次数总等待时间(毫秒) 最小等待时间(毫秒) 最大等待时间(毫秒)。