KAV2代安装说明书
小雷Nighthawk M2 mobile路由器的配置指南说明书

SpecificationsLTE CAT 20, up to 5-band CA and 4x4MIMOWiFi: Full Dual-Band/Dual-Concurrent WiFiLTE/4GX 700/900/1800/2100/2600 MHzWiFi 802.11 b/g/n 2.4 GHz 3G 850/900/1900/2100 MHzWiFi 802.11 a/n/ac 5 GHzFrom the Nighthawk M2 mobile router home page (http://m.home ), click the three dot icon in the upper right corner to access help and support files.Direct all calls and support for PIN numbers, SIM card registration, account andbilling information, network services, and other general enquiries to Telstra at 13 22 00.Direct general enquiries to Telstra at .See your warranty card for warranty and service information.For additional information, visit /support to access the full user manual and to download firmware updates.SupportYou can use touch screen icons and other screen elements to view theNighthawk M2 mobile router’s status, configure WiFi, configure band settings, view data usage details, and view system alerts.Advanced configuration and features¾To access advanced configuration settings and features, log in to theNighthawk M2 mobile router’s home page:1. Launch a web browser from a device that is connected to theNighthawk M2 mobile router.2. In the address field of the web browser, enter http://m.home orhttp://192.168.1.1.3. In the Sign In field, enter the admin password and click the Sign Inbutton.See the label located under the battery for the initial admin password. We recommend that you change it to a password that you want to use.Upload media files to the Nighthawk M2 mobile routerYou can upload media files to either a USB drive connected to the Nighthawk M2 mobile router. USB drives are sold separately.1. Log in to the Nighthawk M2 mobile router home page.2. Click the MyMedia tab.3. Drag and drop your files onto the page.Use the Nighthawk M2 mobile router to charge devicesIf the battery power is low on your smartphone or other device, you can give it a boost by connecting it to the Nighthawk M2 mobile router’s USB port A connector. Jump boost begins automatically once the devices are connected. Note that Jump boost is only supported when the Nighthawk M2 mobile router containsa battery.LED statusSlow blue blink The Nighthawk M2 router is ready.Fast blue blink The Nighthawk M2 router is transferring data.Slow amber blink The Nighthawk M2 router is not ready.Power buttonTurn on the router. Press and hold the Power button for three seconds Turn off the router.Press and hold the Power button for five seconds.Wake the router.Press and quickly release the Power button.TS-9 Port 2TS-9 Port 1LAN/WANUSB (type A)USB (type C)Device indicator panelThe device indicator panel shows you the status of your Nighthawk M2 mobilerouter.49.66Connect your devices1. Check to make sure that WiFi is enabled on your computer or mobiledevice and search for WiFi networks.2. To view the WiFi name and password, press and release the Powerbutton.3. Select the WiFi name displayed on your Nighthawk M2 mobile routerscreen.4. Enter the WiFi password exactly as shown on theNighthawk M2 mobile router screen.Note: Your password is case-sensitive. We strongly recommend that you change the default admin password.5. To use the router as an Internet gateway, connect an Ethernet device tothe Nighthawk M2 mobile router Ethernet port.Windows Click the Internet Access icon, which is usually found on the bottom right side of your screen.MacSelect WiFi > Network .Mobile devicesTap Settings > WiFi .Download the NETGEAR Mobile appUse the NETGEAR Mobile app to change your WiFi network name and password. You can also use it to play and share media, and enable the travel router feature.1. Connect your mobile device to the Internet.2. Download the NETGEAR Mobile app from/mobileapps .Set up the device1. Press and hold the Power button on theNighthawk M2 mobile router for three seconds. After several seconds the screen to set up your device displays. (After you set up your device, the first screen that displays is the home screen.)2. Use the onscreen instructions to change the SSID, passphrase, andadmin password, or use the NETGEAR Mobile app, or visit http://m.home or http://192.168.1.1 from a device that is connected to the Nighthawk M2 mobile router.Note: Although not required, we strongly recommend you change the SSID, passphrase, and admin password.Check the SIM card and insert the battery1. Make sure that power to the Nighthawk M2 mobile router is off.2. Check to see if a SIM card is in the SIM card slot.3. If a SIM card is not in the slot, locate the SIM card.4.card icon illustrates the orientation.5. tabs in the battery recess.6. Replace the mobile router cover.Note: normal way to operate it when it is used as a fixed router.Package contents• Nighthawk M2 mobile router • Battery• Quick start guide • Bottom cover • Type-C USB cable •AC power adapterNote: Quick start guide and bottom cover are in an envelope.NETGEAR INTL LTDBuilding 3, University Technology Centre Curraheen Road, Cork, Ireland© NETGEAR, Inc., NETGEAR, the NETGEAR logo and the Nighthawk logo are trademarks of NETGEAR, Inc. Any non‑NETGEAR trademarksare used for reference purposes only.January 2019SAFETY FIRSTPlease read all the safety notices before using this device. This device is designed to be used at least 20 cm from your body. Do not use the device near fuel or chemicals or in any areas such as service stations, refineries, hospitals, or aircraft. Obey all warning signs where posted.Radio frequency safety information . The device includes an internal antenna. For optimum performance with minimum power consumption, do not shield the device or cover it with any object. Covering the antenna affects signal quality, might cause the router to operate at a higher power level than needed, and might shorten battery life.Radio frequency energy . Your wireless device is a low‑power radio transmitter and receiver. When switched on, it intermittently transmits radio frequency (RF) energy (radio waves). The transmit power level is optimised for best performance and isautomatically reduced when there is good quality reception. Maximum power is used only at the edge of network coverage so under most circumstances the power output is very low. Under poor network conditions the device transmits at a higher power, and might get hot, and battery life might be significantly shorter.Declaration of conformity – specific absorption rate (SAR). Your device is designed to be used at least 20 cm from the body. We declare that the product detailed in this manual, and in combination with our accessories, conforms with the essentialrequirements of the Radio Communications Standard (Electromagnetic IC Radiation Human Exposure) 2003 and the Australian Communications and Media Authority Section 376 of the Telecommunications Act 1997 when used at a distance of not less than 20 cm from the body.E695Home ReturnPower201-23748-02。
卡巴斯基安装步骤
卡巴斯基说俄罗斯一款著名的网络版企业级杀毒软件,具备防病毒/杀毒/防火墙等多重功能。
可以提供对PC机和移动终端设备的防毒需求。
现在最新的版本是卡巴斯基网络版8.0,本文中测试所使用的版本是当前应用最广泛的卡巴斯基网络版6.0 。
以下内容摘录自官方文档:部署方案的选择取决于以下几个主要因素:l 企业网络结构:不同网段之间的传输速度,以及每个网段中的客户端计算机数量。
l 企业组织结构。
l IT部门中为反病毒保护系统提供维护服务的员工人数,以及员工的不同职责划分。
l 能够用于安装反病毒保护管理系统(管理服务器、更新代理)的现有硬件资源。
l 企业网络内能够分配给反病毒保护系统各功能组件之间进行通讯的网络通道的容量。
l 企业网络内允许用于执行关键管理操作的最长时间,如数据库更新包的发布和客户端计算机的策略更改。
反病毒保护的部署通常可以分为以下几个方案:l 一个管理服务器。
l 一个管理服务器和一些更新代理。
l 分级式管理服务器。
l 分级式管理服务器和一些更新代理。
建议采用以下步骤来分析网络和硬件架构:1.确定网络配置,以及将反病毒保护部署在何处。
其中主要的配置为:网络中的网段数。
每个网段之间的连接速度。
每个网段中管理的计算机数。
能够分配给反病毒保护系统各功能组件之间进行通讯的网络通道的容量。
2.确定对企业网络内所有管理的计算机,允许用于执行关键管理操作的最长时间。
3.使用收集到的信息,确定以下问题:管理所有的客户端计算机,需要多少台管理服务器?是否需要使用分级式管理服务器?理服务器要在允许的时间内对所有客户端计算机进行维护,需要怎样的硬件配置?为了减轻网络流量压力,是否需要中间层的更新数据库和安装包发布中心(更新代理)?在回答完以上问题后,管理员应该能够列出一些可选的部署方案,并从其中选出最适合的。
当我们确定了最合适的部署方式之后,下面就可以开始卡巴斯基的部署了。
首先我们来部署卡巴斯基的管理工具。
卡巴斯基管理工具由以下三个主要部分组成:l 管理服务器执行信息的集中化存储功能,这些信息包括:企业网络中所有已安装的卡巴斯基实验室产品信息,和这些程序的管理信息。
威尔指纹消费机使用说明书_龙腾锐达

XX龙腾锐达科技XX提供XX龙腾锐达科技XX重要声明:手册中涉及到的图片信息以及功能示意图,因产品型号不同,可能与实际产品有所出入,请以实物为准。
随着产品的更新换代或升级,本手册内容将会做相应的修改,公司保留对本手册的内容进行修改的权利,恕不另行通知。
本手册属于公司,未经许可不得以任何形式和手段复制或抄袭本手册内容。
衷心感谢您选用消费终端,为保持该设备处于最佳状态,延长使用寿命,在使用前,请仔细阅读本手册。
1)遵守标注在设备上的所有警示;2)远离容易引起电磁干扰或易产生静电的环境;3)使用随机配备的电源适配器和电池;4)不要与大功率或容易引起电压波动的电器设备使用同一交流电源插座;5)避免在阳光直射、靠近热源、油烟、多尘或有腐蚀性气体的地方使用;6)如有液体洒落到机体上,请及时切断电源,并用干布擦拭干净;7)请勿将其它物体从外壳孔隙推入机体内,防止触电或引起短路;8)定期清洁设备外观。
清洁前,关闭电源开关,拔下电源插头,使用微湿的柔软布料擦拭;9)妥善放置电源适配器及电源线,防止电源线被踩踏、拉扯,造成机具跌落损坏;10) 每次开机后请检查时钟是否准确,若出现较大偏差(如超过5 分钟),需校正时间后才能使用,否则可能会造成数据混乱;11)若长期不使用,请清洁机具,保持机具整洁及干燥,将机具、配件、用户手册等重新放回原包装箱内,在通风干燥的环境中保存。
12)请勿自行拆装本产品,以防止损坏机器、丢失数据、触电或产生其它危险。
如需检修请联系服务商;13)使用过程中,如出现其它异常情况,请详细记录当前设备状态,并与服务商联系。
目录1.前言 ..........................................................................................................................................11.1 产品特点........................................................................................................................ 12. 1.2用户对象........................................................................................................................3 产品型号..................................................................................................................................4 3. 产品参数..................................................................................................................................5 4.设备外观及接口说..............................................................................................................明7 4.1 设备外观........................................................................................................................ 7 4.2 接口说明........................................................................................................................ 8 4.3键盘布局及说明 (8)4.3.1操作员键盘.............................................................................................................85.4.3.2客户键盘...............................................................................................................10 产品安装................................................................................................................................115.1 准备工作...................................................................................................................... 116.5.2使用向导......................................................................................................................12 功能介绍................................................................................................................................13 6.1 待机界面...................................................................................................................... 13 6.2功能键说明..................................................................................................................14 6.2.1 F1(管理)........................................................................................................ 14 6.2.2 F2(模式)........................................................................................................ 14 6.2.3 F3(查询)........................................................................................................ 18 6.2.4 F4(结算)........................................................................................................ 20 6.2.5 F5(撤销).. (21)6.2.6 F6(锁定)........................................................................................................22 6.3其他功能...................................................................................................................... 22 6.3.1余额查询功能.......................................................................................................226.3.2 修改卡号密码......................................................................................................23 6.4菜单说明......................................................................................................................24 6.4.1 网络设置............................................................................................................ 24 6.4.2 查询............................................................................................................ 25 6.4.3 卡号管理............................................................................................................ 26 6.4.4 消费管理............................................................................................................ 26 6.4.5 磁盘操作............................................................................................................ 28 6.4.6 常用设置............................................................................................................ 28 6.4.7 系统维护 (29)6.4.8 出厂设置............................................................................................................31 附录一:名词解释................................................................................................................................32附录二:系统提示及处理............................................................................................................措施36附录三:FAQ........................................................................................................................................38设备开机不启动............................................................................................................................38按键无反应....................................................................................................................................38 刷卡无反应....................................................................................................................................39 刷卡提“示无此卡号”................................................................................................................39 终端设备频繁重........................................................................................................................启 40 如何删除终端数........................................................................................................................据 40 通过网络不能传输数................................................................................................................据40 不能识别U 盘 ...............................................................................................................................41U 盘操作不成功............................................................................................................................41 设备无法联机................................................................................................................................42 U 盘升级方法................................................................................................................................42repair 方式软件升级.....................................................................................................................42iv1.前言 ..........................................................................................................................................11.1 产品特点........................................................................................................................ 12. 1.2用户对象........................................................................................................................3 产品型号..................................................................................................................................4 3. 产品参数..................................................................................................................................5 4.设备外观及接口说..............................................................................................................明7 4.1 设备外观........................................................................................................................ 7 4.2 接口说明........................................................................................................................ 8 4.3键盘布局及说明 (8)4.3.1操作员键盘.............................................................................................................85.4.3.2客户键盘...............................................................................................................10 产品安装................................................................................................................................115.1 准备工作...................................................................................................................... 116.5.2使用向导......................................................................................................................12 功能介绍................................................................................................................................13 6.1 待机界面...................................................................................................................... 13 6.2功能键说明..................................................................................................................14 6.2.1 F1(管理)........................................................................................................ 14 6.2.2 F2(模式)........................................................................................................ 14 6.2.3 F3(查询)........................................................................................................ 18 6.2.4 F4(结算)........................................................................................................ 20 6.2.5 F5(撤销).. (21)6.2.6 F6(锁定)........................................................................................................22 6.3其他功能...................................................................................................................... 22 6.3.1余额查询功能.......................................................................................................226.3.2 修改卡号密码......................................................................................................23 6.4菜单说明......................................................................................................................24 6.4.1 网络设置............................................................................................................ 24 6.4.2 查询............................................................................................................ 25 6.4.3 卡号管理............................................................................................................ 26 6.4.4 消费管理............................................................................................................ 26 6.4.5 磁盘操作............................................................................................................ 28 6.4.6 常用设置............................................................................................................ 28 6.4.7 系统维护 (29)6.4.8 出厂设置............................................................................................................31 附录一:名词解释................................................................................................................................32附录二:系统提示及处理............................................................................................................措施36附录三:FAQ........................................................................................................................................38设备开机不启动............................................................................................................................38按键无反应....................................................................................................................................38 刷卡无反应....................................................................................................................................39 刷卡提“示无此卡号”................................................................................................................39 终端设备频繁重........................................................................................................................启 40 如何删除终端数........................................................................................................................据 40 通过网络不能传输数................................................................................................................据40 不能识别U 盘 ...............................................................................................................................41U 盘操作不成功............................................................................................................................41 设备无法联机................................................................................................................................42 U 盘升级方法................................................................................................................................42repair 方式软件升级.....................................................................................................................421.前言 ..........................................................................................................................................11.1 产品特点........................................................................................................................ 12. 1.2用户对象........................................................................................................................3 产品型号..................................................................................................................................4 3. 产品参数..................................................................................................................................5 4.设备外观及接口说..............................................................................................................明7 4.1 设备外观........................................................................................................................ 7 4.2 接口说明........................................................................................................................ 8 4.3键盘布局及说明 (8)4.3.1操作员键盘.............................................................................................................85.4.3.2客户键盘...............................................................................................................10 产品安装................................................................................................................................115.1 准备工作...................................................................................................................... 116.5.2使用向导......................................................................................................................12 功能介绍................................................................................................................................13 6.1 待机界面...................................................................................................................... 13 6.2功能键说明..................................................................................................................14 6.2.1 F1(管理)........................................................................................................ 14 6.2.2 F2(模式)........................................................................................................ 14 6.2.3 F3(查询)........................................................................................................ 18 6.2.4 F4(结算)........................................................................................................ 20 6.2.5 F5(撤销).. (21)6.2.6 F6(锁定)........................................................................................................22 6.3其他功能...................................................................................................................... 22 6.3.1余额查询功能.......................................................................................................226.3.2 修改卡号密码......................................................................................................23 6.4菜单说明......................................................................................................................24 6.4.1 网络设置............................................................................................................ 24 6.4.2 查询............................................................................................................ 25 6.4.3 卡号管理............................................................................................................ 26 6.4.4 消费管理............................................................................................................ 26 6.4.5 磁盘操作............................................................................................................ 28 6.4.6 常用设置............................................................................................................ 28 6.4.7 系统维护 (29)6.4.8 出厂设置............................................................................................................31 附录一:名词解释................................................................................................................................32附录二:系统提示及处理............................................................................................................措施36附录三:FAQ........................................................................................................................................38设备开机不启动............................................................................................................................38按键无反应....................................................................................................................................38 刷卡无反应....................................................................................................................................39 刷卡提“示无此卡号”................................................................................................................39 终端设备频繁重........................................................................................................................启 40 如何删除终端数........................................................................................................................据 40 通过网络不能传输数................................................................................................................据40 不能识别U 盘 ...............................................................................................................................41U 盘操作不成功............................................................................................................................41 设备无法联机................................................................................................................................42 U 盘升级方法................................................................................................................................42repair 方式软件升级.....................................................................................................................421.前言 ..........................................................................................................................................11.1 产品特点........................................................................................................................ 12. 1.2用户对象........................................................................................................................3 产品型号..................................................................................................................................4 3. 产品参数..................................................................................................................................5 4.设备外观及接口说..............................................................................................................明7 4.1 设备外观........................................................................................................................ 7 4.2 接口说明........................................................................................................................ 8 4.3键盘布局及说明 (8)4.3.1操作员键盘.............................................................................................................85.4.3.2客户键盘...............................................................................................................10 产品安装................................................................................................................................115.1 准备工作...................................................................................................................... 116.5.2使用向导......................................................................................................................12 功能介绍................................................................................................................................13 6.1 待机界面...................................................................................................................... 13 6.2功能键说明..................................................................................................................14 6.2.1 F1(管理)........................................................................................................ 14 6.2.2 F2(模式)........................................................................................................ 14 6.2.3 F3(查询)........................................................................................................ 18 6.2.4 F4(结算)........................................................................................................ 20 6.2.5 F5(撤销).. (21)6.2.6 F6(锁定)........................................................................................................22 6.3其他功能...................................................................................................................... 22 6.3.1余额查询功能.......................................................................................................226.3.2 修改卡号密码......................................................................................................23 6.4菜单说明......................................................................................................................24 6.4.1 网络设置............................................................................................................ 24 6.4.2 查询............................................................................................................ 25 6.4.3 卡号管理............................................................................................................ 26 6.4.4 消费管理............................................................................................................ 26 6.4.5 磁盘操作............................................................................................................ 28 6.4.6 常用设置............................................................................................................ 28 6.4.7 系统维护 (29)6.4.8 出厂设置............................................................................................................31 附录一:名词解释................................................................................................................................32附录二:系统提示及处理............................................................................................................措施36附录三:FAQ........................................................................................................................................38设备开机不启动............................................................................................................................38按键无反应....................................................................................................................................38 刷卡无反应....................................................................................................................................39 刷卡提“示无此卡号”................................................................................................................39 终端设备频繁重........................................................................................................................启 40 如何删除终端数........................................................................................................................据 40 通过网络不能传输数................................................................................................................据40 不能识别U 盘 ...............................................................................................................................41U 盘操作不成功............................................................................................................................41 设备无法联机................................................................................................................................42 U 盘升级方法................................................................................................................................42repair 方式软件升级.....................................................................................................................421.前言 ..........................................................................................................................................11.1 产品特点........................................................................................................................ 12. 1.2用户对象........................................................................................................................3 产品型号..................................................................................................................................4 3. 产品参数..................................................................................................................................5 4.设备外观及接口说..............................................................................................................明7 4.1 设备外观........................................................................................................................ 7 4.2 接口说明........................................................................................................................ 8 4.3键盘布局及说明 (8)4.3.1操作员键盘.............................................................................................................85.4.3.2客户键盘...............................................................................................................10 产品安装................................................................................................................................115.1 准备工作...................................................................................................................... 116.5.2使用向导......................................................................................................................12 功能介绍................................................................................................................................13 6.1 待机界面...................................................................................................................... 13 6.2功能键说明..................................................................................................................14 6.2.1 F1(管理)........................................................................................................ 14 6.2.2 F2(模式)........................................................................................................ 14 6.2.3 F3(查询)........................................................................................................ 18 6.2.4 F4(结算)........................................................................................................ 20 6.2.5 F5(撤销).. (21)6.2.6 F6(锁定)........................................................................................................22 6.3其他功能...................................................................................................................... 22 6.3.1余额查询功能.......................................................................................................226.3.2 修改卡号密码......................................................................................................23 6.4菜单说明......................................................................................................................24 6.4.1 网络设置............................................................................................................ 24 6.4.2 查询............................................................................................................ 25 6.4.3 卡号管理............................................................................................................ 26 6.4.4 消费管理............................................................................................................ 26 6.4.5 磁盘操作............................................................................................................ 28 6.4.6 常用设置............................................................................................................ 28 6.4.7 系统维护 (29)6.4.8 出厂设置............................................................................................................31 附录一:名词解释................................................................................................................................32附录二:系统提示及处理............................................................................................................措施36附录三:FAQ........................................................................................................................................38设备开机不启动............................................................................................................................38按键无反应....................................................................................................................................38 刷卡无反应....................................................................................................................................39 刷卡提“示无此卡号”................................................................................................................39 终端设备频繁重........................................................................................................................启 40 如何删除终端数........................................................................................................................据 40 通过网络不能传输数................................................................................................................据40 不能识别U 盘 ...............................................................................................................................41U 盘操作不成功............................................................................................................................41 设备无法联机................................................................................................................................42 U 盘升级方法................................................................................................................................42repair 方式软件升级.....................................................................................................................42。
CAV2000操作手册

M2安装手册中文
安装手册
第一章 警告提示
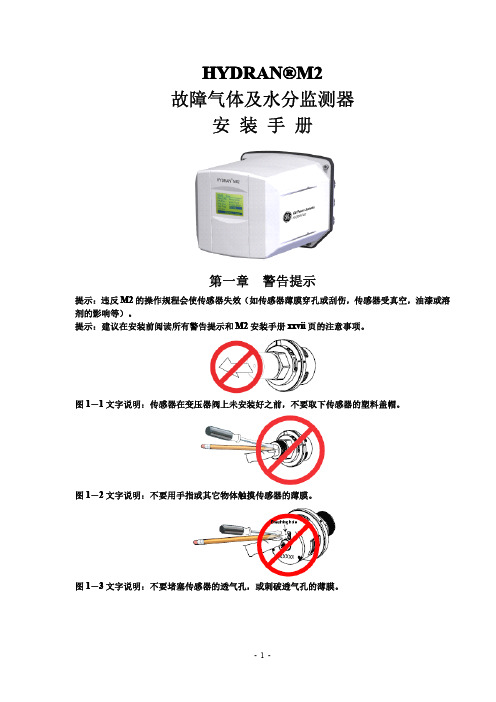
提示:违反 M2 的操作规程会使传感器失效(如传感器薄膜穿孔或刮伤,传感器受真空,油漆或溶 剂的影响等)。 提示:建议在安装前阅读所有警告提示和 M2 安装手册 xxvii 页的注意事项。
图 1-1 文字说明:传感器在变压器阀上未安装好之前,不要取下传感器的塑料盖帽。
图 A-2 文字说明:用笔记本电脑的本机通讯 笔记本电脑:固定的波特比(等于 M2 的比特/秒),8 个数据比特,无极性,1 个停止比特,无流 向控制
图 A-3 文字说明:RS-485 导管的接地 (上)电缆接到 RS-485 的输入接线端,接地导管接到接地接线片。 (下)电缆接到 RS-485 的输出接线端,M2 的传导是隔离传导。
图 2-7 文字说明:脱开传感器的电缆 1. 反时针旋转传感器的连接器(约 1/8 圈) 2. 从传感器上拉出连接器
-7-
图 2-8 文字说明:用特氟纶(绝缘材料)带覆盖传感器的螺纹 顺时针缠绕在螺纹上
图 2-9 文字说明:用手将传感器安装在阀门上,再用活动扳手拧紧 1. 将传感器插入阀门 2. 用手旋入 3. 再用扳手拧紧
-9-
图 2-12 文字说明:将 M2 上紧在传感器上(第一部分)——门阀安装 1. 将传感器的凸型连接器接入凹型连接器 2. 旋转连接器(约 1/8 圈) 3. 将外壳摆正接到传感器上,注意不要挤压到传感器电缆 4. 旋转外壳(约 1/8 圈)直到外壳锁定
图 2-13 文字说明:将 M2 上紧在传感器上(第一部分)——球阀安装 1.将传感器的凸型连接器接入凹型连接器 2.旋转连接器(约 1/8 圈)
图 3-2 显示屏概观 Non-selected item 非选择项 Selected item 选择项(颜色被反转) 用箭头键选择显示屏上的其它项 Identification numberM2 的识别码 Time,……时间,或菜单名,或当前显示的选项 Context key messages 设置键消息 Scrolling indicator 滚动显示指示器 3.1 置定日期和时间
K-FLY2 Ver. 4.1 用户指南说明书
USER GUIDEEnglishTABLE OF CONTENTSSYMBOLS (3)1. INTRODUCTION (4)1.1 SAFETY INFORMATION (4)1.2 COMPATIBLE PRODUCTS (5)1.3 CONFIGURATION EXAMPLES (5)2. THE HORIZONTAL FLY BEAM (6)3. THE JOINT PLATE (6)4. ASSEMBLY AND ADJUSTMENT (7)4.1 ADJUSTING THE ANGLES (9)This symbol alerts the user to the presence of recommendations about product’s use and maintenance.This symbol alerts the user to the presence of recommendations about the product’s use and maintenance.K-array declares that this device is in compliance with applicable CE standards and regulations. Before putting the device into operation, please observe the respective country-specific regulations!Waste Electrical and Electronic Equipment (WEEE)Please dispose of this product at the end of its operational lif etime by bringing it to your local collection point or recycling center for such equipment.SYMBOLS1. INTRODUCTIONThe K-FLY2 system is an accessory needed to fly a cluster of K-array compatible speaker models.In order to link one speaker to another, the K-JOINT2 accessory is also needed (not included). One K-JOINT2 is needed per speaker.K-FLY2 MAXIMUM RUNNING LOAD = 100 kgThe structure’s safety factor is equal to 7 on the breaking load1.1 SAFETY INFORMATION• Read these instructions.• Keep this instructions.• Heed all warnings.• O nly use attachments/accessories specif ied by the manuf acturer. K-array does not assume any responsibility for damages caused by the use of material that does conform to the specific requirements listed in this manual.• C hoking Hazards. This device contains small parts, which may present a choking hazard to small children. Keep the device and its accessories away from small children.• D o not make repairs yourself. Never attempt to disassemble, repair or modify the system yourself.Disassembling the unit may cause damage that is not covered under the warranty. The device contains no user serviceable parts. Repairs should only be performed by factory trained service personnel.• O perating environment. The system can be used both outdoors and indoors and can resist saline environments. It is forbidden to use it in explosive environments.• S etup. Set up your device on a stable, horizontal surface. When combined or mechanically connected with other products, always verif y the stability of the resulting system. Install the unit only in a location that can structurally support the weight of the unit and that is far away from interference with the stability of the system. Ensure the wind does not interfere with the system’s stability by taking extra securities such as chains, weights, ropes or any other certif ied anchoring systems.Otherwise a unit could fall, causing property damage, personal injury or even death. The system should only be suspended by qualified personnel following safe rigging practices. Securing fixtures to the building structure are vital. To clarify any doubts you may have, seek help from architects, structural engineers or other specialists.• L ifting and storage. The whole system must be transported and stored already dismantled. Assembly must be done onsite.• S hutdown. Once the system is no longer being operated it must not be left abandoned. All iron made material must be disposed of by an authorized scrap yard.1.2 COMPATIBLE PRODUCTSThe K-FLY2 must be used only with K-array products KK52,KK102, KP52, KP102, KY102, KU26, KU44.KK52KK102KP52KP102KY102KU26KU44 Max 16 pcs Max 8 pcs Max 12 pcs Max 6 pcs Max 6 pcs Max 12 pcs Max 12 pcs Tot 48 kg Tot 48 kg Tot 84 kg Tot 78 kg Tot 95 kg Tot 85 kg Tot 85 kg1.3 CONFIGURATION EXAMPLESThe regulation of the joints and the choice of the hanging point will generate different array profiles to meet the different needs of the acoustic sound required for each venue.Below are some possible configurations.The array profile also determines the safety factor of the wholeframe.2. THE HORIZONTAL FLY BEAMThe horizontal beam (A) consists of a perforated bar (A1) to which all devices are fastened and flown from the tilt joint (A2) to which the joint plates are fastened.The two components are linked together with two M8x40 stainless steel quick release piston pins (A3).A13. THE JOINT PLATEThe K-JOINT2 joint plate (B) is a device that joins several speakers and adjusts the tilting angles. It also connects the entire cluster to the fly bar.The group is made up of two identical aluminum joints (B1) linked by a stainless steel, quick-release M8x40 piston pin (B3). The piston pin features a security block (B4) that must be used only in stacked applications. Do not use it when flying the speakers as it could accidently fall, causing injuries. Two additional M5x30 stainless steel quick release piston pins (B5) join the central bracket (B2) to the aluminum joints (B1). Eight cylindrical Allen key screws M5x14 (provided) are needed to fasten the joint plates to the loudspeaker enclosures.Question: How many K-JOINT2 units do I need?Answer:O ne per unit. If you want to f ly a cluster composed of 4 x KP102, you’ll need 4 x K-JOINT2.FAQB5B3B1The security block (B4) must be used only in stacked applications. Do not use it when lying the speakers!Hanging points4. ASSEMBLY AND ADJUSTMENT1. F irst, connect the two aluminum joints (B1) of each K-JOINT2 to each loudspeaker frame with theprovided screws.• T he screws are included; in case of displacementonly use stainless steel A2 CLASS 70 screws.• T he tightening of the screws should be donewith a screw gun or by hand using a dedicated hex key without using any extensions.YESNO2. T he horizontal fly beam must be linked to a lifting device with a lifting chain (C1 - NOT SUPPLIED), a hook with security fastening (C2 - NOT SUPPLIED) and an Omega shackle (C3 - SUPPLIED).NOT SUPPLIED NOT SUPPLIED SUPPLIEDUse stainless steel 50° chain with a 5mm links minimum.WLL = 500 kgUse stainless steel hooks with security fastening.WLL = 150 kgUse the Omega shackle (CS3)that is supplied with the system.3. P osition the horizontal fly beam (A1) at an appropriate distance from the floor. Fasten the first speaker to the beam (A1) with a M8x40 piston pin (B3). Lift the beam in order to position the speaker verticallyand then insert the central bracket (B2) and fasten it with the supplied M5x30 piston pins (B5).4. Repeat Step 3 to connect other speakers.Varying the length of the central bracket allows the user to adjust the angle between the speakers. Each joint allows an adjustment of ±10°.To adjust the length of the central bracket, unfasten the screw (D1) and rotate the ring (D2) until youreach the desired angle between the speakers then refasten the screw (D1).4.1 ADJUSTING THE ANGLESD2。
AVSII USB-KAV 使用手册

PNY A.V.S II AttachéUSB-KAV软件使用手册产品简介A.V.S II Attaché是一个可移动USB存储盘,它支持各种媒体格式储存能力。
A.V.S II Attaché中USB-KAV包含卡巴斯基 Kaspersky 防毒软件,提供存储盘病毒防护及私密盘资料保护的功能,使得你的资料更佳的安全。
A.V.S II Attaché同时兼容USB 1.1与USB 2.0规格. A.V.S II ATTAC HÉ是即插即用装置,只要将它插入任何电脑的USB接口,系统将自动侦测并显现出一个可移动磁盘。
使用者可以读写或删除资料,并且可以通过高速USB 2.0通道将资料从硬盘复制到A.V.S II Attaché,或者从A.V.S II Attaché复制资料到硬盘。
A.V.S II Attaché精致小巧,可以将他放入口袋中携带到任何地方。
你可以不用因为工作上需要读取资料而携带笔记本电脑。
此外 A.V.S II Attaché不需要任何电池、连接线及驱动程序。
它完全兼容于任何笔记本及台式电脑USB接口。
A.V.S II Attaché是一个轻薄精致,高效能快速的存储盘。
系统要求-Windows XP Home 、professional.-Windows Vista Ultimate、Business、Home premium、home Basic(32 bit or 64 bit)-Windows 7 Ultimate、Professional、Premium、Home Basic (32bit or 64bit)USB-KAV 使用指南1.启动&注册请先将PNY AVSII连接到电脑上,则会在我的电脑上看到可移动磁盘。
在Windows操作系统中,点击可移动磁盘进入根目录后,会出现“MakeAVS”与”StartUse”两个.exe 可执行程序以及一个”USB-KAV”的文件夹。
娱乐点播机2代使用手册说明书

娱乐点播机2代使用手册目录目录声明 (1)产品介绍 (2)产品结构说明 (2)机箱结构 (3)主机 (5)小手柄 (7)接线图 (8)点播机系统 (9)点播大厅 (9)清晰美图 (9)优质音乐 (10)高清影视 (11)娱乐游戏 (12)其它游戏 (12)后台管理 (14)账目 (14)参数设置 (15)按键测试 (17)关机 (17)点播机升级 (18)升级硬盘安装流程: (18)故障排除 (19)1声 明本设备只提供多媒体点播功能,相关娱乐资源仅供机台测试之用,请在购买本设备后24小时内删除。
如果要将本设备用作商业用途,请详细阅读国家法律、法规及相关政府规定,并且送交相关国家管理部门审核;通过了相关国家管理部门的审核,取得了相关国家管理部门的运营许可证后,才可以作为商业设备使用。
取得了相关国家管理部门的运营许可证后,在作为商业设备的使用过程中,请遵守相关国家法律、法规及政府规定。
2产品介绍娱乐点播机2代娱乐点播机2代作为1代点播机的升级版,从外观到内在都作出了非常大的改变,本公司致力于为客户提供更优质更值得信赖的产品,投入了大量的精力来设计研发新一代的娱乐点播机。
外观设计上,娱乐点播机2代非常大胆的借用了旧款留声机的概念,使新一代点播机更形象鲜活的呈现在客户面前,将点播机的档次越级的提升,而价格却一样的实惠,这是本公司为回馈广大客户支持的一份礼物。
软件设计上,娱乐点播机2代作了全面的革新,软件运行更稳定,画面更精美,最重要的是顾客的体验更人性化更有可玩性。
相信娱乐点播机2代会得到您的青睐。
娱乐点播机2代加入了更多的娱乐游戏,让内容更加丰富。
3产品结构说明点播机套件分为机箱,主机,小手柄三大部件。
机箱结构1.机箱上部件示意图:2.控制板示意图:4按键功能说明表:3.机箱背面示意图:5主机1.主机接线口示意图2.主机内部结构示意图3.游戏电脑板64.游戏硬盘5.资源硬盘6.游戏28插控制板《因我公司多款游戏公用此板,具体引脚接线定义以专用套线和接线图为准》7小手柄1.外壳示意图2.程序加密卡8接线图备注:注意正反面9点播机系统点播大厅1. 本机台通电自动开机,开机后进入点播大厅界面,如下图:2.点播机有四大节目模块: 清晰美图; 优质音乐; 高清影视;娱乐游戏。
蓝马转换器F2使用说明书模板15p
信号对应为:1-CAN1_L,2-CAN1_H,3-CAN2_L,4-CAN2_H,5-NC,6-NC,7-GND,8-VDD。
2.3.拨码开关
图2-3 DP4拨码开关
信号对应为:
DP1-485总线120终端电阻:ON位置,电阻接入,OFF位置电阻断开。
DP2、DP3、DP4:485和422接口转换。
0xD4+4字节ID识别码
D5设置屏弊滤波功能
0xD5+使能字+4字节滤波字+4字节屏蔽字
注:使用固定长度方式时字节个数固定为8字节。收到不足8字节的数据帧时,模块自动补0xff,补足8字节。
例如串口发送数据到转换器:标准数据帧(5字节)
指令码数据个数ID码数据流
0xE1 0x055 0x00 0x00 0xA1+0xA2+0xA3+0xA4+0xA5
-工作电压范围:直流9到 24V
-90mA典型工作电流
-110mA最大工作电流
?工业级温度标准:-40oC ~ +85oC
2.转换器介绍
485/422-CAN F2转换器,是具有一路485/422接口和两路CAN接口,可作为一个标准CAN节点,通过PC连接到CAN网络,实现工控现场CAN总线数据的收、发双向传输、CAN中继器等用途。广泛应用于工业控制、安防监控、智能建筑、汽车电子等领域。增加动态链接库,可以进行二次开发。B2型号具有性能稳定,适应宽电压电源输入(9~24V),完善的静电防护和通讯隔离保护。通讯波特率可设定,尤其适用于CAN总线中继,延长通讯距离或波特率变速中继,协议转换等应用。
ID码说明:标准数据帧和标准远程帧,应填入2个字节。
英文商品说明书:EK2CB07CAV3选项箱外部机械组件安装手册
Installation manualEK2CB07CAV3Table of Contents2Option box for outdoor units with integrated hydraulic components4P405546-1C – 2017.03Table of Contents1About the documentation21.1About this document..................................................................22About the box 22.1Option box.................................................................................22.1.1To remove the accessories from the option box.........23Preparation 33.1Preparing installation site..........................................................33.1.1Installation site requirements of the option box...........33.2Preparing electrical wiring.........................................................33.2.1Overview of electrical connections for external and internal actuators ........................................................34Installation 34.1Opening the units......................................................................34.1.1To open the option box...............................................34.2Mounting the option box............................................................34.2.1To install the option box..............................................34.3Connecting the electrical wiring.................................................44.3.1To connect the electrical wiring on the option box......44.3.2To connect the option box power supply ....................44.3.3To connect the interconnection cable between option box and control box.....................................................44.3.4To connect the electrical meters.................................44.3.5To connect the power consumption digital inputs.......44.3.6To connect the alarm output.......................................54.3.7To connect the space cooling/heating ON/OFFoutput..........................................................................54.3.8To connect the changeover to external heat source...55Starting up the system 51About the documentation 1.1About this document Target audienceAuthorised installersDocumentation setThis document is part of a documentation set. The complete setconsists of:▪General safety precautions:▪Safety instructions that you must read before installing▪Format: Paper (in the box of the outdoor unit)▪Outdoor unit installation manual:▪Installation instructions▪Format: Paper (in the box of the outdoor unit)▪Control box installation manual:▪Installation instructions▪Format: Paper (in the box of the control box)▪Option box installation manual:▪Installation instructions▪Format: Paper (in the box of the option box)▪Backup heater installation manual:▪Installation instructions▪Format: Paper (in the box of the backup heater)▪Installer reference guide:▪Preparation of the installation, good practices, reference data,…▪Format: Digital files on /support-and-manuals/product-information/▪Addendum book for optional equipment:▪Additional info about how to install optional equipment▪Format: Paper (in the box of the outdoor unit) + Digital files on/support-and-manuals/product-information/Latest revisions of the supplied documentation may be available onthe regional Daikin website or via your dealer.The original documentation is written in English. All other languagesare translations.Technical engineering data▪ A subset of the latest technical data is available on the regionalDaikin website (publicly accessible).▪The full set of latest technical data is available on the Daikinextranet (authentication required).2About the box 2.1Option box 2.1.1To remove the accessories from the option box 1Open the option box.2Remove the accessories.a Connectors for interconnection cable between the option box and control box EKCB07CAV3.3 Preparation3Option box for outdoor units with integrated hydraulic components4P405546-1C – 2017.033Preparation 3.1Preparing installation site 3.1.1Installation site requirements of the option box▪Mind the measurement guidelines:Maximum distance between the option box and control box EKCB07CAV33 m▪Mind the following spacing installation guidelines:(mm)▪The option box is designed to be wall-mounted in indoor locations only. Make sure the installation surface is a flat and vertical non-combustible wall.▪The option box is designed to operate in ambient temperatures ranging from 5~35°C.3.2Preparing electrical wiring 3.2.1Overview of electrical connections forexternal and internal actuators(a)Cable section 2.5 mm².(b)Minimum cable section 0.75 mm².4Installation4.1Opening the units4.1.1To open the option box4.2Mounting the option box4.2.1To install the option box1Remove the front plate.2Hold the back plate against the wall and mark the fixation points (2 on the top and 2 at the bottom).3Drill 4 holes and install 4 plugs (suitable for M5).4Put the screws in the top plugs and hang the box on the screws.5Put the screws in the bottom plugs.6Fix the 4 screws firmly.4 Installation4Option box for outdoor units with integrated hydraulic components4P405546-1C – 2017.034.3Connecting the electrical wiring4.3.1To connect the electrical wiring on the option box 1Insert the wiring from the bottom of the option box.2Make sure the low voltage wiring is located on the right. Route itthrough the intake hole and fasten it with cable ties:a Low voltage wiring bHigh voltage wiring c Main power supply 4.3.2To connect the option box power supply 1Connect option box terminal X1M to control box terminal X1M.1GND 2L 3N 2Fix the cable with cable ties to the cable tie mountings toensure strain relief and to make sure that it does NOT come incontact with sharp edges.4.3.3To connect the interconnection cable between option box and control box 1Connect the connectors from the accessory bag to X5A on A1P of both the control box and the option box PCB.2Connect the connectors by way of a field-supplied cable.aConnectors (accessory)b Interconnection cable (field supply)4.3.4To connect the electrical meters 1Connect the electrical meters cable to the appropriate terminalsas shown in the illustration below.2Fix the cable with cable ties to the cable tie mountings.4.3.5To connect the power consumption digital inputs 1Connect the power consumption digital inputs cable to theappropriate terminals as shown in the illustration below.5 Starting up the system5Option box for outdoor units with integrated hydraulic components4P405546-1C – 2017.03S3P Connect to terminals X2M/1+2S2P Connect to terminals X2M/3+4S1P Connect to terminals X2M/5+6S4P Connect to terminals X2M/11+122Fix the cable with cable ties to the cable tie mountings.4.3.6To connect the alarm output1Connect the alarm output cable to the appropriate terminals asshown in the illustration below.2Fix the cable with cable ties to the cable tie mountings.4.3.7To connect the space cooling/heating ON/OFF output1Connect the space cooling/heating ON/OFF output cable to theappropriate terminals as shown in the illustration below.2Fix the cable with cable ties to the cable tie mountings.4.3.8To connect the changeover to externalheat source1Connect the changeover to external heat source cable to theappropriate terminals as shown in the illustration below.2Fix the cable with cable ties to the cable tie mountings.5Starting up the systemFor instructions on how to configure and commission the system,and hand it over to the user, refer to the installation manual of theoutdoor unit.nikiaD512thgirypoC 4P405546-1C 2017.03。
联网两线可视及非可视对讲系统安装使用说明
联网两线可视及非可视对讲系统安装使用说明(适合于ADK2000和AD2000对讲系统)一、系统简介1、系统容量:管理中心机可接256栋楼、每栋可接8个单元,共2000多台门口机,每台门口机可挂500台室内分机。
2、门口机、住户分机、管理中心可实现三方相互呼叫和通话功能3、可视、非可视可同在一系统中联网安装使用4、非可视分机联网二线入户、不分极性,分机可由用户自行安装5、分机房号可在主机上自由编码,具有隔离保护,短路不影响系统`6、门口主机具有用户独立密码开锁、门禁刷卡开锁二、中心机操作说明1、呼叫分机:按楼栋号+单元号+分机房号+“回呼”()键确认,听到振铃后等候通话。
(栋号3位,单元号1位,分机号4位共8位)通话时按1-9键可延时通话,按“*”退出(呼叫时如显示BUSY则线路忙)2、呼叫门口机:按楼栋号+单元号+0000+“回呼”键((栋号3位,单元号1位+0000共8位)通话时按1-9键可延时通话,按“开锁”键可为该门口开锁,按“*”退出(呼叫时如显示BUSY则线路忙)3、监视门口机:按楼栋单元号+“0000”+9,(栋号3位,单元号1位共4位)监视中按1-9键可延时,按“开锁”键可为该门口开锁4、接受门口机呼叫:待机时听振铃时按1-9键或“回呼”键即可进入通话候通话,通话中按1-9键可延时通话,按“开锁”键可为该门口开锁,按“*”退出5、接受分机呼叫:待机时听振铃并显分机房号时,按“回呼”键(等候通话,按“*”键退出6、上下翻查功能向上翻查:V注:1、中心机呼叫用户分机时,拔(楼栋号3位+单元号1位+房号4位共8位数,若不足3位或4位则在前面加0)2、本系统可容纳255栋楼群,每栋1-8个单元,共2000多台门主机同时联网,在同一小区联网内门口主机不能设置相同楼栋号。
三、数码主机使用设置1、楼栋单元号设置:可跟据小区管理处对该门口要求进行设置楼栋单元号。
楼栋号范围:001-255(共3位数,不足3位在前面加0,不能设置000)单元号范围:1--8 (1位数,不能设0或9)方法:A、在主机键盘上输入:##115948,输入完后再输入4位楼栋单元号。
kav安装步骤
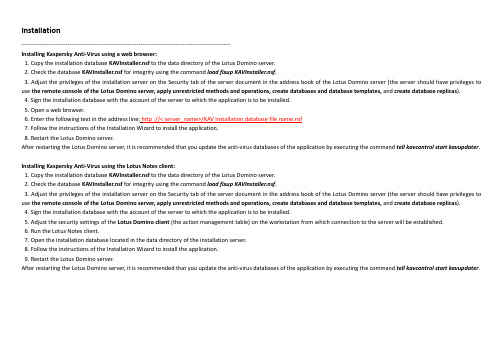
Installation-------------------------------------------------------------------------------------------------------------Installing Kaspersky Anti-Virus using a web browser:1. Copy the installation database KAVInstaller.nsf to the data directory of the Lotus Domino server.2. Check the database KAVInstaller.nsf for integrity using the command load fixupKAVInstaller.nsf.3. Adjust the privileges of the installation server on the Security tab of the server document in the address book of the Lotus Domino server (the server should have privileges to use the remote console of the Lotus Domino server, apply unrestricted methods and operations, create databases and database templates, and create database replicas).4. Sign the installation database with the account of the server to which the application is to be installed.5. Open a web browser.6. Enter the following text in the address line:http ://<server_name>/KAV installation database file name.nsf7. Follow the instructions of the Installation Wizard to install the application.8. Restart the Lotus Domino server.After restarting the Lotus Domino server, it is recommended that you update the anti-virus databases of the application by executing the command tell kavcontrol start kavupdater.Installing Kaspersky Anti-Virus using the Lotus Notes client:1. Copy the installation database KAVInstaller.nsf to the data directory of the Lotus Domino server.2. Check the database KAVInstaller.nsf for integrity using the command load fixupKAVInstaller.nsf.3. Adjust the privileges of the installation server on the Security tab of the server document in the address book of the Lotus Domino server (the server should have privileges to use the remote console of the Lotus Domino server, apply unrestricted methods and operations, create databases and database templates, and create database replicas).4. Sign the installation database with the account of the server to which the application is to be installed.5. Adjust the security settings of the Lotus Domino client (the action management table) on the workstation from which connection to the server will be established.6. Run the Lotus Notes client.7. Open the installation database located in the data directory of the installation server.8. Follow the instructions of the Installation Wizard to install the application.9. Restart the Lotus Domino server.After restarting the Lotus Domino server, it is recommended that you update the anti-virus databases of the application by executing the command tell kavcontrol start kavupdater.。
Tech2Win 安装指南说明书
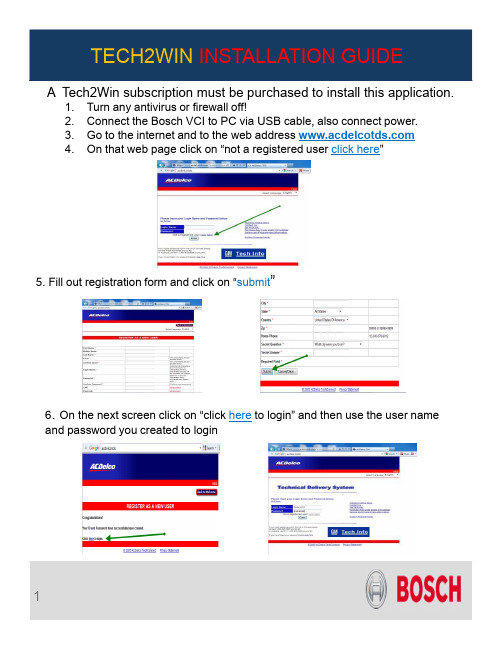
A Tech2Win subscription must be purchased to install this application.1.Turn any antivirus or firewall off! 2.Connect the Bosch VCI to PC via USB cable, also connect power. 3.Go to the internet and to the web address 4.On that web page click on “not a registered user click here ”5. Fill out registration form and click on “submit ”6. On the next screen click on “click here to login” and then use the user name and password you created to login7. agreement, click on “accept” and then click on “service and programing information ”, next screen click on8. Next screen is your choices of subscriptions: For our purpose we will choose the bottom one “Tech2win”. Then pick length of subscription, then fill out form then click on “9.Next screen click on “Access Subscription ” above the subscription that you chose . Next screen click “ ”12. Next screen choose “Software Download (SWDL)” and then click “ Start Software Download “13. Next pop up screen will display “tech2 win not installed” click on “and follow the screen prompts to install tech2win on your PCInstall ”“14. Next screen click “Then you need to minimize the internet screen and click on the ““ icon on your desktop. At this point Connect to your MVCI unit.with thec lick16. Now bring the internet window you minimized back up and choose theoption . Choose “North American operations” ,then the latest version of the software, then “english”, then “select” then “Download”17. Let the program run and then click ““ on the final screen of the installation program and close the internet page. Also close the Tech2win program.18. Reopen the program and the “Select Vehicle CommunicationInterface” screen should pop up, choose how you want to use the program this time. Once you have done that you should be operational!!POSSIBLE ERROR MESSAGESMost error messages are because the programs can not see the VCI.Error messages E4150 one occurs when you are trying to download the program from the internet.● Make sure the Windows Firewall and any antivirus is turned off● Make sure he VCI is powered up and connected via USB cable● Open up the “VCI Manager” on your desktop and see if it see’s the VCI, ifit does it is probably a firewall, if it does not call Bosch Tech support forhelp on resolving the issue.This message occurs wihen you open TECH2winwithout the VCI hooked up and powered on.。
KAV 3.2高清图像传感器产品说明书
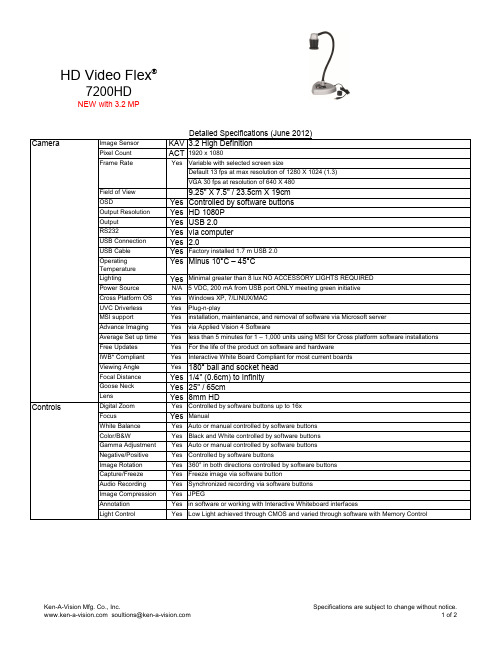
Image Sensor KAV 3.2 High DefinitionPixel Count ACT 1920 x 1080Frame RateYes Variable with selected screen sizeDefault 13 fps at max resolution of 1280 X 1024 (1.3)VGA 30 fps at resolution of 640 X 480Field of View9.25" X 7.5" / 23.5cm X 19cm OSDYes Controlled by software buttons Output ResolutionYes HD 1080P OutputYes USB 2.0RS232Yes via computer USB ConnectionYes 2.0USB CableYes Factory installed 1.7 m USB 2.0 OperatingTemperatureYes Minus 10°C – 45°C LightingYes Minimal greater than 8 lux NO ACCESSORY LIGHTS REQUIRED Power SourceN/A 5 VDC, 200 mA from USB port ONLY meeting green initiative Cross Platform OSYes Windows XP, 7/LINUX/MAC UVC DriverlessYes Plug-n-play MSI supportYes installation, maintenance, and removal of software via Microsoft server Advance ImagingYes via Applied Vision 4 Software Detailed Specifications (June 2012)HD Video Flex ®7200HDNEW with 3.2 MPCamera Average Set up timeYes less than 5 minutes for 1 – 1,000 units using MSI for Cross platform software installations Free UpdatesYes For the life of the product on software and hardware IWB* CompliantYes Interactive White Board Compliant for most current boards Viewing AngleYes 180° ball and socket head Focal DistanceYes 1/4" (0.6cm) to Infinity Goose NeckYes 25" / 65cm Lens Yes 8mm HDDigital ZoomYes Controlled by software buttons up to 16x FocusYes Manual White BalanceYes Auto or manual controlled by software buttons Color/B&WYes Black and White controlled by software buttons Gamma AdjustmentYes Auto or manual controlled by software buttons Negative/PositiveYes Controlled by software buttons Image RotationYes 360° in both directions controlled by software buttons Capture/FreezeYes Freeze image via software button Audio RecordingYes Synchronized recording via software buttons Image CompressionYes JPEG AnnotationYes in software or working with Interactive Whiteboard interfaces Light Control Yes Low Light achieved through CMOS and varied through software with Memory ControlControls7200HDNEW with 3.2 MPFull Screen Yes desktop enabled icon and single click software button via software Applied Vision 4SoftwareImage Compression Yes Software Enabled JPEGSplit Screen Yes SoftwareYes 8 running simultaneously processor speed requiredMultiple CameraSupportTime Lapse Recording Yes Both Image and Video playbackDrawing Yes Multiple pallet toolsVideo Playback Yes Through varied programsDocument Orientation Yes Single Click software buttonDistance Learning Yes Single Click software button UVC compliantAuto Format Image Yes16:9 format and/or 4:3 fomat auto or manual select by softwareExport to MS Office Yes Drop down to MS Word or EXCELSize7" x 7" x 28" / 18cm x 18cm x 72cmOther InformationWeight10lbs / 4.55kgsMicroscope AdaptersBuilt-in 34.5, 28mmCarrying Case Molded plastic with aluminum frame; Folding handle and locking latchOptional Upgrades USB extension cable (VVC16USB)Certifications CE, CSA, RoHS, Weee, ISO 9001 - 2000Warranty 5 Years*Interactive Whiteboard。
手把手教你玩富威二代导航
手把手教你玩富威二代导航手把手教你玩富威二代导航,地图升级篇,很多车主安装了富威二代导航,导航安装以后地图升级一直是个问题,很多人还没有升级过地图,今天我就交给大家怎么样升级,会升级的就不要看了,免得耽误时间,但是麻烦你回个帖,算是对我的一个鼓励,下一步我再教给大家安装DSA和WolfNCU,下面先从升级地图开始。
一、导航的基本知识以下省略N字。
二、了解的几个概念:1、端口:就像是你家所住的大楼,端口就是你家的大门,只对你打开,别人不能用,所以,每个导航仦都会给地图一个端口,别搞错了,搞错了你进不去。
富威二代的端口是2。
2、波特率: 率等于每秒钟传输的数,你一次能接受1个苹果,我却扔给你10个,恐怕你一个也接不住。
富威二代的波特率是4800这两个参数是至关重要的,你错一个那你的导航就搜不到星,就这么简单。
3、虚拟端口:如果你把端口让给DSA戒WolfNCU,那么地图就没有了,只能虚拟一个给地图,这个以后再说。
4、操作系统:导航就是一个小电脑,他也有操作系统,目前主要是winCE。
将来你要是在电脑上模拟,这个用得着。
二、地图篇下载地图:1、要下载和自己的导航相适应的地图,例如富威二代的分辨率是800×480,那些480×234、320×240等分辨率的就不要下了。
2、下载地址:GPS之家是很快的,呵呵。
自己搜吧,否则又要删除的我的帖子,说我侵犯版权了。
3、下载工具:由于下载地图都很大,目前的凯立德2342J07居然达到2.5G,一般的下载工具除非你分割上传,否则还是115优蛋比较好用了,但是关键是看人家用什么上传的,到时会提醒你安装相应的下载工具,这个大家可以自己体会了,别说你不会下载安装!!!。
拷贝地图:特别声明:往地图卡上拷贝地图以前,一定要备份原来的地图!!!!!!这个比较简单,直接将NaviOne文件夹拷贝到地图卡根目录就可以了,特别注意:有的朋友解压缩的时候,NaviOne文件夹里面还有一个NaviOne文件夹,很多TX都犯过这个错误,这个一定注意!!!四、修改参数下一篇我再介绍DSA善领的安装和使用!感谢大家的支持,在这里简单介绍吧设置端口:1、将卡放入导航,然后修改导航路径,使你的导航启动DSA_AutoConfig文件,这一步至关重要的,因为他会告诉你你的导航端口、波特率、和虚拟端口。
KAV2代安装说明书
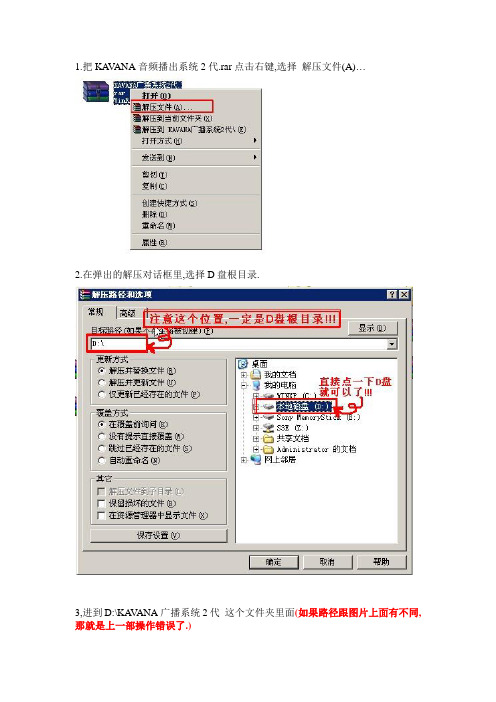
1.把KA V ANA音频播出系统2代.rar点击右键,选择解压文件(A)…2.在弹出的解压对话框里,选择D盘根目录.3,进到D:\KA V ANA广播系统2代这个文件夹里面(如果路径跟图片上面有不同,那就是上一部操作错误了.)4,复制KA V ANA音频系统2代这个文件到桌面上5.双击打开,弹出此对话框6,复制好机器码以后,从qq上发给我(如果有几台电脑,请逐一注明,千万别搞混了.每个电脑都是不一样的.)发给我以后,我会对应的发给您一个注册码这时候您就可以把注册码填写进去,然后点确认(注册)了.PS:因为每台电脑配置不同,可能在安装过程中会出现一些其他情况,如果系统无法运行,请把具体情况告诉我如果能够成功运行的话,那恭喜!!!2代系统升级成功!但是2代系统无法使用1代系统的歌单,待升级完成以后会发新的歌单.自动换单如果需要自动换单,实现无人值守,请注意以下几个地方.1 歌单路径歌单路径最好是本地磁盘的路径,这样就不会重启后,因路由器延时而造成的歌单无法及时载入的现象.默认的是放在这个位置.D:\KA V ANA广播系统2代\歌单在软件的这里可以自定义位置2 重新启动时间如果要自动换单,就需要在这个位置打勾.因为重启需要一定的时间,所以,最好是设置在凌晨,具体的时值,请根据个别计算机重启的速度而决定.默认的时值,是一台比较高配的计算机,而一般的计算机,最好是保守估计,建议调成3:55:20秒重启以后的时间,一定要在整点报时附近,而且一定要在报时前.因为需要整点来触发歌曲的播放.3 随系统启动如果要自动换单,此位置必须选择开机自动启动系统.延时可以自己来调节.延时是为了响应路由器的的延迟时间.。
Elkay ezH2O Liv 水机安装指南说明书

ezH2O Liv ® and Liv Pro Installation Checklist1333 Butterfield Road, Suite 200 | Downers Grove, IL 60515630.574.8484 | | ©2022 Elkay Manufacturing Company(12/22) F-6484-ELKWhich product do you plan to install?Water dispenser with filter box Dimensions: 28″L x 18″W x 5-1/8″DWater dispenser without filter box (remote filter)Dimensions: 20″L x 18″W x 5-1/8″DNote: Filter must be installed within 15 feet of the dispenser.Every installation site is different. To ensure a smooth installation of the ezH2O Liv ® water dispenser, please review this checklist and ensure the wall and surrounding space is properly prepped. This checklist is not intended to replace the installation instructions shipped with the product.Remote Chiller (ERS11Y)Dimensions: 22″L x 19-1/2″W x 7-7/8″D Note: Chiller must be installed within 15 feet of the dispenser using 3/8″ tubing (not included).Electrical RequirementsPower supply junction box: 115 VAC, 60HAccording to most electrical codes, the electrical box cannot be sealed inside a wall cavity with no access to it. If the electrical connection is placed under the water dispenser, a user-suppliedremovable wall cover will be required to access the junction box.Water RequirementsMake sure the water valve is 3/8″ and the water supply pressure to the water dispenser is between 40 and 105 psi.Minimum pressure for unit with filter: 40 psi Optimum pressure: 60 psiOptimum noise level: Lower than 70 dB Catch Basin, Drain and P-trapThis unit can be connected to either a 1) catch basin or a 2) 1-1/2″ drain and 1-1/4″ P-trap (not included).Once installed, complete your fit and finish withdrywall and paint.Unit with filterbox dimensions: 28″ x 18″ x 5-1/8″Unit without filterbox dimensions: 20-1/2″ x 18″ x 5-1/8″Remote chiller (ERS11Y)Note: There are different chiller options available for commercial settings. Work with your sales representative to determine the best solution for your needs.Space RequirementsDeliveryezH2O Liv shipping weight: 40 lbs.ezH2O Liv + chiller shipping weight:78 lbs.Elkay Installation Services can help.Contact 800.952.8064 or************************.。
卡瓦奇安装指南说明书

Kavach application on App StoreThe Kavach application can also be downloaded from the URL: https://.in Enrollment on Kavach applicationOnce the application is downloaded and installed, to complete the enrolment user should follow the steps Accept the terms and conditionsAuthenticate by submitting username & passwordInsert the 6-digit code OTP (One time password) received via SMS on your registered Mobile number.How to use the Mobile applicationAfter successful installation of the mobile application, please follow the steps mentioned below: Login with username /password and press enter.The user will receive a notification from Kavach mobile app to “Accept”/”request.The request should be accepted immediately. Any delay will result in “timeout”have to repeat the above-mentioned steps.Please note: The user should be in strong signal zone to receive the notification. If, for any reason, the user is in a weak signal user may not receive the notificationPlease use the following two option in such a scenario:Notification requires a strong and stable network connection (Wi-Fi/Mobile Data). If the user is in a weak signal zone, then the user may not receive the notification immediately. In this case, the user can click on “PULL NOTIFICATION” option on the home screen of the Kavach app to receive the notification. The user should accept to access mail.Step 1 Step 2 Step 3Append OTP with passwordOpen the Kavach application.Use the 6-digit OTP (displayed on the home screen of the Kavach app). This OTP will change in every 30 seconds.Suffix the numbers with your password, without any gap and click on “Sign In”Steps to configure path for Mailing Client (outlook) in Kavach application Open the Kavach Application“Setting s”and then click on “Set Mail Path” to set the Outlook pathSteps to configure outlook in Kavach ApplicationOpen the Kavach ApplicationClick on “Launch mail” (Mail application will open)A new window prompt “Select Mail application to Launch” will open. To set up a mail path of Thunderbird, the user must enter “ /bin/thunderbird ” in the File Name.Click “Open”. The user will get a prompt on the screen with “Updated mail program path successfully”.3. Enter the user ID, email address and password & click on continueNow your email has been configured.Please Note:•Always Use “Launch Mail” option on Kavach App to access the Mails.•As soon as the user clicks “Launch Mail”, the current IP of the user will be registered, and the mail can be used.I nstalling Kavach Application on your Mac Desktop/Laptop12.1 Installation of Kavach Application on Mac Desktop/Laptop1.Go to “Security & Privacy” option and click on “Open Anyway” under the General option to startthe installation of Kavach application on the desktop/Laptop.3. Click on “Continue” to start the installation of the Kavach application.5. Once the installation of the Kavach application is completed. The below stated window will appear to notify about the completion of installation and then click on close.A new window prompt “Select Mail application to Launch” will open. To set up a mail path of Mail App, the user must enter “/system/applications/mail app/macos/mail” or path of outlook“Application/Microsoft Outlook.app/Contents/Macos/Microsoft outlook” in the File Name.Click “Open”. The user will get a prompt on the screen with “Updated mail program path successfully”.3. Click on Other Mail Account2. Popup window will appear on your screen to “Choose an Email Client application4 .Enter the Incoming and Outgoing server details as .in shown below and click on Next.in iPhone and click on Mail option and then click on Accountsoption and select the account.1.Open iPhone Setting and choose mail。
VERSAJET II 安装指南

VERSAJET™ II 系统组成
• • • • • •
主机控制台
多功能脚踏开关 电源线
一次性手柄
使用说明书 VERSAJET II车架
•
•
无菌生理盐水袋(医院自备)
废物容器(必须是没有连接过 滤器和负压吸引的废物容器, 医院自备)
VERSAJET™ II控制台前控制面板
•
• •
像所有的外科手术一样,VERSAJET II操作员和临床人员应遵守感染控制的通用预防措施(包括使用外科 手套、口罩遮挡口鼻、护目镜、防护服、和防滑鞋套)。
请勿接触手柄的操作窗口的高压喷射流 每件VERSAJET II一次性手柄预期仅供一次性使用。请勿重复灭菌。使用后将其丢弃。VERSAJET II手柄 的设计不能承受重复处理或者重复灭菌;器械的性能将会受损,并且不能保证其无菌性。 请勿让盐水袋排空,这可能使空气进入进水管中,从而临时降低手柄的工作效率,并可能需要重新进行灌 注。 不建议对盐水进行预热,因使用高压,在使用中会发生盐水的加热。
手柄安装图示指南(续)
9.将废物排出管路的末端(蓝色尖端)连接到废物容器上,不 得连接到具有过滤器的端口上或者标注有“VACUUM(真空)” 的端口上。您必须确保废物容器的盖子上有一个额外的开放端口。 确保盐水流入管、高压管和废物排出管中不存在扭结或者其他外 来阻塞。
10.手柄灌注: •从手柄的尖端上取下保护盖。 •保持手柄的安全距离(建议手柄远离病患伤口),同时将控制台 的功率设定为10。 •踩下脚踏开关,并保持系统运行,直至盐水到达手柄刀头的尖端 (必要时调整进水管的高度或角度,协助盐水灌入泵芯处的进水 管段)。 •当听到“咝咝”声并看到盐水流从刀头喷射孔流出,并从排出口 回吸走,表示系统灌注完毕,灌注大约持续30秒。 •成功灌注后,松开脚踏开关,并在开始清创前将功率设置降低到1。 警示:一旦系统灌注,请勿让盐水袋排空。空的盐水袋可能导致空气进入系统中,并需要 重新灌注系统。在更换盐水袋时应夹闭管路。 11.在最低的功率设置下开始清创手术,并在必要时将功率提高 到正在切除或者清除的组织类型最佳的功率设置。
蓝鳄系统产品安装指南说明书
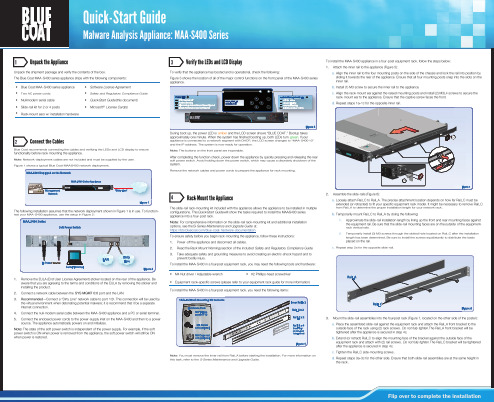
Hale Waihona Puke 3Flip over to complete the installation
2 1
2 static
®
© 2015 Blue Coat Systems, Inc. All rights reserved. BLUE COAT, PROXYSG, PACKETSHAPER, CACHEFLOW, INTELLIGENCECENTER, CACHEOS, CACHEPULSE, CROSSBEAM, K9, DRTR, MACH5, PACKETWISE, POLICYCENTER, PROXYAV, PROXYCLIENT, SGOS, WEBPULSE, SOLERA NETWORKS, DEEPSEE, DS APPLIANCE, SEE EVERYTHING. KNOW EVERYTHING., SECURITY EMPOWERS BUSINESS, BLUETOUCH, the Blue Coat shield, K9, and Solera Networks logos and other Blue Coat logos are registered trademarks or trademarks of Blue Coat Systems, Inc. or its affiliates in the U.S. and certain other countries. This list may not be complete, and the absence of a trademark from this list does not mean it is not a trademark of Blue Coat or that Blue Coat has stopped using the trademark. All other trademarks mentioned in this document owned by third parties are the property of their respective owners. This document is for informational purposes only.
- 1、下载文档前请自行甄别文档内容的完整性,平台不提供额外的编辑、内容补充、找答案等附加服务。
- 2、"仅部分预览"的文档,不可在线预览部分如存在完整性等问题,可反馈申请退款(可完整预览的文档不适用该条件!)。
- 3、如文档侵犯您的权益,请联系客服反馈,我们会尽快为您处理(人工客服工作时间:9:00-18:30)。
1.把KA V ANA音频播出系统2代.rar点击右键,选择解压文件(A)…
2.在弹出的解压对话框里,选择D盘根目录.
3,进到D:\KA V ANA广播系统2代这个文件夹里面(如果路径跟图片上面有不同,那就是上一部操作错误了.)
4,复制KA V ANA音频系统2代这个文件到桌面上
5.双击打开,弹出此对话框
6,复制好机器码以后,从qq上发给我(如果有几台电脑,请逐一注明,千万别搞混了.每个电脑都是不一样的.)
发给我以后,我会对应的发给您一个注册码
这时候您就可以把注册码填写进去,然后点确认(注册)了.
PS:因为每台电脑配置不同,可能在安装过程中会出现一些其他情况,如果系统无法运行,请把具体情况告诉我
如果能够成功运行的话,那恭喜!!!2代系统升级成功!
但是2代系统无法使用1代系统的歌单,待升级完成以后会发新的歌单.
自动换单
如果需要自动换单,实现无人值守,请注意以下几个地方.
1 歌单路径
歌单路径最好是本地磁盘的路径,这样就不会重启后,因路由器延时而造成的歌单无法及时载入的现象.
默认的是放在这个位置.
D:\KA V ANA广播系统2代\歌单
在软件的这里可以自定义位置
2 重新启动时间
如果要自动换单,就需要在这个位置打勾.
因为重启需要一定的时间,所以,最好是设置在凌晨,具体的时值,请根据个别计算机重启的速度而决定.
默认的时值,是一台比较高配的计算机,
而一般的计算机,最好是保守估计,建议调成3:55:20秒
重启以后的时间,一定要在整点报时附近,而且一定要在报时前.因为需要整点来触发歌曲的播放.
3 随系统启动
如果要自动换单,此位置必须选择开机自动启动系统.延时可以自己来调节.
延时是为了响应路由器的的延迟时间.。
