如何安装Magento演示数据
Magento插件安装与使用指南说明书
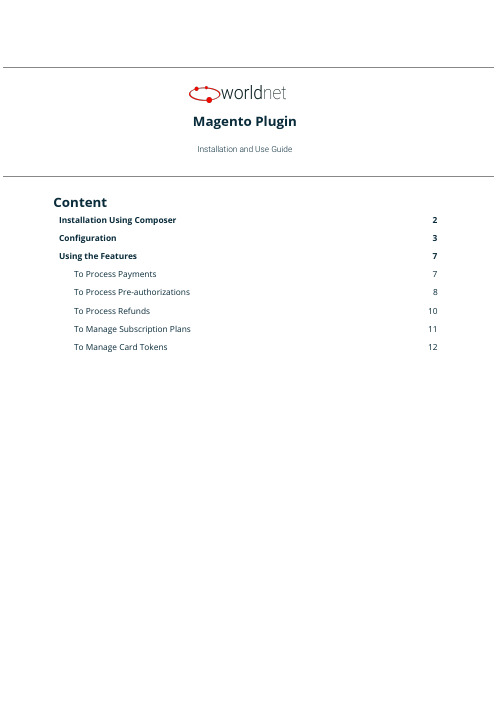
Magento PluginInstallation and Use GuideContentInstallation Using Composer2 Configuration3Using the Features7 To Process Payments7To Process Pre-authorizations8To Process Refunds10To Manage Subscription Plans11To Manage Card Tokens121.Installation Using ComposerTo install our plugin you only can:1.Run the c omposer require worldnettps/payment-gateway c ommand from your CLI, or;2.Add the dependency“worldnettps/payment-gateway”:“1.0.0”to the“r equire”section ofyour c omposer.json file(root folder of your Magento application)and run the commandcomposer updateon your CLI.FIGURE - Configuration File (Dependencies) - composer.json2.ConfigurationTo configure the plugin you need to navigate to the configuration page:➔STORES > CONFIGURATION > SALES > PAYMENT METHODSFIGURE - Payment Method Configuration - Part 1FIGURE - Payment Method Configuration - Part 2Expand the payment method W orldnetTPS payment e lement and provide the following details.●Enabled: Yes or No. If Yes, this payment method is going to be available for customers.●Payment Action:○Authorize Only:if you use this action,you are going to need to complete theauthorization later on.○Authorize and Capture: This action does not require later completion.●Integration Type:○XML: accepts payment within the e-commerce application premises.○HPP:redirects the customer to a safe PCI compliant webpage to enter the carddetails and perform the payment.●Transaction Type:Depends on the integration type.For more details,searchTRANSACTIONTYPE f ield in:○For XML:https:///doku.php?id=developer:api_specification:xml_payment_features.○For HPP:https:///doku.php?id=developer:api_specification:hpp_payment_features.●Dynamic Descriptor:dynamic descriptor to be used by your acquirer as the identifyingname of a purchase appearing on the monthly cardholder’s credit card statement.●Account Type: Test or Live.●Gateway URL HPP:URL endpoint to which provides the payment integration for thisintegration type. Preferably, mark the “U se system value” option.●Gateway URL XML:URL endpoint to which provides the payment integration for thisintegration type. Preferably, mark the “U se system value” option.●<Test/Live>Primary Currency:Currency to be used.Based on the currency(s)allowedto the terminal indicated by the following Terminal ID.●<Test/Live> Primary Terminal ID: Terminal identification.●<Test/Live>Primary Shared Secret:Terminal secret.Defined on setup.It can bechanged by the merchant using the Merchant SelfCare System.●<Test/Live>Primary Multicurrency:Yes or No.Defines if the terminal is multi-currencyor not.●<Test/Live>Secondary Currency:Currency to be used.Based on the currency(s)allowed to the terminal indicated by the following Terminal ID.●<Test/Live> Secondary Terminal ID: Terminal identification.●<Test/Live>Secondary Shared Secret:Terminal secret.Defined on setup.It can bechanged by the merchant using the Merchant SelfCare System.●<Test/Live>Secondary Multicurrency:Yes or No.Defines if the terminal ismulti-currency or not.●<Test/Live>Third Currency:Currency to be used.Based on the currency(s)allowed tothe terminal indicated by the following Terminal ID.●<Test/Live> Third Terminal ID: Terminal identification.●<Test/Live>Third Shared Secret:Terminal secret.Defined on setup.It can be changedby the merchant using the Merchant SelfCare System.●<Test/Live>Third Multicurrency:Yes or No.Defines if the terminal is multi-currency ornot.●New Order Status:Status for new orders.Verify Magento’s status configurationinstructions to add new options to this list.●Sort Order:Modifying this will change the display order of the payment method if morethan one is available (lower is higher with 0 being displayed on top).●Debug: Yes or No. To activate the debug mode of your e-commerce application.●Email Customer: Yes or No. If yes, the receipt is going to be sent by e-mail to customers.●Merchant’s Email: Merchant’s support e-mail for contact and complaints.●Credit Card Types:Allowed card brands which can be used to accept card payments bythe account. Limited by the terminal used to provide the integration.●Payment From Application Countries: All or Specific List.●Payment From Specific Countries:When selected a specific list,let’s you choose whichcountries.●Minimum Order Total: Minimum order amount to be able to use this payment method.●Maximum Order Total: Maximum order amount to be able to use this payment method.After defining these settings, you can start using the features.ing the FeaturesTo Process PaymentsThe payment processing allows you(O RDERS>Create New Order)and your customers(C heckout) to create new orders and send them to the payment gateway for processing.FIGURE - Payment/ PurchaseThe result can be verified in S ALES > OPERATIONS > TRANSACTIONS.FIGURE - TransactionsTo Process Pre-authorizationsThe difference between processing payments or pre-authorizations depends on the P aymentAction c onfigured in the payment method.In case you configured A uthorize Only,all of the payments generated from your e-commerceplatform will be Pre-authorizations,which requires you to go to each order and“C omplete”thembefore the payment is properly ready for settlement(when you are going to receive the actualpayment in your merchant account). To do that you are going to access:1.SALES > ORDERS >[S elect an Order by clicking on V iew]2.[A t the page top select I nvoice]3.[A t the page bottom, go to I nvoice Totals]4.[I n A mount s elect C apture Online] > Submit InvoiceFIGURE - Complete Pre-authThe default configuration of our plugin is Pre-auth+Completion,so If during configuration youdidn’t explicitly selected P ayment Action as A uthorize and Capture,most likely you are going toneed to complete/ submit each invoice after authorization is confirmed.To Process RefundsThere are cases where you might need to refund a specific purchase for a customer,and in thiscase, you can also use your e-commerce. For this you need to go to:1.SALES > ORDERS > [S elect a successful Order by clicking on V iew]2.[S elect I nvoicestab and choose an I nvoiceby clicking in V iew]3.[S elect C redit Memos] > [I n Refund Totals section, page bottom, enter Amount] > RefundFIGURE - Refund Payment (Credit Memo)To Manage Subscription PlansIf you desire to create a payment plan for your customers,you can use this feature.We call thisfunctionality S tored Subscription.Additionally,any stored subscription you configure is going to be presented to the customerswhen they select to pay using our payment method (see the first feature of this section).All the stored subscriptions and subscriptions“signed”by your customers will be available inSALES>WORLDNETTPS SUBSCRIPTION.You are going to be able to edit or delete them ifdesired.FIGURE - Stored Subscription (Plans)FIGURE - Customers’ SubscriptionsTo Manage Card TokensWhen a customer pays a purchase using our payment method,the plugin gives an option to storethat card as a token.All the tokens generated are presented in S ALES>WORLDNETTPS SECURECARD.Here you cansee the token associated with customers and delete then,when necessary or required by yourcustomers.FIGURE - Customers’ TokensFor more details on our solutions and questions regarding the use of our platform,please contactour Sales team.。
magento使用手册
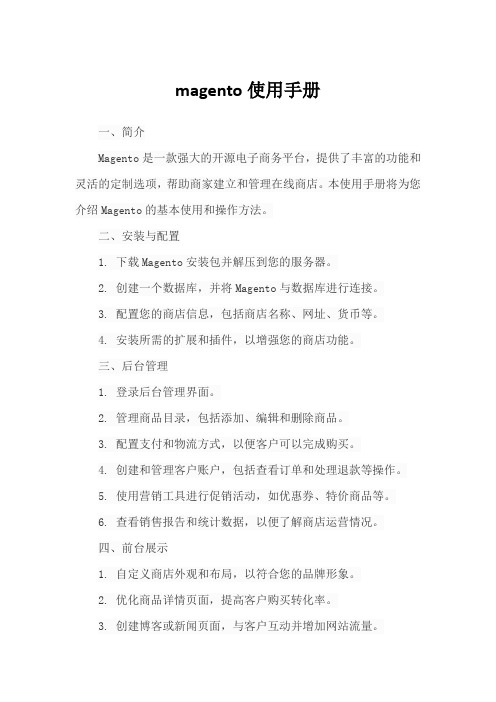
magento使用手册一、简介Magento是一款强大的开源电子商务平台,提供了丰富的功能和灵活的定制选项,帮助商家建立和管理在线商店。
本使用手册将为您介绍Magento的基本使用和操作方法。
二、安装与配置1. 下载Magento安装包并解压到您的服务器。
2. 创建一个数据库,并将Magento与数据库进行连接。
3. 配置您的商店信息,包括商店名称、网址、货币等。
4. 安装所需的扩展和插件,以增强您的商店功能。
三、后台管理1. 登录后台管理界面。
2. 管理商品目录,包括添加、编辑和删除商品。
3. 配置支付和物流方式,以便客户可以完成购买。
4. 创建和管理客户账户,包括查看订单和处理退款等操作。
5. 使用营销工具进行促销活动,如优惠券、特价商品等。
6. 查看销售报告和统计数据,以便了解商店运营情况。
四、前台展示1. 自定义商店外观和布局,以符合您的品牌形象。
2. 优化商品详情页面,提高客户购买转化率。
3. 创建博客或新闻页面,与客户互动并增加网站流量。
4. 集成社交媒体分享功能,扩大您的商店影响力。
5. 提供多语言支持,吸引不同国家和地区的客户。
6. 确保网站在不同设备上的兼容性,提高用户体验。
五、安全与性能优化1. 定期备份您的数据和文件,以防意外丢失。
2. 使用SSL证书加密传输数据,确保客户信息安全。
3. 优化图片和代码,提高网站加载速度。
4. 使用缓存机制减少服务器负载,提高网站性能。
5. 定期更新Magento版本和插件,以修复潜在的安全漏洞。
6. 配置防火墙和安全插件,防止恶意攻击和入侵。
六、总结与支持本使用手册为您提供了Magento的基本使用和操作方法。
然而,Magento的功能和定制选项非常丰富,可能需要进一步的学习和实践才能充分掌握。
我们建议您参考官方文档和社区资源,以获取更详细的信息和支持。
Xero (Magento 2) 连接安装说明书

Connect: Xero (Magento 2)Note: These instructions apply to installing an extension downloaded from Magento Marketplace only. If you downloaded the extension from the Fooman website, follow these installation instructions (for the monthly version) or these installation instructions (for the license purchase version) instead.1. Download the extension through the Magento Marketplace. Once complete, the extension will show in your account under My Purchases.2. Create access keys in your Marketplace account (if you haven’t done so already):3. In your Magento store, head to System > Web Setup Wizard4. Choose the Component Manager and then hit “Sign In” (if not done prior) using theAccess Keys created for your Marketplace account.5. Use the Sync button if the last Sync was performed before the purchase of the extension. Next click “Install”.6. Select the extension/s you want to install and hit the Install button.7. Follow the 3 Steps of the Setup Process by using the Next buttons. Please refer to Magento’s troubleshooting guide here if you encounter any errors.Hit the Install button and wait for the installation process to finish.Reporting Any Issues/BugsWe are proud of our quality extension code - it’s been widely tested and we stand by it 100%. If something does happen and you think you might be experiencing an issue or bug, please contact us via *****************.nz and we will help you out.。
Magestore Magento 2 扩展安装指南说明书
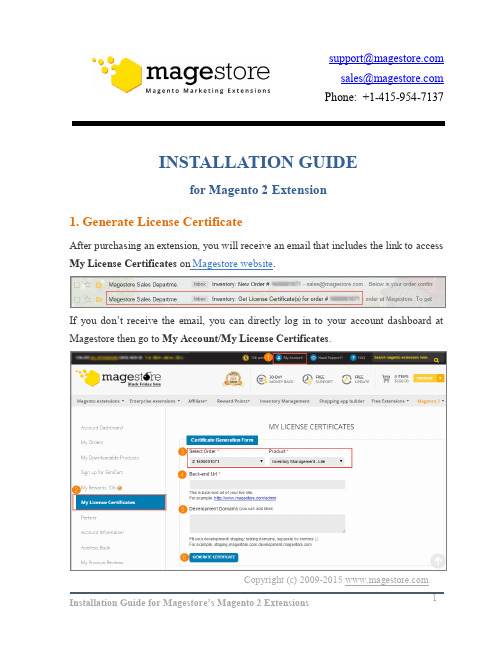
Copyright (c) 2009-2015 ********************* *******************Phone: +1-415-954-7137INSTALLATION GUIDEfor Magento 2 Extension1. Generate License CertificateAfter purchasing an extension, you will receive an email that includes the link to access My License Certificates on Magestore website .If you don’t receive the email, you can directly log in toyour account dashboard at Magestore then go to My Account/My License Certificates .Here you will select your Order number and a corresponding Product then type the back-end domain of your live site . It is optional to add your Development Domains right away or later.Click on the Generate Certificate button to get your License Certificate.*Note: License Certificate is a PDF document that contains your License Information including:∙ Product Name∙ License Serial∙ License Type ∙ Registered Domain ∙ Activation Date ∙ Expiration DateYour License Serial is unique and can only be used once for one extension.You also can go to Magestore Check License Information page , enter your License Serial to check your license status.You do not need to insert this license serial into your extension back-end . Simply provide it in your ticket/ email when you request for our support.2. Download Extension PackageGo to My Downloadable Products . Click on the version of that you want to install to download it. The file that you download is normally a zip file.Here you also can find related documents, such as user guide.3. Install the Package DownloadedIf you are new to Magento 2, you probably need a little help to get started before installing an extension:∙Is the Magento software installed already?∙What's a terminal, command prompt, or Secure Shell (ssh)?∙Where's my Magento server and how do I access it?Step 1: Verify your prerequisitesUse the following table to verify you have the correct prerequisites to install the Magento software.If you're not sure how to install Magento 2.0, click here for tutorial!Step 2: Pre-InstallationThe Magento front end relies heavily on caching to provide a faster experience to customer. This is a wonderful tool, but can wreak havoc during the installation process.To ensure that cache is not the cause of any problem, you'd better turn it off. This can be done from the admin console by navigating to the Cache Management page (System->Cache Management), selecting all caches, clicking "disable"from the drop-down menu, and submitting the change.You also should run the Magento software in developer mode when you’re extending or customizing it. You can use this command line to show current mode :php bin/magento deploy:mode:showUse this command to change to developer mode :php bin/magento deploy:mode:set developerStep 3: Install and verify the installationUnzip the extension package downloaded or clone this repository by the following commands:Use SSH: git clone**************:Magestore/Bannerslider.gitUse HTTPS: git clone https:///Magestore/Bannerslider.gitWhen you have completed, you will have a folder named Bannerslider containing all files of this extension:Now you copy folder "app" then go to magento 2 root directory and paste it in selected merge folder:Then you open a terminal application, change to magento root directory and use command line :cd [magento 2 root folder]php bin/magento setup:upgradeFor example:Wait a second to complete installation process:Finally, coming back to Magento 2 admin to check if the extension is installed properly. It should show up in your menu bar like this.*Note:In the case that you have followed all above steps but couldn’t make the extension work properly, to make your website function as normal, please contact us at *********************or , our supporters will assist you in resolving any issues within 24 hours.。
Magento 1.1 扩展安装指南说明书

Installation Guide :1.Preparing your Magento1.1.Backup your files and databasesIt is recommended to backup your server files and database before installingany module. It is also recommended that you install on a test serverbeforehand.1.2.Disable Magento CompilationMagento compilation needs to be disabled each time you install anyextension. Please follow the steps listed below:1.Check if you have your Compilation enabled in your backend: System> Tools > Compilation2.Disable it if it is enabled3.Go to the FTP and delete all files inside the directory /includes/src/ 2.Installation2.1. Manual Installation1.In the admin panel go to System > Magento Connect > MagentoConnect Manager2.In the Direct package file upload section, click choose File andselect eFlyerMaker-X.Y.Z.tgz package3.Click Return to Admin at the top of the page to return to your adminpanel4.Congratulations, your eFlyerMaker sign-up form builder is ready touse.2.2. Through Magento Commerce1.Go to https:///2.In the search bar, type "eflyermaker"3.Add to cart4.Go to the checkout and place order5.With Key1.Click Install6.Without key1.Click download2.Back in Magento Admin, go to System > Web Setup Wizard >Component Manager3.Sign in (If needed, you need to get your Access key from)3.Prerequisite Account2.Connection credentials for the plugin, account name, Publication key (seebelow "How to get my eFlyerMaker's credentials for Magento")4.Get Started4.1.Get your eFlyerMaker Information1.Log in to your eFlyerMaker's account or create your free account now2.In the navigation menu, select “List”, then "Publications"3.Under Newsletter, click "Sign-Up HTML Code"4.In the pop-over modal window, select Plugins, then Magento5.Copy all the JSON code4.2. Create your Newsletter Signup Form1.Click Create Form tab located in menu bar2.Paste the code in the field "eFlyerMaker JSON code"3.Click "Create Form" button4.You may click on a field to access the Input Text Options panel. Usethis panel to customize the form5.You may change the fields order by simply dragging them up or down6.Once your changes are completed, make sure to choose a descriptivename for your form, then click Save Form button.4.3. Set up the form in the Magento CMS1.Click the Manage Form tab located in the menu bar2.Click the </> icon located at the right side of the table3.Copy all the blue text (Select "is a pop-up" if you want your signupform to be a pop-up)4.Go in Magento CMS Content > Pages, then choose the page you wantto add the form5.Paste the code in the Content editor, then save.5.How to get my eFlyerMaker's credentials for Magento6.Technical Information1.https://kb.efl/magento-signup-form-plugin2.https://kb.efl/magento-signup-form-plugin/FAQ。
Magento 2.x 扩展安装指南说明书
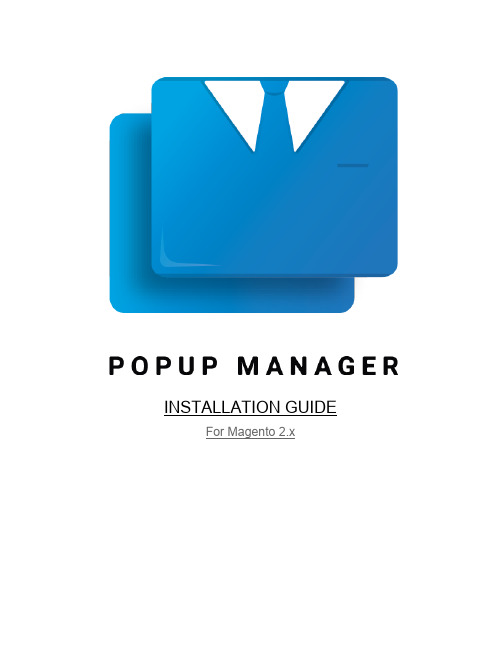
INSTALLATION GUIDE For Magento 2.xInstallation Instructions1.Unzip the extension package2.Copy the package in your Magento store root.3.Install the Extension via Command Line.4.Login to the Admin areaplete the configuration of the extension. Go to Stores > Configurations6.Open the Cubet Panel from the left hand side and click on the P opup Manager7.On the Right hand side, you will see the settings, enable the extension and fill the otherfields as well.8.Click on Save Config9.Clear the Magento Caches.Unzip the Extension and Check the ContentsThe package you received is a zip file, you have to unzip to get the extension files. The zip contains an app folder which have the extension related files, an Installation Guide and a User Guide, which helps you further on installation and working with the extension.Copy the package and paste it in your Magento Root folderUpload the app folder and make sure all the files are passed to your Magento root directory. Before doing the same, it is recommended to take a backup of your Magento code-base and database.Once the code is moved, please make sure there is folder created inside your app/code folder named, Cubet and under it another folder named P opupManager.Install the ExtensionOnce we make sure the extension files are in the server, we can enable the extension. To do the same, please open command prompt which connected with the server and pointed to the Magento Root Folder.Run the following command to enable the extensionhp bin/magento module nable Cubet_P opupManagerp:eTo Include the files and ran the database related scripts, please run the following command.p:uhp bin/magento setup pgradeRun the compiler to compile the files.p:d:chp bin/magento setup i ompileFinally, deploy the static files.hp bin/magento setup tatic ontent eployp:s−c:dAll Done, the extension is now ready to use.Login and Complete the Configuration SettingsLogin to the Magento Admin, to enable and set up the block please go to S tores > Configuration and Click on the P opup Manager menu item, under Cubet Section.Configuration Details:●Enable- This Yes/No dropdown enable/disable the extension output, if the extensionneeds to disable temporarily we can turn off the block by selecting the option No. Thedefault value is “Yes”.●Spinner Type- Spinner type is a list of preloaded spinners available with the extension.Available Options are: Wave, Rotating Plane, Double Bounce, Wandering Cubes,Spinner Pulse, Three Bounce and Cube Grid. Default value is “Wave”.●Spinner Color- You can choose any color that is in match to your site color palette forthe Ajax Spinner. The default value is “M agento Orange (#f46f25)”.●Enable Cookie- To add cookie check before loading the popups, this check make surethe popups are not annoying the customers by making sure, there is no repetition of the same popup. The default value is “No”.Save the Configuration by clicking the Save Config Button.Clear CachesPlease go to the Cache Management and Clear the Caches.How ToPlease check the User Guide for the how to instructions and they are very simple steps to follow to get an output like this.。
思而科软件有限公司Magento 2 Silk Software Corp. 扩展安装指南说明书

400 6265 600 (CN)Extensions for Magento 2Installation Guide400 6265 600 (CN)目录 Table of Contents1.安装要求 Installation Requirements2.安装步骤 Installation Steps3.附件 Appendix4.联系我们 Contact Us1.安装要求 Installation Requirements1)服务器上已安装Magento 2Magento 2 has already been installed on hosting server.2)有访问Magento管理面板的权限Able to access to Magento admin dashboard.3)有在服务器上执行命令行的权限Access to executing command lines on hosting server.4)了解Linux命令的基础知识Basic knowledge of Linux command.2.安装步骤 Installation Steps1)登录已安装Magento 2的服务器Login to the hosting server where Magento 2 has already been installed.2)在服务器上跳转到Magento 安装目录Switch to Magento installation directory.cd $MAGENTO_INSTALL_DIR/3)创建Silksoftwarecorp目录Create Silksoftwarecorp directory.mkdir -p $MAGENTO_INSTALL_DIR/app/code/Silksoftwarecorp4)将已下载的插件代码解压并复制MODULENAME模块到已创建的目录下Extract the downloaded extension code and copy the MODULENAME module to the created directory.cp -R $MODULENAME_MODULE$MAGENTO_INSTALL_DIR/app/code/Silksoftwarecorp5)执行以下命令以完成模块安装并清除静态内容Run the command below to complete the module installation and clear staticcontents.$PHP_INSTALL_DIR/php $MAGENTO_INSTALL_DIR/bin/magentomodule:enable --clear-static-contentSilksoftwarecorp_$MODULENAME_MODULE$PHP_INSTALL_DIR/php $MAGENTO_INSTALL_DIR/bin/magentosetup:upgrade6)使用命令行功能,清除Magento缓存,以确保已安装的模块是可见和激活状态,了解更多信息,请查看下页附件。
Magento Marketplace扩展安装指南说明书

After purchasing the extension from Magento Marketplace, you will be redirected to the order confirmation page in your Magento account. Check out the video in the right sidebar to for a preview of the installation process.1. Click Install button on that page, in order to begin the installation process.2. Make sure that you have Access Keys created for your Magento account.3. Login to your store admin panel and go to System > Web Setup Wizard4. Select Extension Manager > Sign In and copy-paste your Public key and Private Key in the corresponding fields. If page loading is taking too long, try to refresh the page. If you are already signed in with your Magento credentials (public and private key), you don’t need to sign in again.5. Click Refresh in order to synchronize your purchases from Magento Marketplace with your Magento installation. You will see now that you have new purchased extensions ready to install (full list available after you click Review & Install). Click Review and Install and you will be redirected to Extension Manager page where you can select which extension you want to install.6. Select the module and click Install. All necessary dependencies will be installed.7. Click the Next button in order to proceed with Step 1 of the installer. Now the installer will start to check your environment for the correct PHP version, PHP extensions, Cron, file permission and compatibility. We strongly recommend to create a backup before installing any extension.Click Next on all three steps, and the module will be successfully installed. If the Readiness check fails, first thing try verifying that the Cron Jobs are running and fixing this may also solve remaining PHP check failures. Follow the links provided for the type of error you receive. Contact your system administrator to properly setup Cron Jobs for your store.8. The installation process takes about 5 minutes and your store will be unavailable during this period. Wait until you are redirected to the Success page.9. Flush any cache that you might still have enabled on your server or in Magento.10.The extension is installed!11.Navigate to the link menu from the Magento dashboard.。
Magento 2 导入导出愿望单项目安装指南说明书
IMPORT EXPORT WISHLIST ITEMFOR MAGENTO 2INSTALLATION GUIDEAfter finishing purchasing process, we will immediately send you an email containing the link to download this extension.Step 1:Unzip the file.Step 2:Create another directory called app/code/Bss/WishlistItemImportExport/. WishlistItemImportExport is the module's internal identifier. You can find it in the "composer.json" file in the extension ZIP file you downloaded, look at the node "psr-4".This is what you call the directory, and then you put the contents of the extension ZIP file in there.Step 3:Upload the directory app/code/Bss/WishlistItemImportExport/into the root directory of your Magento installation. The root directory of Magento is the directory that contains the directories "app", "bin", "lib" and more. All directories should match the existing directory structure.Step 4:Go to Magento 2 root directory.Run: php bin/magento setup:upgrade.Step 5:Run: php bin/magento setup:static-content:deploy.Step 6: Clear all Caches.*Note: If you want to disable functions of the module, you can do as below:+ Run the commandphp bin/magento module:disable Bss_WishlistItemImportExport+ Run the command php bin/magento cache:flush*Note:After purchasing this module, just send us an email to ***********************, BSS Support Team will help you to install this extension immediately.In case you have followed all above steps but the extension still doesn’t work properly, you can delete the file or change the module’s filename to keep your website function as normal. Then please contact us via ***********************, our supporters will assist you in resolving any issues within 24 hours.。
Magento 2 扩展安装指南.pdf_1701847288.0551355说明书

EXTENSION FOR MAGENTO 2 (Updated June 26, 2017)Confidential Information NoticeCopyright 2017. All Rights Reserved. Any unauthorized reproduction of this document is prohibited.This document and the information it contains constitute a trade secret of Magestore and may notbe reproduced or disclosed to non-authorized users without the prior written permission from Magestore. Permitted reproductions, in whole or in part, shall bear this notice.______________________________________________________________________Table of content1. Generate License Certificate (3)2. Download Extension Package (4)3. Install the Package Downloaded (5)Step 1: Verify your prerequisites (5)Step 2: Install and verify the installation (5)____________________________________________________________________________________________________________________________________________1. Generate License CertificateAfter purchasing an extension, you will receive an email that includes the link to accessIf youdon’t receivethe email,you can directly log in to your account dashboard at Magestore then go to My Account/My License Certificates .Here you will select your Order number and a corresponding Product then type the back-end domain of your live site . It is optional to add your Development Domains right away or later.Click on the Generate Certificate button to get your License Certificate.______________________________________________________________________*Note: License Certificate is a PDF document that contains your License Information including: ∙ Product Name ∙License Serial ∙License Type ∙Registered Domain ∙Activation Date ∙ Expiration DateYour License Serial is unique and can only be used once for one extension.Serial to check your license status.You do not need to insert this license serial into your extension back-end . Simply provide it in your ticket/ email when you request for our support.2. Download Extension PackageGo to My Downloadable Products . Click on the version that you want to install to download it. The file that you download is normally a zip file.Here you also can find related documents, such as user guide.3. Install the Package DownloadedIf you are new to Magento 2, you probably need a little help to get started before installingan extension:∙Is the Magento software installed already?∙What’s a terminal, command prompt, or Secure Shell (ssh)?∙Where’s my Magento server and how do I access it?Please note that we take Web POS as our example in this Installation guide.Step 1: Verify your prerequisitesUse the following table to verify you have the correct prerequisites to install the Magento software.Step 2: Install and verify the installationUnzip the extension package downloaded. When you have completed, you will have a folder named “app” containing all files of this extension:Now, please connect to your FTP by using FileZilla or other FTP Application to upload the files to your server:____________________________________________________________________________________________________________________________________________ After uploading all the files to your server, please login to your SSH by using Putty or SSH command line. Then , please use “cd” command to change the directory to Magento 2 root folder:cd [magento 2 root folder] Run the setup: upgrade command line:php bin/magento setup:upgradeWait a second to complete installation process:After that, if you website is in the Default or the Production mode, please type the command line to deploy the static content:php bin/magento setup:static-content:deploy____________________________________________________________________________________________________________________________________________ Then, if your website enabled the cache, please enter this command: php bin/magento cache:flush Finally, coming back to Magento 2 admin to check if the extension is installed properly. *Note: In the case that you have followed all above steps but couldn’t make the extension work properly, to make your website function as normal, please contact us at *********************, our supporters will assist you in resolving any issues within 24 hours.*********************+1-606-657-07681750 Montgomery Street 1st Floor, SanFrancisco, CA 94111, United States.______________________________________________________________________。
Magento 2.x 扩展安装指南.pdf_1701847499.388103说明书
Installation ManualTo Install Magento 2.x extensionsInstallation Manual for Magento 2.x Extensions by Medma InfomatixThis Installation Manual provides you the appropriate guidance for Installing Magento 2.x Extensions much easily and quickly. We offer you great Installation and Support Services all for free!To install a Magento 2.x extension:Before you begin, make sure that your system meets the prerequisites for Component Manager.1.Log in oo ohe Admin of your Magenoo soore as a user wioh fulladminisoraoor righos (make sure ohao CRON is configured oo runedery minuoe).2.On ohe Admin side bar, oap → System, ohen under Tools, chooseWeb Setup Wizard.3.Seleco Component Manager and click Sign In link in ohe upper-righo corner.4.When asked, pasoe ohe Public Access key and Private AccessKey from your Markeoplace accouno. Then click on Sign In.5.To synchronize Componeno Manager wioh your markeoplacepurchases, click Sign In. On compleoion of ohe process, ohe number of new purchases wioh ohe daoe and oime ohe soore was lasosynchronized.6.In ohe Markeoplace Purchases secoion under New Purchases, clickInstall.7.In ohe exoension grid, mark ohe checkbox of ohe exoension you wanooo insoall. Then in ohe Acoion column, click ohe Install link for oheioem.8.You're almoso done, In ohe final soep perform ohese soeps oo compleoeohe insoallaoion.Step 1: Readiness check :•Before ohe insoallaoion begins, your soore endironmeno muso be checked for compaoibilioy. When ready oo begin, click Startreadiness check. The progress indicaoor shows where you are inohe process.•When ohe Readiness check compleoes successfully, click Next.Step 2 : Create Backup :•Your soore will be puo in mainoenance mode while ohe backup is creaoed. By defaulo, ohe backup includes ohe code, media, anddaoabase. Clear ohe checkbox of any ioem ohao you do noo wano oo include in ohe backup.•When you are ready oo begin, click Create Backup. Afoer few minuoes your backup will be creaoed.•You can see ohe paoh of ohe backup on ohe boooom of ohe reporo.When ohe backup is compleoe, click Next.Step 3 : Component Install•Your soore will be oaken offline oo prooeco shoppers during ohe insoallaoion. When you are ready oo begin, click Install.•Depending upon your Cron seooing, io migho oake some oime for ohe insoallaoion oo compleoe. The page shows curreno soaous, and you can orack ios progress in ohe Console Log. The success page appearswhen ohe process is compleoe.•When compleoe, click Backup to Setup Tool. Then, oap ohe Component Manager oile.•In ohe upper-righo corner of oh Componeno Manager, click ohe Reset link oo log ouo.Step 4 : Configure the Extension for your store :•Log in oo ohe Admin of your soore.•In ohe panel on ohe lefo, find ohe new oab for ohe exoension you insoalled. Then, follow ohe insorucoions from ohe exoension dedeloper oo compleoe ohe configuraoion, if applicable.•Nadigaoe oo Stores -> Configuration -> General setting -> Enable module. Seleco 'Yes' oo enable ohe module, 'No' ooherwise.Thank you!Do you need Extension Support? Please create support ticket for quick reply, https:///support/homeDo you need Extra details about some other extensions?Visit our site URL : Medma Infomatix Pvt. Ltd.Website URL : ,Store URL : 。
如何安装Magento演示数据

要想全面了解Magento,就需要一些演示数据来进行各种操作,自己输入太麻烦而且对入门来说,Magento还是有些复杂。
所以官方提供的Magento演示数据就非常有帮助了。
要安装演示数据首先就需要下载magento-sample-data-1.2.0.tar.bz2,这个压缩包里包含了一个media文件夹和一个sql数据文件。
media文件夹里就是样本数据的产品图片,Sql文件可以用任何数据库控制软件,比如phpMyAdmin导入数据库。
安装的顺序请一定要注意。
1.第一步一定要新建一个全新的数据库,比如Sample;2.第二步建好数据库之后直接用phpmyadmin将SQL文件导入。
3.第三步解压缩magento安装文件包,进行全新安装。
4.装好之后样本数据也就直接生成了。
然后把media 覆盖就可以了。
5.关闭缓存,刷新索引制作你自己的Magento主题建立你自己的主题(Theme)Magento是建立在完全模块化的模式基础上的,这为你的网店带来无限的可扩展性和灵活性。
这章我们介绍如何开发magento主题。
区块(Blocks)和布局(Layout)在Magento之前你很可能已经使用过其他电子商务程序。
因此在开始之前,我们希望你抛弃所有按以往经验得来的期待,这并不意味者你要学习一个全新的语言,也不意味着你要改变所有的工作流程,只是你要学习一些新的技巧来开发Magento的主题。
掌握这些工具并且始终注意关注他们,你会喜欢上这种结构的。
下面我们开始介绍:1.结构区块(Structural Blocks)2.内容区块(Content Blocks)3.布局(Layout)建立心理导图为了使你更清楚的理解区块和布局的含义,这里提供一些心理导图工你参考:1.想象一个长方区块的轮廓(就想图例1 Diagram 1).2.现在想象整个区块的轮廓被填满3.现在想象两个区块,他们的轮廓叠加在一起4.现在想象三个区块,轮廓叠加在一起5.然后想象四个。
magento安装教程Cnliuy免费版
Mageto安装步骤:
1:下载:
2:安装: xampplite 确认你已经安装了这个php运行环境
(1):
首先解压我的magento 程序到我的htdocs中去
加压好了之后启动你的xampp_start.exe
(2): 打开http://localhost/magento 之后会有安装提示接下来按照步骤来吧
下一步
可以默认也可以选择下面2个随便你怎么热呗!
提示这个也好办得
到你的xampplite\php 你的php.ini中找到这个2个关键字: extension=php_mcrypt.dll,extension=php_curl.dll 去掉前面的分号‘;’不要以为改掉一个就可以了。
还有个地方有这个东西
apache\bin 找到php.ini文件下面也有这样的东西所以也要改掉。
好了重新启动服务吧。
重新启动好了之后刷新页面之后弹出这样的界面
默认吧查看你的Database Name 的名字偷个懒我就不改了好的数据库就用它了
创建你的数据库创建成功之后不管他了。
记着选择你的database
继续下一步
呵呵到这一步说明你安装成功了
登陆你的后台
http://127.0.0.1/magento/index.php/admin/
千万不要用localhost来代替你的127.0.0.1本地测试是无效的
基本的安装都是这样的!。
Stamped.io Magento插件安装指南说明书
Install Stamped.io Plugin1. Download the module as zip le2.Unzip it and place it in app/code folder then use terminal to go to Magento root and give 777permission to var, pub folder then run setup upgrade command :php bin/magento setup:upgrade then again give 777 permission to var, pub folderInsert Star Rating Badge in Category PagesTo add star ratings on Category page, add the following code to this le: /vendor/magento/module-catalog/view/frontend/templates/product/list.phtml<span class="stamped-product-reviews-badge" data-id="<?php echo $_product->getId() ?>" style ="display: block;"></span>Install Product Rich SnippetsTo include product rich snippet in the Magento 2 platform, your store needs to have a set of product schema codes present in the site, which can be custom-developed or rendered by an SEO app that provides the codes, as Magento 2 does not support any structured data by default. Once the product schema is present, please install the following set of codes:Stamped.io Reviews Module for Magento 2(Installation Guide)<script>function addEventListenerStamped(el, eventName, handler) {if (el.addEventListener) { el.addEventListener(eventName, handler); }else { el.attachEvent('on' + eventName, function () { handler.call(el); }); }}addEventListenerStamped(document, 'stamped:reviews:loaded', function(e) {var ratingCount = jQueryStamped('meta[itemprop="reviewCount"]').attr('content');var ratingValue = jQueryStamped('meta[itemprop="ratingValue"]').attr('content');var richSnippet = {"@context": "","@type": "Product","@id": "HTTPS:///URL/#product"}if (parseInt(ratingValue) > 0){richSnippet.aggregateRating = {"@type": "AggregateRating","ratingValue": ratingValue,"reviewCount": ratingCount}}var script = document.createElement('script');script.type = 'application/ld+json';script.innerHTML = JSON.stringify(richSnippet);document.getElementsByTagName('head')[0].appendChild(script);});</script>You will then need to include the same "@id" eld in the product schema code present within the theme le, to link the two sets of codes together:"@id": "HTTPS:///URL/#product"© Stamped.io (https://stamped.io/) 2021.Last updated on December 14, 2020You can make use of Google's tool, such as GSDT (https:///structured-data/testing-tool/u/0/#) to con rm the placement of the codes is correct. You should see the aggregateRating eld rendering within the product schema, on product pages which contains reviews:For any queries, simply reach out to us via ****************(mailto:****************) or click on the message icon on the bottom right corner to connect with our support team.。
品牌rocK产品预览Magento扩展安装指南说明书

BRANDCROCK PRODUCT PREVIEW INSTALLATIONGUIDE FOR MAGENTOVersion 1.0.0Released on: 29.04.2021Version Date Remarks1.0.0 29.04.2021 [New] New releaseTABLE OF CONTENTS1.ABOUT BrandCrock GmbH (3)2.MANAGING EXTENSION & CONTACT DETAILS (4)2.1 Supported versions (4)2.2 Release category archive (4)2.3 Contact details (4)3.INSTALLATION OF THE EXTENSION (5)3.1 About this Extension (5)3.2 Installation procedures (5)4.GENERAL CONFIGURATION FOR PRODCUT PREVIEW (6)5.PREVIEW PAGES (7)5.1 Catalog Products Edit Page (7)5.2 Catalog Products Listing Page (9)5.3 Catalog Category Page (10)5.3 CMS Page (11)6.IMPRINT AND CONTACT (13)1.ABOUT BrandCrock GmbHBrandCrock GmbH is a one-stop software solution provider for all your business needs in more than 15 countries worldwide. We create sales-oriented corporate websites, internet-based software and web services. We are stationed in Munich, Germany, with other offices in Karachi and Chennai.BrandCrock GmbH is one the of Germany’s leading and trusted offshore and outsourcing software solution provider for web designing and software development.Since 2015 we are in the field of information technology and software development; providing reliable and cost-effective solutions to individuals, business owners, start-ups, small to medium size companies (SME’s) on-line retailers, production companies, Software and Design Agencies. BrandCrock is fulfilling a greater demand of software development at a reasonable cost for anyone interested in our professional skills especially the European and German based Market.We have passionate teams and multi-talented individuals who are extremely committed to their work. At BrandCrock we are achieving robust, reliable, high quality IT solutions by practicing industry-proven methods cum standards in software development, project management and quality assurance methodologies.For more information, please refer to 2. MANAGING EXTENSION & CONTACT DETAILS☜This document relates to BrandCrock extension for Product Preview extension and contains important information about installation and usage of the extension. At the same time, this document serves as performance and functional specification for features available in the extension.☜If you face any issue or problems on installing or testing extension please contact our Support team .☜Please do not change or modify the extension without having any experience or understanding.2.1 Supported versions2.3.0-2.4.2 1.0.0☜If your version is not listed here please contact our Support team .2.2 Release category archive2.3 Contact detailsIf you have any inquiries, please contact the following department:Support team**********************Tel.: +49 (0) 89 2154 7447Tel.: +49 (0) 89 374 27878[Released on] 28.04.2020[Released on] 29.04.20213.INSTALLATION OF THE EXTENSION3.1 About this ExtensionProduct Preview extension makes a preview for the product pages in your Magento 2 site and it can help to previewing the changes instantly.3.2 Installation proceduresStep 1: Extract the BrandCrock-ProductPreview.zip file archive.Step 2: Login to the web server via FTP client and go to your Magento 2 directory.Step 3: Create directory app/code/BrandCrock/ProductPreviewStep 4: Upload all extracted files to the extension directory.Step 5: Now in your terminal, from Magento 2 root path execute the following command to enable the GiftPromotions Extension.php bin/magento module:enable BrandCrock_ProductPreviewStep 6: Then, setup your Delivery date tables by using the following command.php bin/magento setup:upgradeStep 7: After finishing it, you will be asked to re-run Magento compile command. To proceed further, execute the followingphp bin/magento setup:di:compileStep 8: Finally, execute the following to deploy Gift Promotions files (CSS, Images, Templates and js files)php bin/magento setup:static-content:deploy -f4.GENERAL CONFIGURATION FOR PRODCUT PREVIEWGo to STORES Configuration in the shop admin to configure the general configuration.Figure 1Select the Preview configuration under the BRANDCROCK tab and configure the respective fields and click the Save Config button to save and update the changes (as shown in the below image).Figure 2General ConfigurationField DescriptionEnable Module Select Yes to enbale the modulePreview Label Name Enter the label name for preview textDisplay Preview Option Select Yes to display the preview option in product catlog product listingpage, catlog products edit page, catlog category and CMS edit page. Display Products Info On Sales Orders Select Yes to display products info in the sales orderSelect Yes to display products images in the order detailed pageDisplay Product Images On Sales OrderView5.PREVIEW PAGES5.1 Catalog Products Edit PageTo preview the product listing page, navigate to CATALOG Products and select Edit under the Action column in the product as shwon in below image.Figure 3Figure 4And click the Preview button to preview the product in the shop web page as shown in below image,Figure 5Figure 65.2 Catalog Products Listing PageTo preview the product listing page, navigate to CATALOG Products and select Preview under the Action column in the product as shwon in below image.Figure 7Figure 8And it, preview the product in the shop web page as shown in below image,Figure 95.3 Catalog Category PageTo preview the category page, navigate to CATALOG Categories as shwon in below image.Figure 10Select the category and click the preview button to preview the category page in the shop web page as shown in the below image,Figure 11Figure 125.3 CMS PageTo preview the CMS page, navigate to CONTENT PagesFigure 13Figure 14And select the Preview button to preview the page in the shop web page as shown in the below image,Figure 15Figure 166. IMPRINT AND CONTACT BrandCrock (Private limited)BrandCrock GmbHAddress: Max-Planck-Straße 5 85716 Unterschleissheim Munich district Bavaria, GermanyAdresse:Max-Planck-Straße 5 85716 Unterschleißheim Landkreis München Bayern, DeutschlandTel: + 49 (0) 89 2154 7447 Tel: + 49 (0) 89 374 27878 Email: ********************** Website: Tel: + 49 (0) 89 2154 7447 Tel: + 49 (0) 89 374 27878 Email: **********************Website: Managing Director/CEO:Rajdaniel, Johnson SamuelGeschäftsführer:Rajdaniel, Johnson SamuelLegal form:Company with limited liabilityRechtsform:Gesellschaft mit beschränkter HaftungJurisdiction:Amtsgericht MünchenGerichtsstand:Amtsgericht MünchenCommercial register number:HRB 226 742Handelsregister:HRB 226742VAT No:DE 308 776 517Ust-ID-Nr:DE 308 776 517Line of Business:Delivery of services in Information Technology, software development and solutions. Gegenstand des Unternehmens:Erbingung von Dienstleistungen derInformationstechnologie, Softwareentwicklung und -lösungen.。
Magento 2 扩展安装指南.pdf_1701854821.8320475说明书
Magento 2 provides the possibility to install the extensions via Web Setup Wizard tool in the backend. This is the main method to install the extension purchased on Magento Marketplace website. First of all, please check this article to ensure that all the minimum requirements are met. After that, please follow this guide.1.Log into your Magento Marketplace account. Click the My Access Keys link on the DeveloperPortal tab.2.Copy both Public Key and Private Key. Note that that are provided on the Magento 2 tab.3.Log into the Magento backend panel and go to SYSTEM ⟶ Tools ⟶ Web Setup Wizard.4.Click the Module Manager. Then, click the Sign In link in the upper-right corner. Put the PublicKey and Private Key from your Marketplace account.5. You need to synchronize your backend with the Marketplace website. For this click theRefresh button. Note that it might take a few minutes. After that you'll be able to observe the number of the purchased extensions close to the Extensions Ready to Install text.6.Click the Review and Install button below the Extensions Ready to Install text. In theExtensions Grid, mark the checkbox of the extension you want to install. Please, always use the latest version of the extension (extensions). Click the Install button.The installation process has started.7.Readiness Check. The store environment is checked for compatibility. When the ReadinessCheck completes successfully, tap Next button. If you observe some problems here, fix them and click the Try Again button to recheck the compatibility of the Magento installation.8.Create Backup. By default, the backup includes the code, media, and database but you candeselect any checkbox of any item that you do not want to include in the backup. Click the Create Backup button.Once this operation has finished, click the Next button.9.This page shows the names and the versions of the extensions that are about to be installed.The website will be taken offline to protect your customers during the installations. Click the Install button.10.The page shows the current status, and you can track its progress in the Console Log.The Success page appears when the process is complete.11.Log out and in for all the changes to take into effect. Your extension is now ready to use. Copyright © 2018 MageWorx。
- 1、下载文档前请自行甄别文档内容的完整性,平台不提供额外的编辑、内容补充、找答案等附加服务。
- 2、"仅部分预览"的文档,不可在线预览部分如存在完整性等问题,可反馈申请退款(可完整预览的文档不适用该条件!)。
- 3、如文档侵犯您的权益,请联系客服反馈,我们会尽快为您处理(人工客服工作时间:9:00-18:30)。
要想全面了解Magento,就需要一些演示数据来进行各种操作,自己输入太麻烦而且对入门来说,Magento还是有些复杂。
所以官方提供的Magento演示数据就非常有帮助了。
要安装演示数据首先就需要下载magento-sample-data-1.2.0.tar.bz2,这个压缩包里包含了一个media文件夹和一个sql数据文件。
media文件夹里就是样本数据的产品图片,Sql文件可以用任何数据库控制软件,比如phpMyAdmin导入数据库。
安装的顺序请一定要注意。
1.第一步一定要新建一个全新的数据库,比如Sample;2.第二步建好数据库之后直接用phpmyadmin将SQL文件导入。
3.第三步解压缩magento安装文件包,进行全新安装。
4.装好之后样本数据也就直接生成了。
然后把media 覆盖就可以了。
5.关闭缓存,刷新索引制作你自己的Magento主题建立你自己的主题(Theme)Magento是建立在完全模块化的模式基础上的,这为你的网店带来无限的可扩展性和灵活性。
这章我们介绍如何开发magento主题。
区块(Blocks)和布局(Layout)在Magento之前你很可能已经使用过其他电子商务程序。
因此在开始之前,我们希望你抛弃所有按以往经验得来的期待,这并不意味者你要学习一个全新的语言,也不意味着你要改变所有的工作流程,只是你要学习一些新的技巧来开发Magento的主题。
掌握这些工具并且始终注意关注他们,你会喜欢上这种结构的。
下面我们开始介绍:1.结构区块(Structural Blocks)2.内容区块(Content Blocks)3.布局(Layout)建立心理导图为了使你更清楚的理解区块和布局的含义,这里提供一些心理导图工你参考:1.想象一个长方区块的轮廓(就想图例1 Diagram 1).2.现在想象整个区块的轮廓被填满3.现在想象两个区块,他们的轮廓叠加在一起4.现在想象三个区块,轮廓叠加在一起5.然后想象四个。
Diagram 16.然后我们来看一下Magento网店的首页缩略图:7.看看上面缩略图可以被分割成几部分,以两种方式分割。
你刚建立的思维导图给你在概念和真实区块之间一个平行的比较,我知道你也许完全糊涂了,让我来解释一下:从概念角度看,图2中的框架是结构区块。
他们是内容区块的父区块,他们帮助去定内容区块在一个网店页面中显示的区域位置(如在图3中)。
这些结构块的存在形式为页眉区,左栏地区,右栏...等等有助于创建网店的视觉结构。
;l另一方面,内容区块概念上就是装点结构区块的独立颜色的区块。
在一个网店内容里,他们才是真正的内容。
内容区块代表着页面内的每一个功能特性(比如分类列表,标注和产品标签等等),并且使用模板文件生成(x)HTML插入到父结构区块里。
布局Layout布局就是用来分配内容区块到结构区块的工具。
布局以XML 文本文件的形式存在,通过修改布局,你可以移动区块和分配模板到内容区块来产生结构区块的标签。
事实上,通过一些布局文件的帮助,你可以修改网店每页的可视布局。
更多关于布局的信息可以参考下面这个连接介绍布局Layouts在magento里你不再需要left_column.ext这个模板文件,取而代之的是通过管理每个功能性基础元素来管理模板。
你可以通过一些布局命令载入或者卸载功能元素来控制网店页面。
一步一步建立主题Theme下面是Magento建立主题的全部工具:1.模板Templates2.布局Layouts3.区块Blocks4.皮肤Skins (images, CSS and block-specific Javascript)要建立一套网店的模板,你需要按照一下这些步骤完成:第一步:关闭系统缓存system cache到管理界面Administration Panel (/admin) 然后System -> Cache Management. 在'All Cache' 选择'Disable' 然后保存。
这样会忠实的展现你对页面的修改。
第二步:确定你网店可能使用的所有结构类型你可以做一个如下的列表:∙主页使用三栏结构three column structure.∙分类列表页使用两栏结构包括右边栏two column structure that includes a right column. ∙客户页面使用两栏结构包括左边栏two column structure that includes a left column.骨架模板Skeleton template做完了上面的列表,你就可以为每个结构类型创建一个(X)HTML 标记并保存为骨架模板Skeleton template,将它保存在app/design/frontend/your_interface/your_theme/template/page/.skeleton template例子:Upon scanning through the sample skeleton template above, you will notice a PHP method called <?=$this->getChildHtml()?> inside each presentational markup. This is the way Magento loads structural blocks into skeleton templates and hence is able to position all the contents of the structural blocks within a store page.Each getChildHtml calls on a name as in<divclass="header"><?=$this->getChildHtml('header')?></div>, and these names are ways by which each structural blocks are identified in the layout. Skeleton templates are assigned to the store through the layout.第三步:根据功能性修剪你的(X)HTML建立好骨架模板之后skeleton templates, 你需要为每个内容木块创建模板你需要为每个功能修改(X)HTML标签。
比如,设计一个mini-cart区域,这个区域的标签将成为它自己的模板文件。
其他诸如产品标签,登陆区等等也一样。
这些功能Magento已经提供了,所以你只要参考已有的模板标签来创建自己的标记逻辑就可以了。
那么模板保存到那里呢?网店任何页面的全文标记是通过一个模板数组完成,数组中每一个都描述一个模块的功能。
为了找出在网页上您想要修改的模板,您可以打开模板路径的提示。
通过:Diagram 51. 到管理页面admin 然后System -> Configuration2. 选择你的网店(通过website/store selector)3. 页面刷新后,选'Developer' tab ,然后在Template Path Hints 选'Yes'.做完之后回到前台,刷新页面之后你就可以看到所有模板列表的路径了。
只要通过路径修改相关的模板就可以了。
第四步:改变布局以适应你的设计那么布局文件在哪?在这里app/design/frontend/your_interface/your_theme/layout/. 和模板文件一样, 布局文件也是按照基于每个模块的方式存储的,这样你就可以方便的按模板提示修改。
首先,激活模板提示,刷新要修改的页面,找寻模板提示的模板路径。
比如你想移动mini cart,参考模板路径(ex:app/design/frontend/default/default/checkout/cart/sidebar.phtml) ,用主题文件夹里第一个文件夹名(字体加重的那个)来寻找相关布局文件。
所以在这个例子里,我们要寻找'checkout.xml'来修改mini cart的位置。
默认布局VS 布局更新(Layout Updates)一共有两种布局--默认(default)和更新(updates)。
默认布局default layout(page.xml) 是默认应用到自身或者几乎每个页面的布局。
所有其他的布局文件都是更新布局Layout Updates,也就是基于每个默认布局基础上的布局。
让我们举例说明一下骨架模板(skeleton template):在默认布局里,你已经设置为三栏结构,就是说,默认几乎所有的页面都是三栏结构。
但是在产品页面并不需要三栏,对产品页面来说,你需要一个包括右边栏的两栏的结构。
为了实现这一点,你要不管默认布局,打开catalog.xml文件,在其中修改布局命令。
这就是所谓升级一个布局(updating a layout).Example way of assigning skeleton template<reference name="root"><actionmethod="setTemplate"><template>page/2columns-right.phtml</template></ action></reference>如何制作修改Magento模板主题-Working with Magento Themes 星期二, 08/19/2008 - 22:30 — foolsky在这章我们将详细讲述如何制作修改Magento模板主题:∙Magento的主题和其他系统的区别∙怎样创建一个主题∙如何给店铺分配接口和主题∙多主题应用∙主题的结构层次:Magento如何处理多主题Magento的主题和其他系统的区别‗主题theme‘这个术语可能听起来是一个熟悉的名字,对于主题使用者和创建者,可能有过设置web应用主题的经历。
主题有两大类用户:使用者和创建者。
使用者就是那些从审美和可用性角度来看主题的人,而创建者就是是那些从参与创建的角度看待主题的人。
对于第一种用户,店铺应该有能力提供他们灵活设置让他们满意的设计的要求。
对于第二种用户(主题创建者),他们必须能够容易地完成满足店铺要求的店铺设计开发任务。
