Installing_a_Windchill_Server_Using_PSI
UNIX Windchill安装注意事项
UNIX Windchill安装注意事项:1.sdk64位安装用root用户在系统上安装,最好选择64位版本的最新1.4sdk,到BM网站上可以下载2.需要AIX的X11.fnt.ucs.ttf_cn 5.1.0.1字符集模块installanywhere才能出来中文,但是会使IE下的FTP文件名改变。
2. Apache的安装:使用root用户,安装完毕后,需要安装安装文档进行配置,启动是用root来启动。
3. Oracle的安装etc/oratab文件。
Oracle安装的时候自动创建的文件,oracle database assistance创建数据库时,会把数据库实例写在该文件中,用ocu创建时,没有往该文件中写,所以需要手工在里面添加(ora用户)4. Patch的安装Unix下安装m010 sp1和其他maintenance patch的时候,需要手工先把ldap启动起来,再安装,不然最后会报错5.系统启动重要:Pdmlink安装好之后,导入数据时,Windchill会产生如下错误,而且log日志没有产生:# windchill startStarting ServerManager# windchill statusException in thread "main" wt.util.WTRemoteException:wt.util.WTRemoteException:java.rmi.ConnectException: Connection refused to host: ; nested exception is:.ConnectException: connectat sun.rmi.transport.tcp.TCPEndpoint.newSocket(TCPEndpoint.java:585)at sun.rmi.transport.tcp.TCPChannel.createConnection(TCPChannel.java:203)at sun.rmi.transport.tcp.TCPChannel.newConnection(TCPChannel.java:189)at sun.rmi.server.UnicastRef.newCall(UnicastRef.java:329)at sun.rmi.registry.RegistryImpl_Stub.lookup(RegistryImpl_Stub.java:89)atwt.manager.RemoteServerManager.getServerManager(RemoteServerManager.java:749) at wt.manager.RemoteServerManager.getInfo(RemoteServerManager.java:578)at wt.manager.RemoteServerManager.main(RemoteServerManager.java:950)Caused by: .ConnectException: connectat .PlainSocketImpl.socketConnect(Native Method)at .PlainSocketImpl.doConnect(PlainSocketImpl.java:336)at .PlainSocketImpl.connectToAddress(PlainSocketImpl.java:201)at .PlainSocketImpl.connect(PlainSocketImpl.java:188)at .Socket.connect(Socket.java:478)at .Socket.connect(Socket.java:428)at .Socket.<init>(Socket.java:335)at .Socket.<init>(Socket.java:150)atsun.rmi.transport.proxy.RMIDirectSocketFactory.createSocket(RMIDirectSocketFactory.java:40) atsun.rmi.transport.proxy.RMIMasterSocketFactory.createSocket(RMIMasterSocketFactory.java:14 4)at sun.rmi.transport.tcp.TCPEndpoint.newSocket(TCPEndpoint.java:580)... 7 more# # windchill start解决办法:在site.xconf里面增加如下内容,修改wt.properties的参数,该修改只针对AIX系统。
windchill开发环境配置

Windchill开发环境配置目录1.安装开发环境 (1)1.1安装eclipse (1)1.2安装Windchill10.1F000......................................................错误!未定义书签。
2.配置开发环境 (2)2.1配置eclipse (2)2.2配置反编译工具 (6)2.3配置调试环境 (6)3.加载Windcihll-JAR (8)1.1安装eclipse请参考eclipse的安装过程2.1配置eclipse2.1.1去掉项目Cleaning过程中删除输出文件夹的选项图(1)图(2)2.1.2创建普通的Java项目图(3)2.1.3创建Java项目文件夹与Windchill关联图(4)图(5)2.1.4为Java项目加载Windchill-JAR包图(7)图(8)2.1.5设置Java项目编译路径2.1.6查看编译效果图(11)2.2配置反编译工具2.2.1配置eclipse◆将net.sf.jadclipse_3.3.0.jar插件安装在eclipse插件包中;◆重启eclipse。
2.2.2使用jad.exe采用桌面应用jad.exe反编译class文件。
2.3配置调试环境配置Windchill-RMI远程调用断点调试环境。
2.3.1配置Windchill环境在WT_HOME\site.xconf中增加:<Property name="wt.manager.cmd.MethodServer.debug.args"overridable="true"targetFile="wt.properties"value="-Xdebug-Xrunjdwp:transport=dt_socket,server=y,suspend=n,address=9999"/>2.3.2配置eclipse-debug◆新建Remote Java Application;修改port端口号与windchill配置的address一样。
VigorACS 2 Quick Start Guide
V i g o r A C S2U n i f i e d M a n a g e m e n t S y s t e mManual Version: 1.0Software Version: V2.3.1Date: August 17, 2018Table of Contents1. Platform for Windows 7 or 10 (5)1.1 Installation for Java (5)1.2 Installation for MariaDB (9)1.3 Installation for VigorACS 2 (14)1.4 StartMySQL/MariaDB Databse (23)1.5 Start VigorACS (23)2. Platform for Linux (25)2.1 Installation for MariaDB, Java and VigorACS (25)2.2 Start MySQL/MariaDB Databse (31)2.3 Start VigorACS (31)2.4 Edit VigorACS IP (31)3. Registering VigorACS 2 (32)3.1 Registration for VigorACS via Windows Platform (32)4. Configuration on CPE Device (37)4.1 Set ACS URL on CPE (37)4.2 Invoke Remote Management for CPE (39)4.3 Enable WAN Connection on CPE (40)5. Troubleshooting (42)1.P l a t f o r m f o r W i n d o w s7o r10Please follow the procedure listed below to install VigorACS 2 completely. The installation for different platforms might be different.T o start up the VigorACS, the normal procedure is listed as follows:(I)Installation for Java(II)Installation for MariaDB(III)Installation for VigorACS 2(IV)Start MySQL/MariaDB Database.(V)Edit VigorACS IP.(VI)Start VigorACS.Info VigorACS 2 can be operated only by a host with 64-bit operation system.1.1I n s t a l l a t i o n f o r J a v a1.Install Java by clicking “java-1.8.0-openjdk-1.8.1.151-1.b12…” to execute the installation.2.The first page will be shown as follows. Click Next to get into next page.3.Then, check “I accept the terms…” and click the Next button.4.In this page, optional features will be listed for you to specify the destination folder forJAVA driver installation. Choose the one you need and click Next.5.In the following page, just click Install.6.Wait for a while to install the required features.7.When the following page appears, the installation is completed. Click Finish to exit theinstalling program.1.2I n s t a l l a t i o n f o r M a r i a D B1.Install MariaDB by clicking “mariadb-10.2.10-winx64” (based on your PC condition) it toexecute the installation.2.When the welcome screen appears, please click Next for next step.3.On this dialog box, check the box of “I accept the terms….” and click Next.4.Select the way for the features to be installed. Then click Next.5.If you want to configure password for MariaDB server, please check Modify password… andtype the password. It depends on your request. Otherwise, simply click Next.6.Modify the default instance properties if required. Then click Next.7.On this dialog box, click Next.8.On this dialog box, click Install.9.The installation program starts to install required files for MariaDB to your computer. Waitfor several seconds.10.After finishing the configuration, please click Finish to exit the wizard.1.3I n s t a l l a t i o n f o r V i g o r A C S2It is time to install VigorACS main program. Follow the steps below.1.Click Setup to run VigorACS 2 setup wizard.2.When the following dialog appears, choose Local Database / Remote Database and clickNext.3.Select the directory that MariaDB being installed (done in 1.2) and click Next4.In this dialog box, choose Rebuild Database (for rebuilding the VigorACS database) orUpgrade Database (for upgrading the database). For the first time using, please choose Rebuild Database. Then click Next.5.Click Next. If you have configured MySQL/MariaDB previously and specified password for it,you have to type the password in this page and then click Next.6.Set the maximum memory and minimum memory. Click Next.7.Setup ACS HTTP and HTTPS port, we'll suggest using others port instead of default 80 and443 port to prevent conflict.Info The port number defined here will be used for opening VigorACS later.8.Determine the home path and click Next. The default directory used by this program isC:\Users. You can modify it if you want and please make sure the length of directory is not over 100 characters, otherwise you might encounter problem of VigorACS in installation.9.Determine the destination folder and click Next. The default directory used by thisprogram is C:\Program Files\VigorACS. You can modify it if you want and please make sure the length of directory is not over 100 characters, otherwise you might encounter problem of VigorACS in installation.10.Determine the start menu folder and click Next. The default directory used by thisprogram is VigorACS. You can modify it if you want and please make sure the length of directory is not over 100 characters, otherwise you might encounter problem of VigorACS in installation.11.In this dialog, check the box of “Create a desktop shortcut” for your necessity. Click Next.12.Now, the program is ready to install necessary features and files to your computer. Pleaseclick Install to start.13.Please wait for a while to complete the installation.14.While installing, the following screen will appear to show that MariaDB has been activated.Please wait for next dialog appearing.15.Now the program has completed the installation of VigorACS 2. Click Finish to exit it.1.4S t a r t M y S Q L/M a r i a D B D a t a b s eAfter installing VigorACS, install program will register MySQL/MariaDB to Windows Service.MySQL /MariaDB will startup automatically after installing VigorACS or rebooting system.Normally, you don't need to worry about this step on Windows. But if you find any problems on VigorACS, you should check mysql/mariadb first. Please go to Windows Service check theMySQL/MariaDB Service starts or not.1.5S t a r t V i g o r A C S1.Login VigorACS. Use a web browser and type “localhost:portnumber”. Note that the portnumber must be the one defined for HTTP and HTTPS port while installing VigorACS. Forexample, if HTTPS is defined as 8011, then the URL will be “localhost:8011”.2.The login page of VigorACS will be shown as the following. Please type “root” as user nameand “admin123” as password and type the authentication code. Then click Login.3.For the first time to access into the web user interface, a warning message appears first.Please click the Change password button to change the default password for networksecurity. If not, click Cancel to access into the web user interface of VigorACS and changethe password later.4.After clicking Login, main screen of VigorACS 2 will be shown as below.2.P l a t f o r m f o r L i n u xT o start up the VigorACS under Linux, please execute"/usr/local/vigoracs/VigorACS/bin/vigoracs.sh" instruction. A list of menu items will be shown as follows.1.Start mysql/mariadb2.Shutdown mysql/mariadb3.Start VigorACS4.Shutdown VigorACS5.Edit bind IP of VigorACS Server (please key in IP or server name)6.Set the Max. and Min. memory value of running java (it will be valid after restartingVigorACS)7.View the Max. and Min. memory value of running java8.exit2.1I n s t a l l a t i o n f o r M a r i a D B,J a v a a n d V i g o r A C SFollow the steps listed below to install VigorACS under Linux:1.Login Linux with root or the root privilege.2.Download the ACS installation tar.bz2 package and extract it via below command:#bzip2 -cd VigorACS_Unix_Like_xxxxxx_xxxxx.tar.bz2 | tar xvf -or#tar -jxv -f VigorACS_Unix_Like_xxxxxx_xxxxx.tar.bz23.Decompress the setup packagesbzip2 -cd VigorACS_Unix_Like_xxxxxx_xxxxx.tar.bz2 |tar xvf –4.Change the permissions mode of install.sh and uninstall.sh.chmod 755 install.shchmod 755 uninstall.sh5.Execute ./install.sh installation file.Please make sure you have /usr/bin/sh first. If you don't have /usr/bin/sh, please enter the command:#ln -s /bin/sh /usr/bin/sh6.The system will ask to create vigoracs, enter “y” to proceed.7.Next, the system will ask you to install xfonts-base and fontconfig, just enter “y” toproceed.8.Next, please select the item number which you want to execute. Note that VigorACSsupports Linux OS. The program will detect the system you have in your computer.(1) Install mysql/mariadb(2) Change root password and security configuration of mysql/mariadb(3) Install or Upgrade java(4) Install VigorACS(5) Upgrade VigorACS(6) Redirect the database path of VigorACS to remote host (7) Exitinput select num:InfoIf your computer has installed MariaDB and java previously, ignore theinstallation of them. Otherwise, install all the required items (MariaDB, Java and VigorACS) for your system. Item number 5 is used to upgrade VigorACS, so it is not necessary for you to execute for the first time of installation.9. Input 1 to install MariaDB first. Notice that it will setup blank as default password. You canchange the password by using the following command.#/usr/local/mysql/bin/mysqladmin--defaults-file=/usr/local/mysql/f -u root password 'newpassword'InfoThe password configured by the command above will be effective onlywhen there is no password set for database root before.Follow the instructions on the screen to finish the MariaDB installation.ter, input 2 to change root password and security configuration of mysql/mariadb.Info The password set in this step is used for VigorACS 2 to login database.11.Input 3 to install Java.Follow the instructions on the screen to finish the Java installation.12.Input 4 to install VigorACS. It is suggested to use ACS customized MariaDB database. Whenasked to enter MariaDB password, press “Enter” if you haven’t changed the password via the command. Then, confirm that TR-069 database has been installed successfully.Wait and follow the instructions on the screen to finish the installation.13. Now, input 6 to redirect the database path of VigorACS to remote host. For remotedatabase, please execute such step on remote host.14. Input 7 to finish and exit the installation.Info 1 Step 13 is required for establishing remote database only . You can ignore it while building local database.Info 2T o prevent port conflicts, we'll suggest that using other ports for HTTP and HTTPS instead of default 80 and 443.2.2S t a r t M y S Q L/M a r i a D B D a t a b s eAfter installing VigorACS, mysql/mariadb daemon has started. You can to see it using "ps-ef|grep mysql" instruction. Use the menu item 1 / 2 to start / shutdown mysql/mariadb.2.3S t a r t V i g o r A C SAfter installing VigorACS, access “/usr/local/vigoracs/VigorACS/bin”, execute “./vigoracs.sh”.Select item 3 to start VigorACS.If you ever reboot the machine after installing VigorACS, just select item 1 to startmysql/mariadb first. Then, select item 3 to start VigorACS.2.4E d i t V i g o r A C S I PWhen starting the VigorACS at first time on Linux, startup program will ask you input Server IP or input Enter key by using the IP address of the host. Once you input the IP address, VigorACS will keep it on startway.txt. Next time, if you want to change it, you can select item 5 to editstartway.txt using vi editor.3. R e g i s t e r i n g V i g o r A C S 2For the first time to activate VigorACS 2, the system will ask you to register VigorACS 2 onto DrayT ek MyVigor server . Refer to the following sections to register VigorACS 2 on differentplatforms.Info 1 While installing VigorACS, install program will register MySQL/MariaDB toWindows Service. MySQL/MariaDB will startup automatically after installingVigorACS or rebooting system. Normally , you don't need to worry about this step on Windows. But if you find any problems on VigorACS, you should checkmysql/mariadb first. Please go to Windows Service check the MySQL/MariaDB Service starts or not.Info 2After installing VigorACS, the software will startup automatically . Normally ,you don't need to worry about this step on Windows. But, if you find any problem on VigorACS, you could shut down VigorACS and start VigorACS again. 3.1 R e g i s t r a t i o n f o r V i g o r A C S v i a W i n d o w s P l a t f o r mBelow shows the steps to register VigorACS 2:1. Login VigorACS. Use a web browser and type “localhost:portnumber”. Note that the portnumber must be the one defined for HTTP and HTTPS port while installing VigorACS. For example, if HTTPS is defined as 8011, then the URL will be “localhost:8011”.2. The login page of VigorACS will be shown as the following. Please type “root” as user nameand “admin123” as password and type the authentication code. Then click Login.Info“root” and “admin123” are default settings.3. A License Error dialog appears as follows. Simply click Active.4. A login page for MyVigor web site will be popped up automatically . Type your account (username) and password in this page. Then, click Login.InfoIf you do not have any account, simply click Create an account now to create a new one for using the service provided by MyVigor web site.5.MyVigor will verify and authenticate if the user account you typed is allowed to access intothe web site. If yes, the following screen will appear.6.Type a nickname for VigorACS and click Add.7.After clicking Add, you can see the following screen. Click OK.8.You will get a device information page as shown below. If you are the new user of VigorACS,you can get a free charge of 30-day service of VigorACS. Simply click the Trial button.9.From the following screen, check the box of “I have read and accept the above….” andclick Next.10.In the page below, click Register.11.When the VigorACS License Information page appears, the service is ready for you to use.Click Login to ACS to use VigorACS service.12.The login page will appear as follows. Type the default settings of User Name (root) andPassword (admin123) and type the authentication code. Then, click Login.13.Now, the main screen of VigorACS will be shown as follows.4.C o n f i g u r a t i o n o n C P E D e v i c e4.1S e t A C S U R L o n C P ET o manage CPEs through VigorACS, you have to set ACS URL on CPE first and set username and password for VigorACS.1.Connect one CPE (e.g., Vigor2862 series).2.Open a web browser (for example, IE, Mozilla Firefox or Netscape) on your computer andtype http://192.168.1.1.3.Please type username and password on the window. If you don’t know the correctusername and password, please consult your dealer to get them. In this section, we takethe figures displayed on Windows as examples.4.Go to System Maintenance -> TR-069.•Please set URL as the following and type username and password for ACS server,for the connected CPE with authentication:http://{IP address of VigorACS}:80/ACSServer/services/ACSServlet•Please set URL as the following, for the connected CPE without authentication: http://{IP address of VigorACS}:80/ACSServer/services/UnAuthACSServlet•Please set URL as the following, for the connected CPE with authentication and the data transmission between CPE and VigorACS 2 with encryption (SSL).https://{IP address of VigorACS}:443/ACSServer/services/ACSServlet•Please set URL as the following, for the connected CPE without authentication but the data transmission between CPE and VigorACS 2 with encryption (SSL)https://{IP address of VigorACS}:443/ACSServer/services/UnAuthACSServlet5.Fill Username and Password for VigorACS 2 Server for authentication. Please enter as thefollowing:Username: acsPassword: password6.For the username and password of CPE client, it is not necessary for you to type them.7.Click Enable for Periodic Inform Settings.4.2I n v o k e R e m o t e M a n a g e m e n t f o r C P EYou have to make sure that the CPE device you want to connect supports VigorACS 2 features.Please consult your dealer if you have no idea in it.1.Suppose WAN IP of CPE device has been setup successfully. And you can access into Internetwithout difficulty.2.Login the device (e.g., Vigor2862) by web.3.Go to System Maintenance>>Management.4.Check Allow management from the Internet to set management access control.4.3E n a b l e W A N C o n n e c t i o n o n C P EYou have to make sure the CPE device you want to connect has been configured properly and can access into Internet.1.Login the device (e.g., Vigor2862) by web.2.Open WAN>>Internet Access.3.Choose Static or Dynamic IP as Access Mode and click Details Page for WAN2.4.The following web page appears. Click Enable and Specify an IP address. Enter correctWAN IP address, subnet mask and gateway IP address for your CPE. Then click OK.VigorACS 2 Quick Start Guide41InfoReboot the CPE device and re-log into VigorACS 2. CPE which has registered to VigorACS 2 will be captured and displayed on the home page of VigorACS 2.VigorACS 2 Quick Start Guide42 5. T r o u b l e s h o o t i n gWhen you try to invoke VigorACS 2 and get the following error message, please locate the file of “server .log ” from C:/Program Files/VigorACS/server/default/log and send the file to yourdealer for further assistance.For Linux system, please locate the file of “server .log ” from/usr/local/vigoracs/VigorACS/server/default/log/ and send the file to your dealer for further assistance.。
Sun Netra X6270 M2 Server Module Installation Guid
This guide describes the minimum steps you must perform to power on Oracle’s Sun Netra X6270M2server module for the first time.Additional installation information is provided in the Sun Netra X6270M2Server Module Installation Guide (821-0937)and in the installation guide for the modular system (chassis).This documentation is available at the Sun documentation web site.See “Documentation for This Product”on page 5.Note –Before installing this server module,read the latest Sun Netra X6270M2Server Module Product Notes (820-2383)to find out if any late-breaking issues impact installation requirements.▼Install Optional Components♦Before installing the server into the modular system chassis,install any optional components that youordered with the server,such as storage drives,DIMMs,REMs,FEMs,and so on.Refer to the online Sun Netra X6270M2Server Module Installation Guide .▼Install the Server ModuleYou can insert the server module into a chassis that is either powered on or not powered on.For information about powering on the modular system chassis,refer to the modular system documentation.The following procedure assumes the chassis is powered on.1.Verify that the system chassis is powered on.When the chassis is powered on,the fans are operating and the OK LED illuminates a steady on green light.2.From the front of the chassis,locate and remove the filler panel from the slot where you plan to insert theserver module.Pull the lever out and eject the filler panel.3.Position the server module vertically with the ejectors extended and oriented on the right.4.Push the server module into the slot until the server module stops and is even with the chassis.Sun Netra X6270 M2 Server ModuleGetting Started Guide5.Rotate the top ejector down and the bottom ejector up until both ejectors snap into place.The server module is locked in place and standby power is applied to the server module service processor(SP).6.Verify that the server module power state reaches standby mode.The server module SP take several minutes to boot and the OK/Power LED on the server module displays the following status:■Slow blink(0.5second on,0.5second off)–Server module SP is booting■standby blink(0.1second on,2.9seconds off)–SP is booted,and the server module host is in Standby mode.▼Select a Method For Connecting to ILOMYou start,boot,and manage the server module using the Oracle Integrated Lights Out Manager(ILOM) software.On Sun Netra6000modular systems,different versions of ILOM run on the modular system chassis and on each modular server.You can control the server module from ILOM running on the chassis monitoring module(CMM),or from ILOM on the server module in different ways as described in the following figure and table.Instructions in this guide use method1.To use the other methods,refer to the Sun Netra X6270M2ServerModule Installation Guide and the Oracle Integrated Lights Out Manager(ILOM)3.0documentation collection.▼Access ILOM on the Server Module SPThis procedure uses method 1and uses SSH on the CMM to access the server module ILOM CLI.You must know the CMM IP address to perform this procedure.1.Ensure that the CMM NET MGT port is connected and configured to communicate on your network.Refer to the Sun Netra 6000modular system documentation for details.(Connection Type)Method From To Description1(Ethernet)CMM NET MGTport Your network (Method used in this guide)Ensure that the CMM NET MGT port is connected to your network.From your network,log into ILOM on the CMM using the IPaddress of the e the ILOM proxy to navigate to the servermodule SP ILOM interface.You can use the ILOM command-lineinterface (as described in the remaining instructions in this guide),or use the CMM ILOM web interface.2(Serial)CMM SER MGT port Terminal device Connect a terminal device to the CMM SER MGT RJ-45port and useILOM to navigate to the server module SP ILOM interface.Thismethod only supports the ILOM CLI.3(Serial)Server module SPUCP port(dongle required)Terminal deviceConnect a dongle cable to the server module.Connect a terminaldevice to the RJ-45connector on the dongle municatewith ILOM on the server module SP using the ILOMCLI.2.Log into the CMM with the SSH client.In the following example,replace10.3.212.24with the IP address of your CMM.Specify the password that is assigned to the CMM ILOM root account.The factory default ILOM root password is changeme.Example:$ssh root@10.3.212.24Password:cmm_ILOM_passwordOracle(TM) Integrated Lights Out ManagerVersion 3.0Warning: password is set to factory default.You are now logged in to the CMM ILOM CLI.3.Navigate to the server modules SP.Replace n with an integer that identifies the target server module(the slot for which the server module is installed):->cd/CH/BL n/SP/cli4.Start the server modules SP.If you are prompted for a password,enter changeme(the factory default password for the root user on the server module SP).->startAre you sure you want to start /CH/BL2/SP/cli (y/n)?ystart: Connecting to /CH/BL2/SP/cli as user rootYou are now logged into ILOM on the server module SP.▼Power On the Server Module Host1.Power on the server module host.->start /SYSAre you sure you want to start /SYS (y/n)?yStarting /SYS . . .The server module initializes.The server module might take several minutes to complete POST.If a boot device installed with the Solaris OS is accessible locally,the server module boots.Otherwise,the system uses the boot net command to seek a boot device on the network.2.Switch communication to the console.You are now connected to the server module host.The server module hardware installation is complete.The server module is ready to be configured to suit your needs.▼Set Up the OS and Check for the Latest Patches and FirmwareLater versions of OS,patches,and firmware are available for your server module.Some features can only be enabled when certain patches or firmware are installed.Install the latest versions for the best performance,security,and stability.1.Review the Sun Netra X6270M2Server Module Product Notes at:/app/docs/prod/nt6270.m2.srvrmod?l=en#hicThe product notes provide a list of supported OSs,describes important product dependencies,and lists any late breaking information.Documentation for This ProductYou can view and print Oracle’s documentation,including localized versions,at:/app/docs/prod/nt6270.m2.srvrmod?l=en#hic ->start /SP/consoleAre you sure you want to start /SP/console (y/n)?ySerial console started. To stop, type #.0:0:0>POST enabling CMP 0 threads: ffffffff.ffffffff. . .Task Document Type **For translated documents,go to and select your language.Part Number Review safety information.Safety and Compliance Manual821-0938Important Safety Information for Sun Hardware 821-1590Review known issues and workarounds.Product Notes 821-0936Install,power on,and configure the preinstalled OS.Installation Guide 821-0937Customize BIOS and RAID settings.Remove and replace components.Troubleshoot server problems.Service Manual 821-0939Install and configure the Oracle Solaris,Linux,Windows OS,or install virtual machine software such as Oracle VM or VMware.Linux,Virtual Machine Software,and Oracle Solaris OS Installation Guide 821-0940Windows OS Installation Guide 821-0941Manage server accounts,monitor alerts,set remote access and redirection,and view component status.Oracle ILOM 3.0Documentation:http:///app/docs/coll/ilom3.0MultipledocumentsOther Product DocumentationYou can view,print,or purchase a broad selection of documentation,including localized versions,at:Technical SupportIf you have technical questions about this product that are not answered in this document,go to:/supportDocumentation FeedbackSubmit comments about this document by clicking the Feedback[+]link at .Include the title and part number of your document with your feedback:Sun Netra X6270M2Server Module Getting Started Guide,part number821-2123-10Copyright©2010,Oracle and/or its affiliates.All rights reserved.Copyright©2010,Oracle et/ou ses affiliés.Tous droits réservés.。
windchill系统安装大概步骤

windchill系 统 安 装 大 概 步 骤
1、安装VMware Workstation虚拟机 2、win7的64位操作系统(为什么不用32位?因为32位的内存最大只能设置4G) 3、安装Oracle数据库(映射iso文件【上面栏的虚拟机->设置->硬件->CD/DVD】),一定得先安装数据库在安装windchill系统 4、安装PTC windchill(11.0 M020版本),然后在开始菜单里面把windchill文件快捷方式发送到桌面 5、PSI(PTC解决方案工具)Z:\11.0M020\PSI_110_M020\setup.vbs(Z盘是虚拟机映射的文件夹【上面栏的虚拟机->设置->选项->共享文 件夹】)安装 6、可视化Z:\11.0M020\Creo_View_4.0_Clients-420_F000\setup.vbs客户端安装 7、设置服务为总是打开,以后
Windchill 9.1安装文档

PLM客制化系统安装配置指南目录PLM客制化系统安装配置指南 (1)1基本情况 (3)2安装Oracle10.2 (4)3安装Windchill PDMLink (9)4附录(删除系统) (22)1基本情况本文档描述了安装PDMLink9.1的基本步骤。
所需安装介质列表2安装Oracle11gOracle服务器安装oracle软件安装介质:Oracle11g双击文件夹中“setup”应用程序选择高级安装,点击“下一步”;选择企业版,点击“下一步”验证环境,若有未执行的,手动验证并确认,点击“下一步”点击“安装”,进行安装安装完成3安装Windchill PDMLink进入M040_PTC Solution Installer_MED-60702-CD-091_zip文件夹,双击“setup.vbs”点击“OK”点击下一步选择“高级安装”选择Windchill PDMLink,点击“下一步”选择所需要的模块,点击“下一步”注意数据库配置:在现有数据库上配置现有的用户,点击“下一步”开始安装安装完成4附录(删除系统)卸载Oracle:1、开始->设置->控制面板->管理工具->服务;停止所有Oracle服务。
2、开始->程序->Oracle - OraHome81->Oracle Installation Products->UniversalInstaller卸装所有Oracle产品,但Universal Installer本身不能被删除3、运行regedit,选择HKEY_LOCAL_MACHINE\SOFTWARE\ORACLE,按del键删除这个入口。
4、运行regedit,选择HKEY_LOCAL_MACHINE\SYSTEM\CurrentControlSet\Services,滚动这个列表,删除所有Oracle入口。
5、运行refedit,选择HKEY_LOCAL_MACHINE\SYSTEM\CurrentControlSet\Services\Eventlog\Application,删除所有Oracle入口。
Windchill常使用的命令

1.在windchill shell中输入windchill version,用来查看windchill的版本2. xconfmanager -s name=value -t 目标文件-p 用来在xconf和properties文件中增加条目,例如xconfmanager -s wt.servlet.ajp.minPort=8010 codebase/wt.properties 。
其中-s表示根据name找到value,-t表示目标文件,-p表示执行,-u表示用户名,-p表示密码。
如果要验证文件是否修改成功,可以执行命令:xconfmanager -d name,例如:xconfmanager -d wt.servlet.ajp.minPort3.修改rbinfo文件的两种方式,这里以修改生命周期状态举例说明:规范操作:a 编辑WT_HOME\wtCustom\wt\lifecycle目录下的StateRB.rbInfo和StateRB_zh_CN.rbInfo文件然后保存b 在windchill shell执行ant -f bin/tools.xmlbundle_custom -Dbundle.input=registry 或toolsbundle_custom批量编译c 在windchill shell执行ant -fcodebase\MakeJar.xmld 在windchill shell 执行enumCustomize,查看是否客制化成功不规范操作:a 编辑WT_HOME\src\wt\lifecycle目录下的StateRB.rbInfo和StateRB_zh_CN.rbInfo文件然后保存b 在windchill shell执行resourcebuild wt.lifecycle.StateRBc 在windchill shell执行ant -fcodebase\MakeJar.xml (文件是枚举类型的时候必须执行此命令,文件是不是枚举类型,可以看文件中是否存在此行:ResourceInfo.class=wt.tools.resource.EnumResourceInfo)d 在windchill shell 执行enumCustomize,查看是否客制化成功4、windchill stop、windchill start、windchill stop&windchill start用来关闭和启动windchill5、如果要修改OOTB的xml、jsp、js文件,将文件分别复制到WT_HOME\wtSafeArea\siteMod、WT_HOME\wtSafeArea\ptcCurrent、WT_HOME\wtSafeArea\ptcOrig下,其中ptcCurrent文件夹下存放当前版本的文件,ptcOrig文件夹存放系统最原始的文件,siteMod文件夹存放修改后的文件,编辑保存后,执行ant -f bin/swmaint.xml installSiteChanges 命令将文件部署codebase对应的目录下6、如果要添加客制化的xconf文件,可以在windchill shell中执行命令xconfmanager - i <ConfigurationReflink:href="codebase/config/xconf/custom.xconf" /> -p,命令执行成功后会在site.xconf和WT_HOME\declarations.xconf中增加相应条目,同时会在codebase/config/xconf目录下生成custom.properties 文件。
windchill系统管理手册

本文档中所述软件在有书面许可协议的条件下提供,其中包括重要的商业秘密和专利信息,并受美国和 其它国家 / 地区版权法的保护。未经 PTC 事先书面许可,本软件不能以任何形式在任何媒介中复制或 分发、公开至第三方,或者以任何软件许可证协议所不允许的方式使用。
未经授权使用软件或其文档,将会引起民事赔偿和刑事诉讼。 PTC 将软件盗版视为犯罪,而且我们据此 来对待盗版者。我们不会容忍对 PTC 软件产品的盗版行为,我们会使用一切可用的法律手段来追查 ( 民事和刑事 ) 那些盗版者,包括公私两种监督资源。作为其中的一项防盗版举措, PTC 使用数据监控 及净化技术来获取和传送对我们的软件进行非法复制的用户的数据。对于从 PTC 及其授权分销商处获 取了合法许可软件的用户,我们不会收集他们的数据。如果您在使用我们软件的非法副本,但不同意我 们收集和传送此类数据 ( 包括美国 ),请停止使用此非法版本,然后与 PTC 联系以获取合法的许可版 本。
使用 Java Management Extensions (JMX).................................................................................1-9 客户机类型 ......................................................................................................................... 1-10 设置 JMX 环境 ................................................................................................................... 1-17 建立连接 ............................................................................................................................ 1-18 远程 JMX 监控 ................................................................................................................... 1-20 在集群环境中使用 JMX ...................................................................................................... 1-24 从 JConsole 访问 Windchill MBean ................................................................................... 1-24 使用 MBean 修改属性值 .................................................................................................... 1-25 使用 Loader MBean 保存配置变更 .................................................................................... 1-27 使用 MBean 启动和停止 Windchill 系统............................................................................. 1-28 使用 MBean 处理日志文件................................................................................................. 1-29 使用 MBean 查看和通过电子邮件发送日志文件 ................................................................ 1-30
Windchill10.2高级安装配置指南
UNITED STATES GOVERNMENT RESTRICTED RIGHTS LEGEND
PTC Windchill® Advanced Deployment Guide
PTC Windchill 10.2 M030
Copyright © 2015 PTC Inc. and/or Its Subsidiary Companies. All Rights Reserved.
User and training guides and related documentation from PTC Inc. and its subsidiary companies (collectively "PTC") are subject to the copyright laws of the United States and other countries and are provided under a license agreement that restricts copying, disclosure, and use of such documentation. PTC hereby grants to the licensed software user the right to make copies in printed form of this documentation if provided on software media, but only for internal/personal use and in accordance with the license agreement under which the applicable software is licensed. Any copy made shall include the PTC copyright notice and any other proprietary notice provided by PTC. Training materials may not be copied without the express written consent of PTC. This documentation may not be disclosed, transferred, modified, or reduced to any form, including electronic media, or transmitted or made publicly available by any means without the prior written consent of PTC and no authorization is granted to make copies for such purposes.
Windchill可视化配置

Windchill可视化配置一.Windchill可视化服务器配置1)系统环境配置:1.修改主机名:例如visual.sojoline.2.配置HOSTS:添加上Windchill应用服务器地址:例如:192.168.58.22 plm.sojoline.3.关闭防火墙4.打开远程控制2)安装必须软件:1.安装Adobe Acrobat Pro 11(这里是对应的Adobe LifeCycle ES4)2.安装filezilla_server_0.9.40,安装完毕后需要filezilla_server_0.9.40_patched 中文件替换(解决中文名乱码问题)3.安装office 20104.安装CREO Parametric 2.0(大于M070版本)5.安装Adobe LifeCycle ES46.安装CREO VIEW 3.0 Adapter3)部分必须软件安装说明1.Adobe LifeCycle ES4安装配置说明:(忽略的容为默认)详细请见:lifecycle安装配置.docx安装过程需要主页的页面配置过程需要注意的页面这里是可视化服务器开机登录密码4gSgZdv4;V这里是LifeCycle ES4的密码配置LifeCycle1. 打开浏览器,浏览至localhost:8080/adminui。
2.输入User ID和Password,默认分别为administrator和password。
2.安装Creo View Adapter3.0(忽略的容为默认)安装完毕后手动配置启动将快捷方式放在启动文件夹中就可以实现开机启动配置CREO VIEW Adapter配置文档可视化配置creo可视化配置creo图纸生成可视化时请注意:请将配置好的config.pro替换原有系统的配置,详细请见文档:Windchill可视化生成PDF线性字体设置.docx生成缩略图配置二.Windchill应用服务器端1. 配置site.xconf (配置前请备份好site.xconf文件)在Windchill shell中执行如下命令:xconfmanager -s worker.exe.whitelist.prefixes=C:\\ptc\\creo_view_adapters\\ -t codebase/WEB-INF/conf/wvs.properties xconfmanager -s publish.service.enabled=true -t codebase/WEB-INF/conf/wvs.propertiesxconfmanager -s worker..PDF=DUMMY,preconverted=true -t codebase/WEB-INF/conf/wvs.propertiesxconfmanager -s publish.service.documents.options=encodefilename\=true -t codebase/WEB-INF/conf/wvs.propertiesxconfmanager -s publish.service.enabled=true -t codebase/WEB-INF/conf/wvs.propertiesxconfmanager -s thumbnail.byworker.enabled=false -t codebase/WEB-INF/conf/wvs.propertiesxconfmanager -s ecadagent=true -t codebase/WEB-INF/conf/wvs.propertiesxconfmanager -s worker..DOC=OFFICE -t codebase/WEB-INF/conf/wvs.propertiesxconfmanager -s worker..DOCX=OFFICE -t codebase/WEB-INF/conf/wvs.propertiesxconfmanager -s worker..XLS=OFFICE -t codebase/WEB-INF/conf/wvs.propertiesxconfmanager -s worker..XLSX=OFFICE -t codebase/WEB-INF/conf/wvs.propertiesxconfmanager -s worker..PPT=OFFICE -t codebase/WEB-INF/conf/wvs.propertiesxconfmanager -s worker..PPTX=OFFICE -t codebase/WEB-INF/conf/wvs.propertiesxconfmanager -s easstoredifavailable=false -t codebase/WEB-INF/conf/wvs.propertiesxconfmanager -s publish.markoutofdaterepublishmethod=.ptc.wvs.server.publish.Publi shHelper/markRepublishAll -t codebase/WEB-INF/conf/wvs.properties xconfmanager -pwindchill stop & windchill start2.配置工作器代理方法一:管理员账号登录Windchill,站点——实用程序——工作器代理管理一共需要添加三个:creo数据可视化,office数据可视化,缩略图配置方法二:修改D:\ptc\Windchill_10.2\Windchill\conf\wvs\agent.ini文件[agent]transferpath=$(wt.temp)\transferport=5600numworkers=3(服务器数量,对应的是系统使用了几个工作器代理);[worker1](三个代理的一个:这里是CREO的可视化)autobusystop=port=601username=pdm(FTP用户名)shapetype=PROEautoidlestop=hosttype=ntremotepath=D:\ptc\temp(FTP缓存路径)autostart=falsemaxinstances=1password=pdm(FTP密码)exe=C:\ptc\creo_view_adapters\proe_setup1\proeworker.bat(可视化服务器中的可视化程序)localpath=ftp:/temp(FTP缓存路径)starttime=15prompt=distributed=falseavailabletime=startfromlocal=FALSEhost=visual.sojoline.(可视化服务器主机名)autoerrorstop=false;[worker2](三个代理的一个:这里是office的可视化)localpath=ftp:/tempmaxinstances=1username=pdmprompt=starttime=15host=visual.sojoline.password=pdmautostart=falseautoidlestop=startfromlocal=FALSEexe=C:\ptc\creo_view_adapters\doc_setup\docworker.bat remotepath=D:\ptc\temphosttype=ntport=601distributed=falseautoerrorstop=falseavailabletime=shapetype=OFFICEautobusystop=;[worker3](三个代理的一个:这里是缩略图)localpath=ftp:/tempmaxinstances=1username=pdmprompt=starttime=15host=visual.sojoline.password=pdmautostart=falseautoidlestop=startfromlocal=FALSEexe=C:\ptc\creo_view_adapters\pvsthumb_setup\pvsthumbworker.bat remotepath=D:\ptc\temphosttype=ntport=601distributed=falseautoerrorstop=falseavailabletime=shapetype=THUMBNAILautobusystop=;。
使用task的windchill集成webservice笔记
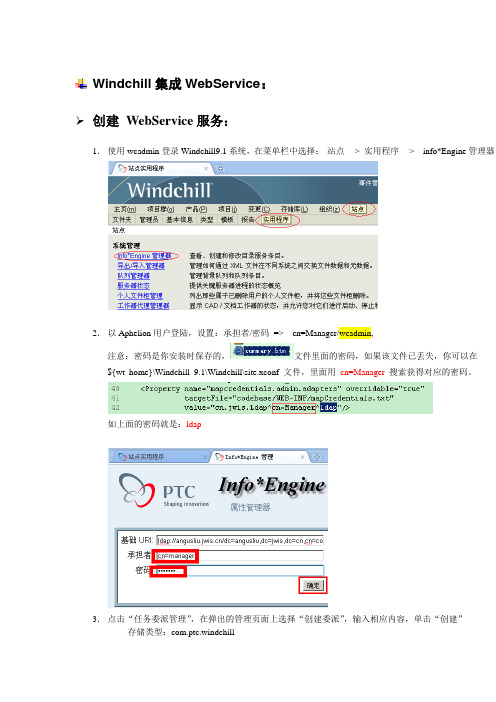
Windchill集成WebService:
创建WebService服务:
1.使用wcadmin登录Windchill9.1系统,在菜单栏中选择:站点--> 实用程序--> info*Engine管理器
2.以Aphelion用户登陆,设置:承担者/密码=> cn=Manager/wcadmin,
注意:密码是你安装时保存的,文件里面的密码,如果该文件已丢失,你可以在
${wt_home}\Windchill_9.1\Windchill\site.xconf 文件,里面用cn=Manager搜索获得对应的密码。
如上面的密码就是:ldap
3.点击“任务委派管理”,在弹出的管理页面上选择“创建委派”,输入相应内容,单击“创建”
存储类型:com.ptc.windchill
名称:Login
源URL:/com/infoengine/soap/webservice.xml (是你xml文件的存放位置)
类型标识符:engine.soap
说明:Webservice Login
我的xml文件存放在:D:\ptc\Windchill_9.1\Windchill\tasks\com\infoengine\soap
应该为反斜杠:
4.继续上一步骤,在管理页面上选择“管理类型标识符”,输入类型标识符名称,单击“创建”
到此为止创建WebService 服务完成。
验证WebService:
1.在浏览器地址栏输入:/Windchill/servlet/RPC?CLASS=engine.soap 输入密码登录之后,你会看到下面的内容:
2.运行WebServicesClient类,如果没有报错,会在MethodServer里面会有如下输出:。
windchill解决方案功能介绍--l快速启动解决方案[管理资料]
![windchill解决方案功能介绍--l快速启动解决方案[管理资料]](https://img.taocdn.com/s3/m/bdbc5f3b360cba1aa911dabe.png)
附录A: Windchill快速启动解决方案功能介绍Windchill®快速启动解决方案Windchill快速启动解决方案是“交钥匙工程”,它使用预先包装好的软件和服务来完成特定的业务过程,以快速获取投资回报。
该套解决方案提供了一个建立在公共Windchill体系架构和平台上的创建-协作-控制组合功能。
综合了为数百家客户部署Windchill积累的经验,Windchill快速启动解决方案具有最佳的用户界面、预装的标准工作流和可配置的过程,所以易于使用。
这些解决方案提供了许多实用功能,其中包括CAD集成、丰富的可视化、以及分布式信息共享功能。
每个解决方案都提供了支持特殊业务过程所必需的功能,这些解决方案可以被完美组合,以满足多个产品生命周期阶段的需求。
为了进一步加快投资回报,Windchill快速启动解决方案的价格固定,并包括资深顾问提供的确定范围内的技术服务和培训。
这些实施工作可以在很短的几周内完成,而不象其它企业系统要用几个月或者几年。
Windchill快速启动解决方案包括:Windchill PDMLinkWindchill PDMLink汇集、控制和利用整个产品生命周期中的数字化产品信息,通过一个基于Web的信息源使参与产品开发过程的每个人都能够轻而易举地访问到各种形式的最新准确信息。
随处可用的基于浏览器的强大可视化功能,确保工程师和非工程师无论身在何处,无需启动原始的应用程序都可以在自己的桌面上浏览和圈阅复杂的2D和3D产品信息。
主要功能:●一个主产品知识库把数字化产品表示(其中包括物料清单、文档、组件属性、二维工作图和模型、原理图、软件模块、技术规格、数据资料和修订记录)编制在一个基于Web的虚拟库中;它支持强大的搜索功能和相关信息的超链接导航。
●强大的产品结构管理功能,可以在建立和处理产品时支持产品配置管理-其中包括自动从CAD模型获得的配置。
●过程和信息的阶段-关口管理有助于管理产品开发过程。
Windchill技术培训笔记
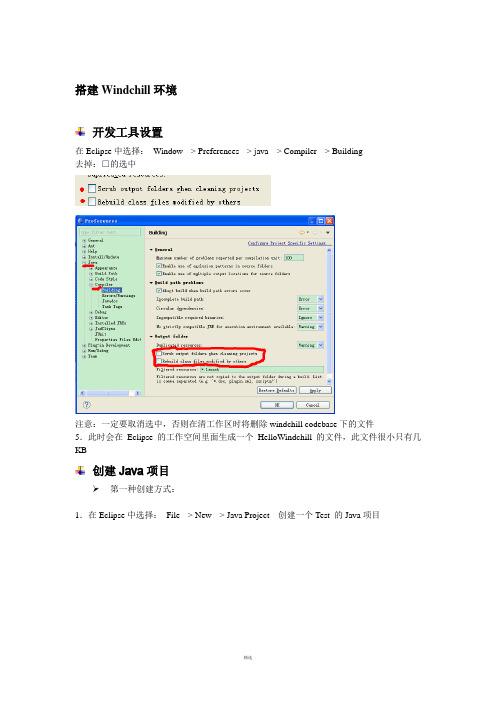
搭建Windchill环境开发工具设置在Eclipse中选择:Window --> Preferences --> java --> Compiler --> Building去掉:□的选中注意:一定要取消选中,否则在清工作区时将删除windchill codebase下的文件5.此时会在Eclipse的工作空间里面生成一个HelloWindchill的文件,此文件很小只有几KB创建Java项目➢第一种创建方式:1.在Eclipse中选择:File --> New --> Java Project 创建一个Test 的Java项目2.在当前创建的java项目Test:在Eclipse中选择:当前项目上(Test)--> New --> Properties --> Java Build Path--> Add Class Folder --> Create New Folder单击ok 完成codebase 文件夹的创建和指定(由于Windchill的codebase文件夹很大,所以这一步骤需要等待片刻)成功之后,将会看到:➢第二种创建方式:1.在Eclipse中选择:File --> New --> Java Project 创建一个TestWindchill 的Java项目→Link additional source --> Browse --> Finish2.Browse →选择codebase3.添加自定义的library库3.指定codebase 的映射:3.指定codebase文件夹编译之后的.class 文件和工程下面的java源文件的映射关系在Eclipse中选择:当前项目上(HelloWindchill)--> New --> Properties --> Java Build Path --> Browse-->单击OK 之后,你可能会发现Java 项目Referenced Libraries里面有个codebase 文件夹了4.添加Windchill环境所需的jar包(推荐使用1)D:\ptc\Windchill_9.1\Windchill里面需要的被导入的jar文件按有:lib、srclib、installlib、WHC\WEB-INF\lib、ant\lib、codebase\WEB-INF\lib、codebase\lib 7个文件夹下的所有jar文件➢ 1.可用自定义一个类库,然后把Windchill 7个lib下面的jar都添加到该库中,以后就可以在开发中直接引用该类库(注意:最好不要覆盖相同名字的jar包,因为他们的jar 的文件大小不同,所以作用也不同,避免在开发中因jar的冲突和版本问题而引起些莫名奇妙的错误)在Eclipse中选择:当前项目上(HelloWindchill)--> New --> Properties --> Java Build Path --> Libraries 选项卡➢ 2.直接引用,7个lib下面的所有jar包第一个Hello World创建HelloWorld.java在Eclipse中选择:当前项目上(HelloWindchill)src --> New --> Package创建一个TestWindchill.java 的类package ;public class TestWindchill {/*** @param args*/public static void main(String[] args) {// TODO Auto-generated method stubSystem.out.println(" Hello World....");}}启动Windchill 服务1.启动Oracle10g 监听服务:OracleOraDb10g_home1TNSListener2.启动Oracle10g 主数据库服务:OracleServiceWIND3.启动Apache 服务4.启动Tomcat 服务成功标志:5.启动control-panel.bat 服务D:\ptc\Windchill_9.1\WindchillDS\server\bat6.启动Windchill Shell 服务,输入windchill start目标:D:\ptc\Windchill_9.1\Windchill\bin\windchill.exe shell 起始位置:D:\ptc\Windchill_9.1\Windchill\bin7.观察Windchill 的两个窗口:ServerManager :MethodServer8.Windchill 启动成功的标志:在MethodServer窗口出现如下标志,表明Windchill 服务启动成功运行HelloWorld.java1.Eclipse控制台会打印:Hello World…2.此时会在Windchill系统的安装目录(D:\ptc\Windchill_9.1\Windchill\codebase)生成如下目录:angus --> com里面会生成TestWindchill.java源文件的编译后的文件:TestWindchill.class此时表明第一个Hello World 程序运行成功3.第一个JSP与Hello Word创建index.jsp在Windchill的安装目录(D:\ptc\Windchill_9.1\Windchill\codebase\netmarkets\jsp)下面新建一个文件夹angus,在里面新建一个index.jsp页面页面内容为:<%@ page language="java" import="java.util.*,.*" pageEncoding="utf-8"%><!DOCTYPE HTML PUBLIC "-//W3C//DTD HTML 4.01 Transitional//EN"><html><head><title>My JSP 'index.jsp' starting page</title><meta http-equiv="pragma" content="no-cache"><meta http-equiv="cache-control" content="no-cache"><meta http-equiv="expires" content="0"><meta http-equiv="keywords" content="keyword1,keyword2,keyword3"><meta http-equiv="description" content="This is my page"></head><body>ddd<% TestWindchill tst = new TestWindchill();%><br><%= tst.helloWindchill() %><%= tst %></body></html>创建TestWindchill.javaTestWindchill.java里面的内容package ;public class TestWindchill {/*** @param args*/public static void main(String[] args) { // TODO Auto-generated method stubSystem.out.println("第一个Windchill程序");}public String helloWindchill(){return"this is the Hello World Windchill...";}}编译后的TestWindchill.class文件会自动映射,放到D:\ptc\Windchill_9.1\Windchill\codebase\angus\com 目录下注意:该目录下的TestWindchill.class 的更新时间访问:在浏览器地址栏输入:http://localhost/Windchill/netmarkets/jsp/angus/index.jsp就可以在Windchill目录使用jsp页面调用Windchill目录java 类的方法。
Windchill系统移植技术分析与实现
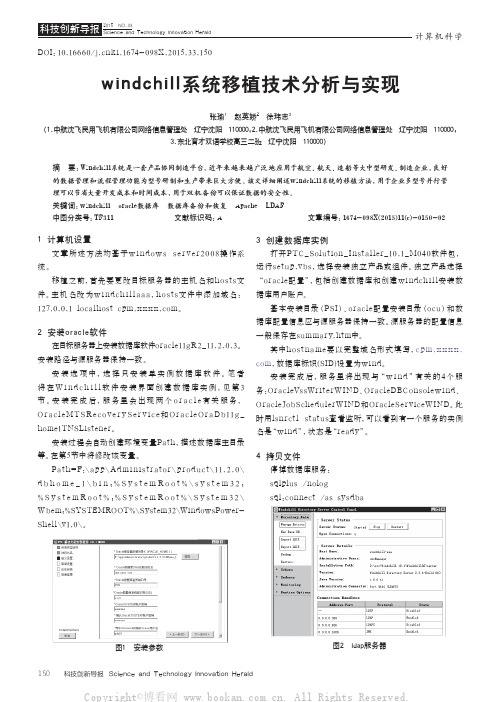
计算机科学科技创新导报 Science and Technology Innovation Herald1501 计算机设置文章所述方法均基于w i n d ow s s e r v e r 2008操作系统。
移植之前,首先要更改目标服务器的主机名和ho s t s文件。
主机名改为w i nd c h i l l a a a,ho s t s文件中添加域名:127.0.0.1 localhost 。
2 安装oracle软件在目标服务器上安装数据库软件oracle11gR2_11.2.0.3。
安装路径与源服务器保持一致。
安装选项中,选择只安装单实例数据库软件。
笔者将在W i n d c h i l l 软件安装界面创建数据库实例,见第3节。
安装完成后,服务里会出现两个o r a c l e 有关服务,O r a c l e M T S R e c o v e r y S e r v i c e 和O r a c l e O r a D b11g _home1TNSListener。
安装过程会自动创建环境变量Path,描述数据库主目录等。
在第5节中将修改该变量。
Pat h=F:\ap p\Ad m i n i s t r at or\pr o du c t\11.2.0\d b h o m e _1\b i n ;%S y s t e m R o o t %\s y s t e m 32;%S y s t e m R o o t %;%S y s t e m R o o t %\S y s t e m 32\Wbem;%SYSTEMROOT%\System32\WindowsPower-Shell\v1.0\。
3 创建数据库实例打开PTC_Solut ion _Inst a l ler_10.1_M040软件包,运行s et up.vb s,选择安装独立产品或组件。
独立产品选择“oracle配置”,包括创建数据库和创建w i ndch i l l安装数据库用户账户。
安装sql server实践报告
安装sql server实践报告英文回答:Installing SQL Server is a practical task that requires attention to detail and following a set of steps. In this report, I will explain the process of installing SQL Server using two languages, English and Chinese.To begin with, the first step in installing SQL Server is to download the installation files from the official Microsoft website. Once the files are downloaded, they need to be extracted to a specific location on the computer. This can be done by right-clicking on the downloaded file and selecting the "Extract" option.After extracting the files, the next step is to run the SQL Server installation wizard. This can be done bylocating the setup file and double-clicking on it. The installation wizard will guide you through the process and prompt you to choose the installation type. There aredifferent installation types available, such as standalone installation or cluster installation.Once the installation type is selected, the wizard will prompt you to choose the SQL Server edition you want to install. The editions vary based on their features and capabilities, such as the Standard Edition or theEnterprise Edition. It is important to choose the edition that best suits your needs and requirements.Next, the installation wizard will prompt you to choose the installation features. This includes options such as database engine services, analysis services, reporting services, and integration services. You can select the features that you need for your specific use case.After selecting the installation features, the wizard will prompt you to choose the instance configuration. This includes options such as default instance or named instance, as well as the instance ID and instance root directory. Itis important to provide a unique instance ID and specifythe appropriate root directory for the instance.Once the instance configuration is completed, the wizard will prompt you to specify the server configuration. This includes options such as service accounts, collation settings, and authentication mode. It is important to provide the necessary information and configure the server settings according to your requirements.Finally, the installation wizard will display a summary of the selected options and prompt you to start the installation process. Once the installation is complete, you can verify the installation by checking the SQL Server services and connecting to the SQL Server instance using a SQL Server management tool.中文回答:安装SQL Server是一个需要注意细节并按照一系列步骤进行的实际任务。
windchill安装

11
命名方法配置
© 2000 PTC
12
命名方法配置( 命名方法配置(二)
© 2000 PTC
13
本地Net服务名配置 服务名配置 本地
© 2000 PTC
14
本地Net服务名配置(二) 服务名配置( 本地 服务名配置
© 2000 PTC
15
本地网络配置( 本地网络配置(三)
© 2000 PTC
© 2000 PTC 2
第一天
安装前的准备工作
© 2000 PTC
3
准备工作
硬件最小需求: 硬件最小需求: 内存: 内存:建议512M内存以上 CPU:P4 以上 硬盘: 以上, 硬盘:40G以上,剩余空间至少10G
© 2000 PTC
4
准备工作
1.
1. 2.
安装操作系统: 安装操作系统: 系列; 建议使用Windows 2K系列; 操作系统安装了Services Pack4 开发工具) 安装JDK(Java 开发工具) 安装Java2SDK1.4.2.03开发包 运行环境) 安装对应Windchill7.0的JRE(Java运行环境) 安装j2re-1_2-windows-i586.exe 安装Java 3D运行环境 安装java3d-1_2_1_03-win32-opengl-sdk.exe
安装LDAP浏览器 浏览器 安装
的浏览器; 此为便于管理Aphelion而安装的一个基于JavaApplet的浏览器; 目录全部复制到本地; 将Aphelion中的SyntegraLdapBrowser目录全部复制到本地;
© 2000 PTC
47
安装Windchill InfoEngine 安装
windchill 8.0安装指南

安装Windchill PDMLink 7.0安装Windchill PDMLink 7.0安装程序清单:Oracle 9iJDK 1.4.2_03 (在安装盘ThirdPartyApps中并没有,需要自己下载)JAVA 3D 1.3.1 (也是自己下载)ApacheTomcatAphelionOCU(Oracle Create Utility)Info*EngineWindchill ServicesWindchill PDMLinkWindchill Multi Language Pack (Asian)Other PatchInfoModeler安装过程在安装JRE1.4.2,Apahce,Tomcat,Aphelion之前,需要首先安装JDK1.4.2,否则无法进行安装。
如果你的电脑曾经已经安装过Windchill 5.1或Windchill 6.2.6等版本,系统中已经存在JDK1.2或JDK1.3.1,你会碰到:在你安装了JDK1.4.2之后,安装Apache等其它软件时还提示必须安装JDK1.4.2,否则无法继续进行。
解决办法:(假设jdk1.4.2安装在d:\jdk1.4.2目录下)1)添加环境变量:JAVA_HOME=d:\jdk1.4.22)在PATH环境变量最前面添加:d:\jdk1.4.2\bin;否则,系统将先找到其它版本的JDK,导致无法进行安装。
如果你的电脑中已经安装了Oracle 8.1.7,你必须首先卸载它,然后手工删除注册表中Oracle相关的项。
还有,记得重新启动机器,然后再开始安装Oracle 9i。
否则,安装很有可能无法成功,还得重来。
如果你是安装开发系统。
在安装Windchill PDMLink 7.0时,你需要选择“定制”,然后选中:1)安装Windchill PDMLink模型文件;(安装*.mdl,*.cat和*.mdata文件)2)启用显示的文本裁减;(安装*.rbinfo文件)db.properties中的设置:wt.pom.serviceName=eric\:1526\:wind需要更改为正确的端口号。
克隆生产机windchill环境方案

生产机windchill系统迁移方案目录1. 背景 (2)2. 编写目的 (2)3. 迁移方案描述 (2)4. 克隆windchill步骤 (2)4.1. Step1 克隆机安装oracle10 (2)4.2. Step2 克隆机安装windchill9.1 (2)4.2.1. 准备工作 (2)4.2.2. 安装windchill9.1 (3)4.2.3. 检测服务能否启动 (3)4.2.4. 检测windchill是否安装成功 (4)4.3. step3备份克隆机环境 (4)4.3.1. 备份windchill9.1文件目录 (4)4.3.2. 备份oracle (4)4.3.3. 备份OCU (4)4.4. step4在克隆机上恢复生产机环境 (4)4.4.1. 克隆widchill环境 (4)4.4.2. 克隆oracle环境 (5)4.4.3. 克隆ocu环境 (5)4.5. step5检测克隆机克隆后服务启动情况 (5)4.6. Step6检测在克隆机中恢复的生产机环境 (5)5. Windchill重命名host (5)5.1. Step1 更新数据库中数据表绑定的host (5)5.2. Step2 修改计算机名 (6)5.3. Step3重新制定ldap的host (7)5.4. Step4更新apache的host名 (9)5.5. Step5更新Tomcat AJP Host (10)5.6. Step6更新site.xconf文件 (13)5.7. Step7更新windchill数据库配置文件 (13)5.8. Step8 更新Partslink配置文档 (13)5.9. Step9更新Ldap配置 (13)5.10. Step10更新oracle监听服务器配置 (16)5.11. Step11检测rehost是否成功 (16)1.背景由于时间、空间的变法,在很大程度需要将当前的windchill环境迁移到其他机器上。
- 1、下载文档前请自行甄别文档内容的完整性,平台不提供额外的编辑、内容补充、找答案等附加服务。
- 2、"仅部分预览"的文档,不可在线预览部分如存在完整性等问题,可反馈申请退款(可完整预览的文档不适用该条件!)。
- 3、如文档侵犯您的权益,请联系客服反馈,我们会尽快为您处理(人工客服工作时间:9:00-18:30)。
Installing a Windchill Server Using PSI1.Downloading the cd images2.Preparing the Windows 2003 server VM Image3.Installing Oracle4.Installing Windchill ServerDownloading the CD images1.You will need a RSA key generator and access to Leopard or a computerwi th Nortel’s VPN client and a ftp client.2.Log into the VPN client with the RSA key generator3.Open the ftp client – on leopard you can connect using the quick connectpull down menu without having to type in an address or user information. 4.Select the files listed in the screenshot below – travel to the directory shownediting it for the build you are attempting to download (i.e./d01/rsync/masterpack.d01/build/wnc/<X-10> or <X-10M10>etc/<buildnumber>/install5.Make sure that you are set to download in binary mode (transfer menu at thetop of filezilla).6.Download the files to a local directory7.Once files are downloaded disconnect from the Nortel VPN client networkand go to \\icubed\corp\wcbuilds\x10\ directory and make a directory called build### where ### is the number of the build you just downloaded. Copy the files that were downloaded from PTC into this folder and unzip them –make sure your zip program keeps directory names and unzips them each into their own directory.8.If you need to install product view or any other extra PTC products you willhave to do the same steps as above for them but they will be located inanother directory on the ftp server.9.If you would like to install a Work Group Manager client on the server thenyou should copy a CD image from u:\cdimages\ to the folder as well.Preparing the Windows 2003 VM server image1.On the machine where the VM Image is to be run copy the base image from<CURRENTLY NO SPACE ON THE NETWORK>\2k3base.zip2.Unzip the file and start up the VM image. Log in as the local administratorand change the computer name to the desired new name (usuallyvmb<buildnumber> (i.e. vmb117). You will have to have someone with the network administrator password add the computer with the new name to thenetwork.3.Cut off enhanced internet security – go to control panel->add removeprograms … when add remove programs window comes up selectAdd/Remove Windows Components on the left side. The window refreshes and you uncheck Internet Explorer Enhanced Security Configuration and click the Next button. (note this step may not be necessary if the base image is updated with this already disabled)4.Reboot the image and log in as user: windInstalling Oracle1.Run:\\icubed\corp\wcbuilds\Oracle\windows\10g\10201_database_win32\database\setup.exe 2.Follow the screenshots below when choosing your install options:Note the next screenshot is two shots of the same screen and just shows the scroll bar at the top and at the bottom so all options selected can be seen:Installing Windchill Server1.Click on the Windows Start button and select Run…2.In the run box type the path to the directory you unzipped all the CD imagefiles into (i.e.: \\icubed\corp\wcbuilds\x10\build117 )3.Click into the PTCSolnInstaller directory and run the setup.vbs file4.Follow the screenshots below to configure the server:Above picture – point to the oracle install directory (the base install directory you set when installing oracle – this may be on the C: or E: drive depending on the server you use and where you chose to put it). Both password blocks shouldbe filled in with ‘wind’Above picture –password for LDAP should be ‘jello’organization to ‘I-Cubed’Above picture – install the icons wherever is most convienantfilesAbove picture –verify that all options say ‘Staging Area’ beside them – if not then it did not find the CD image folders for options that do not say that besidethem.5.After you clicked install on the installer will run for around 4 hours. When itcomes back you will need to set up users on the system (alc\vtc) you will also need to follow the instructions on the QA sharepoint site for setting up auto numbering and document properties pages.6.Follow the steps on this document for the final steps of the install:http://hippo/projects/Contract/reference/X10%20Development/Additional%20Server%20Config%20for%20CAD%20File%20Sync.aspx。
