SP-FB-GEN-1020_Tray_Handling
HP打印机配件的相关0EM代码
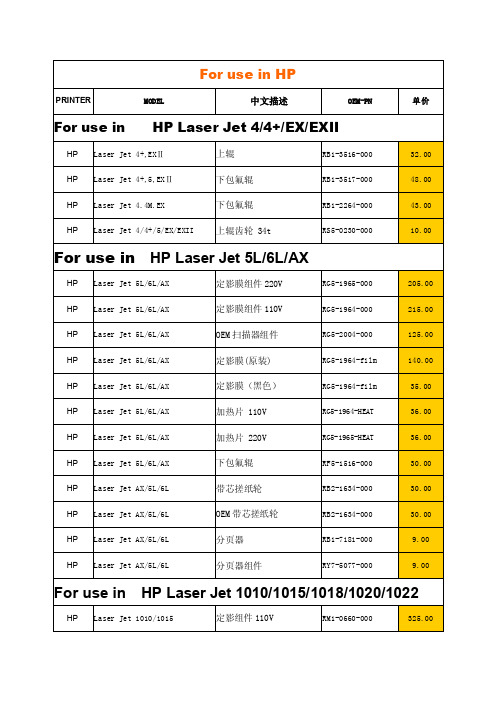
RG9-1493-000 RG9-1494-000 RG9-1495-000 RG9-1496-000 RG9-1486-000 RG9-1494-film RG9-1494-film RG9-1494-HEAT RG9-1493-HEAT RF0-1002-000 RA0-1088-000 RA0-1089-000 RA0-1094-000 RA0-1095-000 RA0-1094-000 RA0-1095-000 RG9-1483-000 RL1-0303-000 RL1-0303-000 RF0-1014-000 RF0-1014-000 RY7-5055-000
HP Laser Jet AX/5L/6L
分页器组件
RY7-5077-000
9.00
For use in HP Laser Jet 1010/1015/1018/1020/1022
HP Laser Jet 1010/1015
定影组件 110V
RM1-0660-000
325.00
HP Laser Jet 1010/1015
HP Laser Jet P1006/1007/1008 分页器
For use in HP Laser Jet P1505
HP Laser Jet P1505
定影组件 110V
HP Laser Jet P1505
定影组件 220V
HP Laser Jet P1505
OEM 定影膜
HP Laser Jet P1505
HP Laser Jet 1010/1015/1020/1022 OEM 定影膜
HP Laser Jet 1010/1015/1020/1022 定影膜(进口)
HP Laser Jet 1010/1015/1020/1022 加热片 110V
华三路由器软件升级指南
完全卸载_hp1020打印机
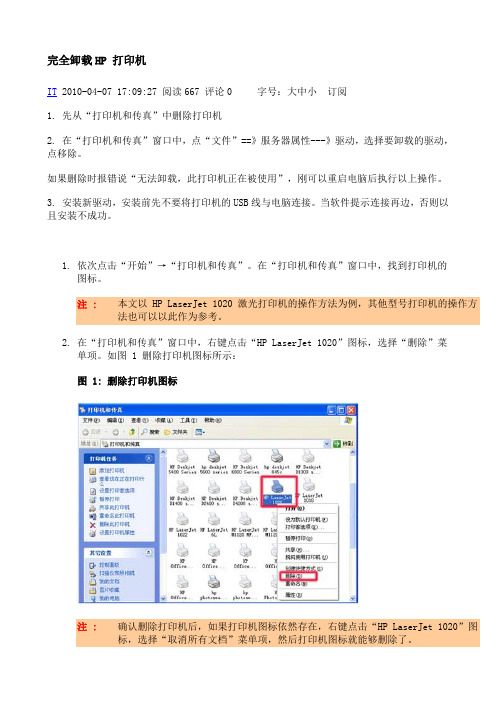
完全卸载HP 打印机IT 2010-04-07 17:09:27 阅读667 评论0 字号:大中小订阅1. 先从“打印机和传真”中删除打印机2. 在“打印机和传真”窗口中,点“文件”==》服务器属性---》驱动,选择要卸载的驱动,点移除。
如果删除时报错说“无法卸载,此打印机正在被使用”,刚可以重启电脑后执行以上操作。
3. 安装新驱动,安装前先不要将打印机的USB线与电脑连接。
当软件提示连接再边,否则以且安装不成功。
1.依次点击“开始”→“打印机和传真”。
在“打印机和传真”窗口中,找到打印机的图标。
注 :本文以 HP LaserJet 1020 激光打印机的操作方法为例,其他型号打印机的操作方法也可以以此作为参考。
2.在“打印机和传真”窗口中,右键点击“HP LaserJet 1020”图标,选择“删除”菜单项。
如图 1 删除打印机图标所示:图 1: 删除打印机图标注 :确认删除打印机后,如果打印机图标依然存在,右键点击“HP LaserJet 1020”图标,选择“取消所有文档”菜单项,然后打印机图标就能够删除了。
3.在“打印机和传真”窗口中,依次点击“文件”→“服务器属性”。
如图 2 服务器属性所示:图 2: 服务器属性4.在“打印服务器属性”窗口中,点击“驱动程序”选项卡,选择“HP LaserJet 1020”打印机型号,然后点击“删除”按钮。
如图 3 属性所示:图 3: 属性5.在“打印服务器属性”窗口中,点击“是”按钮。
如图 4 确认删除打印机所示:图 4: 确认删除打印机6.如果在“打印服务器属性”窗口中提示无法删除驱动程序,点击“确定”按钮,然后重新启动电脑。
如图 5 提示无法删除所示:图 5: 提示无法删除注 :没有删除“打印机和传真”窗口中的打印机图标、删除打印机图标前使用过打印机,都会在“打印服务器属性”窗口中提示无法删除驱动程序。
7.重新启动电脑后不要进行任何打印操作,再次按照步骤操作就能够删除驱动程序了。
微打SP-D10使用说明书(V1.0)

产品简介
SP-D10 系列针式微型打印机是北京思普瑞特科技发展有限公司面向二十一世纪而开 发生产的点阵式智能打印机。机器本身采用全新进口机芯自带单片计算机,具有体积小、重 量轻、功能完备、高速度、高清晰、外观美观、操作简单、连接方便等优点。SP-D10 系列 针式微型打印机型号齐全,标准安装尺寸,是医用器材、火警控制、工业控制以及其他各种 仪器仪表更新换代的最理想的匹配产品。
1.1 主要特征
◇采用针式撞击点阵打印方式 ◇集机头与电路于一体,可方便安装 ◇自带单片处理机,具有标准的并行接口或串行接口,便于与各种微机或智能仪器、仪表
联机使用 ◇具有汉字、字符、图形等实时的打印命令,可打全部标准5×7点阵的ASCII字符和16×
16或12×12点阵汉字。指令集与传统的打印机相兼容 ◇打印速度按型号不同有1.2行/秒、0.7行/秒、0.4行/秒三种选择 ◇具有自检测功能 ,打印全部代码 ,字符清晰度高 ,字体美观大方 ◇ 电源直流 5V±5%,1.5A ◇工作温度范围 0~50℃
1.1 主要特征..............................................................................................................................5 1.2 性能指标..............................................................................................................................5 第二章 系统安装.............................................................................................................................7 2.1 安装尺寸..............................................................................................................................7 2.2 纸的安装..............................................................................................................................7 2.3 电源连接............................................................................................................................10 第三章 操作说明.......................................................................................................................11 3.1 接口连接............................................................................................................................11
NXP MIMXRT1020 EVK 板级硬件用户指南说明书
© 2018 NXP B.V.MIMXRT1020 EVK Board Hardware User’sGuide1. IntroductionThis Hardware User’s Guide for the MIMXRT 1020Evaluation Kit (EVK) is based on the NXP Semiconductor i.MX RT1020 Processor. This board is fully supported by NXP Semiconductor. The guide includes system setup and debugging, and provides detailed information on overall design and usage of the EVK board from a hardware systems perspective.1.1. Board overviewThis EVK board is a platform designed to showcase the most commonly used features of the i.MX RT1020 Processor in a small, low cost package. The MIMXRT1020 EVK board is an entry level development board, which gives the developer the option of becoming familiar with the processor before investing a large amount or resources in more specific designs.NXP Semiconductors Document Number: MIMXRT1020EVKHUGUser's GuideRev. 0 , 05/2018Contents1.Introduction ........................................................................ 1 1.1. Board overview ....................................................... 1 1.2. MIMXRT1020 EVK contents ................................. 2 1.3. MIMXRT1020 EVK Board revision history ........... 3 2.Specifications ..................................................................... 3 2.1. i.MX RT1020 processor .......................................... 5 2.2. Boot Mode configurations ....................................... 5 2.3. Power tree ............................................................... 6 2.4. SDRAM memory .................................................... 9 2.5. SD Card slot ............................................................ 9 2.6. QSPI flash ............................................................... 9 2.7. Ethernet connector .................................................. 9 2.8. USB PHY connector ............................................. 10 2.9. Audio input / output connector .............................. 10 2.10. OpenSDA circuit (DAP-Link) ............................... 10 2.11. JTAG connector .................................................... 10 2.12. Arduino expansion port ......................................... 11 2.13. User interface LED indicator ................................ 13 3.PCB information .............................................................. 13 4. EVK design files .............................................................. 13 5. Contents of the Evaluation Kit ......................................... 14 6.Revision history (14)IntroductionFeatures of the MIMXRT1020 EVK board are shown in Table 11.2. MIMXRT1020 EVK contentsThe MIMXRT1020 EVK contains the following items: •MIMXRT1020 EVK Board•USB Cable (Micro B)Specifications 1.3. MIMXRT1020 EVK Board revision history•Rev A: Prototype.2. SpecificationsThis chapter provides detailed information about the electrical design and practical considerations of the EVK Board, and is organized to discuss each block in the following block diagram of the EVK board.( Figure 1)Figure 1. Block diagramThe overview of the MIMXRT1020 EVK Board is shown in Figure 1 & Figure 2.SpecificationsFigure 2. Overview of the MIMXRT1020 EVK Board (Front side)Figure 3. Overview of the MIMXRT1020 EVK Board (Back side)Specifications 2.1. i.MX RT1020 processorThe i.MX RT1020 is a new processor family featuring NXP's advanced implementation of the Arm® Cortex®-M7 Core. It provides high CPU performance and best real-time response. The i.MX RT1020 provides various memory interfaces, including SDRAM, Raw NAND FLASH, NOR FLASH,SD/eMMC, Quad SPI, HyperBus and a wide range of other interfaces for connecting peripherals, such as WLAN, Bluetooth™, GPS. Same as other i.MX processors, i.MX RT1020 also has rich audio features, including SPDIF and I2S audio interface.The i.MX RT1020 applications processor can be used in areas such as industrial HMI, IoT, motor control and home appliances. The architecture's flexibility enables it to be used in a wide variety of other general embedded applications too. The i.MX processor provides all interfaces necessary to connectp eripherals such as WLAN, Bluetooth™, GPS.The more detail information about i.MX RT1020 can be found in the Datasheet and Reference Manual2.2. Boot Mode configurationsThe device has four boot modes (one is reserved for NXP’s use). The boot mode is selected based on the binary value stored in the internal BOOT_MODE register. Switch (SW8-3 & SW8-4) is used to select the boot mode on the MIMXRT1020 EVK Board.Typically, the internal boot is selected for normal boot, which is configured by external BOOT_CFG GPIOs. The following Table 3 shows the typical Boot Mode and Boot Device settings.NOTEFor more information about boot mode configuration, see the System Boot chapter of theMIMXRT1020 Reference Manual. (waiting for update)For more information about MIMXRT1020 EVK boot device selection and configuration, see the main board schematic. (waiting for update)Specifications2.3. Power treeA DC 5 V external power supply is used to supply the MIMXRT1020 EVK Board at J2, and a slide switch SW1 is used to turn the Power ON/OFF. J23 and J9 also can be used to supply the EVK Board. Different power supply need to configure different Jumper setting of J1. Table 4 shows the details:NOTEFor some computers’ USB, it cannot support 500ma before establishingcommunication. In this case, it is recommended to replace the computer oruse the power adapter(J2) to power the EVK Board.The power tree is shown in Figure 4SpecificationsFigure 4. Power TreeThe power control logic of the MIMXRT1020 EVK board is shown in the Figure 5: •It will power up SNVS, and then PMIC_REQ_ON will be switched on to enable external DC/DC to power up other power domains.•ON/OFF button is used to switch ON/OFF PMIC_REQ_ON to control power modes.•RESET button and WDOG output are used to reset the system power.SpecificationsFigure 5. Power Control Diagram The power rails on the board are shown in Table 5.Specifications2.4. SDRAM memoryOne 256 Mb, 166MHz SDRAM (MT48LC16M16A2P) is used on the EVK Board.2.5. SD Card slotThere is a SD card slot(J15) on the MIMXRT1020 EVK Board. J15 is the Micro SD slot for USDHC1 interface. If the developer wants to boot from the SD Card, the boot device switch (SW8) settings should be: OFF, ON, ON, OFF, as shown in Table 3.2.6. QSPI flashA 64 Mbit QSPI Flash is used on the MIMXRT1020 EVK Board. If the developer wants to boot from the QSPI Flash, the boot device switch(SW8) settings should be: OFF, OFF, ON, OFF, as shown in Table 3.2.7. Ethernet connectorThere is one Ethernet Mac controller in the MIMXRT1020 processor. The Ethernet subsystem of the MIMXRT1020 EVK Board is provided by the KSZ8081RNB 10/100M Ethernet Transceiver (U11) and a RJ45 (J14) with integrated Magnetic.Figure 6. Ethernet Connector RJ45Specifications2.8. USB PHY connectorThe MIMXRT1020 contains a integrated USB 2.0 PHYs capable of connecting to USB host/device systems at the USB low-speed (LS) rate of 1.5 Mbits/s, full-speed (FS) rate of 12 Mbits/s or at the USB 2.0 high-speed (HS) rate of 480 Mbits/s.2.9. Audio input / output connectorThe Audio CODEC used on the MIMXRT1020 EVK Board is Wolfson’s Low Power, high quality Stereo Codec, WM8960.The MIMXRT1020 EVK Board include one headphone interface (J11), one onboard MIC (P1), two speaker interfaces (J12, J13). J11 is a 3.5 mm audio stereo headphone jack, which supports jack detect.2.10. OpenSDA circuit (DAP-Link)The OpenSDA circuit (CMSIS–DAP) is an open-standard serial and debug adapter. It bridges serial and debug communications between a USB host and an embedded target processor.CMSIS-DAP features a mass storage device (MSD) bootloader, which provides a quick and easy mechanism for loading different CMSIS-DAP Applications such as flash programmers, run-control debug interfaces, serial-to-USB converters, and more. Two or more CMSIS-DAP applications can run simultaneously. For example, run-control debug application and serial-to-USB converter runs in parallel to provide a virtual COM communication interface while allowing code debugging via CMSIS-DAP with just single USB connection.For the MIMXRT1020 EVK Board, J23 is the connector between the USB host and the target processor. Jumper to serial downloader mode to use stable DAP-Link debugger function. If developer wants to make OpenSDA going to the bootloader mode, and press SW5 when power on. Meanwhile, the OpenSDA supports drag/drop feature for U-Disk. First, use the seral downloader mode and drag/drop the image file to U-Disk. Then select QSPI Flash as boot device and reset the Board, the image will run.2.11. JTAG connectorJ16 is a standard 20-pin/2.54 mm Box Header Connector for JTAG. The pin definitions are shown in Figure 7. Support SWD by default.SpecificationsFigure 7. JTAG pin definitions2.12. Arduino expansion portJ17 – J20 (unpopulated) is defined as Arduino Interface. The pin definitions of Arduino Interface are shown in Table 6.Specifications2.12.1. Power switchSW1 is a slide switch to control the power of the MIMXRT1020 EVK Board when the power supply is from J2. The function of this switch is listed below:•Sliding the switch to the ON position connects the 5 V power supply to the Evaluation board main power system.•Sliding the switch to OFF position immediately removes all power from the board.2.12.2. ON/OFF buttonSW2 is the ON/OFF button for MIMXRT1020 EVK Board. A short pressing in OFF mode causes the internal power management state machine to change state to ON. In ON mode, a short pressing generates an interrupt (intended to be a software-controllable(power-down). An approximate 5 seconds or more pressing causes a forced OFF. Both boot mode inputs can be disconnected.2.12.3. Reset buttonThere are two Reset Button on the EVK Board. SW5 is the Power Reset Button. Pressing the SW5 in the Power On state will force to reset the system power except SNVS domain. The Processor will be immediately turn off and reinitiate a boot cycle from the Processor Power Off state. SW3 is POR Reset Button.EVK design files 2.12.4. USER buttonSW4 is the USER Button(GPIO5-00) for developers using. Pressing can produce changes in high and low levels.2.13. User interface LED indicatorThere are four LED status indicators located on the EVK Board. The functions of these LEDs include: •Main Power Supply(D3)Green: DC 5V main supply is normal.Red: J2 input voltage is over 5.6V.Off: the board is not powered.•Reset RED LED(D15)•OpenSDA LED(D16)•USER LED(D5)3. PCB informationThe MIMXRT1020 EVK Board is made using standard 2-layer technology. The material used was FR-4. The PCB stack-up information is shown in Table 7.4. EVK design filesThe schematics, layout files, and gerber files (including Silkscreen) can be downloaded from/MIMXRT1020-EVK(waiting for update).Revision history5. Contents of the Evaluation KitNOTEPower adaptor, Micro SD Card are not standard parts of the Evaluation Kit.6. Revision historyTable 9 summarizes the changes made to this document since the initial release.Document Number: MIMXRT1020EVKHUGRev. 0 05/2018How to Reach Us: Home Page: Web Support: /supportInformation in this document is provided solely to enable system and softwareimplementers to use NXP products. There are no express or implied copyright licenses granted hereunder to design or fabricate any integrated circuits based on the information in this document. NXP reserves the right to make changes without further notice to any products herein.NXP makes no warranty, representation, or guarantee regarding the suitability of its products for any particular purpose, nor does NXP assume any liability arising out of the application or use of any product or circuit, and specifically disclaims any and all liability, including without limitation consequenti al or incidental damages. “Typical” parameters that may be provided in NXP data sheets and/or specifications can and do vary in different applications, and actual performance may vary over time. All operating parameters, including “typicals”, must be validated for each customer application by customer’s technical experts. NXP does not convey any license under its patent rights nor the rights of others. NXP sells products pursuant to standard terms and conditions of sale, which can be found at the following address: /SalesTermsandConditions . While NXP has implemented advanced security features, all products may be subject to unidentified vulnerabilities. Customers are responsible for the design and operation of their applications and products to reduce the effect of these vulnerabilities oncustomer’s applications and products, and NXP accepts no liability for any vulne rability that is discovered. Customers should implement appropriate design and operating safeguards to minimize the risks associated with their applications and products NXP, the NXP logo, NXP SECURE CONNECTIONS FOR A SMARTER WORLD, , Freescale, the Freescale logo, and Kinetis, are trademarks of NXP B.V. All other product or service names are the property of their respective owners. Arm and Cortex are registered trademarks of Arm Limited (or its subsidiaries) in the EU and/or elsewhere. All rights reserved. © 2018 NXP B.V.。
FPC1020指纹模块用户使用手册
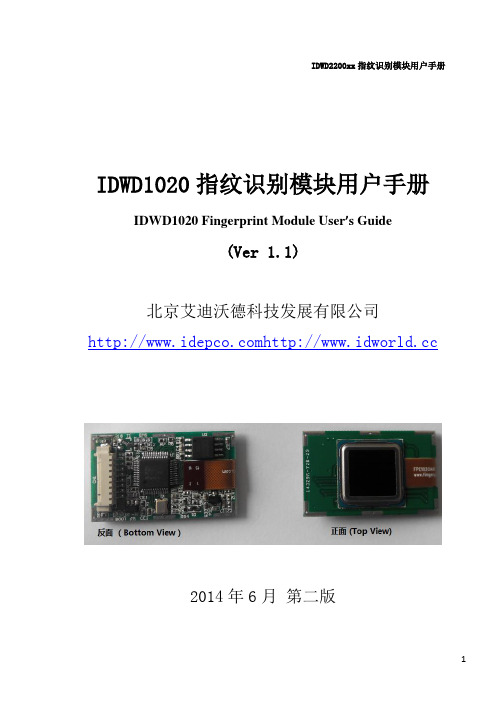
IDWD1020指纹识别模块用户手册IDWD1020 Fingerprint Module User’s Guide(Ver 1.1)北京艾迪沃德科技发展有限公司2014年6月第二版目录(一)概述 (1)(二)通讯协议 (2)2.1通讯处理过程 (2)2.2通讯包P ACKET 的分类 (3)2.2.1命令包Command packet (3)2.2.2响应包Response packet (3)2.2.3指令/响应的数据包Data Packet (3)2.3通讯包的帧结构 (4)2.3.1通讯包Parket识别代码 (4)2.3.2命令包(Command packet )的帧结构 (4)2.3.3响应包(Response packet)的帧结构 (5)2.3.4指令数据包(Command Data Packet)的帧结构 (5)2.3.5响应数据包(Response data packet)的帧结构 (6)(三)通讯命令(COMMAND )综述 (7)3.1指纹特征模板(T EMPLATE R ECORD)的数据结构 (7)3.2命令列表(C OMMAND L IST ) (7)(四)各通讯命令(COMMAND)详细说明 (9)4.1连接测试(CMD_TEST_CONNECTION) (9)4.2设置参数(CMD_SET_PARAM) (10)4.3读取参数(CMD_GET_PARAM) (13)4.4读取设备信息(CMD_DEVICE_INFO) (14)4.5使模块进入IAP模式(CMD_ENTER_IAP_MODE) (15)4.6采集指纹图像(CMD_GET_IMAGE) (16)4.7检测手指(CMD_FINGER_DETECT) (17)4.8上传指纹图像到主机(CMD_UP_IMAGE_CODE) (18)4.9下载指纹图像到模块(CMD_DOWN_IMAGE) (20)4.10控制采集器背光灯(CMD_SLED_CTRL)开/关 (22)4.11保存指纹模板数据到模块指纹库(CMD_STORE_CHAR) (23)4.12读取指纹库中的指纹并暂存在指定的R AM B UFFER中(CMD_LOAD_CHAR) (24)4.13将暂存在R AM B UFFER中的指纹模板上传到主机(CMD_UP_CHAR) (25)4.14下载指纹模板数据到模块指定的R AM B UFFER(CMD_DOWN_CHAR) (26)4.15删除指定编号范围内的指纹(CMD_DEL_CHAR) (28)4.16获取指定编号范围内可注册的首个编号(CMD_GET_EMPTY_ID) (29)4.17检查指定的编号是否已被注册(CMD_GET_STATUS) (30)4.18检查指定编号范围内的指纹库是否有数据损坏(CMD_GET_BROKEN_ID) (31)4.19获取指定编号范围内已注册的指纹总数(CMD_GET_ENROLL_COUNT) (32)4.20从暂存在I MAGE B UFFER中的指纹图像产生模板(CMD_GENERATE) (33)4.21合成指纹模板数据用于入库(CMD_MERGE) (34)4.22指定2个R AM B UFFER之间的模板做比对(CMD_MATCH) (35)4.23指定编号范围的1:N识别(CMD_SEARCH) (36)4.24指定R AM B UFFER与指纹库中指定编号的模板比对(CMD_VERIFY) (37)4.25设置模块序列号(CMD_SET_MODULE_SN) (38)4.26读取模块序列号(CMD_GET_MODULE_SN) (40)4.27取消采集指纹(CMD_FP_CANCEL) (41)4.28获取已注册ID列表(CMD_GET_ENROLLED_ID_LIST) (42)4.29进入休眠状态(CMD_ENTER_STANDBY_STATE) (44)4.30通讯错误返回(I NCORRECT C OMMAND) (45)4.31注意事项 (45)(五)响应(RESPONSE)及错误代码表(ERROR CODE) (46)(六)登记及比对流程图 (47)6.1光学及面阵式半导体指纹采集器模块的注册流程(E NROLL P ROCESS) (47)6.2滑动采集器模块的注册流程(E NROLL P ROCESS) (48)6.3光学及面阵式半导体采集器模块的验证及识别流程(V ERIFY &I DENTIFY) (49)6.4滑动采集器模块指纹验证和识别流程(V ERIFY &I DENTIFY ) (50)(七)硬件描述 (51)7.1主处理板尺寸 (51)7.2指纹传感器尺寸图..................................... 错误!未定义书签。
CANON 打印机 说明书

发送和接受传真 ...................... 快速拨号 ............................ 传真问题的疑难解答 ..................
1
1-1
安装 CAPT
如果您将 imageCLASS D680/D620 用作本地打印机 (直接连到您的计算机上),请遵 循下列步骤。如果 imageCLASS D680/D620 已在您的网络上,而且您想使用它进行启 动,请遵循下列步骤 (在网络用户,1-23 页)。如果您想把 imageCLASS D680/D620 安装为网络打印机,请请遵循下列步骤 (在连接到作为网络打印机的 imageCLASS D680/D620,1-26 页)。
■ 添加打印机向导
要在使用 Windows 95/98/Me 的本地计算机上安装 CAPT,您可使用 Windows 95/98/ Me 添加打印机向导。
以下是 Windows 98 下 “使用并行端口”的安装程序。
1 从开始菜单中选择设置,然后选择打印机。出现 “打印机”文件夹。
2 双击添加打印机图标。添加打印机向导对话框出现。单击下一步 >。
第 4 章:
疑难解答 检查清单 . . . . . . . . . . . . . . . . . . . . . 4-1 打印机问题 . . . . . . . . . . . . . . . . . . . . 4-2 CAPT 的故障 . . . . . . . . . . . . . . . . . . . 4-4 CAPT 消息 . . . . . . . . . . . . . . . . . . . . 4-6 使用疑难解答程序 . . . . . . . . . . . . . . . . . 4-8 卸载 CAPT 软件 . . . . . . . . . . . . . . . . . 4-10
FOXCONN M61PMV Series 主板 说明书

有毒有害物质或元素的名称及含量说明标示印刷电路板及其电子元件外部信号连接头及线材○: 表示该有毒有害物质在该部件所有均质材料中的含量均在《电子信息产品中有毒有害物质的限Declaration of conformityHON HAI PRECISION INDUSTRY COMPANY LTD66, CHUNG SHAN RD., TU-CHENG INDUSTRIAL DISTRICT,TAIPEI HSIEN, TAIWAN, R.O.C.declares that the productMotherboard M61PMV/M61PMV-Eis in conformity with(reference to the specification under which conformity is declared inaccordance with 89/336 EEC-EMC Directive)■ EN 55022: 1998/A2:2003 Limits and methods of measurements of radiodisturbance characteristics of information technologyequipment■ EN 61000-3-2/:2000 Electromagnetic compatibility (EMC)Part 3: LimitsSection 2: Limits for harmonic current emissions(equipment input current <= 16A per phase)■ EN 61000-3-3/A1:2001 Electromagnetic compatibility (EMC)Part 3: LimitsSection 2: Limits of voltage fluctuations and flicker inlow voltage supply systems for equipment with ratedcurrent <= 16A■ EN 55024/A2:2003 Information technology equipment-Immunitycharacteristics limits and methods of measurement Signature: Place / Date: TAIPEI/2008Printed Name: James LiangDeclaration of conformityTrade Name: FOXCONNModel Name: M61PMV/M61PMV-EResponsible Party: PCE Industry Inc.Address: 458 E. Lambert Rd.Fullerton, CA 92835Telephone: 714-738-8868Facsimile: 714-738-8838E quipment Classification: FCC Class B SubassemblyT ype of Product: MotherboardManufacturer: HON HAI PRECISION INDUSTRYCOMPANY LTDAddress: 66, CHUNG SHAN RD., TU-CHENGINDUSTRIAL DISTRICT, TAIPEI HSIEN,TAIWAN, R.O.C.Supplementary Information:This device complies with Part 15 of the FCC Rules.Operation is subject to the following two conditions : (1) this device may not cause harmful interference, and (2) this device must accept any interference received, including interference that may cause undesired operation.Tested to comply with FCC standards.Signature : Date : 2008目录第 1 章产品介绍产品规格 (2)主板布局图 (4)背板端口 (5)第 2 章硬件安装安装CPU和CPU散热风扇 (8)安装内存 (11)安装扩展卡 (13)连接其它内部接口 (14)跳线 (16)第 3 章 BIOS设置进入BIOS程序 (19)BIOS设置主菜单 (19)系统信息 (21)Fox 中心控制单元 (23)高级BIOS功能设置 (27)高级芯片组参数设置 (28)外围设备设置 (28)电源管理设置 (33)系统监测 (35)系统最佳缺省值设置 (36)设定超级用户密码 (36)设定用户密码 (36)保存后退出 (36)不保存退出 (36)第 4 章光盘介绍应用程序光盘简介 (38)安装驱动程序和应用程序 (39)FOX ONE主菜单 (42)CPU 控制 (46)频率控制 (48)监控设置 (49)电压控制 (51)风扇控制 (52)/support/online.aspx800-830-6099付费服务电话或手机用户请拨打:0755-********-74164、显卡、内存兼容性列表,请访问如下网站:/product/Motherboards/compatibility.aspx感谢您购买富士康的 M61PMV系列主板。
HP惠普打印机清零大全

H P惠普打印机清零大全-CAL-FENGHAI.-(YICAI)-Company One1HP惠普打印机清零大全,hp惠普打印机墨盒清零集合惠普打印机废墨仓已满,又打印不出文章了真是头疼老总那里还等着我的打印报告呢这让我如何是好,弄不好搞砸了这次生意我的饭砣就保不住了,这是业内人士经常抱怨的一句话.别着急如果你用的是惠普打印机,而又恰好是废墨仓满了的话那么看完这段文章后也许你的问题就应刃而解了.1.HP4000/4050/4100/5000(1)按"项目"键左端加"数值"键左端开机。
(2)当液晶屏上出现"RESETMAINTENANCECOUNT"(重设计数器)时,松开各键。
2.HP4500/4550?(1)按住"取消"键和"选择"键开机,当液晶亮起来时,松开二键。
(2)按住"数值"键的右端,然后按"选择"键。
?(3)你将在完成正常自检后进入"SERVICEMODE"(服务模式)。
(4)按"项目"键找到"FUSERMAINTENANCECOUNT"(这句我翻译成加热组件保养计数器不知当否)(5)按"数值"键找到"0"(6)按"选择"键保存。
?(7)按"执行"键机器返回ready状态。
3.HPCOLORLASERJET4500/4550(TRANSFERKITRESET)传送单元重置(1)按"菜单"找到"RESETMENU"(2)按"项目"键找到"TRANSFERKITSELECTIFDONE"(传送单元已好)(3)按"选择"键。
HP laserjet P2030系列打印机 说明书
HP LaserJet P2030 系列打印机用户指南版权与许可© 2008 Copyright Hewlett-Packard Development Company, L.P.未经事先书面许可,严禁进行任何形式的复制、改编或翻译,除非版权法另有规定。
此处包含的信息如有更改,恕不另行通知。
HP 产品及服务的保修仅以随该产品及服务提供的书面保修声明为准。
本文所述任何内容不应被视为附加保修。
对任何技术或编辑错误或者本文所述内容的遗漏,HP 不承担任何责任。
部件号: CE461-90937Edition 1, 10/2008商标声明Adobe®、Acrobat®和 PostScript®是 Adobe Systems Incorporated 的商标。
Intel® Core™ 是 Intel Corporation 在美国和其它国家/地区的商标。
Microsoft®、Windows® 和 Windows® XP是 Microsoft Corporation 在美国的注册商标。
Windows Vista™ 是 Microsoft Corporation 在美国和/或其它国家/地区的注册商标或商标。
UNIX®是 The Open Group 的注册商标。
ENERGY STAR 和 ENERGY STAR 标记是在美国注册的标记。
目录1 产品基本信息产品比较 (2)HP LaserJet P2030 系列型号 (2)产品功能 (3)产品概览 (4)前视图 (4)后视图 (4)接口端口 (5)型号和序列号标签位置 (5)2 控制面板3 Windows 软件支持的 Windows 操作系统 (10)支持的 Windows 打印机驱动程序 (11)打印设置优先级 (12)更改 Windows 打印机驱动程序设置 (13)删除 Windows 软件 (14)支持的 Windows 实用程序 (15)状态警报软件 (15)Windows 支持的网络实用程序 (16)内嵌式 Web 服务器 (16)用于其它操作系统的软件 (17)4 在 Macintosh 上使用产品用于 Macintosh 的软件 (20)支持的 Macintosh 操作系统 (20)更改 Macintosh 打印机驱动程序设置 (20)用于 Macintosh 计算机的软件 (20)HP Printer Utility (20)打开 HP Printer Utility (20)支持的 Macintosh 实用程序 (21)内嵌式 Web 服务器 (21)ZHCN iii使用 Macintosh 打印机驱动程序中的功能 (22)打印 (22)在 Macintosh 中创建和使用打印预置 (22)调整文档大小或在自定义纸张尺寸上打印 (22)打印封面 (22)使用水印 (23)在 Macintosh 中在一张纸上打印多个页面 (23)在页面两面打印(双面打印) (24)使用维修菜单 (24)5 连接方式USB 和并行连接 (26)网络配置 (27)支持的网络协议 (27)在网络上安装产品 (28)配置网络产品 (28)查看或更改网络设置 (28)设置或更改网络密码 (28)IP 地址 (29)链接速度设置 (29)6 纸张与打印介质了解纸张和打印介质的使用 (32)支持的纸张和打印介质尺寸 (33)自定义纸张尺寸 (35)支持的纸张和打印介质类型 (36)纸盘和纸槽容量 (37)特殊纸张或打印介质规格 (38)装入纸盘 (39)装入纸盘的纸张方向 (39)纸盘 1 (39)纸盘 2 (40)装入 A6 尺寸纸张 (40)手动送纸 (41)配置纸盘 (42)使用纸张输出选件 (43)打印到顶部(标准)出纸槽 (43)打印到直通送纸道(后出纸槽) (43)7 使用产品功能EconoMode (46)安静模式 (47)iv ZHCN8 打印任务取消打印作业 (50)从控制面板停止当前打印作业 (50)使用软件程序停止当前打印作业 (50)使用 Windows 打印机驱动程序中的功能 (51)打开打印机驱动程序 (51)使用快速设置 (51)设置纸张和质量选项 (51)设置文档效果 (51)设置文档完成选项 (52)获取支持和产品状态信息 (53)设置高级打印选项 (53)9 管理和维护产品打印信息页 (56)演示页 (56)配置页 (56)耗材状态页 (56)管理网络产品 (57)内嵌式 Web 服务器 (57)打开内嵌式 Web 服务器 (57)信息选项卡 (57)Settings(设置)选项卡 (57)Networking(联网)选项卡 (58)Links(链接) (58)保护内嵌式 Web 服务器安全 (58)锁定产品 (59)管理耗材 (60)耗材寿命 (60)管理打印碳粉盒 (60)打印碳粉盒存放 (60)使用原装 HP 打印碳粉盒 (60)HP 对非 HP 打印碳粉盒的策略 (60)打印碳粉盒鉴别 (60)HP 打假热线和网站 (60)更换耗材和部件 (61)耗材更换准则 (61)重新分布碳粉 (61)更换打印碳粉盒 (62)清洁产品 (64)清洁打印碳粉盒区域 (64)清洁纸张通路 (65)清洁纸盘 1 的拾纸轮 (66)ZHCN v清洁纸盘 2 的拾纸轮 (70)10 解决问题解决一般问题 (74)故障排除检查清单 (74)影响产品性能的因素 (75)恢复工厂设置 (76)状态指示灯模式 (77)状态警报消息 (83)卡纸 (85)卡纸常见原因 (85)卡塞位置 (85)清除卡纸 (86)内部区域 (86)打印碳粉盒区域和送纸道 (86)进纸盘 (88)纸盘 1 (88)纸盘 2 (89)出纸槽 (91)解决打印质量问题 (93)与纸张有关的打印质量问题 (93)与环境有关的打印质量问题 (93)与卡纸有关的打印质量问题 (93)调整打印浓度 (93)图像缺陷示例 (94)颜色浅淡 (94)碳粉斑点 (94)丢字 (94)垂直线 (95)灰色背景 (95)碳粉污迹 (95)松散的碳粉 (95)垂直重复的缺陷 (96)字符变形 (96)页面歪斜 (96)卷曲或波形 (96)起皱或折痕 (97)字符轮廓边缘的碳粉分散 (97)解决性能问题 (98)解决连接问题 (99)解决直接连接问题 (99)解决网络问题 (99)解决常见的 Windows 问题 (101)vi ZHCN解决常见的 Macintosh 问题 (102)解决 Linux 问题 (104)附录 A 耗材和附件订购部件、附件和耗材 (106)直接从 HP 订购 (106)通过服务或支持提供商订购 (106)产品号 (107)打印碳粉盒 (107)电缆和接口 (107)附录 B 服务与支持Hewlett-Packard 有限保修声明 (110)打印碳粉盒有限保修声明 (111)最终用户许可协议 (112)客户自助维修保修服务 (114)客户支持 (115)HP 维护协议 (116)现场服务协议 (116)次日现场服务 (116)每周(批量)现场服务 (116)重新包装产品 (116)延长保修期 (116)附录 C 规格物理规格 (118)功耗和噪声发射 (119)操作环境 (120)附录 D 规范信息FCC 规则 (122)环境产品管理计划 (123)保护环境 (123)产生臭氧 (123)能耗 (123)碳粉消耗 (123)纸张使用 (123)塑料 (123)HP LaserJet 打印耗材 (123)返回和回收说明 (123)美国和波多黎各 (123)多个返回(一个以上的碳粉盒) (124)单个返回 (124)ZHCN vii货运 (124)美国以外国家/地区的返回 (124)纸张 (124)材料限制 (124)欧盟用户丢弃私人废弃设备的规定 (124)材料安全数据表 (MSDS) (125)更多信息 (125)一致性声明 (126)一致性声明 (126)安全声明 (127)激光安全 (127)加拿大 DOC 规则 (127)VCCI 声明(日本) (127)电源线声明(日本) (127)EMI 声明(韩国) (127)芬兰激光声明 (127)有毒有害物质表(中国) (128)索引 (129)viii ZHCN1产品基本信息●产品比较●产品功能●产品概览ZHCN1HP LaserJet P2030 系列型号HP LaserJet P2035 打印机CE461AHP LaserJet P2035n 打印机CE462A●在 Letter 尺寸纸张上每分钟最多可打印 30 页 (ppm),在 A4 尺寸纸张上最多为 30 ppm●包含 16 兆字节 (MB) 的随机存取内存 (RAM)●使用 HP 打印碳粉盒时,额定打印量最大为 1,000 页●纸盘 1 最多可以容纳 50 张纸●纸盘 2 最多可以容纳 250 张纸●125 页面朝下出纸槽●直通式出纸通道●高速 USB 2.0 端口●并行端口与 HP LaserJet P2035 型号功能相同,另外还有以下不同:●板上联网●无并行端口2第 1 章 产品基本信息ZHCN功能说明性能●266 MHz 处理器用户界面● 2 按钮,6 LED 控制面板●Windows® 和 Macintosh 打印机驱动程序●内嵌式 Web 服务器,可访问支持信息和订购耗材(仅适用于联网型号)打印机驱动程序●用于 Windows 和 Macintosh 的基于主机的打印机驱动程序,随产品 CD 提供●HP UPD PCL 5 打印机驱动程序,可从 Web 下载●XML 纸张规范 (XPS) 打印机驱动程序,可从 Web 下载分辨率●FastRes 1200 - 可提供 1200 点/英寸 (dpi) 的打印分辨率,可快速、高质量地打印商业文本和图形●600 dpi —提供最快打印速度字体●45 种内置可缩放字体●软件解决方案提供 80 种 TrueType 格式、与设备匹配的屏幕字体连接性●高速 USB 2.0 连接●并行连接(仅适用于 HP LaserJet P2035 打印机)●RJ.45 网络连接(仅适用于 HP LaserJet P2035n 打印机)耗材●耗材状态页包含碳粉量、页数和大约剩余页数方面的信息。
硒鼓加粉后仍显示缺粉的解决方法(清零)

硒鼓加粉后仍显示缺粉的解决方法(清零)三星ML808多功能一体机,显示TONER EMPTY,如何处理很多朋友在加过粉后,机器会显示TONER EMPTY碰到这种情况,多数是要清零以下是清零方法:1,按住停止键,拔掉电源在插上电源,按住开始键(按住不放)2.同时放开俩键,在按确认键...三星555P多功能一体机,显示TONER EMPTY,如何处理很多朋友在加过粉后,机器会显示TONER EMPTY碰到这种情况,多数是要清零以下是清零方法:1,按住停止键,拔掉电源在插上电源,按住开始键(按住不放)2.同时放开俩键,在按确认键...三星4216换粉清零方法三星4216换粉清零方法:按菜单按# 按1934(两秒钟内完成)--按菜单—按用滚动键找到NEW开头的选项—按2次确认---按菜单---按#--按1完成三星SCX-4116清零三星SCX-4116 多功能机加粉后报缺粉。
换完粉后依次按下面板的菜单_上一级-左箭头-右箭头-上一级-确认(4秒内完成)直到出现一个英文是TECH后再按菜单-右箭头三次-直到出现一个英文字母的后三个字是CAR的按确认-这时出现了正常的时间下面有YES字母-再按确认然后关机重起就好了三星4216清零三星4216一体机更换硒鼓(或加粉)仍旧会显示TONE EMPTY解决方法:按菜单——#1934(快速按完)——屏幕会有TECH字母显示——菜单——向左箭头——显示NEW CARTRIDGE——确定——确定。
********************************************************************* **凡三星555、808、5100此三种机型的激光一体机,客户更换新鼓后,需如下操作才能正常收发使用:拔下电源---按住停止键不放并再将电源插上后----直到屏幕显示:"CHINA"---再按两下开始键,即可;(此方法同样适用于机器做全清操作;菜单/#号/1934联系按---TECH-)scx4521f三星4521换粉清零方法:按菜单按# 按1934(两秒钟内完成)--按菜单—按用滚动键找到NEW开头的选项—按2次确认---按菜单---按#--按1完成[原创]三星4X16系列加粉后清零方法!!!4016和4216F:1。
3030 型打印机 扫描器单元 操作说明书 打印机参考
简介 本手册包含本设备操作使用的详细说明和注意事项。为了您的安全和利益, 请在使用本设备之前仔细阅 读本手册。将本手册放在垂手可得之处以备快速参考。 重要事项 本手册的内容如有变动,恕不另行通知。对于因操作和使用本设备而导致的直接的、间接的、特殊的、 偶然的或必然的损失,本公司概不负责。 切勿复制或印刷法律禁止翻印的任何项目。 通常,本地法律禁止复制或印刷以下项目: 纸币,印花税票,债券,股票,银行汇票,支票,护照,驾驶执照。 以上只是举例并不包括所有项目。 我们对其完整和精确不承担责任。 如果您对复制或印刷某些项目的 法律性有任何疑问,请联络您的法律顾问。 警告 如果不按照本手册所述控制、调整或执行步骤,则可能导致危险的辐射伤害。 本手册内使用两种尺寸标注。对于本设备,请参照公制尺寸标注。 商标 Microsoft®、 Windows® 和 Windows NT® 是 Microsoft Corporation 在美国和 / 或其它国家的注册商标。 Adobe®、PostScript®、Acrobat®、PageMaker® 和 Adobe Type Manager 是 Adobe Systems Incorporated 的注 册商标。 PCL® 是 Hewlett-Packard Company 的注册商标。 Apple、AppleTalk、EtherTalk、Macintosh、Mac OS 和 TrueType 是 Apple Computer, Inc. 在美国和其他国 家注册的商标。 Rendezvous 是 Apple Computer, Inc. 的商标。 IPS-PRINTTM Printer Language Emulation© 版权所有 2000, Oak Technology, Inc. 保留所有权利。 UNIX 是在美国和其他国家的注册商标,通过 X/Open Company Limited 获得专有许可。 Bluetooth® 字标和标示属 Bluetooth SIG, Inc. 所有,Ricoh Company, Ltd. 对此类标示的使用已经过许可。 NetWare 是 Novell, Inc. 的注册商标。 本手册涉及的其它产品名称只用作识别目的, 有可能分别是相应公司的商标。我们否认对这些标记拥有 任何部分或全部权利。 Windows 操作系统的正确名称如下所示: • Windows® 95 的产品名称是 Microsoft® Windows® 95 • Windows® 98 的产品名称是 Microsoft® Windows® 98 • Windows® Me 的产品名称是 Microsoft® Windows® Millennium Edition (Windows Me) • Windows® 2000 的产品名称如下所示: Microsoft® Windows® 2000 Professional Microsoft® Windows® 2000 Server Microsoft® Windows® 2000 Advanced Server • Windows® XP 的产品名称如下所示: Microsoft® Windows® XP Home Edition Microsoft® Windows® XP Professional • Windows ServerTM 2003 的产品名称如下: Microsoft® Windows ServerTM 2003 Standard Edition Microsoft® Windows ServerTM 2003 Enterprise Edition Microsoft® Windows ServerTM 2003 Web Edition • Windows NT® 4.0 的产品名称如下: Microsoft® Windows NT® Workstation 4.0 Microsoft® Windows NT® Server 4.0 注 本手册中的一些图例可能会因机器不同而略有差异。 在某些国家出售的机型上可能没有某些选购件。更详细的信息,请您与当地的经销商联系。
HP LaserJet M3027 M3035多功能一体机 说明书
HP LaserJet M3027/M3035 多功能一体机用户指南版权与许可© 2006 Copyright Hewlett-Packard Development Company, L.P.未经事先书面许可,严禁进行任何形式的复制、改编或翻译,除非版权法另有规定。
此处包含的信息如有更改,恕不另行通知。
HP 产品及服务的保修仅以随该产品及服务提供的书面保修声明为准。
本文所述任何内容不应被视为附加保修。
对任何技术或编辑错误或者本文所述内容的遗漏,HP 不承担任何责任。
部件号: CB414-90934Edition 1, 10/2006商标声明Adobe®、Acrobat®和 PostScript®是 Adobe Systems Incorporated 的商标。
Linux 是 Linus Torvalds 在美国的注册商标。
Microsoft®、Windows®和 Windows NT®均为 Microsoft Corporation 在美国的注册商标。
UNIX®是 The Open Group 的注册商标。
ENERGY STAR®和 ENERGY STAR 徽标®均为美国环保署在美国的注册标志。
目录1 设备基本信息设备比较 (2)功能比较 (3)打印机视图 (4)设备部件 (4)接口端口 (5)设备软件 (6)支持的操作系统 (6)支持的打印机驱动程序 (6)选择正确的打印机驱动程序 (6)通用打印机驱动程序 (7)驱动程序自动配置 (7)立即更新 (7)HP 驱动程序预配置 (7)打印设置优先级 (7)打开打印机驱动程序 (8)用于 Macintosh 计算机的软件 (8)从 Macintosh 操作系统中删除软件 (9)实用程序 (9)HP Web Jetadmin (9)内嵌式 Web 服务器 (9)HP Easy Printer Care 软件 (9)支持的操作系统 (9)支持的浏览器 (10)其它组件和实用程序 (10)2 控制面板使用控制面板 (12)控制面板布局 (12)主页屏幕 (12)触摸屏上的按钮 (13)控制面板帮助系统 (14)使用管理菜单 (15)导航管理菜单 (15)信息菜单 (15)默认作业选项菜单 (16)默认原件选项 (16)默认复印选项 (17)默认传真选项 (17)ZHCN iii默认电子邮件选项 (18)默认发送到文件夹选项 (19)默认打印选项 (19)时间/计划菜单 (20)管理菜单 (21)初始设置菜单 (22)联网和 I/O (22)传真设置 (28)电子邮件设置 (29)发送设置菜单 (29)设备动作菜单 (30)打印质量菜单 (33)故障排除菜单 (35)重置菜单 (36)服务菜单 (36)3 输入/输出 (I/O) 配置USB 配置 (38)网络配置 (39)配置 TCP/IPv4 参数 (39)设置 IP 地址 (39)设置子网掩码 (40)设置默认网关 (40)配置 TCP/IPv6 参数 (41)禁用网络协议(可选) (41)禁用 IPX/SPX (41)禁用 AppleTalk (41)禁用 DLC/LLC (42)HP Jetdirect EIO 打印服务器 (42)4 介质和纸盘一般介质准则 (44)避免使用的纸张 (44)可损坏设备的纸张 (44)一般介质规格 (45)介质注意事项 (46)信封 (46)双侧接缝的信封 (46)带粘性封条或封盖的信封 (47)信封边距 (47)信封存放 (47)标签 (47)标签结构 (48)投影胶片 (48)卡片纸和重磅介质 (48)卡片纸结构 (48)卡片纸准则 (48)信头纸和预印表格 (49)选择正确的热凝器模式 (49)iv ZHCN选择打印介质 (51)支持的介质尺寸 (51)支持的介质类型 (52)打印和纸张存放环境 (53)装入介质 (54)将介质放在扫描仪玻璃板上 (54)装入自动文档进纸器 (ADF) (54)装入纸盘 1(多用途纸盘) (55)自定义纸盘 1 操作 (56)装入纸盘 2 和可选纸盘 3 (57)装入特殊介质 (58)控制打印作业 (60)选择出纸槽 (61)打印到顶部出纸槽 (61)打印到后出纸槽 (62)5 设备功能使用便捷订书机 (64)装订介质 (64)装入订书钉 (65)使用作业存储功能 (67)访问作业存储功能 (67)使用审阅待打印功能 (67)创建审阅待打印作业 (67)打印审阅待打印作业的剩余份数 (68)删除审阅待打印作业 (68)使用专用作业功能 (68)创建专用作业 (68)打印专用作业 (68)删除专用作业 (69)使用快速复印功能 (69)创建快速复印作业 (69)打印更多份快速复印作业 (69)删除快速复印作业 (70)使用存储的作业功能 (70)创建存储的复印作业 (70)创建存储的打印作业 (70)打印存储的作业 (71)删除存储的作业 (71)6 打印使用 Windows 打印机驱动程序中的功能 (74)创建和使用快速设置 (74)使用水印 (75)调整文档大小 (75)从打印机驱动程序设置自定义纸张尺寸 (75)使用不同纸张和打印封面 (76)打印空白的第一页 (76)在一张纸上打印多个页面 (76)ZHCN v在纸张两面打印 (77)使用自动双面打印 (77)手动双面打印 (78)双面打印的布局选项 (78)使用维修选项卡 (79)使用 Macintosh 打印机驱动程序中的功能 (80)创建和使用预置 (80)打印封面 (80)在一张纸上打印多个页面 (80)在纸张两面打印 (81)取消打印作业 (83)从控制面板停止当前打印作业 (83)使用软件程序停止当前打印作业 (83)7 复印使用复印屏幕 (86)设置默认复印选项 (87)基本复印说明 (88)从扫描仪玻璃板复印 (88)从文档进纸器复印 (88)调整复印设置 (89)复印双面文档 (90)手动复印双面文档 (90)自动复印双面文档(只限双面打印机型) (90)复印包含多种尺寸的原文档 (92)更改复印自动分页设置 (93)复印照片和书籍 (94)使用“作业构建”功能组合复印作业 (95)取消复印作业 (96)8 扫描和发送电子邮件配置电子邮件设置 (98)支持的协议 (98)配置电子邮件服务器设置 (98)查找网关 (99)从设备控制面板查找 SMTP 网关 (99)从电子邮件程序查找 SMTP 网关 (99)使用“发送电子邮件”屏幕 (100)执行基本电子邮件功能 (101)装入文档 (101)发送文档 (101)发送文档 (101)使用自动填写功能 (101)使用通讯簿 (102)创建收件人列表 (102)使用本地通讯簿 (102)将电子邮件地址添加到本地通讯簿 (102)从本地通讯簿删除电子邮件地址 (103)更改当前作业的电子邮件设置 (104)vi ZHCN9 传真模拟传真 (108)将传真附件连接到电话线 (108)配置和使用传真功能 (108)数字传真 (109)10 管理和维护设备使用信息页 (112)配置电子邮件警报 (114)使用 HP Easy Printer Care 软件 (115)打开 HP Easy Printer Care 软件 (115)HP Easy Printer Care 软件各部分 (115)使用内嵌式 Web 服务器 (117)通过网络连接打开内嵌式 Web 服务器 (117)内嵌式 Web 服务器各部分 (117)使用 HP Web Jetadmin 软件 (119)使用适用于 Macintosh 的 HP Printer Utility (120)打开 HP Printer Utility (120)HP Printer Utility 功能 (120)管理耗材 (122)耗材寿命 (122)打印碳粉盒大致更换时间间隔 (122)管理打印碳粉盒 (122)打印碳粉盒存放 (122)使用原装 HP 打印碳粉盒 (122)HP 对非 HP 打印碳粉盒的策略 (122)打印碳粉盒鉴别 (123)HP 打假热线和网站 (123)更换耗材和部件 (124)耗材更换准则 (124)更换打印碳粉盒 (124)清洁设备 (127)清洁外部 (127)清洁扫描仪玻璃板 (127)清洁扫描仪盖板衬底 (128)清洁 ADF (128)清洁送纸道 (130)校准扫描仪 (131)11 故障排除故障排除检查表 (134)影响性能的因素 (134)问题解决流程图 (135)解决一般设备问题 (138)控制面板消息类型 (141)控制面板消息 (142)ZHCN vii卡塞恢复 (151)清除卡纸 (152)从 ADF 清除卡纸 (152)从进纸盘区域清除卡纸 (154)从打印碳粉盒区域清除卡纸 (155)从出纸槽区域清除卡纸 (156)从双面打印器清除卡纸 (157)解决重复卡纸 (158)清除订书机卡塞 (160)解决打印质量问题 (163)与介质有关的打印质量问题 (163)与环境有关的打印质量问题 (163)与卡纸有关的打印质量问题 (163)图像缺陷示例 (163)打印颜色浅(部分页面) (165)打印浓度淡(整个页面) (165)斑点 (165)丢字 (166)线条 (166)灰色背景 (166)碳粉污迹 (167)松散的碳粉 (167)重复缺陷 (168)重复图像 (168)变形字符 (168)页面倾斜 (169)卷曲或呈波形 (169)皱纹或折痕 (170)白色垂直线 (170)胎迹 (170)黑底上的白色斑点 (171)分散的线条 (171)模糊打印 (172)随机图像重复 (172)解决网络打印问题 (173)解决复印问题 (174)防止出现复印问题 (174)图像问题 (174)介质处理问题 (175)执行问题 (177)解决传真问题 (178)解决发送问题 (178)解决接收问题 (179)解决电子邮件问题 (180)验证 SMTP 网关地址 (180)验证 LDAP 网关地址 (180)解决常见的 Windows 问题 (181)解决常见的 Macintosh 问题 (182)viii ZHCN解决 Linux 问题 (184)解决 PostScript 问题 (185)一般问题 (185)附录 A 耗材和附件订购部件、附件和耗材 (188)直接从 HP 订购 (188)通过服务或支持提供商订购 (188)通过嵌入式 Web 服务器直接订购(适用于连接到网络上的打印机) (188)通过 HP Easy Printer Care 软件直接订购 (188)产品号 (189)纸张处理附件 (189)打印碳粉盒 (189)内存 (189)电缆和接口 (189)订书机附件 (190)打印介质 (190)附录 B 服务与支持Hewlett-Packard 有限保修声明 (193)客户自助维修保修服务 (194)打印碳粉盒有限保修声明 (195)HP 客户服务 (196)联机服务 (196)电话支持 (196)软件实用程序、驱动程序和电子信息 (196)直接订购 HP 附件或耗材 (196)HP 服务信息 (196)HP 服务协议 (196)HP Easy Printer Care 软件 (196)有关 Macintosh 计算机的 HP 支持及信息 (197)HP 维护协议 (198)现场服务协议 (198)次日现场服务 (198)每周(批量)现场服务 (198)重新包装设备 (198)延长保修期 (198)附录 C 规格物理规格 (200)电气规格 (201)声音排放 (202)操作环境 (203)附录 D 规范信息FCC 规则 (206)环境产品管理计划 (207)保护环境 (207)ZHCN ix产生臭氧 (207)能耗 (207)碳粉消耗 (207)纸张使用 (207)塑料 (207)HP LaserJet 打印耗材 (207)HP 打印耗材的退回和回收利用计划信息 (208)纸张 (208)材料限制 (208)欧盟用户丢弃私人废弃设备的规定 (209)材料安全数据表 (MSDS) (209)更多信息 (209)电信服务声明 (210)一致性声明 (211)安全声明 (212)激光安全 (212)加拿大 DOC 规则 (212)VCCI 声明(日本) (212)电源线声明(日本) (212)EMI 声明(韩国) (212)EMI 声明(台湾) (212)芬兰激光声明 (213)附录 E 处理内存和打印服务器卡概述 (216)安装内存 (217)安装设备内存 (217)检查 DIMM 安装 (221)保存资源(永久资源) (222)为 Windows 启用内存 (223)使用 HP Jetdirect 打印服务器卡 (224)安装 HP Jetdirect 打印服务器卡 (224)取出 HP Jetdirect 打印服务器卡 (225)词汇 (227)索引 (229)x ZHCN1设备基本信息本章包含有关设备功能的基本信息:●设备比较●功能比较●打印机视图●设备软件ZHCN1HP LaserJet M3027HP LaserJet M3027x HP LaserJet M3035HP LaserJet M3035xs●在 letter 尺寸介质上打印时,速度可达每分钟 27 页(ppm);在 A4 尺寸介质上打印时,速度可达 25 ppm●总计 256 兆字节 (MB) 随机存储内存 (RAM),最大可升级至 512 MB●内部 40 千兆字节 (GB) 或更大硬盘●100 页多用途纸盘(纸盘 1)、500 页进纸盘(纸盘 2)、50 页自动文档进纸器 (ADF) 和 250 页出纸槽●高速通用串行总线 (USB) 2.0 端口和增强的输入/输出(EIO) 插槽●HP Jetdirect 嵌入式打印服务器,用于连接至以太网 10/100Base-T 网络●一个开放式双列直插式内存模块 (DIMM) 插槽HP LaserJet M3027,外加:●自动双面打印附件●33.6 kpbs 模拟传真●在 letter 尺寸介质上打印时,速度可达 35 ppm;在A4 尺寸介质上打印时,速度可达 33 ppm●总计 256 MB RAM,最大可升级至 512 MB●内部 40 GB 或更大硬盘●100 页纸盘 1、500 页纸盘 2、50 页 ADF 和 250 页出纸槽●高速 USB 2.0 端口和 EIO 插槽●HP Jetdirect 嵌入式打印服务器,用于连接至以太网 10/100Base-T 网络●一个开式 DIMM 插槽●自动双面打印附件HP LaserJet M3035,外加:●33.6 kpbs 模拟传真●20 页便捷订书机●500 页进纸盘(纸盘 3)2第 1 章设备基本信息ZHCN功能说明性能●400 MHz 处理器用户界面●控制面板帮助●Windows® 和 Macintosh 打印机驱动程序●内嵌式 Web 服务器,可用于获得支持和订购耗材(只适用于联网型号的管理工具)●HP Easy Printer Care 软件(一种基于 Web 的状态和故障排除工具)打印机驱动程序●HP PCL 5●HP PCL 6●HP postscript level 3 仿真分辨率●FastRes 1200 - 可提供 1200 点/英寸 (dpi) 的打印分辨率,可快速、高质量地打印商业文本和图形●ProRes 1200 - 可提供 1200 dpi 的打印分辨率,可打印出最佳质量的艺术线条和图形图像存储功能●内部 40 GB 或更大硬盘驱动器●字体、表格和其它宏●作业保留字体●93 种内置字体,供 PCL 使用●软件解决方案提供 80 种 TrueType 格式的与打印机匹配的屏幕字体●可添加其它字体。
HP1020激光打印机维修手册

4.1 清洁 .................................................................. 26 4.2 充电 .................................................................. 26 4.3 暴光 .................................................................. 27 4.4 显影 .................................................................. 28 4.5 转印 .................................................................. 29 4.6 定影 .................................................................. 29
惠普机密,仅供内部使用 "© 2006 Hewlett-Packard Development Company, L.P. The information contained herein is subject to change without notice".
中国惠普公司消费类外设产品维修网——维修手册 消费类激光打印机
1.2 LASERJET1018/1020/1022/1022N/1022NW 具体的性能指标 ....................... 8 1.3 装箱单 ................................................................ 10
恩智浦半导体i.MX RT1020跨界处理器数据手册说明书
恩智浦半导体数据手册:技术数据文件编号:IMXRT1020IEC第0.1版,2018年7月MIMXRT1021CAG4A MIMXRT1021CAF4A面向工业产品的i.MXRT1020跨界处理器封装信息塑料封装144引脚LQFP,20 × 20 mm,0.5 mm间距100引脚LQFP,14 × 14 mm,0.5 mm间距订购信息参见第6页的表21 i.MX RT1020简介i.MX RT1020处理器属于i.MX RT系列,采用恩智浦先进的Arm®Cortex®-M7内核,运行速度高达396 MHz,可提供高CPU性能和实时响应。
i.MX RT1020处理器具有256 KB片内RAM,可灵活配置为TCM或通用片内RAM。
i.MX RT1020集成了先进的电源管理模块、DCDC和LDO,可降低外部电源的复杂性并简化上电时序。
IMX Rt1020还提供各类存储器接口,包括SDRAM、RAW NAND、闪存、NOR闪存、SD/eMMC、四通道SPI;以及各种连接接口,包括UART、SPI、I2C、USB和CAN,可用于连接外围设备,包括WLAN、b luetooth™和GPS。
i.MX Rt1020还提供丰富的音频功能,包括SPDIF和I2S音频接口。
各类模拟IP集成,包括ADC、模拟比较器、温度传感器等。
1. I.MX RT1020简介 (1)1.1. 特性 (2)1.2. 订购信息 (6)2. 架构概述 (8)2.1. 功能框图 (8)3. 模块列表 (9)3.1. 特殊信号考量 (15)3.2. 未使用模拟接口的推荐连接 (16)4. 电气特性 (17)4.1. 芯片级条件 (17)4.2. 系统电源和时钟 (24)4.3. I/O参数 (29)4.4. 系统模块 (35)4.5. 外部存储器接口 (40)4.6. 音频 (50)4.7. 模拟 (53)4.8. 通信接口 (59)4.9. 定时器 (71)5. 启动模式配置 (73)5.1. 启动模式配置引脚 (73)5.2. 启动设备接口分配 (73)6. 封装信息和触点分配 (79)6.1. 20 x 20 mm封装信息 (79)6.2. 14 x 14 mm封装信息 (88)7. 修订记录 (95)i.MX RT1020简介i.MX RT1020特别适合以下应用:•工业•电机控制•家用电器•IoT1.1 特性i.MX RT1020处理器基于Arm Cortex-M7 MPCore™平台,具有以下特性:•支持单Cortex-M7和−16 KB L1指令缓存−16 KB L1数据缓存−全功能浮点单元(FPU),支持VFPv5架构−支持Armv7-M Thumb指令集•集成MPU,最多16个独立保护区域•I-TCM和D-TCM总共达256 KB•目标频率为396 MHz•集成Cortex M7 CoreSight™组件用于调试•内核频率请参见19页的表11“工作范围”。
Scrollio 电子endance双向打印机使用说明书
Operating instructions Page 12 Wine storage cabinet12Description of the applianceSaving energy- Always ensure good ventilation. Do not cover ventilation open-ings or grille.- Always keep fan slits clear.- Avoid positioning the appliance in direct sunlight or near cookers, radiators and similar sources of heat.- The energy consumption depends on the installation conditions, e.g. the ambient temperature.- Keep the time the appliance is open to a minimum.Accumulated dust increases the energy consumption:- Once a year, dust the refrigeration unit together with the metal grid of the heat exchanger at the back of the appliance.Disposal notes The appliance contains reusable materials and shouldbe disposed of properly - not simply with unsorted household refuse. Appliances which are no longer needed must be disposed of in a professional and appropriate way, in accordance with the current local regulations and laws.When disposing of the appliance, ensure that the refrigerant circuit is not damaged to prevent uncontrolled escape of the refrigerant it contains (data on type plate) and oil.• Disable the appliance.• Pull out the mains plug.WARNINGDo not allow children to play with packaging material. Take the packaging material to an official collection point.Climate ratingeration performance.type plate.The position of the type plate is shown inthe section entitled Description of the appliance .Climate rating Room temperature SN +10°C to +32°C N +16°C to +32°C ST +16°C to +38°C T+16°C to +43°C SN-ST +10°C to +38°C SN-T+10°C to +43°CDo not operate the appliance outside the specified room temperature range.EPREL databaseAs from 1 March 2021, information about energy labelling and ecodesign requirements will be available in the European product database (EPREL). You can access the product database using the following link: https://eprel.ec.europa.eu/. You will be asked to enter the model identifier. You will find the model identifier on the type plate.EN Safety instructions and warnings• T o prevent injury or damage to the unit, the ap-pliance should be unpacked and set up by twopeople.• In the event that the appliance is damaged ondelivery, contact the supplier immediately beforeconnecting to the mains.• T o guarantee safe operation, ensure that the ap-pliance is set up and connected as described inthese operating instructions.• Disconnect the appliance from the mains if anyfault occurs. Pull out the plug, switch off or removethe fuse.• When disconnecting the appliance, pull on theplug, not on the cable.• Any repairs and work on the appliance shouldonly be carried out by the customer servicedepartment, as unauthorised work could provehighly dangerous for the user. The same applies to changing the mains power cable.• Do not allow naked flames or ignition sources to enter the appliance. When transporting and cleaning the appliance, ensure that the refrigerant circuit is not damaged. In the event of damage, make sure that there are no ignition sources nearby and keep the room well ventilated.• Do not stand on the plinth, drawers or doors or use them to support anything else.• This appliance is not intended for use by persons (including children) with reduced physical, sen-sory or mental capabilities or lack of experience and knowledge unless they have been given initial supervision or instruction concerning use of the appliance by a person responsible for their safety. Children should be supervised to ensure that they do not play with the appliance.• Avoid prolonged skin contact with cold surfaces or chilled/frozen food. T his could cause pain, numb-ness and frostbite. In the case of prolonged skin contact, protective measures should be taken, e.g. gloves should be worn.• Do not consume food which has been stored for too long, as it could cause food poisoning.Range of appliance useThe appliance is suitable solely for storing wine in a domestic environment or similar. This includes, for example, use- in staff kitchenettes, bed and breakfast establish-ments,- by guests in cottages, hotels, motels and other forms of accommodation,- in catering and similar services in the wholesale trade.Use the appliance solely as is customary within a domestic envi-ronment. All other types of use are inadmissible. The appliance is not suitable for storing and cooling medicines, blood plasma, laboratory preparations or similar substances and products cov-ered by the 2007/47/EC Medical Devices Directive. Any misuse of the appliance may result in damage to or spoilage of stored goods. Furthermore, the appliance is not suitable for operation in potentially explosive atmospheres.• Do not store explosives or sprays using com-bustible propellants such as butane, propane, pentane, etc. in the appliance. Electrical com-ponents might cause leaking gas to ignite. Y ou may identify such sprays by the printed contents or a flame symbol.• Do not use electrical appliances inside the ap-pliance.• If you have a lockable appliance, do not keep the key near the appliance or within reach of children. • The appliance is designed for use in enclosed areas. Do not operate the appliance outdoors or in areas where it is exposed to splash water or damp conditions.• The fluorescent tube illuminates the interior of the appliance. It is not suitable for lighting a room.1314Appliance dimensionsWKb 1812 A = 890 mmB = 613 mmC= 1172 mmSetting up • Avoid positioning the appliance in direct sunlight or near cookers, radiators and similar sources of heat.• • • the wall.Electrical connectionOnly operate the appliance with alternating current (AC)..• If several appliances are installed next to each other, leave a gap of 50 mm between them.If this gap is too narrow, condensation forms between the side walls.• T a top unit can be added.A gap of at least 50 mm depth must be provided behind and along the entire width of this unit so as to ensure sufficient ventilation. The area of ventilation underneath the ceiling should be at least 300 cm 2.15ENSetting the temperatureIncreasing the temperature Press the Up button.Reducing the temperature Press the Down button.will start to flash.- setting. - actual temperature will be displayed.Operating and control elements1T emperature display2T emperature setting buttons 3Audible warning On/Off button 4Child lock activated symbol 5On/Off button6Fan On/Off button combination 7Fan On symbol8Interior light on/off buttonSwitching the appliance on and offSwitching the appliance onPress the On/Off button until the temperature display lights up.Switching the appliance offKeep the On/Offthe temperature display goes out.Storing wineIf you are storing wine for long periods of time, it should be stored at a temperature of between 10°C and 14°C.This is the temperature wine cellars are kept at, and it is just right to allow wine to mature properly.The following drinking temperatures are recommended for the various types of wine.Red wines: +14°C to +18°C Rosé wines: +10°C to +12°C White wines: +8°C to +12°CSparkling wines, Prosecco: +7°C to +9°C Champagne: +5°C to +7°CFan switchThe interior fan guarantees that the interior temperature remains constant and uniform and also increases the humidity in the appliance.In addition to reducing the humidity level, switching off the fan will result in lower energy consumption (energy saving mode).Increased humidity will prevent the corks drying out over a lengthy period.Switching onHold down the Alarm button and then press the Light button. The LED will come on.Switching offHold down the Alarm button and then press the Light button. The LED goes dark.NoteIf the appliance is operated in a low ambient temperature, the fan may also run when the fan function is deactivated.16Door open alarmIf the door is left open for more than 60 seconds, the audible warning signal will sound.If the door must be opened for a lengthy period to place items into the appliance, cancel the audible warning signal by pressing the Alarm button.The alarm switches back to standby when the door is shut.Temperature alarmIf the temperatures in the interior are out of the per-mitted range, the audible warning signal will sound and the temperature display will flash.After a lengthy power failure, the temperature in the interior may have risen to too high a level. After the power supply returns, the fall in temperature can be watched on the display.• Cancel the audible warning signal by pressing the Alarm button. The temperature display will stop flashing as soon as the tem -perature in the interior has reached the set value.Temperature alarm after a fault in the applianceIf the appliance develops a fault, the temperature in the interior may rise too high or fall too low. The audible warning signal will sound and the temperature display will flash.If the temperature displayed is too high (warm), first check whether the door is closed correctly.If the temperature display continues to show a value that is too high or too low after one hour, contact the customer service department.• Cancel the audible warning signal by pressing the Alarm button.If F1 appears in the display, the appliance has suffered a fault. Inthis case, contact the customer service department.Interior lightis opened.Press the Light1pose.2left.3downwards.4Tdownwards.17LabelsThe appliance is supplied with a label holder with labels for each shelf. Use these to label the type of wine stored on each shelf.Additional labels can be obtained from your dealer.Version 1Click the label holder into place and slide the label in from the top.Version 2Click the label holder into place and slide the label in from theside.Air exchange with activated charcoal filterfor preserving the wine.We r ecommend t hat y ou ryour dealer.Changing the filterTake the filter by theand remove.Inserting the filter Storage diagrams for 750 ml Bordeaux bottles1819ENCleaningBefore cleaning always switch off the appliance. Pull out the mains plug or switch off or unscrew the fuse.• Clean the inside and outer walls with lukewarm water and a lit-tle detergent. Do not use abrasive or acid cleaners or chemical solvents.• Use a glass cleaner to clean the glass surfaces and a commercially available stainless-steel cleaning agent for the stainless-steel surfaces.Do not use steam cleaners because of therisk of injury and damage.• Ensure that no cleaning water penetrates into the elec t rical components or ventilation grille.• Do not damage or remove the type plate on the inside of the appliance. It is very important for servicing purposes.DefrostingThe appliance defrosts automatically.Shutting your appliance downIf your appliance is to be shut down for any length of time, switch it off and disconnect the plug or switch off or unscrew the fuse. Clean the appliance and leave the door open in order to prevent unpleasant smells.The appliance complies with the relevant safety regulations and EU Directives 2014/30/EU and 2014/35/EU.Malfunctions• F1 appears in the display.– The appliance has suffered a fault. Contact the customer service department.You may be able to rectify the following faults by checking the possible causes yourself.• Appliance does not function:– Is the appliance switched on?– Is the plug correctly fitted in the mains socket?– Is the fuse intact?• When inserting the mains plug, the refrigeration unit does not switch on, but a value is shown in the temperature display.– Demo mode is activated. Deactivate demo mode as described in the section entitled Additional functions - Demo mode .• Loud running noise:– Is the appliance set up firmly on the floor?– Does the appliance cause nearby items of furniture or objects to vibrate? Please note that noises caused by the refrigerant circuit cannot be avoided.• The temperature is not low enough:– Is the temperature setting correct (see "Setting the temperature")?– D oes the separately installed thermometer show the correct reading?– I s the ventilation system working properly?– I s the appliance set up too close to a heat source?ignation 12Changing over door hingesDoor hinges should only be changed by a trained expert.1.hinge bracket.2.upwards.Important3.fingertip.4.downwards.5.T ransfer plug.6.9.2021EN14. to the lower hinge bracket.Importantmodels W Kb 3212 and W held secure by one person.15. the hinge bracket.the hinge bracket.16.Adjusting the lateral tilt of the door If the door is at an angle, adjust the angle. This screw is no longer needed.18.Liebherr Hausgeräte Lienz GmbHDr.-Hans-Liebherr-Strasse 1A-9900 LienzÖsterreich*708323400*。
提高工作效率DLink全新打印服务器DPR1020全面上市-电脑资料
提高工作效率DLink全新打印服务器DPR1020全面上市-电脑资料随着企业尤其是连锁型企业的成长加快,企业办公中由于很多打印、复印设备因为系统的安排,无法满足工作的需要,缺乏有效的管理手段,难以整合管理,合理的管理,。
对企业来讲,打印能力无法满足业务发展的需要,打印机、复印机等设备更好地服务整个企业业务的运营,也成为了企业所需要引起重视的问题。
D-Link作为国际著名网络设备和解决方案提供商、全球无线网络领导品牌,一直致力于为更多的企业提供更加合理、更加科学的管理方法,帮助企业解决难题。
基于流程优化、科学配置和使用先进的管理工具的服务,D-Link的DPR-1020 USB接口多功能打印服务器就应运而生了。
分享网络,畅享办公一体化DPR-1020的USB接口多功能打印服务器能够为企业用户提供在局域网内分享他们的打印机及多功能打印设备的服务,并对于那些DPR-1020兼容的打印机产品提供在线打印和扫描的服务。
DPR-1020打印服务器允许多个用户直接从电脑上发送文件传输到打印机上进行打印和传真工作。
能够共享办公室的打印机和多功能打印设备的打印、传真和扫描功能,DPR-1020可通过网络上轻松共享多个设备,让企业的办公网络成为一个整体。
强大的性能,满足多种办公需求除此以外,D-Link DPR-1020设备配备了强大的CPU,内存和高速的USB 2.0端口,并且能够支持高达100Mbps的网络数据传输,这使您的打印数据、扫描文件时获得更高的响应速度和服务效率,电脑资料《提高工作效率DLink全新打印服务器DPR1020全面上市》(https://www.)。
打印机连接到DPR-1020可以打印,扫描,传真的同时,如果在您的电脑上安装一个小的PS-Link软件可以使这个打印服务器的性能大幅度提高,能够获得优于其他打印服务器的性能。
安全与兼容并重,带来全新体验在安全性方面D-Link DPR-1020的USB接口采用USB2.0端口是很多打印机所通用的,所以拥有很好的兼容性,能够兼容各种品牌、机型的激光打印机,实现了很高的专业化水平。
hp1020打印机设置
关于使用CTBS访问服务器时,HP LaserJet 1020 打印机自定义纸张
的设置问题
HP LaserJet 1020 打印机驱动文件做的不太好,远程访问时,它的自定义纸张不能和其他打印机一样,从服务器打印机设置那里调用,需要从客户端登陆后,由客户端在映射上来的打印机上设置。
1、下载安装1020打印机驱动(有的版本驱动自定义纸张那里显示是???)/ewfrf/wc/softwareDownloadIndex?softwareitem =bi-52065-1&lc=zh-hans&cc=cn&dlc=zh-hans&product=439320&os=1005&lang= zh-hans
2、服务器端添加驱动文件,客户端安装打印机
3、CTBS客户端登陆服务器后,执行程序选择打印,会弹出打印会话框
选择[首选项]
再选择自定义
在这里修改成需要打印的单据纸张格式大小,起个名字后保存(注意,这个名称不能是中文,不然显示不出来的)
设置好纸张后,在尺寸那里点那个下拉箭头,找到刚才自定义的纸张(因为远程映射的原因,可能打印机纸张格式不能完整的显示,我们可以先选择最下面的纸张,然后用键盘上的向下箭头按键再向后找,就可以找到自定义的纸张了)
但是总不能每次打印的时候读这样用箭头选,这样就很麻烦,现在点快速设置下面这个框,把无标题这几个字修改下
选择保存后就可以了,以后进入的时候,就可以直接从快速设置那里面调出我们以前设置的纸张。
- 1、下载文档前请自行甄别文档内容的完整性,平台不提供额外的编辑、内容补充、找答案等附加服务。
- 2、"仅部分预览"的文档,不可在线预览部分如存在完整性等问题,可反馈申请退款(可完整预览的文档不适用该条件!)。
- 3、如文档侵犯您的权益,请联系客服反馈,我们会尽快为您处理(人工客服工作时间:9:00-18:30)。
8.Liquid container such as water pitchers should be placedtoward thecenter of the tray so that it will not spill off the edge.
4.Tray is carried above shoulder level. Hold the upper arm and elbow close to the body.
5.Carry the tray using the hand, which is most comfortable.
6.While maneuvering through crowd guard the tray with your other hand.
9.Nothing should be protruding over the edge of the tray where it can be easily jarred or fall off.
10.Do not stack cups more than 3 high. Do not over stack or over fill the tray, this may cause damages.
2.Balance beverages on tray. Tall heavy and awkward glasses are placed toward the body.
3.Hold the tray either with:-
Full palm in which the tray is balanced with the palm and fingers spread underneath the tray.
4.重托时,高不要过眉,并靠近身体。
5.用手托运是最和适的。
6.当通过人群时用另一只手扶着。
放置食品托盘
1.同一种类型的盘子要叠在一起。
2.杯和碟分开放,避免占位置。
3.不要把装着食物的盘子叠在一起,应把残食放在同一碟子上。
4.重的一侧朝向里。
5.不要把杯放在食品托盘上。
6.轻的物品要安全的摆放在托盘外侧,防止打翻。
3.Load the tray with regard for safety and balance. One drink should be placed in the middle, two drinks balancing either side also toward the middle. Build the tray from the middle outwards.
NB: -Place heavy items in the center of the tray slightly toward your body - never attempt to lift a tray that is too heavy or stacked improperly.
1.All beverages are carried on a round, silver tray withclean cottontraymat
2.放之前要保证托盘是干的。
3.摆放要安全,均匀,一杯饮料放中间,两杯饮料要放中心的两边,依此类推。
4.记住酒水托盘是用来装酒水的,而食品托盘是装食品的,永远都不要混用。
-完-
4.Remember that drink trays are used for drinks - food trays are used for food.
- 架取托盘时至少要抬高15CM后,才能移动托盘。
2.左手在下,重心在掌心。
3.慢慢的屈膝用腿部的力量挺直身体,最重要的是不要用背部或手臂的力量,否则会造成肌肉拉伤。
1.Tall, easy to be toppled glasses are put in the middle of the beverage try with smaller (e.g. rock glasses) placed toward the outside.
2.Always ensure that the beverage tray is dry before loading it.
4.Place heaviest dishes and equipment with the weight closest to the shoulder.
5.Glasses are NEVER carried on a food tray.
6.Light articles are placed on the outside in a systematic manner to ensure they will not topple over when carrying the tray.
6.Keep shoulders back - slouching will cause the tray to be unstable.
7.Carry tray in the your most comfortable hand, keep your arm relaxed - if it is too rigid any bump will upset the tray.
8.While maneuvering through a crowd guard the tray with your other hand. Always be confident with your beverage tray - it actually becomes part of you through the service period and the more practice at carrying the tray, the better service and more professional you will look.
3.拿托盘的姿势:
五指分开,重心落於掌心;
用指尖紧扣托盘;
4.把托盘托至腰部的高度。
5.如果托盘很重,要用另一手帮助。
6.挺直肩膀,这样不易疲倦。
7.托起时要轻松,自然,如果太紧张,托盘就不稳。
8.当通过人群时,用另一只手帮助平衡,要把托盘运用自如,必须勤练习。
放置酒水托盘
1.高的,容易到的放在中间,小物件放外面。
2.Place the left hand under the tray, palm of your hand should be the heaviest part.
3.Bend carefully at the knees and lift taking the strain through the legs.Important:Do not lift with your back or arms as this may cause back problems.
Fingertips in which the tray is balanced on the fingertips with fingers spread.
4.Tray is held at waist-high level.
5.Weight of the tray is held in the hand.
1.Stack plates according to size.
2.Cups do not remain on saucers as this will take up too much room on the tray.
3.Do not pile plates with food on top of each other. Use one plate for scraping.
7.运走脏托盘时要用口布盖起。
8.水扎等放在中央的位置,防止溅溢。
9.物品不可以超出托盘边缘以免掉出。
10.茶杯叠放时不可超出3个,摆放时避免过重过满。
注:把过重的物品放在托盘的中间并朝向身体的一侧,不要放的太重,太满,以免肌肉拉伤。
酒水托盘
1.酒水托盘是圆的,防滑的,并垫上托盘垫。
2.要保持平衡,重的,高的放里面。
Standard:
All trays should be carried in a manner that is both safe and comfortable.
标准:
保证托盘按标准安全、舒适的使用。
Procedures:
1.To lift a tray allows15cmof the tray to project over the edge of the tray jack.
