Sonicwall_Configuring_L2TP_Client_to_SNWL
SonicWALL 防火墙 HA 配置
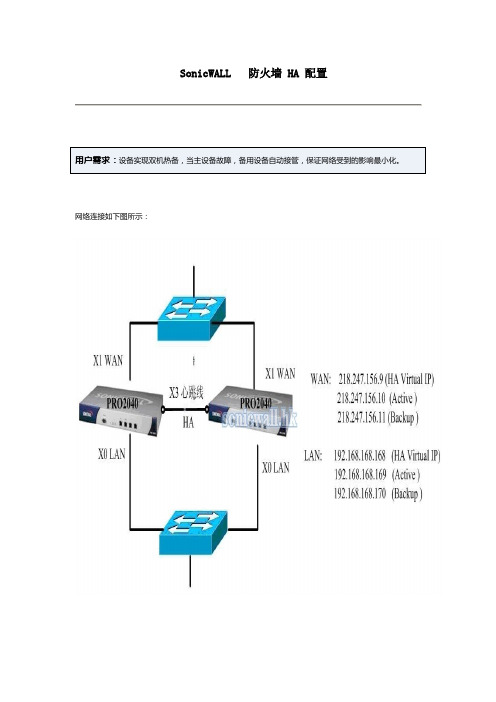
SonicWALL 防火墙 HA 配置网络连接如下图所示:SonicWALL HA是Active/Passive方式的HA,配置界面相当简单,所有配置只需要在主设备上配置,备用设备会自动同步主设备的配置。
配置主设备时,不要打开备用设备电源,待主设备配置完毕之后,连接好物理线路,打开备用设备电源,备用设备自动与主设备同步全部的配置信息。
注意:备用设备要和主设备采用同样的操作系统版本号。
如果备用设备启用UTM的功能,那么备用设备要提前注册,拿到全部的UTM的授权。
主设备的UTM License不会同步到备用设备。
1.进入主设备的管理界面https://192.168.168.168, 默认的LAN口IP地址,用户名是 admin, 密码password2.进入Network->Interfaces界面,配置X1口(WAN),X0口(LAN)的IP地址。
这里X1口是WAN口,IP 地址218.247.156.9, 这个地址将成为HA发生切换之后WAN口的虚拟地址,从WAN外部通过218.247.156.9能访问到当前工作的设备,即如果主设备宕机,那么通过这个地址访问到的是备用设备。
X0 口IP地址用默认的 192.168.168.168. 这个地址将成为HA发生切换之后LAN口的虚拟地址,从LAN 内部通过192.168.168.168能访问到当前工作的设备,即如果主设备宕机,那么通过这个地址访问到的是备用设备。
3.进入Hardware Failover->Setting 界面,选中Enable Hardware Failover激活HA配置,点右上角的Apply按钮使HA生效。
如果希望主设备恢复后立刻切换回到主设备工作,那么选中Enable Preempt Mode,点右上角的Apply按钮使之生效.4.进入Hardware Failover->Monitoring界面,点X0口的配置按钮,5.在Interface X0 Monitoring Settings界面的Primary IP Address, Backup IP Address分别填写主/备设备的管理IP地址。
Sonicwall L2TP 的配置步骤
Sonicwall L2TP 的配置步骤
一、创建用户
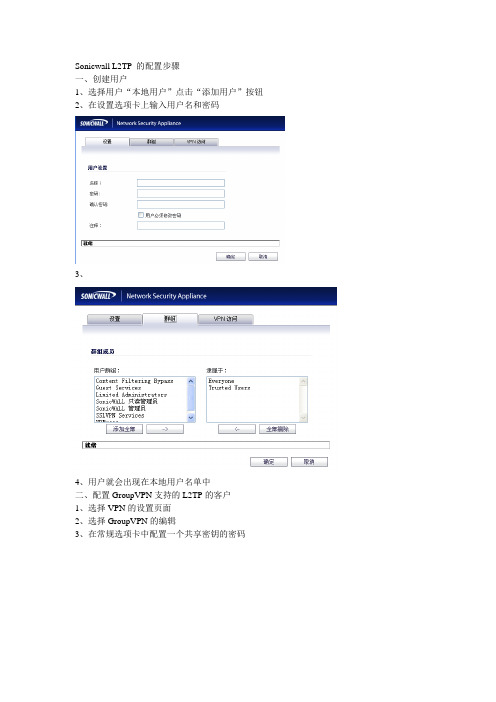
1、选择用户“本地用户”点击“添加用户”按钮
2、在设置选项卡上输入用户名和密码
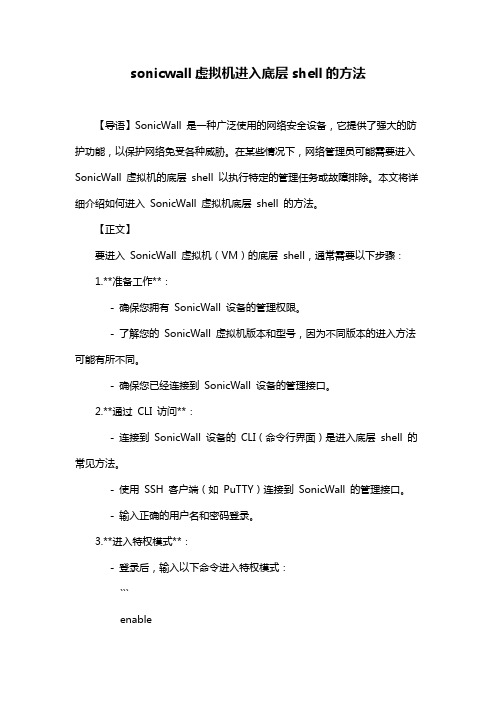
3、
4、用户就会出现在本地用户名单中
二、配置GroupVPN支持的L2TP的客户
1、选择VPN的设置页面
2、选择GroupVPN的编辑
3、在常规选项卡中配置一个共享密钥的密码
4、在建议选项卡保持默认
5、在高级选项卡,如何设置运行的是Sonicwall OS 增强版
6、在用户选项卡,取消使用“简单客户端供应使用默认密钥”
三
三、配置L2TP服务设置
1、点击启用“启用L2TP服务器”复选框(不要单击配置按钮)
2、在面部单击“接受”按钮
3、单击“配置”按钮
4、输入你的DNS服务器IP地址
5选择“使用本地L2TP连接地址池“,输入IP地址范围{注意地址必需是唯一的,不能和局域网相同},单击确定。
sonicwall虚拟机进入底层shell的方法
sonicwall虚拟机进入底层shell的方法【导语】SonicWall 是一种广泛使用的网络安全设备,它提供了强大的防护功能,以保护网络免受各种威胁。
在某些情况下,网络管理员可能需要进入SonicWall 虚拟机的底层shell 以执行特定的管理任务或故障排除。
本文将详细介绍如何进入SonicWall 虚拟机底层shell 的方法。
【正文】要进入SonicWall 虚拟机(VM)的底层shell,通常需要以下步骤:1.**准备工作**:- 确保您拥有SonicWall 设备的管理权限。
- 了解您的SonicWall 虚拟机版本和型号,因为不同版本的进入方法可能有所不同。
- 确保您已经连接到SonicWall 设备的管理接口。
2.**通过CLI 访问**:- 连接到SonicWall 设备的CLI(命令行界面)是进入底层shell 的常见方法。
- 使用SSH 客户端(如PuTTY)连接到SonicWall 的管理接口。
- 输入正确的用户名和密码登录。
3.**进入特权模式**:- 登录后,输入以下命令进入特权模式:```enable```- 您将被提示输入特权模式的密码。
4.**进入底层shell**:- 在特权模式下,根据SonicWall VM 的版本,输入以下命令之一:- 对于某些旧版本,您可能需要输入:```shell```- 对于较新版本,可能需要使用以下命令:```diagnostic```或者```system诊断```- 这些命令将帮助您进入底层shell。
5.**在底层shell 中操作**:- 在底层shell 中,您可以执行各种高级管理任务,如查看系统信息、更新固件、配置网络设置等。
- 请注意,在底层shell 中执行的命令需要谨慎,因为它们可能会影响系统的正常运行。
6.**退出底层shell**:- 完成所有任务后,输入`exit` 命令可返回到上一层CLI。
- 如果需要断开与SonicWall 的连接,输入`logout` 或`exit` 命令。
配置端口转发通过SonicWALL

说明本技术说明提供了关于如何配置您的FTP,SMTP和DNS端口转发SonicWALL防火墙的信息。
端口转发是用来当你有需要受到公众的访问内部服务器,你有有限的公共IP地址。
因此,一对一的NAT是不可能或不理想。
在这种情况下,只有一个公用IP地址,并给出它被分配到SonicWALL广域网接口。
但是,我们有三个服务器,一运行FTP,SMTP和一个运行一个运行DNS,需要得到公众访问,如下面的图所示。
当今高度连接的组织机构在网络部署间传输大量的关键数据。
这些数据的价值很大,因此需要快速、可靠及安全地传输。
为保持及保护业务连续性,组织机构必须采用诸如快速及安全的VPN 接入、高可靠网络连接、强大的性能与灵活及可扩展配置性等高级特性。
SonicWALL PRO 3060 为SonicWALL PRO 系列互联网安全平台的组成成员,可为(甚至)最复杂的网络提供完全的业务连续性。
由SonicWALL 下一代SonicOS 操作系统及功能强大的深度包检测架构支持的PRO 3060 ,具有集成网关防病毒、防间谍程序、入侵防护与防垃圾邮件能功能,可提供对当今不断变化的网络威胁的实时保护。
企业级防火墙吞吐量与VPN 连接,再加上出色的性价比,使PRO 3060 成为需要有“岩石”般可靠网络保护及面向远程雇员的快速、安全VPN 接入的企业的低成本、高效率理想解决方案。
作为PRO 3060 的可选升级,SonicOS 增强版可提供硬件故障切换、WAN ISP 故障切换及一个自动备份VPN 网关,来确保连续的网络连接。
6 个完全可配置10/100 以太网端口,使管理员能创建多个LAN 、WAN 、DMZ 与自定义安全域。
PRO 3060 还具有一个创新的Web 界面,使其成为要求有可靠内外部安全、网络配置灵活性与易使用性的网络的终极选择。
通过一个Web 界面或利用SonicWALL 行业领先的全球管理系统(GMS) ,很容易将PRO 3060 作为多防火墙与VPN 环境的一部分来管理。
SonicWALL 防火墙对于中国3G卡的配置
SonicWALL 防火墙对于中国3G卡的配置目前为止,对于中国的3G服务商,SonicWALL 防火墙能够支持的有4款3G产品:(中国联通的华为E1750, E176G, 中国电信的华为EC1260, EC169C)以下的表格是我们支持的一些全球运营商的3G卡类型。
注意事项:(1) 我们防火墙不完全支持3G产品的即插即用,所以在3G卡插入防火墙后,如果拨号不成功,请重启防火墙。
(2) 有时候,用中国电信的3G卡拨号花需要手动的在Network->Interface页面上点击Manage的按钮,然后在弹出框中点击connect 按钮。
(3) 如果3G卡的信号比较弱的话,3G连接需要花比较长的时间。
(1) 把3G卡插入防火墙的U0接口上。
(2) 登录防火墙,等待直到3G/Modem项变成3G,这意味这3G卡已经检测成功。
如果3G/Modem没有主动变为3G,那么在3G/Modem>Settings中,把3G/Modem Device Type手动改为3G/Mobile.(3) 为3G 创建Connection Profiles:在3G > Connection Profiles的页面, 点击Add按钮.在3G Profile Configuration的窗口, 在国家的下拉列表中选择China.以下的配置将会因为不同的运营商而有所不同:A. 如果你使用的是中国联通的3G卡Service Provider: China Unicom.Plan Type: Standard.Profile Name: 自动填充为China Unicom (Standard); 你也可以自定义名称Connection Type: GPRS/EDGE/HSPA其他的选项(包括用户名和密码)都是默认值,不需要手动更改B: 如果你使用的是中国电信的3G卡Service Provider: OtherPlan Type: 这一项会默认灰掉,不让填。
sonicwall配置截图

SonicWall的防火墙/VPN设备可以部署成透明模式、路由模式、NAT模式以及 混合模式
SonicWall的防火墙/VPN设备还支持多链路的备份和均衡:
许多产品可能提供多链路的备份,却无法提供多种链路均衡方式。
为了对外提供服务,如需要WEB、FTP等,可以通过向导方式,非常快捷简便
除了防火墙的功能,用户还会关心VPN的功能,因为分支机构以及出差在外的用户 需要安全的连接进来,我们同样可以通过上面的向导来方便的配置,下面是配置界 面:
ቤተ መጻሕፍቲ ባይዱ
我们甚至可以通过抓包来分析,到底可能是什么样的数据,几乎没有别的产品提供 这样的工具:
通过以上的一些图片和介绍,我们可以发现,SonicWall具有许多人性化 的设计和体贴用户的功能,这些功能都是用户非常感兴趣并对用户会有实实 在在的帮助的功能。而其他许多别的产品通常都不具备这样的功能。这也就 不难理解为什么SonicWall一直到现在始终处于UTM的领导地位,全球的销量 也始终保持在前列!
为了实现对内网用户上网行为的管理,我们需要定义防火墙策略 通过图片 我们可以看到, 规则定义的时 候,我们可以 根据地址(源、 目的)、服务 (或组)、用 户(或组)、 时间、带宽等 来决定规则的 动作。这已经 大大超越了一 般防火墙只能 做IP地址、服 务和动作的范 围,增加了管 理的灵活度。
为了更好的制定规则,我们先定义地址对象:
Sonicwall配置截图
2009/03
我们可以通 过向导来配置 SonicWall防火墙 /VPN设备,以便 我们可以通过 SonicWall防火墙 /VPN设备连接网 络。对配置VPN 或对外服务器的 配置也同样可以 利用向导功能来 实现,这大大简 化了我们管理、 配置设备的难度, 许多其他的防火 墙产品都没有或 只有部分这样人 性化的功能。
SonicWALL防火墙配置手册

S o n i c W A L L防火墙配置手册-CAL-FENGHAI-(2020YEAR-YICAI)_JINGBIANSonicWALL防火墙标准版配置SonicWall标准版网络向导配置 (2)SonicWall标准版规则向导配置 (10)SonicWall标准版一般规则向导配置 (10)SonicWall标准版服务器规则向导配置 (17)SonicWall标准版一般规则直接配置 (20)SonicWall标准版服务器1对1 NAT配置 (25)SonicWall标准版透明模式配置 (26)SonicWall标准版网络向导配置首次接触SonicWALL防火墙设备,我们将电源接上,并开启电源开关,将X0口和你的电脑相连(注:请用交叉线),SonicWALL防火墙默认的IP地址为192.168.168.168,我们也可以通过setuptool.exe这个小工具探知SonicWALL防火墙的IP地址。
如图所示:当网线和电源等都连接好之后,我们设置一下本机的IP地址,以便和SonicWALL防火墙处于同一个网段。
如图所示:设置好IP地址后,我们在IE浏览器的地址栏输入SonicWALL防火墙的IP地址,点next,提示我们是否修改管理员密码,暂时不修改,点next,提示我们修改防火墙的时区,我们选择中国的时区。
点next,提示我们设置WAN口的地址获取类型,这时候,我们需要和ISP相联系,并选择相关的类型,这里以静态地址为例:我们点next,输入相关的信息,IP地址、掩码、网关、DNS服务器等,如果不知道此处该如何设置,请和你的ISP联系。
点next,提示我们设置LAN口的IP和掩码,我们根据自己的规划和网络的实际情况设置,此处我没有修改。
点next,防火墙询问我们在LAN口是否开启DHCP server的功能,并是否是默认的网段,我们可根据实际情况做调整,决定开始或关闭,以及网段地址等,如下图:点next,防火墙将把前面做的设置做一个摘要,以便我们再一次确认是否设置正确,如果有和实际不符的地方,可以点back返回进行修改。
sonic wall 配置图解 HOW-TO ---Transparent Mode for Multiple LAN Subnets
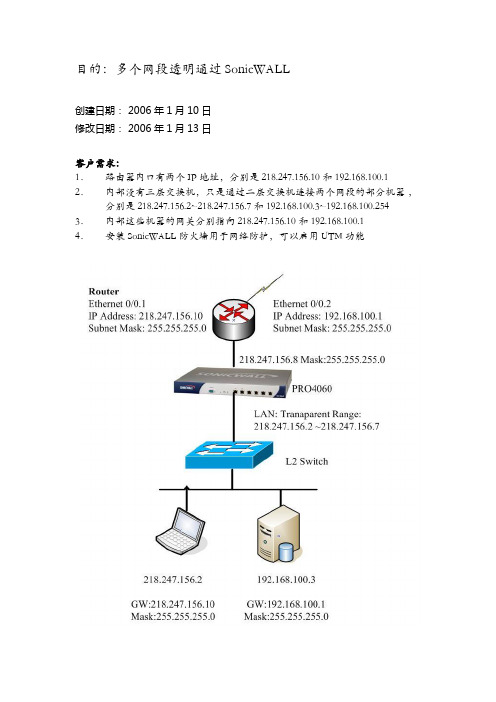
目的:多个网段透明通过SonicWALL创建日期: 2006年1月10日修改日期: 2006年1月13日客户需求:1.路由器内口有两个IP地址,分别是218.247.156.10 和192.168.100.1 2.内部没有三层交换机,只是通过二层交换机连接两个网段的部分机器,分别是218.247.156.2~218.247.156.7和192.168.100.3~192.168.100.254 3.内部这些机器的网关分别指向218.247.156.10和192.168.100.14.安装SonicWALL防火墙用于网络防护,可以启用UTM功能防火墙配置过程:第一个网段透明1.进入管理界面,在Network->Interfaces界面配置好WAN口IP地址218.247.156.8, 掩码:255.255.255.0,在LAN口配置界面,把LAN口选择成透明模式,现场创建一个透明范围地址对象,属于LAN安全域,地址范围是218.247.156.2~218.247.156.7. (这个透明范围地址对象也可以在Network->Address Object界面先创建好,那么在LAN口配置界面就可以直接选择这个透明范围)LAN口配置成透明之后,屏幕界面如下。
鼠标移动到 LAN口对应的那一行Transparent Mode 上,会自动显示出配置的透明范围。
第二个网段透明通过SonicWALL ,从X0进入,从X1出去到上游路由器SonicWALL透明模式是工作在三层的ARP 代理方式实现的,不是二层桥透明,并且透明范围只能和WAN口的IP地址在同一个网段,因此在LAN口上(X0口)上设置第二个透明范围,与WAN口IP地址不在同一个网段是不允许的。
因此配置第二个网段穿过SonicWALL需要采用静态路由和静态ARP的方式,其实要配置的内容很简单,共有三个配置:(1)告诉防火墙到第二个网段的透明范围,如本例的192.168.100.3-192.168.100.254,要通过X0口到达,网关是0.0.0.0,其实就是不用网关.(2)告诉防火墙到第二个网段的上游路由器的IP地址,如本例的192.168.100.1,要通过X1口, 网关是0.0.0.0,其实就是不用网关(3)告诉防火墙上游路由器的第二个网段用的网关的IP地址对应的MAC地址,在静态ARP界面配置。
sonic cli常用命令
Sonic CLI是Cisco公司推出的一种网络设备管理工具,它提供了丰富的命令来管理和配置网络设备。
以下是一些常用的Sonic CLI命令:
- change password:用于修改设备的管理员密码。
- //no shutdown:启用指定的接口。
- //shutdown:关闭指定的接口。
- show interfaces status:显示指定接口的状态。
- interface speed:设置指定接口的速度。
- show version:显示设备的版本信息。
- config vlan add 4:创建一个编号为4的VLAN。
- config vlan member add 4 Ethernet6:将接口Ethernet6加入到编号为4的VLAN 中。
- show vlan:显示VLAN的配置信息。
- show platform psustatus:显示电源系统的状态信息。
- show logging:显示系统日志信息。
- psuutil status:显示电源系统的状态信息。
- sfputil show presence:显示指定接口上的物理层模式和物理层设备的存在状态。
- sfputil lpmode on Ethernet1:启用指定接口的低功耗模式。
- fdbshow:显示MAC地址表信息。
这些命令可以帮助网络管理员更好地管理和配置Sonic网络设备。
在使用这些命令时,请确保你已经正确登录到设备,并具有相应的权限。
如果你需要了解更多关于Sonic CLI 命令的信息,请参考设备的用户手册或咨询设备供应商。
SonicWALL_Global_VPN_Client_21_Administrators_Guide
COMPREHENSIVE INTERNET SECURITY™Table of ContentsSonicWALL Global VPN Client (1)SonicWALL Global VPN Client Features (1)Global VPN Client Enterprise/Global Security Client (3)About this Guide (3)Conventions Used in this Guide (4)Icons Used in this Guide (4)Copyright Notice (5)Limited Warranty (5)Installing the SonicWALL Global VPN Client (7)Using the Setup Wizard (8)Adding VPN Connection Policies (11)VPN Connection Policies (12)Digital Certificates (12)Using the New Connection Wizard (13)Creating a VPN Connection Policy (13)Importing a VPN Configuration File (16)Configuring a Dial-Up VPN Connection (17)Launching the SonicWALL Global VPN Client (18)Making VPN Connections (20)Accessing Redundant VPN Gateways (20)Enabling a VPN Connection (21)Establishing Multiple Connections (22)Entering a Pre-Shared Key (23)Selecting a Certificate (23)Username and Password Authentication (24)Connection Warning (24)Disabling a VPN Connection (25)Checking the Status of a VPN Connection (25)Creating a VPN Policy Shortcut (26)Specifying Global VPN Client Launch Options (27)SonicWALL Global VPN Client 2.1Administrators’s Guide Page 1SonicWALL Global VPN Client System Tray Icon (28)Managing VPN Connection Policy Properties (28)General (29)User Authentication (31)Peers (32)Peer Information Dialog Box (33)Status (35)Managing VPN Connection Policies (37)Displaying Connection Policies (37)Arranging Connection Policies (37)Renaming a Connection Policy (37)Deleting a Connection Policy (37)Selecting All Connection Policies (37)Managing Certificates (38)Troubleshooting SonicWALL Global VPN Client (39)Log Viewer (39)Setting Up Log Files (41)Generating a Help Report (42)Technical Support (43)Help Topics (43)Uninstalling the SonicWALL Global VPN Client (43)Configuring SonicWALL VPN Gatewaysfor Global VPN Clients (44)SonicWALL Global VPN Client Licenses (44)VPN Connections Supported by Each SonicWALL Model (44)Activating Your SonicWALL Global VPN Clients (46)Downloading Global VPN Client Software and Documentation (46)Page 2 SonicWALL Global VPN Client 2.1 Administrato’s GuideSOFTWARE LICENSE AGREEMENT FORSONICWALL GLOBAL VPN CLIENT (47)LICENSE (48)EXPORTS LICENSE (48)SUPPORT SERVICES (48)UPGRADES (48)COPYRIGHT (49)U.S. GOVERNMENT RESTRICTED RIGHTS (49)MISCELLANEOUS (49)TERMINATION (49)LIMITED WARRANTY (50)CUSTOMER REMEDIES (50)NO OTHER WARRANTIES (50)LIMITATION OF LIABILITY (50)SonicWALL Global VPN Client Support (51)Appendix A - Creating and Deploying the Default.rcf Filefor Global VPN Clients (52)How the Global VPN Client uses the default.rcf File (52)Deploying the default.rcf File (53)Include the default.rcf File with the Global VPN Client Software (53)Add the default.rcf file to the Default Global VPN Client Directory (53)Replace the Existing SonicWALL Global VPN Client.rcf File (53)Creating the default.rcf File (54)Default.rcf File Tag Descriptions (55)Sample Default.rcf File (56)Appendix B - SonicWALL Global VPN ClientInstallation using the InstallShield Silent Response File 58 Creating the Silent Installation (58)Playing Back the Silent Installation (58)Using Setup.log to Check for Errors (59)Appendix C - Running the Global VPN Client from the Command Line Interface (61)Command Line Options (61)Command Line Examples (61)SonicWALL Global VPN Client 2.1Administrators’s Guide Page 3Appendix D - Installing the Global VPN Clientwith a Ghost Application (62)Appendix E- Log Viewer Messages (63)Page 4 SonicWALL Global VPN Client 2.1 Administrato’s GuideSonicWALL Global VPN ClientThe SonicWALL Global VPN Client creates a Virtual Private Network (VPN) connection between your computer and the corporate network to maintain the confidentiality of private data. The Global VPN Client provides an easy-to-use solution for secure, encrypted access through the Internet or corporate dial-up facilities for remote users as well as secure wireless networking for SonicWALL SOHO TZW clients using SonicWALL’s WiFiSec technology.Custom developed by SonicWALL, the Global VPN Client combines with GroupVPN on SonicWALL Internet Security Appliances to dramatically streamline VPN deployment and management. Using SonicWALL’s Client Policy Provisioning technology, the SonicWALL administrator establishes the VPN connections policies for the Global VPN Clients. The VPN configuration data is transparently downloaded from the SonicWALL VPN Gateway (SonicWALL Internet Security Appliance) to Global VPN Clients, removing the burden of provisioning VPN connections from the user.SonicWALL Global VPN Client FeaturesThe SonicWALL Global VPN Client delivers a robust IPSec VPN solution with these features:•Easy to Use - Provides an easy-to-follow Installation Wizard to quickly install the product, an easy-to-follow Configuration Wizard with common VPN deployment scenarios, point-and-click activation of VPN connections, and streamlined management tools to minimize support requirements.•Client Policy Provisioning - Using only the IP address or Fully Qualified Domain Name (FQDN) of the SonicWALL VPN gateway, the VPN configuration data is automatically downloaded from the SonicWALL VPN gateway via a secure IPSec tunnel, removing the burden from the remote user of provisioning VPN connections.•XAUTH Authentication with RADIUS - Provides added security with user authentication after the client has been authenticated via a RADIUS server.•VPN Session Reliability - Allows automatic redirect in case of a SonicWALL VPN gateway failure. If a SonicWALL VPN gateway is down then the Global VPN Client can go through another SonicWALL VPN gateway.•Multiple Subnet Support - Allows Global VPN Client connections to more than one subnet in the configuration to increase networking flexibility.•Third-Party Certificate Support - Supports VeriSign, Entrust, Microsoft, and Netscape Certificate Authorities (CAs) for enhanced user authentication.•Tunnel All Support - Provides enhanced security by blocking all traffic not directed to the VPN tunnel to prevent Internet attacks from entering the corporate network through a VPN connection.•DHCP over VPN Support - Allows IP address provisioning across a VPN tunnel for the corporate network while allowing WAN DHCP for Internet Access from the ISP.•Secure VPN Configuration - Critical Global VPN Client configuration information is locked from the user to prevent tampering.SonicWALL Global VPN Client 2.1Administrator’s Guide Page 1•AES and 3DES Encryption - Supports 168-bit key 3DES (Data Encryption Standard) and the new U.S. Government encryption standard AES (Advanced Encryption Standard) for dramatically increased security. AES requires SonicOS 2.0.•GMS Management - Allows Global VPN Client connections to be managed by SonicWALL’s award-winning Global Management System (GMS).•Multi-Platform Client Support - Supports Windows 98 SE, Windows ME, Windows NT 4.0 (service pack 6 or later), Windows 2000 Professional (service pack 3 or later), Windows XP Professional, Windows XP Home Edition, and Windows XP Tablet PC Edition.•NAT Traversal - Enables Global VPN Client connections to be initiated from behind any device performing NAT (Network Address Translation). The SonicWALL Global VPN Client encapsulates IPSec VPN traffic to pass through NAT devices, which are widely deployed to allow local networks to use one external IP address for an entire network.•Automatic Reconnect When Error Occurs - Allows the Global VPN Client to keep retrying a connection if it encounters a problem connecting to a peer. This feature allows the Global VPN Client to automatically make a connection to a SonicWALL VPN gateway that is temporarily disabled, without manual intervention.•Ghost Installation for Large Scale Installations - Enables the Global VPN Client’s virtual adapter to get its default address after installation and then create a ghost image.•NT Domain Logon Script Support - Allows Global VPN Clients to perform Windows NT/ 2000 domain authentication after establishing a secure IPSec tunnel. The SonicWALL VPN gateway passes the logon script as part of the Global VPN Client configuration. This feature allows the VPN user to have access to mapped network drives and other network services.•Dual Processor Support - Enables the Global VPN Client to operate on dual-processor computers.•Group Policy Management - Global VPN Clients access can be customized and restricted to specific subnet access (Requires SonicOS Enhanced).•Hub and Spoke VPN Access - Allows IP addressing from SonicWALL VPN Gateway’s DHCP Server to Global VPN Client for configuring a different subnet for all remote Global VPN Clients than the subnet of the LAN. Makes hub-and-spoke VPN access simpler. Whena Global VPN Client successfully authenticates with the central site, it receives a virtual IPaddress that also grants it access to other trusted VPN sites.•Default VPN Connections File - Enables the SonicWALL administrator to configure and distribute the corporate VPN connections with the Global VPN Client software to streamline VPN clientdeployment.•Integration with Dial-Up Adapter - Allows Global VPN Client connections using Microsoft Dial-Up Networking or third-party dial-up applications either as an automatic backup to a broadband connection or as the primary connection.•Single VPN Connection to any SOHO TZW for Roaming - Allows users to use a single VPN connection policy to access multiple SOHO TZW wireless networks.•Automatic Configuration of Redundant Gateways from DNS - When an IPSec gateway domain name resolves to multiple IP addresses, the Global VPN Client (version 2.1.0.0 or higher) uses the IP addresses in the list as failover gateways.Page 2 SonicWALL Global VPN Client 2.1Administrator’s GuideGlobal VPN Client Enterprise/Global Security Client SonicWALL Global Security Client combines gateway enforcement, central management, configuration flexibility and software deployment to deliver comprehensive desktop security to mobile workers and corporate networks. Global Security Client protection includes the SonicWALL Distributed Security Client and the SonicWALL Global VPN Client Enterprise combined with centrally managed security policies via the SonicWALL Internet Security Appliance and SonicWALL’s industry-leading Distributed Enforcement Architecture (DEA).Global VPN Client Enterprise provides the same functionality as the Global VPN Client with the added feature of license sharing.On the remote client desktop, the SonicWALL Global VPN Client Enterprise, Distributed Security Client and DEA Client provide client security and secure IPSec VPN access to the corporate network. The SonicWALL Distributed Security Client enforces firewall protection at the desktop from centrally managed security policies. The DEA Client monitors the desktop against the security policy, making a real-time decision to allow or deny network access througha SonicWALL Gateway.About this GuideThe SonicWALL Global VPN Client Administrator’s Guide provides complete documentation on installing, configuring, and managing the SonicWALL Global VPN Client 2.1. This guide also provides instructions for SonicWALL Global VPN Client 2.1 Enterprise, which is included aspart of the SonicWALL Global Security Client.Note!For complete instructions on Global Security Client, see theGlobal Security Client Administrator’s Guide .This guide is updated and released for use with SonicWALL Internet Security Appliance firmware versions 6.4.2.0, 6.5.0.0 or higher, SonicOS 1.0.0.0 or higher, SonicOS Standard 2.0.0.0 or higher and SonicOS Enhanced 2.0.0.0 or higher.Note!For complete instructions on configuring your SonicWALL to support Global VPN Clients, see the Administrator’s Guide for your SonicWALL.Tip!Always check /services/documentation.html for the latest version of this manual and other upgrade manuals as well.SonicWALL Global VPN Client 2.1Administrator’s Guide Page 3Page 4 SonicWALL Global VPN Client 2.1Administrator’s GuideConventions Used in this GuideConventions used in this guide are as follows:Icons Used in this Guide Alert! Important information about features that can affect performance, security features, or cause potential problems with your SonicWALL.Tip!Useful information about security features and configurations on your SonicWALL.Note! Related information to the topic .ConventionUse BoldHighlights items you can select on the Global VPN Client interface or the SonicWALL Management Interface.ItalicHighlights a value to enter into a field. For example, “type 192.168.168.168 in the IP Address field.”>Indicates a multiple step menu choice. For example, “selectFile>Open ” means “select the File menu, then select theOpen item from the File menu.Copyright Notice© 2003 SonicWALL, Inc. All rights reserved.Under the copyright laws, this manual or the software described within, can not be copied, in whole or part, without the written consent of the manufacturer, except in the normal use of the software to make a backup copy. The same proprietary and copyright notices must be affixed to any permitted copies as were affixed to the original. This exception does not allow copies to be made for others, whether or not sold, but all of the material purchased (with all backup copies) can be sold, given, or loaned to another person. Under the law, copying includes translating into another language or format.SonicWALL is a registered trademark of SonicWALL, Inc. Other product and company names mentioned herein can be trademarks and/or registered trademarks of their respective companies.Specifications and descriptions subject to change without notice. December 2003Limited WarrantySonicWALL, Inc. warrants that commencing from the delivery date to Customer (but in any case commencing not more than ninety (90) days after the original shipment by SonicWALL), and continuing for a period of twelve (12) months, that the product will be free from defects in materials and workmanship under normal use. This Limited Warranty is not transferable and applies only to the original end user of the product. SonicWALL and its suppliers' entire liability and Customer's sole and exclusive remedy under this limited warranty will be shipment of a replacement product. At SonicWALL's discretion the replacement product may be of equal or greater functionality and may be of either new or like-new quality. SonicWALL's obligations under this warranty are contingent upon the return of the defective product according to the terms of SonicWALL's then-current Support Services policies.This warranty does not apply if the product has been subjected to abnormal electrical stress, damaged by accident, abuse, misuse or misapplication, or has been modified without the written permission of SonicWALL.DISCLAIMER OF WARRANTY. EXCEPT AS SPECIFIED IN THIS WARRANTY, ALL EXPRESS OR IMPLIED CONDITIONS, REPRESENTATIONS, AND WARRANTIES INCLUDING, WITHOUT LIMITATION, ANY IMPLIED WARRANTY OR CONDITION OF MERCHANTABILITY, FITNESS FOR A PARTICULAR PURPOSE, NONINFRINGEMENT, SATISFACTORY QUALITY OR ARISING FROM A COURSE OF DEALING, LAW, USAGE, OR TRADE PRACTICE, ARE HEREBY EXCLUDED TO THE MAXIMUM EXTENT ALLOWED BY APPLICABLE LAW. TO THE EXTENT AN IMPLIED WARRANTY CANNOT BE EXCLUDED, SUCH WARRANTY IS LIMITED IN DURATION TO THE WARRANTY PERIOD.BECAUSE SOME STATES OR JURISDICTIONS DO NOT ALLOW LIMITATIONS ON HOW LONG AN IMPLIED WARRANTY LASTS, THE ABOVE LIMITATION MAY NOT APPLY TO YOU. THIS WARRANTY GIVES YOU SPECIFIC LEGAL RIGHTS, AND YOU MAY ALSO HAVE OTHER RIGHTS WHICH VARY FROM JURISDICTION TO JURISDICTION. This disclaimer and exclusion shall apply even if the express warranty set forth above fails of its essential purpose.SonicWALL Global VPN Client 2.1Administrator’s Guide Page 5DISCLAIMER OF LIABILITY. SONICWALL'S SOLE LIABILITY IS THE SHIPMENT OF A REPLACEMENT PRODUCT AS DESCRIBED IN THE ABOVE LIMITED WARRANTY. IN NO EVENT SHALL SONICWALL OR ITS SUPPLIERS BE LIABLE FOR ANY DAMAGES WHATSOEVER, INCLUDING, WITHOUT LIMITATION, DAMAGES FOR LOSS OF PROFITS, BUSINESS INTERRUPTION, LOSS OF INFORMATION, OR OTHER PECUNIARY LOSS ARISING OUT OF THE USE OR INABILITY TO USE THE PRODUCT, OR FOR SPECIAL, INDIRECT, CONSEQUENTIAL, INCIDENTAL, OR PUNITIVE DAMAGES HOWEVER CAUSED AND REGARDLESS OF THE THEORY OF LIABILITY ARISING OUT OF THE USE OF OR INABILITY TO USE HARDWARE OR SOFTWARE EVEN IF SONICWALL OR ITS SUPPLIERS HAVE BEEN ADVISED OF THE POSSIBILITY OF SUCH DAMAGES. In no event shall SonicWALL or its suppliers' liability to Customer, whether in contract, tort (including negligence), or otherwise, exceed the price paid by Customer. The foregoing limitations shall apply even if the above-stated warranty fails of its essential purpose. BECAUSE SOME STATES OR JURISDICTIONS DO NOT ALLOW LIMITATION OR EXCLUSION OF CONSEQUENTIAL OR INCIDENTAL DAMAGES, THE ABOVE LIMITATION MAY NOT APPLY TO YOU.Page 6 SonicWALL Global VPN Client 2.1Administrator’s GuideInstalling the SonicWALL Global VPN Client The SonicWALL Global VPN Client uses an easy-to-use wizard to guide you through the installation process. The Global VPN Client supports Windows 98 SE, Windows ME, Windows NT 4.0 (service pack 6 or later), Windows 2000 Professional (service pack 3 or later), Windows XP Professional, Windows XP Home Edition, and Windows XP Tablet PC Edition.Alert!Installing the Global VPN Client on Windows NT, Windows 2000, and Windows XP requires Administrator rights.The SonicWALL Global VPN Client requires a SonicWALL Internet Security Appliance running firmware version 6.4.2.0 (or higher), SonicOS 1.0.0.0 (or higher), SonicOS Standard 2.0.0.0 (or higher), or SonicOS Enhanced 2.0.0.0 (or higher).Tip! For information on the number of SonicWALL Global VPN Client connections supported by your SonicWALL and Global VPN Client licensing for your SonicWALL, see “SonicWALL Global VPN Client Licenses” on page44.You can upgrade the SonicWALL Global VPN Client 1.0 to 2.1 without uninstalling 1.0.Alert!If you are upgrading SonicWALL Global VPN Client from 1.0 to 2.1 and want to use the Retain MAC Address uninstall feature of the SonicWALL Virtual Adapter, you must uninstall the Global VPN Client 1.0 before installing Global VPN Client 2.1.SonicWALL Global VPN Client 2.1Administrator’s Guide Page 7Page 8 SonicWALL Global VPN Client 2.1Administrator’s GuideUsing the Setup WizardThe following steps explain how to install the SonicWALL Global VPN Client program using the Setup Wizard . You use the Setup Wizard for a new Global VPN Client installation or upgrading a previous version of the SonicWALL Global VPN Client. If you’re upgrading your Global VPNClient software, the Setup Wizard doesn’t display all the same pages as a new installation.Alert!Remove any installed 3rd Party VPN client program before installing the SonicWALL Global VPN Client.Alert! You must use a Zip program to unzip the SonicWALL Global VPN Client program files before installing it.1.Unzip the SonicWALL Global VPN Client program.2.Double-click setup.exe . The Setup Wizard launches.3.Click Next to continue installation of the VPN Client.SonicWALL Global VPN Client 2.1Administrator’s Guide Page 94.Close all applications and disable any disk protection and personal firewall softwarerunning on your computer. Click Next .5.Select I accept the terms of the license agreement . Click Next .6.Click Next to accept the default location and continue installation or click Browse to specifya different location.Page 10 SonicWALL Global VPN Client 2.1Administrator’s Guide7.Click Install . The Setup Wizard installs the Global VPN Client files on your computer. Afterthe Setup Wizard installs the Global VPN Client, the Setup Complete page is displayed.8.Select Start program automatically when users log in to automatically launch the VPNGlobal Client when you log onto the computer, if desired.9.Select Launch program now to automatically launch the Global VPN Client after finishingthe installation, if desired.10.Click Finish.SonicWALL Global VPN Client 2.1Administrator’s Guide Page 11Adding VPN Connection PoliciesAdding a new VPN connection policy is easy because SonicWALL’s Client Policy Provisioning automatically provides all the necessary configuration information to make a secure connection to the local or remote network. The burden of configuring the VPN connection parameters is removed from the Global VPN Client user. VPN connection policies can be created using three methods:•Download the VPN policy from the SonicWALL VPN Gateway to the Global VPN Clientusing the New Connection Wizard . This wizard walks you through the process of locating the source of your configuration information and automatically downloads the VPN configuration information over a secure IPSec VPN tunnel.•Import a VPN policy file into the SonicWALL Global VPN Client. The VPN policy is sent toyou as a file, which you install using the Import Connection dialog box.•Install the default.rcf file as part of the Global VPN Client software installation or add it afterinstalling the Global VPN Client. If the SonicWALL VPN Gateway administrator included the default.rcf file as part of the Global VPN Client software, when the program is installed,one or more preconfigured VPN connections are automatically created.Note!Creating a Default.rcffile and distributing it with the Global VPN Client software allows the SonicWALL VPN Gateway administrator to streamline VPN client deployment and allow users to quickly establish VPN connections. When the Global VPN Client software is installed,the VPN policy created by the SonicWALL VPN Gateway administrator is automatically created. For more information on creating the Default.rcf file, see “Appendix A - Creating and Deploying the Default.rcf File for Global VPN Clients” on page 52.Alert! Your SonicWALL must be configured with GroupVPN to facilitate the automatic provisioning of Global VPN Clients. For instructions on configuring your SonicWALL with GroupVPN, see your SonicWALL Administrator’s Guide.VPN Connection PoliciesThe Global VPN Client allows multiple connection policies to be configured at the same time, whether they are provisioned from multiple gateways or imported from one or more files.Because connection policies may be provisioned from multiple gateways, each connection policy explicitly states allowed behavior in the presence of any connection policy conflicts. You may have VPN connections that don’t allow other VPN connections or Internet and network connections while the VPN policy is enabled.The VPN connection policy includes all the parameters necessary to establish secure IPSec tunnels to the gateway. A connection policy includes Phase 1 and Phase 2 Security Associations (SA) parameters including:•Encryption and authentication proposals•Phase 1 identity payload type•Phase 2 proxy IDs (traffic selectors)•Client Phase 1 credential•Allowed behavior of connection in presence of other active connections•Client caching behaviorDigital CertificatesIf digital certificates are required as part of your VPN connection policy, your gateway administrator must provide you with the required information to import the certificate. You then need to import the certificate in the Global VPN Client using the Certificate Manager.Alert!If digital certificates are required as part of your VPN connection policy, your VPNgateway administrator must provide you with the required certificates.Note!For instructions on importing a certificate into the Global VPN Client, see “Managing Certificates” on page38.Page 12 SonicWALL Global VPN Client 2.1Administrator’s GuideSonicWALL Global VPN Client 2.1Administrator’s Guide Page 13Using the New Connection WizardThe New Connection Wizard provides easy configuration for the following VPN connection scenarios:•Remote Access - You choose this scenario if you want secure access to a remote VPN gateway from any wired or wireless network. The most common use of this scenario is when you are at home or on the road and want access to the corporate network. You enter the IP address or FQDN ( ) of the VPN gateway and the Global VPN Client automatically downloads the VPN connection policy from the remote SonicWALL VPN gateway.Alert!If you are configuring the Global VPN Client forRemote Access , make sure you havethe IP address or FQDN () of the remote SonicWALL VPN gateway and an active Internet connection before using the New Connection Wizard .•Office Gateway - You choose this scenario if you want secure access to a local SonicWALL SOHO TZW wireless network. When you create an Office Gateway VPN connection, it appears as the Peer entry of <Default Gateway> in the SonicWALL Global VPN Client window. You can use this single Office Gateway VPN connection policy to roam securely across SOHO TZW wireless networks.Alert! If you are configuring the Global VPN Client for Office Gateway , make sure your wireless card is configured with the correct SSID information to access the SonicWALL SOHO TZW before using the New Connection Wizard .Creating a VPN Connection PolicyThe following instructions explain how to use the New Connection Wizard to automatically download VPN connection policies for the Global VPN Client from a local or remote SonicWALL VPN gateway.1.Choose Start>Programs>SonicWALL Global VPN Client . The first time you open the SonicWALL Global VPN Client, the New Connection Wizard automatically launches.2.If the New Connection Wizard does not display, click the New Connection Wizard icon on the far left side of the toolbar to launch the New Connection Wizard . Click Next .3.In the Choose Scenario page, select Remote Access or Office Gateway and then clickNext. Click on View Scenario to view a diagram of each type of VPN connection.4.If you selected Remote Access in the Choose Scenario page,the Remote Access pageis displayed. Type the IP address or FQDN of the gateway in the IP Address or Domain Name field. The information you type in the IP Address or Domain Name field appears in the Connection Name field. If you want a different name for your connection, type the new name for your VPN connection policy in the Connection Name field. Click Next. TheCompleting the New Connection Wizardpage is displayed.Page 14 SonicWALL Global VPN Client 2.1Administrator’s GuideSonicWALL Global VPN Client 2.1Administrator’s Guide Page 155.If you selected Office Gateway in the Choose Scenario page, the Completing the NewConnection Wizard page is displayed.6.In the Completing the New Connection Wizard page select any of the following options:Select Enable this connection when the program is launched , if you want to automatically establish this VPN connection when you launch the SonicWALL Global VPN Client.Select Create a shortcut to this connection on the desktop , if you want to create a shortcut icon on your desktop for this VPN connection.7.Click Finish. The new VPN connection policy appears in the SonicWALL Global VPN Clientwindow.Note!You can change the default name by right-clicking the Office Gateway entry and selecting Properties from the menu. In the General tab of the Properties dialog box, enter the new name in the Name field.。
如何在SonicWALL防火墙上配置L2TP_G5_Enhanced

如何在SonicWALL防火墙上配置L2TP_G5_Enhanced如何在如何在 SonicWALL 防火墙上配置 L2TP配置手册版本 1.0.0Question/T opicUTM: 如何在 SonicWALL 防火墙上配置 L2TPAnswer/Article本文适用于:涉及到的 Sonicwall 防火墙Gen5: NSA E7500, NSA E6500, NSA E5500, NSA 5000, NSA 4500, NSA 3500, NSA2400, NSA 240Gen5 TZ 系列 TZ 100, TZ 100 Wireless, TZ 200, TZ 200 W, TZ 210, TZ 210 系列:WirelessGen4: PRO 系列 PRO 5060, PRO 4100, PRO 4060,PRO 3060, PRO 2040, PRO 系列:1260Gen4: TZ 系列 TZ 190, TZ 190 W, TZ 180, TZ 180 W, TZ 170, TZ 170 W, TZ 170 系列:SP, TZ 170 SP Wireless固件/软件版本固件软件版本: 所有 SonicOS 增强版版本软件版本服务: 服务 L2TP Server功能与应用本文介绍了如何在SonicWALL 防火墙上配置L2TP 服务器以及Microsoft L2TP VPN 客户端。
本文适用于所有 SonicOS 增强版版本以及 Windows XP Service Pack 2(SP2)用户步骤配置 L2TP Server1. 进入 Network->Address Objects 页面2. 添加地址对象 L2TP Subnet3. 进入 VPN->L2TP Server 页面,启动 L2TP Server 服务,点击Configure 按钮,如图所示添加 DNS 服务器地址以及本地 L2TP IP 地址池提示:L2TP IP 地址池应该包含在局域网地址范围内4. 进入Users->Local Users 页面 5. 添加一个地址对象, VPN Access 选项卡将LAN Subnets,在WAN RemoteAccess Networks 和L2TP Subnet 加入到 Access List 方框中6. 进入 Network->NAT Policies 页面,添加一条 NAT Policy7. 进入 VPN->Settings 页面,点击 WAN GroupVPN policy 右边的 configure 按钮,在 General 选项卡,输入 Shared Secret8. Proposals 和 Advanced 选项卡保持不变。
SonicWALL 防火墙配置 Tunnel Interface VPN
SonicWALL 防火墙配置Tunnel Interface VPN本文适用于:涉及到的 Sonicwall 防火墙Gen5: NSA E7500, NSA E6500, NSA E5500, NSA 5000, NSA 4500, NSA 3500, NSA 2400, NSA 240 Gen5 TZ 系列: TZ 100 /W,TZ 200/ W, TZ 210/ Wireless固件/软件版本: SonicOS 5.5.0.0 增强版以及更新版本服务: Route Based VPN(Tunnel Interface VPN)功能与应用使用 Tunnel Interface VPN(基于路由的 VPN)的两个优势:1. 将网络拓扑的配置从 VPN Policy 中独立出来2. 网络流量的路由更加灵活,用户可以自定义 VPN 流量路径配置步骤1. 进入 VPN->Settings 页面,点击 Add 按钮2. 在 General 选项卡,Policy Type 选择 Tunnel Interface,IPSec Primary Gateway Name or Address 中输入 VPN 对端的 WAN 口地址,本例中为192.168.160.2433. 在 Proposals 选项卡,VPN 两端保持一致4.进入 Network->Routing 页面,点击 Add 按钮添加一条路由策略,在 Destination选择Create new address object…,如图所示:Interface 选择之前在 VPN->Settings 页面添加的 VPN Policy5. 点击 OK 完成配置6. 配置完成的路由策略如图所示1. 进入 VPN->Settings 页面,点击 Add 按钮2. 在 General 选项卡,Policy Type 选择 Tunnel Interface,IPSec Primary GatewayName or Address 中输入VPN 对端的WAN 口地址,本例中为192.168.160.2523.进入 Network->Routing 页面,点击 Add 按钮添加一条路由策略,在 Destination选择Create new address object…,如图所示:Interface 选择之前在 VPN->Settings 页面添加的 VPN Policy4. 点击 OK 完成配置5. 配置完成的路由策略如图所示标签:SonicWALL防火墙配置Tunnel Interface VPN 分类:Technical Doc。
win10系统提示L2TP连接尝试失败怎么办?
win10系统提⽰L2TP连接尝试失败怎么办?
可能⼤家也会遇到这个问题,有win10系统⽤户在连接⽹络的时候,发现⽆法使⽤,并提⽰L2TP连接尝试失败,因为安全层在初始化与远程计算机的协商时遇到⼀个处理错误,遇到这样的问题该如何处理呢,今天⼩编给⼤家说明⼀下win10系统提⽰L2TP连接尝试失败解决⽅法,感兴趣的朋友不要错过了。
具体步骤如下:
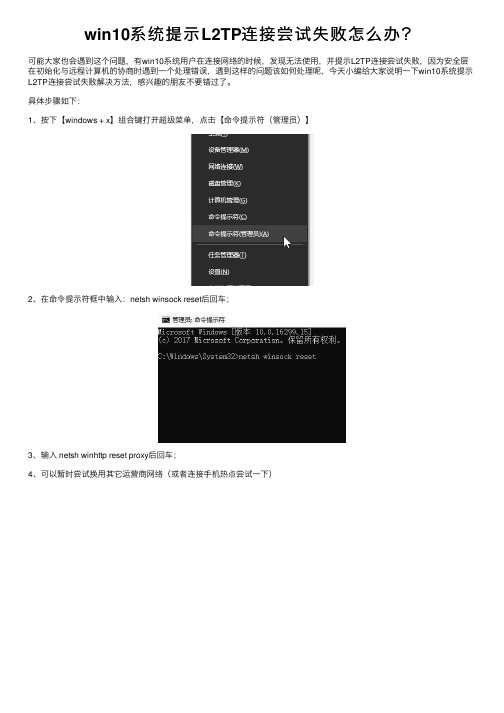
1、按下【windows + x】组合键打开超级菜单,点击【命令提⽰符(管理员)】
2、在命令提⽰符框中输⼊:netsh winsock reset后回车;
3、输⼊ netsh winhttp reset proxy后回车;
4、可以暂时尝试换⽤其它运营商⽹络(或者连接⼿机热点尝试⼀下)。
- 1、下载文档前请自行甄别文档内容的完整性,平台不提供额外的编辑、内容补充、找答案等附加服务。
- 2、"仅部分预览"的文档,不可在线预览部分如存在完整性等问题,可反馈申请退款(可完整预览的文档不适用该条件!)。
- 3、如文档侵犯您的权益,请联系客服反馈,我们会尽快为您处理(人工客服工作时间:9:00-18:30)。
KB ARTICLE:Configuring L2TP Client Access to SonicWALL GroupVPNThis document explains how to configure L2TP Client access to the SonicWALL GroupVPN SA using the built-in L2TP Server and Microsoft's L2TP VPN Client. This guide is for SonicOS Enhanced 2.x and 3.x firmware.The guide is intended for Microsoft Windows XP Service Pack 2 (SP2) users. Non-SP or SP1 users may not be able to use this guide, as Microsoft has recently updated L2TP.1) Go to Network > Address Objects.I. Add an address objectSubnet'Name:'L2TP'Network'Type:*EXAMPLE* (The Class C network address of'10.10.50.0'Network:your L2TP Pool)255.255.255.0Netmask:'VPN'ZoneAssignment:2) Go to Firewall > Services.I. Add a Service Object with these settings:L2TPName:L2TPProtocol:Port Range: Auto-filled (Option disabled)Sub Type: None (Option disabled)3) Go to VPN > L2TP Server.I. Enable the L2TP Server. Click 'Configure'.II. L2TP Server SettingsKeep alive time (secs): 60DNS Server 1: 4.2.2.2 (or use your ISP's DNS)DNS Server 2: 4.2.2.1 (or use your ISP's DNS)DNS Server 3: 0.0.0.0 (or use your ISP's DNS)WINS Server 1: 0.0.0.0 (or use your WINS IP)WINS Server 2: 0.0.0.0 (or use your WINS IP)III. IP Address SettingsIP address provided by RADIUS/LDAP Server: DisabledUse the Local L2TP IP Pool: Enabled*EXAMPLE*10.10.50.10IP:StartEnd IP: 10.10.50.20 *EXAMPLE*Note: Use any unique private range.IV. L2TP UsersUser Group for L2TP Users: 'Trusted Users' or 'Everyone'4) Go to 'Users > Local Users'.I. Add a user and add these objects to the VPN Access list:'L2TPSubnet'IP''AllWANNetworks.'RemoteAccess'WANPrimaryIP''LANNOTE: Alternatively you can add these networks to the 'Everyone' or 'Trusted Users' Group. Also, add any other Address Objects that you need access to.5) Go to Network > NAT Policies.I. Add a NAT Policy with these settings:Source:'L2TPSubnet'.Original:.Translated: 'WAN Primary IP'Destination:'Any'.Original:'Original'.Translated:Service:'Any'.Original:'Original'.Translated:Interface:'Any'.Inbound:.Outbound: 'WAN' or 'X1'ClientNATL2TPComment:Enable NAT Policy: EnabledCreate a reflexive policy: DisabledII. Add another NAT Policy with these settings:Source:'Any'.Original:'Original'.Translated:Destination:.Original: 'WAN Primary IP'.Translated: 'Original'Service:.Original: 'L2TP'.Translated: 'Original'Interface:.Inbound: 'WAN' or 'X1'.Outbound: 'Any'Comment: L2TP to SNWLEnable NAT Policy: EnabledCreate a reflexive policy: Disabled6) Go to 'VPN > Settings' and configure 'WAN GroupVPN' with the following settings:6a) General tabI. Enter a Shared Secret.6b) Proposals tabI. IKE (Phase 1) ProposalDH Group: Group 2Encryption: 3DESAuthentication: SHA1Life Time (seconds): 28800II. IPSec (Phase 2) ProposalProtocol: ESPEncryption: 3DESAuthentication: SHA1Enable Perfect Forward Secrecy (PFS): Disabled (Optional) DH Group: Disabled (Disabled if PFS is disabled)Life Time (seconds): 288006c) Advanced tabI. Enable Windows Network (NetBIOS) Broadcast: Enabled (Optional)II. Enable Multicast: Disabled (Optional)III. Management via this SA:HTTP: Enabled (Optional)HTTPS: Enabled (Optional)IV. Default LAN Gateway: Public (WAN) IP of the SNWL.V. Client AuthenticationofVPN Clients via XAUTH: EnabledRequireAuthenticationUser Group for XAUTH Users: 'Trusted Users' or 'Everyone'Client Access: DisabledVPNAllowUnauthenticated6d) Client tab:I. Username and Password CachingCache XAUTH User Name and Password on Client: AlwaysII. Client ConnectionsVirtual Adapter settings: DHCP Leaseto:"This Gateway only" or "All SecuredConnectionsAllowGateways" (if you need access to site-to-site VPN's).Set Default Route as this Gateway: EnabledRequire Global Security Client for this Connection: DisabledIII. Client Initial ProvisioningUse Default Key for Simple Client Provisioning: Disabled7) Go to VPN > DHCP over VPN:I. DHCP over VPNChoose 'Central Gateway' and click Configure.II. DHCP RelayUse Internal DHCP Server: EnabledFor Global VPN Client: EnabledFor Remote Firewall: DisabledSend DHCP requests to the server address listed below: DisabledRelay IP Address (Optional): 0.0.0.08) Go to Firewall > Access Rules:I. Add this VPN to WAN rule:VPNFromZone:WANToZone:Source: 'WAN Remote Access Networks''Any'Destination:'Any'Service:'Allow'Action'All'Users:-----------------The SNWL portion of the configuration is complete.This next step is being done in Microsoft Windows XP Professional, Service Pack 21) Go to the Control Panel2) Go to Network Connections3) Open the New Connection Wizard. Click Next.4) Choose "Connect to the network at my workplace." Click Next.5) Choose "Virtual Private Network Connection." Click Next.6) Enter a name for your VPN connection. Click Next.7) Enter the Public (WAN) IP address of the SNWL. Alternatively, you can use a domain name that points to the SNWL. Click Next, then click Finish. The connection window will appear. Click Properties.8) Go to the Security tab. Click on "IPSec Settings". Enable "Use pre-shared key for authentication". Enter your pre-shared secret. Click OK.9) Go to the Networking tab. Change "Type of VPN" from "Automatic" to "L2TP IPSec VPN". Click OK.10) Enter your XAUTH username and password. Click Connect.Once the connection has been established, Internet access should be available. Access to the internal network will also be available.。