winform中嵌入word
delphi中 在自己的窗体上嵌入其它程序
delphi中在自己的窗体上嵌入其它程序基于Delphi的融合DLL中的窗体博客分类:delphiDelphiWindows编程基于Delphi的融合DLL中的窗口摘要:提出了一种简单的方法将DLL中的窗口融合(嵌入)到其他应用程序或DLL的窗口中,使用本方法可以简便地实现具有强扩展性和升级能力的软件系统。
1引言在开发一个大型通用控制系统时曾遇到这么一个问题:该系统软件包由若干个可执行文件和动态链接库组成,因为扩展性和兼容性的要求,需要将系统划分为若干个可执行文件和动态链接库,并且在大部分DLL 中封装各自的操作界面,在调用DLL时将其中包含的部分界面嵌入地显示在主界面的某个区域或某个窗口内,与主界面的其他部分浑然一体。
这样主程序与DLL在功能操作上各司其职,在外部界面上又彼此交融,使用户可以通过增加和修改DLL来实现对系统内部、外部的扩展和升级;同时因为DLL的跨语言特性,内部包含操作界面的DLL可以更为方便地在以后的不同工作、不同语言环境中更好地重复使用。
这一问题的应用较为广泛,但没有充分的资料来帮助解决,经过不断的试验,笔者将初步体会总结出来,用以抛砖引玉。
本文中涉及的主程序和DLL都是在Delphi5.0下实现的,但因为其中所依赖的基础还是Windows 本身的窗口机制,所以对于其他的语言平台也有实际意义。
在Delphi中如何创建DLL及输出DLL中的函数有较多资料进行过介绍,在本文中不再赘述,本文只针对DLL中的窗口部分做重点介绍。
2DLL中自带窗口的创建和显示DLL和普通EXE一样,可以自带窗口,用Delphi设计包含窗口的DLL较其他语言更为方便。
在Delphi的DLL 工程中,窗口的生成和编程与普通的EXE工程基本相同,但与EXE文件不同的是:在Delphi的EXE工程中所包含的窗口是自动创建的,而DLL 工程中所包含的窗口需要显示创建。
在通常的应用中,DLL将所包含的窗口的创建和显示函数(或过程)输出,由宿主程序根据情况调用将DLL中的窗口显示出来(如点击宿主程序中的某个按钮时显示DLL中的窗口),其窗口创建和显示的过程如下:首先,创建一个DLL工程,并新建一个名为DllForm的Form,可以在该Form上放置任何控件。
C#WinfromMDI(多文档界面)

C#WinfromMDI(多⽂档界⾯)1、⾸先设置⽗级Form1界⾯,只需要将该界⾯的IsMdiContainer属性设置为true;2、设置按钮的事件来打开⼦级的窗⼝Form2,Form3等等;3、在From1内设置⼀个容器panel,范围为需要打开的⼦级界⾯的⼤⼩;4、设置Form2、Form3的事件,以及唯⼀窗⼝等;//Form2的点击事件private void form2ToolStripMenuItem_Click(object sender, EventArgs e){Form2 f2 = new Form2(); = "f2";openwidow(f2);}//Form3的点击件private void form3ToolStripMenuItem_Click(object sender, EventArgs e){Form3 f3 = new Form3(); = "f3";openwidow(f3);}//设置唯⼀窗⼝://新建⼀个formlist集合,供唯⼀窗⼝使⽤List<Form> formlist = new List<Form>();//新建⼀个public的⽅法private void openwidow(Form f){//定义⼀个Form fff变量Form fff = null;//定义⼀个bool类型的变量为false;bool open = false;//遍历这个集合foreach (Form ff in listfrom){//只要遍历到就隐藏ff.Hide();//如果遍历到if ( == ){open = true;//把ff放到集合内fff = ff;}}//如果遍历到,if (open){//关闭所有窗⼝f.Close();//重新打开这个串⼝fff.Show();}//否则else{//设置打开的窗⼝为Form1的⼦窗体;f.MdiParent = this;//设置⼦窗⼝的⼤⼩为最⼤化;f.WindowState = FormWindowState.Maximized;//把⼦窗⼝放到Form1的panel1⾥;f.Parent = panel1;//设置⽆边框f.FormBorderStyle = FormBorderStyle.None;//打开窗⼝f.Show();//把这个窗⼝放到集合内fromlist.Add(f);}}。
winform练习题

Winform练习题一、基础操作创建一个主窗体,窗体为“基础操作练习”。
在主窗体上添加一个按钮,按钮文本为“显示消息”。
为按钮添加事件,按钮后,在消息框中显示“Hello,World!”。
文本框中输入内容后,按钮,将文本框内容显示在标签上。
在列表框中添加三个选项:“选项1”、“选项2”、“选项3”。
按钮后,将列表框中选中的选项显示在消息框中。
二、控件应用一个标签,显示“请输入姓名:”。
一个文本框,用于输入姓名。
一个按钮,后显示“您好,姓名!”(姓名为文本框中输入的内容)。
包含一个复选框列表,列出三个选项:“足球”、“篮球”、“乒乓球”。
一个按钮,后显示用户选择的运动项目。
一个单选按钮组,包含三个选项:“男”、“女”、“其他”。
一个按钮,后显示用户选择的性别。
三、事件处理包含一个文本框和一个标签。
当文本框内容改变时,自动更新标签内容为文本框中的内容。
每次按钮,标签中的数字增加1。
按钮后,进度条开始从0到100递增。
四、界面布局三个标签,分别显示“姓名”、“年龄”、“性别”。
三个文本框,分别用于输入姓名、年龄、性别。
一个按钮,后显示输入的信息。
五个按钮,按钮文本分别为“1”、“2”、“3”、“4”、“5”。
按钮自动排列在一行。
左侧为列表框,列出五个选项。
右侧为文本框,显示左侧列表框中选中的选项。
五、文件操作一个文本框,用于输入文件路径。
一个按钮,后读取文本框中的文件路径,并将文件内容显示在另一个文本框中。
一个按钮,后打开文件对话框,选择一个文件并读取其内容,显示在文本框中。
一个文本框,用于输入要保存的内容。
一个按钮,后将文本框中的内容保存到文件中。
六、图形与绘图在窗体上绘制一个矩形。
在矩形内部绘制一个圆形。
在窗体上绘制一个正弦波形。
在窗体���绘制一个时钟,显示当前时间。
七、数据库操作连接到一个数据库(例如:SQL Server、MySQL等)。
查询数据库中的数据,并将结果显示在数据网格视图中。
插入一条新记录到数据库中。
Word中如何插入文本框和的链接和嵌入

Word中如何插入文本框和的链接和嵌入在Word中,插入文本框和超链接以及嵌入是很常见的操作。
本文将向您介绍如何在Word文档中进行这些操作,以便您可以更好地使用和编辑文档。
一、插入文本框在Word中,文本框可以用来突出显示文本、添加注释、创建标签等。
下面是在Word中插入文本框的步骤:1. 打开Word文档,并定位光标至要插入文本框的位置。
2. 在顶部菜单栏中的“插入”选项卡下,点击“文本框”按钮。
在弹出的菜单中选择一个预设的文本框样式,或者点击“绘制文本框”以自定义文本框的大小和形状。
3. 输入或粘贴您想要添加到文本框中的内容。
二、插入超链接超链接可以用于在文档中引用其他文档、网页或者电子邮件地址等。
以下是插入超链接的步骤:1. 在Word文档中选中您希望添加超链接的文本。
2. 在顶部菜单栏中的“插入”选项卡下,点击“超链接”按钮(也可以使用快捷键Ctrl + K)。
3. 在弹出的“超链接”对话框中,选择“现有文件或网页”或者“在文档中的位置”,然后输入或浏览并选择目标文件、网页或位置。
4. 点击“确定”按钮以完成插入超链接。
三、嵌入对象Word中的嵌入功能可以将其他文件(例如Excel表格、图片等)插入到当前文档中,以便更好地整合和编辑内容。
下面是嵌入对象的步骤:1. 在Word文档中定位光标至要插入对象的位置。
2. 在顶部菜单栏中的“插入”选项卡下,选择“对象”按钮(在“文本”组中)。
3. 在弹出的“对象”对话框中,选择需要嵌入的文件类型(例如Excel电子表格、图片等),然后点击“浏览”按钮选择目标文件。
4. 根据需要,您可以选中“链接到文件”复选框以创建文件之间的链接,或者选择“显示为图标”复选框以显示文件的图标。
5. 点击“确定”按钮以完成对象的嵌入。
通过上述步骤,您可以在Word文档中插入文本框、超链接和嵌入对象。
这些功能可以为您的文档添加更多的交互性和信息展示效果。
希望本文对您有所帮助!。
如何用VC在Word中添加、操作表格

,VC在WORD中加入文本数据;进行word写的VBA宏代码VC++会自动地在WordAutomation.cpp中的CWordAutomationApp::InitInstance()中生成如下的代码,使得COM的服务能有效。
if (!AfxOleInit()){AfxMessageBox(IDP_OLE_INIT_FAILED);return FALSE;}// TODO: Add your command handler code hereCOleVariant vTrue((short)TRUE),vFalse((short)FALSE),vTmp,vOpt((long)DISP_E_PARAMNOTFOUND, VT_ERROR);//创建Word实例_Application oWordApp;if (!oWordApp.CreateDispatch("Word.Application", NULL)){AfxMessageBox("创建失败!", MB_OK | MB_SETFOREGROUND);return;}Range Rng;Table Tbl;Tables Tbls;//创建一个新的word文档Documents oDocs;_Document oDoc;oDocs = oWordApp.GetDocuments();oDoc = oDocs.Add(vOpt, vOpt, vOpt, vOpt);//如果是word 98,则应该带两个参数,如oDocs.Add(vOpt, vOpt)//把文本添加到word文档Selection oSel;oSel = oWordApp.GetSelection();oSel.TypeText("one");oSel.TypeParagraph();oSel.TypeText("two");oSel.TypeParagraph();oSel.TypeText("three");//保存word文档_Document oActiveDoc;oActiveDoc = oWordApp.GetActiveDocument();oActiveDoc.SaveAs(COleVariant("c:\\doc1.doc"),COleVariant((short)0),vFalse, COleVariant(""), vTrue, COleVariant(""),vFalse, vFalse, vFalse, vFalse, vFalse,vFalse,vFalse,vFalse,vFalse,vFalse);//退出word应用程序//oWordApp.Quit(vOpt, vOpt, vOpt);二,用VC在WORD中加入表格;COleVariant vTrue((short)TRUE),vFalse((short)FALSE),vTmp,vOpt((long)DISP_E_PARAMNOTFOUND, VT_ERROR);//创建Word实例_Application WrdApp;if (!WrdApp.CreateDispatch("Word.Application", NULL)){AfxMessageBox("创建失败!", MB_OK | MB_SETFOREGROUND);return;}Documents Docs;_Document Doc;Range Rng;Table Tbl;Tables Tbls;//创建新文档Docs = WrdApp.GetDocuments();Doc = Docs.Add(vOpt, vOpt, vOpt, vOpt);Rng=Doc.GetContent();//{{Tbls=Doc.GetTables(); 必须给这个变量初始化//}}Tbls.Add(Rng,5,5,vOpt,vOpt);/。
C#Aspose.Words数据写入到Word

C#Aspose.Words数据写⼊到Word⼀、通过“域”写⼊数据在Word中,打开【插⼊】选项卡——【⽂档部件】——【域】,在【域】的功能对话框中,可以看到有全部、编号、等式和公式等多种类别,通过选择这些类别,可以使⽤域来进⾏⾃动更新的相关功能。
包括公式计算、变化的时间⽇期、邮件合并等。
除了利⽤上述步骤插⼊域外,也可以按Ctrl+F9⼿⼯输⼊域。
域实际上是Word中的代码,按Shift+F9可以在代码与计算结果之间进⾏切换。
此处不理解也没关系,看下⾯例⼦就可以了。
“《》”并不是⾃⼰⼿动打出来的,要通过⽂本域构建插⼊⽂本域。
(插⼊--->⽂档部件--->域---->选择MergeFileID--->填写域名---->点击保存)按Alt + F9 是这个样⼦的这个“域”可以通过我们后台代码动态的显⽰我们需要的值,⽐如说《Name》想要变成 Name:Ramon ,Title:《Title》变成 Ramon Title ⼆、代码实现1.在实现的同时我们也需要准备好Aspose.Words.dll 破解版可以上⽹找....2.如果不是破解版他会有⽔印和⾃动⽣成的表头和底部信息(商⽤还是⽤正版吧)添加⼀个AsposeWordHelper帮助类using Aspose.Words;using Aspose.Words.Drawing;using System;using System.Collections.Generic;using System.Data;using System.IO;using ;using .Http;using .Http.Headers;namespace WordHelper{/// <summary>/// word⽂档操作辅助类/// </summary>public class AsposeWordHelper{/// <summary>/// Word/// </summary>private Document _doc;private string _tempPath;private SaveFormat _saveFormat;/// <summary>////// </summary>/// <param name="tempPath">模板地址</param>/// <param name="saveFormat">转换后的类型</param>public AsposeWordHelper(string tempPath, SaveFormat saveFormat = SaveFormat.Doc){this._tempPath = tempPath;this._saveFormat = saveFormat;}/// <summary>/// ⽂本域处理泛型集合赋值/// </summary>/// <typeparam name="TEntity"></typeparam>/// <param name="entity"></param>public void Execute<TEntity>(TEntity entity){var type = entity.GetType();var properties = type.GetProperties();List<string> names = new List<string>();List<string> values = new List<string>();foreach (var item in properties){names.Add();values.Add(item.GetValue(entity, null).ToString());}_doc.MailMerge.Execute(names.ToArray(), values.ToArray());}/// <summary>/// ⽂本域处理键值对赋值/// </summary>/// <param name="entity"></param>public void Execute(Dictionary<string, string> entity){List<string> names = new List<string>();List<string> values = new List<string>();foreach (var item in entity)names.Add(item.Key);values.Add(item.Value);}_doc.MailMerge.Execute(names.ToArray(), values.ToArray());}/// <summary>/// 保存/// </summary>/// <param name="filePath"></param>public void Save(string filePath){_doc.Save(filePath, _saveFormat);}/// <summary>/// 基于模版新建Word⽂件/// </summary>/// <param name="path">模板路径</param>public void OpenTempelte(){_doc = new Document(_tempPath);}/// <summary>/// 书签赋值⽤法/// </summary>/// <param name="LabelId">书签名</param>/// <param name="Content">内容</param>public void WriteBookMark(string LabelId, string Content){if (_doc.Range.Bookmarks[LabelId] != null){_doc.Range.Bookmarks[LabelId].Text = Content;}}/// <summary>/// 列表赋值⽤法/// </summary>/// <param name="dt"></param>public void WriteTable(DataTable dt){_doc.MailMerge.ExecuteWithRegions(dt);}/// <summary>/// 不可编辑受保护,需输⼊密码/// </summary>/// <param name="pwd">密码</param>public void NoEdit(string pwd){_doc.Protect(ProtectionType.ReadOnly, pwd);}/// <summary>/// 只读/// </summary>public void ReadOnly(){_doc.Protect(ProtectionType.ReadOnly);}/// <summary>/// 添加图⽚/// </summary>/// <param name="filename">⽂件路径+⽂件名</param>/// <param name="field">⽂本域名</param>/// <param name="width">宽</param>/// <param name="height">⾼</param>public void AddImage(string filename, string field, double width = 70, double height = 70){DocumentBuilder builder = new DocumentBuilder(_doc);Shape shape = new Shape(_doc, ShapeType.Image);shape.ImageData.SetImage(filename);shape.Width = width;//设置宽和⾼shape.Height = height;shape.WrapType = WrapType.None;shape.BehindText = true;builder.MoveToMergeField(field);builder.InsertNode(shape);}/// <summary>/// 通过流导出word⽂件/// </summary>/// <param name="fileName">⽂件名</param>public HttpResponseMessage ExportWord(string fileName){var stream = new MemoryStream();_doc.Save(stream, SaveFormat.Doc);fileName += DateTime.Now.ToString("yyyyMMddHHmmss");HttpResponseMessage result = new HttpResponseMessage(HttpStatusCode.OK);result.Content = new StreamContent(stream);result.Content.Headers.ContentType = new MediaTypeHeaderValue("application/msword");result.Content.Headers.ContentDisposition = new ContentDispositionHeaderValue("attachment"); result.Content.Headers.ContentDisposition.FileName = fileName + ".doc";return result;}/// <summary>/// 通过流导出pdf⽂件/// </summary>/// <param name="fileName">⽂件名</param>public HttpResponseMessage ExportPdf(string fileName){var stream = new MemoryStream();_doc.Save(stream, SaveFormat.Doc);fileName += DateTime.Now.ToString("yyyyMMddHHmmss");HttpResponseMessage result = new HttpResponseMessage(HttpStatusCode.OK);result.Content = new StreamContent(stream);result.Content.Headers.ContentType = new MediaTypeHeaderValue("application/pdf");result.Content.Headers.ContentDisposition = new ContentDispositionHeaderValue("attachment"); result.Content.Headers.ContentDisposition.FileName = fileName + ".pdf";return result;}}}using Aspose.Words;using Model.Model;using System;using System.Collections.Generic;using System.Linq;using System.Text;using System.Threading.Tasks;using WordHelper;namespace WordTest.App{class Program{private static readonly AsposeWordHelper _AsposeWordHelper;static Program() {_AsposeWordHelper = new AsposeWordHelper(@"C:\Users\NING MEI\Desktop\学习\test.docx");}static void Main(string[] args){//键值对_AsposeWordHelper.OpenTempelte(); //打开定义好的模板_AsposeWordHelper.Execute(new Dictionary<string, string>{{ "Name","Ramon"},{ "Title","Ramon Title"},}); //替换域赋值_AsposeWordHelper.ReadOnly();// 可以设为只读_AsposeWordHelper.Save(@"C:\Users\NING MEI\Desktop\学习\1.doc");//保存到哪个路径//泛型_AsposeWordHelper.OpenTempelte(); //打开定义好的模板_AsposeWordHelper.Execute(new ContractModel() {Name = "Ramon",Title = "RamonTitle"}); //替换域赋值_AsposeWordHelper.ReadOnly();// 可以设为只读_AsposeWordHelper.Save(@"C:\Users\NING MEI\Desktop\学习\2.doc");//保存到哪个路径}}}效果代码只是随便的写了下还有很多可以扩展的地⽅的,⼩编就懒得扩展了,这只是⼀个demo。
dsoframe使用方法
开发环境:VS2010DOSFRAMER版本为1.3MS OFFICE2003+SP3最近一直想用VC#2008做个内嵌WORD/OFFICE的WINFORM,目前主要有以下解决途径:1、直接通过API把WORD/OFFICE的窗口句柄给放到WINFORM中(较为复杂);2、通过WEB BROWSER;3、利用DSOFRAMER。
本人都测试了一下,觉得DSOFRAMER更符合自己的愿望,故决定使用DSOFRAMER 来实现。
操作步骤:1、从微软网站下载DsoFramer_KB311765_x86.exe,解开将得到dsoframer.ocx;2、把dsoframer.ocx拷贝到系统目录下,并注册,我是写了一个reg.bat来实现:copy dsoframer.ocx c:\windows\system32\dsoframer.ocxregsvr32.exe c:\windows\system32\dsoframer.ocx3、启动VS2008,新创建一个WINFORM的C#程序;4、在设计工具栏中,新添加选项,在弹出的页面中选择“TAB”页,在com组件下然后浏览,选择c:\windows\system32\dsoframer.ocx进行添加,此时设计工具栏中将看到这个工具,名字为“DSO FRAMER CONTROL OBJECT”;5、拖动此工具到某设计FORM窗口中,此时将在代码文件中添加了以下行:private AxDSOFramer.AxFramerControl axFramerControl1;6、打开文件,this.axFramerControl1.Open(_filePath);//注:_filePath为.doc或者.xls 为后缀的文件;7、此时就可以直接在打开的WORD/EXCEL上进行编辑保存等等操作了。
注:在操作过程中,发现按打印预览按钮后关闭,会引起WORD/EXCEL报错,找了好久,后来直接安装OFFICE2003 SP3,哈哈,fix the bug,不会报错了。
NPOI在word中插入表格合并单元格
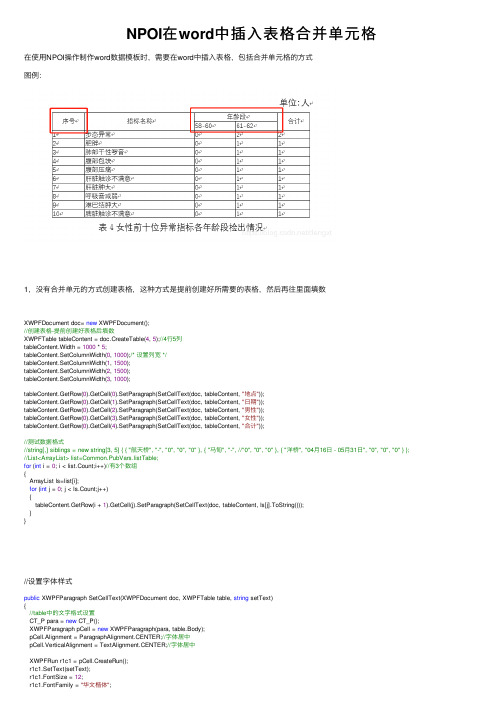
NPOI在word中插⼊表格合并单元格在使⽤NPOI操作制作word数据模板时,需要在word中插⼊表格,包括合并单元格的⽅式图例:1,没有合并单元的⽅式创建表格,这种⽅式是提前创建好所需要的表格,然后再往⾥⾯填数XWPFDocument doc= new XWPFDocument();//创建表格-提前创建好表格后填数XWPFTable tableContent = doc.CreateTable(4, 5);//4⾏5列tableContent.Width = 1000 * 5;tableContent.SetColumnWidth(0, 1000);/* 设置列宽 */tableContent.SetColumnWidth(1, 1500);tableContent.SetColumnWidth(2, 1500);tableContent.SetColumnWidth(3, 1000);tableContent.GetRow(0).GetCell(0).SetParagraph(SetCellText(doc, tableContent, "地点"));tableContent.GetRow(0).GetCell(1).SetParagraph(SetCellText(doc, tableContent, "⽇期"));tableContent.GetRow(0).GetCell(2).SetParagraph(SetCellText(doc, tableContent, "男性"));tableContent.GetRow(0).GetCell(3).SetParagraph(SetCellText(doc, tableContent, "⼥性"));tableContent.GetRow(0).GetCell(4).SetParagraph(SetCellText(doc, tableContent, "合计"));//测试数据格式//string[,] siblings = new string[3, 5] { { "航天桥", "-", "0", "0", "0" }, { "马甸", "-", //"0", "0", "0" }, { "洋桥", "04⽉16⽇ - 05⽉31⽇", "0", "0", "0" } }; //List<ArrayList> list=Common.PubVars.listTable;for (int i = 0; i < list.Count;i++)//有3个数组{ArrayList ls=list[i];for (int j = 0; j < ls.Count;j++){tableContent.GetRow(i + 1).GetCell(j).SetParagraph(SetCellText(doc, tableContent, ls[j].ToString()));}}//设置字体样式public XWPFParagraph SetCellText(XWPFDocument doc, XWPFTable table, string setText){//table中的⽂字格式设置CT_P para = new CT_P();XWPFParagraph pCell = new XWPFParagraph(para, table.Body);pCell.Alignment = ParagraphAlignment.CENTER;//字体居中pCell.VerticalAlignment = TextAlignment.CENTER;//字体居中XWPFRun r1c1 = pCell.CreateRun();r1c1.SetText(setText);r1c1.FontSize = 12;r1c1.FontFamily = "华⽂楷体";//r1c1.SetTextPosition(20);//设置⾼度return pCell;}2,合并单元格的⽅式,这种⽅式需要⼀⾏⼀⾏的创建并操作合并,填⼊数据,//数据样例//string[,] siblings = new string[10, 7] {//{ "1", "test1", "0", "0", "0","0","0" },//{ "2", "test2", "0", "0", "0","0", "0" },//{ "3", "test3", "0", "0", "0","0", "0"},//{ "4", "test4", "0", "0", "0","0", "0"},//{ "5", "test5", "0", "0", "0","0", "0"},//{ "6", "test6", "0", "0", "0","0", "0"},//{ "7", "test7", "0", "0", "0","0", "0"},//{ "8", "test8", "0", "0", "0","0", "0"},//{ "9", "test9", "0", "0", "0","0", "0"},//{ "10","test10", "0", "0", "0","0", "0"},//};List<ArrayList> listYcTable=new List<ArrayList>();int rows = list.Count;int col = 0;foreach (ArrayList al in list){col = al.Count;//列数}//创建表格XWPFTable table = doc.CreateTable(1, col);//思路,数据⼀⾏⼀⾏画table.RemoveRow(0);//去掉第⼀⾏空⽩的table.Width = 1000 * 5;table.SetColumnWidth(0, 300);/* 设置列宽 */table.SetColumnWidth(1, 1200);for (int i = 0; i < col - 3; i++){table.SetColumnWidth(2 + i, 800);/* 设置列宽 */}table.SetColumnWidth(col - 1, 700);CT_Row nr = new CT_Row();XWPFTableRow mr = new XWPFTableRow(nr, table);//创建⾏table.AddRow(mr);//将⾏添加到table中XWPFTableCell c1 = mr.CreateCell();//创建单元格CT_Tc ct = c1.GetCTTc();CT_TcPr cp = ct.AddNewTcPr();//第1⾏cp.AddNewVMerge().val = ST_Merge.restart;//合并⾏cp.AddNewVAlign().val = ST_VerticalJc.center;//垂直ct.GetPList()[0].AddNewPPr().AddNewJc().val = ST_Jc.center;ct.GetPList()[0].AddNewR().AddNewT().Value = "序号";c1 = mr.CreateCell();//创建单元格ct = c1.GetCTTc();cp = ct.AddNewTcPr();cp.AddNewVMerge().val = ST_Merge.restart;//合并⾏cp.AddNewVAlign().val = ST_VerticalJc.center;//垂直ct.GetPList()[0].AddNewPPr().AddNewJc().val = ST_Jc.center;ct.GetPList()[0].AddNewR().AddNewT().Value = "指标名称";c1 = mr.CreateCell();//创建单元格ct = c1.GetCTTc();cp = ct.AddNewTcPr();cp.gridSpan = new CT_DecimalNumber();cp.gridSpan.val = Convert.ToString(col - 3); //合并列cp.AddNewVAlign().val = ST_VerticalJc.center;ct.GetPList()[0].AddNewPPr().AddNewJc().val = ST_Jc.center;//单元格内容居中显⽰ct.GetPList()[0].AddNewR().AddNewT().Value = "年龄段";c1 = mr.CreateCell();//创建单元格ct = c1.GetCTTc();cp = ct.AddNewTcPr();cp.AddNewVMerge().val = ST_Merge.restart;//合并⾏cp.AddNewVAlign().val = ST_VerticalJc.center;//垂直ct.GetPList()[0].AddNewPPr().AddNewJc().val = ST_Jc.center;ct.GetPList()[0].AddNewR().AddNewT().Value = "合计";//=====第⼀⾏表头结束=========//2⾏,多⾏合并类似nr = new CT_Row();mr = new XWPFTableRow(nr, table);table.AddRow(mr);c1 = mr.CreateCell();//创建单元格ct = c1.GetCTTc();cp = ct.AddNewTcPr();cp.AddNewVMerge().val = ST_Merge.@continue;//合并⾏序号c1 = mr.CreateCell();//创建单元格ct = c1.GetCTTc();cp = ct.AddNewTcPr();cp.AddNewVMerge().val = ST_Merge.@continue;//合并⾏指标名称//年龄段分组//["20岁以下","21-30","31-40","41-50","51-60","70岁以上"]ArrayList alAge = Common.PubVars.ageGroup;//年龄段数组for (int i = 0; i < alAge.Count; i++){mr.CreateCell().SetText(Convert.ToString(alAge[i]));//年龄段单元格}c1 = mr.CreateCell();//创建单元格ct = c1.GetCTTc();cp = ct.AddNewTcPr();cp.AddNewVMerge().val = ST_Merge.@continue;//合并⾏合计//====第⼆⾏要合并的for (int i = 0; i < list.Count; i++){//创建⼀⾏nr = new CT_Row();mr = new XWPFTableRow(nr, table);table.AddRow(mr);for (int j = 0; j < list[i].Count; j++){//每⼀⾏创建对应的数据mr.CreateCell().SetText(list[i][j].ToString());// table.GetRow(i + 1).GetCell(j).SetParagraph(SetCellText(doc, table, list[i][j].ToString())); }}合并单元格有跨列合并,和跨⾏分部,两个关键点:跨列合并cp.gridSpan = new CT_DecimalNumber();//实例化数字必须cp.gridSpan.val = “3”; //合并列合并3列跨⾏合并cp.AddNewVMerge().val = ST_Merge.restart;//合并⾏--开始⾏cp.AddNewVMerge().val = ST_Merge.@continue;//合并⾏--到合并⾏//合并的单元格--边创建边合并。
winform显示word和ppt文档
winform显⽰word和ppt⽂档最近所做的项⽬中需要在Winform窗体中显⽰Office⽂档。
刚开始就使⽤webBrowser控件实现的,但是后来发现这个控件在显⽰Office⽂档的时候有个限制:只⽀持Office2003之前的版本,之后的版本都有问题。
在⽹上也有很多⼈遇到这个问题,找了好久的解决⽅案都没有找到,后来在⼀个⽹站上⾯找到了⼀个第三⽅的控件,可以很好的⽀持这个功能,就是Dsoframer(可以从⽹上找到关于Dsoframer的使⽤说明,⾥⾯有很详细介绍它的⽅法和属性)操作步骤:1.需要从⽹站下载dsoframer.ocx⽂件2.把dsoframer.ocx⽂件复制到c:\windows\system32⽬录下开始->运⾏->regsvr32 dsoframer.ocx , 系统会提⽰DSOFramer.ocx中的DllRegisterServer成功。
3.在VS中新建项⽬,添加引⽤4.将该控件加载到⼯具箱中(添加新选项)5.将控件拖到窗体中打开⽂件:this.axFramerControl1.Open(“⽂档地址”); //office的相关⽂档注:此Dsoframer控制还有很多其它很好的⽅法和功能,可以去下载⼀个Dsoframer的使⽤接⼝说明⽂档------------------------------------------------------------------------------------------------------------------------------------------------doc pdf ppt与 txt之间的转换:组件的作⽤⼀般是将⽂件读出成字符格式,并不是单纯的转换⽂件名后缀,所以需要将读出的东西写⼊txt⽂件。
添加office引⽤.net中对office中的word及ppt进⾏编程时,确保安装office时已经安装了word,ppt可编程组件(⾃定义安装时可查看)或者安装“Microsoft Office 2003 Primary Interop Assemblies”安装后,在编程页⾯添加引⽤:添加引⽤-com—microsoft powerpoint object 11.0 libaray/word 11.0 object library;还得添加office组件using Microsoft.Office.Interop.Word;using Microsoft.Office.Interop.PowerPoint;using org.pdfbox.pdmodel;using org.pdfbox.util;using Microsoft.Office.Interop.Word;using Microsoft.Office.Interop.PowerPoint;public void pdf2txt(FileInfo file,FileInfo txtfile){PDDocument doc = PDDocument.load(file.FullName);PDFTextStripper pdfStripper = new PDFTextStripper();string text = pdfStripper.getText(doc);StreamWriter swPdfChange = new StreamWriter(txtfile.FullName, false, Encoding.GetEncoding("gb2312"));swPdfChange.Write(text);swPdfChange.Close();}对于doc⽂件中的表格,读出的结果是去除掉了⽹格线,内容按⾏读取。
如何将EXCEL、WORD嵌入软件操作界面

如何将EXCEL、WORD嵌入软件操作界面利用Delphi和Office结合开发主要有以下三种方法:
(1) 通过Delphi的控件TOleContainer 将Office嵌入,这是最简单的Ole嵌入,能够直接将Office文档调用,只需要使用ToleContainer.Run就可以将Office文档直接启动。
且这样启动的Office文档与Delphi程序是一个整体(从界面上看),但是它存在不可克服的缺点,即不能通过Delphi控制Office文档,也就不能实现将灵活操纵Office的目的。
(2) 使用Delphi提供的Servers控件调用Office,使用Office的属性,使用Delphi的Servers控件来操纵Office,在编程时Delphi 能够实现代码提示,总体上看能够较好的实现Delphi对Office的控制,但是还有一些Office的功能不能在Delphi中调用(比如自己编写的VBA宏代码)。
且实现功能时本来在VBA代码中可选择参数在Delphi调用的时候必须添加,否则,连编译都不能通过。
这种方式启动的Office与Delphi程序分属两个窗体。
(3) 使用CreateOleObject将启动Office,然后以Ole方式对Office进行控制。
这种办法是使用以CreateOleObjects方式调用Office,实际上还是Ole,但是这种方式能够真正做到完全控制Office 文件,能够使用Office的所有属性,包括自己编写的VBA宏代码。
与Servers控件和Com技术相比,本方法能够真正地使用Office的各种属性,和在VBA中编写自己的代码基本一样,可以缺省的代码也不需要使用。
C#winform嵌入Excel和word
C#winform嵌入 Excel和 word
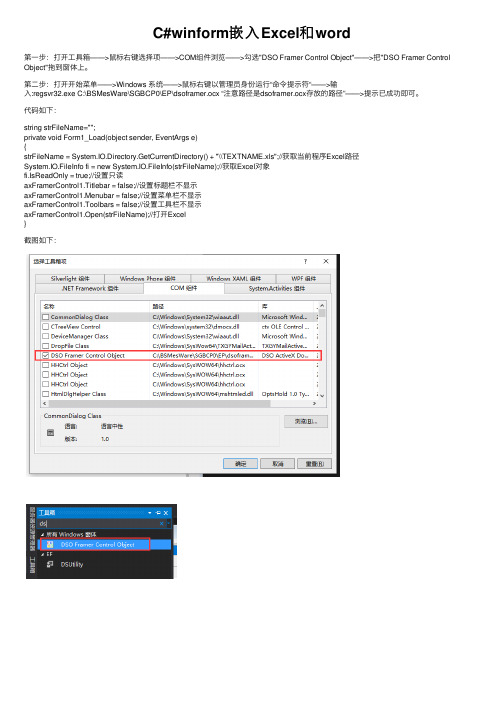
第一步:打开工具箱——>鼠标右键选择项——>COM组件浏览——>勾选"DSO Framer Control Object"——>把"DSO Framer Control Object"拖到窗体上。
第二步:打开开始菜单——>Windows 系统—ห้องสมุดไป่ตู้>鼠标右键以管理员身份运行“命令提示符“——>输 入:regsvr32.exe C:\BSMesWare\SGBCP0\EP\dsoframer.ocx “注意路径是dsoframer.ocx存放的路径”——>提示已成功即可。
代码如下:
string strFileName=""; private void Form1_Load(object sender, EventArgs e) { strFileName = System.IO.Directory.GetCurrentDirectory() + "\\TEXTNAME.xls";//获取当前程序Excel路径 System.IO.FileInfo fi = new System.IO.FileInfo(strFileName);//获取Excel对象 fi.IsReadOnly = true;//设置只读 axFramerControl1.Titlebar = false;//设置标题栏不显示 axFramerControl1.Menubar = false;//设置菜单栏不显示 axFramerControl1.Toolbars = false;//设置工具栏不显示 axFramerControl1.Open(strFileName);//打开Excel }
C#将exe运行程序嵌入到自己的winform窗体中
C#将exe运行程序嵌入到自己的winform窗体中using System;using System.Collections.Generic;using ponentModel;using System.Data;using System.Drawing;using System.Text;using System.Windows.Forms;using System.Diagnostics;using System.Runtime.InteropServices;namespace WindowsTest{public partial class Form2 : Form{Process process = null;IntPtr appWin;private string exeName = '';[DllImport('user32.dll', EntryPoint = 'GetWindowThreadProcessId', SetLastError = true,CharSet = CharSet.Unicode, ExactSpelling = true,CallingConvention = CallingConvention.StdCall)]private static extern long GetWindowThreadProcessId(long hWnd, long lpdwProcessId);[DllImport('user32.dll', SetLastError = true)]private static extern IntPtr FindWindow(string lpClassName, string lpWindowName);[DllImport('user32.dll', SetLastError = true)]private static extern long SetParent(IntPtr hWndChild, IntPtr hWndNewParent);[DllImport('user32.dll', EntryPoint = 'GetWindowLongA', SetLastError = true)]private static extern long GetWindowLong(IntPtr hwnd, int nIndex);[DllImport('user32.dll', EntryPoint = 'SetWindowLongA', SetLastError = true)]private static extern long SetWindowLong(IntPtr hwnd, int nIndex, long dwNewLong);//private static extern int SetWindowLong(IntPtr hWnd, int nIndex, IntPtr dwNewLong);[DllImport('user32.dll', SetLastError = true)]private static extern long SetWindowPos(IntPtr hwnd, long hWndInsertAfter, long x, long y, long cx, long cy, long wFlags);[DllImport('user32.dll', SetLastError = true)]private static extern bool MoveWindow(IntPtr hwnd, int x, int y, int cx, int cy, bool repaint);[DllImport('user32.dll', EntryPoint = 'PostMessageA', SetLastError = true)]private static extern bool PostMessage(IntPtr hwnd, uint Msg, long wParam, long lParam);private const int SWP_NOOWNERZORDER = 0x200;private const int SWP_NOREDRAW = 0x8;private const int SWP_NOZORDER = 0x4;private const int SWP_SHOWWINDOW = 0x0040;private const int WS_EX_MDICHILD = 0x40;private const int SWP_FRAMECHANGED = 0x20;private const int SWP_NOACTIVATE = 0x10;private const int SWP_ASYNCWINDOWPOS = 0x4000;private const int SWP_NOMOVE = 0x2;private const int SWP_NOSIZE = 0x1;private const int GWL_STYLE = (-16);private const int WS_VISIBLE = 0x10000000;private const int WM_CLOSE = 0x10;private const int WS_CHILD = 0x40000000;public string ExeName{get{return exeName;}set{exeName = value;}}public Form2(){InitializeComponent();}private void button1_Click(object sender, EventArgs e){this.exeName = @'D:\Program Files\Microsoft Office\OFFICE11\WINWORD.exe';try{// Start the processprocess = System.Diagnostics.Process.Start(this.exeName);// Wait for process to be created and enter idle conditionprocess.WaitForInputIdle();// Get the main handleappWin = process.MainWindowHandle;}catch (Exception ex){MessageBox.Show(this, ex.Message, 'Error');}// Put it into this formSetParent(appWin, this.Handle);// Remove border and whatnot// SetWindowLong(appWin, GWL_STYLE, WS_VISIBLE);// Move the window to overlay it on this windowMoveWindow(appWin, 0, 0, this.Width, this.Height, true);}private void Form2_FormClosed(object sender, FormClosedEventArgs e){try{process.Kill();}catch { }}private void Form2_Resize(object sender, EventArgs e){if (this.appWin != IntPtr.Zero){MoveWindow(appWin, 0, 0, this.Width, this.Height, true);}//base.OnResize(e);}} }。
winform嵌入word解决方案一

winform嵌⼊word解决⽅案⼀最近⼀直想⽤VC#2005做个内嵌WORD/OFFICE的WINFORM程序,⽬前主要有以下解决途径:1、直接通过API把WORD/OFFICE的窗⼝句柄给放到WINFORM中(感觉较为复杂);2、通过WEB BROWSER;3、利⽤DSOFRAMER。
本⼈都测试了⼀下,觉得DSOFRAMER更符合⾃⼰的愿望,故决定使⽤DSOFRAMER来实现。
操作步骤:1、从微软⽹站下载DsoFramer_KB311765_x86.exe,解开将得到dsoframer.ocx;2、把dsoframer.ocx拷贝到系统⽬录下,并注册,我是写了⼀个reg.bat来实现:copy dsoframer.ocx c:\windows\system32\dsoframer.ocxregsvr32.exe c:\windows\system32\dsoframer.ocx3、启动VS2005,新创建⼀个WINFORM的C#程序;4、在设计⼯具栏中,新添加选项,在弹出的页⾯中选择“TAB”页,然后浏览,选择c:\windows\system32\dsoframer.ocx进⾏添加,此时设计⼯具栏中将看到这个⼯具,名字为“DSO FRAMER CONTROL OBJECT”;5、拖动此⼯具到某设计FORM窗⼝中,此时将在代码⽂件中添加了以下⾏:private AxDSOFramer.AxFramerControl axFramerControl1;6、打开⽂件,this.axFramerControl1.Open(_filePath);//注:_filePath为.doc或者.xls为后缀的⽂件;7、此时就可以直接在打开的WORD/EXCEL上进⾏编辑保存等等操作了。
注:在操作过程中,发现按打印预览按钮后关闭,会引起WORD/EXCEL报错,找了好久,后来直接安装OFFICE2003 SP3,哈哈,fix the bug,不会报错了。
【转载】C#winform操作excel(打开、内嵌)
【转载】C#winform操作excel(打开、内嵌)本⽂转载⾃静待〃花落说明:显⽰的excel是利⽤模板创建的using System;using System.Collections.Generic;using ponentModel;using System.Data;using System.Drawing;using System.Text;using System.Windows.Forms;//*************************************************// 先要添加对Excel的引⽤。
选择项⽬-〉添加引⽤-〉COM-〉添加Microsoft Excel 9.0。
(不同的office讲会有不同版本的dll⽂件)。
//*************************************************using Excel;using System.Reflection; // For Missing.Value and BindingFlagsusing System.Runtime.InteropServices; // For COMExceptionnamespace ExcelTest{public partial class Form1 : Form{public Form1(){InitializeComponent();}//外部操作private void button1_Click(object sender, EventArgs e){string path = System.Reflection.Assembly.GetExecutingAssembly().Location;path = path.Substring(0, stIndexOf('\\'));//创建Excel对象Excel.Application ExcelApp = new Excel.Application();//新建⼯作簿//Excel.Workbook ExcelWb = ExcelApp.Workbooks.Add(true);Excel.Workbook ExcelWb = ExcelApp.Workbooks.Add(path + "\\TestExcel");//新建⼯作表Excel.Worksheet ExcelWs = ExcelWb.ActiveSheet as Excel.Worksheet;Excel.Range ExcelRange = ExcelWs.Cells;//ExcelRange.Cells.Clear();ExcelRange.Cells.set_Item(1, 6, "2010-03-03");ExcelRange.Cells.set_Item(1, 21, "9:30");ExcelRange.Cells.set_Item(1, 38, "会议室");ExcelRange.Cells.set_Item(2, 7, "王三");ExcelRange.Cells.set_Item(3, 7, "全体⼈员");ExcelRange.Cells.set_Item(5, 1, "关于作息制度的新安排");ExcelApp.Visible = true;}private void button2_Click(object sender, EventArgs e){}//内嵌操作private void button3_Click(object sender, EventArgs e){//-------------------------------------------------------------------------------// 1、右击⼯具箱,选择⾃定义⼯具箱,添加COM组件,选择“Microsoft Web 浏览器”(对应⽂件是\winnt\system32\shdocvw.dll),确定。
Winform开发框架中的内容及文档管理模块功能介绍
Winform开发框架中的内容及⽂档管理模块功能介绍在开发项⽬的时候,我们有⼀些场景需要编辑⼀些HTML⽂档,作为内容发布系统的⼀部分,有时候也需要对⼀些⽂档如WORD⽂档进⾏编辑管理,这样需要我们对这些内容及⽂档进⾏合适的管理。
本⽂主要介绍在WInform项⽬中利⽤ZetaHtmlEditControl进⾏HTML内容管理,以及利⽤TX TextControl控件进⾏WORD⽂档管理,这两⽅⾯都是我们⼀般进⾏内容和⽂档管理所必须的。
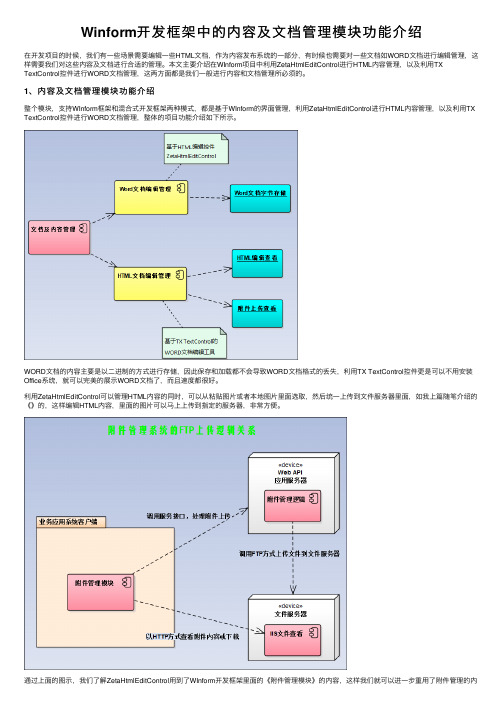
1、内容及⽂档管理模块功能介绍整个模块,⽀持WInform框架和混合式开发框架两种模式,都是基于WInform的界⾯管理,利⽤ZetaHtmlEditControl进⾏HTML内容管理,以及利⽤TX TextControl控件进⾏WORD⽂档管理,整体的项⽬功能介绍如下所⽰。
WORD⽂档的内容主要是以⼆进制的⽅式进⾏存储,因此保存和加载都不会导致WORD⽂档格式的丢失,利⽤TX TextControl控件更是可以不⽤安装Office系统,就可以完美的展⽰WORD⽂档了,⽽且速度都很好。
利⽤ZetaHtmlEditControl可以管理HTML内容的同时,可以从粘贴图⽚或者本地图⽚⾥⾯选取,然后统⼀上传到⽂件服务器⾥⾯,如我上篇随笔介绍的《》的,这样编辑HTML内容,⾥⾯的图⽚可以马上上传到指定的服务器,⾮常⽅便。
通过上⾯的图⽰,我们了解ZetaHtmlEditControl⽤到了WInform开发框架⾥⾯的《附件管理模块》的内容,这样我们就可以进⼀步重⽤了附件管理的内容了。
TX Text Control是⼀款功能类似于 MS Word 的⽂字处理控件,包括⽂档创建、编辑、打印、邮件合并、格式转换、拆分合并、导⼊导出、批量⽣成等功能。
⼴泛应⽤于企业⽂档管理,⽹站内容发布,电⼦病历中病案模板创建、病历书写、修改历史、连续打印、病案归档等功能的实现。
这个控件主要的功能就是可以作为Word以及其他⽂档的编辑器使⽤,整体展⽰的效果⾮常贴近原⽣WORD的展⽰,是⼀款⾮常不错的控件套件。
利用Aspose.Word控件实现Word文档的操作
利⽤Aspose.Word控件实现Word⽂档的操作Aspose系列的控件,功能都挺好,之前⼀直在我的Winform开发框架中⽤Aspose.Cell来做报表输出,可以实现多样化的报表设计及输出,由于⼀般输出的内容⽐较正规化或者多数是表格居多,所以⼀般使⽤Aspose.Cell来实现我想要的各种Excel报表输出。
虽然⼀直也知道Aspose.Word是⽤来⽣成Word⽂档的,⽽且深信其也是⼀个很强⼤的控件,但⼀直没⽤⽤到,所以就不是很熟悉。
偶然⼀次机会,⼀个项⽬的报表功能指定需要导出为Word⽂档,因此寻找了很多篇⽂章,不过多数介绍的⽐较简单⼀点,于是也参考了官⽅的帮助介绍,终于满⾜了客户的需求。
下⾯我由浅⼊深来介绍这个控件在实际业务中的使⽤过程吧。
1、⼆维表格的Word操作⽇常中,常见的内容输出就是⼆维表格的⽅式,表头⽐较固定,内容每⾏⼀条,那么在实际的使⽤控件我们该如何操作呢,其实这个控件这⽅⾯介绍的⽂章很多,参考⼀下就能做出来了。
其实介绍这个就是要说明书签的重要性,这个在Aspose.Cell控件也是如此,书签除了可以⽤来替换内容,还可以⽤来标记内容输⼊的开始位置等等功能。
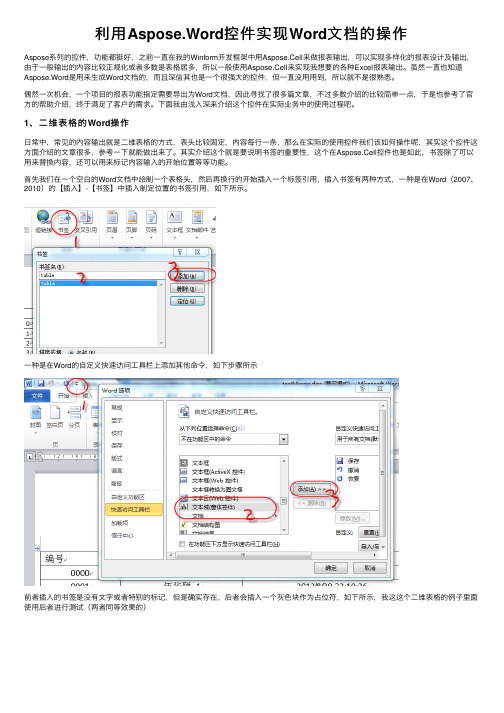
⾸先我们在⼀个空⽩的Word⽂档中绘制⼀个表格头,然后再换⾏的开始插⼊⼀个标签引⽤,插⼊书签有两种⽅式,⼀种是在Word(2007、2010)的【插⼊】-【书签】中插⼊制定位置的书签引⽤,如下所⽰。
⼀种是在Word的⾃定义快速访问⼯具栏上添加其他命令,如下步骤所⽰前者插⼊的书签是没有⽂字或者特别的标记,但是确实存在,后者会插⼊⼀个灰⾊块作为占位符,如下所⽰,我这这个⼆维表格的例⼦⾥⾯使⽤后者进⾏测试(两者同等效果的)这样设计好Word模板后,下⼀步就是如何利⽤代码⽣成⼆维表格了。
⾸先这⾥提⽰⼀下,就是我故意设置了每个表格单元格的宽度不同,所以也就要求⽣成的⾏要和头部对应,所以表格⽣成每⾏之前,肯定要获得对应列的样式属性的,否则就会对应不上了。
【C#】操作word【Aspose.Words】

【C#】操作word【Aspose.Words】上图是要填充的word模板,就是⼀个接⼝说明⽂档。
那个像书名号括起来的东西就是要替换的,这个东西并不是键盘输⼊的书名号,它是⽂档部件的⼀种,要插⼊这个东西需要:打开模板word⽂件,⽤office打开,点击插⼊,找到下⾯的⽂档部件在点开后弹出的下拉菜单⾥选择域在弹出的窗⼝⾥,选择类别邮件合并域名选择MergeFied最后输⼊如Cvouchname的字样。
这样我们就添加好了⼀个域了。
对表格的处理,表格的循环体要这样写<TableStart:headList>表⽰循环的开始 headList是填充表格的DataTable的名称。
<TableEnd:headList>也必须写。
表格⾥⾯的 EnField就是⾃⼰定义的headList的列名,这个域名和headList的列名相同就会渲染到⽂档域名处。
做好这些模板就准备好了。
代码部分:先使⽤nuget 安装 Aspose.Words这个组件,没有nuget可以百度Aspose.Words。
//模板⾥的域String[] fieldNames = new String[] { "Cvouchname", "Cvouchtype", "BusinessScene", "Cvouchname1","JsonStr" };var doc = new Document(tempPath);//tempPath为模板路径//与fieldNames对应的值Object[] fieldValues = new object[5];//渲染⽂档doc.MailMerge.Execute(fieldNames, fieldValues);表格部分是这样://表格名称表格列要和⽂档模板⾥的⼀样DataTable headTable = new DataTable("headList"); headTable.Columns.Add("EnField");headTable.Columns.Add("ChinaField"); headTable.Columns.Add("FieldMark");headTable.Columns.Add("IsMust");headTable.Columns.Add("IDNum");表格的数据⾃⼰填充好。
- 1、下载文档前请自行甄别文档内容的完整性,平台不提供额外的编辑、内容补充、找答案等附加服务。
- 2、"仅部分预览"的文档,不可在线预览部分如存在完整性等问题,可反馈申请退款(可完整预览的文档不适用该条件!)。
- 3、如文档侵犯您的权益,请联系客服反馈,我们会尽快为您处理(人工客服工作时间:9:00-18:30)。
public static string filename = null;
private static bool deactivateevents = false;
/// <summary>iable
int Y, // vertical position
int cx, // width
int cy, // height
uint uFlags // window-positioning options
[DllImport("user32.dll")]
public static extern IntPtr PostMessage(
int hWnd,
int msg,
int wParam,
int lParam
);
*/
/// <summary>
);
[DllImport("user32.dll", EntryPoint="MoveWindow")]
static extern bool MoveWindow(
int hWnd,
int X,
int Y,
int nWidth,
Int32 hMenu,
Int32 nPosition,
Int32 wFlags
);
private const int MF_BYPOSITION = 0x400;
private const int MF_REMOVE = 0x1000;
const int SWP_DRAWFRAME = 0x20;
/// so you can preload Word.
/// </summary>
public void PreActivate()
{
if(wd == null) wd = new Word.ApplicationClass();
}
/// <summary>
const int SWP_NOMOVE = 0x2;
const int SWP_NOSIZE = 0x1;
const int SWP_NOZORDER = 0x4;
#endregion
/* I was testing wheater i could fix some exploid bugs or not.
/// Change. Made the following variables public.
/// </summary>
public Word.Document document;
public static Word.ApplicationClass wd = null;
/*
* this code is to reopen Word.
*/
try
{
deactivateevents = true;
object dummy=null;
object dummy2=(object)false;
document.Close(ref dummy, ref dummy, ref dummy);
components.Dispose();
}
base.Dispose( disposing );
}
#region Component Designer generated code
/// <summary>
/// !do not alter this code! It's designer code
);
[DllImport("user32.dll", EntryPoint="GetMenuItemCount")]
static extern Int32 GetMenuItemCount(
Int32 hMenu
);
[DllImport("user32.dll", EntryPoint="GetSystemMenu")]
static extern bool SetWindowPos(
int hWnd, // handle to window
int hWndInsertAfter, // placement-order handle
int X, // horizontal position
{
/// <summary>
/// WinWordControl allows you to load doc-Files to your
/// own application without any loss, because it uses
/// the real WinWord.
/// cleanup Ressources
/// </summary>
protected override void Dispose( bool disposing )
{
CloseControl();
if( disposing )
{
if( components != null )
/// Code was received from: /cs/miscctrl/winwordcontrol.asp
///
/// you can use it free of charge, but please
/// mention my name ;)
/// </summary>
private void InitializeComponent()
{
//
// WinWordControl
//
= "WinWordControl";
this.Size = new System.Drawing.Size(440, 336);
/// </summary>
private ponentModel.Container components = null;
public WinWordControl()
{
InitializeComponent();
}
/// <summary>
/// Close the current Document in the control --> you can
/// load a new one with LoadDocument
/// </summary>
public void CloseControl()
{
static extern Int32 GetSystemMenu(
Int32 hWnd,
bool 燽Revert
);
[DllImport("user32.dll", EntryPoint="RemoveMenu")]
static extern Int32 RemoveMenu(
// Change the line below.
wd.Quit(ref dummy2, ref dummy, ref dummy);
deactivateevents = false;
}
catch(Exception ex)
{
String strErr = ex.Message;
}
}
/// <summary>
/// catches Word's close event
using ponentModel;
using System.Drawing;
using System.Data;
using System.Windows.Forms;
using System.Runtime.InteropServices;
namespace WinWordControl
int nHeight,
bool bRepaint
);
[DllImport("user32.dll", EntryPoint="DrawMenuBar")]
static extern Int32 DrawMenuBar(
Int32 hWnd
* I left this stuff in here for people who need to know how to
* interface the Win32-API
[StructLayout(LayoutKind.Sequential)]
public struct RECT
this.Resize += new System.EventHandler(this.OnResize);
}
#endregion
/// <summary>
/// Preactivation
/// It's usefull, if you need more speed in the main Program
[DllImport("user32.dll")]
static extern int SetParent( int hWndChild, int hWndNewParent);
