xDVR服务端快速使用手册
虚拟现实VR系统开发软件使用说明书V1.0概要

第一章系统概述1.1 系统介绍“虚拟现实VR系统开发软件”是基于客户/服务器模式,其中服务器提供VR文件及支持资源客户通过网络下载希望访问的文件,并通过本地平台上的VR 浏览器交互式访问该文件描述的虚拟境界。
因为浏览器是本地平台提供的,从而实现了和硬件平台的无关性。
VR象HTML一样,是一种ASCII码描述语言,它是一套告诉浏览器如何创建一个三维世界并在其中航行的指令,这些指令由再现器解释执行,再现器是一个内置于浏览器中或外部的程序。
由于VR是一个三维造型和渲染的图形描述性语言,复杂的3D术语转换为动态虚拟世界是高速的硬件和浏览器,又由于其交互性强和跨平台性,使虚拟现实在Internet上有着广泛的应用,例如远程教育、商业宣传等等。
为此本公司研发出“基于VR的虚拟模型软件”,从用户的角度来说,基本上是HTML加上第三维,但从开发者角度来说, VR环境的产生提供了一套完全的新标准,新过程以及新的Web 技术。
交叉平台和浏览器的兼容性是首先要解决的问题。
设计之前,必须明确指定目标平台(PC、 Mac、SGI的新O2等等), CPU 速度、可以运行的带宽以及最适合使用的VR浏览器。
1.2系统功能概述1.建模“虚拟现实VR系统开发软件”的建造概念和其他工程建模概念相似,必须解决交流的问题,画出草图并研究材质的处理,生成模型、空间、化身,但必须考虑一些技术的限制,如,考虑到目标平台,决定在VR文件中放入多少多边图形;预先考虑到虚拟现实VR系统开发软件执行的动作,把相应的目标归类,用于设定三维物体之间的相互联系,建模与动画相互配合,如果归类正确合适,就会缩小生成动画效果之后文件的体积。
虚拟现实的设计中必须考虑加入重力和碰撞的效果,以使虚拟现实的场景和生活中的相似。
建模者需要生成代理几何模块(一系列的调用指令),其作用在于是浏览器在虚拟现实场景中只需监测一个很小的子目标,而无须计算虚拟场景中所有目标的重力和碰撞效果,最大限度的减少浏览器的工作量,并改善VR的演示效果。
X-Ray操作培训

1.样品载盘 2.载盘滑轨 3.影像接收器 4.真空系统 5.X-Ray射线发射管 6.固定支架
开关机顺序
开机顺序
1.把主控开关从电源正常关闭的‘O’位置转到 ‘I’位置开启电源; 2.插入钥匙并将钥匙开关转到X-RAY enable 位置, 并按下绿色power ON 按钮
开关机顺序
开机顺序
1主控电脑首先按照正常的WINDOWS 启动顺序开机,接着启动Dage
开启X 开启 - RAY射线 射线
1设定X-Ray射线电压及功率 2再单击X-ray 开启按钮 (1)开启X-ray射线前应注意真空值是否正常 (2)开始检测前应注意设定值与实际值是否相符,以及处理进度指示灯是 否为绿色 3满足以上几点方可开始检测
预览导航视图
1自动扫描生成预览导航视图 2在X-Ray 开启后,选择<Board Image>选项 3点击下方的扫描方式按钮Scan board或Scan full 4生成预览导航图后,在导航图上可用鼠标左键双击需检测区域,此时影 像会显示在刚才所点
倾斜检测
1从不同的角度查看PCB 板,可以更加详细的检查PCB 板缺陷。倾斜控制 按钮可以让操 2 在中等的放大率状态下选择所欲检测之点,并用Set Height 按钮来定位 检测点的高度 3用鼠标左键单击倾斜控制按钮 4单击倾斜控制按钮中的任意一点,红色X 符号将移到当前点,同时影像 接收器也移动到相应的位置。单击倾斜控制按钮周边上的任何一点, 影像接收器会移动到以最大的角度检查PCB 板,单击中心的红点,相 机将移回到PCB 板的正上方。
1在X 射线关闭状态,单击开门按钮开启内置安全门锁,打开前门 2等待载物托板移至装卸位置后打开前门 3将PCB 放在载物板的左下角,距离载物板的左下边边缘各约20mm 4关上前门,载物托板回归固定位置 5打开X-ray,即可进行检测 6检测完成后,关闭X-ray射线,点击开门按钮,载物托板回归固定位置,即 可取出PCB. 7注意样品高度不得为50 mm.
VR快捷键与vr命令说明

VR快捷键与vr命令说明VR快捷键与vr命令说明VR快捷键F1 ..................帮助F2 ..................加亮所选物体的面(开关)F3 ..................线框显示(开关)/光滑加亮F4 ..................在透视图中线框显示(开关)F5 ..................约束到X轴F6 ..................约束到Y轴F7 ..................约束到Z轴F8 ..................约束到XY/YZ/ZX平面(切换)F9 ..................用前一次的配置进行渲染(渲染先前渲染过的那个视图)F10 .................打开渲染菜单F11 .................打开脚本编辑器F12 .................打开移动/旋转/缩放等精确数据输入对话框` ...................刷新所有视图1 ...................进入物体层级1层2 ...................进入物体层级2层3 ...................进入物体层级3层4 ...................进入物体层级4层Shift + 4 ...........进入有指向性灯光视图5 ...................进入物体层级5层Alt + 6 .............显示/隐藏主工具栏7 ...................计算选择的多边形的面数(开关)8 ...................打开环境效果编辑框9 ...................打开高级灯光效果编辑框0 ...................打开渲染纹理对话框Alt + 0 .............锁住用户定义的工具栏界面-(主键盘) ...........减小坐标显示+(主键盘) ...........增大坐标显示[ ...................以鼠标点为中心放大视图] ...................以鼠标点为中心缩小视图‘..................打开自定义(动画)关键帧模式\ ...................声音"," .................跳到前一帧. ...................跳后前一帧/ ...................播放/停止动画SPACE ...............锁定/解锁选择的INSERT ..............切换次物体集的层级(同1、2、3、4、5键)HOME ................跳到时间线的第一帧END .................跳到时间线的最后一帧PAGE UP ..............选择当前子物体的父物体PAGE DOWN ...........选择当前父物体的子物体Ctrl + PAGE DOWN .....选择当前父物体以下所有的子物体A ...................旋转角度捕捉开关(默认为5度)Ctrl + A ............选择所有物体Alt + A ..............使用对齐(Align)工具B ....................切换到底视图Ctrl + B ..............子物体选择(开关)Alt + B ..............视图背景选项Alt + Ctrl + B .......背景图片锁定(开关)Shift + Alt + Ctrl + B ..更新背景图片C ...................切换到摄像机视图Shift + C ............显示/隐藏摄像机物体(Cameras)Ctrl + C ................使摄像机视图对齐到透视图Alt + C .................在Poly物体的Polygon层级中进行面剪切D ......................冻结当前视图(不刷新视图)Ctrl + D ...............取消所有的选择E .....................旋转模式Ctrl + E ..............切换缩放模式(切换等比、不等比、等体积)同R键Alt + E ................挤压Poly 物体的面F ......................切换到前视图Ctrl + F ...............显示渲染安全方框Alt + F ................切换选择的模式(矩形、圆形、多边形、自定义。
VR可视化管理软件_用户手册
VR可视化管理软件使用说明书文章摘要本文档详细描述关于如何利用各模块的设置对系统进行日常管理、维护、统计。
读者对象本文档的读者对象为系统的使用者,或者指导最终用户使用本系统的相关人员。
我们假定最终用户已掌握如下知识:⊙Windows/XP/win7/win8等操作系统的使用;⊙Chome浏览器/搜狗浏览器/360浏览器/IE等浏览器的使用;⊙基本的Internet的原理常识。
登录用户点击系统图标进入系统登录界面,如图所示:系统首页双击应用程序或应用程序的快捷方式,系统启动后,我们可以直接进入首页。
如图所示:进入首页后,我们可以点击不同的功能按钮,进行相应的操作。
详细操作如下:1、设备参数:点击设备参数按钮,进入设备参数页面;2、预览显示:点击预览显示按钮,进入预览显示页面;3、安防轮巡:点击安防轮巡按钮,进入安防轮巡页面;4、预警管理:点击预警管理按钮,进入预警管理页面。
设备参数进入设备参数页面后,用户可以点击不同的功能按钮,进行相应的操作。
详细操作如下:1、摄像机属性:进行摄像机属性设置;2、云台相关:进行云台相关设置;3、视频相关:进行视频相关设置;4、摄像机相关:进行摄像机相关设置;5、亮度:滑动鼠标调整亮度;对比:滑动鼠标调整对比;饱和:滑动鼠标调整饱和;色彩:滑动鼠标调整色彩;6、应用:点击应用按钮,进行应用操作;7、取消:点击取消按钮,进行取消操作。
预警管理进入预警管理页面后,用户可以对页面的预警画面进行查看操作。
详细操作如下:1、录像管理:用来管理录像的存储,包括对前端设备的录像计划配置,集中存储的录像计划配置;2、镜头管理:镜头可自动转向预置位置;3、提示:客户端可弹出预警提示信息;4、预警管理:进行预警管理设置。
预览显示预览显示页面的内容主要有同步回放、异步回放等操作功能,用户可以点击功能进行设置。
详细操作如下:1、镜头列表:查看镜头列表;2、画面1:查看画面1情况;3、画面2:查看画面2情况;4、画面3:查看画面3情况;5、画面4:查看画面4情况;6、异步回放:点击异步回放按钮,进行异步回放操作;7、同步回放:点击同步回放按钮,进行同步回放操作;* 添加模型点击预览显示功能的【添加模型】子功能,进入添加模型页面。
VP70XD工业视频播放器用户手册说明书
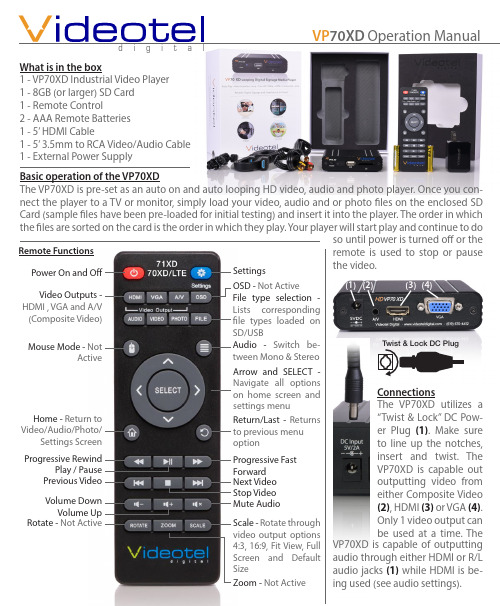
What is in the box 1 - VP70XD Industrial Video Player 1 - 8GB (or larger) SD Card 1 - Remote Control 2 - AAA Remote Batteries 1 - 5’ HDMI Cable 1 - 5’ 3.5mm to RCA Video/Audio Cable 1 - External Power Supply(3)(4)(2)Basic operation of the VP70XD The VP70XD is pre-set as an auto on and auto looping HD video, audio and photo player. Once you con-nect the player to a TV or monitor, simply load your video, audio and or photo files on the enclosed SD Card (sample files have been pre-loaded for initial testing) and insert it into the player. The order in which the files are sorted on the card is the order in which they play. Your player will start play and continue to do Remote Functions Power On and OffVideo Outputs - HDMI , VGA and A/V (Composite Video)Mouse Mode - Not Active Home - Return to Video/Audio/Photo/Settings Screen Progressive Rewind Play / Pause Previous Video Volume Down Volume Up Rotate - Not Active OSD - SD/USB N optionScale - SizeZoom - Connections The VP70XD utilizes a “Twist & Lock” DC Pow-er Plug (1). Make sure to line up the notches, insert and twist. The VP70XD is capable out outputting video from either Composite Video (2), HDMI (3) or VGA (4). Only 1 video output can be used at a time. The (1) while HDMI is be-OperationThe VP70XD rarely needs an interaction via the remote. The most common menu chang-es are switching from 720p to 1080p, chang-ing the setting to play background music dur-ing a photo slide show and changing photo slide show delay and transition type. All other settings are pre-set and rarely get accessed. Play “only” video, audio or photo files When you press the “Home” button on the re-mote, the screen to the right (1) will appear. The menu options are... Audio (2), Video (3), Photo (4) and Settings (5). If you wish to man-ually select a file to play, use one of these op-tions to select your desired file using the ar-row keys and “SELECT” button on the remote. If you wish to set up the player to only play a specific file type, you simply need to change the “Auto Play” option from “Mix” (6) (mean-ing play all file types) to Video only, Audio only or Photo (7)only (there are 2 playback options - “In Order” or “Random” ).Setting up a photo slide showBy default if you load photos onto your SD/ USB the player will auto start and rotate through all the pictures every 5 seconds us-ing “Cross Dissolve” Transition. If you wish to add background music, you must first change the “Auto Play” option to “Photo” (7), and then turn on “Background Music” (8). The delay be-tween photos can be changed from 1 second to 5 minutes using the “Play Interval” option (9). There are also 14 photo transitions avail-able under the “Photo Transition” menu op-tion (10).Video output modeWhen using HDMI you can change your reso-lution size from 720p to 1080p depending on what your TV is capable of. Note: Some TV’s will not sync correctly with the “default” op-tion, in these cases use the “alternate” selec-(1)(2)(3)(4)(5)(6)(7)(8)(9)(10)tion (11). If you wish to use the AV jack and RCA cables you can activate this output by selecting NTSC (USA Standard) or PAL (11). There are also 2 VGA resolution options (1024x768 and 1366x768).Other menu options• Language - Allows you to choose from 15 different languages• Screen Saver - This option will generate a screen saver (Videotel Logo) to move around the screen when no activity is de-tected. Available options range from off to 2 hours.• Audio Output Mode - Choose between HDMI or RCA audio output (when using HDMI).• Auto Detect HDMI - When set to off, you can set a resolution which will be used regard-less of the HDMI “Handshake”.• SD/USB Start - This only applies if you have and SD and USB card loaded at the same time.Video encoding tipsThe VP70XD will play a majority of video and audio codecs. The only limitation is the bit rate of the file. The VP70XD is capable of playing up to 20Mbps (Blu-Ray DVD quality). Most customers are using video files well un-der 20Mbps but if the VP70XD is not playing properly, load the video on any computer (10)(11)and play it. Every video program should have an option for “Video Properties”. You can view the bit rate and determine if it is within range. If the video is out of range, it will need to be re-encoded using a num-ber of free or low cost video converters. When re-encoding, try to choose h.264 for a video codec and a bit rate under 20Mbps.Troubleshooting tipsWhen connecting the VP70XD to a TV or monitor you should see either your looping content or the Videotel “Splash Screen” (1). If you get a black, blue or pixelated screen, remove the SD and USB. If you see the Videotel “Splash Screen” there is an issue with your content. If you still do not see an image, press the HDMI, AV or VGA button on the remote and switch to the type of connection you are using. Your TV’s HDMI input may not be compatible with the output setting of the VP70XD. Simply press and release the HDMI button on the VP70XD remote several times to switch between the various options (720P - Default, 720P - Alternate, 1080P - Default, 1080p - Alternate, 1080P-24Hz, 1080i - Default and 1080i - Alternate). 1080p Default or Alternate are the most common settings for newer TVs.Limited 2 Year WarrantyVideotel Digital warrants the VP70XD to be free from defect in material and workmanship. Warranty shall be limited to a period of 2 years from invoice date. Warranty shall not cover products that are found to be defective due to customers improper operation, accident, misuse, mishandling or damage occurring during transportation.。
诺德森DAGE XD7500VR Jade FP 电子元件 X 射线检查系统 使用说明书

Market-Changing Cost Effective Production PlatformAdvantagesN ordson DAGE Open, Transmissive X-ray Tube< 0.95 µm Feature Recognition Tube160 kV Tube with Full 3W of Target Power atSub-Micron Feature RecognitionN ordson DAGE 1.33 Mpixel @ 10fps Long Life-time CMOS Flat Panel Detector with Real TimeImage EnhancementsG eometric Magnification 1,400 X, System 4,200 X29” x 22.8” (736 x 580 mm) Maximum Board SizeU p to 65° Oblique Views without Loss ofMagnification23” TFT LCD MonitorN o Programming Skills Required for AutomatedInspection TasksHigh Quality Real Time ImagingµCT OptionNordson DAGE, the only x-ray company whose focus ison x-ray electronics inspection, offers the Nordson DAGE XD7500VR Jade FP x-ray inspection system that uses the latest technology flat panel detector to provide the market-leading, cost effective approach where high quality real time imagingis needed for production tasks. With a great specification, this foundation platform easily outperforms the competition.The Nordson DAGE open, transmissive x-ray tube, with its long lifetime filament technology, together with the high quality 1.33 Mpixel CMOS flat panel detector makes this jewel of a system provide the most cost effective choice in terms of price and performance for the high magnification and high resolution real-time imaging necessary for electronics inspection. The vertical system configuration, with the x-ray tube sitting below the isocentric ‘move and tilt’ of the detector, all controlled through the simple, joystick-free, ‘point and click’ software. This provides the safe and collision-free inspection for production applications. All these tasks can be simply and quickly automated without the need for programming skills.Crystal Clear X-ray Inspection. Nordson DAGE.25µmdiametercopperwiredevice+44 (0)1296 317800 Nordson DAGE25 Faraday RoadRabans Lane Industrial AreaAylesbury, Buckinghamshire HP19 8RY , UKCopyright © Nordson DAGE 2013DS-XR-7500XRJade-080413Specification subject to change without notice e & oe1EP 2063261XD7500VR Jade FP X-ray Inspection SystemFor more information, please contact your Nordson DAGE regional office or speak with your local Nordson DAGE representative, all of whom are listed on Americas+1 510 683 3930 Phone*********************Email China+86 512 6665 2008 Phone************************Email Germany+49 7021 950690 Phone************************Email Japan+81 432 995851 Phone************************Email South East Asia +65 679 69500 Phone************************Email United Kingdom+44 1296 317800 Phone***************************EmailSpecifications• Nordson DAGE VR950 new technology, open, transmissive x-ray tube:– < 0.95 µm feature recognition at all kVs – up to160 kV at 3 W target power – long life filament assembly – automated tube stabilisation• 1,400 X geometric magnification (4,200 X system magnification)• Easy, collision-free, high magnification and high resolution inspection:– even at oblique angle views – joystick-free ‘point and click’ operation• Maximum board size: 29” x 22.8” (736 x 580 mm) with reduced magnification • Maximum inspection area: 20” x 17.5” (508 x 444 mm)• Up to 65° oblique angle views– for 360° around a point of interest– isocentric manipulator configuration keeps features in field of view • Long lifetime CMOS digital detector with 1536 x 864 pixels (1.33 Mpixels):– 10 fps full-frame ‘real time’ image acquisition – real time image enhancements • 16-bit digital image processing • Anti-vibration control• 23” TFT LCD operator display monitor• Nordson DAGE Image Wizard operating software including:– automated and manual component fault analysis including BGA & QFN – simple to create and use robust automated inspection routines – plated through hole (PTH) fill percentage calculation – accurate measurement functions– Automated and manual die attach / area void calculation – Patented 1 x-ray navigation map for easy fault location – Simple to use, no complicated joysticks required • Fully lead-shielded system safety cabinet– providing < 1 µSv/hr x-ray leakage – meets all international standards • Windows 7 64-bit operating system •1 year system warrantyOptions• Joystick control (X,Y or X,Y & Z)• Barcode reader• 2nd Year System Warranty • µCT option with system order oras a retro-fitSystem• S ize: 57” x 67” x 77.5” (w x d x h)• S ize: 1450 x 1700 x 1970 mm (w x d x h)• S ystem Weight: 1950 kg (4300 lbs)• M aximum Sample Weight: 5 kg • P ower: Single Phase 200 - 230Vac, 16A • M ax. P ower Consumption: 1000 W Max.• O perating T emp. Range: 10 - 30ºC • Humidity: < 85% (non-condensing)。
虚拟现实VR系统开发软件使用说明书V1.0概要
第一章系统概述1.1 系统介绍“虚拟现实VR系统开发软件”是基于客户/服务器模式,其中服务器提供VR文件及支持资源客户通过网络下载希望访问的文件,并通过本地平台上的VR 浏览器交互式访问该文件描述的虚拟境界。
因为浏览器是本地平台提供的,从而实现了和硬件平台的无关性。
VR象HTML一样,是一种ASCII码描述语言,它是一套告诉浏览器如何创建一个三维世界并在其中航行的指令,这些指令由再现器解释执行,再现器是一个内置于浏览器中或外部的程序。
由于VR是一个三维造型和渲染的图形描述性语言,复杂的3D术语转换为动态虚拟世界是高速的硬件和浏览器,又由于其交互性强和跨平台性,使虚拟现实在Internet上有着广泛的应用,例如远程教育、商业宣传等等。
为此本公司研发出“基于VR的虚拟模型软件”,从用户的角度来说,基本上是HTML加上第三维,但从开发者角度来说, VR环境的产生提供了一套完全的新标准,新过程以及新的Web 技术。
交叉平台和浏览器的兼容性是首先要解决的问题。
设计之前,必须明确指定目标平台(PC、 Mac、SGI的新O2等等), CPU 速度、可以运行的带宽以及最适合使用的VR浏览器。
1.2系统功能概述1.建模“虚拟现实VR系统开发软件”的建造概念和其他工程建模概念相似,必须解决交流的问题,画出草图并研究材质的处理,生成模型、空间、化身,但必须考虑一些技术的限制,如,考虑到目标平台,决定在VR文件中放入多少多边图形;预先考虑到虚拟现实VR系统开发软件执行的动作,把相应的目标归类,用于设定三维物体之间的相互联系,建模与动画相互配合,如果归类正确合适,就会缩小生成动画效果之后文件的体积。
虚拟现实的设计中必须考虑加入重力和碰撞的效果,以使虚拟现实的场景和生活中的相似。
建模者需要生成代理几何模块(一系列的调用指令),其作用在于是浏览器在虚拟现实场景中只需监测一个很小的子目标,而无须计算虚拟场景中所有目标的重力和碰撞效果,最大限度的减少浏览器的工作量,并改善VR的演示效果。
(品管工具)VR使用安装说明书

(品管工具)VR使用安装说明书H.264“9000”系列网络型硬盘录像机用户使用说明书V1.0声明:Copyright©2009非经本公司书面许可,任何单位和个人不得擅自摘抄、复制本书内容的部分或全部,并不得以任何形式传播。
由于产品版本升级或其它原因,本手册内容会不定期进行更新。
除非另有约定,本手册仅作为使用指导,本手册中的所有陈述、信息和建议不构成任何明示或暗示的担保。
注意事项:1.本录像机用市电通过DC19V适配器供电,安装前请检查电源插座的电源是否满足适配器的要求;2.请不要将录像机放置在潮湿或会遭雨淋的场所;3.录像机应避免安装在会剧烈震动的场所;4.录像机的安装应避免阳光直接照射,并且远离热源和高温的环境;5.录像机安装时,其后面板应距离其它物品或墙壁15cm以上,以利于风扇散热;6.使录像机工作在技术指标允许的温度、温度、电压的范围内;7.录像机的安装场所内不应存放可能产生腐蚀性挥发气体的化学物品,以免影响录像机的使用寿命;8.录像机应避免安装在尘埃过多的场所,环境应保持整洁;9.录像机在使用中应保证正确接地;10.录像机在安装时应保证与其它设备的正确连接;11.请从正式渠道购买硬盘,以适应DVR长时间、大数据的读写要求;修订记录目录本书简介81介绍91.1主要特点91.2产品特点91.2.1性能参数91.2.2基本工作参数112环境适应性122.1注意事项123主机操作手册133.1遥控器功能键说明133.1.1遥控器133.1.2鼠标操作153.1.3菜单结构173.2系统设置与操作183.2.1用户登录183.2.2菜单操作194IE操作手册424.1功能特点424.2用户登录424.3界面操作434.3.1.1实时预览434.3.1.2云台控制444.3.1.2.1聚焦444.3.1.2.2变焦444.3.1.2.3光圈454.3.1.2.4云台预置点454.3.1.3播放控制454.3.1.4其他操作454.3.1录像回放464.3.2设置484.3.3.1录像模式484.3.3.2报警设置494.3.3.3云台控制504.3.3.4网络设置514.3.3.5系统设置52 4.3.3.6主机信息535主机安装指导545.1外观与面板定义54 5.2主机硬盘安装示例59前言本书简介本手册介绍了一款嵌入式数字硬盘录像机:型号为GA9004-S/GA9008-SDVR。
XD中文说明书
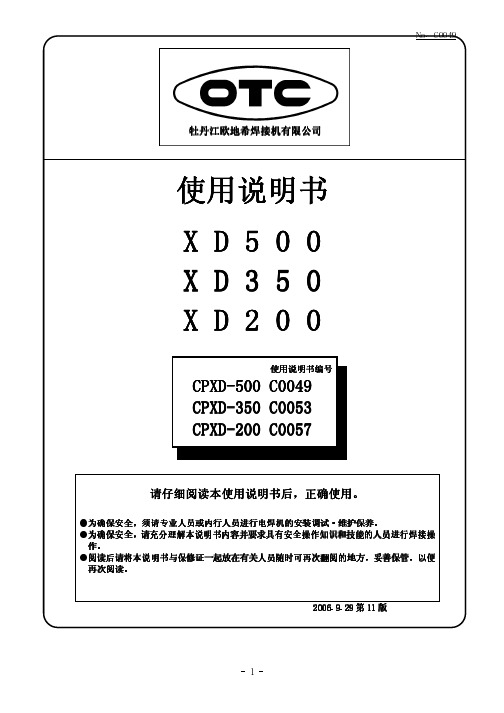
(型号 CMH-2301)
焊接电源 输入侧电缆
气体流量计 气管
控制电缆(6芯) 焊枪侧电缆 (请将其于焊接电源的+相连接。)
接地
送丝机 (型号CMX(L)-2302)
遥控盒(置于送丝机上)
焊枪
工件
工件侧电缆
接地
4.2 附件 名称
机种
XD200
XD350
XD500 数 量
栓遥形控保盒险 玻璃管保险 根角六螺弹光圆角螺头母垫垫栓螺栓
*钢瓶倾倒会引发人身事故。 *钢瓶内装有高压气体,错误使用会引发人身事故。 ●关于如何使用钢瓶,请依照法规与贵公司内部基准。 ●气体流量计请选用本公司附件或本公司推荐产品。 ● 前 流量 在使用 ,请阅读气体 计使用说明书并遵守注意事项。 ●请勿高温曝晒气体钢瓶。 ●请使用专用的支架固定气体钢瓶。 ●打开气体钢瓶阀门时,请勿将脸部靠近出气口。 钢瓶 罩好 罩 ●不使用气体 时,请务必 保护 。 ●请勿将焊枪挂在气体钢瓶上、勿使电极接触钢瓶。 旋转 成 , 定 注意 接触 部位会造 伤害 务请遵守以下规 。
用语予以警告,此标识符及警告用语在电焊机中亦表示相同的意思。
提请注意标识符
警告用语
内Hale Waihona Puke 容高度危险误操作后极度危险,可能引发重大人身事故。
危险
误操作后危险,可能引发重大人身事故。
注意
误操作后发生危险,可能引发中度伤害或轻伤。或只遭受物 质损失。
·注意标识符表示一般情况。 ·上述重大人身事故是指失明、外伤、烫伤(高温、低温)、触电、骨折、中毒等,会遗留后
场 近 灭火 防万 ●请在焊接操作 所附 放置 器,以 一。
-5-
No. C0049
2. 敬请遵守的安全事项(续)
虚拟现实VR系统开发软件使用说明书V10概要

第一章系统概述1.1 系统介绍“虚拟现实VR系统开发软件”是基于客户/服务器模式,其中服务器提供VR文件及支持资源客户通过网络下载希望访问的文件,并通过本地平台上的VR 浏览器交互式访问该文件描述的虚拟境界。
因为浏览器是本地平台提供的,从而实现了和硬件平台的无关性。
VR象HTML一样,是一种ASCII码描述语言,它是一套告诉浏览器如何创建一个三维世界并在其中航行的指令,这些指令由再现器解释执行,再现器是一个内置于浏览器中或外部的程序。
由于VR是一个三维造型和渲染的图形描述性语言,复杂的3D术语转换为动态虚拟世界是高速的硬件和浏览器,又由于其交互性强和跨平台性,使虚拟现实在Internet上有着广泛的应用,例如远程教育、商业宣传等等。
为此本公司研发出“基于VR的虚拟模型软件”,从用户的角度来说,基本上是HTML加上第三维,但从开发者角度来说, VR环境的产生提供了一套完全的新标准,新过程以及新的Web 技术。
交叉平台和浏览器的兼容性是首先要解决的问题。
设计之前,必须明确指定目标平台(PC、 Mac、SGI的新O2等等), CPU 速度、可以运行的带宽以及最适合使用的VR浏览器。
1.2系统功能概述1.建模“虚拟现实VR系统开发软件”的建造概念和其他工程建模概念相似,必须解决交流的问题,画出草图并研究材质的处理,生成模型、空间、化身,但必须考虑一些技术的限制,如,考虑到目标平台,决定在VR文件中放入多少多边图形;预先考虑到虚拟现实VR系统开发软件执行的动作,把相应的目标归类,用于设定三维物体之间的相互联系,建模与动画相互配合,如果归类正确合适,就会缩小生成动画效果之后文件的体积。
虚拟现实的设计中必须考虑加入重力和碰撞的效果,以使虚拟现实的场景和生活中的相似。
建模者需要生成代理几何模块(一系列的调用指令),其作用在于是浏览器在虚拟现实场景中只需监测一个很小的子目标,而无须计算虚拟场景中所有目标的重力和碰撞效果,最大限度的减少浏览器的工作量,并改善VR的演示效果。
Honeywell HRXD DVR用户指南说明书
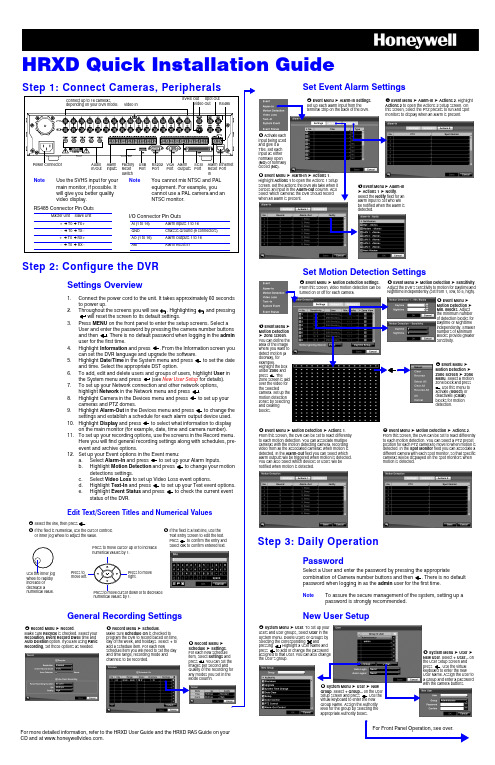
HRXD Quick Installation GuideFor Front Panel Operation, see over.For more detailed information, refer to the HRXD User Guide and the HRXD RAS Guide on your CD and at .Throughout the screens you will see . Highlighting and pressingwill reset the screen to its default settings.General Recording Settingsis checked to program the DVR to record based on time, day of the week, and holidays. Select + to # Record Menu ➤ Set Event Alarm SettingsSet Motion Detection SettingsStep 3: Daily OperationPasswordSelect a User and enter the password by pressing the appropriatepassword when logging in as the admin user for the first time.NoteTo assure the secure management of the system, setting up a password is strongly recommended.New User Setup! Event Menu ➤ Alarm-In Settings .Set up each alarm input from theterminal strip on the back of the DVR." Activate eachinput being used and give it a Title. Set each input as either normally open (NO ) or normally closed (NC ).# Event Menu ➤ Alarm-In ➤ Actions 1.Highlight Actions 1 to open the Actions 1 setup screen. Set the actions the DVR will take when it senses an input in the Alarm-Out column. Also select which cameras the DVR should record when an alarm is present.$ Event Menu ➤ Alarm-In➤ Actions 1 ➤ Notify .Select the Notify field for an alarm input to set who will be notified when the alarm is detected.% Event Menu ➤ Alarm-In ➤ Actions 2. HighlightActions 2 to open the Actions 2 setup screen. On this screen, select the PTZ presets to run and spot monitors to display when an alarm is present.➤ Sensitivity . # Event Menu ➤Motion Detection ➤ Min. Blocks . Adjust the minimum number of detection blocks for Daytime or Nighttime independently. Smaller numbers of Minimum Blocks provide greater sensitivity.$ Event Menu ➤Motion Detection ➤ Zone screen . You can define the area of the image where you want to detect motion (a doorway, for example).Zone screen is laid camera. Set up the zones by selecting %Event Menu ➤Motion Detection ➤ Zone Screen ➤ Zone Menu . Select a motion zone block and press Select ) or Clear ) & Event Menu ➤ Motion Detection ➤ Actions 1.From this screen, the DVR can be set to react differently to each motion detection. You can associate multiple cameras with the motion detecting camera, recording video from all the associated cameras when motion is detected. In the Alarm-Out field you can select which alarm outputs will be triggered when motion is detected. You can also select which devices or users will be notified when motion is detected.' Event Menu ➤ Motion Detection ➤ Actions 2. From this screen, the DVR can be set to react differently to each motion detection. You can select a PTZ preset position for each PTZ camera to move to when motion is detected. In the Spot Monitor field you can associate a different camera with each spot monitor, so that specific cameras will be displayed on the spot monitors when motion is detected.! System Menu ➤ User users and user groups, select System menu. Delete Users or Groups by selecting the corresponding andpressing . Highlight a User Name and assigned to that User. You can also change the User’s group."New User the User setup screen and press keyboard to enter the new User Name. Assign the User to a Group and enter a password with the camera buttons.System Menu ➤ User ➤ New. Select + Group... on the User setup screen and press . Use the virtual keyboard to enter the new Group Name. Assign the Authority level for the group by selecting the appropriate Authority boxes.HRXD Quick Installation Guide+TV (North America only)************************Specifications subject to change without notice.Imperial conversions are approximate.© 2007 Honeywell International Inc.Document 800-00280 – Rev A – 05/07to open the Search menu. Pick a search method to find an incident with:Date and Time Search1.Move the cursor over the date/time and press2.Move Left or Right to highlight the date/time value to change.e the Up and Down buttons to change the date/time value to the date/time that you want to search through.4.Once you have set the date and time you want, press5.Highlight6.The selected time and date will display. If no video was recorded in that time, a7.Use the playback controls to search through the video.Calendar SearchEvent Log SearchMotion SearchCopy Evidence to a CDClip-Copy ScreenReviewing Video ClipsYou do not need to install any special software on your personal computer to review the video clips. The copied video clips contain the Clip Player program.1.If you used a USB storage device, disconnect it from the DVR andconnect it to your PC. If you used a recordable CD, insert the CD into your computer’s CD drive.2.The Clip Player screen displays the clip images. Use the Clip Playercontrols to view the video.1.Days with recorded video display in white.2.3. A time bar displays at the bottom of the calendar. Hours with video recorded are highlighted orange.4.Select the time bar and select the time to search.5.If there is more than one video stream in the same time range, move to Select a Segment and select the video stream you want to search.6.Highlight Go 7.The selected time and date will display. Use the playback controls to search through the video.1.The DVR maintains a log of each time an Event occurs. The Event Log Search screen displays this list.2.Highlight the event that you want to view.3.image of the event.4.Press Search to return to live monitoring.5.You can narrow your event search by selecting Option... and setting up a new search condition. See the User Guide for more information.1.The Motion Search screen allows you to search for motion activity that occurred within the area of a configurable zone of interest.e the arrow buttons to highlight the event for which you want to view video and press3.The first image of the associated event video displays in the small search screen in the left pane of the screen.4.To view and play back the video in full screen, highlight Close5.You can narrow your event search by selecting Option... and setting up a new search condition. See the User Guide for more information.The Clip-Copy screen can be used to copy video clips to an internal CD-RW, or external USB drive.1.In Search mode, press and hold MENU for 2seconds to open the Clip-Copy screen.2.The Data Source (Record or Archive) isdisplayed.3.Set the start and stop times and dates.4.Select the cameras to include in your video clip.5.If necessary, enter a password that will have tobe entered when reviewing the video clips.6.In the box beside Dest., select the storagedevice you would like to record the video clip onto.7.Change the default File name , if necessary.8.Select Start Exits the Player programGo forward one framePlay the video clipGo back one framePlay in fast reverseGo to the beginning of the clipPlay in fast forwardGo to the end of the clipShow the previous pageCycle through screen layoutsShow the next pageSelect from Save, Print, Info, Image Processing and Video FormatSelect from Normal and Double screen viewsDisplay image full screen。
xDVR服务端快速使用手册

xDVR数字硬盘录像系统快速使用手册(Version 6.5)北京捷诺视讯数码科技有限公司目录1.安装光盘向导 (3)2.xDVR服务端安装 (3)2.1 配置向导 (4)登陆 (4)终端类型 (4)采集卡类型 (5)初始化设置 (6)完成向导 (8)3.xDVR 服务器 (9)3.1 主界面 (9)3.2 系统设置 (10)■通道属性 (10)预览 (10)视频参数 (11)移动侦测 (12)录像计划 (13)PTZ云台 (14)报警 (15)■服务器属性 (16)基本信息 (16)外围设备 (17)报警联动 (18)■系统属性 (19)3.3 回放 (19)开始回放 (19)回放主界面 (20)4.WEB服务器 (21)开始WEB服务 (21)IE客户端登陆 (21)5.疑难问题解答 (24)1.安装光盘向导首先,插入软件安装光盘至光驱,运行光盘目录下Autorun.exe自动运行,弹出如下窗口;1.驱动安装;2.服务器软件安装;3.客户端/网络数字矩阵软件安装;4.帮助文档(快速操作手册)2.xDVR服务端安装第一步:双击安装程序按钮,运行安装程序。
第二步:一直点击“下一步”,直到安装完成,最后运行“”。
第三步:运行“ConfigTools配置向导”。
(如果不直接运行“配置向导”的话,可以通过点击开始菜单->程序->->xDVR服务端->点击运行。
2.1 配置向导登陆系统管理员用户名super, 默认密码test;终端类型在这里可以选择本机的终端类型、获取A8报警箱地址:1.默认终端类型分为:DVR ( 服务端默认无需更改)2.A8报警盒地址获取:(若没有接A8报警箱,无需设置,直接点“下一步”)采集卡类型选择采集卡类型, 点击“下一步”按钮后,如下图:用户可根据PCI插槽视频采集卡的型号,选择自己适合的采集卡类型;支持采集卡类型:1)海康DS-40xxHC / HC+/ HF;2)海康DS-400xH3)海康DS-40xxHS4)海康DS-400xM型号说明:xx代表路数,HC代表采集卡型号初始化设置采集卡硬件检测自动获取采集卡序列号;用户可导出序列号,注册序列号;1.系统自动获取采集卡类型,板卡数量等硬件信息;2.采集卡序列号统计3.手动检测硬件;4.用户可点“导出序列卡号“,发回厂家加密;5.收到注册文件后,点“注册序列号”,浏览注册文件,点打开,即可导入数据库;站点信息设置:1. 图像制式选择:PAL制(默认)与NTSC制;2. 图像分辨率:CIF(默认)与D1;3. 图像显示处理方式:Overlay模式(默认)与DirectDraw模式;4. 系统白天/黑夜模式:白天时间段与夜间时间段;5. 开机自动运行:当Windows启动后,自动启动xDVR服务软件;注释:一般Nvidia芯片支持Overlay, ATI芯片显卡支持DirectDraw模式;继续点“下一步”按钮后,进入修改超级管理员密码界面,如下图:在这里可修改管理员的密码,修改密码后请牢记,普通用户不能登陆配置向导;继续点“下一步”按钮,进入数据库备份选项;如下图1.数据库备份与恢复(:建议:第一次安装可跳过此步骤)2.始化数据库;修复数据库表,是否保留注册信息;3.数据库备份保存路径设置启用定时备份功能;完成向导配置向导完成,自动运行xDVR服务;3.xDVR 服务器3.1 主界面主程序面板按钮介绍:1.声音监听2.通道轮巡翻页3.抓拍照片4.录像回放5.画面布局6.系统设置7.锁屏/解锁8.退出系统9.LOGO图片10.日期时间星期| 系统资源信息(硬盘、CPU、内存、网络传输速率);11.PTZ面板控制(云台,快球、视频参数)12.录像状态指示13.报警状态指示3.2 系统设置■通道属性预览在这里你可以设置每个摄像机通道的名称,OSD的显示以及遮挡,通道是否保密1.目录树,选中一个摄像机通道,即可以出现右侧的属性页2.摄像机名,可修改3.采集卡板卡类型系统自动判断;4.设置保密通道5.默认设置OSD时是静态画面,你可以切换到实时视频6.日期时间类型设置,是否闪烁;7.遮挡,你可以添加布置1个遮挡区域;在这里可以设置选定通道的录像参数:1.视频制式选择:(默认为PAL制)2.分辨率选择:(默认:CIF:352 ×288)3.图像质量调整;4.每秒传输帧数:(实时为25帧/秒);5.夜间光线不足,录像码流校大;自动降低码流时间段设置;移动侦测区域设置,灵敏度设置(最多可添加8个侦测区域)1.可切换实时预览,用鼠标左键在视频区域内画侦测区域,鼠标点“添加“按钮;2.侦测灵敏度调节;3.添加或删除侦测区域,用鼠标右键盘在视频区域内画框选择,点“删除“按钮;注意:移动侦测联动录像生效,必需设置移动侦测计划;在这里可以设置定时和移动侦测录像计划:1.可通过模板设置,在此批量设置录像计划功能;2.计划时间点和星期设置(时间最小时间间隔为15分钟);在这里设置该摄像机通道的云台控制参数:1.设置云台解码器的协议2.设置云台解码器的地址3.设置串口通讯参数(COM口、波特率选择)报警在这里设置摄像机通道报警联动关系:1.报警事件类型2.不同报警联动关系(声音报警、联动预置位、发短信、通知客户端、抓拍照片);3.报警布防时间段(白天/黑夜两个时间段)4.报警联动声音报警;5.联动快球预置位;6.发送短信(兼容经纬星航短信Modem);7.给客户端发送报警消息;8.联动抓拍;■服务器属性基本信息在树形列表选择->服务器设置,可设置服务器相关参数;1.服务器名、MAC地址、本机IP地址(自动获取,不能修改)2.音视频服务端口号及权限控制TCP端口号(可修改)注释:服务器的基本信息,配置向导已对它进行配置,无需另外设置;常用端口号音视频端口:5050权限控制端口:8000WEB端口:80在这里可以添加外围硬件设备:包括(报警盒、模拟矩阵、防死机狗)1.是否允许手动暂停计划布防2.添加报警盒的协议(General_A8)、地址、通讯参数、报警盒个数、输入输出个数添加防死机狗及相关属性参数;;在这里可以设置探头报警关联事件、触发时间及事件属性设置;1.报警点号选择2.事件类型日夜是否触发;3.语音报警4.联动摄像机通道录像5.快球控制6.短信7.文字消息通知客户端8.抓拍照片9.弹出电子地图10. 报警联动输出■系统属性系统属性设置说明:1.系统退出或定时退出时是否重启或关机,是否需要输入确认密码;2.系统启动后,是否锁定键盘热键;3.系统夜间时间段设置4.OEM系统所需图片替换;5.登陆用户名及系统运行时间条是否显示;6.定期自动清除日志功能;3.3 回放开始回放操作说明:鼠标左键选中,弹出回放界面,如下图:回放主界面操作说明:1. 选中某DVR 主机的某通道;2. 默认为检索当天24小时录像,可自定义设置开始日期时间及结束日期、时间;3. 选择检索本地或远程,点“普通录像”在 [ 5 ] 区域内显示检索到的录像文件索引; 4. 选中 [5 ] 区域内某个录像文件,鼠标点[4 ] 按钮进行播放;界面按钮元素介绍:录像回放时:开始剪辑、结束剪辑、抓拍照片、缩略图显示4. WEB 服务器开始WEB 服务若已安装IIS 服务,则禁用IIS 服务并启动 开始-》程序—>xdvr 服务端—>WEB 服务发布;IE 客户端登陆必需先启动服务端后,再在Intnet Explor 地址栏内,比如输入http://192.168.0.80/?jnvision=jnvision (IP 地址为服务器IP 地址)回车,进入登陆页面,如下图:图 1-3✧ 当第一次登陆主页面时, 点击下载 “视频预览”及“文件检索” 控件执行注册; ✧ 默认选 [局域网],输入登陆帐号及密码,点“登陆系统“,进入监控主页面;以下两种情况广域网监控,需要作初始化设置(局域网无需设置)1) 若PC-DVR 服务端ADSL 动态拨号上网,采用花生壳或希网动态IP 域名解析, 2) PC_DVR 服务端,具有公网固定IP;登陆帐号与密码,在服务端用户管理内创建视频预览及文件检索控件下载注册3.监控主页面输入WEB服务器IP地址比如:http://192.168.0.80回车界面介绍:1.读取本地PC_DVR配置的通道列表信息;2.视频显示区域;3.画面分割按钮1/4/6/8/9/16 。
dagexd7500vr说明书

dagexd7500vr说明书
检测仪,用来连续测量危险或工业环境中有毒有害有机VOC气体,可单独使用,无需搭配主机实时在线监测,特别适用于个人安全防护和现场VOC检测。
主要用于检测车间、厂界的VOC浓度、安全事故应急监测、废气排放浓度达标快速检测。
那么VOC检测仪要如何使用呢?
1、开机关机。
按【MODE】键一秒后放开,VOC检测仪开始启动,蜂鸣一次后泵启动,自检。
持续按【MODE】键五秒,VOC检测仪蜂鸣一次开始倒计时5秒并蜂鸣五次,VOC检测仪关闭,松开【MODE】键。
2、测量。
步骤1:接上抽气探头及过滤头(注意气流方向)。
步骤2:VOC检测仪启动自检完毕以后,显示“READY”,按【Y/+】键一次,仪器泵开始启动并测量,VOC检测仪持续显示即时VOC浓度值,读数平稳时记录数值。
步骤3:更换测量点位时,应在抽新鲜空气,使读数降低至室外环境读数后再测量。
3、充电。
步骤1:关机。
步骤2:连接充电器连接220V交流电,接通VOC检测仪底部充电接口,仪器面板显示“Deepdischarging”,询问三次。
按
【Y/+】键,仪器开始放电。
如果显示“Deepdischarging”,10秒
钟内不按【Y/+】键,仪器开始充电,仪器显示“Charging”和电池的电压。
步骤3:绿色LED灯长亮时,显示“FullyCharged”,电池充满。
FORDYSVAR VR 用户手册说明书

Manual FORDYSVARVREnglishhttps://fordysvar.eu/es/USER MANUAL - FORDYSVAR VROscar Alonso PlazaMail: *******************************Phone: 637 09 86 85Table of ContentsCONTENTSMENU................................................. .................................................. .................................................. .. (4)MOTHERSHIP................................................ .................................................. .. (8)DRIVING TEST ............................................... .................................................. ......................eleven JOURNEY TO THE FIRST PLANET .............................................. .................................................. ...................fifteen ACTIVITY: CAREER ............................................... .................................................. ..........................2. 3 ACTIVITY: AVOID OBSTACLES .............................................. (32)ACTIVITY: DISCOVER THE FORMULA ............................................. . (38)ACTIVITY: MAGIC SQUARES .............................................. . (52)ACTIVITY: LATITUDE ............................................... .................................................. . (60)FINAL ACTIVITY: TEMPLE .............................................. .................................................. .. (67)GETTING A CRYSTAL ............................................... .................................................. (74)MENUFrom the MENU We can create a new game, load a current game or change the language and subtitles settings. Window SETTING It is opened by clicking on the "Settings" button.To create a new game we follow the following process:- We press the "Play" button, this will open the submenu in which we will choose whether to create a new game or load an existing one- In the window NEW GAME We enter the name and age of the player, clicking on the text box will open the keyboard for data entry- The keyboard will allow us to enter the name and age data using some drumsticks. It will be written as if it were a xylophone- The keyboard to enter the age will be only numeric and will limit the entry- Once the "Start" button is pressed, the game will begin to load. It will take a few seconds.MOTHERSHIP- Once the game is loaded we will appear in the mother ship. A message will appear that will tell us how to move around the shipThe movement stick will be used throughout the game to move through the worlds and thus find the activity panels.- Once we touch the cue ball with the remote, it will wake up. WIBU will explain an introduction to the game and the ship- WIBU shows us the main screen from where we will choose the planet to which to travel and where we will consult the scores.- Once WIBU invites us to get the license of the flying motorcycle we will have to touch it again with the remote control to transport us to the driving areaDRIVING TEST- Once we are transported to the driving area, WIBU will explain to us step by step in a guided way everything necessary to control the flying motorcycleThe stage is an asteroid belt that will help us practice driving using obstacles- WIBU will indicate the steps one by one graphically and audibly in the following way: Hands should be placed on the handlebars so as not to lose control- We will use the trigger of the right control to accelerate the motorcycle- Turning our head to the right the motorcycle will turn to the right- Turning our head to the left the motorcycle will turn to the left- The left control trigger will be used to brake the motorcycle- When we finish the test, the button will return to the ship to pressJOURNEY TO THE FIRST PLANET- Once the driver's license for the motorcycle is obtained, WIBU will indicate that we can travel to the first planet from the main screenFluridium will be unlocked on this screen and we will have to choose it to start the journey, we can also choose an avatar.- The other planets will appear locked and these will be unlocked when we complete the previous planet- By clicking on the planet, a window will appear that will start the trip to the planet and there will be no going back until you return to the mother ship.- We will be transported to the small ship that will take us to the different planets- To start the trip we will push the starter lever on our right- During the trip to the planet WIBU will tell us a brief introduction about that planet. Some data will be useful for some activities on that planet- Once we enter the planet, the landing will begin- Once disembarked, WIBU will guide us to the first activity, the rest we will have to find on our own by looking for the activity panelsACTIVITY: CAREER- The character of that planet will explain the history behind that activity. Broadly speaking, we will have to beat a certain time in an obstacle course with audiovisual guides.- The screen from which we will start the activity RACE he is almost always close to the character of that planet.- Below are images of this activity for the planets Fluridium, Kowat and Atimolod.FLURIDIUM:KOWAT:ATIMOLOD:ACTIVITY: AVOID OBSTACLES- Once the race is completed we will have to find the next activity, for that we will have to look for its panel.The panel will have been activated upon completion of the race.- In this activity we have to dodge the objects that the character throws at us. For that we will use the audiovisual indications that WIBU provides usBelow are images of this activity on the different planetsFLURIDIUM:ACTIVITY: DISCOVER THE FORMULA- Once we overcome the dodging activity, we must find the activity panel of the activity to discover the chemical formula of the element of that planetBelow is that panel on different planets-The development of this activity on the planets Fluridium, Kowat and Atimolod is shown below.FLURIDIUM:or WIBU gives us important information about the mineral to choose the toolcorrector The tool selection panel appearsor If we fail, we will get a brief characteristic of the mineral that to help usor Now we will choose the correct tool (UV Laser for Fluridium)or In Fluridium the molecules will appear from top to bottom and it will be necessary to choose them in the correct order.or Once the formula is completed, we will obtain that crystal fragmentKOWAT:or The same process is followed as in Fluridium but the molecules will rotate around usATIMOLOD:or In Atimolod it is very different from the previous planets. You should look for theformulated by breaking the crystals from the position indications and following thegreen dot in the first instruction as a reference.For the following instructions, the previous broken glass will be used as a reference.。
xDVR客户端用户使用指南
xDVR客户端用户使用指南xDVR客户端用户使用指南1. 简介1.1 产品概述xDVR客户端是一款用于视频监控的客户端软件,可与xDVR设备进行连接并实时监控和管理视频数据。
1.2 主要特性- 实时监控:可以实时查看接入的摄像头所拍摄的视频画面。
- 远程回放:可以回放之前录制的视频数据。
- 图像调整:可以调整视频图像的亮度、对比度、饱和度等参数。
- 报警提醒:可以设定报警规则,当规则条件满足时自动发送报警通知。
- 用户管理:可以管理多个用户,设定用户的权限和访问权限。
2. 安装与配置2.1 系统要求确保您的计算机满足以下最低系统要求:- 操作系统:Windows 7/8/10- 内存:4GB或以上- 处理器:Intel Core i3或以上- 显卡:支持DirectX 9.0c及以上2.2 安装xDVR客户端按照提供的安装程序,一步步完成安装xDVR客户端的过程。
2.3 配置xDVR设备在第一次启动xDVR客户端时,需配置xDVR设备的基本信息,包括IP地址、端口号、用户名和密码等。
3. 使用指南3.1 登录打开已安装的xDVR客户端,输入正确的用户名和密码,“登录”按钮,即可进入主界面。
3.2 实时监控在主界面上方选择需要监控的摄像头,“开始监控”,即可实时查看所选择摄像头的视频画面。
3.3 远程回放在主界面上方选择需要回放的摄像头,“回放”按钮,在时间轴上选择指定时间段,“开始回放”,即可回放所选择摄像头在该时间段内的录制视频。
3.4 图像调整在实时监控或回放界面,“图像调整”按钮,可以调整视频图像的亮度、对比度、饱和度等参数,以获取更好的视觉效果。
3.5 报警提醒在主界面“报警设置”,可以设定报警规则,当规则条件满足时,xDVR客户端会自动发送报警通知,以提醒相关人员注意。
3.6 用户管理在主界面“用户管理”,可以添加、删除和修改用户,并设定用户的权限和访问权限,以实现用户的有效管理和控制。
VR操作
VR实训室设备基本操作基本流程
郑州机电工程学校网络与电教中心郑州润华科教设备有限公司
VR基本操作
一:先按电源控制器F1,再按控制器上面的1按键,或者用IPAD打开浏览器,进入控制界面,点击打开机柜电源,打开投影机
二:用投影机遥控器打开投影机
三:在主控机上(机柜上面的显示器)打开,G-motion软件
出现检测服务端列表,在服务器名称前方框打勾,然后将鼠标移至渲染机(投影电脑上),打开软件,IdeaVR软件,
四:打开后,点击最近,最近使用的工程,,当出现画面后,用键盘按F8全屏拿起控制眼镜,打开开关ON位置拨一下,拿起控制器,打开电源
五:控制器2健按住移动,1菜单,左键确定
六:例如用案例吊装图操作:
先点菜单选择,动画控制,在选择轨迹动画,,选择吊装动画,,按下键,出现播放选择,选播放按左键确定,再按下下键,可选择退出或暂停
2:选择部件操作,部件移动,,然后选择移动的部件,按住左键可移动,,下键可退出并还原
七.设备关机时,先关闭软件、电脑、投影机最后关闭电源。
PHILIPS IntelliVue XDS 應用程式 使用说明

病患監視使用說明IntelliVue XDS 應用程式版本H.xx.xxPhilips Medizin Systeme Boeblingen GmbH Hewlett-Packard-Str. 271034 Boeblingen德國© 版權所有 2011Koninklijke Philips Electronics N.V.保留所有權利文件號碼4535 642 56881 A 版2011 年 3 月於德國印製*453564256881*1IntelliVue XDS 應用程式簡介5XDS Remote Display5XDS LaunchPad6XDS Printing Service6XDS Infrastructure Service72使用 IntelliVue XDS Remote Display9簡介9設定組合10使用者介面慣例10遠端操作病患生理監視器11在病患生理監視器上檢視畫面11啟動 XDS Remote Display11選擇不同畫面12選擇不同的病患生理監視器13返回預設的病患生理監視器15移動病患生理監視器時中斷連線15建立與管理畫面16變更畫面大小與優先順序17啟動其他應用程式19為 XDS Remote Display 進行疑難排解19 PC 執行資源不足20設定 XDS Remote Display21離開 XDS Remote Display21PC 關機21 3使用 IntelliVue XDS LaunchPad23簡介23設定組合23使用者介面慣例23啟動 XDS LaunchPad24在 iPC (IntelliVue MX 系列病患生理監視器) 上啟動24在外部 PC 上啟動24選擇執行中的應用程式25啟動其他應用程式25從病患生理監視器啟動應用程式254使用 IntelliVue XDS Bedside Device27簡介27啟動 XDS Bedside Device27電源中斷後恢復運作27關閉 XDS Bedside Device28為 XDS Bedside Device 進行疑難排解28設定 XDS Bedside Device2935在 iPC 上使用 IntelliVue XDS 應用程式31簡介31在 iPC 上使用 XDS 應用程式31使用輸入設備31前個畫面按鍵31當 iPC 視窗大小改變時31 6附錄 A33IntelliVue XDS 應用程式通訊軟體33 7附錄 B35安全與認證資訊35電磁相容3541 IntelliVue XDS 應用程式簡介IntelliVue XDS 應用程式是一套建於Windows 架構的電腦應用程式,可安裝於以下設備中使用:•MX 系列病患生理監視器的整合式 PC (iPC)•IntelliVue XDS Bedside Device (醫療級 PC),或•其他 PC。
VRP5.3操作手册 安全分册01-第1章 AAA及用户管理配置

目录第1章 AAA及用户管理配置...................................................................................................1-11.1 简介....................................................................................................................................1-11.1.1 AAA简介.................................................................................................................1-11.1.2 RADIUS协议简介....................................................................................................1-31.1.3 HWTACACS协议简介............................................................................................1-51.1.4 基于域的用户管理简介............................................................................................1-61.1.5 本地用户管理简介....................................................................................................1-61.2 配置AAA............................................................................................................................1-71.2.1 建立配置任务...........................................................................................................1-71.2.2 配置认证方案...........................................................................................................1-91.2.3 配置授权方案...........................................................................................................1-91.2.4 配置计费方案.........................................................................................................1-101.2.5 配置记录方案.........................................................................................................1-101.2.6 配置为用户分配IP地址.........................................................................................1-111.2.7 在用户端配置接口IP地址为可协商.......................................................................1-111.2.8 检查配置结果.........................................................................................................1-121.3 配置RADIUS服务器模板................................................................................................1-121.3.1 建立配置任务.........................................................................................................1-121.3.2 创建RADIUS服务器模板......................................................................................1-141.3.3 配置RADIUS认证服务器......................................................................................1-141.3.4 配置RADIUS计费功能.........................................................................................1-141.3.5 配置RADIUS服务器的协议版本...........................................................................1-141.3.6 配置RADIUS服务器的密钥..................................................................................1-151.3.7 配置RADIUS服务器的用户名格式.......................................................................1-151.3.8 配置RADIUS服务器的流量单位...........................................................................1-151.3.9 配置RADIUS服务器的重传参数...........................................................................1-151.3.10 配置RADIUS服务器的NAS端口.......................................................................1-161.3.11 检查配置结果.......................................................................................................1-161.4 配置HWTACACS服务器模板.........................................................................................1-161.4.1 建立配置任务.........................................................................................................1-161.4.2 创建HWTACACS服务器模板...............................................................................1-181.4.3 配置HWTACACS认证服务器...............................................................................1-181.4.4 配置HWTACACS授权服务器...............................................................................1-181.4.5 配置HWTACACS计费功能..................................................................................1-181.4.6 配置HWTACACS服务器的源IP地址..................................................................1-191.4.7 配置HWTACACS服务器的密钥...........................................................................1-191.4.8 配置HWTACACS服务器的用户名格式................................................................1-191.4.9 配置HWTACACS服务器的流量单位....................................................................1-201.4.10 配置HWTACACS服务器的定时器.....................................................................1-201.4.11 检查配置结果.......................................................................................................1-20 1.5 配置域..............................................................................................................................1-201.5.1 建立配置任务.........................................................................................................1-201.5.2 创建域....................................................................................................................1-211.5.3 配置域的认证、授权和计费方案............................................................................1-221.5.4 配置域的RADIUS服务器模板..............................................................................1-221.5.5 配置域的HWTACACS服务器模板.......................................................................1-221.5.6 配置域的地址相关属性..........................................................................................1-231.5.7 配置域的状态.........................................................................................................1-231.5.8 配置域允许的最大接入用户数...............................................................................1-231.5.9 检查配置结果.........................................................................................................1-23 1.6 配置单独本地用户管理.....................................................................................................1-241.6.1 建立配置任务.........................................................................................................1-241.6.2 创建本地用户帐号..................................................................................................1-251.6.3 配置本地用户的服务类型.......................................................................................1-251.6.4 配置本地用户的FTP目录权限..............................................................................1-251.6.5 配置本地用户的状态..............................................................................................1-251.6.6 配置本地用户的优先级..........................................................................................1-261.6.7 配置本地用户的接入限制.......................................................................................1-261.6.8 检查配置结果.........................................................................................................1-26 1.7 维护..................................................................................................................................1-261.7.1 清除.......................................................................................................................1-261.7.2 调试.......................................................................................................................1-27 1.8 AAA及用户管理典型配置举例.........................................................................................1-271.8.1 采用RADIUS协议对用户进行认证和计费............................................................1-271.8.2 对用户使用本地和HWTACACS认证、HWTACACS授权和进行实时计费..........1-30第1章 AAA及用户管理配置配置AAA可以为合法用户提供网络接入服务,同时对敏感的网络设备进行保护,防止非授权访问和抵赖行为。
- 1、下载文档前请自行甄别文档内容的完整性,平台不提供额外的编辑、内容补充、找答案等附加服务。
- 2、"仅部分预览"的文档,不可在线预览部分如存在完整性等问题,可反馈申请退款(可完整预览的文档不适用该条件!)。
- 3、如文档侵犯您的权益,请联系客服反馈,我们会尽快为您处理(人工客服工作时间:9:00-18:30)。
xDVR数字硬盘录像系统
快速使用手册
(Version 6.5)
北京捷诺视讯数码科技有限公司
目录
1. 安装光盘向导 (3)
2. xDVR服务端安装 (3)
2.1 配置向导 (4)
登陆 (4)
终端类型 (4)
采集卡类型 (5)
初始化设置 (6)
完成向导 (8)
3. xDVR 服务器 (9)
3.1 主界面 (9)
3.2 系统设置 (10)
■通道属性 (10)
预览 (10)
视频参数 (11)
移动侦测 (12)
录像计划 (13)
PTZ云台 (14)
报警 (15)
■服务器属性 (16)
基本信息 (16)
外围设备 (17)
报警联动 (18)
■系统属性 (19)
3.3 回放 (19)
开始回放 (19)
回放主界面 (20)
4. WEB服务器 (21)
开始WEB服务 (21)
IE客户端登陆 (21)
1. 安装光盘向导
首先,插入软件安装光盘至光驱,运行光盘目录下Autorun.exe自动运行,弹出如下窗口;
1. 驱动安装;
2. 服务器软件安装;
3. 客户端/网络数字矩阵软件安装;
4. 帮助文档(快速操作手册)
2. xDVR服务端安装
第一步:双击安装程序
2.1 配置向导
登陆
系统管理员用户名super, 默认密码test;
终端类型
在这里可以选择本机的终端类型、获取A8报警箱地址:
1.默认终端类型分为:DVR ( 服务端默认无需更改)
2. A8报警盒地址获取:(若没有接A8报警箱,无需设置,直接点“下一步”)
采集卡类型
选择采集卡类型, 点击“下一步”按钮后,如下图:
用户可根据PCI插槽视频采集卡的型号,选择自己适合的采集卡类型;支持采集卡类型:
1)海康DS-40xxHC / HC+/ HF;
2)海康DS-400xH
3)海康DS-40xxHS
4)海康DS-400xM
型号说明:xx代表路数,HC代表采集卡型号
初始化设置
采集卡硬件检测自动获取采集卡序列号;用户可导出序列号,注册序列号;
1.系统自动获取采集卡类型,板卡数量等硬件信息;
2.采集卡序列号统计
3.手动检测硬件;
4.用户可点“导出序列卡号“,发回厂家加密;
5.收到注册文件后,点“注册序列号”,浏览注册文件,点打开,即可导入数据库;
站点信息设置:
1. 图像制式选择:PAL制(默认)与NTSC制;
2. 图像分辨率:CIF(默认)与D1;
3. 图像显示处理方式:Overlay模式(默认)与DirectDraw模式;
4. 系统白天/黑夜模式:白天时间段与夜间时间段;
5. 开机自动运行:当Windows启动后,自动启动xDVR服务软件;
注释:一般Nvidia芯片支持Overlay, A TI芯片显卡支持DirectDraw模式;
继续点“下一步”按钮后,进入修改超级管理员密码界面,如下图:
在这里可修改管理员的密码,修改密码后请牢记,普通用户不能登陆配置向导;
继续点“下一步”按钮,进入数据库备份选项;如下图
1.数据库备份与恢复(:建议:第一次安装可跳过此步骤)2.始化数据库;修复数据库表,是否保留注册信息;3.数据库备份保存路径设置启用定时备份功能;
完成向导
配置向导完成,自动运行xDVR服务;
3. xDVR 服务器
3.1 主界面
主程序面板按钮介绍:
1.声音监听
2.通道轮巡翻页
3.抓拍照片
4.录像回放
5.画面布局
6.系统设置
7.锁屏/解锁
8.退出系统
9. LOGO图片
10.日期时间星期| 系统资源信息(硬盘、CPU、内存、网络传输速率);11.PTZ面板控制(云台,快球、视频参数)
12.录像状态指示
13.报警状态指示
3.2 系统设置
■通道属性
预览
在这里你可以设置每个摄像机通道的名称,OSD的显示以及遮挡,通道是否保密1.目录树,选中一个摄像机通道,即可以出现右侧的属性页
2.摄像机名,可修改
3.采集卡板卡类型系统自动判断;
4.设置保密通道
5.默认设置OSD时是静态画面,你可以切换到实时视频
6.日期时间类型设置,是否闪烁;
7.遮挡,你可以添加布置1个遮挡区域;
在这里可以设置选定通道的录像参数:
1.视频制式选择:(默认为PAL制)
2.分辨率选择:(默认:CIF:352 ×288)
3.图像质量调整;
4.每秒传输帧数:(实时为25帧/秒);
5.夜间光线不足,录像码流校大;自动降低码流时间段设置;
移动侦测区域设置,灵敏度设置(最多可添加8个侦测区域)
1.可切换实时预览,用鼠标左键在视频区域内画侦测区域,鼠标点“添加“按钮;2.侦测灵敏度调节;
3.添加或删除侦测区域,用鼠标右键盘在视频区域内画框选择,点“删除“按钮;
注意:移动侦测联动录像生效,必需设置移动侦测计划;
在这里可以设置定时和移动侦测录像计划:
1.可通过模板设置,在此批量设置录像计划功能;
2.计划时间点和星期设置(时间最小时间间隔为15分钟);
在这里设置该摄像机通道的云台控制参数:
1.设置云台解码器的协议
2.设置云台解码器的地址
3.设置串口通讯参数(COM口、波特率选择)
报警
在这里设置摄像机通道报警联动关系:
1.报警事件类型
2.不同报警联动关系(声音报警、联动预置位、发短信、通知客户端、抓拍照片);3.报警布防时间段(白天/黑夜两个时间段)
4.报警联动声音报警;
5.联动快球预置位;
6.发送短信(兼容经纬星航短信Modem);
7.给客户端发送报警消息;
8.联动抓拍;
■服务器属性
基本信息
在树形列表选择->服务器设置,可设置服务器相关参数;
1.服务器名、MAC地址、本机IP地址(自动获取,不能修改)
2.音视频服务端口号及权限控制TCP端口号(可修改)
注释:服务器的基本信息,配置向导已对它进行配置,无需另外设置;
常用端口号
音视频端口:5050
权限控制端口:8000
WEB端口:80
在这里可以添加外围硬件设备:包括(报警盒、模拟矩阵、防死机狗)
1.是否允许手动暂停计划布防
2.添加报警盒的协议(General_A8)、地址、通讯参数、报警盒个数、输入输出个数
添加防死机狗及相关属性参数;;
在这里可以设置探头报警关联事件、触发时间及事件属性设置;
1.报警点号选择
2.事件类型日夜是否触发;
3.语音报警
4.联动摄像机通道录像
5.快球控制
6.短信
7.文字消息通知客户端
8.抓拍照片
9.弹出电子地图
10. 报警联动输出
■系统属性
系统属性设置说明:
1.系统退出或定时退出时是否重启或关机,是否需要输入确认密码;2.系统启动后,是否锁定键盘热键;
3.系统夜间时间段设置
4. OEM系统所需图片替换;
5.登陆用户名及系统运行时间条是否显示;
6.定期自动清除日志功能;
3.3 回放
开始回放
操作说明:鼠标左键选中,弹出回放界面,如下图:
回放主界面
操作说明:
1.选中某DVR主机的某通道;
2.默认为检索当天24小时录像,可自定义设置开始日期时间及结束日期、时间;3.选择检索本地或远程,点“普通录像”在[ 5 ]区域内显示检索到的录像文件索引;
4.选中[5 ]区域内某个录像文件,鼠标点[4 ]
4. WEB 服务器
开始WEB 服务
若已安装IIS 服务,则禁用IIS 服务并启动 开始-》程序—>xdvr 服务端—>WEB 服务发布; IE 客户端登陆
必需先启动启动服务端后,再在Intnet Explor 地址栏内,输入http://192.168.0.80(IP 地址为服务器IP 地址)回车,进入登陆页面,如下图:
图 1-3
² 当第一次登陆主页面时, 点击下载 “视频预览”及“文件检索” 控件执行注册; ² 默认选 [局域网],输入登陆帐号及密码,点“登陆系统“,进入监控主页面;
Ø 以下两种情况广域网监控,需要作初始化设置(局域网无需设置)
1) 若PC-DVR 服务端ADSL 动态拨号上网,采用花生壳或希网动态IP 域名解析,
2) PC_DVR 服务端,具有公网固定IP;
登陆帐号与密码,在
服务端用户管理内创建 视频预览及文件检
索控件下载注册
3.监控主页面
界面介绍:
1.读取本地PC_DVR配置的通道列表信息;
2.视频显示区域;
3.画面分割按钮1/4/6/8/9/16 。
若打开的通道数量大于网格数,再次点击相同网格数按钮,视频翻页;
4.打开视频组、文件回放,关闭所有通道;
5. PTZ云镜控制及,预置位控制;
4.文件检索
鼠标点击文件检索
播放按钮
播放控制面板介绍:
1)
停止、播放、暂停、上一帧、下一帧、快放、慢放
2)
开始剪辑/停止剪辑、开始下载/停止下载、抓拍
注意:1)支持IP文件检索回放,不支持域名检索回放;
2)如果使用预置位功能,则必需使用IIS发布,不能使用WEB服务发布工具;。
