WinCE5.0入门
WinCE_5_0_BSP_User_Guide
Intel® 830M4/854 Development PlatformMicrosoft* Windows* CE 5.0 Board Support Package (BSP) User’s Guide January 2006Revision 1.12 Microsoft* Windows* CE 5.0 Board Support Package (BSP) for Intel® 830M4/854 User’s GuideLegal StatementsINFORMATION IN THIS DOCUMENT IS PROVIDED IN CONNECTION WITH INTEL PRODUCTS. NO LICENSE, EXPRESS OR IMPLIED, BY ESTOPPEL OR OTHERWISE, TO ANY INTELLECTUAL PROPERTY RIGHTS ISGRANTED BY THIS DOCUMENT. EXCEPT AS PROVIDED IN INTEL'S TERMS AND CONDITIONS OF SALE FOR SUCH PRODUCTS, INTEL ASSUMES NO LIABILITY WHATSOEVER, AND INTEL DISCLAIMS ANY EXPRESS OR IMPLIED WARRANTY, RELATING TO SALE AND/OR USE OF INTEL PRODUCTS INCLUDING LIABILITY OR WARRANTIES RELATING TO FITNESS FOR A PARTICULAR PURPOSE, MERCHANTABILITY, OR INFRINGEMENT OF ANY PATENT, COPYRIGHT OR OTHER INTELLECTUAL PROPERTY RIGHT. Intel products are not intended for use in medical, life saving, life sustaining applications.Intel may make changes to specifications and product descriptions at any time, without notice.Designers must not rely on the absence or characteristics of any features or instructions marked “reserved” or “undefined.” Intel reserves these for future definition and shall have no responsibility whatsoever for conflicts or incompatibilities arising from future changes to them.This manual may contain design defects or errors known as errata, which may cause the product to deviate from published specifications. Current characterized errata are available on request.This manual as well as the software described in it, is furnished under license and may only be used or copied in accordance with the terms of the license. The information in this document is furnished for informational use only, is subject to change without notice, and should not be construed as a commitment by Intel Corporation. Intel Corporation assumes no responsibility or liability for any errors or inaccuracies that may appear in this document or any software that may be provided in association with this document.Except as permitted by such license, no part of this document may be reproduced, stored in a retrieval system, or transmitted in any form or by any means without the express written consent of Intel Corporation.Contact your local Intel sales office or your distributor to obtain the latest specifications and before placing your product order.Copies of documents which have an ordering number and are referenced in this document, or other Intel literature may be obtained by calling1-800-548-4725 or by visiting Intel's website at .BunnyPeople, Celeron, Celeron Inside, Centrino, Centrino logo, Chips, Core Inside, Dialogic, EtherExpress, ETOX, FlashFile, i386, i486, i960, iCOMP, InstantIP, Intel, Intel logo, Intel386, Intel486, Intel740, IntelDX2, IntelDX4, IntelSX2, Intel Core, Intel Inside, Intel Inside logo, Intel. Leap ahead., Intel. Leap ahead. logo, Intel NetBurst, Intel NetMerge, Intel NetStructure, Intel SingleDriver, Intel SpeedStep, Intel StrataFlash, Intel Viiv, Intel XScale, IPLink, Itanium, Itanium Inside, MCS, MMX, MMX logo, Optimizer logo, OverDrive, Paragon, PDCharm, Pentium, Pentium II Xeon, Pentium III Xeon, Performance at Your Command, Pentium Inside, skoool, Sound Mark, The Computer Inside., The Journey Inside, VTune, Xeon, Xeon Inside and Xircom are trademarks or registered trademarks of Intel Corporation or its subsidiaries in the United States and other countries.*Other names and brands may be claimed as the property of others. Copyright © 2005-2006, Intel CorporationMicrosoft* Windows* CE 5.0 Board Support Package (BSP) for Intel® 830M4/854 3 User’s GuideContents1 Introduction.............................................................................................................7 1.1 Definitions.......................................................................................................................................7 2 System Requirements.............................................................................................8 2.1 Host Development PC....................................................................................................................8 2.2 Development Platform....................................................................................................................8 3 Features Summary..................................................................................................9 3.1 Supported Hardware ......................................................................................................................9 3.2 Supported Features........................................................................................................................9 4 BSP Components..................................................................................................10 5 How the BSP Works..............................................................................................11 6 Setting up the Environment..................................................................................12 6.1 Cross Platform Development Environment..................................................................................12 6.2 Host Development PC Setup........................................................................................................12 6.3 Development Platform Setup........................................................................................................13 6.3.1 Prepare the Hardware...........................................................................................................13 6.3.2 BIOS Settings........................................................................................................................16 6.3.3 Prepare the Hard Disk...........................................................................................................17 7 Building the Microsoft Windows CE 5.0 OS Image ............................................18 8 Installing the Microsoft Windows CE 5.0 OS Image...........................................23 9 Developing Applications for the Development Platform ...................................24 9.1 Common Applications Development............................................................................................24 9.2 Audio Driver Sample Code...........................................................................................................28 9.3 Remote Software Update Sample Code......................................................................................30 9.3.1 Establish the Remote Software Update (RSU) Service........................................................30 9.3.2 Configure the Register Options for the ftpd Server...............................................................31 9.3.3 How to Use the RemoteSoftwareUpdate(RSU) Service.......................................................32 9.3.4 How to Build RSU.DLL. (32)4 Microsoft* Windows* CE 5.0 Board Support Package (BSP) for Intel® 830M4/854 User’s GuideRevision HistoryDateRevisionDescriptionSeptember, 2005 1.0 Initial Release. January, 20061.1Misc edits.Microsoft* Windows* CE 5.0 Board Support Package (BSP) for Intel® 830M4/854 7 User’s Guide1 I n t r o d u c t i o nThis document describes the Intel® 830M4/854 Development Platform – Board Support Package (BSP) for Microsoft* Windows* CE 5.0. It provides a summary of BSP features, build and installation notes, and lists the content of the release package. This BSP is used for developing embedded solutions, and is targeted at Microsoft Windows CE 5.0 developers who are developing Microsoft Windows CE 5.0 software for Consumer Electronic Products on Intel 854 and Intel 830M4 Development Platforms.1.1 DefinitionsTermDefinitionBSP Board Support PackageHDMI High Definition Multimedia Interface ATA Hard drive standard interface S/PDIFSony/Philips Digital Interface8 Microsoft* Windows* CE 5.0 Board Support Package (BSP) for Intel® 830M4/854 User’s Guide2S y s t e m R e q u i r e m e n t s2.1Host Development PC• Workstation containing an Intel Pentium® 4 2.4 GHz (or higher) processor • Microsoft Windows XP operating system • Microsoft Platform Builder•Intel 830M4/854 Microsoft Windows CE 5.0 Board Support Package (BSP) — installation instructions are found in the Release Notes.2.2 Development Platform• Intel 854 Development Platform or an Intel 830M4 Development Platform• NTSC TV Set (with either composite video or S-Video inputs)• Keyboard: You need a keyboard with a PS/2- or USB-style connector. • Mouse: You need a mouse with a PS/2- or USB-style connector.• Electrostatic discharge-safe environment: Ensure that you adhere to sound ESD practices when setting up and configuring the development platform.• IDE compatible hard disk drive (20 GB or greater). (IDE cables are included in the development platform kit.) • USB floppy drive and cables (USB cables are not included in the development platform kit)•VGA Monitor: Any standard VGA or multi-resolution monitor can be used. The setup instructions in this document assume that a standard VGA monitor is used.Other Devices and Adapters: The evaluation board functions much like a standard desktop computer motherboard. Many PC compatible peripherals can be attached and configured to work with the evaluation board.Microsoft* Windows* CE 5.0 Board Support Package (BSP) for Intel® 830M4/854 9 User’s Guide3F e a t u r e s S u m m a r y3.1 Supported HardwareHardwareConfigurationIntel 854 Development Platform Intel® Celeron® M Processor + Intel 82854 GMCH + Intel 82801DBM ICH4-M + 512MB RAM + Intel® 82802AC Firmware Hub (4MB/8MB)Intel 830M4 Development PlatformMobile Intel Celeron® (or Intel Pentium® III) + Intel 83830M GMCH + Intel 82801DBM ICH4-M + 128MB RAM + Intel® 82802AC Firmware Hub (4MB/8MB)Video Add-in CardIntel 854 Development Platform: • Conexant CX25892 add-in card• Conexant 25899* /Silicon Image siI9030* • Focus FS454 Spartan B* add-in cardIntel 830M4 Development Platform: • Conexant CX25873 add-in card• Focus FS454 Spartan B* add-in card3.2 Supported Features• AMI BIOS• Microsoft Windows CE 5.0 • ICH4/ICH4-M PCI Bus • AC97 Audio CODEC • S/PDIF Audio • Analog Audio• Audio Volume Adjustment • HDMI Audio • Microphone Input• Build-in Ethernet Device (Intel 82562)• PCI based Intel family Ethernet adapter (82551ER, 82551QM, 82559, 82562ET, 82562EM, 82540EM, 82541ER, 82545EM, 82545GM, 82546EB, 82546GB) • USB 1.1 • USB 2.0• USB Keyboard/Mouse and Mass storage • IDE/ATAPI Drivers • CD FS/FAT FS/UDF FS • Power Management•Sample Code (BIOS Boot loader, Remote SW Update, Project Template)10 Microsoft* Windows* CE 5.0 Board Support Package (BSP) for Intel® 830M4/854 User’s Guide4B S PC o m p o n e n t sThe BSP includes three component types.• The first type is board related (854 DSTB_CEBSP, or the 830 DSTB_CEBSP). • The second type is device drivers (NDIS, audio, ATAPI/IDE, display, and USB). • The last type is sample code applications.The components are listed below:ComponentContentInstallation Path854 DSTB_CEBSP or 830 DSTB_CEBSP BSP including OAL, ETHDBG, and eboot.bin for Intel NIC, with build configuration to make use of the separately packaged drivers. $WINCEROOT\PLATFORM\854dstb or $WINCEROOT\PLATFORM\830dstb E100CE Ethernet driver for Intel NIC$WINCEROOT\Intelceg\Drivers\E100ce ICHUAMUAM Audio driver with support for the ICH4 $WINCEROOT\Intelceg\Drivers\Audio ICHIDEATAPI/IDE driver with support for the ICH4 $WINCEROOT\Intelceg\Drivers\Atapi DDI_i854 or DDI_i830 Display driver with support for the Intel 854/830 chipsets$WINCEROOT\Intelceg\Drivers\Display ICHUSB UHCI/EHCI USB driver with support for the ICH4$WINCEROOT\Intelceg\Drivers\Usb SAMPLESSample application code$WINCEROOT\Samples and $WINCEROOT\WinceMicrosoft* Windows* CE 5.0 Board Support Package (BSP) for Intel® 830M4/854 11 User’s Guide5H o w t h e B S P W o r k sThe BSP includes several components. As described above, the BSP components are divided into three functional types:• Board Related — this component type enables the special hardware on the Intel 854 or Intel 830M4 development platform for Microsoft Windows CE 5.0, such as the ICH4-M.• Device Driver — this component type provides the Microsoft Windows CE 5.0 device drivers for the peripheral devices on the Intel 854 or Intel 830M4 development platform.• Sample Code — this component type includes code for Microsoft Windows CE 5.0 sample applications, specifically targeted at the Intel 854 or Intel 830M4 development platforms.The BSP creates an 830M- or 854 –based Windows CE 5.0 image as follows:1. Install the BSP on the Host Development PC by launching the supplied 8xxDSTB_CEBSP_v5.0.1xxx.msi file.The installation wizard automatically integrates the BSP into the Platform Builder development environment. 2. Set up the development platform. (See Section 6.3).3. Use Platform Builder to Build a Microsoft Windows CE 5.0 OS image (with BSP features) on your HostDevelopment PC. The result of this is an NK.bin file. (See Section 7 for information on building the OS image; see Section 9 for information on how to use Platform Builder to develop an application.)4. Install the Microsoft Windows CE5.0 OS image (NK.bin) on the development platform. (See Section 8.)12 Microsoft* Windows* CE 5.0 Board Support Package (BSP) for Intel® 830M4/854 User’s Guide6S e t t i n g u p t h e E n v i r o n m e n tTo use the BSP, the Host Development PC should be connected to the development platform through an Ethernet connection. You may connect the Host Development PC and the development platform to an existing network, or you may set up a local network specific for development. In either case, you need to have a DHCP server in your network.6.1Cross Platform Development EnvironmentThe Microsoft Windows CE 5.0 BSP for embedded system uses a cross-platform development environment that includes a Host Development PC and the development platform. The term “cross platform development” means that the Windows CE 5.0 OS image for an Intel 854 or Intel 830M4 development platform is developed and built on your Host Development PC, and the resulting binaries (NK.bin) are run on the development platform.The Host Development PC and the development platform are connected to each other through an Ethernet connection. This is generally used to transfer binary files (image files, executables, and so on) from the Host Development PC to the development platform, and debug the OS image.You can also use a terminal program (for example, Hyper Terminal) on the host Development PC to connect to the development platform via a serial cable (RS232). The debug information can be displayed in the terminal window.6.2 Host Development PC SetupThe Host Development PC is a workstation containing an Intel Pentium® 4 2.4 GHz (or higher) processor, which is used for developing the Microsoft Windows CE 5.0 OS image.The Host Development PC should have the Microsoft Windows XP operating system, as well as Microsoft Platform Builder 5.0 installed on it. Microsoft Platform Builder 5.0 is used as the development tool. After the Platform Builder is installed, you then install the Board Support Package using the installation procedure described in the Release Notes.Its complete System Requirements are listed in Section 2.Microsoft* Windows* CE 5.0 Board Support Package (BSP) for Intel® 830M4/854 13 User’s Guide6.3Development Platform SetupThe development platform can be either an Intel 854 Development Platform or an Intel 830M4 Development Platform. The complete System Requirements for each platform are listed in Section 2.6.3.1Prepare the HardwareBefore applying power to the development platform, make the following connections (see Figures 1-3):1. Connect the VGA cable from the VGA monitor to the development platform.2. Connect the audio cable to the primary audio output.3. Connect the composite or S-video cable from the port driver to your TV if you want to see TV output.4. Connect the PS/2 keyboard and mouse to the development platform.5. Connect the Host Development PC to the development platform using a crossover Ethernet cable, or connect both the Host Development PC and the development platform to a switch/hub in one network.6. Connect the RS232 cable from the development platform to your Host Development PC (COM1) (This step is optional, and is used mainly for debug output during the boot process.)7. Connect a hard disk (20 GB or more) to the primary IDE and set it as master. 8. Connect power cables.9.Insert one add-in card into the ADD slot on the development platform. Refer to the following table to identify the models of add-in cards that can be used on your development platform:Development PlatformAdd-in card can be usedIntel® 854 Development PlatformConexant CX25892 add-in cardConexant 25899* /Silicon Image siI9030* Focus FS454 Spartan B* add-in card Intel® 830M4 Development PlatformConexant CX25873 add-in cardFocus FS454 Spartan B* add-in cardNote : Refer to the Intel Digital Set Top Box Display Driver for the Windows CE 5.0* Operating System User’s Guide for more information.14 Microsoft* Windows* CE 5.0 Board Support Package (BSP) for Intel® 830M4/854 User’s GuideFigure 1. Connecting to the Development PlatformFigure 2. Recommended Cable Connections for the Intel® 854 Development PlatformMicrosoft* Windows* CE 5.0 Board Support Package (BSP) for Intel® 830M4/854 15 User’s GuideFigure 3. Recommended Cable Connections for the Intel® 830M4 Development PlatformFigure 4. The RS232 port on Intel® 854 Development Platform16 Microsoft* Windows* CE 5.0 Board Support Package (BSP) for Intel® 830M4/854 User’s GuideFigure 5. The RS232 port on Intel® 830M4 Development Platform6.3.2 BIOS Settings6.3.2.1BIOS Settings for an Intel 854 Development PlatformBIOS Version: 08.00.11 Build Date: 2/16/2005 ID: SSVYG004Configure BIOS as follows:1. Power up the development platform.2. Press <Del > on the keyboard to enter setup.3. Press <F9> to load optimal default settings.4. Make sure System Time and System Date are consistent with your current local time.5. Click Boot > Boot Device Priority , choose the hard disk as the first boot device, and the DOM as the second bootdevice if a DOM is present in the system. 6. Press <F10> to save the settings and exit.6.3.2.2 BIOS Settings for an Intel 830M4 Development PlatformBIOS Version: 08.00.10 Build Date: 10/05/2004 ID: ASGLB008Configure BIOS as follows:1. Power up the development platform.2. Press <Del > on the keyboard to enter setup.3. Press <F9> to load default settings.4. Make sure System Time and System Date are consistent with your current local time.5. Click Boot > Boot Device Priority ; choose the hard disk as the first boot device, and the DOM as the second bootdevice if a DOM is present in the system. 6. Press <F10> to save the settings and exit.Microsoft* Windows* CE 5.0 Board Support Package (BSP) for Intel® 830M4/854 17 User’s Guide6.3.3 Prepare the Hard DiskThe following procedure describes one method for configuring an ATAPI hard disk so that the Microsoft Windows CE image can boot from it. (For information on other possible methods, refer to the Microsoft Platform Builder online help.) 1. Run C:\Program Files\Windows CE Platform Builder\5.00\CEPB\UTILITIES\websetup.exe. (This path assumes the default installation path.),2.Connect the USB floppy drive to the Host Development PC. Insert a blank floppy disk into it, then run the following command:C:\WINCE500\PUBLIC\COMMON\OAK\CSP\X86\BIOSLOADER\DISKIMAGES\setupdisk.144This will identify the floppy disk as a setup disk. With this floppy disk, you can set up your hard disk. 3.Disconnect the USB floppy drive from Host Development PC and connect it to the development platform,leaving the floppy disk inserted in the floppy drive. The development platform should be prepared according to the instructions in Section 6.3.1 “Prepare the Hardware”.4. Power on your development platform to boot into DOS from the floppy disk. You may need to enter the BIOS to set the floppy disk as the first boot device.5. Use the FDISK and FORMAT utilities to partition and format the hard disk. Do NOT format the disk with the /S option.6.Execute “mkdisk c:” This batch file will re-write the hard disk’s boot sector to allow it to load the Microsoft Windows CE OS Image.The hard disk is now ready to burn the Microsoft Windows CE OS Image.18 Microsoft* Windows* CE 5.0 Board Support Package (BSP) for Intel® 830M4/854 User’s Guide7B u i l d i n g t h e M i c r o s o f t W i n d o w sC E 5.0 O S I m a g eIn this section, you will build the Microsoft Windows CE 5.0 OS image on the Host Development PC. In the next section, you will then install the image on the Development Platform.To build the Microsoft Windows CE 5.0 OS image, from the Host Development PC do the following. 1. Open Platform Builder, and then select File >New Platform .Microsoft* Windows* CE 5.0 Board Support Package (BSP) for Intel® 830M4/854 19 User’s GuideStep 1 of the New Platform Wizard is displayed.2. Click Next , then enter a project name and path as shown below.20 Microsoft* Windows* CE 5.0 Board Support Package (BSP) for Intel® 830M4/854 User’s Guide3. Click Next , and then select the desired BSP(s) for your OS design.4. Click Next , and then select “Intel Set-Top Box”.Microsoft* Windows* CE 5.0 Board Support Package (BSP) for Intel® 830M4/854 21 User’s Guide5. In next two steps, you can modify the selection to customize your OS image, or you can use the default selectionand click Finish .22 Microsoft* Windows* CE 5.0 Board Support Package (BSP) for Intel® 830M4/854 User’s Guide6. From the Build OS menu, select Sysgen . If the build completes without any errors, the Microsoft Windows CE5.0 OS image will be built successfully.Microsoft* Windows* CE 5.0 Board Support Package (BSP) for Intel® 830M4/854 23 User’s Guide8I n s t a l l i n g t h e M i c r o s o f t W i n d o w s C E 5.0 O S I m a g e To install the Microsoft Windows CE 5.0 OS Image (NK.bin) on your development platform, please make sure that: •A hard disk drive is connected to the primary IDE on your development platform, and this hard disk is prepared following the instructions in Section 6.3.3. • A bootable USB storage device is available. Note: a utility for formatting a USB Thumbdrive can be found at the following link: (/support/files/hpcpqdt/us/download/20306.html ).Follow these instructions to install on your development platform:1. Copy the NK.bin which was built in Section 7 to a bootable USB Storage device (for example a USB Thumbdrive or a USB Hard Drive).2. Attach the USB Storage device to the development platform.3. Power on your development platform — it will boot into DOS from the USB device.4. Copy NK.bin from the USB device to the hard disk’s root directory ( “C:\”).5. Disconnect the USB device from the development platform.After the above instructions are done, the Microsoft Windows CE 5.0 OS image is installed on the development platform. Reboot the development platform, it will boot into Microsoft Windows CE.24 Microsoft* Windows* CE 5.0 Board Support Package (BSP) for Intel® 830M4/854User’s Guide9 D e v e l o p i n g A p p l i c a t i o n s f o r t h eD e v e l o p m e n t P l a t f o r mIn the section, we will discuss how to develop Microsoft Windows CE 5.0 applications for the development platform. 9.1Common Applications Development Now that the Microsoft Windows CE 5.0 OS image, built from the Intel Board Support Package, has been installed on the development platform, you can develop Microsoft Windows CE applications to utilize the features listed in Section 3.2.The following instructions explain how to create a simple Windows CE application for the development platform.1. On the Host Development PC, use the Platform Builder to open the “Test” workspace, which you created inSection 7.2. From the File menu, select New Project or File .Microsoft* Windows* CE 5.0 Board Support Package (BSP) for Intel® 830M4/85425User’s Guide 3. From the Project tab, select WCE Application , enter “App1” as the Project name, and select Workspaceproject as the type.4. You may enter additional information in this screen, though it is not required.26 Microsoft* Windows* CE 5.0 Board Support Package (BSP) for Intel® 830M4/854User’s Guide5. Select A typical “Hello World!” application .6. Select LOCAL as the Release Type, and then click the Finish button.Microsoft* Windows* CE 5.0 Board Support Package (BSP) for Intel® 830M4/854 27 User’s Guide7. In the Workspace window, change to FileView. Select the “App1” project. From the Build Project menu, selectBuild Current Project .Once the application has been built successfully, you can execute this application by copying, then executing the NK.bin file on the development platform as shown in section 8 above.Microsoft Windows CE provides APIs you can use to development more extensive applications. For more information, go to the Microsoft MSDN website at /embedded/windowsce/default.aspx .28 Microsoft* Windows* CE 5.0 Board Support Package (BSP) for Intel® 830M4/854User’s Guide9.2Audio Driver Sample Code The audio driver sample code is located at “C:\WINCE500\Intelceg\Drivers\Audio\Unified\Sampleapp “. It provides two samples: •A demonstration of how to use the audio driver’s seven IOCTLs to configure the audio driver. Each IOCTL’s functionality is described in the sample code. • A demonstration of how to use Microsoft Windows CE APIs to develop an audio recording application. To build the sample code, do the following:1. Copy the entire “C:\WINCE500\Intelceg\Drivers\Audio\Unified\Sampleapp “ folder (and its subfolder) to“C:\WINCE500\PUBLIC\COMMON\OAK\DRIVERS\WAVEDEV\UNIFIED\Sampleapp “.Microsoft* Windows* CE 5.0 Board Support Package (BSP) for Intel® 830M4/854 29 User’s Guide2. From the Platform Builder command window, change (cd) to the desired sample app directory. For instance, tobuild the IOCTL sample, cd to the“C:\WINCE500\PUBLIC\COMMON\OAK\DRIVERS\WAVEDEV\UNIFIED\SampleApp\ac97ctrl” directory, then enter “build-c”.C: “C:\WINCE500\PUBLIC\COMMON\OAK\DRIVERS\WAVEDEV\UNIFIED\SampleApp\ac97ctrl”>build –c .The sample code will be built successfully.To use the sample code, you need to copy the ac97ctrl.exe to the development platform, and execute it on the development platform.The ac97ctrl.exe file can be found in “C:\WINCE500\PLATFORM\8xxdstb\target\x86\retail”, where “xx” is “30” for the 830 development platform, or “54” for the 854 development platform.Note: If in debug mode, “\retail” will be “\debug”.To build another sample (for example, “wavrec”) follow the same procedure, except you will cd to its directory in Step 2.30 Microsoft* Windows* CE 5.0 Board Support Package (BSP) for Intel® 830M4/854User’s Guide9.3Remote Software Update Sample Code 9.3.1 Establish the Remote Software Update (RSU)ServiceTo establish the RSU service, do the following:1. Install the “samples” from the WinCE BSP release package. After installation the files will located at:“C:\WINCE500\Intelceg\Samples”2. Use cmds.cpp, ftpd.cpp, and ftpsession.cpp, which are located at:“C:\WINCE500\Intelceg\Wince\Public\SERVERS\SDK\SAMPLES\FTPD” to replace the same named files in directory “C:\WINCE500\PUBLIC\SERVERS\SDK\SAMPLES\FTPD\”.3. Use servers.reg, which is located at “C:\WINCE500\Intelceg\Wince\Public\SERVERS\OAK\FILES” to replacethe same named files in directory “C:\WINCE500\PUBLIC\SERVERS\OAK\FILES\”.Caution !Please back up the files to be replaced first if you are not sure whether they are useful, as they will be overwritten during this process.4. Add the "Intel® Embedded Remote Software Update Service" item to your OS design from the PlatformBuilder's catalog. The item resides at "Catalog/Third Party/Samples/".5. From the Build OS menu in Platform Builder, select Sysgen to build NK.bin - the Remote Software Update(RSU) service will be established in your kernel when the build completes.。
WINCE驱动程序快速入门
WINCE驱动程序快速入门有人也许和我一样比较心急,想尽快知道如何去写一个具体的驱动程序,这里,假设您对驱动程序已经有比较好的了解,告诉大家一个快速上路的方法。
当然,如果您有足够的时间我建议在动手之前还是深入了解一下CE整个系统架构。
在CE中,最简单的一个驱动程序莫过于一个内置(Built-in)设备的流接口驱动。
对于一个不支持热拔插的设备,最快捷的方法就是为其实现一个内置的流接口的驱动。
对于这样一类驱动程序,我们只需要按一种特定的规则实现一个动态库,其中实现对所有的硬件功能的调用,再将这个动态库加入系统中,然后设置相关的注册表项,使得在系统启动时设备管理器能识别并且加载这个设备即可。
3〃1 实现动态链接库此动态链接库与应用程序层所用的库并不很大差别,源文件可以是C、C++、甚至汇编,,只是它要实现以下函数。
DllEntry(HINSTANCE DllInstance, INT Reason, LPVOID Reserved )这个函数是动态链接库的入口,每个动态链接库都需要输出这个函数,它只在动态库被加载和卸载时被调用,也就是设备管理器调用LoadLibrary而引起它被装入内存和调用UnloadLibrary将其从内存释放时被调用,因而它是每个动态链接库最早被调用的函数,一般用它做一些全局变量的初始化。
参数:DllInstance:DLL的句柄,与一个EXE文件的句柄功能类似,一般可以通过它在得到DLL 中的一些资源,例如对话框,除此之外一般没什么用处。
Reason: 一般我们只关心两个值:DLL_PROCESS_ATTACH与DLL_PROCESS_DETACH,Reason等于前者是动态库被加载,等于后者是动态库被释放。
所以,我们可以在Reason等于前者是初始化一些资源,等于后者时将其释放。
DWORD XXX_Init(LPCTSTR pContext,LPCVOID lpvBusContext);它是驱动程序的动态库被成功装载以后第一个被调用的函数。
WinCE5.0入门全程导学1

WinCE5.0入门全程导学!(开发环境建立+流驱动开发)收藏默认分类2010-05-24 10:01:52 阅读453 评论1 字号:大中小转别人的一、前言1、首先谈谈本人基础。
我熟悉AVR单片机,使用过ATmega16单片机大部分功能,如4X4键盘、UART、SPI、I2C、Timer、PWM等等,接触过DSP芯片TMS320C54X,懂得VHDL语言,简单使用过LPC2131,并在其上移植过uC/OS-II,学习过有关操作系统的基本知识。
用过的相关软件有:ICCAVR、ADS1.2、CCS、uVision等。
2、学习不要着急,如果你没有操作系统的基础,可能一时接受不了操作系统这个概念,而是拿着自已天天用的PC机的Windows操作系统的界面钻牛角尖。
不要总感觉这资料是垃圾,那本书是骗钱的,之所以你看不懂那是因为你还没达到看懂的程度!当然现在骗钱的书很多,著书者很少从读者的角度去写书!3、我所使用的开发环境:PC XP+GEC2440+WinCE5.0+VS2008+ActiveSync4.5+DN WGEC2440是广嵌科技术的开发板,不喜欢广嵌,售后技术支持做的不好,而且技术论坛也没人回帖,不建议使用本实验板!其实板子做的还行,只是相关服务有待加强!!!二、入门准备1、什么是操作系统?这个问题是困扰了我很久的问题。
由于我们大家对于Windows XP等PC机操作系统过于熟悉,而此操作系统又过于傻瓜式,以致于使我们感觉不到操作系统的本质,仅感觉操作系统就是一个窗口,反正在我接触嵌入式操作系统前是这样认为的。
那么什么是操作系统呢?从我使用uC/OS-II的体验来说,简单点儿说操作系统就是一个调度器,从我现在使用WinCE的体验来说,操作系统就是管家婆。
总的来说吧,操作系统就是用算法实现的管理系统所有资源一个后台。
可能这样说还是有些抽象,别急,慢慢来!2、操作系统安装在哪儿呢?界面呢?这个问题绝对是Windows操作系统使用后遗症,总感觉操作要像我们PC机装系统一样进行安装,要有像XP等OS一样的操作界面。
WINCE 亲身体验
WINCE 5.0 亲身体验--处女航向往嵌入式开发其实已经很久了,但是作为学计算机的我,对电子方面的知识其实很欠缺,再加上从事了很久的MIS开发基本上都在做工程做项目,一直沉浸在DELPHI的世界中,早已将C语言丢脑后了。
现在终于有机会开始接触嵌入式的开发,真的很开心。
乱七八糟的了解了一些相关知识,急急忙忙的着手了,这里描述一下我的亲身经历。
经过一年的混乱学习、了解,大致明白了嵌入式的开发过程,于是在老板的急切催促中项目开始了。
最开始对于嵌入式还不甚明白的时候购买了一个款ARM2410的试验板(好贵呀!)心想以后生产可以让厂家提供PCB我们自己生产,后来随着对这个行业的了解,才明白,厂家根本不会也不会允许我这么做,人家就靠这个挣钱的。
但在他们提供的技术资料和在网上大量搜集到的资料中,我拼凑出了一套自己的核心板,然后请我们老师按照这个思路绘制了我们自己的ARM2410的PCB核心板。
由于ARM的设计还需要一段时间,老板是不会等很久的,于是老板提出先用电脑PC作为主板先行进行CE的开发(使用WINCE相对来说开发起来较为LINUX简单)。
接下来,我连着几天开始了寻找主板的工作。
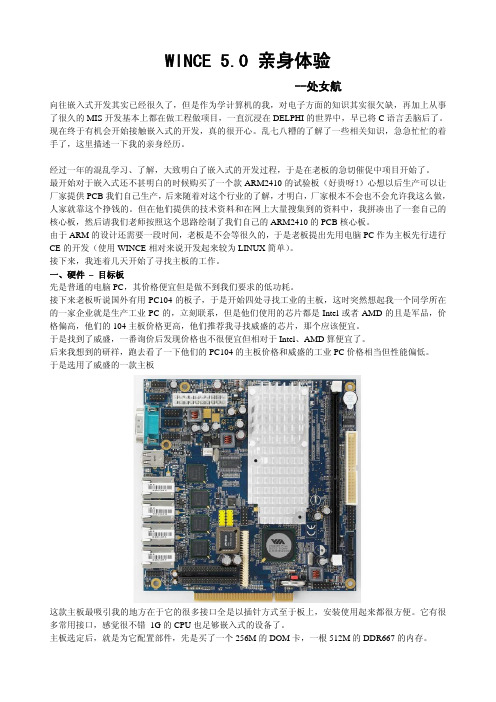
一、硬件 – 目标板先是普通的电脑PC,其价格便宜但是做不到我们要求的低功耗。
接下来老板听说国外有用PC104的板子,于是开始四处寻找工业的主板,这时突然想起我一个同学所在的一家企业就是生产工业PC的,立刻联系,但是他们使用的芯片都是Intel或者AMD的且是军品,价格偏高,他们的104主板价格更高,他们推荐我寻找威盛的芯片,那个应该便宜。
于是找到了威盛,一番询价后发现价格也不很便宜但相对于Intel、AMD算便宜了。
后来我想到的研祥,跑去看了一下他们的PC104的主板价格和威盛的工业PC价格相当但性能偏低。
于是选用了威盛的一款主板这款主板最吸引我的地方在于它的很多接口全是以插针方式至于板上,安装使用起来都很方便。
它有很多常用接口,感觉很不错 1G的CPU也足够嵌入式的设备了。
09第九章 windows CE 5.0开发简介
驱动程序库的层次结构
9.2.5 Boot Loader
• Boot loader的一般性目的 • Boot loader支持库
Boot loader的一般性目的
• A boot loader manages the boot process of the target device by initializing the target device, downloading the run-time image, and booting the run-time image on the target device.
9.2.2 PB提供的BSP
• • • • ARM MIPS SHx X86
Байду номын сангаас
9.2.3 克隆创建BSP
• The easiest way to create a BSP • Use the BSP Wizard in the Platform Builder IDE to clone a BSP • The BSP consists of two parts
9.4.1 系统运行镜像开发过程
9.4.2 New Platform Wizard
• Choose a preconfigured BSP. • Select a base design template for your OS design. • Select some initial OS Catalog items.
Production-Quality OAL
• Simplifies and shortens the process of developing an OAL • Enables developers to develop the most basic Windows CE kernel with little development effort
WINCE启动流程文档
WinCE5.0 PXA270 BSP启动流程李文锋Email: ap9805411@2007-04-27 第一部分:EBOOT启动流程:startup.s:1、初始化硬件,例如关看门狗、禁止所有中断,初始化GPIO等(该功能未添加)。
2、初始化系统时钟(该功能未添加)。
3、初始化内存控制器和FLASH控制器(该功能未添加)。
4、初始化堆栈(该功能未添加)。
5、从FLASH复制EBOOT代码到RAM。
6、验证复制过程,若失败,则程序停止,若成功,则执行第3步。
7、建立memory map、设置MMU。
8、调用main.c中的main函数。
并不再返回。
main.c1、调用PLATFORM\COMMON\SRC\COMMON\BOOT\BLCOMMON\ blcommon.c中的BootloaderMain函数。
BootloaderMain函数调用完后如有返回,则执行第2步(一般不再返回,除非出现异常)。
2、调用utils.c中的SpinForever函数。
程序停止。
(不会执行)blcommon.c1、调用blcommon.c 内的KernelRelocate函数。
把启动相关的全局变量从FLASH复制到SDRAM。
如该函数执行出错,则程序停止,否则将执行第2步。
2、调用main.c中的OEMDebugInit函数初始化调试用串口。
3、调用main.c中的OEMPlatformInit函数硬件平台等工作,包括RTC等,并通过串口打印出EBOOT启动提示信息,并提示用户选择(通过串口控制)引导WinCE内核还是进入EBOOT菜单。
若在设定时间内按下ENTER键或超时,则引导内核,执行第4步。
或在设定时间内按下SPACE键,则进入EBOOT菜单。
当选择设置菜单时,设置相应参数后继续在函数内等待,如选择下载WinCE内核,则初始化以太网控制,并执行通过以太网发送BOOTME信息(调用SetBootMe,该代码未添加)。
wince5.0开发环境搭建

wince5.0开发环境搭建
本来是写了挺多的内容的,后来因为安装软件过程中⼀不⼩⼼重启了电脑,写的东西全丢了,这次就简单的写⼀下⽤的⼯具和安装流程以及碰到的问题;
主要⽤的开发⼯具为windowsce5.0 standard sdk,embedded visual c++4.0,ACTIVE SYNC,这第⼀个⼯具就内含了wince5.0内核源码以及platform builder
pb与evc的区别在于pb的开发及调试针对的是wince内核,即便⽤它进⾏应⽤程序的开发也是内嵌在内核模块中,成为内核代码,⽽evc⽤来进⾏⽤户应⽤程序的开发,是更⾼层的软件。
也就是说pb更多的⽤来做内核裁剪与驱动程序的开发。
standard sdk 与 active syn安装与打开没有问题,只是embedded visual C++安装完成后不能正常打开,报错如下:has discovered no CE platform SDK installed on the desktop.
解决办法是安装Microsoft Pocket PC 2003 SDK即可。
在安装完standard sdk后会在右下⾓有警⽰信息,解决办法是
安装winCE standard sdk 5.0时,必须先修改boot.ini⽂件,即将其中的/noexecute=...修改为/execute=...。
修改⽅法:可以直接编辑boot.ini,也可以通过我的电脑-》属性-》⾼级-》启动及故障修复-》。
其他⼀切正常,后⾯的⼯作就正式进⼊应⽤程序开发了,希望能学习到更多的东西。
北京君正集成电路 WINCE5.0 软件配置指南

WINCE5.0 软件配置指南版本: 2.0日期: 2007年5月君正WinCE软件配置指南Copyright © Ingenic Semiconductor Co. Ltd 2007. All rights reserved.Release historyDate Revision ChangeMay, 2007 2.0March, 2007 1.0 First releaseDisclaimerThis documentation is provided for use with Ingenic products. No license to Ingenic property rights is granted. Ingenic assumes no liability, provides no warranty either expressed or implied relating to the usage, or intellectual property right infringement except as provided for by Ingenic Terms and Conditions of Sale.Ingenic products are not designed for and should not be used in any medical or life sustaining or supporting equipment.All information in this document should be treated as preliminary. Ingenic may make changes to this document without notice. Anyone relying on this documentation should contact Ingenic for the current documentation and errata.北京君正集成电路有限公司北京市海淀区上地东路1号盈创动力E座801CTel: 86-10-58851003Fax: 86-10-58851005Http: //目录目录1概述 (1)2安装Ingenic BSP (3)2.1概述 (3)2.2安装需求 (3)2.3安装步骤 (3)3Ingenic BSP结构 (5)3.1概述 (5)3.2文件夹COMMON (5)3.3文件夹SRC (6)3.4文件夹CESYSGEN (6)3.5文件夹FILES (6)3.6文件夹BIN (6)3.7文件夹DOC (6)3.8文件夹LIB (6)3.9文件夹TARGET (6)4基于RD4730_PMP的系统定制 (7)4.1概述 (7)4.2配置文件 (7)概述1 概述本文介绍基于Ingenic BSP进行平台定制和系统定制的过程。
windows CE.net 5.0 说明书
Windows 5.0 使用说明书第1章WinCE 5.0 for MagicARM2410特点 (1)1.1 Windows 5.0 for MagicARM2410提供的驱动程序 (1)1.2 Windows 5.0 for MagicARM2410优势 (1)1.3 配套教材 (2)1.4 推荐教材 (2)第2章Windows 5.0使用说明 (3)2.1 Windows 5.0功能演示 (3)2.1.1 Windows 5.0的启动 (3)2.1.2 USB键盘、鼠标的使用及Windows CE中的文件 (7)2.1.3 触摸屏校准 (8)2.1.4 以太网IP地址的修改、以太网功能的验证及WebServer功能 (9)2.1.5 系统设置与用户数据的保存 (11)2.1.6 播放mp3,mpeg多媒体文件 (12)2.1.7 Txt,Word,Excel,pdf,ppt,图片文件的浏览 (12)2.1.8 SD/MMC,CF卡,PCMCIA转CF卡,U盘的读写 (12)2.1.9 蓝牙USB适配器 (13)2.1.10 建立ActiveSync连接,从PC机传输数据到Windows 5.0 (14)2.1.11 蜂鸣器、步进电机、LED控制 (20)2.1.12 CAT1025 E2PROM的读写 (21)2.1.13 ZLG7290按键扫描及七段数据管显示 (21)2.1.14 ADC采样显示 (22)2.1.15 直流电机调速 (22)2.1.16 SD/MMC卡的读写 (22)2.1.17 GPRS拨打/接听电话,接收/发送短信,无线上网 (23)2.1.18 串口通信,以太网UDP、TCP通信,CAN总线通信 (25)第1章 WinCE 5.0 for MagicARM2410特点1.1 WinCE 5.0 for MagicARM2410提供的驱动程序MagicARM2410实验箱上运行的Windows CE操作系统为Windows 5.0,支持64MB的NANDFlash盘驱动,保证掉电后系统设置及用户数据不丢失,并且提供了丰富的外设驱动,包括:TFT 640 X 480液晶驱动程序触摸屏驱动程序S3C2410A USB Host驱动程序USB HID驱动程序(支持USB鼠标、USB键盘)USB大容量类驱动(支持U盘读写)USB蓝牙驱动(支持两个蓝牙设备之间的文件传输)USB Device驱动程序(支持与PC机Windows的ActiveSync连接,支持文件传输,应用程序在线调试,远程查看注册表等功能)支持GPRS拨打电话、收发短信、远程控制、无线上网CAN总线驱动10M/100M自适应以太网DM9000驱动(支持UDP、TCP/IP、WebServer)ZLG/FFS支持写平衡的NAND Flash驱动(NAND Flash在Widnows CE下表现为一个Flash Disk)串口UART0、UART1、UART2、RS485驱动程序SD/MMC卡驱动程序(支持SD/MMC卡的读写)PCMCIA驱动程序CF卡驱动程序(支持CF卡、PCMCIA转CF卡的读写)PCMCIA转UART卡驱动模数转换ADC驱动PWM驱动(支持直流电机调速、DAC输出)GPIO驱动(用于控制蜂鸣器、LED、步进电机)音频驱动(驱动2个扬声器、用于播放音乐)I2C主机驱动(可用于读写CAT1025的E2PROM或访问ZLG7290)单独按键KEY1驱动支持txt、Word、Excel、pdf、ppt、图片文件的浏览支持 mp3、mpeg多媒体文件的播放支持掉电系统设备和用户数据的保存1.2 WinCE 5.0 for MagicARM2410优势MagicARM2410教学实验开发平台支持的Windows 5.0与其他厂商支持的Windows CE相比较,其优势如表1.1所示。
Farpoint Spread For Windows Forms 5.0 使用指南 中文

For Windows Forms 5.0使用指南使用指南简介1产品网站/tools 技术支持论坛使用指南简介Spread for Windows Forms 是一个综合性的、用于微软.NET 平台的Windows Forms 应用程序开发的表格控件。
它集成了丰富的表格功能、工作表功能,并可以与多种数据源进行绑定。
一个Spread控件可以处理多达20 亿个工作表,每个工作表可以有20 亿行和20 亿列,并且支持跨工作表的数据引用和跨工作表的公式引用。
Spread 控件已经被业界公认为功能最为强大的表格控件。
Spread 在中国也有了超过10 年的使用历史,得到了许多软件开发人员的认可。
随着5.0 版本的推出,Spread 增加了对于图表功能的支持。
通过超过85 种不同类型的图表和内置的用户界面,为创建和定制图表提供了全面支持,丰富了数据的展示方式。
同时,Spread 与Excel 文件的兼容性得到了进一步的提升。
虽然Spread 产品附带了大量的文档和示例代码,但不可否认的是,对于初次接触Spread 的中国软件开发人员来讲,有时难免会觉得Spread 入门不太容易。
本使用指南旨在帮助软件开发人员较快地了解和运用Spread 的常用功能。
开发人员可以在了解Spread 整体功能的基础上,循序渐进地学习单元格操作、行列操作和工作表操作。
每个操作都附带了具体的C#和VB 代码,读者可以直接运行例子代码进行联系并查看效果。
在表格数据操作的基础上,本指南也针对高级数据操作、图形图表、以及和其他数据格式的交换方面做了进一步的介绍,并且在最后提供了常用词汇的中英文对照表,方便读者查看。
对于项目管理人员和技术主管来讲,通过对本指南中Spread 主要功能的概览,可以帮助他们决策Spread 是否适合于其项目的需要。
有关Spread 产品的更多信息,请访问:Spread 产品网站/toolsSpread 技术支持论坛目录2产品网站/tools 技术支持论坛目录使用指南简介 (1)1. 从例子入门:创建CHECKBOOKREGISTER (4)1.1 添加S PREAD 控件到C HECKBOOK 工程 (4)1.2 设置行和列 (5)1.3 设置单元格类型 (7)1.4 添加公式 (10)2. SPREAD 产品介绍 (12)2.1 产品概述 (12)2.2 基本功能介绍 (13)2.3 S PREAD 5.0 FOR W INDOWS F ORMS 的主要新增功能 (17)3. 单元格操作 (19)3.1 设置单元格类型 (19)3.2 设置单元格的颜色 (21)3.3 合并单元格 (23)3.4 锁定、解锁单元格 (24)3.5 给单元格添加批注 (26)3.6 设置公式 (28)4. 行列操作 (31)4.1 设置行列数 (31)4.2 移动行列 (31)4.3 调整行高、列宽 (33)4.4 冻结行列 (34)4.5 使用分组 (36)4.6 定制行头、列头的文字 (37)4.7 设置多行行头、多列列头 (39)5. 工作表操作 (42)5.1 使用当前工作表 (42)5.2 设置背景色或背景图 (42)5.3 增加工作表 (44)5.4 删除工作表 (45)5.5 移动工作表 (46)5.6 显示或隐藏工作表 (46)5.7 添加标题和子标题 (47)6. 高级数据操作 (50)目录3产品网站/tools 技术支持论坛6.1 数据绑定示例 (50)6.1.1 把Spread添加到一个数据绑定项目 (50)6.1.2 设置数据库链接 (50)6.1.3 指定需要使用的数据 (50)6.1.4 创建数据集 (52)6.1.5 把Spread绑定到数据库 (52)6.1.6 设置单元格类型,改善显示效果 (53)6.2 数据排序 (54)6.3 数据过滤 (55)6.3.1 允许数据过滤 (55)6.3.2 使用数据过滤 (56)7. 使用图形 (58)7.1 创建图形对象 (58)7.2 设置图形属性 (58)7.3 图形旋转 (59)7.4 图形缩放 (59)7.5 图形移动 (60)7.6 图形锁定 (60)8. 使用图表 (61)8.1 创建图表对象 (62)8.2 使用图表设计器 (68)8.3 绑定图表 (69)8.4 允许用户改变图表 (70)9. 与其他数据格式交互 (72)9.1 打开E XCEL 文件 (72)9.2 保存为E XCEL 文件 (74)9.3 导出PDF (75)10. SPREAD WIN 5 中英文术语对照 (77)从例子入门:创建Checkbook Register 4产品网站/tools 技术支持论坛1. 从例子入门:创建Checkbook Register1.1 添加Spread 控件到Checkbook 工程创建一个新的Visual Studio .NET 工程并命名为Checkbook。
实验四(1)构建Windows CE 5.0开发平台
构建Windows CE 5.0开发平台MagicARM2410实验箱在出厂时已经预装了2个操作系统,一个是Linux,另外一个是Windows CE 5.0。
开机后,系统默认启动Linux2.4.18。
此次实验将介绍如何启动Windows CE 5.0。
1.Windows CE 5.0的启动MagicARM2410实验相提供两种方法启动Windows CE 5.0:一种是在液晶屏上启动;另一种是通过PC机串口终端启动。
1)通过液晶屏上直接启动断开MagicARM2410实验箱上DeviceARM2410核心板附近的跳线JP8,然后打开实验箱的电源,当液晶屏出现如下图所示的提示时,请按住实验箱上4×4键盘上的任意一个按键,当液晶屏上显示出按下的键值时,请松开按键。
松开按键后,可以看到液晶屏上显示如图的菜单,然后按按键“4”,这时液晶屏上提示“start run Windows 5.0(Evaluation Version) for MagicARM2410”,系统开始启动Windows CE 5.0等待大约30秒后, Windows CE 5.0启动完成,在液晶屏上可以看到Windows CE 5.0桌面,如下图所示:在上图中,同学们可以看到熟悉的Windows 风格的桌面:其中“我的设备”相当于PC机Windows 操作系统的“我的电脑”,还有“回收站”,“My Documents”等快捷图标。
除此以外,还有Word、 Excel、 PowerPoint 、PDF等文件的浏览器;其中Microsoft WordPad可用于查看文本文件;而Internet Explorer为网页浏览器,可以上网浏览网页.2.通过PC机串口终端启动断开实验箱上DeviceARM2410核心板附近的跳线JP8,短接实验箱上串口UART1附近的跳线JP1;JP2则短接RXD1-232R。
用随机附带的串口线连接实验箱的UART0(位于电源线插座附近)和PC机。
InsightPower Panel for WinCE 5.0 使用手册说明书
InsightPower Panel for WinCE 5.0使用手册InsightPower Panel目录第1章简介________________________________________________________3功能与特色___________________________________________________________3系统架构_____________________________________________________________3支持厂商_____________________________________________________________3第2章初始安装____________________________________________________4安装主程序___________________________________________________________4连接UPS通讯线________________________________________________________4第3章功能介绍____________________________________________________6 Main页面:___________________________________________________________6 UPS页面:___________________________________________________________6 Event页面:__________________________________________________________7 Data页面:___________________________________________________________7第4章组态设定____________________________________________________8 COM设定:___________________________________________________________8 Log设定:____________________________________________________________9 Other设定:__________________________________________________________92InsightPower Panel第1章简介功能与特色透过 RS485 与31部台达NT或T系列UPS通讯经由RS485可以连接高达31部UP ,监控其状态。
wince5.0安装
首先要准备一些软件方面的:GIVEIO(Jtag烧写板驱动),三星的PC端usb驱动文件secbulk.sys和secbulk.inf,wince版本的vivi文件(vivi_wince_64m_32bit),DNW软件,u2410mon.bin,wince的Eboot程序EBOOT_0702.nb0,2410的WinCE内核NK.bin。
硬件当然就是Jtag烧写板以及串口线了。
好了现在开始:sjf2410驱动安装Sjf2410 安装方法:GIVEIO端口驱动安装方法:首先将GIVEIO目录下的GIVEIO.SYS文件复制到C:\WINDOWS\system32\drivers目录下面,然后打开控制面板里的添加硬件,选择“是,我已经连接了此硬件”,下一步,选择添加新的硬件设备,下一步,选择“安装我手动从列表选择的硬件”,下一步,选择“端口(COM和LPT)”,下一步,选择从磁盘安装,在路径中选择GIVEIO目录下的giveio.inf 文件,然后一直下去就OK了。
在设备管理器的端口里能看到GIVEIO端口,就表示安装正常了。
1.先要安装GIVEIO,将GIVEIO.SYS复制到c:/windows/system32/drivers下面,然后安装一个新硬件,将驱动指向giveio.inf就行了。
2.将Jtag板和板子连接,打开电源。
在dos窗口写入sjf2410 /f:vivi_wince_64m_32bit,然后连续输入0,0,0三个将vivi直接考入K9F1208这个flash内。
然后关电,将Jtag板拔下来。
3.现在需要安装usb驱动了,将secbulk.sys文件复制到c:/windows/system32/drivers。
打开DNW,设置好configuration后点击串口的connect,按住空格键后给板子上电,进入vivi。
这时pc会识别到新usb设备,就按步骤安装,选择手动指定到secbulk.inf。
飞歌导航仪操作 Windows CE 5.0 破解限制及 WinCE 美化
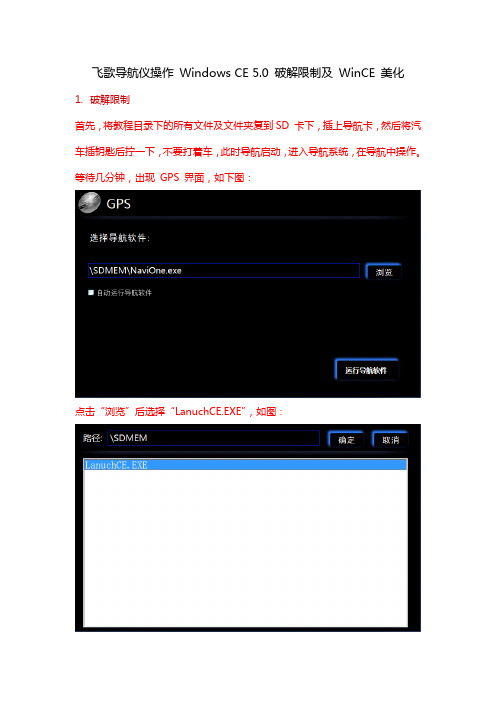
飞歌导航仪操作Windows CE 5.0 破解限制及WinCE 美化1.破解限制首先,将教程目录下的所有文件及文件夹复到SD 卡下,插上导航卡,然后将汽车插钥匙后拧一下,不要打着车,此时导航启动,进入导航系统,在导航中操作。
等待几分钟,出现GPS 界面,如下图:点击“浏览”后选择“LanuchCE.EXE”,如图:选择LanuchCE.exe 然后点击“确定”,之后再点击“运行导航软件”如图:此时导航下端出现白条,此时已进入WinCE 单击开始=>程序=>资源管理器就可以浏览卡中的内容,SDMEM为SD卡。
(如果发现任务栏是隐藏的,可以到开始菜单=>设置=>任务栏和开始菜单中把自动隐藏去了。
)如图:在资源管理器中打开\SDMEM\JOTKBD.EXE 出现虚拟键盘,选中:点击“File”选择第一项,如图:然后,按虚拟键盘上的回车键,关掉GPS 运行器,这时出现桌面,如图:这时打开“我的设备”=》“查看”=》“选项”如图:然后,三个勾全去了,如图:然后点击“OK”,完成,进入“\SDMEM\regedit.exe”打开,如图:选择“View”=》“Options…”如图:然后看图操作:然后依次双击“\SDMEM\快速注册\”下的文件,如图:出现询问,选“是”:注册完成后,破解限制就完成了。
2.美化WinCE (注意:只有完成了破解任务,才能美化!) 依次双击“\SDMEM\快速注册\XP\”下的文件,如图:出现询问,选“是”:这时,单机“开始”=》“程序”=》“关机”=》“重新启动”,如图:这时导航会黑屏且重启,等一会儿会红屏,这为正常现象,等待其启动,这时启动就会直接进入WinCE桌面,你会发现系统托盘里有声音图标,虚拟键盘,INFO 信息,还有一个白箭头,点开它就是手写输入法,好了美化到这里就完成了。
(说明:桌面的内容在“\SDMEM\桌面”)如图:系统声音及系统信息:3.美化系统声音将导航上的“\SDMEM\RT\WAV”文件复制到“\NandFlash\WAV”如图:下面,点击“开始”=》“设置”=》“控制面板”=》“音量和声音”勾选:依次浏览文件,对号入座,选择声音方案:然后另存为方案:“OK”确定,声音美化就完成了。
1-2Windows CE 5.0基础
《实时嵌入式操作系统》1-2第二讲周次:1日期/星期/节次/班次:9月4日,周四,3、4节,06应用49月5日,周五,1、2节,06应用3教学地点:信息中心508教学课题:Windows CE 5.0基础教学内容:1.Windows CE的发展史2.Windows CE的应用领域3.Windows CE 5.0 代码组成4.Windows CE5.0 开发工具5.Windows CE 5.0的安装教学目标:熟悉Windows CE的发展过程和现状重点:Windows CE 5.0的使用难点:Windows CE 5.0安装过程中的问题实践教学:项目1:认识PDA(Windows CE 5.0的安装)教学设计:1.Windows CE5.0的安装是学好这门课程的基础,由于安装过程中有一些特殊的设定,所以一定要让老师带着大家做一遍,把其中应该注意的问题重点强调,保证同学们回去以后也能安装到自己的电脑上。
2.安装完成后,要重点讲一下Windows CE的历史和使用特点。
同学们第一次接触嵌入式操作系统,对其使用的规则和应用的情况并不是很熟悉,所以要重点讲清楚嵌入式操作系统的应用现状,用产品来讲就更清楚了。
3.一要讲清楚在产品中安装使用Windows CE时,是需要付版税的,版税的支付与购买的License数量和使用到的Windows CE组件的数量有关,在产品出货前,需要与微软的代理商协商购买相应的License。
教学过程:1.Windows CE 5.0的安装:Windows CE 5.0的安装有一些具体的要求,需要教师指导后安装。
2.在其后的安装过程中,要在教师指导下安装软件,注重说明其中的一些问题。
并让学生回去安装在自己的电脑上。
3.安装完成后,做一些简单的说明,让学生对整个软件的架构有一个最基本的了解。
4.在同学们对该系统有了一定的了解后,做一个简单的实例来演示一下基本的开发过程。
5.讲解Windows CE的发展和相应的一些基本情况。
- 1、下载文档前请自行甄别文档内容的完整性,平台不提供额外的编辑、内容补充、找答案等附加服务。
- 2、"仅部分预览"的文档,不可在线预览部分如存在完整性等问题,可反馈申请退款(可完整预览的文档不适用该条件!)。
- 3、如文档侵犯您的权益,请联系客服反馈,我们会尽快为您处理(人工客服工作时间:9:00-18:30)。
WinCE5.0入门一、前言1、首先谈谈本人基础。
我熟悉AVR单片机,使用过ATmega16单片机大部分功能,如4X4键盘、UART、SPI、I2C、Timer、PWM等等,接触过DSP芯片TMS320C54X,懂得VHDL语言,简单使用过LPC2131,并在其上移植过uC/OS-II,学习过有关操作系统的基本知识。
用过的相关软件有:ICCAVR、ADS1.2、CCS、uVision等。
2、学习不要着急,如果你没有操作系统的基础,可能一时接受不了操作系统这个概念,而是拿着自已天天用的PC机的Windows操作系统的界面钻牛角尖。
不要总感觉这资料是垃圾,那本书是骗钱的,之所以你看不懂那是因为你还没达到看懂的程度!当然现在骗钱的书很多,著书者很少从读者的角度去写书!3、我所使用的开发环境:PC XP+GEC2440+WinCE5.0+VS2008+ActiveSync4.5+DN WGEC2440是广嵌科技术的开发板,不喜欢广嵌,售后技术支持做的不好,而且技术论坛也没人回帖,不建议使用本实验板!其实板子做的还行,只是相关服务有待加强!!!二、入门准备1、什么是操作系统?这个问题是困扰了我很久的问题。
由于我们大家对于Windows XP等PC机操作系统过于熟悉,而此操作系统又过于傻瓜式,以致于使我们感觉不到操作系统的本质,仅感觉操作系统就是一个窗口,反正在我接触嵌入式操作系统前是这样认为的。
那么什么是操作系统呢?从我使用uC/OS-II的体验来说,简单点儿说操作系统就是一个调度器,从我现在使用WinCE的体验来说,操作系统就是管家婆。
总的来说吧,操作系统就是用算法实现的管理系统所有资源一个后台。
可能这样说还是有些抽象,别急,慢慢来!2、操作系统安装在哪儿呢?界面呢?这个问题绝对是Windows操作系统使用后遗症,总感觉操作要像我们PC机装系统一样进行安装,要有像XP等OS一样的操作界面。
其实界面仅仅是人机交互的一种方式而已,不是操作系统必备的元素,而是操作系统的一种趋势,因为现在对友好的人机交互界面要求越来越高,而且是傻瓜程度过高越好!以uC/OS-II为例,它的核代码就是几个C源文件,使用它时将其像其它程序一样加入你所建立的工程即可,当然在uC/OS-II与你所写的普通代码之间要有一个桥梁来进行链接,这个桥梁就是我们在移植操作系统时所要写的文件,它根本没有界面一说,为什么说它是操作系统呢?因为uC/OS-II有操作系统的一切特征!操作系统都有什么特征呢?自已网上查一吧!那么移值uC/OS-II在CPU上有什么好处呢?个人认为,操作系统的核心好处在于多作务管理与调度。
任务较少时,也许感觉不到它的好处,但任务多了,操作系统的好处就明显了,比如说吧,你的实验板上有八个LED,要求你实现这八个LED以八种不同频率进行闪烁,你该怎么写呢?如果有了uC/OS-II操作系统,这就太简单了,将每个LED闪烁按uC/OS-II要求形式写成任务,然后将八个任务交由uC/OS-II调度即可!说了一大堆uC/OS-II的相关内容,下面进入正题,谈WinCE!3、相关术语0)PC机(Personal Computer)就是指你的电脑,OS(Operating System)是指操作系统!1)BSP(Board Support Package,板级支持包),介于硬件平台和操作系统之间的一层,属于操作系统;不同的操作系统对应于不同定义形式的BSP。
2)Bootloader与BIOS:Bootloader是引导程序,就是对实验平台进行初始化,设定一些相关参数等等。
就我现在使用的WinCE5.0来说,根据个人理解,Bootl oader与BIOS是一个东西,就是在ADS1.2下的一个工程而已,里面含有start. s及其它的一些相关代码。
这个现在我还有些模糊,仅谈到此。
3)OEM:Original Equipment Manufacturer原始设备制造商4)OAL:OEM Abstraction Layer5)DLL:Dynamic Link Library,动态链接库6)MFC:Microsoft Foudation Class,微软基础类7)API:Win32 Application Programming Interface,Win32应用程序编程接口8)SDK:Software Development Kit,使用WinCE时必须安装SDK,你不必在网上找SDK的安装包,对于每个具体实验板都对于一个SDK,这个可以用PB生成。
9)PB、VS、EVC:PB是Platform Builder的简称,VS是Visual Studio的简称,EVC是Embedded Visual C++的简称。
10)Nand flash与Nor flash:与非flash和或非flash,前者价格便宜,后者较贵。
4、所需开发软件1)Platform Builder 5.0:此软件用来定制操作系统,生成内核,生成SDK,编译驱动程序等。
2)Visual Studio 2008:我用的是此版本,当然也许不许这么高版本,网上用的多的是VS2005,还有使用EVC++的。
此软件用来编写应用程序。
3)ActiveSync 4.5:此软用来同步PC机与实验板进行同步。
此软件可以在微软中国官方网站下载。
4)DNW:串口调试工具,在上电时用来显示BIOS发往串口的相关信息,也可以输入相关参数进行设置的。
5)USB同步驱动:必备!!!VS2008的安装按提示按装即可,PB5.0的安装可以参考天嵌科技的手册进行安装,讲的很好很详细,至于PB5.0补丁的安装只需安装Net2.0与Net3.5的那一个即可,其实安装与否我原由我也不清楚,好好参考天嵌科技术的手册吧。
另外要参考天嵌科技术的手册添加BSP,生成相应的SDK,然后安装SDK,这些都安装好后还有一个工作就是安装USB驱动,这一关一定要过,安不上的话就等着安上再说!5、相关参考书目:何宗键编著.Windows CE嵌入式系统.北京:北京航空航天大学出版社还有就是各个开发板厂商的使用手册都是很好的资料,必备!主要有天嵌科技TQ2440、朗成电子AT2440EVB、友善之臂mini2440和QQ2440、广嵌科技GEC2440、飞凌等等,只有飞凌的资料是不公开的,其它的都可以在相关网站下载到。
有关Visual Studio的书可以参考一下机械工业出版社刘冰等编著的《C++程序设计教程——基于Visual Studio 2008》,这本书我也没细看过,扫了一眼,讲的还抽合吧。
三、打开WinCE的大门0、我的学习方法我学习的理念是首先把整套开发环境搭建起来,然后运行一个最简单的程序入门再说,至于更深一层次的内容慢慢研究!1、开发平台的建立个人认为,学习单片机也好,ARM也罢,首先要解决的事情就是将整套开发环境搭建好,成功跑一个最简单的程序,就算入门了,下面我说说WinCE开发环境的建立。
1)安装VS2008,根据提示安装即可,没什么注意事项,唯一的提示就是要留有足够的硬盘空间,仅VS就得留2G空间吧,如果安装MSDN帮助文档的话,再留3 G吧!安装好VS后初次打开会让你选择默认开发环境,有1、Visual Basic 开发设置;2、Visual C#开发设置;3、Visual C++开发设置;4、Web开发设置;5、常规开发设置。
个人认为选哪一个都无所谓,差别仅在于新建项目时项目类型一栏的排列顺序有所差别而已。
这个设置可以按如下更改:工具---》导入和导出设置(I)…---》重置所有设置---》否,仅重置设置,从而覆盖我的当前设置2)安装Microsoft_DotNetFXCHS1.1.exe,这是安装WinCE的前提,如果你电脑上装过VC++等软件,应该就不用安装了,因为Visual Studio系列软件都需要这个的。
3)安装Platform Builder5.0,安装PB其实就是所谓的安装WinCE,这个参考天嵌的手册1.1节内容安装即可,有一点天嵌手册中没提到的是:安装选择处理器到这一步时如果ARMV4I是一个“×”,则应单击向下的小黑三角,选择第一个或第二个选项,其它的我也不是很懂,反正第一次入门多安装了总比不能用好,以后精通了再选择最优方法吧。
4)安装WinCEPB50-081231-Product-Update-Rollup-Armv4I.msi,这是PB5.0的一个补丁,网上相关文章千篇一率,写了一大堆补丁,个人认为安装这个就足够了,其它的等你用到时再安吧,我用了这么些天也没感觉到补丁有什么用。
5)安装ActiveSync4.5,这个很简单!安装完后打开“我的电脑”就会有一个“移动设备”图标,这个以后有用!6)DNW不用安装,是一个绿色版的软件,累似于串口调试助手,但功能强一些吧!7)安装USB同步用驱动,用USB线将实验板与PC机连接起来会提示安装驱动,这个实验板厂商应该会提供的,也可以从网上下载!USB驱动安装不当会导致P C机蓝屏,所以这一步必须过关,否则原地待命!8)添加BSP:打开PB5.0,添加BSP包,BSP是由厂商提供的,别告诉我实验板是你自已做的,一上手就写BSP有点不现实吧。
参考天嵌手册2.1.1节内容,很轻松搞定!9)安装SDK:参考天嵌手册2.4节内容很轻松搞定,然后安装即可!到现在为止环境基本搞定,其它相关细节参考开嵌手册即可!2、什么叫定制操作系统?为什么要安装WinCE到PC机上?由于受uC/OS-II操作系统的影响,总想着WinCE的源代码在哪儿?那些API函数的原型在哪儿头文件中?须知uC/OS-II的源代码是开源的,而WinCE的代码则相反!uC/OS-II的呈现在我们面前的是几个C语言源文件,WinCE呢?就我现在的理解,将PB5.0装到PC机上意味着将WinCE的全部功能放到了PC机上,然后我们需要做的是通过PB从WinCE所有功能中挑选出自已需要的功能,这些功能经自已通过PB组合后生成一个NK.bin和NK.nb0文件,关于这两个的区别参考天嵌手册的第92页,具体我也不太懂。
但我个人的理解是,生成的NK.nb0就好像是我们在学单片机时生成的hex文件,我们将.nb0烧到实验板上也就是将我们裁剪(即所谓的定制!!!)好的WinCE“安装”到实验板上了,这个过程可以近似理解为将hex文件通过ISP或其它方式烧到单片机里一样的。
综上所述,我们安装PB在PC机上是将WinCE所有功能“暂时放到”PC机上,然后通过PB“挑出”你所需要的功能后并将其组合(即.nb0文件)“放到”实验板上即可!打个比方说吧,WinCE各种功能就好像一块块积木(即安装PB),然后我们用需要的积木搭出我们需要图形(即我们用PB定制的操作系统)。