Juniper防火墙查看即时流量
Juniper防火墙基本命令

Juniper防火墙基本命令Juniper防火墙基本命令常用查看命令Get int查看接口配置信息Get int ethx/x查看指定接口配置信息Get mip查看映射ip关系Get route查看路由表Get policy id x查看指定策略Get nsrp查看nsrp信息,后可接参数查看具体vsd组、端口监控设置等Get per cpu de查看cpu利用率信息Get per session de查看每秒新建会话信息Get session查看当前会话信息,后可匹配源地址、源端口、目的地址、目的端口、协议等选项Get session info查看当前会话数量Get system查看系统信息,包括当前os版本,接口信息,设备运行时间等Get chaiss查看设备及板卡序列号,查看设备运行温度Get counter stat查看所有接口计数信息Get counter stat ethx/x查看指定接口计数信息Get counter flow zone trust/untrust查看指定区域数据流信息Get counter screen zone untrust/trust查看指定区域攻击防护统计信息Get tech-support查看设备状态命令集,一般在出现故障时,收集该信息寻求JTAC支持常用设置命令Set int ethx/x zone trust/untrust/dmz/ha配置指定接口进入指定区域(trust/untrust/dmz/ha等)Set int ethx/x ip x.x.x.x/xx配置指定接口ip地址Set int ethx/x manage配置指定接口管理选项,打开所有管理选项Set int ethx/x manage web/telnet/ssl/ssh配置指定接口指定管理选项Set int ethx/x phy full 100mb配置指定接口速率及双工方式Set int ethx/x phy link-down配置指定接口shutdownSet nsrp vsd id 0 monitor interface ethx/x配置ha监控端口,如此端口断开,则设备发生主/备切换Exec nsrp vsd 0 mode backup手工进行设备主/备切换,在当前的主设备上执行set route 0.0.0.0/0 interface ethernet1/3 gateway 222.92.116.33配置路由,需同时指定下一跳接口及ip地址所有set命令,都可以通过unset命令来取消,相当于cisco中的no所有命令都可以通过“TAB”键进行命令补全,通过“?”来查看后续支持的命令防火墙基本配置create account [admin | user] <username> 回车输入密码:再次输入密码:configure account admin 回车输入密码:再次输入密码:2.port配置config ports <portlist> auto off {speed [10 | 100 | 1000]} duplex [half | full] auto off3.Vlan配置无论是核心还是接入层,都要先创建三个Vlan,并且将所有归于Default Vlan的端口删除:config vlan default del port allcreate vlan Servercreate vlan Usercreate vlan Manger定义802.1q标记config vlan Server tag 10config vlan User tag 20config vlan Manger tag 30设定Vlan网关地址:config vlan Server ipa 192.168.41.1/24config vlan User ipa 192.168.40.1/24config vlan Manger ipa 192.168.*.*/24Enable ipforwarding 启用ip路由转发,即vlan间路由Trunk 配置config vlan Server add port 1-3 tconfig vlan User add port 1-3 tconfig vlan manger add port 1-3 t4.VRRP配置enable vrrpconfigure vrrp add vlan UserVlanconfigure vrrp vlan UserVlan add master vrid 10 192.168.6.254configure vrrp vlan UserVlan authentication simple-password extremeconfigure vrrp vlan UserVlan vrid 10 priority 200configure vrrp vlan UserVlan vrid 10 advertisement-interval 15configure vrrp vlan UserVlan vrid 10 preempt5.端口镜像配置首先将端口从VLAN中删除enable mirroring to port 3 #选择3作为镜像口config mirroring add port 1 #把端口1的流量发送到3config mirroring add port 1 vlan default #把1和vlan default的流量都发送到36.port-channel配置enable sharing <port> grouping <portlist> {port-based | address-based | round-robin}show port sharing //查看配置7.stp配置enable stpd //启动生成树create stpd stp-name //创建一个生成树configure stpd <spanning tree name> add vlan <vlan name> {ports <portlist> [dot1d | emistp | pvst-plus]}configure stpd stpd1 priority 16384configure vlan marketing add ports 2-3 stpd stpd1 emistp8.DHCP 中继配置enable bootprelayconfig bootprelay add <dhcp server ip>9.NA T配置Enable nat #启用natStatic NA T Rule Exampleconfig nat add out_vlan_1 map source 192.168.1.12/32 to 216.52.8.32/32Dynamic NA T Rule Exampleconfig nat add out_vlan_1 map source 192.168.1.0/24 to 216.52.8.1 - 216.52.8.31Portmap NA T Rule Exampleconfig nat add out_vlan_2 map source 192.168.2.0/25 to 216.52.8.32 /28 both portmapPortmap Min-Max Exampleconfig nat add out_vlan_2 map source 192.168.2.128/25 to 216.52.8.64/28 tcp portmap 1024 - 819210.OSPF配置enable ospf 启用OSPF进程create ospf area <area identifier> 创建OSPF区域configure ospf routerid [automatic | <routerid>] 配置Routeridconfigure ospf add vlan [<vlan name> | all] area <area identifier> {passive} 把某个vlan加到某个Area中去,相当于Cisco中的network的作用configure ospf area <area identifier> add range <ipaddress> <mask> [advertise | noadvertise] {type-3 | type-7} 把某个网段加到某个Area中去,相当于Cisco中的network的作用configure ospf vlan <vlan name> neighbor add <ipaddress>OSPF中路由重发布配置enable ospf export direct [cost <metric> [ase-type-1 | ase-type-2] {tag <number>} | <route map>]enable ospf export static [cost <metric> [ase-type-1 | ase-type-2] {tag <number>} | <route map>]enable ospf originate-default {always} cost <metric> [ase-type-1 | ase-type-2] {tag <number>} enable ospf originate-router-id11.SNMP配置enable snmp accessenable snmp trapscreate access-profile <access profile> type [ipaddress | vlan]config snmp access-profile readonly [<access_profile> | none]配置snmp的只读访问列表,none 是去除config snmp access-profile readwrite [<access_profile> | none] 这是控制读写控制config snmp add trapreceiver <ip address> {port <udp_port>} community <communitystring> {from <source ip address>} 配置snmp接收host和团体字符串12.安全配置disable ip-option loose-source-routedisable ip-option strict-source-routedisable ip-option record-routedisable ip-option record-timestampdisable ipforwarding broadcastdisable udp-echo-serverdisable irdp vlan <vlan name>disable icmp redirectdisable web 关闭web方式访问交换机enable cpu-dos-protect13.Access-Lists配置create access-list icmp destination sourcecreate access-list ip destination source portscreate access-list tcp destination source portscreate access-list udp destination source ports14.默认路由配置config iproute add default <gateway>15.恢复出厂值,但不包括用户改的时间和用户帐号信息unconfig switch {all}16.检查配置show versionshow configshow sessionshow management 查看管理信息,以及snmp信息show bannershow ports configurationshow ports utilization ?show memory/show cpu-monitoringshow ospfshow access-list {<name> | port <portlist>}show access-list-monitorshow ospf area <area identifier>show ospf area detailshow ospf ase-summaryshow ospf interfaces {vlan <vlan name> | area <area identifier>} unconfigure ospf {vlan <vlan name> | area <area identifier>}switchshow switchshow configshow diagshow iparpshow iprouteshow ipstatshow logshow tech allshow version detail17.备份和升级软件download image [<hostname> | <ipaddress>] <filename> {primary | secondary}upload image [<hostname> | <ipaddress>] <filename> {primary | secondary}use image [primary | secondary]18.密码恢复。
JuniperSRX系列防火墙日常监控命令

JuniperSRX系列防火墙日常监控命令Juniper SRX系列防火墙日常监控命令查看版本admin@#run show version查看机箱环境user@host> show chassis environmentuser@host> show chassis environment cbuser@host> show chassis environment cb 0user@host> show chassis environment pem查看机箱告警(正常情况下不能存在大量硬件错识信息)user@host> show chassis alarms查看日志信息(正常工作情况下,日志中不应该有大量重复的信息,如端口频繁up/down、大量用户认证失败信息等。
)user@host> show log messages查看机箱硬件信息user@host> show chassis hardware查看机箱路由引擎信息user@host> show chassis routing-engine查看机箱FPC信息user@host> show chassis fpcuser@host> show chassis fpc detailuser@host> show chassis fpc pic-status系统关机/重启user@host> request system halt/reboot板卡上线/下线user@host>request chassis fpc slot slot-number offlineuser@host>request chassis fpc slot slot-number online防火墙设备指示灯检查(直接查看防火墙前面板的LED 指示灯)Status :系统状态。
黄色闪烁表示系统正常启动;绿色闪烁表示系统正常工作。
Juniper防火墙日常维护

Juniper防火墙日常维护手册(v 20131112)版本说明目录版本说明1目录21. 日常操作31.1 查看硬件信息31.2 查看OS信息51.3 查看CPU/SPU使用率信息61.3.1 查看CPU/SPU使用率信息61.3.2 查看每秒CPU使用率81.4 查看内存使用率111.5 SRX RE CPU使用率/内存使用率信息(仅JunOS适用)131.6 查看Session会话信息141.6.1 查看会话总数141.6.2 查看每秒新建会话数量161.6.3 查看防火墙所有会话条目191.6.4 按过滤条件查看会话201.6.5 查看会话详细内容221.6.6 保存防火墙所有会话条目231.7 查看警告日志241.8 查看事件日志—— ScreenOS251.8.1 查看所有事件日志(仅ScreenOS适用)251.8.2 按事件级别过滤查看事件日志(仅ScreenOS适用)261.8.3 按时间过滤查看事件日志(仅ScreenOS适用)271.9 查看事件日志—— JunOS271.10 查看策略流量日志281.11 查看/备份配置301.12 查看接口状态321.12.1 查看所有接口状态321.12.2 查看单一接口详情351.13 查看ARP表361.14 查看路由361.14.1 查看全部路由361.14.2 查看特定目标地址的路由381.15 查看策略381.15.1 查看所有策略381.15.2 查看单条策略的详细内容391.16 查看防火墙主备状态401.17 查看集群接口状态(仅JunOS适用)421.18 查看配置同步状态(仅ScreenOS适用)421.19 常用排错命令431.19.1 ping431.19.2 telnet451.19.3 trace route451.19.4 收集support信息471.20 按过滤条件查看各类信息482. 应急操作492.1 清除指定IP的ARP记录492.2 清除指定源IP/目的IP的会话记录492.3 关闭和开启端口502.3.1 关闭端口502.3.2 开启端口502.4 防火墙主备状态切换512.5 同步会话(仅ScreenOS适用)522.6 重启设备523. 日常维护周期策略523.1 日巡检维护建议523.2 周巡检维护建议533.3 月巡检维护建议543.4 不定期维护建议541.日常操作1.1查看硬件信息(1)ScreenOS在CLI下命令为:get chassis示例:JP1000A-> get chassisChassis Environment:Power Supply: GoodFan Status: GoodCPU Temperature: 98'F ( 37'C)Slot Information:Slot Type S/N Assembly-No Version Temperature0 System Board 0993072011000999 0066-004 F01 86'F (30'C), 87'F (31'C)4 Management 0099082011000999 0049-004 D19 98'F (37'C)5 ASIC Board 002079351g110017 0065-002 B00Marin FPGA version 9, Jupiter ASIC version 1, Fresno FPGA version 110I/O BoardSlot Type S/N Version FPGA version2 4 port miniGBIC (0x3) 0994092011000999 B02 261 4 port 10/100/1000T 38Alarm Control Information:Power failure audible alarm: disabledFan failure audible alarm: disabledLow battery audible alarm: disabledTemperature audible alarm: disabledNormal alarm temperature is 132'F (56'C)Severe alarm temperature is 150'F (66'C)(2)JunOS在CLI - 操作模式下命令为:show chassis hardware示例:syro@JP650A> show chassis hardwareHardware inventory:Item Version Part number Serial number DescriptionChassis AJ4309AA0999 SRX650Midplane REV 08 710-023875 AAAS7310System IO REV 08 710-023209 AAAS9446 SRXSME System IO Routing Engine REV 14 750-023223 AAAW4729 RE-SRXSME-SRE6 FPC 0 FPCPIC 0 4x GE Base PIC FPC 2 REV 07 750-026182 AAAS7999 FPCPIC 0 16x GE gPIM Power Supply 0 Rev 03 740-024283 TH01999 PS 645W AC Power Supply 1 Rev 03 740-024283 TH01099 PS 645W AC1.2查看OS信息(1)ScreenOS在CLI下命令为:get system示例:JP1000A-> get systemProduct Name: NetScreen-ISG1000Serial Number: 0993072011000999, Control Number: 00000000Hardware Version: 3010(0)-(04), FPGA checksum: 00000000, VLAN1 IP (0.0.0.0), Type: Firewall+VPNCompiled by build_master at: Wed Apr 28 23:08:24 PDT 2010File Name: default (screenos_image), Checksum: de317771, Total Memory: 1024MBDate 01/01/2013 11:50:43, Daylight Saving Time disabledThe Network Time Protocol is EnabledUp 3286 hours 23 minutes 35 seconds Since 17Aug2012:13:27:08Total Device Resets: 0(2)JunOS在CLI - 操作模式下命令为:show system software示例:syro@JP650A> show system softwareInformation for junos:Comment:JUNOS Software Release []1.3查看CPU/SPU使用率信息1.3.1查看CPU/SPU使用率信息(1)ScreenOS —— CPU在CLI下命令为:get performance cpu示例:JP1000A-> get performance cpuAverage System Utilization: 1%Last 1 minute: 2%, Last 5 minutes: 2%, Last 15 minutes: 2%(2)JunOS —— SPU当SPU使用率达到60%就要引起关注,可能网络或设备有异常。
Juniper防火墙命令行查错工具(snoop)

Juniper防火墙命令行查错工具(snoop)ns208->snoopStart Snoop,type ESC or‘snoop off’to stop,continue?[y]/n y3.发送测试数据包或让小部分流量穿越防火墙4.停止snoopns208->snoop off5.检查防火墙对所转发的符合过滤条件的数据包的分析结果(非采用上面的filter,而是采用另外的filter):ns208->get db stream1.The packet comes into the Netscreen from the Trusted side client.55864.0:0(i):005004bb815f->0010db00ab30/080010.0.0.36->10.10.10.14/1,tlen=60vhl=45,id=31489,frag=0000,ttl=322.The packet then leaves the Netscreen,on it’s way to the destination host.55864.0:1(o):0010db00ab31->00104bf3d073/080010.10.10.10->10.10.10.14/1,tlen=60vhl=45,id=31489,frag=0000,ttl=313.The packet then returns to the Netscreen from the host.55864.0:1(i):00104bf3d073->0010db00ab31/080010.10.10.14->10.10.10.10/1,tlen=60vhl=45,id=12289,frag=0000,ttl=1284.Finally,the packet is returned to the client on the trusted side.55864.0:0(o):0010db00ab30->005004bb815f/080010.10.10.14->10.0.0.36/1,tlen=60vhl=45,id=12289,frag=0000,ttl=1276.清除防火墙缓存的debug结果:ns208->clear db7.清除防火墙的snoop过滤设置ns208->snoop filter deleteAll filters removed本文章由江苏祥和消防科技有限公司(hhtp:///)负责人整理与大家分享!。
juniper防火墙

Juniper防火墙Juniper防火墙是一种企业级网络安全设备,专门设计用于保护网络免受非法入侵、恶意软件和其他网络威胁的攻击。
本文将介绍Juniper防火墙的基本原理、功能和配置方法。
1. 简介Juniper防火墙是Juniper Networks公司生产的一系列网络安全设备,包括物理和虚拟防火墙产品。
它采用先进的技术和算法,为企业提供强大的安全防护能力。
Juniper防火墙具有高性能、高可靠性和高安全性的特点,被广泛应用于数据中心、企业网络和云环境中。
2. 基本原理Juniper防火墙基于过滤规则对网络流量进行检查和控制。
它通过检查IP包的源地址、目的地址、端口和协议等信息,决定是否允许该流量通过。
防火墙还可以进行深度包检查和应用层协议分析,以识别和阻止潜在的安全威胁。
3. 功能3.1 防火墙规则防火墙规则是决定哪些流量被允许通过防火墙的最重要的配置项之一。
管理员可以根据网络的安全需求和策略,定义各种规则,如允许或禁止特定IP地址、端口或协议的流量通过。
3.2 网络地址转换(NAT)Juniper防火墙支持网络地址转换(NAT),它允许在私有网络和公共网络之间建立映射关系。
NAT可以隐藏内部网络的真实IP地址,提高网络的安全性,并且允许多个内部主机共享一个公共IP地址。
3.3 虚拟专用网络(VPN)Juniper防火墙支持虚拟专用网络(VPN)技术,可以建立安全的远程连接并加密数据传输。
VPN可以用于远程办公、分支机构互联和对外合作等场景,保护数据在传输过程中的安全性和隐私性。
3.4 入侵检测与预防系统(IDS/IPS)Juniper防火墙集成了入侵检测与预防系统(IDS/IPS),可以实时监测网络流量,识别并阻止潜在的入侵行为。
IDS/IPS可以在网络层和应用层提供全面的安全保护,有效地减少安全威胁所带来的风险。
3.5 安全日志和报警Juniper防火墙可以生成详细的安全日志,并提供实时的报警机制。
Juniper SRX系列防火墙日常监控命令

Juniper SRX系列防火墙日常监控命令查看版本admin@#run show version查看机箱环境user@host> show chassis environmentuser@host> show chassis environment cbuser@host> show chassis environment cb 0user@host> show chassis environment pem查看机箱告警(正常情况下不能存在大量硬件错识信息)user@host> show chassis alarms查看日志信息(正常工作情况下,日志中不应该有大量重复的信息,如端口频繁up/down、大量用户认证失败信息等。
)user@host> show log messages查看机箱硬件信息user@host> show chassis hardware查看机箱路由引擎信息user@host> show chassis routing-engine查看机箱FPC信息user@host> show chassis fpcuser@host> show chassis fpc detailuser@host> show chassis fpc pic-status系统关机/重启user@host> request system halt/reboot板卡上线/下线user@host>request chassis fpc slot slot-number offlineuser@host>request chassis fpc slot slot-number online防火墙设备指示灯检查(直接查看防火墙前面板的LED 指示灯)Status :系统状态。
黄色闪烁表示系统正常启动;绿色闪烁表示系统正常工作。
juniper防火墙
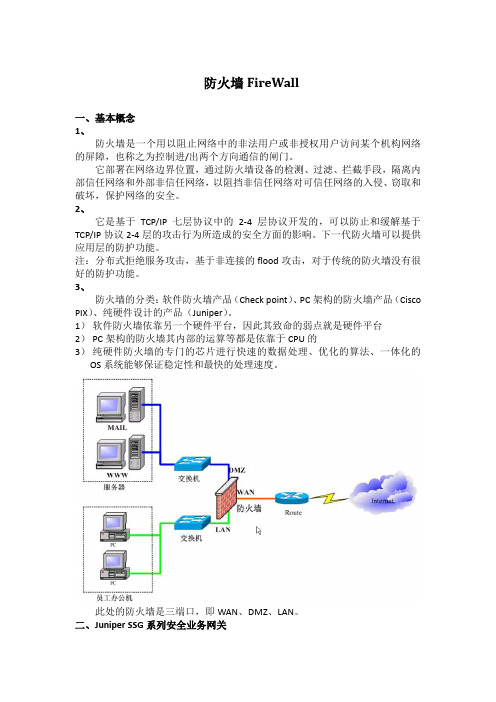
防火墙FireWall一、基本概念1、防火墙是一个用以阻止网络中的非法用户或非授权用户访问某个机构网络的屏障,也称之为控制进/出两个方向通信的闸门。
它部署在网络边界位置,通过防火墙设备的检测、过滤、拦截手段,隔离内部信任网络和外部非信任网络,以阻挡非信任网络对可信任网络的入侵、窃取和破坏,保护网络的安全。
2、它是基于TCP/IP七层协议中的2-4层协议开发的,可以防止和缓解基于TCP/IP协议2-4层的攻击行为所造成的安全方面的影响。
下一代防火墙可以提供应用层的防护功能。
注:分布式拒绝服务攻击,基于非连接的flood攻击,对于传统的防火墙没有很好的防护功能。
3、防火墙的分类:软件防火墙产品(Check point)、PC架构的防火墙产品(Cisco PIX)、纯硬件设计的产品(Juniper)。
1)软件防火墙依靠另一个硬件平台,因此其致命的弱点就是硬件平台2)PC架构的防火墙其内部的运算等都是依靠于CPU的3)纯硬件防火墙的专门的芯片进行快速的数据处理、优化的算法、一体化的OS系统能够保证稳定性和最快的处理速度。
此处的防火墙是三端口,即WAN、DMZ、LAN。
二、Juniper SSG系列安全业务网关1、SSG网络安全产品是集成化网络安全产品,企业级产品。
集成化产品的原因是:第一它可以当做路由设备使用,集成了很多可扩展的广域网的接口类型,第二是集成了UTM的功能,涵盖了反病毒、反垃圾邮件、WEB过滤以及深层的路径检测功能。
2、SSG 500的参数说明:--1 Gbps的FW IMIX @ 600K pps//FW处理能力的包是混合包,处理速度不低于1Gbps;包转发能力600K pps --500 Mbps的VPN / 500 Mbps IPS//最强的加密算法,如AS,3倍的death;--6个I/O插槽-4个可插LAN口模块--双电源,DC为选项,NEBS为选项--12.8万个会话,1000条VPN隧道三、防火墙的基础应用1、应用模式的选择和实现设备调试思路:1)了解网络情况(规模、结构、设备、所提供的应用);2)确定防火墙的部署位置;3)选择防火墙的部署模式,规划网络路由信息4)确定策略方向、地址、服务信息5)合理设定访问策略防火墙设备的设置步骤:1)确定设置防火墙的部署模式2)设置防火墙设备的IP地址信息(此IP地址为接口地址或管理地址)3)设置防火墙设备的路由信息4)确定经过防火墙设备的IP地址信息(基于策略的源、目标地址)5)确定网络应用,即服务6)配置访问控制策略(除了基于TUNNEL内端口的方式不需要策略)Juniper NetScreen防火墙有三种应用模式,即透明模式、NAT模式、路由模式。
查看局域网计算机流量的两种方法检查局域网计算机流量

查看局域网计算机流量的两种方法检查局域网计算机流量1这种方法需要路由器支持这种功能才可以进行查看。
2在浏览器中输入“192.168.1.1”或者“192.168.0.1”(具体地址需要查看路由器背面),回车。
3按照提示输入帐号密码(一般为帐号密码均为admin),点击“确定”。
4依次点击“系统工具”—>“流量统计”。
5点击“开启流量统计”,然后点击“刷新”即可。
6在下表中找到“总流量”中的“数据包”数即为当前主机流量情况,一般为Kb/。
如果你的路由器不支持上述功能或者想在查看各计算机流量同时对个别流量较大的计算机进行限速,那么可以尝试使用网管软件,这里以“聚生网管”为例。
百度“聚生网管”,点击第一个网站进入。
依次点击“开始”—“所有程序”—“聚生网管”—“聚生网管”,点击“新建监控网段”,输入网段名称(随便即可),点击“下一步”,在“请为网段选择对应的网卡”中点击“下拉三角”,选择工作网卡,最后依次点击“下一步”,直到“完成”。
选中上述步骤中新建的网段,点击“开始监控”—“启用管理”。
这时聚生网管软件会自动扫描局域网中计算机并罗列出来,这时即可看到这些计算机的流量情况。
如果想进一步的限制流量较高的计算机,点击“配置策略”—“新建策略”,输入策略名称,点击确定。
点击“带宽限制”选项卡。
选中“带宽限制”选项卡,然后勾选“启用公网主机带宽限制”,并把上行带宽设置为50KB,下行带宽设置为100KB即可,最后点击“确定”。
选中步骤5中罗列出来的主机,并点击右键,选择“为选中主机配置策略”,选中刚刚新建的策略,点击“确定”。
END。
JUNIPER路由器中常用命令总结

JUNIPER路由器中常⽤命令总结前些⽇⼦认真看了⼀下Juniper路由器的⼀些命令。
在这⾥总结⼀下。
⽅便以后使⽤Juniper路由器的命令主要分为两个部分,⼀个是operational,主要是复杂查看⽬前⽹络的配置情况(只能查看,不能修改。
感觉权限⽐较低);另⼀个是configuration,主要⽤来查看和修改配置(感觉权限⾼⼀些)。
刚进⼊到Juniper路由器时,默认进⼊的是operation,输⼊edit命令之后,就进⼊到了[edit]⽬录下,也就是进⼊了configuration。
基础配置命令(如未说明则在[edit]⽬录下)1、配置主机名字:set system host-name router12、配置域名: set system domain-name 3、配置fxp0接⼝(以太⽹中通过这个接⼝进⾏路由器的配置)。
Set interfaces fxp0 unit 0 family inet address 192.168.15.1/2 44、配置备份路由器:set system backup-router 192.168.15.25、配置DNS服务器:set system name-server 192.168.15.36、配置root⽤户的密码:set system root-authentication plain-text-password(密码中不可以全是⼤写、全是⼩写、全是数字)7、设置ntp服务器: set system ntp server 192.168.2.28、提交修改:commit9、查看提交是否合法: commit check10、在当天特定时间进⾏提交 commit at 22:4511、在特定⽇期的特定时间提交: commit at “2005-02-26 10:45”12、取消commit的操作 clear system commit13、为了避免提交带来意外的损害采⽤:commit confirmed,会在10分钟以后⾃动回滚14、与14相同,但在⼀分钟以后⾃动回滚:commit confirmed 115、提交信息,并同步到备份路由器上: commit synchronize配置服务:1、设置ssh服务:set system services ssh2、配置ftp服务: set system services ftp3、删除ftp服务: delete system services ftp权限设置:1、设置root⽤户ssh登录的密码:set system root-authentication ssh password2、禁⽌root⽤户使⽤ssh登录:[edit system ] set services ssh root-login deny3、设置密码要求:[edit system login] set password maximun-length 20 set password minimum-length 8 set password mi nimum-changes 24、设置密码加密算法:set system login password formate md55、查看⾃⼰的权限,以及可以设置的权限: show cli authorization进⼊与退出命令:1、Edit2、修改root的配置:configure3、避免多⼈修改导致设置丢失采⽤ configure exclusive4、查看⽬前修改区域有谁在线:[edit]status(只能看见⽐你先登录的⼈,后⾯登录的信息看不见)5、强制要求别⼈下线:request system logout user mike6、进⼊到根⽬录 top7、退出configuration 模块:quit8、退出configuration模块:exit configuration-mode9、提交并退出:commit and-quit10、退出当前⽬录:exit11、进⼊到某⽬录 edit ⽬录名字查看命令:1、查看当前⽬录地下的设置 [edit]show2、查看你设置的命令 show | display set3、查看你新增的命令 show | compare(+表⽰你增加的命令,-表⽰你删除的命令。
juniper防火墙常用维护指南
juniper防火墙常用维护指南Netscreen 防火墙日常维护指南一、综述. 3二、Netscreen防火墙日常维护. 3常规维护:. 3应急处理. 7总结改进. 8故障处理工具. 9三、Netscreen 冗余协议(NSRP). 10NSRP部署建议. 10NSRP常用维护命令. 11四、策略配置与优化(Policy). 12五、攻击防御(Screen). 13五、特殊应用处理. 15长连接应用处理. 15不规范TCP应用处理. 16VOIP应用处理. 16附录:JUNIPER防火墙Case信息表. 17一、综述防火墙作为企业核心网络中的关键设备,需要为所有进出网络的信息流提供安全保护,对于企业关键的实时业务系统,要求网络能够提供7*24小时的不间断保护,保持防火墙系统可靠运行及在故障情况下快速诊断恢复成为维护人员的工作重点。
NetScreen防火墙提供了丰富的冗余保护机制和故障诊断、排查方法,通过日常管理维护可以使防火墙运行在可靠状态,在故障情况下通过有效故障排除路径能够在最短时间内恢复网络运行。
本文对Netscreen防火墙日常维护进行较系统的总结,为防火墙维护人员提供设备运维指导。
二、Netscreen防火墙日常维护围绕防火墙可靠运行和出现故障时能够快速恢复为目标,Netscreen防火墙维护主要思路为:通过积极主动的日常维护将故障隐患消除在萌芽状态;故障发生时,使用恰当的诊断机制和有效的故障排查方法及时恢复网络运行;故障处理后及时进行总结与改进避免故障再次发生。
常规维护:在防火墙的日常维护中,通过对防火墙进行健康检查,能够实时了解Netscreen防火墙运行状况,检测相关告警信息,提前发现并消除网络异常和潜在故障隐患,以确保设备始终处于正常工作状态。
1、日常维护过程中,需要重点检查以下几个关键信息:Session:如已使用的Session数达到或接近系统最大值,将导致新Session不能及时建立连接,此时已经建立Session的通讯虽不会造成影响;但仅当现有session连接拆除后,释放出来的Session资源才可供新建连接使用。
Juniper日常操作手册

Juniper防火墙日常工作手册深圳市奥怡轩实业有限公司SZ Net Security Co., Ltd2010年01月页脚内容1目录1、ISG1000操作指南 (3)2、IC4000操作指南 (13)3、总结 (23)页脚内容2ISG1000操作指南一、ISG1000概述JUNIPER公司的ISG1000是全面集成的防火墙/VPN系统的高端网络设备,它是面向大型企业、数据中心和运营商网络的理想解决方案。
最多并发会话数:500000每秒新建会话数:20000最多安全策略数:1000如图(1):二、ISG1000操作1、登陆方式一般有三种登陆方式:CONSOLE、HTTP、MGT,用得较多也比较方便的方式是HTTP方式,下面我们具页脚内容3体介绍HTTP登陆方式。
2、HTTP登陆方式设备出厂默认设置是192.168.1.1/24,用HTTP登陆如下图(2):4、操作界面输入用户名和密码后我们经进入图(3)操作界面页脚内容4左边是主配置菜单。
右边最上方是系统启动以及时间信息,右上角显示主机名。
Device information:设备信息,显示设备硬软件版本、序列号以及主机名。
Interface link status:接口链路状态,显示接口所属区和链路UP/DOWN信息。
Resources Status:资源状况,显示系统CPU和内存使用率以及目前的会话和策略是系统满负荷的比例。
(其中注意内存使用率是不真实的,在系统空负荷的情况下内存占用率也会很高,是系统本身设计的问题)。
The most recent alarms:系统最近的报警信息The most recent events:系统最近的通告信息从这个界面我们可以看出防火墙的运行情况,并通过Resources Status:资源状况,可以计算出我们所需要的CPU使用率、内存使用率、对话连接数使用率。
5、主菜单配置在图3的左边是主菜单,分别由如下选项homeConfiguration:Date/Time;Update;Admin;Auth;Report SettingsNetwork:Zones;Interfaces;Routing;NSRPSecurity页脚内容5Policy: PoliciesVPNSObjects:Addresses;ServicesReports:Systems LogWizardsHelp其实只要掌握Configuration、Network 、Policey、Reports这几个就能够应付我们日常的维护和管理了。
Juniper防火墙基本命令

Juniper防火墙基本命令常用查看命令Get int查看接口配置信息Get int ethx/x查看指定接口配置信息Get mip查看映射ip关系Get route查看路由表Get policy id x查看指定策略Get nsrp查看nsrp信息,后可接参数查看具体vsd组、端口监控设置等Get per cpu de查看cpu利用率信息Get per sessionde查看每秒新建会话信息Get session查看当前会话信息,后可匹配源地址、源端口、目的地址、目的端口、协议等选项Get session info查看当前会话数量Get system查看系统信息,包括当前os版本,接口信息,设备运行时间等Get chaiss查看设备及板卡序列号,查看设备运行温度Get counter stat查看所有接口计数信息Get counter stat ethx/x查看指定接口计数信息Get counter flow zone trust/untrust查看指定区域数据流信息Get counter screen zone untrust/trust查看指定区域攻击防护统计信息Get tech-support查看设备状态命令集,一般在出现故障时,收集该信息寻求JTAC支持常用设置命令Set int ethx/x zone trust/untrust/dmz/ha配置指定接口进入指定区域(trust/untrust/dmz/ha等)Set int ethx/x ip x.x.x.x/xx配置指定接口ip地址Set int ethx/x manage配置指定接口管理选项,打开所有管理选项Set int ethx/x manage web/telnet/ssl/ssh配置指定接口指定管理选项Set int ethx/x phy full 100mb配置指定接口速率及双工方式Set int ethx/x phy link-down配置指定接口shutdownSet nsrp vsd id 0 monitor interface ethx/x配置ha监控端口,如此端口断开,则设备发生主/备切换Exec nsrp vsd 0 mode backup手工进行设备主/备切换,在当前的主设备上执行set route 0.0.0.0/0 interface ethernet1/3 gateway 222.92.116.33配置路由,需同时指定下一跳接口及ip地址所有set命令,都可以通过unset命令来取消,相当于cisco中的no所有命令都可以通过“TAB”键进行命令补全,通过“?”来查看后续支持的命令防火墙基本配置create account [admin | user]<username> 回车输入密码:再次输入密码:configure account admin 回车输入密码:再次输入密码:2.port配置config ports <portlist> auto off{speed [10 | 100 | 1000]} duplex [half | full] auto off3.Vlan配置无论是核心还是接入层,都要先创建三个Vlan,并且将所有归于Default Vlan的端口删除:config vlan default del port allcreate vlan Servercreate vlan Usercreate vlan Manger定义802.1q标记config vlan Server tag 10config vlan User tag 20config vlan Manger tag 30设定Vlan网关地址:config vlan Server ipa 192.168.41.1/24config vlan User ipa 192.168.40.1/24config vlan Manger ipa 192.168.*.*/24Enable ipforwarding 启用ip路由转发,即vlan间路由Trunk 配置config vlan Server add port 1-3 tconfig vlan User add port 1-3 tconfig vlan manger add port 1-3 t4.VRRP配置enable vrrpconfigure vrrp add vlan UserVlanconfigure vrrp vlan UserVlan add master vrid 10192.168.6.254configure vrrp vlan UserVlan authentication simple-passwordextremeconfigure vrrp vlan UserVlan vrid 10 priority 200configure vrrp vlan UserVlan vrid 10 advertisement-interval15configure vrrp vlan UserVlan vrid 10 preempt5.端口镜像配置首先将端口从VLAN中删除enable mirroring to port 3 #选择3作为镜像口config mirroring add port 1 #把端口1的流量发送到3config mirroring add port 1 vlan default #把1和vlandefault的流量都发送到36.port-channel配置enable sharing <port> grouping<portlist> {port-based |address-based | round-robin} show port sharing //查看配置7.stp配置enable stpd //启动生成树create stpd stp-name //创建一个生成树configure stpd <spanning treename> add vlan <vlanname> {ports<portlist> [dot1d | emistp |pvst-plus]}configure stpd stpd1 priority 16384configure vlan marketing add ports 2-3 stpd stpd1 emistp8.DHCP 中继配置enable bootprelayconfig bootprelay add <dhcp serverip>9.NAT配置Enable nat #启用natStatic NAT Rule Exampleconfig nat add out_vlan_1 map source 192.168.1.12/32 to216.52.8.32/32Dynamic NAT Rule Exampleconfig nat add out_vlan_1 map source 192.168.1.0/24 to216.52.8.1 - 216.52.8.31 Portmap NAT Rule Exampleconfig nat add out_vlan_2 map source 192.168.2.0/25 to216.52.8.32 /28 both portmap Portmap Min-Max Exampleconfig nat add out_vlan_2 map source 192.168.2.128/25 to216.52.8.64/28 tcp portmap 1024 - 819210.OSPF配置enable ospf 启用OSPF进程create ospf area <area identifier>创建OSPF区域configure ospf routerid [automatic |<routerid>] 配置Routeridconfigure ospf add vlan [<vlanname> | all] area <areaidentifier> {passive}把某个vlan加到某个Area中去,相当于Cisco中的network的作用configure ospf area <areaidentifier> add range<ipaddress><mask> [advertise | noadvertise]{type-3 | type-7} 把某个网段加到某个Area中去,相当于Cisco中的network的作用configure ospf vlan <vlan name>neighbor add <ipaddress>OSPF中路由重发布配置enable ospf export direct [cost<metric> [ase-type-1 | ase-type-2]{tag <number>}|<route map>]enable ospf export static [cost<metric> [ase-type-1 | ase-type-2]{tag <number>}|<route map>]enable ospf originate-default {always} cost<metric> [ase-type-1 | ase-type-2]{tag<number>}enable ospf originate-router-id11.SNMP配置enable snmp accessenable snmp trapscreate access-profile <accessprofile> type [ipaddress | vlan]config snmp access-profile readonly[<access_profile> |none]配置snmp的只读访问列表,none是去除config snmp access-profile readwrite[<access_profile> | none]这是控制读写控制config snmp add trapreceiver <ipaddress> {port<udp_port>}community<communitystring> {from<source ip address>} 配置snmp接收host和团体字符串12.安全配置disable ip-option loose-source-routedisable ip-option strict-source-routedisable ip-option record-routedisable ip-option record-timestampdisable ipforwarding broadcastdisable udp-echo-serverdisable irdp vlan <vlan name>disable icmp redirectdisable web 关闭web方式访问交换机enable cpu-dos-protect13.Access-Lists配置create access-list icmp destination sourcecreate access-list ip destination source portscreate access-list tcp destination source portscreate access-list udp destination source ports14.默认路由配置config iproute add default<gateway>15.恢复出厂值,但不包括用户改的时间和用户帐号信息unconfig switch {all}16.检查配置show versionshow configshow sessionshow management 查看管理信息,以及snmp信息show bannershow ports configurationshow ports utilization ?show memory/show cpu-monitoringshow ospfshow access-list {<name> | port<portlist>}show access-list-monitorshow ospf area <areaidentifier>show ospf area detailshow ospf ase-summaryshow ospf interfaces {vlan <vlanname> | area <areaidentifier>}unconfigure ospf {vlan <vlan name>| area <area identifier>}switchshow switchshow configshow diagshow iparpshow iprouteshow ipstatshow logshow tech allshow version detail17.备份和升级软件download image [<hostname> |<ipaddress>]<filename> {primary | secondary} upload image [<hostname> |<ipaddress>]<filename> {primary | secondary}use image [primary | secondary]18.密码恢复。
juniper防火墙简单配置(Juniper firewall simple configuration)
juniper防火墙简单配置(Juniper firewall simple configuration)取消重点保护使设置时钟的时区7设置时钟DST重复启动2 0 3日02:00结束平日1 0 11 02:00vrouter信任虚拟共享设置设置“不信任vrouter VR”出口集vrouter信任VR”设置自动路径导出出口集appleichat使ALG不appleichat重新装配使ALG集ALG SCTP使认证服务器设置“本地”ID 0认证服务器设置“本地”服务器名称“地方”认证服务器设置“本地”ID 1认证服务器设置“本地”服务器名称“地方”设置默认的认证服务器认证的“地方”设置认证RADIUS记帐端口1646设置管理员名称”txbfhq”设置管理员密码”npd4p / ryerllc51dfsub2fgt96d5on”设置管理访问尝试1集失败960管理员访问锁设置管理员认证网络超时0设置管理认证服务器的“本地”设置管理员认证远程根设置管理格式设置区的“信任”vrouter信任VR”设置区的“不信任”的vrouter信任VR”集区dmz vrouter信任VR”集区”vrouter VLAN”“信任VR”设置区的“不信任”的信任vrouter屯“VR”设置区的“信任”的TCP RST不带“不信任”的块不带“不信任”的TCP RST集区”管理”模块不带“V1信任“TCP RST不带“V1不信任”的TCP RST不带“DMZ”TCP RST不带“v1-dmz”TCP RST不带“VLAN”TCP RST设置区的“信任”屏幕IP欺骗基于区不带“不信任”的屏幕的泪滴不带“不信任”的屏幕SYN洪水不带“不信任”的屏幕平死不带“不信任”的屏幕的IP筛选器SRC 不带“不信任”的屏幕的土地设置区的“不信任”的屏幕区基于IP欺骗集区V1不信任”的屏幕的泪滴集区V1不信任”的屏幕SYN洪水集区V1不信任”的屏幕平死集区V1不信任”屏幕的IP筛选器SRC集区V1不信任”屏幕的土地集区dmz屏幕报警不降集区“DMZ”屏幕上的隧道集区dmz屏幕ICMP洪水集区dmz屏幕泛滥集区dmz屏幕WinNuke集区dmz屏幕端口扫描集区dmz屏幕IP扫描集区“DMZ”屏幕的泪滴集区dmz屏幕SYN洪水集区dmz屏幕IP欺骗集区dmz屏平死集区“DMZ”屏幕的IP筛选器SRC 集区“DMZ”屏幕的土地集区“DMZ”屏幕的SYN片段集区dmz屏幕TCP没有国旗集区dmz筛选未知协议集区dmz屏幕IP不坏的选择集区“DMZ”屏幕的IP记录路由集区“DMZ”屏幕选择IP时间戳集区dmz屏幕IP安全选择集区dmz屏幕IP松散的src路径集区dmz屏幕IP严格的src路径集区“DMZ”屏幕选择IP流集区dmz屏幕ICMP片段集区dmz ICMP大屏幕集区dmz屏幕同翅集区dmz屏翅无确认集区dmz屏幕限制会话的源IP集区dmz屏幕SYN ACK ACK代理集区dmz屏幕块碎片集区dmz屏幕限制会话的IP目标集区dmz屏幕组件块拉链集区dmz屏幕组件块罐集区dmz屏幕组件块EXE集区dmz屏幕组件阻止ActiveX集区dmz屏幕ICMP ID集区dmz屏幕TCP扫描集区dmz屏幕UDP扫描集区dmz屏幕IP欺骗下降RPF路由设置界面“Ethernet0 / 0区”“信任”设置界面“Ethernet0 / 1“区”非军事区”设置界面“Ethernet0 / 2区”“不信任”设置界面“Ethernet0 / 3“区”V1空”设置IP 10.0.3.9/24接口Ethernet0 / 0设置NAT接口Ethernet0 / 0设置接口VLAN1的IP设置IP 192.168.2.1/24接口Ethernet0 / 1 设置NAT接口Ethernet0 / 1设置IP 218.89.188.50/24接口Ethernet0 / 2 设置NAT接口Ethernet0 / 2设置接口VLAN1绕过其他IPSec设置接口VLAN1旁路非IP设置接口Ethernet0 / 0 IP管理设置接口Ethernet0 / 1 IP管理设置接口Ethernet0 / 2 IP管理设置接口Ethernet0 / 1管理SSH设置管理Telnet接口Ethernet0 / 1设置管理SNMP接口Ethernet0 / 1设置接口Ethernet0 / 1管理SSL设置接口Ethernet0 / 1管理网络设置接口Ethernet0 / 2管理平设置接口Ethernet0 / 2管理SSH设置管理Telnet接口Ethernet0 / 2设置管理SNMP接口Ethernet0 / 2设置接口Ethernet0 / 2管理SSL设置接口Ethernet0 / 2管理网络设置接口Ethernet0接口IP 8079 / 1 VIP“http”218.89.189.232设置接口Ethernet0接口IP 8080 / 1 VIP“http”218.89.188.50设置接口Ethernet0接口IP 8077 / 1 VIP“http”10.0.3.10设置接口Ethernet0接口IP 8078 / 1 VIP“http”10.0.3.9设置界面“Ethernet0 / 2“218.89.188.50主机子网掩码255.255.255.255 10.0.3.10 MIP VR”信任VR”设置流量没有TCP序列检查设置流SYN校验设置流TCP SYN位检查设置流量反向路径清晰的文本选择设置流量反向路由隧道总是设置默认的权限模式PKI SCEP“自动”设置默认路径部分PKI X509证书设置地址的“信任”“10.0.3.1 / 24“10.0.3.1 255.255.255.0设置地址的“信任”“218.89.189.1 / 24“218.89.189.1 255.255.255.0设置地址“DMZ”“123”192.168.2.3 255.255.255.255设置地址“DMZ”kbx”10.0.3.10 255.255.255.0设置地址“DMZ”oda1”1.2.1.8 255.255.255.255设置地址“DMZ”oda2”1.2.1.8 255.255.255.255设置用户“恒源祥”UID 3设置用户“恒源祥”型奥特湾设置用户“恒源祥”密码“rvx4ldt9nz8bftsee1cajiiyq + nq9j3hyq = =“设置用户“恒源祥”“启用”设置用户“DW”UID 4设置用户“DW”型奥特湾设置用户“DW”密码“jbbrzotvn7ma6ssjcacxvyrw9jnjo3uwmg = =“设置用户“DW”“启用”设置用户的“kbx UID 1设置用户的“kbx”型奥特湾设置用户的“kbx“密码”sbofmfycngvprksk1mcvhzgdovnjbjd5rq = =“设置用户的“kbx”“启用”设置密码策略出口设置IKE响应不良SPI 1集艾克IKEv2 IKE SA软寿命60撤消艾克ikeid枚举撤消艾克DOS保护设置访问会话启用IPSec集IPSec接入会话最大5000集IPSec接入会话上限0集IPSec接入会议门槛降低0集IPSec接入会话dead-p2-sa-timeout 0 设置IPSec接入会话日志错误设置IPSec接入会话信息交换连接设置IPSec接入会话使用错误日志设置“不信任vrouter VR”出口集vrouter信任VR”出口设置URL协议Websense出口将策略ID从“信任”设置为“信任”、“任何”、“任何”、“任何”允许日志。
网络防火墙的流量监控与分析技巧(四)

网络防火墙的流量监控与分析技巧随着互联网的快速发展,网络安全成为了一个不容忽视的话题。
为了保护网络免受来自外部的攻击,并监控网络上的流量,企业和个人都使用网络防火墙。
网络防火墙作为一种重要的安全工具,不仅可以阻止恶意流量进入网络,还可以提供流量监控和分析的技巧,帮助我们更好地了解网络状况,并采取相应的措施。
一、流量监控技巧1. 网络流量实时监控网络防火墙可以提供实时的流量监控功能,通过可视化的界面展示当前网络的流量情况。
这使得网络管理员能够快速了解各种类型的流量,包括入站和出站流量、协议类型、登录尝试等,以便及时发现异常活动。
2. 流量分类与标记网络防火墙可以根据协议、源IP地址和目标IP地址等信息对流量进行分类和标记。
通过对流量进行分类和标记,管理员可以更好地了解网络中不同类型的流量,并根据需要进行针对性的管理和监控。
3. 告警功能网络防火墙可以根据事先设定的规则,对网络中的异常流量进行告警。
例如,当某台设备的流量明显异常时,防火墙可以发出声音、发送邮件或短信等方式提醒网络管理员。
这样,网络管理员可以及时发现并处理潜在的网络安全威胁。
二、流量分析技巧1. 流量统计和分析网络防火墙可以记录网络流量的详细信息,并提供流量统计和分析功能。
管理员可以根据这些数据,分析网络的使用情况和趋势。
例如,管理员可以了解最常访问的网站、网络带宽的使用情况、最常使用的协议等信息,以便进行网络优化和规划。
2. 威胁情报分析网络防火墙可以与威胁情报数据库集成,将网络上的流量与已知的威胁进行比对和分析。
这样管理员可以及时发现和应对已知的网络威胁,提高网络的安全性。
3. 行为分析网络防火墙可以通过对流量的深度包检测,进行行为分析。
通过对流量的行为进行分析,管理员可以发现内部员工的异常行为、未经授权的访问以及恶意软件的传播等。
这有助于管理员发现并应对潜在的网络安全隐患。
三、小结网络防火墙的流量监控与分析技巧对于保护网络安全至关重要。
网络防火墙的流量监控与分析技巧(二)

网络防火墙的流量监控与分析技巧在如今数字化信息时代,网络已经成为人们工作、学习和娱乐的必备工具。
然而,网络安全问题也日益突出,网络防火墙的作用愈发重要。
网络防火墙通过监控和分析网络流量,保护企业和个人免受网络威胁。
本文将介绍一些网络防火墙的流量监控与分析技巧,以帮助读者更好地保护自己的网络安全。
1. 流量监控技巧实时监控:网络防火墙应具备实时监控功能,能够即时检测网络流量。
实时监控可以帮助管理员快速发现网络异常或攻击行为,及时采取应对措施。
流量统计:通过统计网络流量,管理员可以了解网络的使用情况和趋势,并对网络带宽进行合理分配。
流量统计还可以发现异常流量,及时排查原因并进行处理。
流量日志记录:网络防火墙应该能够记录流量日志,包括来源IP、目标IP、时间戳、协议等信息。
管理员可以通过查看日志了解网络活动,追踪异常流量来源,为网络安全事件的调查提供依据。
2. 流量分析技巧异常流量检测:通过对网络流量进行分析,管理员可以发现异常流量,如大量数据包的突然增加、频繁的连接尝试等。
这些异常流量可能是恶意攻击行为的表现,管理员应立即采取措施阻止攻击并加固网络安全。
流量模式分析:网络流量往往有一定的模式,了解流量模式可以帮助管理员更好地配置防火墙规则。
例如,某个时间段内的流量峰值可能是由于特定应用的高峰期,管理员可以针对性地提升防火墙的带宽限制,以确保网络的正常运行。
用户行为分析:防火墙的流量分析还可以帮助分析用户的行为习惯和使用需求。
管理员可以根据用户流量分布情况,调整网络资源分配,提高用户体验。
3. 流量监控与分析工具IDS/IPS系统:入侵检测和入侵防御系统可以监控网络流量,检测和预防入侵行为。
IDS/IPS系统能够实时监测网络流量,并通过规则匹配、行为分析等技术,发现并阻止恶意攻击。
DPI技术:深度包检测技术可以对网络流量进行深入分析,识别出协议、应用和恶意代码等。
DPI技术能够有效检测网络中的异常流量,并提供更全面的网络安全保护。
Juniper防火墙查看即时流量

打開IE,在地址欄輸入:192.168.1.X(默認為1),按ENTER。
看到如下圖的登錄介面
Admin Name: netscreen
Password:************(默認為netscreen)
按Login進入防火牆
進入防火牆主頁后,看到左側的功能菜單如下圖
按Reports展開,如下圖
再按Polices出現下圖的介面
按圖上的可以看到即時內網IP的流量數據,如圖1 按可查看即時策略的流量統計,如圖2
圖1上面藍色菜單依次為:時間/日期,源地址/端口,目標地址/端口,翻譯后源地址,翻譯后源端口,服務,持續時間,發送字節,接收字節
看內網IP即時流量就看源地址即為內網地址,發送接收字節
以上所說的流量都是通往外網的,總的來說Juniper是基於策略控制的,如果要查看單個IP當前的外網流量統計就需要為每個IP建立策略。
而且Juniper的流量統計都是即時的,沒有總計流量等等直觀的數字報告!如果要適時監控內網每個IP的流量,必須為每個可上外網的IP建立策略然後如上點擊觀看,要想監控流量還是需要專門的軟件。
Juniper防火墙基本命令
Juniper防火墙基本命令Juniper防火墙基本命令Juniper防火墙基本命令常用查看命令Get int查看接口配置信息Get int ethx/x查看指定接口配置信息Get mip查看映射ip关系Get route查看路由表Get policy id x查看指定策略Get nsrp查看nsrp信息,后可接参数查看具体vsd组、端口监控设置等Get per cpu de查看cpu利用率信息Get per session de查看每秒新建会话信息Get session查看当前会话信息,后可匹配源地址、源端口、目的地址、目的端口、协议等选项Get session info查看当前会话数量Get system查看系统信息,包括当前os版本,接口信息,设备运行时间等Get chaiss查看设备及板卡序列号,查看设备运行温度Get counter stat查看所有接口计数信息Get counter stat ethx/x查看指定接口计数信息Get counter flow zone trust/untrust查看指定区域数据流信息Get counter screen zone untrust/trust查看指定区域攻击防护统计信息Get tech-support查看设备状态命令集,一般在出现故障时,收集该信息寻求JTAC支持常用设置命令Set int ethx/x zone trust/untrust/dmz/ha配置指定接口进入指定区域(trust/untrust/dmz/ha等)Set int ethx/x ip x.x.x.x/xx配置指定接口ip地址Set int ethx/x manage配置指定接口管理选项,打开所有管理选项Set int ethx/x manage web/telnet/ssl/ssh配置指定接口指定管理选项Set int ethx/x phy full 100mb配置指定接口速率及双工方式Set int ethx/x phy link-down配置指定接口shutdownSet nsrp vsd id 0 monitor interface ethx/x配置ha监控端口,如此端口断开,则设备发生主/备切换Exec nsrp vsd 0 mode backup手工进行设备主/备切换,在当前的主设备上执行set route 0.0.0.0/0 interface ethernet1/3 gateway 222.92.116.33配置路由,需同时指定下一跳接口及ip地址所有set命令,都可以通过unset命令来取消,相当于cisco中的no所有命令都可以通过“TAB”键进行命令补全,通过“?”来查看后续支持的命令防火墙基本配置create account [admin | user] 回车输入密码:再次输入密码:configure account admin 回车输入密码:再次输入密码:2.port配置config ports auto off {speed [10 | 100 | 1000]} duplex [half | full] auto off3.Vlan配置无论是核心还是接入层,都要先创建三个Vlan,并且将所有归于Default Vlan的端口删除:config vlan default del port all create vlan Servercreate vlan Usercreate vlan Manger定义802.1q标记config vlan Server tag 10config vlan User tag 20config vlan Manger tag 30设定Vlan网关地址:config vlan Server ipa 192.168.41.1/24config vlan User ipa 192.168.40.1/24config vlan Manger ipa 192.168.*.*/24Enable ipforwarding 启用ip路由转发,即vlan间路由Trunk 配置config vlan Server add port 1-3 tconfig vlan User add port 1-3 tconfig vlan manger add port 1-3 t4.VRRP配置enable vrrpconfigure vrrp add vlan UserVlanconfigure vrrp vlan UserVlan add master vrid 10 192.168.6.254configure vrrp vlan UserVlan authentication simple-password extremeconfigure vrrp vlan UserVlan vrid 10 priority 200configure vrrp vlan UserVlan vrid 10 advertisement-interval15configure vrrp vlan UserVlan vrid 10 preempt5.端口镜像配置首先将端口从VLAN中删除enable mirroring to port 3 #选择3作为镜像口config mirroring add port 1 #把端口1的流量发送到3config mirroring add port 1 vlan default #把1和vlan default 的流量都发送到36.port-channel配置enable sharing grouping {port-based | address-based | round-robin}show port sharing //查看配置7.stp配置enable stpd //启动生成树create stpd stp-name //创建一个生成树configure stpd add vlan {ports [dot1d | emistp | pvst-plus]} configure stpd stpd1 priority 16384configure vlan marketing add ports 2-3 stpd stpd1 emistp8.DHCP 中继配置enable bootprelayconfig bootprelay add9.NA T配置Enable nat #启用natStatic NA T Rule Exampleconfig nat add out_vlan_1 map source 192.168.1.12/32 to 216.52.8.32/32Dynamic NA T Rule Exampleconfig nat add out_vlan_1 map source 192.168.1.0/24 to 216.52.8.1 - 216.52.8.31Portmap NA T Rule Exampleconfig nat add out_vlan_2 map source 192.168.2.0/25 to 216.52.8.32 /28 both portmapPortmap Min-Max Exampleconfig nat add out_vlan_2 map source 192.168.2.128/25 to 216.52.8.64/28 tcp portmap 1024 - 819210.OSPF配置enable ospf 启用OSPF进程create ospf area 创建OSPF区域configure ospf routerid [automatic | ] 配置Routeridconfigure ospf add vlan [ | all] area {passive} 把某个vlan加到某个Area中去,相当于Cisco中的network的作用configure ospf area add range [advertise | noadvertise] {type-3 | type-7} 把某个网段加到某个Area中去,相当于Cisco中的network的作用configure ospf vlan neighbor addOSPF中路由重发布配置enable ospf export direct [cost [ase-type-1 | ase-type-2] {tag } | ]enable ospf export static [cost [ase-type-1 | ase-type-2] {tag } | ]enable ospf originate-default {always} cost [ase-type-1 | ase-type-2] {tag } enable ospf originate-router-id11.SNMP配置enable snmp accessenable snmp trapscreate access-profile type [ipaddress | vlan]config snmp access-profile readonly [ | none]配置snmp的只读访问列表,none 是去除config snmp access-profile readwrite [ | none] 这是控制读写控制config snmp add trapreceiver {port } community {from } 配置snmp接收host和团体字符串12.安全配置disable ip-option loose-source-routedisable ip-option strict-source-routedisable ip-option record-routedisable ip-option record-timestampdisable ipforwarding broadcastdisable udp-echo-serverdisable irdp vlandisable icmp redirectdisable web 关闭web方式访问交换机enable cpu-dos-protect13.Access-Lists配置create access-list icmp destination sourcecreate access-list ip destination source portscreate access-list tcp destination source portscreate access-list udp destination source ports14.默认路由配置config iproute add default15.恢复出厂值,但不包括用户改的时间和用户帐号信息unconfig switch {all}16.检查配置show versionshow configshow sessionshow management 查看管理信息,以及snmp信息show bannershow ports configurationshow ports utilization ?show memory/show cpu-monitoringshow ospfshow access-list { | port }show access-list-monitorshow ospf areashow ospf area detailshow ospf ase-summaryshow ospf interfaces {vlan | area } unconfigure ospf {vlan | area }switchshow switchshow configshow diagshow iparpshow iprouteshow ipstatshow logshow tech allshow version detail17.备份和升级软件download image [ | ] {primary | secondary}upload image [ | ] {primary | secondary}use image [primary | secondary]18.密码恢复。
Juniper防火墙命令行查错工具snoop的使用

Juniper防火墙命令行查错工具snoop的使用2007-04-24 13:22Snoop的使用举例如下:1. 先设置过滤列表,使得防火墙只对需要的数据包进行分析. 即snoop filter命令:ns208-> snoop filter ?delete delete snoop filterethernet snoop specified ethernetid snoop filter idip snoop ip packetoff turn off snoop filteron turn on snoop filtertcp snoop tcp packetudp snoop udp packetns208-> snoop filter ip ?<return>direction snoop directiondst-ip snoop filter dst ipdst-port snoop filter dst portinterface interface nameip-proto snoop filter ip protoport src or dst portsrc-ip snoop filter src ipsrc-port snoop filter src port<IPv4 Address> IPv4 Addressoffset ip offsetns208-> snoop infoSnoop: OFFFilters Defined: 2, Active Filters 2Detail: OFF, Detail Display length: 96Snoop filter based on:id 1(on): IP dir(I)id 2(on): IP dst-ip 172.27.68.1 dir(B)2. 开启snoop 进行抓包ns208-> snoopStart Snoop, type ESC or 'snoop off' to stop, continue? [y]/n y3. 发送测试数据包或让小部分流量穿越防火墙4. 停止snoopns208-> snoop off5. 检查防火墙对所转发的符合过滤条件的数据包的分析结果(非采用上面的filter,而是采用另外的filter):ns208-> get db stream1.The packet comes into the Netscreen from the Trusted side client.55864.0: 0(i):005004bb815f->0010db00ab30/080010.0.0.36->10.10.10.14/1, tlen=60vhl=45, id=31489, frag=0000, ttl=322.The packet then leaves the Netscreen, on it’s way to the destination host. 55864.0: 1(o):0010db00ab31->00104bf3d073/080010.10.10.10->10.10.10.14/1, tlen=60vhl=45, id=31489, frag=0000, ttl=313.The packet then returns to the Netscreen from the host.55864.0: 1(i):00104bf3d073->0010db00ab31/080010.10.10.14->10.10.10.10/1, tlen=60vhl=45, id=12289, frag=0000, ttl=1284. Finally, the packet is returned to the client on the trusted side.55864.0: 0(o):0010db00ab30->005004bb815f/080010.10.10.14->10.0.0.36/1, tlen=60vhl=45, id=12289, frag=0000, ttl=1275. 清除防火墙缓存的debug结果:ns208-> clear db6. 清除防火墙的snoop过滤设置ns208-> snoop filter deleteAll filters removed。
- 1、下载文档前请自行甄别文档内容的完整性,平台不提供额外的编辑、内容补充、找答案等附加服务。
- 2、"仅部分预览"的文档,不可在线预览部分如存在完整性等问题,可反馈申请退款(可完整预览的文档不适用该条件!)。
- 3、如文档侵犯您的权益,请联系客服反馈,我们会尽快为您处理(人工客服工作时间:9:00-18:30)。
打開IE,在地址欄輸入:192.168.1.X(默認為1),按ENTER。
看到如下圖的登錄介面
Admin Name: netscreen
Password:************(默認為netscreen)
按Login進入防火牆
進入防火牆主頁后,看到左側的功能菜單如下圖
按Reports展開,如下圖
再按Polices出現下圖的介面
按圖上的可以看到即時內網IP的流量數據,如圖1 按可查看即時策略的流量統計,如圖2
圖1上面藍色菜單依次為:時間/日期,源地址/端口,目標地址/端口,翻譯后源地址,翻譯后源端口,服務,持續時間,發送字節,接收字節
看內網IP即時流量就看源地址即為內網地址,發送接收字節
以上所說的流量都是通往外網的,總的來說Juniper是基於策略控制的,如果要查看單個IP當前的外網流量統計就需要為每個IP建立策略。
而且Juniper的流量統計都是即時的,沒有總計流量等等直觀的數字報告!如果要適時監控內網每個IP的流量,必須為每個可上外網的IP建立策略然後如上點擊觀看,要想監控流量還是需要專門的軟件。