TS3100管理界面操作介绍
中兴通讯T网管基本操作

中兴通讯T网管基本操作Pleasure Group Office【T985AB-B866SYT-B182C-BS682T-STT18】中兴通讯T31网管基本操作手册中兴通讯股份有限公司目录第一章启动T31服务器第二章第三章第四章关闭T31服务器第七章下载数据库第八章网管帮助功能第一章启动T31服务器步骤1. 以系统管理员身份登录T31所在服务器的Windows系统。
2. 在开始菜单中选择程序→NetNumen T31→服务器端,进入T31服务器控制台界面。
图 5T31服务器控制台结果等待大约5分钟,在控制台界面中,单击控制台。
检查SYBASE进程、NAMINGSERVICE进程、NOTIFYSERVICE进程、UMS进程、FTP进程、KERNEL进程、TARTOOL进程、ONEKEYINFO进程对应的操作结果均为成功。
第二章启动T31客户端步骤1. 以系统管理员身份登录T31客户端所在的Windows系统。
2. 登录客户端。
在开始菜单中选择程序→NetNumen T31→客户端,进入客户端登录界面,如所示。
登录客户端3. 在登录对话框中输入用户名和密码。
4.结果启动T31客户端登录界面成功,从客户端登录界面登录成功。
第三章退出T31客户端1. 在T31客户端窗口的主菜单中选择系统→退出。
2. 在弹出的确认对话框中单击确定,退出客户端。
结果T31客户端窗口关闭。
第四章关闭T31服务器步骤1. 已登录T31服务器所在的Windows系统。
2. 从Windows桌面上进入T31控制台界面。
3. 单击控制台下每个进程的名称,在界面右侧单击停止按钮,按如下顺序关闭T31服务器的网管进程。
1 ONEKEYINFO -2 TARTOOL -3 KERNEL 关闭时,其关联进程NOTIFIYSERVICE被关闭4 UMS 关闭时,其关联进程FTP被关闭5 NAMEINGSERVICE -6 SYBASE -4. 在右侧界面中,若同时满足如下两点表示T31服务器进程已关闭。
TS管理界面操作介绍

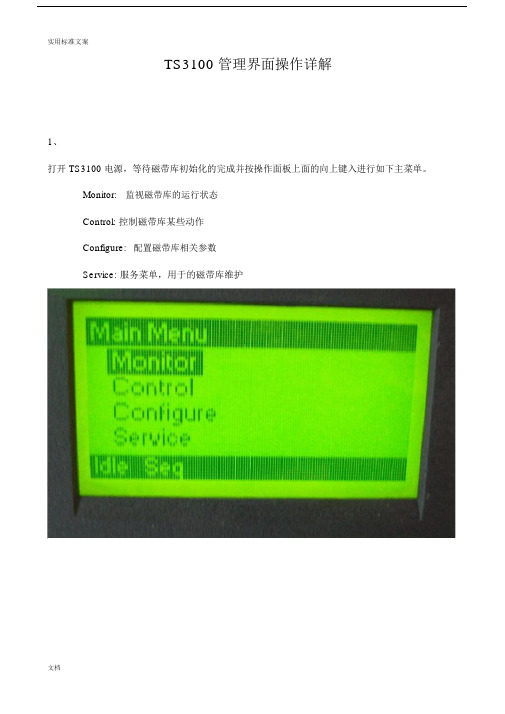
TS管理界面操作介绍————————————————————————————————作者:————————————————————————————————日期:TS3100管理界面操作介绍1、打开TS3100电源,等待磁带库初始化完成,按操作面板上面的向上键入进行如下主菜单。
Monitor:监视磁带库的运行状态Control:控制磁带库某些动作Configure:配置磁带库相关参数Service:服务菜单,用于的磁带库维护2、Monitor子菜单。
可以查看磁带库、磁带驱动器的运行状态,以及磁带的详细信息。
3、Control子菜单。
控制I/O站的打开,磁带的移动,磁带仓的打开,以及对磁带信息的重新检索。
4、Configure子菜单。
对磁带库相关参数,网络的配置等,在出厂默认情况下,磁带库是没有配置IP地址,需要从此菜单下面的Network来进行配置。
当前配置成:10.151.176.253/245、Service子菜单。
对磁带库的检查,测试等。
6、打开IE窗口,在地址栏输入磁带库的IP地址http://10.151.176.253/,打开磁带库的WEB管理界面。
备注:首先检查管理工作站是否能与磁带库的管理口通信。
7、我们选择Admin用户,并输入此用户的管理密码:secure(小写字母)8、成功登录后,出现如下界面。
左边为磁带库的选项列表,中间部分为相关显示与设置界面,右边为当前系统的状态。
右边部分可以查看当前系统时间,磁带库名称,当前磁带驱动器的状态,当前的槽位信息,以及当前磁带库的动作信息。
9、Monitor Library菜单下面的Library Identity,此菜单用于显示磁带库的特性。
10、Monitor Library菜单下面的Drive Identity,此菜单用于显示磁带驱动器的特性。
11、Monitor Library菜单下面的Library Status,此菜单用于显示磁带库的运行状态。
网络设置

网络设置特顿硬盘录像机3100系列网络设置:通过路由器连接上网:1.把网线插到录像机上,然后进入“系统设置--网络设置”查看IP地址(后面用)。
然后进入“系统信息---版本信息--序列号”把这个序列号记好。
2.通过浏览器进入路由器,设置端口转发,有两种方法:第一种:进行端口转发,路由器的品牌不同,转发方把录像机的IP 地址添加到里面,填写端口34599,80,然后就保存,第二种方法:通过路由器的DMZ主机,把录像机的IP地址添加到这里,保存设置。
(DMZ主机一般在路由器的虚拟服务器功能里或转发功能里,品牌不用,位置也不一样)3.然后去:8080这个网站,选择“按设备”,输入序列号,进入里面点击“打开设备”图标(在表格的最后一个图标)。
这样就可以访问了通过拨号上网:把网线插到录像机上,然后进入“系统设置--网络服务”把宽带拨号的用户名和密码添加到里面,然后确定,重启硬盘录像机,重新进入这里,硬盘录像机会自动拨号,IP地址栏里会出现你现在的外网IP 地址,然后进入“系统信息---版本信息--序列号”把这个序列号记好。
3.然后去:8080这个网站,选择“按设备”,然后输入硬盘录像机的序列号,点击“登陆”,进入里面点击“打开设备”图标(在表格的左后一个图标)。
这样就可以访问了特顿3000系列网络设置:1.先到www.332这个网址申请注册一个域名2.把网线连接到硬盘录像机,然后进入硬盘录像机菜单界面,点击“参数设置--网络设置--以太网设置”查看录像机当前的IP地址(记住这个IP地址,后面用到)然后到“参数设置--网络设置--DDNS设置”里,选择启用(方框打上勾),然后把到那个网站申请的用户名、密码和域名添加到里面,然后点击确定。
3.通过浏览器进入路由器,设置端口转发,有两种方法:第一种:进行端口转发(按照路由器说明书使用),把录像机的IP地址添加到里面,填写端口8670,80,101(和自己的录像机开放的端口一致就可以),然后就保存,第二种方法:通过路由器的DMZ主机,进入路由器找到DMZ主机,把录像机的IP地址添加到这里,保存设置。
3100交换机配置指南
XX H3C交换机配置指南? 设备型号:H3C S2126-EI? IP 地址设定:(两部,以下以XX_H3C1为例)? XX_H3C1: 201.2.1.1? XX_H3C2: 201.2.1.2? 新购交换机配置? 注意:配置是为了对交换机进行网管,若不网管,也可不配置? 新交换机购回后IP地址为192.168.0.234,子网掩码为:255.255.255.0,需用暗蓝色终端控制线连接PC机COM口与交换机Console口? 打开WINDOWS下的终端程序Hypertrm? 设置COM口波特率9600? 交换机登入及初始化设置? 敲入几个回车进入? <H3C>? <H3C>system? [H3C]? XX 交换机参数配置--1、交换机命名[H3C] sysname XX_H3C1[XX_H3C1]--2、交换机IP地址设置(基于2126系列)[XX_H3C1]interface vlan-interface 1 --进入vlan端口[XX_H3C1-Vlan-interface1]ip address 201.2.1.1 255.255.255.0 --设置IP地址,子网掩码[XX_H3C1-Vlan-interface1]quit --退出vlan端口设置状态--3、交换机配置AUX用户口令[XX_H3C1] local-user admin --增加admin用户,进入AUX用户界面视图[XX_H3C1- luser admin]password simple admin --设置本地用户的认证口令为明文方式,口令为admin[XX_H3C1- luser admin]service-type telnet --设置AUX用户的服务类型[XX_H3C1- luser admin]level 3 -设置命令级别为3级[XX_H3C1- luser admin]quit -退出至系统视图--4、交换机配置的察看[XX_H3C1] disp cu效果为:#sysname XX_H3C1#radius scheme system#domain system#local-user adminpassword simple adminservice-type telnetlevel 3#vlan 1#interface Vlan-interface1ip address 201.2.1.1 255.255.255.0 #interface Aux1/0/0#interface Ethernet1/0/1#interface Ethernet1/0/2#interface Ethernet1/0/3# interface Ethernet1/0/4#interface Ethernet1/0/5#interface Ethernet1/0/6#interface Ethernet1/0/7#interface Ethernet1/0/8#interface Ethernet1/0/9#interface Ethernet1/0/10#interface Ethernet1/0/11#interface Ethernet1/0/12#interface Ethernet1/0/13#interface Ethernet1/0/14#interface Ethernet1/0/15#interface Ethernet1/0/16#interface Ethernet1/0/17#interface Ethernet1/0/18#interface Ethernet1/0/19#interface Ethernet1/0/20#interface Ethernet1/0/21#interface Ethernet1/0/22#interface Ethernet1/0/23#interface Ethernet1/0/24#interface Ethernet1/1/1#interface Ethernet1/1/2shutdown#interface Ethernet1/2/1#interface Ethernet1/2/2shutdown#interface NULL0#user-interface aux 0备注:缺省IP 地址:192.168.0.234,用户名:admin,密码:admin。
IBM 磁带存储TS3XXX用法以及常见问题解决

TS2900连接方式 连
TS2900磁带自动装入器,
只支持SAS驱动器 (LTO3,LTO4)
1. 以太网线 2. SAS连接线 3. 电源线
TS3100/TS3200磁带驱动器类型与连接 磁
SCSI接 口 驱 动 器 , 无 接 “ WRAP”标 识 终 结 器 标
FC接 口 驱 动 器 , 每 驱 接 动 器 只 有 一 个 可 用 FC 端口
IBM存储售后主要问题,Session 3: 存 : IBM 磁带存储 TS2900/TS3100/TS3200/TS3310用法 用 及常见问题解决
Innovation that matters
Tian XiaoLu Techline Storage Team
Topic
IBM LTO 磁带库产品简介 磁带库初始化安装 IBM LTO磁带库管理/使用以及配置 磁 使 如何定义清洁槽和使用清洁功能 各操作系统下驱动程序的下载以及安装 诊断工具简介 :TapeUtil/NTUtil/ITDT LTO磁带库 常见问题以及解决 方法 磁
1. 在 液 晶 面 板 主 菜 单 项 中 选 择 : Unlock I/ O Station 2. 在 I/O Station里 放 入 数 据 带 . 里
放 TS3200/TS3100 如 何通 过I/O Slot放 磁带
1.通 过 液 晶 面 板 菜 单 项 设 置 : Control通 >Open I/O Station 2. 在 I/O Station里 放 入 数 据 带 . 里
放 TS3310 如何通过I/O Slot放 磁带
1. 查 看 逻 辑 带 库 可 用 的 storage slots , 通 过 web菜 单 选 项 Monitor System-> 菜 Library Map. 2. 在 I/O Station里 放 入 数 据 带 . 里 3. 从 液 晶 面 板 菜 单 项 : Operations >Insert Media 或 从 Web 管 理 界 面 : Manage Cartridges->I/O Station
STARTER 3100C 实验室 电导率仪 使用说明

STARTER 3100C 实验室电导率仪使用说明书奥豪斯仪器(上海)有限公司沪制01040072号目录1简介 (2)1.1安全与防护措施 (2)1.2显示与按键 (3)2安装 (5)2.1配置与选配件 (5)2.2安装支架 (5)2.3连接电源 (6)2.4安装电极 (6)2.5仪表支脚与视角调整 (6)3STARTER 3100C 电导率仪操作 (7)3.1校准 (7)3.1.1选择校准溶液 (7)3.1.2电极校准 (7)3.2样品测量 (8)3.3TDS与盐度测量 (8)3.4使用存储器 (9)3.4.1存储读数 (9)3.4.2调取存储数据 (9)3.4.3清除存储数据 (9)3.5打印 (9)4参数设置 (11)4.1设置温度单位 (11)4.2手动设置温度值 (11)4.3设置校准的标准溶液值 (11)4.4设置温度补偿系数 (11)4.5设置参比温度 (11)4.6设置 TDS 因子 (12)5维修保养 (13)5.1出错信息 (13)5.2仪表维护 (13)5.3仪表自检 (14)5.4恢复出厂设定 (14)6技术参数 (15)7附录 (16)表 1 电导标准溶液 (16)表 2 温度补偿系数实例 (α值) (16)1简介感谢您选择了奥豪斯公司的高品质产品。
在您使用前,请仔细阅读本说明书,将对使用及维护本仪器有很大的帮助。
STARTER 3100C是一款0.5级(参考JJG376-2007)的实验室台式电导率仪。
可广泛应用于大专院校、研究所、工业企业、环保检测等实验室。
奥豪斯产品具有具有简洁的用户界面,易于操作,仪表质量可靠稳定;为您提供更具性价比的产品是奥豪斯公司的一贯追求。
STARTER 3100C具有很多独特的设计:包括了创新易用的独立电极支架,报错蜂鸣器;配合四环电导电极让您的测量范围更广,结果更准确。
另外99组存储数据,RS232可连接打印机打印,仪表自带快速操作指南等给您带来更多便利。
TS3100操作详解演示教学
T S3100操作详解TS3100管理界面操作详解1、打开TS3100电源,等待磁带库初始化的完成并按操作面板上面的向上键入进行如下主菜单。
Monitor:监视磁带库的运行状态Control:控制磁带库某些动作Configure:配置磁带库相关参数Service:服务菜单,用于的磁带库维护2、Monitor子菜单。
可以查看磁带库、磁带驱动器的运行状态,以及磁带的详细信息。
3、Control子菜单。
控制I/O站的打开,磁带的移动,磁带仓的打开,以及对磁带信息的重新检索。
4、Configure子菜单。
对磁带库相关参数,网络的配置等,在出厂默认情况下,磁带库是没有配置IP地址,需要从此菜单下面的Network来进行配置。
当前配置成:10.151.176.253/245、Service子菜单。
对磁带库的检查,测试等。
6、打开IE窗口,在地址栏输入磁带库的IP地址http://10.151.176.253/,打开磁带库的WEB管理界面。
备注:首先检查管理工作站是否能与磁带库的管理口通信。
7、我们选择Admin用户,并输入此用户的管理密码:secure(小写字母)8、成功登录后,出现如下界面。
左边为磁带库的选项列表,中间部分为相关显示与设置界面,右边为当前系统的状态。
右边部分可以查看当前系统时间,磁带库名称,当前磁带驱动器的状态,当前的槽位信息,以及当前磁带库的动作信息。
9、Monitor Library菜单下面的Library Identity,此菜单用于显示磁带库的特性。
10、Monitor Library菜单下面的Drive Identity,此菜单用于显示磁带驱动器的特性。
13、Monitor Library菜单下面的Inventory,此菜单用于显示磁带库中磁带的详细信息。
包括磁带的分布,磁带机中磁带的信息等。
14、点开中间部分的加号,可以查看到磁带的类型、条码等信息。
15、Manage Library菜单下面的Move Media,用于磁带的移动切换,Source部分为原位置,Destination部分为目标位置。
ibm磁带库自动清洗设置
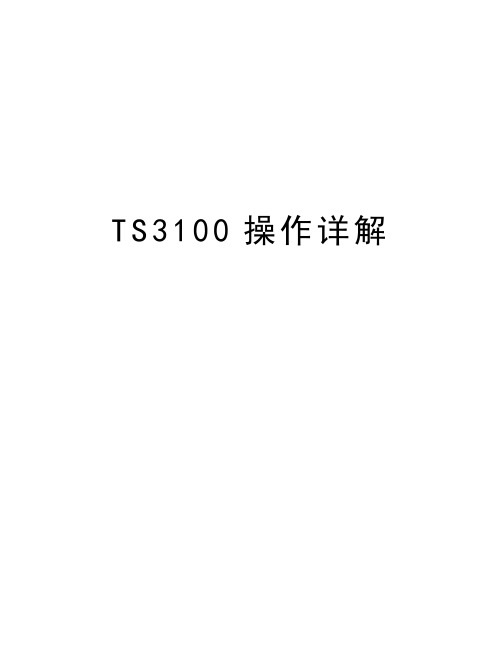
1.定义清洗槽步骤:
在液晶面板主菜单项中选择:Configure→Library Settings→Active Slots或从Web管理界面:Configure Library→General,设置Active Slots选项。
(以TS3100为例,Active Slots的最大数目为23,即23个数据带插槽,如果选择一个任意slot作为cleanning slot,则一般推荐active slots 的数目选为22。
TS3200缺省有一个专门的DCS slot,作为cleanning slot。
所以可以不手工指定cleanning slot。
)
2. 如果自动清洗:
1)将清洗带放入保留槽位或DCS槽位
2)在液晶面板主菜单项中选择:Configure→Library Settings→AutoClean,或从Web管理界面:Configure Library→General
3)选择enable Autoclean功能。
如果手工清洗:
1)将清洗带放入带库
2)在液晶面板主菜单项中选择:Service→Clean Drive,或从Web管理界面: Service Library→Clean Drive
3)选择清洗槽位和驱动器进行清洗。
TS3100操作详解.docx
TS3100 管理界面操作详解1、打开 TS3100 电源,等待磁带库初始化的完成并按操作面板上面的向上键入进行如下主菜单。
Monitor:监视磁带库的运行状态Control: 控制磁带库某些动作Configure:配置磁带库相关参数Service: 服务菜单,用于的磁带库维护2 、Monitor子菜单。
可以查看磁带库、磁带驱动器的运行状态,以及磁带的详细信息。
3、Control子菜单。
控制I/O站的打开,磁带的移动,磁带仓的打开,以及对磁带信息的重新检索。
4、Configure子菜单。
对磁带库相关参数,网络的配置等,在出厂默认情况下,磁带库是没有配置 IP 地址,需要从此菜单下面的Network来进行配置。
当前配置成: 10.151.176.253/245、 Service 子菜单。
对磁带库的检查,测试等。
6、打开 IE 窗口,在地址栏输入磁带库的IP 地址 http://10.151.176.253/,打开磁带库的WEB 管理界面。
备注:首先检查管理工作站是否能与磁带库的管理口通信。
7、我们选择 Admin用户,并输入此用户的管理密码:secure (小写字母)8、成功登录后,出现如下界面。
左边为磁带库的选项列表,中间部分为相关显示与设置界面,右边为当前系统的状态。
右边部分可以查看当前系统时间,磁带库名称,当前磁带驱动器的状态,当前的槽位信息,以及当前磁带库的动作信息。
9、 Monitor Library菜单下面的Library Identity,此菜单用于显示磁带库的特性。
12 、 Monitor Library菜单下面的Drive Status,此菜单用于显示磁带驱动器的状态。
13 、 Monitor Library菜单下面的Inventory,此菜单用于显示磁带库中磁带的详细信息。
包括磁带的分布,磁带机中磁带的信息等。
14、点开中间部分的加号,可以查看到磁带的类型、条码等信息。
15 、 Manage Library菜单下面的Move Media ,用于磁带的移动切换,Source 部分为原位置, Destination部分为目标位置。
TS3100

∙可支持新的 IBM LTO™ Ultrium™ 4 和 LTO Ultrium 3 磁带驱动器,可以提高容量和性能,包括4Gbps 光纤通道、低电压差动(LVD) SCSI 和 3Gbps SAS 连接∙可支持使用标准条码阅读器在有序或随机存取模式下以具有成本效益的方式备份、保存和恢复以及归档存储∙可为中型网络磁带存储环境提供出色的容量、性能和可靠性,采用 2U 外形,具有 24个数据盒插槽和一个专用邮件插槽∙可通过标准 Web 界面对库进行远程管理,为存储操作提供了灵活性和更好的管理控制∙Ultrium 4 具有 24个数据盒插槽,本机数据容量可达 19.2TB(如果使用 2:1 压缩,可达38.4TB),使用 LTO Ultrium 4 磁带驱动器,本机数据传输速率为 120MBps∙Ultrium 3 具有 24个数据盒插槽,本机物理数据容量可达 9.6TB(如果使用 2:1 压缩,可达19.2TB),使用 LTO Ultrium 3 磁带驱动器,本机数据传输速率可达 80MBpsIBM System Storage™ TS3100 Tape Library Express Model 及其存储管理应用程序是为了满足容量、性能、数据保护、可靠性、可用性、可购性和应用等方面的要求而设计的。
它的设计采用了 LTO Ultrium 磁带技术,是一个功能丰富的入门级磁带存储解决方案。
IBM TS3100 Express Model 是出色的大容量或高性能磁带备份解决方案(可以随机存取,也可以有序存取)。
TS3100 还是 IBM System p™、IBM RS/6000®、IBM System i™、IBM AS/400®、IBM System x™和其他开放系统实现磁带自动化的理想选择。
IBM TS3100 Tape Library Express 非常适于中小型环境用来解决备份、保存和恢复以及归档数据存储的需要。
IBM TS3100实施文档

XXX 集团公司清算中心小型机升级改造项目IBM TS3100实施文档文件标识: 当前版本:V1.0 作 者:Jet Wen 文件状态: [ ] 草稿 [√] 正式发布 [ ] 正在修改 完成日期:2008-11-24EMIAL: Jet.Wen@ZWT版 本 历 史版本/状态 作者 参与者 起止日期 备注 V1.0 Jet Wen 2008-11-24 初稿、最终版目 录1. TS3100介绍 (4)2. 安装要求 (7)2.1 空间要求 (7)2.2 承重要求 (7)2.3 环境要求 (8)3. 硬件安装 (8)4. 物理连接图 (10)5. 配置过程 (10)5.1 操作员面板 (10)5.2 IP地址设置 (11)5.3 Web访问 (12)5.4 SCSI Element地址 (13)6. TS3100维护 (14)6.1 健康检查流程 (14)6.2 LED指示灯 (15)6.3 开机和关机 (15)1. TS3100介绍IBM System Storage™ TS3100是一个功能丰富的入门级磁带,它的设计采用了 LTO Ultrium 磁带技术,能满足容量、性能、数据保护、可靠性、可用性、可购性和应用等方面的要求而设计的。
TS3100借助一个 Ultrium 4 或 Ultrium 3 磁带驱动器和 24个磁带盒容量,利用 LTO 技术,以符合成本效益的方式满足不断提高的存储要求。
TS3100 磁带库配置了两个可移动磁带盒仓,一个位于左侧,一个位于右侧。
而且,左侧的磁带盒仓包括一个邮件插槽,有助于在导入/导出媒体时实现持续的库操作。
条码阅读器是一个标准库组件,支持库在有序或随机存取模式下运行。
TS3100 还具有远程管理功能,可通过 Web 界面实现磁带库的远程管理。
新一代 IBM Ultrium 4 驱动器的吞吐量是第三代 LTO Ultrium 磁带驱动器的两倍以上,最高可达第一代驱动器吞吐量的十倍。
IBM带库清洗驱动器方法
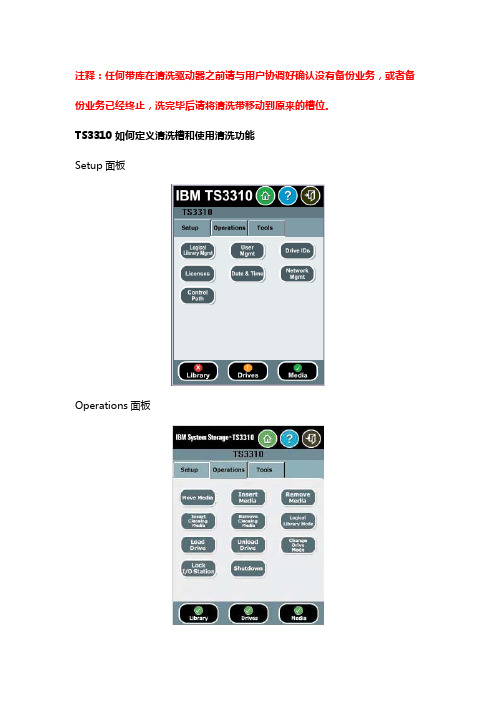
注释:任何带库在清洗驱动器之前请与用户协调好确认没有备份业务,或者备份业务已经终止,洗完毕后请将清洗带移动到原来的槽位。
TS3310 如何定义清洗槽和使用清洗功能Setup面板Operations面板Tools面板面板树默认用户名密码为admin/secureTS3310 查看磁带库和驱动器基本信息从液晶面板菜单项:Tools → About Library从Web 管理界面:Monitor System → Library MapMonitor System → System Summary1.定义清洗槽步骤:从液晶面板菜单项: Setup → Logical Library Mgmt → Configure Cleaning Slots 或从Web 管理界面: Manage Library → Cleaning Slots(当使用上述菜单分配了cleaning slots,则系统就自动激活了AutoClean 功能。
TS3310可以配置0-4个cleaning slots,在定义或修改logical library时,可以通过定义或修改cleaning slots的数目。
)2.放入清洗带到带库中的步骤:从液晶面板菜单项: Operations → Insert Cleaning Media 或从Web 管理界面: Manage Cartridges → Cleaning Cartridges3.手工放入清洗带到驱动器:从液晶面板菜单项: Operations → Load Drive 或从Web 管理界面:Manage Drives → Load(该选项将清洗带从cleaning slot或storage slot加载到所选驱动器中)4.手工移出清洗带从驱动器:从液晶面板菜单项:Operations → Unload Drive 或从Web 管理界面:Manage Drives → UnloadTS3100/TS3200 如何定义清洗槽和使用清洗功能TS3100/TS3200 查看磁带库和驱动器基本信息Web管理工具菜单项中选择:Monitor Library → Library IdentityMonitor Library → Drives Identity1.定义清洗槽步骤:在液晶面板主菜单项中选择:Configure → Library Settings → Active Slots或从Web 管理界面:Configure Library →General,设置Active Slots选项。
3100系列与LPZ平面带传输器平板类型传动系统设置、运行与维护手册说明书
Setup, Operation& Maintenance ManualTable of ContentsWarnings – General Safety2. . . . . . . . . . . . . . . . . . . . Introduction2 . . . . . . . . . . . . . . . . . . . . . . . . . . . . . . . . Installation3 . . . . . . . . . . . . . . . . . . . . . . . . . . . . . . . . . Required Tools3. . . . . . . . . . . . . . . . . . . . . . . . . . . . 3¨ (76 mm) Diameter Pulley Idler End Mounting3. 3¨ (76 mm) Diameter Pulley Drive End Mounting4. 1¨ (25 mm) Diameter Pulleys Idler End Mounting5. Preventative Maintenance & Adjustment6. . . . . . . . . . . Required Tools6. . . . . . . . . . . . . . . . . . . . . . . . . . . . Cleaning6 . . . . . . . . . . . . . . . . . . . . . . . . . . . . . . . . . . . . . . . . Conveyor Belt Replacement6. . . . . . . . . . . . . . . . . . . . . Service Parts 7. . . . . . . . . . . . . . . . . . . . . . . . . . . . . . . Return Policy8. . . . . . . . . . . . . . . . . . . . . . . . . . . . . . .851-339 Rev. BPulley Transfer Plates for 3100 Series & LPZ Flat Belt Conveyors Setup, Operation & Maintenance Manual851-339 Rev. B 2Dorner Mfg. Corp.IntroductionIMPORTANT: Some illustrations may showguards removed. DO NOT operate equipment with-out guards.Upon receipt of shipment:D Compare shipment with packing slip. Contact factory regarding discrepancies.D Inspect packages for shipping damage. Contact carrier regarding damage.D Accessories may be shipped loose. See accessory in-structions for installation.Dorner 3100 Series conveyors are covered by Patent No. 5,156,260, 5,156,261, 5,174,435, 5,203,447,5,265,714,and corresponding patents and patent ap-plications in other countries.Dorner LPZ conveyors are covered by Patent No.5,131,529, 5,156,260, 5,156,261, 5,174,435,5,203,447, 5,265,714,and corresponding patents and patent applications in other countries.Dorner ’s Limited Warranty applies.Dorner reserves the right to make changes at any time without notice or obligation.Warnings – General SafetyPulley Transfer Plates for 3100 Series & LPZ Flat Belt Conveyors Setup, Operation & Maintenance ManualDorner Mfg. Corp.3851-339 Rev. BRequired ToolsD 3 mm hex key wrench D Torque wrench3¨ (76 mm) Diameter Pulley Idler End Mounting1.Gather components (Figure 1)Figure 1BDCACBA Transfer PlateB Transfer Side Plate (2x)C M4 x 8 mm Socket Head Screws (4x)DM5 x 8 mm Button Head Screws (4x)Illustration References2.Remove and discard screws located in holes (E ofFigure 2) on each side of conveyor.Figure 2E3.Install transfer side plate (B of Figure 3) using screws(D) on each side of conveyor. Tighten screws to 28 in-lb (3 Nm).Figure 3DB4.Install transfer plate (A of Figure 4) using screws(C). While maintaining clearance between transfer plate and conveyor belt, tighten screws (C) to 36 in-lb (4 Nm).Figure 4CCAInstallationPulley Transfer Plates for 3100 Series & LPZ Flat Belt Conveyors Setup, Operation & Maintenance Manual851-339 Rev. B 4Dorner Mfg. Corp.3¨ (76 mm) Diameter Pulley Drive EndMounting1.Gather components (Figure 5)Figure 5G AFFCCA Transfer PlateC M4 x 8 mm Socket Head Screws (4x)F Transfer Side Plates (2x)GM5 x 10 mm Button Head Screws (4x)Illustration References2.Remove gearmotor mounting package. See mount-ing package instructions for details.3.Remove and retain original screws (H of Figure 6) andend cap (K) on side opposite drive shaft.Figure 6KJJFH4.Install transfer side plate (F of Figure 7) and end cap(K) using new screws (G). Tighten screws to 28 in-lb(3 Nm).Figure 7KF5.On drive shaft side, remove and discard four (4) screwsaround drive shaft bearing (I of Figure 8).Figure 8I6.Install transfer side plate (F of Figure 9) using originalscrews (H). Tighten screws to 28 in-lb (3 Nm).Figure 9HF7.Install transfer plate (A of Figure 10) using screws(C). While maintaining clearance between transfer plate and conveyor belt, tighten screws (C) to 36 in-lb (4 Nm).Figure 10CA8.Replace gearmotor mounting package. See mount-ing package instructions for details.InstallationPulley Transfer Plates for 3100 Series & LPZ Flat Belt Conveyors Setup, Operation & Maintenance ManualDorner Mfg. Corp.5851-339 Rev. B1¨ (25 mm) Diameter Pulleys Idler End Mounting1.Gather components (Figure 11)Figure 11MLLCCDC M4 x 8 mm Socket Head Screws (4x)D M5 x 8 mm Button Head Screws (4x)L Transfer Side Plate (2x)MTransfer PlateIllustration References2.Remove and discard screws located in holes (N ofFigure 12) on each side of conveyor.Figure 12N3.Install transfer side plate (L of Figure 13) using two (2)screws (D) on each side of conveyor. Tighten screws to 28 in-lb (3 Nm).Figure 13LDL4.Install transfer plate (M of Figure 14) with wide sideup (see detail). While maintaining clearance be-tween transfer plate and conveyor belt, tighten screws (C) to 36 in-lb (4 Nm).Figure 14CCMInstallationPulley Transfer Plates for 3100 Series & LPZ Flat Belt Conveyors Setup, Operation & Maintenance Manual851-339 Rev. B 6Dorner Mfg. Corp.Required ToolsD 3 mm hex key wrench D Torque wrenchCleaningNOTE: Figure 15 shows a 3¨ (76 mm) diameterpulley idler end; 3¨ (76 mm) diameter pulley drive end similar.Periodically, remove screws (C of Figure 15 or 16) and remove transfer plate (A of Figure 15) or (M of Figure 16). Clean any debris from between plate and conveyor belt. Replace transfer plate. While maintaining clearance between transfer plate and conveyor belt, tighten screws (C) to 36 in-lb (4 Nm).Figure 15CCAFigure 16CCMConveyor Belt Replacement1.Remove screws (C of Figure 15 or 16) and removetransfer plate (A of Figure 15) or (M of Figure 16).2.Remove and replace conveyor belt. See 3100 Seriesmanual for details.3.Replace transfer plate. While maintaining clearancebetween transfer plate and conveyor belt, tighten screws (C) to 36 in-lb (4 Nm).Preventive Maintenance & AdjustmentPulley Transfer Plates for 3100 Series & LPZ Flat Belt Conveyors Setup, Operation & Maintenance ManualDorner Mfg. Corp.7851-339 Rev. BNOTE: For replacement parts other than those shown on this page, contact an authorized Dorner Service Center or the factory.Figure 171Figure 182Service PartsNo returns will be accepted without prior written factory authorization. When calling for authorization, please have the following information ready for the Dorner Factory representative or your local distributor: and address of customer.2.Item(s) being returned.3.Reason for return.4.Customer ’s original order number used when ordering the item(s).5.Dorner or distributor invoice number.A representative will discuss action to be taken on the Returned items and provide a Returned Goods Authorization Number to reference.There will be a 15% restocking charge on all new items returned for credit where Dorner was not at fault. These will not be accepted after 60 days from original invoice date. The restocking charge covers inspection, cleaning,disassembly, and reissuing to inventory.If a replacement is needed prior to evaluation of returned item, a purchase order must be issued. Credit (if any) is issued only after return and evaluation is complete.Dorner has representatives throughout the world. Feel free to contact Dorner for the name of your local representative. Our technical sales and service staff will gladly help with your questions on Dorner products.For a copy of Dorner ’s Limited Warranty, contact factory, distributor, service center or visit our website @851-339 Rev. APrinted in U.S.A.1299For replacement parts, contact an authorizedDorner Service Center or the factory.Return Policy。
03-配置文件管理操作

配置文件管理目录目录第1章配置文件管理..............................................................................................................1-11.1 配置文件简介.....................................................................................................................1-11.2 配置文件管理.....................................................................................................................1-21.2.1 保存当前配置...........................................................................................................1-21.2.2 清除设备中的配置文件............................................................................................1-41.2.3 设置下次启动时使用的配置文件及其属性...............................................................1-41.2.4 配置文件显示...........................................................................................................1-5第1章配置文件管理1.1 配置文件简介配置文件用来保存用户对以太网交换机进行的配置,记录用户的整个配置过程。
3100 宏量移液器 操作说明书
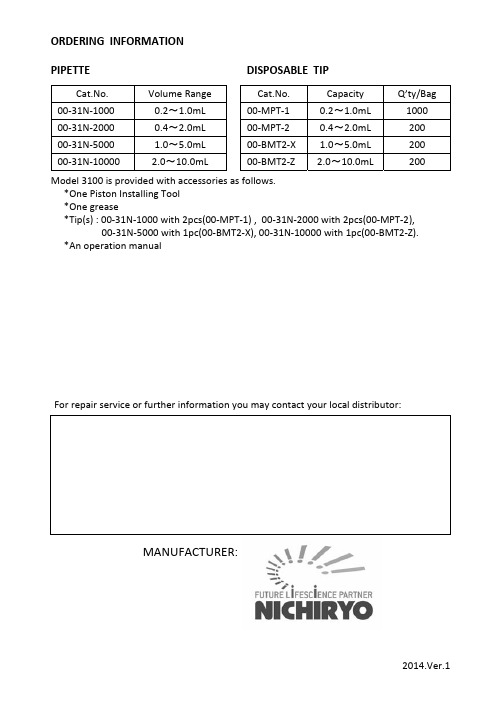
ORDERING INFORMATIONPIPETTE DISPOSABLE TIPCat.No. Volume Range Cat.No. Capacity Q’ty/Bag 00‐31N‐1000 0.2~1.0mL 00‐MPT‐1 0.2~1.0mL 100000‐31N‐2000 0.4~2.0mL 00‐MPT‐2 0.4~2.0mL 20000‐31N‐5000 1.0~5.0mL 00‐BMT2‐X 1.0~5.0mL 20000‐31N‐10000 2.0~10.0mL 00‐BMT2‐Z 2.0~10.0mL 200Model 3100 is provided with accessories as follows.*One Piston Installing Tool*One grease*Tip(s) : 00‐31N‐1000 with 2pcs(00‐MPT‐1) , 00‐31N‐2000 with 2pcs(00‐MPT‐2), 00‐31N‐5000 with 1pc(00‐BMT2‐X), 00‐31N‐10000 with 1pc(00‐BMT2‐Z).*An operation manualFor repair service or further information you may contact your local distributor:MANUFACTURER:2014.Ver.1CERTIFIED ISO9001● Thank you very much for purchasing MODEL 3100 ● Please read this manual carefully before using.Always Pursuing Originality Since 194421L4lm35OOCKLMODEL 3100MACROPIPETTEFEATURES•Excellent accuracy and precision.•Four different volume ranges, 1mL, 2mL, 5mL and 10mL.•Volume of pipetting is easily changed and fixed.•Light design permits easy handling without fatigue.SPECIFICATIONSAccuracy: ± 1.0% Reproducibility Precision: ≤ 1.0%Cat.No. Volume Range Increments00‐31N‐1000 0.2~1.0mL 0.1mL00‐31N‐2000 0.4~2.0mL 0.1mL00‐31N‐5000 1.0~5.0mL 0.5mL00‐31N‐10000 2.0~10.0mL 0.5mLOPERATING PROCEDURES1. Loosen the lock nut and turn the push button until the yellow cross‐line corresponds to the desired volume indicated by the volume scale, then lock by tightening the lock nut.2. Attach a disposable tip firmly onto the syringe nozzle.3. Depress thepush button several times to ensure smooth movement of the piston. Push the push button to the first stop. (Fig. 1, B)4. Place the disposable tip into liquid to a depth of 3 to 4mm.5. Slowly return the push button to its original “up” position. (Fig. 1, A) The sample will be drawn into the tip. The push button should be carefully released so not to flush the liquid into the tip of the pipette, especially for 5mL and 10mL model.6. Touch the tip to the inside wall of the receiving vessel.7. Press the push button again to the first stop to dispense most of the liquid.Wait one second with the push button Held in this position, then continue to push the push button to its limit(Fig. 1, C).This forces out the last remaining liquid from the tip. Keep the knob fully depressed until the tip is removed from the receiving vessel. Remove used tip from the pipette.ABCFig.1REPLACEMENT OF PARTS1. PUSH BUTTON – It is easily removed by pulling it off the push button.2. SYRINGE – Turn it counterclockwise to remove from the syringe connector. (Fig. 3)3. PISTON – After removal of the syringe, keep the push button fully depressed, and push a pin by the probe of the piston installing tool. To install thepiston, push the pin by opposite side of the tool. (Fig. 4)Note:The piston should be lubricated with a small amount of silicone grease provided after certain interval or after cleaning of the piston when contaminated.Syringe Connector Plunger PinPiston InstallingTool(to remove)(to install)Piston Fig.4PARTS AND MATERIALS①Push Button (Polypropylene)②Shaft(Stainless Steel)③Lock Nut (Alumite platedAluminium)④Volume Scale (Polymethylpentene)⑤Body (Polypropylene)⑥Syringe Connector (Polypropylene)⑦Piston(Fluoroplastic)⑧Syringe (Polypropylene)⑨Disposable Tip (Polypropylene)①②③④⑤⑥⑦⑧⑨⑩41235mlFig.2Syringe NozzleSyringeSyringe ConnectorFig.3。
IBM TS3100实施文档
XXX 集团公司清算中心小型机升级改造项目IBM TS3100实施文档文件标识: 当前版本:V1.0 作 者:Jet Wen 文件状态: [ ] 草稿 [√] 正式发布 [ ] 正在修改 完成日期:2008-11-24EMIAL: Jet.Wen@ZWT版 本 历 史版本/状态 作者 参与者 起止日期 备注 V1.0 Jet Wen 2008-11-24 初稿、最终版目 录1. TS3100介绍 (4)2. 安装要求 (7)2.1 空间要求 (7)2.2 承重要求 (7)2.3 环境要求 (8)3. 硬件安装 (8)4. 物理连接图 (10)5. 配置过程 (10)5.1 操作员面板 (10)5.2 IP地址设置 (11)5.3 Web访问 (12)5.4 SCSI Element地址 (13)6. TS3100维护 (14)6.1 健康检查流程 (14)6.2 LED指示灯 (15)6.3 开机和关机 (15)1. TS3100介绍IBM System Storage™ TS3100是一个功能丰富的入门级磁带,它的设计采用了 LTO Ultrium 磁带技术,能满足容量、性能、数据保护、可靠性、可用性、可购性和应用等方面的要求而设计的。
TS3100借助一个 Ultrium 4 或 Ultrium 3 磁带驱动器和 24个磁带盒容量,利用 LTO 技术,以符合成本效益的方式满足不断提高的存储要求。
TS3100 磁带库配置了两个可移动磁带盒仓,一个位于左侧,一个位于右侧。
而且,左侧的磁带盒仓包括一个邮件插槽,有助于在导入/导出媒体时实现持续的库操作。
条码阅读器是一个标准库组件,支持库在有序或随机存取模式下运行。
TS3100 还具有远程管理功能,可通过 Web 界面实现磁带库的远程管理。
新一代 IBM Ultrium 4 驱动器的吞吐量是第三代 LTO Ultrium 磁带驱动器的两倍以上,最高可达第一代驱动器吞吐量的十倍。
3100溶氧仪中文操作手册

3.1 概述............................................................................................................................................ 15 3.2 拆箱............................................................................................................................................ 15 3.3 您接收到的物品.......................................................................................................................... 15 3.4 安装开始检查单.......................................................................................................................... 16 3.5 重新连接电池 ............................................................................................................................. 17 3.6 仪器开关和连接器 ...................................................................................................................... 18 3.7 仪器接口..................................................................................................................................... 20
- 1、下载文档前请自行甄别文档内容的完整性,平台不提供额外的编辑、内容补充、找答案等附加服务。
- 2、"仅部分预览"的文档,不可在线预览部分如存在完整性等问题,可反馈申请退款(可完整预览的文档不适用该条件!)。
- 3、如文档侵犯您的权益,请联系客服反馈,我们会尽快为您处理(人工客服工作时间:9:00-18:30)。
TS3100管理界面操作介绍
1、打开TS3100电源,等待磁带库初始化完成,按操作面板上面的向上键入进行如下主菜单。
Monitor:监视磁带库的运行状态
Control:控制磁带库某些动作
Configure:配置磁带库相关参数
Service:服务菜单,用于的磁带库维护
2、Monitorxx菜单。
可以查看磁带库、磁带驱动器的运行状态,以及磁带的详细信息。
3、Controlxx菜单。
控制I/O站的打开,磁带的移动,磁带xx的打开,以及对磁带信息的重新检索。
4、Configurexx菜单。
对磁带库相关参数,网络的配置等,在出厂默认情况下,磁带库是没有配置IP地址,需要从此菜单下面的Network来进行配置。
当前配置成:10.151.176.253/24
5、Servicexx菜单。
对磁带库的检查,测试等。
6、打开IE窗口,在地址栏输入磁带库的IP地址,打开磁带库的WEB管理界面。
备注:首先检查管理工作站是否能与磁带库的管理口通信。
7、我们选择Admin用户,并输入此用户的管理密码:secure(小写字母)
8、成功登录后,出现如下界面。
左边为磁带库的选项列表,中间部分为相关显示与设置界面,右边为当前系统的状态。
右边部分可以查看当前系统时间,磁带库名称,当前磁带驱动器的状态,当前的槽位信息,以及当前磁带库的动作信息。
9、Monitor Library菜单下面的Library Identity,此菜单用于显示磁带库的特性。
10、Monitor Library菜单下面的Drive Identity,此菜单用于显示磁带
驱动器的特性。
11、Monitor Library菜单下面的Library Status,此菜单用于显示磁带
库的运行状态。
12、Monitor Library菜单下面的Drive Status,此菜单用于显示磁带驱
动器的状态。
13、Monitor Library菜单下面的Inventory,此菜单用于显示磁带库中磁
带的详细信息。
包括磁带的分布,磁带机中磁带的信息等。
14、点开中间部分的加号,可以查看到磁带的类型、条码等信息。
15、Manage Library菜单下面的Move Media,用于磁带的移动切换,Source 部分为原位置,Destination部分为目标位置。
16、切换磁带的步骤:
1)、我们可以查看到Drive 1(1)为磁带机,当前有一盒条码为452ACXL4的磁带,现在我们取出磁带机中的磁带。
我们选中此设备,并选中右边的Slot 2(1),点击中间的Move进行切换。
2)、中间的Move变成灰色的Moving,表示正在进行移动。
3)、移动完成,弹出一个对话框,点确定。
4)、我们可以看到Drive 1(1)已经在右边列表中,表示当前磁带机中没有磁带可以读写。
5)、要切换磁带到磁带机中,操作步骤与上面相似,只是是左边选择一盒磁带,在右边要选择成磁带机。
17、Manage Library菜单下面的Perform Inventory,重新扫描磁带库的
磁带信息。
18、Manage Library菜单下面的Release Magazine,用于弹出磁带xx,选择Left,点Release,表示弹出左边磁带xx,选择Right,表示弹出右边磁带
xx,此项的作用是弹出磁带xx,用于同时放置多盒磁带进去。
19、Configure Library菜单下面的General,设置磁带库名,磁带库加载磁带的模式,激活的插槽位,是否启用I/O站,是否启用自动清洗磁带库以及
设置条码识别的xx。
20、Configure Library菜单下面的Ligocal Libraries,配置当前磁带库
的逻辑带库,当前只有1个逻辑带库。
22、Configure Library菜单下面的Path Failover,用于多路径故障切换。
当前没有配置授权。
23、Configure Library菜单下面的Encryption,用于配置磁带库的xx,
当前没有激活。
24、Configure Library菜单下面的Drives,设置磁带驱动器的相关参数。
25、Configure Library菜单下面的Network,配置磁带库的网络相关参数。
26、Configure Library菜单下面的User Access,用于设置角色访问权限
及密码。
27、Configure Library菜单下面的Date & Time,设置磁带库的日期和时
间。
28、Configure Library菜单下面的Logs & Traces,设置磁带库xx与跟
踪的相关参数。
29、Configure Library菜单下面的Email Notification,用于配置邮件
通知事件。
30、Configure Library菜单下面的SNMP,启用和配置简单网络管理协议。
31、Configure Library菜单下面的Save/Restore,用于恢复到出厂设置、
保存当前配置或恢复备份配置文件到磁带库。
32、Service Library菜单下面的Clean Drive,清洗磁带机,当前磁带库
已配置为自动清洗,所以这里不能操作。
33、Service Library菜单下面的Advance Diagnostic,磁带库的高级诊
断功能,用于磁带库的维护,当前用户没有权限操作。
34、Service Library菜单下面的View Logs,用于查看当前磁带库记录的
xx信息。
35、Service Library菜单下面的View Drive Logs,用于查看磁带驱动器
的xx信息。
36、Service Library菜单下面的Save Drive Dump,转储磁带驱动器信息。
37、Service Library菜单下面的Perform Diagnostics,执行常规诊断功
能。
38、Service Library菜单下面的Key Path Diagnostics,关键路径的诊
断功能。
39、Service Library菜单下面的Update Firmware,用于查看和更新磁带
库及磁带驱动器的固件微码信息。
40、Service Library菜单下面的Reboot,重新启动磁带库,使更改的设
置生效。