BDCOM S2208以太网交换机硬件安装手册
02-基础配置(bdcom配置手册)
02-基础配置(bdcom配置⼿册)基础配置⽬录第1章系统管理配置 (1)1.1 配置⽂件管理 (1)1.1.1 ⽂件系统的管理 (1)1.1.2 ⽂件系统命令 (1)1.1.3 ⼿⼯从某⼀⽂件中启动 (1)1.1.4 软件更新 (2)1.1.5 配置更新 (4)1.1.6 使⽤ftp进⾏软件和配置的更新 (4)1.2 基本系统管理配置 (5)1.2.1 配置以太⽹IP地址 (5)1.2.2 配置缺省路由 (6)1.2.3 利⽤PING测试⽹络连通状态 (6)1.3 HTTP配置 (7)1.3.1 HTTP配置 (7)1.3.2 http配置⽰例 (8)第2章配置终端 (9)2.1 VTY配置概述 (9)2.2 配置任务 (9)2.2.1 线路和接⼝之间的关系 (9)2.3 监视与维护 (9)2.4 VTY配置举例 (10)第3章⽹络管理配置 (11)3.1 配置SNMP (11)3.1.1 概述 (11)3.1.2 SNMP配置任务 (12)3.1.3 配置实例 (16)3.2 配置RMON (17)3.2.1 RMON配置任务 (17)3.3 配置PDP (20)3.3.1 概述 (20)3.3.2 PDP配置任务 (20)3.3.3 PDP配置实例 (22)第4章 SSH 配置命令 (23)4.1 SSH概述 (23)4.1.1 SSH server (23)4.1.2 SSH client (23)4.1.3 实现特性 (23)4.2 配置任务 (23)4.2.1 配置认证⽅法列表 (23)4.2.2 配置访问列表 (23)4.2.3 配置认证超时时长 (24)4.2.4 配置认证重试次数 (24)4.2.5 使能ssh server (24)4.3 Ssh server配置⽰例 (24)4.3.1 访问控制列表 (24)4.3.2 全局配置 (24)第1章系统管理配置1.1 配置⽂件管理1.1.1 ⽂件系统的管理FLASH中⽂件的名字最长只能有20个字符,且不区分⼤⼩写。
18-安全配置(BDCOM 交换机配置手册)

安全配置目录第1章 AAA配置 (1)1.1 AAA概述 (1)1.1.1 AAA安全服务 (1)1.1.2 使用AAA的优点 (2)1.1.3 AAA基本原理 (2)1.1.4 AAA方法列表 (2)1.2 AAA配置过程 (3)1.2.1 AAA配置过程概览 (3)1.3 AAA认证配置任务列表 (4)1.4 AAA认证配置任务 (4)1.4.1 使用AAA配置登录认证 (4)1.4.2 在进入特权级别时开启口令保护 (6)1.4.3 为AAA认证配置消息标语 (7)1.4.4 改变提示输入用户名时的字符串 (7)1.4.5 改变提示输入口令时的字符串 (8)1.4.6 建立本地用户名认证数据库 (8)1.4.7 建立本地特权级别认证数据库 (8)1.5 AAA认证配置示例 (9)1.6 AAA授权配置任务列表 (9)1.7 AAA授权配置任务 (9)1.7.1 使用AAA配置exec授权 (10)1.8 AAA授权示例 (10)1.9 AAA记帐配置任务列表 (11)1.10 AAA记帐配置任务 (11)1.10.1 使用AAA配置connection记帐 (12)1.10.2 使用AAA配置network记帐 (12)1.10.3 使用AAA配置记帐更新 (13)1.10.4 抑制无用户名的用户记帐 (13)第2章配置RADIUS (14)2.1 概述 (14)2.1.1 RADIUS概述 (14)2.1.2 RADIUS协议操作 (15)2.2 RADIUS配置步骤 (15)2.3 RADIUS配置任务列表 (15)2.4 RADIUS配置任务 (16)2.4.1 配置交换机与RADIUS服务器的通信 (16)2.4.2 使用厂商专用的RADIUS属性配置交换机 (16)2.4.3 配置RADIUS认证 (17)2.4.4 配置RADIUS授权 (17)2.4.5 配置RADIUS记录 (17)2.5 RADIUS配置示例 (17)2.5.1 RADIUS认证和授权示例 (17)2.5.2 AAA中应用RADIUS示例 (17)第1章 AAA配置1.1 AAA概述访问控制是用来控制接入交换机或网络访问服务器(NAS)的用户,并限制他们可使用的服务种类。
华为以太网交换机操作手册 1 入门 (1)

第 5 章 系统 IP 配置.............................................................................................................................. 5-1
5.1 系统 IP 简介.................................................................................................................................... 5-1 5.1.1 管理 VLAN.......................................................................................................................... 5-1 5.1.2 IP 地址.................................................................................................................................. 5-1 5.1.3 静态路由.............................................................................................................................. 5-3 5.2 系统 IP 配置.................................................................................................................................... 5-3 5.2.1 创建/删除管理 VLAN 接口................................................................................................ 5-4 5.2.2 为管理 VLAN 接口指定/删除 IP 地址...............................................................................5-4 5.2.3 为管理 VLAN 接口指定描述字符..................................................................................... 5-4 5.2.4 打开/关闭管理 VLAN 接口................................................................................................ 5-5 5.2.5 配置主机名和对应的 IP 地址............................................................................................ 5-5
以太网交换机 说明书

目录1.简介 (2)1.1 启封 (2)1.2 安装过程 (3)2 安装位置 (3)2.1 桌面或架上安装 (4)2.2 机架安装 (4)3. 连接交换机 (4)3.1 设备到交换机 (4)3.2 交换机/HUB到交换机 (5)3.3 应用示例 (6)4. 理解指示灯 (7)4.1 指示灯定义 (7)5. 故障处理 (8)5.1 故障原因 (8)附录A. 技术规范 (9)附录B. 电缆规格 (10)附录C. 电磁辐射及安全认证 (11)11.简介本交换机是一个具有16个10/100M口的即插即用的快速以太网交换机,该交换机具有速率自适应(10/100Mbps)和模式自探测(全双工或半双工),方便安装及使用,利用该交换机的交换技术每个网络连接可以使用高达200Mbps的带宽来传输数据,交换的总带宽为3.2Gbps.用户可以使用这种交换机改善他们的网络性能.1.1 启封一台16口10/100Mbps以太网交换机一条交流电源线两套机架支架和螺丝本用户手册21.2 安装过程2 安装位置本交换机可以放置在一个平面(如桌面)或机架上,为连接方便起见,交换机的放置应遵循以下原则:交换机放置应方便电缆的连接。
连接电缆应远离电源接口,及无线电、显示器等。
要保证交换机的放置位置有较好的通风环境(若环境温度超出0-40摄氏度温度范围,交换机将不能正常工作)。
32.1 桌面或架上安装1. 把要放置的第一台交换机放置在一个坚固的平面上.2. 把第二台交换机放置在第一台交换机上面,请不要在桌面上叠放超过3台交换机,以防摇动。
2.2 机架安装1. 利用支架和螺丝在机架安装。
2 使用十字螺丝起子固定交换机。
3. 连接交换机3.1 设备到交换机连接10 Base-T设备可使用3类或5类双绞线(管脚定义见附录B)连接100 Base-T设备可使用3类或5类双绞线(管脚定义见附录B)4最大电缆长度为100米(根据IEEE的规范)3.2 交换机/HUB 到交换机本交换机可以连接10/100Mbps交换机或HUB,连接方式如下: 3.2.1 MDI(级连口)口与MDI-X(非级连口)口的连接缆.线缆.53.3 应用示例交换机可以克服HUB-HUB的连接限制,改善网络的整体性能,交换机对传输网络中的数据包可以进行智能决策,所以交换机可以减少网络中的不必要的数据传输.下面示例显示交换机能够进行网络分段,减少网段中的节点数目减少冲突.64. 理解指示灯4.1 指示灯定义指示灯可以提供交换机及各端口状态等有用的信息指示灯 状态 说明电源灯 ON 交换机加电.显示模式绿色 指示灯指示Link / Act状态黄色 指示灯指示FDX / Col状态111-16口指示灯Link / Act状ON 端口有一个可靠的连接态闪烁 传送或接受数据.ON 全双工连接FDX / Col状态闪烁 冲突绿色 100Mbps连接黄色 10Mbps连接前面板有显示模式切换开关75. 故障处理5.1 故障原因交换机的故障一般有下列几种情况:设备没有加电错误的电缆连接交换端口无效注意:由于 Port 16 MDI-X 和 MDI port 共占用一个端口结构,不要同时使用两个端口。
BDCOM S2226POE以太网交换机硬件安装手册
BDCOM S2226POE以太网交换机硬件安装手册目录目录第1章 BDCOM S2226POE交换机简介 (1)1.1 标准配置时的外形说明 (1)1.2 BDCOM S2226POE交换机系统特性参数 (3)1.3 ROHS说明 (4)第2章安装准备 (5)2.1 使用注意事项 (5)2.2 安全建议 (5)2.2.1 根据以下原则确保安全 (5)2.2.2 安全警告 (5)2.2.3 带电操作安全原则 (6)2.2.4 预防静电放电损坏 (6)2.3 一般场所要求 (7)2.3.1 场所环境 (7)2.3.2 场所配置预防 (7)2.3.3 机架配置 (7)2.3.4 电源考虑 (8)2.4 安装工具和设备 (8)第3章安装BDCOM S2226POE交换机 (9)3.1 BDCOM S2226POE的安装流程 (9)3.2 交换机机箱安装 (9)3.2.1 安装机箱于桌面 (10)3.2.2 安装机箱于机架 (10)3.3 连接接口 (10)3.3.1 连接监控口 (10)3.3.2 连接快速以太网接口 (12)3.3.3 连接千兆以太网端口 (14)3.4 安装后检查 (15)第4章交换机维护 (16)4.1 打开机箱 (16)4.2 关闭机箱 (17)第5章硬件故障分析 (18)5.1 故障隔离 (18)5.1.1 电源和冷却系统故障 (18)5.1.2 端口、电缆和连接故障 (18)5.2 指示灯说明 (18)第1章 BDCOM S2226POE交换机简介本节主要对BDCOM S2226POE交换机总体方面的特性、参数作了说明和介绍,让读者对BDCOM S2226POE交换机有一个总体的认识。
1.1 标准配置时的外形说明BDCOM S2226POE交换机标配端口由两个部分组成:S2226POE提供20个百兆以太网电口POE供电,4个千兆以太网电口POE供电,2个百兆/千兆SFP接口,1个Console端口,详细说明如下表。
Alteon 2208简易配置手册

ALTEON 4416简易手册Index1.简介 (2)2.ALTEON 4416的基本配置 (2)2.1系统管理 (2)2.1.1设置系统时间 (2)2.1.2设置NTP时钟同步 (3)2.1.3修改管理员口令 (3)2.1.4配置允许访问管理端口的网段 (4)2.2端口设置 (4)2.2.1设置端口名字 (4)2.2.2禁用和启用端口 (4)2.3与上联交换机互联配置 (4)2.3.1配置流程说明 (4)2.3.2VLAN配置 (5)2.3.3互联地址配置 (5)2.3.4配置网关 (5)2.42台交换机的HA配置 (5)2.4.1配置流程说明 (5)2.4.2启用路由转发功能 (6)2.4.3配置本地路由转发 (6)2.4.4给2台交换机的互联端口打tag (6)2.4.5配置VLAN (6)2.4.6将端口划入VLAN (6)2.4.7在下联网段中为2台交换机配置IP地址 (7)2.4.8启用VRRP机制 (7)2.4.9配置VRRP (7)2.4.10配置slb sync switch (8)2.5路由配置 (8)2.6SLB配置 (8)2.6.1ALTEON的SLB基本概念 (8)2.6.2SLB配置基本步骤(以广告引擎为例) (8)3ALTEON的日常维护 (9)3.1INFO命令 (9)3.1.1检查链路状态 (9)3.1.2检查SLB真实服务器的工作情况 (10)3.1.3检查SLB虚拟服务器的工作情况 (10)3.1.4检查Alteon系统情况 (10)3.1.5检查系统日志 (11)3.1.6检查VLAN配置 (12)3.1.7检查端口的配置 (12)3.1.8检查系统的IP配置 (12)3.2S TAT命令 (13)3.2.1检查CPU状态 (13)3.2.2检查内存使用状态 (13)3.2.3检查端口错误计数器 (14)3.2.4检查各个接口的IP流量情况 (15)3.2.5检查系统的IP流量情况 (15)1.简介Alteon WebSystems的万维网操作系统(WebOS)为Alteon万维网交换机产品提供一系列增值服务,包括本地及全球服务器负载均衡、应用重新定向、非服务器(例如防火墙、路由器等)负载均衡、多层的全激活高可用性、带宽管理、服务等级和服务器安全服务,让管理员对其IP网络获得前所未有的控制。
【手册】博达交换机配置手册

【关键字】手册BDCOM交换机配置手册开启系统的通讯中的超级终端界面,在名称处可随意输入,点击确定加入下一步通过超级终端开启电脑的串口,本机是COM3,随电脑不同而COM端口不一样。
点击确定加入下一步点击图中的还原为默认值,使用9600的比特位,数据位8,效验无,停止位1.,流控无。
点击确定加入交换机配置界面如上图加入交换机的配置界面,Switch>为交换机的用户界面不做任何操作如上图在>号状态下,键入ENTER加入管理状态如上图在#号状态下键入CONFIG,加入超级配置状态,在此模式下做交换机的配置操作!配置功能如下:1,配置1口为上联口在CONFIG模式下键入interface f0/1命令加入1号端口在Config_f0/1状态下键入Switchport mode trunk, 把端口设置为上行TRUNK模式。
2,配置管理IP为:;子网掩码:;网关:3,配置管理VLAN 4000上图中在CONFIG模式下键入VLAN 4000,开启4000号VLAN ,再使用QUIT推回CONFIG模式;再键入interface vlan 4000 此时交换机自动建立interface vlan4000的端口,并已加入vlan4000的端口,在config_v4000#状态下键入ip address 4000的管理IP地址,此IP地址随设备的不同而不一样。
在使用QUIT退回CONFIG模式。
在CONFIG模式下,键入ip default-gateway 设置网关IP地址。
4, 配置端口2,VLAN ID 102见上图最下面部分,同建立管理VLAN 4000一样,在CONFIG模式下键入VLAN 102建立102号VLAN,在使用quit回退,在同加入端口命令一样键入interdace f0/2加入交换机2号端口,再在CONFIG_F0/2端口模式下键入Switchport pvid 102把2号端口加入到业务VLAN102中。
8000M系列管理型光纤以太网交换机用户手册 V2.0

8000M8000M系列管理型光纤以太网交换机用户手册2012年4月10日版本:V2.0目录1简介 (1)1.1产品性能 (1)1.2 面板 (2)1.3光纤接口选项 (2)1.4电源选项 (2)1.5物理和环境参数 (2)1.6缺省配置 (2)1.7 管理软件规格 (3)2 Web管理功能 (4)2.1 约定表示方法 (4)2.2系统信息(System Information) (4)2.3高级配置(Advanced Configuration) (5)2.4 端口管理(Port Management) (6)2.4.1端口配置(Port Configuration) (6)2.4.2端口聚合(Port Aggregation) (7)2.4.3端口带宽(Port Bandwidth) (9)2.4.4 端口镜像(Port Mirroring) (9)2.5 VLAN (10)2.5.1高级功能(Advanced) (10)2.5.2基于端口的VLAN(Port-based VLAN) (10)2.5.3 802.1Q VLAN (11)2.5.4基于协议的VLAN(Protocol VLAN) (13)2.5.5基于MAC的VLAN(Mac-Based VLAN) (14)2.5.6 VLAN VPN (14)2.5.7 GARP (16)2.6 QoS (17)2.6.1 QoS配置(QoS Configuration) (18)2.6.2调度模式(Scheduling Mechanism) (18)2.6.3传输队列(Transmit Queues) (19)2.6.4 DSCP映射(DSCP Map) (19)2.7转发(Forwarding) (20)2.7.1单播MAC地址(Unicast MAC Address) (20)2.7.2组播MAC地址(Multicast MAC Address) (21)2.7.3 IGMP侦听(IGMP Snooping) (22)2.7.4 MVR (23)2.7.5未知组播(Unknown Multicast) (24)2.8安全(Security) (25)2.8.1管理安全(Management Security) (25)2.8.2端口验证(Port Authentication) (26)2.8.3 MAC验证(MAC Authentication) (28)2.8.4 IP绑定(IP Binding) (30)2.8.5 DHCP侦听(DHCP Snooping) (30)2.8.6 DHCP 限速(DHCP Limit) (32)2.8.7动态ARP检测(Dynamic ARP Inspection) (34)2.8.8 ARP 限速(ARP Limit) (35)2.8.9 广播风暴控制(Storm Control) (37)2.8.10 端口安全(Port Security) (37)2.8.11 VLAN 隔离(VLAN Isolation) (38)2.9访问控制列表(ACL) (39)2.9.1访问控制列表管理(Management ACL) (39)2.9.2访问控制列表规则(ACL Rule) (40)2.9.3流量ACL(Traffic ACL) (43)2.9.4端口绑定(Port Binding) (44)2.10 LLDP (44)2.10.1 LLDP管理(Management LLDP) (45)2.10.2邻居设备信息(Neighbor Information) (47)2.10.3 LLDP统计(LLDP Statistics) (47)2.11统计(Statistics) (48)2.11.1端口状态(Port Status) (48)2.11.2端口统计(Port Statistics) (49)2.11.3 VLAN列表(VLAN List) (49)2.11.4 MAC地址表(MAC Address Table) (49)2.11.5 IGMP侦听组(IGMP Snooping Group) (50)2.11.6链路聚合(Link Aggregation) (50)2.12生成树(spanning Tree) (51)2.12.1 Globle 全局模式 (51)2.12.2 STP&RSTP (52)2.12.3 MSTP区域(MSTP Region) (55)2.12.4 MSTP端口(MSTP Ports) (57)2.12.5 MSTP状态(MSTP State) (59)2.13 SNMP管理(SNMP Manager) (59)2.13.1 SNMP账户(SNMP Account) (60)2.13.2 SNMP告警(SNMP Trap) (62)2.14管理(Administration) (63)2.14.1 Fgms (63)2.14.2 IP配置(IP Configuration) (64)2.14.3简单网络时间协议(SNTP) (65)2.14.4 Ping诊断(Ping Diagnosis) (65)2.14.5账户(Account) (66)2.14.6TFTP服务(TFTP Services) (66)2.14.7重新启动(Reboot) (67)2.14.8复位(Reset) (68)2.14.9保存配置(Save Configuration) (68)2.14.10系统日志 (System Logs) (69)2.15退出(Logout) (70)3 命令行界面(CLI) (70)3.1 错误信息 (70)3.2 CLI惯例 (70)3.3 快捷键介绍 (70)3.4 CLI命令模式 (71)3.5 全局命令 (72)3.6 用户级别 (72)3.7 系统管理命令 (73)3.8 端口基本配置命令 (83)3.9 链路聚合命令(Link Aggregation Commands) (90)3.10 镜像命令(Mirroring Commands) (96)3.11 VLAN命令(VLAN Commands) (98)3.11.1 VLAN配置命令 (98)3.11.2 基于端口的VLAN配置命令 (110)3.12 VLAN VPN (113)3.13 GVRP命令 (116)3.14 QoS命令 (119)3.15 MAC地址表管理命令 (125)3.16 组播地址 (129)3.17 IGMP Snooping配置命令 (131)3.18 802.1x配置命令 (136)3.19 生成树命令 (142)3.20 SNMP配置命令 (157)3.21系统日志命令 (163)3.22 LLDP配置命令 (165)3.23 ACL配置命令 (171)3.24 端口绑定配置命令 (173)3.25 MVR配置命令 (174)3.26 环回检测 (178)4 订购信息 (181)5 附录A:命令索引 (182)6附录B:支持的MIBs (191)修订记录日期版本描述2011-12-23 V1.0 第一版2012-4-10 V2.0 增加网管功能1简介8000M系列管理型SFP光纤以太网交换机是一款面向服务提供商的高性能管理型二层(Layer 2+)千兆以太网交换机。
BDCOM S3448以太网交换机硬件安装手册

BDCOM S3448以太网交换机硬件安装手册目录目录第1章 BDCOM S3448交换机简介 (1)1.1 标准配置时的外形说明 (1)1.2 BDCOM S3448交换机系统特性参数 (3)第2章安装准备 (4)2.1 使用注意事项 (4)2.2 安全建议 (4)2.2.1 根据以下原则确保安全 (4)2.2.2 安全警告 (4)2.2.3 带电操作安全原则 (5)2.2.4 预防静电放电损坏 (5)2.3 一般场所要求 (6)2.3.1 场所环境 (6)2.3.2 场所配置预防 (6)2.3.3 机架配置 (6)2.3.4 电源考虑 (7)2.4 安装工具和设备 (7)第3章安装BDCOM S3448交换机 (8)3.1 BDCOM S3448的安装流程 (8)3.2 交换机机箱安装 (8)3.2.1 安装机箱于桌面 (9)3.2.2 安装机箱于机架 (9)3.3 连接接口 (9)3.3.1 连接监控口 (9)3.3.2 连接快速以太网接口 (11)3.4 扩展以太网接口插卡模块 (13)3.5 安装后检查 (13)第4章交换机维护 (14)4.1 打开机箱 (14)4.2 关闭机箱 (15)4.3 系统内存升级 (15)4.3.1 SDRAM安装方法 (15)第5章硬件故障分析 (18)5.1 故障隔离 (18)5.1.1 电源和冷却系统故障 (18)5.1.2 端口、电缆和连接故障 (18)5.2 指示灯说明 (18)第1章 BDCOM S3448交换机简介本节主要对BDCOM S3448交换机总体方面的特性、参数作了说明和介绍,让读者对BDCOM S3448交换机有一个总体的认识。
本公司每款交换机都有直流电源和交流电源两种,BDCOM S3448-DC 是使用直流电源的BDCOM S3448交换机。
1.1 标准配置时的外形说明BDCOM S3448交换机标配端口由两个部分组成:48个快速以太网端口,1个Console 端口,详细说明如下表。
交换机安装标准手册整理版

交换机安装标准手册一、前言本手册旨在为交换机安装提供标准化的指导和操作规范。
在计算机网络中,交换机扮演着重要的角色,其安装过程的质量直接影响到网络的性能和稳定性。
因此,遵循本手册进行规范的交换机安装至关重要。
二、准备工作1. 确定交换机的安装位置,确保其处于网络的核心位置,并且便于维护和管理。
2. 准备所需的工具和材料,包括螺丝刀、网络钳、网线、电源线等。
3. 仔细阅读交换机的安装说明书,了解其硬件结构和配置要求。
三、安装步骤1. 连接电源线:将电源线连接到交换机的电源接口,确保电源线的紧固和稳定。
2. 连接网线:将网线连接到交换机的LAN口和计算机的网络接口,确保网线的紧固和稳定。
3. 配置交换机:根据网络需求,配置交换机的IP地址、网关、DNS等网络参数。
4. 测试网络连接:通过ping命令或其他网络测试工具,测试计算机与交换机的网络连接是否正常。
5. 记录配置信息:记录交换机的配置信息,包括IP地址、端口配置、安全设置等,以便于后续管理和维护。
四、注意事项1. 在安装过程中,请遵循交换机的品牌和型号,确保正确连接电源线和网线。
2. 请勿在交换机未完全关闭的情况下进行操作,以避免损坏硬件设备。
3. 在配置交换机时,请根据实际需求进行设置,确保网络的稳定性和安全性。
4. 定期检查交换机的运行状态,及时发现并解决潜在的问题。
五、常见问题及解决方案1. 交换机无法正常启动:检查电源是否连接正常,检查网线是否连接正常。
2. 网络连接不稳定:检查网络设置是否正确,检查网线是否老化或损坏。
3. 无法访问交换机管理界面:检查交换机的IP地址和端口设置是否正确,检查浏览器设置是否正确。
4. 交换机出现故障:请联系技术支持或专业人员进行维修和检测。
六、附录1. 本手册中涉及的交换机型号和品牌仅供参考,具体操作请遵循所使用的交换机的说明书。
2. 本手册未涉及到的交换机安装和维护问题,请参考相关的技术文档或联系技术支持获取帮助。
普联全千兆Web网管交换机安装手册说明书
安装手册全千兆Web网管交换机Enterprise Networking SolutionTL-SG2048TL-SG2226/TL-SG2218TL-SG2024/TL-SG2016TL-SG2024D/TL-SG2016D TL-SG2422F/TL-SG2414F全千兆Web网管PoE交换机TL-SG2226PE/TL-SG2226P TL-SG2218PE/TL-SG2218P TL-SG2024MP声明Copyright © 2020 普联技术有限公司版权所有,保留所有权利未经普联技术有限公司明确书面许可,任何单位或个人不得擅自仿制、复制、誊抄或转译本手册部分或全部内容,且不得以营利为目的进行任何方式(电子、影印、录制等)的传播。
为普联技术有限公司注册商标。
本手册提及的所有商标,由各自所有人拥有。
本手册所提到的产品规格和资讯仅供参考,如有内容更新,恕不另行通知。
除非有特殊约定,本手册仅作为使用指导,所作陈述均不构成任何形式的担保。
I声明相关文档除本安装手册外,我们还提供以下文档的电子版本。
如需获取最新产品资料,请登心,我们将为您提供技术支持服务。
安装手册简介《全千兆Web网管交换机安装手册》主要介绍交换机的硬件特性、安装方法以及在安装过程中应注意事项。
本手册包括以下章节:第1章:产品介绍。
简述交换机的基本功能特性并详细介绍外观信息。
第2章:产品安装。
指导交换机的硬件安装方法以及注意事项。
第3章:硬件连接。
指导交换机与其他设备之间的连接及注意事项。
第4章:登录Web管理界面。
指导通过Web登录配置交换机。
附录A:常见故障处理。
附录B:技术参数规格。
II相关文档附录C:连接SFP端口补充说明。
本手册适合下列人员阅读:网络工程师网络管理员约定在本手册以下部分,如无特别说明,均以TL-SG2226机型为例介绍,所提到的交换机是指全千兆Web网管交换机。
本手册采用了如下几种醒目标志来表示操作过程中应该注意的地方,这些标志的III阅读对象目录第1章 产品介绍 ———————————011.1 产品简介 (01)1.2 产品外观 (02)第2章 产品安装 ———————————092.1 物品清单 (09)2.2 安装注意事项 (09)2.3 安装工具准备 (11)2.4 产品安装 (11)第3章 硬件连接 ———————————133.1 连接至RJ45端口 (13)3.2 连接SFP端口 (13)3.3 连接电源线 (14)3.4 设备初始化 (14)3.5 安装后检查 (14)第4章 登录Web管理界面 ———————15附录A 故障处理 ———————————16附录B 技术参数规格 —————————17附录C 连接SFP端口补充说明 —————18IV目录01全千兆Web网管交换机安装手册产品介绍第1章 产品介绍1.1 产品简介普联技术有限公司全新开发推出的Web网管交换机,采用高性能硬件和软件平台,提供灵活、高性价比的全千兆端口,支持802.1Q VLAN、端口监控、端口汇聚、QoS等常用功能,易于管理维护,适用于校园、酒店及企业园区网络接入应用场景。
8口交换机使用说明书
8口交换机使用说明书
◆8口交换机功能简介
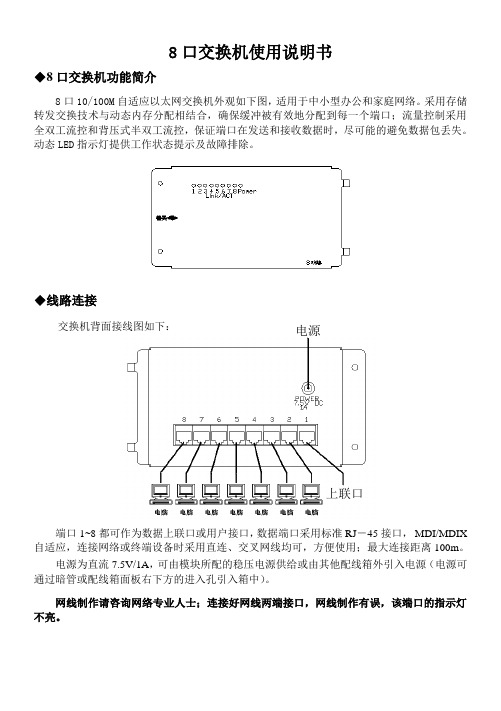
8口10/100M 自适应以太网交换机外观如下图,适用于中小型办公和家庭网络。
采用存储转发交换技术与动态内存分配相结合,确保缓冲被有效地分配到每一个端口;流量控制采用全双工流控和背压式半双工流控,保证端口在发送和接收数据时,尽可能的避免数据包丢失。
动态LED 指示灯提供工作状态提示及故障排除。
◆线路连接
交换机背面接线图如下:
端口1~8都可作为数据上联口或用户接口,数据端口采用标准RJ -45接口, MDI/MDIX 自适应,连接网络或终端设备时采用直连、交叉网线均可,方便使用;最大连接距离100m 。
电源为直流7.5V/1A ,可由模块所配的稳压电源供给或由其他配线箱外引入电源(电源可通过暗管或配线箱面板右下方的进入孔引入箱中)。
网线制作请咨询网络专业人士;连接好网线两端接口,网线制作有误,该端口的指示灯不亮。
电源 上联口。
交换机安装标准手册整理版

交换机安装标准手册整理版一、交换机安装概述交换机作为网络中的重要设备,安装质量直接影响到整个网络的稳定运行。
为了确保交换机安装顺利进行,我们需要遵循一定的标准和步骤。
本文将详细介绍交换机的安装方法、准备工作以及日常维护与管理。
二、交换机安装准备工作1.了解交换机类型和规格在安装交换机之前,首先要了解交换机的类型和规格,例如端口数量、传输速率、供电方式等。
这将有助于我们选择合适的交换机,并为其提供合适的安装环境。
2.选择合适的交换机位置交换机的安装位置要求干燥、通风、避免阳光直射,同时要确保安装面平整。
此外,还需考虑交换机与其他设备的距离,确保线缆敷设的合理性。
3.准备安装工具和材料在安装过程中,需要用到的一些工具和材料包括:螺丝刀、扳手、螺丝等。
同时,要确保线缆、接头、网线等材料的质量和规格符合要求。
三、交换机安装步骤1.安装交换机底座和支架根据交换机的类型和安装方式,将底座或支架安装到预定的位置。
确保底座或支架稳固,能够承受交换机的重量。
2.接线和连接将交换机的电源线、网络线、串口线等接线连接到相应的接口。
注意接线的牢固性和线缆的整理,避免线缆损坏和信号干扰。
3.配置交换机参数使用配置工具或命令行方式,对交换机进行基本参数配置,如IP地址、子网掩码、默认网关等。
此外,还需根据实际需求设置端口速度、双工模式、VLAN等参数。
4.启动交换机并进行自检完成配置后,启动交换机并进行自检。
观察交换机运行状态,如灯指示、自检结果等,确保交换机正常运行。
四、交换机日常维护与管理1.监控交换机运行状态通过交换机的监控工具或命令行方式,定期查看交换机的运行状态,如端口状态、流量、错误日志等。
及时发现并解决潜在问题。
2.保持交换机清洁定期清理交换机表面的灰尘,避免积灰导致设备过热。
同时,检查风扇等散热设备是否正常工作。
3.定期检查接线和连接检查线缆接头是否松动、线缆是否损坏,确保连接牢固可靠。
避免因线缆问题导致的网络故障。
博达交换机常用配置命令手册精品文档

Windows超级终端配置(续)
出现“COM3属性”对话框,把波特率设为9600,数据位为8,奇偶 校验为没有,停止位为1,流控为无,按“确定”完成设置。如下图:
这时,就可以通过超级终端来控制交换机了。
bdcom
交换机各种操作模式说明
在交换机初始启动时,出现“Switch>”的提示符时说明在用户态下, 各状态之间相互转换如下图所示:
Switch#d?
date
-- Set system date
debug
-- Debugging functions
delete
-- Delete a file
dir
-- List files in flash memory
disconnect -- Discoonect an existing outgoing network connection
bdcom
Console配置
交换机CONSOLE端口速率设置为:波特率为9600,8位数据位,1位 停止位,无奇偶校验,无流控;所以计算机的串口也需要把速率设置 成相同。 路由器及交换机和计算机主机串行口的连接如下图所示:
bdcom
Windows超级终端配置
采用操作系统自带的超级终端(Hyper Terminal)应用程序。 用鼠标单击“开始”,选择“程序”,“附件”中的“超级终端”,
bdcom
用户态 出现“Switch>”的提示符时,说明在用户态下。通
过键入“?”键,你可以看到在用户态下可以使用 的配置命令。
在用户态的时候,用户可以键入“enter”或 “enable”,可以进入管理态。如果设置了特权态 密码,在出现“password:”提示的时候需键入特 权态密码。
H3C S7600系列以太网交换机 安装手册(V1.06)-第7章 硬件管理和维护
目录7硬件管理及维护 ································································································································· 7-17.1 查看交换机的硬件信息 ······················································································································ 7-17.1.1 查看交换机的软件及硬件版本信息 ························································································· 7-17.1.2 查看设备运行的统计信息········································································································ 7-37.1.3 查看单板的详细信息 ··············································································································· 7-37.1.4 查看单板的电子标签信息········································································································ 7-57.1.5 查看单板CPU利用率的统计信息····························································································· 7-67.1.6 查看单板内存的使用状况········································································································ 7-77.1.7 查看主控板上CF卡的相关信息 ······························································································· 7-87.1.8 查看设备内置风扇的工作状态································································································· 7-87.1.9 查看电源的工作状态 ··············································································································· 7-87.1.10 配置主控板的负载分担功能 ·································································································· 7-97.1.11 配置/查看单板的温度告警门限······························································································ 7-97.2 端口配置与管理 ······························································································································· 7-107.2.1 配置Combo口 ······················································································································· 7-107.2.2 可插拔接口模块的识别与诊断······························································································· 7-117.3 软件异常时的处理方式 ···················································································································· 7-127.3.1 配置软件异常时的处理方式 ·································································································· 7-127.3.2 查看系统异常时的处理方式 ·································································································· 7-137.4 查看IRF的相关信息 ························································································································· 7-137.4.1 查看IRF中所有成员设备的相关信息 ····················································································· 7-137.4.2 查看成员设备重启以后生效的IRF配置·················································································· 7-147.4.3 查看IRF的拓扑信息··············································································································· 7-157.5 保存设备当前运行的配置 ················································································································ 7-157.6 重启指定单板或整台设备 ················································································································ 7-167 硬件管理及维护本章将为您介绍如何通过命令行,对S7600系列交换机的硬件进行配置、管理及维护。
汉邦 8 端口以太网交换机 用户手册说明书
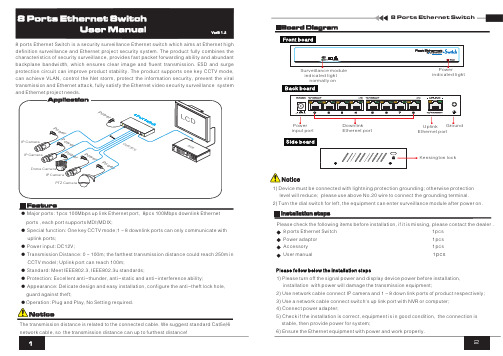
Please check the following items before installation, if it is missing, please contact the dealer .Accessory 1pcspcs 1) Please turn off the signal power and display device power before installation, installation with power will damage the transmission equipment;2) Use network cable connect IP camera and 1~8 down link ports of product respectively;3) Use a network cable connect switch's up link port with NVR or computer;4) Connect power adapter;5) Check if the installation is correct, equipment is in good condition, the connection is stable, then provide power for system;6) Ensure the Ethernet equipment with power and work properly.8 ports Ethernet Switch is a surveillance Ethernet switch which aims at Ethernet high definition surveillance and Ethernet project security system. The product fully combines the characteristics of security surveillance, provides fast packet forwarding ability and abundant backplane bandwidth, which ensures clear image andfluenttransmission. ESD and surge protection circuit can improve product stability. The product supports one key CCTV mode, can achieve VLAN, control the Net storm, protect the information security,prevent the viral transmission and Ethernet attack, fully satisfy the Ethernet video security surveillance systemand Ethernet project needs.security● Major ports: 1pcs 100Mbps up link Ethernet port, 8pcs 100Mbps downlink Ethernet ports , each port supports MDI/MDIX;● Special function: One key CCTV mode;1~8 downlink ports can only communicate with uplink ports;● Power input: DC12V;● Transmission Distance: 0~100m; the farthest transmission distance could reach 250m in CCTV model; Uplink port can reach 100m;● Standard: Meet IEEE802.3, IEEE802.3u standards;● Protection: Excellent anti-thunder, anti-static and anti-interference ability;● Appearance: Delicate design and easy installation, configure the anti-theft lock hole, guard against theft;●Operation: Plug and Play, No Setting required.The transmission distance is related to the connected cable. We suggest standard Cat5e/61) level will reduce; please use above No.20 wire to connect the grounding terminal.2) Turn the dial switch for left, the equipment can enter surveillance module after power on.Device must be connected with lightning protection grounding; otherwise protection indicated lightindicated lightnormally onKensington lockPlease follow below the installation stepsEthernet portEthernet portinput portSpecification change will not be noticedPlease follow the steps if the equipment has trouble. Make sure the equipment is installed according to the manufactures installation guide.Confirm RJ45 cable order meets EIA/TIA568A or 568B standard.Replace the equipment that can not work with a good one to check if the equipment is damaged.Please contact your vendor if trouble still exists.Instruments to be used: wire crimper, network tester. Wire sequence of RJ45 plug should conform with EIA/TIA568A or 568B.1) Please remove 2cm long the insulating layer, and bare 4 pairs UTP cable; 2) Separate the 4 pairs UTP cable and straighten them;3) Line up the 8 pieces of cables per EIA/TIA 568A or 568B;4) Cut off the cables to leave 1.5cm bare wire;5) Plug 8 cables into RJ45 plug, make sure each cable is in each pin;6) Use the wire crimper to crimp it;7) Repeat above 5 steps to make the another end;8) Using network tester to test the cable if it works.EIA/TIA 568AEIA/TIA 568BWhen choose RJ45 make sure if one end is EIA/TIA568A,the other end should also be EIA/TIA568A.When choose RJ45 make sure if one end is EIA/TIA568B,the other end should also be EIA/TIA568B.Notice。
以太网交换机入门说明书

Figure 1: Fire or Combustion Triangle When it comes to engineering, the design must meet the criteria of the classified location. Basically, there are three techniques to avoid a fire or explosion: containment (explosion proof enclosures and fittings), segregation (purge and pressurization of enclosures),Table 4: Class/Division System Compared to Zone System.*The -ER suffix indicates additional crush and impact test requirements and can be used as ‘exposed’ or ‘open’ wiring. When coming out of the cable tray, and the connection is less than six feet away to an end device such as a motor, cables with an ER rating can be used if they are properly supported and given adequate mechanical protection. Mechanical protection consists of struts, angle, or channels.In addition to the approved cable types there are other acceptable wires/cables that can be used with the proper pathway. Any suitable type of wire or cable can be used if installed in threaded metallic conduit with approved termination fittings. Defining ‘suitable’ type of wire is the responsibility of the AHJ but typically wire or cable approved for unclassified (non-hazardous) will be accepted. Many common off the shelf industrial devices, such as network switches, PLC’s, 24V DC power supplies, and Panduit 24V UPS are rated for Class I Division 2 locations. These devices are designed and manufactured to minimize the risk by addressing factors like spacing, fuses, relays, connectors, and surface temperatures. Manufactures may have a separate model that conforms to CID2 but in many cases there may be only one version. It is common for these devices to not be mounted in the hazardous area, but they have the certification regardless.Class I Division 2Reference ➢ Threaded rigid metal conduit or threaded steel intermediate metal conduit➢ Type PLTC and PLTC-ER (Power Limited Tray Cable – Exposed Run)*Article 725 ➢ Type ITC and ITC-ER (Instrumented Tray Cable – Exposed Run)*Article 727 ➢ Type MC (Metal Clad)Article 330 ➢ Type MV (Medium Voltage)Article 328 ➢ Type TC and TC-ER (Tray Cable – Exposed Run)*Article 336 ➢ Optical Fiber cable types allowed: OFNP , OFCP , OFNR, OFCR, OFNG, OFCG, OFN & OFC Installed in raceways that meet Article 501 requirementsArticle 770Table 6: CID2 Wiring MethodsClass I Division 2 (NEC Article 501)This classification is the most common hazardous environment. Methods that are approved for CID1 are allowed for CID2 locations as CID1 construction is more stringent than C1D2 construction. Division 2 includes additional cable types that can be used since there is less exposure to the hazard. Cable types such as Power Limited Tray Cable (PLTC) must be mounted in cable tray with listed fittings to meet the requirements. Cables with a proper sheath, Metal Clad for example, can be mounted without a pathway as long as the cable run is properly supported. Table 6 summarizes these methods and provides the NEC article reference where more information can be found on a specific cable type. For each type of cable listed there are installation requirements that are described as part of Article 501.NonincendiveNonincendive is not a common term but it is another type of classification for hazardous areas. There are a several types of ‘Nonincendive’ (circuit/component/equipment/field wiring) as defined in the NEC Article 100. Nonincendive is defined as having electrical/electronic equipment that is incapable, under normal operating conditions, of causing ignition of the surrounding atmosphere due to arcing or thermal means. Normal operating conditions are defined as maximum voltage under open circuit conditions and maximum current under short circuit conditions. Nonincendive devices are approved for use in a Division 2environment (also can be used for Class III Division 1) and therefore do not require protection such as an explosion proof enclosure or an intrinsically safe barrier. An advantage of this approach is cost when compared to Intrinsically Safe and explosion proof options. Nonincendive field wiring shall be permitted using any of the wiring methods permitted for unclassified locations and installed according to the control drawing.An example of a nonincendive device for CID2 is the Panduit VeriSafe ™ Absence of Voltage Tester (AVT), see figure 2. This rating allows the device to be mounted in control panels that are in the classified area. Any type of non-hazardous wiring can be used provided the manufacturer’s installation instructions are followed.Standards Apply to VS-AVT2 OnlyISA 12.12.01Nonincendive Electrical Equipment rated for Class I, Division 2 area classification, Groups A, B, C, D, and temperature classification T3.Class III (NEC Article 503)Class III focuses on textile mills where easily ignitable fibers/flyings are present in the manufacturing process. Examples of other Class III areas include cotton gins and seed mills, flax producing or handling facilities, pulverizing or shaping plants, and clothing manufacturing facilities. Sawmills and other woodworking plants where combustible fibers/flyings are present may also become hazardous locations. Fibers/flyings are hazardous because they are easily ignited but also because flames quickly spread through them. Class III locations do not have material group designations. Table 8 summarizes these acceptable methods for Class III division 1 and 2.Intrinsically Safe (NEC Article 504)Intrinsically safe equipment is defined as equipment and wiring which is incapable of releasing sufficient electrical or thermal energy under normal or abnormal conditions to create a hazardous situation. Intrinsically safe systems commonly use a standalone barrier that contains energy limiting electronics. Conceptually, the function of an intrinsically safe barrier is like that of a fuse or circuit breaker. When too much energy is detected from the barrier the barrier will react and ‘open’ the circuit. Any of the wiring methods for unclassified (non-hazardous) locations can be used as long as the conditions specified in the control drawings are followed. The intrinsically safe application is viewed as a circuit and each device that is part of the system must follow the design. Control drawings are typically supplied with the intrinsically safe barrier and will specify the requirements of the cabling. It is also important that the intrinsically safe wire is isolated and clearly marked so that it is not accidentally mixed with other wiring. Typically, intrinsically safe wire is blue in color and labeled so it can be easily recognized. For more information on intrinsic safety refer to UL 698A and/or NEC article 504.Class III Division 1 and Division 2➢ Rigid metal conduit, PVC conduit, RTRC conduit, intermediate metal conduit, electrical metallic tubing, dust tight wireways➢ Type MC or MI cable with listed termination fittings ➢ Type PLTC and PLTC-ER cable ➢ Type ITC and ITC-ER➢ Type MC, MI, MV, TC/TC-ER cable (requires ventilation and specific spacing)Table 8: Class III Wiring MethodsSummaryThe NEC has an abundance of information and guidance for hazardous locations found in Chapter 5 (Article 500 to 506). Traditionally the NEC has followed the Class/Division segmentation but with the addition of Article 505 and 506 there is now a reference to the Zone schema that is used internationally. When installing outside of the United States be sure to follow the standards and regulations for that area, ATEX and IECEx are common outside of the US. Direct cross referencing of standards is usually not allowed unless the device is provided with a dual rating. Be aware that there are differences between Classes and Divisions that are not incremental and do not transfer from one to the other. For example, a Class I device cannot be used in a Class III area unless it has been rated for that area.Appropriate materials selection and installation practices are documented in the NEC and are used to create a safe design that can be approved by the authority having jurisdiction. Following these 3 steps will provide a proper install; determine the correct hazardous area classification, review the wiring types allowed for proper cable selection, and installing the cable per the requirements of the hazardous location. Each classified area has a list of approved wiring methods as shown in the tables within this paper. Additional details for the applicable standards of these wiring methods should be researched prior to developing a design. Interpretations of the requirements are subjective, so it is crucial to include any local codes and communicate with the proper authority for the specific location. In most cases there are several options available and having the proper information will result in a successful project.Panduit ProductsIt is challenging to generally classify products due to the many details and the variety of standards that apply to different situations. The FAQ section and chart below provides guidance for common situations and a starting point for product specification. Today there are many products that offer Class I Division 2 ratings; this provides more flexibility when installing in a hazardous location.What type of enclosure is needed for Class I Division 2? Can a Panduit Zone enclosure be used?In CID2 locations, enclosures, fittings, and joints are not required to be explosionproof if they contain no arcing devices and the equipment used in the panel is CID2 rated. Control panels containing solid-state relays, solenoids, and control transformers (as long as the devices operating temperature doesn’t exceed 80% of ignition temperature) are considered non-arcing devices per article 501.105(B)(3 and 4). Therefore, a NEMA 4 rated Zone Enclosure with CID2 rated equipment, such as a Stratix® switch or PLC, can be mounted in the CID2 classified area without the need for an explosion proof rating. This guidance is assuming that the area of installation does NOT require explosion proof seal. Division 2 wiring methods indicated in Article 501.10(B) must be adhered to for the installation.Additionally, some motor control devices that are mounted in control panels can have CID2 ratings. For example, devices suchas circuit breakers/motor controllers/switches that are sealed and not arc producing can be listed as CID2 rated devices. Article 501.115 and 501.120 provide more details on the exceptions but reviewing any equipment’s labeling and/or manuals will statethe rating to which it has been tested and certified.What rating is required for cables and connectors used in a Class I Division 2 control panel?Cables and connectors used in a CID2 control panel, not requiring explosion proof seal, do not have to have a hazardous location listing. As long as the equipment is ‘listed’ it can be used. To clarify, there are two types of terminology used in the NEC code;‘listed’ and ‘listed for the location’. Listed for the locations typically refers to an item being rating for the explosion proof area. However, the term ‘listed’ refers to a more general recognition such as general purpose or ordinary. The term ‘listed’ refers to a component that is tested to a standard by a Nationally Recognized Testing Laboratory such as UL or CSA. Therefore, for these CID2 control panels, Panduit network products such as patch cables, RJ45 plugs/jacks, and related equipment that are used inside the control panel are allowed. Any type of wiring that is outside of the enclosure must adhere to the Division 2 wiring methods indicated in Section 501.What type of fittings are needed for Class I Division 2 installations for Zone Enclosures (or other control panels)? Generally speaking, if the installation requires an explosionproof seal, the fitting must be an explosionproof fitting, rated, listed, and marked for either Class I, Division 1 or Class I, Division 2. If the installation does not require an explosionproof seal, all that is required is an ordinary or general-purpose rated and listed fitting compatible with the appropriate Division 2 wiring method being used. When equipment being installed does not rely on an explosionproof method of protection and does not have ignition concerns then explosionproof enclosures and fittings are not needed per section 501.10(B)(4) of the NEC.What cable can be used inside threaded metal conduit that meets Class I applications?Standard Panduit enterprise or industrial copper cable and fiber can be used in threaded rigid metal conduit. The media used in this pathway only needs to be listed (general recognition) and is not required to have any type of explosion proof rating. The threaded metal conduit provides the protection requiredMore Meaningful Connections11 WHITE PAPER – Specifying Cable Infrastructure in Hazardous Locations Per NEC StandardsThis chart contains Panduit products that can be installed in different types of hazardous locations.Part Number DescriptionApplications Type of use in hazardous locationClass IDiv 1Class I Div 2Class II Div 1Class II Div 2Class III Div 1&2IURHT5C04BL-UG Category 5e 4-pair UTP 600 V 22 AWG solid Type PLTC*Ethernet Networks EtherNet/IPRMC Cable Tray RMC Cable Tray Cable Tray ESFLHT5C02FGR-X Category 5e 2-pair SF/UTP 600 V 22 AWG stranded Type AWM, ITC, PLTC*Ethernet Networks PROFINET Type B/C RMC Cable Tray RMC Cable Tray Cable Tray ESFLHT5C02GR-X Category 5e 2-pair SF/UTP 22 AWG solid Type PLTC*Ethernet Networks PROFINET Type A RMC Cable Tray RMC Cable Tray Cable Tray UPS00100DC Maintenance-free, No battery, 100 Watts, 24VDCPower back up for 24VDC devices Not Rated Yes Not Rated Yes Yes Z22U-S14 and -S15Universal Network Zone EnclosureHousing network switches and devices Not RatedYes**Not Rated Yes**Yes**Z23U-S24 and -S25FODPZ12Y OFNP plenum, 50µm OM4, 900µm buffered fibersIndoor Distribution fiberCable Tray FODPZ24Y FSDP912Y OFNP plenum, 50µm OS2, 900µm buffered fibersIndoor Distribution fiberCable Tray FSDP924Y FOPPZ12Y OFCP plenum, 50µm OM4, 900µm buffered fibersIndoor Distribution interlocking armor Cable Tray FOPPZ24Y FSPP912Y OFCP plenum, 9µm OS2, 900µm buffered fibersIndoor Distribution interlocking armor Cable Tray FSPP924Y FOCPZ12Y OFNP plenum, 50µm OM4, 250µm fibers Indoor/outdoor loose tube cableCable Tray FONPZ24Y FSCP912Y OFNP plenum, 9µm OS2, 250µm fibers Indoor/outdoor loose tube cable Cable Tray FSNP924Y FSJD912OFNR-LS riser LSZH, OS2Industrial Dielectric Double Jacketed Cable Tray FOJDZ12OFNR-LS riser LSZH, OM4Industrial Dielectric Double JacketedCable Tray* Power Limited Tray Cable (PLTC) applications reduce rating to 300 V ** When equipped with location approved equipmentAWM = Appliance Wiring Material ITC = Instrument Tray cable PLTC = Power Limited Tray CableRMC = Rigid Metal Conduit (thick walled threaded metal tubing)OFCP = Fiber Optic Conductive Plenum OFNP = Fiber Optic Nonconductive PlenumOFNR-LS = Fiber Optic Nonconductive Riser LSZH = Low smoke Zero HalogenCable tray = Unit or assembly of units and the associated fittings that form a structural system used to securely fasten or support cables and raceways. Example of cable tray is Panduit Wyr-Grid® Overhead Tray Routing System. In addition to cable tray other installations types are available, refer to NEC Article 725.Acronym decoder list:THE INFORMATION CONTAINED IN THIS WHITE PAPER IS INTENDED AS A GUIDE FOR USE BY PERSONS HAVING TECHNICAL SKILL AT THEIR OWN DISCRETION AND RISK. BEFORE USING ANY PANDUIT PRODUCT, THE BUYER MUST DETERMINE THE SUITABILITY OF THE PRODUCT FOR HIS/HER INTENDED USE AND BUYER ASSUMES ALL RISK AND LIABILITY WHATSOEVER IN CONNECTION THEREWITH. PANDUIT DISCLAIMS ANY LIABILITY ARISING FROM ANY INFORMATION CONTAINED HEREIN OR FOR ABSENCE OF THE SAME.All Panduit products are subject to the terms, conditions, and limitations of its then current Limited Product Warranty, which can be found at /warranty.* All trademarks, service marks, trade names, product names, and logos appearing in this document are the property of their respective owners.©2020 Panduit Corp. ALL RIGHTS RESERVED. CPAT82--WW-ENG 8/2020Since 1955, Panduit’s culture of curiosity and passion for problem solving have enabled more meaningful connections between companies’ business goals and their marketplace success. Panduit creates leading-edge physical, electrical, and network infrastructure solutions for enterprise-wide environments, from the data center to the telecom room, from the desktop to the plant floor. Headquartered in Tinley Park, IL, USA and operating in 112 global locations, Panduit’s proven reputation for quality and technology leadership, coupled with a robust partner ecosystem, help support, sustain, and empower business growth in a connected world.PANDUIT US/CANADA Phone: 800.777.3300PANDUIT EUROPE LTD.London, UK*******************Phone: 44.20.8601.7200PANDUIT JAPAN Tokyo, Japan********************Phone: 81.3.6863.6000PANDUIT SINGAPORE PTE. LTD.Republic of Singapore *****************Phone: 65.6305.7575PANDUIT AUSTRALIA PTY. LTD.Victoria, Australia ******************Phone: 61.3.9794.9020PANDUIT LATIN AMERICA Guadalajara, Mexico *****************Phone: 52.33.3777.6000ContactPanduitNorthAmericaCustomerServicebyemail:**************or by phone: 800.777.3300Visit us at For more information。
PMC2208工业级光纤环网交换机说明书_V

PMC-2208工业光纤环网交换机说明书(V1.2 版)深圳市中电电力技术股份有限公司危险和警告本设备只能由专业人士进行安装,对于因不遵守本手册的说明所引起的故障,厂家将不承担任何责任。
本说明书版权属深圳市中电电力技术股份有限公司所有,未经书面许可,不得复制,传播或使用本文件及其内容,违犯者将要对损坏负责。
深圳市中电电力技术股份有限公司保留所有版权。
我们已经检查了本手册关于描述硬件和软件保持一致的内容。
由于不可能完全消除差错,所以我们不能保证完全的一致。
本手册中的数据将定期审核,并在新一版的文件中做必要的修改,欢迎提出修改建议。
以后版本中的变动不再另行通知。
目录1.前言 (1)2.系统简介 (1)2.1硬件介绍 (1)2.2软件介绍 (1)2.3性能技术参数 (1)3.功能描述 (3)3.1通信冗余功能 (3)3.2链路聚合功能 (3)3.3虚拟LAN 功能 (3)3.4多播过滤功能 (4)3.5速率限制功能 (4)3.6自动报警功能 (4)3.7镜像端口功能(或诊断功能) (4)3.8流量优先级功能 (4)4.人机界面 (5)4.1面板效果图 (5)4.2面板指示灯定义 (5)4.3面板复位按钮说明 (5)5.接口说明 (6)5.1光纤口说明 (6)5.1.1参数说明 (6)5.1.2SC光纤口说明 (6)5.1.3ST光纤口说明 (6)5.1.4光口类别选型区别 (7)5.2以太网接口定义 (8)5.2.1参数说明 (8)5.2.2网口定义 (8)5.2.3网线定义 (8)6.安装 (9)6.1外观图 (9)6.2端子图 (9)6.3开孔尺寸图 (9)7.附录 (9)1. 前言为适应电力、工业和轨道交通等领域采用光纤环网通信需求,我司专门设计开发了一款工业级光纤环网冗余智能以太网交换机。
在电力、工业和轨道交通等领域中以太网络交换机具备光纤环网冗余功能是非常重要的,可以保正长距离通信时,重要链接的可靠运行。
BDCOM S2008以太网交换机硬件安装手册

BDCOM S2008以太网交换机硬件安装手册目录目录第1章 BDCOM S2008交换机简介 (1)1.1 标准配置时的外形说明 (1)1.2 BDCOM S2008交换机系统特性参数 (2)第2章安装准备 (4)2.1 交换机使用注意事项 (4)2.2 安全建议 (4)2.2.1 根据以下原则确保安全 (4)2.2.2 安全警告 (4)2.2.3 带电操作安全原则 (5)2.2.4 预防静电放电损坏 (5)2.3 一般场所要求 (6)2.3.1 场所环境 (6)2.3.2 场所配置预防 (6)2.3.3 机架配置 (6)2.3.4 电源考虑 (6)2.4 安装工具和设备 (7)第3章安装S2008交换机 (8)3.1 S2008的安装流程 (8)3.2 交换机机箱安装 (8)3.2.1 安装机箱于桌面 (8)3.2.2 安装机箱于机架 (9)3.3 连接接口 (9)3.3.1 连接监控口 (9)3.3.2 连接快速以太网接口 (11)3.4 安装后检查 (13)第4章交换机维护 (14)4.1 打开机箱 (14)4.2 关闭机箱 (15)第5章硬件故障分析 (16)5.1 故障隔离 (16)5.1.1 电源和冷却系统故障 (16)5.1.2 端口、电缆和连接故障 (16)5.2 指示灯说明 (16)第1章 BDCOM S2008交换机简介本节主要对BDCOM S2008交换机总体方面的特性、参数作了说明和介绍,让读者对BDCOM S2008交换机有一个总体的认识。
1.1 标准配置时的外形说明BDCOM S2008交换机标配端口由两个部分组成:8个快速以太网端口,1个Console 端口,详细说明如下表。
表 1-1 标配端口特性表 端口名称特点快速以太网端口速率10/100M 自适应,线缆MDI/MDIX 自识别,UTP (RJ45)接口,带LINK/ACT 、100Mbps 指示灯 Console 端口 速率9600bps ,RJ45接口此外,在S2008交换机的后端提供了一个接地柱和一个电源插座。
- 1、下载文档前请自行甄别文档内容的完整性,平台不提供额外的编辑、内容补充、找答案等附加服务。
- 2、"仅部分预览"的文档,不可在线预览部分如存在完整性等问题,可反馈申请退款(可完整预览的文档不适用该条件!)。
- 3、如文档侵犯您的权益,请联系客服反馈,我们会尽快为您处理(人工客服工作时间:9:00-18:30)。
千兆以太网端口 Console端口 电源接口
表 1-1 标配端口特性表
端口名称
特点 SFP接口, UTP (RJ45)接口,带LINK/ACT指示灯。
第 3 章 安装BDCOM S2208 交换机 ......................................................................................................8 3.1 BDCOM S2208 的安装流程 .....................................................................................................8 3.2 交换机机箱安装 .......................................................................................................................8 3.2.1 安装机箱于桌面.............................................................................................................9 3.2.2 安装机箱于机架.............................................................................................................9 3.3 连接接口...................................................................................................................................9 3.3.1 连接监控口 ....................................................................................................................9 3.3.2 连接千兆以太网SFP光端口..........................................................................................11 3.3.3 连接千兆以太网电接口 ...............................................................................................12 3.4 安装后检查.............................................................................................................................13
-I-
BDCOM S2208 以太网交换机硬件安装手册
第1章 BDCOM S2208 交换机简介
本节主要对 BDCOM S2208 交换机总体方面的特性、参作了说明和介绍,让读者对 BDCOM S2208 交换机有一个总体的认识。
1.1 标准配置时的外形说明
BDCOM S2208 交换机标配端口由以下部分组成:8 个百兆以太网 RJ45 端口,2 个千兆 以太网 RJ45 端口,2 个千兆以太网 SFP 光端口,1 个 Console 端口,1 个 Phone Jack 电源接口。详细说明如下表。
第 5 章 硬件故障分析...........................................................................................................................17 5.1 故障隔离.................................................................................................................................17 5.1.1 电源和冷却系统故障 ...................................................................................................17 5.1.2 端口、电缆和连接故障 ...............................................................................................17 5.2 指示灯说明.............................................................................................................................17
第 4 章 交换机维护...............................................................................................................................15 4.1 打开机箱.................................................................................................................................15 4.2 关闭机箱.................................................................................................................................16 4.3 系统内存升级 .........................................................................................................................16 4.3.1 SDRAM扩展 .................................................................................................................16
BDCOM S2208以太网交换机 硬件安装手册
目录
目录
第 1 章 BDCOM S2208 交换机简介 ......................................................................................................1 1.1 标准配置时的外形说明 ............................................................................................................1 1.2 BDCOM S2208 交换机系统特性参数 ......................................................................................2
第 2 章 安装准备 ....................................................................................................................................4 2.1 使用注意事项 ...........................................................................................................................4 2.2 安全建议...................................................................................................................................4 2.2.1 根据以下原则确保安全 .................................................................................................4 2.2.2 安全警告........................................................................................................................4 2.2.3 带电操作安全原则.........................................................................................................5 2.2.4 预防静电放电损坏.........................................................................................................5 2.3 一般场所要求 ...........................................................................................................................6 2.3.1 场所环境........................................................................................................................6 2.3.2 场所配置预防 ................................................................................................................6 2.3.3 机架配置........................................................................................................................6 2.3.4 电源考虑........................................................................................................................7 2.4 安装工具和设备 .......................................................................................................................7
