15_IQ性能调整
VOYO A15-I7系统安装设置说明
系统安装/BIOS刷新说明系统安装方法一使用USB光驱安装,无需更改BIOS中设置,开机引导会默认从光驱启动系统安装方法二使用U盘或者移动硬盘安装,将win8或者win8.1系统镜像直接导入到U盘或者移动硬盘中,类似成USB光驱模式,无需更改BIOS设置,开机引导会默认从U盘或者移动硬盘引导启动系统安装方法三使用U盘或者移动硬盘安装,系统为ghost版本WIN8系统,开机引导需要更改BIOS 设置,关闭secure boot, 进入PE系统安装系统,安装完成后打开secure boot系统安装方法四使用U盘或者移动硬盘在win8 PE系统中还原系统,系统镜像为trueimage格式,开机引导需要更改BIOS设置,关闭secure boot,进入PE系统安装系统,安装完成后打开secure bootBIOS刷新或者EC刷新使用U盘或者移动硬盘进入DOS系统刷新BIOS或者EC,需要更改BIOS设置,关闭secure boot关闭secure boot步骤:1,开机按机器右侧的重力感应开关,进入BIOS设置2,移动到security选项3,set supervision password--回车--设置密码(如数字1)4,向上键--secure boot configuration选项--回车5,secure boot option 选项--回车--更改为disabled--回车6 ,ESC返回,向左键--- main 菜单--向下键boot features--回车7,csm support--回车--选择yes--回车8,向下至lagacy boot--回车--enabled--回车9,ESC 返回---向右移至boot菜单---设置USB设备为第一启动项10,按F10 键保存退出,自动重启,就能自动从U盘或者USB移动硬盘引导进入PE系统或者DOS系统11,刷新完BIOS后,需要进入BIOS设置按F9 load default 值后,按F10 保存12,PE系统还原系统后,需要进入BIOS设置先按F9 load default值,然后security菜单---et supervision password--回车--清除掉密码,再按F9 load default值--F10保存重启。
苹果15系统如何省电设置

苹果15系统如何省电设置苹果15系统节电设置非常简单,只需按照以下步骤进行操作即可:1. 调整屏幕亮度:降低屏幕亮度可以显著减少电池消耗。
你可以在“设置”中选择“显示与亮度”选项,然后通过滑动条调整亮度级别。
2. 关闭背景应用程序更新:很多应用程序会在后台自动更新,这样会消耗大量的电池。
你可以在“设置”中选择“通用”,然后点击“背景应用程序更新”选项,将其关闭。
3. 关闭推送通知:推送通知是一种非常方便的功能,但也会消耗大量的电池。
你可以在“设置”中选择“通知”选项,然后选择需要关闭的应用程序。
4. 关闭亮度自动调节:虽然亮度自动调节功能很智能,但也会耗费电池。
你可以在“设置”中选择“显示与亮度”选项,然后关闭“自动亮度”选项。
5. 关闭不必要的背景应用程序:有些应用程序会在后台持续运行,消耗大量的电量。
你可以双击“主屏幕”按钮查看最近的应用程序,然后将不需要的应用程序滑动,以关闭它们。
6. 使用Wi-Fi而不是数据网络:在Wi-Fi环境下上网可以节省大量的电池。
你可以在“设置”中选择“Wi-Fi”,然后选择可用的无线网络。
7. 关闭定位服务:定位服务是很多应用程序常常使用的功能,但也很耗电。
你可以在“设置”中选择“隐私”,然后选择“定位服务”,将其关闭。
8. 关闭云同步:云同步功能可以将你的数据与云端同步,但也会消耗电池。
你可以在“设置”中选择“iCloud”,然后关闭不需要同步的项目。
9. 关闭动态壁纸:动态壁纸会消耗更多的电池。
你可以在“设置”中选择“背景图片与亮度”,然后选择静态图片。
10. 启用低电量模式:若电池电量较低时,可以启用低电量模式。
你可以在“设置”中选择“电池”,然后启用“低电量模式”。
以上就是苹果15系统省电设置的一些方法,希望对你有帮助。
CSOLFPS优化大全
CSOLFPS优化大全一、优化硬件配置:1.升级显卡:FPS受显卡性能的影响较大,选择一款性能强大的显卡可以提高游戏的流畅度和帧率。
2.增加内存:增加内存可以提高游戏的运行速度,减少卡顿的出现。
3.更换固态硬盘:固态硬盘的读写速度更快,可以缩短游戏加载时间和提高游戏运行的平滑度。
4.设置合理的屏幕分辨率:降低屏幕分辨率可以减轻显卡的显示压力,提高游戏的流畅度。
5.关闭电脑的节能模式:节能模式下会限制显卡的性能,在游戏时应关闭该模式,以提高游戏的流畅度。
二、优化游戏设置:1.降低游戏画质:调低游戏的画质设置可以减轻显卡负担,提高游戏的帧率。
2.关闭不必要的特效:游戏中的一些特效会消耗大量的显卡资源,可以根据自己的需求关闭一些不必要的特效来提高游戏的流畅度。
3.调整游戏分辨率:将游戏的分辨率调整为适合自己电脑配置的设置,可以提高游戏的流畅度。
4.关闭垂直同步:关闭垂直同步可以减少帧数的限制,提高游戏的帧率。
5.开启全屏模式:全屏模式可以提高游戏的帧率和显示效果。
三、优化系统设置:1.关闭后台无关程序:关闭后台运行的无关程序可以释放更多的系统资源给游戏使用。
2.清理垃圾文件:定期清理系统的垃圾文件,可以提高硬盘的读写速度,加快游戏的加载速度。
3.更新显卡驱动程序:及时更新显卡驱动程序可以解决一些兼容性问题,提高游戏的流畅度。
4.关闭自启动程序:禁止一些不必要的自启动程序可以减少系统的负担,提高游戏的帧率。
5.清理系统注册表:清理系统注册表可以解决一些系统错误和冲突,提高游戏的稳定性和流畅度。
四、其他优化技巧:1.使用游戏加速器:游戏加速器可以优化网络连接,提高游戏的网络稳定性和延迟,提高游戏的流畅度。
2.关闭不必要的网络应用程序:关闭一些不必要的网络应用程序可以减少网络负载,减少游戏的延迟。
3.定期清理散热器:保持散热器的清洁可以降低显卡和CPU的温度,提高硬件的性能和寿命。
4.检查网络连接:有时候游戏卡顿是由于网络连接不稳定造成的,检查网络连接是否正常可以提高游戏的流畅度。
华硕 笔记本电脑 用户手册说明书

目录版权和商标声明 ............................................................................................................1-4修订 ..............................................................................................................................1-4FCC-B 频道干扰声明....................................................................................................1-5FCC 规定......................................................................................................................1-5CE 规定 ........................................................................................................................1-6电池规范 .......................................................................................................................1-6WEEE 声明...................................................................................................................1-6化学物质法规................................................................................................................1-7升级和保修 ..................................................................................................................1-7购买备件 .......................................................................................................................1-7安全指南 .......................................................................................................................1-8产品中有害物质的名称及含量.....................................................................................1-10MSI 特殊功能 .............................................................................................................1-11简介 ...............................................................................................2-1打开包装 .......................................................................................................................2-2产品检视 .......................................................................................................................2-3顶盖开启检视图 .......................................................................................................2-3前端检视图 ..............................................................................................................2-5右端检视图 ..............................................................................................................2-6左端检视图 ..............................................................................................................2-7后端检视图 ..............................................................................................................2-8底部检视图 ..............................................................................................................2-9如何使用键盘..............................................................................................................2-11Windows 键 ...........................................................................................................2-11快速启动按键.........................................................................................................2-12开启或关闭触摸板..................................................................................................2-13进入睡眠模式.........................................................................................................2-13切换显示器 ............................................................................................................2-13使用多个监视器 .....................................................................................................2-13调整显示器的亮度 .................................................................................................2-14调整扬声器的音量..................................................................................................2-14调整键盘背光 LED 灯的亮度(选择性配置) ........................................................2-14应用程序:True Color (选择性配置) ......................................................................2-15产品规格 .....................................................................................................................2-16使用者手册如何使用入门 .................................................................................3-1开始使用笔记本电脑 .....................................................................................................3-2如何舒适地使用笔记本电脑 ..........................................................................................3-3如何使用电源供应器 .....................................................................................................3-4电源适配器 ..............................................................................................................3-4电池 .........................................................................................................................3-4如何在 Windows 10 下设置一个电源计划设定 .............................................................3-6选择或自定义电源计划 ............................................................................................3-6创建自己的电源计划 ................................................................................................3-9如何使用触摸板 .........................................................................................................3-11了解一般硬盘和固态硬盘............................................................................................3-12了解 M.2 固态硬盘插槽...............................................................................................3-12如何连接 Internet........................................................................................................3-13无线网络 ................................................................................................................3-13有线网络 ................................................................................................................3-15如何设置蓝牙连接.......................................................................................................3-20开启蓝牙连接.........................................................................................................3-20如何连接外部装置.......................................................................................................3-23视频:如何使用 RAID 功能 ........................................................................................3-24如何在 BIOS 中选择 Boot Mode.................................................................................3-25视频:如何在 MSI 笔记本电脑上恢复 Windows 10 操作系统.....................................3-26视频:如何使用 MSI 一键安装 ..................................................................................3-27版权和商标声明Copyright © 微星科技股份有限公司所有。
韦氏智力测验结果分析

C 17
Cd 9
VIQ=124 PIQ=111
注:PC、PA都有A原因负荷,所以能够作出结论; 但假如无此负荷,则不能下此结论。
韦氏智力测验结果分析
18/35
f. 重测效应(也称学习效应,实践效应) 第一次做测验,经过学习,迁移到第
二次测验。 重测时PIQ增加多,VIQ增加少。
有些人研究: WISC-R 一月后重测: FIQ高7分,VIQ高3.5分,PIQ高9分。
5. 回答分析
受经验影响,回答是否中肯,是否 强迫性回答,是否随意性(未加思索) 回答等。
韦氏智力测验结果分析
32/35
韦氏智测结果汇报基本内容
一、普通资料
姓名、性别、年纪(出生日期、 测验日期),测验名称、场所、父母 情况、测验者。 二、申请理由
韦氏智力测验结果分析
33/35
三、普通观察
对测验结果有影响方面,包含仪表, 缺点、行为表现、态度、感情、疲劳 程度、是否合作、可靠程度。
就要考虑到可信限。 WISC(国外)FIQ可信限:
韦氏智力测验结果分析
7/35
WISCFIQ可信限
可信百分数 68% 85% 90% 95% 99%
误差范围(平均) ±3 ±5 ±5 ±6 ±9
韦氏智力测验结果分析
8/35
普通要求可信百分数达80%, >90% 很好,但在实用中,68%可能性(可信 百分数)预计就能够了。(C-WISCIQ 可信限见手册40~41页)。
(2)领悟测验(C):由一些相关 社会价值观念、社会习俗理由等问题所 组成,可测量对社会适应程度,尤其是 对伦理道德判断力。
韦氏智力测验结果分析
24/35
(3) 算数测验(A):一些心算题, 测量对数概念和应用能力,同时测量 注意力,处理问题能力。
IQ 15的Multi

使用技巧
副服务器什么时候需要被同步 怎么使用服务器的 INCLUDED/EXCLUDED 状态 DBSpace在version管理上的注意事项 怎么实现MPX服务器的特殊存储隔离
怎么使用服务器的 INCLUDED/EXCLUDED 状态
服务器在以下情景应该被置为EXCLUDED 状态:
服务器需要长时间停机 (超过一小时). 频繁的version创建或空间限制,IQ 的main store没有剩余 的空间进行version的创建。 有一个Auto‐exclude 功能可以让服务器自动转为excluded 状态,如果长期没有响应 (timeout可以设置为0, 从不,或 者设置一个小时的整数倍)
这将带来一定的网络开销,将根据网络I/O性能 的不同而不同。 这个开销在小的、短的运行事务中,是个考虑的 因素,但是长时间运行的事务中,该开销几乎不 被察觉。
Multiplex 事务的性能(2)
性能建议:
不要在副节点上运行过大量的全局DDL命令 (例如: 数以千记的CREATE/DROP TABLE命令)。
Multiplex 术语列表 (4)
术语
Included
描述
服务器被认定为活动状态,它的version 废片会 被收集和处理。
Excluded
服务器被认定为非活动状态,它的version 废片 不会被收集和处理. 当一个副服务器长时间停机 时,它应该被置为excluded, 否则将建立version 并消耗大量内存资源。 如果一个服务器准备短时间内停机,不要exclude 它,当它再次启动时会 resynchronize。
节点内的通讯
在IQ 15 Multiplex 架构中,在Coordinator server 和每个 Secondary server支持全双工通讯。
显卡如何设置高性能
显卡如何设置高性能随着游戏和图形应用的不断更新,显卡性能对于电脑性能的影响越来越大。
在游戏和图形应用中,合理设置显卡性能可以提升电脑的运行速度和流畅度。
下面将介绍显卡如何设置高性能。
第一步,更新显卡驱动。
首先需要确保显卡驱动是最新版本,可以通过官方网站下载驱动程序,并按照提示进行安装。
更新显卡驱动可以修复已知的问题,并提供更好的性能优化。
第二步,调整显卡性能模式。
大多数显卡都提供了多种性能模式供用户选择,如“高性能”,“平衡”,和“节能”等。
在控制面板或者显卡驱动的设置界面中,找到性能模式选项,选择“高性能”模式可以提升显卡的工作频率和功耗,从而获得更好的性能。
第三步,优化显卡性能设置。
在显卡驱动的设置界面中,有很多选项可以用来优化显卡性能。
其中最重要的是分辨率和帧率设置。
选择适合自己电脑配置的分辨率可以保证游戏或者图形应用能够以流畅的速度运行,而合理设置帧率可以避免出现卡顿和画面不流畅的问题。
第四步,提升显存性能。
显存是显卡的重要组成部分,对于游戏和图形应用的运行速度有着直接影响。
在显卡驱动的设置界面中,找到显存设置选项,可以根据需要增加显存的占用比例,提升显存性能。
第五步,降低显卡温度。
显卡在工作过程中会产生很多热量,如果温度过高,不仅会影响显卡的性能,还可能导致显卡过热损坏。
因此,及时清理显卡散热器和风扇上的灰尘,并确保显卡散热器通风良好,可以有效降低显卡温度,提升显卡性能。
总结起来,要想设置显卡高性能,需要更新显卡驱动、调整显卡性能模式、优化显卡性能设置、提升显存性能和降低显卡温度。
通过合理的设置和优化,可以获得更好的游戏和图形应用体验。
高情商测试题高智商测试(3篇)
第1篇前言情商(Emotional Intelligence,简称EQ)和智商(Intelligence Quotient,简称IQ)是衡量个人能力的重要指标。
情商指的是个人识别、理解和管理自己情绪的能力,以及识别、理解和管理他人情绪的能力。
智商则是指个人在认知能力上的表现,如逻辑思维、数学能力、空间认知等。
以下是结合高情商与高智商的测试题,旨在帮助您了解自己在这两个方面的水平。
一、高情商测试题1. 当你遇到以下情况时,你会如何应对?- A. 遭遇失败时,你会立即感到沮丧,认为自己再也无法成功。
- B. 遭遇失败时,你会分析失败的原因,并从中吸取教训。
- C. 遭遇失败时,你会保持冷静,相信自己有能力克服困难。
2. 你认为以下哪种行为最能体现高情商?- A. 在公共场合大声喧哗,表达自己的情绪。
- B. 在他人需要帮助时,主动伸出援手。
- C. 在与他人发生争执时,能够冷静地分析问题,寻求解决方案。
3. 当你的朋友向你倾诉烦恼时,你会怎么做?- A. 不断打断他,告诉他应该怎么做。
- B. 仔细倾听,给予安慰和建议。
- C. 不予理会,认为他应该自己解决问题。
4. 你如何处理以下情况?- A. 在工作中,遇到不合理的安排,你会抱怨不停。
- B. 在工作中,遇到不合理的安排,你会尝试调整自己的心态,适应环境。
- C. 在工作中,遇到不合理的安排,你会选择离职。
5. 你认为以下哪种人际关系最能体现高情商?- A. 与他人保持距离,避免产生矛盾。
- B. 与他人建立亲密的关系,共同成长。
- C. 只与少数人交往,避免麻烦。
二、高智商测试题1. 以下哪个数字是连续整数序列?- A. 2, 4, 8, 16, 32- B. 3, 6, 12, 24, 48- C. 1, 3, 7, 13, 212. 以下哪个图形与其他三个不同?- A. 正方形- B. 长方形- C. 矩形- D. 平行四边形3. 以下哪个数列的规律与其他三个不同?- A. 1, 2, 4, 8, 16- B. 2, 4, 8, 16, 32- C. 3, 6, 12, 24, 48- D. 4, 8, 16, 32, 644. 以下哪个图形与其他三个不同?- A. 圆形- B. 正方形- C. 三角形- D. 梯形5. 以下哪个数列的规律与其他三个不同?- A. 2, 4, 6, 8, 10- B. 3, 6, 9, 12, 15- C. 4, 8, 12, 16, 20- D. 5, 10, 15, 20, 25三、测试结果分析1. 高情商测试题:- 如果你的选项多为B或C,说明你在情商方面表现较好,具备良好的情绪管理能力、人际交往能力和适应能力。
win10中,怎么把cpu性能调到极佳?3个方法教会你现在很多人
win10中,怎么把cpu性能调到极佳?3个方法教会你现在很
多人
win10中,怎么把cpu性能调到极佳?3个方法教会你
现在很多人都喜欢在电脑上玩游戏和运行大型的软件,这对电脑的CPU是很有考验的,想要电脑运行顺畅,有良好的游戏体验,CPU 的性能必须好。
不过很多人即便知道想要顺畅运行大型的软件和程序,CPU是得好,但是很多人是不知道怎么才能让电脑的CPU性调整到最佳,下面小编就介绍三个win10把CPU性能调到极佳的方法,一起来看看吧!
方法一:
1.按下【win+i】组合快捷键,调出设置选项界面,选择【更新和安全】进入。
2.进入后,在左侧选择【开发者选项】,然后在右侧下拉找到【远程桌面】并点击【显示设置】。
3.在弹出的界面中,把上方的选项卡切换到【高级】,然后点击【设置】。
4.选择【调整为最佳性能】,最后点击【确定】即可。
方法二:
1.按下【win+i】组合键,调出设置选项界面,选择【系统】进入。
2.进入在左侧选择【电源与睡眠】,然后在右侧点击【其他电源设置】。
3.在弹出的界面中,点击选择【高性能】。
方法三:
1.鼠标右击桌面右下角的开始图标,选择【任务管理器】。
2.在任务管理器界面把没有用的程序关闭即可提高CPU性能。
以上就是本次小编带来的win10把cpu性能调到极佳的三个方法了,希望可以帮到有需要的朋友。
CPU是电脑的中央处理器,CPU的性能如果调到极佳的话,对电脑的运行流畅是非常有帮助的,如果你的电脑运行慢,打开应用程序很卡的话,可以参考上面的方法电脑的
CPU性能调到极佳。
AD15使用及设置
AD15使用及设置AD15是一种功能强大且易于设置和使用的设备。
它适用于许多不同的应用领域,包括声音增强、音频处理和录音等。
在本文中,我将为您介绍AD15的使用方法和设置步骤,并提供一些设置建议。
AD15的使用方法非常简单。
首先,您需要将AD15连接到音频源设备(如混音器、音频接口或音乐播放器)和音频输出设备之间。
接下来,您可以开始调整AD15的参数以满足您的需求。
AD15提供了丰富的设置选项,可让您调整其声音增强和音频处理功能。
以下是一些常用的设置选项及其说明:1.增益控制:您可以使用AD15的增益控制旋钮来调整输入信号的音量。
将旋钮向右旋转可增大音量,向左旋转则减小音量。
调整增益时,请确保信号不会过载或失真。
2.频率均衡器:AD15配备了多个频率带的均衡器,可让您调整不同频段的音频。
您可以使用这些均衡器来增强一些频率,减小其他频率,或者简单地使音频更加平衡。
3.压缩器:AD15的压缩器可以帮助您控制音频的动态范围。
通过使用压缩器,您可以减小音频中较高音量的峰值,并增大较低音量的细节。
这有助于确保音频的整体音量保持在一个较一致的水平上。
4.时延:AD15提供了时延控制功能,可用于调整音频信号的延迟时间。
这在一些应用中非常有用,如为扬声器系统中的不同扬声器设置不同的延迟时间,以达到更好的音频一致性。
除了上述常见的设置选项外,AD15还提供了许多其他设置,如反馈抑制、噪声门控制和混响效果等。
您可以根据您的具体需求来进行设置,以达到最佳的音频效果。
根据您的设备和应用场景,以下是一些建议的设置步骤:1.调整增益控制:首先,确保输入信号的音量适中,既不过大也不过小。
根据您的信号源和音频输出设备的要求,适当地设置增益控制旋钮。
2.应用均衡器:根据您希望增强或减小的频率范围,调整AD15的均衡器控制。
您可以根据您的个人喜好和音频环境来决定如何设置均衡器。
3.使用压缩器:如果您需要控制音频的动态范围,请使用AD15的压缩器。
RayBio Mouse IL-15 IQELISA Kit 使用手册说明书
RayBio® Mouse IL-15 IQELISA KitCatalog #: IQM-IL15User ManualLast revised September 2, 2021Caution:Extraordinarily useful information enclosedISO 13485 Certified3607 Parkway Lane, Suite 100Norcross, GA 30092 Tel: 1-888-494-8555 (Toll Free) or 770-729-2992, Fax:770-206-2393Web: , Email: *******************RayBiotech, Inc.________________________________________RayBio® Mouse IL-15 IQELISA Kit ProtocolTable of ContentsSection Page # I.Introduction3II.Reagents3III.Storage3IV.Additional Materials Required4V.Reagent Preparation4VI.Assay Procedure5VII.Assay Procedure Summary7VIII.Calculation of ResultsA. Typical DataB. Sensitivity and Recovery 8 9 9IX.Troubleshooting Guide10I. INTRODUCTIONThe RayBio®I mmuno Q uantitative E nzyme L inked I mumuno S orbent A ssay (IQELISA) is an innovative new assay that combines the specificity and ease of use of an ELISA with the sensitivity of real-time PCR. This results in an assay that is simultaneously familiar and cutting edge and enables the use of lower sample volumes while also providing more sensitivity. The RayBio® Mouse IL-15 IQELISA Kit is a modified ELISA assay with high sensitivity qPCR readout for the quantitative measurement of Mouse IL-15 in serum, plasma, and cell culture supernatants. This assay employs an antibody specific for Mouse IL-15 coated on a 96-well PCR plate. Standards and samples are pipetted into the wells and IL-15 present in a sample is bound to the wells by the immobilized antibody. The wells are washed and a detection affinity molecule is added to the plates. After washing away unbound detection affinity molecule, primers and a PCR master mix are added to the wells and data is collected using qPCR. C t values obtained from the qPCR are then used to calculate the amount of antigen contained in each sample, where lower C t values indicate a higher concentration of antigen.II. REAGENTS1.IL-15 PCR Plate: 96-well PCR plate coated with anti-Mouse IL-152.PCR Plate film3.Wash Buffer I Concentrate (20x): 25 ml of 20x concentrated solution4.Standards: 2 vials of recombinant Mouse IL-155.Assay Diluent A: 30 ml diluent buffer, 0.09% sodium azide as preservative.6.Assay Diluent B: 15 ml of 5x concentrated buffer.7.Detection Antibody for IL-15: 2 vials of a concentrated solution of anti-Mouse IL-15affinity reagent8.IQELISA Detection Reagent: 1.4ml of a 10x concentrated stock9.Primer Solution: 1.7ml vial10.PCR Master Mix: 1.2ml vial11.PCR Preparation buffer: 1ml vial of 10x concentrated buffer12.Final Wash Buffer: 10 ml vial of 10x concentrated bufferIII. STORAGEMay be stored for up to 6 months at 2°to 8°C from the date of shipment. Standard (recombinant protein) should be stored at -20°C or -80°C (recommended at -80°C) after reconstitution. Opened PCR plate or reagents may be stored for up to 1 month at 2° to 8°C. Note: the kit can be used within one year if the whole kit is stored at -20°C. Avoid repeated freeze-thaw cycles.IV. ADDITIONAL MATERIALS REQUIRED1.Real-time PCR instrument, Bio-Rad recommended2.Precision pipettes to deliver 2µl to 1 ml volumes.3.Adjustable 1-25 ml pipettes for reagent preparation.4.100 ml and 1 liter graduated cylinders.5.Absorbent paper.6.Distilled or deionized water.7.Log-log graph paper or computer and software for data analysis.8.Tubes to prepare standard or sample dilutions.9.Heating block or water bath capable of 80°CV. REAGENT PREPARATION1.Bring wash buffer, samples, assay diluents, and PCR plate to room temperature (18 - 25°C) before use. PCR master mix and Primer solution should be kept at 4°C at all times.2.Sample dilution: If your samples need to be diluted, 1x Assay Diluent B should be usedfor dilution of serum/plasma samples. Assay Diluent A maybe used in place if significant matrix affects are seen.Suggested dilution for normal serum/plasma: 2 fold*.*Please note that levels of the target protein may vary between different specimens.Optimal dilution factors for each sample must be determined by the investigator.3.Assay Diluent B should be diluted 5-fold with deionized water.4.Briefly spin the Detection Antibody vial before use. Add 25 µl of 1X Assay Diluent B intothe vial to prepare a detection antibody concentrate. Pipette up and down to mix gently (the concentrate can be stored at 4°C for 5 days). This concentrate should be diluted 80-fold with 1X Assay Diluent B and used in step 4 of the Assay Procedure.5.PCR preparation buffer should be transferred to a 15mL tube and diluted with 9mL ofdeionized or distilled water before use.6.Final Wash Buffer should be transferred to a 15mL tube and diluted with 9mL ofdeionized or distilled water for every 1mL of 10x concentrate used before use.7.Preparation of standard: Preparation of standard: Briefly spin a vial of Standard. Add500 µl 1X Assay Diluent B into the Standard vial to prepare a 80 ng/ml standardsolution. Dissolve the powder thoroughly by a gentle mix. Pipette 100 µl of the 80ng/ml standard solution into a new tube and mix with 100 µl of 1x assay Diluent B to generatea 40,000 pg/ml standard solution. Pipette 300 µl 1X Assay Diluent B into each tube foruse in the dilution series. Use the 40,000 pg/ml standard solution to produce a dilutionseries (shown below). Mix each tube thoroughly before the next transfer. 1X Assay Diluent B serves as the zero standard (0 pg/ml).100 µl + 100 µl100 µl+ 300 µl100 µl+ 300 µl100 µl+ 300 µl100 µl+ 300 µl100 µl+ 300 µl100 µl+ 300 µl40000 pg/ml 10000pg/ml2500pg/ml625pg/ml156.25pg/ml39.063pg/ml9.766pg/mlpg/ml8.If the Wash Buffer Concentrate (20x) contains visible crystals, warm to roomtemperature and mix gently until dissolved. Dilute 20 ml of Wash Buffer Concentrate into deionized or distilled water to yield 400 ml of 1x Wash Buffer.9.Prepare the IQELISA detection reagent by calculating how much will be needed. Thismay be accomplished by multiplying the number of wells to be assayed by the volume you plan to use per well. Once the volume of IQELISA detection reagent is known,prepare the reagent by diluting it 1:10 with deionized water and mixing thoroughly.VI. ASSAY PROCEDURE1.Bring all reagents and samples to room temperature (18 - 25°C) before use. It isrecommended that all standards and samples be run in triplicate. Partial plate runs may be accomplished by cutting the PCR plate into the desired number of strips using a pair of sturdy scissors, wire cutters, or shears. The remainder may be saved and used for a later date. If this is done, the PCR Plate Film should also be cut to a suitable size.2.Add 10-25µl of each standard (see Reagent Preparation step 2) and sample intoappropriate wells. Volumes should be consistent between all wells, samples, andstandards. As little as 10µL can be used if sample volume is limited, however thisincreases the chance of technical error. Ensure there are no bubbles present at thebottom of the wells. Dislodge any bubbles with gentle tapping or with a pipette tip being careful not to contact the sides or bottom of the well. Cover well and incubate for 2.5hours at room temperature or overnight at 4°C with gentle shaking.3.Discard the solution and wash 4 times with 1x Wash Solution. Wash by filling each wellwith Wash Buffer (100 µl) using a multi-channel Pipette or autowasher. Completeremoval of liquid at each step is essential to good performance. After the last wash,remove any remaining Wash Buffer by aspirating or decanting. Invert the plate and blot it against clean paper towels.4.Add 25 µl of prepared Detection Antibody (Reagent Preparation step 4) to each well.Incubate for 1 hour at room temperature with gentle shaking.5.Discard the solution. Repeat the wash as in step 3.6.Add 25µL of prepared IQELISA detection reagent and incubate 1 hour with rocking(Reagent Preparation step 9)7.Discard the solution. Repeat the wash as in step 3.8.Add 100µL of Final wash buffer to each well and incubate for 5 minutes with rocking.Remove the solution from each well and repeat an additional 2x.9.Add 100µL of 1x PCR preparation buffer to each well and incubate with rocking for 5minutes before removing the buffer. Blot the plate after the buffer is removed to ensure complete removal of the buffer.10.Add 15µL of the Primer solution to each well of the plate. At this stage the plate can becovered and stored at -20°C for use the next day if needed.11.Add 10µL of PCR Master Mix to each well and pipette thoroughly to mix the well (atleast 3x up and down).12.Cover the plate with the supplied PCR Plate Film, taking care to insure the film iscompletely and even pressed onto the plate, creating an air tight seal around each well of the plate.13.Place the plate into a real-time PCR instrument using a FITC compatible wave length fordetection with the following settings for cycling1.3 minute activation at 95°C2.10 seconds 95°C denaturation3.25 seconds 62°C annealing/extension4.Repeat steps 2 and 3 29xVII. ASSAY PROCEDURE SUMMARY1.Prepare all reagents, samples and standards as instructed.2.Add 25µl standard or sample to each well.Incubate 2.5 hours at room temperature or overnight at 4°C.3.Add 25µl Detection Antibody to each well.Incubate 1 hour at room temperature.4.Add 25µL of IQELISA Detection Reagent to each well. Incubate 1 hour5.Add 15µl Primer solution and 10µL of PCR master mix to each well6.Run real-time PCRVIII. CALCULATION OF RESULTSThe primary data output of the IQELISA kit is C t values. These values represent the number of cycles required for a sample to pass a fluorescence threshold. As the DNA is amplified additional fluorescent signal is produced, with each cycle resulting in an approximate doubling of the DNA. Therefore, higher levels of DNA (directly related to the amount of antigen in the sample) result in lower C t values.Calculate the mean C t for each set of triplicate standards, controls and samples. Subtract the C t value of each sample from the control to obtain the difference between the control and sample (Delta C t). Plot the values of the standards on a graph using a log scale for concentration on the x axis. This graph is the quickest way to visualize results, although not the most accurate. If this method is used the concentration of unknown samples can be estimated using a logarithmic line of best fit.The line of best fit will have an equation y = mln(x)+b, where y is the Delta C t value and x is the concentration. It may be helpful to use 5 significant figures for m and b to minimize rounding errors. To calculate the concentration of unknown sample this can be entered into Excel in the following format=EXP((y-b)/m))Where y is the Delta C t obtained during the assay, and b and m are obtained from the line of best fitAlternatively, for a more accurate representation linear regression may be used. Both the Delta C t and Concentration can be transformed using a log base of 10, plotted on a graph as described above, along with a line of best fit (using a linear model). The equation of this line may be used to calculate the antigen concentration of unknown samples. This is the method used for the analysis spreadsheet for IQELISA available online.A. TYPICAL DATAThese data are for demonstration only. A standard curve must be run with each assay.B. SENSITIVITY and RECOVERYThe minimum quantifiable dose of IL-15 is typically 39.0 pg/ml, however levels as lower than 39.0 pg/ml may be detected outside of the quantification range.Serum spike tests show recovery is 95% with a range form 60% to 130%ntraplate CV is below 10% for all samples and Interplate CV is below 15%X. TROUBLESHOOTING GUIDEProblem Cause SolutionPoor standard curve Inaccurate pipettingImproper standard dilutionCheck pipettesBriefly centrifuge standards anddissolve the powder thoroughly bygently mixingLow signal Too brief incubation timesInadequate reagentvolumes or improperdilutionEnsure sufficient incubation time.Assay procedure step 2 may bedone overnightCheck pipettes and ensure correctpreparationLarge CV Uneven pipettingBubbles present in wellsCheck pipettesLightly tap or use pipette tip todislodge from bottom of wellHigh background Plate is insufficientlywashedContaminated washbufferImproper TmReview the manual for proper wash.If using a plate washer, ensure thatall ports are unobstructed.Make fresh wash bufferCheck run parameters and calibrateinstrumentLow sensitivity Improper storage of theIQELISA kitImproper TmStore your standard at <-20°C afterreconstitution, others at 4°C.Check run parameters and calibrateinstrumentThis product is for research use only.©2019 RayBiotech, Inc11。
eq215均衡器面板说明
eq215均衡器面板说明摘要:一、均衡器面板简介1.均衡器的作用2.均衡器面板的组成部分二、均衡器参数详解1.均衡器类型2.频率响应3.增益调整4.频率选择三、均衡器应用场景1.音频处理2.通信系统3.其他领域四、使用注意事项1.操作安全2.设备连接3.参数设置正文:eq215均衡器面板是一种音频处理设备,主要用于调整音频信号的频率特性,以达到音质优化、消除噪声等目的。
均衡器面板由多个参数组成,用户可以根据需要调整这些参数,以满足不同的应用需求。
一、均衡器面板简介均衡器的作用是调整音频信号的频率特性,使之更加和谐。
它主要由高通、低通、带通等滤波器组成,通过对不同频率的信号进行放大、衰减等处理,从而改善音质。
均衡器面板的组成部分包括:输入/输出接口、增益旋钮、频率旋钮、开关等。
二、均衡器参数详解1.均衡器类型:根据所处理信号的频率范围,均衡器可分为高通、低通、带通等类型。
eq215均衡器面板支持多种类型,用户可根据实际需求选择。
2.频率响应:指均衡器对不同频率信号的处理能力。
频率响应范围越广,均衡器的性能越强大。
eq215均衡器面板的频率响应范围广泛,适用于各种音频处理场景。
3.增益调整:增益旋钮用于调整信号的放大程度。
通过增益调整,用户可以实现对信号的放大或衰减,从而达到理想的音质效果。
4.频率选择:频率旋钮用于调整信号的处理频率。
通过改变频率选择,用户可以针对性地处理音频信号中的某个频率成分,实现音质的优化。
三、均衡器应用场景1.音频处理:eq215均衡器面板广泛应用于音频处理领域,如音乐制作、音响系统调试等。
通过调整均衡器参数,可以优化音质、消除噪声,提升音频体验。
2.通信系统:在通信系统中,均衡器面板可用于调整信号的频率特性,以消除信号传输过程中的失真和噪声,提高通信质量。
3.其他领域:除了音频处理和通信系统外,均衡器面板还广泛应用于广播、电视、航空航天等领域,以实现对信号的优化处理。
四、使用注意事项1.操作安全:在操作eq215均衡器面板时,应确保设备接通电源,并遵循相关的操作规程,以防触电等事故发生。
智商与情商测试题(3篇)
第1篇一、智商测试题智商(IQ)测试旨在评估一个人的认知能力,包括逻辑推理、空间判断、数学能力、记忆力等。
以下是一些常见的智商测试题目,请您认真作答。
第一部分:逻辑推理1. 下列四个图形中,哪一个与其他三个不同?A. △△△△B. ○○○○C. □□□□D. ▲▲▲▲2. 下面哪个数字填入空格后,能使等式成立?4 + □ - 3 = 53. 下列哪个数字填入空格后,能使等式成立?6 ÷ □ × 2 = 124. 下列哪个数字填入空格后,能使等式成立?7 × □ + 4 = 255. 下列哪个数字填入空格后,能使等式成立?9 - □ ÷ 3 = 6第二部分:空间判断6. 下面哪个图形可以拼成一个完整的正方形?A.B.C.D.7. 下面哪个图形可以拼成一个完整的圆形?A.B.C.D.8. 下面哪个图形可以拼成一个完整的三角形?A.B.C.D.9. 下面哪个图形可以拼成一个完整的矩形?A.B.C.D.10. 下面哪个图形可以拼成一个完整的五边形?A.B.C.D.第三部分:数学能力11. 下列哪个数字填入空格后,能使等式成立?8 × □ + 6 = 4612. 下列哪个数字填入空格后,能使等式成立?5 ÷ □ + 3 = 813. 下列哪个数字填入空格后,能使等式成立?4 × □ - 2 = 1414. 下列哪个数字填入空格后,能使等式成立?7 + □ × 2 = 2315. 下列哪个数字填入空格后,能使等式成立?6 ÷ □ + 4 = 10第四部分:记忆力16. 请按照顺序写下以下数字:3、1、4、1、5、9、2、6、5、3、5。
17. 请按照顺序写下以下字母:B、A、D、C、F、G、H、E、I、J。
18. 请按照顺序写下以下词语:桌子、椅子、电视、冰箱、电脑、空调、洗衣机。
19. 请按照顺序写下以下颜色:红、黄、蓝、绿、白、黑、紫、橙。
高情商高智商的测试题(3篇)
第1篇说明:本测试旨在评估您的情商(EQ)和智商(IQ)。
情商指的是您识别、理解和管理自己及他人情绪的能力,而智商则是您在逻辑推理、数学能力、空间感知等方面的智力水平。
请认真阅读每个问题,并根据自己的实际情况选择最符合您的答案。
测试结束后,请计算总分,以评估您的情商和智商水平。
情商部分(EQ)1. 当您遇到一个情绪低落的朋友时,您通常会怎么做?A. 直接询问他们发生了什么事B. 给他们一些空间,等他们自己愿意分享C. 试图转移话题,让他们忘记烦恼D. 鼓励他们参加一些活动,让自己忙碌起来2. 在团队合作中,您发现有人对某个决策持不同意见,您会如何处理?A. 尽快解决分歧,确保团队意见一致B. 尊重每个人的意见,但坚持自己的立场C. 私下与持不同意见的人沟通,试图达成共识D. 忽略分歧,继续按照原计划执行3. 当您在工作中遇到挫折时,您通常如何应对?A. 分析问题,寻找解决方案B. 倾诉给同事或朋友,寻求安慰C. 暂时放弃,等待情绪稳定后再重新开始D. 自我批评,认为自己能力不足4. 您如何处理与伴侣的争执?A. 尽快解决问题,避免矛盾升级B. 保持冷静,试图理解对方的立场C. 转移话题,避免争执D. 拒绝沟通,等待对方主动解决5. 在公共场合,您如何表达自己的观点?A. 直接而坚定地表达,不考虑他人感受B. 温和地表达,尊重他人意见C. 避免表达,以免引起争议D. 随意表达,不拘小节6. 当您发现朋友在工作中犯了错误时,您会如何处理?A. 直接指出错误,并给出建议B. 私下与朋友沟通,提醒他们注意C. 等待朋友自己发现错误D. 忽略错误,避免尴尬7. 您如何看待自己与他人的关系?A. 我是一个受欢迎的人,很多人喜欢和我在一起B. 我有一些好朋友,但大部分时间都是自己一个人C. 我的人际关系一般,有时候感到孤独D. 我的人际关系很糟糕,经常与人发生冲突8. 您如何处理压力?A. 通过运动、听音乐等方式放松自己B. 与朋友或家人聊天,寻求安慰C. 通过工作或学习来转移注意力D. 借酒消愁,寻求短暂的解脱9. 您如何看待自己的情绪?A. 我很容易控制自己的情绪,很少感到焦虑或沮丧B. 我能够控制自己的情绪,但有时候会感到焦虑或沮丧C. 我经常感到焦虑或沮丧,但能够自己调节D. 我很难控制自己的情绪,经常感到焦虑或沮丧10. 您如何看待自己的社交能力?A. 我具有很强的社交能力,能够轻松地与人交往B. 我有一定的社交能力,但需要花费一些时间和精力C. 我的社交能力一般,有时候会感到尴尬或不知所措D. 我没有社交能力,经常感到孤独和被排斥智商部分(IQ)1. 以下哪个数字不是5的倍数?A. 10B. 15C. 20D. 252. 如果一个班级有30名学生,其中有15名女生,那么男生有多少人?A. 15B. 20C. 25D. 303. 以下哪个图形不是正方形?A. 图形AB. 图形BC. 图形CD. 图形D4. 以下哪个数字不是偶数?A. 2B. 4C. 6D. 85. 如果一个苹果的重量是100克,那么10个苹果的总重量是多少?A. 100克B. 200克C. 300克D. 400克6. 以下哪个字母不是元音字母?A. AB. EC. ID. M7. 如果一个长方形的长度是8厘米,宽度是4厘米,那么它的周长是多少?A. 12厘米B. 16厘米C. 20厘米D. 24厘米8. 以下哪个数字不是奇数?A. 1B. 3C. 5D. 79. 如果一个班级有40名学生,其中有20名男生,那么女生有多少人?A. 20B. 30C. 40D. 5010. 以下哪个图形不是圆形?A. 图形AB. 图形BC. 图形CD. 图形D评分标准:情商部分(EQ):- A选项:2分- B选项:3分- C选项:1分- D选项:0分智商部分(IQ):- 每题正确得1分,错误不得分。
如何把电脑CPU性能调到最大
如何把电脑CPU性能调到最大
很多小伙伴玩游戏的时候,发现电脑的cpu占用很高,这样对电脑的使用是不是很不好。
那么我们该如何降低cpu的占用率,把电脑cpu的性能调到最大呢?今天小编带来了几种方法,具体的教程下面一起来看看吧。
电脑CPU性能调到最大的方法方法一:
1、点击“任务栏”,右键点击“启动任务管理器”,关闭没有用的程序,即可提高CPU性能。
方法二:
1、右键点击“计算机”图标,找到并选择“属性”
2、点击“高级系统设置”中的“高级”选项,点击性能下方的“设置”,点击视觉效果下方的最佳性能,点击“应用”即可。
方法三:
1、右键点击“计算机”图标,找到并选择“属性”,点击“高级系统设置”并选择“高级”选项
2、点击性能下方的“设置”,点击“高级”,点击调整以优化性的“程序”,点击“应用”即可。
AOC液晶显示器用户说明书
安全说明 (4)关于本指南 (4)电源 (5)安装 (6)清洁 (8)其他 (9)安装 (10)标准配置 (10)安装支架底座 (11)调整视角 (12)连接显示器 (13)安装墙壁装配架 (14)调节显示器 (15)设置最佳分辨率 (15)Windows Vista (15)Windows XP (17)Windows ME/2000 (18)快捷键 (19)OSD 调节 (20)明亮度 (21)图像设置 (23)色温 (25)色彩增强 (27)窗口增亮 (29)OSD 设置 (31)其它 (33)重置 (35)退出 (37)LED 指示灯 (39)驱动 (40)显示器驱动 (40)Windows 2000 (40)Windows ME (40)Windows XP (41)Windows Vista (44)Windows 7 (46)i-Menu .............................................................................................................................................................. 51 故障排除 .. (54)规格 (56)主要规格 (56)e-Saver Screen+ ............................................................................................................................................................ 5.. (53)2即插即用 (59)安规信息 (60)FCC注意事项 (60)WEEE声明 (60)有毒有害物质或元素声明 (61)能效等级 (61)安全说明关于本指南下面说明本文档中使用的符号约定。
IQ设备测试参数设置表
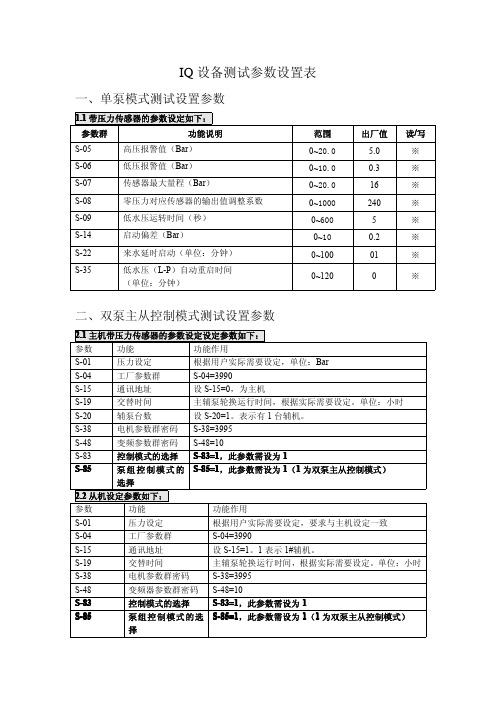
二、双泵主从控制模式测试设置参数
2.1 主机带压力传感器的参数设定设定参数如下: 参数 S-01 S-04 S-15 S-19 S-20 S-38 S-48 S-83 S-85 功能 压力设定 工厂参数群 通讯地址 交替时间 辅泵台数 电机参数群密码 变频参数群密码 控制模式的选择 泵组控制模式的 选择 功能 压力设定 工厂参数群 通讯地址 交替时间 电机参数群密码 变频器参数群密码 控制模式的选择 泵组控制模式的选 择 功能作用 根据用户实际需要设定,单位:Bar S-04=3990 设 S-15=0,为主机 主辅泵轮换运行时间,根据实际需要设定。单位:小时 设 S-20=1。表示有 1 台辅机。 S-38=3995 S-48=10 S-83=1,此参数需设为 1 S-85=1,此参数需设为 1(1 为双泵主从控制模式)
3.2 从机设定参数如下: 参数 S-01 S-04 S-15 S-19 S-25 S-38 S-48 S-83 S-85 功能作用 根据用户实际需要设定,要求与主机设定一致 S-04=3990 设 S-15=1、2、3、4、5、6,为辅机。1 表示 1#辅机。 主辅泵轮换运行时间,根据实际需要设定。单位:小时 根据用户实际需要设定,一般设定 35HZ—40HZ S-38=3995 S-48=10 S-83=1,此参数需设为 1 S-85=2,此参数需设为 2(2 为多泵同步控制)
三、多泵同步控制模式测试设置参数
3.1.主机带压力传感器的参数设定设定参数如下: 参数 S-01 S-04 S-15 S-19 S-20 S-25 S-38 S-48 S-83 S-85 功能 压力设定 工厂参数群 通讯地址 交替时间 辅泵台数 水泵转速下限 电机参数群密码 变频参数群密码 控制模式的选择 泵组控制模式的选 择 功能 压力设定 工厂参数群 通讯地址 交替时间 水泵转速下限 电机参数群密码 变频参数群密码 控制模式的选择 泵组控制模式的选 择 功能作用 根据用户实际需要设定,单位:Bar S-04=3990 设 S-15=0,为主机 主辅泵轮换运行时间,根据实际需要设定。单位:小时 设 S-20=1、2、3、4、5、6,表示辅机数 根据用户实际需要设定,一般设定 35HZ—40HZ S-38=3995 S-48=10 S-83=1,此参数需设为 1 S-85=2,此参数需设为 2(2 为多泵同步控制)
WLS15 Pro LED Strip Light with PICK-IQ 说明书
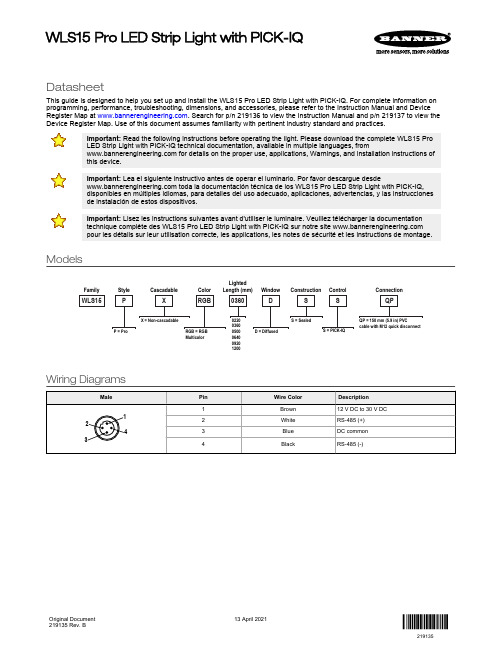
DatasheetThis guide is designed to help you set up and install the WLS15 Pro LED Strip Light with PICK-IQ. For complete information on programming, performance, troubleshooting, dimensions, and accessories, please refer to the Instruction Manual and Device Register Map at . Search for p/n 219136 to view the Instruction Manual and p/n 219137 to view the Device Register Map. Use of this document assumes familiarity with pertinent industry standard and practices.Important: Read the following instructions before operating the light. Please download the complete WLS15 Pro LED Strip Light with PICK-IQ technical documentation, available in multiple languages, from for details on the proper use, applications, Warnings, and installation instructions of this device.Important: Lea el siguiente instructivo antes de operar el luminario. Por favor descargue desde toda la documentación técnica de los WLS15 Pro LED Strip Light with PICK-IQ,disponibles en múltiples idiomas, para detalles del uso adecuado, aplicaciones, advertencias, y las instrucciones de instalación de estos dispositivos.Important: Lisez les instructions suivantes avant d'utiliser le luminaire. Veuillez télécharger la documentation technique complète des WLS15 Pro LED Strip Light with PICK-IQ sur notre site pour les détails sur leur utilisation correcte, les applications, les notes de sécurité et les instructions de montage.ModelsWLS15XRGB 0360D QPConnectionWindowLighted Length (mm)ColorCascadableFamilyX = Non-cascadableRGB = RGB Multicolor022003600500064009201200QP = 150 mm (5.9 in) PVCcable with M12 quick disconnectS = SealedSConstructionS = PICK-IQS ControlStyleP P = ProD = DiffusedWiring DiagramsWLS15 Pro LED Strip Light with PICK-IQOriginal Document 219135 Rev. B13 April 2021219135SpecificationsSupply Voltage12 V DC to 30 V DCUse only with suitable Class 2 power supply (UL) or a SELV power supply (CE)See electrical characteristics on product labelSupply Protection CircuitryProtected against reverse polarity and transient voltagesNote: Do not spray cable with high-pressure sprayer, or cable damage will result.ConstructionClear anodized aluminum housing Polycarbonate outer housing Polyamide end capsConnections150 mm (6 in) PVC cable with a 4-pin M12 male quick disconnect Models with a quick disconnect require a mating cordsetMountingIntegral mounting slots for M4 (#8) screws, tighten to 0.56 N·m (5 in·lbf) max torqueMultiple bracket options availableSecure cables within 150 mm (5.9 in) of the lightNote: It is recommended to use the provided mounting bushings when mounting using the endcaps. Center the mounting bushings in each slot to allow for expansion and contraction.Install using a M4 (#8) screw in each bushing torqued to a maximum of 0.45 N-m (4 in-lbf). For 920 mm and 1200 mm models in environments that vary more than 10 °C (18 °F), it is recommended to use one of the mounting bracket options instead of the end cap slots. If using the LMBWLS15 clip bracket and additional attachment is desired, only one end may be fastened using one of the spacers provided in the LMBWLS15 hardware packet to allow the opposite end to expand and contract. See mounting options in the instruction manual for bracket and tape options that allow expansion and contraction over temperature variations.Environmental RatingRated IEC IP66 and IEC IP67Suitable for wet locations per UL 2108Vibration and Mechanical ShockVibration: 10 Hz to 55 Hz, 1.0 mm peak-to-peak amplitude per IEC 60068-2-6Shock: 15G 11 ms duration, half sine wave per IEC 60068-2-27Operating Temperature–40 °C to +50 °C (–40 °F to +122 °F)Storage Temperature: –40 °C to +70 °C (–40 °F to +158 °F)CertificationsE476617Dimensions - Tel: + 1 888 373 6767P/N 219135 Rev. BBanner Engineering Corp. Limited WarrantyBanner Engineering Corp. warrants its products to be free from defects in material and workmanship for one year following the date of shipment. Banner Engineering Corp. will repair or replace, free of charge, any product of its manufacture which, at the time it is returned to the factory, is found to have been defective during the warranty period. This warranty does not cover damage or liability for misuse, abuse, or the improper application or installation of the Banner product.THIS LIMITED WARRANTY IS EXCLUSIVE AND IN LIEU OF ALL OTHER WARRANTIES WHETHER EXPRESS OR IMPLIED (INCLUDING, WITHOUT LIMITATION, ANY WARRANTY OF MERCHANTABILITY OR FITNESS FOR A PARTICULAR PURPOSE), AND WHETHER ARISING UNDER COURSE OF PERFORMANCE, COURSE OF DEALING OR TRADE USAGE.This Warranty is exclusive and limited to repair or, at the discretion of Banner Engineering Corp., replacement. IN NO EVENT SHALL BANNER ENGINEERING CORP. BE LIABLE TO BUYER OR ANY OTHER PERSON OR ENTITY FOR ANY EXTRA COSTS, EXPENSES, LOSSES, LOSS OF PROFITS, OR ANY INCIDENTAL, CONSEQUENTIAL OR SPECIAL DAMAGES RESULTING FROM ANY PRODUCT DEFECT OR FROM THE USE OR INABILITY TO USE THE PRODUCT, WHETHER ARISING IN CONTRACT OR WARRANTY, STATUTE, TORT, STRICT LIABILITY, NEGLIGENCE, OR OTHERWISE.Banner Engineering Corp. reserves the right to change, modify or improve the design of the product without assuming any obligations or liabilities relating to any product previously manufactured by Banner Engineering Corp. Any misuse, abuse, or improper application or installation of this product or use of the product for personal protection applications when the product is identified as not intended for such purposes will void the product warranty. Any modifications to this product without prior express approval by Banner Engineering Corp will void the product warranties. All specifications published in this document are subject to change; Banner reserves the right to modify product specifications or update documentation at any time. Specifications and product information in English supersede that which is provided in any other language. For the most recent version of any documentation, refer to:.For patent information, see /patents.FCC Part 15 and CAN ICES-3 (B)/NMB-3(B)This device complies with part 15 of the FCC Rules and CAN ICES-3 (B)/NMB-3(B). Operation is subject to the following two conditions:1.This device may not cause harmful interference, and2.This device must accept any interference received, including interference that may cause undesired operation.This equipment has been tested and found to comply with the limits for a Class B digital device, pursuant to part 15 of the FCC Rules and CAN ICES-3 (B)/NMB-3(B). These limits are designed to provide reasonable protection against harmful interference in a residential installation. This equipment generates, uses and can radiate radio frequency energy and, if not installed and used in accordance with the instructions, may cause harmful interference to radio communications. However, there is no guarantee that interference will not occur in a particular installation. If this equipment does cause harmful interference to radio or television reception, which can be determined by turning the equipment off and on, the user is encouraged to try to correct the interference by one or more of the following measures:•Reorient or relocate the receiving antenna.•Increase the separation between the equipment and receiver.•Connect the equipment into an outlet on a circuit different from that to which the receiver is connected.•Consult the manufacturer.Mexican ImporterBanner Engineering de Mèxico, S. de R.L. de C.V.David Alfaro Siqueiros 103 Piso 2 Valle orienteSan Pedro Garza Garcia Nuevo Leòn, C. P. 6626981 8363.2714© Banner Engineering Corp. All rights reserved。
- 1、下载文档前请自行甄别文档内容的完整性,平台不提供额外的编辑、内容补充、找答案等附加服务。
- 2、"仅部分预览"的文档,不可在线预览部分如存在完整性等问题,可反馈申请退款(可完整预览的文档不适用该条件!)。
- 3、如文档侵犯您的权益,请联系客服反馈,我们会尽快为您处理(人工客服工作时间:9:00-18:30)。
Temporary—takes precedence over PUBLIC setting
Userid—takes precedence over PUBLIC setting
15 - 13
© 2002 Sybase, Inc. and its subsidiaries. All rights reserved.
(continued…)
© 2002 Sybase, Inc. and its subsidiaries. All rights reserved.
关联节点
Group By节点
Order By节点
Vertical Grouping Cursor节点
15 - 18
ASIQ的QUERY_PLAN选项
(continued…)
15 - 7
© 2002 Sybase, Inc. and its subsidiaries. All rights reserved.
ASIQ查询优化器
Grouping运算的选择
对GROUP BY 或则DISTINCT操作,存在三种运算法则 :
基于数据排序(Sort-based) 基于哈西算法(Hash-based) 基于索引(Index-based)
设置选项 “public”.OS_File_Cache_Buffering = „Off‟
此选项仅仅对NT平台与Solaris平台有效 将其设置为OFF就不进行操作系统级的文件缓存 (缺 省设置为ON) 当表空间建立在裸设备上时不受此选项的影响
15 - 14
© 2002 Sybase, Inc. and its subsidiaries. All rights reserved.
查询树如下:
15 - 17
© 2002 Sybase, Inc. and its subsidiaries. All rights reserved.
ASIQ查询树 – 组成
查询计划中所有的节点都属于某种节点类型
叶节点
由表或者关联索引构成 某种索引类型 对数据的分组操作 对数据的排序操作 应用于叶节点,将索引数据进行分类
15 - 16
© 2002 Sybase, Inc. and its subsidiaries. All rights reserved.
ASIQ查询计划
查询语句如下:
select colA, colB, colC from tableA, tableB where tableA.joincol = tableB.joincol group by groupcol
设置Database Options
语法
Set [Temporary] Option [userid. [PUBLIC.] option-name=[option-value]
Scope of Options:
PUBLIC—Server wide affecting all users
DBA authority is required to set a PUBLIC Option Temporary—只在某个session中有效 Temporary PUBLIC—有效至数据库服务关闭为止
(continued…)
15 - 8
© 2002 Sybase, Inc. and its subsidiaries. All rights reserved.
Module Map
Define the ASIQ Query Engine 提高查询的性能
ASIQ查询计划
Improving Data Write Performance
15 - 9
© 2002 Sybase, Inc. and its subsidiaries. All rights reserved.
选择正确的索引类型
为了获得最好的性能, 为数据选择正确的索引非常 重要 主要的索引类型
经过优化的FP索引(1-byte FP and 2-byte FP) 减少存储 Байду номын сангаас间并且提高查询性能
进行SQL语句、存储过程语法检 查,以及安全性检查 进行表关联优化, 选择索引类型, 子查询的优化,以及分组运算的 选择 执行查询谓词, joins, groupings, and subqueries, sorting等操作
© 2002 Sybase, Inc. and its subsidiaries. All rights reserved.
15 - 2
© 2002 Sybase, Inc. and its subsidiaries. All rights reserved.
ASIQ查询引擎
与传统查询引擎相似之处
Once ASIQ has completed all the work it can in the indexes for each table, rows are projected and then joined or grouped in the same ways as in other query engines Whenever multiple access paths (or operator algorithms) are available, then a cost-based decision must be made, often based on predicated selectivity estimates
15 - 11
选择正确的索引类型
针对不同的查询建议建立不同的索引
15 - 12
但以上的建议索引类型可以在同一字段上根据需要同时 建立; see Module 5, “ASIQ Index Types and Data Types”
© 2002 Sybase, Inc. and its subsidiaries. All rights reserved.
(continued…)
© 2002 Sybase, Inc. and its subsidiaries. All rights reserved.
15 - 10
选择正确的索引类型
ASIQ 索引的优化基于字段的distinct数值
当字段用于进行join, GROUP BY等操作, 或者在 WHERE子句中使用时, 建议使用LF和HG类型的索 引
ASIQ Optimizer (more detail to follow)
ASIQ Run-Time Engine
15 - 5
ASIQ查询优化器
关联优化
避免使用卡笛尔积类型的关联的使用 关联的优化与其索引相关 关联的运算规则包括以下类型:
Nested loop (NJL) Hash (HJ) Sort/merge (SMJ) Sort/merge push down (SMPDJ) Nested loop push down (NLPDJ) Hash push down (HPDJ)
(continued…)
15 - 6
© 2002 Sybase, Inc. and its subsidiaries. All rights reserved.
ASIQ查询优化器
索引的选择
优化器确定谓词的执行次序以及索引的选择使用 优化器处理内容包括:
谓词类型 选择应用的索引 估计谓词的选择性 估计涉及数据的记录数
此选项设置为‘ON‟时用于收集查询信息, 包括关联 次序和关联运算法则
输出信息到dbname.iqmsg文件中 缺省值为OFF
例如:
SET OPTION QUERY_PLAN = ’ON’; /* A look at customers who have the following */ /* service call waiting, caller id, and voice */ /* mail by fiscal period */ /* i.e. Q1,Q2,Q3,Q4 for year= 1998 */ select service_key,fiscal_period,count(*) from telco_facts T,month M where T.month_key=M.month_key and service_key = 4 group by fiscal_period,service_key order by fiscal_period,service_key
设置数据库选项提高性能
设置选项 “public”.Force_No_Scroll_Cursors = „On‟
Off by default - buffer results set to permit scrolling of data Better performance by setting to ON to turn off buffering
They provide column cardinality to the optimizer
使用UNIQUE或者PRIMARY KEY对字段进行约束
(continued…)
© 2002 Sybase, Inc. and its subsidiaries. All rights reserved.
Administering Adaptive Server IQ for the Data Warehouse
