T4T5做硬件RAID
全程图解手把手教你做DELL服务器 RAID
全程图解手把手教你做RAID说到磁盘阵列(RAID,Redundant Array of Independent Disks),现在几乎成了网管员所必须掌握的一门技术之一,特别是中小型企业,因为磁盘阵列应用非常广泛,它是当前数据备份的主要方案之一。
然而,许多网管员只是在各种媒体上看到相关的理论知识介绍,却并没有看到一些实际的磁盘阵列配置方法,所以仍只是一知半解,到自己真正配置时,却无从下手。
本文要以一个具体的磁盘阵列配置方法为例向大家介绍磁盘阵列的一些基本配置方法,给出一些关键界面,使各位对磁盘阵列的配置有一个理性认识。
当然为了使各位对磁盘阵列有一个较全面的介绍,还是先来简要回顾一下有关磁盘阵列的理论知识,这样可以为实际的配置找到理论依据。
一、磁盘阵列实现方式磁盘阵列有两种方式可以实现,那就是“软件阵列”与“硬件阵列”。
软件阵列是指通过网络操作系统自身提供的磁盘管理功能将连接的普通SCSI卡上的多块硬盘配置成逻辑盘,组成阵列。
如微软的Windows NT/2000 Server/Server 2003和NetVoll的NetWare两种操作系统都可以提供软件阵列功能,其中Windows NT/2000 Server/Server 2003可以提供RAID 0、RAID 1、RAID 5;NetWare操作系统可以实现RAID 1功能。
软件阵列可以提供数据冗余功能,但是磁盘子系统的性能会有所降低,有的降代还比较大,达3 0%左右。
硬件阵列是使用专门的磁盘阵列卡来实现的,这就是本文要介绍的对象。
现在的非入门级服务器几乎都提供磁盘阵列卡,不管是集成在主板上或非集成的都能轻松实现阵列功能。
硬件阵列能够提供在线扩容、动态修改阵列级别、自动数据恢复、驱动器漫游、超高速缓冲等功能。
它能提供性能、数据保护、可靠性、可用性和可管理性的解决方案。
磁盘阵列卡拥有一个专门的处理器,如Intel的I960芯片,HPT370A/372 、Silicon Image SIL3112A等,还拥有专门的存贮器,用于高速缓冲数据。
IBM服务器如何做RAID
IBM服务器如何做RAID阵列
阵列要求:硬盘至少2块
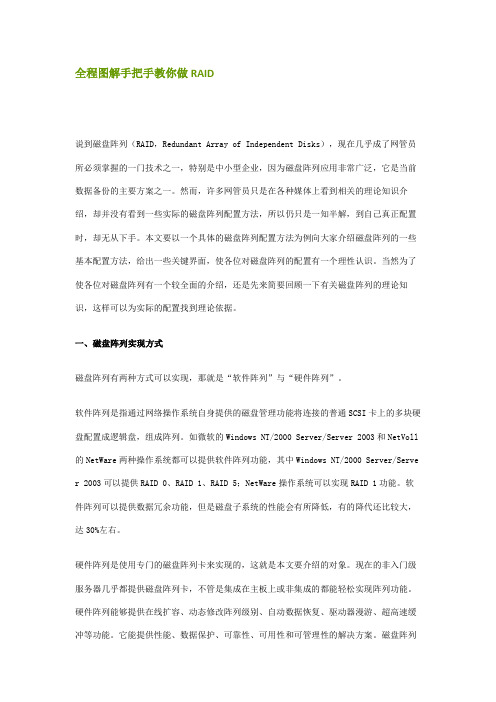
一,首先,起动机器自检CPU 内存硬盘等硬件是否正常(如果不认请正确检查)二,如果硬件一切正常,那现在我们就开始做阵列
当服务器检测到如图一时,按‘CTRL+C'进入阵列主菜单
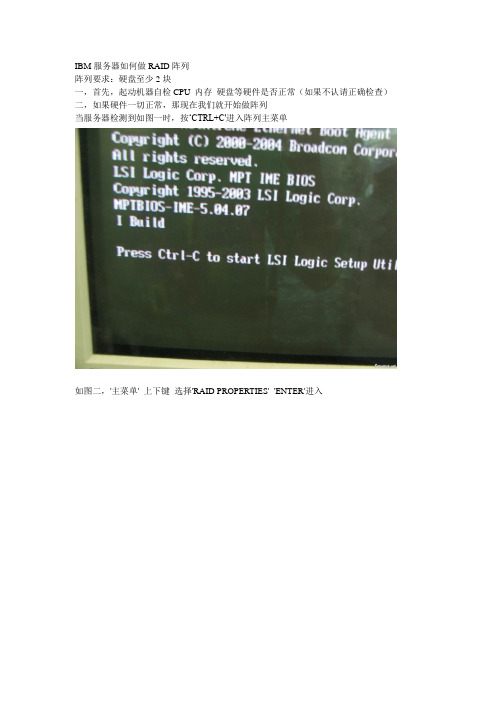
如图二,'主菜单' 上下键选择'RAID PROPERTIES' 'ENTER'进入
如图三进入阵列主选项将选项移到'ARRAY DISK'栏下(查看硬盘是否全认)当'ARRAY DISK'栏下为'NO'时选择加减号将'NO'转为'YES'
方法如下:
1‘使用加减号将'NO'转'YES' 按'F3'如·下图
注意:当有余阵列时,会提示按'DELETE'键做阵列如图四
做好后,'ARRAY DISK'栏下均为'YES'如图五按'ESC'返回图六图六,选择' SA VE CHANGES, EXIT NENU'确定保存如图七
图七
图八,按'ESC'返回到图八选择'DISCARD CHANGES,EXIT NENU'重启及可。
CalDigit T4 4槽RAID 5存储解决方案说明书

RAID User ManualFor more information visit Contents1. Introduction03 Package Contents06 T4 Diagram072. Using the T408 Installing the Software 08 Connecting the T409 Create a RAID10 RAID 0 or RAID 1 11 RAID 5 14 Replacing the T4 Drive Module 18 Turning off the T4203. CalDigit Drive Utility 214. Technical Support & Warranty Information 221. IntroductionThe CalDigit T4 is a compact 4-bay storage solution for users who not only require outstanding performance, but also the ultimate protection for their important data. The T4 is a RAID 5 device that delivers great performance whilst at the same time giving users single drive redundancy for their valuable data. The T4 is equipped with Thunderbolt 2 and is compatible with both 3.5”HDD and SSDs, making it the ideal solution for 4K workflows that demand high performance storage devices. Also capable of RAID 0, 1, and JBOD modes, it is ideal for users who need a flexible 4-bay RAID device.The T4 unit comes with a standard, 5 year limited warranty.The HDDs come with a 3 year limited warranty.Burst transfer rates will vary from one computer to another. Depending on the host configuration, average speeds are usually lower.Weight varies by configuration and manufacturing process.Package Contents 1 1 x T4 RAID 2 4 x CalDigit universal drive modules 3 1 x Drive module pin release key 4 1 x Drive module lock key 5 1 x Power supply 6 1 x AC cord156243T4 DiagramExhaust FanAC Power InDual Thunderbolt™ 2 Ports Kensington LockRemovable Drive ModulePower LEDLED Status LightsFront Side Power Button Drive Module LockPIN Release2. Using the T4Installing the Software1Install the CalDigit Drive Utility Software from the CD that was included with the T4. The installer can also be downloaded from /support.asp. This installation package will also install the drivers necessary to operate the T4.Connecting the T41Turn on the computer, make sure you have logged into the OS.2Connect a Thunderbolt cable* from your computer to the T4.3Connect the power supply to the T4.4Press the T4’s power button and it will boot. You will see it mount and it will be ready for use.*Thunderbolt cable sold separately.Create a RAIDStriped RAID Set - RAID 0 - distributes data evenly across all drives in RAID 0. Use this mode for increased performance. RAID 0 provides no protection against drive failure. It is highly recommended to have a backup when using the T4 in RAID 0.Mirrored RAID Set - RAID 1 - creates identical copies of data across all drives in the RAID 1 volume. RAID 1 is ideal for back up and archiving. This is the most secure form of RAID but does not offer any performance increase.Parity Striped RAID Set - RAID 5 - creates identical copies of data across all drives in the RAID 5 volume. Users that require a combination of performance and protection will opt for RAID 5. RAID 5 offers single drive redundancy along with the performance of a striped set. In the unlikely event of a single drive failure, the data will remain intact and accessible.Concatenated Disk Set - SPAN (non-RAID) - drives work together but data is not distributed evenly. After the first drive in the SPAN set is filled, data then gets saved to the following drive. SPAN does not offer any performance gains but is useful when using drives of different capacities. It is highly recommended to have a backup when using SPAN because it does not offer any form of data protection.1 Launch the CalDigit Drive Utility SoftwareMac OS X - RAID 0 or RAID 12 Click on the “Disk Utility” button on the left hand side of the window.3 Click the “RAID Management” button and then click on “Delete RAID Sets”. Then click on “Yes”to proceed and the current RAID set will be deleted.If the T4 is currently in a RAID set, users will need to delete the current RAID before creating a newRAID set. If your T4 is not configured into a RAID set you can skip to step 4.5 Check all of the drives that you would like to include in the RAID set and select “create”.Drives are numbered from top to bottom (A0 top, A1 A2 middle, A3 bottom).4 Go back into the “Disk Utility” tab and select “Create New RAID Set”. Select the RAID mode youwould like to create.6The RAID will be created and the T4 will mount on your computer.RAID 51Launch the CalDigit Drive Utility Software2 Click on the “Disk Utility” button on the left hand side of the window.3 Click the “RAID Management” button and then click on “Delete RAID Sets”. Then click on “Yes”to proceed and the current RAID set will be deleted.If the T4 is currently in a RAID set, users will need to delete the current RAID before creating a newRAID set. If your T4 is not configured into a RAID set you can skip to step 4.Deleting the RAID set will delete all data on the T4.Back-up your data before proceeding.5 Check all of the drives that you would like to include in the RAID set and select “create”.Drives are numbered from top to bottom (A0 top, A1 A2 middle, A3 bottom).4 Go back into the “Disk Utility” tab and select “Create New RAID Set”. Then Select RAID 5.You can go to the “Device list” to check status of RAID 5.6Once the RAID has been created open OS X Disk Utility (Finder-Applications-Utilities- Disk Utility) and highlight the T4 RAID.7Select the “Partition” tab. Here you can change the options such as partition name, number of partitions, and file system type. Once you have selected your options, confirm by selecting the partition button. Once the partition has been created, the T4 will mount on your computer and will be ready for use.1 2 Insert the drive key into the lock on the front of the drive module and turn clockwise to unlock it.Insert the drive pin into the pin release until the handle of the drive module pops open.Replacing the T4 Drive Module3 4Pull the drive module from the T4 enclosure.Insert the new drive in the same orientation as the drive you removed. The key holes should be on the same side as the drive labeling. Push the drive in all the way and then press in the drive module handle until it locks securely into place. Please do not use excessive force to insert thedrive or you can damage it. The new drive will mount onto your OS.5To lock the new module into place, insert the drive key into the lock and turn counterclockwise.1 2 Right click on the T4 volume icon and click “Eject CalDigit T4”. It is important that the T4 is ejected prior to shutting down to prevent directory/data corruption.After the T4 dismounts, press and hold the power button until the power LED turns off.Turning off the T4CalDigit T421Device ListThe device list tab allows users to monitor all your CalDigit Thunderbolt RAIDs and relays information such as drive temperature, volume size, and drive health.Disk UtilityThe disk utility tab allows users to create a new RAID or delete an existing RAID set. Once a new RAID has been created, the user must then create a new partition in order to use the RAID.PreferencesThe preferences tab allows users to set their S.M.A.R.T. preferences.NotificationsThe notifications tabs allows users to set their notification types and preferences. Enter your network settings in the Email Notification tab to enable email alerts.EventsThe events tab will display the event log in chronological order.Disk BenchmarkThe disk benchmark tool is an integrated benchmark tool that allows users to test the speed of their storage devices.The CalDigit Drive Utility is a powerful tool that allows users to configure, monitor, and diagnose their CalDigit Thunderbolt RAIDs.3. CalDigit Drive Utility4. Technical Support & Warranty Information CalDigit Warranty InformationFor detailed CalDigit warranty information please see the CalDigit website:/rma/Limited-Warranty.pdfTechnical SupportIf you run into any issues while using your T4, please contactCalDigit Technical Support:Phone: 1-(714) 572-6668Email:********************Website: /support.aspWhen contacting CalDigit technical support, make sure to be by your computer and have the following information available: Your T4 serial number Operating system and version Computer make and model Other devices connected to your computer 1234*Specifications and package contents are subject to change without notice*Thunderbolt and the Thunderbolt logo are trademarks of Intel Corporation in the U.S. and/or other countries.CalDigit Limited Warranty PolicyCalDigit, Inc. (“CalDigit”) warrants, to the original purchaser, that this equipment shall be free of defects in materials and workmanship for a period of one (1), three (3), or five (5) years, depending on the model, from CalDigit’s date of original shipment when the equipment is used normally and is properly serviced when needed. If you discover a defect covered by the warranty set forth above, your sole and exclusive remedy will be for CalDigit, in its sole discretion to (i) repair or replace the product at no charge to you; or, if a repaired unit or replacement product is not available, (ii) to refund the current market value of your product. You acknowledge and agree that replacement product, at the sole option of CalDigit, may be a new product or a remanufactured product. In order to receive the remedy set forth above, you must return the product during the warranty period and include with each returned product (I) a copy of your original purchase invoice to verify your warranty; (II) a Return Material Authorization number; (III) your name, address and telephone number; (IV) a copy of the bill of sale bearing the appropriate CalDigit serial numbers as proof of date of original retail purchase; and (V) a description of the problem. The customer must pay all transportation costs for a returned product. This warranty does not apply if the product has been misused or has been damaged by accident, abuse, misuse, or misapplication; if it has been modified without permission of CalDigit; or if any CalDigit serial number has been removed or defaced.Warranty Exclusions and LimitationsThis Limited Warranty applies only to hardware products manufactured by or for CaDigit that can be identified by the “CalDigit” trademark, trade name, or logo affixed to them. The Limited Warranty does not apply to any non-CalDigit hardware products or any software, even if packaged or sold with CalDigit hardware. Manufacturers, suppliers, or publishers, other than CalDigit, may provide their own warranties to the end user purchaser, but CalDigit, in so far as permitted by law, provides their products “as is”.CalDigit does not warrant that the operation of the product will be uninterrupted or error-free. CalDigit is not responsible for damage arising from failure to follow instructions relating to the product’s use. This warranty does not apply: (I) to consumable parts, unless damage has occurred due to a defect in materials or workmanship; (II) to cosmetic damage, including but not limited to scratches, dents and broken plastic on ports; (III) to damage caused by use with non-CalDigit products; (IV) to damage caused by accident, abuse, misuse, flood, fire, earthquake or other external causes; (V) to damage caused by operating the product outside the permitted or intended uses described by CalDigit; (VI) to damage caused by service (including upgrades and expansions) performed by anyone who is not a representative of CalDigit or a CalDigit Authorized Service Provider; (VII) to a product or part that has been modified to alter functionality or capabilitywithout the written permission of CalDigit; or (VIII) if any CalDigit serial number on the product has been removed or defaced.No CalDigit dealer, agent, or employee is authorized to make any modification, extension, or addition to this warranty.Any loss, corruption or destruction of data while using a CalDigit drive is the sole responsibility of the user, and under no circumstances will CalDigit be held liable for the recovery or restoration of this data. To help prevent the loss of your data, CalDigit highly recommends that you keep TWO copies of your data; one copy on your external hard disk, for instance, and a second copy either on your internal hard disk, another external hard disk or some other form of removable storage media.Some states do not allow the exclusion or limitation of implied warranties or liability for incidental or consequential damages, so the above limitation or exclusion may not apply to you. This warranty gives you specific legal rights, and you may have other rights, which vary from state to state.CALDIGIT IS NOT RESPONSIBLE FOR SPECIAL, INCIDENTAL, OR CONSEQUENTIAL DAMAGES RESU LTING FROM ANY BREACH OF WARRANTY, OR U NDER ANY LEGAL THEORY, INCLU DING LOST PROFITS, DOWNTIME, GOODWILL, DAMAGE TO OR REPLACEMENT OF EQU IPMENT AND PROPERTY, AND ANY COSTS OF RECOVERING, REPROGRAMMING, OR REPRODU CING ANY PROGRAM OR DATA STORED IN OR USED WITH CALDIGIT PRODUCTS EVEN IF IT HAS BEEN ADVISED OF THE POSSIBILITY OF SUCH DAMAGES.Your opening of your package, your use of the product acknowledges that you have read and agree to the terms of this Agreement. You further agree that it is the complete and exclusive state of the agreement between us and supersedes any proposal or prior agreement, oral or written, and any other communications between us relating to the subject matter of this Agreement. Read carefully all information related to warranty and precautions of use of your new CalDigit product in the user’s manual.For products purchased in the United States, you may contact CalDigit US Headquarters. Address: CALDIGIT INC.1941 E MIRALOMA AVE STE BPLACENTIA, CA 92870-6770United StatesEmail:******************Website: Customer service: 714-572-9889 x1For products purchased in the European, you can also contact the CalDigit UK Office. Address: Unit 3, Glenmore Business Centre Witney, Oxfordshire OX29 0AAEmail:********************Website: Customer service: +44 (0) 845 835 0372For products purchased in the Asia you may contact CalDigit Taiwan office.Address: 3F., No.880, Zhongzheng Rd., Zhonghe Dist., New Taipei City 235, TaiwanEmail:*****************Website: /twCustomer service: +886 (2) 2226 0966DOA PolicyOn rare occasions, a newly purchased CalDigit product may be delivered in non-working order. We are working to avoid these issues, but unfortunately, these situations may arise from time to time. Within the 15 calendar days of purchase, should you experience an issue with your new CalDigit product, we ask you to return the product to the place where it was originally bought. If the product was purchased direct from CalDigit, please contact our RMA department. You will be required to give a proof of purchase.Return WarningPlease be sure to back up your data before returning your drive to CalDigit for repair. CalDigit cannot under any circumstances guarantee the integrity of data remaining on a returned drive. We make no provisions for data recovery and cannot be held liable for any data loss on drives or media returned to CalDigit.All products returned to CalDigit must be securely packaged in their original box and shipped with postage prepaid along with a RMA number.CalDigit T4© 2014 CalDigit, Inc. All Rights Reserved。
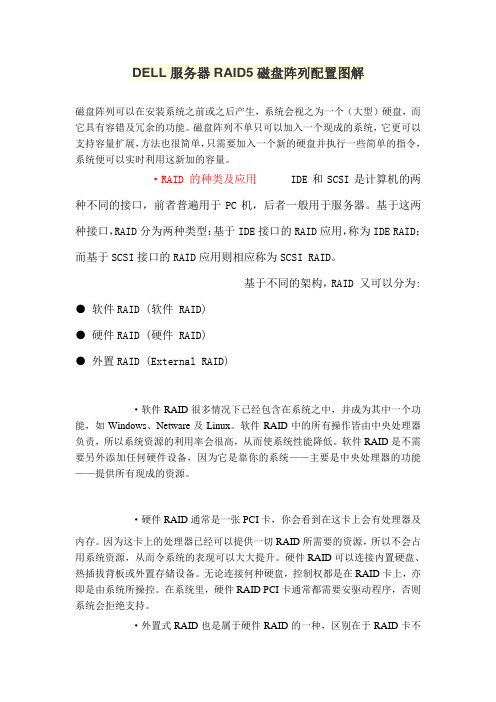
DELL服务器RAID磁盘阵列配置图解
DELL服务器RAID 磁盘阵列配置图解磁盘阵列可以在安装系统之前或之后产生,系统会视之为一个(大型)硬盘,而它具有容错及冗余的功能。
磁盘阵列不单只可以加入一个现成的系统,它更可以支持容量扩展,方法也很简单,只需要加入一个新的硬盘并执行一些简单的指令,系统便可以实时利用这新加的容量。
·RAID 的种类及应用IDE和SCSI是计算机的两种不同的接口,前者普遍用于PC机,后者一般用于服务器。
基于这两种接口,RAID分为两种类型:基于IDE 接口的RAID应用,称为IDE RAID;而基于SCSI接口的RAID应用则相应称为SCSI RAID。
基于不同的架构,RAID 又可以分为:●软件RAID (软件RAID)●硬件RAID (硬件RAID)●外置RAID (External RAID)·软件RAID很多情况下已经包含在系统之中,并成为其中一个功能,如Windows、Netware及Linux。
软件RAID中的所有操作皆由中央处理器负责,所以系统资源的利用率会很高,从而使系统性能降低。
软件RAID是不需要另外添加任何硬件设备,因为它是靠你的系统——主要是中央处理器的功能——提供所有现成的资源。
·硬件RAID通常是一PCI卡,你会看到在这卡上会有处理器及存。
因为这卡上的处理器已经可以提供一切RAID所需要的资源,所以不会占用系统资源,从而令系统的表现可以大大提升。
硬件RAID可以连接置硬盘、热插拔背板或外置存储设备。
无论连接何种硬盘,控制权都是在RAID卡上,亦即是由系统所操控。
在系统里,硬件RAID PCI卡通常都需要安驱动程序,否则系统会拒绝支持。
·外置式RAID也是属于硬件RAID的一种,区别在于RAID卡不会安装在系统里,而是安装在外置的存储设备。
而这个外置的储存设备则会连接到系统的SCSI卡上。
系统没有任何的RAID功能,因为它只有一SCSI卡;所有的RAID功能将会移到这个外置存储里。
组装raid5磁盘阵列服务器
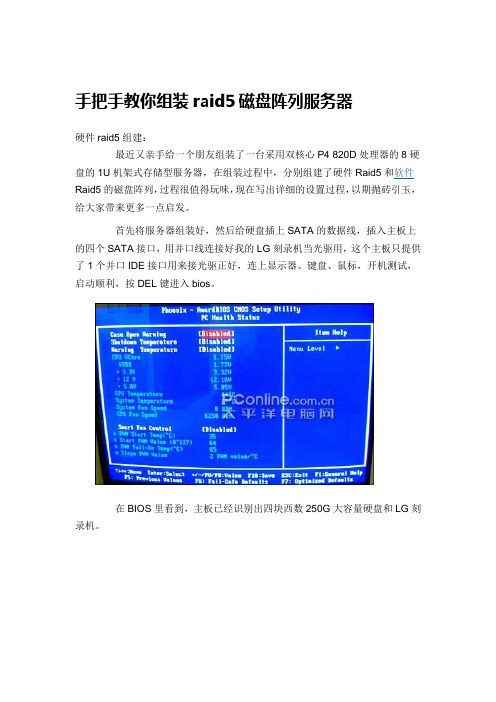
手把手教你组装raid5磁盘阵列服务器硬件raid5组建:最近又亲手给一个朋友组装了一台采用双核心P4 820D处理器的8硬盘的1U机架式存储型服务器,在组装过程中,分别组建了硬件Raid5和软件Raid5的磁盘阵列,过程很值得玩味,现在写出详细的设置过程,以期抛砖引玉,给大家带来更多一点启发。
首先将服务器组装好,然后给硬盘插上SATA的数据线,插入主板上的四个SATA接口,用并口线连接好我的LG刻录机当光驱用,这个主板只提供了1个并口IDE接口用来接光驱正好,连上显示器、键盘、鼠标,开机测试,启动顺利,按DEL键进入bios。
在BIOS里看到,主板已经识别出四块西数250G大容量硬盘和LG刻录机。
硬盘和LG刻录机接下来开启主板的硬件raid5模式,将这四个硬盘组成raid5磁盘阵列,富士康这款主板虽然不错,但是美中不足的是说明书竟然是英文的,如果是E文不好的朋友初次使用难免要发晕,我当初也是琢磨半天,又打了富士康公司800技术服务电话,直到把值班小姐问烦了,才搞明白大概其,下面大家就跟我来。
先移动光标到integrated peripherals回车。
选择OnChip IDE Device,再回车。
选择SATA Mode,主板默认这个选项是IDE,也就是不采用raid模式,现在回车进入设置界面。
移动光标选择raid,然后回车。
启动画面显示,四个物理硬盘已经被主板raid功能识别出来,提示按CTRL-I进入raid详细设置。
进入raid详细设置界面,在MAIN MENU界面里选择第一项Create RAID Volume,新建raid卷。
现在进入CREATE VOLUME MENU界面,在第一项Name里给新卷起个名字,我这里用的是Volume0,你也可以用tanghua之类的,移动光标到第二项RAID Level,选择raid模式,这里有raid0、raid1、raid10、raid5四个选择,我们自然要选择梦寐以求的raid5。
全程图解手把手教你做DELL服务器 RAID
全程图解手把手教你做RAID说到磁盘阵列(RAID,Redundant Array of Independent Disks),现在几乎成了网管员所必须掌握的一门技术之一,特别是中小型企业,因为磁盘阵列应用非常广泛,它是当前数据备份的主要方案之一。
然而,许多网管员只是在各种媒体上看到相关的理论知识介绍,却并没有看到一些实际的磁盘阵列配置方法,所以仍只是一知半解,到自己真正配置时,却无从下手。
本文要以一个具体的磁盘阵列配置方法为例向大家介绍磁盘阵列的一些基本配置方法,给出一些关键界面,使各位对磁盘阵列的配置有一个理性认识。
当然为了使各位对磁盘阵列有一个较全面的介绍,还是先来简要回顾一下有关磁盘阵列的理论知识,这样可以为实际的配置找到理论依据。
一、磁盘阵列实现方式磁盘阵列有两种方式可以实现,那就是“软件阵列”与“硬件阵列”。
软件阵列是指通过网络操作系统自身提供的磁盘管理功能将连接的普通SCSI卡上的多块硬盘配置成逻辑盘,组成阵列。
如微软的Windows NT/2000 Server/Server 2003和NetVoll的NetWare两种操作系统都可以提供软件阵列功能,其中Windows NT/2000 Server/Server 2003可以提供RAID 0、RAID 1、RAID 5;NetWare操作系统可以实现RAID 1功能。
软件阵列可以提供数据冗余功能,但是磁盘子系统的性能会有所降低,有的降代还比较大,达3 0%左右。
硬件阵列是使用专门的磁盘阵列卡来实现的,这就是本文要介绍的对象。
现在的非入门级服务器几乎都提供磁盘阵列卡,不管是集成在主板上或非集成的都能轻松实现阵列功能。
硬件阵列能够提供在线扩容、动态修改阵列级别、自动数据恢复、驱动器漫游、超高速缓冲等功能。
它能提供性能、数据保护、可靠性、可用性和可管理性的解决方案。
磁盘阵列卡拥有一个专门的处理器,如Intel的I960芯片,HPT370A/372 、Silicon Image SIL3112A等,还拥有专门的存贮器,用于高速缓冲数据。
ibm服务器怎么做raid
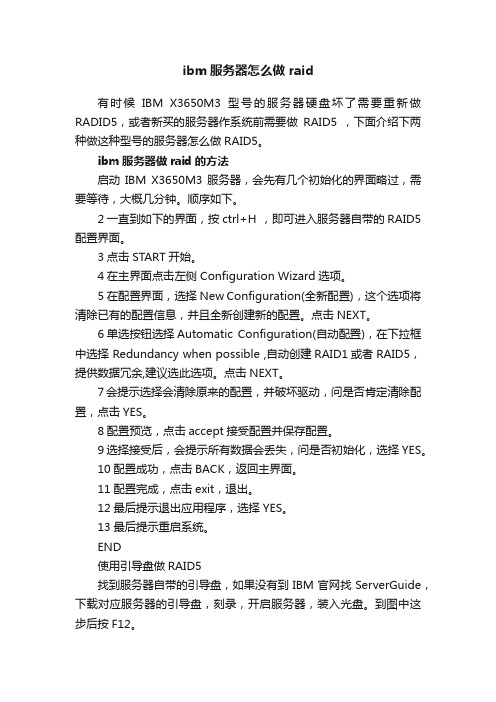
ibm服务器怎么做 raid有时候IBM X3650M3型号的服务器硬盘坏了需要重新做RADID5,或者新买的服务器作系统前需要做RAID5 ,下面介绍下两种做这种型号的服务器怎么做RAID5。
ibm服务器做raid的方法启动IBM X3650M3服务器,会先有几个初始化的界面略过,需要等待,大概几分钟。
顺序如下。
2一直到如下的界面,按ctrl+H ,即可进入服务器自带的RAID5配置界面。
3点击START开始。
4在主界面点击左侧 Configuration Wizard选项。
5在配置界面,选择New Configuration(全新配置),这个选项将清除已有的配置信息,并且全新创建新的配置。
点击NEXT。
6单选按钮选择Automatic Configuration(自动配置),在下拉框中选择 Redundancy when possible ,自动创建RAID1或者RAID5,提供数据冗余,建议选此选项。
点击NEXT。
7会提示选择会清除原来的配置,并破坏驱动,问是否肯定清除配置,点击YES。
8配置预览,点击accept接受配置并保存配置。
9选择接受后,会提示所有数据会丢失,问是否初始化,选择YES。
10配置成功,点击BACK,返回主界面。
11配置完成,点击exit,退出。
12最后提示退出应用程序,选择YES。
13最后提示重启系统。
END使用引导盘做RAID5找到服务器自带的引导盘,如果没有到IBM官网找ServerGuide,下载对应服务器的引导盘,刻录,开启服务器,装入光盘。
到图中这步后按F12。
出来的界面选择CD/DVD启动。
由于光盘数据量大,加载程序需要二十分钟左右,出来的第一个界面选择语言,没有中文,我们选择英文。
进入第一界面选择美式键盘。
出来的协议选择接受协议(I accept),后点击NEXT,接下来的欢迎屏幕直接点NEXT。
在下来的一屏是导入驱动,不选,直接NEXT。
在接下RAID configuration only,NEXT。
DELL 服务器RAID磁盘阵列配置图解

DELL服务器 RAID 磁盘阵列配置图解磁盘阵列可以在安装系统之前或之后产生,系统会视之为一个(大型)硬盘,而它具有容错及冗余的功能。
磁盘阵列不单只可以加入一个现成的系统,它更可以支持容量扩展,方法也很简单,只需要加入一个新的硬盘并执行一些简单的指令,系统便可以实时利用这新加的容量。
·RAID 的种类及应用IDE和SCSI是计算机的两种不同的接口,前者普遍用于PC机,后者一般用于服务器.基于这两种接口,RAID分为两种类型:基于IDE接口的RAID应用,称为IDE RAID;而基于SCSI接口的RAID应用则相应称为SCSI RAID。
基于不同的架构,RAID 又可以分为:● 软件RAID (软件 RAID)● 硬件RAID (硬件 RAID)● 外置RAID (External RAID)·软件RAID很多情况下已经包含在系统之中,并成为其中一个功能,如Windows、Netware及Linux。
软件RAID中的所有操作皆由中央处理器负责,所以系统资源的利用率会很高,从而使系统性能降低。
软件RAID是不需要另外添加任何硬件设备,因为它是靠你的系统——主要是中央处理器的功能——提供所有现成的资源。
·硬件RAID通常是一张PCI卡,你会看到在这卡上会有处理器及内存。
因为这卡上的处理器已经可以提供一切RAID所需要的资源,所以不会占用系统资源,从而令系统的表现可以大大提升。
硬件RAID可以连接内置硬盘、热插拔背板或外置存储设备。
无论连接何种硬盘,控制权都是在RAID卡上,亦即是由系统所操控。
在系统里,硬件RAID PCI卡通常都需要安驱动程序,否则系统会拒绝支持。
·外置式RAID也是属于硬件RAID的一种,区别在于RAID卡不会安装在系统里,而是安装在外置的存储设备内。
而这个外置的储存设备则会连接到系统的SCSI卡上。
系统没有任何的RAID功能,因为它只有一张SCSI卡;所有的RAID 功能将会移到这个外置存储里.好处是外置的存储往往可以连接更多的硬盘,不会受系统机箱的大小所影响。
DELL 服务器RAID磁盘阵列配置图解

DELL服务器 RAID 磁盘阵列配置图解磁盘阵列可以在安装系统之前或之后产生,系统会视之为一个(大型)硬盘,而它具有容错及冗余得功能。
磁盘阵列不单只可以加入一个现成得系统,它更可以支持容量扩展,方法也很简单,只需要加入一个新得硬盘并执行一些简单得指令,系统便可以实时利用这新加得容量.·RAID 得种类及应用IDE与SCSI就是计算机得两种不同得接口,前者普遍用于PC机,后者一般用于服务器。
基于这两种接口,RAID分为两种类型:基于IDE 接口得RAID应用,称为IDE RAID;而基于SCSI接口得RAID应用则相应称为SCSI RAID。
ﻫ基于不同得架构,RAID 又可以分为: ● 软件RAID(软件 RAID)ﻫ● 硬件RAID (硬件RAID)● 外置RAID (External RAID)·软件RAID很多情况下已经包含在系统之中,并成为其中一个功能,如Windows、Netware及Linux.软件RAID中得所有操作皆由中央处理器负责,所以系统资源得利用率会很高,从而使系统性能降低.软件RAID就是不需要另外添加任何硬件设备,因为它就是靠您得系统--主要就是中央处理器得功能——提供所有现成得资源。
·硬件RAID通常就是一张PCI卡,您会瞧到在这卡上会有处理器及内存。
因为这卡上得处理器已经可以提供一切RAID所需要得资源,所以不会占用系统资源,从而令系统得表现可以大大提升.硬件RAID可以连接内置硬盘、热插拔背板或外置存储设备。
无论连接何种硬盘,控制权都就是在RAID卡上,亦即就是由系统所操控。
在系统里,硬件RAIDPCI卡通常都需要安驱动程序,否则系统会拒绝支持.·外置式RAID也就是属于硬件RAID得一种,区别在于RAID卡不会安装在系统里,而就是安装在外置得存储设备内.而这个外置得储存设备则会连接到系统得SCSI卡上。
系统没有任何得RAID功能,因为它只有一张SCSI卡;所有得RAID功能将会移到这个外置存储里。
联想服务器RAID配置步骤

联想服务器RAID配置步骤RAID(Redundant Array of Independent Disks,磁盘冗余阵列)是一种将多个硬盘组合起来,以提高容量和数据冗余性的技术。
在联想服务器中,RAID被广泛应用于提供数据保护和系统性能的提升。
本文将为您介绍联想服务器RAID配置的步骤。
一、了解RAID级别RAID有多个级别可供选择,每个级别都有其特定的优势和限制。
在配置RAID之前,您应该了解各个级别并选择最适合您需求的级别。
常见的RAID级别包括RAID 0、RAID 1、RAID 5、RAID 6和RAID 10。
二、检查硬件要求在进行RAID配置之前,确保您的联想服务器满足相应的硬件要求。
这包括主板的RAID控制器、硬盘插槽等。
三、进入服务器BIOS设置界面要配置RAID,您需要进入服务器的BIOS设置界面。
通常情况下,您可以在开机过程中按下特定的按键(例如F2或Delete键)来进入BIOS。
四、找到RAID设置选项一旦进入BIOS设置界面,您需要找到RAID设置选项。
不同的服务器可能会在不同的菜单下,您可以查找"Advanced"、“Storage”或“RAID”等选项。
五、创建RAID卷在RAID设置选项中,您可以创建一个新的RAID卷。
选择该选项后,您将看到一个RAID配置向导或类似的界面。
按照向导的指示来创建RAID卷,并选择所需的RAID级别。
六、配置RAID参数一旦创建了RAID卷,您可以配置一些RAID参数,以满足您的需求。
这些参数可能包括条带大小、读写缓存、校验方法等。
根据您的具体情况进行相应的配置。
七、确认并保存配置在完成RAID参数的配置后,您需要确认并保存配置。
在确认配置之前,系统会提示您数据可能会被删除或格式化,请确保您的数据已经备份。
八、重启服务器完成所有配置并保存后,您需要重启服务器以使配置生效。
在重启过程中,服务器将重新识别新的RAID卷并启动。
DELL服务器RAID配置详细教学教程
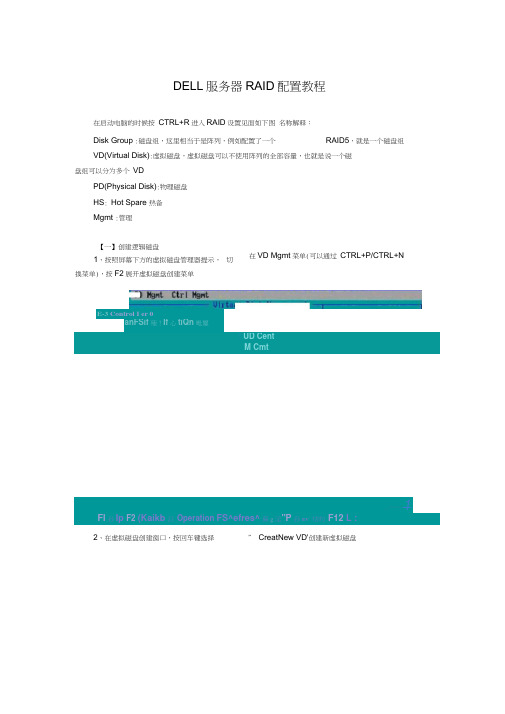
DELL 服务器RAID 配置教程在启动电脑的时候按 CTRL+R 进入RAID 设置见面如下图 名称解释:Disk Group :磁盘组,这里相当于是阵列,例如配置了一个 RAID5,就是一个磁盘组VD(Virtual Disk):虚拟磁盘,虚拟磁盘可以不使用阵列的全部容量,也就是说一个磁盘组可以分为多个 VDPD(Physical Disk):物理磁盘 HS : Hot Spare 热备 Mgmt :管理【一】创建逻辑磁盘1、按照屏幕下方的虚拟磁盘管理器提示, 切换菜单),按F2展开虚拟磁盘创建菜单在VD Mgmt 菜单(可以通过 CTRL+P/CTRL+N! UD CentM Cmt亠—1Fl 孙Ip F2 (Kaikb 汨 Operation FS^efres^ 蘇g 淫"P 孙EV 怙旳 F12 L :2、在虚拟磁盘创建窗口,按回车键选择” CreatNew VD'创建新虚拟磁盘E-3 Control I er 0anFSif 殛!If 心tiQn 毗璽P0 per-PliysUal D41?6 MStr:Size :ll「—万'In 'Ml i[芽1 HMp F12 thPERC 5应 fttUpt 可 H 【略 mrdigttmtion iniUty 1 卫2-906IE Cearrt Count B Ojuiit I _■ … * —-- _■ HIT—— ---------------------- . _.,2 _ _if He Ip F2 flvd i Idh le flperation F5-F<efresh Hext Page *P-rrrv Piige FiZ^Ct Ir '3、在RAID Level 选项按回车,可以出现能够支持的 RAID 级别,RAID 卡能够支持的级别有 RAID0/1⑸10/50,根据具体配置的硬盘数量不同,这个位置可能出现的选项也会有 所区别。
DELL,服务器,RAID5,磁盘阵列,配置图解
DELL服务器RAID5磁盘阵列配置图解磁盘阵列可以在安装系统之前或之后产生,系统会视之为一个(大型)硬盘,而它具有容错及冗余的功能。
磁盘阵列不单只可以加入一个现成的系统,它更可以支持容量扩展,方法也很简单,只需要加入一个新的硬盘并执行一些简单的指令,系统便可以实时利用这新加的容量。
·RAID 的种类及应用IDE和SCSI是计算机的两种不同的接口,前者普遍用于PC机,后者一般用于服务器。
基于这两种接口,RAID分为两种类型:基于IDE接口的RAID应用,称为IDE RAID;而基于SCSI接口的RAID应用则相应称为SCSI RAID。
基于不同的架构,RAID 又可以分为: ● 软件RAID (软件 RAID)● 硬件RAID (硬件 RAID)● 外置RAID (External RAID)·软件RAID很多情况下已经包含在系统之中,并成为其中一个功能,如Windows、Netware及Linux。
软件RAID中的所有操作皆由中央处理器负责,所以系统资源的利用率会很高,从而使系统性能降低。
软件RAID是不需要另外添加任何硬件设备,因为它是靠你的系统——主要是中央处理器的功能——提供所有现成的资源。
·硬件RAID通常是一张PCI卡,你会看到在这卡上会有处理器及内存。
因为这卡上的处理器已经可以提供一切RAID所需要的资源,所以不会占用系统资源,从而令系统的表现可以大大提升。
硬件RAID可以连接内置硬盘、热插拔背板或外置存储设备。
无论连接何种硬盘,控制权都是在RAID卡上,亦即是由系统所操控。
在系统里,硬件RAID PCI卡通常都需要安驱动程序,否则系统会拒绝支持。
·外置式RAID也是属于硬件RAID的一种,区别在于RAID卡不会安装在系统里,而是安装在外置的存储设备内。
而这个外置的储存设备则会连接到系统的SCSI卡上。
系统没有任何的RAID功能,因为它只有一张SCSI卡;所有的RAID功能将会移到这个外置存储里。
DELL服务器RAID磁盘阵列配置图解

DELL服务器RAID 磁盘阵列配置图解磁盘阵列可以在安装系统之前或之后产生,系统会视之为一个(大型)硬盘,而它具有容错及冗余的功能。
磁盘阵列不单只可以加入一个现成的系统,它更可以支持容量扩展,方法也很简单,只需要加入一个新的硬盘并执行一些简单的指令,系统便可以实时利用这新加的容量。
·RAID 的种类及应用IDE和SCSI是计算机的两种不同的接口,前者普遍用于PC机,后者一般用于服务器。
基于这两种接口,RAID分为两种类型:基于IDE接口的RAID应用,称为IDE RAID;而基于SCSI接口的RAID应用则相应称为SCSI RAID。
基于不同的架构,RAID 又可以分为:●软件RAID (软件RAID)●硬件RAID (硬件RAID)●外置RAID (External RAID)·软件RAID很多情况下已经包含在系统之中,并成为其中一个功能,如Windows、Netware及Linux。
软件RAID中的所有操作皆由中央处理器负责,所以系统资源的利用率会很高,从而使系统性能降低。
软件RAID是不需要另外添加任何硬件设备,因为它是靠你的系统——主要是中央处理器的功能——提供所有现成的资源。
·硬件RAID通常是一XPCI卡,你会看到在这卡上会有处理器及内存。
因为这卡上的处理器已经可以提供一切RAID所需要的资源,所以不会占用系统资源,从而令系统的表现可以大大提升。
硬件RAID可以连接内置硬盘、热插拔背板或外置存储设备。
无论连接何种硬盘,控制权都是在RAID卡上,亦即是由系统所操控。
在系统里,硬件RAID PCI卡通常都需要安驱动程序,否则系统会拒绝支持。
·外置式RAID也是属于硬件RAID的一种,区别在于RAID卡不会安装在系统里,而是安装在外置的存储设备内。
而这个外置的储存设备则会连接到系统的SCSI 卡上。
系统没有任何的RAID功能,因为它只有一XSCSI卡;所有的RAID功能将会移到这个外置存储里。
网络环境下做好干部人事档案数字化的新要求

网络环境下做好干部人事档案数字化的新要求作者:解云菲来源:《办公室业务(下半月)》 2019年第7期文/武汉软件工程职业学院解云菲【摘要】通过对干部档案进行扫描和高清处理,完成纸质档案的数字化加工,建立干部档案管理信息系统,逐步实现干部档案信息网上查询,提升干部档案工作科学化、规范化、信息化水平,为建设全国统一的干部档案信息管理与查询系统奠定基础。
【关键词】网络环境;干部人事档案;数字化;新要求一、干部人事档案数字化总体规划干部人事档案数字化总体规划是整个业务的核心,它一定具有先进、适用、多重利用、开放、共享、扩展、维护、安全等特征。
整个数字化管理系统可分为:信息采集部分、日常管理部分、信息服务部分、系统设置与日常维护部分。
档案的整理包括:档案的编号、目录、划分类号、排序、打孔、装订等。
档案的数字化加工流程包括:档案的交接、档案整理、档案扫描、核对、图像偏斜处理、图像清晰度调整、数据终检、数据备份、数据成品验收。
二、干部人事档案数字化工作技术标准1.档案目录数据格式为EXCEL,须与图像数据标识一一对应。
目录校对准确、完整,无错别字。
2.每份材料需进行页码核定,编码范围内包括档案中所有文字、表格等内容的材料。
3.图像数据格式为单页JPG格式,分辨率为600DPI。
4.原始图片须与纸质档案完全一致,去除图像纠偏、裁边、调整清晰度外不做任何修饰性图像处理。
页码连续,无错页,无坏死文件,无黑屏。
5.高清图像须与原始图像方向、分辨率、页数完全一致,对图像中出现的影响提供利用和图像美观的杂质需要进行处理,字迹不清的清晰化处理,让肉眼观看达到清晰、平直、干净的效果。
三、干部人事档案数字化业务系统的安全性(一)业务系统安全性要求。
1.确保政务信息的保密性。
电子政务系统生成和保存的大量的信息,都属于机关内部使用信息,这些信息都属于只限于机关内部使用的信息,不得外漏,因此确保政务信息的保密是电子政务系统首当其冲的安全目标。
T4T5做硬件RAID
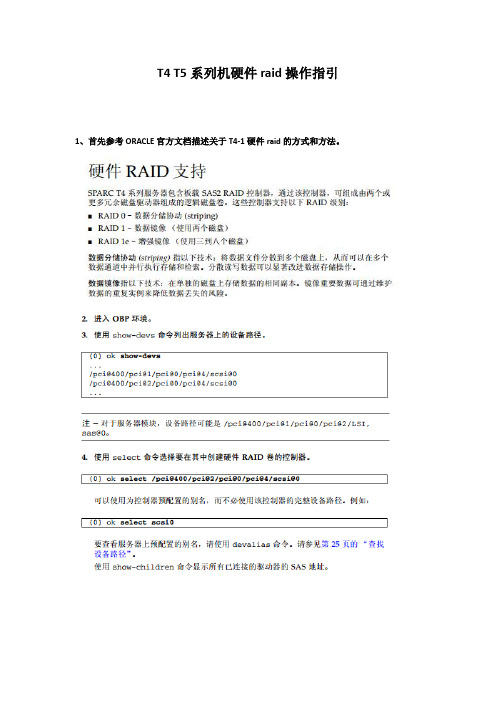
T4 T5系列机硬件raid操作指引1、首先参考ORACLE官方文档描述关于T4-1硬件raid的方式和方法。
2、实际安装配置步骤2、1实际配置为T4-1配置6块硬盘,其中0和1盘做硬件RAID1,剩余4块硬盘做RAID1e,插盘位置如图。
2、2操作日志参考2、2、1 先进入OK状态,show设备{0} ok{0} ok show-devs/pci-performance-counters@400/niu@480/pci@400*********************************/pci@400/pci@2/pci@0/pci@f/pci@0/usb@0,2/hub@2/device@4/keyboard@0 /pci@400/pci@2/pci@0/pci@f/pci@0/usb@0,2/hub@2/hub@3/storage@2/pci@400/pci@2/pci@0/pci@f/pci@0/usb@0,2/hub@2/hub@3/storage@2/disk /pci@400/pci@2/pci@0/pci@7/network@0,1/pci@400/pci@2/pci@0/pci@7/network@0/pci@400/pci@2/pci@0/pci@6/network@0,1/pci@400/pci@2/pci@0/pci@6/network@0/pci@400/pci@2/pci@0/pci@4/scsi@0/pci@400/pci@2/pci@0/pci@4/scsi@0/disk/pci@400/pci@2/pci@0/pci@4/scsi@0/tape/pci@400/pci@2/pci@0/pci@0/pci@0/pci@400/pci@2/pci@0/pci@0/pci@0/display@0/pci@400/pci@1/pci@0/pci@400/pci@1/pci@0/pci@8/pci@400/pci@1/pci@0/pci@6/pci@400/pci@1/pci@0/pci@4/pci@400/pci@1/pci@0/pci@0/pci@400/pci@1/pci@0/pci@4/scsi@0/pci@400/pci@1/pci@0/pci@4/scsi@0/disk/pci@400/pci@1/pci@0/pci@4/scsi@0/tape/pci@400/pci@1/pci@0/pci@0/SUNW,qlc@0,1/pci@400/pci@1/pci@0/pci@0/SUNW,qlc@0/pci@400/pci@1/pci@0/pci@0/SUNW,qlc@0,1/fp@0,0/pci@400/pci@1/pci@0/pci@0/SUNW,qlc@0,1/fp@0,0/disk/pci@400/pci@1/pci@0/pci@0/SUNW,qlc@0/fp@0,0/pci@400/pci@1/pci@0/pci@0/SUNW,qlc@0/fp@0,0/disk************************************/packages/SUNW,builtin-drivers{0} ok选择scsi0设备ok select scsi0 (选择scsi卡设备后,注意查看机器前端哪些对应硬盘亮灯){0} ok show-childrenFCode Version 1.00.61, MPT Version 2.00, Firmware Version 9.00.00.00Target 9Unit 0 Disk HITACHI H106030SDSUN300G A2B0 585937500 Blocks, 300 GB SASDeviceName 5000cca012db9e10 SASAddress 5000cca012db9e11 PhyNum 0 Target aUnit 0 Disk SEAGATE ST930005SSUN300G 0606 585937500 Blocks, 300 GB SASDeviceName 5000c50048346f1b SASAddress 5000c50048346f19 PhyNum 1 {0} ok{0} ok建立raid1{0} ok{0} ok 9 a create-raid1-volumeTarget 9 size is 583983104 Blocks, 298 GBTarget a size is 583983104 Blocks, 298 GBThe volume can be any size from 1 MB to 285148 MBWhat size do you want? [285148]Volume size will be 583983104 Blocks, 298 GBEnter a volume name: [0 to 15 characters] RAID1Volume has been created{0} ok show-volumesVolume 0 Target 381 Type RAID1 (Mirroring)Name RAID1 WWID 02bde0f3ea511dafOptimal Enabled Volume Not Consistent Background Init In Progress2 Members 583983104 Blocks, 298 GB Disk 0Primary OptimalTarget 9 HITACHI H106030SDSUN300G A2B0 PhyNum 0Disk 1Secondary OptimalTarget a SEAGATE ST930005SSUN300G 0606 PhyNum 1{0} ok{0} ok选择raid1{0} ok select scsi1{0} ok show-childrenFCode Version 1.00.61, MPT Version 2.00, Firmware Version 9.00.00.00Target 9Unit 0 Disk HITACHI H106030SDSUN300G A2B0 585937500 Blocks, 300 GB SASDeviceName 5000cca025260e04 SASAddress 5000cca025260e05 PhyNum 0 Target aUnit 0 Removable Read Only device TEAC DV-W28SS-V 1.0B SATA device PhyNum 6Target bUnit 0 Disk HITACHI H106030SDSUN300G A2B0 585937500 Blocks, 300 GB SASDeviceName 5000cca025455060 SASAddress 5000cca025455061 PhyNum 1 Target cUnit 0 Disk HITACHI H106030SDSUN300G A2B0 585937500 Blocks, 300 GB SASDeviceName 5000cca02522e2b4 SASAddress 5000cca02522e2b5 PhyNum 2 Target dUnit 0 Disk HITACHI H106030SDSUN300G A2B0 585937500 Blocks, 300 GB SASDeviceName 5000cca012db9df4 SASAddress 5000cca012db9df5 PhyNum 3 {0} ok{0} ok show-volumesNo volumes to show建立raid1e{0} ok 9 b c d create-raid1e-volumeTarget 9 size is 583983104 Blocks, 298 GBTarget b size is 583983104 Blocks, 298 GBTarget c size is 583983104 Blocks, 298 GBTarget d size is 583983104 Blocks, 298 GBThe volume can be any size from 1 MB to 570296 MBWhat size do you want? [570296]Volume size will be 1167966208 Blocks, 597 GBEnter a volume name: [0 to 15 characters] RAID1eVolume has been created{0} ok{0} ok show-volumesVolume 0 Target 381 Type RAID1E (Mirroring Extended)Name RAID1e WWID 07e16d3b9f7e9b97Optimal Enabled Volume Not Consistent Background Init In Progress4 Members 1167966208 Blocks, 597 GB Disk 0Member 0 OptimalTarget 9 HITACHI H106030SDSUN300G A2B0 PhyNum 0Disk 1Member 1 OptimalTarget b HITACHI H106030SDSUN300G A2B0 PhyNum 1Disk 2Member 2 OptimalTarget c HITACHI H106030SDSUN300G A2B0 PhyNum 2Disk 3Member 3 OptimalTarget d HITACHI H106030SDSUN300G A2B0 PhyNum 3{0} ok用光盘引导进入单用户模式,{0} ok boot cdrom -s进入单用户后label,再格式化。
之欧阳家家创编联想服务器RAID配置步骤
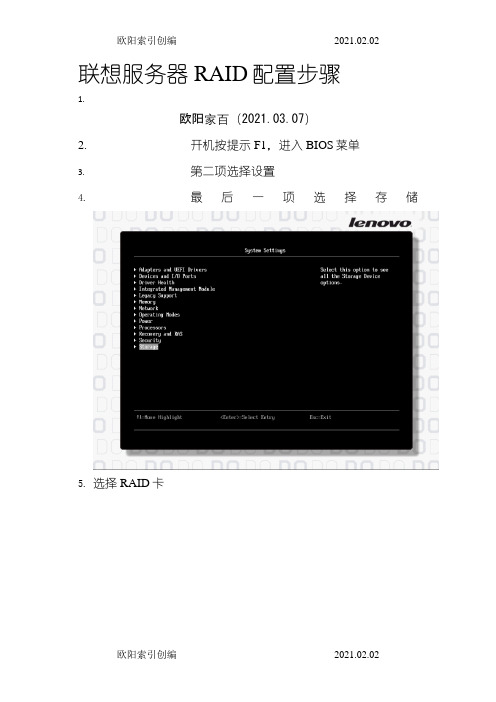
联想服务器RAID配置步骤
1.
欧阳家百(2021.03.07)
2.开机按提示F1,进入BIOS菜单
3.第二项选择设置
4.最后一项选择存储
5.选择RAID卡
6.第一项选择主菜单
7.第一项选择配置
8.如果硬盘是JBOD模式,需要先初始化硬盘,否则直接进行
第9步
8.选择要初始化的硬盘
按ESC返回
9.手动配置
10.选择RAID级别
11.选择磁盘
12.勾选要参与RAID组的磁盘
空格键选中“confirm”才能选择“yes”保存
13.设置卷大小,默认全部容量,超过2TB建议修改,然后再创建一个卷(第二个卷可以不考虑容量大小),如图150GB,是准备安装系统的分区,选择“Save Configuration”保存
14.继续创建RAID组的第二个卷,同样选择RAID5,“Select Drives from”选项要改成“Free Capacity”,因为之前已经选择了硬盘组做RAID,只分了150GB做第一个卷,还有剩余空间,此操作是利用该组剩余空间创建第二个卷
15.选择磁盘
16.此时,已有一个磁盘组,选中,保存
17.保存,
18.返回到此菜单,选择第三项“Drive Management”,磁盘管理
19.选中最后一块硬盘,回车
20.将该硬盘设置为热备盘
21.点“Go”执行,完成热备盘设置
22.完成配置,退出菜单即可。
联想万全服务器的RAID组建步骤全服务器+板载RAID配置方法

万全服务器板载RAID(集成LSI MEGA RAID )配置方法适用于以下机型的板载sata RAID 配置:在系统 POST(自检)过程中,当出现“Press Ctrl-M to run LSI Logic Embedded SATA RAID Setup Utility”时按Ctrl+M(部分机型为 Ctrl+E)进入SATA RAID 管理工具界面注: 如果自检时没有该提示,可以在进bios下main 或boot 菜单中的找到quiet boot,将其设置为disabled,禁用开机lenovo logo 查看。
Configure-(配置阵列)注意:对阵列以及硬盘操作可能会导致数据丢失,请在做任何操作之前,?确认您的数据已经妥善备份!new?configuration.(新建配置)-:选此项创建阵列时,将删除原先存在的阵列信息,配置时可以选择阵列级别、容量和条带大小view/add?Configuration(查看或添加阵列):显示、调整已有阵列配置,或增加阵列。
clear configuration(清除阵列):清除现存阵列Specify Boot Drive(选择阵列启动顺序):设置阵列的引导顺序这里我们推荐使用view/add?Configuration,选择此项按回车键后出现以下配置界面,这里,我们以创建raid 1为例:选择两块显示为ready 硬盘,分别敲击空格后,可以看到两块ready的硬盘已经变成ONLIN 的状态,见下图:接下来连续敲击两下回车键,弹出跨度选择的对话框:敲击一下空格,出现span-1按f10弹出raid配置选择菜单此时光标处已经为RAID= 1,如果要创建其他raid级别,可以在此处敲击回车选择,在RAID菜单的下面, Size 为阵列容量选择项,默认为最大值。
在选择完阵列级别和容量后,将光标移动到Accept后,敲击两下回车键,提示Save Configuration,选择Yes回车保存,至此RAID 1阵列创建完成。
SUNt4-1做raid1

案例设备:SUNT4-1备注:T3,T4系列是一样的案例目标:按照用户需求,4块300GB硬盘做2个RAID1案例解决步骤:一、在OBP下创建卷1.在创建之前要设置auto-boot?为falseok setenvauto-boot? falseauto-boot?= falseok reset-all2、进入到disk目录ok show-disks........ok probe-scsi-all/pci@400/pci@2/pci@0/pci@f/pci@0/usb@0,2/hub@2/hub@3/storage@2Unit 0 Removable Read Only device AMI Virtual CDROM 1.00/pci@400/pci@2/pci@0/pci@4/scsi@0ok select /pci@400/pci@2/pci@0/pci@4/scsi@03、查看是否创建了卷ok show-volumesNo volumes to show4、使用create命令创建卷show-children Lists all connected physical drives and logical volumes.show-volumes Lists all connected logical volumes in detail.create-raid0-volume Creates a RAID 0 volume (minimum two targets).create-raid1-volume Creates a RAID 1 volume (exactly two targets).create-raid1e-volume Creates a RAID 1e volume (minimum three targets).delete-volume Deletes a RAID volume.activate-volume Re-activate a RAID volume after the motherboard has beenreplaced. ok a 9 create-raid1-volume (使用a 9两块硬盘做raid1)Volumehas been createdok c b create-raid1-volume(使用c b两块硬盘做raid1)Volumehas been created两个卷已经建好5、查看建立的卷Volume 0 Target 380 Type RAID1 (Mirroring)Name voldisk2 WWID 0c4550c2e3a2bd1cOptimal Enabled Volume Not Consistent Operations Pending2 Members 583983104 Blocks, 298 GBDisk 1Primary OptimalTarget c HITACHI H106030SDSUN300G A2B0 PhyNum 1Disk 0Secondary OptimalTarget b HITACHI H106030SDSUN300G A2B0 PhyNum 3Volume 1 Target 381 Type RAID1 (Mirroring)Name voldisk1 WWID 0686b54dd6602dc1Optimal Enabled Volume Not Consistent Background Init In Progress 2 Members 583983104 Blocks, 298 GBDisk 3Primary OptimalTarget a HITACHI H106030SDSUN300G A2B0 PhyNum 2Disk 2Secondary OptimalTarget 9 HITACHI H106030SDSUN300G A2B0 PhyNum 06、退出设备目录ok unselect-dev7、把我们第一步的参数改回来auto-boot?为true,reset系统案例延伸二、在OBP下删除卷1、在创建之前要设置auto-boot?为false fcode-debug? 为trueok setenv auto-boot? falseauto-boot?= falseok reset-all2、进入到disk目录ok show-disks。
DELL服务器做RAID磁盘阵列图文教程

磁盘阵列可以在安装系统之前或之后产生,系统会视之为一个(大型)硬盘,而它具有容错及冗余的功能。
磁盘阵列不单只可以加入一个现成的系统,它更可以支持容量扩展,方法也很简单,只需要加入一个新的硬盘并执行一些简单的指令,系统便可以实时利用这新加的容量。
·RAID 的种类及应用IDE和SCSI是计算机的两种不同的接口,前者普遍用于PC机,后者一般用于服务器。
基于这两种接口,RAID分为两种类型:基于IDE接口的RAID应用,称为IDE RAID;而基于SCSI接口的RAID应用则相应称为SCSI RAID。
基于不同的架构,RAID 又可以分为:● 软件RAID (软件RAID)● 硬件RAID (硬件RAID)● 外置RAID (External RAID)·软件RAID很多情况下已经包含在系统之中,并成为其中一个功能,如Windows、Netware及Linu x。
软件RAID中的所有操作皆由中央处理器负责,所以系统资源的利用率会很高,从而使系统性能降低。
软件RAID是不需要另外添加任何硬件设备,因为它是靠你的系统——主要是中央处理器的功能——提供所有现成的资源。
·硬件RAID通常是一张PCI卡,你会看到在这卡上会有处理器及内存。
因为这卡上的处理器已经可以提供一切RAID所需要的资源,所以不会占用系统资源,从而令系统的表现可以大大提升。
硬件RAI D可以连接内置硬盘、热插拔背板或外置存储设备。
无论连接何种硬盘,控制权都是在RAID卡上,亦即是由系统所操控。
在系统里,硬件RAID PCI卡通常都需要安驱动程序,否则系统会拒绝支持。
·外置式RAID也是属于硬件RAID的一种,区别在于RAID卡不会安装在系统里,而是安装在外置的存储设备内。
而这个外置的储存设备则会连接到系统的SCSI卡上。
系统没有任何的RAID功能,因为它只有一张SCSI卡;所有的RAID功能将会移到这个外置存储里。
- 1、下载文档前请自行甄别文档内容的完整性,平台不提供额外的编辑、内容补充、找答案等附加服务。
- 2、"仅部分预览"的文档,不可在线预览部分如存在完整性等问题,可反馈申请退款(可完整预览的文档不适用该条件!)。
- 3、如文档侵犯您的权益,请联系客服反馈,我们会尽快为您处理(人工客服工作时间:9:00-18:30)。
T4 T5系列机硬件raid操作指引1、首先参考ORACLE官方文档描述关于T4-1硬件raid的方式和方法。
2、实际安装配置步骤2、1实际配置为T4-1配置6块硬盘,其中0和1盘做硬件RAID1,剩余4块硬盘做RAID1e,插盘位置如图。
2、2操作日志参考2、2、1 先进入OK状态,show设备{0} ok{0} ok show-devs/pci-performance-counters@400/niu@480/pci@400*********************************/pci@400/pci@2/pci@0/pci@f/pci@0/usb@0,2/hub@2/device@4/keyboard@0 /pci@400/pci@2/pci@0/pci@f/pci@0/usb@0,2/hub@2/hub@3/storage@2/pci@400/pci@2/pci@0/pci@f/pci@0/usb@0,2/hub@2/hub@3/storage@2/disk /pci@400/pci@2/pci@0/pci@7/network@0,1/pci@400/pci@2/pci@0/pci@7/network@0/pci@400/pci@2/pci@0/pci@6/network@0,1/pci@400/pci@2/pci@0/pci@6/network@0/pci@400/pci@2/pci@0/pci@4/scsi@0/pci@400/pci@2/pci@0/pci@4/scsi@0/disk/pci@400/pci@2/pci@0/pci@4/scsi@0/tape/pci@400/pci@2/pci@0/pci@0/pci@0/pci@400/pci@2/pci@0/pci@0/pci@0/display@0/pci@400/pci@1/pci@0/pci@400/pci@1/pci@0/pci@8/pci@400/pci@1/pci@0/pci@6/pci@400/pci@1/pci@0/pci@4/pci@400/pci@1/pci@0/pci@0/pci@400/pci@1/pci@0/pci@4/scsi@0/pci@400/pci@1/pci@0/pci@4/scsi@0/disk/pci@400/pci@1/pci@0/pci@4/scsi@0/tape/pci@400/pci@1/pci@0/pci@0/SUNW,qlc@0,1/pci@400/pci@1/pci@0/pci@0/SUNW,qlc@0/pci@400/pci@1/pci@0/pci@0/SUNW,qlc@0,1/fp@0,0/pci@400/pci@1/pci@0/pci@0/SUNW,qlc@0,1/fp@0,0/disk/pci@400/pci@1/pci@0/pci@0/SUNW,qlc@0/fp@0,0/pci@400/pci@1/pci@0/pci@0/SUNW,qlc@0/fp@0,0/disk************************************/packages/SUNW,builtin-drivers{0} ok选择scsi0设备ok select scsi0 (选择scsi卡设备后,注意查看机器前端哪些对应硬盘亮灯){0} ok show-childrenFCode Version 1.00.61, MPT Version 2.00, Firmware Version 9.00.00.00Target 9Unit 0 Disk HITACHI H106030SDSUN300G A2B0 585937500 Blocks, 300 GB SASDeviceName 5000cca012db9e10 SASAddress 5000cca012db9e11 PhyNum 0 Target aUnit 0 Disk SEAGATE ST930005SSUN300G 0606 585937500 Blocks, 300 GB SASDeviceName 5000c50048346f1b SASAddress 5000c50048346f19 PhyNum 1 {0} ok{0} ok建立raid1{0} ok{0} ok 9 a create-raid1-volumeTarget 9 size is 583983104 Blocks, 298 GBTarget a size is 583983104 Blocks, 298 GBThe volume can be any size from 1 MB to 285148 MBWhat size do you want? [285148]Volume size will be 583983104 Blocks, 298 GBEnter a volume name: [0 to 15 characters] RAID1Volume has been created{0} ok show-volumesVolume 0 Target 381 Type RAID1 (Mirroring)Name RAID1 WWID 02bde0f3ea511dafOptimal Enabled Volume Not Consistent Background Init In Progress2 Members 583983104 Blocks, 298 GB Disk 0Primary OptimalTarget 9 HITACHI H106030SDSUN300G A2B0 PhyNum 0Disk 1Secondary OptimalTarget a SEAGATE ST930005SSUN300G 0606 PhyNum 1{0} ok{0} ok选择raid1{0} ok select scsi1{0} ok show-childrenFCode Version 1.00.61, MPT Version 2.00, Firmware Version 9.00.00.00Target 9Unit 0 Disk HITACHI H106030SDSUN300G A2B0 585937500 Blocks, 300 GB SASDeviceName 5000cca025260e04 SASAddress 5000cca025260e05 PhyNum 0 Target aUnit 0 Removable Read Only device TEAC DV-W28SS-V 1.0B SATA device PhyNum 6Target bUnit 0 Disk HITACHI H106030SDSUN300G A2B0 585937500 Blocks, 300 GB SASDeviceName 5000cca025455060 SASAddress 5000cca025455061 PhyNum 1 Target cUnit 0 Disk HITACHI H106030SDSUN300G A2B0 585937500 Blocks, 300 GB SASDeviceName 5000cca02522e2b4 SASAddress 5000cca02522e2b5 PhyNum 2 Target dUnit 0 Disk HITACHI H106030SDSUN300G A2B0 585937500 Blocks, 300 GB SASDeviceName 5000cca012db9df4 SASAddress 5000cca012db9df5 PhyNum 3 {0} ok{0} ok show-volumesNo volumes to show建立raid1e{0} ok 9 b c d create-raid1e-volumeTarget 9 size is 583983104 Blocks, 298 GBTarget b size is 583983104 Blocks, 298 GBTarget c size is 583983104 Blocks, 298 GBTarget d size is 583983104 Blocks, 298 GBThe volume can be any size from 1 MB to 570296 MBWhat size do you want? [570296]Volume size will be 1167966208 Blocks, 597 GBEnter a volume name: [0 to 15 characters] RAID1eVolume has been created{0} ok{0} ok show-volumesVolume 0 Target 381 Type RAID1E (Mirroring Extended)Name RAID1e WWID 07e16d3b9f7e9b97Optimal Enabled Volume Not Consistent Background Init In Progress4 Members 1167966208 Blocks, 597 GB Disk 0Member 0 OptimalTarget 9 HITACHI H106030SDSUN300G A2B0 PhyNum 0Disk 1Member 1 OptimalTarget b HITACHI H106030SDSUN300G A2B0 PhyNum 1Disk 2Member 2 OptimalTarget c HITACHI H106030SDSUN300G A2B0 PhyNum 2Disk 3Member 3 OptimalTarget d HITACHI H106030SDSUN300G A2B0 PhyNum 3{0} ok用光盘引导进入单用户模式,{0} ok boot cdrom -s进入单用户后label,再格式化。
# formatSearching for disks...WARNING:/pci@400/pci@1/pci@0/pci@4/scsi@0/iport@v0/disk@w32bde0f3ea511daf,0 (sd7):Corrupt label; wrong magic numberWARNING: /pci@400/pci@1/pci@0/pci@4/scsi@0/iport@v0/disk@w32bde0f3ea511daf,0 (sd7):Corrupt label; wrong magic numberWARNING: /pci@400/pci@2/pci@0/pci@4/scsi@0/iport@v0/disk@w37e16d3b9f7e9b97,0 (sd6):Corrupt label; wrong magic numberWARNING: /pci@400/pci@2/pci@0/pci@4/scsi@0/iport@v0/disk@w37e16d3b9f7e9b97,0 (sd6):Corrupt label; wrong magic numberdonec0t32BDE0F3EA511DAFd0: configured with capacity of 277.99GBc2t37E16D3B9F7E9B97d0: configured with capacity of 555.97GBAVAILABLE DISK SELECTIONS:0. c0t32BDE0F3EA511DAFd0 <LSI-LogicalVolume-3000 cyl 65533 alt 2 hd 64 sec 139>/pci@400/pci@1/pci@0/pci@4/scsi@0/iport@v0/disk@w32bde0f3ea511daf,01. c2t37E16D3B9F7E9B97d0 <LSI-LogicalVolume-3000 cyl 65533 alt 2 hd 128 sec 139>/pci@400/pci@2/pci@0/pci@4/scsi@0/iport@v0/disk@w37e16d3b9f7e9b97,0Specify disk (enter its number): 0selecting c0t32BDE0F3EA511DAFd0[disk formatted]可以看到上面红色二行内容,即raid1和raid1e二部分可用空间大小。