施乐115W安装教程
富士施乐DocuPrint CM118w 用户指南

DocuPrint CM118 w ⡾∃偡⻍凖ㆷ⋔㚞ợ䒌㚞◌ ↱濇孛∅⼩€敩孟㚐存㕲 Ɂợ䒌存㕲䪊⍬㝫K!HC0U!28651.2::9Apple、Bonjour、ColorSync、iPad、iPhone、iPod touch、Macintosh、Mac OS 和 OS X是Apple Inc.在美国和其他国家的注册商标。
AirPrint和AirPrint标识是Apple Inc.的商标。
App Store是Apple Inc.的服务商标。
Android和Google Play是Google Inc.的注册商标或商标。
Adobe和Photoshop是Adobe Systems Incorporated在美国和/或其他国家的注册商标或商标。
Microsoft、Windows Vista、Windows、Windows Server、Visual C++、Visual Studio和Internet Explorer是Microsoft Corporation在美国和/或其他国家的注册商标或商标。
Linux是Linus Torvalds的注册商标。
Novell和SUSE是Novell, Inc.在美国和其他国家的注册商标。
Red Hat和Red Hat Enterprise Linux是Red Hat, Inc.在美国和其他国家的注册商标。
Ubuntu是Canonical Ltd.的注册商标。
Wi-Fi和Wi-Fi Direct是Wi-Fi Alliance的注册商标。
Wi-Fi Protected Setup、WPA和WPA2是Wi-Fi Alliance的商标。
所有产品/品牌是各公司的商标或注册商标。
转载Microsoft产品的屏幕截图已获得Microsoft Corporation的许可。
在本使用说明书中,凡标有 记号的事项为安全使用事项。
操作前请务必阅读其内容并严格遵守。
请勿打印纸币、股票或证券凭证或者任何其他具有类似性质的文档,无论这些打印件使用与否,都可能会触犯法律。
DocuPrint CM118w驱动安装设置_网络连接_v2
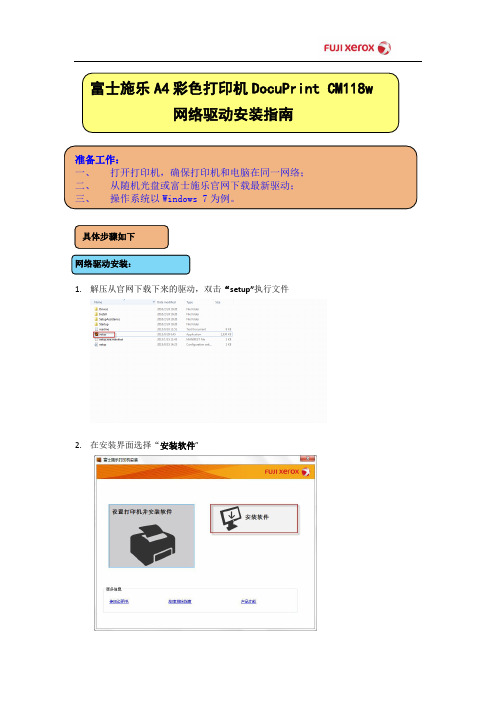
网络驱动安装指南
准备工作:
一、打开打印机,确保打印机和电脑在同一网络;
二、从随机光盘或富士施乐官网下载最新驱动;
三、操作系统以Windows 7为例。
网络驱动安装:
1.解压从官网下载下来的驱动,双击“setup”执行文件
2.在安装界面选择“安.安装类型选择“网络安装”,点击“下一步”
5.等待软件自动完成安装程序
6.软件能自动找到网络中的打印机,点击“下一步”。
勾选“将此打印机设置为默认打印”,点击“下一步”。
7.勾选需要安装的应用程序,建议全选,并点击“安装”。
8. 等待软件自动安装完成,点击“打印测试页”,点击“完成”完成驱动安装。(注:因为系统原因,下图有可能不会显示)
施乐3119硒鼓加粉图解
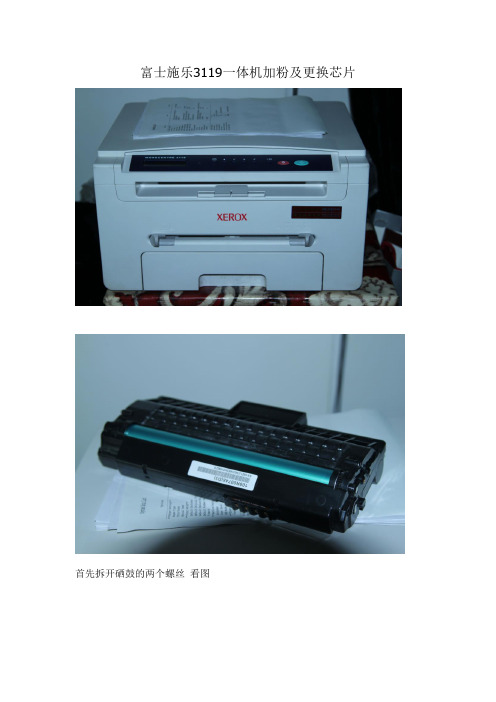
富士施乐3119一体机加粉及更换芯片
首先拆开硒鼓的两个螺丝看图
接着取下盖子,放好螺丝,在盖子下面,有个小塞子,用刀片轻轻翘起来,倒掉里面的废墨粉。
一定要倒干净,不然一会取芯片的时候就麻烦,会弄脏手的!接下来放好拆下来的小塞子和盖子还有螺丝。
继续下一步,拆掉硒鼓上面的5颗螺丝。
看图红圈的位置
拆下来后,放好螺丝接着继续。
用小刀轻轻的翘起,图中红圈位置的卡子。
慢慢打开硒鼓,完成后就是这个样子的。
然后芯片会暴露在我们的面前,
然后换上新的芯片,所以的步骤还原,上好螺丝,加好墨粉。
装上小塞子和盖子,全都检查好。
最后把硒鼓放平,来回轻轻的晃动几下使墨粉分布均匀。
装入复印机,就可以工作了!呵呵!。
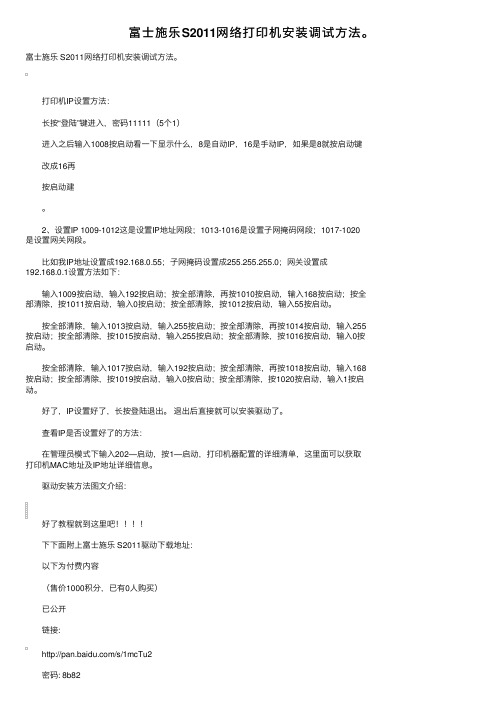
富士施乐S2011网络打印机安装调试方法。
富⼠施乐S2011⽹络打印机安装调试⽅法。
富⼠施乐 S2011⽹络打印机安装调试⽅法。
打印机IP设置⽅法: 长按“登陆”键进⼊,密码11111(5个1) 进⼊之后输⼊1008按启动看⼀下显⽰什么,8是⾃动IP,16是⼿动IP,如果是8就按启动键 改成16再 按启动建 。
2、设置IP 1009-1012这是设置IP地址⽹段;1013-1016是设置⼦⽹掩码⽹段;1017-1020是设置⽹关⽹段。
⽐如我IP地址设置成192.168.0.55;⼦⽹掩码设置成255.255.255.0;⽹关设置成192.168.0.1设置⽅法如下: 输⼊1009按启动,输⼊192按启动;按全部清除,再按1010按启动,输⼊168按启动;按全部清除,按1011按启动,输⼊0按启动;按全部清除,按1012按启动,输⼊55按启动。
按全部清除,输⼊1013按启动,输⼊255按启动;按全部清除,再按1014按启动,输⼊255按启动;按全部清除,按1015按启动,输⼊255按启动;按全部清除,按1016按启动,输⼊0按启动。
按全部清除,输⼊1017按启动,输⼊192按启动;按全部清除,再按1018按启动,输⼊168按启动;按全部清除,按1019按启动,输⼊0按启动;按全部清除,按1020按启动,输⼊1按启动。
好了,IP设置好了,长按登陆退出。
退出后直接就可以安装驱动了。
查看IP是否设置好了的⽅法: 在管理员模式下输⼊202—启动,按1—启动,打印机器配置的详细清单,这⾥⾯可以获取打印机MAC地址及IP地址详细信息。
驱动安装⽅法图⽂介绍: 好了教程就到这⾥吧!!!! 下下⾯附上富⼠施乐 S2011驱动下载地址: 以下为付费内容 (售价1000积分,已有0⼈购买) 已公开 链接: /s/1mcTu2 密码: 8b82 免费送花 (1) 引⽤回复 2015-10-13 21:18:25 [1楼] 若离若近i 第⼀次发帖有点错误求管理帮忙删掉那些⼤字体 超级版主⼤⽩i回复: 已删除 2015-10-14 09:43:05 免费送花 (0) 引⽤回复 2015-10-13 21:21:20 [2楼] qq349721945 可以⽤了 免费送花 (0) 引⽤回复 2015-11-04 10:13:37 [3楼] hswixd 百度8000 谢谢啦 免费送花 (0) 引⽤回复 2016-03-06 22:36:31 [5楼] 齐德隆冬强 谢谢楼主。
XP系统安装富士施乐S2110打印机驱动的解决办法(完整资料).doc

【最新整理,下载后即可编辑】XP系统无法安装富士施乐S2110打印机驱动的解决办法富士施乐官网显示S2110打印机已不支持Xp系统,官网驱动也无法在XP系统安装。
如果使用的XP系统,要如何安装使用S2110打印机呢,我们可以通过安装富士施乐老款的S2011打印机驱动来实现。
1、在富士施乐官网下载老款打印机S2011的打印机驱动和扫描仪驱动。
2、双击S2011打印机驱动,会自动解压开始安装。
3、选择【自定义】安装。
4、然后选择【本地打印机】,点击下一步安装。
5、随便选择一个端口,例如COM1,在型号栏选择【S2011】,点击下一步。
6、选择【是】,点击安装。
7、S2011打印机驱动安装完成,点击完成。
8、点击开始菜单,打开打印机和传真页面。
9、找到刚才安装的S2011打印机,右键点击S2011打印机,选择属性。
10、在弹出的S2011属性窗口,选择端口选项卡,点击添加端口,选择Standard TCP/IP Port,点击新端口。
11、在打开的TCP/IP打印机端口向导中,点击下一步,在IP地址栏输入打印机IP地址。
IP地址可以在打印机上设置,已设置好的打印机可以在打印机上登陆后打印测试页,有打印机IP地址,也可以其他已安装S2110打印机的电脑上,右键点击打印机,选择属性——端口中查看。
12、点击下一步,显示如下窗口,再点击下一步,完成。
13、在S2011打印机属性窗口,点击应用,打印机端口设置完成。
14、在S2011打印机属性,选择常规选项卡,打印测试页,如果正常打印,那么我们就可以使用S2110打印机了。
15、安装扫描仪驱动,点击下载好的S2011扫描仪驱动SETUP.EXE,开始安装,点击下一步。
16、选择【接受条款】,下一步。
17、选择【网络扫描仪驱动程序】,点击下一步。
18、在IP地址栏,输入打印机IP地址,点击下一步,会自动安装扫描仪驱动。
19、在弹出的窗口中选择【重启计算机】,点击完成。
施乐115W安装教程
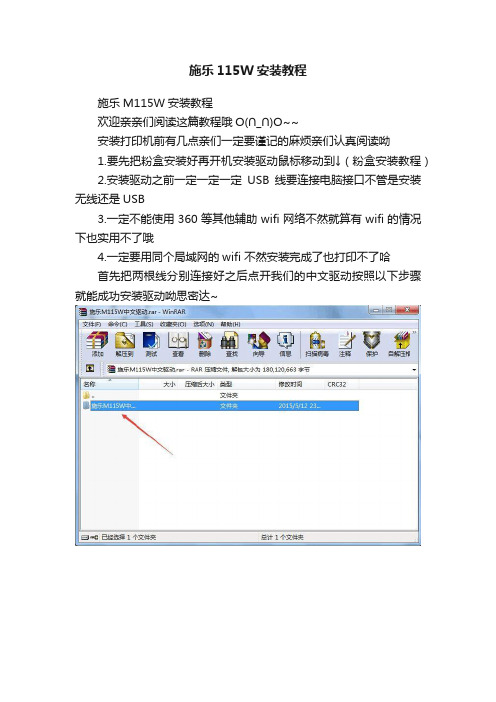
施乐115W安装教程
施乐M115W安装教程
欢迎亲亲们阅读这篇教程哦O(∩_∩)O~~
安装打印机前有几点亲们一定要谨记的麻烦亲们认真阅读呦
1.要先把粉盒安装好再开机安装驱动鼠标移动到↓(粉盒安装教程)
2.安装驱动之前一定一定一定USB线要连接电脑接口不管是安装无线还是USB
3.一定不能使用360等其他辅助wifi网络不然就算有wifi的情况下也实用不了哦
4.一定要用同个局域网的wifi 不然安装完成了也打印不了哈
首先把两根线分别连接好之后点开我们的中文驱动按照以下步骤就能成功安装驱动呦思密达~
选择无线网络连接有一张图漏发了/(ㄒoㄒ)/~~
好了到了这一步之后亲们就已经安装完驱动了哈恭喜恭喜~
那么亲们有用到扫描的话就请看以下图片操作时有任何疑问可以联系旺旺客服随时在线呦除了夜深人静的时候肯定是在睡觉?(ω)?~~~
我们在安装好驱动之后一定会有这个图标桌面随意找出点击进入!
以上就是扫描的操作流程啦亲们学会了嘛(~o ~)~zZ
还有一些童鞋们喜欢用手机打印那么现在再教大家怎么用手机操作呦这篇教程好长~ 亲们会不会给我奖励
手机无线的话需要下载施乐APP(fuji xerox print)
就用苹果手机示范下吧手机操作都是大同小异的哈~
需要注意的要点
1.手机连接的wifi一定要跟打印机是同一个
2.打印文件需要在电脑上登录QQ 一样需要同个局域网呦
用我们的手机在软件搜索里搜索fuji xerox print 下载以下这个软件图片都是从左到右看的
萌哒哒的效果图打印文件示例图↓
总算完成了么么哒全部看完的亲们值得表扬撒花?~ 有问题的可以联系旺旺上的客服呦~
再见~ 思密达~。
施乐S2011、S2320、S2520维修手册
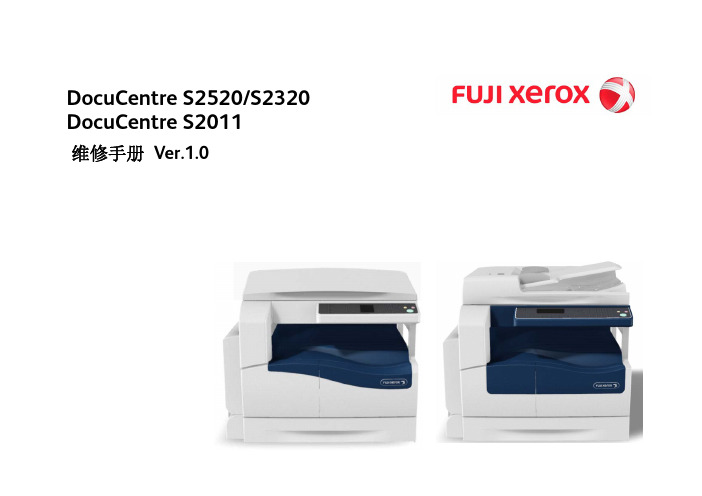
DocuCentre S2520/S2320 DocuCentre S2011DocuCentre S2520/S2320/S2011维修手册 Ver.1.0发行:2014年11月编辑/发行:Fuji Xerox Co., Ltd. Solution Service & Operational Management CS Dept.MMCBldg,3-6-1, Minato-mirai, Nishi-ku, Yokohama-shi, Kanagawa, JAPAN 220-0012 [XEROX] 是注册商标。
∙本维修手册用于下列产品:富士施乐(有限公司)•DocuCentre S2520/S2320/S2011 ∙关于维修手册的机密性∙本维修手册仅限于富士施乐认可的产品维护保养人员使用,严禁未经许可而复印、转载、供他人阅读或提供给他人。
∙因修订等原因而不再需要时,请务必烧毁或用碎纸机进行处理。
∙使用时请注意,应将手册保管好,避免遗失、破损。
∙关于因设计变更等原因而修订维修手册本维修手册的记载内容中出现相关设计变更时,有时会发行必要的相关技术信息,作为维修手册下次修订时反映变更内容以前的补充信息。
注意 技术信息等内容中的“备用零件号码的变更”及调整项目的“设定规定值”的变更等重要项目应在每次变更时记录在本维修手册内。
0 Introduction0.1 关于本手册 (3)0.2 手册的使用方法 (3)0.3 术语、符号的说明 (4)0.1 关于本手册本手册作为标准维修手册适用于DocuCentre S2520 / S2320 / S2011。
· 维修手册意见表若您对本维修手册有任何意见、或您发现有错误、需要订正的地方,请您填写维修手册意见表,寄送至以下部门。
Japan:Solution Service & Operational Management CS Dept.APO/GCO:OSG PSD CS&SD SSOMG via OpCo Technical Service Department 0.2 手册的使用方法本手册记载了本产品维护时的标准作业。
施乐S2011、S2320、S2520维修手册及应用

DocuCentre S2520/S2320 DocuCentre S2011DocuCentre S2520/S2320/S2011维修手册 Ver.1.0发行:2014年11月编辑/发行:Fuji Xerox Co., Ltd. Solution Service & Operational Management CS Dept.MMCBldg,3-6-1, Minato-mirai, Nishi-ku, Yokohama-shi, Kanagawa, JAPAN 220-0012 [XEROX] 是注册商标。
∙本维修手册用于下列产品:富士施乐(有限公司)•DocuCentre S2520/S2320/S2011 ∙关于维修手册的机密性∙本维修手册仅限于富士施乐认可的产品维护保养人员使用,严禁未经许可而复印、转载、供他人阅读或提供给他人。
∙因修订等原因而不再需要时,请务必烧毁或用碎纸机进行处理。
∙使用时请注意,应将手册保管好,避免遗失、破损。
∙关于因设计变更等原因而修订维修手册本维修手册的记载内容中出现相关设计变更时,有时会发行必要的相关技术信息,作为维修手册下次修订时反映变更内容以前的补充信息。
注意 技术信息等内容中的“备用零件号码的变更”及调整项目的“设定规定值”的变更等重要项目应在每次变更时记录在本维修手册内。
0 Introduction0.1 关于本手册 (3)0.2 手册的使用方法 (3)0.3 术语、符号的说明 (4)0.1 关于本手册本手册作为标准维修手册适用于DocuCentre S2520 / S2320 / S2011。
· 维修手册意见表若您对本维修手册有任何意见、或您发现有错误、需要订正的地方,请您填写维修手册意见表,寄送至以下部门。
Japan:Solution Service & Operational Management CS Dept.APO/GCO:OSG PSD CS&SD SSOMG via OpCo Technical Service Department 0.2 手册的使用方法本手册记载了本产品维护时的标准作业。
施乐加载体步骤
步骤如下:
准备一个空的墨粉盒,将载体倒入该空墨粉盒中,然后将装有载体的粉盒装入机器上;
进入诊断模式(按住上下键,同时开机),面板显示CE Mod,松开上下键,(密码两次向下键)
依次按Ok键--向下键,面板显示IOT Diag;
依次按Ok键--向下键,面板显示Digital Output;
按Ok键,面板显示DO-01Ready,按上下键,直到面板显示DO-32Ready ,然后按OK键,面板显示DO-32 EXEC,表示24V电源打开;
按上下键,找到DO-01 Ready,然后按OK键,面板显示DO-01EXEC,这时主马达开始旋转;
按上下键,找到DO-10/12/14/16 Ready,然后按OK键,面板显示DO-10/12/14/16EXEC,这时相关的下粉马达开始旋转,如果打开侧门盖会感觉到下粉齿轮转动,下粉马达可以单独执行旋转;
待下粉马达和主马达同时旋转约2分钟,使载体全部加入显影,按返回键,马达停止旋转;
重新启动机器。
备注:彩机有四个粉,DO-10 为C色;DO-12 为M色;DO-14 为Y色;DO-16 为K色;
施乐 驱动安装方法

准备工作:把驱动文件解压了,不要放在桌面上,放到电脑的盘里去,不要放C盘1.电脑左下角“开始”,“设置”—“打印机和传真”—“添加打印机”—点“下一步”—再点这个“从磁盘安装”点“浏览”然后一直点下一步,下一步,下一步,点“完成”就可以把驱动装好。
装好的驱动在“打印机和传真”里面就会有显示。
如图:在驱动上面点右键点“属性”,就会出现打印机驱动状况,如图:然后点“完成”然后在电脑左下角“开始”——“运行”——输入“ping (如果机器已经修改过IP的话,那就是后面输入已经改过的IP地址|)——再点“运行”再点“确定”看是不是出现三行很长的字,最后面是数字64的,如果是,就表示机器和电脑已经连通,如果是….out,那就表示还没有连通,那就要检查各方面了。
【在拼前要保证机器已经开机并且已经预热好了】1. 复印机是接在路由器上面的话,那么要先确定路由器的IP是多少,也就是确定电脑的IP是多少,如果路由器的IP是的话,那么复印机就不用重新修改IP了,(因为复印机的IP是),如果路由器的IP是或者是其他的IP地址的话,那么复印机就要重新修改IP了,复印机的IP的前面三个数字必须和路由器IP的前面三个数字一样,最后面那一个数字就不能一样(比方路由器是,那么复印机就要改成…多少,如果路由器是,那么复印机就要改成…多少)。
2.用网络打印时,机器的网线接在路由器上面,要保证电脑也是有网线从路由器上面接出来的,电脑不能用无线上网,就算是无线路由器,也要有网线从路由器上面接到电脑,这样电脑才能使用复印机打印,要不然的话是不能完成打印的。
3.如果是直接电脑主机连接的话,那么电脑主机就不能上网,直接把网线插在主机后面的网口处,电脑也不能用无线上网,然后给电脑设置一个IP地址:设置,然后用我们发过去的网线打印,这样就必须用我们的网线,我们的是交叉线,是单机连用的,用网络打印的话就可以用普通的网线。
【一般都是用网络打印,这一步可以省略不看】。
施乐S2011、S2320、S2520维修手册
DocuCentre S2520/S2320 DocuCentre S2011DocuCentre S2520/S2320/S2011维修手册 Ver.1.0发行:2014年11月编辑/发行:Fuji Xerox Co., Ltd. Solution Service & Operational Management CS Dept.MMCBldg,3-6-1, Minato-mirai, Nishi-ku, Yokohama-shi, Kanagawa, JAPAN 220-0012 [XEROX] 是注册商标。
∙本维修手册用于下列产品:富士施乐(有限公司)•DocuCentre S2520/S2320/S2011 ∙关于维修手册的机密性∙本维修手册仅限于富士施乐认可的产品维护保养人员使用,严禁未经许可而复印、转载、供他人阅读或提供给他人。
∙因修订等原因而不再需要时,请务必烧毁或用碎纸机进行处理。
∙使用时请注意,应将手册保管好,避免遗失、破损。
∙关于因设计变更等原因而修订维修手册本维修手册的记载内容中出现相关设计变更时,有时会发行必要的相关技术信息,作为维修手册下次修订时反映变更内容以前的补充信息。
注意 技术信息等内容中的“备用零件号码的变更”及调整项目的“设定规定值”的变更等重要项目应在每次变更时记录在本维修手册内。
0 Introduction0.1 关于本手册 (3)0.2 手册的使用方法 (3)0.3 术语、符号的说明 (4)0.1 关于本手册本手册作为标准维修手册适用于DocuCentre S2520 / S2320 / S2011。
· 维修手册意见表若您对本维修手册有任何意见、或您发现有错误、需要订正的地方,请您填写维修手册意见表,寄送至以下部门。
Japan:Solution Service & Operational Management CS Dept.APO/GCO:OSG PSD CS&SD SSOMG via OpCo Technical Service Department 0.2 手册的使用方法本手册记载了本产品维护时的标准作业。
施乐系列打印机使用说明

施乐系列打印机使用说明在现代办公环境中,打印机是不可或缺的设备之一。
施乐系列打印机以其出色的性能和可靠的质量,受到了许多用户的青睐。
为了让您能够更加顺畅地使用施乐系列打印机,以下将为您详细介绍其使用方法和注意事项。
一、打印机的安装1、选择合适的安装位置施乐打印机应放置在平稳、干燥、通风良好的地方,避免阳光直射和靠近热源。
同时,要确保周围有足够的空间,以便于操作和维护。
2、连接电源将打印机的电源线插入电源插座,并确保电源稳定。
3、连接数据线根据您的打印机型号和计算机接口类型(如 USB、以太网等),选择合适的数据线进行连接。
将数据线的一端插入打印机的相应接口,另一端插入计算机的接口。
4、安装驱动程序在连接好打印机后,您需要安装相应的驱动程序。
通常,您可以从施乐官方网站上下载最新的驱动程序,或者使用随机附带的驱动光盘进行安装。
按照安装向导的提示进行操作,完成驱动程序的安装。
二、打印机的基本操作1、开机与关机按下打印机上的电源按钮,等待打印机初始化完成即可开机。
关机时,同样按下电源按钮,待打印机完全停止工作后再拔掉电源插头。
2、纸张的放置打开打印机的纸盒,根据纸张的尺寸和类型进行调整。
确保纸张平整地放入纸盒,并且不要超过纸盒的最大容量。
3、打印操作(1)在计算机上打开您要打印的文档或图片。
(2)选择“打印”选项,在弹出的打印设置窗口中,您可以选择打印机、纸张大小、打印质量、打印份数等参数。
(3)设置完成后,点击“打印”按钮,打印机将开始打印工作。
三、打印质量的调整1、分辨率设置您可以在打印设置中调整打印分辨率,以获得更清晰或更快速的打印效果。
较高的分辨率会使打印质量更精细,但打印速度可能会较慢;较低的分辨率则打印速度较快,但质量相对较粗糙。
2、色彩设置如果您的打印机支持彩色打印,可以在设置中选择彩色或黑白打印,以及调整色彩的饱和度、对比度等参数。
3、纸张类型选择根据您使用的纸张类型(如普通纸、照片纸、卡片纸等),在打印机设置中进行相应的选择,以获得最佳的打印效果。
简述打印机的安装配置流程。
简述打印机的安装配置流程。
打印机是办公室和家庭里不可或缺的一项设备,它不仅能够将电脑上的文件打印出来,还可以实现复印、扫描等功能。
办公室或家庭内使用打印机之前,必须要先安装配置打印机,以下是安装配置打印机的流程。
第一步,确定打印机型号
在购买打印机之前,要先根据自身的需要确定型号。
一般而言,如果多次使用可以选择功能多样的多功能一体机;如果只是简单的文件打印,可以选择体积小、功能简单的针式打印机。
第二步,正确安装打印机驱动程序
安装完打印机之后,必须正确的安装驱动程序,才能保证打印机的正常使用。
一般来说,只需要在官网上下载打印机的驱动程序,然后按照提示操作即可,不需要花费太多精力。
第三步,检查打印机连线
驱动程序安装好之后,应该检查打印机的连线,比如usb电缆是否接好,电源是否正常供电等等。
如果没有检查完毕,很有可能会出现无法打印的情况。
第四步,调整打印机参数
调整打印机参数可能会比较复杂,涉及到高级设置比如:页面尺寸、彩色/灰度、打印机设置、输出质量等等。
不过,操作者只需要按照软件要求,依次调整各参数即可。
第五步,检查打印机印刷效果
在调整打印机参数完毕之后,应该检查印刷效果,比如:图片是否清晰、是否漏字行、字体是否正常等等,如果有发现效果不佳的情况,可以继续调整设置,直至达到期望的效果。
综上所述,安装配置打印机的流程主要分为以下几个步骤:确定打印机型号、正确安装驱动程序、检查连线、调整参数、检查印刷效果。
正确的安装配置是打印机正常使用的前提,因此,安装配置过程中要特别小心,以避免出现故障状况。
Xerox多功能设备的安全安装和操作说明书
Secure Installation and Operation of Your Xerox Multi-Function Device Version 1.0August 6, 2012Secure Installation and Operation of Your Xerox Multi-Function Device Purpose and AudienceThis document provides information on the secure installation and operation of a Xerox Multi-Function Device (MFD). All customers, but particularly those concerned with secure installation and operation of these machines, should follow these guidelines.OverviewThis document lists some general customer information and guidelines that will ensure that your Xerox MFD is operated and maintained in a secure manner.Some Xerox MFDs have their own product-specific secure installation and operation guidelines; if that is the case the product-specific guidelines supersede and should be used in place of the general guidelines documented here.Not every Xerox MFD may have all of the security functions discussed in these guidelines; follow only those guidelines belowthat apply to the security function(s) provided with your Xerox MFD.Guidelines1.Please follow the general guidelines below for secure installation, setup and operation of a Xerox MFD1:a).The security functions that should be set up by the System Administrator are:•Immediate Image Overwrite•On Demand Image Overwrite•Disk Encryption•IP Filtering•Audit Log•Secure Sockets Layer (SSL)•Trusted Certificate Authorities•IPSec•SNMP v3•Local, Remote or Smart Card Authentication (if so equipped)•Local Authorization and Personalization•802.1x Device Authentication•Session Inactivity Timeout•Secure PrintSystem Administrator login to either the Local User Interface (Local UI) or Web User Interface (Web UI), as applicable, is required when accessing the security features or when implementing the guidelines and recommendations specified in this document. To log into either the Local UI or Web UI as an authenticated System Administrator, follow the applicable instructions in the System Administration Guide (SAG) for your Xerox MFD.Also follow the appropriate instructions located in the SAG for your Xerox MFD to set up the security functions or to implement the guidelines noted in this document, except as indicated in the items below. Note that whenever the SAG requires that the System Administrator provide an IPv4 address, IPv6 address or port number the values should be those that pertain to the particular machine being configured.b).Change the Administrator password2 as soon as possible after installation.•Set the Administrator password to a minimum length of eight alphanumeric characters.•Change the Administrator password once a month.•Ensure that all passwords are strong passwords (e.g., passwords use a combination of alphanumeric and non-alphanumeric characters; passwords don’t use common names or phrases, etc.).c).The following passcodes should be changed on a regular basis, chosen to be as random as possible and set to the indicatedminimum lengths:•Smart Card or CAC passcode/password – 8 characters (alphanumeric)•Secure Print passcode/password – 6 numeric digits•Scan To Mailbox passcode/password – 8 characters (alphanumeric)1 In this document the guidelines included only apply when the MFD has the feature(s) to which the guidelines apply. For example, guidelines covering creation of individual user accounts would not apply to an MFD that does not have the ability to set up local user accounts.2In this document the term “passcode” will be used to represent a password that consists entirely of digits and the term “password” will be used to represent a password that consists of alpha-numeric and special characters.d).The System Administrator should establish or ensure that unique user accounts are established for all users, and that localusernames established on the Xerox MFD match domain names and both map to the same individual.The System Administrator should also ensure that the ‘Minimum Length’ passwords for any unique user accounts established for all users should be set to at least 8 (alphanumeric) characters unless applicable internal procedures require a minimum password of a greater length. The ‘Maximum Length’ can be set to any value between 8 and 63 (alphanumeric) characters consistent with the same internal procedures.e).The ability to delete a job at either the Local UI or Web UI should be set so that only the System Administrator can delete ajob.f).For customers concerned about document files on the hard disk drive(s) or Embedded Fax card memory the ImmediateImage Overwrite and On Demand Image Overwrite security features, which come installed on a Xerox MFD, must be properly configured and enabled.Notes:•Immediate Image Overwrite of a delayed or secure print job will not occur until after the machine has printed the job.•If an Immediate Image Overwrite fails, an error message will appear at the top of the screen indicating that there is an Immediate Image Overwrite error and that an On Demand Image Overwrite should be run. This error message will persist until an On Demand Image overwrite is initiated by the System Administrator.•If there is a power failure or system crash while a network scan job is being processed, an Immediate Overwrite of the residual data will occur upon job recovery. However, the network scan job may not appear in the Completed Job Log.•If there is a power failure or system crash of the network controller while processing a print job, residual data might still reside on the hard disk drive(s). The System Administrator should immediately invoke an On Demand Image Overwrite once the machine has been restored.•Once a manual or scheduled On Demand Image Overwrite has been initiated from either the Local UI or Web UI, as applicable, it cannot be aborted.•The System Administrator has the option of scheduling either a Standard or Full On Demand Image Overwrite from the Web UI.•Before invoking an On Demand Image Overwrite verify that:•There are no active jobs, pending print or scan jobs, no active processes that will access the hard drive(s).•No user is logged into a session via network accounting, Xerox Standard Accounting, or the internal auditron, or into a session accessing a directory on the hard disk drive(s).•After a power on of the machine all subsystems must be properly synced and, if printing of Configuration Reports is enabled, the Configuration Report must have finished printing.•For any previously initiated On Demand Image Overwrite request the confirmation sheet must have finished printing.•The Embedded Fax card must have the correct software version and must be properly configured.•When invoked from the Web UI the status of the completed On Demand Image Overwrite will not appear on the Local UI but can be ascertained from the On Demand Overwrite Confirmation Report that is printed after the system reboots.•If an On Demand Image Overwrite fails to complete because of an error or system crash, a system reboot or software reset should first be initiated by the System Administrator from either the Local UI or the Web UI and be allowed to complete; otherwise, the Local UI may become unavailable. If the Local UI does become unavailable the Xerox MFD will have to be powered off and then powered on again to allow the system to properly resynchronize. Once the system reboots or software reset has completed the System Administrator should immediately perform another On Demand Image Overwrite.•If there is a failure in the hard disk drive(s)a message recommending that an On Demand Image Overwrite be run will appear on the Local UI screen. An Immediate Image Overwrite Error Sheet will also be printed or may contain incomplete status information. The System Administrator should immediately perform the requested On Demand Image Overwrite.•If an On Demand Image Overwrite is successfully completed, the completion (finish) time shown on the printed On Demand Overwrite Confirmation Report will be the time that the system shuts down.•The System Administrator should perform an On Demand Image Overwrite immediately before a Xerox MFD is decommissioned, returned, sold or disposed of.g).The Xerox MFD can be restricted to use only SSLv3/TLSv1 by putting the device into “FIPS mode”. See the SAG forinstructions.h).For SSL to work properly the machine must be assigned a valid, fully qualified machine and domain name (FQDN).i).When utilizing (SSL):•Any self-signed digital certificate or digital certificate signed by a Trusted Certificate Authority should have a maximum validity of 180 days.•If a self-signed certificate is to be used the generic Xerox root CA certificate should be downloaded from the Xerox MFD and installed in the certificate store of the user's browser.j).Enable HTTPS. The HTTPS protocol should be used to send scan jobs to any remote IT product.k).When utilizing Secure Sockets Layer (SSL) for secure scanning:•SSL should be enabled and used for secure transmission of scan jobs.•When storing scanned images to a remote repository using an https: connection, a Trusted Certificate Authority certificate should be uploaded to the Xerox MFD so the Xerox MFD can verify the certificate provided by the remote repository.•When an SSL certificate for a remote SSL repository fails its validation checks the associated scan job will be deleted and not transferred to the remote SSL repository. The System Administrator should be aware that in this case the job status reported in the Completed Job Log for this job will read: “Job could not be sent as a connection to the server could not be established”.l).Remote authentication using Kerberos will not work with Windows Server 2003. In the case of LDAP/LDAPS the System Administrator should ensure that SSL is enabled.m).In viewing the Audit Log the System Administrator should note the following:•Deletion of a file from the Reprint Saved Job folders or deletion of the Reprint Saved Job folder itself is recorded in the Audit Log.•Deletion of a print or scan job or deletion of a scan-to-mailbox job from its scan-to-mailbox folder may not be recorded in the Audit Log.•Extraneous process termination events (Event 50) may be recorded in the Audit Log when the Xerox MFD is rebooted or upon a Power Down / Power Up. Extraneous security certificate completion status (Created/Uploaded/Downloaded) events (Event 38) may also be recorded.n).In downloading the Audit Log the System Administrator should ensure that Audit Log records are protected after they have been exported to an external trusted IT product and that the exported records are only accessible by authorized individuals. o).IP Filtering is not available for either the AppleTalk protocol or the Novell protocol with the ‘IPX’ filing transport. Also, IP Filtering will not work if IPv6 is used instead of IPv4.p).Before enabling disk encryption the System Administrator should make sure that the Xerox MFD is not in diagnostics mode and that there are no active or pending scan jobs:q).IPSec should be used to secure printing jobs; HTTPS (SSL) should be used to secure scanning jobs. Note: IPSec is not available for either the AppleTalk protocol or the Novell protocol with the ‘IPX’ filing transport.The default values for IPSec parameters should be used whenever possible for secure IPSec setup. The following default values typically not listed in the product System Administrator Guide should also be used for secure IPSec setup:•For defining policies the options listed for ‘Hosts’, ‘Protocols’ and ‘Action’ are all defaults; the System Administrator should choose the particular option that pertains to whether the hosts and protocols in each case are to be allowed or discarded and the corresponding desired action.•The Host Group address type defaults to ‘Specific’.•Protocol Group Custom Protocol defaults to being disabled. If Custom Protocol is enabled then the protocol defaults to ‘TCP’ and the Xerox MFD IS type defaults to ‘Server’.•The IPSec New Actions keying method defaults to ‘Internet Key Exchange (IKE)’.•If ‘Manual Keying’ is selected “AH” alone should not be selected as the IPSec Security option.r).The software verification test feature initiated from the Web UI that checks the integrity of the executable code by comparing a calculated hash value against a pre-stored value to ensure that the software has not changed.s).The System Administrator should enable the session inactivity timers (termination of an inactive session), for both the Web UI and Local UI.t).Private folders are available for storing confidential information when using the Scan to Mailbox feature. To use private folders, the scan policies for the Scan to Mailbox feature should be set as follows:•Deselect [Allow Scanning to Default Public Folder].•Deselect [Require per Job password to public folders].•Select [Allow additional folders to be created]•Select [Require password when creating additional folders].•Select [Prompt for password when scanning to private folder].•Deselect [Allow access to job log data].u).Print jobs (other than a LANFax job) submitted to a Xerox MFD from a client or from the WebUI should be submitted as a secure print job.v).Software upgrades via the network should normally be disabled except for those periods when software upgrades are being deployed.2.Change the SNMP v1/v2c public/private community strings from their default string names to random string names.3.Sign up for the RSS3 subscription service available via the Xerox Security Web Site (Security@Xerox) at /securityto receive the latest Xerox Product Security Information and timely reporting of security information about Xerox products, including the latest security patches .4. A Xerox MFD should be installed in a standard office environment. Office personnel should be made aware of authorized servicecalls (for example through appropriate signage) to discourage unauthorized physical attacks such as attempts to remove the internal hard disk drive(s). The System Administrator should also ensure that office personnel are made aware to pick up the outputs of print and copy jobs in a timely manner.5.Customers who encounter or suspect software problems should immediately contact the Xerox Customer Support Center toreport the suspected problem.6.Caution: the Xerox MFD allows an authenticated System Administrator to disable functions like Image Overwrite Security thatare necessary for secure operation. System Administrators are advised to periodically review the configuration of all installed machines in their environment to verify that the proper configuration is maintained.7.Depending upon the configuration of a Xerox MFD, two IPv4 addresses - a primary IPv4 address and a secondary IPv4 address -may be utilized.The System Administrator selects whether the primary IPv4 address will be obtained statically or dynamically via DHCP.The second IPv4 address is assigned via APIPA (Automatic Private IP Addressing) when the System Administrator enables the ‘Self Assigned Address’ option.If the ‘Self Assigned Address’ option is enabled (which is the default case), this secondary IPv4 address will not be visible to the SA4. Xerox recommends that the ‘Self Assigned Address’ option be disabled unless either APIPA is used or Apple Rendezvous/Bonjour support is required.8.If a system interruption such as power loss occurs a job that is in process may not be fully written to the hard disk drive(s).Inthat case any temporary data created will be overwritten during job recovery but a corresponding record for the job may not be recorded in the completed job log or audit log.9.If IPv6 is disabled and then a software upgrade is performed by a Xerox Service Technician using an AltBoot, IPv6 will still bedisabled even though both the Local UI and Web UI show that IPv6 is enabled. IPv6 can be enabled again by re-enabling it on the Web UI.10.A unique Embedded Fax or Scan-to-Mailbox mailbox should be established for each authenticated user.11.Remote Polling should only be used by the System Administrator.12.The Embedded Fax cover sheets should be set to not be printed with an Embedded Fax job.ers should be aware that correct remote repository document pathnames for the receipt of workflow scanning jobs shouldstart with one ‘\’ as opposed to the two ‘\’s shown in a number of SAG documents.ers should undergo appropriate training on how to use a Xerox MFD in a secure manner before being assigned user accountsto access the device.3 Really Simple Syndication – A lightweight XML format for distributing news headlines and other content on the Web. Details for signing up for this RSS Service are provided in the Security@Xerox RSS Subscription Service guide posted on the Security@Xerox site at/go/xrx/template/009.jsp?view=Feature&ed_name=RSS_Security_at_Xerox&Xcntry=USA&Xlang=en_US.4 The primary IPv4 address will always be displayed on the Configuration Report.ContactFor additional information or clarification on any of the product information given here, contact Xerox support.DisclaimerThe information provided in this Xerox Product Response is provided "as is" without warranty of any kind. Xerox Corporation disclaims all warranties, either express or implied, including the warranties of merchantability and fitness for a particular purpose. In no event shall Xerox Corporation be liable for any damages whatsoever resulting from user's use or disregard ofthe information provided in this Xerox Product Response including direct, indirect, incidental, consequential, loss of businessprofits or special damages, even if Xerox Corporation has been advised of the possibility of such damages. Some states do not allow the exclusion or limitation of liability for consequential damages so the foregoing limitation may not apply.©2012 Xerox Corporation. All rights reserved. Contents of this publication may not be reproduced in any form without permission of Xerox Corporation. XEROX®, XEROX and Design®, CentreWare®, Phaser®, ColorQube®, Document Centre®, WorkCentre®, and WorkCentre Pro® are trademarks of Xerox Corporation in the United States and/or other countries. Adobe® and PostScript® are registered trademarks or trademarks of Adobe Systems, Incorporated. All other trademarks are the property of their respective manufacturers.The information in this document is subject to change without notice.。
打印机安装使用教程(杂项)

:下面我简单图文展示一下打印机驱动的安装方法还有一些日常的操作方法。
、把驱动拷贝到自己电脑上面。
驱动文件夹名目前的名字为"施乐 "、目前公司电脑系统以为主,部分,这两种系统对于本次安装差别不大,以为例, 鼠标放在屏幕右下角(系统直接点击左下角搜索),就会出现如下图:在搜索框输入打印机,然后双击红色箭头指的地方。
、双击后会进入如下界面:然后双击红色箭头指的地方。
、双击后进入如下界面:然后双击红色箭头指的打印机,也就是型号,地址为的设备。
、双击后进入如下界面:这一步要多加注意,手残党不要选择文本框里的任何一个厂商神马的!直接点红色箭头指的“从磁盘安装”!、点击后进入如下界面:点击红色箭头所指的“浏览”,然后找到安装步骤里你拷贝好的的驱动文件夹"施乐 "。
、双击驱动文件夹,会进入如下界面:、系统现在一般都用位系统,所以直接选中红色箭头所指的"位",然后点击右下方的“打开”按钮。
、点击后进入如下界面:这一步没什么,不用管这一堆英文是什么鬼,直接双击就好。
、双击后进入如下界面:直接双击红色箭头所指的“”文件夹。
、双击后进入如下界面:仍然是直接双击红色箭头所指的文件夹。
、双击后进入如下界面:那么重点来了,选中“”,然后点击“打开”。
、到这步基本没什么了,根据安装提示一步一步走就了。
:一、驱动安装后,打印功能的原始设定是打印彩色,由于一般情况下打印资料没必要打印彩色(当然还因为彩色成本比黑白高倍),所以我们先改下设置,具体方法如下:、找到打印机,和安装第一步一毛一样。
、双击红色箭头后,正常情况下应该是如下界面(当然前提是你的确已经安装成功了。
)然后把鼠标放在上图红色箭头指的设备上点击右键,选择列表里的“打印首选项”,然后左键双击。
、双击后进入如下界面:然后直奔上面的红色箭头所指的“色彩模式”,用鼠标下拉菜单选择“黑白”选项即可。
接下来直接点击下面红色箭头所指的“应用”按钮搞定。
FUJI XEROX DocuCentre 1085 1055数码多功能机 说明书

纸张来源
直接传真
最大数量选择 输出接纸盘容量 电源 功耗
自动双面输稿器
项目 容量 输稿速度 尺寸检测范围 原稿重量 混合尺寸处理能力 机器尺寸 机器重量 产品升级途径
尺寸 重量(不包括纸张和选配件)
打印
项目 类型 CPU 打印速度 内存
*DC配置的选配件
DocuCentre 1055 DocuCentre 1085 内置式 Power PC 300MHz 15cpm(A4 LEF) 18cpm(A4 LEF) 标准:64MB 可扩展至192MB(64+128MB)或320MB(64+256MB),不提供硬盘 最大600 x 600dpi /二进制 分辨率 相当于2,400 x 2,400 dpi 平滑功能 PCL6 PDL标准 Adobe PostScript Level 3 选配 ESC/P(VP-1000), HP-GL(HP7586B), HP-GL2/RTL(HP DesignJet 750C Plus), PCL6 仿真 (HP Color LaserJet 5500), ESC/P, ESC/PK*1, KSSM*2, KS5843*2, KS5895*2 *1:仅用于繁体和简体中文机型 *2:仅用于韩文机型 支持打印机驱动程序的操作 环境 PCL6 Postscript Windows 95/98 系统 不适用 不适用 WIndows ME 不适用 不适用 Windows 2000 √ √ Windows XP √ √ Windows Vista √ √ Windows NT 4.0 不适用 不适用 Windows 2003 Server √ √ Mac OS √ 100Base-TX/10Base-T, Parallel Port(IEEE1284), USB2.0 网络传输 并行:可兼容,Nibble,ECP 网络协议 Ethernet:TCP/IP(SMB, Port9100, IPP), NetBEUI(SMB), NetWare (IPX/SPX)(选配), EtherTalk(选配) PCL字体:81种欧洲faces字体 字体 PostScript字体:136种欧洲faces字体(选配) CentreWare Internet Services (EWS) 内嵌式
- 1、下载文档前请自行甄别文档内容的完整性,平台不提供额外的编辑、内容补充、找答案等附加服务。
- 2、"仅部分预览"的文档,不可在线预览部分如存在完整性等问题,可反馈申请退款(可完整预览的文档不适用该条件!)。
- 3、如文档侵犯您的权益,请联系客服反馈,我们会尽快为您处理(人工客服工作时间:9:00-18:30)。
施乐M115W安装教程
欢迎亲亲们阅读这篇教程哦O(∩_∩)O~~
安装打印机前有几点亲们一定要谨记的麻烦亲们认真阅读呦
1.要先把粉盒安装好再开机安装驱动鼠标移动到↓(粉盒安装教程)
2.安装驱动之前一定一定一定USB线要连接电脑接口不管是安装无线还是USB
3.一定不能使用360等其他辅助wifi网络不然就算有wifi的情况下也实用不了哦
4.一定要用同个局域网的wifi 不然安装完成了也打印不了哈
首先把两根线分别连接好之后点开我们的中文驱动按照以下步骤就能成功安装驱动呦思密达~
选择无线网络连接有一张图漏发了/(ㄒoㄒ)/~~
好了到了这一步之后亲们就已经安装完驱动了哈恭喜恭喜~
那么亲们有用到扫描的话就请看以下图片操作时有任何疑问可以联系旺旺客服随时在线呦除了夜深人静的时候肯定是在睡觉⁄(⁄⁄•⁄ω⁄•⁄⁄)⁄~~~
我们在安装好驱动之后一定会有这个图标桌面随意找出点击进入!
以上就是扫描的操作流程啦亲们学会了嘛(~o ~)~zZ
还有一些童鞋们喜欢用手机打印那么现在再教大家怎么用手机操作呦这篇教程好长~ 亲们会不会给我奖励
手机无线的话需要下载施乐APP(fuji xerox print)
就用苹果手机示范下吧手机操作都是大同小异的哈~
需要注意的要点
1.手机连接的wifi一定要跟打印机是同一个
2.打印文件需要在电脑上登录QQ 一样需要同个局域网呦
用我们的手机在软件搜索里搜索fuji xerox print 下载以下这个软件图片都是从左到右看的
萌哒哒的效果图打印文件示例图↓
总算完成了么么哒全部看完的亲们值得表扬撒花❀~ 有问题的可以联系旺旺上的客服呦~
再见~ 思密达~。