TP-Link TL-MR3020 3G 4G Wireless N Router
路由器MSR3020的简介与配置

实验报告
课程名称:计算机网络
实验项目:路由器MSR3020的简介与配置专业班级:
姓名:学号:
实验室号:实验组号:
实验时间:批阅时间:
指导教师:成绩:
沈阳工业大学实验报告
(适用计算机程序设计类)专业班级:学号:姓名:
实验名称:路由器MSR3020的简介与配置
附件A 沈阳工业大学实验报告
(适用计算机程序设计类)
专业班级:计算机科学与技术1301班学号:130405119 姓名唐浩淋
一、路由器配置前
1.主机A ping 主机B截图
2.主机A ping 主机B和主机C截图
3.路由表截图
二、路由器配置
三、路由器配置后
1.路由表截图
2. 主机A ping 主机B、主机C、主机D截图
10。
TP-LINK IPTV解决方案

无线共享上网一体机 TD-W89741N 增强型 (经济型)
增强型防雷设计,4000V 雷击测试 支持同时共享上网与 IPTV 连接 11N 技术,150M 无线传输速率 IP 带宽控制,自由分配上网带宽 支持 PVC 自动检测
增强型防雷设计,4000V 雷击测试 支持同时共享上网与 IPTV 连接
无辐射,低功耗,绿色节能
电力线 AP
无线网卡 有线共享上网一体机 无线共享上网一体机
(增强型)
TL-PWA2701
TL-WN723N TL-WN727N TD-89402 增强型
TD-W89841N 增强型
200Mbps 传输速率,150Mbps 无线传输速率 128-bit AES 加密,数据传输安全可靠 同一电表范围内,传输距离可达 300m 支持 QoS 应用优先,保障 IPTV 的畅通
类型型号特点电力线适配器增强型tlpa501500mbps传输速率信号稳定不掉线128bitaes加密数据传输安全可靠同一电表范围内传输距离可达300m支持qos应用优先保障iptv的畅通支持多路iptv电力线适配器经济型tlpa200200mbps传输速率信号稳定128bitaes加密数据传输安全可靠同一电表范围内传输距离可达300m无辐射低功耗绿色节能电力线aptlpwa2701200mbps传输速率150mbps无线传输速率128bitaes加密数据传输安全可靠同一电表范围内传输距离可达300m支持qos应用优先保障iptv的畅通无线网卡tlwn723ntlwn727n11n无线技术150mbps无线传输速率qss快速安全设置无线网络更安全精致小巧方便用于机顶盒有线共享上网一体机td89402增强型ip带宽控制自由分配上网带宽支持pvc自动检测增强型防雷设计4000v雷击测试支持同时共享上网与iptv连接无线共享上网一体机增强型tdw89841n增强型11n技术300m无线传输速率ip带宽控制自由分配上网带宽支持pvc自动检测增强型防雷设计4000v雷击测试支持同时共享上网与iptv连接无线共享上网一体机经济型tdw89741n增强型11n技术150m无线传输速率ip带宽控制自由分配上网带宽支持pvc自动检测增强型防雷设计4000v雷击测试支持同时共享上网与iptv连接2
支持OPenwrt固件列表
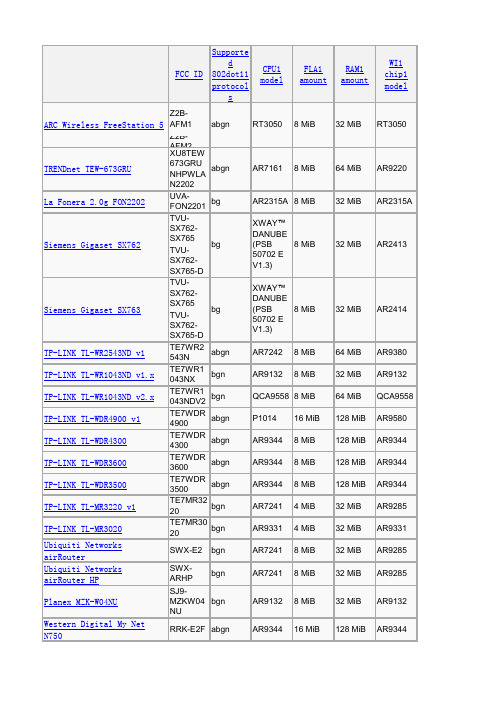
RT3050
8 MiB
32 MiB
RT3050
TRENDn61
8 MiB
64 MiB
AR9220
La Fonera 2.0g FON2202
bg
AR2315A 8 MiB XWAY™ DANUBE (PSB 8 MiB 50702 E V1.3) XWAY™ DANUBE (PSB 8 MiB 50702 E V1.3) AR7242 AR9132 8 MiB 8 MiB
FCC ID
Supporte d 802dot11 protocol s
abgn
CPU1 model
FLA1 amount
RAM1 amount
WI1 chip1 model
Z2BARC Wireless FreeStation 5 AFM1 Z2BAFM2 XU8TEW 673GRU NHPWLA N2202 UVAFON2201 TVUSX762SX765 TVUSX762SX765-D TVUSX762SX765 TVUSX762SX765-D TE7WR2 543N TE7WR1 043NX TE7WR1 043NDV2 TE7WDR 4900 TE7WDR 4300 TE7WDR 3600 TE7WDR 3500 TE7MR32 20 TE7MR30 20 SWX-E2
bgn abgn bgn
RT3050 AR9344
8 MiB 8 MiB
32 MiB 128 MiB 32 MiB 64 MiB 64 MiB 128 MiB
RT3050 AR9344 AR9331
AR9331 4 MiB FWIXP42 32 MiB 2AB AR7161 AR7161 16 MiB 16 MiB
路由器无线N300 WNR2000v4 安装指南说明书
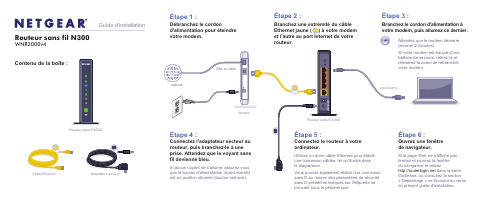
votre modem, puis allumez ce dernier.Contenu de la boîte :Routeur sans fil N300WNR2000v4Guide d'installationCâble EthernetRouteur sans fil N300(non fourni)est en position allumée (bouton enfoncé).sans fil au moyen des paramètres de sécurité sans fil prédéfinis indiqués sur l'étiquette se trouvant sous le périphérique.d'adresse, ou consultez la section « Dépannage » se trouvant au verso du présent guide d'installation.Attendez que le modem démarre (environ 2 minutes).Si votre modem est équipé d'une batterie de secours, retirez-la et réinsérez-la avant de rebrancher votre modem.NETGEAR, le logo NETGEAR et Connect with Innovation sont des marques de commerce ou des marques déposées de NETGEAR, Inc. ou de ses sociétés affiliées aux États-Unis et dans d'autres pays. Ces informations sont susceptibles d'être modifiées sans préavis. Les autres marques ou noms de produits sont des marques déposées de leurs détenteurs respectifs. © NETGEAR, Inc. Tous droits réservés.Uniquement pour utilisation intérieure dans les pays membres de l'UE, les pays membres de l'AELE et en Suisse.Novembre 2012Pour la déclaration de conformité complète pour l'UE, consultez le /app/answers/detail/a_id/11621/Repérez les paramètres sans fil prédéfinis sur votre routeur et Connexion des périphériques sans fil à votre routeurChoisissez la méthode manuelle ou WPS (Wi-Fi Protected Setup) pour ajouter des ordinateurs ou autres périphériques à votre réseau sans fil.Méthode manuellencez l'utilitaire qui gère vos connexions sans fil sur le périphérique sans fil(iPhone, ordinateur portatif ou de bureau, console de jeux) que vous voulez connecter à votre routeur. Cet utilitaire recherche tous les réseaux sans fil de votre secteur.2.Recherchez le nom du réseau sans fil NETGEAR prédéfini (SSID) etsélectionnez-le. Ce nom est indiqué sur l'étiquette du produit, située sous le routeur.Remarque : Si vous avez modifié le nom de votre réseau pendant le processus de configuration, recherchez-le.3.Entrez le mot de passe prédéfini (ou votre mot de passe personnalisé si vousl'avez modifié), puis cliquez sur Connect (Connexion).4.Répétez les étapes 1 à 3 pour ajouter d'autres périphériques sans fil.Méthode WPSSi votre périphérique sans fil prend en charge la fonctionnalité WPS (Wi-Fi Protected Setup), que NETGEAR appelle la méthode « Appuyez : vous êtesconnecté », il vous sera peut-être demandé d'appuyer sur le bouton WPS situé sur le routeur au lieu d'entrer un mot de passe. Le cas échéant :1.Appuyez sur le bouton WPSdu routeur.2.Dans un délai de deux minutes, appuyez sur le bouton WPS sur lepériphérique client ou suivez les instructions de l'utilitaire WPS incluses avec votre appareil sans fil. Le périphérique sera alors connecté à votre routeur. 3.Répétez cette procédure pour ajouter d'autres périphériques sans fil WPS.Remarque : La fonction WPS ne prend pas en charge la sécurité WEP. Si vous essayez de connecter un client WEP à votre réseau au moyen de la fonction WPS, la connexion échouera.DépannageLe navigateur ne peut afficher la page Web.• Assurez-vous que votre ordinateur est connecté en réseau local à l'un desquatre ports Ethernet ou qu'il est connecté via connexion sans fil au routeur.• Assurez-vous que le routeur est correctement alimenté en électricité et que levoyant de réseau sans fil est devienne bleu.• Fermez et rouvrez la fenêtre pour vous assurer que le navigateur n'a pas misen cache la page précédente.• Allez à l'adresse .• Si l'ordinateur est configuré de manière à utiliser une adresse IP statique ou fixe(ce qui est rare), modifiez le paramètre pour obtenir automatiquement une adresse IP du routeur.Après l'installation de votre appareil, notez le numéro de série inscrit sur l'étiquette située sous votre produit. Il vous sera nécessaire pour enregistrer votre produit à l'adresse https:// . Vous devez enregistrer votre produit avant de pouvoir bénéficier des services de soutien par téléphone NETGEAR. NETGEAR vous recommande d'enregistrer votre produit via le site Web NETGEAR. Pour obtenir des mises à jour de produits et consulter le support Web, visitez le site .Si vous désirez obtenir le logiciel gratuit de filtrage centralisé de sites Web Live Parental Controls pour votre routeur, vous pouvez le télécharger à l'adresse /lpc .Pour toute autre fonctionnalité, y compris le compteur de trafic et l'accès réservé aux invités, ouvrez une session sur votre routeur à l'adresse .Vous pouvez obtenir le manuel de l'utilisateur en ligne au ou via un lien dans l'interface utilisateur du produit.NETGEAR vous recommande d'utiliser uniquement les ressources d'assistance officielles NETGEAR.Téléchargez gratuitement NETGEAR Genie Corrigez automatiquement les problèmes de réseau les plus courants et gérez facilement vos connexions de réseautage à domicile./genie。
tp-link tl-xap3020gc-poe_dc 易展版 v1.0 用户手册说明书

双频W i F i6无线易展A P用户手册REV1.0.01910041073声明Copyright © 2022 普联技术有限公司版权所有,保留所有权利未经普联技术有限公司明确书面许可,任何单位或个人不得擅自仿制、复制、誊抄或转译本手册部分或全部内容,且不得以营利为目的进行任何方式(电子、影印、录制等)的传播。
为普联技术有限公司注册商标。
本手册提及的所有商标,由各自所有人拥有。
本手册所提到的产品规格和资讯仅供参考,如有内容更新,恕不另行通知。
除非有特殊约定,本手册仅作为使用指导,所作陈述均不构成任何形式的担保。
前言本手册旨在帮助您正确使用AP产品。
内容包含对AP产品性能特征的描述以及配置AP产品的详细说明。
请在操作前仔细阅读本手册。
目标读者本手册的目标读者为熟悉网络基础知识、了解网络术语的技术人员。
本书约定其他约定在本手册中,所提到的“AP”、“本产品”等名词,如无特别说明,系指双频WiFi 6无线易展AP产品。
全文如无特殊说明,Web界面以TL-XAP3007GC-PoE/DC易展版机型为例。
本文介绍双频WiFi 6无线易展AP产品通用性配置,具体配置项目请以实际机型为准。
目录1 登录 ................................................................................................................................................1-1 1.1 登录Web管理界面 ......................................................................................................................1-11.1.1 需求介绍 ...........................................................................................................................1-11.1.2 设置方法 ...........................................................................................................................1-1 1.2 FAT模式下连云设置方法 .............................................................................................................1-41.2.1 商云APP扫码添加设备上云 ............................................................................................1-51.2.2 商云APP通过设备的ID/MAC添加设备上云 ..................................................................1-71.2.3 商云APP无线添加设备上云 ..........................................................................................1-101.2.4 商用网络云平台通过设备的ID添加设备上云 ...............................................................1-12 1.3 基础连网设置 .............................................................................................................................1-141.3.1 DHCP动态获取IP上网 .................................................................................................1-141.3.2 配置静态IP上网 ............................................................................................................1-162 工作模式 .........................................................................................................................................2-1 2.1 FAT AP模式 .................................................................................................................................2-12.1.1 设备信息 ...........................................................................................................................2-22.1.2 无线参数 ...........................................................................................................................2-22.1.3 扫码上云 ...........................................................................................................................2-32.1.4 易展设备列表 ...................................................................................................................2-42.1.5 无线服务 ...........................................................................................................................2-42.1.6 无线客户端 .......................................................................................................................2-5 2.2 FIT AP模式 ...................................................................................................................................2-5 2.3 易展组网 .......................................................................................................................................2-52.3.1 易展AP .............................................................................................................................2-52.3.2 AP模式 .............................................................................................................................2-62.3.3 Router模式 ......................................................................................................................2-83 无线 ................................................................................................................................................3-13.2.1 扫描选择 ...........................................................................................................................3-63.2.2 手动设置 ...........................................................................................................................3-7 3.3 高级设置 .......................................................................................................................................3-8 3.4 FAT模式下弱信号限制和弱信号剔除配置指南 ...........................................................................3-93.4.1 应用介绍 ...........................................................................................................................3-93.4.2 需求介绍 ...........................................................................................................................3-93.4.3 设置方法 .........................................................................................................................3-10 3.5 FAT模式下多个SSID配置指南 .................................................................................................3-103.5.1 应用介绍 .........................................................................................................................3-103.5.2 需求介绍 .........................................................................................................................3-103.5.3 设置方法 .........................................................................................................................3-114 安全 ................................................................................................................................................4-1 4.1 无线MAC地址过滤 ......................................................................................................................4-1 4.2 VLAN设置 ....................................................................................................................................4-2 4.3 FAT模式下MAC地址过滤配置指南 ............................................................................................4-34.3.1 应用介绍 ...........................................................................................................................4-34.3.2 需求介绍 ...........................................................................................................................4-34.3.3 设置方法 ...........................................................................................................................4-35 系统 ................................................................................................................................................5-1 5.1 工作模式 .......................................................................................................................................5-2 5.2 云管理 ..........................................................................................................................................5-25.2.1 TP-LINK本地NMS管理平台 ...........................................................................................5-25.2.2 TP-LINK商用网络云平台 .................................................................................................5-3 5.3 设备管理 .......................................................................................................................................5-45.3.1 IPv4 ..................................................................................................................................5-45.3.2 IPv6 ..................................................................................................................................5-5 5.4 管理账号 .......................................................................................................................................5-65.7 配置管理 .......................................................................................................................................5-8 5.8 在线软件升级 ...............................................................................................................................5-8 5.9 软件升级 .......................................................................................................................................5-9 5.10 Ping看门狗 ..................................................................................................................................5-9 5.11 FAT模式下Ping看门狗配置指南 ..............................................................................................5-10 5.11.1 应用介绍 .........................................................................................................................5-10 5.11.2 需求介绍 .........................................................................................................................5-10 5.11.3 设置方法 .........................................................................................................................5-10 5.11.4 配置注意事项 .................................................................................................................5-121 登录双频WiFi 6无线易展AP用户手册双频WiFi 6无线易展AP支持两种工作模式:FAT AP模式和FIT AP模式。
路由器CPU型号

TP-LINK TL-WR842N v4
水星 MW300R v10
水星 MW305R v3
水星 MW305R v5
水星 MW316R v1
迅捷 FR300R v9
[breed-qca9558-ar8236.bin]
TP-LINK TL-WR941N v7
联想 Y1S (newifi)
[breed-mt7620-reset12.bin]
小度路由 (Ai-BR100)
极路由 极壹S HC5661
[breed-mt7620-reset13.bin]
海尔智能家居路由 HW-L1W
大麦 DW22D
大麦 DM203
[breed-mt7620-reset26.bin]
适用机型
[breed-mt7620-reset1.bin]
水星 MW300R v6
如意云 RY-1
磊科 NO1
优酷路由宝
[breed-mt7620-reset2.bin]
斐讯 FIR300M/302M
[breed-mt7620-reset11.bin]
联想 Y1 (newifi mini)
[breed-ar724x.bin]
TP-LINK TL-WR740N v1/v2/v3
TP-LINK TL-WR740N v4 (中国版)
TP-LINK TL-WR741N v1/v2/v3
TP-LINK TL-WR841N v5
TP-LINK TL-WR940N v1
TP-LINK TL-WR941N v4
TP-Link AC1350 3G 4G 双频无线路由器 TL-MR3620 用户手册说明书

AC13503G/4G Wireless Dual Band RouterEnjoy 3G/4G Sharing withPower ful AC1350 Wi-Fi SpeedMU-MIMO T echnology for 2× Faster Performance450Mbps + 867Mbps Dual Band Wi-Fi3G/4G SharingEnsured Internet AccessWith both 3G/4G and WAN connectivity, the TL-MR3620 always keeps you online. Take advantage of flexibility when choosing and setting up your network, and share a 3G/4G mobile broadband connection through wired orwireless connections.Beamforming technology detects the location of your connected devices and concentrates the TL-MR3620's Wi-Fi towards them to create stronger overall connections.Beamforming for Better Coverage MU-MIMO technology allows the TL-MR3620 to serve 2 devices at once,reducing wait time and increasing Wi-Fi throughput.MU-MIMO Router Simultaneously sends data to multiple devicesTraditional RouterSends data to one device at a time Regular RouterTL-MR3620· Ultimate Wireless Speed – Combined wireless speeds up to 450 (over 2.4GHz) and 867 (over 5GHz) Mbps· MU-MIMO Technology – Simultaneously exchanges data with several devices, achieving speeds which are 2x faster than standard AC routers· Support 802.11 ac – Provides a data transfer rate 3 times faster than 802.11n for each stream· Ultimate Range Wi-Fi – 3 dual band high-performance antennas with a high-powered amplifier ensure the widespread Wi-Ficoverage and a stable connection· Wi-Fi with Beamforming – Beamforming technology locates the connected devices and further improves the TL-MR3620’srange and the signal strength to each mobile device, delivering a more reliable and efficient wireless connection SpeedWi-Fi RangeReliability· Simultaneous Dual Band – Separate Wi-Fi bands enable moredevices to connect to your network without a drop in performance · Easy Bandwidth Management – IP-based Bandwidth Control makes it easier for you to manage the bandwidth of connected devices· Intuitive Web UI – Ensures quick and simple Installation without hassle· Fast Encryption – One-touch WPA wireless security encryption with the WPS button· Wi-Fi On/Off – Turn on/off wireless radio as needed using the Wi-Fi On/Off button· Power On/Off – Conveniently power on or off your router as required· Hassle-free Management with Tether App – Network management is made easy with the TP-Link Tether App, available on any Android and iOS device· Guest Network – Keep your main network secure by creating a separate network for friends and visitors· Access Control – Establish a whitelist or blacklist to allow or restrict certain devices to access the internet· Parental Controls – Restrict internet access time and contents for children devices· VPN Server – IPSec VPN makes it easy to set up a secure connection between your private network and the internet · Encryptions for Secure Network – WPA-PSK and WPA2-PSK encryptions provide active protection against security threatsEase of UseSecurity· USB Port for Fast Sharing – With the USB port, you can access and share a printer as well as your files and media locally.Through the router's FTP server, you can also access your files and media from network devices remotely· Built-in Print Server – Allows wireless printing from multiple computers (works in conjunction with a USB printer)· Built-in Media Server – Allows you to play music, watch videos and view photos from any device on your networkEasy SharingHardware· Ethernet Ports: 4 10/100Mbps LAN Ports, 1 10/100Mbps WAN Port · USB Ports: 1 USB 2.0 Port· Buttons: Wi-Fi Button, Power On/Off Button, Reset Button, WPS Button · Antennas: 3 Fixed Omni Directional Antennas · External Power Supply: 12VDC/1A· Dimensions (W x D x H): 8.9 × 5.8 × 1.3 in (225 × 148 × 33 mm)Wireless· Wireless Standards: IEEE 802.11ac/n/a 5GHz, IEEE 802.11b/g/n 2.4GHz · Frequency: 2.4GHz and 5GHz· Signal Rate: 867Mbps at 5GHz, 450Mbps at 2.4GHz · Transmit Power:CE: <20dBm (2.4GHz), <23dBm (5GHz)FCC: <30dBm (2.4GHz & 5GHz)· Reception Sensitivity: 5GHz:11a 6Mbps: -94dBm, 11a 54Mbps: -76dBm 11ac HT20: -68dBm, 11ac HT40: -64dBm, 11ac HT80: -60dBm2.4GHz:11g 54M: -77dBm, 11n HT20: -73dBm, 11ac HT40: -71dBm· Wireless Function: Enable/Disable Wireless Radio, WDS Bridge, WMM, Wireless Statistics· Wireless Security: Enable/Disable SSID Broadcast, 64/128-bit WEP, WPA/WPA2, WPA-PSK/WPA-PSK2 encryptions, WPSInternet AccessReset WPSUSB port Power On/Off· Certification:CE, RoHS· System Requirements:Microsoft Windows 98SE/NT/2000/XP/Vista™/7/8/8.1/10, MAC OS, NetWare, UNIX or LinuxInternet Explorer 11, Firefox 12.0, Chrome 20.0, Safari 4.0, or other Java-enabled browser Cable or DSL ModemSubscription with an internet service provider (for internet access)· Environment:Operating Temperature: 0℃~40℃ (32℉ ~104℉)Storage Temperature: -40℃~70℃ (-40℉ ~158℉)Operating Humidity: 10%~90% non-condensingStorage Humidity: 5%~90% non-condensing· Package Contents AC1350 3G/4G Wireless Dual Band Router TL-MR3620Power AdapterRJ45 Ethernet CableQuick Installation GuideOthersSoftware· Operation Mode: 3G/4G Router Mode, 3G/4G Router Mode with Ewan Backup, Wireless Router Mode, Wireless Router Mode with 3G/4G Backup · Quality of Service: WMM, Bandwidth Control· WAN Type: Dynamic IP, Static IP, PPPoE, PPTP(Dual Access), L2TP(Dual Access)· Management: Access Control, Local Management, Remote Management · DHCP: Server, DHCP Client List, Address Reservation · Port Forwarding: Virtual Server, Port Triggering, UPnP, DMZ · Dynamic DNS: DynDns, NO-IP · VPN Server: IPSec VPN· Access Control: Parental Control, Local Management Control, Blacklist, Whitelist · Firewall Security: DoS, SPI Firewall, IP and MAC Address Binding · Protocols: IPv4, IPv6 Tunel· USB Sharing: Supports Samba(Storage), FTP Server, Media Server, Printer Server · Guest Network: 2.4GHz guest network x 1, 5GHz guest network x 1For technical support, please visit: /supportAttention: This device may only be used indoors in all EU member states and EFTA countries.Specifications are subject to change without notice. TP-Link is a registered trademark of TP-Link Technologies Co., Ltd. Other brands and product names are trademarks or registered trademarks of their respective holders. Copyright ©2017 TP-Link Technologies Co., Ltd. All rights reserved.TP-Link Technologies Co., Ltd.Building 24 (floors 1, 3, 4, 5) and 28 (floors 1-4) Central Science and Technology Park, Shennan Rd, Nanshan, Shenzhen, China For more information, please visit /en/products/details/TL-MR3620.htmlor scan the QR code left。
TL-WR340G+无线路由器设置指南
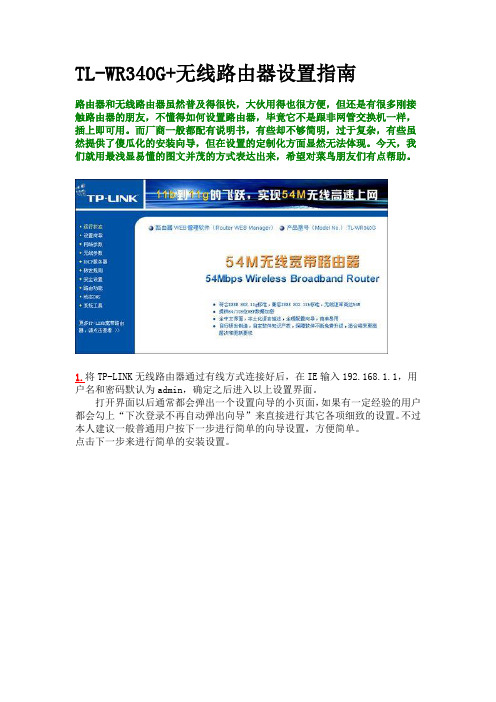
TL-WR340G+无线路由器设置指南路由器和无线路由器虽然普及得很快,大伙用得也很方便,但还是有很多刚接触路由器的朋友,不懂得如何设置路由器,毕竟它不是跟非网管交换机一样,插上即可用。
而厂商一般都配有说明书,有些却不够简明,过于复杂,有些虽然提供了傻瓜化的安装向导,但在设置的定制化方面显然无法体现。
今天,我们就用最浅显易懂的图文并茂的方式表达出来,希望对菜鸟朋友们有点帮助。
1.将TP-LINK无线路由器通过有线方式连接好后,在IE输入192.168.1.1,用户名和密码默认为admin,确定之后进入以上设置界面。
打开界面以后通常都会弹出一个设置向导的小页面,如果有一定经验的用户都会勾上“下次登录不再自动弹出向导”来直接进行其它各项细致的设置。
不过本人建议一般普通用户按下一步进行简单的向导设置,方便简单。
点击下一步来进行简单的安装设置。
2.通常ASDL拨号上网用户选择第一项PPPoE来进行下一步设置。
但是如果你是局域网内或者通过其它特殊网络连接(如视讯宽带、通过其它电脑上网之类)可以选择以下两项“以太网宽带”来进行下一步设置。
这里先说明一下ADSL拨号上网设置,以下两项在后面都将会进行说明。
到ADSL拨号上网的帐号和口令输入界面,按照字面的提示输入用户在网络服务提供商所提供的上网帐号和密码然后直接按下一步。
3.接下来可以看到有无线状态、SSID、频段、模式这四项参数。
检测不到无线信号的用户留意一下自己的路由器无线状态是否开启。
SSID这一项用户可以根据自己的爱好来修改添加,这一项只是在无线连接的时候搜索连接设备后可以容易分别需要连接设备的识别名称而已。
另外在频段这一项我们拉下来可以看到有13个数字选择,这里的设置只是你路由的无线信号频段,如果你附近有多台无线路由的话你可以在这里设置使用其它频段来避免一些无线连接上的冲突。
接着模式这一选项拉下来我们可以看到TP-LINK无线路由的几个基本无线连接工作模式,11Mbps(802.11b)最大工作速率为11Mbps;54Mbps(802.11g)最大工作速率为54Mbps,也向下兼容11Mbps。
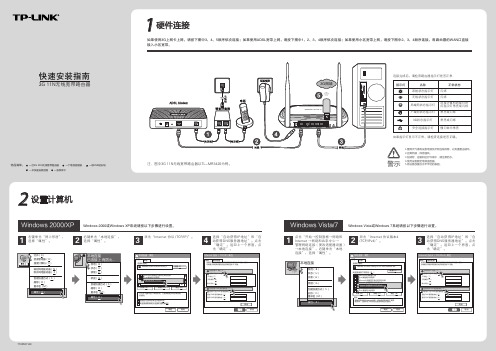
TP-LINK 3G 11N无线宽带路由器 快速说明书
确定
取消
3 选择“自动获得IP地址”和“自 动获得DNS服务器地址”。点击 “确定”。返回上一个界面,点 击“确定”。
Internet 协议4 (TCP/IPv4) 属性
常规 备用配置 如果网络支持此功能,则可以获取自动获得的 IP 设置。否则, 您需要从网络系统管理员处获得适当的 IP 设置。
选择“无线网络连接”, 右键单击,选择“查看可
用的无线连接”。
打开(0) 资源管理器(X) 搜索计算机(C)
映射网络驱动器(N) 断开网络驱动器(I)
创建快捷方式(S) 删除(D) 重命名(M)
属性(R)
无线网络连接 未连接
停用(B) 查看可用的无线连接(W) 状态(U) 修复(P) 桥接(G) 创建快捷方式(S) 删除(D) 重命名(M)
自动获得 IP 地址(0 ) 使用以下的 IP 地址(S ) IP 地址(T ) 子网掩码(U ) 默认网关(D )
自动获得 DNS 服务器地址(P ) 使用以下的 DNS 服务器地址(E ) 首选 DNS 服务器地址(F ) 备用 DNS 服务器地址(A )
高级
确定
取消
7103501149
3 设置路由器
2 右键单击“本地连接”, 选择“属性”。
打开(0) 资源管理器(X) 搜索计算机(C)
映射网络驱动器(N) 断开网络驱动器(I)
创建快捷方式(S) 删除(D) 重命名(M)
属性(R)
本地连接 已连接上 有防火...
停用(B) 状态(U) 修复(P)
桥接(G)
创建快捷方式(S) 删除(D) 重命名(M)
QSS快速安装设置
无线配置已完成 您的计算机已成功接入 TP-LINK 网络。
路由器

路由器品牌:其它品牌:M ercury(水星)路由器N uQX(欣向)路由器V igor 路由器锐捷网络路由器K ingnet(金浪)路由器M AIPU(迈普)路由器博达(BDCOM)路由器H illstone(山石网科路由器N ateasy(欣联)路由器A DNS 路由器中怡数宽路由器H ardlink(理想固网)路由器A lcatel-Lucent 路由器I NMI(英迈)路由器A llied Telesyn(安奈路由器安网路由器T P-LINK TL-R402+参数(家用或网吧系列)基本特征路由器类型SOHO宽带路由器端口结构非模块化网络标准IEEE 802.3、IEEE 802.3u、IEEE 802.3x网络协议TCP/IP、DHCP、ICMP、NAT、PPPoE、SNTP传输速率10/100Mbps固定的广域网接1个口固定的局域网接4个口接口介质10Base-T:3类或3类以上UTP、100Base-TX:5类UTP包转发率10Mbps:14,800pps、100Mbps:148,800ppsLED指示端口:端口(1-4)、WAN,其它:M1、M2(系统状态指示灯)内置防火墙是Qos支持不支持支持VPN支持网络管理支持远程和Web管理、全中文配置界面、配备简易安装向导(Wizard)电源电压外置电源适配器输出:9V 50Hz 0.8A认证纠错CE、FCC Class A产品尺寸160*102*30mm适用环境工作温度:0℃-40℃、存储温度:-40℃-70℃、工作湿度:10%-90% RH不凝结、存储湿度:5%-90% RH不凝结TP-LINK TL-R1660+参数TP-LINK SOHO (非模块化)价格范围70-340元带管理功能思科(非模块化:1050--3850元,模块化:10000--30000左右)思科Cisco 3800 系列路由器(中档)思科Cisco 3800 系列路由器,是思科Cisco公司的中档价格的路由器,可以用于中型企业的上网接入路由器或大型企业的远程接入服务。
TP-Link 300Mbps 无线N 4G LTE 路由器 TL-MR6400 用户手册说明书

300Mbps Wireless N 4G LTE RouterShare 4G LTE Internet with Reliable Wi-Fi4G(TDD&FDD)/3G/2G Compatible 300MbpsWireless SpeedLTE Antennas forBetter PerformanceAdvanced LTE antennas make efficient and stable connections to everydevice. Power Amplifier and Low Noise Amplifier boost sending and receivingcapabilities, creating a wide-coverage Wi-Fi network for your home.Design for Maximum Network CoverageIdeal Use PlacesRemoteAreasOutdoorsActivitiesBusinessMeetings300Mbps 2.4GHz4G LTE150Mbps50Mbps 2.4GHz 300MbpsTL-MR6400Simply insert your 3G/4G SIM card into the built-in slot, turn on the TL-MR6400 and start surfing!With a fully functional WAN/LAN port, enjoy a variety of backup connection types, including cable, fiber, and DSL modems.Plug and Play with a SIM CardAvailable WAN Connection BackupSIM CardModem· 4G LTE – Supports 4G LTE network, compatible with 3G/2G network· Faster Connections – Up to 150Mbps download speed and 50Mbps upload for uninterrupted HD movies, rapid file downloads and video chats that won't freeze up · 300Mbps Wireless Speed – 300Mbps Wi-Fi allows stable speed for wireless activities, such as streaming, surfing, browsing and posting social media4G LTE SpeedWi-Fi Range· Better Coverage – Integrated antennas provide stable wireless connections and better coverage· No Configuration – Simply insert your SIM card into the built-inslot and turn on the router · Available LAN/WAN port – Allows you to connect to any standard cable, fiber, or DSL modems· Fast Encryption – Easily set up an encrypted wireless connection at a push of the WPS button· Wi-Fi On/Off – Turn On/Off wireless radio using the Wi-Fi buttonEase of Use· Guest Network – Keep your main network secure by creating a separate network for friends and visitors· Parental Control – Manage when and how connected devices can access the internet· Bandwidth Control – Makes it easier for you to manage the bandwidth of connected devices· Encryptions for Secure Network – WPA-PSK/WPA2-PSKencryptions provide active protection against security threatsSecurityReliability · IP QoS – Advanced QoS automatically prioritizes streaming and gaming applicationsHardware· Ports: 3 10/100Mbps LAN ports, 1 10/100Mbps LAN/WAN Port , 1 SIM Card Slot· Button: WPS/RESET Button, WiFi ON/OFF Button, POWER ON/OFF Button · Antenna: 2 × Internal Wi-Fi Antennas, 2 × Detachable External 4G LTE Antennas· External Power Supply: 12V/1A· Dimensions (W x D x H): 7.95 × 5.55 × 1.32 in. (202 × 141 × 33.6 mm)Wireless· Network Type:4G: FDD-LTE Cat4 (800/900/1800/2100/2600MHz), TDD-LTE (1900/2300/2500/2600MHz)3G: DC-HSPA+/HSPA+/HSPA/UMTS (900/2100MHz) 2G: EDGE/GPRS/GSM (850/900/1800/1900MHz)· Wireless Standards: IEEE 802.11b, 802.11g, 802.11n · Frequency: 2.4GHz· Signal Rate: 300Mbps at 2.4GHz· Transmit Power: CE: <20dBm (2.4GHz)· Reception Sensitivity: 11g 54M: -74dBm 11n HT20: -71dBm 11n HT40: -67dBm· Wireless Function: Enable/Disable Wireless Radio, WDS Bridge, WMM, Wireless Statistics· Wireless Security: Supports 64/128-bit WEP, WPA/WPA2, WPA-PSK/WPA2-PSK encryptions, Wireless MAC FilteringPOWERWiFi ON/OFFWPS/RESET LAN/WAN PortLANPorts SIM CardSlotPOWER· Certification: CE, RoHS · System Requirements:Microsoft Windows 98SE, NT, 2000, XP, Vista™ or Windows 7, 8, 8.1, MAC OS, NetWare, UNIX or LinuxInternet Explorer 11, Firefox 12.0, Chrome 20.0, Safari 4.0 browers or higher, or other Java-enabled browsers SIM Card · EnvironmentOperating Temperature: 0℃~40℃ (32℉ ~104℉) Storage Temperature: -40℃~70℃ (-40℉ ~158℉)Operating Humidity: 10%~90% non-condensing Storage Humidity: 5%~90% non-condensing · Package Contents300Mbps Wireless N 4G LTE Router TL-MR6400 Power Adapter RJ45 Ethernet Cable Quick Installation GuideMicro-to-Standard SIM Card AdapterNano-to-Standard SIM Card AdapterOthersSoftware· Operation Modes: 3G/4G Router, Wireless Router· WAN Type: Dynamic IP/Static IP/PPPoE/PPTP(Dual Access)/L2TP(Dual Access)· DHCP: Server, Client, DHCP Client List, Address Reservation · Quality of Service: Traffic Control (IP QoS)· Port Forwarding: Virtual Server, Port Triggering, UPnP, DMZ · Dynamic DNS: DynDns, NO-IP · VPN Passthrough: PPTP, L2TP, IPSec· Access Control: Parental Control, Local Management Control, Host List, Access Schedule, Rule Management· Firewall Security: DoS, SPI Firewall, IP Address Filter/Domain Filter, IP and MAC Address Binding · Protocols: IPv4, IPv6· Management: Access Control, Local Management, Remote Management · Guest Network: 2.4GHz guest networkSpecifications are subject to change without notice. TP-Link is a registered trademark of TP-Link Technologies Co., Ltd. Other brands and product names are trademarks or registered trademarks of their respective holders. Copyright ©2017 TP-Link Technologies Co., Ltd. All rights reserved.* Attention: This device may only be used indoors in all EU member states and EFTA countries.* Maximum wireless speed of up to 300Mbps is the theoretical data rate derived from IEEE standard 802.11 specifications. Actual data throughput and wireless coverage will vary due to network conditions and environmental factors including volume of network traffic, building materials and construction, network overhead, actual data throughput rate, and wireless coverage. TP-LINK makes no express or implied representations or warranties about this product’s compatibility with any future standards.For more information, please visit /en/products/details/?model=TD-MR6400or scan the QR code left。
TP-LINK 路由器 使用手册(适用型号:TL-R410)

前面板指示灯:后面板1)电源插孔:这个插孔供您接插电源。
注意:电源规格为9v~50hz0.8a,如果使用不匹配的电源,可能会导致路由器损坏。
2) reset:复位按钮。
关闭电源,按住此按钮,然后打开电源,约过3秒钟,m1,m2指示灯同时闪烁后,可松开按钮,待路由器启动后,其配置将恢复到出厂默认值。
ATTENTION:在路由器未完全启动前,不能关闭电源,否则,配置有可能没有恢复到出厂默认值。
3) wan:广域网端口(rj-45)。
连接xdsl modem或以太网。
4)局域网端口:4个rj-45接口。
计算机和hub/交换机通过这些端口连入局域网。
硬件安装步骤在安装路由器前,我们希望您已经能够利用您的宽带服务在单台计算机上成功上网。
如果您单台计算机上宽带网有问题,请先和您的网络服务商(isp)联系解决问题。
当您成功地利用单台计算机上网后,请遵循以下步骤安装您的路由器。
切记安装时拔除电源插头,保持双手干燥。
1)建立局域网连接用一根网线连接路由器和局域网中的hub或交换机如下图所示。
您也可以用一根网线将路由器与您的计算机网卡直接相连。
2)建立广域网连接用一根网线连接路由器和xdsl modem或以太网,如下图所示。
3)连接电源将电源连接好,路由器将自行启动。
建立正确的网络设置路由器默认ip地址是192.168.1.1,默认子网掩码是255.255.255.0。
这些值可以根据您的需要而改变,但是我们在这本用户手册上将按默认值说明。
首先请将您的计算机接到路由器的局域网端口,接下来您可以使用两种方法为您的计算机设置ip地址。
方法一、手动设置ip地址。
1)设置您计算机的tcp/ip协议,请参考附录。
如果您已经正确设置完成,请跳过第一步。
2)设置您计算机的ip地址为192.168.1.xxx(xxx范围是2至254),子网掩码为255.255.255.0,默认网关为192.168.1.1。
方法二、利用路由器内置dhcp服务器自动设置ip地址。
TP—LINKXDR3020拆机
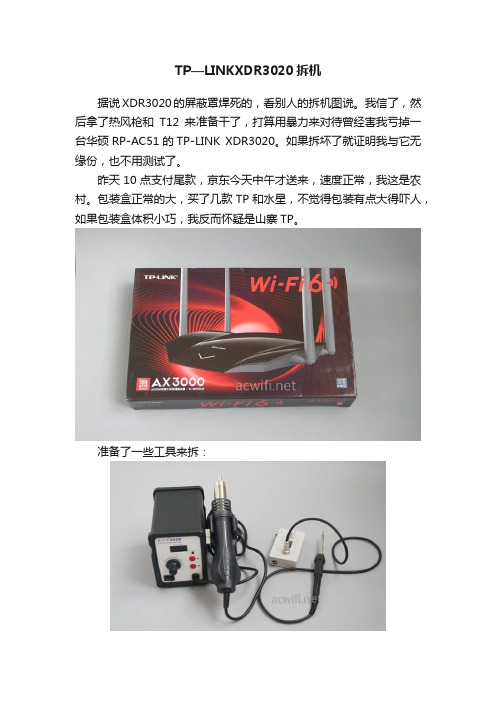
TP—LINKXDR3020拆机据说XDR3020的屏蔽罩焊死的,看别人的拆机图说。
我信了,然后拿了热风枪和T12来准备干了,打算用暴力来对待曾经害我亏掉一台华硕RP-AC51的TP-LINK XDR3020。
如果拆坏了就证明我与它无缘份,也不用测试了。
昨天10点支付尾款,京东今天中午才送来,速度正常,我这是农村。
包装盒正常的大,买了几款TP和水星,不觉得包装有点大得吓人,如果包装盒体积小巧,我反而怀疑是山寨TP。
准备了一些工具来拆:担心真会弄坏,所以拆机之前我简单测试了一下XDR3020的无线性能,测试机如下:I5-4300U工控板,通过ngff转minipcie转接卡装上Intel AX200无线网卡,win10系统,无线网卡驱动版本是21.20.0.5,如果你的AX200与华硕的TUF-AX3000或这款TP的XDR3020有明显的速率飘忽不定的问题,可以尝试安装这个版本的驱动试试。
反正我这个很稳。
把XDR3020放在楼上”WIFI“位置,这台I5-4300U放在楼下的D点。
平面图就不放了,在其它测试文章中有。
反正是路由放楼下,测试机器放楼下。
隔了一楼板,只测试5G。
先测试内网传输速度,路由器的LAN口接了一台J1900 NAS(240G固态,专门测试用)。
速度如下:忘记说了,5G信道36,开160M频宽。
连接速率还有324Mbps,下行速度还有28MB/秒,对于2x2mimo的无线路由器来说,很不错了。
只是上行速度相对地差一些。
2.4G没测。
然后用老掉牙的小米4C手机来进行speedtest测速。
同样是站在楼下D点位置。
宽带200M,测速满的是290多,而在D点就还有160m左右。
如下图:如果信道从36换成161,手机测速会大降,只有70m左右。
到时详细评测时再仔细鉴别这个现象。
最后的测试是近距离,大概1.5-2米,用IxChariot测试AX200连接XDR3020无线路由器的5G,信道是36。
NETGEAR N300 WiFi Range Extender WN2000RPTv3 使用指南说
Quick StartN300 WiFi Range ExtenderExisting WiFi Sometimes your routerdoes not provide the WiFicoverage you need.WiFi Range Extender Boosts the range of yourexisting WiFi and createsa stronger signal inhard-to-reach areas.Meet Your ExtenderBefore you install your extender, familiarize yourself with its LEDs,buttons, and port.Status LEDLED with LED LEDLED DescriptionsRouter Link LED This LED indicates the connection between the extender and the router or access point.Solid green. Best connection.Solid ambe r. Good connection.Solid red. Poor connection.Off. No connection.Status LED Solid amber. The extender is booting.Solid green. The extender is powered on.Off. The extender is powered off..Client Link LED This LED indicates the connection between the extender anda computer or WiFi device.Solid green. Connected.Off. No connection.WPS LED Solid green. WiFi security is enabled (WPA or WPA2).Blinking green. A WPS connection is being established.Off. WiFi security is not enabled.Use the Extender in Extender ModeIn extender mode, the extender repeats the signals from an existing WiFi router or access point. Place the extender, apply power, and connect it to your WiFi network.Place the Extender and Apply Power1. Place your extender in the same room as your WiFi router.Proximity to the WiFi router is required only during the initial setup process.2. Connect the power adapter to the extender and plug the poweradapter into an electrical outlet.3.4. If the Status LED does not light, press the Power On/Off button onthe extender.Connect to an Existing WiFi NetworkTo extend the range of your WiFi network, you must connect the extender to your existing WiFi network. You can do this in one of two ways:• Connect with WPS. For more information, see Connect with WPS on page 6.• Connect with web browser setup. For more information, see Connect with Web Browser Setup on page 8.Connect With WPSWi-Fi Protected Setup (WPS) lets you join a secure WiFi network without typing the network name and password.Note: WPS does not support WEP network security. If you are using WEP security, follow the instructions in Connect with Web Browser Setup on page 8.1. Press the2. Within two minutes, press the WPS button on your router or accesspoint.When the extender connects to your existing WiFi network, theRouter Link LED lights. If the Router Link LED does not light, try again.If it still does not light, see Connect with Web Browser Setup onpage 8.3. Unplug the power adapter and move the extender to a new locationthat is about halfway between your router and the area with a poor router WiFi signal.The location that you choose must be within the range of yourexisting WiFi router network.4. Plug the power adapter into an electrical outlet and wait for the5. on the front panel to help you choose aspot where the extender-to-router connection is optimal.6. If the Router Link LED doesn’t light amber or green, plug the extenderinto an outlet closer to the router and try again.Keep moving the extender to outlets closer to the router until theRouter Link LED lights amber or green.7. On your computer or WiFi device, find and connect to the newextended WiFi network.The extender creates a new extended WiFi network. The extender’snew WiFi network names are based on your existing WiFi networkname, with _EXT at the end of the name.For example:• Existing WiFi network name. MyNetworkName• New extended WiFi network name. MyNetworkName_EXT.Use the same WiFi password that you use for your WiFi router.8. Test the extended WiFi range by moving your computer or WiFi deviceto the area with a poor router WiFi signal:a. Leave your computer or WiFi device in the area with a poor routerb. on the extender:• If the Client Link LED is solid green, your extended WiFinetwork reaches the area with a poor router WiFi signal andyour network setup is complete.• If the Client Link LED is red, your extended WiFi network does not reach the area with a poor router WiFi signal.You must move the computer or WiFi device closer to theextender until the Client Link LED turns solid green.Connect With Web Browser Setup1. Use a WiFi network manager on a computer or mobile device to findand connect to the extender WiFi network NETGEAR_EXT.2. Launch a web browser.3. Enter in the address field of the browser.The New Extender Setup page displays.4. Click the NEW EXTENDER SETUP button.The Create Account page displays.5. Complete the fields on the page to set up your login credentials andclick the NEXT button.6. Click the WIFI RANGE EXTENDER button.The extender searches for WiFi networks in your area and displays a list.7. Select a WiFi network to extend and click the NEXT button.8. In the Password (Network Key) field, type the existing WiFinetwork passphrase (also called the passphrase or security key) and click the NEXT button.9. Set the network name (SSID) and password for your extender andclick the NEXT button.Wait for the page to display a list of available extended WiFi networks, which might take up to one minute.10. Use a WiFi network manager on the computer or WiFi device toconnect to the new extended WiFi network.You must connect your computer or WiFi device before you click the Continue button.11. Click the Continue button.A message displays confirming that the extender is connected and ready.12. Click the Next button.The registration page displays.13. Complete the registration fields and click the Finish button tocomplete the setup.If you do not want to register your extender, click the SkipRegistration link. Note that you must register your extender before you can use NETGEAR telephone support.The Status page displays.14. Unplug the adapter and move the extender to a new location that isabout halfway between your router and the area with a poor router WiFi signal.The location that you choose must be within the range of your existing WiFi router network.15.Plug the power adapter into an electrical outlet and wait for the16. to help you choose a spot where theextender-to-router connection is optimal.17. If the Router Link LED doesn’t light amber or green, plug the extenderinto an outlet closer to the router and try again.Keep moving the extender to outlets closer to the router until theRouter Link LED lights amber or green.18. Reconnect your computer or WiFi device to the new extended WiFinetwork.19. Test the extended WiFi range by moving your computer or WiFi deviceto the area with a poor router WiFi signal:a. Leave your computer or WiFi device in the area with a poor routerWiFi signal and return to the extender.b. on the extender:• If the Client Link LED is solid green, your extended WiFinetwork reaches the area with a poor router WiFi signal andyour network setup is complete.• If the Client Link LED is red, your extended WiFi network does not reach the area with a poor router WiFi signal.You must move the computer or WiFi device closer to theextender until the Client Link LED turns solid green.Connect Ethernet-Enabled DevicesAfter the extender is connected to your existing WiFi network, you can connect wired devices to the extender using Ethernet cables. These devices can then access your existing network through the WiFiconnection.WiFirouterTVUse the Extender in Access Point ModeYou can use the extender as a WiFi access point, which creates a new WiFi hotspot by using a wired Ethernet connection.1. Use an Ethernet cable to connect the Ethernet port on the extenderto an Ethernet LAN port on a router or a remote Ethernet LAN jack with LAN access.2. Connect the power adapter to the extender and plug the poweradapter into an electrical outlet. Wait for the Status LED to light green.3. If the Status LED does not light, press the Power On/Off button.4. Use a WiFi network manager on a computer or WiFi device to find andconnect to the NETGEAR_EXT (SSID) WiFi network.lights.5. Launch a web browser and enter in the addressfield.The New Extender Setup page displays.6. Click the NEW EXTENDER SETUP button.The Create Account page displays.7. Complete the fields on the page to set up your login credentials andclick the NEXT button.8. Click the ACCESS POINT button.The extender checks for an Internet connection.9. Set the network name (SSID), security option, and password for eachaccess point network and click the NEXT button.Your settings are applied and the extender is ready to be used as an access point.10. Use a WiFi network manager on the computer or WiFi device toconnect to the new access point WiFi network.11. Click the Continue button.A page displays that says you successfully created an access point.12. Click the Next button.The registration page displays.13. Follow the onscreen instructions to register your extender.Access Extender SettingsAfter installation, you can log in to the extender to view or change the extender’s settings.1. Use a WiFi network manager on a computer or WiFi device to find andconnect to the new extended WiFi network.lights.2. Launch a web browser.3. Enter in the address field of the browser.A login window opens.4. Enter your email address and password and click the LOG IN button.The Status page displays.5. Make any needed changes.Frequently Asked QuestionsYou can find more information about your product in the user manual, which is available at .The web browser setup keeps asking me for my network password (passphrase) or security key, and I am sure I have entered the correct password. What can I do?The extender is probably placed at the borderline of the range covered by the router or access point. For more information, see Place the Extender and Apply Power on page 5.If you are using WEP security, make sure that you are typing the network password in the correct field.Can I set up the extender in extender mode if I connect it to the router with an Ethernet cable?No. The extender is designed to connect wirelessly to the router or access point if it is in extender mode. If the extender is in access point mode, you can connect it to the router or access point with an Ethernet connection. For more information about access point mode, see Use the Extender in Access Point Mode on page 13.I forgot my login email address and password. What can I do?In the login window, click the Username & Password Help link to answer the security questions that you set up during the initial setup.If you forgot the answers to your security questions, do the following to set up your login credentials again:1. Restore the extender to its factory default settings.2. Launch a web browser.3. Enter in the address field of the browser.The New Extender Setup page displays.4. Click the NEW EXTENDER SETUP button.5. When prompted, complete the fields on the page to set up your logincredentials again.How do I restore the extender to its factory default settings?1. Use a sharp object such as a pen or straightened paper clip to pressand hold the Restore Factory Settings button on the extender for at least five seconds until the Status LED lights amber.2. Release the Restore Factory Settings button and wait for theextender to reboot.The extender resets and returns to the factory default settings.I enabled a WiFi MAC filter, WiFi access control, or access control list (ACL) on my router. What should I do when installing the extender?When a device connects through the extender to your router, the MAC address of the device shown on the router is translated to another MAC address. If your router’s MAC filter, wireless access control, or ACL is enabled, the device connects to the extender but cannot get an IP address from the extender and cannot access the Internet.To allow your device to receive an IP address from the extender and access the Internet, you must provide the translated MAC address to the router.1. Log in to your router and disable the MAC filter, wireless accesscontrol, or ACL.For more information about how to disable your router’s MAC filter, wireless access control, or ACL, see your router’s documentation.2. Power on the extender and connect all of your WiFi devices to theextender network.3. Make sure that the Router Link LED remains lit.4. Log in to your extender:a. Launch a web browser.b. Enter in the address field of the browser.A login window opens.c. Enter your email address and password and click the LOG INbutton.The Status page displays.5. Select Settings > Connected Devices.The Connected Devices section displays the MAC addresses andvirtual MAC addresses for the computers and WiFi devices that areconnected to the extender.6. On the router, add the extender’s virtual MAC addresses and all of thevirtual MAC addresses of the devices connected to the extender toyour router’s MAC filter table.7. Enable the router’s MAC filter, wireless access control, or ACL.I am connected to NETGEAR_EXT and launched a browser. Why can’t I see the web browser setup?Try these troubleshooting steps:• Make sure that your computer is set up to use DHCP (most are).• Make sure that the Device Link LED is green and that you are using a valid IP address.• Relaunch the web browser and type in the address field. Type your email address and password and click the LOG IN button.August 2015NETGEAR, Inc.350 East Plumeria DriveSan Jose, CA 95134, USA SupportThank you for purchasing this NETGEAR product. You can visit /support to register your product, get help, access the latest downloads and user manuals, and join our community. We recommend that you use only official NETGEAR support resources.Trademarks© NETGEAR, Inc., NETGEAR and the NETGEAR Logo are trademarks of NETGEAR, Inc. Any non-NETGEAR trademarks are used for reference purposes only.ComplianceFor the current EU Declaration of Conformity, visit: /app/answers/detail/a_id/11621/.For regulatory compliance information, visit: /about/regulatory/.See the regulatory compliance document before connecting the power supply.。
tp-link tl-r402m

tp-link tl-r402mTP-Link TL-R402M路由器文档一、产品简介TP-Link TL-R402M是一款经济实用的4口以太网口宽带路由器。
该路由器适用于家庭和小型办公室环境,提供稳定可靠的互联网连接。
TL-R402M采用贝叶斯算法来提供高效的上网体验,并具有易于配置和管理的特点。
二、产品特点1. 四个以太网口:TL-R402M配备了四个10/100M自适应以太网口,可连接多台电脑或其他网络设备,提供稳定且高速的局域网连接。
2. 高效的贝叶斯算法:TL-R402M采用了贝叶斯算法来提供对网络流量的智能处理,从而提高上网速度和效率。
3. 简单易用的Web界面:通过简单易用的Web界面,用户可以轻松地配置路由器设置,包括网络连接、防火墙设置、端口转发等。
4. 支持DHCP服务器和静态IP地址:TL-R402M支持DHCP服务器和静态IP地址分配,使网络连接更加灵活和便捷。
5. 安全性保障:TL-R402M具有防火墙功能和支持虚拟专用网络(VPN),提供安全可靠的网络连接。
6. 支持IPv6:TL-R402M支持IPv6协议,在未来的网络环境中提供更广泛的兼容性和可用性。
三、硬件规格1. 产品尺寸:120mm x 100mm x 30mm2. 网络接口:4个10/100M自适应以太网口3. 外部电源适配器:输入AC 100-240V,输出DC 9V/0.6A四、安装和配置1. 将提供的电源适配器连接到TL-R402M的电源接口,并将适配器插入电源插座。
2. 将以太网线正确连接到TL-R402M的WAN接口,然后将另一端连接到宽带调制解调器(如光猫、ADSL调制解调器等)。
3. 将另一根以太网线分别连接到TL-R402M的LAN 1/2/3/4接口和电脑的以太网口。
4. 打开电脑上的浏览器,输入默认的路由器管理地址,可以在产品手册中找到,默认地址为192.168.1.1。
5. 在打开的Web界面上输入默认用户名和密码进行登录,用户名和密码都是admin。
TP-Link的TL-R402MSOHO型路由器的配置

一、在配置之前,先简单说明下什么是静态IP、什么是动态IP。
静态IP是指有固定的IP地址,不用虚拟拨号就直接联入internet 通过Modem、ISDN、ADSL、有线宽频、小区宽频等方式上网的计算机,每次上网所分配到的IP地址都不相同,这就是动态IP地址。
因为IP地址资源很宝贵,大部分用户都是通过动态IP地址上网的。
普通人一般不需要去了解动态IP地址,这些都是计算机系统自动完成的。
今天我们拿一款很常见的路由器来做示范,那就是TP-Link的TL-R402MSOHO型路由器。
二、网线的接法:1.adsl猫与路由器的连接:一般家庭所用路由器,有五个口,即一个W AN口,四个LAN口,adsl猫出来的网线自然要接入到W AN口了!2.电脑与路由器的连接:W AN口被接入了,那么就剩下LAN口就是为电脑所用的了!四个口怎么接都可以,如果你有超过4台以上的电脑,那么直接加交换机就可以了,加一根路由跟交换机之间的连通线就可以了!三、开始设置(记得把线都接好了哦!别忘了开路由器)1.任意一台电脑:将IP地址改为自动获取IP(右击网上邻居属性-右击本地连接属性-将Internet 协议<TCP/IP>双击-选择自动获取ip地址/自动获得DNS服务器地址!然后确定-再确定!)一般过了几秒种,你就发现右下角提示本地连接已连接或是带黄色惊叹符的本地连接图标没有了,这说明你已经跟路由器连接了,自然就是自动获取了路由器分配给你的IP地址了!2.获取路由器地址:既然已经连接,我们就来设置路由器吧!怎么设置呢?一般家庭级的路由器都是用过web页面来设置,那么它的“主页面”地址是什么呢?我们再来操作这台电脑,右击网上邻居属性-双击本地连接属性,出现了本地连接状态的对话框,点击“支持”,看到默认网关了吗?对了,这个就是路由器的地址了!(一般路由器的这个IP为192.168.1.1或是192.168.0.1)3.打开IE浏览器,在地址栏里输入刚才咱们看到的默认网关的地址!回车后,可以看见一个让你输入用户名和密码的对话框,在这里,如果是新路由器,它有一个默认的用户名和密码,一般用户名为Admin,密码也为Admin,所有品牌路由器的默认用户名和密码是不一样的,我将会在附件里附有一些常见路有器默认的用户名和密码!4.当路由器管理主页面打开后,我们在左边的选单里点击“网络参数”这一项,这里共有三个选项可供设置。
无线路由器CPU闪存内存芯片列表

WIFI模块应用领域:串口(RS232/RS485)转WiFi、SPI转WiFi;WiFi远程控制/监控、TCP/IP和Wi-Fi协处理器;WiFi遥控飞机、车等玩具领域;WiFi网络收音机、摄像头、数码相框;医疗仪器、数据采集、手持设备;WiFi脂肪秤、智能卡终端;家居智能化;LED照明灯具电源开关仪器仪表、设备参数监测、无线POS机;现代农业、军事领域等其他无线相关二次开发应用。
汽车电子智能电网工业控制NO 中文名称型号方案 flash (M ) D DR (M ) Data Rate (速率)(M) RF Power壳料材质Power(optional)(电源)1 CPE cpe007 9341 8M/16M 32/64M 300 B:28±2,N :24.5 胶壳 18V/1A2 CPE cpe008 9344 8M/16M 64/128M 300 500MW 胶壳 18V/1A3 CPE cpe012 9331 8M/16M 32/64M 150 500MW 胶壳 18V/1A4 CPEcpe0177240+9285 8M/16M 32/64M150100MW胶壳 18V/1A5 CPE cpe020 7240+92858M/16M 32/64M 150 100MW 胶壳 18V/1A6 CPE cpe021 7240+92838M/16M 32/64M 300 500MW 胶壳 18V/1A7 CPE/壁挂APcpe0217240+92838M/16M 32/64M 300 500MW 铁壳 18V/1A8 CPE/壁挂APAP023 9344 16M 128M 300 500MW 铁壳 18V/1A9 CPE/壁挂APSX-AP-23A AR9344 16M64M/128Mdual-frequency/2.4/5.8B:23±2A:22±2铁壳POE06BorPOE12Aor12V1A10 CPE/壁挂APAR9341 8M/16M 64M 300 500MW 铁壳 24V POEor48V POE11 CPE/壁挂APSX-AP-23A AR9344 16M 128M 600 300 铁壳 24V POEor48V POE12 CPE/壁挂APSX-AP-23A AR9344 16M64M/128Mdual-frequency/2.4/5.8B:23±2A:22±2铁壳POE06BorPOE12Aor12V1A13 入墙AP SX-RQAP-01B AR9331 8M/16M 32/64M 150 100MW 胶壳 POE04BorPOE15Aor14 入墙AP SX--RQAP-05A AR9341 8M/16M 32/64M 300 B:18±1.5 胶壳 POE08A15 入墙AP SX-rqap_07A AR9341 8M 64M 300 300MW 胶壳 POE04BorPOE15A16 室外AP SX-AP-03 AR9344 16M 128M dual-frequency600M/2.4/5.82.4GB:27±1.5A:24/26铁壳 POE06B17 吸顶AP SX-AP-10A6 AR9341 8M/16M 32/64M 300 B:28±2 胶壳POE06BorPOE12Aor12V1 A18 吸顶AP SX-AP-15B AR9344 16M 128M dual-frequency600M/2.4/5.8B:27±2,n:20A:22±2,n:20胶壳POE06BorPOE12Aor12V1A19 吸顶AP SX-AP15 9344+938216M 128M300M/2.4g B:27±2,n:20胶壳POE06BorPOE12Aor12V1A20 吸顶AP SX-AP-16A AR9331 8M/16M 32/64M 150 500MW 胶壳POE06BorPOE12Aor12V1 A21 吸顶AP SX-AP19 8197 8M/16M 32/64M 600M 200MW(23DBM)胶壳 POE06B/POE12Aor12V1.22 吸顶AP SX-AP-20A 8192+81968M/16M 32/64M 300M 500MV 胶壳 POE06B/POE12Aor12V1.23 吸顶AP SX-AP-21A 8197DL 8M/16M 32/64M 600Mbps 200mW 胶壳 POE06B/POE12Aor12V1.24 吸顶AP SX-AP-22A1 AR9341 8M/16M 32/64M 300 B:28±2,N:24.5 胶壳 POE06B/POE12A/(falseP24V1A)25 路由LY-03C 9341 8M/16M 64M 300Mbps 500mW 胶壳POE06BorPOE12Aor12V1 A26 路由LY-06B AR9344 8M/16M 64M/128M300Mbps 500mW 胶壳POE06BorPOE12Aor12V1A27 路由LY-08A MTK7620N A18M 64M 300Mbps 100mW 胶壳POE06BorPOE12Aor12V1A28 路由LY-09A AR9341 8M 64M 300Mbps 200mW 胶壳POE06BorPOE12Aor12V1 A29 路由LY-10A MTK7620A 8M/16M 64M/128M300Mbps 500mW 胶壳POE06BorPOE12Aor12V1A30 路由LY-10B MTK7620A 8M/16M 64M/128Mdual-frequency 300Mbps500mW 铁壳POE06BorPOE12Aor12V1A31 路由RT-03C 9341 8/16M 64M 300Mbps 500mW 铁壳POE06BorPOE12Aor12V1 A32 路由RT-06B AR9344 8/16M 64/128M 300Mbps 500mW 铁壳POE06BorPOE12Aor12V1 A33 模块SX-9331MK-01A AR9331 8M/16M 32M/64M 150 50MW34 模块AR9331-PCB-A2 9331 8M/16M 32M/64M 150 50MW35 模块SX-9331MK-04A AR9331 8M/16M 32M/64M 150 50MW36 模块MK-06A AR9344 8M/16M 64M/128Mdual-frequency300M/2.4/5.850MW37 模块SX-9331MK-07A AR9331 8M/16M 32M/64M38 模块SX-9331MK-08AAR9331 16M 64M 150 50MW39 模块SX-9331MK-11A AR9331 8M/16M 32/64M 150 50MW40 模块SX-9331MK-12A AR9331 8M/16M 32/64M 150 50MW41 模块SX-9331MK-13A AR9331 8M/16M 32/64M 150 50MW42 模块SX-MK-15A 9341 8M/16M 32/64M 300 B:23±243 模块SX-AP9331-CPU 9331 8M/16M 32/64M 150 50MW44 模块SX-9331MK-20A 9331 8M/16M 32/64M 150 50MW45 模块SX-9331MK-21A 9331 8M/16M 32/64M46 网卡SHX007C AR9220 NO NO 300 300MW47 网卡SHX002D AR9223 NO NO 300 500MW48 网卡MB92网卡NO NO 300 500MW49 网卡SHX22A 9382 NO NO 300 A:21±1.550 网卡SHX22A1 AR9382 NO NO 300 A:21±1.551 网卡SHX023A 8192 NO NO 300 100MW本文由于作者精力与能力所限,所列型号大部分只能为国产,或YLJ+水货,且也不能列举所有型号和所有版本,但阅读完本文应该已能辨别绝大部分路由的好坏本文如有疏漏,也请各位不吝指正另,路由猫不在本文讨论范围内基本知识储备:1.关键词:解决方案路由厂家实在太多,但是能生产路由主芯片的厂家则很少,路由厂你可以理解为主板厂,而提供无线和主芯片的厂家则可对应理解为intel 和AMD,后者提供解决方案,前者则生产出最终的路由成品卖到消费者手中,如下图所示Athros的官方解决方案:AR9001AP-2NG(AR9130+AR9102+AR)和d-link,TP-link对应的自己的出场成品(后者可能处于成本或者性能考虑,交换芯片更换成Marvell的产品)Athers官方解决方案:AP81图片来自: alan_rei的百度相册d-link dir615 c1版TP-link 841n v3版(交换芯片更改成Marvell 88E6060,性能没有区别)现在无线路由的解决方案主要由两大厂家把持——Broadcom(博通)和Atheros(目前已被Qualcomm高通收购) 以下是两家的产品列表链接:Atheros /wiki/AtherosAtheros被收购后设计的芯片/wiki/Qualcomm_AtherosBroadcom /wiki/Broadcom!!这两家的解决方案将是重点,图例和说明在下一楼上!!还有少部分份额则是由廉价的螃蟹(realtek),Ralink(雷凌)和比较昂贵(还是没有Broadcom贵,博通方案,特别是高端解决方案纯属于坑爹价的类型)的Marvell,Ubicom(只用主芯片的解决方案,没有无线芯片的解决方案,D-link的中高端产品用的最多)方案占据.(早期的主芯片解决方案中还有intel的strongARM插足,如有名的IXP4XX系类)D-link dir-655 A3版解决方案:主芯片Ubicom IP5160U,千兆交换芯片VITESSE VSC7385,无线基带+射频芯片:Atheros AR5416+AR2133(MINI PCI)Ubicom属于比较小众的解决方案,但却是D-link的御用芯片,这种芯片的特点是多线程的性能非常好,这也是D-link 一直再上默默投入的原因,D-link很早就在此基础上开发了自己流控固件,类似于killer网卡的那种QOS,可以设置网络游戏封包的优先权,高端系列的转发也很不错,无线方面一般是配合Atheros的无线网卡,所以无线性能也很有保障,缺点嘛,显而易见,芯片集成度不高,整套方案很繁杂,成本很高belkin 8235-4 V2 (v2000)解决方案:主芯片+无线Ralink RT3025F ,千兆交换芯片realtek RTL8366RB/SB其实Ralink的这个芯片已经集成了一个百兆的交换机,只是这个路由需要千兆的功能所以外加了千兆的交换芯片,Ralink 的解决方案一般集成度比较高,也比较廉价,但是Ralink的由于无线和网络芯片的研发起步的比较早,所以性能还是很不错的,不过产品线比较单一,优势是在信号和传输稳定上,缺点则是芯片的发热(集成度高)和802.11N的极限传输速度上代表产品还有MOTO 2108-N9/D9 , ASUS RT-N13, 华为HG255Ddir 615 A版解决方案:主芯片Marvell 88F5180, 交换芯片Marvell 88E6061, 无线基带+射频芯片Marvell 88W8361P+88W8060 可以看出Marvell的方案一般为全套的解决方案,一般不会与其他芯片混用,而且设计的也比较复杂,成本比较高,典型代表还有Netgear的WNR854T和苹果的airport extreme base station A1354,优点是无线极限传输性能不错,主芯片转发也不错,缺点是方案复杂,成本很高dir-615 F3版或FG版解决方案:主芯片+无线芯片+交换芯片Realtek RTL8196B廉价路由上用烂的方案,性能不是很好,不管是转发抑或是无线覆盖或是传输稳定性,口碑都不好,FG版也成为国内615系列口碑最烂的版本,Realtek做无线相对较少,对这方面投入的没有有线那么多,54M的时候很响亮的8187L USB无线网卡解决方案是其经典的代表作,但是近几年的在无线方面建树较少,所以无线路由选购时尽量不要选采用螃蟹芯片的产品linksys WRV54G V1解决方案:主芯片intel IXP425 @266MHz,交换芯片KENDIN KS8995M, 无线基带+射频芯片Intersil ISL3880 +ISL3686A,自从Intel将strongARM卖给Marvell以后,Intel的解决方案自此从路由市场销声匿迹了,这是04年初上市的老路由,一般Intel解决方案都定位为中小企业及的产品,比家用级高一个档次,这款型号对应的家用版本就是赫赫有名的WRT54G,但显然IXP425的性能是Broadcom BCM4712这类芯片所不能比拟的,所以也注定了他的过高的身价,在市场中的产品也是凤毛麟角,代表产品还有Actiontec MI424WR(此款为IXP425全频版@533MHz ), linksys WRT300N v1,casio RV042注释:进入802.11N无线时代,主要的无线芯片厂都拿出了自己解决方案Broadcom叫INTENSI-FI,Atheros 叫XSPAN,Marvell叫Top Dog,螃蟹和雷凌的叫法不详2.各路由厂家的喜好linksys(Casio):intel(早期),BroadcomASUS:BroadcomNetgear:Broadcom,Marvell(中高端),Atheros(中低端),Realtek(低端)Buffalo:Broacom( 早期),Atheros(目前,高端),Ralink(目前,低端)apple:Marvell+Atheros(前者提供主芯片,后者提供无线)Belkin: Broadcom(中高端),Ralink(中低端)d-link:Ubicon+Atheros(中高端:前者提供主芯片,后者提供无线),Atheros(中低端),Ralink(中低端),Marvell(中端),realtek(低端)moto:Broadcom,RalinkTPlink&Mercury&FAST(普联,水星,迅捷基本算是一家公司):Atheros, MTK(是的你没看错!!!)以上是比较常见的牌子,韩国棒子的ToTolink和斐讯国内也有一定市场,但是我没玩过,所以就不说了。
tl-mr12u路由器3g模式不能上网怎么办
tl-mr12u路由器3g模式不能上网怎么办tplink现在路由器是连接互联网的重要设备,选择一款好的路由器对我们越来越重要,tplink路由器是世界一流的设备,那么你知道tl-mr12u路由器3g模式不能上网怎么办吗?下面是店铺整理的一些关于tl-mr12u路由器3g模式不能上网的相关资料,供你参考。
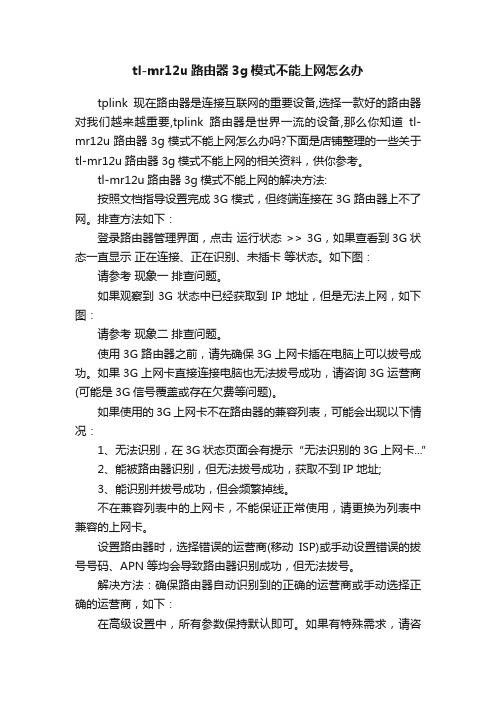
tl-mr12u路由器3g模式不能上网的解决方法:按照文档指导设置完成3G模式,但终端连接在3G路由器上不了网。
排查方法如下:登录路由器管理界面,点击运行状态 >> 3G,如果查看到3G状态一直显示正在连接、正在识别、未插卡等状态。
如下图:请参考现象一排查问题。
如果观察到3G状态中已经获取到IP地址,但是无法上网,如下图:请参考现象二排查问题。
使用3G路由器之前,请先确保3G上网卡插在电脑上可以拔号成功。
如果3G上网卡直接连接电脑也无法拔号成功,请咨询3G运营商(可能是3G信号覆盖或存在欠费等问题)。
如果使用的3G上网卡不在路由器的兼容列表,可能会出现以下情况:1、无法识别,在3G状态页面会有提示“无法识别的3G上网卡...”2、能被路由器识别,但无法拔号成功,获取不到IP地址;3、能识别并拔号成功,但会频繁掉线。
不在兼容列表中的上网卡,不能保证正常使用,请更换为列表中兼容的上网卡。
设置路由器时,选择错误的运营商(移动ISP)或手动设置错误的拔号号码、APN等均会导致路由器识别成功,但无法拔号。
解决方法:确保路由器自动识别到的正确的运营商或手动选择正确的运营商,如下:在高级设置中,所有参数保持默认即可。
如果有特殊需求,请咨询3G运营商获取对应参数并手动设置。
3G上网卡启用PIN码保护,路由器能识别到3G上网卡,但无法拔号,如下图所示:解决方法:输入PIN码或取消PIN码保护。
点击网络参数>> 3G,在SIM/UIM PIN中,输入PIN码,点击保存。
取消PIN码保护:把3G上网卡插入电脑,在3G客户端软件中进行设置。
- 1、下载文档前请自行甄别文档内容的完整性,平台不提供额外的编辑、内容补充、找答案等附加服务。
- 2、"仅部分预览"的文档,不可在线预览部分如存在完整性等问题,可反馈申请退款(可完整预览的文档不适用该条件!)。
- 3、如文档侵犯您的权益,请联系客服反馈,我们会尽快为您处理(人工客服工作时间:9:00-18:30)。
TP-Link TL-MR3020 3G/4G Wireless N Router
tag: TP-link TL-MR3020, TP-link TL-MR3020 Router
The TP-Link TL-MR3020 is a small, handy wireless router with a USB port, which can make him a Wi-Fi hotspot, but user has to connect an LTE stick or an LTE modem to the router. TL-MR3020 work with the LTE stick to provide wireless Internet.
Features and characteristics of TP-link TL-MR3020
Manufacturer and model TP-Link TL-MR3020
Chipset: Atheros AR9330
LTE Category: depending on the LTE stick used
Download rate up: "
Features and characteristics of TP-link TL-MR3020
Upload rate to: "
Supported LTE bands: "
Backward compatible with: "
MIMO Support: 1x1
External antenna connector: no
Network | LAN & WLAN
LAN Ports: 1 x RJ45
WLAN Standards: WiFi 802.11 b/g/n
5 GHz WLAN support: no
Encryption: WPS, WEP, WPA, WPA2
Wireless Internet Hotspot function: Yes
Others
Battery pack: no
Dimensions: 74 x 67 x 22 mm
USB: USB 2.0 / mini USB
Memory card expansion: no
Release: November 2011
available at:
Technical Features
With dimensions of 7.4 x 6.7 x 2.2 centimeters, the small white box TP-Link has the right size for on the go. The TL-MR3020 has an Ethernet port (RJ45) for a LAN connection, a mini-USB port for power supply via an adapter or a PC and a standard USB input for connecting a mobile drives or modems.
The TP-Link TL-MR3020 has no display, but only through green LEDs that indicates the Internet connection, the WLAN status and LAN connection as well as encryption. A slider can switch between 3G/4G, and WISP AP. WISP (Wireless Internet Service Provider) stands for Wi-Fi access, AP (Access Point) for a wired internet connection.
Wi-Fi hotspot via LTE-Stick
If you put an LTE stick in the USB port of the TL-MR3020, a data connection to an available LTE network is established in 3G or 4G mode. Subsequently, the TP-Link TL-MR3020 connect with devices such as laptop, smartphone or tablet as wireless hotspot to provide Internet via Wireless LAN. What's more, the TP-link TL-MR3020 can support 802.11b/g/n with up to 150 Mbit/s at 2.4 GHz.
Ensures security
The TL-MR3020 has the way over an IP QoS function (Quality of Service), with the leave of bandwidth as desired spread on the connected devices. The safety of the data links ensures encryption up to WPA2 via WPS button (WiFi Protected Setup) which can be prepared quickly. A firewall is also on board.
The router can be configured via its own URL with a browser. Supported browsers include Internet Explorer, Firefox, Chrome and Safari as well as the operating systems Windows (from 98), Mac and Linux. By the way, it is recommended to download the manufacturer TP-Link the latest firmware for the router to ensure compatibility with as many modems and sticks.
Conclusion
What benefit a wireless router can bring to you into which you can slot in its mobile stick? First of all, if you have an LTE stock, you will get a new mobile hotspot with their combination. In addition, Hotspot and stick can be placed where the best wireless coverage exists. You can also use the Ethernat cable in a hotel or at home to get Wifi network.
The TL-MR3020 is recommended only if you already own a mobile stick and usually travel and would like to connect more than one device. Otherwise it is better to buy a real mobile router such as huawei E5776, ZTE MF93D. They don't need USB stick and can work directly with SIM cards.
If you want to know more latest 4G LTE mini Routers, welcome to click here:
/3g-4g-pocket-wifi/300mbps-mobile-wifi.html。