lte开机流程
LTE网关使用说明

LTE网关使用说明一、开机前的准备机身侧面的按键说明:1、WPS:WiFi保护设置,用于WIFI快速建立加密连接,不自动开启。
2、路由/调试模式按键:往上拨是路由模式,即可用有线和无线连接上网;往下拨是调试模式,需要配合USB口进行调试。
默认拨到路由模式。
3、电源开关4、USB口:用于设备调试5、外接天线接口:由于设备有内置天线,在覆盖范围比较小的情况下可以不外接天线。
6、直流电源插口7、有线网口1222 32 45262 72机身背面的按键说明:8、内部/外边天线开关:用来切换内置/外置天线,一般只需拨到inner(内部)即可。
9、USIM卡插槽8292开机前只需插入USIM卡,把按键2拨到路由模式,把电源打开即可。
二、开机后一般配置1、设备通电后,可以选择有线或者无线连接,在此以无线连接为例:可以搜到类似以下的信号,开放模式,自动获取地址即可。
2、用浏览器进入设备的地址192.168.0.1进行一般的配置,用户名和密码都是admin。
进去之后,采用默认配置即可。
如需改动无线设置,例如SSID、无线加密、无线模式、信道等,则进入“无线网络配置”→“基本配置”/“安全配置”进行设置即可。
3、查看联网状态插入USIM卡后,设备会自动联网,可通过“联网状态”→“联网状态”查询当然的网络情况。
联网状态下的默认配置是3G和4G双模(LTE优先),也可以手动按需更改接入的模式。
一般采用默认即可。
接入前,请先确认现场是否有LTE信号,以及USIM卡的状态正常,如能成功接入,LTE连接状态会是connected。
这样用户端就可以接通外网上网。
LTE信令流程之开机附着去附着流程分析

LTE信令流程之开机附着去附着流程分析为了实现LTE网络中用户设备的连接和通信,开机附着和去附着是非常重要的步骤。
下面将分析LTE信令流程中的开机附着和去附着过程。
开机附着是指当用户设备(UE)开机或从断网状态恢复时,UE需要与LTE网络建立连接。
开机附着的过程可以分为以下几个步骤:第一步,扫描小区:UE首先会扫描周围的小区,以便找到可用的LTE小区。
UE会通过物理广播信道(PBCH)和物理下行共享信道(PDSCH)接收广播信号,获取小区的系统信息。
第二步,收到系统信息和选择小区:UE会解码收到的系统信息,并根据其中的参数选择要附着的目标小区。
UE需要选择一个最优的小区,以便进行后续的附着过程。
第三步,发送附着请求:UE会在随机接入过程中使用随机接入信道(RACH)发送附着请求。
UE会在附着请求中携带相关的用户身份和能力信息,以便网络能够识别和验证UE的身份。
第四步,接收附着响应:如果网络接收到UE的附着请求并验证通过,它将向UE发送附着响应。
附着响应中包含了分配给UE的临时标识,以及其他相关的系统信息。
第五步,完成附着过程:UE收到附着响应后,将与网络进行配对并完成附着过程。
UE会解码附着响应,获取分配的临时标识,并在后续的通信过程中使用它。
去附着是指当用户设备不再需要连接LTE网络时,可以发送去附着请求来终止与网络的连接。
第一步,发送去附着请求:UE会使用随机接入过程中的RACH发送去附着请求。
UE会在去附着请求中携带相关的用户身份信息,以便网络能够识别和验证UE的身份。
第二步,接收去附着响应:如果网络接收到UE的去附着请求并验证通过,它将向UE发送去附着响应。
去附着响应中可能包含一些系统信息,以便UE可以在后续的操作中使用。
第三步,释放资源:UE收到去附着响应后,将释放与网络之间的所有资源,并终止与网络的连接。
开机附着和去附着是LTE网络中用户设备连接和断开连接的重要过程。
通过开机附着过程,用户设备可以与网络建立连接,并获取到分配的临时标识,以便进行后续的通信。
LTEUE开机时发生的流程

LTEUE开机时发生的流程当LTE用户终端设备(UE)开机时,会经历一系列的流程以建立和维护与LTE网络的连接。
下面是一个大致的过程描述,涵盖了UE开机过程中的主要步骤。
1.开机时序电源管理:用户打开设备电源后,UE会执行一系列的开机自检程序,包括对电源等硬件进行初始化和供电。
同时,UE还会检测是否插入了有效的SIM卡,并根据卡的类型和状态来确定是继续进行开机流程还是进入SIM卡相关的程序。
2.引导过程:UE会加载存储在非易失性存储器中的启动代码,以便启动UE的操作系统。
该引导过程还可能包括ROM(只读存储器)中的固件检查和初始化,以确保设备处于可靠的状态,并且能够执行正确的启动代码。
3.启动操作系统和加载软件:一旦设备启动操作系统,UE会加载必要的软件模块和驱动程序,以支持与LTE网络的通信。
这些软件模块包括无线通信协议栈和相关的硬件驱动程序。
4.启动基带处理器和硬件:UE会启动基带处理器和相关硬件,这些硬件负责处理与无线通信相关的任务。
UE会初始化和配置这些硬件,以便能够正常地与LTE网络进行通信。
5.执行SIM卡识别程序:如果SIM卡已插入设备,UE会执行与SIM 卡相关的识别程序。
这个过程涉及与SIM卡通信,以验证卡的有效性和访问权限。
UE还会从SIM卡中读取必要的身份认证和密钥信息。
6.启动LTE协议栈:一旦UE完成了硬件初始化和SIM卡的识别,它将启动LTE协议栈,这是一个负责处理与LTE网络通信的软件模块。
该协议栈用于处理LTE网络中的各种控制和数据传输,包括网络注册、用户身份验证和数据传输的建立。
7.执行网络注册:UE会发送一个特定的注册请求消息,将自己注册到附近的LTE网络中。
这个过程涉及与周围的LTE基站进行通信,并提供必要的用户和设备信息。
基站将使用这些信息来验证并注册UE。
8.建立安全连接:一旦UE注册到LTE网络中,它将参与一个安全性的握手过程,以建立与网络的安全连接。
lte开机流程

1TD-LTE基本信令流程
1.1开机附着流程
附着就是几十UE将NAS层的无线资源请求消息经eNB转发到核心网,核心网触发对UE的认证和鉴权,并向UE分配默认的IP连接。
UE刚开机时,先进行物理下行同步,搜索小区并选择到一个合适的小区后,驻留并进行附着过程。
附着流程图如下:
1.1.1正常流程
1.1.2异常流程
RRC建立失败
T300
✓核心网拒绝
✓eNB未等到Initial context setup request消息
RRC重配消息丢失或eNB内部配置的UE安全参数失败
一些概念理解:
接入层与非接入层:接入层与接入网有消息交互,非接入层直接与核心网进行消息交互。
LTE网络下终端开机注册流程(个人理解)-张小文

关于TD-LTE终端开机注册流程个人理解姓名:张小文专业:TD-SCDMA时间:2014年8月25日目录摘要 (3)1 小区搜索 (5)1.1 PSS信号解码 (5)1.2 SSS信号解码 (6)2 系统消息 (7)2.1 MIB消息 (7)2.1.1 MIB消息的位置 (7)2.1.2 MIB消息的传输 (7)2.1.3 MIB消息主要内容 (8)2.2 SIB1消息 (9)2.2.1 SIB1消息的传输 (9)2.2.2 PCFICH信道: (9)2.2.3 PDCCH信道: (9)2.2.4 SIB1消息的位置 (10)2.3 SI消息 (10)3 随机接入 (11)3.1 随机接入的触发 (11)3.1.1 上行同步过程介绍 (11)3.1.2 preamble的产生原理 (11)3.1.3 preamble的运用 (12)3.1.4 preamble时频资源介绍 (12)3.2 随机接入过程 (13)4 总结 (14)摘要近两年,运营商间竞争非常激烈,各大运营商都想获得更多的LTE用户,中国移动略胜一筹,中国移动已经开始大批量建设TD-LTE站点,全国已经大范围商用TD-LTE,LTE优化人员非常短缺,技能需要快速提升,本文可以协助初学者更好的理解LTE网络下终端开机注册流程。
UE需要接入LTE网络,开机后必须要经过小区搜索、接收系统消息、随机接入等过程。
本专题就LTE终端开机后的相关流程个人理解。
关键词:小区搜索、系统消息、随机接入1小区搜索小区搜索是UE注册网络的第一步,在此过程中会涉及到2个导频信号,分别是PSS(主导频信号)和SSS(辅导频信号)。
协议中分别规定了LTE两种制式的PSS和SSS在时域上的位置:对于FDD而言,PSS在子帧0和5的第一个slot的最后一个symbol中发送,SSS与PSS在同一子帧同一slot发送,但SSS在倒数第二个symbol中发送,即比PSS提前一个symbol。
LTE基本信令流程-开机附着流程

LTE基本信令流程-开机附着流程2014-01-13 15:23:21| 分类:LTE | 标签:|举报|字号大中小订阅1、正常流程:UE刚开机时,先进行物理下行同步,搜索测量进行小区选择,选择到一个suitable或者acceptable 小区后,驻留并进行附着过程。
附着流程图如下:说明:1) 步骤1~5会建立RRC连接,步骤6、9会建立S1连接,完成这些过程即标志着NAS signalling connection建立完成,见24.301。
2) 消息7的说明:UE刚开机第一次attach,使用的IMSI,无Identity过程;后续,如果有有效的GUTI,使用GUTI attach,核心网才会发起Identity过程(为上下行直传消息)。
3) 消息10~12的说明:如果消息9带了UE Radio Capability IE,则eNB不会发送UECapabilityEnquiry 消息给UE,即没有10~12过程;否则会发送,UE上报无线能力信息后,eNB再发UE Capability Info Indication,给核心网上报UE的无线能力信息。
为了减少空口开销,在IDLE下MME会保存UE Radio Capability信息,在INITIAL CONTEXT SETUP REQUEST消息会带给eNB,除非UE在执行attach或者"first TAU following GERAN/UTRAN Attach" or "UE radio capability update" TAU过程(也就是这些过程MME不会带UE Radio Capability信息给eNB,并会把本地保存的UE Radio Capability信息删除,eNB会问UE要能力信息,并报给MME。
注:"UE radio capability update" TAU is only supported for changes of GERAN and UTRAN radio capabilities inECM-IDLE.)。
LTE入网流程分析[1]
![LTE入网流程分析[1]](https://img.taocdn.com/s3/m/c1cee2235a8102d276a22fbd.png)
目录LTE入网流程分析 ............................................................................................ 错误!未定义书签。
Revision Record 修订记录 ............................................................................错误!未定义书签。
1入网流程 .. (2)1.1UE初始化 (3)1.2PLMN选择 (4)1.3扫频 (4)1.4小区搜索 (7)1.5解系统消息(System Information) (8)1.6小区选择 (10)1.7小区驻留(Camped on the Cell): (10)1.8Attach request (10)1.9RRC CONNECTION Request (11)1.10随机接入 (11)1.11RRC连接建立 (12)1.12Attach accept / Attach complete (12)2搜网相关AT命令 (13)2.1AT+COPS命令 (13)2.2扩展系统配置参考设置命令AT^syscfgex命令 (13)3UE LTE网络入网log抓取与查看 (14)3.1LTE入网log抓取 (14)3.2UE入网log查看 (15)4LTE的锁频方法 (16)5QCN的备份与导入 (17)6参考资料 (18)1 入网流程LTE 入网是指UE 开机上电后搜网,并注册到网络的过程。
入网基本流程图如下图所示:1) System Scan Fail 2) 获取UE 支持Band3) 从每个Band 中选出最多50 个候选(candidate)频点4) 对每个候选频点进行Acq1) 读取Acq DB 中的频点nv\reg_files\modem\lte\rrc\csp\acq_db 2) 对每个acq_db 中的频点进行Acq 1) 时隙同步 P-SCH 匹配滤波器2) 帧同步(S-SCH 和主扰码识别3) 区广播消息1) PSS 2) SSS图1.1 入网基本流程图LTE入网的详细流程分析如下:1.1 UE初始化UE的初始化主要包含SIM卡识别和搜网相关NV项读取两部分内容。
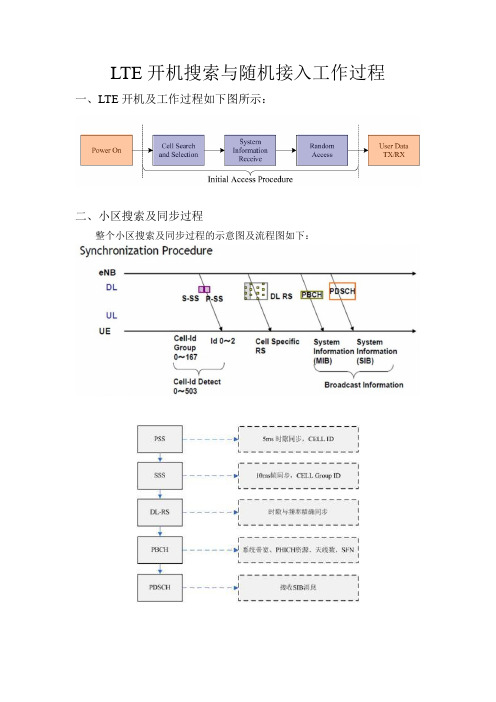
LTE开机搜索与随机接入工作过程

LTE开机搜索与随机接入工作过程、LTE开机及工作过程如下图所示:1!Power ()nj-k fell Search andSckction->SystemlnifbrmatinnReceivef Random Access I Jser DataTX/RX 1YInitial Access Procedure二、小区搜索及同步过程整个小区搜索及同步过程的示意图及流程图如下: Synchronization ProcedureGroup 0-*167 C«ll Specific RSC«lMd Dtttct 0*503 Syittm System tnfortnaTiGn Information (MIB) (SIB)t 丿¥Bro^dc^st informationeNBDLULUE畑第口HQ * C LLL IDJtNntehW CLLQr曲ip【卩JI________________ ______ ________________ _____ ________ _____ i1) UE开机,在可能存在LTE小区的几个中心频点上接收信号(PSS),以接收信号强度来判断这个频点周围是否可能存在小区,如果UE保存了上次关机时的频点和运营商信息,则开机后会先在上次驻留的小区上尝试;如果没有,就要在划分给LTE系统的频带范围内做全频段扫描,发现信号较强的频点去尝试;2)然后在这个中心频点周围收PSS(主同步信号),它占用了中心频带的6RB, 因此可以兼容所有的系统带宽,信号以5ms为周期重复,在子帧#0发送,并且是ZC序列,具有很强的相关性,因此可以直接检测并接收到,据此可以得到小区组里小区ID,同时确定5ms的时隙边界,同时通过检查这个信号就可以知道循环前缀CP长度以及采用的是FDD还是TDD (因为TDD的PSS是放在特殊子帧里面,位置有所不同,基于此来做判断)由于它是5ms 重复,因为在这一步它还无法获得帧同步;Ona fnams (Kims'i0123456739FDD 2 Z i i im i i i ■ 」i・i i i ■■ i・ ii ~l~ 二二One frame (id msi■4* ・-■・「■・■ r ■ ■anc i s, ■ n v a a ■ ■ ■ ■ ■ ■ ■B.・・■・■・■・■■p斗 3 零7^0 TDD ' Z7 T ne ] i 工..二』T ]二'.......... .......... /"t二n」一一】i L—t一.j 】】丄i厂i r [ i 】i _i [ i ] i -1 PSSR J I乩I Tinie-cttjira:n pasjJietis of P55A-in cast cifFDD arid TLJf).3) 5ms时隙同步后,在PSS基础上向前搜索SSS, SSS由两个端随机序列组成,前后半帧的映射正好相反,因此只要接收到两个SSS就可以确定10ms的边界,达到了帧同步的目的。
LTE开站流程

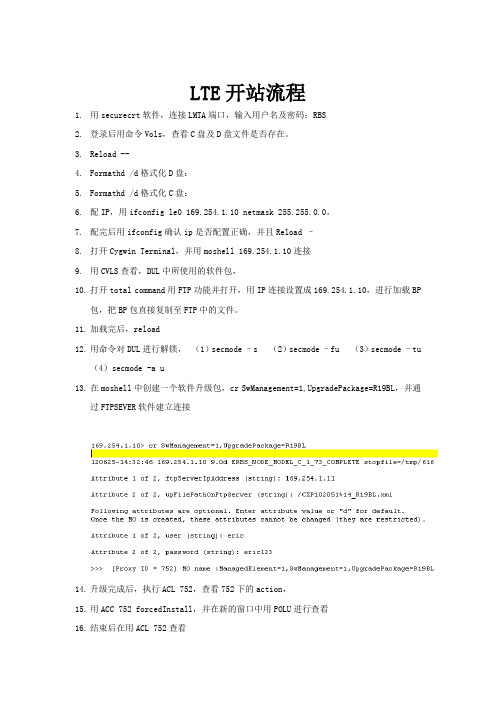
LTE开站流程1.用securecrt软件,连接LMTA端口,输入用户名及密码:RBS2.登录后用命令Vols,查看C盘及D盘文件是否存在。
3.Reload --4.Formathd /d格式化D盘:5.Formathd /d格式化C盘:6.配IP,用ifconfig le0 169.254.1.10 netmask 255.255.0.0,7.配完后用ifconfig确认ip是否配置正确,并且Reload –8.打开Cygwin Terminal,并用moshell 169.254.1.10连接9.用CVLS查看,DUL中所使用的软件包,10.打开total command用FTP功能并打开,用IP连接设置成169.254.1.10,进行加载BP包,把BP包直接复制至FTP中的文件。
11.加载完后,reload12.用命令对DUL进行解锁,(1)secmode –s (2)secmode –fu (3)secmode –tu(4)secmode -a u13.在moshell中创建一个软件升级包,cr SwManagement=1,UpgradePackage=R19BL,并通过FTPSEVER软件建立连接14.升级完成后,执行ACL 752,查看752下的action,15.用ACC 752 forcedInstall,并在新的窗口中用POLU进行查看16.结束后在用ACL 752查看17.再次用ACC 752 rebootNodeUpgrade,并在新的窗口中用POLU进行查看18.结束后用CVLS查看,升级包是否已经升级成功,19.用L PWD查看目录20.用L LS查看脚本所在的位置21.用L CD ****进入脚本文件夹22.用TRUN加载脚本,在完成第二个脚本即giga后,对其进行ping测试,测试都通过后再做一个CVMS *****,再用CONFB+对硬件做一个关闭,23.用acc 155 create24.在用if $nr_of_mos_ok = 125.再用acc 155 setstartable26.用confb-对其解开27.通过acc 0 manualrestart进行重启,28.再次用TRUN加载其他脚本,直至加载lisence停止29.用pr rbscon查看30.用acl 884查看31.并用acc 884 setUniqueLogicalName32.同过license server查看license是否安装33.用readclock读取时钟,并用setclock更改时钟,34.在用acc Licensing updateLicenseKeyFile,加载license35.结束后再用license server读取看是否已经安装成功,36.然后再加载license脚本37.。
LTE开站流程

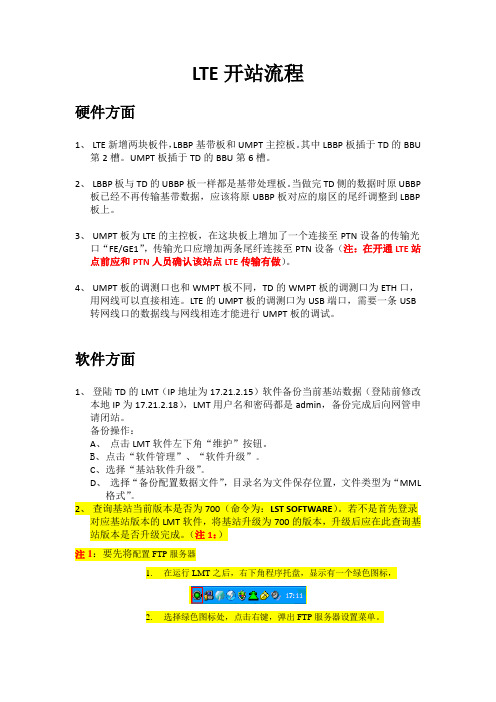
LTE开站流程硬件方面1、LTE新增两块板件,LBBP基带板和UMPT主控板。
其中LBBP板插于TD的BBU第2槽。
UMPT板插于TD的BBU第6槽。
2、LBBP板与TD的UBBP板一样都是基带处理板。
当做完TD侧的数据时原UBBP板已经不再传输基带数据,应该将原UBBP板对应的扇区的尾纤调整到LBBP 板上。
3、UMPT板为LTE的主控板,在这块板上增加了一个连接至PTN设备的传输光口“FE/GE1”,传输光口应增加两条尾纤连接至PTN设备(注:在开通LTE站点前应和PTN人员确认该站点LTE传输有做)。
4、UMPT板的调测口也和WMPT板不同,TD的WMPT板的调测口为ETH口,用网线可以直接相连。
LTE的UMPT板的调测口为USB端口,需要一条USB 转网线口的数据线与网线相连才能进行UMPT板的调试。
软件方面1、登陆TD的LMT(IP地址为17.21.2.15)软件备份当前基站数据(登陆前修改本地IP为17.21.2.18),LMT用户名和密码都是admin,备份完成后向网管申请闭站。
备份操作:A、点击LMT软件左下角“维护”按钮。
B、点击“软件管理”、“软件升级”。
C、选择“基站软件升级”。
D、选择“备份配置数据文件”,目录名为文件保存位置,文件类型为“MML格式”。
2、查询基站当前版本是否为700(命令为:LST SOFTWARE)。
若不是首先登录对应基站版本的LMT软件,将基站升级为700的版本,升级后应在此查询基站版本是否升级完成。
(注1:)注1:要先将配置FTP服务器1.在运行LMT之后,右下角程序托盘,显示有一个绿色图标,2.选择绿色图标处,点击右键,弹出FTP服务器设置菜单。
3.选择“FTP server configure”,进入界面,在Working directory设置FTP根目录(文件所在文件夹的根目录)。
升级操作:A、点击LMT软件左下角维护。
B、点击“软件管理”、“软件升级”。
LTE下的详细开机流程介绍-很好-很重要

UE的开机流程PLMN由很多个小区组成。
小区由其使用的主扰码(Primary Scrambling Code)标识,主扰码在网络规划时分配。
小区所属的PLMN的信息包含在系统消息中。
终端在开机或脱网时,首先选择一个PLMN,然后搜索该PLMN的小区,如果在该PLMN下无法捕捉到合适的小区,则上报PLMN列表启动新一轮小区获取过程。
终端要维护几种不同类型的PLMN列表,每个列表中会有多个PLMN。
●RPLMN----已登记PLMN(RPLMN)是终端在上次关机或脱网前登记上的PLMN。
●EPLMN----等效PLMN(EPLMN)为与终端当前所选择的PLMN处于同等地位的PLMN,其优先级相同。
●HPLMN----归属PLMN(HPLMN)为终端用户归属的PLMN。
●UPLMN----用户控制PLMN(UPLMN)是储存在USIM卡上的一个与PLMN选择有关的参数。
●OPLMN----运营商控制PLMN(OPLMN)是储存在USIM卡上的一个与PLMN选择有关的参数。
●FPLMN----禁用PLMN(FPLMN)为被禁止访问的PLMN,●APLMN----可获取PLMN(APLMN)为终端能在其上找到至少一个小区,并能读出其PLMN标识信息的PLMN。
PLMN的选择有自动和手动两种:(1)自动选择,终端开机或脱网时,其非接入层功能模块会利用终端中存储的PLMN信息首先选择一个PLMN,然后命令接入层功能模块去搜索该PLMN。
相应地,接入层利用终端中存储的小区列表信息来选择、捕获小区,或启动小区搜索程序来搜索属于该PLMN的小区。
如果捕获成功,则将搜索结果报告非接入层;否则,将由非接入层再次选择一个PLMN,重新搜索。
不同类型的PLMN其优先级别不同,终端在进行PLMN选择时将按照以下顺序依次进行:①RPLMN和EPLMN②HPLMN③UPLMN④OPLMN⑤其他的PLMN(2)手动选择,终端开机或脱网时,其非接入层功能模块会命令接入层去搜索所有的PLMN,然后接入层将搜索到的所有PLMN信息报告给非接入层,由用户手动操作来选定一个PLMN。
lte使用方法

lte使用方法随着移动互联网的普及,人们对于上网速度和稳定性的要求越来越高。
相比于3G和4G网络,LTE网络在速度和稳定性方面都有了极大的提升,成为目前最流行的网络类型之一。
那么,如何正确使用LTE网络呢?下面将为大家详细介绍。
一、开启LTE网络首先,我们需要确保我们的手机支持LTE网络。
目前,大部分智能手机都能够支持LTE网络,但是有一些旧款的手机可能不支持。
如果您不确定您的手机是否支持LTE网络,可以在设置里查看网络类型选项,如有LTE选项则说明您的手机支持该网络。
其次,确保本地的移动运营商已经推出了支持LTE的服务。
如果您不确定移动运营商是否支持LTE服务,可以访问官方网站或通过客服咨询获得相关信息。
最后,在手机设置中开启LTE选项。
具体操作如下:进入手机“设置”界面,点击“无线和网络”或“移动数据”,找到“网络模式”或“网络选项”,选择“LTE/WCDMA/GSM自动”,手动开启LTE网络。
二、注意事项使用LTE网络需要注意以下事项:1、LTE网络需要更大的网络带宽,因此在大流量的情况下,可能会出现网络拥堵的情况,导致网速下降或无法连接。
建议在使用前,先了解运营商的网络流量使用规则。
2、手机在使用LTE网络时会消耗较多的电量,因此需要注意电量是否充足,可以选择使用充电宝等配件保证使用时间。
3、在使用LTE网络时,需要注意是否处于稳定的网络环境。
如果处于网络信号不稳定的地区,可能会导致网络速度变慢或无法连接。
4、在使用LTE网络时,需要注意网络数据的安全问题,建议使用安全的网络环境,不要在不安全的公共网络下进行敏感信息的传输。
三、总结LTE网络是目前最流行的网络类型之一,可以为我们提供更快速、更稳定的上网体验。
为了正确使用LTE网络,我们需要首先确保手机是否支持LTE网络,然后开启LTE网络选项,同时需要注意网络拥堵、电量消耗、网络环境和网络数据的安全问题。
如果能够正确使用LTE网络,相信一定会获得更稳定、更流畅的上网体验。
LTEUE开机时发生的流程

UE 开机时发生得流程1、1 PL MN选择流程UE在E —UTRAN频段中扫描所有得载频信道,如果搜索到了一个或多个PLMN, U E将把所找到得满足质量门限P L M N报给NA S。
获取PLMN I D,不满足质量门限得P LM N将与测量值一起上报给NAS层.N A S层选定P LMN,再进行小区选择。
PLMN由很多个小区组成。
小区由其使用得主扰码 (Prima r y Sc r am bl in g Co d e)标识,主扰码在网络规划时分配•小区所属得P LM N得信息包含在系统消息中。
终端在开机或脱网时,首先选择一个P LMN,然后搜索该P LM N得小区,如果在该P LM N下无法捕捉到合适得小区,则上报PLM N列表启动新一轮小区获取过程。
终端要维护几种不同类型得P L MN列表,每个列表中会有多个P LMN .R PL MN-—--已登记PL M N (R P L MN )就是终端在上次关机或脱网前登记上得PLM N。
EPLMN ——--等效P L MN(EPLMN) 为与终端当前所选择得PLMN 处于同等地位得PLM N ,其优先级相同。
HPL MN ——--归属PLMN( H P L MN)为终端用户归属得P L M N。
UPLMN---------- 用户控制PLMN( U P L MN )就是储存在USI M卡上得一个与PLM N 选择有关得参数。
OPLMN- ———运营商控制P LM N(O P LMN) 就是储存在U SI M 卡上得一个与PL M N 选择有关得参数。
F PLMN-――-禁用P LMN( F PLMN)为被禁止访问得PLMN,AP LMN-—-—可获取PL MN (AP LMN )为终端能在其上找到至少一个小区,并能读出其P L M N标识信息得PLMN。
PLMN 得选择有自动与手动两种:(1)自动选择,终端开机或脱网时,其非接入层功能模块会利用终端中存储得PLM N信息首先选择一个PLMN,然后命令接入层功能模块去搜索该PLM N.相应地,接入层利用终端中存储得小区列表信息来选择、捕获小区,或启动小区搜索程序来搜索属于该PLMN 得小区。
LTE基本业务流程与主要信令

LTE基本业务流程与主要信令1. 引言LTE(Long Term Evolution)是第四代移动通信系统,以其高速数据传输、低延迟和高质量语音通信而受到广泛关注和应用。
LTE基本业务流程与主要信令是了解和理解LTE技术的重要方面。
本文将介绍LTE基本业务流程和涉及的主要信令。
2. LTE基本业务流程2.1 附着过程附着是指用户设备(UE)与网络之间建立起连接并进行认证、注册的过程。
下面是附着过程的基本流程:1.UE开机后,首先搜索周围的LTE网络。
2.UE选择一个合适的LTE网络并尝试与之建立连接。
3.UE通过初始接入过程与网络建立起连接,并请求进行附着。
4.网络对UE进行认证、注册,并向其分配一个临时标识。
5.UE成功附着到网络后,可以开始访问LTE网络的各项服务。
2.2 呼叫过程呼叫过程是用户在网络中发起和接收通话的过程。
下面是呼叫过程的基本流程:1.呼叫发起方UE向网络发送设备能力请求。
2.网络根据设备能力请求,判断是否满足通话需求。
3.网络为呼叫发起方UE分配资源,并建立起通信链路。
4.呼叫接收方UE收到呼叫请求后,进行相应的处理。
5.呼叫接收方UE响应呼叫请求,建立起与发起方UE的通信链路。
6.呼叫双方进行语音通话或数据传输。
7.当通话结束时,通信链路被释放。
2.3 切换过程切换是UE在移动中从一个基站切换到另外一个基站的过程,以保证通信的连续性。
下面是切换过程的基本流程:1.UE监测周围的LTE网络信号强度。
2.当UE监测到新基站的信号强度较大时,开始准备切换。
3.UE与新基站进行切换准备,比如获取新基站的系统信息。
4.当UE准备好切换时,通知当前基站进行切换操作。
5.当UE与新基站建立起连接后,切换完成。
3. 主要信令3.1 RRC消息RRC(Radio Resource Control)消息用于UE与网络之间的无线资源控制和管理。
以下是RRC消息的一些主要类型:•RRC Connection Setup:建立UE与网络之间的RRC连接。
LTE完整信令流程

LTE完整信令流程LTE(Long Term Evolution)是第四代移动通信技术,其完整的信令流程涵盖了网络接入、鉴权和安全、呼叫建立和释放等方面。
以下是详细的LTE完整信令流程:1. 初始接入(Initial Access):- 移动台(User Equipment,简称UE)启动,并选择最强的目标小区,完成小区和同步。
- UE发送随机接入前导(Random Access Preamble)到目标小区,以请求接入。
- 目标小区回复指定随机接入响应前导(Random Access Response Preamble),包含临时标识和时隙分配。
- UE发送接入确认请求(Access Request)。
- 目标小区发送接入确认响应(Access Accept),标识初始接入成功。
2. 鉴权和安全(Authentication and Security):- UE发送鉴权请求(Authentication Request),向鉴权中心(Authentication Center,简称AuC)请求鉴权参数。
- AuC生成鉴权响应(Authentication Response),发送给UE。
3. 建立连接(Establishment of Connection):- UE发送连接请求(Connection Request)给目标小区,请求建立初始连接。
- 目标小区回复连接确认(Connection Setup)。
- UE发送连接接受(Connection Accept)给目标小区,确认连接建立。
- 目标小区发送连接确认(Connection Confirm),标识连接建立成功。
4. 寻呼(Paging):-当UE处于空闲状态时,网络通过广播通知目标小区需要找到该UE。
- 目标小区发送寻呼消息(Paging Message)到UE指定的寻呼信道。
- UE收到寻呼消息后,返回寻呼响应(Paging Response)。
B310 LTE CPE 快速启动指南说明书

B310 LTE CPE Quick Start31507294_011Getting to know your B310Power indicator ●On: the B310 is powered on.●Off: the B310 is powered off.Network mode indicator ●Steady cyan: connected to an LTE network.●Steady green: connected to an Ethernet network.●Steady red:–The SIM card is not recognized, the PIN has not been entered, or the PIN verification failed.–Failed to connect to a mobile network or anEthernet network.Wi-Fi/WPS indicator ●Steady on: Wi-Fi turned on.●Blinking: a WPS connection is being set up.●Off: Wi-Fi turned off.LAN/WAN indicator● Steady on: LAN/WAN port is connected to a LANdevice or an Ethernet port.● Blinking: data is being transmitted through the LAN/WAN port.● Off: LAN/WAN port is not connected to a LAN device or an Ethernet port.Signal strength indicator ● On: signal reception available (more bars meanbetter reception).● Off: no reception.SIM card slot Install a standard SIM card to access the Internet via an LTE data connection.External antenna port Connect to external antenna after remove the cover.WPS buttonPress and hold for 2 or more seconds until is blinking to active WPS connection when Wi-Fi is turned on.Power buttonPress and hold for about 3 seconds to power the B310 on or off.Reset buttonRestoring the default settings of the B310 will eraseall previous settings.When the B310 is powered on, use a sharplypointed object to press and hold for about 3 seconds until indicator is blinking to restore the B310 to its factory settings. After the factory defaults are restored, the B310 will restart automatically.Power port Connect to compatible power adapter.LAN/WAN port● Working as a LAN port when connected to acomputer, switch, or other LAN device.● Working as a WAN port when connected to an Ethernet port on the wall. Telephone portConnect to a telephone.2InstallationScenario 1: Accessing the Internet using an LTE networkStep 1: Installing the SIM card1.Slide off the card slot cover.2.Insert the SIM card into the card slot. Ensure that the beveled edge of the SIM cardaligns with that of the card slot.3.Close the card slot cover.Do not remove the SIM card when it is in use. Doing so will affect the performance of your B310 and data stored on the SIM card may be lost.Step 2: Connecting cablesOnce connected to a power outlet, the B310 automatically powers on.Power adapterComputerTelephoneLaptop, tablet, or smart phone● To prevent interference caused by radio signals, place the B310 at least 1 meter (3.28 feet) away from telephone and other electrical devices. ● The B310's power adapter model is HW-120100XYW. X and Y represent letters or numbers that vary by region. For details about the specific adapter model, contact an authorized dealer.Do not connect the B310 to the telephone wall outlet (or any Public SwitchedTelephone Network), because doing so could damage the B310 due to excessive heat.Optional: Installing the external antennaIn areas with poor reception, connect external antenna to the B310's external antenna port to improve signal reception.1. Power off the B310 and disconnect it from the power outlet.2. Remove the cover from the antenna port. (Keep it in a safe place.)3. Install one or two external antennas as you need. Make sure the external antennas are securely connected to the antenna ports.If you are using only one external antenna, connect it to port 1.The external antenna is an optional accessory, and may not included in the packagingbox. If required, please contact your local dealer to purchase it.● Before installing the external antenna, ensure that the B310 is powered off and disconnected from the power outlet. ● Only use the external antenna indoors, and do not use it during thunderstorm. ● Do not change another unexpected antenna unless manufacturer provide.Scenario 2: Accessing the Internet using EthernetConnect the B310 to a wall-mounted Ethernet port or an ADSL modem for Internetaccess.Once connected to a power outlet, the B310 automatically powers on.Power adapterEthernet port on the wall TelephoneLaptop, tablet, or smart phone● To prevent interference caused by radio signals, place the B310 at least 1 meter (3.28 feet) away from telephone and other electrical devices. ● The B310's power adapter model is HW-120100XYW. X and Y represent letters or numbers that vary by region. For details about the specific adapter model, contact an authorized dealer.Do not connect the B310 to the telephone wall outlet (or any Public SwitchedTelephone Network), because doing so could damage the B310 due to excessive heat.3 Setting up a Wi-Fi connectionStep 1: Enabling Wi-Fi on the B310When theindicator is steady on, the Wi-Fi function of the B310 is turned on.Step 2: Recording the SSID and Wi-Fi keyThe default SSID and Wi-Fi key are printed on the B310's bottom label.Step 3: Setting up a Wi-Fi connection on your clientMethod 1: Setting up a Wi-Fi connection manually1. From your Wi-Fi enabled client, scan for wireless networks in your area.2. Connect to the network name that matches the SSID found on the device label.3. When prompted for password, enter the Wi-Fi Key found on the device label. (TheWi-Fi key is case sensitive.) Your client will notify you when it is connected.Make sure your client (computer, tablet, or smart phone) also supports Wi-Fi.For details about how to manually enable or disable the Wi-Fi function, refer to theWLAN settings section of the help information on the web management page.To prevent unauthorized parties from accessing your Wi-Fi network, it isrecommended that you change the SSID and Wi-Fi key from time to time. For details, see the help information on the web management page.Method 2: Setting up a Wi-Fi connection through WPSIf the client supports WPS, you can set up a WPS connection as follows:1.Ensure that Wi-Fi is enabled on the client.2.Press and hold the WPS button for 2 or more seconds. The indicator thenstarts blinking.3.Activate the WPS connection on the client in 2 minutes.user guide.4 Configuring your B3101. After a client is connected to the B310 through Wi-Fi or LAN port, launch a browser on the client and visit http://192.168.8.1.2. Enter the user name and password to log in to the web management page. Thedefault user name and password are printed on the B310's bottom label.3. Follow the quick setup wizard to check or set network connection parameters step by step. For details, see the help information on the web management page.Once you are done, try opening a web page on the client to verify whether you haveInternet access.● To protect your account, change the password after your first login. For details, see the help information on the web management page.● If you modify the SSID and Wi-Fi key, you must set up the Wi-Fi connection on the client again.5For more helpIf you are experiencing any issues with the B310:●Restart the B310.●See the help information on the web management page.●Restore the B310 to its factory settings.●Contact your service provider.Please visit /en/support/hotline for recently updated hotline and email address in your country or region.Figures in this guide are for your reference only. Specific models may vary slightly, contact your service provider for more detailed information.6Safety informationThis section contains important information about the operation of your device. It also contains information about how to use the device safely. Read this information carefully before using your device.Electronic deviceDo not use your device if using the device is prohibited. Do not use the device if doing so causes danger or interference with other electronic devices.Interference with medical equipment●Follow rules and regulations set forth by hospitals and health care facilities. Do notuse your device where prohibited.●Some wireless devices may affect the performance of hearing aids or pacemakers.Consult your service provider for more information.●Pacemaker manufacturers recommend that a minimum distance of 15 cm bemaintained between a device and a pacemaker to prevent potential interference with the pacemaker. If using a pacemaker, hold the device on the side opposite the pacemaker and do not carry the device in your front pocket.Areas with flammables and explosives●Do not use the device where flammables or explosives are stored (in a gas station,oil depot, or chemical plant, for example). Using your device in these environments increases the risk of explosion or fire. In addition, follow the instructions indicated in text or symbols.●Do not store or transport the device in containers with flammable liquids, gases, orexplosives.Operating environment●Avoid dusty, damp, or dirty environments. Avoid magnetic fields. Using the devicein these environments may result in circuit malfunctions.●Before connecting and disconnecting cables, stop using the device and disconnectit from the power supply. Ensure that your hands are dry during operation.●Place the device on a stable surface.●Keep the device away from electronic appliances that generate strong magnetic orelectric fields, such as a microwave oven or refrigerator.●During thunderstorms, power off your device and remove all cables connected to itto protect against lightning strikes.●Do not use your device during thunderstorms to protect your device against anydanger caused by lightning.●Ideal operating temperatures are 0°C to +40°C. Ideal storage temperatures are-20°C to +70°C. Extreme heat or cold may damage your device or accessories.●Keep the device and accessories in a well-ventilated and cool area away fromdirect sunlight. Do not enclose or cover your device with towels or other objects.Do not place the device in a container with poor heat dissipation, such as a box or bag.●To protect your device or accessories from fire or electrical shock hazards, avoidrain and moisture.●Keep the device away from sources of heat and fire, such as a heater, microwaveoven, stove, water heater, radiator, or candle.●Do not place any object, such as a candle or a water container, on the device. Ifany foreign object or liquid enters the device, immediately stop using it, power it off, and remove all cables connected to it. Then, contact an authorized service center.●Do not block device openings. Reserve a minimum of 10 cm around the device todissipate heat.●Stop using your device or applications for a while if the device is overheated. If skinis exposed to an overheated device for an extended period, low temperature burn symptoms, such as red spots and darker pigmentation, may occur.●Do not touch the device's antenna. Otherwise, communication quality may bereduced.●Do not allow children or pets to bite or suck the device or accessories. Doing somay result in damage or explosion.●Observe local laws and regulations, and respect the privacy and legal rights ofothers.●The device should be installed and operated with a minimum distance of 20 cmbetween the radiator and your body.●Keep the device in a place with good reception. The distance between the deviceand other metal materials (such as metal brackets or metal doors and windows) should be greater than 25 cm and the distance between the device should be greater than 30 cm.Child's safety●Comply with all precautions with regard to child's safety. Letting children play withthe device or its accessories may be dangerous. The device includes detachable parts that may present a choking hazard. Keep away from children.●The device and its accessories are not intended for use by children. Children shouldonly use the device with adult supervision.Accessories●Using an unapproved or incompatible power adapter, charger or battery may causefire, explosion or other hazards.●Choose only accessories approved for use with this model by the devicemanufacturer. The use of any other types of accessories may void the warranty, may violate local regulations and laws, and may be dangerous. Please contact your retailer for information about the availability of approved accessories in your area. Power adapter safety●The power plug is intended to serve as a disconnect device.●For pluggable devices, the socket-outlet shall be installed near the devices and shallbe easily accessible.●Unplug the power adapter from electrical outlets and the device when not in use.●Do not drop or cause an impact to the power adapter. If it is damaged, take it toan authorized service center for inspection.●If the power cable is damaged (for example, the cord is exposed or broken), or theplug loosens, stop using it at once. Continued use may lead to electric shocks, short circuits, or fire.●Do not touch the power cord with wet hands or pull the power cord to disconnectthe power adapter.●Do not touch the device or the power adapter with wet hands. Doing so may leadto short circuits, malfunctions, or electric shocks.●If your power adapter has been exposed to water, other liquids, or excessivemoisture, take it to an authorized service center for inspection.●Ensure that the power adapter meets the requirements of Clause 2.5 in IEC60950-1/EN60950-1/UL60950-1 and has been tested and approved according to national or local standards.Cleaning and maintenance●During storage, transportation, and operation of the device, keep it dry andprotect it from collision.●Keep the device and accessories dry. Do not attempt to dry it with an external heatsource, such as a microwave oven or hair dryer.●Do not expose your device or accessories to extreme heat or cold. Theseenvironments may interfere with proper function and may lead to fire or explosion.●Avoid collision, which may lead to device malfunctions, overheating, fire, orexplosion.●If the device is not going to be used for an extended period of time, power it off,and remove all cables connected to it.●If anything unusual occurs (for example, if the device emits smoke or any unusualsound or smell), immediately stop using it, power it off, remove all cablesconnected to it, and contact an authorized service center.●Do not trample, pull, or excessively bend any cable. Doing so may damage thecable, causing the device to malfunction.●Before you clean or maintain the device, stop using it, stop all applications, anddisconnect all cables connected to it.●Do not use any chemical detergent, powder, or other chemical agents (such asalcohol and benzene) to clean the device or accessories. These substances may cause damage to parts or present a fire hazard. Use a clean, soft, and dry cloth to clean the device and accessories.●Do not place magnetic stripe cards, such as credit cards and phone cards, near thedevice for extended periods of time. Otherwise the magnetic stripe cards may be damaged.●Do not dismantle or remanufacture the device and its accessories. This voids thewarranty and releases the manufacturer from liability for damage. In case ofdamage, contact an authorized service center for assistance or repair. Environmental protection●The device and its accessories (if included), such as the power adapter, headset,and battery should not be disposed of with household garbage.●Disposal of the device and its accessories is subject to local regulations. Supportproper collection and recycling.Disposal and recycling informationThis symbol (with or without a solid bar) on the device, batteries (if included), and/or the packaging, indicates that the device and its electrical accessories (for example, a headset, adapter, or cable) and batteries should not be disposed of as household garbage. These items should not be disposed of as unsorted municipal waste and should be taken to a certified collection point for recycling or proper disposal.For more detailed information about device or battery recycling, contact your local city office, household waste disposal service, or retail store.Disposal of the device and batteries (if included) is subject to WEEE Directive Recast (Directive 2012/19/EU) and Battery Directive (Directive 2006/66/EC). The purpose of separating WEEE and batteries from other waste is to minimize the potential environmental impacts and human health risk of any hazardous substances that may be present.Reduction of hazardous substancesThis device is compliant with the REACH Regulation [Regulation (EC) No 1907/2006] and RoHS Directive Recast (Directive 2011/65/EU). Batteries (if included) are compliant with the Battery Directive (Directive 2006/66/EC). For up-to-date information aboutREACH and RoHS compliance, please visit the web site/certification.EU regulatory conformanceStatementHereby, Huawei Technologies Co., Ltd. declares that this device is in compliance with the essential requirements and other relevant provisions of Directive 1999/5/EC.For the declaration of conformity, visit the web site/certification.The following marking is included in the product:This device may be operated in all member states of the EU.Observe national and local regulations where the device is used.This device may be restricted for use, depending on the local network. Restrictions in the 2.4 GHz band:Norway: This subsection does not apply for the geographical area within a radius of 20 km from the centre of Ny-Ålesund.7Legal NoticeCopyright © Huawei Technologies Co., Ltd. 2015. All rights reserved. No part of this manual may be reproduced or transmitted in any form or by any means without prior written consent of Huawei Technologies Co., Ltd. and its affiliates ("Huawei").The product described in this manual may include copyrighted software of Huawei and possible licensors. Customers shall not in any manner reproduce, distribute, modify, decompile, disassemble, decrypt, extract, reverse engineer, lease, assign, or sublicense the said software, unless such restrictions are prohibited by applicable laws or such actions are approved by respective copyright holders.Trademarks and Permissions, , and are trademarks or registered trademarks of HuaweiTechnologies Co., Ltd.LTE is a trade mark of ETSI.Other trademarks, product, service and company names mentioned may be the property of their respective owners.NoticeSome features of the product and its accessories described herein rely on the software installed, capacities and settings of local network, and therefore may not be activated or may be limited by local network operators or network service providers.Thus, the descriptions herein may not exactly match the product or its accessories which you purchase.Huawei reserves the right to change or modify any information or specifications contained in this manual without prior notice and without any liability. DISCLAIMERALL CONTENTS OF THIS MANUAL ARE PROVIDED "AS IS". EXCEPT AS REQUIRED BY APPLICABLE LAWS, NO WARRANTIES OF ANY KIND, EITHER EXPRESS OR IMPLIED, INCLUDING BUT NOT LIMITED TO, THE IMPLIED WARRANTIES OF MERCHANTABILITY AND FITNESS FOR A PARTICULAR PURPOSE, ARE MADE IN RELATION TO THE ACCURACY, RELIABILITY OR CONTENTS OF THIS MANUAL.TO THE MAXIMUM EXTENT PERMITTED BY APPLICABLE LAW, IN NO EVENT SHALL HUAWEI BE LIABLE FOR ANY SPECIAL, INCIDENTAL, INDIRECT, OR CONSEQUENTIAL DAMAGES, OR LOSS OF PROFITS, BUSINESS, REVENUE, DATA, GOODWILL SAVINGSOR ANTICIPATED SAVINGS REGARDLESS OF WHETHER SUCH LOSSES ARE FORSEEABLE OR NOT.THE MAXIMUM LIABILITY (THIS LIMITATION SHALL NOT APPLY TO LIABILITY FOR PERSONAL INJURY TO THE EXTENT APPLICABLE LAW PROHIBITS SUCH A LIMITATION) OF HUAWEI ARISING FROM THE USE OF THE PRODUCT DESCRIBED IN THIS MANUAL SHALL BE LIMITED TO THE AMOUNT PAID BY CUSTOMERS FOR THE PURCHASE OF THIS PRODUCT.Import and Export RegulationsCustomers shall comply with all applicable export or import laws and regulations and be responsible to obtain all necessary governmental permits and licenses in order to export, re-export or import the product mentioned in this manual including the software and technical data therein.Privacy PolicyTo better understand how we protect your personal information, please see the privacy policy at /privacy-policy.。
LTEUE开机时发生的流程

LTEUE开机时发生的流程1.启动电源:当LTEUE处于关机状态时,用户需要按下电源键来启动设备。
电源键的功能是打开设备的电源以开始开机流程。
2.初始化硬件:一旦电源被打开,设备开始对硬件进行初始化。
这包括检查处理器、内存、无线模块等硬件组件的状态,以确保它们能够正常工作。
3.加电测试(PST):在硬件初始化完成后,设备会进行加电测试(PST),以确保所有硬件功能都正常。
PST会检查设备的各个组件,如显示屏、摄像头、扬声器等,确保它们能够正常工作。
4.引导设备:一旦硬件初始化和PST测试完成,设备会开始引导操作系统。
引导过程会加载操作系统的内核,并进行各种系统检查和设置。
5.启动操作系统:操作系统加载完成后,设备就可以开始正常运行。
LTEUE的操作系统会加载所需的驱动程序和应用程序,以确保设备能够正常使用。
6.网络:一旦设备启动,LTEUE会开始可用的LTE网络。
设备会扫描附近的基站,以寻找最适合的网络。
一旦找到网络,设备会尝试建立连接。
7.连接基站:设备在找到合适的基站后,会尝试与其建立连接。
这包括发送连接请求、等待基站的确认和分配资源等步骤。
一旦连接建立成功,LTEUE就可以开始进行通信。
8.认证和鉴权:在连接建立后,设备会进行认证和鉴权过程,以确保设备有权访问LTE网络。
这包括设备向网络发送身份信息、网络验证身份信息并授权设备使用网络资源等步骤。
9.获取IP地址:一旦鉴权成功,设备会获取一个IP地址,以便在LTE网络上进行数据传输。
IP地址是设备在网络中的唯一标识,用于路由数据包。
10.就绪状态:最后,LTEUE进入就绪状态,可以开始进行数据传输。
设备现在已经成功连接到LTE网络,可以进行通话、发送短信、浏览互联网等操作。
总的来说,LTEUE开机的流程包括硬件初始化、操作系统加载、网络、连接基站、认证鉴权、获取IP地址等多个步骤。
只有在经过这些步骤后,LTEUE才能成功连接到LTE网络并正常工作。
LTE开机搜索与随机接入工作过程

LTE开机搜索与随机接入工作过程一、LTE开机及工作过程如下图所示:二、小区搜索及同步过程整个小区搜索及同步过程的示意图及流程图如下:1)UE开机,在可能存在LTE小区的几个中心频点上接收信号(PSS),以接收信号强度来判断这个频点周围是否可能存在小区,如果UE保存了上次关机时的频点和运营商信息,则开机后会先在上次驻留的小区上尝试;如果没有,就要在划分给LTE系统的频带范围内做全频段扫描,发现信号较强的频点去尝试;2)然后在这个中心频点周围收PSS(主同步信号),它占用了中心频带的6RB,因此可以兼容所有的系统带宽,信号以5ms为周期重复,在子帧#0发送,并且是ZC序列,具有很强的相关性,因此可以直接检测并接收到,据此可以得到小区组里小区ID,同时确定5ms的时隙边界,同时通过检查这个信号就可以知道循环前缀CP长度以及采用的是FDD还是TDD(因为TDD的PSS是放在特殊子帧里面,位置有所不同,基于此来做判断)由于它是5ms 重复,因为在这一步它还无法获得帧同步;3)5ms时隙同步后,在PSS基础上向前搜索SSS,SSS由两个端随机序列组成,前后半帧的映射正好相反,因此只要接收到两个SSS就可以确定10ms的边界,达到了帧同步的目的。
由于SSS信号携带了小区组ID,跟PSS结合就可以获得物理层ID(CELL ID),这样就可以进一步得到下行参考信号的结构信息。
4)在获得帧同步以后就可以读取PBCH了,通过上面两步获得了下行参考信号结构,通过解调参考信号可以进一步的精确时隙与频率同步,同时可以为解调PBCH做信道估计了。
PBCH在子帧#0的slot #1上发送,就是紧靠PSS,通过解调PBCH,可以得到系统帧号和带宽信息,以及PHICH的配置以及天线配置。
系统帧号以及天线数设计相对比较巧妙: SFN(系统帧数)位长为10bit,也就是取值从0-1023循环。
在PBCH的MIB(master information block)广播中只广播前8位,剩下的两位根据该帧在PBCH 40ms周期窗口的位置确定,第一个10ms帧为00,第二帧为01,第三帧为10,第四帧为11。
LTE终端开机小区选择过程研究解析

LTE终端开机小区选择过程研究解析LTE网络是一种4G高速移动网络,已经得到了广泛的应用。
在LTE网络中,终端设备的开机小区选择过程非常重要。
本文将分析LTE终端开机小区选择过程的各个环节,帮助大家更好地理解LTE网络,提高LTE网络使用效率。
一、LTE终端开机小区选择流程LTE终端开机小区选择流程包括以下三个步骤:1. 发现小区当LTE终端设备开机后,它会广播请求信令,请求与基站进行连接。
当基站收到这个请求信令后,基站会发送“BCCH广播信”号来告诉终端设备有哪些基站可以连接。
基站发送的BCCH信号包括小区频率、小区ID等信息。
2. 探测小区当终端设备接收到基站的BCCH信号后,它就会开始探测小区。
终端设备根据收到的BCCH信号来判断可连接的小区的信号强度和质量。
当终端设备发现可连接的小区时,会把这个小区的ID和频率等信息存储起来。
如果没有发现可连接的小区,终端设备就会继续等待下一个广播信号。
3. 选择小区当终端设备发现多个可连接的小区时,它会通过对比小区信号强度、质量等因素,选择最优的一个小区进行连接。
以上就是LTE终端开机小区选择流程的全部步骤。
二、LTE终端开机小区选择理论LTE终端设备在开机时要选择一个小区进行连接,这个选择是基于某些理论的。
在开机小区选择过程中,以下几个因素是影响选择的关键。
1. 小区信号质量小区信号质量是指小区发射端发送的射频信号的信号强度以及小区接收端接收到的信号的信噪比。
一般情况下,小区信号强度越强,信噪比越高,就越有可能被终端设备选择。
2. 小区信道状态小区的信道状态是指信道的质量和信道干扰程度的综合体现。
一般情况下,小区的信道质量好,信道干扰程度低,就越有可能被终端设备选择。
3. 小区载频质量小区的载频质量越好,小区能提供的数据传输速率就越高,越有可能被终端设备选择。
4. 终端设备位置终端设备与小区之间的距离和占比是影响小区选择的一个关键因素。
如果终端设备与小区之间的距离太远,或在城市中高层建筑中,会导致信号质量降低,从而影响小区选择。
- 1、下载文档前请自行甄别文档内容的完整性,平台不提供额外的编辑、内容补充、找答案等附加服务。
- 2、"仅部分预览"的文档,不可在线预览部分如存在完整性等问题,可反馈申请退款(可完整预览的文档不适用该条件!)。
- 3、如文档侵犯您的权益,请联系客服反馈,我们会尽快为您处理(人工客服工作时间:9:00-18:30)。
1TD-LTE基本信令流程
1.1开机附着流程
附着就是几十UE将NAS层的无线资源请求消息经eNB转发到核心网,核心网触发对UE的认证和鉴权,并向UE分配默认的IP连接。
UE刚开机时,先进行物理下行同步,搜索小区并选择到一个合适的小区后,驻留并进行附着过程。
附着流程图如下:
1.1.1正常流程
1.1.2异常流程
RRC建立失败
T300
✓核心网拒绝
✓eNB未等到Initial context setup request消息
RRC重配消息丢失或eNB内部配置的UE安全参数失败
一些概念理解:
接入层与非接入层:接入层与接入网有消息交互,非接入层直接与核心网进行消息交互。
