pox+mininet
voxelnet解读

voxelnet解读
VoxelNet是一种高效的三维物体检测方法,通过使用三维体素来有效地
检测和定位道路上的物体。
这种方法结合了特征提取和对象检测的能力,能
够在处理三维数据时获得很好的性能。
在VoxelNet中,三维点云数据首先被分割成一系列体素,并且每个体素
内包含多个点云。
这样做的好处是可以将三维物体的位置信息以二维形式表示,使得处理更加高效。
然后,在每个体素内部使用全卷积网络来提取特征。
这些特征将用于预测物体的位置、方向和大小。
VoxelNet中的关键创新是使用了一个特殊的特征提取网络,称为Voxel Feature Encoding (VFE)。
VFE网络使用多个卷积层和规范化操作,将点云数
据编码成体素特征。
这种编码方式能够有效地捕捉三维数据中物体的形状和
结构信息。
在进行对象检测时,VoxelNet使用了一种名为Region Proposal Network (RPN)的技术。
RPN网络将体素特征与二维图像特征相结合,生成一系列候
选框,并对每个候选框进行分类和回归。
这样就能够检测出三维点云中存在
的物体,并预测它们的位置和形状。
VoxelNet在大规模三维物体检测任务上取得了很好的性能,能够准确地
检测出道路上的车辆、行人和其他物体。
它的创新之处在于将点云数据转换
成体素表示,并使用全卷积网络和RPN网络进行特征提取和对象检测。
这
种方法不仅提高了检测的准确性,而且处理速度也很快,适用于实时应用。
Mininet操作命令
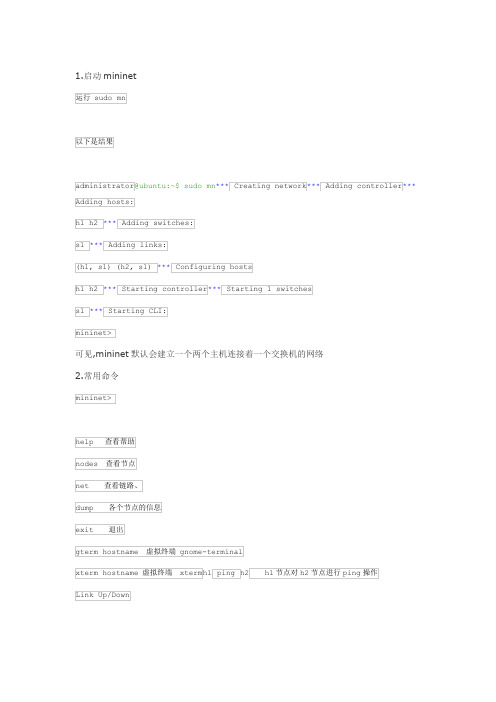
1.启动mininet运行 sudo mn以下是结果administrator@ubuntu:~$ sudo mn*** Creating network*** Adding controller*** Adding hosts:h1 h2 *** Adding switches:s1 *** Adding links:(h1, s1) (h2, s1) *** Configuring hostsh1 h2 *** Starting controller*** Starting 1 switchess1 *** Starting CLI:mininet>可见,mininet默认会建立一个两个主机连接着一个交换机的网络2.常用命令mininet>help 查看帮助nodes 查看节点net 查看链路、dump 各个节点的信息exit 退出gterm hostname 虚拟终端 gnome-terminalxterm hostname 虚拟终端 xtermh1 ping h2 h1节点对h2节点进行ping操作Link Up/Down禁用s1与h1通路link s1 h1 down启用s1和h1通路link s1 h1 up3.mininet 运行参数sudo mininet -c 清理配置信息Options:-h, --help show this help message and exit--switch=SWITCH ivs|lxbr|ovs|ovsk|ovsl|user[,param=value...]--host=HOST cfs|proc|rt[,param=value...]--controller=CONTROLLER default|none|nox|ovsc|ref|remote[,param=value...]--link=LINK default|tc[,param=value...]--topo=TOPOlinear|minimal|reversed|single|torus|tree[,param=value...]-c, --clean clean and exit--custom=CUSTOM read custom topo and node params from .pyfile--test=TEST cli|build|pingall|pingpair|iperf|all|iperfudp|none-x, --xterms spawn xterms for each node-i IPBASE, --ipbase=IPBASE base IP address for hosts--mac automatically set host MACs--arp set all-pairs ARP entries-v VERBOSITY, --verbosity=VERBOSITY info|warning|critical|error|debug|output--innamespace sw and ctrl in namespace?--listenport=LISTENPORT base port for passive switch listening--nolistenport don't use passive listening port--pre=PRE CLI script to run before tests--post=POST CLI script to run after tests--pin pin hosts to CPU cores (requires --host cfs or --host rt) --nat adds a NAT to the topology that connects Mininet to the physical network--version举例使用pox控制器$ ./pox.py forwarding.l2_learning$ sudo mn --controller=remote,ip=127.0.0.1,port=6633让OF交换机工作为“二层自学习交换”CTRL+D 退出MININET。
mininet使用教程
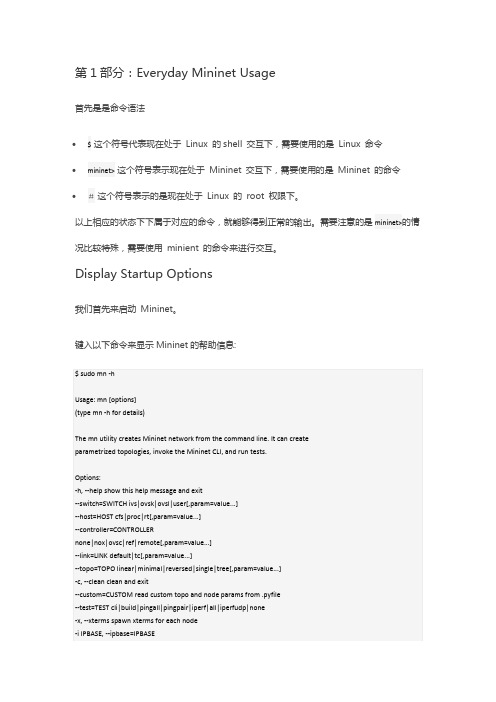
第1部分:Everyday Mininet Usage首先是是命令语法•$这个符号代表现在处于Linux 的shell 交互下,需要使用的是Linux 命令•mininet>这个符号表示现在处于Mininet 交互下,需要使用的是Mininet 的命令•#这个符号表示的是现在处于Linux 的root 权限下。
以上相应的状态下下属于对应的命令,就能够得到正常的输出。
需要注意的是mininet>的情况比较特殊,需要使用minient 的命令来进行交互。
Display Startup Options我们首先来启动Mininet。
键入以下命令来显示Mininet的帮助信息:如上所示,输出了mn 的帮助信息。
Start Wireshark为了使用Wireshark 来查看OpenFlow 的控制信息,我们先打开Wireshark 并让他在后台运行。
$ sudo wireshark &在Wireshark 的过滤选项中,输入of,然后选择Apply。
In Wireshark, click Capture, then Interfaces, then select Start on the loopback interface (lo).现在窗口上暂时应该没有任何OpenFlow 的数据包。
如果已经安装了Wireshark,但是运行不了(e.g. 你得到一个类似$DISPLAY not set之类的错误信息,可以参考FAQ,:https:///mininet/mininet/wiki/FAQ#wiki-X11-forwarding)设置好X11就可以正常运行GUI 程序,并且使用xterm 之类的终端仿真器了,后面的演示中可以用到。
Interact with Hosts and SwitchesStart a minimal topology and enter the CLI:默认的最小拓扑结构包含有两台主机(h1,h2),还有一个OpenFlow 的交换机,一个OpenFlow 的控制器四台设备。
Lab1 Mininet 安装设定与使用

链路类型:有线、无 线、混合等
控制器类型: OpenFlow、OVS、
POX等
拓扑结构:线性、树 形、环形、网格等
流量控制:带宽、延 迟、丢包率等
仿真场景:单节点、 多节点、网络故障等
实验案例:简单网络、 复杂网络、SDN实验
等
Mininet的高级使用
第五章
Mininet的自定义网络拓扑
添加 标题
实验步骤: . 创建网络拓扑 b. 配置路由协议 c. 启动网络 d. 测试网络性能
. 创建网络拓扑 b. 配置路由协议 c. 启动网络 d. 测试网络性能
实验结果:成功实现基于Mininet的路由协议
单击此处输入你的项正文文字是您思想的提炼请尽量言简赅的意 阐述你的观点。
实验案例三:基于Mininet的安全协议实现
安装过程中的常见问题及解决方法
问题:安装过程中出现错误提示 解决方法:检查网络连接和防 火墙设置确保网络畅通防火墙允许Mininet通过
解决方法:检查网络连接和防火墙设置确保网络畅通防火墙 允许Mininet通过
问题:安装过程中出现权限问题 解决方法:使用管理员权限运 行安装程序或者更改安装目录的权限设置
Mininet是一个网络模拟器用于创建和运行虚拟网络 它可以模拟各种网络拓扑和协议如SDN、OpenFlow等 Mininet支持Python编程可以编写脚本来控制和测试网络 它可以用于网络研究、教学和测试帮助用户更好地理解和使用网络技术
Mininet的特点
开源软件:Mininet是一个开源的网络仿真平台可以免费下载和使用。
启动网络:net.strt()
添加主机和交换机:net.ddHost('h1')、 net.ddSwitch('s1')
Mininet介绍及安装
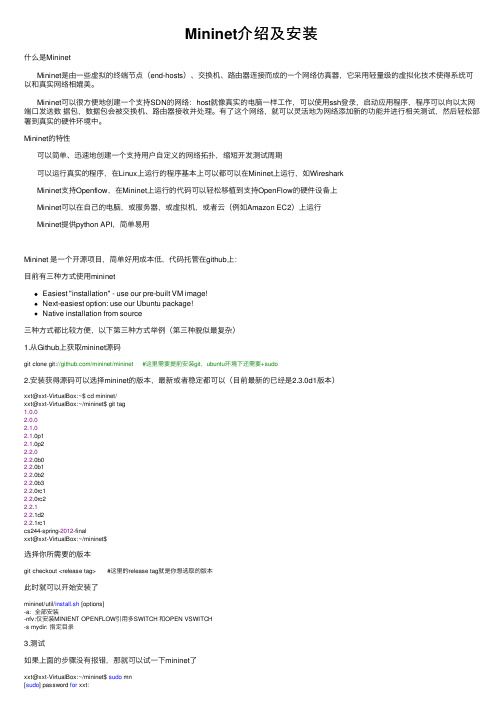
Mininet介绍及安装什么是MininetMininet是由⼀些虚拟的终端节点(end-hosts)、交换机、路由器连接⽽成的⼀个⽹络仿真器,它采⽤轻量级的虚拟化技术使得系统可以和真实⽹络相媲美。
Mininet可以很⽅便地创建⼀个⽀持SDN的⽹络:host就像真实的电脑⼀样⼯作,可以使⽤ssh登录,启动应⽤程序,程序可以向以太⽹端⼝发送数据包,数据包会被交换机、路由器接收并处理。
有了这个⽹络,就可以灵活地为⽹络添加新的功能并进⾏相关测试,然后轻松部署到真实的硬件环境中。
Mininet的特性可以简单、迅速地创建⼀个⽀持⽤户⾃定义的⽹络拓扑,缩短开发测试周期可以运⾏真实的程序,在Linux上运⾏的程序基本上可以都可以在Mininet上运⾏,如WiresharkMininet⽀持Openflow,在Mininet上运⾏的代码可以轻松移植到⽀持OpenFlow的硬件设备上Mininet可以在⾃⼰的电脑,或服务器,或虚拟机,或者云(例如Amazon EC2)上运⾏Mininet提供python API,简单易⽤Mininet 是⼀个开源项⽬,简单好⽤成本低,代码托管在github上:⽬前有三种⽅式使⽤mininetEasiest "installation" - use our pre-built VM image!Next-easiest option: use our Ubuntu package!Native installation from source三种⽅式都⽐较⽅便,以下第三种⽅式举例(第三种貌似最复杂)1.从Github上获取mininet源码git clone git:///mininet/mininet #这⾥需要提前安装git,ubuntu环境下还需要+sudo2.安装获得源码可以选择mininet的版本,最新或者稳定都可以(⽬前最新的已经是2.3.0d1版本)xxt@xxt-VirtualBox:~$ cd mininet/xxt@xxt-VirtualBox:~/mininet$ git tag1.0.02.0.02.1.02.1.0p12.1.0p22.2.02.2.0b02.2.0b12.2.0b22.2.0b32.2.0rc12.2.0rc22.2.12.2.1d22.2.1rc1cs244-spring-2012-finalxxt@xxt-VirtualBox:~/mininet$选择你所需要的版本git checkout <release tag> #这⾥的release tag就是你想选取的版本此时就可以开始安装了mininet/util/install.sh [options]-a: 全部安装-nfv:仅安装MINIENT OPENFLOW引⽤多SWITCH 和OPEN VSWITCH-s mydir: 指定⽬录3.测试如果上⾯的步骤没有报错,那就可以试⼀下mininet了xxt@xxt-VirtualBox:~/mininet$ sudo mn[sudo] password for xxt:*** Creating network*** Adding controller*** Adding hosts:h1 h2*** Adding switches:s1*** Adding links:(h1, s1) (h2, s1)*** Configuring hostsh1 h2*** Starting controllerc0*** Starting 1 switchess1 ...*** Starting CLI:mininet>这是⼀个最简单的拓扑,包括两个host和⼀个switch然后可以互相ping⼀下mininet> pingall*** Ping: testing ping reachabilityh1 -> h2h2 -> h1*** Results: 0% dropped (2/2 received)mininet>可以通过help命令了解其他功能mininet> helpDocumented commands (type help <topic>):========================================EOF gterm iperfudp nodes pingpair py switchdpctl help link noecho pingpairfull quit timedump intfs links pingall ports sh xexit iperf net pingallfull px source xtermYou may also send a command to a node using:<node> command {args}For example:mininet> h1 ifconfigThe interpreter automatically substitutes IP addressesfor node names when a node is the first arg, so commandslikemininet> h2 ping h3should work.Some character-oriented interactive commands requirenoecho:mininet> noecho h2 vi foo.pyHowever, starting up an xterm/gterm is generally better:mininet> xterm h2mininet>这⾥可以看到有许多功能都集成在mininet中,可以试⼏个⽐如查看节点(nodes)mininet> nodesavailable nodes are:c0 h1 h2 s1mininet>可以看到当前的拓扑⾥有四个节点,包括两个host,⼀个switch,还有⼀个控制器c0查看连接情况(net)mininet> neth1 h1-eth0:s1-eth1h2 h2-eth0:s1-eth2s1 lo: s1-eth1:h1-eth0 s1-eth2:h2-eth0c0mininet>可以看到h1的port0和s1的port1连接,h2的port0和s2的port2连接dump(这不知道怎么翻译,好多语⾔⾥都有这个⽅法。
Mininet+Ryu配置流程
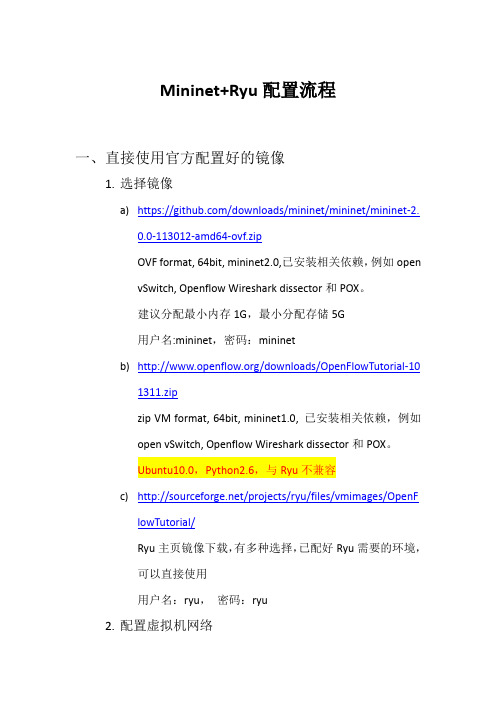
Mininet+Ryu配置流程一、直接使用官方配置好的镜像1.选择镜像a)https:///downloads/mininet/mininet/mininet-2.0.0-113012-amd64-ovf.zipOVF format, 64bit, mininet2.0,已安装相关依赖,例如openvSwitch, Openflow Wireshark dissector和POX。
建议分配最小内存1G,最小分配存储5G用户名:mininet,密码:mininetb)/downloads/OpenFlowTutorial-101311.zipzip VM format, 64bit, mininet1.0, 已安装相关依赖,例如open vSwitch, Openflow Wireshark dissector和POX。
Ubuntu10.0,Python2.6,与Ryu不兼容c)/projects/ryu/files/vmimages/OpenFlowTutorial/Ryu主页镜像下载,有多种选择,已配好Ryu需要的环境,可以直接使用用户名:ryu,密码:ryu2.配置虚拟机网络使用virtualbox打开镜像,在设置->网络->网卡2中增加一个网络连接3.配置SSH配置SSH可以直接在当前系统下远程登录虚拟机进行操作 Iifconfig –a查看虚拟机网络配置出现ethx, ethy和lo三项时说明配置成功,否则返回2重新配置●sudo dhclient ethxsudo dhclient ethy●下载Putty和Xming,在window下远程登录虚拟机打开Xming。
点击打开Putty,选择Enable X11 forwarding,注意,使用过程中不要关闭此窗口在cmd中打开Putty命令为:Putty.exe –X 虚拟机用户名@虚拟机地址虚拟机地址可以在虚拟机中使用ifconfig –a查看连接成功使用xtermxterm –sb 5004.Mininet基本操作是否安装成功●sudo mn用来测试mininet是否安装成功其他见openflow Tutorail和mininet book5.dpctl使用样例见openflow Tutorial6.安装ryu●直接使用pip安装ryupip install ryu●下载源码包安装ryugit clone git:///osrg/ryu.gitcd ryu; python ./setpu.py install●测试ryu是否能与mininet连接使用首先启动mininetsudo mn -csudo mn –topo single,3 –mac –switch ovsk –controller remote然后,在ryu文件夹下用ryu-manager运行simple_switch.py文件PYTHONPATH=../bin/ryu-managerryu/app/simple_switch.py二、使用虚拟机或者linux系统自行配置1.安装mininet及相关依赖●git clone git:///mininet/mininet下载mininet●mininet/util/install.sh [option]-a 安装mininet+openvswitch+wirshark+Pox-nfv 安装mininet+openvswitch安装完毕之后用sudo mn测试mininet是否安装成功2.剩余步骤没有远程登录的需求,不需要重新配置网络。
基于软件定义网络的动态QoS方法
基于软件定义网络的动态QoS方法徐苒茨;曹袖【摘要】随着计算机网络的快速发展,其对于服务质量(Quality of Service)的需求和要求也越来越高.近年来,软件定义网络(Software Defined Network)逐渐兴起,由于软件定义网络的服务质量方法可编程性、可扩展性强,因而能够弥补传统服务质量的很多问题.提出了一种软件定义网络实现的动态服务质量方法,在转发队列和路由选择环节都能根据当前网络的状况进行决策;与此同时还会根据网络状态的变化以及数据包到达目的地的延时和丢包率情况来对决策进行调整和补偿.%With the rapid development of network,there is more and more requiring for quality of service in communication system.In recent years,software defined network(SDN) has become a hot spot.SDN based Qos method is programmable and extensible,it makes up the defects of traditional method.This paper proposes a method for dynamic quality of service based on SDN in smart grid by considering both the state of current network and the delay and packet loss of the data packets arriving the destination.【期刊名称】《微型电脑应用》【年(卷),期】2017(033)012【总页数】4页(P71-74)【关键词】服务质量;软件定义网络;动态路由;动态转发队列【作者】徐苒茨;曹袖【作者单位】复旦大学计算机科学技术学院,上海201203;网络信息安全审计与监控教育部工程研究中心,上海200433【正文语种】中文【中图分类】TN393近年来,计算机网络快速发展,开始承载越来越多具有商业价值的业务,如网络音频视频会议、位置服务、云服务等,此类业务在传输时需要保证最低的带宽,且对时延、带宽、丢包率等网络参数敏感,要求一定的服务质量QoS(Quality of Service)而不是尽力服务(Best Effort Service)。
Mininet系列实验(12个实验)
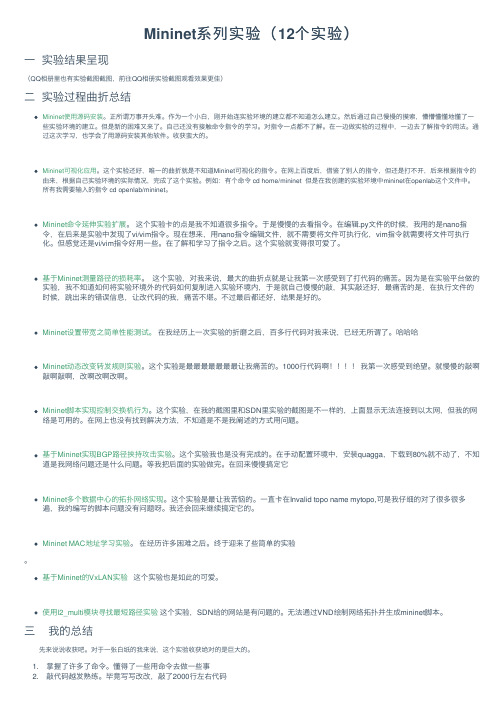
Mininet系列实验(12个实验)⼀实验结果呈现(QQ相册⾥也有实验截图截图,前往QQ相册实验截图观看效果更佳)⼆实验过程曲折总结Mininet使⽤源码安装。
正所谓万事开头难。
作为⼀个⼩⽩,刚开始连实验环境的建⽴都不知道怎么建⽴。
然后通过⾃⼰慢慢的摸索,懵懵懂懂地懂了⼀些实验环境的建⽴。
但是新的困难⼜来了。
⾃⼰还没有接触命令指令的学习。
对指令⼀点都不了解。
在⼀边做实验的过程中,⼀边去了解指令的⽤法。
通过这次学习,也学会了⽤源码安装其他软件。
收获蛮⼤的。
Mininet可视化应⽤。
这个实验还好,唯⼀的曲折就是不知道Mininet可视化的指令。
在⽹上百度后,借鉴了别⼈的指令,但还是打不开,后来根据指令的由来,根据⾃⼰实验环境的实际情况,完成了这个实验。
例如:有个命令 cd home/mininet 但是在我创建的实验环境中mininet在openlab这个⽂件中。
所有我需要输⼊的指令 cd openlab/mininet。
Mininet命令延伸实验扩展。
这个实验卡的点是我不知道很多指令。
于是慢慢的去看指令。
在编辑.py⽂件的时候,我⽤的是nano指令,在后来是实验中发现了vi/vim指令。
现在想来,⽤nano指令编辑⽂件,就不需要将⽂件可执⾏化,vim指令就需要将⽂件可执⾏化。
但感觉还是vi/vim指令好⽤⼀些。
在了解和学习了指令之后。
这个实验就变得很可爱了。
基于Mininet测量路径的损耗率。
这个实验,对我来说,最⼤的曲折点就是让我第⼀次感受到了打代码的痛苦。
因为是在实验平台做的实验,我不知道如何将实验环境外的代码如何复制进⼊实验环境内,于是就⾃⼰慢慢的敲,其实敲还好,最痛苦的是,在执⾏⽂件的时候,跳出来的错误信息,让改代码的我,痛苦不堪。
不过最后都还好,结果是好的。
Mininet设置带宽之简单性能测试。
在我经历上⼀次实验的折磨之后,百多⾏代码对我来说,已经⽆所谓了。
哈哈哈Mininet动态改变转发规则实验。
mininet拓扑构建与命令使用
mininet拓扑构建与命令使用§§11251.构建mininet拓扑mininet>py net = Mininet(topo, switch=OVSKernelSwitch)2.启动mininet拓扑mininet>net.start()3.查看mininet拓扑mininet>net.pingall()4.关闭mininet拓扑mininet>net.stop()5.查看mininet拓扑节点mininet>net.hosts6.查看mininet拓扑节点详细信息mininet>ToNode[hostname].IP()7.查看主机之间的连接情况mininet>net.ping(host1, host2)§§10208.查看拓扑网络流量mininet>net.iperf((host1, host2))9.给mininet 拓扑图节点添加额外的命令mininet>net.addHost(‘newnode’, command=‘custom command’)10.启动minonet功能测试mininet>net.run()11.重启mininetmininet>net.reboot()12.修改mininet网络mininet>net.modify()§§COMReorganized & Edited the AnswerI have reorganized and edited the answer to make it more concise and easier to understand.1. Create a Mininet topology:mininet> py net = Mininet(topo, switch=OVSKernelSwitch)2. Start the topology:mininet>net.start()3. Check the topology:mininet>net.pingall()4. Shut down the topology:mininet>net.stop()5. List the nodes in the topology:mininet>net.hosts6. Get info about specific nodes in the topology: mininet>ToNode[hostname].IP()7. Check for connections between hosts:mininet>net.ping(host1, host2)8. Check network traffic in the topology:mininet>net.iperf((host1, host2))9. Add a custom command to nodes in the topology:mininet>net.addHost(‘newnode’, command=‘custom command’)10. Execute a Mininet Function Test:mininet>net.run()11. Reboot the Mininet topology:mininet>net.reboot()12. Modify the Mininet topology:mininet>net.modify()。
mininet的stp协议的python代码
mininet的stp协议的python代码Mininet是一个用于构建虚拟网络的工具,它可以帮助我们模拟网络拓扑,并在其中运行各种网络协议。
其中,STP(Spanning Tree Protocol)是一种用于解决网络中的环路问题的协议。
在本文中,我们将介绍如何使用Python代码在Mininet中实现STP协议。
首先,我们需要安装Mininet和Python的相关库。
可以通过以下命令来安装:```sudo apt-get install mininetsudo apt-get install python```安装完成后,我们可以开始编写Python代码。
首先,我们需要导入所需的库:```pythonfrom mininet.topo import Topofrom import Mininetfrom mininet.node import RemoteControllerfrom mininet.link import TCLinkfrom mininet.cli import CLI```接下来,我们定义一个继承自Topo的类,用于创建网络拓扑。
在这个类中,我们可以定义网络中的交换机和主机,并连接它们:```pythonclass STPTopo(Topo):def __init__(self):Topo.__init__(self)# 创建交换机switch1 = self.addSwitch('s1')switch2 = self.addSwitch('s2')switch3 = self.addSwitch('s3')# 创建主机host1 = self.addHost('h1')host2 = self.addHost('h2')host3 = self.addHost('h3')# 连接交换机和主机self.addLink(host1, switch1)self.addLink(host2, switch2)self.addLink(host3, switch3)self.addLink(switch1, switch2)self.addLink(switch2, switch3)self.addLink(switch3, switch1)```然后,我们可以定义一个函数来创建网络并运行STP协议:```pythondef run_stp():topo = STPTopo()net = Mininet(topo=topo, link=TCLink, controller=RemoteController) # 启动网络net.start()# 启动STP协议net['s1'].cmd('ovs-vsctl set bridge s1 stp-enable=true')net['s2'].cmd('ovs-vsctl set bridge s2 stp-enable=true')net['s3'].cmd('ovs-vsctl set bridge s3 stp-enable=true')# 打开交换机的STP日志net['s1'].cmd('ovs-appctl fdb/show s1')net['s2'].cmd('ovs-appctl fdb/show s2')net['s3'].cmd('ovs-appctl fdb/show s3')# 运行CLI命令行界面CLI(net)# 关闭网络net.stop()```最后,我们可以在主函数中调用run_stp函数来运行STP协议:```pythonif __name__ == '__main__':run_stp()```在运行代码之前,我们需要确保已经启动了OpenvSwitch服务。
Pox Mininet2.0的安装和初级使用 SDNAP原创 SDN联合播报
Pox + Mininet2.0的安装和初级使用SDNAP原创SDN联合播报系统:Distributor ID: UbuntuDescription: Ubuntu 12.04.2 LTSRelease: 12.04Codename: precise硬件:单台PCMininet2.0、Open vSwitch的安装最简单也是最常用的使用方法是下载打包好了的Mininet/UbuntuVM(https:///mininet/mininet/downloads/)。
这个VM包括了Mininet,所有的openflow相关的文件和预装的软件,也可以调整内核配置来支持更大的Mininet网络。
上述的VM直接可以拿来用,但是要用像VirtualBox的软件来使用,这里就不赘述。
接下来,按照我们的环境来搭建测试组网正式开始。
首先进行源更新及安装、升级:apt-get update,apt-get upgrade。
如果是初安装完的系统可能会更新较慢,建议将源更新设定到比较近、网络好的服务器,或者自己搭的服务器。
如果升级过Ubuntu系统或者使用的Mininet是旧版(1.0),需要把之前的Mininet和Open Vswitch从/usr/local/中删除。
sudo rm -rf /usr/local/bin/mn /usr/local/bin/mnexec \/usr/local/lib/python*/*/*mininet* \/usr/local/bin/ovs-* /usr/local/sbin/ovs-*下一步,安装基础的Mininet包sudo apt-get install mininet/precise-backports这里需要安装的软件及库文件在90M左右,包括了mininet,openvswitch-common,openvswitch-controller,openvswitch-datapath-dkms,openvswitch-pki,openvswitch-switch,python2.7等。
【Mininet】关于Mininet的使用整理
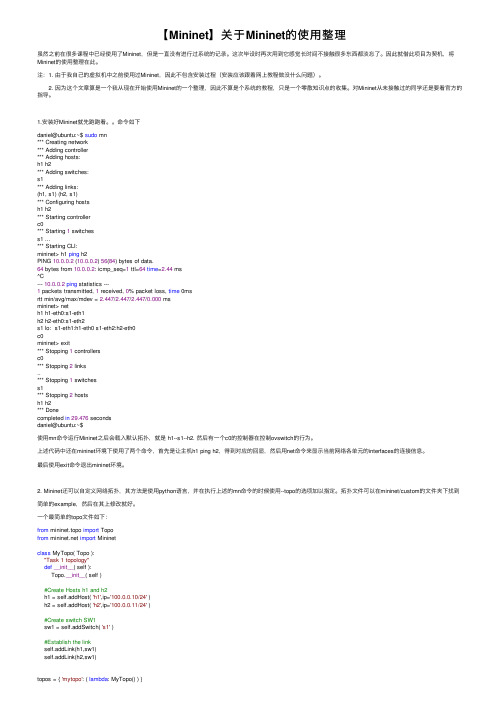
【Mininet】关于Mininet的使⽤整理虽然之前在很多课程中已经使⽤了Mininet,但是⼀直没有进⾏过系统的记录。
这次毕设时再次⽤到它感觉长时间不接触很多东西都淡忘了。
因此就借此项⽬为契机,将Mininet的使⽤整理在此。
注:1. 由于我⾃⼰的虚拟机中之前使⽤过Mininet,因此不包含安装过程(安装应该跟着⽹上教程做没什么问题)。
2. 因为这个⽂章算是⼀个我从现在开始使⽤Mininet的⼀个整理,因此不算是个系统的教程,只是⼀个零散知识点的收集。
对Mininet从未接触过的同学还是要看官⽅的指导。
1.安装好Mininet就先跑跑看。
命令如下daniel@ubuntu:~$ sudo mn*** Creating network*** Adding controller*** Adding hosts:h1 h2*** Adding switches:s1*** Adding links:(h1, s1) (h2, s1)*** Configuring hostsh1 h2*** Starting controllerc0*** Starting 1 switchess1 ...*** Starting CLI:mininet> h1 ping h2PING 10.0.0.2 (10.0.0.2) 56(84) bytes of data.64 bytes from 10.0.0.2: icmp_seq=1 ttl=64time=2.44 ms^C--- 10.0.0.2ping statistics ---1 packets transmitted, 1 received, 0% packet loss, time 0msrtt min/avg/max/mdev = 2.447/2.447/2.447/0.000 msmininet> neth1 h1-eth0:s1-eth1h2 h2-eth0:s1-eth2s1 lo: s1-eth1:h1-eth0 s1-eth2:h2-eth0c0mininet> exit*** Stopping 1 controllersc0*** Stopping 2 links..*** Stopping 1 switchess1*** Stopping 2 hostsh1 h2*** Donecompleted in29.476 secondsdaniel@ubuntu:~$使⽤mn命令运⾏Mininet之后会载⼊默认拓扑,就是 h1--s1--h2. 然后有⼀个c0的控制器在控制ovswitch的⾏为。
mininet 简单的自定义拓扑
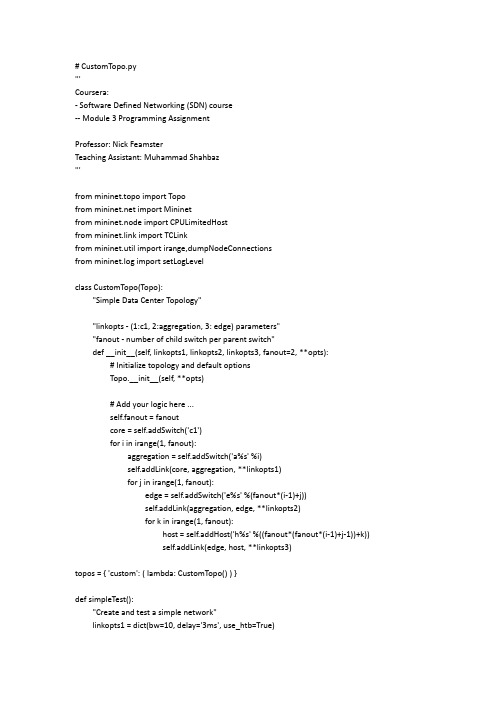
# CustomTopo.py'''Coursera:- Software Defined Networking (SDN) course-- Module 3 Programming AssignmentProfessor: Nick FeamsterTeaching Assistant: Muhammad Shahbaz'''frommininet.topo import Topofrom import Mininetfrommininet.node import CPULimitedHostfrommininet.link import TCLinkfrommininet.util import irange,dumpNodeConnectionsfrom mininet.log import setLogLevelclassCustomTopo(Topo):"Simple Data Center Topology""linkopts - (1:c1, 2:aggregation, 3: edge) parameters""fanout - number of child switch per parent switch"def __init__(self, linkopts1, linkopts2, linkopts3, fanout=2, **opts):# Initialize topology and default optionsTopo.__init__(self, **opts)# Add your logic here ...self.fanout = fanoutcore = self.addSwitch('c1')for i in irange(1, fanout):aggregation = self.addSwitch('a%s' %i)self.addLink(core, aggregation, **linkopts1)for j in irange(1, fanout):edge = self.addSwitch('e%s' %(fanout*(i-1)+j))self.addLink(aggregation, edge, **linkopts2)for k in irange(1, fanout):host = self.addHost('h%s' %((fanout*(fanout*(i-1)+j-1))+k)) self.addLink(edge, host, **linkopts3)topos = { 'custom': ( lambda: CustomTopo() ) }defsimpleTest():"Create and test a simple network"linkopts1 = dict(bw=10, delay='3ms', use_htb=True)linkopts2 = dict(bw=8, delay='4ms', loss=1, max_queue_size=900, ) linkopts3 = dict(bw=6, delay='5ms', loss=1, max_queue_size=800) topo = CustomTopo(linkopts1, linkopts2, linkopts3, fanout=2) net = Mininet(topo, host=CPULimitedHost, link=TCLink)net.start()print "Dumping host connections"dumpNodeConnections(net.hosts)print "Testing network connectivity"net.pingAll()net.stop()真实的SDN网络需要很多OpenFlow设备包括控制器、交换机、功能虚拟化等一系列设备共同依赖来搭建并应用,但因条件有限,每一位实验者不可能有这样真实的环境来验证或者实验,此文将主要介绍在没有OpenFlow硬件设备下模拟搭建通过Mininet基于不同数据中心的网络拓扑。
Mininet日常使用一(官网)
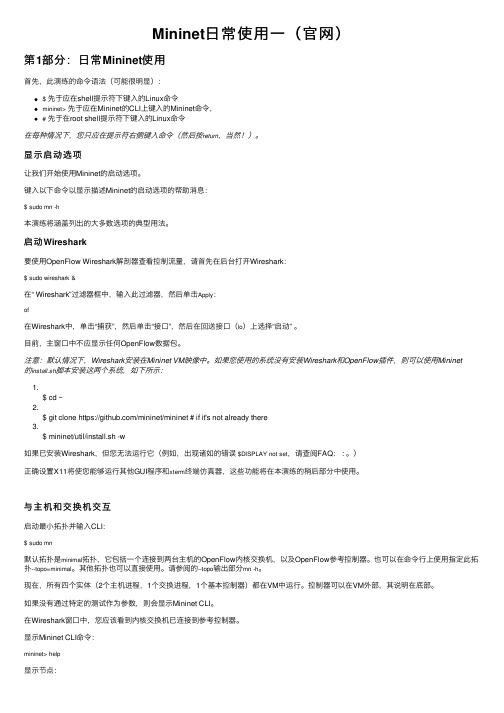
Mininet⽇常使⽤⼀(官⽹)第1部分:⽇常Mininet使⽤⾸先,此演练的命令语法(可能很明显):$先于应在shell提⽰符下键⼊的Linux命令mininet>先于应在Mininet的CLI上键⼊的Mininet命令,#先于在root shell提⽰符下键⼊的Linux命令在每种情况下,您只应在提⽰符右侧键⼊命令(然后按return,当然!)。
显⽰启动选项让我们开始使⽤Mininet的启动选项。
键⼊以下命令以显⽰描述Mininet的启动选项的帮助消息:$ sudo mn -h本演练将涵盖列出的⼤多数选项的典型⽤法。
启动Wireshark要使⽤OpenFlow Wireshark解剖器查看控制流量,请⾸先在后台打开Wireshark:$ sudo wireshark &在“ Wireshark”过滤器框中,输⼊此过滤器,然后单击Apply:of在Wireshark中,单击“捕获”,然后单击“接⼝”,然后在回送接⼝(lo)上选择“启动” 。
⽬前,主窗⼝中不应显⽰任何OpenFlow数据包。
注意:默认情况下,Wireshark安装在Mininet VM映像中。
如果您使⽤的系统没有安装Wireshark和OpenFlow插件,则可以使⽤Mininet的install.sh脚本安装这两个系统,如下所⽰:1.$ cd ~2.$ git clone https:///mininet/mininet # if it's not already there3.$ mininet/util/install.sh -w如果已安装Wireshark,但您⽆法运⾏它(例如,出现诸如的错误$DISPLAY not set,请查阅FAQ: : 。
)正确设置X11将使您能够运⾏其他GUI程序和xterm终端仿真器,这些功能将在本演练的稍后部分中使⽤。
与主机和交换机交互启动最⼩拓扑并输⼊CLI:$ sudo mn默认拓扑是minimal拓扑,它包括⼀个连接到两台主机的OpenFlow内核交换机,以及OpenFlow参考控制器。
实验3:Mininet实验——测量路径的损耗率
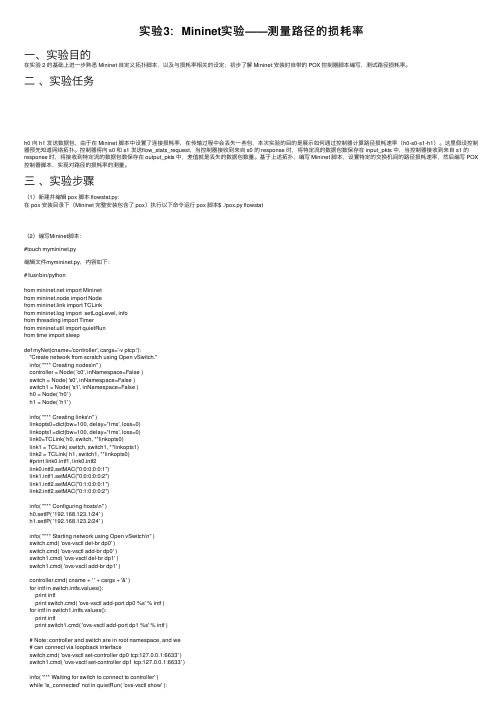
实验3:Mininet实验——测量路径的损耗率⼀、实验⽬的在实验 2 的基础上进⼀步熟悉 Mininet ⾃定义拓扑脚本,以及与损耗率相关的设定;初步了解 Mininet 安装时⾃带的 POX 控制器脚本编写,测试路径损耗率。
⼆、实验任务h0 向 h1 发送数据包,由于在 Mininet 脚本中设置了连接损耗率,在传输过程中会丢失⼀些包,本次实验的⽬的是展⽰如何通过控制器计算路径损耗速率(h0-s0-s1-h1)。
这⾥假设控制器预先知道⽹络拓扑。
控制器将向 s0 和 s1 发送flow_stats_request,当控制器接收到来⾃ s0 的 response 时,将特定流的数据包数保存在 input_pkts 中,当控制器接收到来⾃ s1 的response 时,将接收到特定流的数据包数保存在 output_pkts 中,差值就是丢失的数据包数量。
基于上述拓扑,编写 Mininet 脚本,设置特定的交换机间的路径损耗速率,然后编写 POX 控制器脚本,实现对路径的损耗率的测量。
三、实验步骤(1)新建并编辑 pox 脚本 flowstat.py:在 pox 安装⽬录下(Mininet 完整安装包含了 pox)执⾏以下命令运⾏ pox 脚本$ ./pox.py flowstat(2)编写Mininet脚本:#touch mymininet.py编辑⽂件mymininet.py,内容如下:#!/usr/bin/pythonfrom import Mininetfrom mininet.node import Nodefrom mininet.link import TCLinkfrom mininet.log import setLogLevel, infofrom threading import Timerfrom mininet.util import quietRunfrom time import sleepdef myNet(cname='controller', cargs='-v ptcp:'):"Create network from scratch using Open vSwitch."info( "*** Creating nodes\n" )controller = Node( 'c0', inNamespace=False )switch = Node( 's0', inNamespace=False )switch1 = Node( 's1', inNamespace=False )h0 = Node( 'h0' )h1 = Node( 'h1' )info( "*** Creating links\n" )linkopts0=dict(bw=100, delay='1ms', loss=0)linkopts1=dict(bw=100, delay='1ms', loss=0)link0=TCLink( h0, switch, **linkopts0)link1 = TCLink( switch, switch1, **linkopts1)link2 = TCLink( h1, switch1, **linkopts0)#print link0.intf1, link0.intf2link0.intf2.setMAC("0:0:0:0:0:1")link1.intf1.setMAC("0:0:0:0:0:2")link1.intf2.setMAC("0:1:0:0:0:1")link2.intf2.setMAC("0:1:0:0:0:2")info( "*** Configuring hosts\n" )h0.setIP( '192.168.123.1/24' )h1.setIP( '192.168.123.2/24' )info( "*** Starting network using Open vSwitch\n" )switch.cmd( 'ovs-vsctl del-br dp0' )switch.cmd( 'ovs-vsctl add-br dp0' )switch1.cmd( 'ovs-vsctl del-br dp1' )switch1.cmd( 'ovs-vsctl add-br dp1' )controller.cmd( cname + ' ' + cargs + '&' )for intf in switch.intfs.values():print intfprint switch.cmd( 'ovs-vsctl add-port dp0 %s' % intf )for intf in switch1.intfs.values():print intfprint switch1.cmd( 'ovs-vsctl add-port dp1 %s' % intf )# Note: controller and switch are in root namespace, and we# can connect via loopback interfaceswitch.cmd( 'ovs-vsctl set-controller dp0 tcp:127.0.0.1:6633' )switch1.cmd( 'ovs-vsctl set-controller dp1 tcp:127.0.0.1:6633' )info( '*** Waiting for switch to connect to controller' )while 'is_connected' not in quietRun( 'ovs-vsctl show' ):sleep( 1 )info( '.' )info( '\n' )#info( "*** Running test\n" )h0.cmdPrint( 'ping -Q 0x64 -c 20 ' + h1.IP() )sleep( 1 )info( "*** Stopping network\n" )controller.cmd( 'kill %' + cname )switch.cmd( 'ovs-vsctl del-br dp0' )switch.deleteIntfs()switch1.cmd( 'ovs-vsctl del-br dp1' )switch1.deleteIntfs()info( '\n' )if __name__ == '__main__':setLogLevel( 'info' )info( '*** Scratch network demo (kernel datapath)\n' )Mininet.init()myNet()(3)编写POX脚本在装有POX的虚拟机⾥新建⽂件flow_stats.py#cd pox#touch flow_stats.py2 编辑⽂件flow_stats.py,内容如下:#!/usr/bin/python# Copyright 2012 William Yu# wyu@## This file is part of POX.## POX is free software: you can redistribute it and/or modify# it under the terms of the GNU General Public License as published by# the Free Software Foundation, either version 3 of the License, or# (at your option) any later version.## POX is distributed in the hope that it will be useful,# but WITHOUT ANY WARRANTY; without even the implied warranty of# MERCHANTABILITY or FITNESS FOR A PARTICULAR PURPOSE. See the # GNU General Public License for more details.## You should have received a copy of the GNU General Public License# along with POX. If not, see </licenses/>.#"""This is a demonstration file created to show how to obtain flowand port statistics from OpenFlow 1.0-enabled switches. The flowstatistics handler contains a summary of web-only traffic."""# standard includesfrom pox.core import corefrom pox.lib.util import dpidToStrimport pox.openflow.libopenflow_01 as offrom pox.lib.addresses import IPAddr, EthAddr# include as part of the betta branchfrom pox.openflow.of_json import *from pox.lib.recoco import Timerimport timelog = core.getLogger()src_dpid = 0dst_dpid = 0input_pkts = 0output_pkts = 0def getTheTime(): #fuction to create a timestampflock = time.localtime()then = "[%s-%s-%s" %(str(flock.tm_year),str(flock.tm_mon),str(flock.tm_mday)) if int(flock.tm_hour)<10:hrs = "0%s" % (str(flock.tm_hour))else:hrs = str(flock.tm_hour)if int(flock.tm_min)<10:mins = "0%s" % (str(flock.tm_min))else:mins = str(flock.tm_min)if int(flock.tm_sec)<10:secs = "0%s" % (str(flock.tm_sec))else:secs = str(flock.tm_sec)then +="]%s.%s.%s" % (hrs,mins,secs)return then# handler for timer function that sends the requests to all the# switches connected to the controller.def _timer_func ():for connection in core.openflow._connections.values():connection.send(of.ofp_stats_request(body=of.ofp_flow_stats_request()))connection.send(of.ofp_stats_request(body=of.ofp_port_stats_request()))log.debug("Sent %i flow/port stats request(s)", len(core.openflow._connections))# handler to display flow statistics received in JSON format# structure of event.stats is defined by ofp_flow_stats()def _handle_flowstats_received (event):#stats = flow_stats_to_list(event.stats)#log.debug("FlowStatsReceived from %s: %s", dpidToStr(event.connection.dpid), stats)global src_dpid, dst_dpid, input_pkts, output_pkts#print "src_dpid=", dpidToStr(src_dpid), "dst_dpid=", dpidToStr(dst_dpid)for f in event.stats:if f.match.dl_type==0x0800 and f.match.nw_dst==IPAddr("192.168.123.2") and f.match.nw_tos==0x64 and event.connection.dpid==src_dpid:#print "input: ", f.byte_count, f.packet_countinput_pkts = f.packet_countif f.match.dl_type==0x0800 and f.match.nw_dst==IPAddr("192.168.123.2") and f.match.nw_tos==0x64 and event.connection.dpid==dst_dpid:#print "output: ", f.byte_count, f.packet_countoutput_pkts = f.packet_countif input_pkts !=0:print getTheTime(), "Path Loss Rate =", (input_pkts-output_pkts)*1.0/input_pkts*100, "%"# handler to display port statistics received in JSON formatdef _handle_portstats_received (event):#print "\n<<<STATS-REPLY: Return PORT stats for Switch", event.connection.dpid,"at ",getTheTime()#for f in event.stats:#if int(f.port_no)<65534:#print " PortNo:", f.port_no, " Fwd's Pkts:", f.tx_packets, " Fwd's Bytes:", f.tx_bytes, " Rc'd Pkts:", f.rx_packets, " Rc's Bytes:", f.rx_bytes#print " PortNo:", f.port_no, " TxDrop:", f.tx_dropped, " RxDrop:", f.rx_dropped, " TxErr:", f.tx_errors, " RxErr:", f.rx_errors, " CRC:", f.rx_crc_err, " Coll:", f.collisions stats = flow_stats_to_list(event.stats)log.debug("PortStatsReceived from %s: %s", dpidToStr(event.connection.dpid), stats)def _handle_ConnectionUp (event):global src_dpid, dst_dpidprint "ConnectionUp: ", dpidToStr(event.connection.dpid)for m in event.connection.features.ports:if == "s0-eth0":src_dpid = event.connection.dpidelif == "s1-eth0":dst_dpid = event.connection.dpidmsg = of.ofp_flow_mod()msg.priority =1msg.idle_timeout = 0msg.match.in_port =1msg.actions.append(of.ofp_action_output(port = of.OFPP_ALL))event.connection.send(msg)msg = of.ofp_flow_mod()msg.priority =1msg.idle_timeout = 0msg.match.in_port =2msg.actions.append(of.ofp_action_output(port = of.OFPP_ALL))event.connection.send(msg)msg = of.ofp_flow_mod()msg.priority =10msg.idle_timeout = 0msg.hard_timeout = 0msg.match.dl_type = 0x0800msg.match.nw_tos = 0x64msg.match.in_port=1msg.match.nw_dst = "192.168.123.2"msg.actions.append(of.ofp_action_output(port = 2))event.connection.send(msg)msg = of.ofp_flow_mod()msg.priority =10msg.idle_timeout = 0msg.hard_timeout = 0msg.match.dl_type = 0x0800msg.match.nw_tos = 0x64msg.match.nw_dst = "192.168.123.1"msg.actions.append(of.ofp_action_output(port = 1))event.connection.send(msg)# main functiont to launch the moduledef launch ():# attach handsers to listnerscore.openflow.addListenerByName("FlowStatsReceived",_handle_flowstats_received)core.openflow.addListenerByName("PortStatsReceived",_handle_portstats_received)core.openflow.addListenerByName("ConnectionUp", _handle_ConnectionUp)# timer set to execute every five secondsTimer(1, _timer_func, recurring=True)(4)设置 s0 和 s1 之间链路的丢包率为 0,再执⾏命令运⾏ Mininet 脚本 mymininet3.py$ sudo python mymininet3.py(6)修改代码中 s0 和 s1 之间链路的丢包率为 10。
浅析Mininet网络仿真平台的应用与研究
浅析 Mininet网络仿真平台的应用与研究摘要:现代信息科技和社会经济的迅速进步,世界正在产生着天翻地覆的改变,人类生产生活的方方面面也变得与网络脉脉相通。
我们的未来和网络不可分割,未来是现代化的舞台,是网络化的舞台,是智能化的舞台。
网络仿真技术是一种运用建立数学模型及统计剖析的办法模仿网络行为,它是经过建设网络设施和网络链路的统计模型,模仿网络流量的传递,达到取得网络设计和优化所需要的网络功能数据的一种新兴高技术。
网络仿真技术的出现有效解决了开发新的网络结构高成本、效率低、高耗费等一系列问题。
Mininet能够创建实现虚拟化的网络,虚拟网络仿真现实网络由主机、链路等组成,它具有能够支撑OpenFlow的功能,具备高度灵便的特性,功能多且强大。
在Mininet网络仿真平台上测试进行的实验,可以直接移到我们的现实生活中去(Mininet官网说法,还未经过实践)。
本文章从Mininet的概念、实现工作与原理、Mininet中SDN元素、仿真建模,发展前景等多方面剖析了Mininet网络仿真平台,为人们进一步了解研究Mininet网络仿真平台提供支持。
关键词:Mininet网络仿真平台、仿真建模、SDN软件定义网络、虚拟化引言:作为第三次科技革命,互联网是全世界全人类的变革,在这机遇和挑战并存的浪潮中,不可否认网络已经成为我们工作生活中必不可少的因素。
网络人才层见叠出,网络新样式如雨后春笋层出不穷,现下SDN/OpenFlow技术虽然发展的轰轰烈烈,但是由于真实的实验存在花费高、成本大等诸多缺点,执行起来很多阻碍,Mininet网络仿真平台恰好可以解决以上问题,也能够适应这种新的网络架构。
在这个平台中,需进行的实验可以很方便的被模拟出来,毋庸置疑在仿真平台的位置中,Mininet占有一席之地。
Mininet的出现有效节约了开发新的网络结构的成本、提高了效率、减少了耗费,提升了设计网络结构的效率和便捷程度,为网络发展注入了新的活水和动力,推动网络的现代化科技化的发展。
mininet的常用命令
mininet的常用命令Mininet是一个虚拟网络环境模拟器,可以用于测试和研究网络拓扑和应用程序。
本文将介绍Mininet中的常用命令及其作用。
1. mnmn是Mininet的核心命令,用于创建虚拟网络拓扑。
可以通过mn命令指定网络拓扑的规模、节点类型、连接类型等参数,例如:mn --topo single,3 --mac --switch ovsk --controller remote该命令创建了一个包含3个主机和1个Open vSwitch交换机的单一拓扑,并指定使用MAC地址和远程控制器。
2. netnet命令用于列出当前虚拟网络中的节点和连接。
可以使用net命令查看主机、交换机、控制器的名称和IP地址,以及它们之间的连接情况。
3. xtermxterm命令可以在Mininet的节点上打开一个终端窗口,以便在其中运行命令和应用程序。
可以通过xterm命令打开主机、交换机、控制器的终端窗口,例如:xterm h1该命令将在主机h1上打开一个终端窗口。
4. pingping命令用于测试虚拟网络中节点之间的连通性。
可以使用ping 命令向其他主机发送ICMP包,并查看响应时间和丢包率,例如:h1 ping h2该命令在主机h1上向主机h2发送ICMP包并测试连通性。
5. iperfiperf命令用于测试虚拟网络中的带宽和吞吐量。
可以使用iperf命令在主机之间发送TCP或UDP流,并测量传输速度和延迟,例如:h1 iperf -sh2 iperf -c h1其中,h1上运行iperf服务器,h2上运行iperf客户端,并向h1发送TCP流进行测试。
6. dumpdump命令用于打印虚拟网络中节点和连接的详细信息。
可以使用dump命令查看节点和连接的属性、状态、流量和错误信息,例如:dump该命令将打印当前虚拟网络中所有节点和连接的信息。
7. linklink命令用于修改虚拟网络中连接的属性。
mininet原理
mininet原理Mininet是一种用于实验和测试网络应用程序的虚拟网络环境。
它提供了一个通过Linux的命名空间实现的轻量级虚拟化平台,可以轻松地在单台计算机上模拟一个复杂的网络拓扑。
Mininet的工作原理主要包括以下几个方面:拓扑建模、虚拟化、控制器、交换机和主机。
1.拓扑建模在Mininet中建立网络拓扑需要指定网络的拓扑结构,如拓扑类型、节点数、链路类型等,可以使用Mininet提供的拓扑建模工具或手动配置。
常见的拓扑结构有线性拓扑、环形拓扑、星形拓扑、树形拓扑、网格拓扑等。
在拓扑中,节点可以包括虚拟化的交换机、主机以及控制器。
2.虚拟化在Mininet中,虚拟化使用的是Linux的命名空间。
命名空间提供了一种虚拟化的方式,让不同的进程或网络配置拥有独立的网络栈、网络设备和路由表,在同一台计算机中可以同时运行多个彼此独立的网络。
Mininet将每个节点视为一个进程,并使用命名空间将不同的进程隔离开来。
每个节点都可以有自己的网络配置、IP地址、MAC地址和路由表。
3.控制器Mininet使用OpenFlow控制器来实现网络中交换机的控制。
OpenFlow是一种新型的网络数据交换技术,它将数据平面和控制平面分离,将数据流转决策交给控制器。
Mininet内置了多种控制器,如OpenDaylight、Floodlight、POX等,用户也可以自行添加控制器。
控制器接收交换机发送的OpenFlow消息并根据流表的定义进行交换机流表更新和流量转发控制。
4.交换机Mininet的交换机是一个虚拟化的交换机,它提供了OpenFlow协议的支持,可以与控制器进行通信,并按照控制器的指示处理数据包的传输。
交换机的输入输出端口是虚拟的,它们通过Linux的虚拟网络设备veth相连,数据包在交换机内部的转发是基于OpenFlow协议完成的。
5.主机Mininet的主机由普通的Linux命名空间实现,它们是虚拟机器,可以通过虚拟网络设备与交换机相连。
支持完整OF13协议的mininet平台搭建-北邮-陈明明
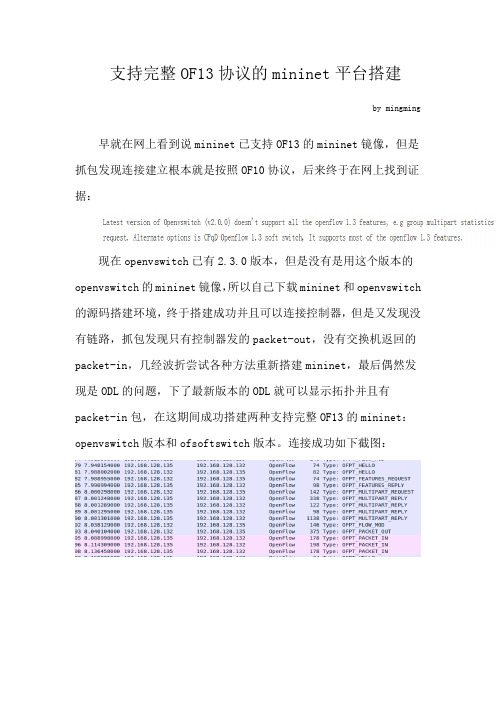
支持完整OF13协议的mininet平台搭建by mingming 早就在网上看到说mininet已支持OF13的mininet镜像,但是抓包发现连接建立根本就是按照OF10协议,后来终于在网上找到证据:现在openvswitch已有2.3.0版本,但是没有是用这个版本的openvswitch的mininet镜像,所以自己下载mininet和openvswitch 的源码搭建环境,终于搭建成功并且可以连接控制器,但是又发现没有链路,抓包发现只有控制器发的packet-out,没有交换机返回的packet-in,几经波折尝试各种方法重新搭建mininet,最后偶然发现是ODL的问题,下了最新版本的ODL就可以显示拓扑并且有packet-in包,在这期间成功搭建两种支持完整OF13的mininet:openvswitch版本和ofsoftswitch版本。
连接成功如下截图:下面我们就来搭建支持完整OF13协议的mininet参考:https:///view/Openflow_Protocol_Librar y:OpenVirtualSwitchhttps:///view/Openflow_Protocol_Librar y:OpenVirtualSwitch一、 Openvswitch2.3.0版本mininet1.下载openvswitch2.3.0(/releases/openvswitch-2.3.0.tar.gz) 解压:tar zxvf openvswitch*****2.依照~/openvswitch-2.3.0/INSTALL.Debian来建立Library (1)安装build-essential和fakerootsudo apt-get install build-essential fakeroot(2)进入到顶层目录(3)检查一下依赖有没有安装全sudo dpkg-checkbuilddeps 如果安装完全会什么都不打印出来,如没有安装全会提示unmet **** *** *** ,执行命令sudo apt-get install ******注:有可能会出现sudo apt-get install ***报错404,解决办法:sudo apt-get update(4)运行sudo fakeroot debian/rules binary注:可能会出现的错误dpkg-shlibdeps: error: no dependency information found for /usr/local*****,解决办法:sudo dpkg-buildpackage -rfakeroot -d -Bexport DEB_DH_MAKESHLIBS_ARG=--ignore-missing-info 具体参见:/questions/11238134/dpkg-shlibdeps-error-no-dependency-information-found-for(5)会产生如下包-rw-r--r-- 1 root root 831816 Oct 7 20:08 openvswitch-common_2.3.0-1_i386.deb-rw-r--r-- 1 root root 3230392 Oct 7 20:08 openvswitch-datapath-dkms_2.3.0-1_all.deb-rw-r--r-- 1 root root 3304788 Oct 7 20:08 openvswitch-datapath-source_2.3.0-1_all.deb-rw-r--r-- 1 root root 7641926 Oct 7 20:08 openvswitch-dbg_2.3.0-1_i386.deb-rw-r--r-- 1 root root 38656 Oct 7 20:08 openvswitch-ipsec_2.3.0-1_i386.deb-rw-r--r-- 1 root root 31710 Oct 7 20:08 openvswitch-pki_2.3.0-1_all.deb-rw-r--r-- 1 root root 2175596 Oct 7 20:08 openvswitch-switch_2.3.0-1_i386.deb-rw-r--r-- 1 root root 47578 Oct 7 20:08 openvswitch-test_2.3.0-1_all.deb-rw-r--r-- 1 root root 217712 Oct 7 20:08 openvswitch-vtep_2.3.0-1_i386.deb-rw-r--r-- 1 root root 90926 Oct 7 20:08 python-openvswitch_2.3.0-1_all.deb3.安装.deb包(1)安装Open vSwitch kernel module.参看debian/openvswitch-switch.README.Debian,给了四种方法,我们采用了第三种,可进一步参看/usr/share/doc/openvswitch-datapath-source/README.Debian,其中又给了三种方法,我们采用第一种:sudo module-assistant auto-install openvswitch-datapath 或者sudo m-a a-i openvswitch-datapath,注:可能会出现木有module-assistant这一命令,sudo apt-get install module-assistant(2)安装openvswitch-Switch和openvswitch-common包dpkg -i openvswitch-common_2.3.0-1_i386.debdpkg -i openvswitch-switch_2.3.0-1_i386.deb4.核实下是否安装成功sudo ovs-vsctl show若成功会显示类似如下bd38d7bd-7419-40d1-b80e-b48cf773c960ovs_version: "2.3.0"否则就没有安装成功,检查之前的步骤5.安装mininet 2.1.0(1)Install mininet:odluser@odl-vm:~\$ git clonegit:///mininet/mininetodluser@odl-vm:~\$ cd mininet/odluser@odl-vm:~\$ git checkout -b 2.1.0p1 2.1.0p1 odluser@odl-vm:~\$ # apply patch (patch -p0 < newOptions.patch)odluser@odl-vm:~\$ cd ./utilodluser@odl-vm:~\$ ./install.sh -fn(2)修改源码cd mininet/mininetvim node.pyWhere the patch to apply newOptions.patch is:--- mininet/node.py 2014-09-12 13:48:03.165628683 +0100+++ mininet/node.py 2014-09-12 13:50:39.021630236 +0100 @@ -952,6 +952,10 @@datapath: userspace or kernel mode (kernel|user)"""Switch.__init__( self, name, **params )self.failMode = failMode+ protKey = 'protocols'+ if self.params and protKey in self.params:+ print 'have protcol params!'+ self.opts += protKey + '=' +self.params[protKey]self.datapath = datapath@classmethod@@ -1027,8 +1031,9 @@if self.datapath == 'user':self.cmd( 'ovs-vsctl set bridge',self,'datapath_type=netdev' )int( self.dpid, 16 ) # DPID must be a hex string + print 'OVSswitch opts: ',self.optsself.cmd( 'ovs-vsctl -- set Bridge', self,- 'other_config:datapath-id=' + self.dpid )+ self.opts+'other_config:datapath-id=' + self.dpid )self.cmd( 'ovs-vsctl set-fail-mode', self, self.failMode )for intf in self.intfList():if not intf.IP():(3)核实mininet安装:sudo mn --test=pingall*** Creating network*** Adding controller*** Adding hosts:h1 h2*** Adding switches:s1*** Adding links:(h1, s1) (h2, s1)*** Configuring hostsh1 h2*** Starting controller*** Starting 1 switchess1 OVSswitch opts:*** Ping: testing ping reachabilityh1 -> h2h2 -> h1*** Results: 0% dropped (2/2 received) *** Stopping 1 switchess1 ..*** Stopping 2 hostsh1 h2*** Stopping 1 controllersc0*** Donecompleted in 0.541 secondsVerify mininet works for OF1.3:odluser@odl-vm:~\$ sudo mn--controller=remote,ip=192.168.128.132 --topo tree,2 --switch ovsk,protocols=OpenFlow13*** Creating network*** Adding controller*** Adding hosts:h1 h2 h3 h4*** Adding switches:have protcol params!s1 have protcol params!s2 have protcol params!s3*** Adding links:(h1, s2) (h2, s2) (h3, s3) (h4, s3) (s1, s2) (s1, s3) *** Configuring hostsh1 h2 h3 h4*** Starting controller*** Starting 3 switchess1 OVSswitch opts: protocols=OpenFlow13s2 OVSswitch opts: protocols=OpenFlow13s3 OVSswitch opts: protocols=OpenFlow13*** Starting CLI:注意:若运行到一半卡住,按Enter键不能出现mininet<,说明没有安装成功,还有情况可能会报错:Cannot find required executable ovs-controller. Please make sure that it is installed and available in your $PATH:***** 参考:/questions/21687357/mininet-ovs-con troller-can-t-be-loaded-and-run/questions/17341076/mininet-cannot-find-required-executable-controller(若不用到ovs-controller,不管它直接连接远端控制器其实也完全可以。
mainnet中文翻译

mainnet中文翻译Mainnet,也称为“主网”,是一种使用分布式账本技术(Blockchain)实现的去中心化的应用程序网络,旨在提供有价值的数字货币和服务,交易过程受到数字化技术和加密货币的保护。
与其他区块链应用程序不同,mainnet是去中心化的,它运行世界各地的未知节点,不受任何特定机构的控制,无法伪造交易记录,用户可以实现安全的数字交换。
Mainnet的主要好处是它能够促进跨境支付,以及创建和发行价值数字货币(如比特币)。
此外,它还可以用来存储和交换数据,使用户能够安全地访问它们。
Mainnet可以在区块链上存储数据,发行虚拟货币或生成智能合约,它还可以作为一种去中心化服务提供者,以实现全球跨境支付。
Mainnet基于区块链,为用户提供可靠的分布式账本技术,旨在保护用户的隐私和安全。
Mainnet具有出色的性能,可以让用户在网络上安全地发送和接收资金,并通过双签名技术保护交易安全。
Mainnet的另一个优点是去中心化,使用户可以在网络上任意发送和接收货币,而无需任何中介机构。
Mainnet使用时序一致性算法(TLA)来确保全球网络上所有参与者有同样的视图,这样用户也可以安全地完成交易。
此外,Mainnet也支持去中心化的账本技术,这意味着每个用户都可以完全控制自己的资金,并且可以查看所有交易的详细记录,以确保双方的资金安全。
最后,Mainnet还拥有可塑性,可以轻松扩展到更多的网络,它不仅可以用作一个数字货币交易系统,它还可以用于文件存储,数据共享和计算任务执行等其他应用程序。
总之,Mainnet是一个可靠的分布式账本技术,旨在为用户提供安全、可靠、可塑性的解决方案,使用户可以安全地实现跨境支付,同时还能发行价值数字货币,为用户的安全和隐私提供最大的保护。
Mainnet的出现改变了传统的支付方式,使用户能够快速、安全地发送和接收货币,极大地为用户带来了便利。
- 1、下载文档前请自行甄别文档内容的完整性,平台不提供额外的编辑、内容补充、找答案等附加服务。
- 2、"仅部分预览"的文档,不可在线预览部分如存在完整性等问题,可反馈申请退款(可完整预览的文档不适用该条件!)。
- 3、如文档侵犯您的权益,请联系客服反馈,我们会尽快为您处理(人工客服工作时间:9:00-18:30)。
Mininet2.0、Open vSwitch的安装和Pox的初级使用---OFirMan系统:Distributor ID: UbuntuDescription: Ubuntu 12.04.2 LTSRelease: 12.04Codename: precise硬件:单台PCMininet2.0、Open vSwitch的安装最简单也是最常用的使用方法是下载打包好了的Mininet/Ubuntu VM(https:///mininet/mininet/downloads/)。
这个VM包括了Mininet,所有的openflow 相关的文件和预装的软件,也可以调整内核配置来支持更大的Mininet网络。
上述的VM直接可以拿来用,但是要用像VirtualBox的软件来使用,这里就不赘述。
接下来,按照我们的环境来搭建测试组网正式开始。
首先进行源更新及安装、升级:apt-get update,apt-get upgrade。
如果是初安装完的系统可能会更新较慢,建议将源更新设定到比较近、网络好的服务器,或者自己搭的服务器。
如果升级过Ubuntu系统或者使用的Mininet是旧版(1.0),需要把之前的Mininet和Open Vswitch从/usr/local/中删除。
sudo rm -rf /usr/local/bin/mn /usr/local/bin/mnexec \/usr/local/lib/python*/*/*mininet* \/usr/local/bin/ovs-* /usr/local/sbin/ovs-*下一步,安装基础的Mininet包sudo apt-get install mininet/precise-backports这里需要安装的软件及库文件在90M左右,包括了mininet,openvswitch-common,openvswitch-controller,openvswitch-datapath-dkms,openvswitch-pki,openvswitch-switch,python2.7等。
root@10-6-2-133:/home/ubuntu# mn --version2.0.0Mininet安装完毕,下面简单测试下root@10-6-2-133:/home/ubuntu# sudo mn --test pingall*** Creating network*** Adding controller*** Adding hosts:h1 h2*** Adding switches:Jul 14 13:45:44|00001|stream_unix|ERR|/tmp/stream-unix.17367.0: connection to/var/run/openvswitch/db.sock failed: No such file or directoryJul 14 13:45:44|00002|reconnect|WARN|unix:/var/run/openvswitch/db.sock: connection attempt failed (No such file or directory)Jul 14 13:45:45|00003|stream_unix|ERR|/tmp/stream-unix.17367.1: connection to/var/run/openvswitch/db.sock failed: No such file or directoryJul 14 13:45:45|00004|reconnect|WARN|unix:/var/run/openvswitch/db.sock: connection attempt failed (No such file or directory)ovs-vsctl exited with code -14*** Error connecting to ovs-db with ovs-vsctlMake sure that Open vSwitch is installed, that ovsdb-server is running, and that"ovs-vsctl show" works correctly.You may wish to try "service openvswitch-switch start".从提示发现,Mininet需要开启service:openvswitch-switchroot@10-6-2-133:/home/ubuntu# service openvswitch-switch startFATAL: Module openvswitch not found.* Inserting openvswitch moduleModule has probably not been built for this kernel.Install the openvswitch-datapath-source package, then read/usr/share/doc/openvswitch-datapath-source/README.DebianFATAL: Module openvswitch not found.* Inserting openvswitch module模块openvswitch插入失败,此模块没有编译。
在安装Mininet基础安装包的时候安装了openvswitch的相关包,唯独openvswitch-datapath-source 没有安装,所以接下来安装之。
root@10-6-2-133:/home/ubuntu#module-assistant auto-install openvswitch-datapathPs:若无module-assistant,apt-get install module-assistant编译模块后再次尝试启动服务:root@10-6-2-133:/home/ubuntu# service openvswitch-switch restart* ovs-brcompatd is not running* Killing ovs-vswitchd (30133)* Killing ovsdb-server (30124)* Starting ovsdb-server* Configuring Open vSwitch system IDs* Starting ovs-vswitchd* iptables already has a rule for gre, not explicitly enablingroot@10-6-2-133:/home/ubuntu# service openvswitch-controller restart * Restarting ovs-controller ovs-controller下面查看ovs的各项运行状态root@10-6-2-133:/home/ubuntu# ps -ea |grep ovs30201 pts/0 00:00:00 ovsdb-server30202 ? 00:00:00 ovsdb-server30210 pts/0 00:00:00 ovs-vswitchd30211 ? 00:00:00 ovs-vswitchd一切准备就绪,那就测试Mininet是否可用啦root@10-6-2-133:/home/ubuntu# sudo mn --test pingall*** Creating network*** Adding controller*** Adding hosts:h1 h2*** Adding switches:s1*** Adding links:(h1, s1) (h2, s1)*** Configuring hostsh1 h2*** Starting controller*** Starting 1 switchess1*** Ping: testing ping reachabilityh1 -> h2h2 -> h1*** Results: 0% dropped (0/2 lost)*** Stopping 2 hostsh1 h2*** Stopping 1 switchess1 ...*** Stopping 1 controllersc0*** Donecompleted in 0.423 seconds到此,Mininet和Open vSwitch安装完毕。
已经成功了一半了,哈哈!Pox的初级使用Pox是Nox的年轻点的同胞兄弟。
核心意义在于,利用python的强大,提供了快速开发的平台和网络原型的控制软件。
听着晦涩,其实就是python轻巧、便捷,开发起来舒服。
相对上面稍微复杂的安装,Pox的安装就简单多了,就叫绿色版的controller吧。
相对其他的controller(Nox,Floodlight等),Pox集成的东西也简单多了,所以才需要二次开发嘛。
root@10-6-2-133:/home/ubuntu# git clone https:///noxrepo/pox.gitCloning into 'pox'...remote: Counting objects: 12980, done.remote: Compressing objects: 100% (5820/5820), done.remote: Total 12980 (delta 7488), reused 12582 (delta 7113)Receiving objects: 100% (12980/12980), 5.90 MiB | 22 KiB/s, done.Resolving deltas: 100% (7488/7488), done.Ps:git----n. 饭桶,无用的人,其实是Gnu Interactive Tools的缩写,哈哈。
先来体验下pox吧root@10-6-2-133:/home/ubuntu/pox# ./pox.py openflow.of_01 --address=127.0.0.1POX 0.1.0 (betta) / Copyright 2011-2013 James McCauley, et al.INFO:core:POX 0.1.0 (betta) is up.pox.py是程序的入口,需要openflow.of_01库解释后面的参数。