JBL电影音箱配置经验整理
JBL Cinema SB130 2.1渣滅聲音棒说明书
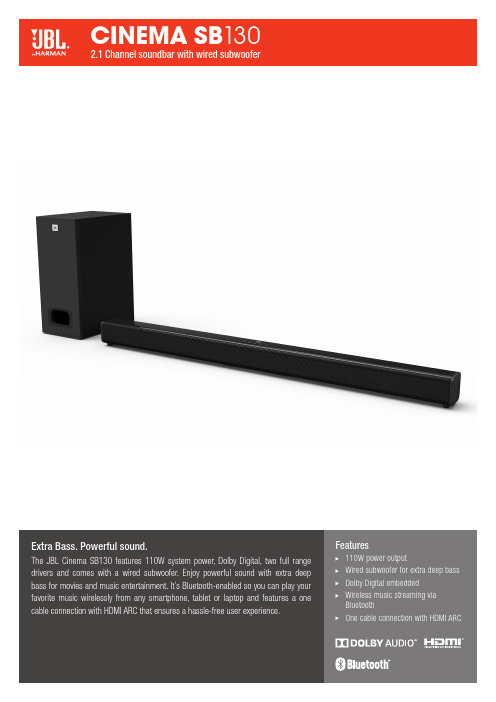
Extra Bass. Powerful sound.The JBL Cinema SB130 features 110W system power, Dolby Digital, two full range drivers and comes with a wired subwoofer. Enjoy powerful sound with extra deep bass for movies and music entertainment. It’s Bluetooth-enabled so you can play your favorite music wirelessly from any smartphone, tablet or laptop and features a one cable connection with HDMI ARC that ensures a hassle-free user experience.Features110W power outputWired subwoofer for extra deep bass Dolby Digital embeddedW ireless music streaming viaBluetoothOne cable connection with HDMI ARCHARMAN International Industries, Incorporated 8500 Balboa Boulevard, Northridge, CA 91329 USA © 2019 HARMAN International Industries, Incorporated. All rights reserved. JBL is a trademark of HARMAN International Industries, Incorporated, registered in the United States and/or other countries. The Bluetooth® word mark and logos are registered trademarks owned b y Bluetooth SIG, Inc. and any use of such marks b y HARMAN International Industries, Incorporated is under license. Other trademarks and trade names are those of their respective owners. The terms HDMI, the HDMI logo, and High-Definition Multimedia Interface are trademarks or registered trademarks of HDMI Licensing LLC in the United States and other countries. Les termes HDMI, le logo HDMI et High-Definition Multimedia Interface sont des marques commerciales ou des marques commerciales déposées de HDMI Licensing LLC aux États-Unis et dans d’autres pays. Dolb y, Dolb y Audio and the doub le-D symb ol are trademarks of Dolb y Lab oratories. Dolb y, Dolb y Audio et le symb ole du doub le D sont des marques commerciales de Dolby Laboratories. Features, specifications and appearance are subject to change without notice.Features and Benefits110W power outputIncredible, powerful sound for an immersive cinematic experience.Wired subwoofer for extra deep bassEnjoy deep and thrilling bass.Dolby Digital embeddedDolby Digital embedded for the ultimate movie experience.Wireless music streaming via BluetoothStream and enjoy all your music wirelessly from any mobile device.One cable connection with HDMI ARCThe one cable H DMI ARC connection allows for the simplest set-up and a hassle-free user experience.What’s in the BoxSoundbarWired subwooferRemote control with batteriesPower cords (up to 4pcs depending on region SKUs)HDMI cableWall-mount bracket kit with screwsQuick start guideWarranty cardSafety sheet GeneralP ower supply: 100 – 240VAC, ~ 50/60HzT otal speaker power output (Max. @THD 1%): 110WS oundbar power output (Max. @THD 1%): 2 x 27WS ubwoofer power output (Max. @THD 1%): 56WS oundbar transducer: 2 x 2" full range driver S ubwoofer transducer: 4", wired subO perating temperature: 0°C – 45°CVideoH DMI Video output (With Audio return channel): 1H DMI HDCP version: 1.4AudioM ax SPL: 82dBF requency response: 40Hz – 20kHzA udio inputs: 1 Optical, Bluetooth (USB is for Service only.)USB (For Service only)U SB port: Type AU SB rating: 5VDC/0.5AS upporting file format: mp3, wavM P3 Codec: MPEG 1 Layer 2/3; MPEG 2 Layer 3; MPEG 2.5 Layer 3M P3 sampling rate: 16kHz – 48kHzM P3 bitrate: 80kbps – 320kbps;80kbps – 160kbps (MPEG 2.5 Layer 3)W AV sample rate: 16kHz – 48kHzW AV bitrate: Up to 3000kbpsWirelessB luetooth version: 4.2B luetooth profile: A2DP V1.3/AVRCP V1.5B luetooth frequency range:2402MHz–2480MHzB luetooth max. transmitting power:<0dbm (EIRP)M odulation type: GFSK, π/4 DQPSK DimensionS oundbar dimensions (W x H x D):900 x 67 x 63(mm) / 35.4" x 2.6" x 2.5"S ubwoofer dimensions (W x H x D):150 x 320 x 220(mm) / 6" x 12.6" x 8.7"S oundbar weight: 1.5kgS ubwoofer weight: 2.8kgP ackaging dimensions (W x H x D):975 x 170 x 355mm / 38.4" x 6.7" x 14"P ackaging weight (Gross weight): 5.8kg。
JBL 电影声音 CST56、CSB6、CSC56、CSS11 用户手册说明书
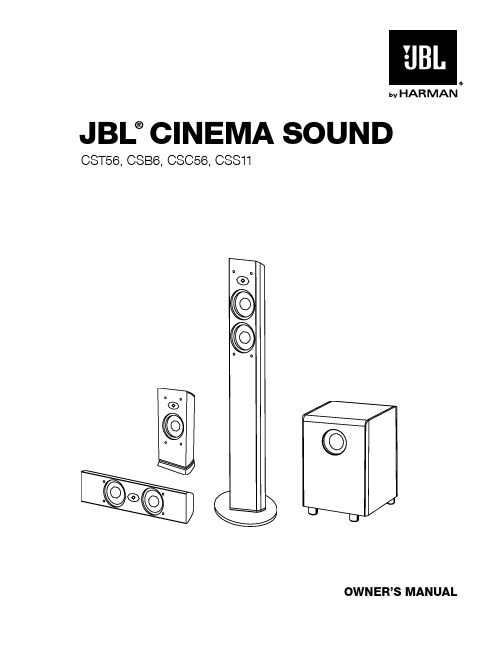
OWNER’S MANUALJBL ®CINEMA SOUNDCST56, CSB6, CSC56, CSS11IMpORtANt SAfEty INStRUCtIONS2tABLE Of CONtENtSThank You For Choosing This JBL® Product (4)Included Items (4)Speaker Placement (5)Wall-Mounting the CSC56 and CSB6 (6)Speaker Connections (7)Subwoofer Operation (9)Troubleshooting (10)Specifications (11)3thANk yOU fOR ChOOSINg thIS JBL® pRODUCtFor more than 60 years, JBL® products have been involved in every aspect of music and film recording and reproduction, from live performances to the recordings you play in your home, car or office.We’re confident that the JBL system you have chosen will provide every note of enjoyment that you expect – and that when you think about purchasing additional audio equipment for your home, car or office, you will once again choose JBL equipment.Please take a moment to register your product on our website at . Registration enables us to keep you posted on our latest advancements and helps us to understand our customers better and build products that meet their needs and expectations.INCLUDED ItEMSEACH MODEL SOLD SEPARATELYTwo wall bracketsCSS11One wall bracketCSB6CST5645 SpEAkER pLACEMENtFRONT SPEAKERSCENTER-CHANNEL SPEAKERSUBWOOFERSURROUND SPEAKERSAlternate placement for surround speakers when only 5.1 channels are used; required placement for surround back speakers in 7.1-channel systems.† Single surround back speaker may be used with 6.1-channel receivers and processors.The front speakers should be placed the same distance from each other as they are from the listening position. The CSB6 speakers should be placed at about the same height from the floor as the listeners’ ears will be, or they may be angled toward the listeners.The center channel speaker should be placed slightly behind the front left and right speakers, and no more than 2 feet (0.6m) above or below the tweeters of the left and right speakers. It is often convenient to set the center speaker on top of the television set, as shown in the drawing.The JBL Cinema Sound speaker system may be used in 5.1-, 6.1- or 7.1-channel applications. In 5.1-channelapplications, two of the surround speakers should be placed slightly behind the listening position and, ideally, should face each other and be at a level higher than the listeners’ ears. If that is not possible, they may be placed against a wall behind the listening position, facing forward. In 6.1-channel applications, two of the surround speakers should be placed in the side positions, and a single surround back speaker should be placed against the wall behind the listening position. In 7.1-channel applications, place two of the surround speakers in the side positions, and place the two surround back speakers against the back wall.In Dolby ® Digital and DTS ® systems, it is best to aim all of the speakers (except the subwoofer) toward the listening position at or slightly above ear-level height. In systems where only analog surround processing (such as Dolby Pro Logic ® II) is available, it may be preferable to aim the speakers straight out from the wall to obtain a more diffuse sound.The low-frequency sound from the subwoofer radiates in all directions, and this speaker may be placed in a convenient location in the room. However, bass reproduction will be maximized when the subwoofer is placed in a corner along the same wall as the front speakers. Experiment with subwoofer placement by temporarily placing the subwoofer in the listening position and moving around the room until the bass reproduction sounds best. Place the subwoofer in that location.WALL-MOUNtINg thE CSC56 AND CSB6The CSC56 center channel and the CSB6 are designed to be mounted on the wall. There are two (2) fixed-mount wallbrackets provided for the CSC56, and one for the CSB6. Each speaker bracket will require up to three 1-1/2" #10wood screws; each screw should be fastened to a wall stud. If a wall stud is unavailable, install an anchor appropriatefor a 1-1/2" #10 screw.NOTE: The customer is responsible for the correct selection and use of mounting hardware (available through hardwarestores) to ensure the proper and safe wall-mounting of the speakers.Step 1: Using the included mounting template (CSC56 only) or the bracket back plate (CSB6 only), mark the positionson the wall where you would like to place the mounting screws.Step 2: Attach the back plate(s) of the brackets to the wall using three screws (not included).Step 3: Attach the front plate(s) (with the two holes) of the bracket(s) to the CSC56 or CSB6, using the providedscrews.Step 4: Slide the CSC56 or CSB6 speaker with the attached bracket front plate(s) onto the back plate(s) of thebracket(s). Once positioned properly, the speaker should slide down slightly and become secure.To remove the speaker from the wall, simply slide the speaker up.CSC56CSB6NOTE: Remove the baseof the CSB6 by removingthe two screws on thebottom of the speaker.6SpEAkER CONNECtIONSCONNECTION TIPSSeparate and strip the ends of the speaker wire as shown. Speakers and other electronic components havecorresponding (+) and (–) terminals. Most manufacturers of speakers and electronics, including JBL electronics, usered to denote the (+) terminal and black to denote the (–) terminal.The (+) lead of the speaker wire is noted with a stripe. It is important to connect both speakers identically: (+) on thespeaker to (+) on the amplifier and (–) on the speaker to (–) on the amplifier. Wiring “out of phase” results in thin sound,weak bass and a poor stereo image.With the advent of multichannel surround sound systems, it is equally important to connect all of the speakers in yoursystem with the correct polarity in order to preserve the proper ambience and directionality of the sound.CST56To provide a neater installation, the CST56 allows you to insert the speaker wires through holes in the base. Simplyseparate and strip the wires as described above, loosen the terminals and insert each wire into its corresponding holein the base. Then tighten down the terminals.The hole in the center of each collar is intended for use with banana-type connectors. To comply with European CEcertification, these holes are blocked with plastic inserts at the point of manufacture. To use banana-type connectorsrequires the removal of the inserts.CSB6, CSC56To use the binding-post speaker terminals, unscrew the colored collar until the pass-through hole in the centerpost is visible under the collar. Insert the bare end of the wire through this hole; then screw the collar down until theconnection is tight. The hole in the center of each collar is intended for use with banana-type connectors. To complywith European CE certification, these holes are blocked with plastic inserts at the point of manufacture. To use banana-type connectors requires the removal of the inserts.7SpEAkER CONNECtIONSDOLBy® DIgItAL OR DtS® (OR OthER DIgItAL SURROUND MODE) CONNECtIONUse this installation method for Dolby Digital, DTS or other digital surround processors:Use the line-level input jack marked “LFE” for the Low-Frequency Effects channel. Connect this jack to the LFE outputor subwoofer output on your receiver or amplifier. Connect each speaker to the corresponding speaker terminals onyour receiver or amplifier.Make sure that you have configured your surround-sound processor for “Subwoofer On.” Also, configure your receiverfor 5.1-, 6.1- or 7.1-channel operation as appropriate. The front left, front right, center and back speakers shouldall be set to “Small.” If your receiver allows you to set the crossover frequency between the subwoofer and the mainspeakers, select 100Hz or the setting that is the closest frequency below it.DOLBY PRO LOGIC® (NON-DIGITAL) – LINE LEVELUse this installation method for Dolby Pro Logic® applications (not Dolby Digital, DTS or other digital processing),where the receiver/processor is equipped with a subwoofer output or a volume-controlled preamp (line-) level output:Use RCA-type cables to connect the line-level subwoofer outputs on your receiver or amplifier to the line-level inputson the subwoofer. IMPORTANT: Do not use the LFE input on the subwoofer with Dolby Pro Logic processors.NOTE: If your receiver or amplifier has only one subwoofer output jack, then you will need to use a Y-connector (notincluded). Plug the male end of the Y-connector into your receiver or amplifier’s subwoofer output jack, and connecteach of the two female ends to separate RCA-type interconnects. Finally, plug the RCA-type interconnects into theline-level inputs on the subwoofer.Connect each speaker to the corresponding speaker terminals on your receiver or amplifier. Make sure your receiver orprocessor is correctly configured to indicate that the subwoofer is “On.”89SUBWOOfER OpERAtIONPress the Master Power switch (marked “Power” å) to the On position to use the subwoofer. The CSS11 subwoofer will automatically turn on or go into Standby (sleep) mode as described below. When your receiver or amplifier is off, or is not sending program material to the subwoofer, the subwoofer will be in standby mode (the LED on the front of the CSS11 will be red). When the subwoofer senses an audio signal, it will automatically turn on (the LED will be green). If the subwoofer does not sense a signal after approximately 20 minutes, it will automatically go into Standby mode.If you will be away from home for an extended period of time, or if the subwoofer will not be used, switch the Master Power switch å to the Off position by pressing it until it pops out.VOLUMEVolume may be adjusted using the Subwoofer Level control ∫, as shown.PHASEThe Phase control determines whether the subwoofer’s pistonlike action moves in and out in phase with the main speakers or opposite the main speakers. There is no correct or incorrect setting. Proper phase adjustment depends on several variables, such as subwoofer placement and listener position. Adjust the Phase switch çto maximize bass output at the listening position.Remember, every system, room and listener is different. There are no right or wrong settings; this switch offers the flexibility to adjust your subwoofer to optimum performance for your specific listening conditions without moving your speakers. If at some time in the future you happen to rearrange your listening room and move your speakers, you should experiment with the phase switch in both positions and leave it in the position that maximizes bass performance.pROBLEM SOLUtIONIf there is no sound from any of the speakers:Check that receiver/amplifier is on and a source is playing.•Check that the powered subwoofer is plugged in and is turned on (Power •switch å pushed in).Check all wires and connections between receiver/amplifier and speakers. •Make sure all wires are connected. Make sure none of the speaker wires are frayed, cut, punctured or touching each other.Review proper operation of your receiver/amplifier.•If there is no sound coming from one speaker:Check the Balance control on your receiver/amplifier.•Check all wires and connections between receiver/amplifier and speaker. •Make sure all wires are connected. Make sure none of the speaker wires are frayed, cut, punctured or touching each other.In Dolby Digital or DTS modes, make sure that the receiver/amplifier is•configured so that the speaker in question is enabled.Turn off all electronics, and switch the speaker in question with one of•the other speakers that is working correctly. Turn everything back on, and determine whether the problem has followed the speaker or has remained in the same channel. If the problem is in the same channel, the source of the problem is most likely with your receiver or amplifier, and you should consult the owner’s manual for that product for further information. If the problem has followed the speaker, consult your dealer for further assistance or, if that is not possible, visit .If there is no sound from the center speaker:Check all wires and connections between receiver/amplifier and speaker. •Make sure all wires are connected. Make sure none of the speaker wires are frayed, cut, punctured or touching each other.If your receiver/processor is set in Dolby Pro Logic mode, make sure the •center speaker is not in phantom mode.If your receiver/processor is set in one of the Dolby Digital or DTS modes, •make sure the receiver/processor is configured so that the center speaker is enabled.If the system plays at low volumes but shuts off as volume is increased:Check all wires and connections between receiver/processor and speakers. •Make sure all wires are connected. Make sure none of the speaker wires are frayed, cut, punctured or touching each other.If more than one pair of main speakers is being used, check the minimum •impedance requirements of your receiver/amplifier.If there is low (or no) bass output:Make sure the connections to the left and right speaker inputs have the•correct polarity (+ and –).Make sure the subwoofer is plugged into an active electrical outlet and is•turned on (Power switch å pushed in).In Dolby Digital or DTS modes, make sure your receiver/processor is•configured so that the subwoofer and LFE output are enabled.Switch the Phase switch• ç to the opposite position, and select the positionthat results in the most pleasing bass response.If there is no sound from the surround speakers:Check all wires and connections between receiver/processor and speakers. •Make sure all wires are connected. Make sure none of the speaker wires are frayed, cut, punctured or touching each other.Review the proper operation of your receiver/amplifier and its surround-sound •features.Make sure the movie or TV show you are watching is recorded in a surround •sound mode. If it is not, check to see whether your receiver/processor has other surround modes you may use.In Dolby Digital or DTS modes, make sure your receiver/processor is•configured so that the surround speakers are enabled. When five satellites are in use, remember to configure your receiver or processor for 6.1-channel operation, and when six satellites are in use, configure your receiver orprocessor for 7.1 channels.Review the operation of your DVD player and the jacket of your DVD to make •sure that the DVD features the desired Dolby Digital or DTS mode, and that you have properly selected that mode using both the DVD player’s menu and the DVD disc’s menu.tROUBLEShOOtINg1011 SpECIfICAtIONSSYSTEMFrequency response:27Hz – 30kHz (–6dB)CST56CSB6CSC56Maximum recommended amplifier power:150W*125W*150W*Power handling:50W continuous/300W peak 40W continuous/300W peak 50W continuous/300W peak Frequency response:55Hz – 30kHz (–6dB)60Hz – 30kHz (–6dB)55Hz – 30kHz (–6dB)Nominal impedance:8 ohms 8 ohms 8 ohmsSensitivity:90dB @ 1 watt/1 meter 88dB @ 1 watt/1 meter 90dB @ 1 watt/1 meterTweeter:3/4" (19mm) titanium-laminate dome, video-shielded 3/4" (19mm) titanium-laminate dome, video-shielded 3/4" (19mm) titanium-laminatedome, video-shieldedWoofers:Dual 5" (130mm) transducers with PolyPlas ™ cones, neodymium magnets and HeatScape ™ motor structure, video-shielded5" (130mm) transducer with PolyPlas cone, neodymium magnet and HeatScape motor structure, video-shielded Dual 5" (130mm) transducerswith PolyPlas cones, neodymiummagnets and HeatScape motorstructure, video-shieldedDimensions (H x W x D):46" x 11-1/4" x 11-1/4" (1168mm x 286mm x 286mm) (including base and grille)Including base and grille:14-5/16" x 6-1/8" x 4-9/16" (363mm x 155mm x 116mm)Without base but with wall-mount bracket and grille:13-5/16" x 6-1/8" x 5-1/8"(338mm x 155mm x 130mm)6-1/4" x 26-1/4" x 4-1/4"(159mm x 667mm x 108mm)(including wall-mount bracketand grille)Weight:17 lb (7.7kg)Including base and grille:5 lb (2.3kg)Without base and with wall-mount bracket and grille:4.5 lb (2kg)10 lb (4.5kg)*The maximum recommended amplifier power rating will ensure proper system headroom to allow for occasional peaks. We do not recommend sustained operation at these maximum power levels.Features, specifications and appearance are subject to change without notice.CSS11Amplifier power:150W RMSFrequency response:27Hz – low-pass crossover setting at signal sourceLow-frequency driver:10" (250mm) cone and HeatScape motor structure, video-shielded Input:LFE preamp levelDimensions (H x W x D) (including feet):18-1/4" x 13-1/4" x 16" (464mm x 337mm x 406mm)Weight:43 lb (19.5kg)Harman Consumer, Inc.8500 Balboa Blvd., Northridge, CA 91329 USA© 2010 Harman International Industries, Incorporated. All rights reserved.JBL is a trademark of Harman International Industries, Incorporated,registered in the United States and/or other countries. PolyPlas andHeatScape are trademarks of Harman International Industries, Incorporated.Dolby and Pro Logic are registered trademarks of Dolby Laboratories. DTSis a registered trademark of Digital Theater Systems, Inc.Part No. 950-0317-001 Rev. B 。
JBL Cinema 500 六部分家庭影音扬声器系统快速指南说明书

4X1X4X4X8X 1XINCLUDED ITEMS3X15 ft (4.5m)2X30 ft (9.0m)THANK YOU FOR CHOOSING THIS JBL ® PRODUCTThe Cinema 500 is a complete six-piece home theater speaker system that includes four identical, two-way, video-shielded satellite speakers, a dedicated, voice-matched, video-shielded center speaker with dual midrange drivers an 8-inch (203mm), 150-watt powered subwoofer and all of the cables you need to connect all of the speakers to your audio/video receiver or preamp/processor and ampli fier.We're con fident that this JBL system will provide every note of enjoyment that you expect – and that when you think aboutpurchasing additional audio equipment for your home, car or of fice, you will once again choose JBL products.This quick-start guide contains all the information you need to set up, connect and adjust your new speaker system. For more in-depth information, go to our Web site: .CINEMA 500Home theater speaker systemQUICK-START GUIDE2On/Standby LED: When the Power-On Mode Switch is in the “Auto” position, this LED indicates whether the subwoofer is in the On or Standby state:When the LED glows green, the subwoofer is turned on.• • When the LED glows red, the subwoofer is in the Standby mode.When the Power Switch is set to “Off,” the LED will not light up, no matter what setting the Power-On Mode Switch is in.Crossover Control: This control determines the highest frequency at which the subwoofer reproduces sounds. The higher you set the Crossover Control, the higher in frequency the subwoofer will operate and the more its bass will “overlap” that of the satellite speakers. This adjustment helps achieve a smooth transition of bass frequencies between the subwoofer and the satellites for a variety of different rooms and subwoofer locations.NOTE: The Crossover Control functions only when you are using the Line-Level In L/R Connectors. The Line-Level In LFE Connector bypasses the subwoofer’s built-in crossover and Crossover Control. Phase Switch: This switch determines whether the subwooferdriver’s piston-like action moves in and out in phase with the satellite speakers. If the subwoofer were to play out of phase with the satellite speakers, the sound waves from the satellites could partially cancel out the sound waves from the subwoofer, reducing bass performance and sonic impact. This phenomenon depends in part on the placement of all the speakers relative to each other in the room.Power-On Mode Switch: When this switch is set in the “Auto” position and the Power Switch is set to “On,” the subwoofer will automatically turn itself on when it receives an audio signal and will enter the Standby mode when it has gone without receiving an audio signal for 20 minutes. When this switch is set in the “On” position, the subwoofer will remain on whether or not it is receiving an audio signal.Subwoofer Level Control: Use this control to adjust the subwoofer’s volume. Turn the knob clockwise to increase the volume; turn the knob counterclockwise to decrease the volume.Line-Level In LFE Connector: This input bypasses the subwoofer’s internal crossover circuitry, so use it only with a receiver or processor subwoofer output that has been low-pass filtered. If your receiver or processor does not have a dedicated subwoofer output that is low-pass filtered, use the subwoofer’s Line-Level In L/R Connectors (see below) instead.Use the supplied mono RCA cable (purple connectors) to connect the Line-Level In LFE Connector to the dedicated subwoofer output of a receiver or preamp/processor.Line-Level In L/R Connectors: These inputs pass through the subwoofer’s built-in crossover. Use them if your receiver or preamp/processor does not have a dedicated subwoofer output that is low-pass filtered.Power Switch: Set this switch in the “On” position to turn the subwoofer on. The subwoofer will then be in On or Standby mode, depending on the setting of the Power-On Mode Switch.Power Cord: After you have made and verified all subwoofer and speaker connections described in this manual, plug the power cord into an active, unswitched electrical outlet for proper operation of the subwoofer. DO NOT plug this cord into the accessory outlets found on some audio components.SUBWOOFER REAR-PANEL CONTROLS AND CONNECTIONSSubwoofer Level ControlCrossover Control On/StandbyLED Phase Switch Power-On Mode Switch Line-Level In LFE Connector Line-Level In L/R Connectors Power Switch Power Cord3 PLACING THE SPEAKERSFRONT LEFT AND RIGHT SPEAKERSCENTER SPEAKERSURROUND SPEAKERS AND SUBWOOFER4SPEAKER MOUNTING OPTIONSSHELF-MOUNTING Satellites:Center:3.WALL-MOUNTINGIMPORTANT SAFETY NOTE: The customer is solely responsible for proper selection and installation of mounting hardware not included with the speakers. JBL disclaims any liability for the selection and installation of mounting hardware.Be sure to follow these installation instructions carefully. If you have any questions or doubts about your ability to wall-mount the speakers correctly, consult with your authorized JBL dealer or custom installer.Satellite(195.5mm)Center1. D ecide on locations for the speakers according to the recommendations in Placing the Speakers , on page 3.2. S elect wall-hanging hardware that is appropriate for the construction and materials of your walls. The Cinema 500 front, center and surround speakers weigh3.25 lb (1.47kg) each. Be sure to use hardware that can support their weight.3. I nstall the wall-hanging hardware on the walls. Make sure that the hardware is driven into studs and not into drywall or plaster. If the hardware must be mounted in drywall or plaster, you are responsible for selecting and using wall anchors that are appropriate for the construction and materials of your walls.4. Hang the speakers on the wall-mount hardware.5IMPORTANT: Make sure the ( + ) and ( – ) bare wires do not touch each other or the other terminal. Touching wires can cause a short circuit that can damage your receiver or amplifier.Connect the speakers to the proper amplifier channels:Front LeftFront Right6OPERATING THE SUBWOOFERTURNING THE SUBWOOFER ON AND OFFSet the subwoofer’s Power Switch to the “On” position.I f the subwoofer’s Power-On Mode Switch is set to “Auto,” the •subwoofer will automatically turn itself on when it receives an audio signal, and it will go into Standby mode after it has received noaudio signal for 20 minutes. The subwoofer’s LED will glow green when the subwoofer is on and will glow red when the subwoofer is in Standby.I f the Power-On Mode Switch is set to “On,” the subwoofer will •remain on at all times. The subwoofer’s LED will glow green.If you will not be using the subwoofer for an extended period – for instance, if you’re going on vacation – set the Power Switch to the “Off” position.SUBWOOFER ADJUSTMENTS: CROSSOVER CONTROL NOTE: The Crossover Control functions onlywhen you are using the Line-Level In L/RConnectors. The Line-Level In LFE Connectorbypasses the subwoofer’s built-in crossover andthe Crossover Control.The Crossover Control adjusts the subwoofer’sbuilt-in crossover between 50Hz and 200Hz.The higher you set the Crossover Control, thehigher in frequency the subwoofer will operateand the more its bass will “overlap” that of thesatellite speakers. This adjustment helps achievea smooth transition of bass frequencies between the subwoofer and the satellites for a variety of different rooms and subwoofer locations. To set the Crossover Control, listen for the smoothness of the bass.If the bass seems too strong at certain frequencies, try a lower Crossover Control setting. If the bass seems too weak at certain frequencies, try a higher Crossover Control setting.SUBWOOFER ADJUSTMENTS: VOLUMEUse the Subwoofer Level Control to set thesubwoofer’s volume. Turn the knob clockwiseto increase the subwoofer’s volume; turn theknob counterclockwise to decrease the volume.Once you have balanced the subwoofer’svolume with that of the other speakers in yoursystem, you shouldn’t have to change it.Notes on Setting Subwoofer Volume:s Sometimes the ideal subwoofer volumesetting for music is too loud for films, whilethe ideal setting for films is too quiet formusic. When setting the subwoofer volume, listen to both music and films with strong bass content and find a “middle ground”volume level that works for both.I f your subwoofer always seems too loud or too quiet, you may •want to place it in a different location. Placing the subwoofer in a corner will always tend to increase its bass output, while placing it away from any walls or corners will always tend to lessen its bass output.SUBWOOFER ADJUSTMENTS: PHASEThe Phase Switch determines whetherthe subwoofer driver’s piston-likeaction moves in and out in phase withthe satellite speakers. If the subwooferwere to play out of phase with thesatellite speakers, the sound wavesfrom the satellites could partially cancelout the waves from the subwoofer,reducing bass performance and sonic impact. This phenomenon depends in part on the placement of all the speakers relative to each other in the room.Although in most cases you should leave the Phase Switch in the “Normal” position, there is no absolutely correct setting for the Phase Switch. When the subwoofer is properly in phase with the satellite speakers, the sound will be clearer and have maximum impact, and percussive sounds like drums, piano and plucked strings will sound more lifelike. The best way to set the Phase Switch is to listen to music that you know well and to set the switch in the position thatgives drums and other percussive sounds maximum impact. CROSSOVER50(Hz)2007SPECIFICATIONSCINEMA 500 SYSTEMFrequency response:32Hz – 20kHz (–6dB)CINEMA 500 CENTER SPEAKERLow-frequency transducer:Two 3" (75mm) PolyPlas cones, video-shieldedHigh-frequency transducer:1" (25mm) titanium-laminate dome, video-shielded Recommended power handling:100 watts Nominal impedance:8 ohms Sensitivity (2.83V/1m):89dB Crossover frequency: 3.7kHz Enclosure type:SealedConnector type:Push-spring terminal Dimensions (H x W x D):4-7/8" x 12" x 3-3/8"(124mm x 305mm x 86mm)Weight:3.2 lb (1.45kg)CINEMA 500 SATELLITE SPEAKERSLow-frequency transducer:Two 3" (75mm) PolyPlas ™ cone, video-shielded High-frequency transducer:1" (25mm) titanium-laminate dome, video-shielded Recommended amplifier power:100 watts Nominal impedance:8 ohms Sensitivity (2.83V/1m):86dB Crossover frequency: 3.7kHz Enclosure type:SealedConnector type:Push-spring terminal Dimensions (H x W x D):11-3/8" x 4-3/4" x 3-3/8" (289mm x 121mm x 86mm)Weight:3.2 lb (1.45kg)SUB140P SUBWOOFERLow-frequency transducer:8" (200mm) cone (down-firing)Enclosure type:Ported (down-firing)Amplifier power:150 wattsFrequency response:32Hz – 150Hz (–6dB)Audio controls:Volume level, phase, crossover frequency Connections:LFE input, left and right RCA line-level inputsPower requirement:120V/60Hz, 150W (US);220V – 240V/50Hz, 150W (EU)Power consumption:<1W (8mA@120V) standby; 300w (2.5A@120V) peak Dimensions (W x H x D):19" x 14" x 14"(483mm x 355mm x 355mm)Weight:22 lb (10kg)HARMAN Consumer, Inc.8500 Balboa Boulevard, Northridge, CA 91329 USA© 2010 HARMAN International Industries, Incorporated. All rights reserved.JBL is a trademark of HARMAN International Industries, Incorporated, registered in the United States and/or other countries. PolyPlas is a trademark of HARMAN International Industries, Incorporated.Features, specifications and appearance are subject to change without notice.Part No. 950-0298-001 Rev. A。
JBL CINEMA SB190 用户手册说明书

JBL CINEMA SB190用户手册重要安全指引使用前先检查线路电压JBL CINEMA BAR 190(条形音箱和低音扬声器)的设计用电规格为 100-240 V、50/60 Hz 交流电。
如果连接至不符合产品规格的线路电压,将会造成安全和火灾危险,并会使设备受损。
如果对指定型号的电压要求或所在地区的线路电压有任何疑问,将设备插接至墙壁插座前,请先联系您的零售商或客服代表。
请勿使用延长线。
为避免产生安全威胁,请确保只使用设备随附的电源线。
我们不建议此产品使用延长线。
和所有电气设备一样,请勿将电源线铺设在地毯下面,也不要在电源线上摆放任何重物。
如果电源线损坏,请立即通知授权服务中心,由专人将其更换为符合工厂规格的电源线。
使用电源线时请轻拿轻放从交流电插座拔出电源线时,请拔插头,不要拔电线。
如果将要长时间不使用此扬声器,请从插座拔出插头。
请勿打开本产品的机箱。
本产品内没有用户能够自行维修的组件。
打开机箱可能会产生电击危险,同时对产品做出任何修改都会使您的产品的保修无效。
如果有水意外进入设备内部,请立即断开电源连接,然后通知授权服务中心。
目录重要安全指引 21 简介 42 产品清单 43 产品概述5 3.1 控件和指示灯 5 3.2 连接器 5 3.3 低音炮 5 3.4 遥控器 64 放置 7 4.1 桌面放置 7 4.2 挂壁安装 75 连接 8 5.1 连接电视和数字设备 8 5.2 蓝牙连接 106 播放 11 6.1 开机/自动待机/自动唤醒 11 6.2 播放电视源11 6.3 播放 HDMI IN 源 12 6.4 播放蓝牙源 127 声音设置12 7.1 DOLBY ATMOS®(虚拟) 127.2 预定义的 EQ 设置 13 7.3 人声模式 13 7.4 低音增强 148 恢复出厂设置 149 软件更新 1510 重新连接低音炮 1511 产品规格 1612 故障排除 1613 商标 171 简介感谢您购买 JBL CINEMA BAR 190(条形音箱和低音炮),它是一款旨在为您的家庭娱乐系统带来非凡聆听体验的产品。
影音室设备方案 - 音频 美国JBL7.1-影院

手机:135********E-mail:bjyutian 序号品名品牌型号国别单位数量单价金额1H系列音箱JBL JBL3677 左 中 右美国只39800.0029400.002H系列外摆式音箱JBL JBL8320 环绕美国只41950.007800.003低音炮JBL JBL4641美国只18900.008900.004解码器Tripath 710台湾台15610.005610.00音响重放系统产品特点: 1.HS-215是专为小型影厅设计的二分频扬声器。
2.此音箱采用单15“低音单元和单1.75”高音单元组成。
3.仅30CM的超溥箱体设计中采用了直接辐射技术的低音箱体,这样不仅可以给影厅留出更多的空间,还不会影响影片音质效果。
4.适用小型电影院。
产品参数: 型号 HS-215频率响应 45Hz-20KHz阻抗 8Ω额定功率 300W灵敏度 99dB覆盖角度 水平90×垂直40°分频点 1.5HZ单元系统组成 15"×1+1.75"×1谐波失真≤ 2%体积 LF:650×300×1125mm 重量 32kg产品特点: 1、具有功率大,灵敏度高,动态范围大,失真小的特点 2、能真实还原影片声音,其近乎完美的声音的特性 3、非常适用于影院环绕声的还音 ,产品参数: 频率响应 50Hz~18KHz 额定阻抗 8Ω 功率 150W 灵敏度 93dB 尺寸 330x227x430 重量7Kg产品特点: HS-S18是一款单18"的影院超低频音箱。
它充分体现出高性能单元与合理箱体结构的完美组合特性,为发出高声压深沉有力的低频提供安全保障。
产品参数: 型号 HS-S18 频率响应 35Hz-400Hz 阻抗 8Ω 额定功率 800W 灵敏度103dB 覆盖角度 水平90×垂直40° 单元系统组成 18“×1 谐波失真 ≤2% 体积 LF:650×450×1000mm 重量 32kg北京雨田创盛科技有限公司电影音响系统解决方案电话:010-********工程部:刘工地址:北京市朝阳区博大路3号院2号楼708室展厅:▼4英吋 65.5K像素彩色液晶显示,菜单界面全触控操作,中英文可选,简洁直观;▼4进1出HDMI音视频接口,支持光纤、同轴两种音频数字输入;▼全面支持DOBLY AC3,DTS影院解码功能,8通道HDMI音频解码输入接口,7.1声道平衡输出;▼输入通道音乐和麦克风分别有13段独立参量均衡;▼专业级KTV混响效果,效果独立3段均衡调节,麦克风4级反馈抑制控制,防啸叫无忧;▼主输出通道设7段参量均衡(PEQ),中置,低音,环绕,后置通道分别设5段参量均衡(PEQ),电子分频,输入选择及混合比例,极性,延时,限幅,增益功能;▼音频处理采用双DSP芯片设计,解码芯片采用专业级ADI第四代DSP芯片,400MHz主频,96KHz采样频率32-bit浮点运算;▼KTV处理采用德州TI公司最5双通道功率放大器TPA YT600 2*600W美国台24600.009200.00输出功率8Ω/1khz 600W;输出功率 4Ω/1khz 850W;信噪比 102dB;输入灵敏度 0.775V 1KHz;总谐波失真 <0.05%;阻尼系数 >300;输入阻抗 20KΩ(平衡)/10KΩ(非平衡);尺寸(宽深高)483×468×90mm;重量 15.5Kg;6双通道功率放大器TPA YT2350 2*350W中国台23150.006300.00产品特性(PRODUCT FEATURES): YT系列数字功率放大器为1U外观设计,classD拓扑结构并集成开关电源,超轻巧机身,强大功率输出。
L100经典版JBL 标志性三分频书架式扬声器说明书

L100经典版标志性三分频书架式扬声器用户手册2感谢您购买 JBL® L100 经典版三分频扬声器逾 70 年来,JBL 一直为全球各地的音乐厅、录音棚和电影院提供音频设备,已成为领先的唱片艺术家和录音师的信赖之选。
传奇般的 JBL 4310 录音室专业监听音箱帮助 20 世纪六七十年代成功制作了许多热门专辑。
4310 是1970 年推出的 L100 家庭扬声器的灵感来源,成为 JBL 一直最畅销的扬声器。
L100 经典版是原先 L100 的当代再现。
全新的 L100 经典版向该历史经典致敬,采用了标志性的 12 英寸 (300mm) 三分频配置,还配备了全新驱动器、分频网络、机箱,使设计达到 21 世纪最高性能标准。
L100 经典版采用了紧凑的监听器类型占地空间设计,具有先进的 JBL 换能器,包括 JW300PW-8 纯纸浆锥盆低音扬声器、105H-1 聚合物包膜纯纸浆锥盆中音扬声器和 JT025TI1-4 钛高音扬声器。
L100 经典版保留了初始 L100 受七八十年代听众欢迎的所有性能属性,例如特殊的动态范围和对比度、清晰而轻松的高输出以及精确的高冲击低音。
更新的 L100 经典版添加了针对全带宽的更高细节分辨率、更低的失真度、更逼真的立体声声场成像,尤其是离轴。
L100 经典版必定在各地音乐爱好者中缔造新的传奇。
包装内容一个 L100 经典版扬声器 •一个 Quadrex 泡沫网罩 •一个 L100 经典版用户手册•摆放和定位警示:L100 经典版各重 58.8 lb. (26.7 kg)。
在将扬声器放在架子或平台上之前,请先确保架子或平台稳固,足以支撑扬声器的重量。
在决定扬声器的摆放位置之前,请测量您的房间并参考下图考虑摆放位置。
•切勿将扬声器放在功放、电热器等能够产生大量热量的设备附近。
切勿将扬声器放在潮湿或多尘位置。
• 切勿将扬声器放在阳光直射或有其他强光源的位置。
JBL L82 Classic 扬声器用户手册说明书
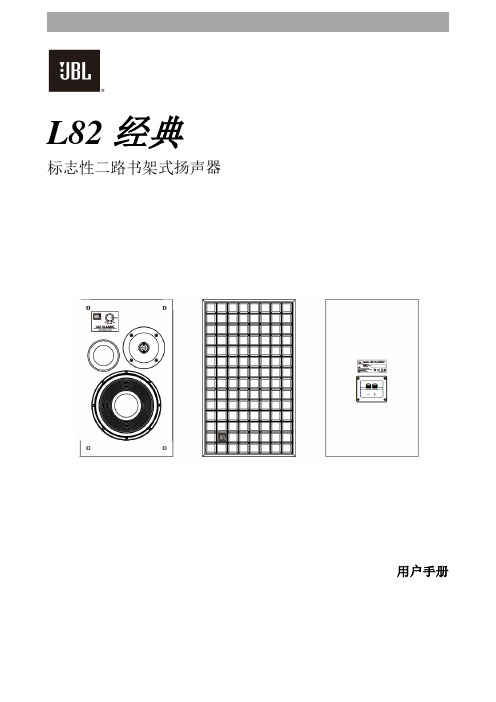
L82经典标志性二路书架式扬声器用户手册简介感谢购买JBL® L82经典二路扬声器逾70 年来,JBL一直为全球各地的音乐厅、录音棚和电影院提供音频设备,已成为领先的唱片艺术家和录音师的首选品牌。
极具传奇色彩的JBL 4310专业演播监听器在上世纪六七十年代帮助人们制作了大量极受欢迎热门专辑。
JBL 4310是1970年推出的L100家庭音响扬声器的灵感来源,这款扬声器成为JBL有史以来最畅销的一款。
L82经典是一款新型号产品,在现代L100经典风格的系统中重新诠释了经典的JBL 8'' 2路设计。
全新L82经典的标志性8英寸(200mm)2路配置继承了JBL 8" 2路扬声器的传奇性设计,同时融入了全新的驱动器、分频网络、音箱和各种功能,使产品设计完全达到了21世纪最高性能标准。
L82经典体型纤巧,配备先进的JBL换能器,包括JW200PW-6纯纸浆锥盆低音扬声器和JT025TI1-4钛高音扬声器。
L82经典凭借其出色的动态范围和对比度、简洁轻松的高输出和精确的高冲击低音,改善了可追溯到70年代的JBL 8''的双向型号的性能。
L82经典采用极具现代感的设计,在全带宽范围内具有极高的细节分辨率、极低的失真以及非常逼真的同轴和离轴立体声像,这一切都证明它是L100经典不折不扣的“小兄弟”。
这款L82经典产品一定会成为世界各地音乐爱好者的新传奇。
包装内容•2x L82经典扬声器•2x Quadrex泡沫网罩•1x L82经典用户手册摆放和定位注意:每台L82经典重量均为29磅(13.2kg)。
在将扬声器放到搁架或平台上之前,请确保其足够坚固,能够承受扬声器的重量。
要确定扬声器的最终摆放位置,请仔细观察室内环境并参考下图。
•切勿将扬声器摆放到功放、电热器或其他能够产生热量的设备附近。
•切勿将扬声器摆放在潮湿或多尘的位置。
•切勿将扬声器摆放在直接光照下或有其他强光源的位置。
JBL Cinema SB250 平面电视搭配子音箱说明书

Aporta un sonido cinematográfico a cualquier televisor de perfil delgado. JBL Cinema SB250 está diseñado para complementar cualquier televisor de panel plano y proyectar un sonido envolvente virtual impactante con un conjunto elegante y sencillo. Se conecta sin hilos a su subwoofer compacto y potente, y al televisor con un solo cable. También mejora la experiencia de visualización con funciones de transmisión inalámbrica avanzadas mediante Bluetooth como JBL SoundShift™, que funciona con el televisor y un dispositivo móvil inalámbrico a la vez para que pueda cambiar automáticamente entre el sonido del televisor y el de su teléfono o tableta. JBL Cinema SB250 puede aprender cualquier control de volumen de control remoto de televisor, con lo cual usted disfruta de un control más sencillo de toda su experiencia de cine en casa. Un conmutador EQ mural o de sobremesa calibra el SB250 para cualquier tipo de instalación y el control independiente del volumen del subwoofer permite ajustar la respuesta de bajos a su gusto personal.CaracterísticasAporta un sonido cinematográfico a cualquier televisor de perfil delgado Solución inalámbrica todo en uno Conexión con un solo cable Aprendizaje del control remoto del televisorJBL SoundShift™Dolby® Digital y Harman Surround Harman Volume (Volumen Harman)Características y ventajasAporta un sonido cinematográfico a cualquier televisor de perfil delgadoJBL Cinema SB250 se ajusta a cualquier televisor moderno de panel plano y aporta un sonido cinemático impactante.Solución inalámbrica todo en unoSolución completa todo en uno con un subwoofer inalámbrico compacto de 6,5" (165 mm).Conexión con un solo cableConexión sencilla con un solo cable analógico u óptico con su televisor.Aprendizaje del control remoto del televisorSimplifique su experiencia utilizando el control remoto de su televisor, ya existente, para hacer funcionar la barra de sonido.JBL SoundShift ™Funciona con el televisor y un dispositivo móvil inalámbrico a la vez para que pueda cambiar automáticamente entre el sonido del televisor y el de su teléfono o tableta.Dolby ® Digital y Harman SurroundSonido cinematográfico con sonido Dolby ® Digital y Harman Display Surround.Harman Volume (Volumen Harman)Basta de anuncios a todo volumen; Harman Volume mantiene el nivel de sonido coherente.Contenido de la caja1 Barra de sonido Cinema SB2501 Subwoofer inalámbrico JBL 1 Control remoto1 Cable analógico de 3,5 mm 1 Cable óptico1 Guía de inicio rápido 1 Tarjeta de garantía 1 Hoja de seguridadEspecificaciones técnicasIntervalo de frecuencias: 45 Hz – 20 kHz SPL máximo: 100 dBPotencia total del amplificador de Cinema SB250: 200 W máx.Dimensiones: Barra de sonido (Ancho x Alto x Profundidad): 831 x 65 x 78 mm Peso: 2,8 kgSubwoofer (Ancho x Alto x Profundidad): 242 x 242 x 320 mm Peso: 4,8 kgDimensiones (Ancho x Alto x Profundidad): 935 x 310 x 375 mm Peso bruto: 10,5 kgJBL Cinema SB250 incluye módulos de altavoces izquierdo y derecho con unidades duales de dos vías cada uno con unidades de gama completa de 55 mm (2,25") y un altavoz de agudos con cúpula de 32 mm (1,25"). Subwoofer inalámbrico alimentado con una unidad de 165 mm (6,5") en una carcasa con puertosDescodificación Dolby ® Digital Conectividad Bluetooth ®Una entrada de audio analógica estéreo Una entrada óptica digitalUn puerto USB para actualizaciones de software© 2015 HARMAN International Ind ustries, Incorporated. Tod os los d erechos reservad os. JBL es una marca comercial d e HARMAN International Ind ustries, Incorporated , registrad a en Estad os Unid os y en otros países. Las funciones, las especificaciones y el diseño del producto están sujetos a cambios sin previo aviso. La marca de la palabra Bluetooth ® y los logotipos son marcas registradas propiedad de Bluetooth SIG, Inc.y cualquier uso de dichas marcas por parte de HARMAN International Industries, Incorporated se realiza bajo licencia. Otras marcas registradas y nombres comerciales son propiedad de sus respectivos propietarios. Fabricado con licencia de Dolby Laboratories. Dolby y el símbolo de la doble D son marcas registradas de Dolby Laboratories.HARMAN International Industries, Incorporated8500 Balboa Boulevard, Northridge, CA 91329 USA 。
JBL cinema 500 家庭影院扬声器系统指南说明书

5D E U T S C HLaUTSPReCHeR aUFSTeLLenLINKER UND RECHTER FRONTLAUTSPRECHERCENTERSURROUND-LAUTSPRECHER UND SUBWOOFERLinker Front-LautsprecherTVCenterRechter Front-LautsprecherSubwooferLinker Surround-LautsprecherRechter Surround-LautsprecherRechter Surround-LautsprecherLinker Surround-Lautsprecher1,5 - 1,8 mLinker Frontlaut-sprecherRechter Frontlaut- sprecherTVCenterTV0 - 0,6 mLinker Front-LautsprecherRechter Front-Lautsprecher6mOnTaGemÖGLiCHKeiTenAUFSTELLUNG MITTELS REGAL-STATIV Satelliten:Center:1.3.2.WiCHTiGeR SiCHeRHeiTSHinWeiS: Wird zusätzliches Befestigungsmaterial nötig, ist der Kunde selbst für dessen Auswahl und korrekte Installation verantwortlich. Der Hersteller verweigert jegliche Verantwortung für den korrekten Zusammenbau und die Befestigung der Lautsprecher.Bitte folgen Sie den Anweisungen in dieser Bedienungsanleitung. Sollten Sie Zweifel hegen, ob Sie die Lautsprecher korrekt und sicher an die Wand befestigen können, wenden Sie sich bitte an Ihren Fachhändler.Satelliten49 mm55 mm195.5 mmCenter1. S uchen Sie nach passenden Aufstellungsorten für Ihre Lautsprecher – konsultieren Sie hierzu das Kapitel Lautsprecher aufstellen auf Seite 5.2. W ählen Sie für Ihre Wände geeignetes Befestigungsmaterial. Die Front- und Surround-Lautsprecher der Cinema 500 Serie wiegen 1,45 kg; der Cinema 500 Center bringt 1,47 kg auf die Waage. Bitte suchen Sie Befestigungsmaterial aus, das dieses Gewicht tragen kann.3. I nstallieren Sie die Wandhalterungen. Stellen Sie bitte sicher, dass die Halterungen sicher an Holzbalken befestigt werden. Für die montage auf Ziegel-, Gipskarton- oder Betonwände benötigen Sie geeignete Dübel.4. Hängen Sie nun die Lautsprecher in die Wandhalterungen ein.WANDMONTAGE7D E U T S C HLaUTSPReCHeR anSCHLieSSenaCHTUnG: Schalten Sie ihren Receiver bzw. Verstärker vollständig aus oder trennen Sie ihn vom Stromnetz BeVOR Sie mit der Verkabelung beginnen.WiCHTiG: a chten Sie bitte darauf, dass die positiven und negativen Leitungen weder sich noch andere Kabel anderer anschlussterminalsberühren (Kurzschluss).2.1.3.Die farblich markierte Ader an die "+"-Klemme anschließenLautsprecher mit dem Receiver verbinden:SPEAKER OUTPUTDie "+"-Klemme am Lautsprecher mit der "+"-Klemme am Verstärker verbinden:Die Lautsprecher mit den entsprechenden Lautsprecherterminals am Verstärker verkabeln:Linker Front-LautsprecherCenterKabel mit weißer MarkierungKabel mit grüner MarkierungKabel mit blauer MarkierungKabel mit grauer MarkierungKabel mit roter MarkierungLinker Surround-LautsprecherRechter Front-LautsprecherRechter Surround-LautsprecherReceiver oder VerstärkerLautsprecherDie farblichmarkierte Ader an die "+"-Klemme anschließenVerstärkerDie farblich markierte Ader an die "+"-Klemmeanschließen9D E U T S C HnORmaLBeTRieB DeS SUBWOOFeRSSUBWOOFER EIN- UND AUSSCHALTENStellen Sie den Netzschalter auf der Rückseite des Subwoofers auf …On“.Haben Sie den Power-On-Mode-Schalter auf …Auto" gestellt, schaltet •sich der Subwoofer automatisch vollständig ein sobald am Eingang ein Tonsignal erkannt wird. Empfängt er 20 Minuten lang kein Signal, schaltet er wieder in den Standby-Modus. Ist der Subwoofer aktiviert, leuchtet die Betriebsanzeige grün; leuchtet die LED rot, befindet sich der Subwoofer im Standby-Modus.Steht der Power-Schalter auf …On“ bleibt der Subwoofer ständig aktiviert. • Steht der Power-Schalter auf "On" bleibt der Subwoofer ständig aktiviert, und die LED leuchtet grün.Verwenden Sie den Subwoofer über einen längeren Zeitraum nicht (zum Beispiel während der Sommerferien), sollten Sie den Power-Schalter auf …Off“ stellen und ihn damit vollständig ausschalten.SUBWOOFER-BEDIENELEMENTE: CROSSOVER-REGLER:HINWEIS: Der Crossover-Regler wirkt nur, wenn das Signal über die Line-Level In L/R-Eingänge empfangen wird. Das am Line-Level In LFE-Anschluss anliegende Signal durchläuft weder den Crossover-Regler noch die eingebaute Frequenzweiche.Mit dem Crossover-Regler können Sie die obere Grenzfrequenz des Subwoofers im Bereich zwischen 50 und 200 Hz justieren. Je höher Sie die obere Grenzfrequenz einstellen, desto größer ist der mitden Satelliten-Lautsprechern überlappende Frequenzbereich. Auf diese Weise sorgen Sie selbst in Wohnräumen mit schwierigen akustischen Eigenschaften und unabhängig vom Aufstellungsort des Subwoofers für einen gleichmäßigen Frequenzübergang zwischen den Satelliten-Boxen und dem Bass-Lautsprecher.Achten Sie auf eine gleichmäßige Basswiedergabe in Ihrem Hörraum. Werden bestimmte Basstöne überbetont, sollten Sie eine niedrigere obere Grenzfrequenz ausprobieren. Wirken bestimmte Basstöne schwach, können Sie das Klangbild mit einer höheren oberen Grenzfrequenz verbessern.SUBWOOFER-BEDIENELEMENTE: SUBWOOFER LEVELMit diesem Regler können Sie die Lautstärke des Subwoofers justieren. Drehen Sie den Regler im Uhrzeigersinn, um die Lautstärke zu erhöhen. Drehen Sie ihn gegen den Uhrzeigesinn, um die Lautstärke zu mindern. Haben Sie einmal eine ausgeglichene Lautstärke zwischen Satelliten und Subwoofer gefunden, sollten Sie diese Einstellung nicht mehr verändern.Hinweise zur korrekten einstellung der Subwoofer-Lautstärke:Manchmal ist die ideale Lautstärke für Musik zu laut für die Wiedergabe •von Filmen und umgekehrt. Deswegen sollten Sie für die Einstellung der Subwoofer-Lautstärke bassbetonte Filme und Musikstücke verwenden – wählen Sie einen Durchschnittswert, der zu beiden Inhalten passt. Klingt Ihr Subwoofer ständig zu laut oder zu leise, wählen Sie bitte einen •anderen Aufstellort. Rücken Sie den Subwoofer näher in eine Zimmerecke, wird die Bass-Wiedergabe verstärkt. Vergrößern Sie den Abstand zur nächsten Wand, wird der Bass schwächer.SUBWOOFER-BEDIENELEMENTE: PHASE Dieser Schalter legt fest, ob sich die Bassmembran des Subwoofers und die Membranen der Satelliten-Lautsprecher synchron oder gegenläufig bewegen. Bewegen sich die Membranen nicht synchron, löschen sich einige Bassfrequenzen des Subwoofers oder der Satelliten gegenseitig auf, wodurchBassleistung und Dynamik sinken. Dieser Effekt hängt überwiegendermaßen vom Aufstellungsort der Lautsprecher im Raum ab.In den meisten Fällen können Sie den Phasen-Schalter auf …Normal“ belassen – eine wirklich …richtige“ Einstellung gibt es dennoch nicht. Spielen Subwoofer und Satelliten in Phase, bleibt das Klangbild klar und packend – dynamische Instrumente wie Schlagzeug oder Klavier klingen besonders naturgetreu. Am besten gehen Sie wie folgt vor, um die Phase Ihres Subwoofers korrekt einzustellen: Legen Sie Musik auf, die Sie sehr gut kennen. Stellen Sie den Phasenschalter so ein, dass Schlagzeug und Bass lauter klingen. Korigieren Sie anschließend evtl. die Lautstärke mit dem Subwoofer-Level-Regler mit höchster Dynamik wiedergegeben werden.© 2010 HARMAN International Industries, Incorporated. Alle Rechte vorbehalten.JBL ist eine Marke von HARMAN International Industries, Incorporated, eingetragen in den Vereinigten Staaten und/oder anderen Ländern. PolyPlas ist eine Marke von Harman International Industries, Incorporated.Teile-Nr. 950-0296-001, Rev.: AHARMAN Consumer, Inc.8500 Balboa Boulevard, Northridge, CA 91329 USA HARMAN Deutschland GmbH Hünderstraße 1 D-74080 HeilbronnD E U T S C HTeCHniSCHe DaTenCinema 500 SystemFrequenzbereich:Cinema 500 SatellitenBass-Chassis:Zwei Chassis mit 75 mm großen PolyPlas™-Membranen, magnetisch abgeschirmtHochtöner:25-mm-Hochtonkalotte aus Titan-Verbundmaterial, magnetisch abgeschirmt Belastbarkeit:100 Watt Nennimpedanz:8 Ohm Wirkungsgrad (2,83 V/1 m):89 dB Übergabefrequenz:3,7 kHz Gehäusetyp:geschlossen Anschlussterminals:Federkontaktklemme Maße (H x B x T):289 x 121 x 86 mm Gewicht:1,45 kgCinema 500 CenterBass-Chassis:Zwei 75-mm-PolyPlas-Membranen, magnetisch abgeschirmtHochtöner:25-mm-Hochtonkalotte aus Titan-Verbundmaterial, magnetisch abgeschirmt Belastbarkeit:100 Watt Nennimpedanz:8 Ohm Wirkungsgrad (2,83 V/1 m):89 dB Übergabefrequenz:3,7 kHz Gehäusetyp:geschlossen Anschlussterminals:Federkontaktklemme Maße (H x B x T):124 x 305 x 86 mm Gewicht:1,47 kgSUB140P SubwooferBass-Chassis:Ein nach unten abstrahlendes Chassis mit 200 mm großer Membran, magnetisch abgeschirmt Gehäusetyp:Nach unten abstrahlendes Gehäuse mit Bassreflexöffnung Verstärkerleistung:150 Watt Frequenzbereich:32 – 200 Hz (–6dB)Bedienelemente:Lautstärkeregler, Phasenschalter, Regler für die obere GrenzfrequenzAnschlüsse:LFE-Eingang, Linker und Rechter Line-Level-Anschluss (Cinch)Betriebsspannung:120 V/60 Hz, 150 W (US); 220 V – 240 V/50 Hz, 150 W (EU)Stromaufnahme:<1 W (8 mA bei 120 V) Standby; 300 W (2,5 A bei 120 V) maximal Maße (H x B x T):483 x 355 x 355 mm Gewicht:10 kgAlle Leistungsmerkmale und Spezifikationen sowie das mechanische Design können sich ohne vorherige Ankündigung ändern.32 Hz – 20 kHz (–6dB)。
JBL电影音箱配置经验整理
JBLJBL3722N(500W)厅长21米内影厅,全频单功放驱动(dsi1000)JBL3732 (500W)同上,价位略高,三分频,双功放驱动(dsi1000)BL4722N (800W)厅长27米内影厅,全频,单功放驱动(dsi2000)JBL4732 (800W)同上,价位略高,三分频,双功放驱动(dsi2000)JBL4675C-(4LF,8LF)1200W多用于超大厅的千人会场,廉价高效,实际厅长可达36米。
或用在超宽厅(宽度大于20米)双功放驱动(dsi4000)JBL5672(1200W),5674(2400W)同上,可用在超大厅,三分频,三功放驱动(dsi4000+dsi2000) JBL4641小厅的次低频,厅长14米内,单功放dsi1000或2000JBL4642A通用大功率双音圈次低频,应用广泛,大中小厅皆可,一只可用在厅长20米以内影厅,再大的影厅就要增加一只了,否则储备不足。
环绕声8320,8340,8350考虑到以后7.1升级,建议所有影厅都选用40、50大功率型号;如影厅土建设计在150座以下,可选用8320,以后升级没有冲突。
飞达FD-2215MVA]厅长25米以内,两分频双功放驱动,800W。
FD-2152MV N]厅长18米以内,两分频单功放驱动,600W.FD-3315MV A厅长25米以内应用,三分频双功放驱动,800W.FD-3415MV可在30米开外的影厅使用,三分频,可选双、三功放驱动,1600W。
相当于4675C,品质一般。
音霸网站打不开,待续。
李海兵QQ:641963875。
JBL Soundfly BT插入式无线扬声器快速设置指南说明书

Quick Setup GuideJBL SoundfL y ™BtPlug-in wireless speakerWelcomeThank you for purchasing the JBL Soundfly™ BT plug-in wireless speaker. Soundfly BT will fill your room with sound from your portable Bluetooth -enabled device while plugging directly into an AC outlet and remaining practically invisible.Included ItemsJBL Soundfly BTUnitAC Plug Adapter (varies with region)Support Pad (varies with region)2Plug soundfly Bt Into an ac outletONturnIng soundfly Bt on and offONSTANDBYNote: Soundfly BT will automatically enter the Standby mode after 10 minutes of inactivity.PaIr soundfl y Bt WIth your BluetoothdevIceNOTE: Bluetooth pairing between two devices does not have to be repeated after a successful initial pairing unless you remove Soundfly BT from the paired device’s Bluetooth device list. To un-pair Soundfly BT from the current device, press and hold the Bluetooth logo button.stream your audIo on soundfl y BtSoundfly BT will automatically turn from Standby to On when it receivesa streaming audio signal from a Bluetooth-capable device. Use your Bluetooth-enabled device to control the volume and other playback functions. The maximum streaming range is approximately 33 feet(10m) from the Soundfly BT unit.JBl easy connect aPPlIcatIonThe JBL Easy Connect application is downloadable free from theAndroid® Market at . The JBL Easy Connect Application features:• C ontrols for Soundfly BT’s digital sound processing (DSP) thatenables you to get the best sound wherever you plug in Soundfly BT.• A music player with a music browser function.• O ne touch Bluetooth operation.uPgradIng fIrmWareYour Soundfly BT has upgradeable firmware that lets you takeadvantage of new features and improvements as they becomeavailable. Go to for information about checking your unit’s firmware version and instructions on upgrading to a newer firmware version.3trouBleshootIngSymptom poSSible problem Solution noteNo sound (Power button LED is not illuminated)Faulty AC connection Make sure that Soundfly BT isplugged into a working AC outlet.The Power button LED glowswhite or amber when the unit isreceiving AC power.No sound (Power button LED glows amber.)Soundfly BT is in Standby mode.Touch the Power button.The Power button LED glowswhite when the unit is on.The Bluetooth-enabled device is outof range of Soundfly BTMove the device closer to SoundflyBT.Soundfly BT’s operational range isapproximately 33 feet (10m).No sound (Power button LED glows white.)Soundfly BT is not paired with aBluetooth-enabled device.Pair Soundfly BT with a Bluetooth-enabled device. See Pair SoundflyBT with Your Bluetooth Device, onpage 3.The Pairing LED illuminates solidblue when Soundfly BT is pairedwith a Bluetooth-enabled device.Sound crackles, hisses or is distorted The Bluetooth-enabled device isoverloading Soundfly BT.• T urn down the volume on theBluetooth-enabled device.• S et the EQ on the device to “Off”.Loud hum or buzzing There is a ground loop with the ACwiring.• U nplug Soundfly BT and plug it into a different AC outlet.The Bluetooth-enabled device does not pair with Soundfly BT Soundfly BT is not in pairing mode.Touch the Pairing button on SoundflyBT.The Pairing LED flashes blue whenSoundfly BT is in the pairing mode. Bluetooth-enabled device’s batteryis low.Recharge the device’s batteryfollowing the instructions in its usermanual.The device is not compatible withSoundfly BT.Verify compatibility with the device’smanufacturer.4sPecIfIcatIonsAmplifier power: 10 watts x 2Frequency response: 60Hz – 20kHzSignal-to-noise ratio: 80dBPower requirement: 100V – 240V AC, 50Hz/60HzPower consumption: <0.5W (standby); 30W (maximum)Dimensions (W x H x D): 7-1/2" x 2-13/16" x 3-5/8"(71mm x 92mm x 190mm)Weight:0.9 lb (0.42kg)56fcc and Ic regulatIons (usa and canada onl y)FCC and iC inFormation For uSerSThis device complies with Part 15 of the FCC rules and Industry Canada license-exempt RSS 210. Operation is subject to the following two conditions: (1) This device may not cause harmful interference; and (2) this device must accept any interference received, including interference that may cause undesired operation.radio and televiSion interFerenCe]This equipment has been tested and found to comply with the limits for a Class B digital device, pursuant to Part 15 of the FCC rules. These limits are designed to provide reasonable protection against harmful interference in a residential installation. Thisequipment generates, uses and can radiate radio frequency energy and, if not installed and used in accordance with the instructions, may cause harmful interference to radio communications. However, there is no guarantee that interference will not occur in a particular installation. If this equipment does cause interference to radio or television reception, which can be determined by turning the equipment off and then on, the user is encouraged to try to correct the interference by one or more of the following measures:• I ncrease the separation between the equipment and the receiver.• C onnect the equipment to a different outlet so that the equipment and receiver are on different branch circuits.• C onsult the dealer or an experienced radio/ TV technician for help.note: Changes or modifications not expressly approved by HARMAN could void the user’s authority to operate the equipment.Ic statement and WarnIng (canada onl y)This Class B digital apparatus complies with Canadian ICES-003. Cet appareil numérique de la classe B est conforme à la norme NMB-003 du Canada.ImPortant safety InstructIonsHereby, HARMAN International Industries, Incorporated declares that this JBLSOUNDFLY BT is in compliance with the essential requirements and other relevant provisions of Directive 1999/5/EC, ErP 2009/125/EC Directive and RoHS 2011/65/EU Directive. The declaration of conformity may be consulted at the support section of our Web site, accessible from .7© 2012 HARMAN International Industries, Incorporated. All rights reserved.JBL is a trademark of HARMAN International Industries, Incorporated, registered in the United States and/or other countries. Soundfly is a trademark of HARMAN International Industries, Incorporated.Android is a trademark of Google Inc. Use of this trademark is subject to Google Permissions.The Bluetooth word mark and logo are registered trademarks and are owned by the Bluetooth SIG, Inc., and any use of such marks by HARMAN International Industries, Incorporated, is under license.Features, specifications and appearance are subject to change without notice.Part No. JBLP3271 Rev.: AHARMAN International Industries, Incorporated8500 Balboa Boulevard, Northridge, CA 91329 USA。
JBL 影院音频系统所有者手册说明书

2READ FIRST! Important Safety Precautions!1.Read these instructions.2.Keep these instructions.3.Heed all warnings.4.Follow all instructions.5.Do not use this apparatus near water.6.Clean only with a dry cloth.7.Do not block any ventilation openings. Install in accordance with the manufacturer’s instructions.8.Do not install near any heat sources such as radiators, heat registers, stoves or other apparatus (including amplifiers) that produce heat.9.Do not defeat the safety purpose of the polarized or grounding-type plug.A polarized plug has two blades with one wider than the other.A grounding-type plug has two blades and a third grounding prong. The wide blade or the third prong are provided for your safety. If the provided plug does not fit into your outlet, consult an electrician for replacement of the obsolete outlet.10.Protect the power cord from being walked on or pinched, particularly at plugs, convenience receptacles and the point where they exit from the apparatus.11.Only use attachments/accessories specified by the e only with the cart, stand,tripod, bracket or table specified by the manufacturer or sold with thecaution when moving the cart/ apparatus combination to avoid injury from tip-over.13.Unplug this apparatus during lightning storms or when unused for long periods of time.14.Refer all servicing to qualified service personnel. Servicing is required when the apparatus has been damaged in any way, such as power-supply cord or plug isdamaged, liquid has been spilled or objects have fallen into theapparatus, the apparatus has been exposed to rain or moisture, does not operate normally, or has been dropped.15.Do not use attachments not recommended by the product manufacturer, as they may cause hazards.16.This product should be operated only from the type of power source indicated on the marking label. If you are not sure of the type of power supply to your home, consult your product dealer or local power company. For products intended to operate from battery power or other sources, refer to the operating instructions.17.If an outside antenna or cable system is connected to the product, be sure the antenna or cable system is grounded so as to provide some protection against voltage surges and built-up static charges. Article 810 of the National Electrical Code,ANSI/NFPA 70, provides information with regard to proper grounding of the mast and supporting structure,grounding of the lead-in wire to an antenna discharge unit, size of grounding conductors, location of antennadischarge unit, connection to grounding electrodes, and requirements for the grounding electrode. See Figure A.18.An outside antenna system should not be located in the vicinity of overhead power lines or other electric light or power circuits, or where it can fall into such power lines or circuits. When installing an outside antenna system, extreme care should be taken to keep from touching such power lines or circuits,as contact with them might be fatal.19.Do not overload wall outlets,extension cords, or integralconvenience receptacles, as this can result in a risk of fire or electric shock.20.Never push objects of any kind into this product through openings, as they may touch dangerous voltage points or short-out parts, which could result in a fire or electric shock.Never spill liquid of any kind on the product.21.The apparatus shall not be exposed to dripping or splashing, and no objects filled with liquids,such as vases, shall be placed on the apparatus.22.Do not attempt to service this product yourself, as opening or removing covers may expose you to dangerous voltage or other hazards.Refer all servicing to qualified service personnel.23.When replacement parts are required, be sure the service technician has used replacement parts specified by the manufacturer or that have the same characteristics as the original part. Unauthorized substitutions may result in fire,electric shock or other hazards.24.Upon completion of any service or repairs to this product, ask the service technician to perform safety checks to determine that the product is in proper operating condition.25.The product should be mounted to a wall or ceiling only asrecommended by the manufacturer.THANK YOU FOR CHOOSING JBLFor more than 60years, JBL has been involved in every aspect of music and film recording and reproduction, from live performances to the provide every note ofenjoyment that you expect –and that when you think aboutpurchasing additional audioequipment for your home, carWeb site at .It enables us to keep youposted on our latest advance-ments, and helps us to betterunderstand our customers4SPEAKER PLACEMENTSUBWOOFERSURROUND SPEAKERSFRONTSPEAKERSThe front speakers should be placed the same distance from each other as they are from the listening position.The CSB5 speakers should be placed at about the same height from the floor as the listeners’ ears will be, or they may be angled toward the listeners.The center channel speaker should be placed slightly behind the front left and right speakers, and no more than 2 feet (0.6m) above or below the tweeters of the left and right speakers. It is often convenient to set the center speaker on top of thetelevision set, as shown in the drawing.The JBL Cinema Soundspeaker system may be used in 5.1-, 6.1- or 7.1-channel applications. In 5.1-channel applications, two of thesurround speakers should be placed slightly behind the listening position and, ideally,should face each other and be at a level higher than the listeners’ ears. If that is not possible, they may be placed against a wall behind the listening position, facingforward. In 6.1-channel appli-cations, two of the surround speakers should be placed in the side positions, and asingle surround back speaker should be placed against the wall behind the listening position. In 7.1-channelapplications, place two of the surround speakers in the side positions, and place the two surround back speakers against the rear wall.In Dolby ®Digital and DTS ®systems, it is best to aim all of the speakers (except the subwoofer) toward thelistening position at or slightly above about ear-level height.In systems where only analog surround processing (such as Dolby Pro Logic ®II) isavailable, it may be preferable to aim the speakers straight out from the wall to obtain a more diffuse sound.The low-frequency material reproduced by the subwoofer is mostly omnidirectional, and this speaker may be placed in a convenient location in the room. However, bass reproduction will be maximized when the subwoofer is placed in acorner along the same wall as the front speakers.Experiment with subwoofer placement by temporarily placing the subwoofer in the listening position and moving around the room until the bass reproduction is best. Place the subwoofer in that location.CENTER CHANNEL SPEAKER† Single surround back speaker may be used with 6.1 receivers and processors.Alternate placement for surround speakers when only 5.1 channels are used; required placement for surround back speakers in 7.1-channel systems.5The CSC55 center channel and the CSB5 are designed to be mounted on the wall. There are two (2) fixed-mount wall brackets provided for the CSC55, and one for the CSB5.Each speaker bracket will require up to three 1-1/2" #10wood screws; each screw should be fastened to a wall stud.If a wall stud is unavailable,install an anchor appropriate for a 1-1/2" #10 screw.NOTE: The customer is responsible for the correct selection and use of mounting hardware (available through hardware stores) to ensure the proper and safe wall-mounting of the speakers.Step ing the included mounting template (CSC55only) or the bracket back plate (CSB5 only), mark thepositions on the wall where you would like to place the mounting screws.Step 2.Attach the back plate(s) of the bracket to the wall using three screws (not included).Step 3.Attach the frontplate(s) (with the two holes) of the bracket(s) to the CSC55 or CSB5, using the provided screws.Step 4.Slide the CSC55 or CSB5 speaker with attached bracket front plate(s) onto the back plate(s) of the bracket(s).Once positioned properly, the speaker should slide down slightly and become secure.To remove the speaker from the wall, simply slide the speaker up.WALL-MOUNTING THE CSC55AND CSB56CONNECTION TIPSSPEAKER CONNECTIONSSeparate and strip the ends of the speaker wire as shown.Speakers and electronics terminals have corresponding (+) and (–) terminals. Most manufacturers of speakers and electronics, including JBL, use red to denote the (+)terminal and black to denote the (–) terminal.The (+) lead of the speaker wire is noted with a stripe. It is important to connect both speakers identically:(+) on the speaker to (+) on the amplifier and (–) on the speaker to (–) on the amplifier.Wiring “out of phase” results in thin sound, weak bass and a poor stereo image.With the advent of multichan-nel surround sound systems,connecting all of the speakers in your system with the correct polarity remains equally important in order to preserve the proper ambience and directionality of theprogram material.insert each wire into its corresponding hole in the base. Then tighten down the terminals.CSB5,CSC55To use the binding-post speaker terminals, unscrew the colored collar until the pass-through hole in the center post is visible under the collar. Insert the bare end of the wire through this hole;then screw the collar down until the connection is tight.The hole in the center of each collar is intended for use with banana-type connectors. To comply with European CE certification,these holes are blocked with plastic inserts at the point of manufacture.To use banana-type connectors requires the removal of the inserts.The hole in the center of each collar is intended for use with banana-type connectors. To comply with European CE certification,these holes are blocked with plastic inserts at the point of manufacture.To use banana-type connectors requires the removal of the inserts.DOLBY PRO LOGIC®(NON-DIGITAL) – LINE LEVELUse this installation method for Dolby Pro Logic applications (not Dolby Digital, DTS or other digital processing), where the receiver/processor is equipped with a subwoofer output, or a volumecontrolled preamp (line-) level output:Use RCA-type interconnectsto connect the line-levelsubwoofer outputs on yourreceiver or amplifier to theline-level inputs on thesubwoofer. IMPORTANT: Donot use the LFE input on thesubwoofer with DolbyPro Logic processors.NOTE: If your receiver oramplifier has only onesubwoofer output jack, thenyou will need to use aY-connector (not included).Plug the male end of theY-connector into your receiveror amplifier’s subwooferoutput jack, and connect eachof the two female ends toseparate RCA-typeinterconnects. Finally, plug theRCA-type interconnects intothe line-level inputs on thesubwoofer.Connect each speaker tothe corresponding speakerterminals on your receiveror amplifier.Make sure your receiver orprocessor is correctlyconfigured to indicate that thesubwoofer is “On.”Use this installation method for Dolby Digital, DTS or other digital surround processors: Use the line-level input jack marked “LFE” for the Low-Frequency Effects channel.Connect this jack to the LFEoutput or subwoofer outputon your receiver or amplifier.Connect each speaker tothe corresponding speakerterminals on your receiveror amplifier.Make sure that you haveconfigured your surroundsound processor for “Sub-woofer On.” Also configureyour receiver for 5.1-, 6.1-or 7.1-channel operation asappropriate. The front left,front right, center and rearspeakers should all be setto “Small.” If your receiverallows you to set the cross-over frequency between thesubwoofer and the mainspeakers, select 100Hz orthe setting that is the closestfrequency below it.DOLBY®DIGITAL OR DTS®(OR OTHER DIGITAL SURROUND MODE) CONNECTION7SUBWOOFER OPERATIONPress the Master Power switch (marked “Power” a) to the On position to use the subwoofer. The CSS10 subwoofer will automatically turn on or go into standby (sleep) mode as described below. When your receiver or amplifier is off, or is not sending program materialto the subwoofer, the subwoofer will be in standby mode (the LED on the front of the CSS10 will be red). When the subwoofer senses an audio signal, it will automatically turn on (the LED will be green). If the subwoofer does not sense a signal after approximately 20 minutes, it will automatically go into standby mode.If you will be away from home for an extended period of time,or if the subwoofer will not beused, switch the MasterPower switch a to the Offposition by pressing it until itpops out.VOLUMEVolume may be adjusted using the Subwoofer Level control b, as shown.The Phase control determineswhether the subwoofer’spistonlike action moves in andout in phase with the mainspeakers or opposite the mainspeakers. There is no corrector incorrect setting. Properphase adjustment depends onseveral variables, such assubwoofer placement andlistener position. Adjust thePhase switch c to maximizebass output at the listeningposition.Remember, every system,room and listener is different.There are no right or wrongsettings; this switch offers theadded flexibility to adjust yoursubwoofer for optimumperformance for your specificlistening conditions withouthaving to move your speakers.If at some time in the futureyou happen to rearrange yourlistening room and move yourspeakers, you shouldexperiment with the phaseswitch in both positions, andleave it in the position thatmaximizes bass performance.8If there is no sound from any of the speakers:• Check that receiver/amplifier is on and a source is playing.• Check that the powered subwoofer is plugged in and is turned on (Power switch a pushed in).• Check all wires and connections between receiver/ amplifier and speakers. Make sure all wires are connected. Make sure none of the speaker wires are frayed, cut or punctured, or touching each other.• Review proper operation of your receiver/amplifier.If there is no sound coming from one speaker:• Check the “Balance” control on your receiver/amplifier.• Check all wires and connections between receiver/ amplifier and speakers. Make sure all wires are connected. Make sure none of the speaker wires are frayed, cut or punctured, or touching each other.• In Dolby Digital or DTS modes, make sure that the receiver/ amplifier is configured so that the speaker in question is enabled.• Turn off all electronics and switch the speaker in question with one of the other speakers that is working correctly. Turn everything back on, and determine whether the problem has followed the speaker or has remained in the same channel. If the problem is in the same channel, the source of the problem is most likely with your receiver or amplifier, and you should consult the owner’s manual for that product for further information. If the problem has followed the speaker, consult your dealer for further assistance or, if that is not possible, visit .If there is no sound from thecenter speaker:• Check all wires andconnections between receiver/amplifier and speaker. Makesure all wires are connected.Make sure none of the speakerwires are frayed, cut orpunctured, or touching eachother.• If your receiver/processor isset in Dolby Pro Logic mode,make sure the center speaker isnot in phantom mode.• If your receiver/processor isset in one of the Dolby Digital orDTS modes, make sure thereceiver/processor isconfigured so that the centerspeaker is enabled.If the system plays at lowvolumes but shuts off asvolume is increased:• Check all wires andconnections between receiver/processor and speakers. Makesure all wires are connected.Make sure none of the speakerwires are frayed, cut orpunctured, or touching eachother.• If more than one pair of mainspeakers is being used, checkthe minimum impedancerequirements of your receiver/amplifier.If there is low (or no) bassoutput:• Make sure the connections tothe left and right “SpeakerInputs” have the correctpolarity (+ and –).• Make sure the subwoofer isplugged into an active electricaloutlet and is turned on (Powerswitch a pushed in).• In Dolby Digital or DTS modes,make sure your receiver/processor is configured so thatthe subwoofer and LFE outputare enabled.• Switch the Phase switch c tothe opposite position, and selectthe position that results in themost pleasing bass response.If there is no sound fromthe surround speakers:• Check all wires andconnections between receiver/processor and speakers. Makesure all wires are connected.Make sure none of the speakerwires are frayed, cut orpunctured, or touching eachother.• Review proper operation ofyour receiver/amplifier and itssurround sound features.• Make sure the movie orTV show you are watchingis recorded in a surround soundmode. If it is not, check to seewhether your receiver/processor has other surroundmodes you may use.• In Dolby Digital or DTS modes,make sure your receiver/processor is configured so thatthe surround speakers areenabled. When five satellitesare in use, remember toconfigure your receiver orprocessor for 6.1-channeloperation, and when sixsatellites are in use, configureyour receiver or processor for7.1 channels.• Review the operation of yourDVD player and the jacket ofyour DVD to make sure that theDVD features the desired DolbyDigital or DTS mode, and thatyou have properly selected thatmode using both the DVDplayer’s menu and the DVDdisc‘s menu.TROUBLESHOOTING9SYSTEMFrequency Response 27Hz – 30kHz (–6dB)CST55Maximum Recommended Amplifier Power150 Watts*Power Handling50W Continuous/300W Peak Frequency Response55Hz – 30kHz (–6dB) Nominal Impedance8 OhmsSensitivity90dB @ 1 Watt/1 meterTweeter One 3/4" (19mm) titanium-laminate dome, video-shieldedWoofers Dual 130mm (5")transducers with PolyPlas™ cones, neodymium magnets and HeatScape™ motor structure, video-shielded Dimensions (H x W x D)(including wall-mount bracket and grille)1168 x 286 x 286mm (46" x 11-1/4" x 11-1/4") Weight7.7kg (17 lb)CSB5Maximum Recommended Amplifier Power125 Watts*Power Handling40W continuous/300W peak Frequency Response60Hz – 30kHz (–6dB) Nominal Impedance8 OhmsSensitivity88dB @ 1 watt/1 meterTweeter 3/4" (19mm) Titanium-laminate dome, video-shieldedWoofer5" (130mm)Transducer with PolyPlas™cone, neodymium magnet and HeatScape™ motor structure, video-shieldedDimensions (H x W x D) (including base and grille) 363 x 155 x 116mm (14-5/16" x 6-1/8" x 4-9/16") Weight2.3kg (5 lb)Dimensions (H x W x D)(without base and with wall-mount bracket and grille)338 x 155 x 130mm (13-5/16" x 6-1/8" x 5-1/8") Weight2kg (4.5 lb) CSC55Maximum Recommended Amplifier Power150 Watts*Power Handling50W Continuous/300W Peak Frequency Response55Hz – 30kHz (–6dB) Nominal Impedance8 OhmsSensitivity90dB @ 1 watt/1 meterTweeter One 19mm (3/4")titanium-laminate dome, video-shieldedWoofers Dual 130mm (5")transducers with PolyPlas™ cones, neodymium magnets and HeatScape™ motor structure, video-shielded Dimensions (H x W x D)(including wall-mount bracket and grille)159 x 667 x 108mm (6-1/4" x 26-1/4" x 4-1/4") Weight4.5kg (10 lb)CSS10Amplifier Power150 Watts RMSFrequency Response27Hz – Low-pass crossover setting at signal sourceLow-Frequency Driver250mm (10")cone and HeatScape™motor structure, video-shieldedInput LFE preamp levelDimensions (H x W x D)(including feet)464 x 337 x 406mm (18-1/4" x 13-1/4" x 16") Weight19.5kg (43 lb)SPECIFICATIONSAll features and specifications are subject to changewithout notice.Dolby and Pro Logic are registered trademarks of DolbyLaboratories.DTS is a registered trademark of DTS, Inc.*The maximum recommended amplifier power ratingwill ensure proper system headroom to allow foroccasional peaks.We do not recommend sustained operation at thesemaximum power levels.CSB5, CSC55 and CST55CSS10 (230V only)。
JBL Cinema 300 六路家庭影音扬声器系统说明书

5E N G L I S HPlaCing the sPeakersFront LeFt and right speakers center speakersurround speakers and subwooFerFront Left SpeakerTVCenter SpeakerFront Right SpeakerSubwooferSurround Left SpeakerSurround RightSpeakerSurround Right SpeakerSurround LeftSpeaker5 –6 ft (1.5m – 1.8m)Front Left SpeakerFront Right SpeakerTVCenter SpeakerTV0 – 2 ft (0 – 61cm)Front Left SpeakerFront Right Speaker6sPeaker mounting oPtionssheLF-Mounting satellites:Center:1.3.2.imPortant saFetY note: The customer is solely responsible for proper selection and installation of mounting hardware not included with the speakers.JBL disclaims any liability for the selection and installation of mounting hardware.Be sure to follow these installation instructions carefully. If you have any questions or doubts about your ability to wall-mount the speakers correctly, consult with your authorized JBL dealer or custom installer.satellite1-15/16" (49mm)2-3/16" (55mm)7-11/16" (195.5mm)Center1. D ecide on locations for the speakers according to the recommendations in Placing the Speakers , on page 5.2. S elect wall-hanging hardware that is appropriate for the construction and materials of your walls. The Cinema 300 front and surround speakers weigh 2.1 lb (0.95kg); the Cinema 300 center speaker weighs3.25 lb (1.47kg). Be sure to use hardware that can support their weight.3. I nstall the wall-hanging hardware on the walls. Make sure that the hardware is driven into studs and not into drywall or plaster. if the hardware must be mounted in drywall or plaster, you are responsible for selecting and using wall anchors that are appropriate for the construction and materials of your walls.4. Hang the speakers on the wall-mount hardware.waLL-Mounting7E N G L I S HConneCting the sPeakersCaution: Before making speaker connections, be sure that your receiver or amplifier is turned off and preferably that its aC cord is unplugged from the aC power outlet.imPortant: make sure the ( + ) and ( – ) bare wires do not touch each other or the other terminal. touching wires can cause a short circuit that can damage your receiver or amplifier.2.1.3.Colored Band to "+" TerminalConnect the speakers to your receiver or amplifier:SPEAKER OUTPUTConnect the speaker's "+" terminal to the amplifier's "+" terminal:Connect the speakers to the proper amplifier channels:Front LeftCenterWire with White BandsWire with Green BandsWire with Blue BandsWire with Gray BandsWire with Red BandsSurround LeftFront RightSurround RightReceiver or AmplifierSpeakerWire with Colored Band to “+” TerminalAmplifierWire with Colored Band to “+” Terminal––++–+–FRONTLEFT ++–SURROUNDRIGHT CENTER9E N G L I S HoPerating the suBwooFerturning the subwooFer on and oFF Set the subwoofer’s Power Switch to the “On” position.If the subwoofer’s Power-On Mode Switch is set to “Auto,” the •subwoofer will automatically turn itself on when it receives an audio signal, and it will go into Standby mode after it has received no audio signal for 20 minutes. The subwoofer’s LED will glow green when the subwoofer is on and will glow red when the subwoofer is in Standby.If the Power-On Mode Switch is set to “On,” the subwoofer will •remain on at all times. The subwoofer’s LED will glow green .If you will not be using the subwoofer for an extended period – for instance, if you’re going on vacation – set the Power Switch to the “Off” position.subwooFer adJustMents: crossover controL NOTE: The Crossover Control functions only when you are using the Line-Level In L/R Connectors. The Line-Level In LFE Connector bypasses the subwoofer’s built-in crossover and the Crossover Control.The Crossover Control adjusts the subwoofer’s built-in crossover between 50Hz and 200Hz. The higher you set the Crossover Control, the higher in frequency the subwoofer will operate and the more its bass will “overlap” that of the satellite speakers. This adjustmenthelps achieve a smooth transition of bass frequencies between thesubwoofer and the satellites for a variety of different rooms and subwoofer locations.To set the Crossover Control, listen for the smoothness of the bass. If the bass seems too strong at certain frequencies, try a lower Crossover Control setting. If the bass seems too weak at certain frequencies, try a higher Crossover Control setting.subwooFer adJustMents: voLuMe Use the Subwoofer Level Control to set the subwoofer’s volume. Turn the knob clockwise to increase the subwoofer’s volume; turn the knob counterclockwise to decrease the volume. Once you have balanced the subwoofer’s volume with that of the other speakers in your system, you shouldn’t have to change it.notes on setting subwoofer Volume:Sometimes the ideal subwoofer volume •setting for music is too loud for films, whilethe ideal setting for films is too quiet for music. When setting the subwoofer volume, listen to both music and films with strong bass content and find a “middle ground” volume level that works for both.If your subwoofer always seems too loud or too quiet, you may •want to place it ina different location. Placing the subwoofer in a corner will always tend to increase its bass output, while placing it away from any walls or corners will always tend to lessen its bass output.subwooFer adJustMents: phase The Phase Switch determines whether the subwoofer driver’s piston-like action moves in and out in phase with the satellite speakers. If the subwoofer were to play out of phase with the satellite speakers, the sound waves from the satellites could partially cancel out the waves from the subwoofer, reducing bass performance andsonic impact. This phenomenon depends in part on the placement of all the speakers relative to each other in the room.Although in most cases you should leave the Phase Switch in the “Normal” position, there is no absolutely correct setting for the Phase Switch. When the subwoofer is properly in phase with the satellite speakers, the sound will be clearer and have maximum impact, and percussive sounds like drums, piano and plucked strings will sound more lifelike. The best way to set the Phase Switch is to listen to music that you know well and to set the switch in the position that gives drums and other percussive sounds maximum impact.© 2010 HARMAN International Industries, Incorporated. All rights reserved.JBL is a trademark of HARMAN International Industries, Incorporated, registered in the United States and/or other countries. PolyPlas is a trademark of HARMAN International Industries, Incorporated.Part No. 950-0296-001, Rev.: AHARMAN Consumer, Inc.8500 Balboa Boulevard, Northridge, CA 91329 USAsPeCiFiCationscinema 300 systemFrequency response:32Hz – 20kHz (–6dB)cinema 300 center speakerLow-frequency transducer:Two 3" (75mm) PolyPlas cones,video-shielded High-frequency transducer:1" (25mm) titanium-laminate dome, video-shielded Recommended power handling:100 watts Nominal impedance:8 ohms Sensitivity (2.83V/1m):89dB Crossover frequency: 3.7kHz Enclosure type:SealedConnector type:Push-spring terminalDimensions (H x W x D):4-7/8" x 12" x 3-3/8" (124mm x 305mm x 86mm)Weight:3.25 lb (1.47kg)cinema 300 satellite speakersLow-frequency transducer:3" (75mm) PolyPlas ™ cone, video-shielded High-frequency transducer:1" (25mm) titanium-laminate dome, video-shielded Recommended amplifier power:100 watts Nominal impedance:8 ohms Sensitivity (2.83V/1m):86dB Crossover frequency: 3.7kHz Enclosure type:SealedConnector type:Push-spring terminalDimensions (H x W x D):9-1/4" x 4-3/4" x 3-3/8" (235mm x 121mm x 86mm)Weight:2.0 lb (0.9kg)sub140p subwooferLow-frequency transducer:8" (200mm) cone (down-firing)Enclosure type:Ported (down-firing)Amplifier power:150 watts Frequency response:32Hz –200Hz (–6dB)Audio controls:Volume level, phase, crossover frequency Connections:LFE input, left and right RCA line-level inputs Power requirement:120V/60Hz, 150W (US); 220V – 240V/50Hz, 150W (EU)Power consumption:<1W (8mA@120V) standby; 300w (2.5A@120V) maximumDimensions (W x H x D):19" x 14" x 14" (483mm x 355mm x 355mm)Weight:22 lb (10kg)Features, specifications and appearance are subject to change without notice.。
JBL白皮书(之)影院扬声器系统设计概述

影院系统:电影扬声器系统设计概述作者: John Eargle、Mark Gander设计屏幕通道(即左、中、右通道)扬声器1、屏幕通道的假定前提条件:z低频扬声器15寸,灵敏度在95-97dB*W/m左右;z低频扬声器功率在300W左右;z高频扬声器具有相匹配的灵敏度和功率容量;z房间尺寸为影院建筑中的典型尺寸;2、低频扬声器的数量(每个屏幕通道):z对于200座以下的房间,每个通道用1只低频扬声器;z对于200-500座的房间,每个通道用2只低频扬声器;z对于500座以上的房间,每个通道用4只低频扬声器;注意:虽然给小房间装个大系统基本上没什么问题,但是反过来就绝对行不通了。
3、屏幕通道音箱的布位:z左、中、右通道音箱水平分开布置,与屏幕尺寸宽度一致;z将扬声器抬高,以使高频单元的高度可以达到屏幕整体高度的2/3处;z合理摆放扬声器,要让高音单元尽可能地靠近屏幕;z反射面上全部覆涂粗糙的黑色涂料。
4、屏幕扬声器内倾:不管屏幕是不是环形幕,你都要将外侧的左右通道音箱指向向内倾斜,以使屏幕音箱的中轴指向线在屏幕到后墙的2/3处交会成一个点。
(如图1)图1:顶视图5、高频单元指向下倾:将高频单元下倾,使其中轴指向观众听音面距离后墙1/3远处。
(如图2)图2:侧视图(注意:对于使用非对称号角的系统,由于号角已经做了下倾指向设计,上面这一步骤就可以省略了。
)设计环绕通道扬声器1、环绕通道的假定前提条件:中功率环绕音箱----灵敏度为91dB*W/m左右,连续功率100W;高功率环绕音箱----灵敏度为96dB*W/m左右,连续功率250W;(注意:两者的最大输出相差约9dB。
)2、上述两种环绕音箱的选择:z对于200座以下的房间,既可以用中功率级别的音箱也可以用高功率级别的音箱;z对于200座以上的房间,要使用高功率级别的环绕音箱;3、环绕音箱的数量:z对大部分房间而言,都是采用12-16只环绕音箱比较理想;z一般来说,后墙上至少要安装4只环绕音箱;z非常小的房间是个例外,它的后墙可以只安装2只环绕音箱。
JBL 4349 12 英寸(300 毫米)二分频演播监听音箱使用手册说明书

JBL®434912 英寸(300 毫米)二分频演播监听音箱用户手册简介感谢您购买 JBL®4349 二分频演播监听音箱。
逾 70 年来,JBL 一直为全球各地的音乐厅、录音棚和电影院提供音频设备,已成为领先的唱片艺术家和录音师的信赖品牌。
4349 是 JBL 演播监听音箱系列的一种新的大型书架式监听音箱,专为家庭使用而设计。
要使扬声器发挥最佳性能,请通读本指引。
包装内容每个 JBL 4349 包装盒内含:• 1 - 扬声器• 1 - 网罩(预先安装)• 1 - 用户手册若您怀疑运送过程中产品被损坏,请及时联系经销商。
强烈建议您保留包装盒和包装材料,以备日后使用。
摆放和定位警告:每个 4349重 83磅(37.7千克)。
强烈建议书架、支架或特殊结构足够坚固,以支撑 240磅 (108.9千克)。
把扬声器放在书架或平台上之前,确保其足够坚固,能够支撑扬声器的重量。
在选取布置扬声器的位置之前,请仔细观察室内环境,考虑放置的方案,并参考下图。
收听位置切勿将扬声器摆放到功放、电热器或其他能够产生大量热量的设备附近。
切勿将扬声器摆放在潮湿或多尘的位置。
切勿将扬声器摆放在直接光照下或有其他强光源的位置。
为获得最佳音效,请确保扬声器之间保持 6 - 8 英尺(1.8 - 2.4 米)的距离。
如果摆放距离比这个距离大,请调整扬声器角度以朝向收听位置。
听众和扬声器之间的角度保持在 40 至 60 度之间时,扬声器才能够产生出最准确的立体声声场。
对各个扬声器进行定位,使喇叭中心处于与耳朵相同或相近的高度。
一般情况下,扬声器越贴近墙壁或角落,低音输出越强劲。
为达到最佳效果,强烈建议在扬声器和侧面墙壁之间至少保留20 英寸(50 厘米)的距离。
4349 可通过可选 JBL 金属支架(型号 JBL JS-120,单独出售)独立安装,使扬声器角度向上。
2 连接警告:连接前,请确保已关闭系统的所有电气部件(最好断开与交流电插座的连接)。
JBL CS46 230V 电影音频扬声器用户指南说明书

READ FIRST! Important Safety Precautions!1. Read these instructions.2. Keep these instructions.3. Heed all warnings.4. Follow all instructions.5. Do not use this apparatus near water.6. Clean only with a dry cloth.7. Do not block any ventilation openings. Install in accordance with the manufacturer’s instructions.8. Do not install near any heat sources such as radiators, heat registers, stoves or other apparatus (including amplifiers) that produce heat.9. Do not defeat the safety purpose of the polarized or grounding-type plug.A polarized plug has two blades with one wider than the other. A grounding-type plug has two blades and a third grounding prong. The wide blade or the third prong is provided for your safety. If the provided plug does not fit into your outlet, consult an electrician for replacement of the obsolete outlet.10. Protect the power cord from being walked on or pinched, particularly at plugs, convenience receptacles and the point where they exit from the apparatus.11. Only use attachments/accessories specified by the manufacturer.12. Use only with the cart, stand,tripod, bracket or table specifiedby the manufacturer or sold withthe apparatus. When a cart isused, use caution when movingthe cart/apparatus combination to avoid injury from tip-over.13. Unplug this apparatus during lightningstorms or when unused for long periods oftime.14. Refer all servicing to qualified servicepersonnel. Servicing is required when theapparatus has been damaged in any way,such as power-supply cord or plug isdamaged, liquid has been spilled or objectshave fallen into the apparatus, theapparatus has been exposed to rain ormoisture, does not operate normally, or hasbeen dropped.15. Do not use attachments notrecommended by the product manufacturer,as they may cause hazards.16. This product should be operated onlyfrom the type of power source indicated onthe marking label. If you are not sure of thetype of power supply to your home, consultyour product dealer or local powercompany. For products intended to operatefrom battery power or other sources, referto the operating instructions.17. If an outside antenna or cable system isconnected to the product, be sure theantenna or cable system is grounded so asto provide some protection against voltagesurges and built-up static charges. Article810 of the National Electrical Code, ANSI/NFPA 70, provides information with regardto proper grounding of the mast andsupporting structure, grounding of the lead-in wire to an antenna discharge unit, size ofgrounding conductors, location of antenna-discharge unit, connection to groundingelectrodes, and requirements for thegrounding electrode. See Figure A.18. An outside antenna system should notbe located in the vicinity of overhead powerlines or other electric light or power circuits,or where it can fall into such power lines orcircuits. When installing an outside antennasystem, extreme care should be taken tokeep from touching such power lines orcircuits, as contact with them might be fatal.19. Do not overload wall outlets, extensioncords, or integral convenience receptacles,as this can result in a risk of fire or electricshock.20. Never push objects of any kind into thisproduct through openings, as they maytouch dangerous voltage points or short-outparts, which could result in a fire or electricshock. Never spill liquid of any kind on theproduct.21. The apparatus shall not be exposed todripping or splashing, and no objects filledwith liquids, such as vases, shall be placedon the apparatus.22. Do not attempt to service this productyourself, as opening or removing coversmay expose you to dangerous voltage orother hazards. Refer all servicing toqualified service personnel.23. When replacement parts are required,be sure the service technician has usedreplacement parts specified by themanufacturer or that have the samecharacteristics as the original part.Unauthorized substitutions may result infire, electric shock or other hazards.24. Upon completion of any service orrepairs to this product, ask the servicetechnician to perform safety checks todetermine that the product is in properoperating condition.25. The product should be mounted to a wallor ceiling only as recommended by themanufacturer.Figure A.Example of Antenna Grounding as perNational ElectricalCode ANSI/NFPA 7023E n g l i s hBefore deciding where to best place your speakers, survey your room and study Figure 1.Figure 1. In this overhead view of a typical installation, satellite speakers are used to reproduce sound for the front channels. The powered subwoofer provides bass for effects and music.THANK YOU FOR CHOOSING JBL(1) Subwoofer(2)Wall brackets for satellites(2) Adjustable wall brackets for satellites with tightening bar(2) Satellite speakersPLANNING YOUR SYSTEMFor more than 60 years, JBL has been involved in every aspect of music and film recording and reproduction, from live performances to the recordings you play in your home, car or office.We’re confident that the JBL system you have chosen will provide every note of enjoyment that you expected – and that when you think about purchasing additional audio equipment for your home, car or office, you will once again choose JBL.Please take a moment to register your product on our Web site at . It enables us to keep you posted on our latestadvance-ments, and helps us to better understand our customers and build products that meet their needs and expectations.INCLUDEDCarefully unpack the system. If you suspect damage from transit,report it immediately to your dealer and/or delivery service. Keep the shipping carton and packing materials for future use. Open the package and verify the following contents:CouchLeft Front ChannelSubwooferRight Front ChannelPLACEMENTLeft and Right Front ChannelsFor left and right front channels, place one satellite to the leftand another to the right of the television, as shown in Figure 1. Since the speakers are magnetically shielded, you can placethem very close to the TV without worrying about the magnetic field distorting the picture.SubwooferSince the installation of a subwoofer can be somewhat more complicated than installing full-range speakers, it is essential that you read this section very carefully prior to connecting the subwoofer to your system.The performance of the subwoofer is directly related to its placement in the listening room and how the subwoofer is aligned with the satellite speakers. Setting the volume of the subwoofer in relation to the left and right speakers is also of critical importance because it’s essential that the subwoofer integrate smoothly with the entire system. Setting the subwoofer’s volume level too high will result in an overpowering, boomy bass. Setting the volume level too low will negate the benefits of the subwoofer.Here are several additional facts on installation that may prove useful. It is generally believed that low frequencies (below 125Hz) are nondirectional and, therefore, placement of a subwoofer within any listening room is not critical. While in theory it is true that the larger wavelengths of extremely low frequencies are basically nondirectional, the fact is that, when installing a subwoofer within the limited confines of a room, reflections, standing waves and absorptions generated within the room will strongly influence the performance of any subwoofer system. As a result, specific location of the subwoofer becomes important, and we strongly recommend that you experiment with placement before choosing a final location. Placement will depend upon your room (for example, whether or not your room permits placement of the subwoofer near either satellite) and the amount and quality of bass required.45E n g l i s hThe CS46 satellites are designed to be mounted on the wall. There is a fixed-mount wall bracket and an adjustable wall bracket provided for each satellite.Each speaker bracket will require up to four 1-1/2"#10 wood screws; each screw should be fastened to a wall stud. If a wall stud is unavailable, install an anchor appropriate for a 1-1/2" #10screw.NOTE:The customer is responsible for the correct selection and use of mounting hardware (available through hardware stores) that will ensure the proper and safe wall-mounting of the speakers.Fixed-Mount Wall BracketStep 1.Mark the positions on the wall where you would like to place the mounting screws.Step 2.Attach the bracket to the wall using two screws (not included).Step 3.Remove the rubber ring on the bottom of the satellite and sit the satellite speaker onto the back bracket.Step 4.Attach 1/4-20" screw into insert on bottom of speaker and tighten.Adjustable Wall BracketStep 1.Remove cap over threaded insert on rear of speaker.Step 2.Mark the positions on the wall where you would like to place the mounting screws.Step 3.Place bracket against the wall and fasten four 1-1/2" #10wood screws through the bracket’s screw holes into the wall. If a wall stud is not available, use an appropriate anchor.Step 4.Unscrew round collar (C) from bracket (A)..Step 5.Screw the ball and shaft assembly (B) to the 1/4"-20 insert on the back of the satellite (do not use the bottom insert). Back out 1/2of a turn and tighten the nut against the speaker. If the ball and shaft assembly is not backed out before tightening the nut, performing Step 8 below may dislodge the threaded insert in the speaker housing and permanently damage the speaker.Step 6.Attach speaker wire as shown on page 6.Step 7.Drop round collar (C) over ball and shaft assembly (B) that is mounted to the speaker with the finished side of the collar facing the rear of the speaker.Step 8.Carefully push the ball straight into the socket mounted on the wall, angle the speaker as desired and tighten the collar using the enclosed metal bar.Figure 2.Bracket on wall.Metal barABCWALL-MOUNTING THE SATELLITESTurn Off All PowerAfter placing the speakers, you are ready to connect your system. First, turn off all audio-system power. Use high-quality speaker wire to make your connections. #18-gauge speaker wire with polarity coding is included. For longer distances, #16-gauge or heavier wire is recommended. The side of the wire with a ridge or other coding is usually considered positive polarity (i.e., +). Also, consult the owner’s manuals that were included with your amplifier or receiver to confirm connection procedures.SatellitesObserve polarities when making speaker connections, as shown in Figure 3. Connect each + terminal on the back of the amplifier or receiver to the respective + (red) terminal on each speaker. Connect the – (black) terminals in the same way.Important!Do not reverse polarities (i.e., + to –, or – to +) when making con-nections. Doing so will cause poor imaging and diminished bass response. Be certain that positive and negative wire strands are completely isolated to avoid short circuits that may damage your equipment.NOTE:On certain models using hexagonal terminal nuts, a small socket wrench is provided to help in properly tightening the terminals. Hand-tighten only and do not overtighten.SATELLITE SPEAKER CONNECTIONS Figure 3.Wiring diagram shows polarity connections for onechannel of a home theater system.67E n g l i s hSUBWOOFER CONTROLSRear PanelAC 220V-230V 50Hz-60Hz 220WattsPHASECS60SUB/230¡™£¢∞§ᕡSubwoofer-Level Control ᕢPhase Switch ᕣ LFE Input ᕤLine-Level Inputs ᕥPower Indicator LED ᕦPower SwitchSubwoofer ConnectionsIf you have a Dolby ®Digital or DTS ®receiver/processor with a low-frequency-effects (LFE) or subwoofer output:SUBWOOFER OR LFE OUTPUTRECEIVER/PROCESSOR4.5m (15')Subwoofer cable includedNOTE:If your receiver/processor has only one sub out, you may use either the L or R input.If your receiver/processor does not contain a Dolby Digital or DTS processor but has a subwoofer output:4.5m (15')Subwoofer cableincludedRECEIVER/PROCESSORImportant!Whenever changing cables, pulling plugs, etc., ALWAYS TURN OFF ALL EQUIPMENT, including the subwoofer.OPERATIONSurround ModesIf using the CS46 in a Dolby Digital or DTS home theater system, make sure all speakers are set to “Small”.Some Dolby Digital-equipped receivers/processors offer different setup options for each source or surround mode (e.g., CD-stereo, videotape, Dolby, Pro Logic). In each case, follow your equipment’s instructions to ensure that the subwoofer output is turned on and that the speakers are set to “Small” in each mode.Power OnPlug your subwoofer’s AC cord into a wall outlet. Do not use the outlets on the back of the receiver.Initially set the Subwoofer-Level Control ᕡto the“MIN” position. Turn on the subwoofer by pressing the Power Switch ᕦon the rear panel.Turn on your entire audio system and start a CD or movie soundtrack at a moderate level.Auto On/StandbyWith the Power Switch ᕦin the ON position, the LED on the rear panel ᕥwill remain lit in green or red to indicate the On or Standby mode of the subwoofer.RED = STANDBY (No signal detected, Amp Off)GREEN = ON (Signal detected, Amp On)The subwoofer will automatically enter the Standby mode after approximately 10 minutes when no signal is detected from your system. The subwoofer will then power on instantly when a signal is detected. During periods of normal use, the Power Switch ᕦcan be left on. You may turn off the Power Switch ᕦfor extended periods ofnonoperation, e.g., when you are away on vacation.Adjust LevelTurn the Subwoofer-Level Control ᕡup about halfway. If no sound emanates from the subwoofer, check the AC-line cord and input cables. Are the connectors on the cables making proper contact? Is the AC plug connected to a “live” receptacle? Has the Power Switch ᕦbeen pressed to the ON position? Once you have confirmed that the subwoofer is active, proceed by playing a CD or DVD. Use a selection that has ample bass information.Set the overall volume control of the receiver/processor to a comfortable level. Adjust the Subwoofer-Level Control ᕡuntil you obtain a pleasing blend of bass. Bass response should not overpower the room but rather be adjusted so there is a harmonious blend across the entire musical range. Many users have a tendency to set the subwoofer volume too loud, adhering to the belief that a subwoofer is there to produce lots of bass. This is not entirely true.A subwoofer is there to enhance bass, extending the response of the entire system so the bass can be felt as well as heard. However, overall balance must be maintained or the music will not sound natural. An experienced listener will set the volume of the subwoofer so its impact on bass response is always there but never obtrusive.Phase ControlThe Phase Switch ᕢdetermines whether the subwoofer speaker’s pistonlike action moves in and out with the main speakers (0˚) or opposite the main speakers (180˚). Proper phase adjustment depends on several variables such as room size, subwoofer placement and listener position. Adjust the phase switch to maximize bass output at the listening position.Final PositioningAfter correctly connecting the CS46system and verifying that both the subwoofer and all satellite speakers are playing, it is time to optimize the system for your particular listening room. Earlier, you placed the subwoofer in its general location. Finding the exact location for optimum performance sometimes only involves moving the speakers up to a few inches in any direction. We urge you, therefore, to experiment with placement, if possible, until your speakers deliver their full potential.A Few SuggestionsWe recommend that you do not operate your speakers or subwoofer with the bass, treble and loudness controls set to full boost. This will place undue strain on your electronics and speakers and could damage them.The volume control setting on your processor/preamp or receiver is not a specific indication of the overall loudness level of the speakers. The only important consideration is the loudness level at which the system can be played, regardless of where the volume control is set.Always turn down the volume control setting on yourprocessor/preamp or receiver when changing sources, or switching inputs to AM or FM operation. Excessively loud transients (clicks or popping sounds) can damage the satellite speakers and possibly the subwoofer.Maintenance and ServiceThe satellite and subwoofer enclosures may be cleaned using a soft cloth to remove fingerprints or to wipe off dust.All wiring connections should be inspected and cleaned or remade periodically. The frequency of maintenance depends on the metals involved in the connections, atmospheric conditions and other factors, but once per year is the minimum.In the event that your system ever needs service, contact your local JBL dealer or distributor, or visit for a service center near you.8All features and specifications are subject to change without notice.JBL is a trademark of Harman International Industries, Incorporated, registeredin the United States and/or other countries. Pro Sound Comes Home is a trademark of Harman International Industries, Incorporated.Dolby and Pro Logic are registered trademarks of Dolby Laboratories.DTS is a registered trademark of DTS, Inc.PRO SOUND COMES HOME™®Harman Consumer Group, Inc., 250 Crossways Park Drive, Woodbury, NY 11797, USA 8500 Balboa Boulevard, Northridge, CA 91329, USA2, route de Tours, 72500 Château du Loir, France516.255.4JBL(4525) (USA only) ©2006 Harman International Industries, Incorporated. All rights reserved.Part No.406-000-05542-E。
JBL CS600SAT 音响系统用户指南说明书
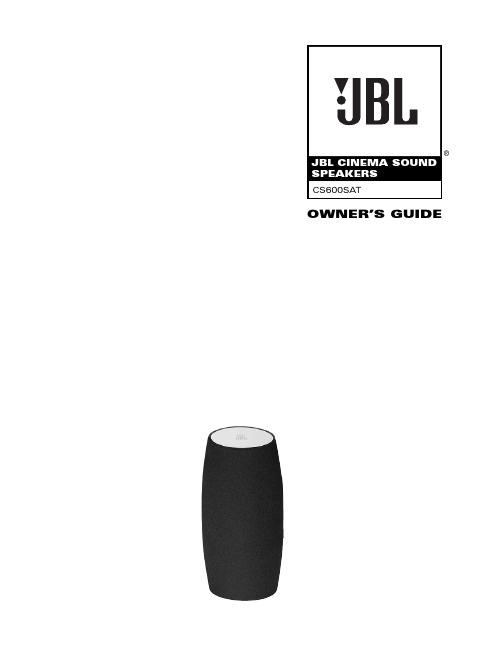
CS600SAT OWNER’S GUIDE TABLE OF CONTENTS3Introduction3Included3Planning Your System3Placement4Wall-Mounting the Satellites5Connections5Maintenance and Service6Specifications2For more than 60 years, JBL has been involved in every aspect of music and film recording and reproduction, from live performances to the recordings you play in your home, car or office.We’re confident that the JBL speakers you have chosen will provide every note of enjoyment that you expected – and that when you think about purchasing additional audio equipment for your home, car or office, you will once again choose JBL.Please take a moment to register your product on our Web site at . It enables us to keep you posted on our latest advance-ments, and helps us to better understand our customers and build products that meet their needs and expectations.INCLUDEDCarefully unpack the system. If you suspect damage from transit, report it immediately to your dealer and/or delivery service. Keep the shipping carton and packing materials for future use. Open the package and verify the following contents:(2) Speakers (2) Adjustable wall (2) Fixed wall brackets with bracketstightening barPLANNING YOUR SYSTEMBefore deciding where to best place your speakers, survey your room and study Figures 1 and 2.Figure 1. In this overhead view of a typical installation, satellite speakers are used to reproduce sound for the front and surround channels. The center channel reproduces sound and dialogue. The powered subwoofer provides bass for effects and music.Figure 2. This figure shows an alternative layout, which may be more suitable for some rooms.PLACEMENT NOTE:The CS600SAT can be placed directly on a shelf, or mounted on a wall using the included wall brackets. As Left and Right Front Channels For left and right front channels, place one satellite to the left and another to the right of the television, as shown in Figure 1. Since the speakers are magnetically shielded, you can place them very close to the TV without worrying about the magnetic field distorting the picture.As Surround Channels For left and right surround channels, place one speaker on the left and another on the right, to the side of or slightly behind the listening area. The surround speakers should be mounted at a height of between 5 ft. (1.5m) and 7 ft. (2m).In 7-channel configurations, place the rear channel(s) behind the listening position, as shown in Figures 1 and 2. NOTE:A powered subwoofer will add impact and realism to both music and film soundtracks. Contact your JBL dealer for recommendations on subwoofer models for your application.Mounting on Floor Stands Optional floor stands are available, should you prefer to place your CS600SAT satellites on the floor; see your dealer or visit for more information.Left Rear Channel Left Surround Channel Right Surround Channel Right Rear Channel Left Front Channel Subwoofer Right Front Channel Center Channel CouchLeft Rear Channel Left Surround Channel RightSurroundChannelRight Rear Channel Left Front Channel SubwooferRight FrontChannelCenter Channel THANK YOU FOR CHOOSING JBL 3The CS600SAT is designed to be mounted on the wall. There is a fixed-mount wall bracket and an adjustable wall bracket provided for each satellite. Each speaker bracket will require up to four1-1/2"#10 wood screws; each screw should be fastened to a wall stud. If a wall stud is unavailable, install an anchor appropriate for a1-1/2"#10 screw.NOTE:The customer is responsible for the correct selectionand use of mounting hardware (available through hardware stores) that will ensure the proper and safe wall-mounting of the speakers.Fixed-Mount Wall BracketStep 1.Mark the positions on the wall where you would liketo place the mounting screws.Step 2.Attach the bracket to the wall using two screws(not included).Step 3.Remove the rubber ring on the bottom of the satellite, and seat the satellite speaker onto the back bracket.Step 4.Attach 1/4"-20 screw into insert on bottom of speakerand tighten.Adjustable Wall BracketStep 1.Remove cap over threaded insert on rear of speaker.Step 2.Mark the positions on the wall where you would like to place the mounting screws.Step 3.Place bracket against the wall and fasten four 1-1/2" #10 wood screws through the bracket’s screw holes into the wall.If a wall stud is not available, use an appropriate anchor.Step 4.Unscrew round collar (C) from bracket (A).Step 5.Screw the ball and shaft assembly (B) to the 1/4"-20 insert on the back of the satellite (do not use the bottom insert on the speaker). Back out 1/2 of a turn and tighten the nut against the speaker. If the ball and shaft assembly is not backed out before tightening the nut, performing Step 8 below may dislodge the threaded insert in the speaker housing and permanently damage the speaker.Step 6.Attach speaker wire as shown on page 5.Step 7.Drop round collar (C) over ball and shaft assembly (B) thatis mounted to the speaker with the finished side of the collar facing the rear of the speaker.Step 8.Carefully push the ball straight into the socket mounted on the wall, angle the speaker as desired and tighten the collar using the enclosed metal bar.Figure 3. Bracket on wall.Metal barMetal bar ABCMetal barWALL-MOUNTING THE SA TELLITES45CONNECTIONSAfter placing the speakers, you are ready to connect your system.First, turn off all audio-system power. Use high-quality speaker wire to make your connections; #18-gauge speaker wire with polarity cod-ing is recommended. For longer distances, #16-gauge or heavier wire is recommended. The side of the wire with a ridge or other coding is usually considered positive polarity (i.e., +). Also, consult the owner’s manuals that were included with your amplifier or receiver to confirm connection procedures. Observe polarities when making speaker connections, as shown in Figure 4. Connect each + terminal on the back of the amplifier or receiver to the respective + (red) terminal on each speaker. Connect the – (black) terminals in the same way.Important!Do not reverse polarities (i.e., + to –, or – to +) when making connections. Doing so will cause poor imaging and diminished bass response. Be certain that positive and negative wire strands are completely isolated to avoid short circuits that may damage your equipment.NOTE:On certain models using hexagonal terminal nuts, a small socket wrench is provided to help in properly tightening the terminals.Hand-tighten only and do not overtighten.Figure 4. Wiring diagram shows polarity connectionsfor one channel of a home theater system.MAINTENANCE AND SERVICE The enclosure may be cleaned using a soft cloth to remove finger-prints or to wipe off dust.All wiring connections should be inspected and cleaned or remade periodically. The frequency of maintenance depends on the metals involved in the connections, atmospheric conditions and other factors, but once per year is the minimum.If a problem occurs, make sure that all connections are properly made and clean. If a problem exists in one loudspeaker, reverse the connection wires to the left and right system. If the problem remains in the same speaker, then the fault is with the loudspeaker. If the problem appears in the opposite speaker, the cause is in another component or cable. In the event that your speaker ever needs service, contact your local JBL dealer or distributor, or visit for a service center near you.Receiver or Amplifier(rear view)Output One Channel ShownBlack=–Red =+Red =+Loosen TerminalInsert Bare End; TightenTerminalBlack =–No Stripe =–Stripe =+Speaker WireLaurent RaultJBL is a trademark of Harman International Industries, Incorporated, registered in the United States and/or other countries. Pro Sound Comes Home is a trademark of Harman International Industries, Incorporated.PRO SOUND COMES HOME™®Harman Consumer Group, Inc., 250 Crossways Park Drive, Woodbury, NY 11797 USA 8500 Balboa Boulevard, Northridge, CA 91329 USA2, route de Tours, 72500 Château du Loir, France516.255.4JBL(4525) (USA only) ©2006 Harman International Industries, Incorporated. All rights reserved.Part No.406-000-05545-E。
JBL PSW-D110 简单设置指南说明书
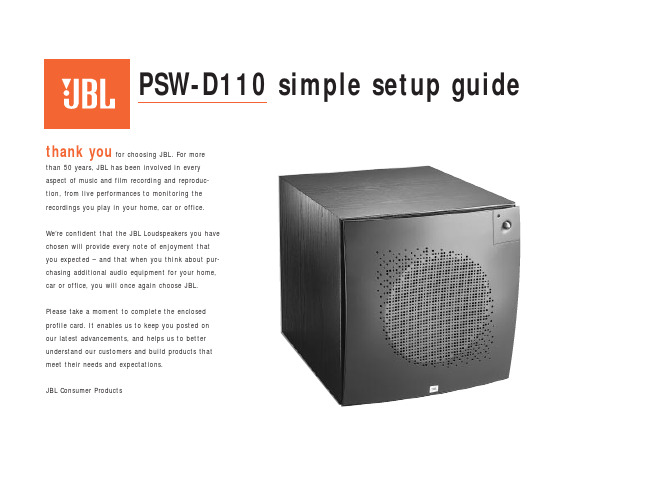
12. Power-Cord Protection. Power-supply cords should be routed so that they are not likely to be walked on or pinched by items placed upon or against them, paying particular attention to cords at plugs, convenience receptacles and the point where they exit from the product.
PSW-D110 simple setup guide
thank you for choosing JBL. For more
than 50 years, JBL has been involved in every aspect of music and film recording and reproduction, from live performances to monitoring the recordings you play in your home, car or office.
Please take a moment to complete the enclosed profile card. It enables us to keep you posted on our latest advancements, and helps us to better understand our customers and build products that meet their needs and expectations.
11. Grounding or Polarization. This product may be equipped with a polarized alternating-current line plug (a plug having one blade wider than the other). This plug will fit into the power outlet only one way. This is a safety feature. If you are unable to insert the plug fully into the outlet, try reversing the plug. If the plug should still fail to fit, contact your electrician to replace your obsolete outlet. Do not defeat the safety purpose of the polarized plug.
- 1、下载文档前请自行甄别文档内容的完整性,平台不提供额外的编辑、内容补充、找答案等附加服务。
- 2、"仅部分预览"的文档,不可在线预览部分如存在完整性等问题,可反馈申请退款(可完整预览的文档不适用该条件!)。
- 3、如文档侵犯您的权益,请联系客服反馈,我们会尽快为您处理(人工客服工作时间:9:00-18:30)。
JBL
JBL3722N(500W)
厅长21米内影厅,全频单功放驱动(dsi1000)
JBL3732 (500W)
同上,价位略高,三分频,双功放驱动(dsi1000)
BL4722N (800W)
厅长27米内影厅,全频,单功放驱动(dsi2000)
JBL4732 (800W)
同上,价位略高,三分频,双功放驱动(dsi2000)
JBL4675C-(4LF,8LF)1200W
多用于超大厅的千人会场,廉价高效,实际厅长可达36米。
或用在超宽厅(宽度大于20米)双功放驱动(dsi4000)
JBL5672(1200W),5674(2400W)
同上,可用在超大厅,三分频,三功放驱动(dsi4000+dsi2000) JBL4641
小厅的次低频,厅长14米内,单功放dsi1000或2000
JBL4642A
通用大功率双音圈次低频,应用广泛,大中小厅皆可,一只可用在厅长20米以内影厅,再大的影厅就要增加一只了,否则储备不足。
环绕声8320,8340,8350
考虑到以后7.1升级,建议所有影厅都选用40、50大功率型
号;如影厅土建设计在150座以下,可选用8320,以后升级没有冲突。
飞达
FD-2215MVA]
厅长25米以内,两分频双功放驱动,800W。
FD-2152MV N]
厅长18米以内,两分频单功放驱动,600W.
FD-3315MV A
厅长25米以内应用,三分频双功放驱动,800W.
FD-3415MV
可在30米开外的影厅使用,三分频,可选双、三功放驱动,1600W。
相当于4675C,品质一般。
音霸
网站打不开,待续。
李海兵QQ:641963875。