佳能闪光灯 430EX-II 中文说明书
580EXII仅中文说明书

全自动闪光拍摄
将相机的拍摄模式设置为<V> (程序自动曝光)或<U> (全自动) 时,E-TTL II/E-TTL全自动闪光会使闪光摄影变得和<V>模式及<U>模 式下的普通自动曝光摄影一样简单。
1 将闪光灯设置为<a>。 按下<D>按钮以显示 <a>。
2 对被摄体对焦。 半按快门按钮进行对焦。 快门速度和光圈值将会显示在取景器 中。 检查<Q>图标是否出现在取景器中。
5
液晶显示屏
<9> ,62ᛳܝᑺ ࡼ䮾ܝ䕧ߎ㑻߿ 䮾ܝᲱܝ㸹ٓ䞣 䮾ࣙܝೈᲱܝ㸹ٓ䞣
<c> 催䗳ৠℹ )3䮾 ܝ
<g> 䮾ࣙܝೈᲱܝ
<8/a/b> 㞾ࡼ䚼⌟(ܝ 77/ OO 77/㞾ࡼ 䮾ܝ
<d> ࡼব⛺
ܝ 䮾ࣙܝೈᲱܝ⢊ᗕ 乥䮾䮾ܝ᭄ 乥䮾䮾ܝ乥⥛ ࡼ䮾ܝḷ䞣ᣛ冫 㞾ᅮНࡳ㛑㓪ো 㞾ᅮНࡳ㛑䆒㕂
7
安装电池
安装4节AA型电。
1 打开电池仓盖。 用您的拇指按电池仓锁定杆,然后按 照箭头所示方向c说明书滑动电池仓 锁定杆将电池仓盖打开。
2 安装电池。 按电池仓中的指示确保电池的正负触 点朝向正确。
3 关闭电池仓盖。 按箭头所示方向滑动电池仓盖将其关 闭。 在电池仓盖发出咔嚓声的位置,电池 仓盖将被锁定。
请使用4节相同品牌的新电池。更换电池时,请同时更换4节。 也可以使用AA型镍氢(Ni-MH)或锂电池。
8
把闪光灯安装到相机上
1 安装闪光灯。 滑动闪光灯固定座使其完全插入相机 的热靴插座。
佳能数码相机使用说明书
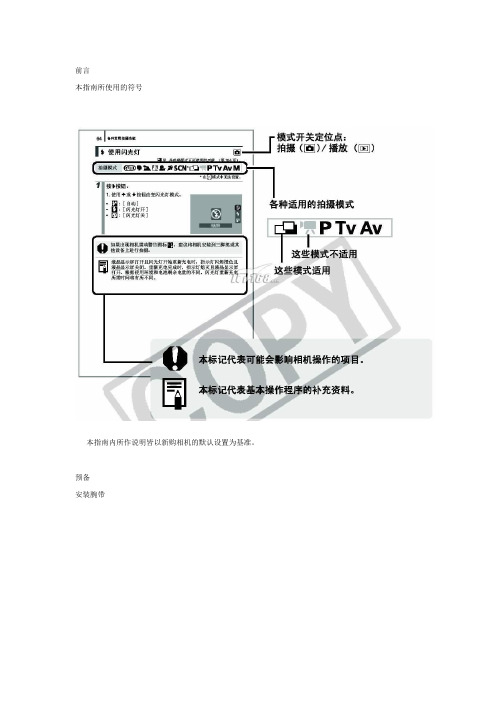
前言本指南所使用的符号本指南内所作说明皆以新购相机的默认设置为基准。
预备安装腕带为防止相机在使用过程中掉落,建议使用腕带。
安装电池1. 将电池仓盖锁扣推向箭头(1) 的方向,定住锁扣不放,此时将电池仓盖推向箭头(2) 方向,然后以箭头(3) 方向将电池仓盖向上打开。
2. 装入两颗电池。
3. 关闭电池仓盖(1),然后将电池仓盖向下按着推向(2),直到咔一声到位为止。
插入存储卡1. 将电池仓盖锁扣推向箭头(1) 的方向,定住锁扣不放,此时将电池仓盖推向箭头(2) 方向,然后以箭头(3) 方向将电池仓盖向上打开。
2. 装入存储卡直到咔一声到位为止。
3. 关闭电池仓盖(1),然后将电池仓盖向下按着推向(2),直到咔一声到位为止。
存储卡插入相机前,请先确定其方向正确。
若存储卡以反方向插入,相机则无法识别该卡或导致故障。
要取出存储卡用手指推存储卡直至听到咔哒声,然后松开存储卡。
设置日期和时间首次开启相机电源时,即会出现日期/ 时间设置菜单。
请依照下面说明的第3 及4 步骤设置日期及时间。
1. 按电源按钮。
2. 选择[ 日期/ 时间]。
3. 选择年、月、日和时间及显示的排列方式。
您可在图像上加印所设置的日期及时间。
设置显示的语言您可变更显示在液晶显示屏菜单及信息所使用的语言。
拍摄静止图像1. 按电源按钮。
(1) 将播放起动声音,液晶显示屏上将显示起动图像。
(2) 再次按电源按钮关闭电源。
2. 选择拍摄模式。
3. 将相机对准拍摄主体。
4. 轻按( 半按) 快门按钮进行对焦。
(1) 相机对焦时,相机鸣响两次,指示灯亮为绿色(使用闪光灯时亮为橙色)。
(2)在液晶显示屏的对焦点上会出现绿色自动对焦框。
5. 不作其他任何变动,将按钮按到底( 全按) 拍摄。
(1) 将播放一次快门声音并记录图像。
(2) 图像被录入存储卡时,指示灯将呈绿色闪烁。
静音设置拍摄后立即查看图像( 拍摄预览)拍摄所录制的图像随即在液晶显示屏上出现约2 秒。
580EXII闪光灯,中国牛人详尽解释,秒杀说明书

580EXII闪光灯,中国牛人详尽解释,秒杀说明书580EXII闪光灯中国牛人详尽解释秒杀说明书580EXII闪光灯中国牛人详尽解释秒杀说明书580EXII闪光灯中国牛人详尽解释秒杀说明书580EXII闪光灯中国牛人详尽解释秒杀说明书580EXII闪光灯中国牛人详尽解释秒杀说明书580EXII 闪光灯中国牛人详尽解释秒杀说明书580EXII闪光灯中国牛人详尽解释秒杀说明书580EXII闪光灯中国牛人详尽解释秒杀说明书580EXII闪光灯中国牛人详尽解释秒杀说明书580EXII闪光灯中国牛人详尽解释秒杀说明书本文111 BWANG7贡献pdf文档可能在WAP端浏览体验不佳。
建议您优先选择TXT或下载源文件到本机査看。
580EXII和430EXII有什么区别或者说580EXII值不值得买不考虑预算答我觉得回答这个月经问题要考虑两个方面1、两者的重量、体积区别。
580EXII 体积非常大比430EXII重和大见下图。
长时间手持和经常外出必须要考虑重量和体积的问题这是要首先考虑的。
2、要是你不怕重量那好我们再看看两者的功能区别主要见下表。
主要你要弄清楚需不需要更大的指数、频闪功能还有无线主控功能。
搞明白了也就可以做出判断了。
奎尔萨拉斯上传了这张照片:五、想玩离机闪以上提到的那么多闪光灯中哪些可以做主控单元下文统称主灯那些可以做从属单元下文统称副灯答可以做主控单元580EXII、580EX、550EX、ST-E2 引闪器。
可以做从属单元580EXII. 580EX、550EX、430EXII. 430EX、420EX 即将上市的320EX、270EXII第二部分佳能闪光灯实物说明及基本术语解释好了拿到闪光灯我们自然要弄明白各个按钮和部位是干什么的我拍了四张430、580EXII的实物图片作为说明。
这张是430EXII的正面奎尔萨拉斯上传了这张照片:这张是430EXII的背面奎尔萨拉斯上传了这张照片:这张是580EXII的正面奎尔萨拉斯上传了这张照片:这张是580EXII的背面奎尔萨拉斯上传了这张照片:一、什么是A-TTL、E-TTL、E-TTLII闪光测光模式答1、A-TTL闪光测光模式英文全称Advanced ThroughThe Lens意为“高级透过镜头”闪光测光。
佳能 EOS 30D DIGITAL数码单镜头反光相机 说明书
“打印/共享”按钮和 丰富的 PictBridge 功能
EOS 30D 新增了“打印 / 共享”按钮,相机连接 打印机时,按此按钮可以方便的进行直接打印; 相机连接电脑(已安装了相机随机软件)时,按此 按钮可以便捷的直接传输图像并将图像下载到电 脑里。 EOS 30D 支持 PictBridge ,和佳能新打印 机连接,可以实现更加丰富的直接打印功能:增 加了新的纸张尺寸选择;扩展了打印效果选择:
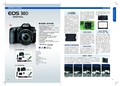
A. EOS 30D机身 A B C B. EOS数码处理光盘 C. 软件使用手册光盘 D E F G H D. 电源线 E. 充电器CB-5L F. 锂离子充电电池BP-511A G. 接口连接电缆IFC-400PCU(USB线) H. 视频电缆VC-100 I I. 相机宽背带EW-100DGR * J. EF-S 17-85mm f/4-5.6 IS USM镜头
85
85
拍摄时,错误代码会同时出现在相机的 LCD 显示 屏和 LCD 液晶监视器上,而且在 LCD 液晶监视器 上会显示出故障解决方法,非常方便摄影师排除 故障。
水平方向
85
。
E-TTL II 自动闪光
20 60 。
EOS 20D 可视角度 EOS 30D 可视角度
测光对构图区域内特定部分进行控制测光,测光 覆盖了取景器中央约 9% 的圆形面积。点测光对 需要严格测光的构图区域内特定部分进行控制测 光,测光范围仅覆盖取景器中央约 3.5% 的圆形 面积。中央重点平均测光,有经验的摄影师喜欢 的一种测光模式,考虑整个构图,将重点放在图 像的中心部分。 EOS 30D 全自动拍摄模 式优化了相机的各种设置, 可用于拍摄时的特殊场景。 安装在相机顶部左侧的 控制转盘上可轻松地找
厂商建议价格(RMB): 11,580.00 (机身) 17,280.00 (套机)
详解:佳能闪光灯SPEEDLITE430EXIII

详解:佳能闪光灯SPEEDLITE430EXIII使用简便、功能充实的多用途闪光灯SPEEDLITE 430EX III-RT是一款功能充实,基本性能优秀,同时又小巧易操控的闪光灯。
无线闪光同时支持无线电传输及光学脉冲传输,无线电传输方式下,可作为主控单元或从属单元,方便用户驾驭多灯闪光,享受闪光的艺术。
闪光灯还附带反射闪光适配器与色彩滤镜,提供更加灵活的拍摄体验。
■1.可应对多种拍摄场景的宽广覆盖范围与大光量拥有最大闪光指数约43※的大光量。
闪光覆盖范围在正常闪光时约24-105mm ,使用广角散光板时可覆盖超广角的14mm。
可根据与被摄体之间的距离自动调节闪光量,获得适宜的光量。
除了微调闪光量的闪光曝光补偿外,还可以设置闪光灯光线照射范围内的光线分布特性。
光线分布特性有自动设置的“标准”,闪光覆盖范围收窄优先闪光距离的“闪光指数优先”,以及拓展闪光覆盖范围抑制周边光量降低的“均匀覆盖”3种类型。
当然也可进行根据拍摄场景调整光量与闪光覆盖范围的手动闪光。
灯头可旋转角度向上约45-90°,向左约60-150°,向右约60-180°,便于利用天花板或墙壁进行跳闪拍摄。
※ISO 100下闪光覆盖范围设为105mm时,以米为单位。
■2.无线电传输功能使拍摄更加自由无线闪光拍摄同时支持光学脉冲和无线电传输方式。
无线电传输方式不易受到障碍物的影响,可实现全方位360°、最远约30米的信号传输,从属闪光灯可配置在其后方。
且无线电传输模式下既可作为主控单元又可作为从属单元,作为主控单元时可控制5组(15个)支持无线电传输的从属闪光灯。
并可使用联动拍摄功能,最多令16台相机(主控相机及从属相机)同时释放快门拍摄※。
另外光学脉冲方式下,闪光灯只能作为从属单元。
※当使用2012年和之后发售的EOS数码相机EOS-1D X等(EOS 1300D / 1200D除外)时,可以进行联动拍摄。
全景闪光灯专家用户手册说明书
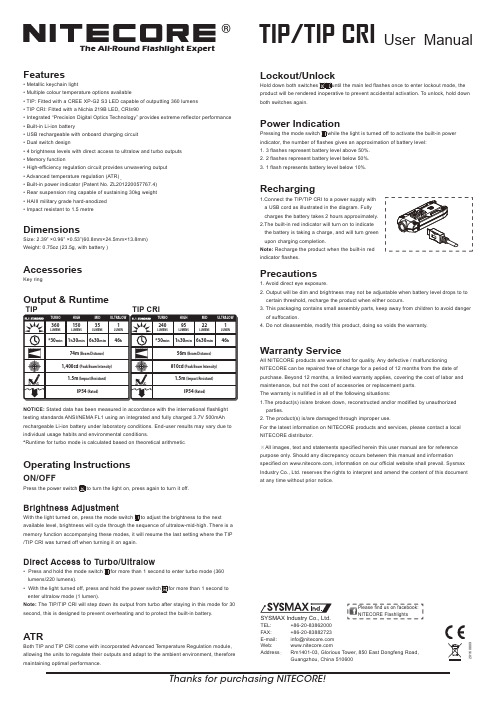
®The All-Round Flashlight ExpertUser ManualTIP/TIP CRIFeaturesMetallic keychain lightMultiple colour temperature options availableTIP: Fitted with a CREE XP-G2 S3 LED capable of outputting 360 lumens • TIP CRI: Fitted with a Nichia 219B LED, CRI≥90Integrated “Precision Digital Optics Technology” provides extreme reflector performance Built-in Li-ion batteryUSB rechargeable with onboard charging circuit Dual switch design4 brightness levels with direct access to ultralow and turbo outputs Memory functionHigh-efficiency regulation circuit provides unwavering output Advanced temperature regulation (ATR)Built-in power indicator (Patent No. ZL201220057767.4) Rear suspension ring capable of sustaining 30kg weight HAIII military grade hard-anodized Impact resistant to 1.5 metreDimensionsSize: 2.39” ×0.96” ×0.53”(60.8mm×24.5mm×13.8mm)Weight: 0.75oz (23.5g, with battery )AccessoriesKey ringOutput & RuntimeNOTICE: Stated data has been measured in accordance with the international flashlight testing standards ANSI/NEMA FL1 using an integrated and fully charged 3.7V 500mAh rechargeable Li-ion battery under laboratory conditions. End-user results may vary due to individual usage habits and environmental conditions.*Runtime for turbo mode is calculated based on theoretical arithmetic .Operating InstructionsON/OFFPress the power switch to turn the light on, press again to turn it off.Brightness AdjustmentWith the light turned on, press the mode switch to adjust the brightness to the next available level, brightness will cycle through the sequence of ultralow-mid-high. There is a memory function accompanying these modes, it will resume the last setting where the TIP /TIP CRI was turned off when turning it on again.Direct Access to Turbo/UltralowPress and hold the mode switch for more than 1 second to enter turbo mode (360 lumens/220 lumens).With the light turned off, press and hold the power switch for more than 1 second to enter ultralow mode (1 lumen).Note: The TIP/TIP CRI will step down its output from turbo after staying in this mode for 30 second, this is designed to prevent overheating and to protect the built-in battery.ATRBoth TIP and TIP CRI come with incorporated Advanced Temperature Regulation module, allowing the units to regulate their outputs and adapt to the ambient environment, therefore maintaining optimal performance.Lockout/UnlockHold down both switches until the main led flashes once to enter lockout mode, the product will be rendered inoperative to prevent accidental activation. To unlock, hold downboth switches again.Power IndicationPressing the mode switch while the light is turned off to activate the built-in power indicator, the number of flashes gives an approximation of battery level:1. 3 flashes represent battery level above 50%.2. 2 flashes represent battery level below 50%.3. 1 flash represents battery level below 10%.RechargingPrecautions1. Avoid direct eye exposure.2. Output will be dim and brightness may not be adjustable when battery level drops to to certain threshold, recharge the product when either occurs.3. This packaging contains small assembly parts, keep away from children to avoid danger of suffocation.4. Do not disassemble, modify this product, doing so voids the warranty.Warranty ServiceAll NITECORE products are warranted for quality. Any defective / malfunctioning NITECORE can be repaired free of charge for a period of 12 months from the date of purchase. Beyond 12 months, a limited warranty applies, covering the cost of labor and maintenance, but not the cost of accessories or replacement parts.The warranty is nullified in all of the following situations:1.The product(s) is/are broken down, reconstructed and/or modified by unauthorized parties.2. The product(s) is/are damaged through improper use.For the latest information on NITECORE products and services, please contact a local NITECORE distributor.※All images, text and statements specified herein this user manual are for reference purpose only. Should any discrepancy occurs between this manual and information specified on , information on our official website shall prevail. Sysmax Industry Co., Ltd. reserves the rights to interpret and amend the content of this document at any time without prior notice.Thanks for purchasing NITECORE!SYSMAX Industry Co., Ltd.TEL: +86-20-83862000 FAX: +86-20-83882723 E-mail: *****************Web: Address : Rm1401-03, Glorious Tower, 850 East Dongfeng Road,Guangzhou, China 510600Please find us on facebook: NITECORE Flashlights201608091.Connect the TIP/TIP CRI to a power supply with a USB cord as illustrated in the diagram. Fully charges the battery takes 2 hours approximately.2.The built-in red indicator will turn on to indicate the battery is taking a charge, and will turn green upon charging completion.Note: Recharge the product when the built-in red indicator flashes.150360351*30min 1h 30min 6h 30min 46h 74m (Beam Distance)1,400cd (Peak Beam Intensity)IP54 (Rated)1.5m (Impact Resistant)95240221*30min 1h 30min 6h 30min 46h56m (Beam Distance)810cd (Peak Beam Intensity) IP54 (Rated)1.5m (Impact Resistant)TIPTIP CRI。
佳能照相机使用手册2

1 将相机电源开关设置为 <ON>。
2 设置相机的 [ 数据传输设置 ]。 ● 如下表所示设置您相机型号的 [ 数据传输设置 ]。
5D 30D 20D 10D 350D 300D
菜单 [ 数据传输设置 ] [ 数据传输设置 ] [ 数据传输设置 ]
[ 数据传输设置 ] [ 数据传输设置 ] [ 数据传输设置 ]
相机通信软件
EOS Utility
Ver. 2.4
1D Mk II N 1Ds Mk II 1D Mk II 1Ds
1D
5D
30D 20D 10D
400D 350D 300D D60 D30
使用说明书
● 本使用说明书的内容
● EU 用于表示 EOS Utility。 ● 每个相机型号都显示为一个图标。
● 连接 400D 和计算机 ( 右侧所述 )
● 使用 [ 数据传输设置 ] 设置连接相机和计算机 (p.6)
5D
30D 20D 10D 350D 300D
● 连接 1D Mk II N 1Ds Mk II 1D Mk II 和计算机 (p.7)
● 连接 1Ds
1D 和计算机 (p.8)
● 连接 D60 D30 和计算机 (p.9)
● 使用无线文件发送器 WFT-E1 进行拍摄并实时查看图 像
➜ p.52
● 从 EU 启动 WFT-E1 软件
➜ p.53
● 从 EU 启动原始数据安全套装 OSK-E3 软件
➜ p.53
简介
内容概述
1下载图像 2相机设置 3远景拍摄 4首选项
参考
索引
3
1 下载图像至计算机
此处介绍如准备下载图像至计算机 ( 连接相机和计算机 )、启动 EU、从 相机下载图像至计算机和退出 EU 等的基本操作。
闪光灯使用指南说明书
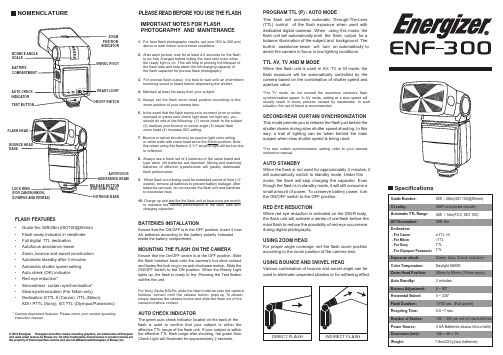
1. For best flash photography results, set your ISO to 200 and above in both indoor and outdoor conditions.2. After each picture, wait for at least 4-5 seconds for the flash to be fully charged before taking the next shot even when the ready light is on. This will help to prolong the lifespan of the flash tube and help attain the full charging capacity of the flash capacitor for precise flash photography.3. For precise flash output, it is best to wait until an intermittent humming sound is heard before depressing the shutter.4. Maintain at least 2m away from your subject.5. Always set the flash zoom head position according to the zoom position of your camera lens.6. In the event that the flash exposure is incorrect (over or under- exposed or green auto check light does not light up), you should do one of the following: (1) move closer to the subject (2) readjust your bounce or swivel angle (3) adjust flash zoom head (4) Increase ISO setting.7. Bounce or swivel should only be used on light color ceiling or white walls with zoom head set at the 50mm position. Note that when using this feature, 2-3 F stops of light will be lost due to reflection.8. Always use a fresh set of 4 batteries of the same brand and type when old batteries are depleted. Mixing and matching batteries of different types/brands will greatly deteriorate flash performance.9. When flash is not being used for extended period of time (>2 weeks), remove all batteries to prevent battery leakage. After batteries removal, do not expose the flash unit and batteries to excessive heat. 10. Charge up and test fire the flash unit at least once per monthto maintain the optimal performance of the flash tube and charging capacitor.SpecificationsNOMENCLATURE • Guide No: 92ft/28m (ISO100@50mm) • Flash ready indicator in viewfinder • Full digital TTL dedication • Autofocus assistance beam• Zoom, bounce and swivel construction • Automatic standby after 3 minutes • Automatic shutter speed setting • Auto check (OK) indicator • Red eye reduction*• Second/rear curtain synchronization* •Slow synchronization (For Nikon only)• Dedication: ETTL II (Canon), iTTL (Nikon),ADI / PTTL (Sony), 4/3 TTL (Olympus/Panasonic)* Camera dependent features. Please check your camera operating instruction manualZOOM SCALEBASEAUTOFOCUS PROGRAM TTL (P) / AUTO MODEThis flash unit provides automatic Through-The-Lens (TTL) control of the flash exposure when used with dedicated digital cameras. When using this mode, the flash unit will automatically emit the flash output for a balance illumination of the subject and background. The built-in assistance beam will turn on automatically to assist the camera to focus in low lighting conditions.TTL AV, TV AND M MODEWhen this flash unit is used in AV, TV or M mode, the flash exposure will be automatically controlled by the camera based on the combination of shutter speed and aperture value.*For TV mode, do not exceed the maximum camera’s flash synchronization speed. In AV mode, setting at a slow speed will usually result in blurry pictures caused by handshake. In such situation, the use of tripod is recommended.SECOND/REAR CURTAIN SYNCHRONIZATIONThis mode permits you to release the flash just before the shutter closes during slow shutter speed shooting. In this way, a trail of lighting can be taken behind the main subject when slow shutter speed is being used.*For rear curtain synchronization setting, referto your camera instruction manual.AUTO STANDBYWhen the flash is not used for approximately 3 minutes, it will automatically switch to standby mode. Under this mode, the flash will stop charging the capacitor. Even though the flash is in standby mode, it will still consume a small amount of power. To conserve battery power, turn the ON/OFF switch to the OFF position.RED EYE REDUCTIONWhen red eye reduction is activated on the DSLR body,the flash unit will activate a series of pre-flash before the main flash to reduce the possibility of red-eye occurrence during digital photography.USING ZOOM HEADFor proper angle coverage, set the flash zoom position according to the zoom position of the camera lens.USING BOUNCE AND SWIVEL HEADVarious combination of bounce and swivel angle can beused to eliminate unwanted shadow or for softening effect.BATTERIES INSTALLATIONEnsure that the ON/OFF is in the OFF position. Insert 4 new AA batteries according to the battery polarity indicated inside the battery compartment.MOUNTING THE FLASH ON THE CAMERAEnsure that the On/OFF switch is at the OFF position. Slide the flash hotshoe base onto the camera’s hot shoe contact and fasten the lock ring in an anti-clockwise motion. Slide the ON/OFF Switch to the ON position. When the Ready Light lights up, the flash is ready to fire. Pressing the Test Button will fire the unit.For Sony Alpha DSLRs, slide the flash hotshoe onto the camera hotshoe contact until the release button pops up. To detach,simply depress the release button and slide the flash out of the camera hotshoe contact.AUTO CHECK INDICATORThe green auto check indicator located on the back of the flash is used to confirm that your subject is within the effective TTL range of the flash unit. If your subject is within the effective TTL flash range after shooting, the green Auto Check Light will illuminate for approximately 2 seconds.IMPORTANT NOTES FOR FLASHPHOTOGRAPHY AND MAINTENANCEPLEASE READ BEFORE YOU USE THE FLASHFLASH FEATURES© 2012 Energizer Energizer and other marks, including graphics, are trademarks of Energizer and used under license by Bower , Inc. All other trademarks, brand names or product names are the property of their respective owners and are not affiliated with Energizer or Bower , Inc.。
新增无线电主控佳能430EXIII闪灯评测

新增无线电主控佳能430EXIII闪灯评测在热靴闪光灯内部配备无线电引闪器已然成为闪光灯的一种趋势,一众国产厂商也比较早地进行了尝试。
而在原厂方面,此前仅有佳能公司在2012年推出的旗舰级热靴闪光灯SPEEDLITE 600EX-RT闪光灯上具备有支持TTL主控和从属的无线电引闪器。
相比传统的可见光无线TTL引闪,无线电TTL引闪系统可以说是优势巨大,引闪成功率也更高,用户完全不用担心因为遮挡导致从属闪光灯无法接收主控闪光灯发出的可见光引闪信号。
可以说无线电TTL引闪系统将会取代可见光TTL引闪,成为未来TTL闪光灯的标配。
佳能公司在发布了SPEEDLITE 600EX-RT热靴闪光灯和ST-E3-RT无线电引闪器之后,又在今年7月份正式发布了旗下第二款支持无线电TTL引闪的热靴闪光灯——SPEEDLITE 430EX III-RT(以下简称佳能430EX III-RT闪光灯),充实了自家无线电TTL引闪闪光灯的阵容的同时,还完成了08年发布的前代产品SPEEDLITE 430EX II的更新。
更新后的佳能430EX III-RT闪光灯整体配置水平更加强大,在各家原厂中端级别热靴闪光灯中处于领先水平。
这款闪光灯配备有无线电TTL主控和从属引闪功能,相比前两代430EX闪光灯只有从属闪光没有主控功能,佳能430EX III-RT在机顶使用时,可以通过无线电TTL引闪功能,引闪处于从属TTL无线电引闪功能的SPEEDLITE 600EX-RT或430EX III-RT闪光灯。
除此之外,相比前代产品,这款闪光灯还增加了眼神光板、原厂标配柔光罩和CTO色温校正滤镜,提升的幅度可谓巨大。
佳能430EX III-RT闪光灯外包装盒采用经典的红白配色设计佳能430EX III-RT闪光灯的外包装盒采用红白配色,包装盒正面印刷有该闪光灯的正面外观,相比已经逐渐换装的银黑色产品包装盒,红白色设计更加简洁,也更加经典。
闪光灯商品说明书
Fan Umbrella Holder
Fuse Holder
Power Input Connector
Counterweight Holder
FLASH 1/32 1/16 1/8 1/4 1/2 FULL
MODEL
Quick Change Levers (Front of Light)
Digital Display
Power Switch
Sync Outlet Optical Slave Sensor
Ready Light
Fan Umbrella Holder
Fuse Holder
Power Input Connector
Counterweight Holder
Quick Change Levers (Front of Light)
Flash Power Control
Modeling Lamp Power Control
Modeling Lamp Controls
FLASH 1/32 1/16 1/8 1/4 1/2 FULL
MODEL
WARNING! DO NOT OPERATE
WITHOUT GLASS LAMP COVER IN PLACE.
Digital Display
Power Setting Buttons Flash/Modeling Lamp Adjust Button
Test Button
WARNING! DO NOT OPERATE WITHOUT GLASS
LAMP COVER IN PLACE.
ADJUST
l 2
TRACK SET
Power Setting Buttons Flash/Modeling Lamp Adjust Button
美兹52af-1尼康sb700佳能430exii对比测试
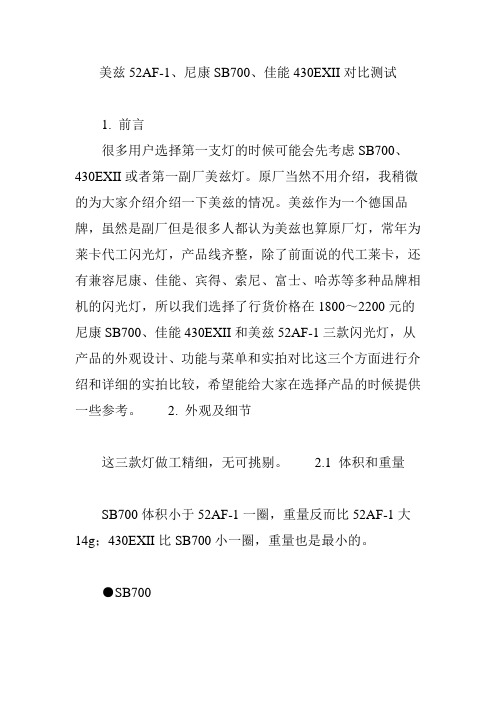
美兹52AF-1、尼康SB700、佳能430EXII对比测试1. 前言很多用户选择第一支灯的时候可能会先考虑SB700、430EXII或者第一副厂美兹灯。
原厂当然不用介绍,我稍微的为大家介绍介绍一下美兹的情况。
美兹作为一个德国品牌,虽然是副厂但是很多人都认为美兹也算原厂灯,常年为莱卡代工闪光灯,产品线齐整,除了前面说的代工莱卡,还有兼容尼康、佳能、宾得、索尼、富士、哈苏等多种品牌相机的闪光灯,所以我们选择了行货价格在1800~2200元的尼康SB700、佳能430EXII和美兹52AF-1三款闪光灯,从产品的外观设计、功能与菜单和实拍对比这三个方面进行介绍和详细的实拍比较,希望能给大家在选择产品的时候提供一些参考。
2. 外观及细节这三款灯做工精细,无可挑剔。
2.1 体积和重量SB700体积小于52AF-1一圈,重量反而比52AF-1大14g;430EXII比SB700小一圈,重量也是最小的。
●SB700体积:71×126×104.5mm重量:360g(仅闪光灯,不包括电池)●430EXII体积:72×122×101mm重量:320g(仅闪光灯,不包括电池)●美兹52AF-152AF-1外观简约、时尚,体积在这三种灯最大。
体积:73×134×90mm重量:346g(仅闪光灯,不包括电池) 2.2 整体外观 2.2.1 正面三只灯的高度不同,430EX(122mm)高度最低,52AF-1(134mm)最高,SB700(126mm)高度比430EXII(124mm)略高。
三只灯的辅助对焦灯、从属模式信号灯都位于正面。
佳能430EXII的无线信号接收窗口也位于正面。
2.2.2 背面SB700有3个波段开关,6个按钮和1个转轮;显示屏较大。
430EX有8个按键1个开关;显示屏较小。
52AF-1有3个按键,相当简洁;触摸显示屏较大。
显示屏的后部有无线光信号接收装置,一项独特的设计。
说明手册:GODOX TTL无线引闪器指南说明书

说明手册Instruction Manual地址/Add: 深圳市宝安区福永镇福洲大道西新和村华发工业园A4栋Building A4, Xinhe Huafa Industrial Zone, Fuzhou RD West, Fuyong Town, Baoan District, Shenzhen 518103, China电话/Tel: +86-755-29609320(8062) 传真/Fax: +86-755-25723423邮箱/E-mail:***************深圳市神牛摄影器材有限公司GODOX Photo Equipment Co., Ltd.TTL 无线引闪器TTL Wireless Flash TriggerForeword Warning Names of Parts Body LCD Panel BatteryInstalling Batteries Battery Level Indication Using the Flash TriggerAs a Wireless Camera Flash Trigger As a Wireless Outdoor Flash Trigger As a Wireless Original Flash Trigger As a Wireless Studio Flash Trigger As a Wireless Shutter Release Trigger As a Flash Triggerwith 2.5mm Sync Cord Jack Setting the Flash Trigger Power SwitchAutomatically Enter Power Saving Mode Power Switch of AF Assist Beam Channel Settings Wireless ID SettingsMode Settings Magnification Function Output Value SettingsFlash Exposure Compensation SettingsMulti Flash Settings (Output Value, Times and Frequency) Modeling Lamp Settings ZOOM Value Settings Shutter Sync Settings Buzz Settings Sync Socket Settings TCM FunctionSHOOT Function Settings C.Fn: Setting Custom Functions Compatible Flash Models Compatible Camera Models Technical DataRestore Factory Settings Firmware Upgrade AttentionsCaring for Flash TriggerContentsThanks for your purchase of this XProC wireless flash trigger.This wireless flash trigger is suitable for using Canon cameras to control Godox flashes with X system e.g. camera flash, outdoor flash, and studio flash. It can also control Canon original speedlites with the coordination of X1R-C receiver. Featuring multi-channel triggering, stable signal transmission, and sensitive reaction, it gives photographers unparalleled flexibility and control over their strobist setups. The flash trigger applies to hotshoe-mounted Canon EOS series cameras, as well as the cameras which have PC sync sockets.With XProC wireless flash trigger, high speed synchronization is available for most of camera flashes in the market which support E-TTL II. The max flash synchronization speed is up to 1/8000s *.*: 1/8000s is achievable when the camera has a max camera shutter speed of 1/8000s.24252628283444454647474848Do not disassemble. Should repairs become necessary, this product must be sent to an authorized maintenance center.Always keep this product dry. Do not use in rain or in damp conditions.Keep out of reach of children.Do not use the flash unit in the presence of flammable gas. In certain circumstance, please pay attention to the relevant warnings.Do not leave or store the product if the ambient temperature reads over 50℃.Turn off the flash trigger immediately in the event of malfunction.Observe precautions when handling batteries- Use only batteries listed in this manual. Do not use old and new batteries or batteries of different types at the same time.- Read and follow all warnings and instructions provided by the manufacturer.- Batteries cannot be short-circuited or disassembled.- Do not put batteries into a fire or apply direct heat to them. - Do not attempt to insert batteries upside down or backwards.- Batteries are prone to leakage when fully discharged. To avoid damage to the product, be sure to remove batteries when the product is not used for a long time or when batteries run out of charge.- Should liquid from the batteries come into contact with skin or clothing, rinseimmediately with fresh water.LCD PanelTrigger (Flash) + Focus (Camera) --Red:Trigger (Flash) + Shutter (Camera)3 4Cord JackPort17693LCD Panel(1) Multi Groups Display1. Channel (32)2. Camera Connection3. Modeling Lamp Master Control4. High-Speed/Rear Curtain Sync5. Sound6. Battery Level Indication7. Group8. Mode9. Power 10. Group’s Modeling Lamp 11. ZOOM Value 12. Icons of Function Button 13. C.Fn Menu 14. Version(4) Multi Groups’ ZOOMDisplay(2) Single Group Display(3) MenuInstalling BatteriesAs shown in the illustration, slide the batterycompartment lid of the flash trigger and insert two AA batteries separately.Battery IndicationCheck the battery level indication on the LCD panel to see the remaining battery level during the usage.AA alkaline batteries are recommended.Battery Level Indication 3 grids2 grids 1 grid Blank grid BlinkingMeaning Full Middle LowLow battery, please replace it.< 2.5V The battery level is going to be used out immediately (please replace new batteries, as low power leads to no flash or flash missing incase of long distance).1. As a Wireless Camera Flash Trigger Take TT685C as an example:1.1 Turn off the camera and mount the transmitter on camera hotshoe. Then, power on the flash trigger and the camera.Using the Flash TriggerThe battery indication only refers to AA alkaline batteries. As the voltage of Ni-MH battery tends to be low, please do not refer to this chart.1.2 Long press the <Zm/CH> button to setchannel, group, mode and parameters (refersto the contents of “Setting the Flash Trigger”).1.3 Turn on the camera flash, press thewireless setting button and the wirelessicon and <SLAVE> slave unit icon will bedisplayed on the LCD panel. Press the <CH>button to set the same channel to the flashtrigger, and press the <Gr> button to set thesame group to the flash trigger (Note: please refer to the relevant instruction manual whensetting the camera flashes of other models).1.4 Press the camera shutter to trigger and the status lamp of the flash triggerturns red synchronously.2. As a Wireless Outdoor Flash TriggerTake AD600B as an example:2.1Turn off the camera and mount thetransmitter on camera hotshoe. Then,power on the flash trigger and thecamera.2.2Long press the <Zm/CH> button to setchannel, group, mode and parameters(refers to the contents of “Setting theFlash Trigger”).2.3 Power on the outdoor flash and press the wireless setting button and thewireless icon will be displayed on the LCD panel. Long press the3. As a Wireless Original Flash TriggerTake 600EX-RT as an example:3.1Turn off the camera and mount the transmitteron camera hotshoe. Then, power on the flashtrigger and the camera.3.2Long press the <Zm/CH> button to set channel,group, mode and parameters (refers to thecontents of “Setting the Flash Trigger”).3.3Attach the original flash to the X1R-C receiver.Press the <CH> button on the receiver to setthe same channel to the flash trigger, and pressthe <Gr> button to set the same group to theflash trigger (Note: please refer to the relevantinstruction manual when setting the originalcamera flashes).3.4 Press the camera shutter to trigger. And thestatus lamp of the camera flash and the flashtrigger both turn red synchronously.< >< >< >< ><GR/CH> button to set the same channel to the flash trigger, and short pressthe < GR/CH> button to set the same group to the flash trigger (Note: pleaserefer to the relevant instruction manual when setting the oudoor flashes of othermodels).2.4 Press the camera shutter to trigger and the status lamp of the flash trigger turnsred synchronously.power it on. Synchronously press down the <G R/CH > button and <S1/S2>button and the wireless icon will be displayed on the LCD panel. Long press the <GR/CH > button to set the same channel to the flash trigger, and short press the < GR/CH > button to set the same group to the flash trigger (Note: please refer to the relevant instruction manual when setting the studio flashes of other models). 4.4 Press the camera shutter to trigger. And thestatus lamp of the camera flash and the flash trigger both turn red synchronously.Note: As the studio flash’s minimum output value is1/32, the output value of the flash trigger should be set to or over 1/32. As the studio flash do not have TTL and stroboscopic functions, the flash trigger should be set to M mode in triggering.5. As a Wireless Shutter Release Trigger Operation method:5.1 Turn off the camera. Take a camera remotecable and insert one end into the camera’s shutter socket and the other end to theshutter release port of X1R-C to connect. Power on the camera and the receiver.5.2 Long press the <Zm/CH > button to set channel, group, mode and parameters (refers to the contents of “Setting the Flash Trigger”).5.3 Press the receiver’s <CH > button to set the same channel to the flash trigger, and press the <Gr > button to set the same group to the flash trigger.5.4 Half press the button to focus and full press the <TEST > button to shoot. Release the button until the status lamp turns to red.Using the Flash Trigger< >Slide the Power Switch to ON, and the device is on and status indicator lamp will not reveal.Note: In order to avoid power consumption, turn off the transmitter when not in use.Power Switch1. The system will automatically enter standby mode after stop operating the transmitter over 90 seconds. And the displays on the LCD panel disappear now.2. Press any button to wake up. If the flash trigger is attached to the hot shoe of CANON EOS camera, half press the camera shutter can also wake the system up.Note: If do not want to enter power saving mode, press the <MENU> button to enter C.Fn custom settings and set STBY to OFF.Automatically Enter Power Saving ModeSlide the AF-assist beam switch to ON , and the AF lighting is allowed to output.When the camera cannot focus, the AF assist beam will turn on; when the camera can focus, the AF assist beam will turn off.Power Switch of AF Assist BeamChannel Setting1. Long press the <Zm/CH > button and the channel value will be chosen.2. Turn the select dial to choose the appropriate channel. Press the <SET > button again to confirm the setting.3. This flash trigger contains 32 channels which can be changed from 1 to 32. Set the transmitter and the receiver to the same channel before usage.6. As a Flash Trigger with 2.5mm Sync Cord Jack Operation method:6.1 The connection method please refers to thecontents of “As a Wireless Studio Flash Trigger” and “As a Wireless Shutter Release”.6.2 Press the shutter normally and the flashes will be controlled by sync cord jack’s signal.Change the wireless channels and wireless ID to avoid interference for it can only be triggered after the wireless IDs and channels of the master unit and the slave unit are set to the same.Press the <MENU> button to enter C.Fn ID. Press the <SET> button to choose OFF channel expansion shutdown, and choose any figure from 01 to 99.Note: As the current Godox flashes do not have wireless ID setting functions, please set ID to OFF. Wireless ID SettingsMode Setting Switch between multi-group and one-group mode: choose a group in multi-group mode and press the <TCM> button to magnify it to one-group mode. Then, press the <TCM> button to back to multi-group.Magnification FunctionOutput Value Settings1. Short press the <MODE> button, and the mode of thecurrent group will change.2. Set the groups to five groups (A-E)2.1When displaying multiple groups, press the <MODE> button to switch the multi-group mode to MULTI mode. Press the group selection button can set the MULTImode to ON or OFF.2.2When displaying multiple groups, press the groupselection button or <MODE> button in one-groupmode, and all the current group’s mode will bechanged by the order of TTL/M/--.3. When setting the group to 16 groups (0-F), there is only manual mode M.4. Long press the <MODE> button for 2 seconds until“LOCKED” is displayed on the bottom of the LCD panel, which means the screen is locked and no parameters can be set. Long press the <MODE> button again to unlock.1. Multi-group displays in the M mode1.1Press the group button to choose the group, turn the select dial, and the power output value will change from Min to 1/1 in 0.3 stop increments. Press the<SET> button to confirm the setting.1.2Press <ALL> button to choose all groups’ power output value, turn the select dial, and all groups’ power output value will change from Min to 1/1 in 0.3 stop increments. Press <ALL> button again to confirm the setting.2. One-group displays in the M modeTurn the select dial and the group’s power output value will change from Min to 1/1 in 0.3 stop increments.Note: Min. refers to the minimum value that can be set in M or Multi mode. The minimum value can be set to 1/128 or 1/256 according to C.Fn-Min. For most of camera flashes, the minimum output value is 1/128 and cannot be set to 1/256. However, the value can change to 1/256 when using in combination with Godox strong power flashes e.g. AD600, etc.Modeling Lamp Settings1. Multi-group displays in the TTL mode1.1 Press the group button to choose the group, turn the select dial, and the FEC value will change from -3 to ~3 in 0.3 stop increments. Press the <SET > button to confirm the setting.1.2 Press <ALL > button to choose all groups’ FEC value, turn the select dial, and all groups’ FEC value will change from -3 to ~3 in 0.3 stop increments. Press <ALL > button again to confirm the setting.2. One-group displays in the TTL modeTurn the select dial and the group’s power output value will change from -3 to ~3 in 0.3 stop increments.1. When displaying multiple groups, press the <MOD > button to control the ON/OFF of the modeling lamp.2. Press the group button to choose the group when displaying multiple groups or when displaying one-group, press the <MOD > button to control the ON/OFF of the modeling lamp (note: The models that can use one- group to ON/OFF the modeling lamp are as follows: GSII, SKII, QSII, QDII, DEII, DPII series, etc. The outdoor flash AD200 and AD600 can use this functionafter upgrade. The new arrivals with modeling lamps can also use this function.).Flash Exposure Compensation Settings1. In the multi flash (TTL and M icon are not displayed).2. The three lines are separately displayed as power output value, Times(flash times) and Hz (flash frequency).3. Turn the Select Dial to change the power output value from Min. to 1/4 in integer stops.4. Short press the Times button can change flash times. Turn the select dial to change the setting value.5. Short press the Hz button can change flash frequency. Turn the select dial to change the setting value.Multi Flash Settings (Output Value, Times and Frequency)6. Until all the amounts are set. Or during any value setting, short press the <MODE > button to exit the setting status. No values will blink.7. In the multi flash setting submenu, short press the <MODE > button to return to main menu when no values are blinking.Note: As flash times are restricted by flash output value and flash frequency, the flashtimes cannot surpass the upper value that permitted by the system.The times that transported to the receiver end are a real flash time, which is alsorelated to the camera’s shutter setting.1.High-speed sync: press the <SYNC > button and is displayed on the LCD panel.2. Second-curtain sync: press the <SYNC > button and is displayed on the LCD panel.Shutter Sync SettingsPress the <MENU > button to enter C.Fn BEEP and press the <SET > button. Choose ON to turn on the BEEP while OFF to turn off it. Press the <MENU > button again to back to the main menu.Buzz Settings1.Press the <MENU > button to enter C.Fn SYNC andpress the <SET > button to choose IN or OUT. Press the <MENU > button again to back to the main menu. 1.1 When choosing IN, this sync socket will enable XProC to trigger flash.1.2 When choosing OUT, this sync socket will send trigger signals to trigger other remote control and flash.Sync Socket SettingsTCM transform function is a particular function that owned by Godox: TTL flash value transform into power output value in M mode.1.1 Set the flash trigger to TTL mode and attach it to the camera. Press the shutter for shooting.1.2 Long press the <TCM > button, and the flash value in TTL mode will transform into power output value in M mode (The displayed minimum value is the set Min. value).1.3 Please refer to the C.Fn setting custom functions to see the flash models which are compatible with TCM functions.Note: Please choose the relevant models in TCM function in C.Fn custom settings according to your own flash.TCM FunctionZOOM Value SettingsShort press the <Zm/CH > button and the ZOOM value will be displayed on the LCD panel. Choose the group and turn the select dial, and the ZOOM value will change from AUTO/24 to 200. Choose the desired value and long press the <Zm/CH > button again to back to the main menu.Note: The flash’s ZOOM should be set to Auto (A) mode before responding.The following table lists the available and unavailable custom functions of this flash.C.Fn: Setting Custom FunctionsSHOOT Function SettingsPress the <MENU > button to enter C.Fn SHOOT. Press the <SET > button to choose one-shoot or multi-shoots, and press the <MENU > button again to back to the main menu.One-shoot: When shooting, choose one-shoot. In the M and Multi mode, the master unit only sends triggering signals to the slave unit, which is suitable for one person photography for the advantage of power saving.Multi-shoots: When shooting, choose multi-shoots, and the master unit will send parameters and triggering signals to the slave unit, which is suitable for multi person photography. However, this function consumes power quickly.APP: Only send triggering signal when camera is shooting (control the flash's parameters by smartphone APP).Compatible Flash ModelsReceiver --X1R-C XTR-16 XTR-16S FlashAD600 series/AD360II series/AD200/V860II series/V850II/TT685 seriesTT600/TT350CQuickerII series/QTII/SK II seriesDP II series/GSII600EX-RT/580EXII/580EX/430EXIIV860CAD360/AR400Quicker series/SK series/DP series/GT/GS series/Smart flash seriesV860CV850NoteAs there are so many camera flashes inthe market which are compatible withCanon speedlites, we do not test one by one.The flashes with Godox wireless USB portC an only be triggeredTransmitterXProCNote: The range of support functions: the functions that are both owned by XProC and flash.The relationship of XT wireless system and X1 wireless system:1Dx Mark II 1Dx 5Ds/5Dsr 5DⅣ 5D Mark III 5D Mark II5D7D Mark II 7D6D80D70D60D50D40D30D750D/760D 700D 650D 600D 550D500D 450D 400D Digital 350D DIGITAL 100D 1200D 1000D 1100D M5 M31. This table only lists the tested camera models, not all Canon EOS series cameras. For the compatibility of other camera models, a self-test is recommended.2. Rights to modify this table are retained.3. The cameras which are released before 2012 do not have TTL mode in their D and E group.This flash trigger can be used on the following Canon EOS series camera models:Compatible Camera ModelsSynchronously press the two function button in the middle, and the restore factory settings are finished until the “RESET” is displayed on the LCD panel.and Power Switch is turned on. Check if the transmitter and the receiver are set to the same channel, if the hotshoe mount or connection cable is well connected, or if the flash triggers are set to the correct mode.2. Camera shoots but does not focus. Check if the focus mode of the camera or lens is set to MF. If so, set it to AF.3. Signal disturbance or shooting interference. Change a different channel on thedevice.4. Operating distance limited or flash missing. Check if batteries are exhausted. If so, change them.Avoid sudden drops. The device may fail to work after strong shocks, impacts, or excess stress.Keep dry. The product isn’t water-proof. Malfunction, rust, and corrosion may occur and go beyond repair if soaked in water or exposed to high humidity.Avoid sudden temperature changes. Condensation happens if suddentemperature changes such as the circumstance when taking the transceiver out of a building with higher temperature to outside in winter. Please put the transceiver in a handbag or plastic bag beforehand.Keep away from strong magnetic field. The strong static or magnetic fieldproduced by devices such as radio transmitters leads to malfunction.Caring for Flash TriggerFirmware UpgradeThis flash trigger supports firmware upgrade through the Type-CUSB port. Update。
闪光灯使用入门
闪光灯使用入门根据“佳能EOS相机闪光摄影”的章节,本文分为三个部分。
如需转载,请保留以下信息。
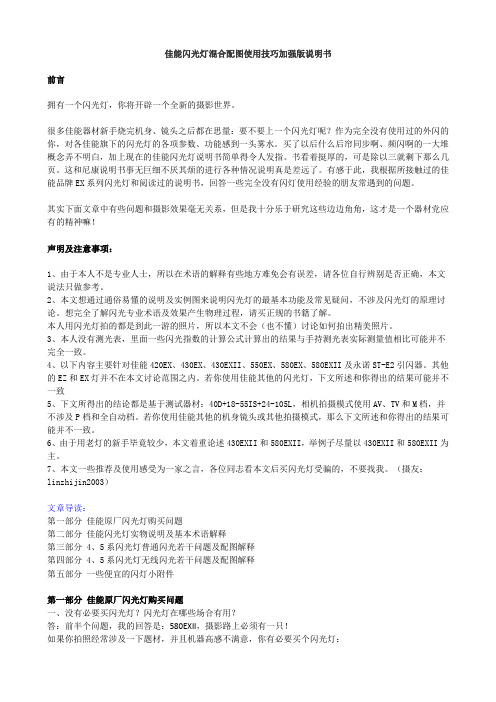
作者:李岩十个常见的EOS闪光灯问题:(1) 我的相机已经有内置的闪光灯,我还需要一个外置的吗?如果需要的话,我该选择哪一种?『笔记』:内置闪光灯发出的光线十分生硬,而外置闪光灯允许你利用墙壁、天花板或所附的柔光散光板使光线柔化。
最重要的是,你可以利用延长连线或无线技术使外置闪光灯与相机分离,因为机顶闪光灯会产生不自然的正面光线。
〖心得〗:直射的光线生硬,反射闪光的光线柔和自然,根据需要选用不同的照射方式。
(2) 我对自己的闪光摄影照片不满意,光线总显得生硬和不讨人喜欢。
『笔记』:你什么时候会看到现实世界是被发自你头部的光线所照亮的?除非你戴着采矿的头盔,否则难得一见。
光线通常来自高处的光源,如太阳、天花板灯光等。
〖心得〗:所以需要使用“反射闪光”,以获得更自然的光线。
(3) 我的朋友是否中了魔法?他们的眼睛发出恐怖的红光!『笔记』:因为闪光灯发出的光被眼睛视网膜上的红色血管直接反射回照相机。
减少红眼现象的最简单办法就是用外置闪光灯代替内置的闪光灯。
〖心得〗:使闪光灯远离镜头光轴并使用“防红眼”功能,可减轻或消除红眼。
在大多数相机上,“防红眼”功能以一个小眼睛形状的图标指示,拍照时,它会使闪光灯预闪几次,使人眼适应强光后,再发出有效的闪光。
(4) 我拍摄的闪光照片底部会出现弧形的阴影。
『笔记』:你使用照相机的内置闪光灯,同时又使用了非常大的镜头,或者带有大型遮光罩的镜头。
要么是有东西遮挡了内置闪光灯的光线。
〖心得〗:大多情况下,使用外置闪光灯或摘下遮光罩可解决问题。
(5) 我用闪光灯连拍了两张照片,但是第二张很暗。
『笔记』:所有闪光灯在每次闪光之间都需要几秒钟的时间充电。
〖心得〗:在电池电量不足或使用劣质电池的时候,这种现象尤其明显。
这会使连拍中除了第一张之外的其他照片非常暗(闪光灯没有发出闪光),使用充电电池或减少连拍次数可解决问题。
CAM-430使用手册V2.0.0教程

5.1 基本操作 ....................................................................................................... 12 5.1.1 查看视音频输入状态 ................................................................................................ 12 5.1.2 测试 3G 信号强度 ...................................................................................................... 13 5.1.3 设置服务器 IP ........................................................................................................... 14
第四章 菜单................................................................................................... 8
1
CAM-430 用户手册
4.1 开机界面 ......................................................................................................... 8
佳能闪光灯混合配图使用技巧加强版说明书
佳能闪光灯混合配图使用技巧加强版说明书前言拥有一个闪光灯,你将开辟一个全新的摄影世界。
很多佳能器材新手烧完机身、镜头之后都在思量:要不要上一个闪光灯呢?作为完全没有使用过的外闪的你,对各佳能旗下的闪光灯的各项参数、功能感到一头雾水。
买了以后什么后帘同步啊、频闪啊的一大堆概念弄不明白,加上现在的佳能闪光灯说明书简单得令人发指。
书看着挺厚的,可是除以三就剩下那么几页。
这和尼康说明书事无巨细不厌其烦的进行各种情况说明真是差远了。
有感于此,我根据所接触过的佳能品牌EX系列闪光灯和阅读过的说明书,回答一些完全没有闪灯使用经验的朋友常遇到的问题。
其实下面文章中有些问题和摄影效果毫无关系,但是我十分乐于研究这些边边角角,这才是一个器材党应有的精神嘛!声明及注意事项:1、由于本人不是专业人士,所以在术语的解释有些地方难免会有误差,请各位自行辨别是否正确,本文说法只做参考。
2、本文想通过通俗易懂的说明及实例图来说明闪光灯的最基本功能及常见疑问,不涉及闪光灯的原理讨论。
想完全了解闪光专业术语及效果产生物理过程,请买正规的书籍了解。
本人用闪光灯拍的都是到此一游的照片,所以本文不会(也不懂)讨论如何拍出精美照片。
3、本人没有测光表,里面一些闪光指数的计算公式计算出的结果与手持测光表实际测量值相比可能并不完全一致。
4、以下内容主要针对佳能420EX、430EX、430EXII、550EX、580EX、580EXII及永诺ST-E2引闪器。
其他的EZ和EX灯并不在本文讨论范围之内。
若你使用佳能其他的闪光灯,下文所述和你得出的结果可能并不一致5、下文所得出的结论都是基于测试器材:40D+18-55IS+24-105L,相机拍摄模式使用AV、TV和M档,并不涉及P档和全自动档。
若你使用佳能其他的机身镜头或其他拍摄模式,那么下文所述和你得出的结果可能并不一致。
6、由于用老灯的新手毕竟较少,本文着重论述430EXII和580EXII,举例子尽量以430EXII和580EXII为主。
King佳能中文说明书

causes. Normal working operations should not be affected by this. 1
Function
Support EV Support FE lock Support camera group setting Support flash group setting on transmitter Support High speed sync for studio and outdoor light Support well known brand flashes for High speed sync and TTL. (Metz, Sigma, Sunpak, Nissin) Support well known brand flashes for trigger. (Does not support high speed sync and TTL flash) Support multi receiver control Support flash focusing light Can set flash mode for flashgun via camera, such as ETTL, M mode. Support for Canon wireless flash system Support flashes using mixed modes, such as E-TTL and M together Can set flash output power for flashgun via camera, such as under ETTL mode, can set 3 levels of +/- EV.Under M mode, can 1/1 to 1/128 in 23 levels. Can set shutter sync mode for flashgun via camera, such as 1st curtain, 2nd curtain and high speed sync. Can set zoom mode for flashgun via camera. Support for bracket exposure Can set communication channel and group flash for King Transmitter via camera. Can set flash light output ratio via camera. Can set flash mode, output ratio, focal length directly on flash. (But cannot set exposure compensation, FEB compensation on flash.When you set different mode on flash, flash on camera menu settings must be under ETTL mode.) All King products support online firmware upgrade. Follow camera instructions for above usage. Transmitter's hot shoe is NOT used for flashgun
佳能380EX闪光灯简介.doc
380EX 闪光灯简介佳能 Speedlite 380EX 闪光灯是配合EOS50(Elan II)和 EOS50e( Elan IIe)而推出的一支新型闪光灯. 它提供了几项实用的功能, 包括可变灯头角度, 涵盖24- 105mm自动变焦, 高达1/4000秒的全速同步, 待机90秒自动关机。
本文假设读者对50相机已经很了解。
它是强大的还不错的102英尺指数(ISO 100,50mm时). 回电时间长了一些: 4节新的AA电池也要用20秒回电时间.它是弱小的快门速度小于1/125秒可全功率输出. 超过1/125秒, 它靠快门间隙在移动时发出频闪来达到同步的目的. 这样会影响闪光指数快门速度达到1/4000秒时指数下降为14. 但这样小的指数也足以凝固动体.它是多面手你可以把闪光灯装在热靴上、打开开关、把相机设到某个傻瓜模式上就可以开始拍摄了。
You'll get that deer in the headlight look you can get with a $20 disposable, 但至少看起来很专业。
另一方面,还可以选择Av (光圈优先) 或 Tv (快门优先) 模式, 这时闪光灯可以用来补光。
在 Av 模式时的快门速度 (或在 Tv 模式下的光圈) 由相机根据你确定的光圈(或快门)自动设置使背景正确曝光。
闪光灯能根据前景的正确曝光需要点亮足够长的时间后熄灭。
在相机背后的 AE(自动曝光)锁按钮也可以用来锁定闪光曝光,一旦按下此按钮,闪光灯发出一束短的预闪,曝光量就被测得并保持16秒。
如果你想改变背景的曝光量,只要简单的先按下闪光曝光锁,然后根据背景要亮一点还是暗一点的需要再用机背上的拇指拨盘调整曝光补偿即可。
有后帘幕同步功能,如果该功能打开,确实好用。
该灯还带有一个强劲的AF辅助灯,虽然他只能由中心对焦点使用,但可以达到30英尺的作用范围。
它是傻瓜的如果闪光量足够,机背后的绿灯会点亮两秒钟。