NSF-PROD-ADS-V4.5-M系列用户使用手册
西盟冻干机用户手册及说明

4
泵按钮
-只用于手动控制,运行真空泵。
5
通风按钮
-用于自动和手动控制,释放真空。
6
除霜按钮
-用于自动和手动控制,除去冷阱中的霜冻。
7
温度仪表
-显示冷阱中的温度。
8
真空仪表
-显示真空压力。
5.操作流程
5.1.手动模式试样干燥之前 Nhomakorabea1)顺时针旋转琴键开关90度,调整到开的位置。
序号
按钮的名称
控制
1
琴键开关
关闭时,所有的功能停止。
启动时,所有的功能运行。
2
制冷按钮
使用这一功能键可以使冰箱的制冷系统运转。
3
旋转按钮
使用这一功能键可以让转筒机械装置开始旋转
4
温度仪表
显示制冷器的温度
5.3.2如何操作筒式
1)顺时针旋转琴键开关90度,调整到开的位置。
2)现在,你可以运行所有的功能。按下(2)REF。制冷按钮,制冷系统会立即启动,槽的温度回显示在按钮(4)TEMP.GAUGE-温度仪表上。
8)按下按钮(4)PUMP泵按钮,泵发光二级管就会熄灭,真空泵会停止工作。
9)按下按钮(5)VENT通风按钮,通风发光二级管就会熄灭,腔室内的真空状态和真空阀由自动阀释放。(在关闭真空装置时,会听到一点点噪音)
10)彻底释放完毕后,再按下按钮(5)进入下一个干燥处理过程。通风发光二级管就会发光并且自动阀门会关闭。
5.3.2.预冷装置的操作流程
6.附件
6.1.真空泵
6.1.1.部件的参数(型号:VP8951,VP8920)
6.1.2.换油频率和如何换油
6.1.3.如何换排气过滤器的元件和换的周期
德斯兰移动式说明书、德斯兰空压机说明书

V
防腐油脂 防锈剂 柴油 蓄电池电解液 避免摄取、皮肤接触、吸入排烟。 若压缩机润滑油不慎入眼,用清水冲洗眼睛 5 分钟。 若皮肤溅上压缩机润滑油,立即用水洗净。 若不慎摄入大量压缩机润滑油,须就医诊治。 若不慎吸入压缩机润滑油,须就医诊治。 若患者神志不清或发生痉挛,不要使用流质或诱吐剂。 有关压缩机和柴油机润滑油的安全数据,可向润滑油供应商查询。 当本机组处于通风不良的建筑中时,不要对发动机进行任何操作。操作机组或在机组附近 时,注意不要吸入排烟。 本机组包含诸如润滑油、柴油、防冻剂、刹车灰尘、油/气分离和电池等材料,在对机组进 行维护保养时注意对这些材料的正确处理。具体事宜请咨询当地政府部门。 蓄电池 蓄电池含有硫酸并可产生强腐蚀性、易爆气体。避免与皮肤、眼部和衣物接触。若不慎触 到,立即用水冲洗。 不要企图启动一个已被冰冻的蓄电池,因为这样可能导致爆炸。 当以备用蓄电池启动机组时,必须确保极性连接正确且连接方式可靠。 散热器 柴油机炙热的冷却剂和蒸汽可能导致严重的人身伤害。打开散热器注水盖时,保持小心谨
有关的事故防范规则公认的安全法规国家法规本系列机器和机组必须在完善的技术条件下使用必须根据操作手册规定的使用范围和指南进行使用使用人员必须有安全意识能充分认识操作机器中存在的危险
操作维修说明书
OPERATING & MAINTENANCE MANUAL
0080CY-7/7,0080CY-5/10, 0100CY-10/7,0100CY-8/10,0100CY-7/13, 0125CY-12/7,0125CY-10/10,0125CY-8/13,
高速旋转的风扇叶片会造成严重的人身伤害。当风扇网罩不在位时,不要进行任何操作。
(完整word版)FDS5用户指南(自译非完整版)

目录第一部分运行FDS (1)第一章绪论 (1)1.1 FDS的特征 (1)1.2 FDS5中增加的内容 (3)第二章开始 (4)第三章运行FDS (5)3。
1 开始一个FDS计算 (5)3。
1.1 开始一个FDS运算(单个处理器版本) (6)3.2 模拟过程 (7)4.1 版本编号 (8)第二部分 (9)第五章一个输入文件夹的基本结构 (9)5.1 为任务命名 (9)5。
2 命名格式 (9)5。
3 输入文件夹的结构 (11)第六章设置时间和空间界限 (14)6.1 为任务命名:HEAD名称列表组(表13.6) (14)6.2 模拟时间:TIME命名列表组(表13。
24) (14)6。
3 计算的网格:MESH名称组(表13.11) (16)6.4 混杂参数 MISC名称列表组(13。
12表) (17)1第七章建立模型 (18)7。
1 创造障碍:OBST名称系列组(表13。
13) (18)7.2 创建空间:HOLE命名系列组(表13.7) (21)7。
3 应用表面性质:VENT组(表13。
27) (23)第八章边界条件 (23)8。
1 基础 (23)8.2 描述边界曲面:SURF名称组(表格13。
22) (24)8.2.1 用一个已知的热量释放率来指定一个火灾 (25)8.2.2 简单的热力学边界条件 (25)8。
4 描述真实的材料:MATL名称组 (26)8.4.1 热力学性质 (27)8.4。
2 高温分解模型 (28)8.4。
5特殊专题:使燃料消失(BURN_AWAY) (35)8.5 用户指定的功能:RAMP和TABL名称组 (36)第九章燃烧与辐射 (38)9。
1 混合分数燃烧:REAC名称系列组 (38)9.1.2特殊专题:Heat of Combustion (40)9。
1.4特殊专题:CO产量 (40)9。
2额外气体类别:SPEC组 (41)第十章粒子和小滴:PART名称系列组 (43)10.1 基础 (44)10.2 控制微粒和液滴 (44)210.3 微粒和液滴性质 (46)10。
ADS软件的使用手册编写及应用_1_
ADS软件的使⽤⼿册编写及应⽤_1_ADS软件的使⽤⼿册编写及应⽤⼀.关于ADS软件⼀)ADS中的projects当⽤户对ADS中的designs进⾏建⽴,模拟和分析以完成设计任务时,将会产⽣⼀定量的数据,⽽projects正是对这些数据进⾏⾃动的组织和存储。
⼀个project包括:电路(circuit),版⾯(layout),模拟(simulation),分析(analysis)以及由于⽤户建⽴的designs和projects之间的连结⽽产⽣的designs的输出信息。
使⽤ADS的主窗⼝可以建⽴或打开projects。
当⽤户登陆ADS时,主窗⼝将被打开。
⼆)ADS中的designsADS中的designs是⽤来存储⽤户为完成设计任务⽽⽣成的原理图及版⾯设计信息。
⼀个designs包括:⼀个单独的原理图或电路图,或者包括若⼲原理图或电路图嵌⼊式的包含于⼀个单独的design中。
所有的designs都可以直接从主窗⼝打开或者从design窗⼝打开。
在⼀个design窗⼝中,⽤户可以做以下事情:建⽴或修改电路图和布线图增加变量和等式配置电路元件和模拟控制器制定版⾯,选择参数添加注释以及例证从电路中产⽣版⾯(版⾯中产⽣电路图)三)ADS中的模拟ADS软件提供模拟控制器功能,以便⽤户可以添加或配置模拟来测试⽤户的设计。
对于DSP设计来说,当⼀个模拟/射频设计仿真需要⼀个或多个不同的控制器时,就需要⼀个数据流控制器。
⽤户可以⾃⼰添加合适的控制器,也可以插⼊⼀个包含合适控制器的模板(template)。
模拟控制器的分类:1.数据流控制器:在使⽤Agilent Ptolemy模拟器时,⽤来控制混合同步数字信号来进⾏数字信号处理。
适⽤于所有的DSP设计。
2.DC :是射频/模拟电路设计模拟的基本控制器,提供拓扑检测和直流分析的功能。
适⽤于所有的射频/模拟设计。
3.AC:获得⼩信号转换参数,如电压增益,电流增益,线性电压或电流噪声。
Smart Ads插件用户指南说明书

User Guide for MerchantsContentsW HAT I S S MART A DS P LUGIN? (3)S tep 1 – D ownload S mart A ds (6)S tep 2 – R egister (7)S tep 3 – E dit p lugin s ettings (8)YOUR C REDENTIALS (8)SETTINGS F OR O PT I N (8)I w ant m y c ustomers t o o pt i n (8)I o pt i n m y c ustomers (8)REWARDS (10)BRAND A DVERTISEMENT (11)Step 1: T urn b rand a dvertisement o n (11)Step 2: S elect t he b rands y ou p refer t o w ork w ith (11)Step 3: S elect t he b est p ositions i n y our s tore f or a ds (11)EMAIL A UTOMATION (16)CONTACT U S (17)SMART A DS I N T HE E YES O F Y OUR C USTOMERS (18)Step 1: L ogin (18)Step 2: S elect S mart R ewards (18)Step 3: G et d etailed S mart R ewards p rogram i nformation (19)Step 4: E njoy r ewards w ith e very p urchase (21)PORTAL: C reate r ewards (23)PORTAL: C reate E mail C ampaigns (25)PORTAL: C reate E mail T emplates (28)A bout (32)WHAT IS SMART ADS PLUGIN?Smart Engine's Smart Ads plugin is based on an award-‐winning cloud-‐based ad platform that enables merchants, brands, and advertisers to deliver relevant ads and offers to consumers through their eCommerce site, eCommerce checkout, mobile payment platform, and POS/mPOS.As a Magento merchant, you can monetize your webshop, enhance client interaction through email marketing, reward loyal customers, and get paid by premium brands for promotion.Competing with the Amazons of the world isn’t easy but not impossible either. Successful online marketing today depends on timely, relevant ads – creating a personalized customer experience. Satisfied customers are more loyal and generate 30% more sales. Rewards and promotions make them feel special. Loyalty points when shopping with you or special promotions on their birthday are just two examples of how to strengthen customer relationships that have proved successful time and again.An easy solutionThe Smart Ads plugin for Magento offers a powerful reward program, top brand advertising, and email marketing options to monetize your eCommerce site. The positive impact is reflected by:Ø 30% more sales from loyal customersØ 3x better conversion rates with audience targetingØ 20% revenue increase from brand advertisingThe Smart Ads plugin offers you a combination of a powerful rewards program and brands advertising to monetize your eCommerce site.We believe that successful online marketing directly relates to timely and relevant ads. It is all about the personalized customer experience. Satisfied customers are more loyal and generate 30% more sales. Rewards and promotions make them feel special. Offer them to collect loyaltypoints when they shop with you or send them special promotions on their birthday – this will make them come back and stay.You decide to monetize your shop with brand advertising but you don’t have the time and skills to do it? We do it for you. You select the brands you prefer and the best position in your store – landing page, catalog page, product detailed page, top banners, footer – you have the choice. We collect your preferred brand ads and select the most relevant for each visitor in real time utilizing latest machine learning technologies. Our programmatic ads exchange provides up to 3 times better conversion than other ads platforms. It accelerates your shop’s customer experience and creates more loyalty. This competitive advantage directly translates into premium income for you!By using our plug-‐in, you will realize:• 30% more sales from loyal customers• 3 times better conversion rates with audience targeting• 20% revenue increase from brands advertisingThe Rewards componentWe provide you with a solid rewards solution with all functions you need to boost loyalty and retention. You do not have to choose between multiple functionality packages and sophisticated pricing scheme, just to find out that you are being charged for functionality with you never need or you have to become marketing professional or IT geek to be able to use it. Loyalty and rewards only works when it is simple, easy and transparent – for you and for your customers. Based on our years of experience in this field we put together a package for you with includes everything you and your customers will need.Simply use the following features by just a few clicks:-‐Points rewards-‐Welcome offer-‐Earn points offer-‐Redeem points offer-‐Special promotions-‐Audience TargetingPerformance dashboardSmart Ads provides powerful reporting that allows you to view powerful graphs and reports. You choose time ranges and data that you want to see in your reports and Smart Ads does the rest providing you with insights into your customer’s purchasing habits including their earned, bought, redeemed and gifted points.By encouraging customers to stick to your brand and rewarding them with points, for doing so, it’s an easy win-‐win situation for all parties involved. As per multiple studies and reports, 45% of users successfully convert into paying customers within the first minutes of visiting your shop.Brand advertising easy made for youOur SmartAds platform includes an advertising exchange for brand advertising. This makes our platform unique on the market and opens you the way to enter the next level of marketing. Brand Advertising is the key monetization component that is typically available only for big online retailers as the certain reach necessary to make an advertising play work.Before Smart Ads, brand advertising was a premium service for big online retailers with millions of monthly visitors that could afford big upfront investment into agency and technical set up. It’s not a secret that big brands and advertisers are looking to cooperate with shops with millions of monthly visitors. We make it affordable to every Magento merchant.You select the brands you prefer and the best position in your store – landing page, catalog page, product detailed page, top banners, footer at Smart Ads admin page and send us email with your confirmation to allow brand advertising. We collect the brands and agree with you on advertising start time.You receive premium income from brands and provide your customers with personalized experience to discover new products, easily find products they like and buy them.Step 1 – Download Smart AdsTo enjoy Smart Ads, download the extension on the Magento Marketplace.To install Smart Ads, please follow this 3 steps:-‐Step 1: Download the extension in the Magento Marketplace-‐Step 2: Install the extension (like any other extensions) using Magento Web Setup Wizard -‐Step 3: Go to the Smart Ads Admin Page and start configure settingsContact us at ****************************** if you need help.Step 2 – RegisterTo start using Smart Ads, you should register with credentials that you especially define for this extension.Once you have downloaded the extension, you will be redirected to the Smart Ads dashboard where you can enter your username and your password. These credentials are specially defined for Smart Ads.Once you are registered and connected to the extension dashboard, you will be able to see and use all the features.Login for demo merchant:Username: ***************************Password: 123456Complete your company profile at https://smartengine.solutions/ecommerce/. Login with your credentials and fill in company profile information.After logging in with your plugin credentials, you will be redirected to the ‘Profile’ and ‘Finance’ tabs from the top navigation panel. Complete your registration and enjoy Smart Ads!Step 3 – Edit plugin settingsOnce you have downloaded the plugin and registered with your credentials, you can start editing your settings.YOUR CREDENTIALSIn this section you can see what user name and what password you are registered with. If you want to change your credentials, please go to the merchant portal.SETTINGS FOR OPT INThese are settings of your rewards program.I want my customers to opt inOpt – in is the active choice your customer has to make in order to take part in your rewards program. During the first purchase a pop up appears, where the customer needs to agree to Terms and Conditions of your rewards program.I opt in my customers+43 1 919 504 1 100 ****************************** Smart Ads User Guide for MerchantIf you want that your customers automatically take part to your program, you can choose this option. No opt-‐in is required from your customers. They enjoy your rewards program without any extra steps. This option is recommended if your customers already provided their consent to your loyalty activities or if there is no consent legally required at your region of operations.+43 1 919 504 1 100 Smart Ads User Guide****************************** REWARDSYou can create offers for your customers. Decide if you want to let them earn or spend points onyour whole brands or on a particular product. Offer them points for their birthday or to thankthem for their loyalty.Points rewards: You decide how many points are rewarded for money spent or product bought.Welcome offer: You decide what discount or points a customer earns when they sign up.Earn points offer: You decide whether customers can buy loyalty points for specific productor product category and for how much.Redeem points offer: You decide on your premium sales campaigns for your loyal customerswhere they can buy products by paying partially with points.Special promotions: You set special offers on a customer’s birthday or the ability to giftpoints to a friend or earn points for referring a friend when they join the program.Audience Targeting: You set up email campaigns for targeted audience with special promotions.Head over to https://smartengine.solutions/ecommerce/ to create rewards, get customer insightand performance reports.BRAND ADVERTISEMENTStep 1: Turn brand advertisement onWith Smart Ads, you are able to monetize your shop with brand advertising. All you have to do is to choose the brands you would like to work with, we will take care of the rest for you.You will receive income from brands and provide your customers with personalized experience to discover new products, easily find products they like and buy them.Step 2: Select the brands you prefer to work withIn this section you can define and select which brands you want to promote. Type the name in the field, click on add and the brand will appear in the field bellow. You can leave this section open, so that quality brands in your category can participate.Step 3: Select the best positions in your store for adsIn this section you can decide where you want to show the banners.Note, you can change your preferences any time by turning off a previously selected position for ads on your website. If you turn off ads’ position, no further ads will be shown on that position.Based on your preferences defined in this section, we will contact your selected brands and come back to you with the information about the brands that agreed to participate and timing of their ads and places from your selection where they would like to post their ads.If you choose to show banners on the home page:-‐Advertisers can capture your customer’s attention right when he / she starts his / her journey on your homepage at a premium price-‐Banners are shown for registered and non-‐registered users of Smart Ads plug-‐in-‐Mobile: 737 px x 360 px; format: jpg /png; file size: max 200KB-‐Desktop: 1240 px x 675 px, format: jpg /png; file size: max 200KBIf you choose to show banner on the catalog page:-‐Advertisers can bid their products up the catalogues and drive their brands visibility -‐Mobile: generated from existing product images-‐Desktop: generated from existing product imagesIf you choose to show banners on the product detailed page:-‐Advertisers can bid their products to be shown on the first X propositions in the product recommendation lists on the product detailed page and drive their brands visibility-‐Mobile: generated from existing product images-‐Desktop: generated from existing product imagesIf you choose to show banners on the success page top banner:-‐Advertisers can capture your customer’s attention at the end of the purchase process -‐Mobile: 737 px x 500 px; format: JPG, PNG, GIF, HTML5; File Size: Max. 100 kb.-‐Desktop: 600 x 500 px; format: JPG, PNG, GIF, HTML5; File Size: Max. 100 kb.If you choose to show banners on the success page banner:-‐Advertisers can capture your customer’s attention at the end of the purchase process. Up to 3 banners can be enabled-‐Mobile: 737 px x 300 px; format: JPG. File Size: Max. 100 kb.-‐Desktop: 600 x 300 px; format: JPG. File Size: Max. 100 kb.If you choose to show banners on the footer ad:-‐Advertisers can address specific audiences with dynamic banners based on Smart Ads analytics-‐Address specific audiences based on our data and insights-‐Mobile: 737 x 300 px; format: JPG. File Size: Max. 100 kb.-‐Desktop: 1240 x 130 px; format: JPG. File Size: Max. 100 kb.After any changes, do not forget to save your setting by clicking on the “Save Config” button in the right top corner. As soon as you saved it, we will get automatic notification of your choices and will start contacting brands.EMAIL AUTOMATIONThis block is displayed in the admin part of plugin below the ‘Brand Advertisement’ block in the ‘Smart Ads’ configuration page. If you select “I’d love to use email automation”, you will be able design beautiful email templates and send out automatic email campaigns based on the customer actions or lack of action in your webshop.If you select option “I opt-‐in my registered customers for email updates”, your registered customers that provided you with their valid email addresses, will be able to receive your email campaigns.If you select option “I let my shop visitors sign up for email updates”, your visitors will receive an automatic pop up inviting them to sign in for a newsletter.You can design the look and feel of the automatic pop up using the designer form below.CONTACT USDo you have a problem or do you want to get in touch? Confirm your intention to enable brand advertising by sending us a short email. Ask questions and provide us with any additional information, we will contact you as soon as possible.SMART ADS IN THE EYES OF YOUR CUSTOMERSAs a merchant, you can see how the extension looks like for your customers.•For Magento Quality Assurance Tester, please use these credentials: Username: *********************Password: **********************Please proceed as follow:Step 1: LoginTo test Smart Ads from a customer perspective, you can login with the credentials above.Step 2: Select Smart RewardsClick on “Smart Rewards” at the end of the list.Step 3: Get detailed Smart Rewards program informationIn this section you can have an overview of all the features of the Smart Rewards dashboard (see screenshots below).Your loyalty points: In this section, your customers will have a look at their points balance (screenshot 1).Invite your friends: Your customers can invite friends and get e.g. 5 points for each new registration. You can decide how many points you want to offer them for this offer. Customers can invite friends via e-‐mail or via Facebook (screenshot 1).Welcome Discount: You can offer your customers discount for their first purchase. They simply will redeem points during checkout (screenshot 1).Earn Loyalty Points: Every time your customers shop at your store, they will earn loyalty points. You can decide how many points for which purchase amount they will earn (screenshot 1).How to Spend Points: Your customer can spend their points as a real discount (screenshot 1).Earn points with these products: In this section you can choose on which products you want your customers to earn points (screenshot 2).Spend points with these products: In this section you can choose on which products you want your customers to spend points (screenshot 3).Need help? : If your customers have a problem with Smart Rewards, they can contact us any time (screenshot 4).+43 1 919 504 1 100******************************Smart Ads User Guide for MerchantScreenshot 1Screenshot 2Step 4: Enjoy rewards with every purchaseYour customer can choose which color and size they want to order.Screenshot 4Screenshot 3They then click on the cart picture and on …Go to check out“ to proceed to payment.PORTAL: Create rewardsTo complete the payment, customers click on …Place order“.Your customers choose shipping address and specify the shipping and payment method.Smart Ads signals them their points balance and let them choose how many points they want to redeem (e.g 7). The purchase amount will automatically be adjusted when they click on “Redeem points”.Create offers for your customers at merchant portal. After saving, offers appear at your customers’ personal page at your webshop.PORTAL: Create Email CampaignsCreate automated email campaigns for your customers at merchant portal. After saving, campaigns will be automatically sent out to all of your customers on annual basis and to some of your customers based on their actions or lack of actions that you specify as campaign triggers.The ‘Email Campaign’ grid is displayed in three blocks: ‘Customer Lifecycle’, ‘Shopping Cart’ and ‘Annual Campaign’.The email campaign dashboard is your main guide in creating and tracking successful email campaigns. It contains detailed tracking data on how your campaign performs: number of bounced emails, clicks, number of products added to a cart, number of purchases and total purchase amount resulted from a particular campaign.The left column shows three (3) campaign statuses: ‘Running’ – green arrow, ‘Stopped’ – red stop sign and ‘Ended’ – grey arrow.‘Customer Lifecycle’ campaigns are triggered when your customer: (1) registered, (2) subscribed for a newsletter, (3) has a birthday, (4) after X hours / days since your customer last login, (5) after your customer’s first purchase, (6) after your customer’s last purchase, (7) after your customer’s last time viewed product(s) on your website. You can define all or some of those 7 triggers while creating a campaign. You can specify after how many hours, days or even months your campaign shall be triggered after your customer made an eligibility action on your website or after your customer has been inactive on your website.‘Shopping cart” campaigns are triggered when your customer left a cart. You can decide to trigger a campaign only if some particular products are left at a cart, perhaps, because you are trying to sell them faster. Or you can trigger a campaign every time when any of the products are left. This campaign is truly tailored to your customer’s preferences, as it will show them the products they left with a special offer from you.‘Annual campaigns” are triggered at fixed dates of your choice every year. You are only limited with your imagination in specifying those annual events. Is it a Valentine’s day? A special offer day?PORTAL: Create Email TemplatesYour Email Template Creator provides beautiful designs with no coding required. This makes it particularly easy to manage content and layouts for all customers’ lifecycle events.You can access your template creator by clicking on your profile at the right top corner of the merchant portal or by editing your email campaign. After you complete your email template, it’s automatically available at email campaign creation step.To create a new template click on ‘Create Template’ button in the bottom left side of the grid.After saving the template it will be displayed in the list.You can choose to start by modifying our basic template, your previously created template or by creating a new template from scratch.Your Email Template Creator allows you to add and modify any part of your template without any programming effort. After clicking on “Edit” button, simply select a block you wish to edit – it will be highlighted by yellow. Click on “Pencil” button to edit or “Trash bin” button to delete.AboutSmart Engine is an international technology company with offices in New York, Vienna (Austria) and Hong Kong.Our platform, Smart Ads, is an award-‐winning cloud-‐based ad solution that enables merchants, brands, and advertisers to deliver relevant offers and messages to consumers through their eCommerce site, eCommerce checkout, mobile payment platform and POS /mPOS.With Smart Ads, Merchants can compete with the big players in online and offline shopping, significantly increase revenue and create a richer, more relevant customer experience.Do you have any questions? Do not hesitate to contact us:Smart Engine GmbHWienerbergstraße 111100 Wien -‐ AustriaTel: +43 1 919 504 1 100Mail: ******************************www.smartengine.solutions。
富士医疗干式激光相机4000说明书
FUJIFILM富士医疗干式激光相机DRYPIX4000操作手册第一版:2005年2月Fuji Photo Film Co., Ltd.(富士照相胶片有限公司)安全操作 1 产品总览 2 基本操作 3 效用 4 排除故障 5 保养和维护 6 规格7维护和检查软件许可协议实际运行DRYPIX 4000系统之前,请详细阅读本操作手册。
阅读本手册之后,请存放在DRYPIX 4000附近,以便需要时随时查看。
ii DRYPIX 4000操作手册897N0218 2005年2月介绍介绍非常感谢您购买富士医疗干式激光相机DRYPIX 4000。
富士医疗干式激光相机DRYPIX 4000是将数字图像数据以所选格式打印至专用胶片的设备,数字图像数据来自FCR图像阅读器或CT、MRI和其它成像设备,经DICOM网络传送。
本DRYPIX 4000操作手册提供操作方法和注意事项的详细解释,以便促进正确理解功能并且能够更有效地使用。
我们要求首次使用的用户在实际应用DRYPIX 4000之前,详细阅读本手册。
阅读之后,请将其存放在DRYPIX 4000附近,便于使用,以保证在最佳状态下使用该设备。
小心The DRYPIX 4000使用Vx Works。
Vx Works的版权属于Wind River Systems, Inc。
版权所有<禁止重新打印和/或复制部分或全部本手册。
>版权所有。
2005 富士照相胶片有限公司。
DRYPIX 4000操作手册897N0218 2005年2月iiiiv DRYPIX 4000操作手册897N0218 2005年2月内容浏览内容浏览第1章安全操作本章介绍我们希望您注意的安全操作本设备所需了解的警告(Warning)和小心(Caution)。
第2章产品总览本章介绍该设备的总览和主要特性。
第3章基本操作本章描述常规操作程序,包括如何启动/关闭该设备以及如何更换胶片盒。
第4章效用本章解释如何校准胶片输出密度和设置Economy Mode(经济模式)。
联创DSLAM网管电子工单系统操作说明
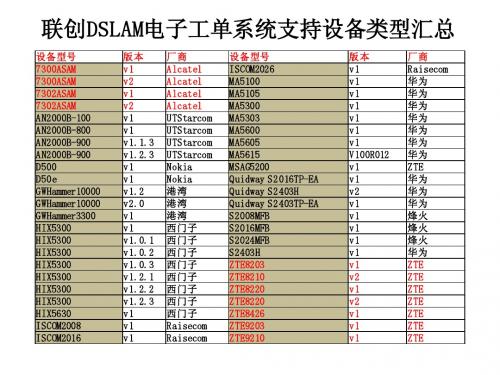
设备资源列表界面
• 设备资源列表:已加入了大部分DSLAM节点的信息,如需 对一个节点开通电子工单,建议先到设备资源列表里面根 据IP地址搜索,搜出后点“编辑”修改其关键信息,使其 满足开通电子工单配置条件,修改完毕后保存。 • 添加设备资源:若设备资源列表里面没有指定的设备,则 首先要添加设备资源,点击后出现对话框填写相关信息, 其中带有*号项必填,完毕后保存,如需修改,则可以在 设备资源列表里搜出该节点后编辑,因此建议添加设备时 信息一次填写规范。
• 浅蓝色代表正在重新激活的工单。重新激活并非立即执行, 根据系统繁忙程度不同而不同,此类工单一般需跟踪执行 结果。 • 深蓝色代表已选中该工单。 双击工单即可查看工单详情,对于红色失败工单下方会自动 标注执行失败原因,此时如需手工标记为失败则需要在界面 中填写操作说明,建议复制失败原因后标失败。
双击红色失败工单即可在下方查看失败原因,首先复制
打开后如图,注意录入信息规范
填选相应设备厂商、设备型号、MIB版本,注意此处慎重选择
打开后如图,注意录入信息规范
设备管理责任人帐号选择admin即可,读、写snmp字串均填public
打开后如图,注意录入信息规范
属地强烈要求按照地区填选,便于搜索统计。其余必填项根据实际情况填写
打开后如图,注意录入信息规范
• 工单统计:统计指定时间段内的工单执行情况,包括业务 类型、成功数量、失败数量、成功率等。
错单处理界面
可以查看所有失败工单详细信息,并有重新激活、手工回单两项可选
• 重新激活:DSLAM设备并非实时都可以网管,有可能存在 短暂丢包的现象,如果丢包期间恰巧电子工单正在对节点 进行操作,有可能会产生失败工单,对于此类工单可以采 用重新激活的方式执行,如果失败原因是网管丢包引起的 话一般激活后可以成功。
ADS使用以及简易仿真器的配置文档

ADS的使用实训目标:1、学会设置和使用超级终端2、学会设置和使用DNW3、学会安装和使用ADS1.24、能够配置简易仿真器5、利用简易仿真器调试一个程序一、超级终端的配置本实验开发系统既可以利用提供的终端软件(实验箱光盘ADS_Tools/目录下的SecureCRT 4.1和DNW软件),也可以利用Windows XP自带的超级终端,但是无论使用那一个终端,他们的使用方法基本都是一致的,在这里一一介绍。
(一)超级终端的使用1、点击Windows XP下的“开始/所有程序/附件/通讯/超级终端”,具体操作如图1所示。
图1 超级终端的打开2、点击后出现如下提示,输入终端的名称,例如“2410X”,如图2所示,然后点击“确定”键。
图2 新建连接3、在如图3提示下,设置您的连接端口,根据您的实际使用选择“COM1或COM2”(注意:该串口号指的是PC机上的串口1或串口2,不是实验箱的串口1或串口2),这里我们选择COM1。
图3 端口选择4、如图4所示,进行端口设置:每秒位数选择“115200”,数据位选择“8”,奇偶校验选择“无”,停止位选择“1”,数据流控制选择“无”,选择确定。
图4 串口1参数设置5、此时,我们的端口设置已经成功。
(超级终端的使用结束,请大家务必掌握!!!!!!!)(注意前面5步必须全部掌握,后面的了解即可)6、由于Linux操作系统要利用串口进行烧写文件,为此在此举例如何烧写Linux内核,在Linux教材中将重点介绍整个过程如图5所示,当vivi启动后,出现如下提示,输入内核烧写命令:load flash kernel x;图5 vivi的启动图6 使用超级终端发送文件选择要烧写的文件,例如内核映象文件“zImage”,选择传送协议“Xmodem”,配置好之后点击“发送”,具体的烧写过程见图7和图8。
图7 烧写文件配置烧写root.cramfs过程和内核的烧写过程是一样的,烧写完这些文件之后,重启实验箱,点击“回车”进入Linux界面。
西门子型号CFS的综合说明书

Type CFS Compact Fusible Disconnect Switches Disconnect Switches Product Guide/switchesTable of contents Disconnect switches product guide23General informationType CFS switches, shafts and handlesDescriptionSiemens Type CFS compact fusible switches meet UL 98 requirements and can be used in either service entrance or branch circuit applications. 30-800A, 3 pole switches are offered and are all rated 600V AC maximum. 30A switches are available with provisions for either Class CC or J fuses. A 30A non-fusible switch, catalog number CNFS361, is also available. 60A and larger switches provided with Class J fuse provisions can also be use in non-fusible applications with field installable no-fuse kits.All are open style, designed to be panel mounted and are UL listed under file number #E121152 or #E68312 and CSA certified under file number #222227. A variety of door mounted rotary operators are available with Type 1, 3R, 12 or 4/4X ratings.NFPA79 kitsCFSNFPA1 AND CFSNFPA2N kits provide an internal handle and padlocking means to comply with article 5.3.4.2 of the NFPA-2002 standard.Catalog numbering system1 =2 =3 =4 =5 =6 =7 = C = J = JL = L = 5 = Omit N = New size reduced version N1 = New 100kA 60A switcha 30A non-fusible switch (catalog number CNFS361) is also available5 = 10 = 12 = B = R = BL = RL = 12 = 4 = N = New version 5 = 10 = 12 = H = N = New version4Type CFS compact fusible switchesFeatures and ordering informationFeatures30 - 800A ratingsUL Listed under file #E121152& CSA Certified under file #222227 IEC 60947-3 Certified and CE markedDoor mounted rotary handles with defeatable cover interlock Meets UL requirements for both main and branch circuit applications Compact size100kA with Class CC fuses or up to 200kA with Class J fuses Load break and horsepower ratedOrdering information1. Select the panel mounted switch required based onAmpere, HP and AIC requirements. Switches with a right hand mechanism are standard, 30-100A switches with a left hand mechanism are available.2. Select handle based on environmental rating required.3. Select operating shaft (200 or 400mm in length). For enclosure depths of 9.0” or less from panel mounting surface to inside of door use 200mm long shafts. For deeper enclosures use 400mm long shafts. 30A 100kA switches can be used in 10” deep enclosures (panel to inside of door) with 200mm shaft and CFSH5N handles.Note: Be sure to check shaft and handle compatibility with the switch selected by using information provided in the selection tables.4. Line & load lugs are provided as standard on 30-100A switches. Terminal kits are available for 200-800A switches if needed.5. Auxiliary contact are available if needed as follows. A. 30A switch CFS361C5 and non-fusible 30A switch CNFS361 will accept up to (4) aux contacts B. 30A switch CFS361J5 will accept up to (2) aux contacts without an aux contact holder. If more than (2) aux contacts are required order aux contacts PLUS aux contact holder kit CFSAUXH1. All other switches willaccept up to (4) aux contacts.6. If non-fusible switch is required order a shorting bar for 60-600A switches or catalog number CNFS361 for 30A.7. 30-100A switches are designed to prevent inadvertent contact with live parts and shields are not required. 200 & 400A switches are not supplied with terminal shields. They are available as field installed kits for bothline and load terminals. 400-800A switches are suppliedSwitch ShaftHandleLugs/AccessoriesCFS363JNwith (2) CFSAUX1NOCFSS10200HN CFSH10BL12N CFSL200Quick make and break operationAll handles are padlockable with up to (3) padlocks with 5/16” hasps in the OFF positionCatalog number CFS361C5, CFS361J5 & CNFS361 can be DIN-rail mounted and can be either front or side operated with standard rotary handles.All CFS part numbers ending in N can be either front or side operated with standard rotary handles.Handles are available in Type 1, 3R, 4/4X & 12 ratings NFPA 79 field installed kits are available30-400A, 200kA switches are provided with quick connect terminal provisions for voltage sensing or for 10A max. control circuits5Shaft and handle selectionType CFS compact fusible switchesFusible switches, 3-pole 600V AC Max. 30-100A & 600-800A switches are also rated 250V DC Max when poles are field connected in series eCompact rotary operating handles – door mountedRotary operating handles - door mounteda Line and load lugs included.b Line and load lugs are not included. Order from table on next page if required.CFS361J5CFSS5400NCFSH5B12Nc DC HP rating shown requires (3) poles to be connected in series.d CFS364JN & CFS365JN can be rotated 180º for left hand operation as standard.e Catalog numbers CFS361C5, CFS361J5 &CNFS361 accept 5mm x 5mm operating shafts. All other 30-400A switches accept 10mm x 10mm operating shafts.f Compact pistol grip design (2.75” long) with defeatable cover interlock. Cover can be opened when handle is padlocked in the OFF position.g Defeatable cover interlock provided. Cover cannot be opened when handle is padlocked in the OFF position.h Catalog number CNFS361 is a non-fusible switch. i 4 pole 600 & 800A switches, CFS466J & CFS467L are also available.j CFS366J and CFS367L are rated 250 & 600V DC when (2) poles are connected in series. k CNFS361 is rated 65kA when protected by Class J or CC 30A max. fuses.6NFPA 79 kits (if auxiliary contacts are needed, see table on page 7)Kits provide an operating shaft suitable for use with all heavy duty handles (not for use with CFSH5 handles). Selection and accessoriesType CFS compact fusible switchesa Supplied as standard on 30-100A switchesb CFS361C5 and CNFS361 will accept (4) aux contacts without an aux contact holder. CFS361J5 will accept (2) aux contacts without an aux contact holder.c Supplied as standard on all but 30A, 65kA & 100kA compact switches. d 12.6 in. (320 mm) long operating shaft includede 12.7 in. (323 mm) long operating shaft includedCFSL200 & 400CFSAUX1NCCFSSB100 - CFSSB400f Line side terminal shrouds supplied with switchg Defeatable cover interlock included. Cover cannot be opened when the handle is padlocked in the OFF position.h Neither line or load terminal shrouds are supplied as standard with new style 200 & 400A switches.Dimensions and technical characteristics Type CFS compact fusible switchesa Minimum dimensions from mounting surface to inside of cover.Dimensions shown can be decreased if aux contacts are not required.b CNFS361 is rated 65kA when protected by 30A max. Class J or CC fuses.c For additional auxiliary contacts use side mounted CFS11AUX or CFS22AUX.78CFS361C5CNFS361CFS361J5Dimensions - 30A, 100kA (65kA for CNFS361) switchesCFS361C5CFS361J5CNFS361Recommended minimum enclosure dimensions Note: CNFS361, CFS361C5 andCFS361J5 can be DIN-rail mountedDimensions - in. (mm)9CFS361JN CFS362JN1CFS362JN CFS363JNDimensions - 30-100A, 100kA & 200kA switchesDimensions - 200A, 200kA switchCFS364JNRecommended minimum enclosure dimensions for 30-100A, 100kA & 200kA switches CFS361JNCFS362JN1CFS362JNCFS363JN10Recommended minimum enclosure dimensions for 200A, 200kA switchesCFS364JN1112CFS365JNDimensions - 400A, 200kA switch19,5 ±2mm1314CFS366J CFS466J CFS367L CFS467LDimensions -Recommended minimum enclosure dimensionsCFS366J CFS466J CFS367LCFS467L15Heavy duty handles: 4.93 (125.1)8.27 (209.8)3.071.583.07Door drilling -typicalCompact handles:CFS5B12N CFS5R12N CFS5B4N CFS5R4NCFSH10B12N CFSH10R12N CFSH10B4N CFSH10BL12N CFSH10RL12N CFSH10BL4NCFSH12BL12CFSH12RL12 CFSH12BL4Dimensions - handles and door drillingsDimensions shown in inches and millimeters ( ).Door drillingSiemens Industry, Inc.5400 Triangle ParkwayNorcross, GA 300921-800-241-4453*******************Printed in USA | /switchesOrder no.: SSBR-03000-1013 | © 2013 Siemens Industry, Inc. The information provided in this brochure contains merely general descriptions or characteristics of performance which in case of actual use do not always apply as described or which may change as a result of further development of the products. An obligation to provide the respective characteristics shall only exist if expressly agreed in the terms of contract.All product designations may be trademarks or product names of Siemens AGor supplier companies whose use by third parties for their own purposes could violate the rights of the owners.。
多串泰斯操作说明书

描述
最低一节电池的正极 第 2 节电池的正极 第 3 节电池的正极 第 4 节电池的正极 第 5 节电池的正极 第 6 节电池的正极 第 7 节电池的正极 第 8 节电池的正极 第 9 节电池的正极 第 10 节电池的正极 预留,未定义 暂定,实际未连接 暂定,实际未连接 暂定,实际未连接 暂定,实际未连接 用来测试正极内阻,必须用独立的引线连接到保护板的 B+端 独立的正极充电端口,连接到保护板的 C+端(如果有的话) 用来测试正极内阻,必须用独立的引线连接到保护板的 P+端 第 11 节电池的正极 第 12 节电池的正极 第 13 节电池的正极 第 14 节电池的正极 第 15 节电池的正极 第 16 节电池的正极 第 17 节电池的正极 第 18 节电池的正极 第 19 节电池的正极 第 20 节电池的正极 最下面一节电池的负极,必须用单独的导线连接到 B暂定,实际未连接 暂定,实际未连接 暂定,实际未连接 暂定,实际未连接 用来测试负极内阻,必须用独立的引线连接到保护板的 B-端 独立的负极充电端口,连接到保护板的 C-端(如果有的话) 用来测试负极内阻,必须用独立的引线连接到保护板的 P-端
4. 开机使用
本测试仪可以单独使用,也可以通过 USB 接口连接电脑使用,通过电脑连接,可以更方便的设 置保护板参数,记录保护板测试结果数据,导出测试结果表格,保存保护板设置参数文件等等,特 别推荐客户采用电脑连接的方式使用该测试仪。
将电源线插入仪器背后的电源插座,开启面板上的电源开关,测试仪将显示如下画面:
按任意键,测试仪将进入测试功能选择界面,如下所示:
从上向下,从左至右分别是: 1, 生产测试:可以按照生产参数设置的基本模式测试保护板的常规参数,该测试模式常用于
NSF-PROD-RSAS-V5.0-(漏洞管理系列)快速使用指南DOC演示教学
绿盟远程安全评估系统(漏洞管理系列)快速使用指南文档版本:V5.0.6.0-20090922© 2020 绿盟科技■版权声明本文中出现的任何文字叙述、文档格式、插图、照片、方法、过程等内容,除另有特别注明,版权均属绿盟科技所有,受到有关产权及版权法保护。
任何个人、机构未经绿盟科技的书面授权许可,不得以任何方式复制或引用本文的任何片断。
目录一、基础配置 (1)1.1 登录NSFOCUS RSAS设备 (1)1.2 登录Web管理界面 (3)3系统用户 (4)二、创建评估任务 (5)三、报表查看 (7)3.1 查看在线报表 (7)3.2 报表输出 (8)四、日常维护 (10)4.1 修改扫描接口IP地址 (10)4.2 测试网络连通性 (10)4.3 备份与恢复 (10)五、漏洞修复 (12)附录出厂参数 (12)1. 初始网络设置 (12)1.1管理口初始配置 (12)1.2 扫描口初始配置错误!未定义书签。
2. 初始用户帐号 ........... 错误!未定义书签。
3. 串口通讯参数 (12)本文针对初次使用绿盟远程安全评估系统(漏洞管理系列)的用户,介绍产品的基本配置和主要功能的使用方法。
一、基础配置1.1 登录NSFOCUS RSAS设备请将NSFOCUS RSAS设备按照如图1.1所示的拓扑结构方式接入网络。
此图考虑的是通常情况,在具体应用时,请根据实际网络的拓扑结构加以调整。
图1.1 NSFOCUS RSAS的网络接入拓扑结构图◆NSFOCUS RSAS无论接入网络何处都能使用,但考虑到使用性能建议将其接入到公司主干网的交换机上。
◆使用网络直连线连接交换机和NSFOCUS RSAS的扫描口(SCAN口)。
◆管理员可以通过设备的扫描口或管理口的缺省IP地址对设备进行管理。
◆NSFOCUS RSAS扫描接口(SCAN口)、管理接口(CONFIG口)的位置和缺省IP地址如图1.2所示。
浪潮 NF M 服务使用手册

PCI 扩展插槽 PCI 总线类型 PCI 插槽
硬盘 硬盘类型 数量Fra bibliotek南桥集成 S A T A 控制器,主板引出四个 S A T A I I 接口,两个 S A T A I I I 接口。配置标准光驱时,1 个 S A T A 接口用来连接 SATA 光驱
集成 Aspeed 2300 芯片,支持 IPMI2.0+IKVM
● 安装操作系统 本章介绍如何在此款服务器上安装主流操作系统。
● 集成管理卡管理功能使用说明 本章介绍此款服务器集成管理卡的使用。
● 常见问题及故障排除 本章介绍一些常见问题的解决方法。 我们建议您在使用此款服务器之前仔细阅读本手册,以避免您在操作中出现不必要的
失误。
技术服务电话:86-531-88546554
SATA RAID 设置 ...................................................... 21 如何进入 SATA HostRAID 配置界面 .................................... 21 控制键的应用 ...................................................... 21 SATA HostRAID 设置 ................................................. 21
普传变频器说明书
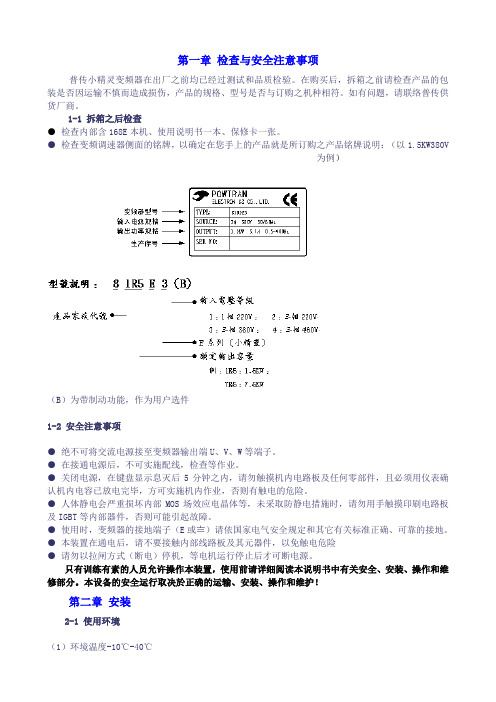
第一章检查与安全注意事项普传小精灵变频器在出厂之前均已经过测试和品质检验。
在购买后,拆箱之前请检查产品的包装是否因运输不慎而造成损伤,产品的规格、型号是否与订购之机种相符。
如有问题,请联络普传供货厂商。
1-1 拆箱之后检查●检查内部含168E本机、使用说明书一本、保修卡一张。
●检查变频调速器侧面的铭牌,以确定在您手上的产品就是所订购之产品铭牌说明:(以1.5KW380V为例)(B)为带制动功能,作为用户选件1-2 安全注意事项●绝不可将交流电源接至变频器输出端U、V、W等端子。
●在接通电源后,不可实施配线,检查等作业。
●关闭电源,在键盘显示息灭后5分钟之内,请勿触摸机内电路板及任何零部件,且必须用仪表确认机内电容已放电完毕,方可实施机内作业,否则有触电的危险。
●人体静电会严重损坏内部MOS场效应电晶体等,未采取防静电措施时,请勿用手触摸印刷电路板及IGBT等内部器件,否则可能引起故障。
●使用时,变频器的接地端子(E或〨)请依国家电气安全规定和其它有关标准正确、可靠的接地。
●本装置在通电后,请不要接触内部线路板及其元器件,以免触电危险●请勿以拉闸方式(断电)停机,等电机运行停止后才可断电源。
只有训练有素的人员允许操作本装置,使用前请详细阅读本说明书中有关安全、安装、操作和维修部分。
本设备的安全运行取决於正确的运输、安装、操作和维护!第二章安装2-1 使用环境(1)环境温度-10℃-40℃(2)防止电磁干扰、远离干扰源(3)防止水滴、蒸气、粉尘、灰尘、棉絮、金属细粉的侵入(4)防止油、盐及腐蚀性气体侵入(5)避免震动(6)避免高温多湿且无雨水滴淋,湿度小於90%RH(不结露)(7)禁止使用在易燃性、可燃性、爆炸性气体、液体或固体的危险环境。
2-2 安装方向与空间变频调速器要安装於室内通风良好的场所,并採用壁掛式。
并与周围相邻物品或挡板(墙)必须保持足够的空间。
如下图所示:2-3 产品外观与各部分名称产品各部分名称产品组装2-4 配线变频调速器配线,分为主回路及控制回路两部分。
江森ADS备份及恢复数据操作手册

江森ADS备份及恢复数据操作手册1)A DS4.0-5.1版本备份操作步骤都是一样的:备份数据包括上传NAE和ADS.首先用最高权限用户和密码登陆SCT登陆成功之后上传ADS,NAE最新数据,下面就说怎么上传ADS,NAE,先选中你要备份NAE点击Load Archive一下,出现下图选择Upload From Device之后点击Next,点击一下Test Login,稍等一下sct就会与NAE通讯测试一下,如果通讯没有问题就会出现Login ID is OK,之后就点击Next至完成点Finsh,之后就会自动上传NAE 的最新的,稍等一下(大约三分钟)之后等待上传完了之后会有提示的。
NAE 上传的步骤都是一样的,如果有两个NAE,要每一个NAE都要上传一下。
上传ADS(图形)的步骤首先选择ADS点击Load Archive一下,出现下图选择Upload From Device之后点击Next,点击一下Test Login,稍等一下sct就会与ADS通讯测试一下,如果通讯没有问题就会出现Login ID is OK,之后就点击Next至完成点Finsh,之后就会自动上传ADS 的最新的,稍等一下(大约五分钟)之后等待上传完了之后会有提示的。
上传数据就完成了。
还有最后一步就是把数据打包,如下图点击Create Backup,数据库就自动打包了,数据打包后会提示上图就点击OK整一个备份就完成了!!!备份文件的路径:C:\Documents and Settings\All Users\Application Data\Johnson Controls\MetasysIII\DatabaseFiles2)A DS6.1备份操作,首先用最高权限用户和密码登陆SCT之后上传ADS,NAE最新数据,下面就说怎么上传ADS,NAE,先选中你要备份NAE点击Manage Archive一下就出现如下图,Upload From Device,点Next至如下图点击一下Test Login,稍等一下sct就会与ADS通讯测试一下,如果通讯没有问题就会出现Login ID is OK,之后就点击Next至完成点Finsh,之后就会自动上传ADS的最新的,稍等一下(大约五分钟)之后等待上传完了之后会有提示的。
DSR操作步骤及注意事项

CVOR-ADS旋转流变仪操作步骤(用于SHRP标准测试程序)1.打开空压机电源,空压机开始工作,待空压机上压力表气压至少超过5bar后,接通压缩空气过滤器处空气阀门(将过滤器开关下扳即可);2.待过滤器气压稳定在约3bar后,再依次打开流体冷却泵(为白色PE塑料桶,将插头插入接线板即可)、Julabo F25水浴装置(共2个绿色开关,分别位于该装置的上下方)、流变仪主机(开关位于流变仪背部左下角).3.按流变仪面板上“▲”按钮,完成流变仪初始化,流变仪轴承系统将向下运动至一定位置停下,初始化结束后按“▲”按钮,使流变仪轴承系统向上运动至最高处;4.打开电脑主机,启动操作软件(桌面上Bohlin R6.50.5.7软件),直接登录进入软件;5.选择合适标准测试步骤(如有其他自定义测试步骤则需另外选择),点击上方“edit”进入参数设置步骤,根据软件右侧夹具显示栏选择合适夹具(PP DSR25-上下板直径为25mm或PP DSR 8-上下板直径为8mm);6.按下Julabo F25水浴装置工作按钮(位于该装置上方控制面板上,右侧第一个,按下该钮后装置马达开始运转),此时打开调节水浴装置出水阀(位于装置上方背部),小心调节该阀门直至流变仪上ADS单元内有水面上下运动且不溢出位置;7.待软件上温度显示在设定温度的±0.5℃以内后,将水位限制罩(为白色四角塑料罩)套在上夹具上方的锁扣和插销之间,并用锁扣将上夹具锁紧;8.按下流变仪面板上ZERO按钮,流变仪系统对板间距校零,校零结束后,面板上GAP显示屏数值为“0000”,待“OK”指示灯亮后,按下面板“▲”按钮,抬至最高处或其他合适位置;9.将预热好的沥青样品(约130度下预热)倒在下板中央(样品不可倒在下板边缘或水浴槽内),样品约0.2ml(使用DSR PP 8)或1ml(使用DSR PP 25)左右;10.点击软件上“start”按钮,夹具下压至某一间距处,用硬质铁片或其他片状器材沿上下夹具外沿将多余样品刮去,并将水位限制罩插在下方ADS内插孔内,并继续调节进水阀,直至水将样品完全浸泡且不溢出ADS进样结束后,拔开插销,点击软件上确认按钮,仪器将继续下压50微米后开始测试;11.实验结束后,将数据保存,佩戴手套将水位限制罩拔出并放在上夹具上方的锁扣和插销之间,按面板上“▲”按钮,将夹具抬起;12.将Julabo F25水浴装置的出水阀关小,将上夹具小心拧下,用纸巾或其他溶液或铜刷或其他工具(硬度最大不超过铜质)将上夹具清理干净,用内八角扳手将ADS下夹具固定套拧松,用长柄夹取出下夹具,用工具或溶剂将下夹具清理干净。
Netshare瑞科打印服务器产品说明书

Netshare®瑞科网络打印服务器中文使用手册- 1 -目录物品清单 (3)第一章产品简介 (4)产品功能及原理 (5)产品规格指标 (6)第二章硬件安装 (7)安装USB服务器 (8)USB服务器接口说明 (9)第三章配置说明 (12)进入系统web服务器 (13)系统配置 (15)网络配置 (17)FTP服务配置 (18)共享设置 (21)打印服务配置 (22)恢复出厂配置 (23)系统升级 (24)重启设备 (24)附录Ⅰ网络打印端口配置 (25)附录Ⅱ常见问题 (30)- 2 -物品清单小心打开包装盒,检查包装盒里面应有以下物件:一台NS-P202网络打印服务器一个5V/2A电源适配器一张NetShare保修卡一张用户手册光盘注意:如果发现有所损坏或者任何配件短缺的情况,请及时与当地经销商联系。
- 3 -第一章产品简介感谢您使用瑞科网络设备有限公司开发的网络打印服务器, NS-P202网络打印服务器是我公司最新研发的新产品. NS-P202是一款高性能低功耗的USB网络打印及文件服务器,提供打印和文件服务。
采用美国caviumnetwor ks公司研制的高性能ARM处理器,主频高达250MHz,配置DDR内存,容量为256Mb。
NS-P202在硬件上支持1个标准的以太网RJ45接口,用于连接交换机,配置2个USB2.0接口,向下兼容USB1.1,可以同时连接打印机和USB存储设备,如U盘。
该服务器支持HP JetDirect和L PD打印协议,支持FTP文件共享,FTP支持标准的SS L加密协议(RFC 4217 - Securing FTP with TLS)。
USB 服务器通过内置的WEB配置页面进行配置,无需安装客户端软件。
Netshare NS-P202网络打印服务器为全中文网页配置界面,界面友好,无需专业人员即可按照本手册完成配置。
在您准备安装使用本产品前,请仔细阅读本手册,以全面正确使用本产品的所有功能。
NSM-205Fx 用户手册说明书
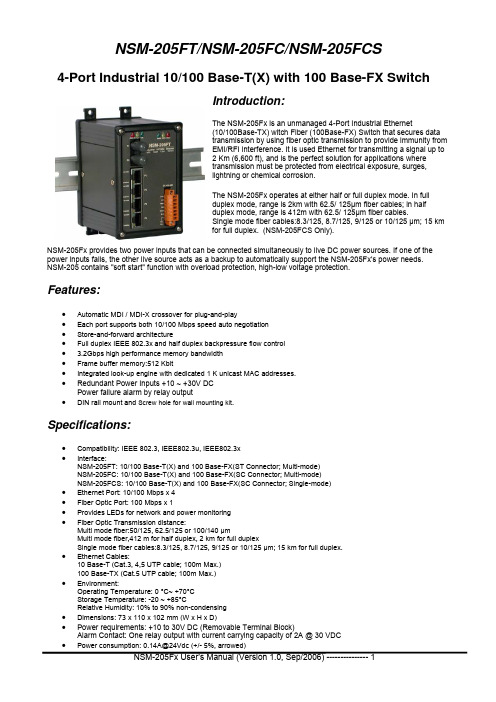
NSM-205FT/NSM-205FC/NSM-205FCS4-Port Industrial 10/100 Base-T(X) with 100 Base-FX SwitchIntroduction:The NSM-205Fx is an unmanaged 4-Port Industrial Ethernet(10/100Base-TX) witch Fiber (100Base-FX) Switch that secures datatransmission by using fiber optic transmission to provide immunity fromEMI/RFI interference. It is used Ethernet for transmitting a signal up to2 Km (6,600 ft), and is the perfect solution for applications wheretransmission must be protected from electrical exposure, surges,lightning or chemical corrosion.The NSM-205Fx operates at either half or full duplex mode. In fullduplex mode, range is 2km with 62.5/ 125μm fiber cables; in halfduplex mode, range is 412m with 62.5/ 125μm fiber cables.Single mode fiber cables:8.3/125, 8.7/125, 9/125 or 10/125 μm; 15 kmfor full duplex. (NSM-205FCS Only).NSM-205Fx provides two power inputs that can be connected simultaneously to live DC power sources. If one of the power inputs fails, the other live source acts as a backup to automatically support the NSM-205Fx's power needs.NSM-205 contains "soft start" function with overload protection, high-low voltage protection.Features:•Automatic MDI / MDI-X crossover for plug-and-play•Each port supports both 10/100 Mbps speed auto negotiation•Store-and-forward architecture•Full duplex IEEE 802.3x and half duplex backpressure flow control• 3.2Gbps high performance memory bandwidth•Frame buffer memory:512 Kbit•Integrated look-up engine with dedicated 1 K unicast MAC addresses.•Redundant Power Inputs +10 ~ +30V DCPower failure alarm by relay output•DIN rail mount and Screw hole for wall mounting kit.Specifications:•Compatibility: IEEE 802.3, IEEE802.3u, IEEE802.3x•Interface:NSM-205FT: 10/100 Base-T(X) and 100 Base-FX(ST Connector; Multi-mode)NSM-205FC: 10/100 Base-T(X) and 100 Base-FX(SC Connector; Multi-mode)NSM-205FCS: 10/100 Base-T(X) and 100 Base-FX(SC Connector; Single-mode)•Ethernet Port: 10/100 Mbps x 4•Fiber Optic Port: 100 Mbps x 1•Provides LEDs for network and power monitoring•Fiber Optic Transmission distance:Multi mode fiber:50/125, 62.5/125 or 100/140 μmMulti mode fiber,412 m for half duplex, 2 km for full duplexSingle mode fiber cables:8.3/125, 8.7/125, 9/125 or 10/125 μm; 15 km for full duplex.•Ethernet Cables:10 Base-T (Cat.3, 4,5 UTP cable; 100m Max.)100 Base-TX (Cat.5 UTP cable; 100m Max.)•Environment:Operating Temperature: 0 °C~ +70°CStorage Temperature: -20 ~ +85°CRelative Humidity: 10% to 90% non-condensing•Dimensions: 73 x 110 x 102 mm (W x H x D)•Power requirements: +10 to 30V DC (Removable Terminal Block)Alarm Contact: One relay output with current carrying capacity of 2A @ 30 VDC•Power consumption: 0.14A@24Vdc (+/- 5%, arrowed)LED functions:Standard RJ45 female connectors are provided. A standard RJ45 plug cable is necessary to connect your device to the unit since switch that supports auto crossover.Redundant Power Inputs:B o t h p o w e r i n p u t s c a n b e c o n n e c t e d simultaneously to live DC power sources. If one power source fails, the other live source acts as a backup, and automatically supplies all of NSM-205Fx’s power needs.Soft start Power Inputs:Integrated “soft-start” function that limits the in-rush current to the device being powered.Delay time + Rise time = 2 second at power on.Pin Function For Terminal Block:External power supply is connected using the removable terminal block:PWR1 : Power input 1 (+10 to +30Vdc) PWR2 : Power input 2 (+10 to +30Vdc) GND : Ground : Common(Form "A” Relay) for Alarm contact.R.NO : Normal Open (Form "A” Relay) for Alarm contact.F.G. :F.G. stands for Frame Ground (protective ground). It is optional. If you use this pin, it can reduce EMI radiation; improve EMI performance and ESD protection.LED Color DescriptionRed On Core Power is OK PWR_OK Red Off Core Power is Off Yellow On Full Duplex Full for P0 Yellow Off Half Duplex Green On Link/Act Link for P0 Green Off Not Networking Yellow On Link/Act Yellow Off Not Networking Green On Link to 100 Mbps Ethernet Port(P1 ~ P4) Green Off Link to 10 MbpsGreen On Power is being supplied to power input PWR2 PWR2 Green Off Power is not being supplied to power input PWR2 Yellow On Power is being supplied to power input PWR1 PWR1 Yellow Off Power is not being supplied to power input PWR1Red On Power is not being supplied to power input PWR1 and PWR2 FAULTRed OffPower is being supplied to power input PWR1 and PWR2Application Note:Figure shows common media conversion system network topologies. This figure is a simple end-to-end configuration; it is easy way to verify proper operation of the media converter(s), assuming that the Network Interface Cards (NIC’s) or Ethernet ports in each PC/workstation end link partner are properly configured.Figure:Full / Half-Duplex Selection:There are two modes of data transmissions, full-duplex and half-duplex transmission.The data can be transmitted in both directions on a single carrier atthe same time when you select Full-duplex mode. But the data can only betransmitted in one direction on a single carrier at the same time when youselect Half-duplex mode. You may select Full or half-duplex mode according toyour equipment requirement.Block Diagram:Dimensions:102.01m m 72.58mm110.02m m。
ProDSS使用指南资料

ProDSS使用指南资料ProDSS 操作指南电池说明ProDSS 使用充电锂离子电池包作为电源,电池已预装在主机内。
电池发货时,以50%负载新的ProDSS 电池持续下列时间(25°C(77°F),自动采样,GPS 开启,背光关闭:ProDSS 主机-48小时ProDSS 主机带电缆和25%LC D 亮度-20小时?ProDSS 带电缆100%LCD 亮度-14小时为增加电池寿命,开启手动采样模式.手动采样时供电给传感器结束后断电保护电池寿命. 充电一个USB 电缆连接ProDSS 和PC 进行充电,也可用AC 电源适配器充电.主机和电缆的连接传感器安装通用接口,涂密封酯,安装传感器。
现场应用如果不装传感器,必须将防尘盖换成端口塞安装探头保护套键盘功能主显示屏二.系统设置改变GLP 选项改变语言改变小数点改变记录选项改变采样选项设置自动关机时间设置背光模式查看软件版本查看系列号查看和调节单位查看传感器特别信息调节显示亮度设定日期时间 Date/Time 选项:设置YY/MM/DD, MM/DD/YY, DD/MM/YY 或YY/DD/MM 日期格式 ? 设定正确时间设置 12 或24小时格式1 采样屏记录或采样(刷新测量)提示(单点或连续)6 电池充电 % 2 当前屏/菜单7 USB/PC 连接指示 3 日期/T 时间8 卷标 4 GPS 信号指示9 信息区域 5电池充电指示10 显示的测量GLP菜单传感器校准日期时间标签传感器号码传感器软件版本校准方法 (电导和 ODO 校准)校准值温度使用者身份(optional)探头身份 (optional)使用者区域 #1 and #2 (optional) 校准状态三.传感器设置已安装传感器显示设定溶氧设定浊度:TSS参数设定设定PH(USA 4.7.10)NIST (4.016.86.9.18)设定电导率参考温度为25度温度补偿1.91%。
液位计调试指导

854伺服液位调试培训手册1,ENSITE调试软件安装和基本操作:液位计安装完成后,确认接线正确,就可以送电了。
将ENRAF提供的调试软件ENSITE直接COPY到D盘,打开ENSITE 文件夹中的可执行文件ENSITE.EXE,按ALT+回车全屏化。
没点击SCAN后,选择1200(CIU的通讯波特率),COM1,ALL后按OK。
搜索完成后所有的现场仪表都显示在列表中,输入新的文件名,按确认就可以开始调试了。
单击ALL将所有表添加到右侧列表中,单击ENCASE,进入调试界面,按SPLIT=OFF打开显示窗口,SELECT可以任意切换罐,REQUEST是指令输入窗口,SEND送出指令。
指令送出后显示&表示成功,显示!058或者!053表示失败。
当然,调试同样可以使用手操器PET 在罐上进行。
所有指令都完全一一样。
当调试完液位计后,单击左侧的LOG,将液位计的所有设置备份到相应文件下:D:\ENSITE\DAT\文件名\罐名2,液位计基本设置:新的液位计送电后会显示+027.0000,这是出厂的设置。
输入FR停住浮子,检查DC(磁鼓周长是否和磁鼓上刻的是否一致)。
输入:W2=ENRAF2 指令输入密码DW=+.26540000E+03 预设浮子的重量(数值刻在浮子上)(D isplacer W eight)DV=+.20040000E+03 设置浮子体积(数值刻在浮子上)(D isplacer V olume)S1=+.20800000E+03 预设测量液位(I1)时钢丝张力的平衡值(S et point1)S2=+.05000000E+03 设定浮子到罐底(I2)钢丝张力的平衡值(S et point2)TA=03 新的仪表地址(原先是00)(T ransmission A ddress)TI=TK-003 输入罐的编号,空格补齐6位(T ank I dentifier)WT=EDE 力传感器保护(W ire T ension protection)ML=+000.0000 马达低限位由1米改成0。
- 1、下载文档前请自行甄别文档内容的完整性,平台不提供额外的编辑、内容补充、找答案等附加服务。
- 2、"仅部分预览"的文档,不可在线预览部分如存在完整性等问题,可反馈申请退款(可完整预览的文档不适用该条件!)。
- 3、如文档侵犯您的权益,请联系客服反馈,我们会尽快为您处理(人工客服工作时间:9:00-18:30)。
文档版本:V4.5.22-20100415
©Hale Waihona Puke 2010 绿盟科技■ 版权声明 本文中出现的任何文字叙述、文档格式、插图、照片、方法、过程等内容,除另有特别注明,版权均属绿 盟科技所有,受到有关产权及版权法保护。任何个人、机构未经绿盟科技的书面授权许可,不得以任何方 式复制或引用本文的任何片断。
目录
前言 ............................................................................................................................................................. 1 文档范围 ................................................................................................................................................. 1 期望读者 ................................................................................................................................................. 1 内容简介 ................................................................................................................................................. 1 获得帮助 ................................................................................................................................................. 1 格式约定 ................................................................................................................................................. 2 一. 产品概述............................................................................................................................................... 3 二. 控制台管理........................................................................................................................................... 4 2.1 控制台功能概述 ............................................................................................................................... 4 2.2 登录控制台 ....................................................................................................................................... 4 2.3 详细介绍 ........................................................................................................................................... 4 2.3.1 检查系统状态 ........................................................................................................................... 5 2.3.2 网络设置 ................................................................................................................................... 5 2.3.3 DNS 设置 .................................................................................................................................... 6 2.3.4 修改控制台密码 ....................................................................................................................... 6 2.3.5 系统时间设置 ........................................................................................................................... 6 2.3.6 系统初始化 ............................................................................................................................... 7 2.3.7 系统恢复 ................................................................................................................................... 7 2.3.8 网络恢复 ................................................................................................................................... 7 2.3.9 重启系统 ................................................................................................................................... 7 2.3.10 退出系统 ................................................................................................................................. 7 三. 登录 WEB 管理界面 ............................................................................................................................. 8 3.1 登录方法 ........................................................................................................................................... 8 3.2 布局介绍 ......................................................................................................................................... 10 3.3 图标含义 ......................................................................................................................................... 10 四. WEB 管理 ............................................................................................................................................. 12 4.1 系统监控 ......................................................................................................................................... 12 4.1.1 对 ADS 设备根节点的监控 ..................................................................................................... 12 4.1.2 对 ADS 设备类型根节点的监控 ............................................................................................. 17 4.1.3 对 ADS 设备的监控 ................................................................................................................. 20 4.1.4 对流量群组的监控 ................................................................................................................. 23 4.1.5 对主机的监控 ......................................................................................................................... 25 4.2 统计报表 ......................................................................................................................................... 26 4.2.1 流量报表 ................................................................................................................................. 26 4.2.2 安全报表 ................................................................................................................................. 40 4.2.3 综合报表 ................................................................................................................................. 45 4.3 日志查询 ......................................................................................................................................... 47
