手册:Weblogic 集群配置
[计算机软件及应用]WebLogic配置集群
![[计算机软件及应用]WebLogic配置集群](https://img.taocdn.com/s3/m/79bda19c0242a8956bece4f3.png)
• 为WebLogic配置SSL • 配置WebLogic服务器的SSL侦听端口 • 在http.conf中设置WebLogicPort指向WebLogic SSL侦听端口 • 设置http.conf中的SecureProxy参数为ON • 在Apache上安装可信任证书权威CA文件。你可以使用来自
• 管理服务器 • 受管服务器 • 多播位置
• 在生产环境,使用DNS名称,而不使用IP地址:
• 防火墙会引起IP地址转换错误
• 每个WebLogic服务器资源应该有唯一的名称 • 除了集群通讯外,多播地址不应用于其他任何方面
h
集群地址
• 集群地址用来在实体和会话Bean中构建请求URL的主 机名部分
• 这个Servlet代理将请求转发给集群中其他服务器 • 它应该运行在独立的、非集群导创建。
• 你也可以手工设置带HTTPClusterServlet的Web应用,部署到 受管服务器上
h
使用配置向导创建WebLogic代理服务器
h
手工创建WebLogic代理服务器
h
集群架构的安全选项
• 对于代理架构,你可以:
• 在不信任客户端和Web服务器层之间有一个防火墙 • 在代理层和集群之间有一个防火墙
• 当使用负载均衡器时,在负载均衡器提供的安全特性 基础上,你可能想在均衡器和不信任客户端之间放置 一个防火墙。
• 当使用单个数据库同时支持内部和外部数据时:
• 在数据库服务器前放置额外的防火墙
• 如果你在使用支持的第三方Web服务器,而不是 WebLogic Web服务器,你需要设置代理插件
• 下面是支持的第三方Web服务器:
weblogic的集群与配置图文方法

weblogic的集群与配置图⽂⽅法⼀、Weblogic的集群还记得我们在第五天教程中讲到的关于Tomcat的集群吗?两个tomcat做node即tomcat1, tomcat2,使⽤Apache HttpServer做请求派发。
现在看看WebLogic的集群吧,其实也差不多。
区别在于: 如果我们要布署我们的Web应⽤,需要分别⼿⼯往每个Tomcat的webapp⽬录⾥拷贝⽂件。
Weblogic的集群必须设⽴⼀个总控端,可从上图中看出,然后这个总控端我们把它称为AdminServer,然后在其下可以挂weblogic的集群的node,这个node不是物理上不同的两个weblogic,⽽是不同的domain,我们假设domain1, domain2为两个weblogic的集群的节点。
如果我们要布署我们的Web应⽤,只需要在总控端布署⼀次,然后挂在这个总控端下的节点将会⾃动将我们的web应⽤发布到每⼀个节点。
因此,要实现weblogic的集群必须:安装Weblogic创建⼀个AdminServer的domain在AdminServer上建⽴集群总控端分别创建每⼀个要加⼊此集群总控端的node,也是⼀个个的domain⼆、创建Weblogic集群前的规划根据第⼀节中的内容,我们将我们⽤于实验的Weblogic规划成3个domain,每个domain都包含有下列的必不可少的属性:AdminConsole(总控端) 逻辑名 物理名(domain的系统路径) 端⼝号 计器名(IP) 登录信息(username/password)Cluster node1(集群节点1) 逻辑名 物理名(domain的系统路径) 端⼝号 计器名(IP) 登录信息(username/password)Cluster node2(集群节点2) 逻辑名 物理名(domain的系统路径) 端⼝号 计器名(IP) 登录信息(username/password) 我们⽤表格列出我们将要创建的集群中总控端与每个节点的集息:物理名逻辑名端⼝号主机名(IP)登录信息\bea\user_projects\domains\adminserverAdminServer7001localhost weblogic/password_1\bea\user_projects\domains\server1mycluster17011localhost weblogic/password_1bea\user_projects\domains\server2mycluster27012localhost weblogic/password_1 规划好了,就可以开始来创建我们的集群了。
weblogic多机集群配置文档
Weblogic10.0多机集群配置说明一配置说明:配置weblogic双机集群,主机1上运行管理服务器,受管理服务器1和代理服务器,主机2上运行受管理服务器2。
二目标:实现所有http请求全部发到主机1上的代理服务器,统一由代理服务分发给两个主机上的受管理服务器来处理业务,并且实现会话复制,即一台机器上的受管理服务器宕掉,所有的请求都转到另一台受管理服务器上,并且会话也会转移到这个服务器。
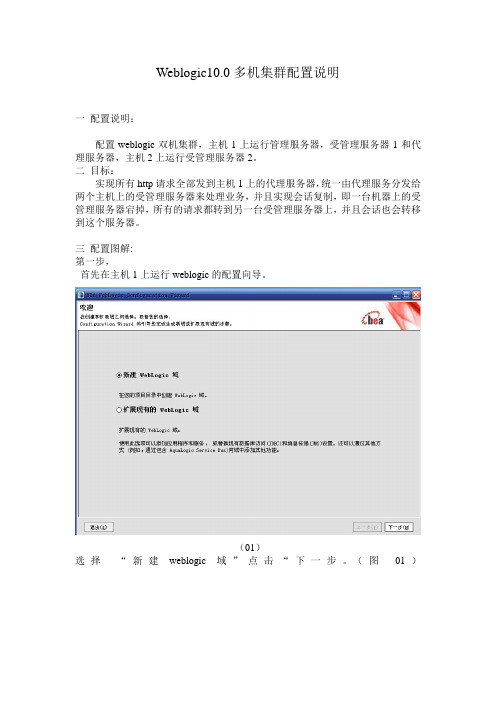
三配置图解:第一步,首先在主机1上运行weblogic的配置向导。
(01)选择“新建weblogic域”点击“下一步。
(图01)选择“生成一个自动配置的域以支持下列BEA产品“,点击”下一步“。
(图02)(03)填入用户名和密码,请记录填写的信息不要丢失,后面登陆控制台的时候需要用到这些信息,点击“下一步“。
(图03)(04)首先选择左侧的“生产模式“,然后选择右侧的”sun jdk“,点击”下一步“。
(图04)选择下方的“是“,点击”下一步“。
(图05)(06)填写管理服务器的相关信息( 我的配置:a 172.16.15.131 8001),点击“下一步“。
(图06)(07)填写各个受管理服务器的详细信息,这里要注意的是m2的监听地址填的是主机2的ip地址,因为这个服务实际是运行在主机2上,下面是我的配置:m1 172.16.15.131 8002m2 172.16.15.132 8003p 172.16.15.131 8008点击“下一步“。
(图07)(08)填入集群相关信息监听地址、端口可以默认,建议修改成唯一的不要是被占用了的,点击“下一步“。
(图08)(09)将左边的服务器m1和m2添加到右边的c集群下,点击“下一步“。
(图09)(10)勾上“为集群创建http代理c,点击“下一步”。
(图10)填入域的名称和位置,配置是:域名:web_c,域位置:默认,点击,“创建”。
到此主机1的配置向导的工作已完成。
安装配置WEBLOGIC集群
安装、配置BEA WEBLOGIC 事项一、最好先安装、配置好SUN公司的JDK。
WEBLOGIC 虽然有自带的JDK 但还是推荐安装者用SUN公司的JDK。
二、安装WEBLOGIC时只要按照WEBLOGIC安装向导中默认的安装步骤往下进行就OK了,只需要自己选择一下安装路径。
三、主要是配置集群,下面是配置集群的过程。
1.在配置集群应用前要对集群的配置信息有一个良好的设计,下面就是我们这次配置的集群信息:2. 使用Domain Configuration Wizard进行配置四、创建新的Domain选择“Create a new WebLogic configuration”,单击“Next”按钮1.选择安装类型选择安装“Basic WebLogic Server Domain”,单击“Next”按钮2.选择定制安装选择“Custom”安装,单击“Next”按钮3.配置管理服务器输入Administrator Server的信息输入Administrator Server的名称,监听地址,监听端口如果需要SSL支持的话可以在“SSL enabled”后面的复选取框上打勾,配置SSL监听端口单击“Next”按钮4.是否配置Server、Cluster、Machine信息选择“Yes”,对Server、Cluster、Machine信息进行配置,,单击“Next”按钮5.配置Managed Server信息输入Managed Server的名称,监听地址,监听端口,如果需要SSL支持的话,可以在“SSL enabled”复选框上打勾,配置SSL监听端口。
可以配置多个Managed Server。
单击“Next”按钮6.配置Cluster信息输入Cluster的名称,Cluster的组播地址和端口,Cluster地址可输可不输。
单击“Next”按钮7.将Managed Server添加到Cluster中选择左面列表中的Managed Server,将其添加到右面的列表中在这里我们可以添加代理服务器,也可以不添加以后可以在控制台里添加。
weblogic集群配置方法

weblogic集群配置方法案例所属系统案例现象无案例平台环境AIX 5300-04-00AIX 5300-05-CSPWeblogic9.2mp2JDK1.5.0主机结构应用部署案例分析分析过程web应用部署在两台服务器上,客户没有硬件负载均衡器,但要求从唯一的ip和端口登录web应用,通过weblogic集群来实现。
案例解决方法一、在web1主机上执行config.sh脚本建立domain:elndomain11;建立管理server:AdmServer11;建立被管理server: Server11、Server12 (注意:配置被管理server 时把web2主机上的两个被管理server也配置上) 。
详细方法如下:config.shUnable to instantiate GUI, defaulting to console mode.<--------------------- BEA WebLogic Configuration Wizard --------------------->Welcome:--------Choose between creating and extending a domain. Based on your selection,the Configuration Wizard guides you through the steps to generate a new or extend an existing domain.->1|Create a new WebLogic domain| Create a WebLogic domain in your projects directory.2|Extend an existing WebLogic domain| Extend an existing WebLogic domain. Use this option to add|applications and services, or to override existing database access (JDBC) |and messaging (JMS) settings. You can also incorporate additional|functionality in your domain, for example, by including AquaLogic Service |Bus.Enter index number to select OR [Exit][Next]> 1<--------------------- BEA WebLogic Configuration Wizard --------------------->Select Domain Source:---------------------Select the source from which the domain will be created. You can create the domain by selecting from the required components or by selecting from alist of existing domain templates.->1|Choose Weblogic Platform components| You can choose the Weblogic component(s) that you want supported in |your domain.2|Choose custom template| Choose this option if you want to use an existing template. This|could be a custom created template using the Template Builder.Enter index number to select OR [Exit][Previous][Next]> 1<--------------------- BEA WebLogic Configuration Wizard --------------------->Application Template Selection:-------------------------------Available Templates|_____WebLogic Server (Required)xEnter number exactly as it appears in brackets to toggle selection OR [Exit][Previous][Next]>1、设置管理帐号和口令<--------------------- BEA WebLogic Configuration Wizard --------------------->Configure Administrator Username and Password:----------------------------------------------Create a user to be assigned to the Administrator role. This user is the default administrator used to start development mode servers.| Name | Value |_|_________________________|_________________________________________|1| *User name: | weblogic |2| *User password: | |3| *Confirm user password: | |4| Description: | This user is the default administrator. |Use above value or select another option:1 - Modify "User name"2 - Modify "User password"3 - Modify "Confirm user password"4 - Modify "Description"Enter option number to select OR [Exit][Previous][Next]> 2<--------------------- BEA WebLogic Configuration Wizard --------------------->Configure Administrator Username and Password:----------------------------------------------Create a user to be assigned to the Administrator role. This user is the default administrator used to start development mode servers."*User password:" = []Enter new *User password: OR [Exit][Reset][Accept]> xxxxxxxx<--------------------- BEA WebLogic Configuration Wizard --------------------->Configure Administrator Username and Password:----------------------------------------------Create a user to be assigned to the Administrator role. This user is the default administrator used to start development mode servers.| Name | Value |_|_________________________|_________________________________________|1| *User name: | weblogic |2| *User password: | ********* |3| *Confirm user password: | |4| Description: | This user is the default administrator. |Use above value or select another option:1 - Modify "User name"2 - Modify "User password"3 - Modify "Confirm user password"4 - Modify "Description"5 - Discard ChangesEnter option number to select OR [Exit][Previous][Next]> 3<--------------------- BEA WebLogic Configuration Wizard --------------------->Configure Administrator Username and Password:----------------------------------------------Create a user to be assigned to the Administrator role. This user is the default administrator used to start development mode servers."*Confirm user password:" = []Enter new *Confirm user password: OR [Exit][Reset][Accept]> xxxxxxxx<--------------------- BEA WebLogic Configuration Wizard --------------------->Configure Administrator Username and Password:----------------------------------------------Create a user to be assigned to the Administrator role. This user is the default administrator used to start development mode servers.| Name | Value |_|_________________________|_________________________________________|1| *User name: | weblogic |2| *User password: | ********* |3| *Confirm user password: | ********* |4| Description: | This user is the default administrator. |Use above value or select another option:1 - Modify "User name"2 - Modify "User password"3 - Modify "Confirm user password"4 - Modify "Description"5 - Discard ChangesEnter option number to select OR [Exit][Previous][Next]><--------------------- BEA WebLogic Configuration Wizard --------------------->Domain Mode Configuration:--------------------------Enable Development or Production Mode for this domain.->1|Development Mode2|Production ModeEnter index number to select OR [Exit][Previous][Next]> 2<--------------------- BEA WebLogic Configuration Wizard ---------------------> Java SDK Selection:-------------------->1|IBM SDK 1.5.0 @ /usr/java5_642|Other Java SDKEnter index number to select OR [Exit][Previous][Next]> 1<--------------------- BEA WebLogic Configuration Wizard --------------------->Choose Configuration Option:----------------------------*Do you want to modify any of the preconfigured settings or defaults in*your template?**To keep the default or template settings, and proceed directly to name and *create your domain, leave No selected.1|Yes->2|NoEnter index number to select OR [Exit][Previous][Next]> 12、建立管理server<--------------------- BEA WebLogic Configuration Wizard --------------------->Configure the Administration Server:------------------------------------Enter adminstration server configurations. Each WebLogic Server domain must have one Administration Server. The Administration Server hosts the Administration Console which is used to perform administrative tasks.| Name | Value |_|__________________|_____________________|1| *Name: | AdminServer |2| Listen address: | All Local Addresses |3| Listen port: | 7001 |4| SSL listen port: | N/A |5| SSL enabled: | false |Use above value or select another option:1 - Modify "Name"2 - Modify "Listen address"3 - Modify "Listen port"4 - Modify "SSL enabled"Enter option number to select OR [Exit][Previous][Next]> 1<--------------------- BEA WebLogic Configuration Wizard --------------------->Configure the Administration Server:------------------------------------Enter adminstration server configurations. Each WebLogic Server domain must have one Administration Server. The Administration Server hosts the Administration Console which is used to perform administrative tasks.| Name | Value |_|__________________|_____________________|1| *Name: | AdminServer |2| Listen address: | All Local Addresses |3| Listen port: | 7001 |4| SSL listen port: | N/A |5| SSL enabled: | false |Enter value for "Name" OR [Exit][Previous][Next]> AdmServer11<--------------------- BEA WebLogic Configuration Wizard --------------------->Configure the Administration Server:------------------------------------Enter adminstration server configurations. Each WebLogic Server domain must have one Administration Server. The Administration Server hosts the Administration Console which is used to perform administrative tasks.| Name | Value |_|__________________|_____________________|1| *Name: | AdmServer11 |2| Listen address: | All Local Addresses |3| Listen port: | 7001 |4| SSL listen port: | N/A |5| SSL enabled: | false |Use above value or select another option:1 - Modify "Name"2 - Modify "Listen address"3 - Modify "Listen port"4 - Modify "SSL enabled"5 - Discard ChangesEnter option number to select OR [Exit][Previous][Next]> 2<--------------------- BEA WebLogic Configuration Wizard --------------------->Configure the Administration Server:------------------------------------Enter adminstration server configurations. Each WebLogic Server domain must have one Administration Server. The Administration Server hosts the Administration Console which is used to perform administrative tasks.| Name | Value |_|__________________|_____________________|1| *Name: | AdmServer11 |2| Listen address: | All Local Addresses |3| Listen port: | 7001 |4| SSL listen port: | N/A |5| SSL enabled: | false |Enter value for "Listen address" OR [Exit][Previous][Next]> 134.32.9.61<--------------------- BEA WebLogic Configuration Wizard --------------------->Configure the Administration Server:------------------------------------Enter adminstration server configurations. Each WebLogic Server domain must have one Administration Server. The Administration Server hosts the Administration Console which is used to perform administrative tasks.| Name | Value |_|__________________|_____________|1| *Name: | AdmServer11 |2| Listen address: | 134.32.9.61 |3| Listen port: | 7001 |4| SSL listen port: | N/A |5| SSL enabled: | false |Use above value or select another option:1 - Modify "Name"2 - Modify "Listen address"3 - Modify "Listen port"4 - Modify "SSL enabled"5 - Discard ChangesEnter option number to select OR [Exit][Previous][Next]> 3<--------------------- BEA WebLogic Configuration Wizard --------------------->Configure the Administration Server:------------------------------------Enter adminstration server configurations. Each WebLogic Server domain must have one Administration Server. The Administration Server hosts the Administration Console which is used to perform administrative tasks.| Name | Value |_|__________________|_____________|1| *Name: | AdmServer11 |2| Listen address: | 134.32.9.61 |3| Listen port: | 7001 |4| SSL listen port: | N/A |5| SSL enabled: | false |Enter value for "Listen port" OR [Exit][Previous][Next]> 9001<--------------------- BEA WebLogic Configuration Wizard --------------------->Configure the Administration Server:------------------------------------Enter adminstration server configurations. Each WebLogic Server domain must have one Administration Server. The Administration Server hosts the Administration Console which is used to perform administrative tasks.| Name | Value |_|__________________|_____________|1| *Name: | AdmServer11 |2| Listen address: | 134.32.9.61 |3| Listen port: | 9001 |4| SSL listen port: | N/A |5| SSL enabled: | false |Use above value or select another option:1 - Modify "Name"2 - Modify "Listen address"3 - Modify "Listen port"4 - Modify "SSL enabled"5 - Discard ChangesEnter option number to select OR [Exit][Previous][Next]>3、配置被管理server<--------------------- BEA WebLogic Configuration Wizard --------------------->Configure Managed Servers:--------------------------Add or delete configuration information for Managed Servers. A typical production environment has one or more Managed Servers. Each Managed Serveris an instance of WebLogic Server used to host enterprise applications.| Name* | Listen address | Listen port | SSL listen port | SSL enabled |_|_______|________________|_____________|_________________|_____________| Enter name for a new OR [Exit][Previous][Next]> Server11<--------------------- BEA WebLogic Configuration Wizard --------------------->Configure Managed Servers:--------------------------Add or delete configuration information for Managed Servers. A typical production environment has one or more Managed Servers. Each Managed Serveris an instance of WebLogic Server used to host enterprise applications.| Name* | Listen address |Listen port |SSL listen port |SSL enabled | _|_________|___________________|____________|________________|____________| 1->|Server11 |All Local Addresses| 7001 | N/A | false |Use above value or select another option:1 - Modify "Name"2 - Modify "Listen address"3 - Modify "Listen port"4 - Modify "SSL enabled"5 - DoneEnter option number to select OR [Exit][Previous][Next]> 2<--------------------- BEA WebLogic Configuration Wizard --------------------->Configure Managed Servers:--------------------------Add or delete configuration information for Managed Servers. A typical production environment has one or more Managed Servers. Each Managed Serveris an instance of WebLogic Server used to host enterprise applications.| Name* | Listen address |Listen port |SSL listen port |SSL enabled |_|_________|___________________|____________|________________|____________| 1->|Server11 |All Local Addresses| 7001 | N/A | false |Modify "Listen address" OR [Exit][Previous][Next]> 134.32.9.61<--------------------- BEA WebLogic Configuration Wizard --------------------->Configure Managed Servers:--------------------------Add or delete configuration information for Managed Servers. A typical production environment has one or more Managed Servers. Each Managed Serveris an instance of WebLogic Server used to host enterprise applications.| Name* | Listen address | Listen port | SSL listen port | SSL enabled | _|__________|________________|_____________|_________________|_____________| 1->| Server11 | 134.32.9.61 | 7001 | N/A | false |Use above value or select another option:1 - Modify "Name"2 - Modify "Listen address"3 - Modify "Listen port"4 - Modify "SSL enabled"5 - DoneEnter option number to select OR [Exit][Previous][Next]> 3<--------------------- BEA WebLogic Configuration Wizard ---------------------> Configure Managed Servers:--------------------------Add or delete configuration information for Managed Servers. A typical production environment has one or more Managed Servers. Each Managed Serveris an instance of WebLogic Server used to host enterprise applications.| Name* | Listen address | Listen port | SSL listen port | SSL enabled | _|__________|________________|_____________|_________________|_____________| 1->| Server11 | 134.32.9.61 | 7001 | N/A | false |Modify "Listen port" OR [Exit][Previous][Next]> 10011<--------------------- BEA WebLogic Configuration Wizard --------------------->Configure Managed Servers:--------------------------Add or delete configuration information for Managed Servers. A typical production environment has one or more Managed Servers. Each Managed Serveris an instance of WebLogic Server used to host enterprise applications.| Name* | Listen address | Listen port | SSL listen port | SSL enabled | _|__________|________________|_____________|_________________|_____________| 1->| Server11 | 134.32.9.61 | 10011 | N/A | false |Use above value or select another option:1 - Modify "Name"2 - Modify "Listen address"3 - Modify "Listen port"4 - Modify "SSL enabled"5 - DoneEnter option number to select OR [Exit][Previous][Next]> 5<--------------------- BEA WebLogic Configuration Wizard --------------------->Configure Managed Servers:--------------------------Add or delete configuration information for Managed Servers. A typical production environment has one or more Managed Servers. Each Managed Serveris an instance of WebLogic Server used to host enterprise applications.| Name* | Listen address | Listen port | SSL listen port | SSL enabled | _|__________|________________|_____________|_________________|_____________| 1->| Server11 | 134.32.9.61 | 10011 | N/A | false |Use above value or select another option:1 - Add2 - Modify3 - Delete4 - Discard ChangesEnter option number to select OR [Exit][Previous][Next]> 1<--------------------- BEA WebLogic Configuration Wizard --------------------->Configure Managed Servers:--------------------------Add or delete configuration information for Managed Servers. A typical production environment has one or more Managed Servers. Each Managed Serveris an instance of WebLogic Server used to host enterprise applications.| Name* | Listen address | Listen port | SSL listen port | SSL enabled | _|__________|________________|_____________|_________________|_____________| 1->| Server11 | 134.32.9.61 | 10011 | N/A | false |Enter name for a new OR [Exit][Previous][Next]> ProxyServer11<--------------------- BEA WebLogic Configuration Wizard --------------------->Configure Managed Servers:--------------------------Add or delete configuration information for Managed Servers. A typical production environment has one or more Managed Servers. Each Managed Serveris an instance of WebLogic Server used to host enterprise applications.| Name* | Listen address |Listen port|SSL listen port|SSL enabled| _|_____________|__________________|___________|_______________|___________| 1| Server11 | 134.32.9.61 | 10011 | N/A | false | 2->|ProxyServer11|All Local Addre...| 7001 | N/A | false |Use above value or select another option:1 - Modify "Name"2 - Modify "Listen address"3 - Modify "Listen port"4 - Modify "SSL enabled"5 - DoneEnter option number to select OR [Exit][Previous][Next]> 2<--------------------- BEA WebLogic Configuration Wizard --------------------->Configure Managed Servers:--------------------------Add or delete configuration information for Managed Servers. A typical production environment has one or more Managed Servers. Each Managed Serveris an instance of WebLogic Server used to host enterprise applications.| Name* | Listen address |Listen port|SSL listen port|SSL enabled| _|_____________|__________________|___________|_______________|___________| 1| Server11 | 134.32.9.61 | 10011 | N/A | false | 2->|ProxyServer11|All Local Addre...| 7001 | N/A | false |Modify "Listen address" OR [Exit][Previous][Next]> 134.32.9.61<--------------------- BEA WebLogic Configuration Wizard --------------------->Configure Managed Servers:--------------------------Add or delete configuration information for Managed Servers. A typical production environment has one or more Managed Servers. Each Managed Serveris an instance of WebLogic Server used to host enterprise applications.| Name* |Listen address |Listen port |SSL listen port |SSL enabled | _|______________|_______________|____________|________________|____________| 1| Server11 | 134.32.9.61 | 10011 | N/A | false | 2->|ProxyServer11 | 134.32.9.61 | 7001 | N/A | false |Use above value or select another option:1 - Modify "Name"2 - Modify "Listen address"3 - Modify "Listen port"4 - Modify "SSL enabled"5 - DoneEnter option number to select OR [Exit][Previous][Next]> 3<--------------------- BEA WebLogic Configuration Wizard --------------------->Configure Managed Servers:--------------------------Add or delete configuration information for Managed Servers. A typical production environment has one or more Managed Servers. Each Managed Serveris an instance of WebLogic Server used to host enterprise applications.| Name* |Listen address |Listen port |SSL listen port |SSL enabled | _|______________|_______________|____________|________________|____________| 1| Server11 | 134.32.9.61 | 10011 | N/A | false | 2->|ProxyServer11 | 134.32.9.61 | 7001 | N/A | false |Modify "Listen port" OR [Exit][Previous][Next]> 8090<--------------------- BEA WebLogic Configuration Wizard --------------------->Configure Managed Servers:--------------------------Add or delete configuration information for Managed Servers. A typical production environment has one or more Managed Servers. Each Managed Serveris an instance of WebLogic Server used to host enterprise applications.| Name* |Listen address |Listen port |SSL listen port |SSL enabled | _|______________|_______________|____________|________________|____________| 1| Server11 | 134.32.9.61 | 10011 | N/A | false | 2->|ProxyServer11 | 134.32.9.61 | 8090 | N/A | false |Use above value or select another option:1 - Modify "Name"2 - Modify "Listen address"3 - Modify "Listen port"4 - Modify "SSL enabled"5 - DoneEnter option number to select OR [Exit][Previous][Next]> 5继续添加被管理server,最终web1主机上被管理server如下:<--------------------- BEA WebLogic Configuration Wizard --------------------->Configure Managed Servers:--------------------------Add or delete configuration information for Managed Servers. A typical production environment has one or more Managed Servers. Each Managed Serveris an instance of WebLogic Server used to host enterprise applications.| Name* |Listen address |Listen port |SSL listen port |SSL enabled | _|______________|_______________|____________|________________|____________| 1| Server11 | 134.32.9.61 | 10011 | N/A | false | 2| Server12 | 134.32.9.61 | 10012 | N/A | false | 3|ProxyServer11 | 134.32.9.61 | 8090 | N/A | false | 4| Server21 | 134.32.9.138 | 10021 | N/A | false | 5->| Server22 | 134.32.9.138 | 10022 | N/A | false |Use above value or select another option:1 - Add2 - Modify3 - Delete4 - Discard ChangesEnter option number to select OR [Exit][Previous][Next]>4、配置集群<--------------------- BEA WebLogic Configuration Wizard --------------------->Configure Clusters:-------------------Add or delete configuration information for clusters. A cluster contains multiple WebLogic Server instances that run simultaneously and worktogether to provide increased scalability and reliability. A clusterappears to be a single WebLogic Server instance to clients.| Name* | Multicast address | Multicast port | Cluster address |_|_______|___________________|________________|_________________|Enter name for a new Cluster OR [Exit][Previous][Next]> elnclu1<--------------------- BEA WebLogic Configuration Wizard --------------------->Configure Clusters:-------------------Add or delete configuration information for clusters. A cluster contains multiple WebLogic Server instances that run simultaneously and worktogether to provide increased scalability and reliability. A clusterappears to be a single WebLogic Server instance to clients.| Name* | Multicast address | Multicast port | Cluster address |_|_________|___________________|________________|_________________|1->| elnclu1 | 239.192.0.0 | 7001 | |Use above value or select another option:1 - Modify "Name"2 - Modify "Multicast address"3 - Modify "Multicast port"4 - Modify "Cluster address"5 - DoneEnter option number to select OR [Exit][Previous][Next]> 3<--------------------- BEA WebLogic Configuration Wizard --------------------->Configure Clusters:-------------------Add or delete configuration information for clusters. A cluster contains multiple WebLogic Server instances that run simultaneously and worktogether to provide increased scalability and reliability. A clusterappears to be a single WebLogic Server instance to clients.| Name* | Multicast address | Multicast port | Cluster address |_|_________|___________________|________________|_________________|1->| elnclu1 | 239.192.0.0 | 7001 | |Modify "Multicast port" OR [Exit][Previous][Next]> 7777<--------------------- BEA WebLogic Configuration Wizard --------------------->Configure Clusters:-------------------Add or delete configuration information for clusters. A cluster contains multiple WebLogic Server instances that run simultaneously and worktogether to provide increased scalability and reliability. A clusterappears to be a single WebLogic Server instance to clients.| Name* | Multicast address | Multicast port | Cluster address |_|_________|___________________|________________|_________________|1->| elnclu1 | 239.192.0.0 | 7777 | |Use above value or select another option:1 - Modify "Name"2 - Modify "Multicast address"3 - Modify "Multicast port"4 - Modify "Cluster address"5 - DoneEnter option number to select OR [Exit][Previous][Next]> 5<--------------------- BEA WebLogic Configuration Wizard --------------------->Configure Clusters:-------------------Add or delete configuration information for clusters. A cluster contains multiple WebLogic Server instances that run simultaneously and worktogether to provide increased scalability and reliability. A clusterappears to be a single WebLogic Server instance to clients.| Name* | Multicast address | Multicast port | Cluster address |_|_________|___________________|________________|_________________|1->| elnclu1 | 239.192.0.0 | 7777 | |Use above value or select another option:1 - Add Cluster2 - Modify Cluster3 - Delete Cluster4 - Discard ChangesEnter option number to select OR [Exit][Previous][Next]><--------------------- BEA WebLogic Configuration Wizard --------------------->Assign Servers to Clusters:---------------------------Assign Managed Servers to a cluster in the domain.Cluster|_____elnclu1 [1]Enter number exactly as it appears in brackets to toggle selection OR [Exit][Previous][Next]> 1<--------------------- BEA WebLogic Configuration Wizard --------------------->Assign Servers to Clusters:---------------------------Assign Managed Servers to a cluster in the domain.*Select WebLogic Servers and assign them to a cluster. elnclu11|Server112|Server123|ProxyServer114|Server215|Server22Use above value or select another option:1 - Select2 - Select AllEnter option number to select OR [Exit][Discard][Accept]> 1<--------------------- BEA WebLogic Configuration Wizard --------------------->Assign Servers to Clusters:---------------------------Assign Managed Servers to a cluster in the domain.*Select WebLogic Servers and assign them to a cluster. elnclu11|Server112|Server123|ProxyServer114|Server215|Server22Select( Enter index numbers and/or index ranges separated by commas. For example, 1, 4-5 ) OR [Exit][Discard][Accept]> 1<--------------------- BEA WebLogic Configuration Wizard --------------------->Assign Servers to Clusters:---------------------------Assign Managed Servers to a cluster in the domain.*Select WebLogic Servers and assign them to a cluster. elnclu1->1|Server112|Server123|ProxyServer11。
WebLogic集群详细方案

From here数据库层:数据库:oracle 10g 数据库服务器:2台以上F5 设备:2台部署图:采用RAID 0+1的磁盘阵列部署描述:1.F5虚拟地址作为对数据用户的唯一地址。
2.F5有主备2台设备,相互之间部署心跳线,在F5的配置中设定其中一台作为主机,配置心跳的告警设置和数据库服务器的告警设置。
3.ORACLE需要安装F5的管理插件以监控数据库服务器性能参数和状态。
4.数据库采用RAC的方式进行集群,数据库之间有心跳线。
5.服务器Cluster需要一个统一的时间,在整个应用中由统一的服务器提供同步服务。
6.在数据库服务器集群和文件系统之间的交换机需要有主备线路。
访问控制:1.对F5虚拟地址的访问需要在数据库防火墙中配置白名单2.数据库的实地址只有DBA等数据库管理角色才能访问负载均衡:1.F5设备通过在Oracle服务器上的插件获取各个数据库本身的连接数,内存使用量,CPU占用率等参数,以及在F5配置中设置负载分发的规则来分发对数据库的真实访问。
2.对于数据库Cluster来说,采用10g以上版本的RAC的方式会有一个公用的缓存区。
数据安全:1.在文件系统中采用RAID 0+1的方式进行数据存放和备份2.磁带库作为文件系统的最终容灾备份。
故障处理:1.在F5主机出现故障时,由F5备用的心跳监控到并做自动切换,同时可以按告警配置进行对应操作。
2.数据库节点中一台出现问题时,会由别的节点接手,同时F5会监控到数据库的状态出现异常并按照告警配置进行对应操作,例如【发送告警邮件】等。
3.在数据库集群和文件系统的网络中,当主要线路出现问题,由备用线路接手。
优点:1.可扩展性好,在性能出现瓶颈的时候不需要修改整体布局,只需要增加服务器并配置2.可靠性好,所有设备都至少有一个备用节点。
3.访问无缝隙,对于用户来说只有一个访问接口,对于内部所有节点的备用节点都能实现自动切换或自动故障点剔除。
缺点:1.采用RAC进行数据库集群需要一个统一的文件存取管理系统,数据和存取基于网络,对网络性能和稳定性要求非常高。
Weblogic 集群配置方案
Weblogic 集群配置文章分类:互联网1、Weblogic10.3.1.0.0集群配置要求1、两台在同一网段的,可以相互访问的计算机。
2、两台计算机都安装了Weblogic10.3.1.0.0版本的应用服务器。
3、安装介质注意:集群中的Weblogic版本一定要相同。
2、Weblogic集群规划1、集群规划(两台物理机分别为称为机器A和机器B)机器名称硬件配置服务器名机器类型AdminServer(admin)PC机器A IP:192.168.10.214 PORT:7001ProxyServer_1PC机器A IP:192.168.10.214 PORT:7004PC机器A IP:192.168.10.214 PORT:ManagedServer_17002PC机器B IP:192.168.10.88 PORT:7003ManagedServer_23、Weblogic集群配置(机器A)1、「开始」菜单\程序\Oracle WebLogic (BEAHOME 1)\WebLogic Server10gR3\Tools\Configuration Wizard,单击启动Configuration Wizard,默认点击Next2、默认,点击Next3、输入Weblogic管理员密码,点击Next4、选中Production Mode,点击Next5、选中Yes,点击Next6、默认,点击Next7、默认,点击Next8、新增管理服务器,填写管理服务器的Name,Listen address,Listen port,完成管理服务器添加,点击Next9、添加Clusters,完成cluter添加,点击Next10、把Server栏的服务器添加到Cluster栏中,点击Next11、默认,点击Next12、默认,点击Next13、在Domain name中输入TestDomain,点击Create14、选中Start Admin Server,点击Done完成A机器上的集群配置。
Weblogic部署手册配置

Weblogic 集群配置手册一.配之前的准备二.配置过程(一)创建新域。
输入命名“./config.sh”,选择下一步。
(二)选择安装域源。
选择安装“WebLogicServer”,选择下一步。
(三)配置管理员用户和密码。
输入Weblogic管理服务器(AdminServer)的用户和密码,本次上线使用的用户名(username)为weblogic,密码(password)为weblogic_cpds。
(四)配置域启动模式和JDK。
在开发模式和生成模式中选择生产模式,JDK选择JRockt SDK。
(五)选择是否自定义环境和服务设置。
在是否选择是否自定义环境和服务设置中选择“是”。
(六)配置管理服务器。
输入Administrator Sever的名称,监听地址,监听端口。
此次上线的Administrator Server的名称为AdminServer,监听地址为12.8.16.72,监听端口为7001。
(七)配置受管服务器输入ManagedSever的名称,监听地址,监听端口。
此次上线的ManagedServer的名称为cpds_server_1,监听地址为12.8.16.72,监听端口为7003。
输入ManagedSever的名称,监听地址,监听端口。
此次上线的ManagedServer的名称为cpds_server_2,监听地址为12.8.16.73,监听端口为7003。
(八)配置代理服务器(代理服务器也是一个受管理服务器)输入ManagedSever的名称,监听地址,监听端口。
此次上线的ManagedServer的名称为proxyserver,监听地址为12.8.16.72,监听端口为8080。
(九)配置集群信息。
添加集群,Cluster的名称为cpds_cluster,将受管理服务器添加到集群中。
(十)检查Weblogic域。
检查之步骤中所有的配置,如果没有问题可以进入下一步。
(十一)创建Weblogic域。
一步一步学WebLogic集群配置(Windows环境)

一步一步学WebLogic 集群配置(Windows XP+WebLogic923)版本说明概要描述本例测试例规划一、安装篇1.安装WebLogic1) WebLogic安装过程2) 安装WebLogic完成后生成的目录结构如下2.Apache安装1) Apache安装过程2) 安装Apache完成后生成的目录结构3) 自动生成Apache启动服务4) 测试安装Apache是否成功二、配置篇1.WebLogic配置1) 从开始菜单→BEA Products→Tools→ConfigurationWizard启动2) 创建域A.Create a new WebLogic domainB.Select Domain SourceC.Configure Administrator UserName and PasswordD.Configure Server Start Mode And JDKE.Customize Environment And Services SettingsF.Configure the Administration ServerG.Configure Managed ServersH.Configure ClustersI.Assign Servers to ClustersJ.Configure MachinesK.Assign Servers to MachinesL.Review WebLogic DomainM.Create WebLogic DomainN.Creating DomainO.配置Domain成功后生成的目录结构3) 配置域启动信息A.新增启动用户名、密码文件B.初始化各个Server内存参数大小C.拷贝bin目录底下的startManagedWebLogic.cmd到域目录底下D.分别重命名为startServer7081.cmd、startServer7082.cmdE.修改startServer7081.cmd文件对应的SERVER_NAMEF.修改startServer7082.cmd文件对应的SERVER_NAMEG.修改各Server控制台日志文件输出位置4) 启动域A.双击startWebLogic.cmd启动域5) 配置Data Sources A. 配置Data Source 过程B.点击“Activ ate Changes”按钮生效变更配置C.类似创建其它Data Source6) 配置Multi Data SourcesA.配置Multi Data Source过程B.类似创建其它Multi Data Source7) 部署应用服务A.先在本地取得某应用程序拷贝文件(集群多机器需分别拷贝,且目录位置一致)B.分别修改ManagedServer底下的Staging Mode模式为nostageC.重新启动所有的Server(第一次启动ManagedServer,需保证AdminServer处于已启动状态)D.部署应用服务过程E.启动应用Servicing all requestsF.类似部署其它应用G.配置应用复制session信息修改对应的App\WEB-INF\底下的weblogic.xml文件,可用于复制server间的session信息。
weblogic集群配置方法-具体实施步骤1

weblogic集群配置方法案例所属系统应用服务器weblogic1,weblogic2案例现象应用服务器,主机8G内存,目前使用情况:主机weblogic1为了提高内存使用率,准备在两台主机上各新增一个域,并配置集群,然后部署应用。
案例平台环境查看主机信息[weblogic@weblogic1 ~]$ uname -aLinux weblogic1 2.6.18-128.el5 #1 SMP Wed Dec 17 11:41:38 EST 2008 x86_64 x86_64 x86_64 GNU/Linux[weblogic@weblogic2 bin]$ uname -aLinux weblogic2 2.6.18-128.el5 #1 SMP Wed Dec 17 11:41:38 EST 2008 x86_64 x86_64 x86_64 GNU/Linux查看weblogic版本信息[weblogic@weblogic1 ~]$ cat /home/weblogic/bea/logs/log.txtNov 24, 2010 9:15:28 PM -- install "WebLogic Platform" 9.2.3.0 at /home/weblogic/bea/weblogic92release 9.2.3.0 [Added]|_____WebLogic Server [Added]| |_____Server [Added]| |_____Server Examples [Added]|_____Workshop for WebLogic Platform [Added]|_____Workshop [Added]|_____Workshop Examples [Added][weblogic@weblogic2 logs]$ cat /home/weblogic/bea/logs/log.txtNov 24, 2010 2:56:10 PM -- install "WebLogic Platform" 9.2.3.0 at /home/weblogic/bea/weblogic92release 9.2.3.0 [Added]|_____WebLogic Server [Added]| |_____Server [Added]| |_____Server Examples [Added]|_____Workshop for WebLogic Platform [Added]|_____Workshop [Added]|_____Workshop Examples [Added]查看JDK信息[weblogic@weblogic1 logs]$ echo $JA V A_HOME/usr/local/jdk1.5.0_21[weblogic@weblogic2 logs]$ echo $JA V A_HOME/usr/local/jdk1.5.0_21查看ip地址信息[root@weblogic1 ~]# ifconfig eth0eth0 Link encap:Ethernet HWaddr 00:50:56:B9:00:01inet addr:172.22.0.12 Bcast:172.22.0.255 Mask:255.255.255.0inet6 addr: fe80::250:56ff:feb9:1/64 Scope:LinkUP BROADCAST RUNNING MULTICAST MTU:1500 Metric:1RX packets:598544 errors:0 dropped:0 overruns:0 frame:0TX packets:1863036 errors:0 dropped:0 overruns:0 carrier:0collisions:0 txqueuelen:1000RX bytes:52714000 (50.2 MiB) TX bytes:2139395347 (1.9 GiB)Base address:0x2000 Memory:d8840000-d8860000[root@weblogic2 ~]# ifconfig eth0eth0 Link encap:Ethernet HWaddr 00:0C:29:CD:80:D2inet addr:172.22.0.13 Bcast:172.22.0.255 Mask:255.255.255.0inet6 addr: fe80::20c:29ff:fecd:80d2/64 Scope:LinkUP BROADCAST RUNNING MULTICAST MTU:1500 Metric:1RX packets:348063 errors:0 dropped:0 overruns:0 frame:0TX packets:200615 errors:0 dropped:0 overruns:0 carrier:0collisions:0 txqueuelen:1000RX bytes:436311559 (416.0 MiB) TX bytes:19902363 (18.9 MiB)Base address:0x2000 Memory:d8820000-d8840000主机结构域和集群信息案例分析过程两台应用服务器,主机8G内存,目前使用率较低,为了提高内存使用率,准备在两台主机上各新增一个域,并配置weblogic集群,然后部署应用(还要修改F5配置)。
weblogic 集群配置

Machine-Node Server 图示
Cluster
WebLogic Server 群集由多个 WebLogic Server 服务器实例组成,这些服务器实例同 时运行并一起工作以提高可缩放性和可靠性。 对于客户端而言,群集是一个 WebLogic Server 实例。构成群集的服务器实例可以在 同一台计算机上运行,也可以位于不同的计算 机上。群集中的每个服务器实例必须运行同一 版本的 WebLogic Server 。
Domain定义三
群集中的所有的服务器实例必须驻留在同一域 中;不能将群集“拆分”到多个域中。同样, 不能在域之间共享配置的资源或子系统。例如, 如果在一个域中创建了 JDBC 连接缓冲池, 则不能将其用于另一个域中的服务器实例或群 集。(而是必须在另一个域中创建类似的连接 缓冲池)。
Domain图示
Domain Administrator Server Managed Server Machine Node Manager Cluster
Domain定义一
Domain是WebLogic Server实例的基本管理 单元。由配置为Administrator Server的 WebLogic Server实例管理的逻辑单元,这个 单元是所有相关资源的集合。中心配置文件叫 config.xml 。
Administrator Server图示
Managed Server定义一
被管理服务器是用来部署运行各种
应用程序的。一个域中有一台或多 台被管理服务器。
Managed Server定义二
在生产环境中,域由一个管理服务器与多个被 管服务器组成。在启动这个域的被管服务器时, 首先必须先启动管理服务器,被管服务器启动 时,会被命令从管理服务器获得配置信息。这 样,管理服务器就成为整个域的配置控制中心。 一个域只能有一个活动的管理服务器。被管服 务器和管理服务器是多对一的,并且被管服务 器由管理服务器统一管理。
SSL下Apache代理Weblogic集群配置手册-V1.0

远光软件股份有限公司ERP软件部 SSL下Apache代理Weblogic集群配置手册版本 <1.0>修订历史记录目录1.简介 (4)1.1目的 (4)1.2范围 (4)1.3定义、首字母缩写词和缩略语 (4)1.4参考资料 (4)1.5概述 (4)2.配置WE BLOGIC集群 (4)3.构建证书和证书库 (4)3.1下载安装必须软件 (4)3.2构建CA体系 (4)3.3构建J AVA证书库 (17)4.部署证书库和配置SSL (22)5.配置APACHE HTTP S ERVER (24)5.1下载安装A PACHE HTTP S ERVER (24)5.2配置HTTP S ERVER (24)5.3启动HTTP S ERVER (27)6.补充 (27)SSL下Apache代理Weblogic集群配置手册1.简介本文档包括了SSL下Apache代理Weblogic集群配置方法。
1.1目的1.2范围Weblogic集群、Apache HTTP Server1.3定义、首字母缩写词和缩略语1.4参考资料1.5概述2.配置Weblogic集群)Apache HTTP Server本文档应用的集群环境如上所示,其中Weblogic9.2的安装、Weblogic域的创建与配置、集群节点的创建、安装FMIS服务端这些操作请参考“Weblogic92安装配置手册-初级”和“Weblogic92安装配置手册-中级”,在此不再赘述。
集群节点server1和server2对Http请求的监听端口为7011和7012,对于Https请求的监听端口都为8008。
3.构建证书和证书库3.1下载安装必须软件本文中用XCA构建CA体系,用KeytoolGUI生成证书库(也可以用SecureX的Eclipse插件),本文附件中提供了相应的安装程序,也可以去网上搜索下载最新版本。
本节要用到软件如下图:根据安装向导的提示完成安装即可,对于SecureX的Eclipse插件的安装,可使用link的方式。
Weblogic12c-集群-代理安装配置手册-初级V1.0

软件室 Weblogic12 C安装配置手册-初级版本 <1.0>修订历史记录目录1.简介 (4)1.1目的 (4)1.2范围 (4)1.3定义、首字母缩写词和缩略语 (4)1.4参考资料 (4)1.5概述 (4)2.部署前准备工作 (4)2.1JDK环境安装(使用ROOT用户) (4)2.2H OSTS文件配置和多台WEBLOGIC集群说明(使用ROOT用户) (5)2.3创建WEBLOGIC用户和用户组(使用ROOT用户) (6)3.WEBLOGIC12C的安装(在桌面模式下进行安装,非命令行模式) (6)3.1运行安装程序 (6)3.2安装步骤图片展示 (7)4.创建WEBLOGIC域(DOMAIN) (15)4.1运行配置向导 (15)4.2选择D OMAIN S OURCE (19)4.3输入管理员用户名称和密码 (21)4.4选择WEBLOGIC启动模式和JDK (21)4.5选择定制配置和集群服务器配置选择说明 (23)4.6配置管理节点 (23)4.7W EB容器服务配置 (25)4.8集群配置 (26)4.9其他配置图解 (29)5.WEBLOGIC 启动和JVM内存设置 (33)5.1节点配置 (33)5.2W EBLOGIC手动启动(使用WEBLOGIC用户) (33)5.2.1启动管理服务(使用weblogic用户) (33)5.2.2启动web容器节点(使用weblogic用户) (34)5.2.3访问地址 (34)5.3生产模式免密码和后台启动(使用WEBLOGIC用户操作命令) (34)5.4开机自启动服务配置和设置(使用ROOT用户) (35)5.5关闭WEBLOGIC (39)5.6调整WEBLGOC的运行JVM内存 (39)Weblogic12c安装配置手册-初级1.简介本文档是对以前的weblogic12c安装配置手册的整理和总结,包括在日常维护过程中常出现的问题及解决方法。
WEBLOGIC+集群SERVICE配置步骤

WEBLOGIC集群SERVICE配置步骤一、管理机和受管机在同一台机器上的配置方式1.登陆weblogic控制台。
2.把集群中所有weblogic服务关闭.3.配置管理机,登陆192.169.8.17,在路径“d:\bea816\user_projects\domains\mydomain”下找到“installService.cmd”文件,将其备份。
4.用文本编辑器打开“installService.cmd”,输入“-delay:240000”指令,见下图:5.接着在该文件中找到设置用户和密码的地方,把该集群的用户和密码写在相应位置的等号右边。
假定用户名和密码都是weblogic, 见下图:6.修改服务名@rem Set SERVER_NAME to the name of the server you wish to start up.set SERVER_NAME=myserver(注意这个地方一定要和原来集群里安装的管理服务名一样,如果不一样weblogic服务起不了)7.然后安装管理机到windows系统的service中。
安装的方式是双击该脚本,在service中就能看到一个服务项,名称是beasvc+””+创建集群的域名+”_”+服务器名。
这里的情况下应该是:beasvc mydomain_myserver.8.配置ip地址为192.169.8.17的受管机,同样在刚才修改的“installService.cmd”文件中,把先前配置管理机器的指令“-delay:240000”删除,再在同样的位置添加指令-depend: “beasvc mydomain_myserver”,见下图:见下图:10.由于管理机和受管机是同一台机器,且生成service的时候都要用到该文件,所以在生成受管机的service的时候,参数set SERVER_NAME=myserver中的myserver字符串要改成受管机的名称。
Linux下Weblogic集群配置

Weblogic集群是一个weblogic Server组,在一个集群中的服务器可以获得集群范围的命名服务、负载平衡以及容错等功能。
<------- BEA WebLogic Configuration Wizard -------->
Configure the Administration Server:
------------------------------------
Enter adminstration server configurations. Each WebLogic Server domain must have one Administration Server. The
3|Avitek Medical Records Sample Domain8.1.4.0
| BEA Systems, Inc.
| Create the Avitek Medical Records domain in a directory outside of the installed kit. The Avitek Medical Records is
建立管理服务器
启动linux下的配置向导
进入bea目录下的weblogic81/common/bin目录输入./config.sh,这里使用的终端登陆,所以没有图形环境,程序会以控制台模式启动
第一步:选择建立新的域:
启动配置向导后,系统提示如下:
<------- BEA WebLogic Configuration Wizard---------->
【VIP专享】Weblogic集群配置
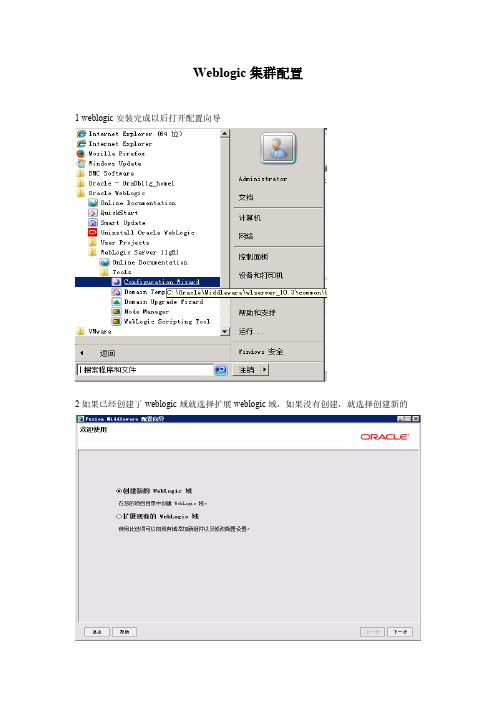
Weblogic集群配置1 weblogic安装完成以后打开配置向导2如果已经创建了weblogic域就选择扩展weblogic域,如果没有创建,就选择创建新的3选择生成一个自动配置域4修改域名5输入用户名及口令6选择生产模式7第一台选择管理服务器,受管服务器两项,第二三台,只选择第二项8配置管理服务器IP及端口9配置3台受管服务器IP及端口10不用配置,直接下一步11配置3台计算机的IP及端口12将服务器添加到对应的计算机13选择创建14点击完成,并启动管理服务器16到C:\Oracle\Middleware\wlserver_10.3\common下复制nodemanager文件夹到C:\Oracle\Middleware\user_projects\domains目录下17修改文件nodemanager.properties将路径改成nodemanager文件夹的真实路径18将startNodeManager.cmd复制到nodemanager下面,并打开编辑将NODEMGR_HOME 也改成nodemanager文件夹真实路径19重复1-18步的操作安装第2,3台计算机20第一台启动管理服务器,3台都启动节点服务器startNodeManager.cmd,在第一台上访问weblogic,选择环境-服务器,点击对应服务器,切换到控制界面,点击启动将3台服务器全部启动。
启动单台节点服务器可使用命令:C:\Oracle\Middleware\user_projects\domains\base_domain\bin\startManagedWebLogic.cmd mSrv1 http:\\localhost:7001。
Weblogic集群配置

Weblogic集群配置1 weblogic安装完成以后打开配置向导2如果已经创建了weblogic域就选择扩展weblogic域,如果没有创建,就选择创建新的3选择生成一个自动配置域4修改域名5输入用户名及口令6选择生产模式7第一台选择管理服务器,受管服务器两项,第二三台,只选择第二项8配置管理服务器IP及端口9配置3台受管服务器IP及端口10不用配置,直接下一步11配置3台计算机的IP及端口12将服务器添加到对应的计算机13选择创建14点击完成,并启动管理服务器16到C:\Oracle\Middleware\wlserver_10.3\common下复制nodemanager文件夹到C:\Oracle\Middleware\user_projects\domains目录下17修改文件nodemanager.properties将路径改成nodemanager文件夹的真实路径18将startNodeManager.cmd复制到nodemanager下面,并打开编辑将NODEMGR_HOME 也改成nodemanager文件夹真实路径19重复1-18步的操作安装第2,3台计算机20第一台启动管理服务器,3台都启动节点服务器startNodeManager.cmd,在第一台上访问weblogic,选择环境-服务器,点击对应服务器,切换到控制界面,点击启动将3台服务器全部启动。
启动单台节点服务器可使用命令:C:\Oracle\Middleware\user_projects\domains\base_domain\bin\startManagedWebLogic.cmd mSrv1 http:\\localhost:7001。
Weblogic集群配置(附带截图)
Weblogic集群配置(附带截图)1.1.1本节样例部署方案描述本文中将以如下部署方案进行说明:1)单机环境下做集群,服务器ip地址192.168.71.2082)Weblogic安装跟路径WEBLOGIC_HOME=/opt/bea3)JVM安装根路径JA VA_HOME=/opt/java1.44)WebLogic域建立在%WEBLOGIC_HOME%/user_projects/domains 下,域名为:siClusterDomain5)应用程序部署在%WEBLOGIC_HOME%/user_projects/applications 下6)日志文件放在siClusterDomain下7)siClusterDomain 下WebLogic Server的建立:adminServer: 192.168.71.208:7010 管理使用appServer1 : 192.168.71.208:7011 部署社保应用appServer2 : 192.168.71.208:7012 部署社保应用proxyServer: 192.168.71.208:7013 部署代理应用updateServer: 192.168.71.208:7014 部署版本分发应用,用于客户端程序更新本例中使用软件负载均衡器进行分发处理,实施中如果使用硬件负载均衡器,则跳过proxyServer的建立及代理应用的部署环节。
8)appServer1和appServer2上java虚拟机内存分配:各1843M 32位java虚拟机下,内存分配最大1.8G(即1843M),不能超过1.8G9)建立集群名称为:myCluster,包含appServer1和appServer2数据库服务器192.168.71.218:1521:orcl,支撑数据库用户名/密码为drm_hnsimis/drm_hnsimis,业务数据库的用户名/密码为hnsimis/hnsimis1.1.2创建Domain、Server和Cluster输入密码登陆服务器:Wizard。
- 1、下载文档前请自行甄别文档内容的完整性,平台不提供额外的编辑、内容补充、找答案等附加服务。
- 2、"仅部分预览"的文档,不可在线预览部分如存在完整性等问题,可反馈申请退款(可完整预览的文档不适用该条件!)。
- 3、如文档侵犯您的权益,请联系客服反馈,我们会尽快为您处理(人工客服工作时间:9:00-18:30)。
Weblogic 集群配置手册
使用Domain Configuration Wizard进行配置
创建新的Domain
输入命令“./config.sh”,单击“下一步”按钮,如果没有配置环境路径,可进入/../weblogic/Oracle/Middleware/wlserver_10.3/common/bin/安装目录执行。
选择安装域源
选择安装“WebLogic Server”,单击“下一步”按钮
指定域名和位置
输入域名,单击“下一步”按钮。
配置管理员用户名和密码
输入Weblogic管理员管理服务器(AdminServer)的用户名和密码,在此以“sxscms”作用登录管理服务器的用户名,密码welcome1,单击“下一步”按钮
配置域启动模式和JDK
选择“生产模式”和“JRockt SDK”后,单击“下一步”按钮
选择可选配置
选择“管理服务器”和“受管服务器,集群和计算机”,单击“下一步”按钮。
配置管理服务器
根据集群配置前的规划,输入Administrator Server的名称,监听地址,监听端口,如果需要SSL支持的话可以在“SSL enabled”后面的复选取框上打勾,配置SSL监听端口,单击“下一步”按钮。
配置受管理服务器(代理服务器实际上也是一个受管理服务
器)
根据集群配置规划输入Managed Server的名称,监听地址,监听端口,如果需要SSL 支持的话,可以在“SSL enabled”复选框上打勾,配置SSL监听端口。
可以配置多个Managed Server。
单击“下一步”按钮
配置群集信息
单击“添加”,输入Cluster的名称,Cluster messaging mode默认即可,Cluster address 输入210.41.121.134:7082,210.41.121.135:7080。
单击“下一步”按钮
(注)Cluster address的值就是受管理服务器的IP地址:端口号,以逗号隔开。
将“受管理服务器”添加到“集群”中
选择左面列表中的Managed_Server_x,将其添加到右面的列表中,这里代理服务器(Proxy_Server)不要添加到右边,单击“下一步”按钮
创建HTTP代理应用程序
选中“创建Http代理”,代理服务器选择前面没有加入sxscmsCluster的Proxy_Server,单击“下一步”按钮
配置计算机
在此不对计算机进行配置,单击“下一步”按钮
检查Weblogic域
在此检查前面所做的配置,如果没有问题单击“创建”按钮
正在创建域
创建无误后,单击“完成”按钮
编辑启动WebLogic服务文件
编辑口令文件
在刚才创建的域目录下建立boot.properties文件,内容为:
username=sxscms
password=weblogic1
编辑启动管理服务器的文件
在刚才创建的域目录下的bin目录中创建startAdminServer.sh,内容为:
./startWebLogic.sh
编辑启动代理服务器的文件
在刚才创建的域目录下的bin目录中创建startProxyServer.sh,内容为:
./startManagedWebLogic.sh Proxy_Server http://210.41.121.134:7001
编辑启动受管理服务器(ManagedServer_1)的文件
在刚才创建的域目录下的bin目录中创建startManagedServer_1.sh,内容为:
./startManagedWebLogic.sh Managed_Server_1 http://210.41.121.134:7001
(注:Proxy_Server, Managed_Server_1名称一定要和规划的名称一致。
)
注意:所有的端口号都是一致的都是7001,在Server文件夹下面都要加一个security文件夹,然
后把boot.properties文件放进去。
Windows里面用
的是.cmd,Linux中用的是.sh
在其它机器上配置受管理服务器
一.按默认情况按装Weblogic 10.3
二.启动Weblogic域配置向导,按默认选择,直接单击“下一步”
三.选择域源
按默认选择,单击“下一步”
输入域名,单击“下一步”按钮。
五.配置管理员用户名和密码
输入管理员的用户名和密码,这里为:用户名sxscms,密码welcome1,完成后单击“下一步”
六.配置服务器启动模式和JDK
这里选择“生产模式”,JDK选择“JRockit JDK”,完成后单击“下一步”。
七.选择可选配置
选择“管理服务器”和“受管服务器,集群和计算机”,单击“下一步”
八.配置管理服务器
输入本机的管理服务器名称和地址以及端口号,完成后单击“下一步”。
九.配置受管理服务器
这是一是重点,在这里设置的受管理服务器名称和IP地址以及端口号要与群集服务器上设置的一致,完成后单击“下一步”。
一〇.配置集群
这里也与群集服务器配置不同,在这里不做任何处理直接单击“下一步”。
一一.配置计算机
这一步我们也不做处理,直接单击“下一步”。
一二.检查Weblogic域
检查你做的配置是否正确,完成后单击“下一步”。
一三.正在创建域
稍等待创建完成后单击“完成”。
一四.编辑启动文件
在刚才创建的域目录下的bin目录中创建startManagedServer_2.sh,内容为:
./startManagedWebLogic.sh Managed_Server_2 http://210.41.121.134:7001
注:windows环境下将.sh改为.cmd,不需要”./”不在赘述.
启动WebLogic服务
在集群服务器上所创建的域的bin中做如下操作。
输入命令“./startAdminServer.sh”启动管理服务器
输入命令“./startProxyServer.sh”启动代理服务器
输入命令“./startManagedServer_1.sh”启动受管理服务器1
(注:./startAdminServer.sh命令启动完成后,再启动别的命令,需要输入管理员用户名和密码sxscms:welcome1)
在其它受管理服务器的bin目录下做如下操作。
输入命令“./startManagedServer_2.sh”启动受管理服务器2(注意:中间会要你输入管理域的用户名和密码)
部署WEB应用
进入Console控制台(http://210.41.121.134:7001/console)。
进入console控制台后,在左边域结构树中点击“环境”前的“+”,
在展开的菜单中点击“服务器”,在右边的列表中可以看到各服务器是否正常启动。
如果正常启动则单击“部署”,再单击“锁定编辑”,
再单击“安装”,选择要部署的WEB应用程序
完成后,单击“下一步”,再单击“下一步”,
选择群集“myCluster”,再选择“群集中的所有服务器”,之后单击“下一步”,选中“将此应用程序复制到每个目标”再单击“完成”。
再单击左上角的“激活更改”。
启动WEB应用
进入Console控制台(http://10.0.10.149:7001/console)。
进入console控制台后,点击“部署”
选中列表中的应用,然后选择“为所有请求提供服务”,再单击“是”。
看到状态是“活动”就表示WEB应用启动完成。
测试集群的分发功能
Session共享问题测试
一.编辑weblogic.xml配置文件放到WEB应用程序的WEB-INF目录下,内容如下:
<?xml version="1.0" encoding="UTF-8"?>
<weblogic-web-app xmlns="/ns/weblogic/90">
<session-descriptor>
<debug-enabled>true</debug-enabled>
<persistent-store-type>replicated</persistent-store-type>
<sharing-enabled>true</sharing-enabled>
</session-descriptor>
<context-root>/</context-root>
</weblogic-web-app>
二.在IE地址栏中输入http://210.41.121.134:8080/,并登录系统执行业务操作,这时
你可以随便关闭或打开Managed_Server_1或Managed_Server2,只要保持有一个
Managed_Server是启动状态,业务操作仍可继续执行,不必重新登录。
集群配置中要注意的问题
AdminServer只用于集群的管理,而不能参与集群事务。
Web应用应该部署到集群上,文件的同步是由WebLogic来完成的。