猫眼 cateye velo 7 & velo 8使用说明
cateye猫眼码表 设置说明书
CATEYE MITY3 和 ENDURO2码表的使用说明1.MITY3和ENDURO2的初始设置(a):第一次设置码表的微处理器,首先同时按住3个键清除所有设置提示:把码表倒置,按住ST。
/STOP 和MODE键,然后用铅笔或其他尖锐物戳SET键(b):液晶屏上的显示会闪一下然后消失,只剩下一个闪动的K。
K表示公里/小时,M表示英里/小时,用MODE 键选择您所需的速度制式。
注意您所选择的制式的指令时钟功能为12小时或24小时制,K为24小时制,M为12小时制。
按ST./STOP键确定您选择的制式。
(c):\"210\"将会闪动,这是为了调整700*23C轮胎设置的。
请在您的手册或我们的网站中查询轮径参数。
请注意这个数字事实上是您骑车时的车胎旋转滚动一周的距离(厘米)。
如果您想输入最精确的参数请您动手测量。
(d):按MODE键增加参数,按ST./STOP键减少参数。
按码表背后的SET键确定参数。
现在您的码表已设置完备。
2.按键使用说明码表右边的按键是MODE键,左边的按键是ST./STOP键。
您可以用MODE键通过模式完成控制。
当屏幕显示耗用时间功能(TM)时,按MODE键转换到平均速度功能(AV),再次按MODE键转换到里程1功能,这是标准骑行里程功能。
此时按MODE键回到时间功能。
耗用时间功能的附属功能是时钟功能。
在耗用时间功能下按住MODE键2秒,即转为时钟功能,再次按MODE键则回到耗用时间功能。
平均速度功能的附属功能是最大时速功能(MX),使用方法同上。
里程1有2个附属功能。
按住MODE键2秒即转为里程2。
里程2是一个单独的计程功能,它能在别的参数保留的情况下单独清空。
只要同时按住ST./STOP和MODE键一秒即可。
在里程2功能下,按住MODE键2秒转为总里程功能(ODO)。
在里程2或总里程功能下按MODE键即可回到里程1功能。
3 (1) 设置功能和里程功能同时按住ST。
猫眼MSC-CY300码表中文说明书
感谢您购买 CATEYE Q3a Multi-Sport Computer 多功能运动手表。 Q3a 是一款附加有秒表功能的手表型心率监测器,能协助运动选手们更安全、 更科学地进行运动训练。 整合型踏频/速度传感器与心率传感器两者皆采用 2.4 GHz 频率数字无线技 术此种用于无线网络等日常设备的相同技术。此一技术可使计测不易受外部 信号干扰,能够记录和保存高信赖度的数据。 使用前请彻底阅读本份使用手册与熟悉手表的各项功能,并将手册妥为保存 以供未来参考之用。
继续 简体中文 -3
海拔高度与大气压力 之间关系. ........................................ 62 与天气和海拔高度 有关之知识. ................................... 62 心率训练..................................63 目标心率区. ................................... 63 比赛训练. ........................................ 66 目标区之运用. .............................. 67 故障排除..................................68 显示问题. ........................................ 68 操作问题. ........................................ 70 手表之防水性..........................71 从事水上和室外活动之前. ..... 71 更换电池..................................71 手表. .................................................. 72 心率传感器. ................................... 72 速度传感器. ................................... 72 维护. .........................................73 备用配件..................................73 画面操作之流程图. ..................74 规格. .........................................76 注册. .........................................78 有限保固..................................78 索引. .........................................79
性能与体验俱佳,小维智能猫眼K2深度体验
性能与体验俱佳,小维智能猫眼K2深度体验随着科技进步,盗贼的作案手法也变得愈加高明,家庭安全问题日益突出,智能猫眼作为连接室内室外的第一道安全屏障,凭借其实用便捷、安全性高等优点迅速被消费者喜爱。
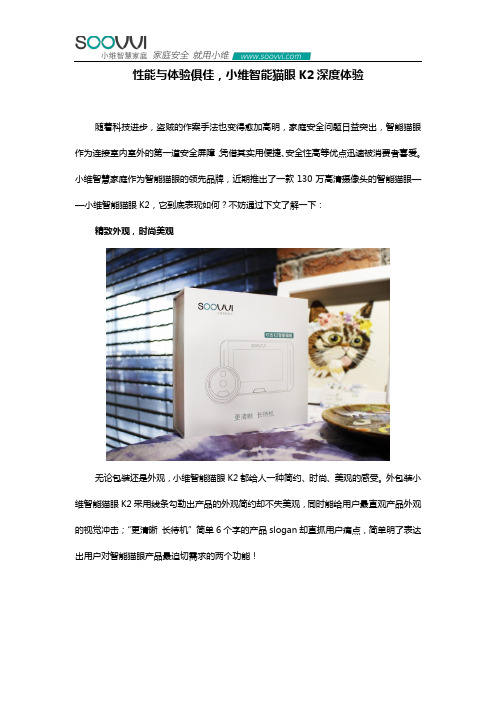
小维智慧家庭作为智能猫眼的领先品牌,近期推出了一款130万高清摄像头的智能猫眼——小维智能猫眼K2,它到底表现如何?不妨通过下文了解一下:精致外观,时尚美观无论包装还是外观,小维智能猫眼K2都给人一种简约、时尚、美观的感受。
外包装小维智能猫眼K2采用线条勾勒出产品的外观简约却不失美观,同时能给用户最直观产品外观的视觉冲击;“更清晰长待机”简单6个字的产品slogan却直抓用户痛点,简单明了表达出用户对智能猫眼产品最迫切需求的两个功能!小维智能猫眼K2机身以黑白为主色调,机身正面两条海蓝色线条让机身看起来更活泼,增添一丝科技范儿。
机身下方拥有home键一枚,其主要作用为唤醒屏幕,可以及时查看门外动态。
小维智能猫眼K2猫头采用古铜配色,此配色与大多防盗门相近,可以与防盗门很好融合而不影响美观。
猫头是小维智能猫眼K2最核心部件,130万高清摄像头、四颗850nm红外灯、PIR被动红外探测器、扬声器以及门铃按键等核心部件全部集中于这个小小的猫头,集成度和科技含金量还是蛮高的。
猫头与机身的链接是通过上图中的排线完成,通过此条排线猫头可以将前端采集处理的图像消息、报警消息以及门铃消息等数据及时传送后端机身处理显示,最终完成画面呈现和消息推送。
此外,小维智能猫眼K2还拥有一块3000mAh大容量电池,足以满足大多用户日常使用的续航需求,在笔者实际使用过程中,满电状态使用了6天,目前仍然剩余40%电量,以此推算小维智能猫眼K2完成7-10天的续航丝毫没压力,一周以上充一次电几乎可以满足90%以上用户群体需求。
而且小维智能猫眼K2还配备了专用充电插座,对于具有电量强迫症的用户不妨额外购买一块备用电池以备不时之需。
便捷实用,上手简单小维智能猫眼K2是笔者遇到最好操控的智能硬件设备之一,配置过程非常简单,只要按照界面提示一步步操作即可完成,而且配置过程中全程具有语音提示指导,真正做到手把手教学。
ZEISS TIVATO 700 清洁与消毒指南说明书

ZEISS TIVATO 7007.1 Safety during cleaning and disinfectionG-30-2032-en - 7.0 - 2019-07-12169 / 2167Cleaning and disinfection7.1Safety during cleaning and disinfectionContamination with pathogenic germs!If the device is cleaned or disinfected using unsuitable methods orcleaning agents, pathogenic germs can accumulate on the deviceand the device may also be damaged.u Make sure that the device is operated only in a sterile mannerand with sterile accessories, Attaching a ZEISS SMARTDRAPE[} 121].u Make sure that the device is operated, cleaned and disinfectedonly by personnel who have been instructed in these proce-dures.uWhen cleaning and disinfecting the device, only use cleaning/disinfection agents that are suitable and approved for the surface in question.7.2Contamination of the systemDust can penetrate into the internal optics of the device or itsindividual components.Action u Always close all openings that are not in use with the coversprovided (e.g. openings for eyepieces, tube outlets or thelateral co-observation outlets).u Always store tubes, eyepieces and accessories in dust-free caseswhen they are not being used.u After use, cover the system with the supplied dust cover toprotect it from dust.uClean used accessories directly after use.7.3Cleaning and disinfecting agent7.3.1Cleaning agents7.4CleaningClean the device before the first use and after every use.ZEISS TIVATO 7007.4 Cleaning 170 / 216G-30-2032-en - 7.0 - 2019-07-127.4.1Cleaning optical surfacesThe multi-layer T* coating of the optical components (e.g.eyepieces, objective lenses) ensures optimal image quality. Imagequality is impaired by even slight contamination of the optics or bya fingerprint. Clean the exterior surfaces of the optical components(eyepieces, objective lenses) only when necessary:Action uDo not use any chemical cleaning agents.u Use a clean and grease-free brush to remove dust.TIP: For the regular cleaning of surgical microscope's objectivelenses and eyepieces, we recommend the optics cleaning setavailable from ZEISSCleaning agents [} 169].7.4.2Cleaning the monitor (touchscreen)To prevent damage, ensure that no moisture or cleaning agents get inside the monitor.Incorrect use of glass cleaner!Damage to the monitor.u Never spray glass cleaner directly onto the monitor.PrerequisiteþSwitch off the device.Action u Clean the monitor with a soft, clean microfiber cloth or withmoist optical lens wipes.u If necessary, moisten the cloth slightly with water or pure glasscleaner.uWipe the monitor with a moist cloth.7.4.3Cleaning mechanical surfacesAll mechanical surfaces of the system can be cleaned by wipingthem with a damp cloth.Action uDo not use any aggressive or abrasive cleaning agents.u Remove any possible residue using a mixture of 50% ethylalcohol and 50% distilled water plus a dash of householddishwashing liquid.ZEISS TIVATO 7007.5 DisinfectionG-30-2032-en - 7.0 - 2019-07-12171 / 2167.4.4Fogging of optical surfacesWe recommend using an anti-fogging agent to prevent fogging ofoptical surfaces. Anti-fogging agents like the ones offered byopticians for applications with eyeglasses are also suitable foroptical surfaces from ZEISS.Action u Observe the Instructions for Use pertaining to the anti-foggingagent concerned.An anti-fogging agent does not ensure fog-free eyepiece optics. Itcleans eyepiece optics and protects them against dirt, grease, dust,lint and fingerprints.7.5Disinfection7.5.1Disinfecting the mechanical surfacesThe maximum application concentrations are:•For alcohol (tested with isopropyl alcohol): 60%•For aldehyde (tested with glutaraldehyde): 2%•For quaternary compounds (tested with DDAC): 0.2%Surface damage caused by wrong disinfectants!Performing disinfection with the wrong disinfectants may result indamage to the surfaces of the device.u Use an aldehyde and/or alcohol-based disinfectant. Theaddition of quaternary compounds is acceptable.u In order to prevent surface tensions, you may use only the disinfecting components specified above.Action uDisinfect all of the required surfaces.。
Cateye EL710RC 车灯说明书
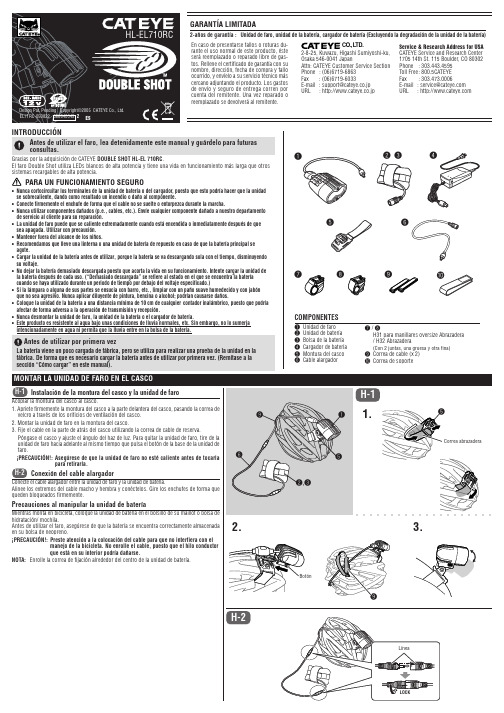
Design Pat. Pending Copyright©2005 CATEYE Co., Ltd.EL71RC-050822 066640045 2HL-EL710RCH-1H-2155962 39LOCK12 3497865○○○○○○○○○○○○○○○○○○○○H-11.2. 3.H-2ESMONTAR LA UNIDAD DE FARO EN EL CASCOInstalación de la montura del casco y la unidad de faroAcoplar la montura del casco al casco.1. Apriete firmemente la montura del casco a la parte delantera del casco, pasando la correa de velcro a través de los orificios de ventilación del casco.2. Montar la unidad de faro en la montura del casco.3.Fije el cable en la parte de atrás del casco utilizando la correa de cable de reserva.Póngase el casco y ajuste el ángulo del haz de luz. Para quitar la unidad de faro, tire de la unidad de faro hacia adelante al mismo tiempo que pulsa el botón de la base de la unidad de faro.¡PRECAUCIÓN!:Asegúrese de que la unidad de faro no esté caliente antes de tocarlapara retirarla.Conexión del cable alargadorConecte el cable alargador entre la unidad de faro y la unidad de batería.Alinee los extremos del cable macho y hembra y conéctelos. Gire los enchufes de forma que queden bloqueados firmemente.Precauciones al manipular la unidad de bateríaMientras monta en bicicleta, coloque la unidad de batería en el bolsillo de su maillot o bolsa de hidratación/ mochila.Antes de utilizar el faro, asegúrese de que la batería se encuentra correctamente almacenada en su bolsa de neopreno.¡PRECAUCIÓN!:Preste atención a la colocación del cable para que no interfiera con elmanejo de la bicicleta. No enrolle el cable, puesto que el hilo conductor que está en su interior podría dañarse.NOTA:Enrolle la correa de fijación alrededor del centro de la unidad de batería.BotónCorrea abrazaderaINTRODUCCIÓNAntes de utilizar el faro, lea detenidamente este manual y guárdelo para futuras consultas.Gracias por la adquisición de CATEYE DOUBLE SHOT HL-EL 710RC .El faro Double Shot utiliza LEDs blancos de alta potencia y tiene una vida en funcionamiento más larga que otros sistemas recargables de alta potencia.PARA UN FUNCIONAMIENTO SEGURO•Nunca cortocircuitar los terminales de la unidad de batería o del cargador, puesto que esto podría hacer que la unidad se sobrecaliente, dando como resultado un incendio o daño al componente.•Conecte firmemente el enchufe de forma que el cable no se suelte o entorpezca durante la marcha.•Nunca utilizar componentes dañados (p.e., cables, etc.). Envíe cualquier componente dañado a nuestro departamento de servicio al cliente para su reparación.•La unidad de faro puede que se caliente extremadamente cuando está encendida o inmediatamente después de que sea apagada. Utilizar con precaución.•Mantener fuera del alcance de los niños.•Recomendamos que lleve una linterna o una unidad de batería de repuesto en caso de que la batería principal se agote.•Cargar la unidad de la batería antes de utilizar, porque la batería se va descargando sola con el tiempo, disminuyendo su voltaje.•No dejar la batería demasiado descargada puesto que acorta la vida en su funcionamiento. Intente cargar la unidad de la batería después de cada uso. (“Demasiado descargada” se refiere al estado en el que se encuentra la batería cuando se haya utilizado durante un periodo de tiempo por debajo del voltaje especificado.)•Si la lámpara o alguna de sus partes se ensucia con barro, etc., limpiar con un paño suave humedecido y con jabón que no sea agresivo. Nunca aplicar diluyente de pintura, bencina o alcohol; podrían causarse daños.•Coloque la unidad de la batería a una distancia mínima de 10 cm de cualquier contador inalámbrico, puesto que podría afectar de forma adversa a la operación de transmisión y recepción.•Nunca desmontar la unidad de faro, la unidad de la batería o el cargador de batería.•Este producto es resistente al agua bajo unas condiciones de lluvia normales, etc. Sin embargo, no lo sumerja intencionadamente en agua ni permita que la lluvia entre en la bolsa de la batería.Antes de utilizar por primera vezLa batería viene un poco cargada de fábrica, pero se utiliza para realizar una prueba de la unidad en la fábrica. De forma que es necesario cargar la batería antes de utilizar por primera vez. (Remítase a la sección “Cómo cargar” en este manual).GARANTÍA LIMITADA2-años de garantía :Unidad de faro, unidad de la batería, cargador de batería (Excluyendo la degradación de la unidad de la batería)LíneaEn caso de presentarse fallos o roturas du-rante el uso normal de este producto, éste será reemplazado o reparado libre de gas-tos. Rellene el certificado de garantía con su nombre, dirección, fecha de compra y fallo ocurrido, y envíelo a su servicio técnico más cercano adjuntando el producto. Los gastos de envío y seguro de entrega corren por cuenta del remitente. Una vez reparado o reemplazado se devolverá al remitente.CO.,L TD.2-8-25, Kuwazu, Higashi Sumiyoshi-ku,Osaka 546-0041 JapanAttn: CATEYE Customer Service Section Phone : (06)6719-6863Fax : (06)6719-6033E-mail : support@cateye.co.jp URL : http://www.cateye.co.jpService & Research Address for USACATEYE Service and Research Center 1705 14th St. 115 Boulder, CO 80302Phone : 303.443.4595Toll Free: 800.5CATEYE Fax : 303.473.0006E-mail : service@ URL : COMPONENTES1Unidad de faro 2Unidad de batería 3Bolsa de la batería 4Cargador de batería 5 Montura del casco 6 Cable alargador7 / 8H31 para manillares oversize Abrazadera / H32 Abrazadera(Con 2 juntas, una gruesa y otra fina)9Correa de cable (x 2)0Correa de soporte○○○○○ABC○○○○○○○○○○○○○○○○○○○○○○○○○○1247 or 82LOCK192 37 or 82, 31.B-2B-32.B-11.or*H322.3.1#533-8825#534-1830#534-1706#534-1707UL #534-1708UK #534-1709EC #534-1710AS #534-1711#533-8880#534-1832#534-1831B-1B-2B-3Aprox. 3 horasTiempo de carga est ándar Estado del indicador decargaLuz naranja : Conectar a la fuente de alimentaci ón Parpadea la luz roja : Cargando Luz verde : Ha terminado de cargarAprox. 5 horasTiempo de duraci ón C ÓMO MONTAR A UNA BICICLETAInstalaci ón de la abrazadera/unidad de faroAcoplar la abrazadera H31 o H32 al manillar.NOTA:Seleccione H31 para los manillares oversize.1.Monte una almohadilla de goma y la abrazadera en el manillar. Se suministran almohadillas de goma de 2 grosores distintos; si fuera necesario, corte la almoha-dilla de goma para que encaje.2.Apriete y luego afloje la manecilla para fijar. Aseg úrese de que la abrazadera no gira en el manillar.¡PRECAUCI ÓN!:Aseg úrese de ajustar el ángulo del haz de luz remiti éndose a lasecci ón “C ómo ajustar el ángulo del haz de luz ” en este ma-nual antes de hacer funcionar al sistema de luz.3.Montar la unidad de faro en la abrazadera.Para retirar la unidad despu és de utilizarla, tire de ella hacia afuera mientras pre-siona el bot ón.¡PRECAUCI ÓN!:Aseg úrese de que la unidad de faro no est é caliente antes detocarla para retirarla.Instalaci ón de la unidad de la bater íaMonte la unidad de bater ía en el cuadro de la bicicleta.Antes de utilizar el faro, aseg úrese de que la bater ía se encuentra correctamente al-macenada en su bolsa de neopreno.¡PRECAUCI ÓN!:Al montar la unidad, aseg úrese de que la costura de la bolsa dela bater ía se encuentra mirando hacia abajo y de que la l ínea de pliegue se encuentra en la parte delantera. Enrolle la correa de fijaci ón alrededor del centro de la unidad de la bater ía.1.Enrolle la correa de fijaci ón alrededor del tubo superior para asegurar la unidad.¡PRECAUCI ÓN!:Enrolle la correa sobre el tubo superior pero por debajo de loscables de los cambios y el freno. Enrolle la correa por encima de los cables es peligroso puesto que podr ía interferir al frenar o al cambiar de marcha.2.Utilice la correa de soporte, para asegurar la unidad de la bater ía al tubo inferior y asi evitar que se enrolle.NOTA:Es posible tambi én instalar la bater ía en otras posiciones en la bicicleta. Sin em-bargo, aseg úrese de que la costura de la bolsa de la bater ía se encuentre boca a bajo, y que la l ínea de pliegue se encuentre en la parte delantera. Esto ayudar á a prevenir que entre agua en la bolsa.Conexi ón y fijaci ón de cablesAlinee los extremos del cable mancho y hembra y con éctelos. Gire los enchufes de forma que queden bloqueados de forma segura. Fije los cables al cuadro y/o v ástago para mantenerlos seguros.¡PRECAUCI ÓN!:Preste atenci ón a la colocaci ón del cable de forma que nointerfiera con el manejo de la bicicleta. No fije el cable a un ángulo agudo puesto que el hilo interior podr ía romperse.ManecillaTubo inferiorCorrea de fijaci ónCorrea de fijaci ónTubo superiorCables de loscambios y del frenoL íneaJunta de cauchoManillarBot ónC ÓMO UTILIZARA Enc ender/apagarPara encender/apagar el faro, pulse el bot ón que se encuentra justo detr ás de la unidad de faro.B C ómo ajustar el ángulo del haz de luzSi la unidad de faro est á montada en la bicicleta, ajuste el ángulo del haz de luz de forma que no moleste al tr áfico que viene en sentido contrario.C C ómo cargar la unidad de la bater ía¡Importante!•Aseg úrese de utilizar s ólo el cargador de bater ía suministrado. Este cargador puede aceptar 100-240 voltios.•No retire por completo la unidad de la bater ía de la bolsa de la bater ía.•Despu és de cargar, devuelva la bater ía a su estado de almacenado original. Evitar la entrada de agua en la bolsa de la bater ía.•El tiempo est ándar de carga y ejecuci ón son valores gu ía y dependen de las condiciones de funcionamiento.•Si la unidad de la bater ía no cumple el debido tiempo de ejecuci ón incluso cuando est é completamente cargada,puede que se encuentre al final de su vida en funcionamiento. Reemplace la unidad de la bater ía antigua por una nueva. La unidad de la bater ía utilizada deber ía de deshacerse de acuerdo con las regulaciones locales.1.Retire la correa de soporte de la bolsa de la bater ía y abra la bolsa.2.Conecte el conector al cargador de bater ía.3.Enchufe el cargador de bater ía a una salida de CA.NOTA:Cuando termine de cargarse, la luz indicadora cambia de roja parpadeante a verde.4.Cuando termine de cargarse, desenchufe el adaptador de carga. Rem ítase a las correspondientes figuras para volver a colocar el cable y utilizar la correa de cierre para cerrar bien la abertura.¡PRECAUCI ÓN!:Cuando vaya a fijar la bater ía al cuadro, aseg úrese de que la correa de fijaci ón se ajusta alcentro de la unidad de la bater ía.C ómo almacenar la unidad de la bater íaLa unidad de la bater ía se almacena en su bolsa como se muestra en la figura. En caso de que la unidad de la bater ía se encuentre fuera de la bolsa, aseg úrese de devolverla a su estado original. Si no se siguen estas instrucciones puede que entre lluvia en la bolsa de la bater ía, causando problemas en la unidad.Bot ónIndicador de cargaA salida de alimentaci ón de CAConector de cargaCorrea de cierreColocaci ón del cableCorrea de fijaci ónManecillaAflojar la manecillaCosturaEnchufeConector de cargaESPECIFICACIONESFuente de luz -------------------Dos LEDs blancos de altapotenciaUnidad de la bater ía -----------Bater ía de hidruro de n íquel(Ni-MH/12V 2700mAh)Cargador de bater ía -----------CHR-2700(AC100V-240V50/60Hz 0.5A)Tiempo de funcionamiento --Aprox. 5 horasTiempo establecido de carga --Aprox. 3 horasRango de temperatura ----------Operaci ón de carga:-10°C - 40°C Funcionamiento: -15°C - 45°CCargas/descargas estimadas --Alrededor de 300 veces(hasta que la capacidad de la bater ía disminuya al 50%)CosturaL ínea de pliegue SPARE PARTSUnidad de faroCargador de bater íaH32 para manillares m ás grandesH31 para manillares m ás grandesMontura del cascoUnidad de bater ía/Bolsa de la bater íaConjunto de la bolsa de la bater íaCable alargador* El modelo y especificaciones de estos faros est án sujetos a modificaciones sin previo aviso.。
基于猫眼效应的窃视目标检测研究

{
为了提高窃视设备检测的正确率, 提出一种利 用激光主被动图像差分的目标检测方法, 即在激光 在脉冲间隔采集漫反射 探测时采集主动照明图像, 图像, 利用背景差的方法, 实现窃视目标检测, 流程 图如图 3 所示。 步骤 1 : 分别获得漫反射图像和激光主动照射 图像各一张, 按照背景差的思想, 将其二者进行差 分。理论上得到的差分图应该只含有目标物体, 但 在实际中, 由于多数物体会反射激光, 导致真实的 图像里包含大量的噪声。 步骤 2 : 阈值分割。 由步骤 1 得到的图像包含 目标物体和一些噪声, 将其二值化, 通过阈值分割 将它们分离开来。 由于“猫眼 ” 目标亮度较高, 灰 度分布比较均匀, 同时利用“背景差 ” 所得到的图 因此, 该步骤可选 像不受外界环境的光强的影响, 用固定阈值法进行分割。 步骤 3 : 噪声抑制。 通过步骤 2 得到的图像依 然包含大量噪声, 此时为了将目标从大量的噪声提 取出来, 需要进行噪声抑制处理。各种低通滤波可 以有效的去除噪声, 但同时也会对目标物体产生影 , 因此, 模板的选择显得十分重要。 系统使 用模板为 3 × 3 的中值滤波进行处理。 步骤 4 : 特征提取: 由于窃视光学设备的镜头 响
eye effect of photoelectric device,this paper establishes a system of active laser reconnaisAbstract: Based on catsance with CCD,and presents an effective algorithm based on background difference method for detecting peeping device. The proposed algorithm acquires one image when the laser power is on and the other image when the laser power is off in the laser pulse interval. According to the echo intensity,space and shape property difference between peeping device and usual object,the target is detected by using the background difference method. The experimental results show that compared to the method with single frame, in a radius of 5m, the system can effectively and quickly detect peeping target from background,and is not influenced by the scene and light. Through the experiments on 20 different scenes,accuracy of proposed method is 95% ,which is much higher than the method with single frame,and the detection time of each frame is in the range of 0. 015 ~ 0. 021 s,meets the demand of realtime,and the correctness and effectiveness of this system is validated. eye effect; laser active reconnaissance; background difference method Keywords: cat-
皇冠猫望远镜的中文说明书

皇冠猫望远镜的中文说明书摘要:一、皇冠猫望远镜简介1.产品背景2.产品特点二、皇冠猫望远镜的使用方法1.准备工作2.组装望远镜3.使用望远镜进行观测4.拆卸望远镜三、皇冠猫望远镜的维护与保养1.清洁望远镜2.维护望远镜3.存放望远镜四、皇冠猫望远镜的注意事项1.使用安全2.避免损坏3.问题处理正文:皇冠猫望远镜是一款高性能的望远镜,具有高清晰度、便携性和易操作性等特点,深受广大天文爱好者的喜爱。
一、皇冠猫望远镜简介1.产品背景:皇冠猫望远镜是我国自主研发的一款望远镜,自上市以来,凭借其优良的性能和合理的价格,赢得了消费者的认可。
2.产品特点:皇冠猫望远镜具有高清晰度、便携性和易操作性等特点,适合初学者和资深天文爱好者使用。
二、皇冠猫望远镜的使用方法1.准备工作:在开始使用之前,请确保望远镜的部件齐全,避免在操作过程中出现零件丢失的情况。
2.组装望远镜:将望远镜的镜筒与支架连接,然后将目镜插入镜筒,即可完成望远镜的组装。
3.使用望远镜进行观测:将望远镜对准目标,通过调节支架和目镜,使目标清晰可见。
在观测过程中,请勿直接用眼睛观察太阳,以免损伤眼睛。
4.拆卸望远镜:在观测结束后,先将目镜从镜筒中取出,然后将镜筒与支架分离,拆卸望远镜。
三、皇冠猫望远镜的维护与保养1.清洁望远镜:使用柔软的布擦拭望远镜的外壳和镜片,避免使用含有酒精或其他有溶剂的清洁剂,以免损坏望远镜的表面涂层。
2.维护望远镜:定期检查望远镜的零部件,如支架、旋钮等,确保其正常工作。
如发现有损坏或磨损的零部件,请及时更换。
3.存放望远镜:在长时间不使用望远镜时,请将其存放在干燥、通风、避免阳光直射的地方,以延长望远镜的使用寿命。
四、皇冠猫望远镜的注意事项1.使用安全:在使用过程中,请勿将望远镜对准强光源,以免损伤眼睛。
同时,请勿在极端天气条件下使用望远镜。
2.避免损坏:在搬运和存储过程中,请轻拿轻放,避免望远镜受到撞击或摔落。
3.问题处理:如在使用过程中遇到问题,请及时联系售后服务,切勿自行拆卸或修理。
猫眼石的功效与作用
猫眼石的功效与作用猫眼石是一种具有独特魅力的宝石,也被称为“舍恩石”或“猫眼”。
它的表面呈现出绿色或黄色的条纹,并拥有一条独特的猫眼效应,因此得名为猫眼石。
猫眼石是由一种叫做硅酸铝钠的矿石晶体组成。
它拥有许多神奇的功效和作用,被广泛用于宝石治疗和水晶疗法。
一、猫眼石的外观与成分猫眼石的主要成分是硅酸铝钠,矿石结构含有石英晶体,通常为黄色和灰色。
在研磨猫眼石时,它会展现出一条强烈的光线,这就是猫眼石独特的视觉效果。
它的颜色有时会因微量杂质的存在而有所变化。
二、猫眼石的神话与传说猫眼石在许多文化中都拥有丰富的神话与传说。
在古埃及,人们普遍认为猫眼石是埃及太阳神赫利奥波利斯的眼泪。
许多人认为猫眼石具有超自然的力量,可以保护佩戴者免受邪恶势力的侵害。
三、猫眼石的功效与作用1. 碰触灵敏:猫眼石可以增强皮肤的感觉,使它更加灵敏。
这对于那些嗅觉、触觉或神经系统功能受损的人来说,特别有益。
2. 平衡与保护:猫眼石被认为是最强大的保护石之一。
它可以帮助平衡和保护人的能量场。
佩戴猫眼石可以防止外界负能量的干扰,并将对个人道德价值观的违背引导回正义和良善的道路。
3. 增强直觉力与洞察力:猫眼石被认为是提高直觉力和洞察力的宝石。
它可以帮助个体更敏锐地意识到周围环境中的细微变化,并做出正确的判断。
4. 促进自我意识:佩戴猫眼石可以促进个人对自我价值和内在力量的意识,帮助排除自卑或缺乏勇气的感觉。
5. 抗压能力与恢复力:它对于缓解压力、焦虑和负面情绪具有良好的作用。
佩戴猫眼石能够使能量得到平衡,平静心灵,提高个体的稳定性。
6. 辅助医疗:猫眼石被广泛用于水晶和宝石疗法中,以帮助治疗和缓解多种疾病。
例如,它被认为可以促进睡眠,减轻头痛和眼部疲劳,以及舒缓消化不良。
7. 提升领导能力与创造力:猫眼石被认为是一种鼓舞个体领导能力和创造力的宝石。
这是因为它具有有力的、稳定的和坚定的能量。
六、猫眼石的使用方法1. 佩戴:将猫眼石制作成项链、手链等饰品,佩戴在身上。
电动车加装路码表记
电动车加装路码表记[这个贴子最后由sdbbsdbb在 2006/10/05 09:11pm 第 1 次编辑][watermark]猫眼、马(码)表、电驴----电动车加装路码表记近日,发现买了一年的小电驴明显后劲不足,特别是在电量指示灯进入中间段后,上桥乏力、速度偏慢。
一来是为了知道我的电池是否需要更换,二来也为了玩一把DIY,某天突发奇想,产生了一个类似于“床上叠床”的念头---在电动车上加装路码表。
尽管如今电动车品种多多、琳琅满目,可有路程表的车型可说是廖廖无几(而且就算有,也是机械型的,易坏难修,不用也罢)。
有了构思,马上动手,先是上网,打开谷歌,搜索一下“路程表”、“码表”或“电动车码表”,会发现有N多的内容,可仔细一琢磨,发现适合我的只有自行车用码表。
原因何在?其实很简单,性/价比。
在网上其实有不少“电动车专用码表”,而且价格不贵,加上运费也不超过半百大洋,可一来呢用户评价一般般,二来做工实在太那个,体积大不说,而且显示表与底座还不能分离,而如果把这样的新奇东东放在公众停车场无疑是“开门辑盗”。
因此,最终放弃了便宜的国产货,而选择了质平价贵的“舶来品”(我敢保证,这些玩意儿绝对是大陆生产,不过那质量就是比那些自主品牌强得多)。
其实,选择自行车用码表比选择那些“电动车运用码表”要麻烦得多,一是安装麻烦,后者因为在设计时已经考虑了相关因素,比如信号线的长度、磁钢的形状等;二来么,就得拜广告与宣传所赐了,具体原因下面详述。
但我基于品质的考虑,再加上自己丰富的DIY 经验,最终还是选择了并非最佳选择的自行车用码表。
种类决定了,下来就是选品牌了。
苏州地方小,这些新奇特的玩意儿就更是乏人问津了,先去了我的电动车所在的专卖店与特约维修店(也是某名牌产品,而且质量也的确不错),一打听,米有;再去某大型电动车4S店、米有;最后来到了最精英的自行车品牌---捷安特的专卖店。
先去了人民路的那家,一看,有货,是猫眼(CATEYE),可一看我的车子,修配的师傅立马拒绝,说不是钢丝型的电动车米法装。
cateye猫眼码表设置说明书(Cateye

cateye猫眼码表设置说明书(Cateye's table settinginstructions)The use of CATEYE MITY3 and ENDURO2 description tableInitial settings for 1.MITY3 and ENDURO2(a): first set the table while holding the first microprocessor, the 3 keys to remove all settingsTip: put the table upside down, hold down ST. /STOP and MODE keys, and then stab the SET key with a pencil or other sharp object(b): the display on the LCD screen flashes and disappears, leaving only a flashing K. K stands for kilometers / hour, M stands for miles / hour, and uses the MODE key to select the speed you want. Note that the clock function of your selected system is 12 hours or 24 hours, K is 24 hours, and M is 12 hours.Press the ST./STOP button to determine the format you selected.(c): \ "210\" will be flashing, this is to adjust the 700*23C tire settings. Please refer to the wheel diameter parameter in your manual or our website. Please pay attention to this number. In fact, it is the rotation of your tire when you ride a bicycle. If you want to enter the most accurate parameters, please proceed with the measurement.(d): press the MODE key to increase the parameter, press the ST./STOP key to reduce the parameter. The parameters determinedby SET keytable behind.Now your table has been set up complete.2. button instructionsTable on the right side of the button is the MODE button, the button on the left is ST./STOP key. You can use the MODE key to complete the control by mode.When the screen display time consuming function (TM), press the MODE button to convert to the average speed function (AV), and then press the MODE button to change to mileage 1 function, which is standard riding mileage function. Press MODE to return to time function at this time.The function of time consuming function is clock function. Under the elapsed time function, hold down the MODE key for 2 seconds, then turn to the clock function, and press MODE again to return to the elapsed time function.The auxiliary function of the average speed function is the maximum speed function (MX), using the same as above.Mileage 1 has 2 subsidiary functions. Hold down the MODE key for 2 seconds, then turn to mileage 2.2 miles is a separate meter function, it can keep on other parameters in the case of single empty. Just hold the ST./STOP and MODE keys at the same time for one second.Under the mileage 2 function, hold down the MODE button for 2 seconds and change to the total mileage function (ODO).In the mileage 2 or total mileage function, press the MODE button to return to mileage 1 function.3 (1) set function and mileage functionHold down ST at the same time. The /STOP and MODE keys can be cleared in one second.In standard mode, you must press the ST./STOP (S) key to start recording the elapsed time and mileageIn the automatic mode (AT), when the microprocessor receives the signal of the sensor on the front fork is at the beginning or end of the table behind the record according to the SET button to open or close the automatic function of the elapsed time or mileage function. A small AT symbol indicates this function.(2) set the clock functionWhen using the function table must stop working, the speed of symbols (K or M) must stop flashing. Under the elapsed time function, hold down the MODE key for 2 seconds, then turn to the clock function.You will see a small clock symbol. Hour starts flashing, press MODE to increase the number. Press the ST./STOP button, from the hour to the minute. Finally, press the SET key to confirm.The clock is the standard clock function for 12 or 24 hours to select the command clock that you choose. K is 24 hour system, M is 12 hour system. (see B notes)(3) set consumption time, maximum speed and average speed function for higher displayPress ST when the computer is in auto function. The /STOP key takes time, and the maximum speed and average speed function will be converted to higher display. Press the ST./STOP button again. You can change the speed for higher display.In standard mode (automatic function shutdown), hold down the ST./STOP key for 2 seconds.(4) class A or class B tire setting;Table for two different types of tires for quick and easy conversion. There are 1.5 circular containing A or B symbol table screen. A Class A is a road car for 700*23C. The B class is a mountain bike for the 26*1.95, which is designed to be sensitive as well as specially arranged for low speed vehicles. If your code is installed in the car on the mountain, we recommend the use of B class.In addition to the functions in total length (ODO), according to the code behind the SET button to change the settings.(5) change wheel diameter setting;When you are in the function (ODO), at the same time, accordingto the ST./STOP and MODE keys you can check the diameter of the wheel set, or press the table behind the SET button to change the settings. Press the MODE key to increase the parameter, press the ST./STOP key to reduce the parameter. The parameters determined by SET keytable behind.6. Replacement total mileageThis function is used in battery replacement or read mileage from another block number on the table.Hold the ST./STOP and MODE keys at the same time. K flashes the speed system and uses the MODE button to select the speed system you need (see the B instructions).Continue to hold down the MODE key when adding the previous number. \ "0\" will flash. Press the MODE key to increase the number. Press the ST./STOP button to change the number, then press SET key code behind the determination. (the following steps are the same as C)CATEYE TOMO XC CC-ST200 bike manual operation guideThe main display A. (speed) G. (M mode) button 1. bracket B. sensor pulse symbol H. S/S (start / stop) button 2. wire mode C. symbol I. set button 3. D. speed sensor unit symbol J. battery cover 4. magnet E. automatic mode symbol K. connection terminal 5. rubber pad F. auxiliary display (selection function) 6. bar with 1. button M button (model selection) a graph according to the diagram a sequential change mode, data is displayed on the display on the side. Press for more than two seconds to displaythe 12 hour clock. The 2. S/S button starts and stops measuring mileage and time. A unit of speed symbol flashing during measurement. This button is not valid when auto function. The 3. SET button is used to set the wheel circumference and table time. Start or stop automatic measurement function. Clear current data and any errors. In thePress the mode stop state, you can modify the parameters as follows: l in ODO mode - wheel circumference L in clock mode - time to adjust L in TM, DST, AVS mode - open / close automatic reset operation function 4.: figure two to select any mode except ODO model, press M and S/S button at the same time MXS, AVS, DST, and TM is cleared.(in ODO mode, show the input wheel circumference) 5. erase all data operations: figure three, press the M button, the S/S button and the SET button at the same time, all the storage data (ODO, speed, unit, wheel circumference, and table)Time) erased, all displayed flashing, and then mile/h flashing. This operation should be after the replacement of the battery or due to static electricityCause a display error, etc.. After all the stored data is erased, to reset the parameters, see "primary unit ready"". Read the following carefully before the main unit is ready for operation. 1. how to measure your bicycle wheel circumference (L) in Figure four to make a mark in your front wheel of a bicycle tire, and then ride a car to the front of a turn, turn start point and the end point on the groundMark。
帝尼特猫眼智能锁全国说明书

帝尼特猫眼智能锁全国说明书第一部分:引言欢迎使用帝尼特猫眼智能锁。
本说明书将为您提供详细的操作指南和使用说明,以便您能够正确地使用和享受帝尼特猫眼智能锁带来的便利和安全。
第二部分:产品概述1.安全性:采用最新的指纹识别技术,保证只有授权人员能够开启门锁。
2.多种开锁方式:除了指纹识别,还可以使用密码、IC卡、APP远程开锁等多种方式。
3.容易安装:可与现有的普通门锁兼容,简单易安装。
4.历史记录查看:可记录开锁的时间和身份,可通过APP查看历史记录。
5.防火功能:在发生火灾时,智能锁将自动解锁以确保人员的生命安全。
6.低电量提醒:当电池电量低于安全值时,智能锁会发出提醒,告知用户更换电池。
第三部分:安装步骤1.打开智能锁的包装,取出所有配件。
2.根据说明书上的示意图,选择合适的门锁安装方式并进行固定。
3.安装指纹识别模块,确保其与门锁完全贴合。
4.将智能锁安装在门上,并根据说明书上的示意图进行固定。
5.连接智能锁和电源,等待系统初始化完成。
第四部分:功能操作1.开锁a.指纹识别:将指纹放置在指纹识别模块上,听到"嘀"声后,即可开锁。
b.密码开锁:按下密码开关,输入正确的密码,听到"嘀"声后,即可开锁。
c.IC卡开锁:将IC卡贴近识别区域,听到"嘀"声后,即可开锁。
d.APP远程开锁:使用APP连接智能锁,选择相应的开锁方式,即可进行远程开锁。
2.设置a.添加指纹:在系统设置中选择“添加指纹”,按提示操作,即可添加指纹。
b.修改密码:在系统设置中选择“修改密码”,按提示操作,即可修改密码。
c.添加IC卡:在系统设置中选择“添加IC卡”,按提示操作,即可添加IC卡。
d.历史记录查看:通过APP连接智能锁,选择“历史记录”,即可查看开锁记录。
第五部分:注意事项1.保持干燥:智能锁为电子设备,请避免与水或湿气接触。
2.防止破坏:请不要随意撞击、敲击或使用尖锐物体划伤智能锁。
猫眼的功效与作用

猫眼的功效与作用猫眼是一种宝石,由矿石中的铁、铝、钛和铬等元素形成,具有独特的光学效果和美丽的金黄色。
猫眼的功效与作用涉及到保护眼睛、增加勇气、平衡能量、增强直觉等方面。
下面将详细介绍猫眼的这些功效与作用。
第一,猫眼在心灵疗愈方面有着独特的效果。
哲学上,猫眼被认为是一种能量平衡的宝石,它能够帮助我们平衡和激活自身的能量。
当我们感到情绪低落、能量不足时,佩戴猫眼可以帮助我们恢复平衡并获得内在的力量。
此外,猫眼还可以帮助我们减轻压力、释放焦虑,提高集中力和注意力。
它还被认为能够帮助我们更好地理解和控制自己的情绪,增加自信心和决心。
第二,猫眼对于保护眼睛和改善眼睛健康有着显著的作用。
猫眼具有对眼睛有益的磁电特性,可以吸收并中和电磁辐射带来的有害影响。
在现代社会中,我们每天都接触到大量的电子设备,比如手机、电脑、电视等,长期暴露在电磁辐射中会对眼睛造成损害。
佩戴猫眼可以帮助减轻这种损害,保护我们的眼睛健康。
第三,猫眼被认为是一种增加勇气和自信心的宝石。
它被誉为“商人的石头”,因为它具有激发勇气和决心的作用。
猫眼能够增强个人的自我表达能力和说服力,帮助人们克服害羞和不安的情绪,勇敢地面对挑战和困难。
它也可以帮助我们建立坚定的意志力和毅力,坚持追求自己的目标和梦想。
第四,猫眼对于提高直觉和洞察力也有着重要的作用。
猫眼是一种与第三眼和心灵直觉有关的宝石。
佩戴猫眼可以帮助人们打开心灵的大门,加强直觉和洞察力。
它能够帮助我们更好地理解感知到的信息,提高我们的观察力和理解能力。
猫眼还能够增加我们对周围环境和他人的敏感度,帮助我们更好地了解周围的人和事物。
第五,猫眼被认为是一种能够带来好运和财富的宝石。
传说中,猫眼被称为“财富之石”,它据说能够带来好运和财富。
佩戴猫眼可以加强个人的财务运势,带来意想不到的财富和好运。
此外,猫眼还能够帮助我们更好地理财和投资,提高我们对金钱和财富的管理能力。
然而,需要注意的是,佩戴猫眼并不能直接带来财富,它只是一种促进人们思考和行动的工具。
因特 智能锁 V6-智能猫眼款 用户手册 说明书
2
⼆、如何开通微信提醒
4
1. 点击“开通提醒”进⼊设置⻚⾯,如未登录,请先登录;“开通提醒”,如下图即为开通成功;
.当智能锁发⽣开锁或远程开锁等事件时,微信实时提醒。
2 . 远程开锁操作
远程开锁需在锁上按⻔铃键发出请求,“客⼈请求,主⼈开锁”,⽤收到开锁请求,或点击播放进视频对讲,或直接输⼊安全密码开锁
五、如何备注⻔锁⽤⼾
. 进⼊⻔锁界⾯,点击右上⻆“更多−⽤⼾列表”,进⼊⽤⼾列表界
⾯,如下图;
.点击⽤⼾,直接备注⽤⼾名称如下图。
3. ⽤⼾备注好后,就清楚地知道是谁开了锁,关⼼家⼈。
四、如何分享设备
侧边栏,选择“家庭管理”−点击
输⼊要添加的⽤⼾⼿机号码和称谓。
注意该
⽤⼾必须提前关注此公众号并注册。
6。
猫眼cateye_velo8中文说明书
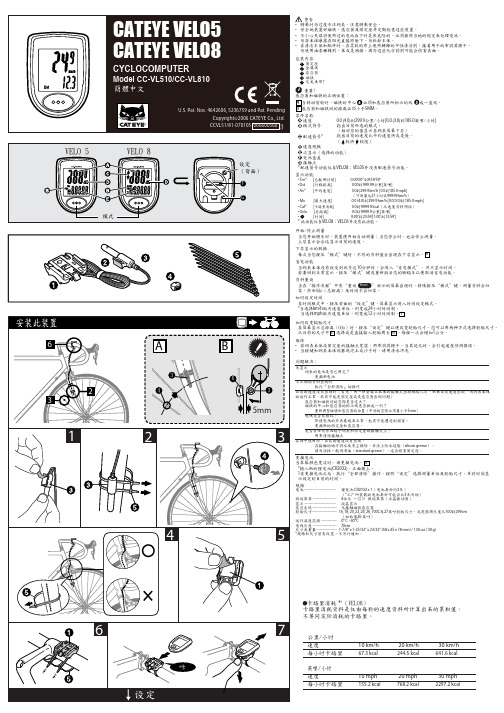
包装内容 1 固定座 2 金属线 3 感应器 4 磁铁 5 尼龙束带7
重要!
感应器和磁铁的正确位置:
A 当转动前轮时,磁铁的中心 必须和感应器所标示的线 成一直线。
B 感应器和磁铁间的距离必须小于5MM。
零件名称 速度 模式符号
配速箭号*
20 mph 768.2 kcal
30 mph 2297.2 kcal
设定
全部清除
a 选择km/h或是mph
b
设定 + 模式
设定 2个按键
模式
推!
Tm
Dst Av Mx Cal Odo
0
Clock
选择km/h km/h
模式
mph
km/h
设定结束
设定
轮子尺寸
轮胎尺寸
L (cm)
ETRTO
14 x 1.50
207
26 x 1-1/2
210
26 x 1.40
200
40-559 26 x 1.50
201
47-559 26 x 1.75
202
50-559 26 x 1.95
205
54-559 26 x 2.00
206
26 x 2.10
207
57-559 26 x 2.125
207
26 x 2.35
208
轮胎尺寸
20-622 700 x 20C 209
23-622 700 x 23C 210
25-622 700 x 25C 211
28-622 700 x 28C 214
700 x 30C 217
Philips 7000系列腮毛剃刀说明书

Beardtrimmer series 7000Pas de 0,5 mmLames auto-affûtées en métal 60 min d'autonomie / 1 h de chargeAvec tondeuse corps BG105BT7501/85Aspiration puissante pour une barbe en toute propretéLe n°1 de Philips pour une taille en toute propretéTaillez votre barbe, votre moustache et vos pattes en toute propreté. La nouvelle tondeuse à système d'aspiration Philips est équipée d'un système haute performance amélioré produisant un flux d'air 50 % plus puissant*. Il aspireefficacement les poils coupés, pour vous éviter la corvée de nettoyage.Aspiration puissante pour une barbe en toute propretéAvec flux d'air amélioré pour éviter la corvée de nettoyageRespect de votre peauDes protections pendant la coupeCoupe dans toutes les directionsCoupe uniformeTaille uniformément et attrape les poils couchésLames auto-affûtées ne nécessitant aucun entretienFacile à utiliserPermet de régler différentes hauteurs de coupeLes voyants indiquent si la batterie est faible, vide, pleine ou en cours de charge60 min d'autonomie pour 1 h de charge, fonctionnement sur secteur possibleEntretien simpleUne garantie protégeant les consommateursPoints fortsSystème d'aspiration haute performanceLe système d'aspiration haute performance de la tondeuse à barbe Philips 7000 bénéficie d'un flux d'air amélioré 50 % plus puissant*pour capturer jusqu'à 95 % des poils coupés**et vous éviter la corvée de nettoyage.Guide de coupe PRO dynamiqueLes barbes de 3 jours n'y résistent pas. Le système Lift&Trim Pro attrape tous les poils couchés et les soulève pour permettre aux lames de les couper avec précision. C'est également une tondeuse idéale pour les longues barbes.Lames auto-affûtées en métalAdaptées aux poils les plus épais, les lames doublement affûtées assurent un dessin précis des contours et une coupe d'excellente qualitéà chaque fois. Aucun lubrifiant et aucune lame de rechange ne sont nécessaires.20 hauteurs de coupe verrouillablesCoupez à la hauteur exacte que vous souhaitez obtenir. Il vous suffit de tourner la molette de précision sur l'une des 20 hauteurs de coupe comprises entre 0,5 et 10 mm et séparées par des pas de 0,5 mm.Utilisation avec ou sans fil, 60 mind'autonomieChargez votre tondeuse barbe pendant 1 heure pour obtenir jusqu'à 60 minutes d'utilisation sans fil, ou utilisez-la simplement branchée sur le secteur. Vous pouvez également profiter de la fonction de charge rapide permettant une utilisation complète avec seulement 5 minutes de charge.Indicateurs de batterieLes indicateurs de batterie de la tondeuse vous présentent l'état de la batterie : faible, vide,pleine ou en cours de charge. Vouspourrez ainsi recharger votre tondeuse à temps et entièrement, afin d'éviter une batterie vide en cours d'utilisation.Facile à nettoyerDétachez la tête de votre tondeuse à barbe Philips et rincez-la sous le robinet pour lanettoyer facilement. Séchez-la avant de la fixer à nouveau à l'appareil.Conçu pour durerTous nos produits de soin masculin sont conçus pour durer. Ils bénéficient d'unegarantie de 2 ans, n'ont jamais besoin d'être lubrifiés et sont compatibles avec toutes les tensions utilisées dans le monde.Système de protection de la peauNotre système unique de protection de la peauprotège les parties les plus sensibles de votre corps, pour vous permettre de tailler les poils en douceur à 0,5 mm sans contact direct entre votre peau et les bords tranchants des lames.T ondeuse et sabot bidirectionnelsCoupez les poils qui poussent dans n'importe quelle direction grâce à la tondeusebidirectionnelle et au sabot de 3 mm. Il est recommandé de pré-tailler les poils les plus épais.CaractéristiquesSystème de coupePrécision (taille du pas): 0,5 mmPlage des hauteurs de coupe: De 0,5 à 10 mm Élément de coupe: Lames en inoxFacile d'utilisationMolette de réglage: Ajustement facile desréglages de hauteurNettoyage: Lames et protections rinçables Fonctionnement: Utilisation avec ou sans filCréez le look dont vous rêvezNombre de hauteurs de coupe: 20 hauteurs de coupe intégrées DesignCouleur: NoirFinition: Très confortableSystème d'alimentationRecharge rapide en 5 minAlimentationAutonomie: 60 minutesCharge: Charge complète en 1 heureType de batterie: NiMHTension automatique: 100-240 VEntretienGarantie de 2 ansAucune lubrification nécessaireAccessoiresSabot: Guide de coupe dynamiqueAccessoires inclus: Tondeuse corps(série BG1000)Trousse: Trousse de rangement soupleEntretien: Brossette de nettoyage* Par rapport aux précédents modèles Philips* * Testé en laboratoire© 2022 Koninklijke Philips N.V. Tous droits réservés.Les caractéristiques sont sujettes àmodification sans préavis. Les marques commerciales sont la propriété de Koninklijke Philips N.V. ou de leurs détenteurs respectifs.Date de publication 2022‑01‑04 Version: 4.2.1EAN: 08 71010 38781 79 。
Бош 视觉智能 AUTODOME IP Starlight 7000 HD 高清 PTZ 球型摄像

u高分辨率、720p 高清 PTZ 摄像机具有高性能的 30 倍变焦镜头,适用于在照明度极低的场景中拍摄精细的细节u Intelligent Tracking(智能跟踪)和报警规则引擎采用板载智能视频分析 (IVA)u使用双重录像选项(iSCSI 和 SD 卡)以及双电源选项(高功率以太网供电(高功率 PoE)/24 VAC),增强系统灵活性u完全可配置的四码流,且视频流可单独配置,基于博世通用产品平台 (CPP4)u安装极为轻松直观,具备多个预配置的用户模式,允许用户选择适合其应用场合的摄像机配置AUTODOME IP starlight 7000 HD 是一款易于安装的高速PTZ 球型摄像机,它采用经过现场验证的室内/室外吊装防护罩或室内嵌入天花板式防护罩,配备优质的高清 (HD)720p50/60 视频和 30 倍光学变焦,无论在白天还是黑夜都可以提供出色的画面质量和网络性能。
该摄像机使您可以通过网络完全控制球型摄像机的所有功能,包括遥摄/俯仰/变焦操作、预置位、巡视路线和报警,并可通过 Web 配置球型摄像机的所有设置。
此外,它还提供直接网络视频流,并且采用 H.264 压缩/带宽限制技术,不但能高效地管理带宽和存储要求,同时还能提供出色的图像品质。
功能采用starlight技术的高性能PTZ摄像机相当出色的低光照灵敏度使此摄像机在所有光线条件下均表现出色。
光线不足时,此摄像机可以移开红外滤镜以自动从彩色切换至黑白模式,从而增强灵敏度,同时保持高超的图像品质。
在昏暗的环境中工作时,自动控制快门速度将会使灵敏度提高 50 倍以上。
Starlight 型号具有 720p50/60 高清成像平台,并采用starlight 技术。
此摄像机可在环境光线不足的场景中生成清晰的视频图像,而不会出现与使用慢速快门的摄像机相关的任何运动模糊。
此摄像机经过调试,在白天和黑夜工作时,均可提供高品质的高清视频。
猫眼cateye_velo8中文说明书

102
14 x 1.75
106
16 x 1.50
119
47-305 16 x 1.75
120
18 x 1.50
134
18 x 1.75
135
47-406 20 x 1.75
152
20 x 1-3/8
162
22 x 1-3/8
177
22 x 1-1/2
179
24 x 1
175
24 x 3/4 Tubular 178
下层显示的转换 每次当您按压“模式"键时,不同的资料值会出现在下层显示。 e
省电功能 当码表本体没有收受到讯号达10分钟时,会进入“省电模式",并只显示时间。 若要回到正常显示,按压“模式"键或重新激活您的脚踏车以便取消省电功能。
资料重设 当在“操作流程"中有“重设 Re set "标示的屏幕出现时,持续按压“模式"键,测量资料会归 零。然而Odo(总距离)及时间不会归零。
20 mph 768.2 kcal
30 mph 2297.2 kcal
设定
全部清除
a 选择km/h或是mph
b
设定 + 模式
设定 2个按键
模式
推!
Tm
Dst Av Mx Cal Odo
0
Clock
选择km/h km/h
模式
mph
km/h
设定结束
设定
轮子尺寸
轮胎尺寸
L (cm)
ETRTO
14 x 1.50
如何设定时间 在时间模式中,按压背面的“设定"键,屏幕显示进入时间设定模式。 *当选择km/h做为速度单位,则变成24小时时间制。 当选择mph做为速度单位,则变成12小时时间制。 f
高斯光束通过猫眼逆反射器的变换特性_谷锁林

反射光束与入射光束具有同样的发散角 、束腰宽度
以及束腰位置 , 两者完全相同 。
图 1 理想猫眼逆反射器
3 存在离焦的猫眼反射器 存在离焦量的情况下 , 激光束通过猫眼逆反器
的矩阵分解示意图如图 2所示 。
半径 ), 推导得 :
wr2
=π2
w2if4 w4if8
λ2 [ π2 wi4 (2δl-f2 )2 +4λ2 l2 (δl-f2 )2 ] λ2 +4(2δl-f2 )2 [ λ2 l(δl-f2 )+δπ2 w4i]
w2i +4πλ22δf24w4i
(8)
则反射光束发散角为
θr=πλwr =πλwi 1 +4πλ22δf24w4i
(9)
从图 6可见 , 在入射发散角保持 0.25mrad不变
时 , 主要影响 反射光束发散角 的是离焦量和焦 距 。
离焦量越大 , 发散角越大 , 焦距越小 , 发散角越大 。
离焦量 /m 图 4 不同距离时离焦量与发散角的关系 (焦距 0.5m)
从图 4可以更加明显的看出 , 负离焦时的发散 角要大于同等数值的正离焦 。 而无论距离多远 , 只
要离焦量为 0, 则发散角保持不变 , 这个值可以从式 (6)中令离焦量为 0而求得 wr =wi, 即 θr =入射发 散角 , 这里为 0.25mrad。 这说明只要是理想的目标 系统 , 在理论上猫眼效应反射光束参数是与入射光 束参数严格一致的 。但是在距离较近时 , 甚至是离 焦量越大 , 发散角越小 , 这说明合理的选择距离和离
(7) 当负离焦时 , 公式不变 , 仅是数值为负即可 。
3.2 特性分析
由于输入光腰距猫眼逆反射器的距离较大时入
Luma 110 Series мини巧眼摄像头指南说明书
110 Series Mini Dome 1080p Analog Surveillance CameraQuick-StartGuideLuma 110 Series Mini Dome CameraBox Contents•Camera and mount•DC 12V power adapter•Self-adhesive mounting template•4 × camera mount screws with anchors•Extra desiccant pack• 2.5mm hex wrenchOther Required EquipmentAside from the contents of this box, you will need•Phillips screwdriver•Power source: 12V DC•CC-TV tester (recommended)23Luma 110 Series Mini Dome CameraInspectionBefore you start, ensure that the device is in good condition and all the assembly parts are included.}Power off all equipment during installation.}Ensure the wall is strong enough to hold three times the weight of the camera and the mount.}If the mounting surface is cement, use the included expansion screws to install the camera. If mounting to a wood surface, use self-tapping wood screws (not included) to secure the camera.}If the product does not function properly, please contact technical support. Do not disassemble the camera for repair or maintenance.WARNING: This product can expose you to chemicalsincluding cadmium, which is known to the State of California to cause cancer. For more information go to.4Video BNC CablePower Barrel CableLensInfrared Light Sensor Dome CoverLuma 110 Series Mini Dome CameraPrepare for Installation1. Drill a cable hole and pilot holes for your screws in the ceiling, using the supplied template. We recommend installing with RJ59 or RJ6 cabling with two-wire power (regular or siamese). This provides better performance over distance than category cable with baluns.2. Loosen the hex screws on the dome to remove the dome and the black shroud. Do not throw away the foam arou nd the camera lens! It protects the camera from glare from its infrared lights.5Luma 110 Series Mini Dome CameraInstall the Camera 3. Connect the cables, and route thecables through the hole.4. Attach the base of the camera to theceiling and secure it.5. Gripping the side of the camera,rotate, angle, and spin the lens to getthe orientation you desire.6. Ensure the black foam ring aroundthe lens is in its proper position.Replace the black shroud andprotective dome.6AdjustmentsIf you want to use the camera’s on-screen display through your DVR or the web interface, go into the DVR’s menu and set the camera protocol to UTC(Coaxitron). To do so from the DVR’s local interface, go to Settings > Camera > PTZ, then click the PTZ Settings button. From the web interface, go to Configure the Recorder > Camera Settings > PTZ Settings.7Luma 110 Series Mini Dome CameraSupportCall 866-838-5052 or email T echSupport@.For information, instructional videos, support documentation, or ideas, visit our website.5-Year Limited WarrantyT his Luma Surveillance™ product has a 5-Y ear Limited Warranty. T his warranty includes parts and labor repairs on all components found to be defective in material or workmanship under normal conditions of use. This warranty shall not apply to products that have been abused, modified or disassembled. Products to be repaired under this warranty must be returned to a designated service center with an assigned return authorization (RA) number. Contact technical support for an RA number.Copyright ©2015–2019 by SnapAV. All rights reserved. SnapAV, Luma Surveillance, and all related marks and images are trademarks or registered trademarks of SnapAV.Version 190104-15398。
- 1、下载文档前请自行甄别文档内容的完整性,平台不提供额外的编辑、内容补充、找答案等附加服务。
- 2、"仅部分预览"的文档,不可在线预览部分如存在完整性等问题,可反馈申请退款(可完整预览的文档不适用该条件!)。
- 3、如文档侵犯您的权益,请联系客服反馈,我们会尽快为您处理(人工客服工作时间:9:00-18:30)。
CATCYE猫眼 VELO 7 VELO 8 自行车单车码表里程表
猫眼经久不衰的经典款式VELO 8,很多人可能觉得现在大多数码表的功能让人眼花缭乱,殊不知越是功能多的,越容易出问题,顺东的548码表带温度计的经常出现乱码就是一个非常头疼的问题,厂家至今无法解决。
反倒是不带温度计的更稳定。
猫眼码表此款的正常售价都在150元以上,不要拿一些国内某些品牌的产品来衡量性价比,我可以用事实来可以告诉您Cat Eye的质量。
非常实用的8种功能,能满足您骑行。
品牌:cat eye猫眼
型号:VELO8
颜色:如图
尺寸:46mm*43mm*16mm(因个人测量方式不同,可能会存在一定误差)
重量:盒装±92g 单码表±25g
VELO7 和VELO8的对比:两款外观一样,只是在个别功能上有所区别,VELO7而可以设置轮胎粗度,让显示更加精准,VELO8 多一项运动卡路里消耗显示。
掌柜推荐:对于车速要求精准度比较高,专业些的车友可以要VELO7,或是车型比较特殊,轮胎小或者大的就用VELO7。
如果是平时运动,休闲骑,锻炼为目的的就用VELO8!
猫眼码表(CATEYE VELO 7)功能表:
功能一:骑行时间 (Tm) 可清零
功能二:骑行距离(Dst)可清零
功能三:平均速度(Av)可清零
功能四:最高速度(Mx)可清零
功能五:功能六:总路程(Odo)
功能六:时钟
功能七:实时速度带与平均速度作比较的动态箭头显示
猫眼码表(CATEYE VELO 8)功能表:
功能一:骑行时间 (Tm) 可清零
功能二:骑行距离(Dst)可清零
功能三:平均速度(Av)可清零
功能四:最高速度(Mx)可清零
功能五:消耗卡路里(Ca)可归零猫眼专利带能量消耗
功能六:总路程(Odo)
功能七:时钟
功能八:实时速度带与平均速度作比较的动态箭头显示
屏幕上部为实时车速,左下部为功能标志(Tm\Dst\Av\Mx…..,右下部为该功能数据。
按MODE键可以在各个功能间切换.
设置方法:
1、初始化码表:按住MODE键,并按下SET键,码表内记录和设置全部清空。
更换电池后的开机也是同样的操作,按住MODE键,并按下SET键。
2、初始化后,屏幕闪烁“Km/h”(公式),按MODE键可以切换为“mph”(英式),按SET键确定为“Km/h”(公式)或“mph”(英式)
3、确定制式后,屏幕闪烁“26”,是默认的26山地车的车轮尺寸。
轮组规格依次为:26",27",700c,16",18",20",22",24"。
按MODE键可以调节车轮尺寸,按SET键确定车轮尺寸。
4、时钟的设置:在时钟模式,按SET键,时位闪烁,按MODE键调整,再按SET键确定,分位闪烁,按MODE键调整,再按SET键,完成时钟设置。
5、长按MODE键,可以清空除ODO总骑行里程外的其他记录。
其中时钟不会清除的。
长时间闲置(超过30分钟无输入)自动进入节能状态。
所用电池与电脑主板电池一样,都是CR2032,可使用2-3年。
重量很轻30g。
注意事项:安装磁铁与感应器时,感应器头部对准磁铁中心即可(注意是感应器头部,不是感应器整体),间隙在3MM左右,如无接受数据,请调整磁体与感应器位置。
部分朋友提到的问题:
1.选项里面选择固定轮子尺寸,没有14寸的选项,本来想用在bya412上,现在只能用在P8上了。
回答:可以设置的轮组规格已经写在说明了
(26",27",700c,16",18",20",22",24"。
)偶对大行了解还处在初级阶段,朋友提到的bya412 看了一下是下面这个车型,轮径14寸,有朋友用这款车打算买这款码表的就不要买了,木有这个轮组的设置。
2. 部分第一次安装码表的车友提出:码表在安装过程中不显示即时公里数的问题,这个并不是产品本身问题,主要还是在安装细节上的事情,也就是磁铁和接收器的距离和角度的事情。
通过安装掌柜发现美利达的碟刹款大部分必须安装在车避震的右侧,左侧有碟刹盘片,角度不太合适。
如何安装过程中没
有信号,最简单的测试是拿接收器靠近磁铁左右晃一下测试是否有显示,有显示的话就是安装角度问题。
安装时最好是让磁铁靠近接收器离线远的一端,一般比较容易找到信号。
3.码表屏幕没有显示:如果是换了电池或者是拔下电池再重新安装后,码表就会自动关机,需要按下功能键和码表后面的复位键,就会开机。
再就是检查电池是否装反面了!
4.安装注意事项:在安装绕线时,请给避震留出行程距离,以免避震反弹将数据线拽断
车轮周长对照表:
16×1.75120
18×1.75135
20×1-3/8 162
22×1-3/8 177
24×1.75189
26×7/8 192
26×1.25195
26×1-1/8 190
26×1-3/8 207
26×1-1/2 210
26×1.40 200
26×1.50 201
26×1.75 202
26×1.95 205
26×2.00 206
26×2.10 207
26×2.125207
26×2.35 208
27×1 215
27×1-1/8 216
27×1-1/4 216
27×1-3/8 217
650×35A 209
650×38A 212
650×38B 211
700×19C 208 700×20C 209 700×23C 210 700×25C 211 700C Tubular 213。
