快速报表系统FastReport4用户使用手册_修改版
fastReport简易说明
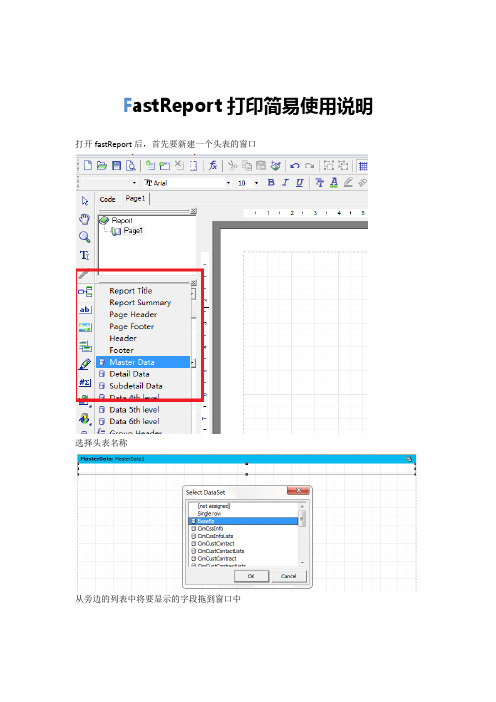
F astReport打印简易使用说明打开fastReport后,首先要新建一个头表的窗口
选择头表名称
从旁边的列表中将要显示的字段拖到窗口中
重复以上步骤新建一个重表窗口
使用文本和画笔添加文字和表格
在code中定义事件:例
procedure DetailData1OnBeforePrint(Sender: TfrxComponent);
begin
IF(<WZ_SO."SO_ID"> =<WZ_SO_DETAIL."SO_ID">) //需要修改这个地方,判断主表的从表,显示与主表相对应的从表信息
THEN DetailData1.VISIBLE := TRUE
ELSE DetailData1.VISIBLE := FALSE
end;
点击detailData,在DetailData控件的Events中,
“OnBeforePrint”选择“DetailData1OnBeforePrint
(完)
附录1:
1.时间
在文本框内输入[Date] [Time]可显示当前时间。
2.小数位
在右边的属性栏中可以看到dispalyFormat的属性点击进去
选择需要的小数位
3.其他function
双击属性文本会出现一个对话框,上面的fx可以选择所需要的函数,具体可以自己研究下
在模板编辑过程中可以点击这个按钮进行预览。
Fast 用户手册说明书
Fast USER MANUALUser manualfor Fast scoreE505M001 – Version 4 –10/05/2021(software version 1.3)enTABLE OF CONTENTS1.PURPOSE OF THE USER MANUAL (3)2.INDICATIONS (4)2.1. INTENDED USE (4)2.2. INDICATION FOR USE (4)2.3. PRECAUTIONS FOR USE (4)2.4. TARGET POPULATION (4)2.5. INTENDED USER (4)2.6. INTENDED ENVIRONMENT (4)3.CLASSIFICATION (5)4.CLINICAL PERFORMANCES (5)5.OPERATING PROCEDURE (5)5.1. TECHNICAL RECOMMENDATION FOR FIBROSCAN PROCEDURE (5)5.2. TECHNICAL RECOMMENDATION FOR BLOOD SAMPLING (5)5.3. ADDITIONAL RECOMMENDATION (6)5.4. USER REGISTRATION ON MyFIBROSCAN (6)5.5. Fast COMPUTATION FROM myFIBROSCAN ACCESSORY (7)5.6. Fast COMPUTATION FROM Echosens API (9)6.SYMBOLS ON THE DEVICE (9)7.CONTACT US (9)8.ABOUT (9)9.GLOSSARY (10)1. PURPOSE OF THE USERMANUALThe present User Manual has no contractual value whatsoever and under no circumstances may Echosens be held responsible on the basis of the information contained in the present manual.The present User Manual details the information required for the use of Fast computation.Echosens publishes this manual "as is'", without guarantees of any nature, whether explicit or implicit, including, but not limited to, implicit guarantees concerning merchantability or fitness for a particular use, for the purpose of providing simple and accurate information. Consequently, Echosens cannot accept any responsibility for any incorrect interpretation of the manual. Though all efforts have been made to offer a manual that is as accurate as possible, the manual may nevertheless contain some technical inaccuracies and/or typographical errors.Echosens cannot, under any circumstances, be held responsible for any loss of profit, loss of business, data loss, business interruption, or for any indirect, specific, accidental or consecutive damages of any type.Any information or modification requests pertaining to this manual should be sent to: Echosens,6rueFerrus,75014PARIS,*******************************.Fast™, Echosens TM, TM, FibroScan®, TM among others, are trademarks and/or service marks of Echosens Group. Echosens and FibroScan are registered in the U.S.and/or other countries. © 2021 Echosens. All rights reserved.2. INDICATIONSFast™ is an algorithm using liver stiffness measurement, controlled attenuation parameterand aspartate amino transferase intended to compute a score between 0 and 1.Fast™ calculator is a tool for clinicians, computed from LSM and CAP (obtained fromFibroScan device) and AST blood parameter measurement, to aid in the identification ofpatients with suspicion of NAFLD as being at risk for active fibrotic NASH(NASH+NAS≥4+F≥2).Fast™ is presented as an educational service intended for licensed healthcareprofessionals. While this score is about specific medical and healthcare issues, it is not asubstitute for or replacement of personalized medical advice and is not intended to be usedas the sole basis for making individualized medical or health-related decisions.The following circumstances may affect the results obtained and therefore may affect theinterpretation of Fast result:• Pregnancy• Patients under 18 years of age• Other chronic or acute liver disease than NAFLD• Liver transplant patients• Cardiac failure and/or significant vascular disease• Confirmed diagnosis of active malignancy or other terminal disease• Use of treatment inducing liver injuryTo get a reliable result:• LSM and CAP should come from a single FibroScan exam• FibroScan exam and blood collection for AST assessment should be performedwithin 6 months.Fast is indicated for adult patients with suspicion of NAFLD.The device is intended for use by healthcare professionals.The results obtained from the device are intended to be interpreted by a physicianexperienced in the management of liver diseases.Fast is accessible through devices connected to the internet using dedicated services.Users shall authenticate and confirm his/her status and abilities to use Fast.2.1. INTENDED USE2.2. INDICATION FOR USE2.3. PRECAUTIONS FOR USE2.6. INTENDED ENVIRONMENT2.5. INTENDED USER2.4. TARGET POPULATION4 05/2021 - ECHOSENS, FIBROSCAN® AND Fast ARE REGISTERED TRADEMARKS © COPYRIGHT ECHOSENS ALL RIGHTS RESERVED E505M001.4505/2021 - ECHOSENS , FIBROSCAN® AND Fast ARE REGISTERED TRADEMARKS © COPYRIGHT ECHOSENS ALL RIGHTS RESERVEDE505M001.43. CLASSIFICATIONFast is an in vitro diagnostic medical device according to directive 98/79/EC and a non-device Clinical Decision Support (FDA).4. CLINICAL PERFORMANCESFormula and performances are available in Newsome et al., Lancet Gastroenterol Hepatol. 2020 Apr;5(4):362-3735. OPERATING PROCEDUREThe measurement of liver stiffness (E or LSM) and controlled attenuation parameter (CAP) shall be done on a FibroScan device by an operator trained and certified by Echosens or its local representative according to the recommendations of Echosens with a probe fitted to the morphology of the patients as described in the FibroScan user guide.The FibroScan examination results should fulfill reliability criteria defined in the publication entitled “Determination of reliability criteria for liver stiffness evaluation by transient elastography” by Boursier J, Zarski JP, de Ledinghen V, Rousselet MC, Sturm N, Lebail B, Fouchard-Hubert I, Gallois Y, Oberti F, Bertrais S, Cales P and the Multicentric Group from ANRS/HC/EP23 FIBROSTAR St published in Hepatology in 2013 volume 57(3) page 1182-1191.It is essential to comply with the requirements of the ISO 15189 international standard concerning the performance of quality controls (internal quality control, external evaluation including the mandatory national quality control), and with the regulations in force in the country where the laboratory is located.Blood collection should be performed in fasting conditions. The patient should not have made recent physical effort to avoid hemolysis. 5.1. TECHNICAL RECOMMENDATION FOR FIBROSCAN PROCEDURE5.2. TECHNICAL RECOMMENDATION FOR BLOOD SAMPLING605/2021 - ECHOSENS , FIBROSCAN® AND Fast ARE REGISTERED TRADEMARKS © COPYRIGHT ECHOSENS ALL RIGHTS RESERVED E505M001.4The delay between the FibroScan examination and the blood collection shall be less than 6 months.Downloading and sign inmyFibroScan application can be used on iOS and Android platforms. It is available on both Apple store and Google play store. Once it has been downloaded, anyone can launch the application but he/she has to be registered to access Echosens services.The screen aside appears. The application is available both in French and English. However, by default, this page language is based on the phone language.If the user is already registered, he/she can connecthimself/herself by entering his/her login and password and clicking on “Sign In” button. If not, the user should create an account by clicking on “Sign Up” button.Once signed-in, unless he/she specifically logs out from the application, the user will be automatically logged-in and will not have to enter his credentials again.RegistrationTo access Fast, any user has to create an account on Echosens Cloud services by clicking on “Sign Up”. He/she then accesses to the following screens:5.4. USER REGISTRATION ON MyFIBROSCANFigure 1: Sign inFigure 2 : Sign up5.3. ADDITIONAL RECOMMENDATION705/2021 - ECHOSENS , FIBROSCAN® AND Fast ARE REGISTERED TRADEMARKS © COPYRIGHT ECHOSENS ALL RIGHTS RESERVED E505M001.4Home pageOnce logged-in, the user accesses to the home page screen (figure 3). Fast is available under the “Scores” menu (figure 4)Inputs screenBy clicking on the “Fast ” block, the user accesses Fast input screen to fil the input parameters: LSM by VCTE (E), CAP and AST (SGOT). (figure 5).Invalid values will be notified to the user. He will not be able to submit its computation with out of range values of bad/missing units.The user has to confirm that: • He/ She has read precautions for use, including that patient is suspected of NAFLD,•VCTE liver examination and blood collection for AST assessment are performed within 6 monthsThe user can access:• This user guide by clicking on “Learn more” • Fast formula by clicking on publicationThen, the user can submit his/her computation or go back to the home page by clicking on thepictogram.5.5. Fast COMPUTATION FROM myFIBROSCAN ACCESSORYFigure 3: myFibroScan Home pageFigure 5 : Fast input parametersFigure 4: myFibroScan - Scores menu805/2021 - ECHOSENS , FIBROSCAN® AND Fast ARE REGISTERED TRADEMARKS © COPYRIGHT ECHOSENS ALL RIGHTS RESERVED E505M001.4Results screenAfter submission, the user accesses the results screen (figure 6). He/She can consult the input parameters he/she submitted and the associated result. If he/she wants to update one of these values, the user can come back to the inputs screen by clicking on the “back” pictogram.Again, the user can access:• This user guide by clicking on “Learn more” • Fast formula by clicking on publicationFrom here, he can generate the corresponding report by clicking on “Create a report” or go back to the home page by clicking on thepictogram.Report creationTo generate a report, the user has to enter personal patient data. Several options are possible:• The user can re-use data previously entered by selecting a patient from the patient list and confirm the statement.• Or he/she can create a new patient file. It will be locally stored on the phone and will be visible in the patient list for future use. Fields with a red star are mandatory.Once done, the user can submit the data or go back to the home page by clicking on the pictogram.Once submitted, the user has to fill or select FibroScan examination date and blood collection date (figure 7).Even if the time elapsed between these two dates is longer than the threshold mentioned in the Fast input recommendations, the report will be generated. However, the Fast result will not be displayed since it does not meet the specific indications agreed by the user to use the Fast computation.Once done, the user can click on Submit button. The report is generated, downloaded on the phone and can be read by any PDF reader.He/She can go back to the home page by clicking on thepictogram.Results and PDF reports are not stored in myFibroScan application. PDF report can be stored in the phone under the responsibility of the user.Figure 6: Fast Results screenFigure 7: Examination dates905/2021 - ECHOSENS , FIBROSCAN® AND Fast ARE REGISTERED TRADEMARKS © COPYRIGHT ECHOSENS ALL RIGHTS RESERVEDE505M001.4For specific purposes, users can contact Echosens to implement direct API calls without using myFibroScan interface to perform Fast computations.6. SYMBOLS ON THE DEVICEFast deviceCE marking affixed by Echosens 04th November 2019In vitro diagnostic Medical DeviceManufacturer7. CONTACT USThe user can contact Echosens by clicking on the “Contact us” block available on myFibroScan home page.It will redirect him/her towards the support platform in which he/she will be able to fill a request form.8. ABOUTBy clicking on the “About” block available on myFibroScan home page, the user can consult general information regarding Echosens, myFibroScan, trademarks and patents.5.6. Fast COMPUTATION FROM Echosens API9. GLOSSARY10 05/2021 - ECHOSENS, FIBROSCAN® AND Fast ARE REGISTERED TRADEMARKS © COPYRIGHT ECHOSENS ALL RIGHTS RESERVED E505M001.4Fast USER MANUAL 11 05/2021 - ECHOSENS , FIBROSCAN® AND Fast ARE REGISTERED TRADEMARKS © COPYRIGHT ECHOSENS ALL RIGHTS RESERVED E505M001.4Echosens6 rue Ferrus 75014 PARISFranceTel: +33 (0)1 44 82 78 50 Fax: +33 (0)1 44 82 78 60 Website: Contact: *****************。
FastReport-程序员手册
FastReport-程序员手册一、使用Tfr某Report组件工作1、加载并存储报表默认情况下,报表窗体同项目窗体构存储在同一个DFM文件中。
多数情况下,无须再操作,因而你就不必采用特殊方法加载报表。
如果你决定在文件中存储报表窗体或者是数据库的Blob字段(他提供了非常大的弹性,你能够在非编译程序中修改),你必须使用“Tfr某Report”提供的加载和存储方法。
functionLoadFromFile(contFileName:String;E某ceptionIfNotFound:Boolean=Fale):Boolean;从一个给定名字文件中加载报表。
如果第二个参数等于“True”并且文件没找到,那么他会触发一个异常。
如果文件加载成功,他返回“True”。
procedureLoadFromStream(Stream:TStream);从流中加载报表。
procedureSaveToFile(contFileName:String);用特殊名称文件存储报表。
procedureSaveToStream(Stream:TStream);把报表存在流中。
例如:Pacal:fr某Report1.LoadFromFile('c:\\1.fr3');fr某Report1.SaveToFile('c:\\2.fr3');C++:fr某Report1->LoadFromFile(\fr某Report1->SaveToFile(\2.设计报表通过“Tfr某Report.DeignReport”方法调用报表设计器。
你必须在你的项目中包含报表设计器(必要条件是:要么使用“Tfr某Deigner”组件,要么增加“fr某Degn”单元到ue列表)“DeigReport”方法接受两个默认参数:procedureDeignReport(Modal:Boolean=True;MDIChild:Boolean=Fal e);Modal参数决定设计器是否被模态,MDIChild参数允许把设计器窗体作为一个MDI子窗体。
fastreport中手册(翻译整理)

第一章通用说明(一)安装成VS工具箱(二)故障排除(三)部署(四)编译源代码第二章winform窗体中的使用Visual Studio中报告组件的使用使用代码生成报表存储和装载一个报告注册数据传递一个值到报表参数运行报告设计报告导出报告配置环境取代了“开放”和“保存”对话框更换标准进度窗口通过自己的连接字符串通过自定义的SQL引用报告对象使用代码创建一个报告使用自己的预览窗口24过滤表中数据向导第三章 的使用使用WebReport组件存储和装载一个报告注册数据传递一个值到报告参数工作在“中等信任”模式第一章通用说明1.0 一般信息安装VS工具网络安装程序自动添加FastReport组件进入Visual Studio的工具箱。
如果你有禁用这个特性在安装,你可以手动添加组件。
要做到这一点:在工具箱中删除“FastReport·NET”选项卡,如果它是在那里;·创建一个新的标签(要做到这一点,右键单击工具箱并选择“添加选项卡”项目),或选择一个现有的标签你想添加FastReport组件; 右键点击一个标签,·选择“选择项目…”:·在对话框中,按“浏览…”按钮,选择FastReport.dll,FastReport.Web.dll文件(它们位于“C:\ Program files \ FastReports ”文件夹);·关闭对话框与OK按钮。
在此之后,您将看到组件在一个选择的选项卡:·报告;·视图控制;·设计控制;·EnvironmentSettings;(此组件将WebReport·可见, 在 项目唯一的)。
2.0 故障排除如果你面临的问题在使用报表设计器(例如,一些工具栏或工具窗户被损坏),你应该删除配置文件。
这个文件在启动时创建。
它位于以下文件夹:A.Windows XP系统【C:\文档和设置\ user_name \ \应用程序本地设置数据\ \ FastReport.config FastReport】B.Windows Vista系统【C:\用户\ user_name \ AppData \当地\ \ FastReport.config FastReport】以下信息是存储在配置文件中:1.对话框窗口的大小和位置2.工具栏设置;3.最近使用的数据连接4.邮件设置(如果你使用“发送电子邮件”功能在预览)。
FastReport4(Delphi)动态生成报表
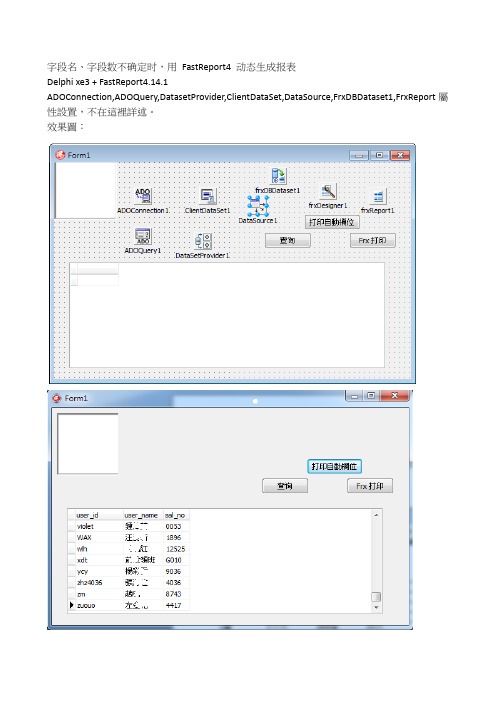
字段名、字段数不确定时,用FastReport4 动态生成报表Delphi xe3 + FastReport4.14.1ADOConnection,ADOQuery,DatasetProvider,ClientDataSet,DataSource,FrxDBDataset1,FrxReport屬性設置,不在這裡詳述。
效果圖:unit Unit1;interfaceusesWinapi.Windows, Winapi.Messages, System.SysUtils, System.Variants, System.Classes, Vcl.Graphics,Vcl.Controls, Vcl.Forms, Vcl.Dialogs, Vcl.StdCtrls, Vcl.Grids, Vcl.DBGrids, Datasnap.Provider, Data.Win.ADODB, Data.DB, Datasnap.DBClient, frxClass, frxPreview, frxDesgn, frxDBSet;typeTForm1 = class(TForm)ADOConnection1: TADOConnection;DataSource1: TDataSource;ClientDataSet1: TClientDataSet;ADOQuery1: TADOQuery;DataSetProvider1: TDataSetProvider;DBGrid1: TDBGrid;Button1: TButton;Button2: TButton;frxDBDataset1: TfrxDBDataset;frxDesigner1: TfrxDesigner;frxPreview1: TfrxPreview;frxReport1: TfrxReport;Button3: TButton;procedure Button1Click(Sender: TObject);procedure Button2Click(Sender: TObject);procedure Button3Click(Sender: TObject);private{ Private declarations }public{ Public declarations }end;varForm1: TForm1;implementation{$R *.dfm}procedure TForm1.Button1Click(Sender: TObject);beginclientdataset1.Close;mandText:= 'select user_id,user_name ,sal_no from t_user '; clientdataset1.Open;end;procedure TForm1.Button2Click(Sender: TObject);varpDataPage :TfrxDataPage;pPage :TfrxReportPage ;pBand :TfrxBand;pDataBand :TfrxMasterData ;pMemo :TfrxMemoView ;i:integer;x,y,z,width:extended;begin// 清除原报表内容frxReport1.Clear;// 设置Report 的DataSetfrxReport1.DataSets.Add(frxDBdataset1);// 添加Report 的Data 页pDataPage := TfrxDatapage.Create(frxReport1);// 增加报表显示内容pPage := TfrxReportPage.Create(frxReport1);ppage.CreateUniqueName();// 设置Fields 的默认尺寸pPage.SetDefaults;// 页面方向// pPage.Orientation := poLandscape;// 页面边距pPage.TopMargin := 20;pPage.LeftMargin := 20;pPage.RightMargin := 20;pPage.BottomMargin := 20;// 创建报表Title BandpBand := TfrxReportTitle.Create(pPage);pBand.CreateUniqueName();pBand.Top := 0;pBand.Height := 20;// 创建显示Field 的MemopMemo := TfrxMemoView.Create(pBand);pMemo.CreateUniqueName();pMemo.Text := 'Hello FastReport!';pMemo.Height := 20;// 风格pMemo.Align := baWidth;// 创建DataBandpDataBand := TfrxMasterData.Create(pPage);pDataBand.CreateUniqueName();pDataBand.DataSet := frxDBDataset1;pDataBand.Top := 100;pDataBand.Height := 20;// 将Memo 添加到DataBand 上pMemo := TfrxMemoView.Create(pDataBand);pMemo.CreateUniqueName();// 连接数据pMemo.DataSet := frxDBDataset1;// 显示username 字段pMemo.DataField := 'user_name';pMemo.SetBounds(0, 0, 100, 20);// memo 带边框pMemo.Frame.Typ := [ftLeft , ftRight , ftTop , ftBottom];// 风格pMemo.HAlign := haRight;// 报表显示frxReport1.ShowReport(true);end;procedure TForm1.Button3Click(Sender: TObject);varpDataPage :TfrxDataPage;pPage :TfrxReportPage ;pBand :TfrxBand;pDataBand :TfrxMasterData ;pMemo :TfrxMemoView ;pTitle :TfrxReportTitle;pPageHeader :TfrxPageHeader;pPagetFooter :TfrxPageFooter;i:integer;x,y,z,width:extended;poPortrait, poLandscape: TPrinterOrientation ;beginwidth:= 80 ; // 字段宽度x:= 0 ;y:= 0 ;z:= 0 ;frxReport1.Clear;frxReport1.DataSets.Add(frxDBdataset1);pDataPage := TfrxDatapage.Create(frxReport1);pPage := TfrxReportPage.Create(frxReport1);ppage.CreateUniqueName();pPage.SetDefaults;pPage.Orientation := poLandscape; // 橫印,poPortrait: 直印(默認),pPage.TopMargin := 10; // 上邊距(mm)pPage.LeftMargin := 20; // 左邊距(mm)pPage.RightMargin := 20; //右邊距(mm)pPage.BottomMargin := 15; // 下邊距(mm){pBand := TfrxReportTitle.Create(pPage);pBand.CreateUniqueName();pBand.Top := 0;pBand.Height := 20;}pTitle := TfrxReportTitle.Create(pPage);pTitle.CreateUniqueName();pTitle.Top := 0;pTitle.Height := 30;// 標題頭pMemo := TfrxMemoView.Create(pTitle);pMemo.CreateUniqueName();pMemo.Text :='AutoReport for FastReport4.14';pMemo.SetBounds(0,0,300,30); //MemoView :長、寬、高;pMemo.Font.Size := 14 ; // 14號字pMemo.Font.Style :=[fsBold]; // 粗體pMemo.Height := 30;pMemo.Align := baCenter; // MemoView:居中;// 創建表頭欄pPageHeader := TfrxPageHeader.Create(pPage); pPageHeader.CreateUniqueName;pPageHeader.Top := 50;pPageHeader.Height:= 20;for i := 0 to clientDataset1.FieldCount -1 dobegin// 表頭欄位pMemo := TfrxMemoView.Create(pPageHeader);pMemo.CreateUniqueName();pMemo.Text := clientDataset1.Fields[i].FieldName; pMemo.SetBounds( i * width, 0, width, 20);pMemo.Frame.Typ:=[ftLeft , ftRight , ftTop , ftBottom]; pMemo.Height := 20;// 风格// pMemo.Align := baWidth;pMemo.Align := baLeft;end; // end for ;// 创建DataBandpDataBand := TfrxMasterData.Create(pPage);pDataBand.CreateUniqueName();pDataBand.DataSet := frxDBDataset1;pDataBand.Top := 100;pDataBand.Height := 20;for i := 0 to clientdataset1.FieldCount-1 dobegin// 将Memo 添加到DataBand 上pMemo := TfrxMemoView.Create(pDataBand);pMemo.CreateUniqueName();// 连接数据pMemo.DataSet := frxDBDataset1;// 显示username 字段pMemo.DataField := clientDataset1.Fields[i].FieldName;pMemo.SetBounds( i * width, 0, width, 20); // setBountds(X横行起点,Y起点,字段宽度,字段高度)// memo 带边框pMemo.Frame.Typ:=[ftLeft , ftRight , ftTop , ftBottom];// 风格// pMemo.HAlign := haRight; // 字右對齊;pMemo.HAlign := haLeft;end; // end for ;// 报表显示frxReport1.ShowReport(true);end;end.。
快速报表系统FastReport4用户使用手册簿_修改版(3)
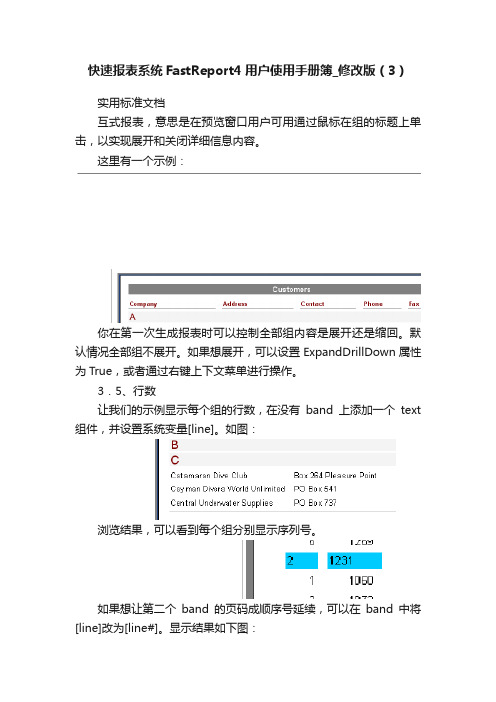
快速报表系统FastReport4用户使用手册簿_修改版(3)实用标准文档互式报表,意思是在预览窗口用户可用通过鼠标在组的标题上单击,以实现展开和关闭详细信息内容。
这里有一个示例:你在第一次生成报表时可以控制全部组内容是展开还是缩回。
默认情况全部组不展开。
如果想展开,可以设置ExpandDrillDown属性为True,或者通过右键上下文菜单进行操作。
3.5、行数让我们的示例显示每个组的行数,在没有band上添加一个text 组件,并设置系统变量[line]。
如图:浏览结果,可以看到每个组分别显示序列号。
如果想让第二个band的页码成顺序号延续,可以在band中将[line]改为[line#]。
显示结果如下图:3.6、函数集在分组报表中,一般情况下需要显示一些结论性的内容,如分组数,组内行数等。
为了这个目的,FastReport提供了一些函数集。
Sum 返回公式的和Min 返回公式的最小值Avg 返回公式的平均值Count 返回数据行数除count函数外的其他函数的语法如下,以sum为例:sum(公式,band,标记)sum(公式,band)sum(公式)参数解释:公式——要显示数据的公式band——数据Band的名称标记——一个字节,可以是以下数据之一或他们的和1:计算时包含不可见Band2:对计算值进行累计公式是必需的参数,其他是可选的,不过,有歧义时,应该使用band这个参数。
Count函数的语法:Count(band,标记)Count(band)参数说明和上面类似。
对所有的函数有一个规定,就是只适用于数据Band或数据Band 的Footer Band.集合函数是怎么工作的呢?让我们做一个示例:数据Band的“ItemTotal”字段显示当前表单的总计,在groupfooter中添加一个text 组件,输入[sum(,masterdata1)]。
显示结果如下图:函数中“标记”参数的目的就是为了有些报表部分数据Band可能隐藏不可见,不管是否可见都应该计算在范围内。
FastReport用户手册译文
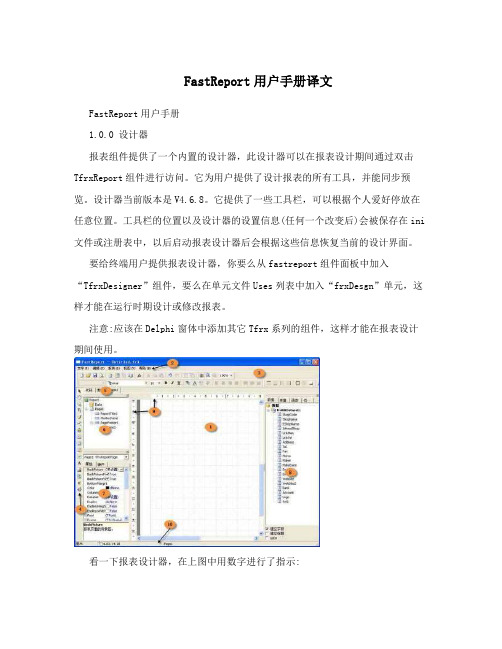
FastReport用户手册译文FastReport用户手册1.0.0 设计器报表组件提供了一个内置的设计器,此设计器可以在报表设计期间通过双击TfrxReport组件进行访问。
它为用户提供了设计报表的所有工具,并能同步预览。
设计器当前版本是V4.6.8。
它提供了一些工具栏,可以根据个人爱好停放在任意位置。
工具栏的位置以及设计器的设置信息(任何一个改变后)会被保存在ini 文件或注册表中,以后启动报表设计器后会根据这些信息恢复当前的设计界面。
要给终端用户提供报表设计器,你要么从fastreport组件面板中加入“TfrxDesigner”组件,要么在单元文件Uses列表中加入“frxDesgn”单元,这样才能在运行时期设计或修改报表。
注意:应该在Delphi窗体中添加其它Tfrx系列的组件,这样才能在报表设计期间使用。
看一下报表设计器,在上图中用数字进行了指示:1 –报表设计器工作区;2 –菜单栏;3 –工具栏;4 –对象工具栏;5 –报表页标签;6 –“报表树”窗体;;7 –“对象查看器”窗体;8 –“数据树”窗体,可以从此窗体中拖到一个数据元素到工作区;9 –标尺。
当往工作区拖动标尺时,将会出现一根引导线;10 –状态栏。
1.1.0控制键键描述Ctrl+O “文件|打开…” 菜单命令Ctrl+S “文件|保存” 菜单命令Ctrl+P “文件|预览” 菜单命令Ctrl+Z “编辑|撤消” 菜单命令Ctrl+C “编辑|复制” 菜单命令Ctrl+V “编辑|粘贴” 菜单命令Ctrl+X “编辑|剪切” 菜单命令Ctrl+A “编辑|全选” 菜单命令方向键, Tab 在对象间移动Del 删除选中的对象Enter 访问选中对象的编辑器Shift+方向键修改选中对象的大小Ctrl+方向键移动选中的对象Alt+方向键选中的物体附着到最近的一个特定的方向 1.2.0鼠标控制操作描述左键选择对象;粘贴一个新对象; 移动名调整一个对象的大小。
fastreport 使用参数
在本篇文章中,我将就“fastreport 使用参数”这一主题展开全面的评估和深入的探讨。
通过逐步分析和解释,我将帮助您更好地理解这一主题,并使文章内容具有足够的深度和广度,以满足您的需求。
1. 什么是fastreport?FastReport是一款功能强大的报表工具,它能够帮助用户快速、灵活地设计和生成各种类型的报表。
使用FastReport,用户可以根据自己的需求,自定义报表的外观和内容,实现个性化的报表设计。
FastReport还提供了丰富的数据处理和导出功能,为用户在报表生成过程中提供了极大的便利。
2. 参数的作用及使用方法在FastReport中,参数可以用来灵活地传递数据和控制报表的生成。
通过使用参数,用户可以在生成报表时,根据不同的需求,动态地改变报表的内容和展示方式,从而实现灵活的报表生成。
用户可以在报表设计过程中,将需要动态改变的内容设置为参数,并在生成报表时,通过传递不同的数值或条件,来改变参数的取值,从而实现报表的个性化生成。
参数的使用方法也非常灵活,用户可以通过代码或者设计界面来设置和控制参数的取值,以满足不同的报表生成需求。
3. 如何在FastReport中使用参数要在FastReport中使用参数,首先需要在报表设计界面中定义参数,然后在代码中传递参数的取值。
在报表设计界面中,用户可以通过参数面板添加和编辑参数,设置参数的名称、数据类型以及默认值等属性。
在代码中,用户可以通过参数对象的方法,为参数设置具体的取值,并在生成报表时,根据不同的条件来动态地改变参数的取值。
通过合理地使用参数,用户可以实现灵活的报表生成,满足不同条件下的报表展示需求。
在对FastReport使用参数的方法进行了详细的介绍之后,我将对本文进行总结和回顾,帮助您全面、深刻地理解主题。
总结:本文通过对FastReport使用参数的作用、使用方法以及实际操作进行了全面的评估和深入的探讨。
从简单介绍到详细解释,逐步展开,帮助您更好地理解并掌握这一主题。
fastreport使用总结

fastreport使用总结FastReport使用总结FastReport是一款功能强大的报表工具,它可以帮助用户快速、方便地生成各种类型的报表。
在使用FastReport的过程中,我们可以将其按照功能和使用方法进行分类,以便更好地掌握其使用技巧。
一、报表设计FastReport的报表设计功能非常强大,可以满足各种复杂报表的设计需求。
在设计报表时,我们可以使用FastReport提供的各种控件,如文本框、图片、表格等,还可以自定义控件,以满足特定的需求。
此外,FastReport还支持多种数据源,如数据库、XML文件等,可以方便地将数据导入到报表中。
二、报表预览在设计完报表后,我们可以使用FastReport提供的预览功能,对报表进行预览。
预览功能可以帮助我们快速查看报表的效果,以便及时进行修改和调整。
同时,FastReport还支持多种输出格式,如PDF、Excel、Word等,可以方便地将报表导出到不同的文件格式中。
三、报表打印除了预览和导出报表外,FastReport还提供了打印功能,可以将报表直接打印出来。
在打印报表时,我们可以设置打印参数,如纸张大小、打印方向等,以满足不同的打印需求。
同时,FastReport还支持多种打印机,可以方便地将报表打印到不同的打印机上。
四、报表导出除了预览和打印报表外,FastReport还支持将报表导出到多种文件格式中。
在导出报表时,我们可以选择不同的文件格式,如PDF、Excel、Word等,以满足不同的需求。
同时,FastReport还支持将报表导出到多个文件中,以便更好地管理和使用报表。
总之,FastReport是一款功能强大、使用方便的报表工具,可以帮助用户快速、方便地生成各种类型的报表。
在使用FastReport时,我们可以按照功能和使用方法进行分类,以便更好地掌握其使用技巧。
FastReport4中文使用手册
FastReport4中文使用手册FastReport4是一款用于快速创建报表和生成报表的工具。
它是一个功能全面的软件,提供了多种界面和报表样式,可以满足不同用户的需求。
本文将介绍FastReport4的中文使用手册,帮助用户更好地使用该软件。
安装FastReport4的安装比较简单,只需要按照向导提示进行操作即可。
安装完成后,启动软件。
在软件中,有一个“向导”按钮,这个按钮可以帮助用户快速上手。
界面FastReport4的界面比较清晰、易于操作。
在软件的主界面上,有一个工具栏和一个菜单栏。
用户可以从菜单栏中选择不同的命令,从工具栏中选择不同的工具。
报表制作在FastReport4中,报表的制作非常简单。
用户只需要从工具栏中选择“新建报表”,然后根据需要选择不同的报表样式和布局。
用户还可以选择不同的数据源和字段,以便生成所需的报表。
报表生成在FastReport4中,用户可以快速生成报表。
只需要选择需要生成的报表类型、数据源和布局,然后点击“生成报表”按钮即可。
如果需要,用户可以将报表输出到不同的文件格式,如PDF、Microsoft Excel等。
报表排版FastReport4还提供了丰富的报表排版功能。
用户可以通过调整表格、图片、文本框的大小和位置,来实现所需的报表效果。
用户还可以添加不同的样式,使报表更加美观。
报表设计在FastReport4中,用户可以通过报表设计功能,对报表进行更加细致的编辑。
用户可以在报表上添加不同的控件,如文本框、图片、图表等。
用户还可以通过操作数据源,对报表进行更加详细的调整。
总结FastReport4是一款非常实用的报表制作和生成工具,具有丰富的界面和功能。
通过本文的介绍,相信大家已经了解到了FastReport4的基本使用方法。
希望读者能够通过这篇中文使用手册,更好地使用FastReport4,为自己的工作提高效率。
FastReport的使用方法
FastReport的使⽤⽅法以下是我在⽹上收集的这是FastReport的主控件。
它包含了调⼊、保存、预览和打印报表的⽅法。
每个TfrReport控件只能包含⼀个单独报表。
TfrReport属性描 述DataSet-联接到⼀个TfrxxxDataSet。
这个数据源的记录数定义需多少时间这个报表才能被构建和打印。
(参考:ReportType属性)GrayedButtonsFalse如果为True,设计器和预览窗⼝的⼯具栏将显⽰为灰⾊。
InitialZoompzDefault定义预览的初始缩放值。
MDIPreviewFalse显⽰预览窗⼝为⼀个MDI⼦窗⼝。
ModalPreviewTrue如果为True,预览窗⼝为模式⽅式。
ModifyPreparedTrue如果为True,在预览窗⼝中双击页⾯则可以修改准备好的报表。
Preview-连接到⼀个TfrPreview。
如果这个属性被设置,准备好的报表将被显⽰在这个控件中。
PreviewButtonsAll定义在预览窗⼝中可⽤的按钮集。
ReportTypeRtSimpleDefines how to interpret the data source connected to the DataSet property. If ReportType = rtMultiple, the report will be built as many times as the number of records in the connected data source. This is useful for printing a report multiple times based on a list (i.e. the data source).定义怎样解释数据源连接到DataSet属性。
如果ReportType = rtMultiple,报表将在不同时间构建连接数据源的记录数。
FastReport用户手册译文
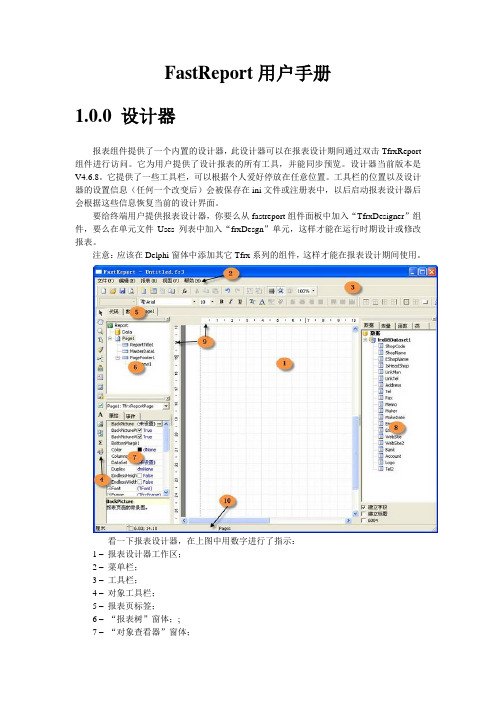
FastReport用户手册1.0.0设计器报表组件提供了一个内置的设计器,此设计器可以在报表设计期间通过双击TfrxReport 组件进行访问。
它为用户提供了设计报表的所有工具,并能同步预览。
设计器当前版本是V4.6.8。
它提供了一些工具栏,可以根据个人爱好停放在任意位置。
工具栏的位置以及设计器的设置信息(任何一个改变后)会被保存在ini文件或注册表中,以后启动报表设计器后会根据这些信息恢复当前的设计界面。
要给终端用户提供报表设计器,你要么从fastreport组件面板中加入“TfrxDesigner”组件,要么在单元文件Uses列表中加入“frxDesgn”单元,这样才能在运行时期设计或修改报表。
注意:应该在Delphi窗体中添加其它Tfrx系列的组件,这样才能在报表设计期间使用。
看一下报表设计器,在上图中用数字进行了指示:1 –报表设计器工作区;2 –菜单栏;3 –工具栏;4 –对象工具栏;5 –报表页标签;6 –“报表树”窗体;;7 –“对象查看器”窗体;8 –“数据树”窗体,可以从此窗体中拖到一个数据元素到工作区;9 –标尺。
当往工作区拖动标尺时,将会出现一根引导线;10 –状态栏。
1.1.0控制键1.2.0鼠标控制Ctrl + 左键(原文是右键,有误)按住左键拖动,将出现虚线框,释放左键时所有被虚线框捕获的对象将被选中。
该操作也可以由点击空白页面,并移动鼠标光标到所需的位置。
Alt + 左键如果选中的对象是文本对象, 可直接编辑对象的文本。
1.3.0工具栏1.3.1设计栏与对象工具栏是一体的,有下列基本的按钮:图标名称描述选取工具一个标准的操作方法,显示一个鼠标指针,用来选择对象,修改大小等等。
徒手工具点击该图标后可以拖动报表。
显示比率工具点击鼠标左键放大报表显示(每次增加100%),点击右键缩小显示(每次减少100%)。
当按住左键拖动时,指定区域会被缩放。
文本工具点击“文本”的对象后可以在报表内直接编辑文本内容。
FastReport4安装教程
FastReport4 安装教程详细的安装方法:1. 安装前请删除原有的FastReport控件。
2. 最好把FastReport v4复制到一个固定不变的目录下。
因为如果路径一旦变化,delphi将不能装载FastReport。
例如,我把它放到了C:\Program Files\Borland\Delphi7\Third\FastReport 4 目录下。
3. "Tools|Options|Environmet Options|Delphi Options|Library - Win32"中的"Directories"标签面下"Library path"添加FastReport的各个路径。
FastReport.v4\FastScriptFastReport.v4\FastQBFastReport.v4\SourceFastReport.v4\Source\BDEFastReport.v4\Source\ADOFastReport.v4\Source\IBXFastReport.v4\Source\DBXFastReport.v4\Source\ExportPack(我安装的时候,只添加前三个路径就可以正常使用了,到目前为止还没出现什么错误,可能是我用到的功能比较少吧)4. 生成汉化文件(先关闭delhi)运行"recompile.exe"文件,设置相应选项,我的设置如下:1.Select the compiler 设置为Delphi7(Delphi,C++)2.Select the FR3 Version 设置为Enterprise(或根据具体版本设置)3.Select the TeeChart version 设置为TeeChartStd (或根据具体版本设置)4.选择What you want to do 下的Recompile all packages ,点击compile4.选择What you want to do 下的Change language To: 设置为Chinese ,点击compile5. 编译运行包(compile)- FastReport.v4\FastScript\fs7.dpk- FastReport.v4\FastScript\fsDB7.dpk- FastReport.v4\FastScript\fsBDE7.dpk- FastReport.v4\FastScript\fsADO7.dpk- FastReport.v4\FastScript\fsIBX7.dpk- FastReport.v4\FastScript\fsTee7.dpk- FastReport.v4\FastQB\fqb70.dpk- FastReport.v4\Source\frx7.dpk- FastReport.v4\Source\frxDB7.dpk- FastReport.v4\Source\ADO\frxADO7.dpk- FastReport.v4\Source\BDE\frxBDE7.dpk- FastReport.v4\Source\IBX\frxIBX7.dpk- FastReport.v4\Source\DBX\frxDBX7.dpk- FastReport.v4\Source\frxTee7.dpk- FastReport.v4\Source\ExportPack\frxe7.dpk快速打开上面一堆文件的方法:打开FastReport.v4\ ,按Ctrl+F 打开文件搜索,在“全部或部分文件名”里输入f*7*.dpk ,搜索。
FastReport4-动态报表制作
FastReport4 动态报表制作注:1、窗体报表控件FR:TfrxReport;frDB:TfrxDBDataset2、调用自定义函数:GetPrnFieldWidth(ADOQ_List); //取得查询结果中各字段宽度3、全局变量:Prn_FieldWidth: Array of integer; //打印时各字段宽度数组通过GetPrnFieldWidth修改其值4、uses PRINTERS;代码:procedureTFrm_yppf_prn_pfd.ToolButton3Click(Sender: TObject);Var//DataPage: TfrxDataPage;Page: TfrxReportPage;PageTitle:TfrxReportTitle;PageHeader:TfrxPageHeader;//Band: TfrxBand;MastData: TfrxMasterData;PageSummary:TfrxReportSummary;Memo: TfrxMemoView;i:integer;MLeft:Real;//表头字段在mastdata中的左边距PaperWidth:Real; //纯报表(不含边距)宽度(毫米)begin//清除报表FR.Clear;//1====添加页Page:=TfrxReportPage.Create(FR);Page.CreateUniqueName;//创建唯一名称//Page.SetDefaults;//设置默认字段大小, 纸张//自定义纸张大小//Page.PaperWidth:=210; //纸张宽//Page.PaperHeight:=297;//纸张高Page.PaperSize:=9;//a4纸Page.Orientation:=poPortrait; //纸张纵向//Page.Orientation:=poLandscape; //纸张横向Page.TopMargin:=25;//上边距Page.BottomMargin:=15;Page.LeftMargin:=15;Page.RightMargin:=15;//2====添加一个报表标题栏PageTitle:=TfrxReportTitle.Create(Page);PageTitle.CreateUniqueName;PageTitle.Top:=0;PageTitle.Height:=140; //留出空白行//得到报表不含边距的宽度(毫米)转换为像素时需乘以3.77953//SetBounds中用的是像素值PaperWidth:=(Page.PaperWidth-page.LeftMargin-page.RightMargin)*3.77953; //添加标题memoMemo:= TfrxMemoView.Create(PageTitle);Memo.CreateUniqueName;Memo.HAlign:=haCenter;//左右居中Memo.VAlign:=vaCenter;//上下居中Memo.Font.Size:=14;Memo.Text := '药品批发单';Memo.Height := 40;Memo.Align:=baWidth;//伸展坐标到标题栏的宽度//摘要第一行Memo:= TfrxMemoView.Create(PageTitle);Memo.CreateUniqueName;Memo.HAlign:=haLeft;//左右居中Memo.VAlign:=vaCenter;//上下居中Memo.Text := '单号:'+LEdit_dh.Hint;Memo.Height := 20;Memo.Frame.Typ:=[ftLeft,ftRight,ftTop,ftBottom];//显示边线Memo.SetBounds(0,60,PaperWidth/3,20);//Memo:= TfrxMemoView.Create(PageTitle);Memo.CreateUniqueName;Memo.HAlign:=haLeft;//左右居中Memo.VAlign:=vaCenter;//上下居中Memo.Text := '单位:'+LEdit_dwmc.Text;Memo.Height := 20;Memo.Frame.Typ:=[ftLeft,ftRight,ftTop,ftBottom];//显示边线Memo.SetBounds(PaperWidth/3,60,PaperWidth/3,20);//Memo:= TfrxMemoView.Create(PageTitle);Memo.CreateUniqueName;Memo.HAlign:=haLeft;//左右居中Memo.VAlign:=vaCenter;//上下居中Memo.Text := '批发金额:'+LEdit_SumPfj.Text;Memo.Height := 20;Memo.Frame.Typ:=[ftLeft,ftRight,ftTop,ftBottom];//显示边线Memo.SetBounds(PaperWidth/3*2,60,PaperWidth/3,20); //摘要第二行Memo:= TfrxMemoView.Create(PageTitle);Memo.CreateUniqueName;Memo.HAlign:=haLeft;//左右居中Memo.VAlign:=vaCenter;//上下居中Memo.Text := '结算方式:'+LEdit_jsfsmc.Text;Memo.Height := 20;Memo.Frame.Typ:=[ftLeft,ftRight,ftTop,ftBottom];//显示边线Memo.SetBounds(0,80,PaperWidth/3,20);//Memo:= TfrxMemoView.Create(PageTitle);Memo.CreateUniqueName;Memo.HAlign:=haLeft;//左右居中Memo.VAlign:=vaCenter;//上下居中Memo.Text := '制单人:'+LEdit_zdr.Text;Memo.Height := 20;Memo.Frame.Typ:=[ftLeft,ftRight,ftTop,ftBottom];//显示边线Memo.SetBounds(PaperWidth/3,80,PaperWidth/3,20);//Memo:= TfrxMemoView.Create(PageTitle);Memo.CreateUniqueName;Memo.HAlign:=haLeft;//左右居中Memo.VAlign:=vaCenter;//上下居中Memo.Text := '制单日期:'+LEdit_zdrq.Text;Memo.Height := 20;Memo.Frame.Typ:=[ftLeft,ftRight,ftTop,ftBottom];//显示边线Memo.SetBounds(PaperWidth/3*2,80,PaperWidth/3,20); //摘要第三行Memo:= TfrxMemoView.Create(PageTitle);Memo.CreateUniqueName;Memo.HAlign:=haLeft;//左右居中Memo.VAlign:=vaCenter;//上下居中Memo.Text := '操作员:'+UserName;Memo.Height := 20;Memo.Frame.Typ:=[ftLeft,ftRight,ftTop,ftBottom];//显示边线Memo.SetBounds(0,100,PaperWidth/3,20);//Memo:= TfrxMemoView.Create(PageTitle);Memo.CreateUniqueName;Memo.HAlign:=haLeft;//左右居中Memo.VAlign:=vaCenter;//上下居中Memo.Text := '打印日期:'+DateToStr(Date)+'^^^'+TimeToStr(GetTime); Memo.Height := 20;Memo.Frame.Typ:=[ftLeft,ftRight,ftTop,ftBottom];//显示边线Memo.SetBounds(PaperWidth/3,100,PaperWidth/3,20);//Memo:= TfrxMemoView.Create(PageTitle);Memo.CreateUniqueName;Memo.HAlign:=haLeft;//左右居中Memo.VAlign:=vaCenter;//上下居中Memo.Text := '';Memo.Height := 20;Memo.Frame.Typ:=[ftLeft,ftRight,ftTop,ftBottom];//显示边线Memo.SetBounds(PaperWidth/3*2,100,PaperWidth/3,20);//=3==添加Pageheader (表头)PageHeader:=TfrxPageHeader.Create(Page);PageHeader.CreateUniqueName;//PageHeader.Top:=PageTitle.Height+120; //其总是紧随PageTitle之后PageHeader.Height:=20;//添加表头memoGetPrnFieldWidth(ADOQ_List); //取得查询结果中各字段宽度MLeft:=0;for i := 0 to ADOQ_List.FieldCount - 1 doBeginMemo:=TfrxMemoView.Create(PageHeader);Memo.CreateUniqueName;Memo.HAlign:=haCenter;Memo.HAlign:=haCenter;Memo.VAlign:=vaCenter; //上下对齐Memo.Frame.TopLine.Style:=fsSolid;Memo.Frame.BottomLine.Style:=fsSolid;Memo.Frame.LeftLine.Style:=fsSolid;Memo.Frame.RightLine.Style:=fsSolid;//边线格式Memo.Frame.Typ:=[ftLeft,ftRight,ftTop,ftBottom];//显示边线 Memo.Text:=Trim(ADOQ_List.Fields[i].FieldName);ifi<ADOQ_List.FieldCount-1 thenBeginMemo.SetBounds(MLeft,0,Prn_FieldWidth[i]*7.5,20);EndElseBegin //最后一列时 ,页面剩余宽度都给他Memo.SetBounds(MLeft,0,PaperWidth-MLeft,20);End;MLeft:=MLeft+Prn_FieldWidth[i]*7.5;//下一列左起位置End;//4=====主数据 (记录)MastData:=TfrxMasterData.Create(Page);MastData.CreateUniqueName;MastData.Top:=PageTitle.Height+PageHeader.Height; MastData.Height:=20;MastData.DataSet:=frDB;//添加 memoMLeft:=0;for i := 0 to ADOQ_List.FieldCount - 1 doBeginMemo:=TfrxMemoView.Create(MastData);Memo.CreateUniqueName;//Memo.HAlign:=haCenter;Memo.HAlign:=haLeft;Memo.VAlign:=vaCenter; //上下对齐Memo.Font.Size:=9;Memo.Frame.TopLine.Style:=fsSolid;Memo.Frame.BottomLine.Style:=fsSolid;Memo.Frame.LeftLine.Style:=fsSolid;Memo.Frame.RightLine.Style:=fsSolid;//边线格式Memo.Frame.Typ:=[ftLeft,ftRight,ftTop,ftBottom];//显示边线 Memo.DataSet:=frDB;Memo.DataField:=Trim(ADOQ_List.Fields[i].FieldName);ifi<ADOQ_List.FieldCount-1 thenBeginMemo.SetBounds(MLeft,0,Prn_FieldWidth[i]*7.5,20);EndElseBegin //最后一列时 ,页面剩余宽度都给他Memo.SetBounds(MLeft,0,PaperWidth-MLeft,20);End;MLeft:=MLeft+Prn_FieldWidth[i]*7.5;//下一列左起位置 End;//5=====页尾PageSummary:=TfrxReportSummary.Create(page); PageSummary.CreateUniqueName; PageSummary.Height:=20;//添加summary memoMemo:= TfrxMemoView.Create(PageSummary); Memo.CreateUniqueName;Memo.HAlign:=haLeft;//左右居中Memo.VAlign:=vaCenter;//上下居中Memo.Top:=0;Memo.Left:=0;Memo.Height := 20;Memo.Font.Size:=10;Memo.Text :=;Memo.Align:=baWidth;//伸展坐标到标题栏的宽度//FR.DesignReport();exit;//显示报表FR.ShowReport;end;自定义函数代码://==================================================== ===========//====得到欲打印的查询结果中各字段的最长值,结果保存在Prn_FieldWidth====== //==================================================== ============ProcedureGetPrnFieldWidth(MyADOQ:TADOQuery);Vari:integer;FindSql:String;BeginSetLength(Prn_FieldWidth,MyADOQ.FieldCount);//先使表头字段宽度等于标题宽度fori := 0 to MyADOQ.FieldCount - 1 doBegin//ADOQ_List.Fields[i].FieldName 默认为宽字符型 widestring,用length只能取得其字符长度//用Pchar可将其转换为AnsiString类型,这样length可以取得其字节长度Prn_FieldWidth[i]:=Length(Pchar(Trim(MyADOQ.Fields[i].FieldName )));MyADOQ.Next;End;//再用查询结果各字段结果长于标题着替换fori := 0 to MyADOQ.FieldCount - 1 doBeginFindSql:='SELECT Max(Datalength('+ Trim(MyADOQ.Fields[i].FieldName)+'))as 字段最长值'+' FROM (' +MyADOQ.SQL[0]+') DERIVEDTBL';DM.ADOQ_Find.Close;DM.ADOQ_Find.SQL.Clear;DM.ADOQ_Find.SQL.Add(FindSql);DM.ADOQ_Find.Open;if DM.ADOQ_Find.RecordCount>0 thenBeginif StrToInt(DM.ADOQ_Find.FieldByName('字段最长值').AsString)>Prn_FieldWidth[i] thenPrn_FieldWidth[i]:=StrToInt(DM.ADOQ_Find.FieldByName('字段最长值').AsString);End;MyADOQ.Next;End;End;。
【VIP专享】FastReport4.6程序员手册
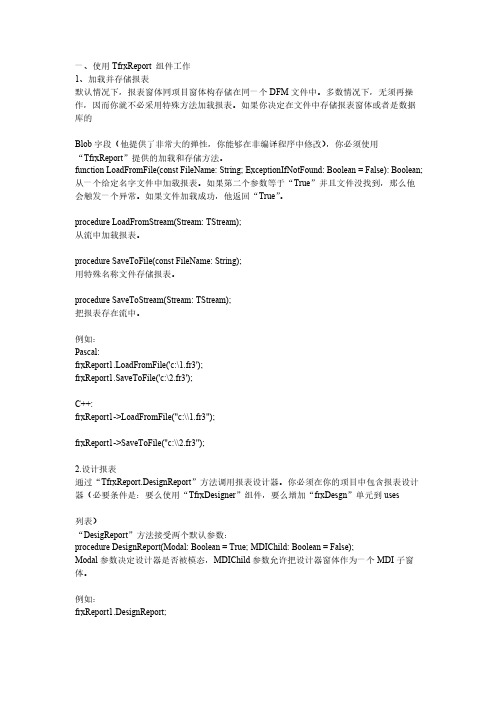
Blob 字段(他提供了非常大的弹性,你能够在非编译程序中修改),你必须使用 “TfrxReport”提供的加载和存储方法。 function LoadFromFile(const FileName: String; ExceptionIfNotFound: Boolean = False): Boolean; 从一个给定名字文件中加载报表。如果第二个参数等于“True”并且文件没找到,那么他 会触发一个异常。如果文件加载成功,他返回“True”。
3.运行报表 应用下面两个“TfrxReport”方法中的一个启动报表: procedure ShowReport(ClearLastReport: Boolean = True); 启动报表并在预览窗体中显示。如果“ClearLastReport”参数等于“False”,报表将会增加 先前的一个报表结果,否则清除前一个报表结构。
例如: Pascal: frxReport1.LoadFromFile('c:\1.fr3'); frxReport1.SaveToFile('c:\2.fr3');
C++: frxReport1->LoadFromFile("c:\\1.fr3");
frxReport1->SaveToFile("c:\\2.fr3");
procedure LoadFromStream(Stream: TStream); 从流中加载报表。
- 1、下载文档前请自行甄别文档内容的完整性,平台不提供额外的编辑、内容补充、找答案等附加服务。
- 2、"仅部分预览"的文档,不可在线预览部分如存在完整性等问题,可反馈申请退款(可完整预览的文档不适用该条件!)。
- 3、如文档侵犯您的权益,请联系客服反馈,我们会尽快为您处理(人工客服工作时间:9:00-18:30)。
“Reprint headers on new page”决定在多个页面打印时,是否在每个页面当打印输出标题栏。
“Side by side cell”:是否允许合并单元格“Join equal cells”选项,当数值相等时是否可以合并单元格。
使用对象查看器的属性设置也可以设置这些内容。
第八章FastReport允许用户插入chart制表组件到报表中,这样,在FastReport面板上的“TfrxCharObject”组件就必须应用上。
这个组件基于“TeeChart”动态库,在delphi 中需要将它包含在工程中。
我们通过以下示例先进行简单说明,连接DBDemos中的countory表,数据内容如下:在delphi环境中创建一个新的工程,添加“TTable”,“TfrxChartObject”,“TfrxDBData”,“TfrxReport”组件,并设置属性值:Table1:DatabaseName = 'DBDEMOS'TableName = ''frxDBDataSet1:DataSet = Table1UserName = 'Country'进入到报表设计器页面,并连结设置数据源。
在报表的设计页上放置一个“chart”组件,并调整其大小(18X8cm)。
双击组件,打开组件的编辑器窗口。
char编辑器区域说明:1:chart结构,一个chart包含有几个制表系统。
2:组件监视器,显示所选组件的属性。
3:连结chart的series的数据属性。
开始的界面显示如上,首先添加一个或几个series,在1区点击按钮,添加一个Pie。
有许多可用的不同的类型的series。
添加一个系列之后,3区被激活。
首先选择数据源,设置Label和pie字段。
点击确定按钮,关闭编辑器窗口,然后预览。
还如何改良以下报表呢?首先,将数据按升序方式进行排序。
再次进入编辑器,选择要设置的series,在3区设置选项。
8.1、chart数据中数字的限制上面的制表看上去非常拥挤,在chart中有特别多的值,而有些看不见。
FastReport可以设置显示数据的限制性。
因此不被限制的值可以在制表中显示。
在我们的示例中,包含18个数值,而最多友8个能显示,键入编辑器,进行设置。
前几个如果不等于0。
则显示在报表中,如果排序没有设置,则采用默认排序。
结果如下:8.2、设置下面说明一下几个有用的设置。
这些属性只能在对象监视器中进行设置。
以下几个属性可用:——Gradient:设置背景填充颜色。
——Legend : 图例一下是series的属性:——ColorEachPoint:设置每个部分一种颜色——ExplodeBiggest:设置最大部分分出。
——ValueFormat:数字监视格式。
8.3、指定数字制表在上面的制表中,我们使用的是数据表中数据进行创建的图表。
还可以通过手动输入进行制表。
这对创建一个小的制表系统是非常方便的。
让我们示范一下如何工作?在报表设计器中添加一个制表系统,进入编辑器,添加一个“bar chart”类型series,并设置属性:8.4、利用脚本进行制表将上面的xvalue和yvalue属性值取消掉,并在报表中添加如下代码:PascalScript:begin[0].XSource := 'Jan;Feb;Mar;Apr';[0].YSource := '31;28;31;30';end.C++Script:{[0].XSource = "Jan;Feb;Mar;Apr";Chart1.}SeriesData[0]允许用户设置第一个series参数,如果制表中有多个series,可以通过SeriesData[Data_Number]进行设置。
8.5、在delphi环境中创建的报表的打印如果用delphi的代码创建一个报表,并想着打印报表,这需要一个“Picture”组件。
在报表设计器的相应位置添加一个“Picture”组件。
在delphi环境中,在事件中添加如下代码:procedure (Sender: TfrxReportComponent);beginif = 'Picture1' thenTfrxPictureView(Sender).((False,end;Picture1是报表中Tpicture组件,chart1是delphi中的Tchart组件名称。
第九章以前的报表在普通的打印机中打印,如果发送到点阵打印机中,则打印速度非常的慢。
FastReport允许用户生成针对点阵打印机的报表模式,他只有标准的元素,而没有图形等其他特殊元素。
这就是为什么会打印的速度要快。
我们创建一个List报表,创建点阵报表,以前的报表参考客户列表报表。
我们应用相同的数据源。
在delphi环境中添加一个Ttable,TfrxDBData,TfrxReport,TfrxDotMatrixExport组件。
并设置属性:TTable:DatabaseName = 'DBDEMOS'TableName = ''TfrxDBDataSet:DataSet = Table1UserName = ‘Customers’进入报表设计器,在“文件|新建…”菜单,打开报表向导窗口,选择“Dot-Matrix report”项。
点击确定按钮,生成一个空白的报表设计界面。
可用的组件列表发生变化,只有band、text、line、esc-command、subreport、cross-tab 组件。
其他组件在点阵报表中不可用。
放置Report title、Page header 、master data band到报表中。
在Band上添加“text”组件,如下:点阵报表中组件的放置原则和普通报表一样,不同之处,就值放置的位置严格的对应网格,不能设置字体的大小和颜色。
选择Text组件,在工具栏中点击“Tt”按钮。
如你所见,能够修改字体的属性,打印预览报表。
9.1、点阵报表使用交叉报表点阵报表中可用的几个组件是可以放在文本报表上使用的。
其中就有cross-tab组件。
我们示范cross-tab组件和以前的例子相类似。
点阵报表的创建步骤和以前的报表“Empty dot-matrax widard”相类似。
放置一个DB cross-tab组件,并进入编辑器:报表预览:、点阵报表的打印以文本模式打印点阵报表,需要组件TfrxDotMatrixExport 。
这个组件将报表转换为文本模式进行打印,同时他还替代标准的打印对话框。
使用以下可用的命令:还有几个打印选项标志。
9.3、命令组件第十章除了可是设计报表页面,在报表中还可以使用对话框窗体。
在报表设计器中创建对话框,使用工具栏中的按钮,可以创建一个空白对话框,在上面可以添加一些组件。
10.1、控件为了在报表中使用这些组件,需要在delphi的设计窗口中添加TfrxDialogControls 或将frxDctrl单元添加到uses列表中。
以下组件在报表中即可使用。
图标名称描述TfrxLabelControl这个组件可用在对话窗口中作为显示解释性的描述文字TfrxEditControl这个组件用于键盘输入单行文本框TfrxMemoControl这个组件可是输入多行文本TfrxButtonControl这个组件绘制一个按钮TfrxCheckBoxControl这个组件绘制一个只有两种状态的标志,标志旁边是解释文本。
TfrxRadioButtonControl单选按钮TfrxListBoxControl显示可以选择的多行列表TfrxComboBoxControl下拉框选择列表TfrxPanelControl工具面板,上面可以放置不同的组件TfrxGroupBoxControl带有描述性的工具面板。
TfrxDateEditControl下拉框中可选择日期的组件TfrxImageControl图形组件,可以容纳BMP,ICO,WMF,EMF格式图形TfrxBevelControl在对话框中绘制图形TfrxBitBtnControl可以支持放置图形的按钮TfrxSpeedButtonControl可以支持放置图形的按钮TfrxMaskEditControl带格式的文本输入窗口控件TfrxCheckListBoxControl多行标志列表控件可以发现,这些组件的使用和delphi环境下相应的组件相类似。
10.2、“世界你好!”报表在这个示例中,我们在报表输出之前,用对话框窗口显示一个欢迎窗口。
在delphi中创建一个新的工程,放置一个frxReport和一个TfrxDialogContors组件,进入报表编辑器环境,创建一个新的窗口。
在窗口上添加一个TfrsLebalControl和一个TfrcButtonControl,并设置属性:TfrxLabelControl:Caption = ‘世界你好!'TfrxButtonControl:Caption = 'OK'Default = TrueModalResult = mrOk设置Bodystyle=bsDialog。
你会发现这些组件和窗口的属性列表和delphi环境的组件的属性列表基本相同。
然后关闭设计环境,进行预览:点击确定进入报表预览界面,点击系统关闭按钮,则退出报表。
10.3、输入参数,并传递到报表中让我们示范如何在对话框窗口中输入参数,并将其值传递到报表中输出。
修改上面的示例:在报表设计页放置一个text组件,并输入你输入的名称:[]预览报表,确认你输入的文字已经显示到报表中了。
同样可以放置其他的组件到对话框中。
每个组件在整个报表中都有一个唯一的名称,可以在报表的任何部位进行使用。
10.4、组件的交互使用脚本可以很容易得创建一个可以交互的报表。
我们改变一下示例进行示范:双击checkbox1组件,创建一个checkbox1的onclick事件,并输入如下代码:PascalScript:procedure CheckBox1OnClick(Sender: TfrxComponent);begin:= not ;end;C++ Script:void CheckBox1OnClick(TfrxComponent Sender){= !;}10.5、多个对话框表单让我们示范以下两个对话框如何工作。
报表设计器加入组件,并建立两个对话框。
预览:10.6、对话框窗体的管理在报表中两个窗口都运行出现。
怎么能够根据条件,隐藏第二个窗体呢?创建一个checkbox的Onclick事件。
