Windows2000USB接口驱动安装步骤
USB转串口的虚拟串口驱动
USB转串口的虚拟串口驱动简介USB2COM是USB转串口转换器的虚拟串口驱动程序(Windows2000/XP),适用于Cypess的USB-HID->COM转换器(未测试), 以及与之兼容的设备。
USB-HID->COM转换器是兼容USB HID类设备的设备,因此可以不用此驱动,直接以USB_HID类设备访问。
特性:∙支持设置波特率、奇偶校验、停止位。
∙事件检测。
仅支持SERIAL_EV_RXCHAR | SERIAL_EV_RXFLAG | SERIAL_EV_TXEMPTY。
∙数据流控。
todo∙超时设置。
todo安装方法-:1.把HID->COM转换器插入USB端口。
2.HID->COM转换器被识别为:USB人体学输入设备。
3.选择设备管理器->人体学输入设备->USB人体学输入设备,单击右键。
4.选择更新驱动程序。
5.选择从列表或指定位置安装,单击下一步。
6.选择不要搜索,我要自己选择要安装的驱动程序,单击下一步。
7.选择从磁盘安装,浏览驱动程序所在路径,单击确定。
8.提示没有通过Windows徽标测试,选择仍然继续。
9.安装完成,端口(COM和LPT) 项下面显示USB-HID ->Comm Port(COM?)。
方法二:使用安装程序。
还没写-;)访问设备∙使用Windows APIo阻塞式读写comtst.co检测事件comevent.co适当的超时设置,可以实现有数据时ReadFile返回,无数据时阻塞。
o CommTimeOuts.ReadIntervalTimeout = 3;o CommTimeOuts.ReadTotalTimeoutMultiplier = 0;o CommTimeOuts.ReadTotalTimeoutConstant = 0;o CommTimeOuts.WriteTotalTimeoutMultiplier = 0;o CommTimeOuts.WriteTotalTimeoutConstant = 0;o bRc = SetCommTimeouts(hCommPort, &CommTimeOuts);∙MFC中使用MSComm控件1.VC6.0 Project菜单--->Add toProject--->Components and Controls--->RegisteredActiveX Controls,选择Components: MicrosoftCommunications Control 插入到当前的Workspace中。
usu驱动安装说明书

USB驱动程序安装说明概述我公司USB接口产品是通过将电脑的USB接口模拟成传统的串行口(通常为COM3),通过PC机的USB接口实现通信。
功能●支持的操作系统Windows2000/Windows XP●完全兼容USB 2.0规范●波特率:300bps~1Mbps自动适应。
我公司产品无特别说明,均采用19200bps●每台PC只支持一个相同型号的USB接口的产品(如一台电脑需使用多个相同USB接口产品,需为各个USB接口产品设置不同的序列号,请咨询生产厂商索取序列号设置工具软件)系统要求请在使用USB接口设备之前确认你的电脑是IBM PC兼容型并具备以下最低系统要求:●Intel兼容586DX4-100MHz中央处理器或更高●一个标准的USB接口(4-pin A型插座)●运行操作系统为Windows2000或Windows XP或Windows vsta或Windows 7驱动程序的安装驱动程序的安装非常简单,只需按提示进行即可,以Windows XP为例,按以下步骤进行:1、打开将要连接USB接口产品的电脑电源,并确认电脑的USB口已经启动并正常工作。
2、将USB接口产品通过USB电缆,插入电脑的USB接口,Windows将检测到设备并运行添加新硬件向导帮助你设置新设备,插入驱动程序光盘并单击下一步继续。
如果Windows没有提示找到新硬件,那么在设备管理器的硬件列表中,展开“通用串行总线控制器”,选择带问号的USB设备,单击鼠标右键并运行更新驱动程序。
3、Windows将检测到安装信息,显示“CP2102 USB Composite Device ”设备,如果出现“没有通过Windows徽标测试”的信息框,单击“仍然继续”。
4、继续安装,让Windows拷贝驱动程序文件到你的硬盘。
5、当Windows显示完成找到新硬件向导,单击“完成”结束安装。
6、安装完成后,请确认在Windows的“开始\设置\控制面板\系统\硬件\设备管理器”菜单的“端口(COM和LPT)”展开条目中出现“CP2101 USB to UART Bridge Controller(COMx)”,这个COMx(如下图中的COM5)就是USB设备使用的COM口号。
USB接口通信(驱动)的设计与实现

引言WDM是“Windows驱动程序模型”的简称,即“Windows Driver Model”。
实际上它是一系列集成在操作系统之中的常规系统服务集,用于简化硬件驱动程序的编写,并保证它们在Windows 98/Me/2000中的二进制兼容,WDM(Windows Driver Model)模型是从WinNT3.51和WinNT4的内核模式设备驱动程序发展而来的。
WDM主要的变化是增加了对即插即用、电源管理、Windows Management Interface(WMI)、设备接口的支持。
WDM模型的主要目标,是实现能够跨平台使用、更安全、更灵活、编制更简单的Windows 设备驱动程序。
WDM采用了“基于对象”的技术,建立了一个分层的驱动程序结构。
WDM 首先在Windows98中实现,在Windows2000中得到了进一步的完善,并在后续开发的Windows操作系统中都将存在,比如Windows Me和Windows XP。
微软在通过WDM 模型的引入,希望减轻设备驱动程序的开发难度和周期,逐渐规范设备驱动程序的开发,应该说,WDM将成为以后设备驱动程序的主流。
USB技术的全称是通用串行总线,是英文Universal Serial Bus的缩写。
它是一种应用在PC领域的新型接口技术,虽然USB2.0已经被广泛应用,但是初始的Windows 2000是支持USB1.0协议的,如果希望支持USB2.0协议,需要在微软网站上下载升级包。
实际上,对于键盘或者鼠标来说,传输的速度非常小,使用USB1.0或者是USB2.0的区别并不大。
闪存盘之类的存储设备,则需要重视传输速度。
USB1.0版本主要应用在鼠标,键盘等HID设备上,这就是本驱动程序中引用的头文件版本是USB1.0的原因。
本毕业设计的目的是希望对Windows 2000操作系统体系结构和驱动程序开发以及调试等方面的问题有一个比较深入的了解,对USB协议和USB体系有做一个比较深入的了解。
oki彩色打印机驱动安装说明(O...

oki彩色打印机驱动安装说明(OKI color printer driverinstallation instructions)readme.txt= = = = = = = = = = = = = = = = = = = = = = = = = = = = = = = = = = = = = = = = = = = = = = = = = = = = = = = = = = = = = = = = = = =oki c810dn软件cd - rome版本 1.00copyright (c) 2008 oki data corporation= = = = = = = = = = = = = = = = = = = = = = = = = = = = = = = = = = = = = = = = = = = = = = = = = = = = = = = = = = = = = = = = = = =目录1. 关于本cd - rome2. cd rom的构成3. windows环境3.1 在windows 2000上安装3.1.1 使用安装程序3.1.2 通过添加打印机向导安装3.1.3 即插即用安装3.1.3.1 通过usb接口连接3.2 在windows xp / server 2003上安装3.2.1 使用安装程序3.2.2 通过安装打印机安装3.2.3 即插即用安装3.2.3.1 通过usb接口连接3.3 在windows vista / server 2008上安装3.3.1 使用安装程序3.3.2 即插即用安装3.3.2.1 通过usb接口连接4. macintosh环境4.1 在macintosh上安装※关于商标= = = = = = = = = = = = = = = = = = = = = = = = = = = = =1. 关于本cd - rome= = = = = = = = = = = = = = = = = = = = = = = = = = = = =本cd - rom包含oki c810dn专用的软件.打印机驱动程序为windows 2000 / xp / server 2003 / vista / server 2008、macintosh、mac osx专用.有关相应机型的详细信息, 请参阅打印机软件的用户手册及各目录中的 "gas" 或 "readme".= = = = = = = = = = = = = = = = = = = = = = = = = = = = =2. cd rom的构成= = = = = = = = = = = = = = = = = = = = = = = = = = = = =本cd - rom的构成如下.windowsdrivers windows专用打印机驱动程序.utilities 包括颜色和网络设定等各种实用程序.misc 包括adobe reader等.cdinst 供安装程序使用的目标文件.i'm 供安装程序使用的目标文件.(注意)- 以下各种软件均是使用 "安装程序 (cd 根目录的startup.exe) 安装.nic setup utilityoki lpr utilitynetwork extensioncolor swatch utilitycolor correct utilityoki setup utilitymacintoshdriver 包括macintosh专用打印机描述文件、mac os x专用打印机描述文件.utility 包括adobe reader及网络设定专用的各种实用程序. other language包括英文版专用打印机驱动程序.= = = = = = = = = = = = = = = = = = = = = = = = = = = = =3. windows环境= = = = = = = = = = = = = = = = = = = = = = = = = = = = =---------------------------------3.1 在windows 2000上安装---------------------------------(注意) 需要administrator权限.- 在本文中cd - rom驱动器名以d: 为例.- 通过 "软件cd rome" 安装时, 请原封不动使用该文件夹名.- 将 "软件cd rome" 复制到硬盘等进行安装时, 请将 "d: \" 替换为复制有打印机驱动程序的文件夹的路径.- 当即插即用程序不能搜索出该新硬件时,请参阅 "3.1.1 使用安装程序".-----------------------------------------3.1.1 使用安装程序-----------------------------------------(1) insert "software CD-ROM"".(2) select "run" from the "start" menu, and "open" columnType "D:\Setup" and click "OK"".(3) read the software license agreement carefully and click the accept button.(4) click Install driver.(5) choose to use it as a local printer or as a network printer,Click the "next" button.(6) install according to the prompt of the screen.For more information, please refer to the user manual (installation section).(7) when used as a network printer, the printer icon added will be displayed in the "printers and faxes" folder after installation. When connected to the USB interface and used as a local printer, it will automatically install the driver after it is connected to the computer. Finished installationAfter it is finished, it will be displayed in the printers and faxes folder.-----------------------------------------3.1.2 installs by adding a printer wizard-----------------------------------------(1) insert "software CD-ROM"".(2) from the "start" menu, select "Settings" - "printers and faxes", double-click "add printers"".(3) click "Add Printer Wizard", and then click next".(4) select "local printer" and click "next"".(5) select "use the following port", select port, click "next"".(6) click "use disk"".(7) when the "disk install" screen prompt appears in the "vendor file replication source",Type "D:\Drivers\CHS\WinXP2k\Hiper-C""Click ok".(8) select the name of the printer you want to install, and clicknext".(9) confirm the name of the printer and choose "yes" in "whether you want to set the printer as the default printer", and click "next"".(10) select "do not share this printer", and click "next"".(11) when showing "want to print the test page?"" Choose "no" and click "next"".(12) Click finish".(13) when you show "no digital signature" is found, click "yes"". Start copying files.(14) after installation, the printer icon added will be displayed in the "printers and faxes" folder.---------------------------------------------3.1.3 plug and play installation---------------------------------------------------------------------------------------------Connection of 3.1.3.1USB port------------------------------------------------(1) make sure that the printer and the computer's power are closed.(2) connect the USB cable.(3) open the printer power supply.(4) start Windows.Reboot if Windows is already started. If it is connected to the new USB corresponding printer,Windows will automatically install USB printing support.(5) when you display the search for the new hardware wizard, click next".When you show "no digital signature" is found, click Yes, and go to step (11).(6) choose "search for drivers for my device" (recommended), click "next"".(7) select the specified path, and click next".(8) insert "software CD-ROM"". At the source of the manufacturer file replication,Type "D:\Drivers\CHS\WinXP2k\Hiper-C""Click ok".(9) after confirming the driver of the device, click next".(10) if the "no signature" dialog box pops up, then click "yes"". Start copying files.(11) in the "new hardware has been searched" dialog box,Click finish".(12) make sure that the printer icon has been added.-------------------------------------------3.2 install on Windows XP/Server 2003-------------------------------------------(notice) you must have Administrator permissions.In this paper, the CD-ROM driver name, D:, is taken as an example.Install through the software CD-ROM, please use the folder name directly.If you copy the software CD-ROM to the hard disk and so on, when you install it, please send it"D:\" replaces the path to the folder where the printer driver is copied.When the plug and play device cannot search for new hardware,Please refer to "3.2.1 use installer"".-----------------------------------------3.2.1 using installer-----------------------------------------(notice)In the case of connecting to the USB interface, if you install the installer, start the printer andWhen WindowsXP/Server 2003, the screen displays "search for new hardware"".Plug and play must be used when installing on WindowsXP/Server 2003 for the first time.(1) insert "software CD-ROM"".(2) select "run" from the "start" menu, and then "open" columnType "D:\Startup" and click "OK"".(3) read the software license agreement carefully and click the accept button.(4) click Install driver.(5) install according to the prompt of the screen.For more information, please refer to the user manual (installation section).(6) after installation, the printer icon added will be displayed in the "printers and faxes" folder.,3.2.2 is installed by adding printers,(1) insert "software CD-ROM"".(2) open the "control panel" from the "start" menu and double-click "printers and faxes"".Click "Install Printer"".(3) the screen prompts "Add Printer Wizard", and click "next"".(4) select the local printer that connects to this computer, and click next".(5) select "use the following ports", select the port, and click "next"".(6) click "use disk"".(7) when the "disk installation" is displayed, at the "vendor file replication source",(in the case of 32bit OS)Type "D:\Drivers\CHS\WinXP2k\Hiper-C""(64bit OS)Type "D:\Drivers\CHS\WinXP64\Hiper-C""Click ok".(8) select the folder to install, and click next".(9) confirm the name of the printer and choose "yes" in "whether you want to set the printer as the default printer", and click "next"".(10) select "do not share this printer", and click "next"".(11) when showing "want to print the test page?"" Choose "no" and click "next"".(12) Click finish".(13) when you display "installing from hardware", click "continue"". Start copying files.(14) after installation, the printer icon added is displayed in the "printers and faxes" folder.---------------------------------------------3.2.3 plug and play installation---------------------------------------------------------------------------------------------Connection of 3.2.3.1USB port------------------------------------------------(1) make sure that the printer and the computer's power are closed.(2) connect the USB cable.(3) open the printer power supply.(4) start Windows.Reboot if Windows is already started.If it is connected to the new USB corresponding printer, Windows will automatically install USB printing support.(5) after the screen display "start searching for new hardware wizard", if the pop-up "to search software, want to connectWindows Update" dialog box?,Please choose "no, no connection", and then choose "the next step"".Please select "browse or install from specific path" (detail), and click "next"".Sometimes need to display a dialog box with a 1-2 minutes.If the screen does not display the above content, go to "3.2.2" using the installer".(6) insert printer software CD-ROM".(7) choose the most appropriate driver to search from the following path".(8) do not choose "search disk" (floppy disk, CD-ROM, etc.)".Select "include the following path",(in the case of 32bit OS)Type "D:\Drivers\CHS\WinXP2k\Hiper-C""(in the case of 64bit OS)Type "D:\Drivers\CHS\WinXP64\Hiper-C""Click next".(9) when you display the tooltip for installing hardware, click continue".(10) when displaying "insert disk", go to step (12).Start copying files.(11) make sure that the new hardware has been searched, and click finish".Go to step (15).Employed(12) insert the "software CD-ROM" when the screen shows "insert disk"",Click ok".(13) at the source of the manufacturer's document replication,(in the case of 32bit OS)Type "D:\Drivers\CHS\WinXP2k\Hiper-C""(in the case of 64bit OS)Type "D:\Drivers\CHS\WinXP64\Hiper-C""Click next". Start copying files.(14) make sure that the new hardware has been searched, and click finish".Employed(15) select "start" - "control panel", click "printers" and other hardware",Confirm the printer icon has been added.-----------------------------------------3.3 install on Windows Vista/Server 2008-----------------------------------------(notice) you must have Administrator permissions.In this paper, the CD-ROM driver name, D:, is taken as an example.Install through the software CD-ROM, please use the folder name directly.If you copy the software CD-ROM to the hard disk and so on, when you install it, replace the D:\Copy the path to the folder with printer driver.When the plug and play program is unable to search for the newhardware, please refer to "3.3.1 using the installer"".-----------------------------------------3.3.1 using installer-----------------------------------------(1) insert "software CD-ROM"".(2) from the "start" menu, select "D:\Startup" in "run"",Click "startup" on "open"".(3) read the software license agreement carefully and click accept".(4) click "install driver"".(5) install according to the prompt of the screen.For more information, please refer to the user manual (installation section).(6) after installation, the printer icon added will be displayed in the "printers and faxes" folder.---------------------------------------------3.3.2 plug and play installation---------------------------------------------------------------------------------------------3.3.2.1设施上通过USB端口连接------------------------------------------------(1)确认打印机和电脑的电源均为关闭状态。
OMNIKEY1021驱动安装与注册方法
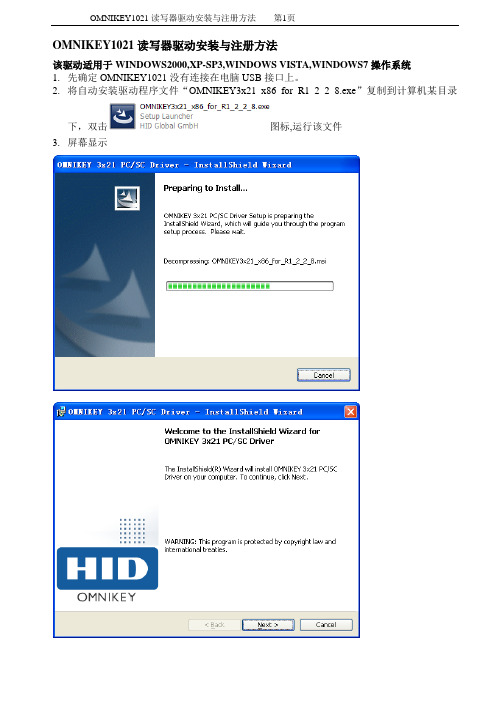
OMNIKEY1021读写器驱动安装与注册方法该驱动适用于WINDOWS2000,XP-SP3,WINDOWS VISTA,WINDOWS7操作系统1.先确定OMNIKEY1021没有连接在电脑USB接口上。
2.将自动安装驱动程序文件“OMNIKEY3x21_x86_for_R1_2_2_8.exe”复制到计算机某目录下,双击图标,运行该文件3.屏幕显示4.点,屏幕显示5.选择屏幕显示6.点,屏幕显示7.点,屏幕显示8.点,完成驱动安装。
9.将读写器插入USB接口,此时计算机“滴答”响一声,屏幕右下角显示,过1秒钟显示,此时读写器上红色指示灯点亮,如下图。
在屏幕右下角显示,驱动安装完毕。
10.我们将在设备管理器中看到OMNIKEY1021读卡器,确认驱动已经正确安装。
具体方法为(1)用鼠标右键点击一下桌面上图标,显示(2)选择,屏幕显示(3)双击选择,屏幕显示(4)双击,屏幕显示如下,若正确安装驱动能看到11.控件的注册方法:(1)先把注册控件文件整个文件夹复制到系统盘(一般在C盘)下;(2)打开注册控件文件夹,双击进行批处理后屏幕显示:(3) 点,完成控件的注册。
12.IE浏览器设置:(1)将crm系统的地址加入安全站点,双击打开IE浏览器,(2)选择再选择屏幕显示:(3)选择屏幕显示:(4)选择再选择屏幕显示:(5)将网址http://130.38.18.248到可信站点(6)把前如有打钩要将钩取消如下图:后点。
(7)点击将安全级别设置为低如下图;或者将窗口内的所有含ActiveX的选都设置为启用,然后点完成IE浏览器设置。
易驱使用说明
目 录产品简介: ........................................... 3 产品特点: ........................................... 3 功能部件: ........................................... 3 硬件安装: ........................................... 3 软件安装: ........................................... 4 操作指南 ............................................. 4 故障排除 ............................................. 6 技术规格: ........................................... 7 产品清单: ........................................... 7 服务条款: . (7)重要声明1、 感谢您购买本公司出品的US B 系列产品,请您在使用本产品之前先耐心阅读说明书,当您开始使用本产品时,本公司认为您已经认真阅读了此说明书。
2、 请在购买产品一个月内认真填写“产品保修卡”,以便为您提供更好的服务。
本说明书所涵盖的内容均是参考此手册编写时最新的事项,当涉及到内容改变时,恕不另行通知。
如有需要,请到本公司网站下载最新的使用说明及最新的驱动程序。
111112333 3产品简介:易驱USB2IDE转接器,一物多用:适用于硬盘,CD-ROM,DVD-ROM,CD-RW,COMBO外置转接。
采用USB2.0(Universal Serial Bus)界面传输技术,支持热插拔,适用于各种带USB接口的品牌及兼容PC机、笔记本电脑等,方便追加外设,用以实现海量存储、移动办公。
hart-usb
hart-usbHT100C驱动安装说明一>概述HART/USB转换器是通过将电脑的USB接口模拟成传统的串行口(通常为COM3),从而使用现有的编程软件或通信软件,通过HART/USB转换器与HART协议仪表等设备进行通信。
功能● 支持的操作系统Windows2000/Windows XP● 完全兼容USB V1.1和USB CDC V1.1规范● 完全兼容USB V2.0和USB CDC V2.0规范● 波特率:300bps~1Mbps自动适应● 每台PC只支持一根USB编程电缆系统要求请在使用USB编程电缆之前确认你的电脑是IBM PC兼容型并具备以下最低系统要求:● Intel兼容586DX4-100MHz中央处理器或更高● 一个标准的USB接口(4-pin A型插座)● 运行操作系统为Windows2000或Windows XP二>驱动程序的安装驱动程序的安装非常简单,只需按提示进行即可,以Windows XP 为例安装步骤:2.1、将USB接口插入电脑,会弹出如下页面2.2、选择第二个选项,如下图所示2.3、点击“下一步”后,如下图所示2.4、点击“下一步”将“搜索可移动媒体(软盘、CD-ROM…)”前面的“√”去掉,在“在搜索中包括这个位置” 的前面打“√”,点击浏览,选中SM110文件夹后,点确定。
注意:HT100C文件夹是由HT100C.rar解压的,浏览所选择的路径为解压后HT100C文件夹所在的目录。
例如:HT100C文件夹解压后放在桌面上,则浏览选中HT100C 文件夹后,会出现下图红圈中的内容。
2.5、点击“下一步”,等待驱动安装完成。
2.6、点击“完成”2.7、右键点击“我的电脑”,选择“管理”。
2.8、选择“设备管理器”,点开“其它设备”2.9、右键点击“ USB to UART Bridge Controller”,选择“更新驱动程序”,会弹出步骤1的页面,然后按照步骤2~6操作。
Dell PowerEdge 6800-6850 服务器 Windows 2000安装手册

Dell PowerEdge 6800/6850 服务器windows 2000安装手册本文档介绍了在不使用Dell Open Manage Server Assistant (DOSA) 光盘引导的情况下,如何安装Windows 2000 Server 到您的Dell PowerEdge 6800/6850 上。
这个过程需要大约45 到60 分钟。
*通常不使用Dell Open Manage Server Assistant 光盘引导安装主要是基于以下一些原因:1. 原有的硬盘分区里有重要的数据, 需要保留. 而使用DOSA光盘安装, 将会删去硬盘上的原有分区;2. 原有硬盘上有动态磁盘分区,DOSA光盘引导将导致系统自动重启, 而进入不了安装界面。
索引步骤1. 识别您的Power Edge 服务器的系统配置步骤2. 安装前的准备步骤3. win2000安装步骤步骤4. 驱动程序的安装步骤1. 识别您的Power Edge 服务器的系统配置Note:具体信息随配置不同,请根据自己的配置正确安装。
常见6800/6850服务器集成的设备:·集成两块网络适配器BoardCom NexXtreme Gigabit以太网卡;·A TI Radeon(TM) 7000-M显示卡;·DRAC 4 远程控制卡(可选)·常见使用的硬盘控制卡:- LSI Logic Ultra 320 SCSI控制器- PERC 4e/DI控制器(可选)- PERC 4e/DC控制器(可选)- PERC 4/DC控制器(可选)步骤2. 安装前的准备2.1 安装操作系统前请您先准备好以下物品·硬盘控制卡驱动软盘Note:硬盘控制卡识别以及驱动制作请参考《8G服务器Windows 2000磁盘控制卡识别及驱动制作》·Windows 2000安装光盘2.2设置BIOS1.开机自检时按F2键进入系统BIOS2.光标移到BOOT SEQUENCE ,敲回车进入引导设备列表3.光标移到CD_ROM DEVICE,按";-";键直到CD_ROM跳到第一项,并保证此项最左边有";v";标志(该标志用空格键选取)4.用同样方法把Hard drive C:列为第二引导设备,并也有";v";标志5.按ESC键退出引导设备选择界面6.按ESC键,敲Enter键保存退出步骤3. Windows 2000 Text Mode Setup 文本模式安装Text Mode Setup 文本模式安装1. 把Windows 2000 安装光盘放入光驱,并从光盘引导。
USB-CQM1-CIF02驱动安装说明

USB-CQM1-CIF02编程电缆驱动程序安装说明概述USB编程电缆是通过将电脑的USB口模拟成传统的串行口(通常为COM3),从而使编程软件OMRON CPT通过USB-CQM1-CIF02编程电缆与CQM1/CPM1A/CPM2A PLC进行通信。
功能●支持的操作系统Windows XP/ Windows2000●兼容USB V1.1 V2.0●波特率:300bps~1Mbps自动适应●每台PC只支持一根USB编程电缆系统要求请在使用USB编程电缆之前确认你的电脑是IBM PC兼容型并具备以下最低系统要求:●Intel兼容586DX4-100MHz中央处理器或更高●一个标准的USB接口(4-pin A型插座)驱动程序的安装驱动程序的安装非常简单,只需按提示进行即可,以Windows XP为例,按以下步骤进行:1、打开电脑主机,插入驱动程序光盘。
2、将USB-CQM1-CIF02电缆插入电脑的USB接口,Windows将检测到设备并运行添加新硬件向导帮助你设置新设备,并单击下一步继续。
如果Windows没有提示找到新硬件,那么在设备管理器的硬件列表中,展开“通用串行总线控制器”,选择带问号的USB设备,单击鼠标右键并运行更新驱动程序。
3、Windows将检测到安装信息,并出现如下没有通过Windows徽标测试的信息框,单击“仍然继续”。
4、继续安装,让Windows拷贝驱动程序文件到你的硬盘。
5、当Windows显示完成找到新硬件向导,单击“完成”结束安装。
6、安装完成后,请确认在Windows的“开始\设置\控制面板\系统\硬件\设备管理器”菜单的“端口(COM和LPT)”展开条目中出现“ProlificUSB-to-Serial Comm(COMx)”,这个COMx就是USB编程电缆使用的COM口号,该端口号与电脑有关,一般为COM3或COM4,以后每次使用只要插入编程电缆就会出现该COM口,你只需在编程软件或通信软件等应用软件中选中该COM口号即可通信。
USB-SC-09驱动安装说明

USB-SC-09编程电缆驱动程序安装说明概述USB编程电缆是通过将电脑的USB口模拟成传统的串行口(通常为COM3),从而使编程软件SWOPC-FXGP/WIN和GPP通过USB-SC-09编程电缆与FX系列PLC进行通信。
功能●支持的操作系统Windows XP/ Windows2000●兼容USB V1.1 V2.0●波特率:300bps~1Mbps自动适应●每台PC只支持一根USB编程电缆系统要求请在使用USB编程电缆之前确认你的电脑是IBM PC兼容型并具备以下最低系统要求:●Intel兼容586DX4-100MHz中央处理器或更高●一个标准的USB接口(4-pin A型插座)驱动程序的安装驱动程序的安装非常简单,只需按提示进行即可,以Windows XP为例,按以下步骤进行:1、打开电脑主机,插入驱动程序光盘。
2、将USB-SC-09电缆插入电脑的USB接口,Windows将检测到设备并运行添加新硬件向导帮助你设置新设备,并单击下一步继续。
如果Windows没有提示找到新硬件,那么在设备管理器的硬件列表中,展开“通用串行总线控制器”,选择带问号的USB设备,单击鼠标右键并运行更新驱动程序。
3、Windows将检测到安装信息,并出现如下没有通过Windows徽标测试的信息框,单击“仍然继续”。
4、继续安装,让Windows拷贝驱动程序文件到你的硬盘。
5、当Windows显示完成找到新硬件向导,单击“完成”结束安装。
6、安装完成后,请确认在Windows的“开始\控制面板\系统\硬件\设备管理器”菜单的\“端口(COM和LPT)”\展开条目中出现“Prolific USB-to-Serial Comm(COMx)”,这个COMx就是USB编程电缆使用的COM口号,该端口号与电脑有关,一般为COM3或COM4,以后每次使用只要插入编程电缆就会出现该COM口,你只需在编程软件或通信软件等应用软件中选中该COM口号即可通信。
USB-PC-PPI驱动安装说明

USB-PC-PPI编程电缆驱动程序安装说明概述USB编程电缆是通过将电脑的USB口模拟成传统的串行口(通常为COM3),从而使编程软件STEP7通过USB-PC-PPI编程电缆与S7-200系列PLC进行通信。
功能●支持的操作系统Windows XP/ Windows2000●兼容USB V1.1 V2.0●波特率:300bps~1Mbps自动适应●每台PC只支持一根USB编程电缆系统要求请在使用USB编程电缆之前确认你的电脑是IBM PC兼容型并具备以下最低系统要求:●Intel兼容586DX4-100MHz中央处理器或更高●一个标准的USB接口(4-pin A型插座)驱动程序的安装驱动程序的安装非常简单,只需按提示进行即可,以Windows XP为例,按以下步骤进行:1、打开电脑主机,插入驱动程序光盘。
2、将USB-PC-PPI电缆插入电脑的USB接口,另一端插入S7-200PLC并使PLC加电情况下Windows将检测到设备并运行添加新硬件向导帮助你设置新设备,并单击下一步继续。
如果Windows没有提示找到新硬件,那么在设备管理器的硬件列表中,展开“通用串行总线控制器”,选择带问号的USB设备,单击鼠标右键并运行更新驱动程序。
3、Windows将检测到安装信息,并出现如下没有通过Windows徽标测试的信息框,单击“仍然继续”。
4、继续安装,让Windows拷贝驱动程序文件到你的硬盘。
5、当Windows显示完成找到新硬件向导,单击“完成”结束安装。
6、安装完成后,请确认在Windows的“开始\控制面板\系统\硬件\设备管理器”菜单的\“端口(COM和LPT)”\展开条目中出现“Prolific USB-to-Serial Comm(COMx)”,这个COMx就是USB编程电缆使用的COM口号,该端口号与电脑有关,一般为COM3或COM4,以后每次使用只要插入编程电缆就会出现该COM口,你只需在编程软件或通信软件等应用软件中选中该COM口号即可通信。
HaiKey驱动安装说明书For Windows

HaiKey驱动安装说明书( For Windows )2006年7月©2006 北京海泰方圆科技有限公司版权所有目录1.HaiKey驱动安装(For Windows 98/Me) (3)2.HaiKey驱动安装 (For Windows 2000) (7)3.HaiKey驱动安装 (For Windows XP) (11)4.HaiKey驱动安装 (For Windows 2003) (14)5.HaiKey卸载驱动 (17)网址: 邮箱:tech@网址:邮箱:tech@1.HaiKey 驱动安装(For Windows 98/Me )Ⅰ、HaiKey 的安装:点击如下图的应用程序HaiKeyDriver.exe ,安装程序将自动运行。
注意:在安装各种软件前和过程中,无提示插入HaiKey 时请不要插入HaiKey!①出现如下界面(图一),等待一会会出现开始安装界面(图二)图一②如下图,点击“下一步”网址:邮箱:tech@图二③安装软件会自动拷贝相应的驱动文件到系统中,如果Windows98/Me 系统没有安装智能卡的补丁包,安装软件会运行补丁包。
会出现以下文件窗口。
关闭这个文件窗口即可。
安装程序会自动将驱动安装到系统中。
图三网址:邮箱:tech@图四图五④此时插入HaiKey 后,系统会自动加载驱动,点击“确定”后,如下图所示:网址:邮箱:tech@图六⑥如上图,点击“确定”后,系统重新启动之后,便可使用HaiKey 了。
注意事项:① 由于USB 的使用特性,如果有可能在不同的USB 口上使用HaiKey ,则在每一个USB 口上都要插入HaiKey ,分别安装驱动程序,这一点是由操作系统决定的。
② 如未执行安装程序就先插入了HaiKey ,操作系统能探测到HaiKey 的存在,并弹出 安装HaiKey 的界面:此时,点击“下一步”,再重新启动计算机,并运行安装程序即可!网址:邮箱:tech@2.HaiKey 驱动安装 (For Windows 2000)点击如下图的应用程序HaiKeyDriver.exe ,安装程序将自动运行。
如何删除并重新安装 USB 设备驱动程序

如何删除并重新安装USB 设备驱动程序?1。
如何找到USB驱动?在Palm Desktop的安装目录下,有一个叫做USB Driver或者USB_Driver或者Drivers 的目录,这个目录下就是你的USB驱动。
快速安装一次Palm Desktop,随便输入一个用户名,邮件设置选择No。
然后同步一次,如果可以工作,那么这个USB驱动就是你的Palm在当前操作系统下的驱动。
在你安装其他版本的Palm Desktop之前,把这个目录保存下来。
2。
如何删除USB驱动?在你卸载Palm Desktop的时候,并不会删除USB设备驱动。
这可能会为你安装新的设备或者新版本的Palm Desktop带来麻烦。
手动删除它的方法是:1) 找到Windows文件夹下的inf文件夹。
这是一个隐藏文件夹,如果看不到,在“工具”菜单中选择“文件夹选项”,在“查看”标签页上选择“查看所有文件和文件夹”即可。
右键点击文件夹图标,选择“搜索”,在包含文字输入框中输入“palm”。
搜索出来的oe mxx.inf名字的文件就是可能的USB驱动信息文件。
打开它,如果看到里面写的是Palm. I nc字样,删除这个文件。
如果你用的是Visor,那应该搜索“visor”或者“handspring”关键字,在搜索到的文件也是以oem加数字命名的,文件头应该有Handspring. Inc字样。
删除它。
2) 在这个文件夹下面查找名字为PalmUSBD.inf和VisorUsb.inf的文件,如果有就删掉。
3) 在Windows\system32\drivers文件夹下面,查找下列名字的文件,PalmUSBD.sys,Visorusb.sys,如果有就删除。
3。
如何手动安装USB驱动-Clie/PalmClie或者Palm的同步超时时间较长,如果插入之后系统提示找不到PalmUSBD.sys,把你备份的USB driver目录告诉安装程序就可以。
GPW-CB03驱动安装说明

GPW-CB03编程电缆驱动程序安装说明概述USB编程电缆是通过将电脑的USB口模拟成传统的串行口(通常为COM3),从而使编程软件通过GPW-CB03编程电缆与GP系列进行通信。
功能●支持的操作系统Windows XP/ Windows2000●兼容USB V1.1 V2.0●波特率:300bps~1Mbps自动适应●每台PC只支持一根USB编程电缆系统要求请在使用USB编程电缆之前确认你的电脑是IBM PC兼容型并具备以下最低系统要求:●Intel兼容586DX4-100MHz中央处理器或更高●一个标准的USB接口(4-pin A型插座)驱动程序的安装驱动程序的安装非常简单,只需按提示进行即可,以Windows XP为例,按以下步骤进行:1、打开电脑主机,插入驱动程序光盘。
2、将GPW-CB03电缆插入电脑的USB接口,Windows将检测到设备并运行添加新硬件向导帮助你设置新设备,并单击下一步继续。
如果Windows没有提示找到新硬件,那么在设备管理器的硬件列表中,展开“通用串行总线控制器”,选择带问号的USB设备,单击鼠标右键并运行更新驱动程序。
3、Windows将检测到安装信息,并出现如下没有通过Windows徽标测试的信息框,单击“仍然继续”。
4、继续安装,让Windows拷贝驱动程序文件到你的硬盘。
5、当Windows显示完成找到新硬件向导,单击“完成”结束安装。
6、安装完成后,请确认在Windows的“开始\控制面板\系统\硬件\设备管理器”菜单的\“端口(COM和LPT)”\展开条目中出现“Prolific USB-to-Serial Comm(COMx)”,这个COMx就是USB编程电缆使用的COM口号,该端口号与电脑有关,一般为COM3或COM4,以后每次使用只要插入编程电缆就会出现该COM口,你只需在编程软件或通信软件等应用软件中选中该COM口号即可通信。
驱动程序的删除删除驱动程序是为了释放COM口资源以便其他设备使用,或驱动程序故障时需将其删除后重新安装,按下面步骤删除驱动程序:1、从你的电脑上拔下USB编程电缆。
HaiKey驱动安装说明书For Windows
HaiKey驱动安装说明书( For Windows )2006年7月©2006 北京海泰方圆科技有限公司版权所有目录1.HaiKey驱动安装(For Windows 98/Me) (3)2.HaiKey驱动安装 (For Windows 2000) (7)3.HaiKey驱动安装 (For Windows XP) (11)4.HaiKey驱动安装 (For Windows 2003) (14)5.HaiKey卸载驱动 (17)网址: 邮箱:tech@网址:邮箱:tech@1.HaiKey 驱动安装(For Windows 98/Me )Ⅰ、HaiKey 的安装:点击如下图的应用程序HaiKeyDriver.exe ,安装程序将自动运行。
注意:在安装各种软件前和过程中,无提示插入HaiKey 时请不要插入HaiKey!①出现如下界面(图一),等待一会会出现开始安装界面(图二)图一②如下图,点击“下一步”网址:邮箱:tech@图二③安装软件会自动拷贝相应的驱动文件到系统中,如果Windows98/Me 系统没有安装智能卡的补丁包,安装软件会运行补丁包。
会出现以下文件窗口。
关闭这个文件窗口即可。
安装程序会自动将驱动安装到系统中。
图三网址:邮箱:tech@图四图五④此时插入HaiKey 后,系统会自动加载驱动,点击“确定”后,如下图所示:网址:邮箱:tech@图六⑥如上图,点击“确定”后,系统重新启动之后,便可使用HaiKey 了。
注意事项:① 由于USB 的使用特性,如果有可能在不同的USB 口上使用HaiKey ,则在每一个USB 口上都要插入HaiKey ,分别安装驱动程序,这一点是由操作系统决定的。
② 如未执行安装程序就先插入了HaiKey ,操作系统能探测到HaiKey 的存在,并弹出 安装HaiKey 的界面:此时,点击“下一步”,再重新启动计算机,并运行安装程序即可!网址:邮箱:tech@2.HaiKey 驱动安装 (For Windows 2000)点击如下图的应用程序HaiKeyDriver.exe ,安装程序将自动运行。
USB转并口线说明书V24

USB转并口线用户手册V2.4 -感谢你购买USB TO Parallel 完全按照USB标准设计 专用芯片设计数据传输稳定可靠 有效利用USB接口速率 线缆制作工艺严谨高速打印传输 桌面出版应用 热拔插操作应用 多打印机使用者 并口输出的工业控制机 并口扫描仪等多种并口设备您所作的仅仅是将电缆的一端与电脑的USB端 口相连USB(通用串行总线)接口允许 高达12Mbps的数据传输速率150KbpsUSB接口具有真正的即插即用和热插拔的能力--在windows 操作系统下插上电缆 功能此USB TO PARALLEL提供如下功能无需外接电源 l符合USB打印机规范1.0 l符合IEEE-1284 1994(双向并行接口)规范 系统要求 ÇëÈ·¶¨ÄãµÄµçÄÔÊÇIBM PC ¼æÈÝÐͲ¢¾ß±¸ÒÔÏÂ×îµÍµÄϵͳҪÇó此USB TO PARALLEL的驱动程序只支持Win98/ Win98SE/ Win ME΢ÈíÒÀÕÕIEEE 1284规格在Win2000/X P 里包含标准的驱动程序Win2000/XP 将自动检测到U S B -Parallel Bridge cable 并安装包含的驱动程序1.打开将要连接USB TO PARALLEL的电脑的电源2. 将USB TO PARALLEL插入USB接口并运行添加新硬件向导帮助你设置新设备3. 插入USB TO PARALLEL驱动程序盘选择为硬件搜索最新的驱动程序然后单击下一步4. Windows将检测到安装信息(Parupl.inf或parppl.inf)并显示 IEEE-1284 Controller设备, 单击下一步继续安装让Windows拷贝必要的文件到你的硬盘单击完成以打印机为例1. 关闭打印机电源如果打印机上已经插有普通打印线然后打开打印机电源3. 如果在这之前你已经安装打印机的驱动程序设置然后右击缺省打印机并单击属性 4. 单击详细资料栏目并改变打印机端口到LPT2: (USB to Parallel Port). 5. 如果你还没有安装打印机设置添加打印机从列表里选择打印机厂商和型号名称或使用打印机随机提供的驱动程序盘单击LPT2: USB to Parallel Port. 7. 当提示你成功安装以后看看打印是否正常1. 从你的电脑上拔下USB TO PARALLEL并按照提示进行拒绝条款 此文件以提供信息为目的因为此说明文件中的内容或变更所引起的直接或间接或与此相关的任何损失和错误 此文件的任何部分在未经厂商允许的情况下包括复印电子拷贝等 所有商标名称和产品名称是它们各自生产厂商的商标或注册商标 FCC 声明 T h i s d e v i c e g e n e r a t e s a n d u s e s r a d i o f r e q u e n c y a n d m a y c a u s e i n t e r f e r e n c e t o r a d i o a n d t e l e v i s i o n r e c e p t i o n i f n o t i n s t a l e d a n d u s e d p r o p e r l y. T h i s h a s b e e n t e s t e d a n d f o u n d t o c o m p l y w i t h t h e l i m i t s o f a C l a s s B c o m p u t i n g d e v i c e i n a c c o r d a n c e w i t h t h e s p e c i f i c a t i o n s i n P a r t15o f F C C R u l e s.T h e s e s p e c i f i c a t i o n s a r e d e s i g n e d t o p r o v i d e r e a s o n a b l e p r o t e c t i o n a g a i n s t s u c h i n t e r f e r e n c e i n a r e s i d e n t i a l i n s t a l a t i o n.H o w e v e r,t h e r e i s n o g u a r a n t e e t h a t i n t e r f e r e n c e w i l n o t o c c u r i n a p a r t i c u l a r i n s t a l a t i o n.I f t h i s d e v i c e d o e s c a u s e h a r m f u l i n t e r f e r e n c e t o r a d i o o r t e l e v i s i o n r e c e p t i o n,w h i c h c a n b e d e t e r m i n e d b y p l u g g i n g t h e d e v i c e i n a n d o u t,t h e u s e r c a n t r y t o c o r r e c t t h e i n t e r f e r e n c e b y o n e o r m o r e o f t h e f o l o w i n g m e a s u r e s:l R e o r i e n t o r r e l o c a t e t h e r e c e i v i n g a n t e n n a.l I n c r e a s e t h e s e p a r a t i o n b e t w e e n t h e d e v i c e a n d r e c e i v e r.l C o n n e c t t h e c o m p u t e r i n t o a n o u t l e t o n a c i r c u i t d i f f e r e n t f r o m t h a t t o w h i c h t h e r e c e i v e r i s c o n n e c t e d.l C o n s u l t t h e d e a l e r o r a n e x p e r i e n c e d r a d i o/T V t e c h n i c i a n f o r h e l p.C o p y r i g h t©2002A l r i g h t s r e s e r v e d.。
- 1、下载文档前请自行甄别文档内容的完整性,平台不提供额外的编辑、内容补充、找答案等附加服务。
- 2、"仅部分预览"的文档,不可在线预览部分如存在完整性等问题,可反馈申请退款(可完整预览的文档不适用该条件!)。
- 3、如文档侵犯您的权益,请联系客服反馈,我们会尽快为您处理(人工客服工作时间:9:00-18:30)。
USB接口设备驱动的安装说明
1、USB接口设备驱动的安装步骤
(1)硬件安装:将USB接口设备插入计算机的USB接口中,会出现一个画面如图1所示,说明计算机已找到新硬件。
图1 图2
(2)为驱动程序指定位置:点击下一步,如图2所示,选择“搜索适于我的设备的驱动程序(推荐)”,再点击下一步,如图3所示,选择“指定一个位置”,点击下一步如图4所示,然后点击“浏览”。
选定驱动程序的位置(根据驱动程序放的位置不同而选择不同的路径)。
如果F盘为光驱,将与实验箱配套的光盘放入光驱,指定路径为F:\usb驱动\window,如图5所示,选定路径后点击打开。
在如图6中点击确定,完成驱动程序的指定。
图3 图4
图5 图6
(3)完成安装;在图6中确定后出现如图7所示,已找到最新的USB设备的驱动程序,
开始安装驱动程序所需的信息和文件,点击下一步出现如图8所示,点击完成后,则USB设备驱动程序已全部安装完成。
2、查看USB设备的信息
选择“我的电脑”点击右键,选择“属性”就出现系统特性,对话框显示如图9所示。
图7 图8
选择“硬件”选项卡,选择“设备管理器”,选择“查看”→“依类型排序设备”。
再双击“端口(com 和LPT)”如图10所示,可以看到(prolific usb-to-serial bridge(com3)桥控制器)。
注意!这个com3在通信过程中要与usb接口设备的上位机软件中通信口设置一样,否则会出问题。
图9 图10
3、注意!
(1)不要直接在驱动程序文件夹中,点击setup来直接安装USB设备的驱动程序。
(2)这个过程是在win2000系统中的安装过程,在win98和winxp中,步骤一样,可能有些不同的图片。