CF卡使用手册_CN
兄弟牌电脑车CF卡使用说明

8. CF卡的使用方法8-1. CF卡(市场上销售产品)使用上的注意事项・ 请使用32、64、128、256、512MB、1GB及2GB的CF卡。
(超过2GB以上容量的CF卡本产品不能使用。
)・ 请勿拆卸或改装。
・ 请勿强行弯曲,摔跌,损伤,以及在卡上压重物。
・ 请勿让卡沾上水,油,溶剂及饮料等液体。
・ 请在无强静电,电器噪音的环境下使用和保管。
・ 请勿在有振动及冲击,阳光直射,布满线屑等灰尘,高温多湿,温差较大,以及靠近扬声器等强磁体的地方使用和保管CF卡。
・ 在进行数据读取和写入时,如有振动及冲击,请勿将CF卡从缝纫机中取出。
・ CF卡中的数据会因错误操作及事故等消失和破损。
因此建议请将重要的数据备份。
・ 请务必在缝纫机电源切断的状态下插入或拔出CF卡。
・ 由于购入时CF卡就已经格式化,因此请勿再次格式化。
・ 推荐的CF卡为San Disk, Hagiwara SYS-COM的市场上销售产品。
其它厂商的产品也可使用,但有可能会因格式不同而发生无法读写的情况。
其它请参阅所购CF卡附带的使用说明书。
* 本产品对应于CF卡的FAT16格式,不对应FAT32格式。
* CF TM为San Disk公司的商标。
* 本说明书记载的公司名及产品名为各公司的商标或登记商标。
但是正文中没有明确标明TM等标记。
8-2. CF卡文件夹的构成\BROTHER\ISM\ISMSYS\ISM05MN.MOT :控制程序\BROTHER\ISM\ISMDB00\ISMMSW.SEW :存储开关数据(*1) \ISMUPG.SEW :用户程序数据\ISMS0100.SEW :缝制数据P№=100\ISMS0101.SEW :缝制数据P№=101\ISMS0102.SEW :缝制数据P№=102(*1) 缝制数据的文件夹\BROTHER\ISM\ISMDB00因是根据存储开关No.752的数值的变更而改变有下线的号码,文件夹名也可由此改变。
CF卡的操作
备份PMC时选择第四项“ SYSTEM DATA SAVE ” ,在选择该项目下的“PMC-RA”或“PMC-SB”即可。
(注:通过这种方法备份数据,备份的是系统数据的整体,下次恢复或调试其他相同机床时,可以迅速的完成。
但是数据为机器码且为打包形式,不能在计算机上打开。
)1)首先要将20#参数设定为4 表示通过M-CARD进行数据交换2)要在编辑方式下选择要传输的相关数据的画面(以参数为例)按下软健右侧的[OPR](操作),对数据进行操作。
按下右侧的扩展建[?][READ]表示从M-CARD读取数据,[PUNCH]表示把数据备份到M-CARD[ALL]表示备份全部参数,[NON-0]表示仅备份非零的参数执行即可看到[EXECUTE]闪烁,参数保存到M-CAID中。
通过这种方式备份数据,备份的数据以默认的名字存于M-CARD中。
如备份的系统参数器默认的名字为“CNCPARAM”(注:把100#3 NCR设定为1可让传出的参数紧凑排列)(从M-CARD输入参数时选择[READ])使用这种方法再次备份其他机床相同类型的参数时,之前备份的同类型的数据将被覆盖。
若要给备份的数据起自定义的名称,则可以通过[ALL IO]画面进行。
按下MDI面板上按下[操作] 键,出现可备份的数据类型,以备份参数为例:按下[参数]键。
按下[操作] 键,出现可备份的操作类型。
[F READ] 为在读取参数时按文件名读取M-CARD中的数据[N READ] 为在读取参数时按文件号读取M-CARD中的数据[PUNCH] 传出参数[DELETE] 删除M-CARD中数据在向M-CARD中备份数据时选择[PUNCH],按下该键出现如下画面输入要传出的参数的名字例如[HDPRA],按下[F 名称]即可给传出的数据定义名称,执行即可。
通过这种方法备份参数可以给参数起自定义的名字,这样也可以备份不同机床的多个数据。
对于备份系统其他数据也是相同。
FANUC系统CF卡的用法 (2)

FANUC 系统 CF 卡的用法
一.用CF卡进行程序的导入导出
1. 准备工作
机床工作方式:编辑状态
程序保护开关:打开
I/O 通道设为:4
机床工作方式:MDI状态,按MDI面板OFS/SET键,进入图1 页面。
图1
按软键“设定”,进入图2页面。
移动光标到“I/O通道”,键入“4”,按输入即可。
1
图2
2. 程序的传输
按 MDI 面板 SYSTEM 键,进入图 3 页面。
图3
按扩展软键进入图4
图4按扩展软键进入图5
图5
按软键“所有IO",进入图6
图6按软键“操作”进入图7
图7
从CF卡输入程序到CNC,按软键“F输入”,进入图8
图8
该页面上半部分,显示的是CF卡的内容,下半部分是CNC存储器的内容,*在的部分,可以用翻页键查看下页内容,*可以用光标键移动到CF卡部分或CNC部分。
用翻页键找到要输入的程序,输入程序序号,按“F设定”,输入程序名,若程序名与CNC存储区的程序名不重复,可以不写,若重复,可重新命名,按“O设定”,按“执行”即可,如图8.
若从CNC输入程序到CF卡,在图7时按软键“F输出”,进入图9,键入要输出的程序名,按“执行”即可。
见图 10,程序 O5556 输出到CF卡上。
如果不键入程序名,直接按“执行”,则把系统当前打开的程序输出到CF卡上。
CF卡选用终极手册
CF卡选用终极手册CF卡选用终极手册CF卡全称为“ Compact Flash ” 卡,译为汉语就是“ 标准闪存卡” ,CF卡是最早推出的存储卡产品,由最大的FLASH MEMORY厂商之一的美国SANDISK 于1994年研发成功的。
1.了解CF卡CF卡是目前应用最为广泛的存储卡,由于它不带驱动器,也没有其它的移<-- -->动部件,因此,极少出现机械故障,使存储的图像数据更加安全。
CF卡的使用寿命也非常长,即使用上100多年也可以保证数据完好无损。
而且 CF卡耗电量小,只有普通硬盘的5%。
与其它存储卡相比,容量大是CF卡的另一个优势,目前主流产品已经达到512Mb和1Gb标准。
另外它还具备速度快、价格便宜等优点。
CF卡的主要缺点是CF模块在设备与安装程序之间不存在互换性,不能直接运行程序,功耗大,势必会影响到电池续航时间等。
CF卡的工作过程是:当拍摄数字图像时,数码相机的CCD会对图像有感应,之后图像数据就被存储在中介卡上。
然后,数码相机会对图像进行不同的处理。
最后,图像被压缩并存储在CF卡上。
大部分数码相机均使用CF卡,特别是专业的数码单反相机。
CF卡的部分结构采用强化玻璃及金属制造,采用闪存的储存方式,是一种稳定的存储解决方案。
CF卡基于ATA数据传输界面,具有优良的兼容特性,它不仅仅是一个存储器件,而且内置了控制器,无论采用多大容量的闪存芯片组,其外部接口都是标准的ATA/IDE接口,而且3.3V、5V外电压通用,与计算机系统的联接非常方便。
从封装方式上来看,CF存储卡可分为I型和II 型,从外观上看,CF Type I与Type II差不多,两者均基于普通的50针接口设计,只不过在厚度上有所区别,Type II型CF卡大约是Type I的两倍厚。
只支持CF TYPE I的数码相机无法使用CF TYPE II型卡,但是使用CF TYPE II的数码相机则可以向下兼容 CF TYPE I。
CF卡的使用
CF 卡之应用
1.前言:
Compact flash card (CF 卡) 可以当作FANUC及三菱控制器的数据服务器储存空间。
而且,当插在FANUC控制器的PCMCIA 接口上可以当作备份数据用的记忆卡(IC 卡)。
2.组成:
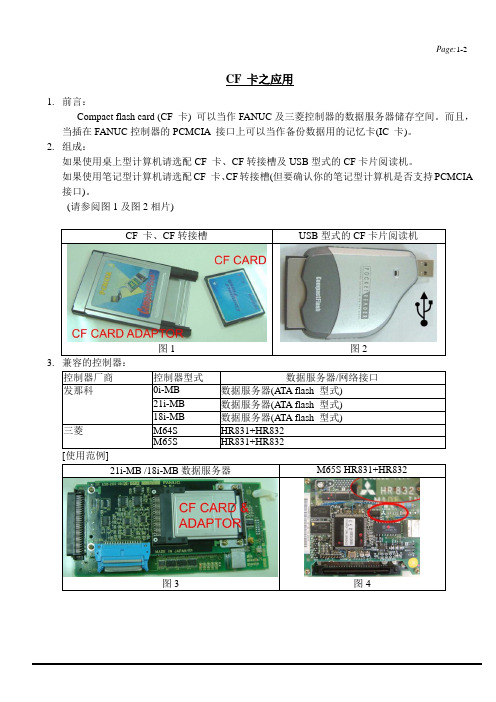
如果使用桌上型计算机请选配CF 卡、CF转接槽及USB型式的CF卡片阅读机。
如果使用笔记型计算机请选配CF 卡、CF转接槽(但要确认你的笔记型计算机是否支持PCMCIA 接口)。
(请参阅图1及图2相片)
3.
4.规格:
使用TYPE II 接口。
不需要备份电池。
需格式化成FAT 格式。
目前支持的容量为128MB、256MB、512MB、1GB、,2GB等。
5.注意事项:
CF 卡如果初次使用请事先格式化。
抽取或安装CF卡请先关闭控制器电源避免CF卡损坏。
不要在格式化或数据存取的过程中关闭控制器电源避免CF卡损坏。
CF 卡之应用。
Dzz4----CF 卡操作
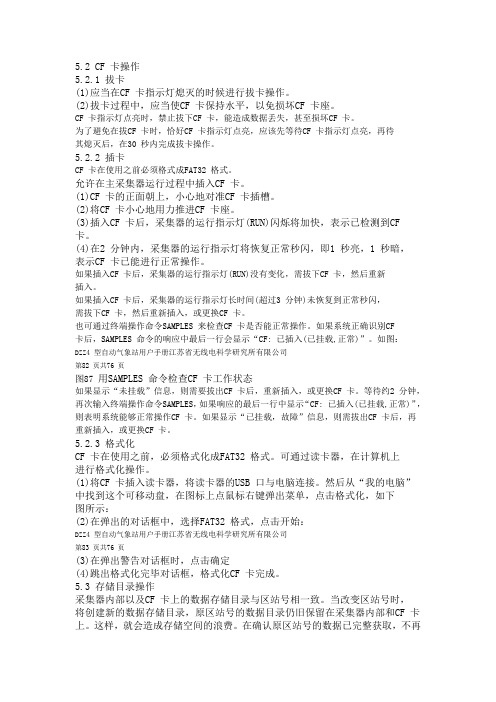
5.2 CF 卡操作5.2.1 拔卡(1)应当在CF 卡指示灯熄灭的时候进行拔卡操作。
(2)拔卡过程中,应当使CF 卡保持水平,以免损坏CF 卡座。
CF 卡指示灯点亮时,禁止拔下CF 卡,能造成数据丢失,甚至损坏CF 卡。
为了避免在拔CF 卡时,恰好CF 卡指示灯点亮,应该先等待CF 卡指示灯点亮,再待其熄灭后,在30 秒内完成拔卡操作。
5.2.2 插卡CF 卡在使用之前必须格式成FAT32 格式。
允许在主采集器运行过程中插入CF 卡。
(1)CF 卡的正面朝上,小心地对准CF 卡插槽。
(2)将CF 卡小心地用力推进CF 卡座。
(3)插入CF 卡后,采集器的运行指示灯(RUN)闪烁将加快,表示已检测到CF 卡。
(4)在2 分钟内,采集器的运行指示灯将恢复正常秒闪,即1 秒亮,1 秒暗,表示CF 卡已能进行正常操作。
如果插入CF 卡后,采集器的运行指示灯(RUN)没有变化,需拔下CF 卡,然后重新插入。
如果插入CF 卡后,采集器的运行指示灯长时间(超过3 分钟)未恢复到正常秒闪,需拔下CF 卡,然后重新插入,或更换CF 卡。
也可通过终端操作命令SAMPLES 来检查CF 卡是否能正常操作。
如果系统正确识别CF卡后,SAMPLES 命令的响应中最后一行会显示“CF: 已插入(已挂载,正常)”。
如图:DZZ4 型自动气象站用户手册江苏省无线电科学研究所有限公司第82 页共76 页图87 用SAMPLES 命令检查CF 卡工作状态如果显示“未挂载”信息,则需要拔出CF 卡后,重新插入,或更换CF 卡。
等待约2 分钟,再次输入终端操作命令SAMPLES,如果响应的最后一行中显示“CF: 已插入(已挂载,正常)”,则表明系统能够正常操作CF 卡。
如果显示“已挂载,故障”信息,则需拔出CF 卡后,再重新插入,或更换CF 卡。
5.2.3 格式化CF 卡在使用之前,必须格式化成FAT32 格式。
可通过读卡器,在计算机上进行格式化操作。
CF卡的数据手册
CF卡的数据手册RoHS CompliantValue Added Compact Flash Series ⅢSpecification for Industrial CF Mar 8, 2011 Version 1.0Value Added Compact Flash Ⅲ seriesFeatures:Compact Flash Association Specification Revision 3.0 Standard Interface – ATA command set compatible – ATA mode support for up to: PIO Mode-6 Multiword DMA Mode-4 Ultra DMA Mode-4 ––––––Connector Type 50 pins female Low power consumption (typical) Supply voltage: 3.3V & 5V Active mode: 80 mA/95 mA (3.3V/5.0V) Sleep mode: 700 μA/900 μA (3.3V/5.0V) Performance** Sustained read: 30 MB/sec Sustained write: Standard: 5 MB/sec High Speed: 15 MB/sec Temperature ranges Operation: Standard: 0° to 70° C C ET*: -40° to 85° C C –Storage: -40° to 100° C C –Flash management –Intelligent endurance design Advanced wear-leveling algorithms S.M.A.R.T. Technology Built-in Hardware ECC Enhanced Data Integrity –Intelligent power failure recovery RoHS compliant–Capacity Standard: 128, 256, 512 MB 1, 2, 16 GB – High Speed: 256, 512 MB 1, 2, 4, 8 GB NAND Flash Type: SLC*Extended Temperature **Performance varies with flash configurations1 ? 2011 Apacer Technology Inc. Rev. 1.0Value Added Compact Flash Ⅲ series1. General DescriptionApacer’s Industrial Compact Flash Card (CFC) offers the most reliable and high performance storage which is compatible with CF Type I and Type II devise. Unlike the ordinary consumer Compact Flash cards, Apacer Industrial Compact Flash card provides solid traceability to ensure all products HW/SW are the same as you qualified. Apacer’s CFC provides complete PCMCIA - ATA functionality and compatibility. Apacer ‘s Compact Flash technology is designed for use in Point of Sale (POS) terminals, telecom, IP-STB, medical instruments, surveillance systems, industrial PCs and handheld applications. Featuring technologies as Advanced Wear-leveling algorithms, S.M.A.R.T, Enhanced Data Integrity, Builtin Hardware ECC, and Intelligent Power Failure Recovery, Apacer’s I ndustrial Compact Flash Card assures users of a versatile device on data storage.1.1 Performance-Optimized ControllerThe Compact Flash Card Controller translates standard CF signals into flash media data and control signals.1.1.1 Power Management Unit (PMU)The power management unit (PMU) controls the power consumption of the Compact Flash card controller. It reduces the power consumption of the Compact Flash Card Controller by putting circuitry not in operation into sleep mode. The PMU has zero wake-up latency.1.1.2 SRAM BufferThe Compact Flash Card Controller performs as an SRAM buffer to optimize the host’s data transfer to and from the flash media.2 ? 2011 Apacer Technology Inc. Rev. 1.0Value Added Compact Flash Ⅲ series2. Functional BlockThe Compact Flash Card (CFC) includes a controller and flash media, as well as the Compact Flash standard interface. Figure 2-1 shows the functional block diagram.Flash Array Flash Media Flash Media Flash Media Flash Media Compact Flash InterfaceCompact Flash ControllerFigure 2-1: Functional block diagram3 ? 2011 Apacer Technology Inc. Rev. 1.0Value Added Compact Flash Ⅲ series3. Pin AssignmentsTable 3-1 lists the pin assignments with respective signal names for the 50-pin configuration. A “#” suffix in dicates the active low signal. The pin type can be input, output or input/output. Table 3-1: Pin assignments (1 of 2)Pin No. 1 2 3 4 5 6 7 8 9 10 11 12 13 14 15 16 17 18 19 20 21 22 23 24 25 26 27 28 29 30 31 32 33 34 35 36 37 38 39 40 41 Memory card mode Signal name GND D3 D4 D5 D6 D7 #CE1 A10 #OE A9 A8 A7 VCC A6 A5 A4 A3 A2 A1 A0 D0 D1 D2 WP #CD2 #CD1 D11 D12 D13 D14 D15 #CE2 #VS1 #IORD #IOWR #WE RDY/-BSY VCC #CSEL #VS2 RESET Pin I/O type I/O I/O I/O I/O I/O I I I I I I I I I I I I I I/O I/O I/O O O O I/O I/O I/O I/O I/O I O I I I O I O I I/O card mode Signal name GND D3 D4 D5 D6 D7 #CE1 A10 #OE A9 A8 A7 VCC A6 A5 A4 A3 A2 A1 A0 D0 D1 D2 #IOIS16 #CD2 #CD1 D11 D12 D13 D14 D15 #CE2 #VS1 #IORD #IOWR #WE #IREQ VCC #CSEL #VS2 RESET Pin I/O type I/O I/O I/O I/O I/O I I I I I I I I I I I I I I/O I/O I/O O O O I/O I/O I/O I/O I/O I O I I I O I O I True IDE mode Signal name GND D3 D4 D5 D6 D7 #CS0 1 A10 #ATA SEL 1 A9 1 A8 1 A7 VCC 1 A6 1 A5 1 A4 1 A3 A2 A1A0 D0 D1 D2 #IOCS16 #CD2 #CD1 D11 D12 D13 D14 D15 #CS1 #VS1 #IORD #IOWR #WE INTRQ VCC #CSEL #VS2 #RESET Pin I/O type I/O I/O I/O I/O I/O I I I I I I I I I I I I I I/O I/O I/O O O O I/O I/O I/O I/O I/O I O I I I O I O I4 ? 2011 Apacer Technology Inc. Rev. 1.0Value Added Compact Flash Ⅲ seriesTable 3-1: Pin assignments (2 of 2)Pin No. 42 43 44 45 46 47 48 49 50 Memory card mode Signal name #WAIT #INPACK #REG BVD2 BVD1 D8 D9 D10 GND Pin I/O type O O I O O I/O I/O I/O I/O card mode Signal name #WAIT #INPACK #REG #SPKR #STSCHG D8 D9 D10 GND Pin I/O type O O I O O I/O I/O I/O True IDE mode Signal name IORDY 2 DMARQ 2 DMACK #DASP #PDIAG D8 D9 D10 GND Pin I/O type O O I O O I/O I/O I/O -1. The signal should be grounded by the host.2. Connection required when UDMA is in use.5 ? 2011 Apacer Technology Inc. Rev. 1.0Value Added Compact Flash Ⅲ series4. Capacity Specification4.1 Performance SpecificationPerformances of the Standard and High Speed ATA-Flash Disk are listed in Table 4-2 and Table 4-3. Table 4-1: Standard Performance specificationsCapacity Performance Sustained read (MB/s) Sustained write (MB/s) 128 MB / 256 MB 512 MB / 1 GB 15 5 20 5 20 2 GB 16 GB 5Table 4-2: High Speed Performance specificationsCapacity Performance Sustained read (MB/s) Sustained write(MB/s) 25 5 25 5 25 5 25 5 30 10 30 15 256 MB 512 MB 1 GB 2 GB 4 GB 8 GBNote: Performance varies from flash configurations.4.2 Environmental SpecificationsEnvironmental specification of the Compact Flash Card series (CFC) which follows the MIL-STD-810F standards is available as shown in Table 4-4. Table 4-3: Environmental specifications Environment Temperature Humidity Vibration (Non-Operation) Shock (Non-Operation) Operation Storage -40℃ to 100℃ 5% to 95% RH (Non-condensing) Sine wave: 10~2000Hz, 15G (X, Y, Z axes) Half sine wave, Peak acceleration 50 G, 11 ms (X, Y, Z ; All 6 axes) Specification 0° to 70 ℃ (Standard) ; -40° to 85 ℃ (Extended Temperature) C C6 ? 2011 Apacer Technology Inc. Rev. 1.0Value Added Compact Flash Ⅲ series5. Physical Characteristics5.1 DimensionTABLE 5-1: Type I CFC physical specificationLength: Width:Thickness (Including Label Area):36.40 +/- 0.15mm (1.433+/- 0.06 in.) 42.80 +/- 0.10mm (1.685+/- 0.04 in.) 3.3mm+/-0.10mm (0.130+/-0.04in.)Unit: mmFIGURE 5-1: Physical dimension6. Product Ordering Information6.1 Product Code Designations A P – C F 0 0 8 G E 3 F R –ETNRK7 ? 2011 Apacer Technology Inc. Rev. 1.0。
加工中心CF卡传输程序
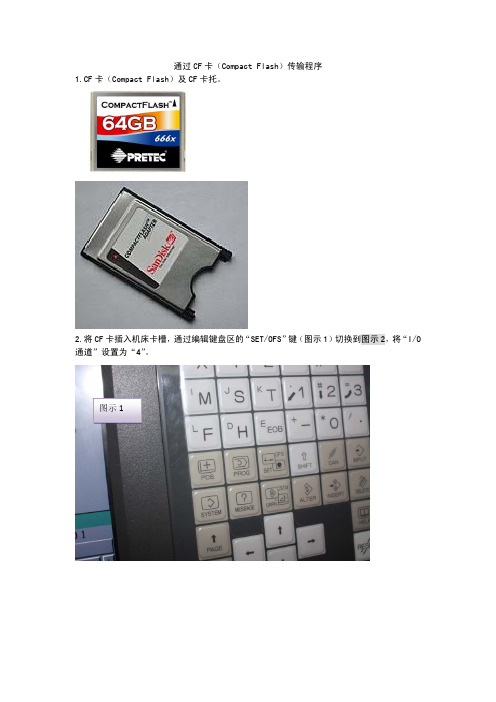
通过CF卡(Compact Flash)传输程序
1.CF卡(Compact Flash)及CF
卡托。
2.将CF卡插入机床卡槽,通过编辑键盘区的“SET/OFS”键(图示1)切换到图示2,将“I/O 通道”设置为“4”。
图示1
3.将机床开到编辑模式。
4.点击编辑键盘区的“PROG”(图示3),切换到图示4界面。
图示2
图示3
图示4
5.点击“(操作)”出现图示5。
图示5
6.点击屏幕最右边的“+”,出现图示6。
图示6
7.点击“设备”,出现图示7。
图示7
8.点击“M-卡”,出现图示8。
9.,比如,我们想要输入“20120815.NC”,它的序号是“0002”,此时需要再编辑面板上输入“2”,如图示9中红色箭头所示。
10. 点击“F 设定”,屏幕变化如图示10
红色箭头所指示。
图示8
图示9
11.再输入“145”,屏幕变化如图示11红色箭头所示。
12.点击“O 设定”,屏幕变化如图示12
红色箭头所示。
图示10
图示11
13.点击“执行”,程序就会传入机床内存里。
14.在图示6中点击“F输入”可以直接跳到图示
8,不用进行设备选择的操作。
图示12。
CF卡说明书
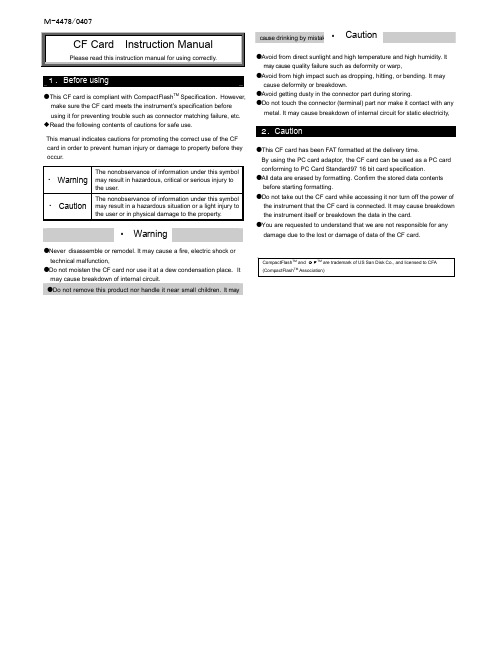
M-4478/0407CF Card Instruction ManualPlease read this instruction manual for using correctly.●This CF card is compliant with CompactFlash TM Specification. However,make sure the CF card meets the instrument’s specification beforeusing it for preventing trouble such as connector matching failure, etc.◆Read the following contents of cautions for safe use.This manual indicates cautions for promoting the correct use of the CF card in order to prevent human injury or damage to property before they occur.Warning The nonobservance of information under this symbol may result in hazardous, critical or serious injury to the user.Caution The nonobservance of information under this symbol may result in a hazardous situation or a light injury to the user or in physical damage to the property.●Never disassemble or remodel. It may cause a fire, electric shock ortechnical malfunction,●Do not moisten the CF card nor use it at a dew condensation place. Itmay cause breakdown of internal circuit.●Do not remove this product nor handle it near small children.It maycause drinking by mistake or other danger.●Avoid from direct sunlight and high temperature and high humidity. Itmay cause quality failure such as deformity or warp,●Avoid from high impact such as dropping, hitting, or bending. It maycause deformity or breakdown.●Avoid getting dusty in the connector part during storing.●Do not touch the connector (terminal) part nor make it contact with anymetal. It may cause breakdown of internal circuit for static electricity,●This CF card has been FAT formatted at the delivery time.By using the PC card adaptor,the CF card can be used as a PC card conforming to PC Card Standard97 16 bit card specification.●All data are erased by formatting. Confirm the stored data contentsbefore starting formatting.●Do not take out the CF card while accessing it nor turn off the power ofthe instrument that the CF card is connected. It may cause breakdown the instrument itself or breakdown the data in the card.●You are requested to understand that we are not responsible for anydamage due to the lost or damage of data of the CF card.WarningCautionCompactFlash TM and CFTM are trademark of US San Disk Co., and licensed to CFA(CompactFlash TM Association)。
CF卡传PLC程序方法

关于CJ1M PLC CF卡使用(CF卡要FAT格式化)直接用CF卡如下:一、把PLC的程序传出到CF卡方法:1.关断PLC电源,把PLC的DIP开关7脚拨到ON;2.插CF卡,插卡时要注意方向性,标有存储量(如32MB)朝PLC电源模块方向插孔朝下小心插下;3.接通PLC电源,然后按住存储卡电源开关三秒;直到存储卡电源所有灯熄灭为止;4.然后在关断PLC电源,按下下方弹出按钮取出CF卡,再把PLC的DIP开关7脚拨到OFF。
二、把CF卡的程序传出到PLC方法:1.关断PLC电源,把PLC的DIP开关2脚拨到ON是(AUTOEXEC文件)或把PLC的DIP开关7脚拨到ON是(BACK文件既从PLC直接传出的文件)。
2.插CF卡,插卡时要注意方向性,标有存储量(如32MB)朝PLC电源模块方向插孔朝下小心插下;3.接通PLC电源,这时CF卡程序文件自动传送到PLC的CPU中,直到存储卡BUSY灯熄灭为止;4.然后在关断PLC电源,按下下方弹出按钮取出CF卡,再把PLC的DIP开关2脚拨到OFF。
使用电脑如下:1把 CF 卡先插在PLC上,和CX-P的软件连接上之后,双击内存卡,右击参数区--传送到内存卡,以AUTOEXEC.STD的文件保存在 CF卡下2.把CF卡拔出插在读卡器上后。
在CX-P的软件中的文件下拉菜单下,选择保存注释程序,在出现的对话框中把程序前打勾,按下文件名旁的按钮,自动生成一个文件名为AUTOEXEC.OBJ 的文件,并保存下来。
把这个文件连同AUTOEXEC.STD的文件一起保存到CF 卡的盘符下就可以了。
通过Plc把程序传到CF卡上的话:把7号开关打到on,插入CF卡,按住PLC上的MCPOWER 3秒后看到BUSY灯闪烁表示数据在传送。
注意:先用32MB把程序从PLC传出,然后用128MB里的程序传入PLC。
ON)。
FANUC系统中CF卡的使用

FANUC系统中CF卡的使用1.CF卡的安装:首先需要将CF卡插入FANUC系统的CF卡插槽。
在插入之前,请确保机器电源已经关闭,并且操作面板上的电源指示灯已熄灭。
然后,打开FANUC系统的机柜门,找到CF卡插槽,并将CF卡小心地插入插槽中。
插入时,请确保卡的插入方向正确,避免强行插入。
2.CF卡的格式化:首次使用CF卡时,需要将其格式化,以确保其与FANUC系统的兼容性。
格式化操作可以在FANUC系统的菜单中完成。
打开FANUC系统的操作界面,选择“系统”菜单,然后选择“存储设备”选项。
接下来,选择CF卡,并选择“格式化”操作。
随后,按照系统提示完成格式化过程。
3.CF卡的读写操作:在CF卡插入并格式化完成后,可以进行数据的读写操作。
FANUC系统中提供了多种方式进行读写操作,包括直接在系统界面进行操作、通过PC软件进行操作以及通过有线或无线网络进行操作等。
具体的读写操作方法可以参考FANUC系统的用户手册或相关培训教材。
4.CF卡的备份和恢复:CF卡可以用于对FANUC系统的程序、参数等重要数据进行备份和恢复。
备份操作可以将系统数据保存到CF卡中,以防止数据丢失或损坏。
恢复操作可以将CF卡中的数据恢复到FANUC系统中,以恢复系统的配置和功能。
备份和恢复操作可以通过FANUC系统的菜单完成,具体的操作方法可以参考FANUC系统的用户手册。
5.CF卡的保养和保护:为了确保CF卡的正常工作和使用寿命,需要进行适当的保养和保护。
首先,要避免在使用过程中频繁插拔CF卡,以免卡槽或卡片损坏。
其次,要避免将CF卡放置在静电环境中,以防止静电干扰对卡片的损坏。
此外,还应定期检查CF卡的金属接点,确保其干净和无腐蚀,以保证良好的接触。
总之,FANUC系统中的CF卡是一种重要的存储介质,用于存储和传输程序、参数、数据等重要信息。
正确使用和保养CF卡可以保证FANUC 系统的正常工作和数据的安全性。
在使用前请务必阅读相关的用户手册和操作指南,以确保正确操作和使用CF卡。
fanuc存储卡又称cf卡)的使用
fanuc存储卡又称cf卡)的使用首先,Fanuc存储卡的容量通常为几MB到几GB不等,可以根据实际需求选择合适的容量。
使用Fanuc存储卡之前,需要确认数控系统与存储卡的兼容性,确保存储卡能够被系统正确识别和使用。
Fanuc存储卡的使用主要分为数据备份和数据恢复两个步骤。
首先是数据备份,将数控系统中的程序、参数和数据保存到存储卡中,以便在需要时能够进行恢复。
具体操作步骤如下:1.首先,将数控系统关闭,并确保存储卡已插入到正确的插槽中。
2.打开数控系统,并进入操作界面。
3.在操作界面中,选择“系统”或“设置”菜单,然后选择“数据备份”。
4.在数据备份选项中,选择需要备份的数据类型,例如程序、参数和数据。
5.确认备份目标为存储卡,并选择开始备份。
6.等待备份完成,系统会提示备份成功。
数据备份完成后,存储卡中将保存有数控系统中的所有程序、参数和数据。
接下来是数据恢复的步骤,将存储卡中的数据还原到数控系统中。
具体操作步骤如下:1.关闭数控系统,并插入备份好的存储卡。
2.打开数控系统,并进入操作界面。
3.在操作界面中,选择“系统”或“设置”菜单,然后选择“数据恢复”。
4.在数据恢复选项中,选择需要恢复的数据类型,例如程序、参数和数据。
5.确认恢复源为存储卡,并选择开始恢复。
6.等待恢复完成,系统会提示恢复成功。
数据恢复完成后,数控系统中将恢复存储卡中保存的所有程序、参数和数据。
注意,在进行数据恢复操作前,请确保备份好的数据与当前数控系统的配置和版本相匹配,以避免不必要的问题。
此外,Fanuc存储卡还可以用于程序的传输和更新。
可以将需要的程序保存到存储卡中,然后插入到另一个数控系统中进行程序的加载和更新。
总结起来,Fanuc存储卡是Fanuc数控系统中重要的数据备份和传输工具,能够方便地进行程序、参数和数据的备份、恢复和传输。
使用存储卡可以提高生产效率,减少数据丢失的风险,并方便进行程序的更新和调整。
在使用存储卡时,请注意兼容性、备份和恢复的操作步骤,以确保数据的安全和可靠性。
cf相机怎么使用技巧
cf相机怎么使用技巧1.了解CF卡CF卡是一种存储介质,通常用于相机、摄像机等设备中。
在使用CF相机之前,首先要了解CF卡的基本知识,包括容量、读写速度等方面的参数。
2.选择合适的CF卡根据个人需求选择合适的CF卡。
容量越大的CF卡可以存储更多的照片或视频,但价格也更高。
读写速度也是选择的重要因素,快速的读写速度可以有效提高数据传输效率。
3.正确插入CF卡将CF卡插入相机时,要确保电源关闭并且相机无法使用。
然后找到相机背面的CF卡槽,将CF卡插入卡槽中,并确保插入方式正确。
不要用力插入,以免损坏CF卡或相机。
4.格式化CF卡在使用CF卡之前,建议先进行格式化操作。
格式化可以清除存储介质中的无效数据,并为后续的拍摄工作做好准备。
但请注意,在格式化之前先备份重要的数据,以免误操作导致数据丢失。
5.了解相机设置在使用CF相机之前,要熟悉相机的各项设置参数,并根据拍摄需求进行适当调整。
例如,快门速度、ISO感光度、白平衡等参数都会影响到拍摄效果,适当的设置可以使照片更加美观。
6.选用高质量的镜头CF相机的镜头是影响照片质量的重要因素。
选用高质量的镜头,可以获得更为清晰、锐利的照片。
此外,还可以根据需要选择不同焦距的镜头,满足不同拍摄需求。
7.使用稳定器拍摄时,尽量使用稳定器,以降低因手部抖动而导致的模糊、不清晰的照片。
稳定器可以是三脚架、手持稳定器等设备,通过固定相机来确保相机的稳定性。
8.校准对焦对焦是拍摄中必不可少的环节。
在拍摄前,可以通过对焦功能调整相机的焦距,确保被拍摄的对象清晰、锐利。
可以使用相机自动对焦功能,也可以选择手动对焦。
9.注意光线条件光线是影响拍摄效果的重要因素。
在光线较暗的环境中拍摄,可以适当增加ISO感光度或使用闪光灯等方式提高照片的亮度。
而在光线较亮的环境中,可以选择较低的ISO感光度来避免过曝。
10.多拍摄尝试尝试不同的拍摄角度、构图方式、曝光时间等,可以获得更多样化的照片效果。
CFexpress Card 使用说明书
Operating Instructions使用說明CFexpress CardModel No./型號RP-CFEX128/RP-CFEX256Thank you for purchasing this product.≥Please read these instructions carefully before using thisproduct, and save this manual for future use.This CFexpress card can only be used with CFexpress compatible equipment. Before using this card, please confirm that your equipment is compatible with CFexpress cards.≥This card has been formatted already, but refer to the operating instructions of the CFexpress-compatible equipment before using it.Check the presence of the CFexpress logo, or refer to the operating instructions of the equipment or the information supplied by the manufacturer.When the CFexpress card is inserted into equipment not compatible with CFexpress cards≥A message saying that “Re-insert the card”, “This card cannot be used”, etc., may display.≥A message saying “This card needs to be formatted”, etc., or a format screen may display.>Do not format the card as problems with compatibility will occur if you format it in incompatible equipment.≥The power may not go on.When the CFexpress card is used on equipment not compatible with CFexpress cards≥Note that it may cause a problem with the compatibility of the card or data may be lost.∫WARNINGCease use immediately in the event of abnormalities or malfunctions–Whenever any smoke, odd odor, unusual noise is detected –When liquid or foreign objects got inside–When damaged–When abnormally hotFire or electrocution may result if you continue use.≥Cease use and consult your dealer.Do not disassemble or modifyBurns or fire may result if the card malfunctions or metal objects get into it.Do not put metal objects into the card or allow liquids such as water to get onto itFire or electrocution may result due to shorting and overheating.≥Do not place receptacles containing liquids such as water or metal objects near or above this product.≥Be particularly careful when there are children around.Do not touch this product with wet hands or use it in wet areasThe card may malfunction or fire or electrocution may result.≥Do not use the product in locations that have a lot of water, humidity, steam, dust, or oily smoke such as a bathroom.∫CAUTIONDo not place in locations such as the following where temperatures can get very high:–In locations exposed to direct sunlightIn particular, temperatures in mid-summer vehicle cabins and trunks can become unimaginably high (approximately 60o C or more). Never leave this product in such areas.–In locations subject to strong magnetic fields or static electricity–In locations where the humidity exceeds the usage environment stipulated in the operating instructions for this product, or where condensation occurs–In very dusty locations–Near flames or where hot air collects–In places where there is a danger of current leakage or water leakageThe card may malfunction or fire or electrocution may result.≥This can also cause deterioration of the casing and internal parts, so care should be taken.Take care of high temperatures when removing from the deviceIn particular, the metal surfaces can become hot. Check as you remove it.Do not touch the product directly for long periodsDirectly touching the hot parts of the product over long periods can be the cause of low temperature burns¢.¢People with poor blood circulation (people with vascular disorders, defective circulation, diabetes, or receivingintense pressure) or people with sensitive skin are prone to low-temperature burns.Keep out of reach of childrenDanger of swallowing.≥If swallowed, seek medical advice immediately.Supplied accessory:CFexpress card case (1)You may be prompted to format the card when it is used withequipment not compatible with the CFexpress card. Doing sowill result in loss of data, so be sure to cancel.About this CFexpress cardHow to check CFexpress compatibleequipmentPrecautions23Capacity indicated on the card:128GB (RP-CFEX128)256GB (RP-CFEX256)Card type:CFexpress Ver.2.0 TypeB Interface:PCle Gen3 x2Protocol:NVMe1.3Data transfer speed:Maximum read out speed: 1700MB/s Maximum write speed: 1000MB/s Default formatting type:exFATOperating temperature:j 10o C to 70o C Operating humidity:5%RH to 95%RH (no condensation)Operating voltage:3.3VStorage temperature:j 40o C to 85o CDimensions (Width t Length t Thickness):38.5mm k 29.6mm k 3.8mm Mass (Weight):Approx. 8g≥Specifications are subject to change without notice.≥Different devices have different formatting requirements.When reformatting the card, format according to the operating instructions of the device. All of the data stored on the CFexpress card is deleted when it is formatted. Before formatting, save any necessary data to your computer, etc.≥Do not disassemble, alter, apply strong shocks, bend, drop or wet with water. These can cause the card to malfunction. Furthermore, do not touch the metal terminals with your hands or metals.≥Do not peel off the labels that are attached or attach new labels or stickers.≥The device may not be able to function properly, so do not use where it can be subjected to the effects of static electricity or electronic noise. If the device stops working properly, switch the device off, remove the card from the device, then insert the card again.≥After using the card, put it back into the supplied card case for storage.≥Do not leave in locations that may become hot such as in cars or exposed to direct sunlight. Do not leave in locations with high humidity, where there is a lot of dust, or where corrosive gases, etc., may occur.≥Under no circumstances should this product be used in applications where special quality or reliability is arequirement, where malfunction or erroneous operation can directly threaten human life or cause harm to people, or for specialist applications (for aeronautical or astronauticalpurposes, for transportation devices, for combustion devices, for life-supporting devices, for safety apparatuses, etc.).≥Do not remove the card, or turn off devices or peripheraldevices in which the card is inserted while the CFexpress card is working (data is being read or written). Do not remove the batteries from battery-operated equipment. These actions can cause data to be destroyed.≥We recommend backing up important data. Panasonic will not accept responsibility for any data loss, or loss directly or indirectly caused by data loss.∫About writing on this cardThe space for writing on the card can be directly written on using an oil-based pen, etc.≥Do not use excessive force as it may damage the card. Take care not to stain the metal terminals.CFexpress compatible equipment may contain the functions “Format” and “Erase”. However, in most cases all data on the card will not be completely erased even after performing these functions. Be aware of this when transferring the card to another person.When you dispose of the CFexpress card, destroy it physically and follow your local rules of separation and disposal of waste.The CFexpress logo is a trademark licensed by the CompactFlash Association.Specifications When using or storing the cardProtecting your dataGIdentifying the week and year of production(Rear)Week and year of production (the numbers are examples)a Year of production 19:201920:2020b Week of production01:Week 1 of the year of production 02:Week 2 of the year of productionHCautions about disposal or transferring ownership of this cardThe data recorded to the CFexpress card is protected bycopyright laws and, apart from personal use, may not be used without the permission of the rights holder.Panasonic takes no responsibility for any loss or direct or indirect failure that might occur to the data recorded on the CFexpress card.(Rear)感謝您購買本產品。
CF卡操作实例
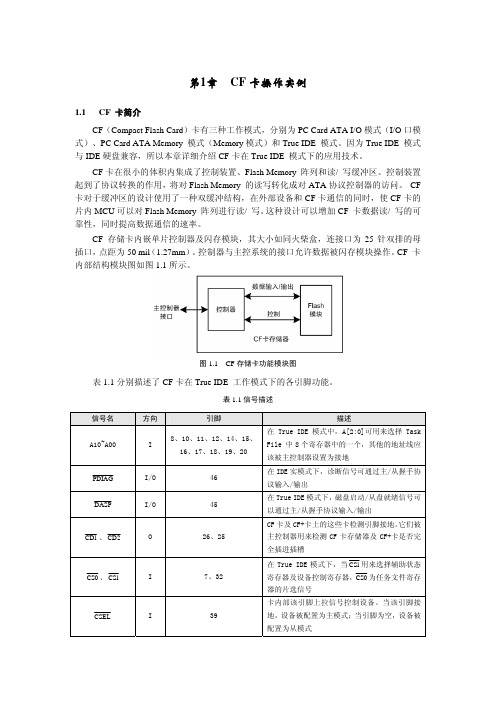
第1章CF卡操作实例1.1CF 卡简介CF(Compact Flash Card)卡有三种工作模式,分别为PC Card ATA I/O模式(I/O口模式)、PC Card ATA Memory 模式(Memory模式)和True IDE 模式。
因为True IDE 模式与IDE硬盘兼容,所以本章详细介绍CF卡在True IDE 模式下的应用技术。
CF卡在很小的体积内集成了控制装置、Flash Memory 阵列和读/ 写缓冲区。
控制装置起到了协议转换的作用,将对Flash Memory 的读写转化成对ATA协议控制器的访问。
CF 卡对于缓冲区的设计使用了一种双缓冲结构,在外部设备和CF卡通信的同时,使CF卡的片内MCU可以对Flash Memory 阵列进行读/ 写。
这种设计可以增加CF 卡数据读/ 写的可靠性,同时提高数据通信的速率。
CF 存储卡内嵌单片控制器及闪存模块,其大小如同火柴盒,连接口为25针双排的母插口,点距为50 mil(1.27mm)。
控制器与主控系统的接口允许数据被闪存模块操作。
CF 卡内部结构模块图如图1.1所示。
图1.1 CF存储卡功能模块图表1.1分别描述了CF卡在True IDE 工作模式下的各引脚功能。
表1.1信号描述在True IDE模式下,CF卡的D0~D15、A0~A2、CS0、CS1、IOWR、IORD、RESET 是最基本的连接信号线,CD1、CD2可探测CF卡是否插入,其他的信号线是可以选的。
CF卡寄存器读写时序如图1.2所示,在图中有的波形信号不一定与实际电平对应,而是表示所定义的电平信号有效,从而忽略实际引脚信号的高/低电平状态。
所以,如图 1.2中的-IORD、-IOWR及-IOCS16等信号当其波形为高时,则表示其脚电平信号有效,其实际电平应为低电平。
表1.2 寄存器读/写时序符号项模式0(ns)模式1(ns)模式2(ns)模式3(ns)模式4(ns)注t0周期时间(min)600 383 240 180 120 1t1地址有效时,-IORD/-IOWR的调整时间(min)70 50 30 30 25t2-IORD/-IOWR(min) 16512510080701 t2-IORD/-IOWR(min)寄存器(8位)290 290 290 80 70 1t2i-IORD/-IOWR唤醒时间(min) - - - 70 25 1符号项模式0(ns)模式1(ns)模式2(ns)模式3(ns)模式4(ns)注t3-IOWR数据调整时间(min) 60 45 30 30 20t3-IOWR数据保持时间(min) 30 20 15 10 10t5-IORD数据调整时间(min) 50 35 20 20 20t6-IORD数据保持时间(min) 5 5 5 5 5t6z-IORD数据触发态30 30 30 30 30 2 t7地址有效时,-IOCS16的设定时间(最大)90 50 40 N/a N/a 4 t8地址有效时,-IOCS16的释放时间(最大)60 45 30 N/a N/a 4 t9地址有效时,-IORD/-IOWR的保持时间20 15 10 10 10t RD 读数据有效时,IORDY的启动时间(min),如果t A后,IORDY初始化为低。
CF卡的使用说明
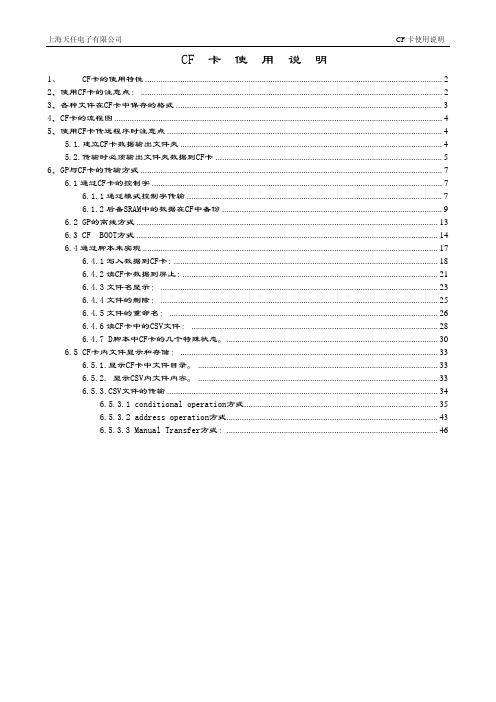
CF 卡 使 用 说 明1、CF卡的使用特性 (2)2、使用CF卡的注意点: (2)3、各种文件在CF卡中保存的格式 (3)4、CF卡的流程图 (4)5、使用CF卡传送程序时注意点 (4)5.1.建立CF卡数据输出文件夹 (4)5.2.传输时必须输出文件夹数据到CF卡 (5)6、GP与CF卡的传输方式 (7)6.1通过CF卡的控制字 (7)6.1.1通过模式控制字传输 (7)6.1.2后备SRAM中的数据在CF中备份 (9)6.2 GP的离线方式 (13)6.3 CF BOOT方式 (14)6.4通过脚本来实现 (17)6.4.1写入数据到CF卡: (18)6.4.2读CF卡数据到屏上: (21)6.4.3文件名显示: (23)6.4.4文件的删除: (25)6.4.5文件的重命名: (26)6.4.6读CF卡中的CSV文件: (28)6.4.7 D脚本中CF卡的几个特殊状态。
(30)6.5 CF卡内文件显示和存储: (33)6.5.1.显示CF卡中文件目录。
(33)6.5.2. 显示CSV内文件内容。
(33)6.5.3.CSV文件的传输 (34)6.5.3.1 conditional operation方式 (35)6.5.3.2 address operation方式 (43)6.5.3.3 Manual Transfer方式: (46)1、C F卡的使用特性1、一个外部的存储设备是必需的,配方数据能存放在CF卡并且随时传送到GP中去。
2、所有的报警数据、趋势图数据、采样数据和记录数据能够以*.CSV文件形式保存。
3、存储的数据能够通过数据库或其他的方法在PC上使用。
4、画面数据能以*.MRM文件保存,这种文件能够拷贝到其它的GP上。
2、使用CF卡的注意点:·CF卡只能用于GP77R和GP2000系列,其中GP77R系列需配备适配器。
·被用于存储数据的GP单元必须提前设置GP系统和协议文件。
CF卡操作实例范文

CF卡操作实例范文一、CF卡的格式化操作1.打开电脑,插入CF卡。
CF卡插槽通常位于电脑的前面板或侧面板。
2.在桌面上找到CF卡的图标,右键单击该图标,选择“格式化”选项。
3.在格式化窗口中,选择文件系统为FAT32或NTFS,选择单位大小为默认值。
如果需要分区,请勾选“快速格式化”选项。
4.点击“开始”按钮,开始格式化CF卡。
格式化完成后,会弹出一个提示框,说明格式化成功。
5.关闭格式化窗口,并将CF卡从电脑中取出。
二、CF卡的文件传输操作1.打开电脑,插入CF卡。
CF卡插槽通常位于电脑的前面板或侧面板。
2.在桌面上找到CF卡的图标,双击该图标,打开CF卡的存储空间。
3. 在电脑上找到需要传输的文件,选中文件并按住Ctrl键,单击选中的文件,右键单击其中一个选中文件,选择“复制”选项。
4.回到CF卡的存储空间,右键单击空白处,选择“粘贴”选项。
或者直接将选中的文件拖放到CF卡的存储空间中。
5.等待文件传输完成,传输完成后,可以直接拔出CF卡。
三、CF卡的文件删除操作1.打开电脑,插入CF卡。
CF卡插槽通常位于电脑的前面板或侧面板。
2.在桌面上找到CF卡的图标,双击该图标,打开CF卡的存储空间。
3. 在CF卡的存储空间中,找到需要删除的文件,选中文件并按下Delete键,或者右键单击选中的文件,选择“删除”选项。
4. 弹出一个提示框,确认是否删除选中的文件,点击“确定”按钮进行删除。
也可以使用快捷键Shift+Delete来永久删除文件,不经过回收站。
5.删除完成后,可以直接拔出CF卡。
四、CF卡的数据恢复操作1. 安装并运行一款专业的数据恢复软件,如EaseUS Data Recovery Wizard、Recuva等。
2.在软件界面上选择文件恢复模式,如“全部文件恢复”、“已删除的文件恢复”等。
3.选择待恢复文件所在的储存设备,如CF卡的驱动器符号。
4.点击“扫描”按钮,等待软件扫描CF卡上的文件。
FANUC存储卡(又称CF卡)的使用
FANUC存储卡(又称CF卡)的使用存储卡(又称CF卡)的使用使用CF卡可以存储系统参数,梯形图以及程序等。
对于我们维修中常用重装系统参数来解除一些系统故障。
此外,我们也应该备份一下系统参数,万一机床损坏后,为恢复机床性能,应重装系统参数。
CF卡分为一个卡和架。
卡一般用金士顿(KINGSTON)的CF卡。
现在256MB,512MB ,1GB,架和笔记本电脑上用的卡的架是一致的,通常在电脑市场上都可以买到。
架约30元左右。
卡多在100 元以内。
强调一个概念:系统SRAM中存储系统参数,加工程序,各种补偿值。
系统FROM中存储了梯形图,宏执行程序。
按RESET+DELETE键只清除SRAM中的参数,不清除FROM中的梯形图和宏执行程序部分。
系列备份:在系统上电时作的备份,全部数据是以机器码的形式存放,不能在计算机中打开,但是可以作为一个文件保存。
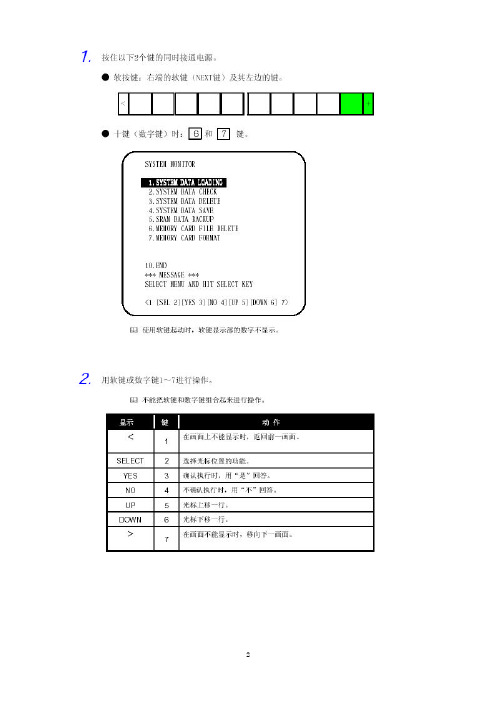
操作步骤:1.按住显示屏幕下最右边两个软键,同时上电(NC ON)2.触摸屏没软键,按住字母6,7 进入画面显示如下:①SYSTEM DATA LOADING②SYSTEM DATA CHECK③SYSTEM DATA DELDTE④SYSTEM DATA SAVE⑤SRAM DATE SAVE⑥MEMORY CARD FILE DELETE⑦MEMORY CARD FORMAT10 END解释:1.由存储卡将数据加载到FROM中2.检查系统FROM的文件3.删除系统FROM的文件4.系统中FROM文件保存到存储卡中5.SRAM中的数据备份和回装6.检查和删除存储卡的数据7.存储卡格式化我们常用1 4 5项SRAM 备份系统参数操作第五项按软键UP或DOWN软键选择第五项,按(SELECT)选择操作软键,显示如下画面SRAM DATA BACKUP[BOARD:MAIN]1.SRAM BACKUP (CNC→MEMORY CARD)2.RESTORE SRAM (MEMORY CARD→CNC)END[SELECT] [YES] [NO] [UP] [DOWN]用[UP][DOWN]键移光标到1,备份,将系统参数保存储到CF卡,按[SELECT]选择[YES]或[NO],[YES]为执行,[NO]为放弃。
CF卡功能介绍
SINAMICS S120 CF 卡介绍与选型Introduction and Selection of SINAMICS S120 CF Cards Single FAQ Edition (2011 年 1 月)摘要介绍了 Sinamics S120 CF 卡选型方法 Sinamics S120;CF 卡;选型 Sinamics S120; CF Card; Selection关键词Key WordsIA&DT&BT Service & SupportPage 2-7目录1 SINAMICS S120 CF卡介绍 ...............................................................................4 2 SINAMICS S120 CF卡选型 ...............................................................................42.1 固件版本Firmware Version............................................................................................ 4 2.2 性能扩展........................................................................................................................ 5 2.3 集成安全功能 ................................................................................................................ 53 使用CF卡时的注意事项......................................................................................5IA&DT&BT Service & SupportPage 3-71 SINAMICS S120 CF 卡介绍CF 卡是 SINAMICS S120 的控制单元 (CU)工作时必需的存储设备,其中保存了固 件(Firmware)、用户数据、授权等信息,在 断电情况下,数据也能够永久保存。
- 1、下载文档前请自行甄别文档内容的完整性,平台不提供额外的编辑、内容补充、找答案等附加服务。
- 2、"仅部分预览"的文档,不可在线预览部分如存在完整性等问题,可反馈申请退款(可完整预览的文档不适用该条件!)。
- 3、如文档侵犯您的权益,请联系客服反馈,我们会尽快为您处理(人工客服工作时间:9:00-18:30)。
Copyright 2006 ABB. All rights reserved.
Task List
Modifications list
Contents
1概要 (4)
2功能描述 (4)
3操作步骤 (4)
4把CF盘安装到控制器 (9)
5通过打开和关闭电源测试CF盘 (10)
6用CF盘设置控制器的IP地址 (10)
1 概要
1. 简介.
该文档的目的是提供一个如何使用CF盘的快速指南。
对于AC800M系列控制器,在没有备份电池的情况下,可以使用CF盘引导控制器并下装应用程序。
对于重启项目这是一个省时的、易于维护的方法。
该特性在许多情况下都是有价值的,当系统失电而又无备份电池;或有电池但不会保持太长时间(电池快没电时);或在控制器并非连续运行的情况(白天运行,晚上断电休息);或是演示设备等。
2. 硬件、软件需求
硬件: AC800M 控制器, Compact Flash Card (CF 盘)
软件: Compact CBM 4.1 或800xA4.1 以后版本
2 功能描述
组态AC800M控制器,将测试程序装入CF盘,用CF盘启动AC800M控制器。
并演示如何手动保存ColdRetain 值。
3 操作步骤
1. 准备CF盘
下列盘卡已经在Feeder Factory经过了测试(大多数其他卡也应该可以使用)
.Silicon System; SiliconDriveTM CF256MB (SSD-C25M-3012)
.SimpleTech;CompactFlash Flash Storage 128MB(SLCF128J-F)
.Transcend;CompactFlashTM 512MB Industrial (TS512MCF451)
PM865不支持CF盘。
准备CF盘
1) 将CF盘插入读卡器;
2) 连接读卡器到PC的USB口;
3) 用FAT格式格式化CF盘;
4) 现在CF盘已经准备好。
2. 在Control Builder 中设置CF 盘
在CF Reader 槽添加CF 盘
对于非冗余控制器,Cold Retain 值可定期存入CF 盘,其设置如下(默认值是60分钟):
对于冗余控制器该值应设置为0,也就是说对于冗余控制器,不可以自动定期将Cold Retain 值存入CF 盘,而必须安如下方法手动保存Cold Retain 值: 1) 将项目切换到ONLINE 模式;
2) 在项目浏览器菜单中, 选择Tool>Save “ColdRetain ” Values. 将打开 “ColdRetain ” Values 对话框:
3) 按“Save ”键保存Cold Retain 值,
4) 操作完成后,出现下面状态窗口:
3. 组态控制器
在Control Builder中,按照正常方法组态控制器,编写项目程序。
4. 将应用程序下装到CF盘
在 Offline 模式下, 用鼠标右键点击控制器,选择Compact Flash,
t
选择准备好的CF盘,
按OK 键,应用程序将下装到CF盘。
当应用程序将下装到CF盘后,会看到下面的信息窗口:
打开CF盘,会发现有如下内容:
4 把CF盘安装到控制器
把CF盘插入控制器,该操作可在控制器带电的情况下完成。
5 通过打开和关闭电源测试CF盘
将控制器的电源关闭然后再打开(不要安装电池)。
刚上电时,可看到CI854的F红灯亮。
当控制器启动之后,应用程序从CF盘下装到控制器,看到CI854的绿色R灯。
6 用CF盘设置控制器的IP地址
用CF盘可以很方便的修改控制器的IP地址。
修改方法如下:
输入地址,
把项目下装到CF盘;
把CF盘插入控制器;
将控制器的电源关闭然后再打开;
控制器启动后,复位控制器;现在控制器的IP地址修改完成。
参考资料
详情请参考手册《基本控制软件介绍与组态》 (3BSE040935R101)。