Mac mini (2009 年初机型) - 使用手册 Mac_mini_Early2009_UG_CH
如何识别 Mac mini 机型
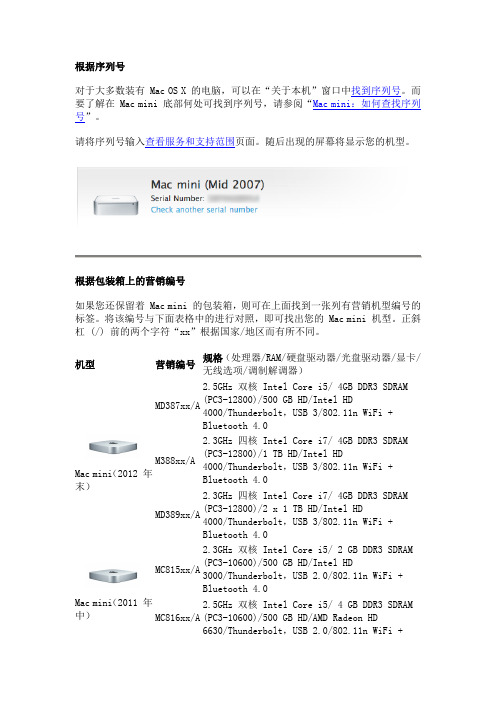
根据序列号对于大多数装有 Mac OS X 的电脑,可以在“关于本机”窗口中找到序列号。
而要了解在 Mac mini 底部何处可找到序列号,请参阅“Mac mini:如何查找序列号”。
请将序列号输入查看服务和支持范围页面。
随后出现的屏幕将显示您的机型。
根据包装箱上的营销编号如果您还保留着 Mac mini 的包装箱,则可在上面找到一张列有营销机型编号的标签。
将该编号与下面表格中的进行对照,即可找出您的 Mac mini 机型。
正斜杠 (/) 前的两个字符“xx”根据国家/地区而有所不同。
机型营销编号规格(处理器/RAM/硬盘驱动器/光盘驱动器/显卡/无线选项/调制解调器)Mac mini(2012 年末)MD387xx/A2.5GHz 双核 Intel Core i5/ 4GB DDR3 SDRAM(PC3-12800)/500 GB HD/Intel HD4000/Thunderbolt,USB 3/802.11n WiFi +Bluetooth 4.0M388xx/A2.3GHz 四核 Intel Core i7/ 4GB DDR3 SDRAM(PC3-12800)/1 TB HD/Intel HD 4000/Thunderbolt,USB 3/802.11n WiFi + Bluetooth 4.0MD389xx/A2.3GHz 四核 Intel Core i7/ 4GB DDR3 SDRAM(PC3-12800)/2 x 1 TB HD/Intel HD4000/Thunderbolt,USB 3/802.11n WiFi +Bluetooth 4.0Mac mini(2011 年中)MC815xx/A2.3GHz 双核 Intel Core i5/ 2 GB DDR3 SDRAM(PC3-10600)/500 GB HD/Intel HD3000/Thunderbolt,USB 2.0/802.11n WiFi +Bluetooth 4.0MC816xx/A2.5GHz 双核 Intel Core i5/ 4 GB DDR3 SDRAM(PC3-10600)/500 GB HD/AMD Radeon HD6630/Thunderbolt,USB 2.0/802.11n WiFi +Bluetooth 4.0MC936xx/A 2.0GHz 四核 Intel Core i7/ 4 GB DDR3 SDRAM(PC3-10600)/2 x 500 GB HD/Intel HD 3000/Thunderbolt ,USB 2.0/802.11n WiFi +Bluetooth 4.0Mac mini (2010 年中) MC438xx/A 2.66GHz Intel Core 2 Duo/4 GB DDR3 SDRAM(PC3-8500)/500 GB HD/无光盘驱动器/内建AirPort 及蓝牙MC270xx/A 2.4GHz Intel Core 2 Duo/2 GB DDR3 SDRAM (PC3-8500)/320 GB HD/SuperDrive 驱动器/GeForce 320M/内建 AirPort 及蓝牙Mac mini (2009 年末) MC238xx/A 2.26GHz Intel Core 2 Duo/2 GB DDR3 SDRAM(PC3-8500)/160 GB HD/SuperDrive 驱动器/GeForce 9400M/内建 AirPort 及蓝牙MC239xx/A 2.53GHz Intel Core 2 Duo/4 GB DDR3 SDRAM(PC3-8500)/320 GB HD/SuperDrive 驱动器/GeForce 9400M/内建 AirPort 及蓝牙 MC408xx/A 2.53GHz Intel Core 2 Duo/4 GB DDR3 SDRAM (PC3-8500)/2 x 500GB HD/无光盘驱动器/GeForce9400M/内建 AirPort 及蓝牙Mac mini (2009 年初) MB464xx/A 2.0GHz Intel Core 2 Duo/2 GB DDR3 SDRAM(PC3-8500)/320 GB HD/SuperDrive 驱动器/GeForce 9400M/内建 AirPort 及蓝牙MB463xx/A 2.0GHz Intel Core 1 Duo/2 GB DDR3 SDRAM (PC3-8500)/120 GB HD/SuperDrive 驱动器/GeForce 9400M/内建 AirPort 及蓝牙Mac mini (2007 年中) MB138xx/A 1.83GHz Intel Core 2 Duo/1 GB DDR2 SDRAM(PC2-5300)/80 GB HD/复合驱动器/内建 AirPort及蓝牙MB139xx/A 2.0GHz Intel Core 1 Duo/2 GB DDR2 SDRAM (PC2-5300)/120 GB HD/SuperDrive 驱动器/内建 AirPort 及蓝牙Mac mini (2006 年末) MA607xx/A 1.66GHz Intel Core Duo/512MB DDR2 SDRAM(PC2-5300)/60GB HD/复合驱动器/Intel GMA950GPU/内建 AirPort 及蓝牙/无调制解调器MA608xx/A 1.83GHz Intel Core Duo/512MB SDRAM/80GB HD/SuperDrive 驱动器/Intel GMA950 GPU/内建 AirPort 及蓝牙/无调制解调器MA205xx/A 1.5GHz Intel Core Solo/512MB SDRAM/60GB HD/复合驱动器/Intel GMA950 GPU/内建 AirPort 及蓝牙/无调制解调器MA206xx/A 1.66GHz Intel Core Duo/512MB SDRAM/80GB HD/8x SuperDrive 驱动器/Intel GMA950 GPU/内建Mac mini(2006年初)AirPort 及蓝牙/无调制解调器Mac mini(2005 年末)M9686xx/B1.33GHz G4/512MB SDRAM/40GB HD/复合驱动器/ATIRadeon 9200/AirPort 及蓝牙已准备就绪/56K v92调制解调器M9687xx/B1.5GHz G4/512MB SDRAM/80GB HD/复合驱动器/ATIRadeon 9200 (PC2-5300)/内建 AirPort 及蓝牙/无调制解调器M9971xx/B1.5GHz G4/512MB SDRAM/80GB HD/8x SuperDrive 驱动器/ATI Radeon 9200 (64MB VRAM)/内建 AirPort及蓝牙/无调制解调器Mac mini M9686xx/A1.25GHz G4/256MB SDRAM/40GB HD/复合驱动器/ATIRadeon 9200/AirPort 及蓝牙/56K v92 调制解调器M9686xx/B1.25GHz G4/512MB SDRAM/40GB HD/Combo 光驱/ATIRadeon 9200/AirPort 及蓝牙已准备就绪/56K v92调制解调器M9687xx/A1.42GHz G4/256MB SDRAM/80GB HD/复合驱动器/ATIRadeon 9200/AirPort 及蓝牙已准备就绪/56K v92调制解调器M9687xx/B1.42GHz G4/512MB SDRAM/80GB HD/复合驱动器/ATIRadeon 9200/内建 AirPort 及蓝牙/56K v92 调制解调器M9971xx/A1.42GHz G4/512MB SDRAM/80GB HD/4x SuperDrive驱动器/ATI Radeon 9200/内建 AirPort 及蓝牙/56K v92 调制解调器M9971xx/B1.42GHz G4/512MB SDRAM/80GB HD/4x SuperDrive驱动器/ATI Radeon 9200/内建 AirPort 及蓝牙/无调制解调器原文链接:/mac/518.html。
IE-MiniMc 用户手册说明书

Advantech B+B SmartWorx - Americas707 Dayton RoadOttawa, IL 61350 USAPhone (815) 433-5100Fax (815) 433-5105Advantech B+B SmartWorx - European HeadquartersWestlink Commercial ParkOranmore, Co. Galway, IrelandPhone +353 91-792444Fax +353 91-792445B+B SMARTWORX TECHNICAL SUPPORTUSA/Canada: 1 (800) 346-3119 (Ottawa IL USA location)(Monday - Friday, 7:00 a.m. to 7:00 p.m. CST) Europe: +353 91 792444 (Ireland location)(Monday - Friday, 8 a.m. to 5:00 p.m. GMT) Email: ************************Web: CONTENTSB+B SMARTWORX TECHNICAL SUPPORT (i)List of Figures (ii)List of Tables (iii)FCC RADIO FREQUENCY INTERFERENCE STATEMENT (iii)WARRANTY (iv)ABOUT THE IE-MINIMC (1)HARDWARE INSTALLATION -both product lines (2)hardware mounting options (2)powering options (3)LEDS (4)DC terminal block wiring instructions (5)Cascading DC Power (5)SPECIFICATIONS (6)CERTIFICATIONS/APPROVALS (7)ELECTROSTATIC DISCHARGE PRECAUTIONS (8)FIBER OPTIC CLEANING GUIDELINES (9)CERTIFICATIONS (10)LIST OF FIGURESFigure 1. Wall Mount Bracket (2)Figure 2. DIN Rail Mounting (3)LIST OF TABLESTable 1. LEDS (4)Table 2. Specifications (6)Table 3. Certifications (7)FCC RADIO FREQUENCY INTERFERENCE STATEMENTThis equipment has been tested and found to comply with the limits for a Class B computing device, pursuant to Part 15 of the FCC Rules. These limits are designed to provide reasonable protection against harmful interference when the equipment is operated in a commercial environment This equipment generates, uses and can radiate radio frequency energy and, if not installed and used in accordance with the instruction manual, may cause harmful interference to radio communications. Operation of this equipment in a residential area is likely to cause harmful interference in which the user will be required to correct the interference at his own expense.Any changes or modifications not expressly approved by the manufacturer could void the user’s authority to operate the equipment. The use of non-shielded I/O cables may not guarantee compliance with FCC RFI limits. This digital apparatus does not exceed the Class B limits for radio noise emission from digital apparatus set out in the Radio Interference Regulation of the Canadian Department of Communications. Le présent appareil numérique n’émet pas de bruits radioélectriquesdépassant les limites applicables aux appareils numériques de classe B prescrites dans le Règlement sur le brouillage radioélectrique publié par le ministère des Communications du Canada.WARRANTYEffective for products of B+B SmartWorx shipped on or after May 1, 2013, B+B SmartWorx warrants that each such product shall be free from defects in material and workmanship for its lifetime. This limited lifetime warranty is applicable solely to the original user and is not transferable.This warranty is expressly conditioned upon proper storage, installation, connection, operation and maintenance of products in accordance with their written specifications. Pursuant to the warranty, within the warranty period, B+B SmartWorx, at its option will:1. Replace the product with a functional equivalent;2. Repair the product; or3. Provide a partial refund of purchase price based on a depreciated value.Products of other manufacturers sold by B+B SmartWorx are not subject to any warranty or indemnity offered by B+B SmartWorx, but may be subject to the warranties of the other manufacturers.Notwithstanding the foregoing, under no circumstances shall B+B SmartWorx have any warranty obligations or any other liability for: (i) any defects resulting from wear and tear, accident, improper use by the buyer or use by any third party except in accordance with the written instructions or advice of the B+B SmartWorx or the manufacturer of the products, including without limitation surge and overvoltage conditions that exceed specified ratings, (ii) any products which have been adjusted, modified or repaired by any party other than B+B SmartWorx or (iii) any descriptions, illustrations, figures as to performance, drawings and particulars of weights and dimensions contained in the B+B SmartWorx’ catalogs, price lists, marketing materials or elsewhere since they are merely intended to represent a general idea of the products and do not form part of this price quote and do not constitute a warranty of any kind, whether express or implied, as to any of the B+B SmartWorx’ products.THE REPAIR OR REPLACEMENT OF THE DEFECTIVE ITEMS IN ACCORDANCE WITH THE EXPRESS WARRANTY SET FORTH ABOVE IS B+B SMARTWORX’ SOLE OBLIGATION UNDER THIS WARRANTY. THE WARRANTY CONTAINED IN THIS SECTION SHALL EXTEND TO THE ORIGINAL USER ONLY, IS IN LIEU OF ANY AND ALL OTHER WARRANTIES, EXPRESS OR IMPLIED, AND ALL SUCH WARRANTIES AND INDEMNITIES ARE EXPRESSLY DISCLAIMED, INCLUDING WITHOUT LIMITATION (I) THE IMPLIED WARRANTIES OF FITNESS FOR A PARTICULAR PURPOSE AND OF MERCHANTABILITY AND (II) ANY WARRANTY THAT THE PRODUCTS ARE DO NOT INFRINGE OR VIOLATE THE INTELLECTUAL PROPERTY RIGHTS OF ANY THIRD PARTY. IN NO EVENT SHALL B+B SMARTWORX BE LIABLE FOR LOSS OF BUSINESS, LOSS OF USE OR OF DATA INTERRUPTION OF BUSINESS, LOST PROFITS OR GOODWILL OR OTHER SPECIAL, INCIDENTAL, EXEMPLARY OR CONSEQUENTIAL DAMAGES. B&B ELECTRONIC SHALL DISREGARD AND NOT BE BOUND BY ANY REPRESENTATIONS, WARRANTIES OR INDEMNITIES MADE BY ANY OTHER PERSON, INCLUDING WITHOUT LIMITATION EMPLOYEES, DISTRIBUTORS, RESELLERS OR DEALERS OF B+B SMARTWORX WHICH ARE INCONSISTENT WITH THE WARRANTY, SET FORTH ABOVE.ABOUT THE IE-MINIMCThe IE-MiniMc Industrial Ethernet media converter features 10/100 switching copper-to-fiber conversion. Miniature in size, it offers plug-and-play operation, and supports an extended voltage range as well as extended operating temperature.. The media converter can function as a PD device, and is compliant to the IEEE 802.3af Power Over Ethernet (PoE) standard. Available in a variety of Single Mode and Multi Mode fiber types, it supports an MTU of 1916 bytes. Several mounting options and powering options are available and detailed in the following sections of the manual.HARDWARE INSTALLATION -BOTH PRODUCT LINES The IE-MiniMc installs virtually anywhere as a standalone device in locations with extremely limited space. Installation options include:·Velcro strips·DIN rail mounting with DIN Rail clips· A wall mount bracket· A PowerTray/18 for high density applicationsHARDWARE MOUNTING OPTIONSThe IE-MiniMc can be mounted on a DIN rail or using wall mount brackets (shown below).Figure 1. Wall Mount BracketDIN rail clips (part number 806-39105) and wall mount brackets (part number 895-39229) are available for purchase through an B&B Electronics Distributor. The DIN Rail clips include screws, to allow the installation onto a DIN Rail. Install the screws into DIN Rail clips, which should be mounted parallel or perpendicular to the DIN Rail. Snap the converter onto the clips. To remove the converter from the DIN Rail, use a flat-head screwdriver into the slot to gently pry the converter from the rail.Figure 2. DIN Rail MountingPOWERING OPTIONSThe IE-MiniMc includes multiple powering options:· A country-specific, high-reliability AC power adapter (included)·The IEEE 802.3af Power over Ethernet standard; draws power from power sourcing equipment (NON-Telco version only)·The 4-terminal DC power block·IE-PowerTray/18 for Rack MountingPower Over EthernetPower Over Ethernet technology allows the IE-MiniMc to be a Powered Draw device (PD) and draw power when connected to Power Sourcing Equipment (PSE). Power Sourcing Equipment distributes an electrical current across existing copper data cabling.LEDSEach IE-MiniMc includes two LEDs, located on the RJ-45 connector.LED functions are as follows:FXLNK/ACT Glows green when a link is established on the fiber port; blinks green when activity is detected on the fiber port.TXLNK/ACT Glows amber when a link is established on the copper port; blinks amber when activity is detected on the copper port.Table 1. LEDSDC TERMINAL BLOCK WIRING INSTRUCTIONSThe IE-MiniMc can also be powered with the DC terminal block. From a power source, connect to any one positive and any one negative terminal on the IE-MiniMcFigure 3. DC Terminal BlockNOTEWhen using stranded wire, the leads must be tinned and equivalent to a 16 AWG solid conductor. The DC terminal block is protected against mis-wiring. If the unit is mis-wired, positive power lead to the negative terminal and negative power lead to the positive terminal, it will not function. When powering a unit with voltages near the upper limit of the device’s specification (for example: 50 volts) take precautions to limit the voltage at the units terminal block. When turning on high voltage DC circuits, initial voltages may exceed the maximum allowed duration of the unit’s transient protection devices.Cascading DC PowerWhen installing multiple IE-MiniMc units on a DIN rail, the end user can connect to one DC input source, and then cascade from one DC block to the next, until reaching the maximum current available.SPECIFICATIONSConnectorsCopper RJ-45Fiber ST, SCEnvironmental -- Intended for indoor and outdoor use.Operating Temperature -40°F to +185°F (-40°C to +85°C) DC configuration +14°F to +122°F (-10°C to +50°C) with AC wall adapterStorage Temperature-40°F to +185°F (-40°C to +85°C)Operating Humidity 5 to 95% (non-condensing); 0 to 10,000 ft. altitude LED Indicators One Green LEDCopper RJ-45 port LNK/ACT Color = GREENBlink = GREEN when data is passing Off = NO COLORFiber Port LNK/ACT Color = AMBERBlink = AMBER when data is passing Off = NO COLORPower InputDC Terminal Block 7 to 50 VDC, 1-0.1ADC jack 5 to 24 VDCPoE When IE-MiniMc uses PoE technology to be a PD,the maximum supply voltage is 50VTable 2. SpecificationsCERTIFICATIONS/APPROVALSCertificationsFCC FCC Part 15 Class BCEEN55022 CISPR 22 Class BEN61000-3-2 Generic Standards for Residential, Commercial, & Light IndustrialEN61000-4-2 ESD (15kV air & 4kV contact)EN61000-4-3 RFIEN61000-4-4 EFTEN61000-4-5 SurgeEN61000-4-6 CIEN61000-4-8 Power Frequency MagneticVoltage Dips & InterruptionsEN61000-4-11Regulatory ApprovalsROHS and WEEE CompliantTable 3. CertificationsELECTROSTATIC DISCHARGE PRECAUTIONS Electrostatic discharge (ESD) can cause damage to any product, add-in modules or stand-alone units, containing electronic components. Always observe the following precautions when installing or handling these kinds of products:Do not remove unit from its protective packaging until ready to install. Wear an ESD wrist grounding strap before handling any module or component. If the wrist strap is not available, maintain grounded contact with the system unit throughout any procedure requiring ESD protection. Hold the units by the edges; do not touch the electronic components or gold connectors.After removal, always place the boards on a grounded, static-free surface, ESD pad or in a proper ESD bag. Do not slide the modules orstand-alone units over any surface. WARNING! Integrated circuits and fiber optic components are extremely susceptible to electrostatic dischargedamage. Do not handle these components directly unless you are a qualified service technician and use tools andtechniques that conform to accepted industry practices.FIBER OPTIC CLEANING GUIDELINESFiber optic transmitters and receivers are extremely susceptible to contamination by particles of dirt or dust, which can obstruct the optic path and cause performance degradation. Good system performance requires clean optics and connector ferrules.Use fiber patch cords (or connectors, if you terminate your own fiber) only from a reputable supplier; low-quality components can cause many hard-to-diagnose problems in an installation.Dust caps are installed at B+B SmartWorx to ensure factory-clean optical devices. These protective caps should not be removed until the moment of connecting the fiber cable to the device. Should it be necessary to disconnect the fiber device, reinstall the protective dust caps.Store spare caps in a dust-free environment such as a sealed plastic bag or box so that when reinstalled they do not introduce any contamination to the optics.If you suspect that the optics have been contaminated, alternate between blasting with clean, dry, compressed air and flushing with methanol to remove particles of dirt.CERTIFICATIONSCE: The products described herein comply with the Council Directive on Electromagnetic Compatibility (2004/108/EC). For further details, contact B+B SmartWorx.European Directive 2002/96/EC (WEEE) requires that any equipment that bears this symbol on product or packaging must not be disposed of with unsorted municipal waste. This symbol indicates that the equipment should be disposed of separately from regular household waste. It is the consumer’s responsibility to dispose of this and all equipment so marked through designated collection facilities appointed by government or local authorities. Following these steps through proper disposal and recycling will help prevent potential negative consequences to the environment and human health. For more detailed information about proper disposal, please contact local authorities, waste disposal services, or the point of purchase for this equipment.____________________________________________________© 2017 B+B SmartWorx. All rights reserved. The information in this document is subject to change without notice. B+B SmartWorx assumes no responsibility for any errors that may appear in this document. IE-MiniMc is a trademark of B+BSmartWorx. Other brands or product names may be trademarks and are the property of their respective companies.Document #: 55-80722-00-A8_1017。
笔记本内置网卡(MINI PCI-E)天线网卡的接法
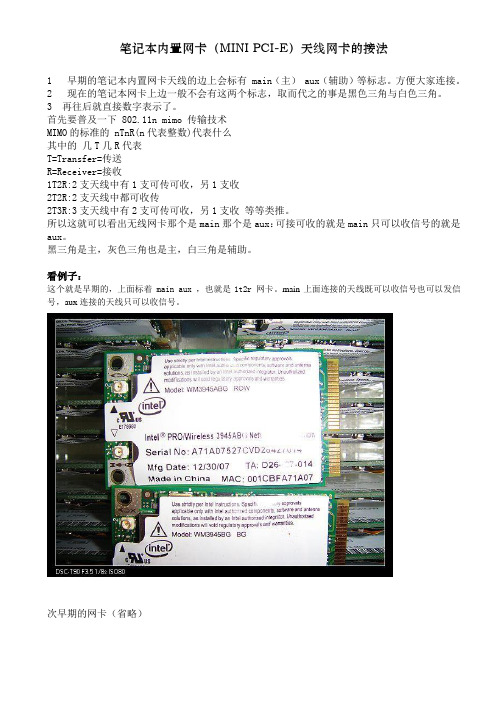
笔记本内置网卡(MINI PCI-E)天线网卡的接法1 早期的笔记本内置网卡天线的边上会标有 main(主) aux(辅助)等标志。
方便大家连接。
2 现在的笔记本网卡上边一般不会有这两个标志,取而代之的事是黑色三角与白色三角。
3 再往后就直接数字表示了。
首先要普及一下 802.11n mimo 传输技术MIMO的标准的 nTnR(n代表整数)代表什么其中的几T几R代表T=Transfer=传送R=Receiver=接收1T2R:2支天线中有1支可传可收,另1支收2T2R:2支天线中都可收传2T3R:3支天线中有2支可传可收,另1支收等等类推。
所以这就可以看出无线网卡那个是main那个是aux:可接可收的就是main只可以收信号的就是aux。
黑三角是主,灰色三角也是主,白三角是辅助。
看例子:这个就是早期的,上面标着main aux ,也就是1t2r网卡。
main上面连接的天线既可以收信号也可以发信号,aux连接的天线只可以收信号。
次早期的网卡(省略)下面这个是目前常见的网卡,可以看到数字,上面的tr已经标明了,tr1代表第一个可以接收与发送信号的接口;tr2代表第二个可以接收与发送信号的接口;r0代表这个端口只可以接收信号:结论:TR 代表主天线接口,意味着这个接口连接天线后就可以收信号与发信号;R代表辅助天线接口,意味着这个就口连接天线后只能收信号不能发信号。
接口旁边字体比较大的数字是为了标志顺序,从1到3接天线(上图)tr接口排在数字前段 r 接口排在后段。
如果是3t3r的网卡,则从1到3全部是t接口(可发可收)。
接口旁边的main aux aux1 aux2...也是为了表明顺序从main到aux分别代表1 2...接法按数字标识的接口。
接口旁边的三角也是为了表明顺序,白三角代表1号口;灰三角2号口;黑三角3号口。
接法按数字接法如上。
如果大家笔记本上面的天线数量>=(大于等于)网卡上接口的数量,那就好办了:用天线把网卡接口插满;如果大家笔记本上面的天线数量< (小于)网卡上接口的数量呢,尽量往带t的接口上插,因为这个接口既可以发信号也可以收信号,可以显著提升带宽。
mac mini 的用法

mac mini 的用法Mac Mini的用法什么是Mac Mini?Mac Mini是一款由苹果公司设计和生产的台式电脑。
它是Mac系列中最小、最轻的机型,尺寸仅有20cm×20cm×,非常便携且占用空间小。
虽然Mac Mini体积小,但配置却十分强大,配备了各种高性能组件,适合各种办公和娱乐需求。
Mac Mini的用途以下是一些Mac Mini的常见用途:1.家庭娱乐中心Mac Mini可以连接电视或显示器,通过其HDMI接口进行视频输出。
你可以使用它来观看在线视频、播放数字媒体文件,并通过其内置的蓝牙和Wi-Fi功能进行在线流媒体。
还可以连接音响设备,将Mac Mini打造成完美的家庭娱乐中心。
2.工作站Mac Mini非常适合作为工作站使用。
你可以连接显示器、键盘和鼠标,进行办公工作、网页浏览、邮件处理等任务。
同时,Mac Mini配备的处理器和内存可以轻松应对多任务处理,提高工作效率。
3.服务器由于尺寸小巧,Mac Mini非常适合用作服务器。
你可以在家中或办公室中搭建一个私人云服务器,用于存储和共享文件,备份数据,甚至搭建个人网站。
通过配置服务器软件,如macOS Server,你可以轻松地管理和共享文件、远程访问等。
4.软件开发和测试Mac Mini也是一台非常适合软件开发和测试的机器。
你可以在上面安装各种开发工具,如Xcode、Visual StudioCode等,编写和测试软件代码。
此外,Mac Mini具有强大的图形处理能力,适用于游戏开发和图形渲染等领域。
5.家庭办公如果你需要在家中进行办公工作,Mac Mini可以是一个理想的选择。
你可以连接外部显示器、键盘、鼠标和打印机,创建一个高效的工作环境。
而且,Mac Mini的静音设计能够确保你在工作时不会受到噪音的干扰。
6.个人媒体中心Mac Mini可以存储和播放大量的音乐、电影和照片等个人媒体文件。
你可以使用iTunes等软件管理和同步你的媒体库,并通过AirPlay功能将内容投射到其他设备上。
iPadmini使用说明书

iPadmini使⽤说明书⽬录7 第1 章:iPad 概览7 iPad 概览8 配件9 按钮10 SIM 卡托架11 状态图标13 第2 章:使⽤⼊门13 操作须知13 设置iPad13 Apple ID14 设⽴邮件帐户和其他帐户14 管理iPad 上的内容14 使⽤iCloud15 将iPad 连接到电脑16 与iTunes 同步16 在iPad 上查看此使⽤⼿册17 第3 章:基本功能17 使⽤应⽤程序20 ⾃定iPad21 键⼊24 听写25 搜索26 通知27 共享28 将iPad 连接到电视机或其他设备28 使⽤AirPrint 打印29 蓝⽛设备30 ⽂件共享30 安全功能31 电池33 第4 章:Siri36 影⽚37 体育37 听写37 纠正Siri239 第5 章:Safari41 第6 章:邮件41 阅读邮件42 发送邮件42 整理邮件43 打印邮件和附件43 邮件帐户和设置45 第7 章:信息45 发送和接收信息46 管理对话46 发送照⽚、视频等等46 “信息”设置47 第8 章:FaceTime 49 第9 章:相机49 概览50 查看、共享和打印50 编辑照⽚和修剪视频51 第10 章:照⽚51 观看照⽚和视频52 整理照⽚和视频52 照⽚流53 共享照⽚和视频53 打印照⽚54 电⼦相框54 导⼊照⽚和视频55 第11 章:Photo Booth 55 拍照55 管理照⽚60 使⽤多个⽇历60 共享iCloud ⽇历61 “⽇历”设置62 第14 章:通讯录62 概览63 添加联系⼈63 “通讯录”设置64 第15 章:备忘录64 概览⽬录365 第16 章:提醒事项67 第17 章:时钟68 第18 章:地图68 查找位置69 获取路线70 3D 视图和Flyover 视图70 “地图”设置71 第19 章:⾳乐71 获取⾳乐71 播放⾳乐72 Podcast 和有声读物73 播放列表73 Genius73 Siri74 iTunes Match74 家庭共享75 ⾳乐设置76 第20 章:iTunes Store 78 第21 章:App Store78 概览79 删除应⽤程序80 第22 章:报刊杂志81 第23 章:iBooks82 与多媒体进⾏互动82 学习笔记和词汇列表83 整理书架83 同步图书和PDF83 打印PDF 或⽤电⼦邮件发送PDF84 iBooks 设置85 第24 章:Podcast87 第25 章:Game Center87 概览88 与朋友⼀起玩游戏88 Game Center 设置89 第26 章:辅助功能89 辅助功能89 V oiceOver96 Siri96 连按三次主屏幕按钮96 缩放⽬录497 ⼤⽂本97 反转颜⾊97 朗读所选项97 朗读⾃动⽂本97 单声道⾳频97 可指定的铃声97 引导式访问98 AssistiveTouch98 OS X 中的辅助功能98 邮件的最⼩字体⼤⼩99 宽屏幕键盘99 隐藏式字幕100 第27 章:设置100 飞⾏模式100 ⽆线局域⽹101 VPN102 蜂窝移动数据102 勿扰模式和通知103 通⽤106 声⾳107 亮度与墙纸107 电⼦相框107 隐私108 附录A: iPad 商务应⽤108 iPad 在企业中的使⽤108 使⽤配置描述⽂件108 设置Microsoft Exchange 帐户108 VPN 访问109 LDAP 和CardDA V 帐户110 附录B: 国际键盘110 使⽤国际键盘110 特殊输⼊法112 附录C: 安全、操作与⽀持112 重要安全信息113 重要处理信息114 iPad ⽀持114 出现“电池电量不⾜”图像或“不在充电”信息114 iPad 不响应114 重新启动iPad 和将它复位115 显⽰“密码不正确”或者“iPad 已停⽤”115 显⽰“iPad 不⽀持此配件”115 应⽤程序未填满屏幕115 屏幕键盘不出现115 备份iPad116 更新和恢复iPad 软件⽬录5117 发送、接收或查看电⼦邮件118 声⾳、⾳乐和视频119 iTunes Store 和App Store119 了解更多信息以及服务与⽀持120 处理和回收信息7阅读本章以了解iPad 的功能以及如何使⽤各个控制等更多内容。
Mac电脑使用教程
Mac电脑使用教程第一章:Mac电脑简介和购买指南在这一章节中,我们将介绍Mac电脑的基本信息和购买指南。
我们将讨论不同类型的Mac电脑及其适用场景,以及如何选择适合自己需求的Mac电脑。
第二章:Mac电脑的基本操作与设置在这一章节中,我们将介绍Mac电脑的基本操作与设置。
我们将讨论如何使用触控板、键盘快捷键以及系统设置,帮助用户快速上手Mac电脑,并进行个性化设置以满足自己的需求。
第三章:Mac电脑的文件管理和备份在这一章节中,我们将介绍Mac电脑的文件管理和备份功能。
我们将讨论如何使用Finder管理文件和文件夹,以及如何使用Time Machine进行文件的备份和恢复,确保用户的数据安全。
第四章:Mac电脑的应用程序使用在这一章节中,我们将介绍Mac电脑的常用应用程序的使用方法。
我们将讨论如何使用Safari浏览器进行网上冲浪,如何使用Mail发送和接收电子邮件,以及如何使用iWork套件进行文档处理、演示和电子表格操作。
第五章:Mac电脑的创意和娱乐应用在这一章节中,我们将介绍Mac电脑的创意和娱乐应用。
我们将讨论如何使用iMovie进行视频编辑,如何使用GarageBand进行音频录制和编辑,以及如何使用Photos进行照片编辑和管理。
第六章:Mac电脑的网络和安全在这一章节中,我们将介绍Mac电脑的网络和安全功能。
我们将讨论如何设置和管理无线网络连接,如何使用防火墙保护自己的电脑,以及如何使用密码管理器安全存储和管理密码。
第七章:Mac电脑的故障排除与维护在这一章节中,我们将介绍Mac电脑的故障排除和维护技巧。
我们将讨论常见的问题和解决方案,如何进行系统更新和软件更新,以及如何优化Mac电脑的性能。
结语通过本教程,我们希望能够帮助读者更好地理解和使用Mac电脑。
从基本操作到高级功能,从文件管理到应用程序使用,我们的目标是让您能够充分发挥Mac电脑的潜力,提升工作效率和生活质量。
如果您有任何问题或建议,请随时与我们联系。
macmini 玩法

macmini 玩法
Mac Mini 是一款由苹果公司推出的台式电脑产品,它可以用于
各种不同的用途和玩法。
以下是一些常见的 Mac Mini 玩法:
1. 日常办公,Mac Mini 可以作为一台高性能的办公电脑,用
于处理文件、浏览互联网、发送电子邮件、视频会议等日常办公任务。
它可以运行各种办公软件,如Microsoft Office套件、Adobe
创意套件等。
2. 制作音乐和视频,由于Mac Mini配备了强大的处理器和图
形性能,它非常适合用来制作音乐和视频。
用户可以使用各种专业
的音乐制作软件和视频编辑软件,如Logic Pro X、Final Cut Pro 等。
3. 互联网浏览和娱乐,Mac Mini 也可以作为家庭娱乐中心使用,用户可以通过连接电视或显示器来观看流媒体视频、玩游戏、
浏览互联网等。
4. 服务器用途,由于Mac Mini具有较小的体积和低功耗设计,它也可以用作服务器,用于托管网站、文件共享、数据备份等用途。
5. 虚拟化和开发,对于技术爱好者和开发人员来说,Mac Mini 也可以作为一台用于虚拟化环境和软件开发的平台,用户可以在其上安装虚拟化软件和开发工具,进行软件开发和测试。
总的来说,Mac Mini 是一款功能强大、灵活多样的台式电脑产品,可以满足用户在不同领域的需求和玩法。
用户可以根据自己的需求和兴趣,充分发挥Mac Mini的潜力,体验其中不同的玩法和用途。
苹果电脑使用全攻略
苹果电脑使用全攻略本人使用苹果机也有一段时间了,积累了一些东西与大家分享,同时也为了更多的人少走弯路,让大家了解苹果并且使用苹果,我写了以下内容。
如果内容有误,请大家指出。
一:苹果电脑的一些基本概念(1)苹果电脑使用的操作系统是MAC OS X ,最新的版本代号是Tiger。
她是基于开放源码的Darwin UNIX计划, 也就是说MAC OS X实际上是一个UNIX操作系统, UNIX向来以工作稳定效率高但是难于学习著称, 苹果MAC OS X利用了UNIX系统稳定高效的特点, 又通过自己专门设计的Aqua操作界面完美地解决了易用性问题,使OS X成为最易用的操作系统之一。
(2)MAC OS X与windows的主要区别是:windows程序不能在苹果机上直接运行, 因为苹果机的CPU是PowerPC,运行windows软件需要通过虚拟机来模拟,而且模拟效率不好, 所以不推荐, 建议应急用。
(3)Apple Care,苹果维护保修,别名:苹果保鲜。
苹果公司提供的苹果保鲜是全球性有效!购买全新苹果电脑产品,苹果公司提供一年有限责任的苹果全球维护保修保证。
自带的一年期有限责任苹果维护保修保证完结之前,可于当地认可的苹果代理经销商,自行购买二年期限的有限责任苹果维护保修保证。
苹果保鲜适用于任何型号的苹果电脑和配套液晶显示器。
(4)苹果有微软为其开发的OFFICE软件,最新的版本是OFFICE 2004,她包括word,po erpoint,excel,m sn,virtual pc。
因此苹果在文字处理方面没有任何的不方便。
苹果也有QQ,国内的苹果爱好者自己开发了两个QQ软件:渤麦堂的ISQ和清华版的IQQ,但是这里没有QQ游戏,功能也仅限于文字聊天。
(5)由于苹果使用UNIX内核,因此苹果机非常稳定。
并且苹果机的保有量比较少,病也主要是针对windows系统,目前来讲,苹果病毒几乎没有。
(6)苹果操作系统没有英文版与中文版之分,她是多国语言的操作系统,可以任意调,非常适合学习外文。
Mac mini 快速启动指南说明书

Hello. Quick Start GuideWelcome to your new Mac mini.Let us show you around.This guide shows you what’s on your Mac, helps you set it up, and gets you up and running with tips for the apps you’ll use every day.SDXCTransfer photosfrom your camera’smemory cardThunderbolt 2Connect externaldisplays and high-performance devicesTo learn more about ports and connectors, go to /kb/HT2494.Built-inpower supplyGigabit EthernetConnect to theInternet or alocal networkPowerbuttonHeadphonePlug in headphonesor external speakersAudio inAC power cordLet’s get startedPress the power button to start up your Mac mini, and Setup Assistant guides you through a few simple steps to get you up and running. It walks you through connecting to your Wi-Fi network and creating a user account. And it can even transfer your documents, email, photos, music, and movies to your new Mac from another Mac or PC.Sign in with your Apple ID in Setup Assistant. This sets up your account in the Mac App Store and the iTunes Store, and in apps like Messages and FaceTime, so they’re ready the first time you open them. It also sets up iCloud, so apps such as Mail, Contacts, Calendar, and Safari have all your latest information. If you don’t have an Apple ID, create one in Setup Assistant.To learn more about transferring files to your new Mac, go to /kb/HT6408.Get to know your desktopThe desktop is where you can find everything and do anything on your Mac. The Dock at the bottom of the screen is a place to keep the apps you use most. It’s also where you can open System Preferences, which lets youcustomize your desktop and other settings. Click the Finder icon to get to all your files and folders.The menu bar at the top has useful information about your Mac. To check the status of your wireless Internet connection, click the Wi-Fi icon. Your Mac automatically connects to the network you chose during setup. You can also find anything on your Mac and look up information using Spotlight.Menu bar DockSystem PreferencesDock.Browse the Mac App Store Click the icon in the dock.Find the app you wantYour Mac comes with great apps you can use to make the most of your photos, create documents, browse the web, and more. Use Launchpad to easily find all the apps on your Mac. Arrange apps any way you want and even group them in folders.Find new apps on the Mac App Store. When you download an app you like, it appears in Launchpad. The Mac App Store lets you know when app and OS X updates are available, and can update them automatically.Be up to date across all your devicesiCloud lets you access your music, photos, calendars, contacts, documents, and more from your Mac, iOS devices, and even your PC. It keeps everything up to date automatically.Create a Pages document, take a photo, or buy a song with one device, and it’s instantly available on all the others. With iCloud Drive, you can store your files in iCloud and organize them any way you like. Family Sharing makes it easy to share family members’ iTunes Store, App Store, and iBooks Store purchases. iCloud helps you locate and protect your Mac if you misplace it. To choose the iCloud features you want, click System Preferences in the Dock and click iCloud.Use your Mac and iOS devices togetherWhen you sign in to iCloud on your Mac and iOS devices* they recognize when they’re near each other, enabling amazing features. You can make and receive iPhone calls on your Mac, using your Mac as a speakerphone. SMS messages sent to your iPhone appear in Messages on your Mac, so you can keep track of all your conversations. With Instant Hotspot, your Mac can automatically use the personal hotspot on your iPhone. And with Handoff, you can start an activity on your Mac and pick it up right where you left off on your iOS device—and vice versa.*Requires a device running iOS 8. Your Mac and iOS device must be signed in to the same iCloud account.HandoffAn app icon appears in the Dock when an activity is handed off to your Mac.iPhone callsMake an iPhone call or send a text message by clicking a phone number on your Mac.Safari is the best way to surf the web on your Mac. Just click in the Smart Search field and see icons for your favorite websites, or type a search term or web address—Safari knows the difference and will send you to the right place. You can save pagesSafarito your Reading List to read later, and check out Shared Links for pages posted by people you follow on Twitter and LinkedIn. The Tab view organizes all of your tabs and makes it easy to locate the one you’re looking for.MailMail lets you manage all your email accounts from a single, ad-free inbox. It works with popular email services like iCloud, Gmail, Yahoo Mail, and AOL Mail. With Mail Drop, large attachments are automaticallyuploaded to iCloud. And Markup lets you fill out and sign forms or annotate a PDF. The first time you open Mail, Setup Assistant helps you get started.CalendarKeep track of your busy schedule with Calendar. You can create separate calendars—one for home, another for school, and a third for work. See all your calendars in a single window, or choose to see just the ones you want. Create and send invitations to events, then see who has responded. Add a location to an event, and Calendar will include a map, calculate travel time, and even display the weather forecast. Use iCloud to automatically update calendars on all your devices or share calendars with other iCloud users.MapsExplore new destinations and get directions on your Mac with Maps. View locations using standard or satellite imagery, or use Flyover to soar through select cities in photorealistic 3D. You can look up information for local points of interest like restaurants and hotels, and Maps shows you phone numbers, photos, and even Yelp reviews. Once you find your destination, Maps provides point-to-point directions that you can send to your iPhone for turn-by-turn voice navigation.SpotlightSpotlight is an easy way to find anything on your Mac—documents, contacts, apps, messages, and more. No matter what you’re doing on your Mac, you can access Spotlight through its menu icon or by using the Command-Space keyboard shortcut. Just start typing, and Spotlight shows you rich previews of your results. You can use Spotlight to look up information from sources like Wikipedia, Bing, news, Maps, movies, and more,* and to convert currencies and units of measure.iTunesiTunes makes it easy to enjoy your favorite music, movies, TV shows, and more on your Mac. iTunes includes the iTunes Store, where you can find classics or new favorites. It also includes iTunes Radio, a great way to discover music.iPhoto, iMovie, and GarageBandiPhoto, iMovie, and GarageBand give you amazing ways to create and share your photos, movies, and music. iPhoto helps you organize your library by Faces, Places, and Events, and create gorgeous photo books, cards,and calendars. iMovie lets you turn your home videos into beautiful movies and epic Hollywood-style trailers. And GarageBand has everything you need to learn to play an instrument, write music, or record a song.Pages, Numbers, and KeynoteCreate stunning documents, spreadsheets, and presentations on your Mac. Beautiful templates give you a great head start—simply add your own words and photos. And customizing everything is a snap with the context-sensitive Format Panel. You can even open and edit Microsoft Office files. And you can quickly and easily share a link to your work with Mail or Messages, right from your toolbar.Not all features are available in all areas.TM and © 2014 Apple Inc. All rights reserved. Designed by Apple in California. Printed in XXXX. 034-00123-AAn important notePlease read this document and the safety information in the Important Product Information Guide carefully before you first use your computer.Learn moreYou can find more information, watch demos, and learn even more about Mac mini features at /mac-mini .HelpYou can often find answers to your questions, as well as instructions and troubleshooting information, in Mac Help. Click the Finder icon, click Help in the menu bar, and choose Mac Help. You can also use Safari to get online help at /support .OS X UtilitiesIf you have a problem with your Mac, OS X Utilities can help you restore your software and data from a Time Machine backup or reinstall OS X and Apple apps. If your Mac detects a problem, it opens OS X Utilitiesautomatically. Or you can open it manually by restarting your computer while holding down the Command and R keys.SupportYour Mac mini comes with 90 days of technical support and one year of hardware repair warranty coverage at an Apple Retail Store or an Apple Authorized Service Provider. Visit /support/macmini for Mac mini technical support. Or call 1-800-275-2273. In Canada, call 1-800-263-3394.。
Mac mini (Early 2006) 使用手册 Mac_mini_UG-Early2006
आྑਁ؇Ӧ
ཱࣞෝሢ Mac mini
؝1 ᇅ ൔႬೊ
15
൲Օ గ ײMac mini ൌĩೆ ݘൔ Ⴌ qഥᇆ ᇽড়rণԲ ൿྔ ༓ĩᄹ ޮग़ၟ ൔႬ qላၑᇽড়rণԲൿྔ༓dչऻ qႏႬӵ࿁r໗ࡵࡇĩչऻ qႬӵ࿁r ĩಚޮ৹ σ qላၑᇽড়rїd ቡೆ ݘୡၟ ޮᄠ ൔႬ qላ ၑᇽ ড়rণԲ ൿ ྔ༓ĩ౬ ಖ ֩ࣼ ࢤࢀ ഌ֩ ĩ FileVault ĥ໗ࡵАཆཕĦܵтdဵܵт FileVaultĩ౬࿎ಀ Apple () >q༦ძᇆr σ qρಊr ĩಚޮσᅺଢᆻ൙࣍ྟҤቘd ೆݘୡૄႹԲൿອഥᇆĩᄹ qഥᇆᇽড়rߒग़ၟႈ֡ୡഥᇆ Mac mini ၟ৹ࢨᇄ Internet dؗჃࡉ๚Ⴌ߀ĩInternet ٤ໝྷဵ၆۵ Internet ڟ༄ุ܆ഉ (ISP) ෲุ֩܆ ᅯ߀dᆇग़ୃྷဵٲ ڵdೆݘୡႹ၆۵ Internet ᅯ߀ĩ౬ҙᄋֿ 77 ှڼ੧ C q৹ ࢨᇄ Internet r ĩၟਘࢷྷဵൿೊଫླྀྔ༓d
7 8 9 15 17 19 20 22 24 25 26 27 28 29 29 30 31
3
31 ֖ႏႬӵ࿁҆ཝႏൌ 33 34 35 39 41 43 45 47 48 50 54 55 56 58 59 62 63 ؝3 ᇅķᄊ Mac mini ৹ࢨཅ൙చࠋ൮ഥХ ൔႬ Apple Remote ီ३చ ވFront Row ൔႬ USB ൔႬ FireWire ࣍ྟ৹ࢨ ਘࢷ AirPort Extreme ཐ৷ອ ൔႬ Bluetooth ཐ࠳ඐ ৹ࢨᇄၟขອ ৹ࢨၿഥХ ൔႬܿ౾ײచ ١ᆼ Mac mini Ш֦ ؝4 ᇅķႲकו ൔୡىൔႬ֩ໝู ᇛྑρሑڼտ֩ೌࡵ ఇ෴ໝู ൔႬ Apple Hardware Test ᅷ֢Ӆ࿁ਝހ
macmini说明书

显示搜索结果的丰富预览内容。您可以使 用 Spotlight 查找诸如维基百科、必应、 新闻、“地图”、影片等来源的信息*,还 可转换货币和计量单位。
iTunes
iTunes 可让您在 Mac 上轻松欣赏喜爱的 音乐、影片、电视节目等。iTunes 包括 iTunes Store,您可以在其中找到经典或
iPhone 通话 通过在 Mac 上点按电话号 码进行 iPhone 通话或发送 文本信息。
Hando∂ 当有活动转移到 Mac 上时, 该应用程序图标会显示在 Dock 中。
若要了解将文件传输到您的新 Mac 的更多信息,请访问 /kb/HT6408?viewlocale=zh_CN。
在所有设备上保持最新 iCloud 可让您从 Mac、iOS 设备,甚至 PC 访问音乐、照片、日历、通讯录、文稿等 等。它会让所有内容自动保持最新。
在一台设备上创建的 Pages 文稿、拍摄的照片或购买的歌曲,在其他所有设备上立即可 用。借助于 iCloud Drive,您可以将文件储存到 iCloud,并按您想要的方式进行整 理。“家人共享”则可轻松共享家庭成员的 iTunes Store、App Store 和 iBooks Store 购买项目。如果找不到 Mac,iCloud 可帮助您定位和保护它。若要选取想使用的 iCloud 功能,请在 Dock 中点按“系统偏好设置”,然后点按“iCloud”。
mini-pro 用户手册说明书
用户手册文件编号:RGB-RD-UM-mini-pro C000版本:V1.0目录声明 (4)第一章产品简介 (6)1.1随附配件 (6)1.2产品概述 (7)1.2.1主要特点 (7)1.2.2前面板图示 (8)1.2.3接口面板图示 (9)1.2.4外形尺寸图 (10)第二章产品安装 (11)2.1连接电源 (11)2.2连接信号源 (11)2.3连接监看设备 (12)2.4连接麦克风和外接监听设备 (12)2.5连接USB作为网络信号源 (13)2.6连接计算机 (13)2.7打开mini-pro (14)第三章产品使用 (15)3.1触摸屏操作 (15)触摸屏简介 (15)划屏功能 (15)预设调用菜单 (16)3.2信号直切 (16)设置切换特效 (16)设置切换时长 (17)3.3信号预监切换与多画面分割监看 (17)3.4画中画设置 (17)设置画中画布局 (18)设置图层大小 (18)3.4预设场景的保存和快捷调用 (18)3.5视频输出设置 (19)HDMI输出 (19)USB输出 (20)3.6音频设置 (21)3.7抠图设置 (22)3.8PTZ控制与预设位置保存 (23)3.9连接USB进行硬盘录制 (24)第四章网络推流 (26)4.1OBS推流 (26)4.2VMix推流 (30)4.3钉钉直播 (31)4.4腾讯会议直播 (32)4.5飞书会议直播 (33)第5章XPOSE mini软件操作 (35)5.1.连接mini与电脑 (35)使用网线直接连接 (35)使用静态直连 (36)使用路由器无线连接 (37)5.2使用XPOSE mini (38)搜索设备 (38)PTZ摄像头设置 (39)色度抠图 (40)测试模式 (40)密码保护 (41)T-Bar校正 (41)流媒体 (42)5.3升级指导 (43)第六章订购编码 (45)6.1产品编码 (45)第七章附录 (46)7.1规格 (46)7.2FAQ (47)7.3术语和定义 (48)7.4修订记录 (54)第八章技术支持 (55)首先感谢您选购我们的产品!为了让您迅速掌握如何使用这款创意拼接器,我们为您送上了详细的产品使用手册。
Mac mini快捷键
MAC电脑操作快捷键注:command即苹果键,也有人称为花键。
ctrl即control键。
escape即键盘左上角的esc键。
space空格键。
屏幕捕捉快捷键动作:保存到-快捷键全屏捕捉-桌面(.pdf文件):command + shift + 3屏幕部分画面-桌面(.pdf文件):command + shift + 4窗口、图标-桌面(.pdf文件):1. command + shift + 4 2. 空格全屏捕捉-剪贴板:ctrl + command + shift + 3屏幕部分画面-剪贴板:ctrl + command + shift + 4窗口、图标-剪贴板: 1. ctrl + command + shift + 4 2. 空格动作:-快捷键程序冻结快捷键停止进程-command + 小数点强制退出程序-command + option + escape强制重新启动-command + ctrl + 电源键启动时的快捷键启动为安全模式-shift (在开机提示音后)阻止自动登录-shift (显示进度条时)阻止启动项目-shift (登录过程中)从光盘启动系统-c火线目标盘模式-t从网络映像启动-n选择启动磁盘-option清除参数存储器(pram) command + option + p + r启动为verbose 模式-command + v启动为单用户模式-command + s打开主板固件-command + option + o + ffinder 快捷键隐藏finder-command + h隐藏其它程序-command + option + h清空废纸篓-command + shift + delete清空废纸篓(不提示)-command + option + shift + delete获取简介(静态窗口) -command + i获取简介(动态窗口) -command + option + i查找 mand + f弹出-command + e显示查看选项-command + j转到计算机-command + shift + c转到home-command + shift + h转到idisk-command + shift + i转到应用程序目录-command + shift + a转到个人收藏-command + shift + f转到目录 ... command + shift + g连接服务器 ... command + k注销... -command + shift + q注销(无提示) -command + option + shift + qfinder中的图标快捷键选择下一图标-方向键按首字母选择图标-字母键选择下一个(升序)-tab添加选择图标-shift + 点击选择连续的图标(列表模式)-shift + 点击选择不连续的图标(列表模式)-command + 点击编辑图标名称-return文件及目录的快捷键拷贝项目-option + 拖动项目复制#-command + d创建替身(鼠标方式)-command + option + 拖动创建替身(命令方式) -command + l (l)显示替身的原身-command + r添加到个人收藏-command + t对齐项目-command + 拖动在新窗口中打开目录-command + 双击打开项目-command + 下方向键关闭目录(并返回上层目录) -command + 上方向键打开目录(列表模式) -option + 右方向键关闭目录(列表模式)-option + 左方向键打开选择的目录中的所有目录(列表模式-command + option + 右方向键关闭选择的目录中的所有目录(列表模式)-command + option + 左方向键删除项目-command + delete窗口快捷键新的finder 窗口-command + n关闭当前窗口-command + w最小化当前窗口-command + m关闭所有窗口-option + 点击关闭按钮或command + option + w最小化所有窗口-option + 点击最小化按钮全屏-option + 点击缩放按钮隐藏当前程序-option + 点击(desktop, dock item, ...) 移动未激活窗口-command + 拖动窗口显示为图标-command + 1显示为列表-command + 2显示为分栏-command + 3显示/隐藏工具栏-command + b查看并选择当前目录的路径-command + 点击窗口标题dock快捷键在finder中显示项目-command + 点击dock 项目切换dock-ctrl + d导航-左、右方向键或tab, shift + tab打开项目-space, return, enter隐藏/显示dock-command + option + d用户进程快捷键浏览激活的应用程序-command + tab逆向浏览-command + shift + tab对话框快捷键选择下一区域- tab选择默认按钮- return 或enter关闭对话框- esc 或command + 小数点选择上层/下层目录(保存, 打开对话枉)-上、下方向键向上滚动(列表方式) - page up向下滚动(列表方式) - page down输入光标移动到行首-上方向键输入光标移动到行末-下方向键全键盘操作打开完全键盘操作-ctrl + f1任意控制对话框及窗口-ctrl + f7高亮下一控制-tab高亮下一控制(文本框) -ctrl + tab高亮下一窗口-command + ‘高亮项目、表单或菜单-方向键移动滚动条及按钮-方向键高亮控制相邻的文本框-ctrl + 方向键选择高亮项目-空格键默认点击动作-return 或enter点击取消按钮-esc不选择项目关闭窗口-esc反转高亮移动顺序-shift + "key"动作(使用功能键) 快捷键菜单条-ctrl + f2dock - ctrl + f3浏览窗口-ctrl + f4 (ctrl + shift + f4) 工具栏-ctrl + f5实用程序-ctrl + f6动作(使用字母键) 快捷键菜单条-ctrl + mdock - ctrl + d浏览窗口-ctrl + w (ctrl + shift + w) 工具栏-ctrl + t实用程序-ctrl + u。
iPod mini 使用手册
2ૅ35ೊྺᆭ 8ᄡ iPod mini ഌѰ٦ၿ֩ල۵҈ᇫ 12iPod m ini 12ൔႬ iPod m ini ३ᇉ୪ 18৹ࢨވؒऻ iPod m ini 22ᆠড়ވԲൿၿ 29לࢯ iPod m ini ഥᇆ 33ൔႬ iPod m ini ֩ڼࡊ܃ୃ 37۷ iPod m ini ԁԍ 40iPod m ini னࡵ 445052iPod miniiPod miniiPod mini ဵეiPod CD ܿᇓЋݧ֩iTunes ၿೌࡵனފൔႬdୡग़ၟൔႬࢀCD ܿࠋખၿࣞ࿎ᇓ֩ۧ౻ൿೊĩࠋൔႬiTunes ၿഉĥ࣋ႬჃଚླྀݗࡉࠋֽ౹Ħܗઝۧ౻ѭࢀఇ༳ᄟ֢ୡ֩ഌĩಚޮᆠড়ᆇླྀۧ౻ѭࢀૐiPod mini౬ᄋЫᅧĩၟѐॽිഥᇆѰ٦ၿၟࠧൔႬఇ෴ଚླྀ܃ୃ֩ۻأྔ༓ĩ౬ҙᄋֿiPodဵࠊ֨ႹܵࢀၿԲൿᇄଚླྀݗࡉࠋֽ౹ĦiPod mini҆࣋࣋ൢၿѰ٦చdൔႬܿࠋખၿࣞ࿎ᇓ֩న൲ۧ౻խԩᇄiTunes ၿഉࠋO n-The-Go rѰ٦ਝњᇓ֩ၿ႓ᅿMacintosh ൪ᄊ•MacintoshĩனХķ•ୁࡽ۞܃ੵUSB 2.0•ࠋୁࡽFireWireiPod miniဵഥᇆiPod miniĩ౬ൔႬiPod CD ܿρሑೌࡵĩѭ՚ၿiTunes ၿĥ࣋ႬჃଚླྀݗࡉࠋֽ౹Ħܗઝۧ౻dԍ֩ൌࢀۧ౻ԲൿᇄiPod miniĩಚޮऀग़ၟऻൗ๔ၿਘd iPod CD ܿҰೊѭρሑೆݘୡࢀၿԲൿᇄĩೆݘୡࢨೊਘInternetĩᄹग़ၟൔႬdୡग़ၟᛖযӕݚ၆Ϩວ൲֩ۧ౻ѭग़ၟؗಭމ၆൲ۧ౻൯๔: iPod miniൔႬڼտ֩iPod Dock Connector to USB 2.0 Cable ࢀUSB 2.0 ؎५d၆ဵࢀᇄე৹ࢨ֩Ⴙ჻ĥೆӌᄡࡳࠋఇ෴ທ຺ഥХഌᅷ֢֩ମླྀ؎५Ħതிᄊ؇Үබࡩུ൪تஙםᄗܼݡ:ۧ౻ԲൿຟӲޮĩୡऀग़ၟiPod mini ഌؒऻdᄋ༳၆ᅧၟਘࢷႹܵൔވఇ෴iPod mini ३ᇉ୪ ࢀiPod mini ѭ࣍ྟܹড় ൔႬனࡵ֩ۻأྔ༓d12ᄊiPodmini iPod miniiPodm iniiPod mini σ༳ಭމσ୪ग़ၟչऻ iPodm ini d ᇺҖ֊ߺཅ൙d ୡग़ၟൔႬσ൘ላވ࿎ᄸσ୪ণᛖযଢҖ֊ Ѱ٦ۧ౻ ۻۃഥᇆވཅ൙ྔ༓d Ⴌଛᆻౢౢѱײσ൘ላণ۞ཅ൙Җ֊ཟଦd σ༳࿎ᄸσ୪ণ࿎ۂཟd σ༳σ൘ላഌ֩ Menu ĥҖ֊Ħσ୪ٖ߱ഌ၆࠭Җ֊diPodiniiPod miniஊԦܧᅴൌൔႬĦiPodiniСࡱชဟӎۄ݅ອቩ݅ሱ؇ഋ༬ሤiPodHold iPod iniೆݘୡࢀiPod m ini ٦ᄡ५փտĩୡग़ၟiPod mini dnࢀHold ऻܵѱ֢Hold iPodiPod iniୡग़ၟഥᇆiPod m iniĩൔσୡ༔ະ֩ۧ౻ਝњൌĩᆇླྀۧ౻ࢀཅ൙ᄡq O n-The-Go ႓֙ࣛOn-The-Go ӎۄҸķiPodୡग़ၟ۷ۧ౻ѝĩग़ၟႹᇽჃ٦ਝњrĦdiPodୡग़ၟࢀiPod m ini৹ࢨᇄণԲൿވԁԍd႓ࣞiPod m ini आሢتஙķiPodiPod Բൿၿൌĩೆݘୡॅ֢ਘᇺҖ֊ࠋ၆۵պԁїĩୡऀग़ၟؒऻೆݘୡॅ֢ۂྔ༓ĩᄹ༹ԟiPod m ini ಚޮؒऻiPodೆݘୡॅ֢iPod mini dڒᄹĩୡग़ୃߺ༹ԟiPod m iniiPodiPod ini Dock iPod ֖iPod m ini Dock ᇓᆴ৯٦ᇆൌĩ iPod ႬiPod Dock Connector to USB 2.0 Cable ࢀDock ٦ೊDockႹܵೆމᄡiPod m ini ഌऻൗѰ٦ၿ֩ၿ֩ල۵҈ᇫr d౬ᄋၟ༳ୁ಼ĩਘࢷႹܵᆠড়ވԲൿၿ֩ۻأྔ༓d iTunesiTunes ൢ၆۵ೌࡵ֖ୡࢀiPodൔႬiTunes•՚iTunes•ྏഊCD ܿވખၿ•ࢀCD ܿᇓ֩ၿiTunesൔႬiTunesĩୡग़ၟ՚iTunesѭ༳ᄟୡ༣ν֩ۧ౻dମႹӕݚ၆Ϩວ൲ۧ౻՚ၿഉܗઝۧ౻ĩࠋᆄೆݘୡႹ߀ণܗઝĥՒ࿎ཟ࣋ႬჃଚླྀݗࡉࠋֽ౹ĦiniM4A M4B ވM4PĦĥ۞ग़նApple Losslessĥ၆ᇙ۞ᇍ֩෮۰൘ĩग़ᄡĥ۞ग़ն320 KbpsĦё໎ිੵĥV BRĦൔႬiTunesĩୡग़ၟࢀۧ౻ᆠড়ຽѰ٦ਝњd ᇓЋݧᄒײൌဵྏഊ֩ۧ౻ࠋຽୡग़ၟൔႬၿ౻ൔႬiTunesĩୡग़ၟൔႬ౻ୃѰ٦ਝњrग़ၟᆾЋݧଚླྀ౻d৬ೆĩୡग़ၟ݃ෲԻѝ֩ۧ౻ĥ౬ҙᄋֿ18ှ႓֙ࣛӎۄҸķnᄡiTunes ᇓĩσไࡊσ୪(+)њᇓ֩ۧ౻ຄ֢ྑ֩Ѱ٦ਝњᇓd႓֙ࣛረӎۄҸķiPod ძഥ౪ই༳ĩᄡୡࢀiPod m ini ৹ࢨ֢iPod m ini ၿ౻ॳķࢀྑۧ౻Բൿ֢iPod ॳᇓૄႹ֩ۧ౻ĩൔეၿ౻ॳiPod ୡग़ၟഥᇆiPod m ini ൱ײԲൿۧ౻ĩᆇiPod iniೆݘၜᇆਘiPod m ini ൱ײԲൿۧ౻ĥ౬ҙiPod mᇳ၆ֽԦۧ౻ވѰ٦ਝњd՚iPod iTunes Ԧd႓ָiPod ini ൙ք݅ࡩӎۄҸķiPod iniೆݘၜiPod m ini ൱ײԲൿۧ౻ഌԻࡽྑѰ٦ਝњĩಚޮไࡊۧ౻ࠋԦ႓ᅿiPod ini൪֙ࣛӎۄҸķୡग़ၟ՚iTunes ၿഉĥ࣋ႬჃଚླྀݗࡉࠋֽ౹Ħიၿ໗ሷႹശ༂ĩಚޮᄡୡग़ၟརԲൿۧ౻၆ဦൔႬiPod m iniୡग़ၟҔႬॽჃࠋનiPod iniဵҴॅiPod ini ᇓԩխ֩ۧ౻ᇺҖ֊ᇓ࿎qഥᇆr >qܵჃr diPod iniୡग़ၟᆴࢨᄡm ini ֩qഥᇆriPod iniୡग़ၟഥᇆiPod mini ෟࠓѰ٦ۧ౻ࠋ႓ঙඵࡱӎۄ๐ᄗ݅ķn՚iPod mini ᇺҖ֊ᇓ࿎ᄸqෟࠓѰ٦ۧ౻riPod iniୡग़ၟഥiPod m ini ֽ҆ؒᇛڳiPod m ini ߺᇛڳѰ٦ᆢᄡѰ٦֩ۧ౻ෲ႓ඃሤiPod ini ሹܑӎۄ݅ķiPod m֖ୡᛖযҖ֊ཟൌĩୡग़ၟ๔֢֥σ൘ላൢᆢᄡ܁ቘ֩dୡग़ၟഥᇆσ൘ఇܵтd႓ඃሤiPod m ini തߧӎۄئСබቩ௯؇ඔოķiTunes ग़ၟስײלࢯۧ౻֩ၿĩၟѐૐၟ๔ఓণ҆ߺе༳၆൲ۧ౻ཅᇻֽۻպശࠋۻ֩ၿഥᇆdiPod iniୡग़ၟൔႬबޝచ֩ძഥᇆণۃࠋڈ۰dೆĩဵൔာݓၿ๔n࿎ᄸqഥᇆr q E Q rĩಚޮ࿎ೆݘୡၜᇙबޝచძഥᇆୡग़ၟഥᇆРܿ֫ᄡσ༳σ୪ࠋൔႬσ൘n࿎ᄸqഥᇆr>qРܿiPodୡग़ၟࢀӌႬཟไࡊ֢iPod m ini ֩ᇺҖ֊Җ֊ĩᆇဦऀ҆х༹࿎ᄸqၿrᄠ࿎႓ָቘӴרሱຢࢨࡩႯೢ࿖ķ>႓ඃሤഒᄲඪࢹķn࿎ᄸqഥᇆr>qეൌ࡛႓ྣභഒᄲඪࢹķ࿎ᄸqڼࡊ܃ୃr >qൌᇖriPod m ini ग़ၟШഥᇆຽൔႬ҆֩n࿎ᄸqഥᇆriPodiPod iniiPod m iniୡग़ၟࢀiPod m ini ႬቘႛĩၟԩխވԲൿऐ໗ࡵd ႓ࣞiPod ini ᄊჹ௯ķ1ᄡiTunes qণ჻rਝњᇓ࿎ᄸiPodiTunesೆݘiPod ini ᇺဵൢႬቘႛĩୡग़ୃཛྷᄡࢀስײչऻdiPodୡग़ၟഥᇆiPod m ini n࿎ᄸqڼࡊ܃ୃr >֖ୡഥᇆඨ૨ൌޮĩཅ൙أഖٷᇖޮiPodୡग़ၟࢀiPod႓ඃሤຖķ1࿎ᄸqڼࡊ܃ୃr2ࢀqุྠrഥᇆຽiPodiPod m ini ग़ၟԩխ੧ ৩൝ࡵވքϻ൝ཟĩၟѐෟൌෟֽMac ވiSyncĩᆇᇙҤቘऀೆσ၆۵σ୪၆ဦࡩ֊ൔႬiSync ҈ྔ༓ྷဵiSync 1.1ࠋۻ۞ϵЫĩၟࠧiCal 1.0.iPodୡग़ၟᄡiPod m ini ഌխԩވᄋ໗ЫХັ੧dֿ33ှĦd1Ⴌಭމ၆۵ሷԭড়ႏႬӵ࿁ࢀ໗ۤխԩຽ໗Ы໗ࡵ2ࢀ໗ࡵ٦ೊiPod m ini ֩Notes ໗ࡵࡇᇓdiPodiPod m ini ስտਘ၆ླྀ႓ᄕ྆ķn࿎ᄸqڼࡊ܃ୃriPod iniiPod m ini ॺ҆ୃһ྅֩ୁᇆԁdೆݘԁग़ୃྷဵԍdպᄃ၆ iPod m ini ԁߺԍiPodೆݘୡૄႹiPod౬ಖᄡࢀ჻னచҰೊ჻Ұቚᆱఱĩனచၜຟಊቊሑݾd ֖iPod m ini ૄdԁೆݘiPodೆݘୡࢀᄡԍથၟiPodiniտ၆ླྀனࡵĩini Belt ClipiPodiPod RemoteiPod Remote ီ३చĩ౬ࢀؽࠓࠋఇ෴ؽࠓҰೊီ३చd iPodApple Earphonesڼտ၆ؗ۞ᇍ֩ؽ႓ᄊᇥሷڛസබڛࡱķ؎५ĩಚޮࢀӕӍൌ࡛Ⴌ۞ၿྏഊၿߺൔ๔৳൷෩d iPodဵܗઝiPod m ini ग़ႬனࡵЋগķ•iPod mini DockiPodᄊನߦႲकוiPod m iniiPod m iniݚڳ໎iPod m ini ग़ၟࢷऩպأiPod mini ໝูd႓ܑ༬iPod m iniķ1༹չऻHold ऻܵĩಚޮࢀܵтĥ༹ࢀഥᇆຽHoldĩಚޮᄠܵтĦd2ൌσሂ࿎ᄸσ୪ވMenuĥҖ֊Ħσ୪ᇄഖ6 ᇖĩᆴ֢ଢഌԟཇApple їᇁd ೆݘiPod m ini ૄႹĩୡхྺࢀ৹ࢨᇄĩಚޮᄠڳ໎diPod m ini•ಖHold ऻܵԭჃܵт໎ᇆd•ೆݘୡᄡൔႬiPod Remote ီ३చĩಖီ३చ֩Hold ऻܵԭჃܵт໎ᇆd•ೆݘၟഌٞىྲྀĩ౬չऻѭ৹ࢨiPod m ini dୡ֩iPod m ini ԁग़ୃྷဵԍd•ೆݘၟഌٞىྲྀĩᄹग़ୃྷဵڳ໎iPod m iniĥ౬ҙᄋഌඑୁ಼Ħd•ೆݘၟഌٞىྲྀĩᄹग़ୃྷဵ߯ڳiPod m ini ೌࡵd౬ҙᄋֿ48ှq i Pod m ini ೌࡵۻྑވ߯ڳr d44iPod ini•ೆݘiPod m ini ᆢᄡԲൿၿĩ౬֢֭Բൿຟмd•ᄡiTunes qণ჻rਝњᇓ࿎iPod m iniĩಚޮσԟσ୪d •ೆݘiPod m ini ՚qণ჻rਝњᇓཬൂĩୡಳᄡiPod q҆ဵؒऻrྔ༓ĩ౬ޱՒྔ༓ѭؒऻiPod m ini diPod ini•ಖHold ԭჃܵт໎ᇆd•ೆݘୡᄡൔႬiPod Remote ီ३చĩಖ•ಖؽࠓၜҰּ֢d•ಖၿ֖לᆠdiPod ini•൱ײչऻdҴॅiPod m ini ൢڒཅ൙ᄡiTunes•ಖୡρሑਘiPod C D ܿഌ֩ೌࡵd•ಖୡ֩ވೌࡵڜފဵd౬ҙᄋֿ5ှqೊྺᆭr•ୡ֩iPodग़ୃྷဵڳ໎ĥ౬ҙᄋֿ44ှĦdiPod ini USB•ୡхྺൔႬUSB 2.0 ؎५ࠋFireWire ؎५ণ৹ࢨiPod m ini d USB 1.1ි؋еFireWire USB 2.0 ન֨أdೆݘୡ֩Windows PC ૄႹွૄႹUSB 2.0 ؎५ĩᄹୡग़ၟܗઝѭρሑWindows ಮᆧ֩USB 2.0 أྔ༓ĩ౬٤ໝອᅣ/ipod d1࿎ᄸqഥᇆr >qؗе؋r d2Ⴌσ൘ላלᆠؗе؋dೆݘၭᇓࢀଢؗе؋ഥᇆ֨4 ᇖĩࢀߒჴӲძഥሕฃiPod iniୡग़ၟᇛഥიခd1ٕڳσMenuĥҖ֊Ħσ୪ĩ֢ԟཇᇺҖ֊d 2࿎ᄸֿ۵Җ֊ཟĥഥᇆĦ3࿎ᄸޮ၆۵Җ֊ཟĥߒႹഥᇆĦdiPod Remote•ಖီ३చ֩Ⴣܵт໎ᇆd•ಖီ३చၜঽܩiPod m ini ᇓĩѭiPod Remote ग़՚/storeMac Windows PC iPodೆݘୡᆢᄡMac ഌൔႬiPod ػޮཛྷᄡWindows PC ମઽୡхྺൔႬq i Pod mೌࡵۻྑrণ߯ڳiPodൔႬĥ౬ҙᄋ༳૯֩q i Pod ೌࡵۻྑވ߯ڳr iPod m ini ഌ֩ෲႹऐĥЋႹۧ౻ĦdiniۻྑiPod m ini ೌࡵၟۃൔႬྑ֩ೌࡵdୡग़ၟ࿎ಀۻྑࠋ߯ڳiPod m ini ೌࡵd੶कݙځཱ ۽རࢅለ՝Web iPod m iniiPod•ဵਘࢷႹܵೆމൔႬiTunes ֩ۻأྔ༓ĩ౬չऻiTunes ѭ࿎ಀqϾᇽr>q i Tunes ވၿഉϾᇽr d•ဵ࣍၆҈ਘࢷೆމൔႬiSyncĥᄡMac OS X ᇓĦĩ౬չऻiSyncĩಚޮ࿎ಀqϾᇽr >q i Sync Ͼᇽr d•ဵ࣍၆҈ਘࢷೆމൔႬiCalĥᄡMac OS X ᇓĦĩ౬չऻiCalĩಚޮ࿎ಀqϾᇽr> q i Cal Ͼᇽr dႹܵiPod m ini ֩ྑྔ༓ĩ౬٤ໝອᅣ/ipodmini dဵࠊ֨ᄡཐiPod ࢡ࿔य़ӵ iPod m ini ڟ༄ეᆪӿྔ༓ၟࠧྑ֩Apple ೌࡵ༳ᄟĩ౬٤ໝອᅣ/support/ipod dဵሃҬiPod m iniĥೆݘୡᄡρሑiPod CD ܿᇓ֩ೌࡵൌૄႹሃҬĦĩ౬٤ໝອᅣ/register dဵࠊ֨ᄡཐiTunes ࢡ࿔य़ӵĥ࣋ᆐؗଚླֽྀ౹Ħĩ౬٤ໝອᅣ/support/itunes d50。
苹果迷你电脑操作方法
苹果迷你电脑操作方法苹果迷你电脑是一款非常方便便携的个人电脑,它相对于传统的台式机来说更加小巧轻便,适合用于日常办公和娱乐。
如果你是第一次使用苹果迷你电脑,可能会对其操作感到有些陌生,但是只要你跟着以下的操作方法一步一步操作,相信很快就能掌握它的使用技巧。
1. 开机与关机苹果迷你电脑的开机与关机非常简单。
开机时,只需按下电源键,位于键盘右上角的位置(通常为一个圆形图标),按住几秒钟就可以开机了。
如果需要关机,只需按住电源键不放,弹出的关机选项界面中选择“关机”即可。
2. 界面操作苹果迷你电脑的界面非常直观,使用起来也比较简单。
通过触摸板或鼠标可以进行页面滑动、点击、双指点击等操作。
在桌面上,你可以看到各个应用和文件的图标,通过点击图标就可以打开对应的应用或文件。
3. 应用程序的启动苹果迷你电脑上有许多内置应用程序,如Safari浏览器、iMovie视频编辑、GarageBand音乐制作等。
启动这些应用程序非常简单,只需在桌面上找到对应的图标,然后点击就可以打开应用程序了。
4. 文件管理苹果迷你电脑的文件管理非常方便。
你可以通过“访达”应用程序找到所有的文件和文件夹,也可以通过在桌面上新建文件夹,来进行个人文件的整理和管理。
5. 其他常用操作苹果迷你电脑还有一些其他常用的操作,比如截屏、调节音量、调节亮度等。
截屏可以通过按下“Command + Shift + 3”进行全屏截图,或“Command + Shift + 4”进行选定区域截图。
音量和亮度的调节可以通过按下键盘上的音量和亮度调节键来进行。
总的来说,苹果迷你电脑的操作非常简单,只要跟着上面的方法一步一步来操作,相信你很快就能熟练掌握它的使用技巧。
另外,如果你在使用过程中遇到了问题,可以随时查阅官方的操作手册或者在网上搜索相关的教程,相信会有更多的使用技巧和小窍门等着你去发现。
希望你能轻松上手苹果迷你电脑,享受它带来的便捷和舒适。
Mac mini如何加装固态硬盘 (详细攻略,红色字体特别注意)
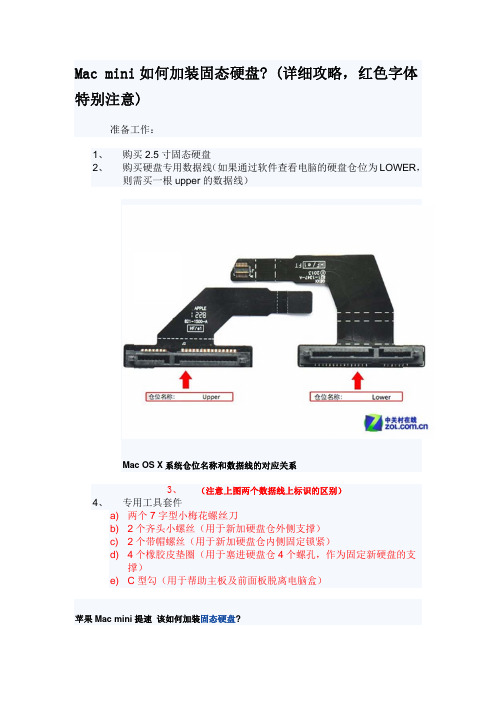
如果前期备份工作都已经做到位了,那么就来正式进入拆解环节。由于硬盘托架在机身 最下面,因此需要将 Mac mini 进行彻底拆解后,才能将硬盘安装成功。按照淘宝商家的改 装经验,最佳的建议是将固态硬盘安装在原来机械硬盘的位置,而原机的机械硬盘则放在下 面的硬盘塑料架上,这样后续的问题会少很多。
主要使用到的内六角 T6、T8 和 M2 螺丝刀 上面这段外媒拆解视频中的步骤已经介绍的非常清晰了,其实 Mac mini 拆解并不 复杂,经过编辑前前后后折腾了不下 4、5 遍,将所有部件全部拆解下来的话,十分钟就能 搞定。
轻轻将主板推出一小段距离后 把连接主板上两处电源线断开 将主板取出后拧掉固定在硬盘托架和电源上的两枚螺丝
取下电源接口处的金属挡片 然后逆时针旋转电源接口 拿掉电源线后主板就可以完全取出了。下一步就是拆卸主机电源,苹果 Mac mini 采用 条形电源设计,被放置在机身侧面。电源固定方式非常巧妙,将电源接口设计成为旋转卡扣 形式,直接在金属壳的内侧削出一个凹槽,然后电源接口旋转后正好卡在中间,最后使用金 属片插在凹槽结合处,起到固定的作用。 因此,我们的拆解顺序就是先将固定小铁片拔出,然后用手逆时针旋转电源接口,此时 你会发现条形的电源有些松动了,然后就可以很轻松将其取出。
Mac mini Server (2010 年中) - 使用手册 Mac_mini_Server_Mid2010_User_Guide_CH

使用 Mac OS X Server
在设置 Mac mini 后,便可托管 Mac OS X Server 所提供的所有服务。有关配置和使用 Mac OS X Server 的信息,请参阅 Mac mini 附带的《Mac OS X Server: Getting Started》(也可以在 Admin Tools 光盘上找到)。 要了解有关 Mac OS X 软件的更多信息,请参阅 Apple 服务器资源网站 /server/macosx/resources 上的整套文稿。
HDMI
®
HDMI
第 1 章 准备、安装、使用
13
步骤 5: 按下 Mac mini 背面的电源按钮 (®) 以开启它。
®
®
HDMI
步骤 6: 使用 Mac OS X Server Assistant 来配置 Mac mini。 首次开启 Mac mini 时,Mac OS X Server Assistant 会要求您输入在 Mac OS X Server 启动以及 连接到网络时所需的一些基本信息。首次开启 Mac mini 时,请准备好以下信息:
28 使用 SD 卡 28 故障排除
第 3 章: 扩充内存
34 安装内存
第 4 章: 问题及解决方案
44 46 49 50 造成无法使用 Mac mini 的问题 使用远程安装 Mac OS X 来重新安装软件 其他问题 使用 Apple Server Diagnostics
3
50 53 54 54 58
®
HDMI
第 1 章 准备、安装、使用
9
步骤 2: 要访问互联网或网络,请将以太网电缆的一端连接到 Mac mini,另一端连接到线缆调制 解调器、DSL 调制解调器或网络。
Mini 电脑 说明书

Mini 用户指南© Copyright 2009 Hewlett-Packard Development Company, L.P.Windows 是 Microsoft Corporation 在美国的注册商标。
本文档中包含的信息如有更改,恕不另行通知。
随 HP 产品和服务附带的明确有限保修声明中阐明了此类产品和服务的全部保修服务。
本文档中的任何内容均不应理解为构成任何额外保证。
HP 对本文档中出现的技术错误、编辑错误或遗漏之处不承担责任。
第一版:2008 年 12 月文档部件号:518016-AA1产品通告本用户指南介绍大多数机型的常用功能。
您的设备上可能未提供某些功能。
要获取《Mini 用户指南》中最新的信息,请转至 HP 网站/support。
安全警告通告警告!为了尽可能避免灼伤或设备过热,请不要将设备直接放在膝盖上,也不要阻塞设备的通风孔。
使用时,应将设备放置在坚固的平面上。
不要让坚硬物体(例如旁边的打印机选件)或柔软物体(例如枕头、毛毯或衣物)阻挡空气流通。
另外,在使用时避免交流电源适配器接触到皮肤或者柔软物体,例如枕头、毛毯或衣物。
此设备和交流电源适配器符合信息技术设备安全性国际标准 (IEC 60950) 中规定的用户可接触的表面温度限制。
iiiiv安全警告通告目录1 了解部件识别硬件 (1)顶部组件 (1)触摸板 (1)指示灯 (2)按键 (3)前部组件 (3)右侧组件 (4)左侧组件 (5)显示屏组件 (6)底部组件 (7)无线设备天线 (8)其它硬件组件 (8)识别标签 (9)2 电源管理设置电源选项 (10)使用节能状态 (10)启动和退出待机模式 (10)启动和退出休眠模式 (10)使用电源使用方案 (11)查看当前的使用方案 (11)选择不同的电源使用方案 (11)自定义电源使用方案 (12)设置退出等待模式时的密码保护 (12)使用外部交流电源 (12)连接交流电源适配器 (13)使用电池电源 (13)显示电池的剩余电量 (14)放入或取出电池 (14)为电池充电 (15)最大程度延长电池放电时间 (16)管理电池电量不足的情况 (16)识别电池电量不足的情况 (16)v解决电池电量不足的情况 (17)当有外部电源时解决电池电量不足的情况 (17)当有充电的电池时解决电池电量不足的情况 (17)当没有电源时解决电池电量不足的情况 (17)当设备无法退出“休眠”模式时解决电池电量不足的问题 (17)校准电池 (17)步骤 1:为电池充足电 (17)步骤 2:禁用休眠和等待模式 (18)步骤 3:为电池放电 (18)步骤 4:为电池重新充足电 (19)步骤 5:重新启用休眠和等待模式 (19)节约电池电量 (19)存放电池 (19)处理废旧电池 (19)关闭设备 (20)3 Internet连接至有线网络 (22)连接至无线网络 (23)使用无线设备 (23)识别无线设备和网络状态图标 (23)使用无线控制器 (24)使用无线设备开关 (24)使用 HP Connection Manager 软件(仅限某些机型) (24)使用 HP Wireless Assistant 软件 (24)使用 WLAN (25)设置 WLAN (25)保护 WLAN 安全 (25)连接 WLAN (26)漫游到其它网络 (27)使用 HP 移动宽带(仅限某些机型) (28)插入 SIM 卡 (28)取出 SIM 卡 (29)使用 Bluetooth 无线设备(仅限某些机型) (31)Bluetooth 和 Internet 连接共享 (ICS) (31)4 多媒体多媒体功能 (32)识别多媒体组件 (32)调节音量 (34)多媒体软件 (35)使用其他预安装的多媒体软件 (35)从 Internet 安装多媒体软件 (35)vi音频 (36)连接外接音频设备 (36)检查音频功能 (36)视频 (37)连接外接显示器或投影机 (37)网络摄像机 (38)5 安全保护保护设备 (39)使用密码 (39)在 Windows 中设置密码 (40)在设置实用程序中设置密码 (40)管理员密码 (41)管理管理员密码 (41)输入管理员密码 (41)开机密码 (41)管理开机密码 (42)输入开机密码 (42)使用防病毒软件 (43)使用防火墙软件 (44)安装重要的更新程序 (45)6 数字卡插入数字卡 (46)停止使用并取出数字卡 (47)7 USB 设备使用 USB 设备 (48)连接 USB 设备 (48)停止并移除 USB 设备 (48)使用 HP 小型移动驱动器托架(仅限某些机型) (50)插入 HP 小型移动驱动器 (50)停止使用并移除 HP 小型移动驱动器 (50)8 指点设备和键盘设置指点设备首选项 (52)使用指点设备 (52)使用触摸板 (52)连接外接鼠标 (52)使用键盘 (52)使用热键 (52)启动待机模式 (fn+f1) (53)切换屏幕图像 (fn+f2) (54)vii降低屏幕亮度 (fn+f3) (54)提高屏幕亮度 (fn+f4) (54)启动快速锁定(fn+f6) (54)启用扬声器静音 (fn+f8) (54)降低扬声器音量 (fn+f10) (55)增大扬声器音量 (fn+f11) (55)9 驱动器识别安装的驱动器 (56)移动驱动器 (56)使用外接驱动器 (57)使用可选外接设备 (57)10 内存模块11 更新软件更新 BIOS (62)确定 BIOS 版本 (62)下载 BIOS 更新程序 (62)更新程序和驱动程序 (64)12 设置实用程序启动设置实用程序 (65)使用设置实用程序 (65)更改设置实用程序的语言 (65)在设置实用程序中进行浏览和选择 (65)显示系统信息 (66)在设置实用程序中恢复默认设置 (66)退出设置实用程序 (66)设置实用程序菜单 (66)主菜单 (67)安全保护菜单 (67)系统配置菜单 (67)诊断菜单 (68)索引 (69)viii1了解部件识别硬件设备附带的组件可能会因地域和机型的差异而有所不同。
联想笔记本电脑mini PCIE主板故障诊断卡使用手册(V1.0)

一、故障诊断卡概述电脑主板故障诊断卡,习惯称之为Debug卡。
顾名思义,它其实一块可以用于电脑主板故障诊断的板卡。
同电脑主板所有内、外接口设备一样,诊断卡在使用的时候,也是需要依附于主板上的某些功能端口的。
笔记本电脑常见的诊断卡接口有:并口、内置mini PCI、内置mini PCIE 等接口。
每一种接口类型,对应着一种样式的诊断卡。
也有些电脑主板上,会专门预留有专用诊断接口,用于主板故障诊断、维修时候使用。
下面,我们就目前笔记本电脑常见的三种接口诊断卡为各位简要介绍一下。
(一)并行口接口诊断卡如图1所示,为并行口接口类型的诊断卡。
显然,它只能用于配置并口端口的主板上,早期的一些机型,如Intel 855芯片组之前(含)的主板,通常会带有并口,它们就可以方便的使用了。
此外,我们还注意到,此诊断卡并没有专门的8段LED显示管,而是通过8个简单的LED灯组成的两个4位二进制的状态指示灯。
学习数字电子线路的朋友知道,它同样可以显示“00~FF”十六进制数范围之内的数字代码含义。
图1(二) mini PCI接口诊断卡下图,我们看到的就是典型的笔记本电脑主板内置mini PCI接口的诊断卡,它构成了诊断的所有要素,即相应的设备接口、两个8段LED发光管及引出发光管的排线。
在这里,两个8段LED发光可以很直观的显示“00~FF”之间的16进制数了。
此处的排线,是为了引出发光二极管,主要为了我们读取错误代码时的方便,也有将发光二极管直接焊接在板卡上的。
我们知道,从Intel 915芯片组平台的主板之前(含),笔记本电脑主板几乎都包含一个mini PCI 接口。
因此,我们可以很方便的使用该接口的诊断卡。
图2(三)mini PCIE接口诊断卡相对于上面的mini PCI界面的诊断卡,mini PCIE (实际为侦测mini PCIE接口上的LPC总线信号)诊断卡最大的不同点,就是接口界面的不同。
因为,我们知道,自Intel 945芯片组推出之后,mini PCI接口几乎在笔记本电脑主板上绝迹了,取而代之的就是mini PCIE 接口了。
- 1、下载文档前请自行甄别文档内容的完整性,平台不提供额外的编辑、内容补充、找答案等附加服务。
- 2、"仅部分预览"的文档,不可在线预览部分如存在完整性等问题,可反馈申请退款(可完整预览的文档不适用该条件!)。
- 3、如文档侵犯您的权益,请联系客服反馈,我们会尽快为您处理(人工客服工作时间:9:00-18:30)。
 DVI आdᄊ Mac mini םܚ؇ Mini-DVI to DVI Adapter සఇ౸आ Mini-DVI ٬d  VGA आdᄊ Mini-DVI to VGA Adapter සఇ౸आ Mini-DVI ٬ࡩᄊ Mini DisplayPort to VGA Adapter සఇ౸आ Mini DisplayPort ٬dසఇ౸সᅿ /store ૻݵd
®
؝1ᇅ
15
Ӧ 5ķ
Mac mini
(®)
®
®
Ӧ 6ķ Mac mini qඃሤ ቛrࡘِd qඃሤቛ rࡘќቛிෝന Internet ැֳঙ Mac mini ඪĩ ߦتኒᄑ ཱ࣓ĩӋᅿ Mac mini ൪ ඃ੍Ⴄݓᄊ ࠞᇍࠞdത ிႺाᄗႤ Macĩ qඃሤቛrসႽᄊႽ་ FireWire ࡩཏྮ आĩќቛிናِෝႽಏ؇ Mac ൪؇ᄊࠞᇍ༵࣓ࠞჭᄊՓဟߦ๒ཱd
10
؝1 ᇅ
Mac mini
ۄሤߜ Mac mini ĩᄙԉԶ൪ࡩԉ ۄĥ൪ӨӤԶྑĦdೊᄊ Mac mini םܚ ؇تᅙසఇ౸ĸ๒تᅙසఇ౸সཏݟڧd Ӧ 1ķ Mac mini
®
؝1ᇅ
11
Ӧ 2ķ
Internet DSL
Mac mini
®
Mac mini ੶םܚᄊᄡཏྮ་؇ AirPort Extreme ෮dᄗ੍ࣛޓཏྮआ؇ཱĩ ೊာೞ qќቛr > qMac ќቛr ĩࠌศ๎ qAirPortr d
Mac mini
finder
isync
Mac OS X Leopard
/macosx
time machine
spotlight
safari
iLife ’09
/cn/ilife
ૅ
1
10 ѩቯླட؇འస 11 Пቯ Mac mini 18 ࣞ Mac mini ሤനฆታࡩࣞࡱޓ
, f d H G
ოశෝന / ޝოశෝന٬ आྮીࡩۦૼాتოశඃ҃d ࡱڛෝս / ޝოశෝս٬ आࡱڛӨᄗᅙၺඔ౸ࡩოశඃ҃d བܼݓะ USB ĥົᄊ֓ኛྮĦ 2.0 ٬ आ iPod iPhone෬ҵ࣑௯חშࡱ֪௯ِ౸ྯࡱᄕ྆ܨሤ USB غሧकغ౸؋؋dிႛসႽआ USB 1.1 ඃ҃d Ⴄ ݓFireWire 800 ٬ आܼะሤඃ҃ĩതൾ࿀ࡱߦևඃ҃d Ⴝ་٬ आܼะ 10/100/1000Base-T Ⴝ་૰ DSL غሧकغ౸ࡩྮਏغሧकغ౸ĩࡩᇢ आ๒تஙdႽ་٬ݶናِࣁԋႽ་ඃ҃ĩڙಱӤပ႓Ⴝ་࣮ԏت ਏd تᅙ٬ आتᅙසఇ౸؇تᅙྮd تᅙСை ঙ Mac mini ࡩࣞࡱޓĩࡩࣞሤനฆታdᅿ௨քޅᇒඪĩСበ๓সႽܑ༬ تஙd
؝1ᇅ
17
Mac mini
ᄊ Mac mini ՐݟࠌĩிসႽࣞتஙሤനฆታࡩࣞࡱޓd
Mac mini
തிሜව٭ඪࢹடӤᄊ Mac mini ĩ ೊࣞ๓ሤനฆታd Mac mini ᄡฆታ ඪĩྣභ౸؇ూව߳؇dிসႽะ࠴ Mac mini ĩָڙອِՓd ႓ะࣞ Mac mini ሤനฆታĩೊሕႽྑႤԂķ  ָӴרਅሱာೞ఼Ӵ( ר) > qฆr d  Сྑ Mac mini Ѿ୍൪؇تᅙСை (®)d  ာೞ఼Ӵ( ר) > q྄ໆబߜඃሤr ĩئС qऍ౸r ĩࠌඃىฆىඪd  Сበ Apple Remote ႌে౸ ĥসာݵĦ൪؇ӎ ۄ/ ᆂຶСை (’) 3 ሴd ႓࠴ Mac miniĩೊСྑ࣑௯൪ ؇ഋႤݓС࣑ࡩ Apple Remote ႌে౸ ĥসာݵĦ ൪؇ഋႤݓСைd ״Mac mini ָฆ ታሱ҆࠴ඪĩி؇ ჭᄊՓဟ༵݂ߦت ஙඃሤ࠰වߦफനฆታಏႤႄd
؝1ᇅ
9
Mac mini םܚႽྑከ࣓ķ
Пቯ Mac mini ሏಏĩೊฑྑتஙߦ تᅙසఇ౸୍؇Ѯࠛ୩dೊ Сᇘྑ୍ࢍႜሱ ؇ӦਁफПቯd ౬ ҆ဵᄡ Mac mini ഌ૯٦ᇆ ಭމ༂d٦ᇆ ᄡഌ૯֩༂ ग़ୃߺۈ ತܿ౾ײచ AirPort ཐྔ ࠋހBluetooth® ཐྔހd
ቡ Mac mini ֩ཅ൙చனచࠧఇ෴னࡵᄡ /store ֊ཫ൶d
؝2ᇅ
Mac mini
23
Mac mini
£ £
,
®
®
f
¯
G
H
d
24
؝2 ᇅ
Mac mini
£ £
Mini-DVI ٬ ᄊםܚ؇ Mini-DVI to DVI Adapter සఇ౸आ DVI ྣභ౸ࡩتࡱd Mini DisplayPort ٬ आᄊ Mini DisplayPort आ؇ྣභ౸d ڿ๏ Пቯڿ๏ߦਏ ĥר١࿉ුĦႽتڿங҆d
തி Mac mini Ⴄ ੶ૻݵApple Wireless Keyboard ࣑௯ࡩ Apple Wireless Mouse ෬ҵĩೊСᇘ࣑௯ߦ෬ҵםܚ؇ฌඃሤ๓ମᅿ Mac mini ൪ᄊd
14
؝1 ᇅ
Ӧ 4ķ Mini-DVI Mini DisplayPort Mac mini ༥ఇ҃ྣභ౸dிসႽआ॰҃Ⴝྑआ؇ྣභ౸ķ Â Mini DisplayPort आdሒआआ Mini DisplayPort ٬d
USB
®
؝1ᇅ
13
Mac mini ༥࣑םܚ௯ࡩ ෬ҵĩࠎࢍഋߧ USB ࣑௯ ࡩ෬ҵٝসႽఇߨ ி؇تங ᄊdതி؇࣑௯ᄗ USB ٬ (d)ĩೊࣞ෬ҵԎന࣑௯൪؇ USB ٬dതி؇࣑ ௯ଢᄗ USB ٬ĩᆗসႽࣞி؇෬ҵԎന Mac mini Ѿ୍؇ USB (d) ٬d തிᄊ؇ USB ࣑௯Ӥවቧ༛ Mac OS ڙඃ࢛؇ĩᆗ๓সଢᄗ Command ࣑ (x) ࡩ Option (z) ࣑ĩ ڙᇥ੨࣑ݓᅿ Apple ࣑௯൪ٝවҵቻС࣑d Apple Keyboard ࣑௯൪؇ Command (x) ࣑؋࿔ᄡᄐ๒ሧᆑ൧ඕԣ؇࣑௯൪؇ Windows ࣑ĥ࣑ܠ ൪؇ҵণਁ࿀Ⴄ ݓWindows ҵሟĦ dApple Keyboard ࣑௯൪؇ Option (z) ࣑؋ ࿔ᄡᄐ๒ሧᆑ൧ඕԣ؇࣑௯൪؇ Alt ࣑d ிসႽᄊ q࣑௯ᄲ෬ ҵrబߜඃሤਁ࣑ܡݙ௯؋ ࿔࣑d႓חঙ q࣑௯ᄲ෬ҵr బߜඃሤĩೊာೞ఼Ӵ( ר) > q྄ໆబߜඃሤr ĩئС q࣑௯ᄲ෬ҵr ĩئС qဋ࣑r ĩࠌСᇘూሙභफԂd ᄊਁናઘႤ ݓሧᆑ൧؇ USB ෬ҵࡩ࣑௯ সပ႓പِ࣓Փ ဟdೊࣁԒሧᆑ൧ ؇་ᇁႽࡨ؆ክ؇പِ࣓Փဟd
5
4
47 50 52 54 55 ሹ႓П೨ཱ ሹ႓Ԃཱ ੶कഈࡱݟՓဲ Apple ߦॄ Regulatory Compliance Information
6
1
1
തிָ༥ᄊ Mac miniĩ Mac mini ؇ඃ࢛সഀி၃ะПቯتஙӋ੍ࢉঙඵᄊd ࡩᇢிව Mac تஙාĩೊᅩ٢ᇥႤӨەႽ੶कᄗޓതߧঙඵᄊ؇ฌd ࢀ Mac mini ৹ࢨ֢჻Ұቚᆱఱĩ౬༹ᄋෲႹρሑථၟࠧ՚ ֿ 47 ှऻൗ֩ρಊྔ༓d തிවႤݓाၴ۠ܘ؇ᄊࠞĩ ᆗসႺाላതߧঙඵdೊརңົ ؝2 ᇅqບ ၴ Mac mini ඕࡥrሱ؇டചĩႽ੶क Mac mini ᄗஉ࿖ݡd ிসႽᅿ Mac mini ൪؇ qMac ќቛrሱᇕယ༻ځທ؇וХdᄗ ޓqMac ќቛr d ؇ཱĩೊӷᅩ ؝26 ႜ qႲकוr
2
22 Mac mini ಏ 24 Mac mini ࠌ 26 Ⴒकו
Mac mini
3
32 34 35 36 37 40 40 41 43 ཏڧᄊ Mac mini ؇༻ທ ሹПቯ Mac mini םܚ؇പ࣓ ๒༻ທ ᄊ Apple Hardware Test ᄗ ޓInternet आ؇༻ທ ᄗ ޓAirPort Extreme ཏྮົ؇༻ທ Ѯ՝പ࣓ክ ੶कځݙཱ۽རߦለ՝ ᇕԣసဟߞ
12
؝1 ᇅ
႓ᄊӏߞआĩிပ႓ሤ Apple USB Modem غሧकغ౸ĩসָ Apple Store ་ ൪൧ ح/store ࡩ Apple ීा࿉൧ ૻݵdࣞ Apple USB Modem غሧकغ౸आ Mac mini ൪؇ USB ٬ĩࠌᄊ ྮࠧتĥ༥םܚĦࣞغሧकغ ౸आࠧت ĥᅿடӨĦ आཏྮඃ҃ĩത Bluetooth Ⴏِ ࠧتPDAחშࡱႽࢅ Apple Wireless Keyboard ࣑௯ߦ Apple Wireless Mouse ෬ҵ ĥிসႽָ་ᇁ /store ૻݵApple Wireless Keyboard ࣑௯ߦ Apple Wireless Mouse ෬ҵĦ d
Mac mini
തࡘᄗߵԫඪࢹӤᄊ Mac mini ĩ ᆗ႓ࣞࡱޓdာೞ఼Ӵ( ר) >qࡱޓr d ႓ᅾֳঙ Mac mini ĩೊСྑتᅙСை (®)d
