二十四小时电子时钟产品说明书
EMU9000 24小时,7天数字计时器模块说明书
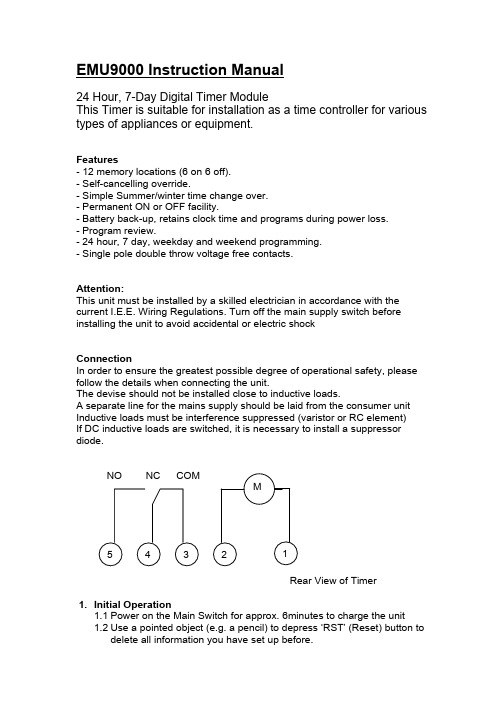
EMU9000 Instruction Manual24 Hour, 7-Day Digital Timer ModuleThis Timer is suitable for installation as a time controller for various types of appliances or equipment.Features- 12 memory locations (6 on 6 off).- Self-cancelling override.- Simple Summer/winter time change over.- Permanent ON or OFF facility.- Battery back-up, retains clock time and programs during power loss.- Program review.- 24 hour, 7 day, weekday and weekend programming.- Single pole double throw voltage free contacts.Attention:This unit must be installed by a skilled electrician in accordance with the current I.E.E. Wiring Regulations. Turn off the main supply switch before installing the unit to avoid accidental or electric shockConnectionIn order to ensure the greatest possible degree of operational safety, please follow the details when connecting the unit.The devise should not be installed close to inductive loads.A separate line for the mains supply should be laid from the consumer unit Inductive loads must be interference suppressed (varistor or RC element)If DC inductive loads are switched, it is necessary to install a suppressor diode.NO NC COMRear View of Timer1. Initial Operation1.1 Power on the Main Switch for approx. 6minutes to charge the unit1.2 Use a pointed object (e.g. a pencil) to depress ‘RST’ (Reset) button todelete all information you have set up before.2. Time setting / Time CorrectionSet up current time before you enter any ON/OFF programs.2.1 Keep ‘TIME’ key depressed while you are setting or correcting thecurrent time2.2 Depress ‘DAY’ key once to advance current day.2.3 Depress ’HR’ (hour) key once to advance one hour.2.4 Depress ‘MIN’ (minute) key once to advance one minuteNote: Pressing the keys DAY, HR or MIN for more than 2 seconds will initiate a fast run through.3. Programming / Review the switch-on and switch-off times3.1 Depress the ‘PRG’ (Programming) key once. You will then seePROG 1 ON shown on the LCD display, which indicates the switch-on time command to be entered.3.2 Depress ’DAY’ key to choose the day’s group you wish to switch-onthe appliance. The days group will advance in the sequence of MO TU WE TH FR SA SU→MO→TU→WE→TH→FR→SA→SU→MO TU WE TH FR→SA SU→MO TU WE TH FR SA→MO WE FR→TU TH SA.3.3 Depress ’HR’ key once to advance one hour3.4 Depress ‘MIN’ key once to advance one minute3.5 Depress ‘PRG’ key again to advance to next PROG 1 OFF, whichindicates the switch-off time command to be entered. Then followsteps 3.2 to 3.5 through the rest of the program.3.6 Although there are 6 switching-on and 6 switching-off programmingmemory locations be sure to depress the ‘TIME’ key afterprogramming or reviewing the contents of the memory locations.Otherwise these switching times will not be carried out. The unit willswitch to existing time mode automatically if no key is pressed for 2minutesNote: Pressing the DAY, HR or Min key for more than 2 secondswill initiate a fast run through.4. Recall FunctionIf for some reason you do not want some of the switching times to becarried out, without loosing the preset memory, you can use the ‘RCL’(recall) key to enable or disable the execution of a program.4.1 Depress the ‘PRG’ key until the preset memory location is displayed4.2 Use a point to depress ‘RCL’ key to enable or disable the switchingcommand.4.3 The display shows ‘ - -:- - ‘ for the hours and minutes indicating thatthe specified memory location will not be carried out. If it shows thepreset contents of hour and minute this indicates that the specifiedmemory location will be carried out.4.4 The preset memory will be recalled once you depress the key of‘DAY’, ‘HR’ or ‘MIN’. If the memory location is disabled(LCD display - -:- -)Note: be sure to depress the ‘TIME’ key after programming reviewof the contents of the memory locations, otherwise theseswitching times will not be executed.5. Summer / Winter Time Change OverIt is possible to change from summer to wintertime and visa a versa withthe aid of this simple function. Initially the clock must be set towintertime irrespective of the time of year.5.1 To change from wintertime to summertime, simultaneously press the‘TIME’ key and one of the override buttons. The LCD display willindicate ‘+1h’5.2 To change from summer time to wintertime simply repeat 5.1 and the‘+1h’ will disappear from the LCD display.6. Manual OperationThis function is useful for example turning the appliance off for holidayperiods, remembering to reset upon your return.The LCD displays the operational status of the timer as follows:-AUTO OFF The unit is operating by its program and is currently off.AUTO ON The unit is operating by its program and is currently on.ON The unit is permanently onOFF The unit is permanently offTo over-ride the operational status, simply press the override key toswitch the status. The sequence loop is as follows:-AUTO OFF→ ON→AUTO ON→OFF→Technical DataDimensions H x W x D mm 60 x 60 x 32Switching outputs Relay (SPDT Type)Operating Temperature 0°C to 55°CAccuracy Deviation ±1.5 sec/day at 23°CPower Reserve 150 hours min at 20°CNi-Cdbuilt-inBattery BatteryRechargeableBase QuartsTimeMemory locations 12 (6 on 6 off)Shortest switching interval 1 minute1minuteintervalsProgrammingSummer winter time change over YesYesProgramrecallOperational Status indicator LCD displayPower Consumption approx 5.5VA at 240V 50Hz.Contact rating SPDT 16(4)A 240V 50HzOperating Voltage 220 to 240V 50HzProtectionClass IP00Timeguard Ltd 2004EMU9000NL。
电子时钟使用说明

电子时钟使用说明书目录1电子时钟 (1)1.1电子时钟简介 (1)1.2 电子时钟的基本特点 (1)2作品构成 (1)3核心器件 (3)3.1 单片机(STC12C5A60S2) (3)3.2 时钟芯片(DS1302) (4)3.3液晶屏模块(LCD12864) (5)4 作品功能及操作说明 (6)4.1 功能介绍 (6)4.2操作说明 (7)5注意事项 (8)1 电子时钟1.1 电子时钟简介1957年,Ventura发明了世界上第一个电子表,从而奠定了电子时钟的基础,电子时钟开始迅速发展起来。
现代的电子时钟是基于单片机的一种计时工具,采用延时程序产生一定的时间中断,用于一秒的定义,通过计数方式进行满六十秒分钟进一,满六十分小时进一,满二十四小时清零。
从而达到计时的功能,是人民日常生活补课缺少的工具。
1.2 电子时钟的基本特点现在高精度的计时工具大多数都使用了石英晶体振荡器,由于电子钟、石英钟、石英表都采用了石英技术,因此走时精度高,稳定性好,使用方便,不需要经常调试,数字式电子钟用集成电路计时时,译码代替机械式传动,用LED显示器代替指针显示进而显示时间,减小了计时误差,这种表具有时、分、秒显示时间的功能,还可以进行时和分的校对,片选的灵活性好。
2 作品构成品名型号/规格数量(PCS)液晶屏模块LCD128641单片机STC12C5A60S21时钟芯片DS13021温度芯片DS18B201石英晶体12.00MHz1石英晶体32.768KHz1电容0.1μF2电容30pF2电容100μF 1 电阻1kΩ1扬声器无源1三极管85501微动开关12×12×6mm4钮扣电池3V锂电池1光敏电阻0~20KΩ1电源适配器5V 500mA13 核心器件3.1 单片机(STC12C5A60S2)STC12C5A60S2系列单片机管脚图该作品采用STC12C5A60S2单片机驱动程序,该单片机共包含40个可用引脚,完全可以应付时钟电路在接口电路上的要求。
电子钟(万年历)说明书

河北工程大学科信学院课程设计说明书(2012 /2013 学年第 1 学期)课程名称:小型数字系统设计1题目:电子钟专业班级:计算机1021班****:***学号:*********指导教师:赵建明蔡恒设计周数: 1 周设计成绩:二〇一三年一月十八日一、选题意义电子钟是对时、分、秒等用数字显示的计时装置,广泛用于个人家庭、车站、办公室等公共场所,成为人们日常生活中不可少的必需品。
钟表的数字化给人们生产生活带来了极大的方便,而且大大地扩展了钟表原先的报时功能。
诸如定时自动报警、按时自动打铃、时间程序自动控制、定时广播、自动起闭电路、甚至各种定时电器的自动启用等,所有这些,都是以钟表数字化为基础的。
因此,研究数字电子钟及扩大其应用,有着非常现实的意义。
二、项目设计方案2.1 硬件选取与说明2.1.1硬件选择及数量AT89C51 单片机1个、 7SEG-MPX1-CC (1位七段数码管)1个、7SEG-MPX2-CC(1位七段数码管)5个、7SEG-MPX4-CC(1位七段数码管)1个、NPN三极管一个、蜂鸣器一个、七段显示译码器7448与74141 BCD—十进制译码器/驱动器各两片。
2.1.2 单片机端口设定单片机端口选择:根据选用的AT89C51单片机将P0口的低4位作为时间数据显示的数据输出端口,高4位作为数码管选择端口。
P1端口的低4位作为日期的数据输出端口,高4位作为日期显示数码管的选择端口。
P2.6端口作为蜂鸣器控制端口,INT0、INT1两中断引脚作为更改数据的按键。
2.1.3 方案设计(1) 方案设计框图见图1图1方案设计框图(2)电路原理图图2电路原理图2.2软件设计2.2.1 系统分析电子钟包含时间、日期、星期的显示。
其中时间包含有秒与分、分与小时之间的逻辑;日期中包含日于月、月与年、星期计算等逻辑;时间与日期之间也存在逻辑。
具体逻辑如下:(1)其中秒最大计数不能超过60,超过60后应置0重新计数。
电子时钟温度计使用说明书

电子时钟温度计DIY套件使用说明书
作者:张卫兵 时间:2010.1.27
本套DIY套件专为业余电子爱好者制作,DIY简单实用,成本低。
产品如图所示:
上图为空板。
焊好的成品板。
功能说明:
本套件程序已经烧好,单片机数字时钟温度计DIY,掉电切换到备用电池,无需重新设置时间,显示完整的日历和温度
时间:24小时制显示。
秒:计时由小数点闪烁 精确定时一秒散动一次
温度:显示精确到0.1度
日历:月份和日期显示,年份,月份自动控制
功能按键:K2为设置动能键,可以设定时间,日期,星期等 K3和K4分别为加一和减一功能键。
【精品】24时数字电子钟
【精品】24时数字电子钟
24时数字电子钟,又称多功能数字电子钟,是一种采用微处理器技术,能够显示当前时间的电子装置。
可以用来显示24小时制的时间,并以12小时制的格式显示。
它可以兼容多种时间控制系统,支持不同的时区、日期、时间格式设置。
它通常用于商用房间、大型庆典等场合,以显示该地区实时时钟,不会受到地点距离、夜晚时间及外界因素的影响。
24时数字电子钟外观造型简约大气,采用抗偏色的高品质无闪烁LED模块,光源色彩稳定,显示清晰,而且可以调节背景光,增强各种光源相间的视觉效果;此外,它主要运用的储存器为博基诺存储器,可支持多种显示格式,时分秒显示,模式切换设定等,电源稳定,使用寿命长,保证数据准确更新。
24时数字电子钟采用先进的智能技术,可以自动更新时间,准确无误;内置计算机程序技术,实现实时时间更新;此外,它可实现定时开关机等功能,实现省电与节能,满足各种应用需求;有报警功能,可以提醒使用者在规定的时间做好对应的工作。
Schneider-Electric IH 24h 时间开关说明书

D 15365-561-03_e n 12/2020¼DANGERRisk of serious damage to property and per-sonal injury, e.g. from fire or electric shock, due to incorrect electrical installation.Safe electrical installation can only be ensured if the person in question can prove basic knowledge in the following areas:•Connecting to installation networks •Connecting several electrical devices •Laying electric cablesThese skills and experience are normally only pos-sessed by skilled professionals who are trained in the field of electrical installation technology. If these minimum requirements are not met or are disregard-ed in any way, you will be solely liable for any dam-age to property or personal injury.IH 24h is a mechanical time switch that switches con-nected loads on or off when the set time has been reached. It is installed on a DIN rail (DIN EN 60715).1Place the IH 24h onto the DIN rail.2Connect cables:–Remove 8 mm (max. 9 mm) of insulation –Open the plug-in terminal with a screwdriver and plug in the cable at a 45° angle. (max. 2 cables per plug-in terminal)IH 24hOperating instructionssrm: CCT16364 arm: CCT15365For your safetyG etting to know IH 24hProduct detailsA Manual switchB Setting discC SwitchingsegmentsD Automatic/perma-nent switchE Clock hands (hour, minutes)F Display: Morning(3/6/9), afternoon (15/18/21)G Rotary knob H Switch output I Mains connectionInstalling IH 24h3Connect the mains voltage.|IH 24h arm (art. no. CCT15365) is equipped with a quartz clock mechanism. The quartz clock mechanism only starts after a few minutes after having connected it a power supply. Complete power reserve is reached after 5 days.Setting the timeUse the rotary knob to set the time (hour, minutes). Y ou can turn the rotary knob clockwise and anti-clockwise.|The clock face changes between morning and af-ternoon times when the dial has gone past 24 and 12 hours.Setting the switching timeY ou can set the switching time using the switching seg-ments. Each switching segment stands for a 15-minute time period. The switching segments can be pushed in or out, for example, by using your index finger. The set-ting disc shows the switching period (+/- 5 minutes).Operating the manual switchY1Turn the manual switch by one position anti-clockwise.The current status is reversed and stays unchanged forSetting IH 24hTo set the time in the morning, 3/6/9 must be visible on the clock face.To set the time in the after-noon, 15/18/21 must be visible on the clock face.Switching segment out Load switched off Switching segment inLoad switched on Switching time 1 = 6:00 - 10:00Switching time 2= 17:00 - 21:00Operating IH 24hOperating the automatic/permanent switch With the automatic/permanent switch, you can switch the load permanently on or off or permanently set it to au-tomatic mode.•Set the switch to "1".The load is switched on permanently. The set switch-ing times are deactivated.•Set the switch to "0".The load is switched off permanently. The set switch-ing times are deactivated.•main activated. The load is switched on or off when the set switching time has been reached.|For permanent ON or permanent OFF , the set switching times are deactivated.If you have technical questions, please contact the Customer Care Centre in your country. T echnical dataNominal voltage:CCT16364AC 230 V , 50/ Hz CCT15365AC 110-230 V , 50-60 Hz Nominal current:16 A, cos φ = 14 A, cos φ = 0.6Incandescent lamps:AC 230V , max. 1100W Halogen lamps:AC 230V , max. 1000W Fluorescent tubes:AC 230V , max. 600VA Fluorescent lamps with electronic ballast:2 x 40W (12µF), parallel-compensatedCompact fluorescent lamps with electronic ballast:25 W LED lamps:<2W: 20 W>2W:180 W Power consumption:≈ 0.5 W Ambient temperature:-20°C to +55°C Connecting terminals: 2 x 0.5 - max. 2.5 mm², fixed and flexible wires Power reserve:CCT15365150 h (230V), 75 h (110V)Accuracy:CCT16364Network synchronous CCT15365≤ ±1s/day at +20°C Mode of operation:srm: Device of 1BRTU type in accordance with EN 60730-1arm: Device of 1BSTU type in accordance with EN 60730-1Degree of pollution:2Rated impulse voltage:4000 VProtection class:II per EN 60730-1 when installed correctly T ype of protection:IP 20 in accordance with EN 60529Schneider Electric Industries SAS。
捷腾电子 CTR24 小时计数器说明书
Part numbers
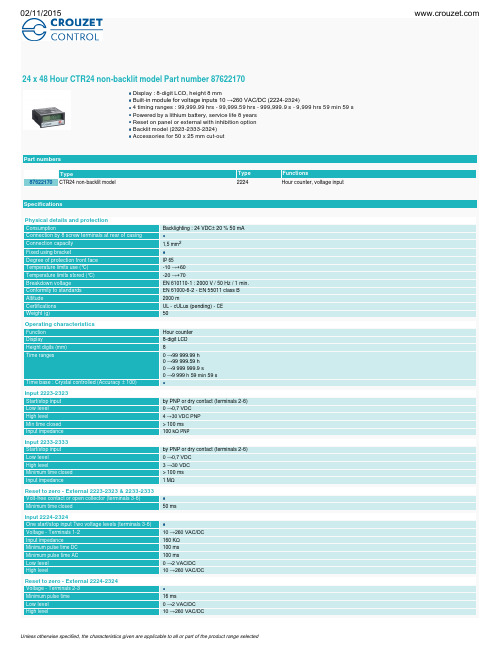
Type 87622170 CTR24 non-backlit model
Type 2224
Functions Hour counter, voltage input
Specifications
Physical details and protection Consumption Connection by 8 screw terminals at rear of casing Connection capacity Fixed using bracket Degree of protection front face Temperature limits use (°C) Temperature limits stored (°C) Breakdown voltage Conformity to standards Altitude Certifications Weight (g)
Mode 1 (Time selection)
0 V common/ (BL- only 23xx)
Mode 2 (Time selection)
Backlighting option + 24 VDC (only 2333)
Connections 2233-2333
Unless otherwise specified, the characteristics given are applicable to all or part of the product range selected
Unless otherwise specified, the characteristics given are applicable to all or part of the product range selected
电子闹钟说明书

本电子闹钟的设计是以单片机技术为核心,采用了小规模集成度的单片机制作的功能相对完善的电子闹钟。
硬件设计应用了成熟的数字钟电路的基本设计方法,并详细介绍了系统的工作原理。
硬件电路中除了使用AT89C51外,另外还有晶振、电阻、电容、发光二极管、开关、喇叭等元件。
在硬件电路的基础上,软件设计按照系统设计功能的要求,运用所学的汇编语言,实现的功能包括‘时时-分分-秒秒’显示,设定和修改定时时间的小时和分钟、校正时钟时间的小时、分钟和秒、定时时间到能发出一分钟的报警声。
一芯片介绍AT89C51是一种带4K字节FLASH存储器的低电压、高性能CMOS 8位微处理器,俗称单片机。
AT89C51是一种带2K字节闪存可编程可擦除只读存储器的单片机。
单片机的可擦除只读存储器可以反复擦除1000次。
该器件采用ATMEL高密度非易失存储器制造技术制造,与工业标准的MCS-51指令集和输出管脚相兼容。
由于将多功能8位CPU和闪烁存储器组合在单个芯片中,ATMEL的AT89C51是一种高效微控制器,AT89C51是它的一种精简版本。
AT89C51单片机为很多嵌入式控制系统提供了一种灵活性高且价廉的方案,外形及引脚排列如图1-1所示。
图1-1 AT89C51引脚图74LS573 的八个锁存器都是透明的D 型锁存器,当使能(G)为高时,Q 输出将随数据(D)输入而变。
当使能为低时,输出将锁存在已建立的数据电平上。
输出控制不影响锁存器的内部工作,即老数据可以保持,甚至当输出被关闭时,新的数据也可以置入。
这种电路可以驱动大电容或低阻抗负载,可以直接与系统总线接口并驱动总线,而不需要外接口。
特别适用于缓冲寄存器,I/O 通道,双向总线驱动器和工作寄存器。
外形及引脚排列如图1-2所示。
图1-2 74LS573引脚图二硬件电路设计1 时钟电路设计AT89C51系列的单片机的时钟方式分为内部方式和外部方式。
内部方式就是在单片机的XTAL1和XTAL2的两引脚外接晶振,就构成了自己振荡器在单片机内部产生时钟脉冲信号。
Talento 400系列24小时、7天、单路和双路电子时间控制说明书
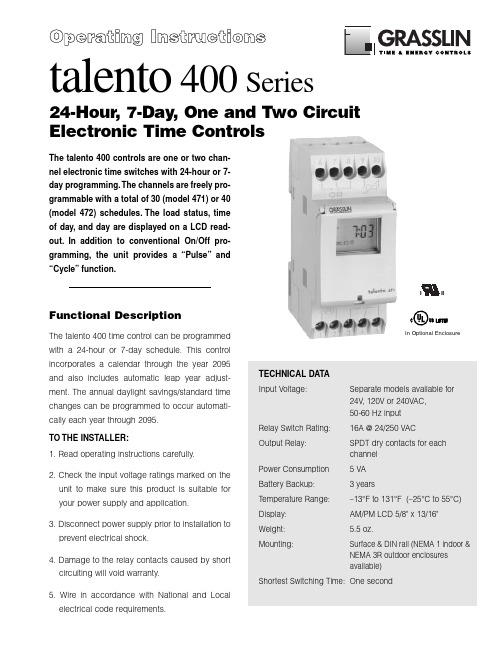
talento 400Series24-Hour, 7-Day, One and Two Circuit Electronic Time ControlsTECHNICAL DATA Input Voltage:Separate models available for 24V , 120V or 240VAC, 50-60 Hz input Relay Switch Rating:16A @ 24/250 VACOutput Relay:SPDT dry contacts for each channel Power Consumption 5 VA Battery Backup: 3 yearsTemperature Range:–13°F to 131°F (–25°C to 55°C)Display:AM/PM LCD 5/8" x 13/16"Weight: 5.5 oz.Mounting:Surface & DIN rail (NEMA 1 indoor &NEMA 3R outdoor enclosures available)Shortest Switching Time:One secondThe talento 400 controls are one or two chan-nel electronic time switches with 24-hour or 7-day programming.The channels are freely pro-grammable with a total of 30 (model 471) or 40(model 472) schedules.The load status,time of day,and day are displayed on a LCD read-out.In addition to conventional On/Off pro-gramming,the unit provides a “Pulse”and “Cycle”function.Functional DescriptionThe talento 400 time control can be programmed with a 24-hour or 7-day schedule. This control incorporates a calendar through the year 2095and also includes automatic leap year adjust-ment. The annual daylight savings/standard time changes can be programmed to occur automati-cally each year through 2095.TO THE INSTALLER:1. Read operating instructions carefully.2. Check the input voltage ratings marked on the unit to make sure this product is suitable for your power supply and application.3. Disconnect power supply prior to installation to prevent electrical shock.4. Damage to the relay contacts caused by short circuiting will void warranty.5. Wire in accordance with National and Localelectrical code requirements.PAGE 2WIRINGMake certain to connect only to the supply voltage designated on the unit itself. Warranty will be void if wrong voltage is applied. Connect wires to the screw terminals in accordance with the wiring diagram shown (use 12 to 22 AWG wire).INSTALLATION CHECKLIST1. The time switch should have its own independent circuit for power supply.2. Since all electronic instruments are sensitive to volt-age spikes, close attention must be paid to the fol-lowing:a) If possible, power to the electronic time switch should be supplied from a phase different from the one supplying power to the load.b) INDUCTIVE-LOADS should have suitable VARIS-TOR and RC network () across the supply terminals to reduce voltage spikes.c) DC INDUCTIVE LOADS should have a diode across their terminals to eliminate back EMF of the inductor.d) HIGHLY INDUCTIVE LOADS , especially fluores-cent lights, may require a relay in which case (a)and (c) apply.e) IN HIGH LIGHTNING AREAS ,a surge suppres-sor should be installed.InstallationMOUNTINGSurface mounting the talento 400 inside a control panel or enclosure is accomplished with a standard DIN rail.Place the two protruding guides, which are on the top of the rear rail cutout slot, over the top lip of the rail;then snap the bottom into place.For stand-alone installation use a Grasslin indoor/out-door enclosure.PAGE 3KEYPAD DESCRIPTIONDay – Day selector (1 = Mon, 2 = Tue, etc.)Reset*– “Restarts” microprocessor,all programs are preserved+1h – Switch for daylight savings time functions Clear – To cancel program(s)Prog.– Used to review/program/store– Recalls actual time (Time of Day)– S ets the Pulse (momentary contact)command and the Cycle function (“repeating” pulse command)h – Hour advance– Minute advance/select min./sec.– Manual override for each channel & sets command for each channel *Recessed buttons—use a long pen point or pencil LCD DISPLAY ELEMENTSThe LCD incorporates a number of different ele-ments to display various data and information.A new feature of the talento 400 Series is the “Sleep”Mode, an energy saving feature. This feature turns off the LCD (when the unit is not powered) if no but-tons are pressed for a period of two minutes. When in the sleep mode the only character displayed is a flashing Colon ( : ). To restore the full display simply press the clock () button one time.Execution of ProgramsOnce the talento 400 is programmed, it will automatically“look back” and assume the correct ON or OFF switch position.PROGRAM STORAGE CAPACITYThe talento 471 can store up to 30 programs. The talento 472 can store up to 40 programs. To view the number of unused or “free” programs available, press the “Prog.”button until “Fr XX” is displayed. “XX” equals the number of “free” programs remaining.AM/PM displayedDateEnter Pulse/Cycle ResetSelect day(s)of the week Start programinput PROGRAM INSTRUCTIONS TABLE OF CONTENTSSetting Time Format........................................Chart 1 (page 4)Setting Daylight Changeover..........................Chart 2 (page 4)Setting Actual Time.........................................Chart 3 (page 5)Setting 24 Hr./7 Day On/Off Schedule............Chart 4 (page 5)Setting 24 Hr./7 Day Pulse Schedule..............Chart 5 (page 6)Setting 24 Hr./7 Day Cycle Schedule..............Chart 6 (page 6)PAGE 4ProgrammingTIME FORMAT1Full Display AppearsDisplay shows all segments88:88Display shows AM 12:00(00:00 for Military time)“ :”FlashesSelect Start date from chart belowDisplay shows 10.29Select End Date From Chart BelowTo Store and Return to Run ModeDisplay shows 3.26(start date)Complete Steps 1-3 BeforeProgramming TimerNote:Performing the above operation a second time will switch clock to Military time.ENDSTART2002: April 7, October 27PAGE 5ProgrammingACTUAL TIME34Programming 24 Hour / 7 Day“ON/OFF” SCHEDULESENDSTART“—”Moves Under 1-7 with Each PressOnce to Delete,Twice to Restore Day“—”Disappears“—”Appears Under 1 (Mon)PAGE 6Programming 24 Hour / 7 DayPULSEProgramming 24 Hour / 7 DayCYCLEENDEND“—”Appears Under 1 (Mon)“—”Moves Under 1-7 with Each PressOnce to Delete,Twice to Restore Day“—”Disappearsas DescribedAboveShows “– – :– –”PAGE 7MANUAL OVERRIDEEach channel can be manually overridden by pressing the appropriate “Hand switch”. There are two types of manual overrides: “temporary” and “fixed”. A “tempo-rary” override is in effect until the next programmed switch command, at which point the automatic mode takes over. A “fixed” override lasts indefinitely and must be canceled by the user. The LCD displays the operating mode of each channel as follows:=Automatic “ON”=Automatic “OFF”=Temporary “ON”=Temporary “OFF”FIX =Fixed “ON”FIX=Fixed “OFF”PROGRAM REVIEW/EDIT/DELETE With the full display in view:1. Press the “Prog.” button once; the first program is displayed.2. Continue pressing the “Prog.” button to review addi-tional programs, one event at a time.3. To edit a particular command, scroll to its location and change (or add) data as is done during a nor-mal programming procedure – press the “Prog.”button to store the change. When finished, press theclock () button one time to return to the operating mode.4. To delete a particular command, scroll to its location and press the “Clear” button. Continue pressing the“Prog.” button to view additional programs or pressthe clock () button to return to the operatingmode.5. After the last programmed event is viewed, an addi-tional press of the program button will display a free (blank) program location. Additional programs canbe entered at this time.6. After a free (blank) program location is viewed, an additional press of the “Prog.” button will display the free (unused) program locations – displayed as “Fr XX” where “XX” represents the number of unused locations.7. To delete all switching commands; press the “Prog.”button until “Fr XX” is displayed. Press the “Clear”button once, “Cl” is displayed. Press the “Clear” but-ton again. “Cl” flashes and “Fr 30” or “Fr 40” is dis-played. All switching commands are now cleared. Press the clock () button to return to the “Run”mode.BATTERY-POWERED RESERVEIn the event of a power failure, the built-in Lithium bat-tery maintains the current time and date for up to 3years. The program schedule is stored in EEPROM memory and is non-volatile.12345678910111213141516171819202122232425P r i n t e d i n U S A 131U S 06.00TALENTO 400 PROGRAM WORK SHEETDAILY/WEEKLY PROGRAM STEPS。
Digi 42 2双回路电子24小时或7天时间开关操作说明书
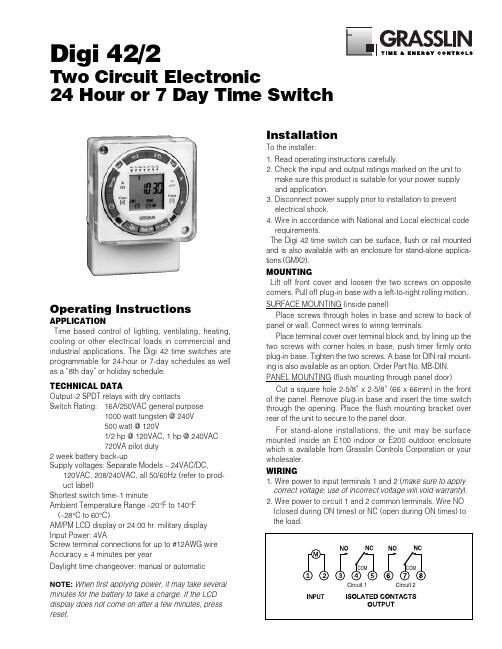
Digi 42/2Two Circuit Electronic24 Hour or 7 Day Time SwitchOperating InstructionsAPPLICATIONTime based control of lighting, ventilating, heating,cooling or other electrical loads in commercial and industrial applications. The Digi 42 time switches are programmable for 24-hour or 7-day schedules as well as a “8th day” or holiday schedule.TECHNICAL DATAOutput–2 SPDT relays with dry contactsSwitch Rating:16A/250VAC general purpose1000 watt tungsten @ 240V 500 watt @ 120V1/2 hp @ 120VAC, 1 hp @ 240VAC 720VA pilot duty2 week battery back-upSupply voltages: Separate Models – 24VAC/DC,120VAC, 208/240VAC, all 50/60Hz (refer to prod-uct label)Shortest switch time–1 minuteAmbient Temperature Range –20°F to 140°F (–28°C to 60°C)AM/PM LCD display or 24:00 hr. military display Input Power: 4VAScrew terminal connections for up to #12AWG wire Accuracy ±4 minutes per yearDaylight time changeover: manual or automatic NOTE:When first applying power, it may take several minutes for the battery to take a charge. If the LCD display does not come on after a few minutes, press reset.InstallationTo the installer:1. Read operating instructions carefully.2. Check the input and output ratings marked on the unit to make sure this product is suitable for your power supply and application.3. Disconnect power supply prior to installation to prevent electrical shock.4. Wire in accordance with National and Local electrical code requirements.The Digi 42 time switch can be surface, flush or rail mounted and is also available with an enclosure for stand-alone applica-tions (GMX2).MOUNTINGLift off front cover and loosen the two screws on opposite corners. Pull off plug-in base with a left-to-right rolling motion.SURFACE MOUNTING (inside panel)Place screws through holes in base and screw to back of panel or wall. Connect wires to wiring terminals.Place terminal cover over terminal block and, by lining up the two screws with corner holes in base, push timer firmly onto plug-in base. Tighten the two screws. A base for DIN rail mount-ing is also available as an option. Order Part No. MB-DIN.PANEL MOUNTING (flush mounting through panel door)Cut a square hole 2-5/8” x 2-5/8” (66 x 66mm) in the front of the panel. Remove plug-in base and insert the time switch through the opening. Place the flush mounting bracket over rear of the unit to secure to the panel door.For stand-alone installations, the unit may be surface mounted inside an E100 indoor or E200 outdoor enclosure which is available from Grasslin Controls Corporation or your wholesaler.WIRING1. Wire power to input terminals 1 and 2 (make sure to apply correct voltage; use of incorrect voltage will void warranty ).2. Wire power to circuit 1 and 2 common terminals. Wire NO (closed during ON times) or NC (open during ON times) to the load.sKEYPAD DESCRIPTIONSetting the Time/Automatic Run Mode Prog.Program ModeRes.*Reset: Clears all programs and timeSelect ON or OFF in Prog. Mode, Manual Override in Run Mode ±1h *Manual Daylight Time Change h Setting the Hour (12:– – AM)m Setting the Minute (12:01 AM)Day Set Current Day and Select Days to be Omitted Omit Day Selected w/Day keyHoliday Program*Recessed keys; use a pen point to presss LCD DISPLAY ELEMENTSs PROGRAMSThe Digi 42/2 will accept up to 42 programs A program consists of:1. An ON or OFF command2. Time of day (Hour and Minute)3. Single day or multiple daysA program is required for each ON event, and a program is required for each OFF event.NOTE:MULTIPLE ON OR OFF EVENTS MAY BE PROGRAMMED.For example, Program 1 may turn the office air conditioning ON at 8AM Mon.-Fri. Program 2 may turn the air conditioning OFF at 5PM Mon.-Fri.If someone is working late, they may press the override key to turn on the air conditioning. If they forget to press the override key again when they leave, the air conditioning will stay on all night (or all weekend).To prevent this from occurring, additional OFF times may be pro-grammed.• Program 3 can turn the air conditioning OFF at 6PM.• Program 4 can turn the air conditioning OFF at 7PM.• Program 5 can turn the air conditioning OFF at 8PM., etc.!IMPORTANT:BEFORE PROCEEDING WITH SETTING THE TIME AND PROGRAMMING THE UNIT, PRESS THE RESET KEY TO CLEAR ALL DATA FROM THE MEMORY.s SELECTING AM/PM OR MILITARY TIMEAfter pressing reset, the display may show AM (right). The num-bered day symbols will be flashing on and off.If the display does not show AM, it is in military time mode (24:00 hr.) To change to AM/PM mode, press and hold the h key and press the ±1h key once.AM will appear in display.If display is in AM mode and military mode is desired, press and hold the h key, press the ±1h key once.s SETTING THE TIMENOTE:If the h and m keys are held down longer than 2 seconds,the numbers will advance rapidly.Press and hold the key during the following:(If Daylight Savings Time is in effect, press ±1h first)1.Press hto advance to the current hour (while holding down the key)2.Press m to advance to the current minute (while holding down the key)3.Press Day repeatedly to advance to current day (while holding down the key)NOTE:If the days are flashing, it indicates the day of the week was not set when setting the time. The timer cannot be programmed unless the day of the week is entered.s MANUAL DAYLIGHT TIME CHANGEOVEREach year, in the Spring, press ±1h to advance the time an hour. In the Fall, press ±1h to set back an hour.s SETTING AUTOMATIC DAYLIGHT TIMECHANGEOVER (OPTIONAL)NOTE:It is only necessary to program the changeover dates once.The timer will then automatically change the time at 2:00AM on the first Sunday in April and the last Sunday in October until the year 2079.1. Press and hold the ±1h key and press the Day key once. If in AM/PM mode, “12:31” (Dec.31) will be flashing. If in military time mode, “31:12” will be flashing.2. Enter the current (today’s) date.Example: June 15, 1997.Press m key (for date) to 15first and then press h key (for month) to 06(If in military time, h is date and m is month)3. Press ±1h once, a 2under Tu and 1995appears in display 4. Enter the current year. Example: 1997. Press m key twice to 1997(If you overshoot, hold down the m key – the years will scroll to 2079 and back to 1995)5. Press ±1h once, a 3under We and AU appears in display,which indicates preset European dates.6. Press m key once so display shows cHA (If m key is inadver-tently pressed twice and HA shows in display, press m key two more times until cHA shows)7. Press ±1h once, a 4under Fr and 03:30(for 1997) appears in display, which indicates March 30 (30:03 in military)8. Enter the date for spring time change.Example: April 6, 1997.Press h key (for month) to 04.Press m key (for date) to 06(If in military time, h is date and m is month)9. Press ±1h once, a 5under Sa and the fall time change date appears in display. Example: 10:26 for 199710. Presskey to enter Run ModeDaylight Time Changeover Dates 1997April 6 - October 262002April 7 - October 271998April 5 - October 252003April 6 - October 261999April 4 - October 312004April 4 - October 312000April 2 - October 292005April 3 - October 302001April 1 - October 282006April 2 - October 29s PROGRAMMING 24 HOUR OR 7 DAY SCHEDULES It is helpful to write out the program schedulesbefore beginning. See last page.!IMPORTANT:THE CURRENT TIME OF DAY AND DAY OF WEEK MUST BE SET PRIOR TO PROGRAMMING. SEE “SET-TING THE TIME”NOTE:The Day and Sel.keys are used to omit days of the week for which the OFF or ON time is not to be implemented. For 24 hour sched-ules (same program every day fo the week), ignore Day and Sel.keys.If an ON or OFF symbol is not entered, the ON symbol will flash,and program will not be accepted.ExampleProgram 1:CH1 ON at 7:00AM Monday thru FridayProgram 2:CH1 OFF at 6:00PM Monday and Friday onlyProgram 3:CH1 OFF at 5:00PM Tuesday, Wednesday and Thursday Three programs need to be entered.Press Prog.key only once. Display shows:appears Press h keyto 07AM Press m key once to 00Press Day key 6 times flashing line appears under 6PressSel.key once to omit 6 in display flashesPress Day key onceflashing line appears under 7Press Sel.key once to omit 7 in display flashesPress Prog.key to enterappears Press h key to 06PM Press m key once to 00Press Day key twice flashing line appears under 2Press Sel.key once to omit 2 in display flashes Press Day key once flashing line appears under 3Press Sel.key once to omit 3 in display flashes Repeat Day and Sel.keys for days 4, 6, and 7Press Prog.key to enterPress h key to 05PM Press m key once to 00Press Day key once flashing line appears under 1Press Sel.key once to omit 1 in display flashes Press Day key 4 times flashing line appears under 5Press Sel.key once to omit 5 in display flashes Repeat Day and Sel.keys for days 6 and 7Press Prog.key to enter Press key to enter Run Mode!IMPORTANT:IF AN “ON” TIME WAS PROGRAMMED THAT IS EARLI-ER IN THE DAY THAN THE CURRENT TIME, PRESS AND/ORDETERMINE IF IT SHOULD BE ON OR OFF AFTER PROGRAMMING)sCHANNELSIn each program, CH1 and/or CH2 can be a OFFor ON event. Also,one channel can be an OFF event and the other an ON event in the same program. With both channels programmed to the same ON/OFF schedule, the timer becomes a DPDT time switch.Example: CH1 ON, CH2 OFF at 8AM Every Day.key oncePress CH1 ON symbol appears PressCH2 OFF symbol appearsPress h key to 08AM Press m key to 00Press Prog.keyto enter additional programss MANUAL OVERRIDETEMPORARY: While in the Run Mode, pressing the or or eliminating the override.CONTINUOUS: While in the Run Mode...• Pressing the or key twice will turn the output to ON permanently. • Pressing the or key three times will turn the output OFFpermanently.• To terminate a continuous override, press the or key untilappears in the display.s REVIEWING PROGRAMSTo review the programs at any time, press Prog.key. Programs will appear in the order they were entered with repeated presses of the Prog.key. After all programs have been reviewed, the blank display will appear to allow entering another program. Another press of the Prog.key will display the number of free programs available, such as Fr 38if 4 programs have been entered.s CHANGING A PROGRAMSelect the program to be changed with the Prog.key. New daysmay be omitted or omitted days may be returned by using the Day and Sel.keys just as in initial programming. Hour and minute can be changed with the h and m keys.Press Prog.or key to store the new program.s DELETING A PROGRAMTo delete only one or a few programs:Press Prog.key until the desired program is displayed.Press m key to :59and press once more to blank out.Press h key to 11PM and press once more to blank out.Press key, display will flash for several seconds and then enter the Run Mode.Using the reset key will delete ALL programs, the time of day, and daylight change dates.s HOLIDAY PROGRAMAn “8th day”, or Holiday program schedule may be entered for use on holidays or vacation periods. More than one ON or OFF time may be entered for the Holiday program.A typical Holiday schedule may be to turn OFF at 12:01AM dur-ing the holiday period.1. Press Prog.key to first free program2. Pressappears3. Press h key once to 12AM4. Press m key twice to 015. Presskey onceEnter additional ON or OFF schedules as above, followed by the key.6. Press key to enter Run Modes IMPLEMENTING HOLIDAY PROGRAMUp to 6 days in advance of the Holiday, the “8th day” or Holiday schedule may be selected to begin on a certain day of the week, and continue from 1 to 99 days.Example: Thursday and Friday will be Holidays 1. Presskey once2. Press Day3. Press Sel.4. Press key to enter Run ModeDisplay will show symbol above current time8th day schedule will be implemented on Thursday and run for 2days and then timer will revert back to normal programs.NOTE:If Sel.key is held down, it will scroll rapidly to 99 and back to 01To review the implementation scheduled, press key once.Display shows day of implementation and number of days holiday pro-gram will be active.Press key.To delete the implementation scheduled, press key twice. symbol disappears from display.On the day the Holiday Program is selected to begin, the 8th day program will be implemented. The display will show the Holiday symbol point, press once.s TROUBLESHOOTINGPROBLEM: Days are flashing, pressing any key does nothing except key turns output ON and OFF.SOLUTION: Time of Day and Day of Week have not been set. See “SETTING THE TIME”NOTE:This is the condition after a reset. If the timer is found in this condition after it has been installed, programmed and operating for a while, it may indicate that electrical noise or voltage transients have dis-rupted the microprocessor causing a loss of program information. Call 1-800-272-1115 and request that a no-charge “Snubber Filter” be sent to you to place across the input to the timer, which may solve the problem.A second, but very unlikely cause of loss of program is a power fail-ure with the backup battery low or dead. Check by disconnecting power and monitoring how long the battery keeps the time of day in the display.PROBLEM:Time of day was set while holding the key down,but days are still flashing.SOLUTION: Current day of week was not set while holding down the key. See “SETTING THE TIME”PROBLEM: It is 10AM and a ON program for 8AM was entered, but the output is not ON. Display shows the and symbols.SOLUTION: After programming, the timer does not “look back” to determine if it should be ON. Press the key (temporary override)to turn the output ON; appears in display. The timer will assume automatic operation at the next programmed event.PROBLEM: A program for 8AM Monday thru Friday was entered,but it will not accept it and CH1is flashing.SOLUTION: The ON or OFF was not entered as part of theprogram. ON or OFF must be selected.P r i n t e d i n U S A 082U S 010.97GRÄSSLIN GmbH & Co. KG is ISO 9001 CertifiedGRASSLIN CONTROLS CORPORATION31 Industrial Ave. • Mahwah, New Jersey 07430 • Tel.: 201-825-9696 • Fax: 201-825-8694E-mail:*********************•。
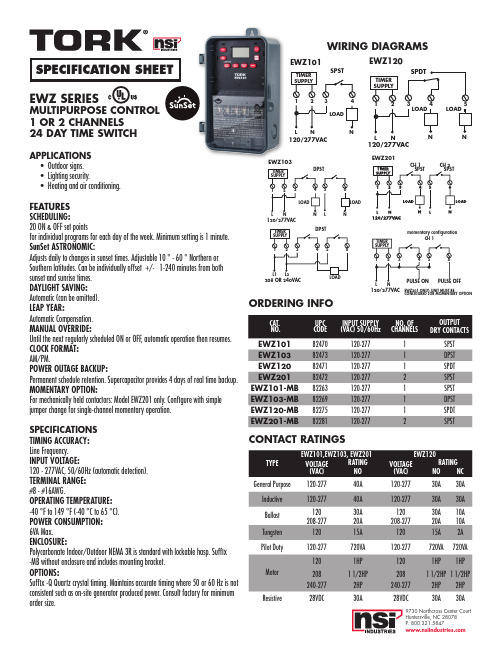
EWZ系列多功能时间控制器(1或2通道、24小时定时开关应用)说明书
ORDERIN1G I2NF3O 4 5
6
1 23
TIMER
DPSSUTPPLY
1
45
Automatic Compensation.
1 23
MANUAL OVERRIDE:
Until the next regularly scheduled ON or OFF, automatic operation then resumes.
DPST
ECW OENW Z2FI0GZ1U1OREN2DL0YF:OURNMITOMMUE8SN2TT4BA7ER1Y OPTION120-277
1
SPDT
EWZ201
82472
120-277
2
SPST
L1 L 208 OR 2
LO
MOMENTARY OPTION:
EWZ101-MB 82263
120-277
TIMER
SPST
SUPPLY EWZ120
SPDT
TIMER
1
2 SU3PPLY
4
EWZ101
TIMER SUPPLY
SPST
1 23
4
1 23
4
LOAD LOAD
5 LOAD
LOAD
L
N
N
L
NL N
120/277V12A0C/277VAC
NN
N
120/277VAC
EWZ120
ETWIMZE1R01
WIRING DIAGRAMS
SPECIFICATION SHEET
EWZ SERIES
EWZ101
TIMER SUPPLY
SPST
MULTIPURPOSE CON1 TR2 O3L 4
24小时电子时间开关使用说明书

• 1 H.P. 120 V.A.C., 60 Hz.
• 2 H.P. 240 V.A.C., 60 Hz.
• 5 Amps Tungsten, 120/240 V.A.C., 60 Hz.
• 20 Amps Ballast 277 V.A.C., 60 Hz.
V.A.C.
SWITCH RATINGS: ET105C
SET POINTS (EVENTS): 8 total (4 ON/4 OFF).
BATTERY POWERED CLOCK OPERATION: 3 Years minimum
SERVICE CENTER/ SERVICE CENTRE CENTRE DE SERVICE
INTERMATIC INCORPORATED After Sales Service 7777 Winn Rd., (815) 675-7000
158--00385
LIMITED ONE YEAR WARRANTY If within one (1) year from date of purchase, this product fails due to a defect in material or workmanship, Intermatic Incorporated will repair or replace, at its sole option, the unit free of charge. This warranty applies only to the original purchaser and is not transferable. The warranty does not apply to: (a) damage caused by accident, abuse, mishandling, dropping, acts of God, or any negligent use; (b) units which have been subject to unauthorized repair, opened, taken apart, or otherwise modified; (c) units not used in accordance with directions; (d) damages exceeding the cost of the product. Some states do not allow a limitation of damages, so the foregoing limitation may not apply to you. This warranty gives you specific legal rights and you may have other rights that vary from state to state. INTERMATIC INCORPORATED WILL NOT BE LIABLE FOR INCIDENTAL OR CONSEQUENTIAL DAMAGES. THIS WARRANTY IS IN LIEU OF ALL OTHER EXPRESS OR IMPLIED WARRANTIES. ALL IMPLIED WARRANTIES, INCLUDING THE WARRANTY OF MERCHANTABILITY AND THE WARRANTY OF FITNESS FOR A PARTICULAR PURPOSE, ARE HEREBY MODIFIED TO EXIST ONLY AS CONTAINED IN THIS LIMITED WARRANTY AND SHALL BE OF THE SAME DURATION AS THE WARRANTY PERIOD STATED ABOVE. This warranty service is available by either (a) returning the product to the dealer from whom the unit was purchased, or (b) mailing postage prepaid to the nearest authorized service center listed. Please be sure to wrap the product securely when mailing to avoid damage. This warranty is made by: Intermatic Incorporated/After Sales Service, 7777 Winn Rd., Spring Grove, IL 60081-9698.
木头电子钟中英文说明书

双屏数码声控木钟使用说明书(升级版)一.产品简介1)开机/复位:RESET键2)功能特征:◆工作电压:DC5V/500MA 或4节7号干电池(AAA)◆万年历从2000年到2099年,共100年。
◆时间,日期,温度,可自动切换显示,也可手动锁定显示时间,单按SET键切换。
◆12/24小时:可以进行12/24小时制转换,默认24小时制,2016年1月1日,12:00◆三组闹铃,每组闹铃时长1分钟◆声控开关自由调节(按Down键)◆工作日闹铃设置(长按SET键进入设置,ON E是打开,即周六周日不响闹铃;--E 是关闭,即周一至周日每天都响闹铃)2)产品常规配置温馨提示:当您打开产品包装时请检查包装盒内是否有如下配件:◆数码木钟一台◆使用说明书一份◆USB线一条二.产品主要技术参数◆本产品直接配电源适配器使用,电源适配器的输入电压:AC110V-240V,50/60HZ,电源适配器的输出电压:DC5V/500MA-1000MA。
也可以使用AAA*4节电池备用。
(使用电池时建议开启声控功能。
)◆声控模式下,当近距离声音大于60分贝时就可以唤醒显示。
三.显示及按键介绍1)显示功能说明2)按键功能说明四.功能设置在正常显示状态下,长按设置键(SET),3秒不放,显示闪动。
设置顺序为: 年-月-日→12H/24H→时-分→闹钟(A1-时-分,A2-时-分,A3-时-分)→工作日闹铃开关。
◆年设置:按住设置健(SET)三秒,年所在位闪动,按向上键(UP)/向下键(DOWN)可以向上或向下调整,长按可以快进/快退◆月设置:年设置完成后,再按设置健(SET)进入月调整,月所在位闪动,按向上键(UP)/向下键(DOWN)可以向上或向下调整,长按可以快进/快退◆日设置:月设置完成后,再按设置健(SET)进入日调整,日所在位闪动,按向上键(UP)/向下键(DOWN)可以向上或向下调整,长按可以快进/快退◆12/24H设置:日设置完成后,再按设置健(SET)进入12/24小时调整,按向上键(UP)/向下键(DOWN)可切换12/24小时制。
24小时程控定时器使用说明书

24小时程控定时器使用说明书1概述24小时程控定时器是一种能定时。
带有程序控制电源通断的装置。
能在24小时内,预先设定控制时间范围,从而有效地控制用电器具的开启和关闭。
2技术数据电源AC220V50HZ 最大负载电流:10A 定时范围;15min-23h45min 最小设定单位:15mim 开关控制数最大48次工作方式:连续工作制3工作原理与特点程控器系用同步电机驱动齿轮减速,实现24小时转一圈,由定时插片处于上,下的不同位置,控制定时器内微动开关的接通或断开,从而达到控制用电器具的电源自动开启和关闭。
与一般的定时器不一样了!对家用电器的使用有极大的安全性,本产品体积小,使用方便。
4控制开关功能控制开关"ON"和"T"二个位置,当往上拨时,置于"ON"位置时,指示灯常亮,此时定时功能丧失,电器用具不受控制。
当控制开关往下拨时置于"T"位置时,定时器的功能恢复了。
5使用方法1设定定时范围,根据你的需要,何时接通被控电器就将此时此刻的刻度圈下方的定时插片按下,按下一个定时插片,定时范围为15min;按下二个插片,定时范围为30min;依次类推。
2插上电源往顺时针方向旋转把现在的时间对准当箭头上。
就OK了注:1定时插片必须上下按到位。
2用电器具的功l率不得超过规定值。
3每次插上定时器需对好现在时间。
例如:现在是上午9:00钟,我想在下午16:00钟煮饭大约煮30分钟。
我在16:00—16:30之间的定时插片按下两片.插上电源往顺时针方向旋转,箭头对准9:00钟就好了。
程序控制定时器(以下简称:程控定时器)由北京多维精控计算机技术开发中心研制成功,具有多项专利技术。
本产品是通用的程序控制定时器,具有多路设置灵活的定时器。
设置时无需编程,也不需要类似可编程控制器(PLC)那样设计梯形图,而是采用填表设置的方法代替繁琐的编程工作,操作使用非常方便,被称为:无需编程的“PLC”。
智能电子钟用户手册 2023
智能电子钟用户手册 2023用户手册:智能电子钟(2023版)欢迎使用智能电子钟(以下简称“电子钟”),此手册将向您介绍电子钟的基本功能和使用方法,以帮助您更好地运用该产品。
1. 产品简介电子钟是一款集时钟、闹钟和日历于一体的智能设备。
具备大屏幕显示、定时闹铃、定时提醒、语音交互等功能,旨在为您打造更便捷的时间管理和提醒功能。
2. 外观与按键电子钟采用简约现代的设计风格,外观小巧精致,适用于不同场景。
主要按键包括:- 功能键:用于进入菜单界面和选择功能。
- 上/下/左/右键:用于在菜单界面或设置页面进行上、下、左、右的导航。
- 确认键:用于在菜单界面选择或确认设置。
3. 基本设置3.1 时间设置在主界面按下功能键,进入设置菜单,选择时间设置。
根据菜单提示,使用上/下键进行小时、分钟、日期和年份的设置,确认键进行确认。
3.2 闹钟设置在设置菜单中选择闹钟设置,按照提示进行时间、重复周期和铃声的设定。
3.3 提醒设置提醒功能可帮助您设置定时任务,如待办事项、会议提醒等。
在设置菜单中选择提醒设置,按照菜单提示进行时间和内容的设定。
4. 高级功能4.1 语音交互电子钟支持语音交互功能,您可以通过语音指令设置时间、闹钟和提醒等。
长按功能键进入语音交互模式,根据语音提示进行操作。
4.2 背光调节电子钟配备背光功能,可根据环境光线自动调节或手动调节背光亮度。
在设置菜单中选择背光设置,按照提示进行相关设定。
4.3 换肤功能电子钟提供多种主题可供选择,在设置菜单中选择换肤功能,按照菜单提示进行主题样式的切换。
4.4 电源管理电子钟可以通过USB充电或使用电池供电。
在使用电池供电时,电量低时会自动提醒更换电池或接通电源。
5. 常见问题解答5.1 电子钟无法正常充电或使用- 确认电源插座是否正常供电。
- 检查电源线和适配器是否连接牢固。
- 如果使用电池供电,请确认电池是否正常。
5.2 闹钟无法正常响起- 确保已正确设置闹钟时间和重复周期。
飞利浦66237电子钟说明书
飞利浦66237电子钟说明书
以下是我找到的关于飞利浦66237电子钟说明书:
一、电池安装打开电池盒,按电池盒内极性标志,装入三节“AAA”7 号电池,如电池安装正确,产品将自动检测,显示屏自动全显示瞬间后,恢复到初试时间,20xx 年x 月x日 12 点整,初始温度25℃,同时发出“哔哔”的声。
否则重新安装电池。
二、查询、设置功能:
1、在正常时间显示状态下,且彩灯开关拨到“ON”或“OFF”时,连续按“M”键或轻触显示屏,显示屏按以下模式循环:TIME→TEMPERATURE→DATE→AL→TIMER,意思为时间→温度→日期→闹铃→定时器
2、在正常时间显示状态下,且彩灯开关拨到“TR”时,首次按“M”键或轻触显示屏,彩灯亮、显示保持时间显示界面,再连续按“M”键或轻触显示屏,显示屏按以下模式循环:TIME→TEMPERATURE→DATE→AL→TIMER,意思为时间→温度→日期→闹铃→定时器
秒信号产生器是整个系统的时基信号,它直接决定计时系统的精度,一般用石英晶体振荡器加分频器来实现。
将标准秒信号送入“秒计数器”,
“秒计数器”采用60进制计数器,每累计60秒发出一个“分脉冲”信号,该信号将作为“分计数器”的时钟脉冲。
“分计数器”也采用60进制计数器,每累计60分钟,发出一个“时脉冲”信号,该信号将被送到“时计数器”。
“时计数器”采用24进制计时器,可实现对一天24小时的累计。
译码显示电路将“时”、“分”、“秒”计数器的输出状态用七段显示译码器译码,通过七段显示器显示出来。
整点报时电路时根据计时系统的输出状态产生一脉冲信号,然后去触发一音频发生器实现报时。
- 1、下载文档前请自行甄别文档内容的完整性,平台不提供额外的编辑、内容补充、找答案等附加服务。
- 2、"仅部分预览"的文档,不可在线预览部分如存在完整性等问题,可反馈申请退款(可完整预览的文档不适用该条件!)。
- 3、如文档侵犯您的权益,请联系客服反馈,我们会尽快为您处理(人工客服工作时间:9:00-18:30)。
总结………………………………………………………………………………?
参考文献…………………………………………………………………………?
单片机原理及应用概述
生活啊
系统设计
1.设计要求
学习领域
单片机控制系统的运行与维护
总学时:64
训练项目
二十四小时电子时钟制作
4、吃苦耐劳、敬业精神和良好的职业道德。
参考资料及资源
1、教材、自借图书;
2、网络资料。
展示成果
1、带外壳包装的电子时钟产品;
2、产品说明书;
3、汇报ppt
注意事项
1、做好小组内的分工及协作;
2、项目实施中注意安全。
2.设计思路(系统构成框图)
硬件设计
1.器件清单
序号
元器件名称
型号规格
数量
实测值
1
2
学时:20
班级
10G机电5
组长
赵传成
组员
李佩刘成龙
任务描述
任务要求:
根据任务书描述的要求及应达到的指标制作:
1.利用单片机设计一个二十四小时电子时钟,实现一天二十四小时的准确计时
2.由四个按键进行当前时间的调节,按键电路采用独立式接法
3.用四个数码管进行当前时间的显示,动态显示方式显示时和分
4.秒位显示可以用数码管实现,也可以用LED指示
3
4
5
6
7
8
9
10
11饿
12
13
……
2.实验电路
3.实验照片
软件设计
1.流程图
2.程序清单
总结
参考文献
二十四小时电子时钟产品说明书
设计者:哇哈哈
班级:10G机电一班
工位号:G503
指导者:郭志伟刘家文
聊城职业技术学院工程学院
概述………………………………………………………………………………?
系统设计…………………………………………………………………………?
硬件设计……………………………………………………………、能撰写设计报告书的能力。
方法能力
1、自我学习和独立思考的能力;
2、通过多种渠道(说明书、手册、互联网、辅导教材、课件等)收集信息并进行整理、分类的能力;
3、分析与决策能力、创新意识与创新能力。
社会能力
1、与人交流与沟通的能力;
2、组织和团队合作能力;
3、针对性明确的表达和总结能力;
5.其他功能:外扩温度显示,星期显示,音乐报时等功能
专业能力
1、读懂工作任务描述的能力;
2、理解单片机定时器、中断的基本知识,会正确设置TMOD、TCON的相关参数;
3、掌握电子时钟电路的实物装接工艺;
4、能够正确使用电烙铁的能力;
5、熟练建立单片机软件运行环境的能力;
6、相关指令应用及独立编程、调试应用的能力;