海伦智能钢琴DUA I说明书
单轴电动钢琴机组说明书
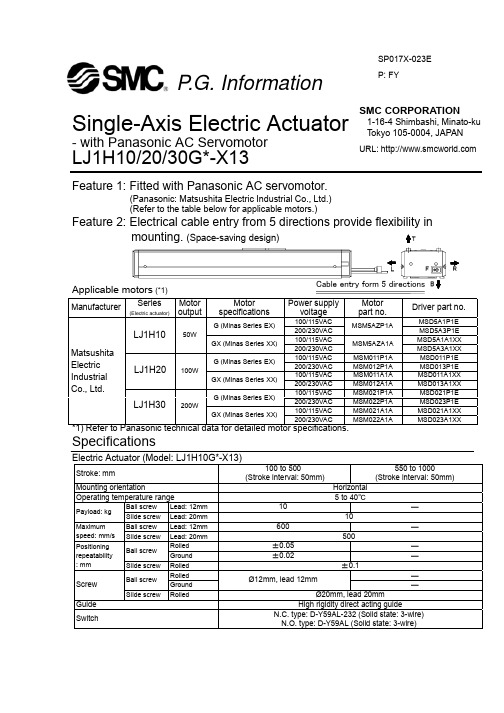
Single-Axis Electric Actuator - with Panasonic AC ServomotorSpecificationsElectric Actuator (Model: LJ1H10G*-X13)Stroke: mm100 to 500(Stroke interval: 50mm)550 to 1000(Stroke interval: 50mm)Mounting orientationHorizontalOperating temperature range5 to 40℃Ball screw Lead: 12mm 10― Payload: kg Slide screw Lead: 20mm 10Ball screw Lead: 12mm 600― Maximum speed: mm/s Slide screw Lead: 20mm 500Rolled ±0.05 ― Ball screw Ground ±0.02― Positioning repeatability : mmSlide screw Rolled ±0.1Rolled ― Ball screw Ground Ø12mm, lead 12mm―Screw Slide screwRolledØ20mm, lead 20mmGuideHigh rigidity direct acting guideSwitchN.C. type: D-Y59AL-232 (Solid state: 3-wire) N.O. type: D-Y59AL (Solid state: 3-wire)SP017X-023EP: FYSMC CORPORATION1-16-4 Shimbashi, Minato-kuTokyo 105-0004, JAPANURL: P .G. InformationSpecificationsElectric Actuator (LJ1H20G*-X13)Stroke: mm100 to 650(Stroke interval: 50mm)700 750 800 850 900 950 1000 1200Mounting orientationHorizontal Operating temperature range5 to 40℃ Lead: 10mm 30― Ball screw Lead: 20mm 15 ― Payload: kgSlide screwLead: 20mm 15Lead: 10mm 500 460 410 370 330 300 275 250 ― Ball screw Lead: 20mm 1000930 820 740 660 600 550 500― Maximum speed: mm/s Slide screw Lead: 20mm 500Rolled ±0.05 ― Ball screw Ground ±0.02― Positioning repeatability : mmSlide screw Rolled ±0.1Ø15mm, lead 10mm ― Ball screw Rolled, Ground Ø15mm, lead 20mm―Screw Slide screwRolledØ20mm, lead 20mmGuide High rigidity direct acting guide SwitchN.C. type: D-Y7GL (Solid state: 3-wire) N.O. type: D-Y59AL (Solid state: 3-wire)Electric Actuator (LJ1H30G*-X13)Stroke: mm200 to 1000(Stroke interval: 50mm)1050 1100 1150 1200 1250 1300 1350 1400 1450 1500Mounting orientationHorizontal Operating temperature range5 to 40℃ Ball screw Lead: 25mm60 Payload: kgSlide screwLead: 40mm 30Ball screw Lead: 25mm 1000940 860 780 700 660 620 590 560 530 500Maximum speed: mm/s Slide screw Lead: 40mm 500 Rolled ±0.05 Ball screwGround ±0.02 Positioningrepeatability : mm Slide screw Rolled ±0.1RolledBall screwGroundØ25mm, lead 25mmScrew Slide screw RolledØ30mm, lead 40mm Guide High rigidity direct acting guideSwitchN.C. type: D-Y7GL (Solid state: 3-wire) N.O. type: D-Y59AL (Solid state: 3-wire)How to Order Cable (*2)*2) Connector requirement:Power supply connector (5557-10R by MOREX)Interface connector (10126-3000VE by Sumitomo/3M Limited)(Refer to the specification table to verify applicable model.)*3) Please contact your sales representative when supplying your own motors.*4) A driver unit will be included if the motor is already installed at the time of shipment.the cable for connecting a motor and driver unit is optional. (Refer to “How to Order Cable”.)*5) Please refer to our standard catalog regarding the details of combinations of feed screw lead and stroke.Please contact SMC for lead times.*6) Stroke lengths with an asterisk (*) are produced upon receipt of order.Please contact SMC for lead times.*7) For Series LJ1H20 with stroke length of 1200mm, only slide screws are available (Symbol: S).*8) Please refer to the dimensions page for electrical entry directions.*9) Auto switches (positioning) should be adjusted by customers.©2001 SMC CORPORATION All Rights Reserved。
美国标准吉他电子钢琴2012年版说明书
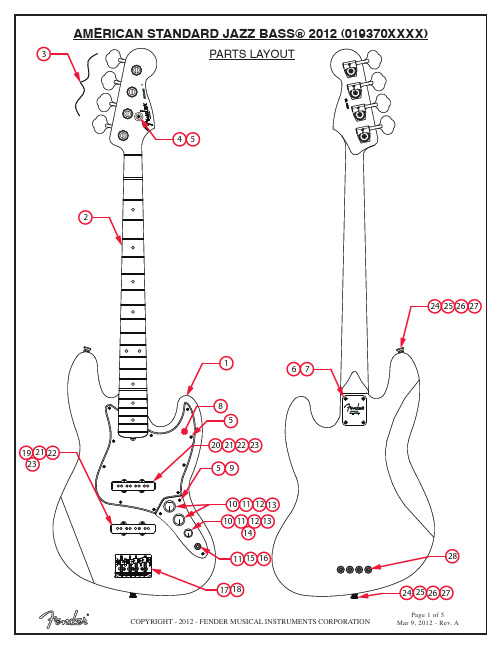
PARTS LAYOUTJ A Z Z B A SS M A D E N U S A CORONA,CALIFORNIAZ 3 0 0 0 01SER IAL NU MBER 21345768510121311591012131114111516171821222021221923 23252624272526242728REF#DESCRIPTION PARTNUMBER 1BODY AM STD JAZZ BASS JPM0056191519 1BODY AM STD JAZZ BASS 3TS0055219500 1BODY AM STD JAZZ BASS OWT0056191505 1BODY AM STD JAZZ BASS BLK0056191506 1BODY AM STD JAZZ BASS COLA0056191512 1BODY AM STD JAZZ BASS BPL0056191555 1BODY AM STD JAZZ BASS CFM0056191569 2NECK AM STD JAZZ BASS RW0074255000 2NECK AM STD JAZZ BASS MN0074256000 3KEY BASS STD UPG BASS LNG CHROME0075116000 4STRING GUIDE BASS CHROME0994913000 5SCREW SMAB 4 X 1/2 OHP ZA CHROME0994923000 6NECK PLATE AM DLX BASS CHROME0991446100 7SCREW SMA 8 X 1-3/4 OHP ZARTAN0021424049 8 PICKGUARD AM STD J-BASS MG/B/MG0080768000 8 PICKGUARD AM STD J-BASS W/B/W0991335000 8 PICKGUARD AM STD J-BASS P/B/P0991377000 8 PICKGUARD AM STD J-BASS TORT0074131000 9PLATE CONTROL JAZZ BASS CHROME0992057100 10KNOB 2 LARGE 1 SMALL SKIRTED BLACK0991370000 11HEX NUT 3/8-32 X 3/32 TK NI0016352049 12WASHER LOCK INTL 3/8 X .6870016436049 13CONTROL 250K 10%0990831000 14CAPACITOR CD .05µF 100V 20%0015552049 15JACK PHONE OPEN CIRCUIT0021956049 16WASHER FLAT 3/8 X .614 NI0031153049 17BRIDGE ASSY AM SERIES BASS UPG RH CHROME0075124000 17A BASE PLATE BASS BRIDGE AM SERIES CHROME0075125000 17B BLOCK BASS BRIDGE AM SERIES CHROME0075126000 17C BRIDGE SADDLE AM SERIES BASS 1-20075127000 17D BRIDGE SADDLE AM SERIES BASS 3-40075135000 17E SCREW 6-32 X 5/16 FHP ZI0076154000 17F SCREW CAP 6-32 X 1-1/2 HEX SKT BLX0075394000 17G SPRING TELE BRIDGE BLACK 0018872049 17H SCREW SET 6-32 X 7/16 HEX SKT BLX NYLOK0075354000 18SCREW SMAB 5 X 1 OH CHROME0021422049 *=NOT PICTURED IN DIAGRAMREF#DESCRIPTION PARTNUMBER 19PICKUP BRIDGE VINT JACO 0055199000 20PICKUP NECK VINT JACO0055198000 21PICKUP COVERS SET 0992038000 22SCREW WOOD 4 X 1-1/4 RH ZA CHROME0021408049 23WEATHER-STRIP 9/16 X 1/2 OP CL NEOP0018556049 24BUTTON STRAP CHROME 0063267049 25WOOD SCREW 6 X 1 OHP NI0016188049 26FELT WASHER BLACK 0994929000 27FELT WASHER WHITE0994930000 28FERRULE STRING AM SERIES BASS 0048604049 *CASE BASS RH0996171506 *WRENCH HEX KEY 1/16 SHORT ARM0021109049 *WRENCH ALLEN WRENCH 3/160048693000 *HEX KEY 7/64 BALL END0076157000*=NOT PICTURED IN DIAGRAMWIRING ASSEMBLY.05NECK PICKUP VOLUMEBRIDGE PICKUPNECK PICKUPBRIDGE PICKUPVOLUMETONE CONTROL CAPACITOR.05µFOUTPUT JACKGROUND LUG TO GUITAR BODYBLACK WIRE TO BRIDGESWITCH AND CONTROL FUNCTIONNECK PICKUP VOLUMEBRIDGE PICKUPVOLUMEMASTER TONENECK PICKUPBRIDGE PICKUP。
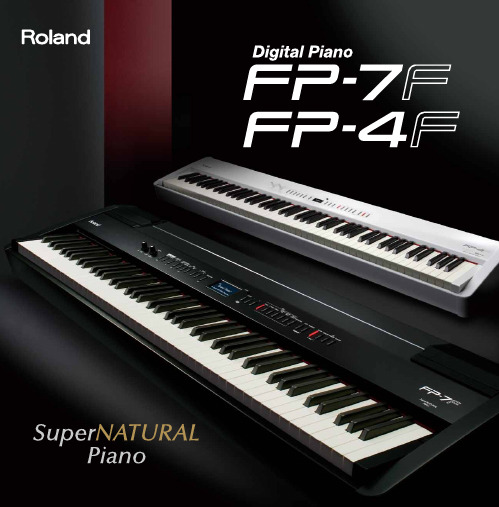
Roland SuperNATURAL Piano Power 三款数字钢琴说明书
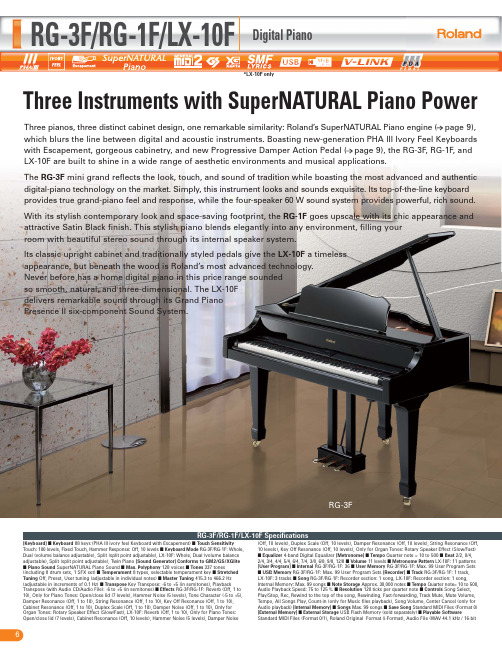
Three Instruments with SuperNATURAL Piano PowerRG-3F/RG-1F/LX-10FDigital Piano*LX-10F onlyRG-3F/RG-1F/LX-10F Specifications[Keyboard] ■ Keyboard 88 keys (PHA III ivory feel Keyboard with Escapement) ■ Touch SensitivityTouch: 100 levels, Fixed Touch, Hammer Response: Off, 10 levels ■ Keyboard Mode RG-3F/RG-1F: Whole, Dual (volume balance adjustable), Split (split point adjustable), LX-10F: Whole, Dual (volume balance adjustable), Split (split point adjustable), Twin Piano [Sound Generator] Conforms to GM2/GS/XGlite ■ Piano Sound SuperNATURAL Piano Sound ■ Max. Polyphony 128 voices ■ Tones 337 tones(including 8 drum sets, 1 SFX set) ■ Temperament 8 types, selectable temperament key ■ Stretched Tuning Off, Preset, User tuning (adjustable in individual notes) ■ Master Tuning 415.3 to 466.2 Hz (adjustable in increments of 0.1 Hz) ■ Transpose Key Transpose: -6 to +5 (in semitones), PlaybackTranspose (with Audio CD/Audio File): -6 to +5 (in semitones) ■ Effects RG-3F/RG-1F: Reverb (Off, 1 to 10), Only for Piano Tones: Open/close lid (7 levels), Hammer Noise (5 levels), Tone Character (-5 to +5), Damper Resonance (Off, 1 to 10), String Resonance (Off, 1 to 10), Key Off Resonance (Off, 1 to 10), Cabinet Resonance (Off, 1 to 10), Duplex Scale (Off, 1 to 10), Damper Noise (Off, 1 to 10), Only for Organ Tones: Rotary Speaker Effect (Slow/Fast), LX-10F: Reverb (Off, 1 to 10), Only for Piano Tones: Open/close lid (7 levels), Cabinet Resonance (Off, 10 levels), Hammer Noise (5 levels), Damper Noise(Off, 10 levels), Duplex Scale (Off, 10 levels), Damper Resonance (Off, 10 levels), String Resonance (Off, 10 levels), Key Off Resonance (Off, 10 levels), Only for Organ Tones: Rotary Speaker Effect (Slow/Fast) ■ Equalizer 4-band Digital Equalizer [Metronome] ■ Tempo Quarter note = 10 to 500 ■ Beat 2/2, 0/4, 2/4, 3/4, 4/4, 5/4, 6/4, 7/4, 3/8, 6/8, 9/8, 12/8 ■ Volume 11 levels ■ Metronome Pattern LX-10F: 11 patterns [User Program] ■ Internal RG-3F/RG-1F: 36 ■ User Memory RG-3F/RG-1F: Max. 99 User Program Sets ■ USB Memory RG-3F/RG-1F: Max. 99 User Program Sets [Recorder] ■ Track RG-3F/RG-1F: 1 track, LX-10F: 3 tracks ■ Song RG-3F/RG-1F: Recorder section: 1 song, LX-10F: Recorder section: 1 song,Internal Memory: Max. 99 songs ■ Note Storage Approx. 30,000 notes ■ Tempo Quarter note= 10 to 500, Audio Playback Speed: 75 to 125 % ■ Resolution 120 ticks per quarter note ■ Controls Song Select, Play/Stop, Rec, Rewind to the top of the song, Rewinding, Fast-forwarding, Track Mute, Mute Volume, Tempo, All Songs Play, Count-in (only for Music files playback), Song Volume, Center Cancel (only for Audio playback) [Internal Memory] ■ Songs Max. 99 songs ■ Save Song Standard MIDI Files (Format 0) [External Memory] ■ External Storage USB Flash Memory (sold separately) ■ Playable SoftwareStandard MIDI Files (Format 0/1), Roland Original Format (i-Format), Audio File (WAV 44.1 kHz / 16-bitThree pianos, three distinct cabinet design, one remarkable similarity: Roland’s SuperNATURAL Piano engine (page 9), which blurs the line between digital and acoustic instruments. Boasting new-generation PHA III Ivory Feel Keyboards with Escapement, gorgeous cabinetry, and new Progressive Damper Action Pedal (page 9), the RG-3F , RG-1F , and LX-10F are built to shine in a wide range of aesthetic environments and musical applications.The RG-3F mini grand reflects the look, touch, and sound of tradition while boasting the most advanced and authentic digital-piano technology on the market. Simply, this instrument looks and sounds exquisite. Its top-of-the-line keyboard provides true grand-piano feel and response, while the four-speaker 60 W sound system provides powerful, rich sound.With its stylish contemporary look and space-saving footprint, the RG-1F goes upscale with its chic appearance and attractive Satin Black finish. This stylish piano blends elegantly into any environment, filling your room with beautiful stereo sound through its internal speaker system.Its classic upright cabinet and traditionally styled pedals give the LX-10F a timeless appearance, but beneath the wood is Roland’s most advanced technology. Never before has a home digital piano in this price range sounded so smooth, natural, and three-dimensional. The LX-10F delivers remarkable sound through its Grand Piano Presence II six-component Sound System.linear format), Audio CDs (CD-DA) (when using a USB CD drive) ■ Save Song Standard MIDI Files (Format 0) [Other] ■ Internal Songs RG-3F/RG-1F: 60 songs, LX-10F: 74 songs ■ Rated Power Output RG-3F: 60 W x 2, RG-1F: 40 W x 2, LX-10F: 60 W x 2 ■ Speakers RG-3F/RG-1F: 20 cm x 2, 5 cm x 2,LX-10F: 16 cm x 2 (with Speaker box), (8 cm x 12 cm) x 2, 5 cm x 2 ■ Display RG-3F/RG-1F: 20 characters, 2 lines LCD, LX-10F: 128 x 64 dots Graphic monochrome LCD (with backlit) ■ Language LX-10F: English, Japanese ■ Lyrics LX-10F: Yes (Built-in Display) ■ Controls RG-3F/RG-1F: Volume, Brilliance, LCD Contrast, LX-10F: Volume, LCD Contrast ■ Pedals Damper (Progressive Damper Action Pedal, capable of continuous detection), Soft (capable of continuous detection, function assignable), Sostenuto (function assignable) ■ Other Functions RG-3F/RG-1F: Panel Lock, Playback Lock, V-LINK, LX-10F: Panel Lock, V-LINK ■ Connectors RG-3F/RG-1F: AC inlet, Pedal Connector, Input jacks (1/4 inch phone type) (L/Mono, R), Input jacks (RCA phono type) (L/Mono, R), Output jacks (1/4 inch phone type) (L/Mono, R), USB (MIDI) connector, MIDI connectors (IN, OUT), Headphone jack (Stereo) x 2, External memory connector (USB), LX-10F: AC inlet, Pedal connector, Input jacks (L/Mono, R), Output jacks (L/Mono, R), USB connector, MIDI connectors (In, Out), Phones jack (Stereo) x 2, External Memory connector ■ Power Supply AC 117 V, AC 220 V, AC 230 V, AC 240 V (50 / 60 Hz) ■ Power Consumption RG-3F/LX-10F: 140 W, RG-1F: 95 W ■ Dimensions <top opened> RG-3F: 1,490 (W) x 950 (D) x 1,540 (H) mm/58-11/16 (W) x 37-7/16 (D) x 60-11/16 (H) inches, RG-1F: 1,420 (W) x 730 (D) x 1,270 (H) mm/56 (W) x 29 (D) x 50 (H) inches, LX-10F: 1,410 (W) x 453 (D) x 1,124 (H) mm/55-9/16 (W) x 17-7/8 (D) x 44-1/4 (H) inches (including piano stand) <top closed> RG-3F: 1,490 (W) x 950 (D) x 920 (H) mm/58-11/16 (W) x 37-7/16 (D) x 36-1/4 (H) inches, RG-1F: 1,420 (W) x 730 (D) x 890 (H) mm/56 (W) x 29 (D) x 36 (H) inches, LX-10F: 1,410 (W) x 446 (D) x 1,070 (H) mm/55-9/16 (W) x 17-9/16 (D) x 42-1/8 (H) inches (including piano stand) ■ Weight RG-3F: 110 kg/243 lbs, RG-1F: 75 kg/166 lbs, LX-10F: 93.6 kg/206 lbs 6 oz (including piano stand) ■ AccessoriesRG-3F: Owner’s Manual, Power Cord, Headphone Hook, Maintenance Kit, Key Cover, Caster Caps,RG-1F: Owner’s Manual, Power Cord, Headphone Hook, Brackets, LX-10F: Owner’s Manual, Power Cord, Roland 60 Classical Piano Masterpieces, Headphones Hook, Cord Clamps*, Stabilizer*, Felt*,*Supplied with the stand. ■ Options Headphones (RH-A30, RH-300, RH-L20, RH-5), USB Flash Memory (M-UF2G), USB CD Drive (CD-01A)RG-3F/RG-1F/LX-10F SpecificationsRG-1F LX-10F。
EASY PIANO使用手册20130712
2.1.4. 外部電源插孔......................................................................................................6
2.2.
MIDI功能..................................................................................................................... 6
1.1.1. 面版總覽..............................................................................................................3
1.1.2. 背版總覽..............................................................................................................3
1.2.4. 調音......................................................................................................................4
1.3.
進階功能...................................................................................................................... 5
2.1.2. 喇叭插座..............................................................................................................6
MEDELI DP-468 说明书
尊敬的用户:非常感谢您选购美得理数码钢琴!这款外观精美,易学易用的数码钢琴是本公司全体员工不懈努力,孜孜以求的结晶,,强大英贴近用户......我们竭诚希望这部精工制造,功能丰富的数码钢琴能充分发挥您的音乐天赋,给您带来无比快乐和美妙的音乐享受。
为使您的演奏得以理想发挥,使用前敬请仔细阅读本说明书;此外,请保管好本说明书以备后用。
它仅拥有丰富的音色和动感的节奏,还具有存储功能,方便现场演奏的中文显示,使您的操作变得更加简单、直观您会在使用过程中惊喜地发现更多实用的功能。
不尊敬的用户,当您选购本数码钢琴后,请检查以下物品是否齐全。
右支架左支架琴体(含电源线)脚踏盒(含脚踏线)背板螺丝包美得理售后保修证书使用说明书1Version:006尊敬的用户,不要将本琴置于多尘土、振动、寒冷或高温的环境中(如阳光直射处、暖气旁),以免损伤外观及内部元件。
不要在其他电器附近使用本琴,如电视机、收音机等,以免产生干扰。
本琴在下列环境下使用最佳:温度:拔本琴的电源插头时,要握住插头,切勿用力狠拉电线,以免电线和插座受损。
清洁琴体前请先拔掉电源插头,不要用湿手插拔电源插头。
定期检查电源插头并清除积于其上的污垢。
当不使用本琴或打雷时,请拔掉电源线。
操作开关按钮及拔连接线时,不要用力过猛。
不要长时间把琴的音量开到很大或感觉不适应的程度来演奏,建议您将旋钮调到最大音量的三分之二处,以免造本成永久性听力下降。
与其他电器设备(如电脑、音响等)连接之前应先关闭所有的电源。
在开关这些设备时,应先将所有音量控制器置于最低。
并且应该一边演奏琴一边将外接设备的音量从最小逐渐提升到所需要的音量。
本供电电缆、电线上发现断线或接触不良等,请勿继续使用,以防引致火灾、触电等事故。
设置场所电 源操作说明维修·保养避免本琴遭受雨淋,不要在水边或潮湿环境下使用。
不要在琴上放置盛有液体的容器,以免液体流入琴内,损伤内部元器件。
清洁本琴时,请用干燥柔软布擦拭,不可使用带有化学腐蚀性溶剂清洗擦拭。
Fishman Prefix Plus 钢琴电子系统用户指南说明书
This fine instrument is equipped with a FISHMAN PREFIX PLUS™ACOUSTIC GUITAR SYSTEM.Please read these instructions care-fully.If you have any questions or problems, please call our CUS-TOMER SERVICE LINE at (978) 988-9665.The PREFIX PLUS™ is an instrument-mounted pickup / preamp sys-tem that offers total control of your amplified guitar sound.THE PICKUPThe PREFIX PLUS™ ACOUSTIC GUITAR SYSTEM includes the FISH-MAN ACOUSTIC MATRIX pickup;made with a unique co- polymer sensing material available exclusively from Fishman.This technology is not available from any other manufacturer.The sensing material exhibits a sensitivity and dynamic range that far surpasses all other known sensing materials.The ACOUSTIC MATRIX transducer is a fully EMI shielded, multi-layer sandwich of co-polymer strips that run the length of the pickup.This design allows the pickup to sense the motion of the entire saddle length, providing superb string to string balance, as well as sensitivity to both the strings and top of the instrument. THE PREAMPThe PREFIX PLUS™ preamp module incorporates a unique "flip-top" battery compartment for easy access. A variable NOTCH filter, shelv-ing BASS & TREBLE , semi-parametric CONTOUR, and BRILLIANCE controls are included for precise tone shaping and fighting feedback. There is also a PHASE reversal switch and a low battery indicator. The PREFIX PLUS™ can be plugged into any instrument-level audio input with excellent results.2PREAMP FUNCTIONSBATTERY COMPARTMENTPull the small tab at the top of the PREFIX PLUS™ toward you.The body of the preamp will swing out, revealing the BATTERY COMPARTMENT.Insert a fresh 9V alkaline battery.cable from the endpin jack when the unit is not being used.NOTE:Plug an instrument cable into the endpin jack before you plug into the sound equipment.Doing so will prevent loudspeaker damage.BATTERY LOW INDICATORWhen plugging into the endpin jack, the LOW BATTERY light will flash momentarily, indi-cating that the power is on.When the LOW BATTERY light stays on, it is time to change the battery.CONTROLSNOTCH FILTERThis is a fixed level, variable-frequency filter for eliminating feedback or unwanted reso-nance.The affected frequency is variable from 40 to 500 Hz.The NOTCH FILTER is effectively off in the full counter-clockwise position.3VOLUME CONTROLControls the overall gain of the PREFIX PLUS™.Goes from very quiet to very loud. BASS CONTROLThis is a boost/cut shelving tone control.The center detent yields a flat response. CONTOURThis is a Wide-range semi-parametric filter.It is used to selectively shape the instru-ment's tone.The CONTOUR Level slider controls the amount of boost or cut applied to the selected Contour FREQUENCY.The center detent yields a flat response.The Contour FREQUENCY slider determines the frequency band that is boosted or cut by the CONTOUR LEVEL control.The frequency is variable from 250 to 10 kHz. TREBLE CONTROLThis is a boost/cut shelving tone control.The center detent yields a flat response. BRILLIANCE CONTROLThis is a resonant style boost/cut filter.When boosted, the BRILLIANCE control can add presence to your sound or brighten up dead strings.PHASE SWITCHThe PHASE switch compensates for acoustic phase differences that often occur between instrument and speaker.It can be used as a tone filter at low volume levels or a feedback filter at high levels.The PHASE switch can correct any electrical phase difference between the PREFIX™ system and an outboard instrument microphone.Flip the PHASE switch several times and use your ear to find the optimum setting.The best position for the PHASE switch may change, depending on the sound system and/or venue acoustics. 4SUGGESTED EQ SETTINGSMID CUTYou can scoop out harsh midrange by setting the FREQUENCY slider slightly above center with the CONTOUR Level cut to taste below the center detent. You can alsocut midrange byboosting theBASS and TRE-BLE sliders torealize an"implied" mid-cut at 800 Hz.5FINGERSTYLEThis setting will add fullness to the bass and definition to the treble. 6CUT THROUGHFor cutting through a live band mix at high volumes.7WHAT IS PHASE?Phase is the relationship between two signals or soundwaves originating from the same instrument.For our purposes, phase relationships are expressed as being either "in phase" or "out of phase".In phase tends to enhance, while out of phase tends to sup-press the natural characteristics and acoustic tendencies of an instrument.A simple way to determine the quality of phase (in or out) of two sounds is to com-pare phase switch settings at low volumes.is when the wave-yourOUT OF PHASEOut of phase is when theinating from the same instru-upper peak of one waveoccurs at the same moment intime as the lower peak of theother.Out of phase is likelooking at yourself in a livevideo monitor;the image yousee is similar, but the per-spective is shifted.When you move to the right, the image appears to move to your left.Continued ...8WHAT IS THE PHASE SWITCH FOR?The phase switch is useful for two reasons:1.Due to the interactive and changing nature of phase, acoustic amplification depends on maintaining optimum phase relationships between amplified instruments, sound systems and venues.2.Since an industry standard for polarity has not been established for all sound equipment, the phase switch can compensate for any unintentional differences that might occur between instrument and sound system. APPLICATIONSIn any situation where the instrument faces a loudspeaker, there will be an inter-active phase relationship between the two.This usually occurs with stage amps, side fill and floor monitors at close distances.• LOW VOLUME AMPLIFICATIONAt low volumes, when an instrument and speaker are at similar levels and are in phase, the sound is full and solid, with the lower frequencies emphasized. When a mic'ed instrument and speaker are out of phase at low levels, the bass frequencies cancel out to some extent.The resulting sound is somewhat unnat-ural and unbalanced compared to in phase.• HIGH VOLUME LEVELSAt high volume levels, when an instrument and speaker are in phase, the sound pressure from the speaker will excite the instrument's sound chamber, creating a feedback loop at the instrument's lowest octave.This "cavity resonance" feed-back can be dealt with by putting the instrument and speaker out of phase or by adding equalization.ING THE PHASE SWITCH TO REDUCE FEEDBACK.Inverting the PHASE switch will put the instrument and speaker out of phase with each other, cancelling the low frequency feedback.If you move from your position on stage more than a few feet, you may have to invert the PHASE switch again to maintain an out of phase relationship between the mic'ed instrument and speaker.Continued ...9Here's why:A typical guitar has a cavity resonance of about 100 Hz.This is the frequency that generally feeds back when the guitar and speaker are in phase.100 Hz has a wavelength of about 11 feet.Phase inverts 180° for every 1/2 a frequency's wavelength.In this case, 1/2 the wavelength is about 5 1/2 feet.If you set your PHASE switch to eliminate cavity resonance (out of phase) and then move 5 1/2 feet towards or away from the speaker, you will effectively put the mic'ed guitar/speaker relationship at 100 Hz back in phase;in the line of fire for low frequency feedback.The PHASE switch on the ONBOARD BLENDER™ in effect electronically "moves" your instrument's position relative to the speaker by inverting the phase 180° every time you flip it.ING THE NOTCH FILTER TO REDUCE FEEDBACKNotching out instrument cavity resonance will eliminate the low frequency feed-back problem completely.The advantages to using notching equalization are:• The physical distance from the speaker will no longer be a factor for potential low frequency feedback.• The mic'ed instrument/speaker can remain in phase, maintaining a more nat-ural and balanced response.10SPECIFICATIONSNominal Input Level:-20 dBVInput Overload:(20 Hz - 20 kHz)-2 dBVInput Impedance:20 M OhmsOutput Impedance:Less than 3.5 k OhmsNominal Output Level:-12 dBVTHD:Less than .04 %, -20 dBV inputSignal to Noise Ratio:77 dB(A weighted referred to nominal-20 dBV input)Current Drain:Less than 3.5 mAPower Supply:9V Alkaline battery(estimated 160 hours continuous use with lowbattery indicator at 6.5V)Notch Filter Range:40Hz - 500 Hz (-15 dB)Bass Control Range:± 12 dB at 60 Hz± 3 dB at 350 HzTreble Control Range:± 12 dB at 10 kHz± 3 dB at 2.4 kHzContour Control Range:± 12dB(adjustable from 250 Hz to 10 kHz) Q = 0.5 Brilliance Control Range:± 9 dB at 10 kHzAll specifications subject to change without notice.11。
智能键盘乐器通用技术条件说明书
T /C N L I C 0013-2020中国轻工业联合会团体标准智能键盘乐器通用技术条件T/CNLIC 0013-2020*中国轻工业出版社出版地址:北京东长安街6号邮政编码:100740发行电话:(010)65241695网址:http :// Email :club @ 轻工业标准化研究所编辑发行地址:北京西城区月坛北小街6号院邮政编码:100037电话:(010)68049923*版权所有侵权必究书号:155019·5497印数:1-200册定价:38.00元全国团体标准信息平台ICS 97.200.20X 58团体标准T/CNLIC 0013-2020智能键盘乐器通用技术条件General specification for intelligent keyboard instrument国团体标准信息平台T/CNLIC 0013-2020I前言本标准按照GB/T 1.1-2009给出的规则起草。
本标准由中国轻工业联合会提出并归口。
本标准主要起草单位:北京星海钢琴集团有限公司、森兰信息科技(上海)有限公司、广州珠江钢琴集团股份有限公司、北京乐器研究所、吟飞科技(江苏)有限公司、海伦钢琴股份有限公司、江阴金杯安琪乐器有限公司。
本标准主要起草人:孟宇、赵秀伟、滕杨裔、王伟、徐刚、秦宏伟、郑之杰、时建明、张文博、周军、成慈、郭婷。
本标准为首次发布。
全国团体标准信息平台台平息信准标体团国全T/CNLIC 0013-20201智能键盘乐器通用技术条件1范围本标准规定了智能键盘乐器的术语和定义、概述、要求、试验方法、检验规则、使用说明的编制、使用环境、标志、包装、运输、贮存及回收利用。
本标准适用于音域至少为三个八度的智能键盘乐器(包括但不限于智能钢琴、智能手风琴、电子手风琴、智能电子琴、智能电子钢琴、智能电子管风琴)。
2规范性引用文件下列文件对于本文件的应用是必不可少的。
凡是注日期的引用文件,仅注日期的版本适用于本文件。
C-30数字琴类产品说明书

Targeted retail availability : April 2008A beautiful marriage: The enchanting harpsichord and the wonders of a digital instrument.From solo performance to ensemble playing, the C-30 provides the perfect sound and touch for baroque music. Enjoy the best of both worlds — a new-generation digital harpsichord with authentic sound and touch, excellent playability, and soul-stirring expression.■ Beautiful designAble to fit beautifully into a small space, the exquisite compact design is modeled on a small rectangularharpsichord known as the virginal. Picture board can be installed on the inside of the keyboard lid, and the side panels can be replaced with reproduction stained glass. Customization is available to match anyinterior so you can create the look you desire.■ Sensitive keyboard touchA newly developed special keyboard authentically reproduces the plucking sensation of a harpsichordkey when pressed. All of the characteristics of the harpsichord key action have been captured, includingthe length and form of the black keys, the depth of the key press, and even the distinctive noise thatcomes when a key is released.■ Rich timbreKnown as “Cembalo” in German and Italian and “Clavecin” in French, the harpsichord comes in various shapes and sizes. Two different types, Frenchand Flemish, of harpsichord sounds are built into the C-30. You can togglebetween them with the touch of a switch. For each sound, four buttons areavailable: 8-foot I (back), 8-foot II (front), 4-foot (octave higher), and lute (buffmute). You play them individually or layer them.In pursuit of the perfect harpsichord, Roland has equipped the C-30 with“Dynamic Harpsichord” sounds, which can be played with dynamics (velocitysensitivity) and a damper pedal. In addition, the sounds of the early fortepianoand a compact pipe organ have been included.Example of a French harpsichordMade 1765 by F . BlanchetHeld by, and photo courtesy of,Hamamatsu Museum of Musical InstrumentsPreliminary InformationC-30 operation panelRoland Corporation would like to thank the Collection Molinari-Pradelli, for the authorization to reproduce the picture entitled 'Estasi de Santa Maria Madalena' by MarcantonioFranceschini, for this limited edition of the C-30 Harpsichord.。
理查特·布莱克莫尔签名电子钢琴说明书
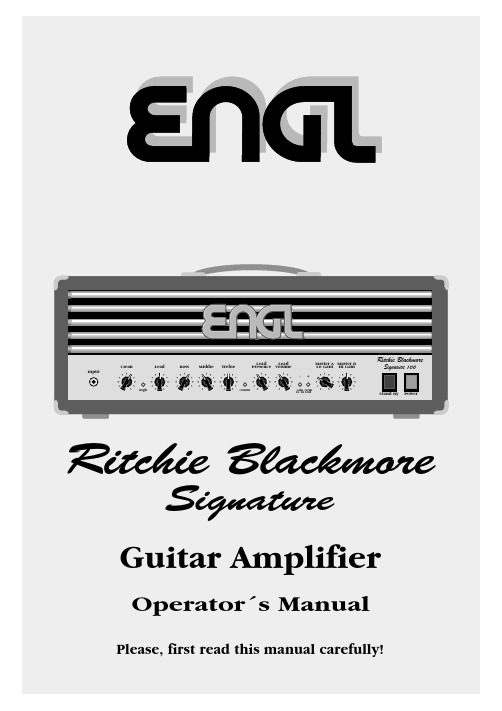
Ritchie Blackmore Signature - an all-tube guitar amp head featuring the soundand the look that fascinates a guitar legend such as Ritchie Blackmore.The Ritchie Blackmore Signature amp is based on a classic, proven design, but is also equipped with a number of innovative features. For instance, you can vary the amount crunch for the two channels Clean and Lead via the Gain-Boost switch. Also, each of the two Gain stages (Lo and Hi) is equipped with a dedicated Master Volume control or you can activate Master A and Master B via footswitch.With its high-quality components and superior finishing, this amp is built to last.You will find guidelines on care and maintenance of tube amps on the last page of 1 Input Unbalanced 1/4" input jack.2 Clean Input sensitivity control for the Clean channel, adjust the volume by means of this control and the Lo Gain Master (13); in the Hi Gain mode use the Hi Gain Master (14) for adjusting the volume. 3 Bright Alters the EQ by boosting the upper treble range; effectiveness decreases at higher Clean Gain (2) settings.4 Lead TIP: To get Crunch or heavy Rhythm sounds, set this Gain control for the Lead channel, control between the 9 and 12 o ´clock ´s position controls the amount of distortion (depending on the type of pick-up) and leave in the Lead mode. the Gain Boost pusbutton in the Off-position. CAUTION: Extremely high gain and volume levels in the Lead mode can produce strong feedback. Avoid feedback squeals, they lead to hearing loss and damaged speakers!5 BassBottom end voicing control. TIP : To get an idea of this amp ’s capabilities,6 Middle we suggest you set all control pots Mid-range voicing control. to the 12 o ’clock position. 7 Treble Upper range voicing control.8 Contour Press this button to alter the mid-EQ. When the button is pressed, the low mids (300-500 Kz) are boosted slightly. You can also activate this function via footswitch (Jack 19).9 Lead PresenceThis control defines the Treble response in the poweramp stage for the Lead channel.10 Lead VolumeVolume control for the Lead channel (in front of the FX loop, affects the SEND level).11 Gain Lo - Hi This button increases the gain levels for both channels. When you activate it, the Clean channel responds more like a Crunch channel, and the Lead channel delivers a hi-gain lead sound. Y ou can also activate this function via footswitch (Jack 20), the Gain Boost pushbutton is then no longer functional. The yellow LED illuminates to indicate Hi-Gain mode is active.12 Clean - Lead Channel selector pushbutton for Clean and Lead modes, red LED indicate Lead mode; This function can also be activated via a footswitch connected to jack 20. Once a footpedal is connected, the channel selector pushbutton is deactivated.13 Master A - Lo Gain Use this control (post FX Loop) to set the poweramp ´s master volume when the preamp is in Lo-Gain mode. Connect a footswitch to Jack 19 if you want to convert this control for use as Master A.You can then use the footswitch to activate two different master volumes (Master A and Master B).Rear Panel17 AC SOCKET Connect AC cord here ATTENTION: Ensure you use an intact AC cord with an insulated plug only! Before you power the amp up, ensure the voltage value printed beside the AC socket corresponds to the available current.18 AC FUSE BOX Contains mains fuse (rear chamber) and spare fuse (front chamber).NOTE: Ensure replacement fuses bear identical ratings (refer to the table)!19 Footswitch: Master A - B; Contour 1/4" stereo jack for double footswitches, executes the following functions: 1.Switching between the two Master volume controls A and B (mono terminal) 2.Contour switching (stereo terminal).Please note: If a footpedal is connected to this jack, the Lo Master - Hi Master function automatically converts to the Master A - B feature. In this case it can only be accessed via the footswitch.20 Footswitch: Clean - Lead; Gain Lo - Hi 1/4" stereo jack for double footswitches, executes the following functions: 1.Channel switching Clean - Lead (mono terminal) 2.Gain Lo - Hi (stereo terminal).21 F.X. Loop: Send Signal output for the Effects loop. Connect this output to a signal processor ’s input/return jack via a shielded cable with 1/4" plugs.22 F.X. Loop: ReturnSignal input for the Effects loop. Connect this input to a signal processor ’s output/send jack via a shielded cable with 1/4" plugs.23 Balance FX mix control for the Effects loop: Rotate the knob to the DRY position for the pure amp signal, i.e. no effect on the signal. Turn clockwise to blend in an effect connected to the loop to the dry signal (parallel/passive). At the Effect position, only the wet signal, i.e. the signal sent from the FX device is fed to the power amp (serial/passive).NOTE: If no effects processor is connected to this loop, leave this control in position DRY!24 Poweramp Output: 4 Ohms parallel4 ohms speaker output jacks, internal parallel signal path for the connection of one 4 ohms cabinet or two 8 ohms speaker cabinets.25 Poweramp Output: 8 Ohms parallel8 ohms speaker output jacks, internal parallel signal path for the connection of one 8 ohms cabinet or two 16 ohms speaker cabinets.26 Poweramp Output: 16 Ohms 16 ohms speaker output jack, for the connection of one 16 ohms speaker cabinet.NOTE: Never operate the amplifier without a sufficient load, otherwise you may damage or destroy the power amp! Ensure your cabinet ’s specifications match the espective output ’s specs.Possible speaker cabinet options:1 x 4z or 2 x 8z or 1 x 8z or 2 x 16z or 1 x 16z.14 Master B - Hi Gain Use this control (post FX Loop) to set the poweramp ´s master volume when the preamp is in Hi-Gain mode. Connect a footswitch to Jack 19 if you want to convert this control for use as Master B.You can then use the footswitch to activate two different master volumes (Master A and Master B).15 Stand ByPoweramp standby switch.16 Power AC power on/off.Technical Data, T ype 650 ("Signature 100"):Rated power: approx. 100 watts at 4, 8 or 16 ohms; Type 650.Tubes: V1(Input -Tube): ECC 83 / 12AX7, FQ selected;V2: ECC 83 / 12AX7 selected;V3, V4: ECC 83 / 12AX7, standard;V7 - V10: 5881 (6L6GC) matched sets.Fuses: external: 2,5 AM (medium) for the 230 Volt model;5 AM (medium) in the 100 and 120 V olt models.internal:3,15 AT (slow) for the 230 Volt model;6,3 A T (slow) in the 100 and 120 Volt models. Important: Replace fuses only against same type and rating! Dimensions: appr o x. 71 x 27 x 27 cm (l x h x d)Weight: approx. 20 kgTube array:Technical Data,T ype 655 ("Signature 150"):Rated power: approx. 150 watts at 4, 8 or 16 ohms.Tubes: V1(Input -Tube): ECC 83 / 12AX7, FQ selected;V2: ECC 83 / 12AX7 selected;V3, V4: ECC 83 / 12AX7, standard;V7 - V10: 6550 (KT88) matched sets.Fuses:external: 3,15 AM (medium) for the 230 Volt;6,3 AM (medium) in the 100 and 120 V olt models.internal: 4 AT (slow) at 230 Volt.8 A T (slow) in the 100 and 120 Volt models. Important: Replace fuses only against same type and rating! Lighting: 15 Watts/230 V in the 230 Volt model.15 Watts/110 V in the 100 and 120 Volt model.Attention: Ensure you never use a bulb rated higher than 15 watts! Dimensions: approx. 71 x 27 x 27 cm (l x h x d)Weight: approx. 22 kgTube array:"Engl Amps are the best amps I´ve ever used – not only are they powerful,but they have texture and character too."Handling and CareProtect the amp from mechanical knocks (tubes!).Let the amp cool down before you transport it (approx. 10 minutes).Tubes need about 20 seconds to warm up after you switch the power on, and furtheron a few minutes before they reach their full power capability.Avoid storing the amp in damp or dusty rooms, they are hard on jacks, switches and potentiometers.Make sure air can circulate at the front and top of the ampto allow for adequate cooling (increases component life).avoid microfonic properties, undesireable noise and unbalanced performance.We r e s e r v e t h e r i g h t t o m a k eu n a n n o u n c e d t e c h n i c a l u p g r a d e s !ENGL Ger ätebau GmbH, Germany;Internet: Text, design, grafics and layout by Horst LangerPhoto - Ritchie Blackmore: Antonio Scettri。
钢琴产品说明书带你了解钢琴的演奏技巧和保养方法
钢琴产品说明书带你了解钢琴的演奏技巧和保养方法钢琴产品说明书一、产品介绍钢琴是一种多功能的乐器,除了具有美妙的音色外,还可以带来许多乐趣和享受。
本产品说明书旨在向您介绍钢琴的演奏技巧和保养方法,帮助您更好地使用和保护您的钢琴。
二、钢琴的演奏技巧1. 坐姿和手位在演奏钢琴时,正确的坐姿和手位是非常重要的。
请确保您坐直,双脚平放在地板上,身体与琴键保持一定的距离,保持身体放松。
同时,手掌应平整,手指轻轻曲起,靠近琴键盖。
这样的坐姿和手位可以帮助您更好地控制力度和音准。
2. 按键技巧钢琴的按键技巧包括按下琴键的力道和速度控制。
轻柔的选择和使用手指,通过控制力道和速度,可以产生不同的音效和音色。
练习时应该注重手指的独立性,通过反复练习和实践,提高手指的灵活性和敏感度。
3. 节奏感和音乐感在演奏钢琴时,节奏感和音乐感是必不可少的。
通过感受音乐的节奏和旋律,可以更好地表达音乐的情感和感觉。
尝试用心去理解和体会音乐,注重每个音符的长度和强度,并试着与其他乐器进行合奏或伴奏,提高整体的音乐感。
三、钢琴的保养方法1. 清洁保养钢琴的外观和琴键需要定期进行清洁。
使用柔软的布轻轻擦拭琴身和琴键,腊水湿润后擦拭琴身,以保持钢琴的光洁和美观。
请勿使用含有酒精或其他化学物质的清洁剂,以免损坏琴身和琴键。
2. 定期调音钢琴的音准会随着时间的推移而发生变化,因此定期调音非常重要。
建议每年至少调音一次,以保持钢琴音色的稳定和准确。
3. 控制温湿度钢琴对温度和湿度非常敏感。
过高或过低的温度和湿度会影响钢琴的演奏品质和保养状态。
请将钢琴放置在避免阳光直射和潮湿的环境中,并定期使用湿度计监测钢琴所处的湿度。
四、注意事项1. 避免直接暴露在阳光下,以防止琴身和琴键变色。
2. 避免堆放重物在钢琴上,以免对琴身造成损坏。
3. 避免将饮食和饮料放置在钢琴附近,防止液体溅到琴键和琴身上。
4. 避免在使用钢琴时过度使用力,以免对琴键和琴弦造成损坏。
智能电子琴产品说明书

智能电子琴产品说明书本说明书详细介绍了我们公司生产的智能电子琴的特点、功能、使用方法和维护保养事项,以便用户更好地了解和操作产品。
一、产品特点1. 多功能:智能电子琴集合了多种音色、节奏、和弦等功能,让用户在弹奏中享受更多乐趣。
2. 智能化:该电子琴配备了人工智能技术,能够智能识别弹奏内容并提供实时指导,方便初学者学习和提高。
3. 便携性:该产品采用轻便设计,携带方便,适合各种场合的演奏需求。
4. 多媒体连接:智能电子琴支持蓝牙、USB等多媒体连接方式,可与智能设备进行互联,扩展了使用功能和乐曲资源。
二、产品功能1. 音色选择:智能电子琴内置了多种音色选择,包括钢琴、吉他、鼓等音色,用户可以根据需要进行切换。
2. 节奏设置:通过选择不同的节拍器,用户可以弹奏出不同的节奏风格,丰富演奏效果。
3. 自动伴奏:智能电子琴配备了丰富的自带伴奏音乐库,可以自动伴奏,让用户的演奏更加动听。
4. 学习模式:该产品内置了专门的学习模式,针对初学者提供系统的指导和训练,帮助用户快速掌握基础技巧。
5. 录音功能:智能电子琴具备录音功能,用户可以将自己的演奏录制下来,方便回放和分享。
三、使用方法1. 开机:将电源按钮置于“ON”位,等待电子琴自检完成后即可正常使用。
2. 音色选择:通过音色选择按钮选择合适的音色,根据需求设置演奏效果。
3. 节奏设置:通过节拍器按钮选择合适的节拍器,调整节奏风格。
4. 自动伴奏:在演奏过程中,通过按下自动伴奏按钮,切换不同的伴奏风格,丰富演奏效果。
5. 学习模式:按下学习模式按钮,按照屏幕指示进行学习训练,提高演奏水平。
6. 录音功能:按下录音按钮开始录音,演奏完毕后再次按下结束录音,并在屏幕上选择保存位置。
四、维护保养1. 保持干燥:使用电子琴后,应该注意保持其干燥,避免受潮和进水。
2. 定期清洁:使用干软布清洁琴键和琴面,避免使用含有酒精或化学物质的清洁剂,以免损坏表面材质。
3. 避免撞击:使用时要避免电子琴受到剧烈撞击,放置时要选择平稳的表面,避免倾斜摔落。
益音 FP-7F 电子钢琴说明书
Portable perfectionUnmatched performance with superb tone and touchStylish and portable, the FP-7F provides authentic piano tone, touch,and expression. Take the FP-7F anywhere, and experience the joy ofmusic in your home, on stage, in your studio, or in the classroom.FP-7F-WH with optional KSC-44-WHFP-7F-BK with optional KS-18ZFP-7F-BK with optional KSC-44-BK and RPU-3The ultimate sound and natural keyboard touchAmazing authenticity and expression with SuperNATURAL Piano The FP-7F’s SuperNATURAL Piano sound engine combines our award-winningV-Piano technology with an exceptional 88-key stereo multi-sampling core. By extensively analyzing the characteristics of world-class concert pianos, we have faithfully replicated the unmatched tone color and expressiveness of a real acoustic grand piano. SuperNATURAL Piano delivers the complete playing experience, with seamless tone variation according to touch, smooth and natural tone decay with no “looping,” and maximum expression in each individual key.Piano DesignerIn addition to all of the great the features found in the FP-4F, the FP also offers Piano Designer editing parameters for customizing and detailing the sound. Make delicate adjustments to hammer and damper noise, for example, or the resonance of the damper, strings, and cabinet. And you can do it all with ease via the FP-7F’s enlarged graphical LCD.Custom speaker enclosuresAnother unique attribute of the FP-7F is its custom internal speaker housings, which provide rich vibration, enhanced warmth, and beautiful resonance for spacious sound that fills the room. No additional amplification is required; simply power up, adjust the volume to your taste, and play. Should you wish to connectto external gear, however, the FP-7F can be plugged into additional sound-reinforcement gear, such as our own award-winning KC-series keyboard amplifiers. Newly developed Ivory Feel-S KeyboardWith the Ivory Feel-S’s action, we achieved the natural touch of an acoustic grand piano, where the keys respond solely from the weight of the hammer mechanism, without the use of springs. Like an acoustic grand, the touch also becomes progressively lighter as you play from the low range to the high. For further authenticity, an escapement mechanism simulates the hammer release of an acoustic grand, with a realistic “click” feel that allows you to play delicate pianissimo phrases with ease. Thanks to the Roland’s most advanced sensor technology inherited from the flagship V-Piano Grand, the Ivory Feel-S improves the key repetition and expressiveness. The extraordinary combination of Ivory Feel-S and SuperNATURAL Piano faithfully translate the most subtle performance nuance into natural, accurate sound. The Ivory Feel-S keyboardis made of a proprietary material that replicates theunique appearance and texture of real ivory keys.Thanks to its moisture-absorbing characteristics, theIvory Feel-S keyboard feels better the more you play it.Add the optional RPU-3 for more control and expression The included DP-10 Damper Pedal provides continuous-pedaling capability, while the optional RPU-3 Triple-Pedal Unit affords a fully authentic grand piano playing experience. In addition, the RPU-3 gives you hands-free control of various functions, including the harmony effects and Looper.Get creative with the built-in LooperThe FP-7F’s onboard Looper lets you record, loop, and overdub sounds from the keyboard itself, as well as vocals from the mic input. Y ou can also tap into the onboard Looper Rhythm patterns to create ensemble performances with bass and drums in real time, complete with intros and endings.Add harmony effects to your vocalsConnect an external microphone (sold separately) and enjoy singing along as you play. Y ou can even add harmony effects to your voice in real time based on the chords you play or via the built-in Session Partner accompaniment. Y ou can also add vocal harmony to Looper phrases and control the harmony parts hands-free with the optional RPU-3 Pedal Unit.Beautiful sound, beautiful lookThe FP-7F looks as beautiful as it soundsAvailable in a gorgeous black or white finish, the FP-7F blends beautifully into any environment. It’s also lightweight and easy to transport. Use our KS-G8or foldable KS-18Z stand (sold separately) for portable playing, or transform the FP-7F into a stylish, compact piano for the home with the optional custom-designed KSC-44 stand.Enhanced freedom and creativityThe FP-7F’s Session Partner function provides built-in chord progressions for playing along. Y ou can also define your own chord changes for songwriting and custom-performance applications. In addition to all of the features found in theFP-4F, the FP-7F provides an enhanced play-along experience with its Audio Key mode, which allows one-touch playback of audio files you’ve stored on a USB memory key, including phrases that you’ve created with the Looper. Additionally, the MIX IN jack lets you connect any commercially available audio player to the FP-7F and blend its music with your performance.FP-4F-BK with optional KSC-44-BKFP-4F-WH with optional KSC-44-WH and RPU-3FP-4F-BK with optional KS-18Z Pro performance in a travel-friendly instrument Play piano in any environmentAuthentic piano sounds, natural keyboard touch, and functions to expand your range of musical enjoyment are all packed into this compact keyboard. Take this instrument anywhere, and enjoy your music in any environment, from lessons to live performances.Newly designed speakers deliver dynamic soundThe FP-4F’s newly designed speakers are compact in size yet they deliver adynamic sound, which means you can enjoy playing on this instrument alonewithout any other equipment necessary. Play the FP-4F at home or at intimatepublic performances without having to set up a PA system.Compact and ready to travelIts body is only 30.5 cm/12-1/16 inch depth and weighs only 16.6 kg/36 lbs 10 oz,which makes the FP-4F convenient to transport. Choose from two classic finishes,white or black. At home or onstage, the FP-4F is friendly to operate with its high-visibility LCD, which provides a clear view of tones, song names, and parameters.Y ou can place the FP-4F on any flat surface, or add a matching KSC-44 stand(optional) for a realistic piano look and feel. For performers who desire the utmostin portability, the collapsible KS-18Z stand is an ideal match.Perform and practice with a virtual bandThe FP-4F’s “Session Partner” provides rhythm and accompaniment patternscreated by professional musicians; it’s like playing along with a dynamic backingband! Y ou can even have the FP-4F play chord changes and ad-libs, or addcomplete accompaniment to a sing-along piece during a live performance. Explorethe diverse range of built-in rhythm patterns, which are great song starters as wellas musical metronomes for improving your sense of timing.Expand your musical enjoyment with USBWith its USB flash-memory support, the FP-4F lets you conveniently storeyour recorded performances and keyboard settings. You can also downloadSMF and WAV files from your computer and play them via USB memory keyfrom the FP-4F. Connect a USB CD drive (CD-01A, sold separately) to blendyour favorite audio CDs with your keyboard performance — a great way toadd back backing tracks to a live performance or to learn to play along withpre-recorded songs.Excellent piano quality in a lightweight,compact bodySuperNATURAL Piano provides the ultimate authenticityand expressionThe FP-4F’s SuperNA TURAL Piano sound engine combines our award-winningV-Piano technology with an exceptional 88-key stereo multi-sampling core. Byextensively analyzing the characteristics of world-class concert pianos, we havefaithfully replicated the unmatched tone color and expressiveness of a real acousticgrand piano. SuperNA TURAL Piano delivers the ultimate playing experience, withseamless tone variation according to touch, smooth and natural tone decay withno “looping,” and maximum expressivity in each individual key.Ivory Feel-G keyboard provides the real feel of a grand pianoThe Ivory Feel-G keyboard is a revolutionary new keyboard in that it inheritsthe functions, appearance, and texture of keyboards found on our flagshippianos, and is featured in this stylish model. Needless to say, it comes withthe Progressive Hammer Action construction and escapement function.Thanks to the sublime combination of the latest sensor technologies coupledwith the SuperNATURAL Piano sound engine, subtle differences in theplayer’s touch is reflected in its output tone — another feature it has inheritedfrom high-end models.Add the optional RPU-3 for additional controland expressionThe included DP-10 Damper Pedal offerscontinuous-pedaling capability, while theoptional RPU-3 Triple-Pedal Unit affordsa fully authentic grand piano playingexperience.RPU-3Roland’s Miyakoda Factory in Hamamatsu, Japan, is a state-of-the-art facility that has acquired internationally recognized ISO14001 certificationfor its environmental management systems and ISO9001* for quality assurance. Recycled plastic is used for Ivory Feel keyboards and keyboardparts with no lead materials used in the pianos. Using Roland’s original digital-cell production method, each instrument is individually made byhand and carefully assembled with low-environmental impact.*ISO14001 is an international standard for environmental management systems issued by the International Organization for Standardization (ISO). Similarly, ISO9001 is aninternational ISO standard for quality management systems. The International Organization for Standardization is a non-government organization that issues internationallyrecognized industrial standards, quality control standards, and other standards.Visit us online at Roland, , SuperNATURAL and V-Piano are either registered trademarks ortrademarks of Roland Corporation in the United States and/or other countries.All specifications and appearances are subject to change without notice.All trademarks used in this catalog are the property of their respective companies.Printed in Japan Feb. 2011 RAM-4682 GR-UPR-SS AIDG1USB Flash MemoryM-UF2GUSB CD DriveCD-01A Dedicated StandKSC-44-BK / KSC-44-WHKeyboard Stand Pedal UnitRPU-3Damper PedalDP-10Expression PedalEV-5Dynamic MicrophoneDR-50 (for FP-7F)Keyboard88 keys [FP-7F] Ivory Feel-S Keyboard with Escapement [FP-4F] Ivory Feel-G Keyboard with EscapementT ouch Sensitivity[FP-7F] 100 levels/Fixed Touch, Hammer Response (Off, 1 – 10) [FP-4F] 5 levels, Fixed TouchKeyboard Mode Whole, Dual (volume balance adjustable), Split (split point adjustable)Piano Sound SuperNATURAL Piano SoundPiano EffectsDamper Resonance (Off, 1 – 10), String Resonance (Off, 1 – 10), Key Off Resonance (Off, 1 – 10)[FP-7F only] Open/Close Lid (0 – 6), Cabinet Resonance (Off, 1 – 10), Hammer Noise (-2 – 2),Duplex Scale (Off, 1 – 10), Damper Noise (Off, 1 – 10)Max. Polyphony128 voicesT one[FP-7F] 351 tones (including 8 drum sets, 1 SFX set) [FP-4F] 345 tones (including 8 drum sets, 1 SFX set)T emperaments8 types, selectable temperament keyStretched Tuning Off, Preset [FP-7F only] User tuning (adjustable in individual notes: -50.0 – +50.0 cent)Master T uning415.3 Hz – 466.2 Hz (adjustable in increments of 0.1 Hz)T ranspose-6 – +5 (in semitones)EffectsReverb (Off, 1 – 10), Only for Organ Tones: Rotary Speaker Effect (Slow, Fast)[FP-7F only] Only for MIC INPUT: Harmony (Off, 3 types), Reverb (Off, 1 – 10)Equalizer4-band Digital EqualizerT empo Quarter Note = 10 – 500Beat2/2, 0/4, 2/4, 3/4, 4/4, 5/4, 6/4, 7/4, 3/8, 6/8, 9/8, 12/8Song 1 SongNote Storage Approx. 30,000 notesT empo Quarter Note = 10 – 500Resolution120 ticks per quarter notePlayable Song Format Standard MIDI Files (Format 0/1), Roland Original Format (i-Format)T ranspose-6 – +5 (in semitones)Rhythms80 types x 2 variationsChord Progression Automatic or input with keyboard (User Programmable)Playable Song Format Audio File (WAV 44.1 kHz / 16-bit Linear Format), Audio CDs (CD-DA) (when using an optional CD drive)Audio Playback Center Cancel, Audio Playback Speed (75 – 125 %), Playback Transpose (-6 – +5, in semitones)Songs Max. 99 songsSong Save Format Standard MIDI Files (Format 0)External Storage USB Flash Memory (sold separately)Songs[FP-7F] Max. 999 songs [FP-4F] Max. 99 songsSong Save Format Standard MIDI Files (Format 0)Internal Songs [FP-7F] 74 songs [FP-4F] 73 songsDisplay[FP-7F] Graphic LCD 128 x 64 dots (with backlit) [FP-4F] Custom LCD (with backlit)Registrations[FP-7F] To Internatl Memory: 30 x 25 sets (max.), To External Memory: 30 x 99 sets (max.)[FP-4F] To Internatl Memory: 20 x 25 sets (max.), To External Memory: 20 x 99 sets (max.)Other Functions V-LINK, Tone Demo, Panel Lock [FP-7F only] Looper, Audio Key, Piano DesignerConnectorsExternal Memory connector, USB (MIDI) connector, PEDAL jacks (DAMPER/R, SOFT/L (FC1)*,SOSTENUTO/C (FC2)*): 1/4-inch phone type (*Assignable),OUTPUT jacks (L/MONO, R): 1/4-inch phone type ,INPUT jacks (L/MONO, R): 1/4-inch phone type (FP-7F) / RCA phono type (FP-4F),PHONES jack x 2: Stereo 1/4-inch phone type, MIDI connectors (IN, OUT), DC IN jack,[FP-7F] MIX IN jack: Stereo miniature phone type, MIC INPUT jack: 1/4-inch phone typeRated Power Output[FP-7F] 13W x 2 [FP-4F] 12W x 2Speakers[FP-7F] (8cm x 12 cm) x 2 (with speaker box) [FP-4F] (8cm x 12 cm) x 2Volume Level (SPL)[FP-7F] 100 dB [FP-4F] 98 dB* These figures were measured according to the method that is based on Roland’s technical standard.Control VOLUME, BALANCE, LCD CONTRAST [FP-7F only] MIC VOLUME, SPEAKER switchPower Supply DC 12 V (AC Adaptor)Power Consumption[FP-7F] 26 W [FP-4F] 24 WFinish Black, WhiteDimensions[FP-7F] 1,346 (W) x 375 (D) x 137 (H) mm / 53 x 14-13/16 x 5-7/16 inches1,346 (W) x 397 (D) x 949 (H) mm / 53 x 15-11/16 x 37-3/8 inches (FP-7F withdedicated stand KSC-44 and music rest)[FP-4F] 1,342 (W) x 305 (D) x 135 (H) mm / 52-7/8 x 12-1/16 x 5-3/8 inches1,342 (W) x 341 (D) x 940 (H) mm / 52-7/8 x 13-7/16 x 37-1/16 inches (FP-4F withdedicated stand KSC-44 and music rest)Weight[FP-7F] 24.0 kg / 52 lbs 15 oz36.6 kg / 80 lbs 12 oz (FP-7F with dedicated stand KSC-44 and music rest)[FP-4F] 16.6 kg / 36 lbs 10 oz29.1 kg / 64 lbs 3 oz (FP-4F with dedicated stand KSC-44 and music rest)AccessoriesOwner’s Manual, AC Adaptor, Power Cord (for AC Adaptor), Music Rest,Damper Pedal (capable of continuous detection) FP-7F shown with the optional stands (KSC-44-BK / KSC-44-WH / KS-18Z)For additional pedals. FP-7F/FP-4Fpackage includes one DP-10.KS-18ZBK / KSC-44-WH / KS-18Z)。
Alesis Concert Digital Piano用户指南说明书

User GuideEnglish ( 3 – 12 )Guía del usuario Español ( 13 – 22 )Guide d’utilisation Français ( 23 – 33 )Guida per l’usoItaliano ( 34 – 43 )Benutzerhandbuch Deutsch ( 44 – 54 )AppendixEnglish ( 55 )3Box ContentsConcert Digital Piano Sustain Pedal Power Adapter Music Rest User GuideSafety & Warranty ManualSupportFor the latest information about this product (system requirements, compatibility information, etc.) and product registration, visit .For additional product support, visit /support .Music RestConnection DiagramItems not listed in Introduction > Box Contentsare sold separately.Step 1 Step 2DetailTop Panel1.Power: This switch turns the piano’s power on or off. In order to save energy, the piano willautomatically shut down after 30 minutes if it is not used.2.Master Volume: This knob adjusts the master volume for the Line Output and Headphone Output.Note: The internal speakers will be muted if there are headphones plugged into the Headphone Output. If the internal speakers do not produce any sound, make sure the Master Volume knob is not set too low and that headphones are not plugged into the Headphone Output.3.Split: Press this button to enter or exit Split Mode. Press the Split button and the Layer button at thesame time to start Demo playback.yer: Press this button to enter or exit Layer Mode. Press the Layer button and the Split button atthe same time to start Demo playback. Press and hold the Layer button and the Lesson button at the same time for 5 seconds to reset the Concert to its factory default settings.5.Metronome: Press this button to turn the metronome on or off. Press the Metronome button and theLesson button at the same time to enter Advanced Function Mode.6.Lesson: Press this button to turn the Lesson Mode on or off. Press the Lesson button and theMetronome button at the same time to enter Advanced Function Mode. Press and hold the Lesson button and the Layer button at the same time for 5 seconds to reset the Concert to its factory default settings.7.Voice Select: Press one of these buttons to select a preset voice. See Voices to learn more.8.Reverb/Chorus: Press this button to turn the reverb and/or chorus effects on or off. See AdvancedFunctions > E ffects to learn more.Rear PanelB Port: Allows for transfer of MIDI datato a computer.2.Sustain Pedal Input: Connect theincluded sustain pedal here.3.Line Output: Connect external audioequipment such as an amplifier, mixer, orrecorder. Use the R and L outputs forstereo output or just the L output formono output.4.Headphone Output: Connect stereo headphones with a 1/4” (6.35mm) stereo connector. Whenheadphones are connected, the internal speakers will automatically turn off and sound will only be heard from the headphones.5.Power Connector: Connect the included power adapter here.Bottom Panel1.Battery Compartment: Install 6 “D” batteries here topower the Concert digital keyboard if you are not using the power adapter.4Playing Demo SongsThe Concert Digital Piano features 2 demo songs.To play the demo songs:1.Press and release the Split and Layer buttons at the same time. The Concert Digital Piano will enterDemo Mode and play the demo songs in a continuous loop. The two button LEDs will flash during demo playback.2.To exit Demo Mode, press and release the Split and Layer buttons again.Playing Voice DemosEach Voice on the panel is preset with a voice demo. Hold the Split and Layer buttons together, then press one of the Voice buttons to play a voice demo.The Concert digital piano features 10 voices. Each of the 5 Voice buttons has an Original voice and a Variation voice to choose from:Button No. Original / Variation Voice Name1 Piano / Bright Piano2 Electric Piano / Harpsichord3 Drawbar Organ / Church Organ4 Synth / Strings5 Bass / ClaviTo choose one of the Original voices, press the corresponding Voice button. The button LED will be lit green. When you play the piano keys, the Original voice will sound.To choose one of the Variation voices, press the corresponding Voice button twice (or once if this button’s Original Voice is currently selected). The button LED will be lit red. When you play the piano keys, the Variation voice will sound.5Layer Mode allows for two different voices to be layered together for a fuller and richer sound.To enable Layer Mode:1.Press the Layer button to enter Layer Mode. The Layer button LED will be lit green.2.Select the first voice by pressing one of the Voice buttons to choose between its Original or Variationvoice.3.Press the Layer button again. The Layer button LED will be lit red.4.Select the second voice by pressing one of the Voice buttons to choose between its Original orVariation voice.5.Press the Layer button again. The Layer button LED will be lit amber.6.Play the keys to hear the two different voices layered together.To disable Layer Mode, press the Layer button again.Note: When you are selecting which voices will be layered, the first voice you select will be set as the Upper voice, and the second voice you select will be set as the Lower voice. See Advanced Functions > Voice Volume to learn how to adjust the levels of the Upper and Lower voices.Split Mode allows you to split the 88 keys into two zones so that you can have two different voices for each of your hands. For example, you may want the Piano voice for your right hand, and the Bass voice for your left hand. When Split Mode is enabled, the left hand voice is referred to as the Split voice.To enable Split Mode:1.Select the voice you would like to be in the right-hand zone.2.Press and hold the Split button, then press one of the Voice buttons to select the Split voice for theleft-hand zone and then release the Split button to enter Split Mode. The Split button LED will be lit when Split Mode is enabled.3.Play the keys and you will hear that the right-hand and left-hand zones will have different voices.To disable Split Mode, press the Split button again. The Split button LED will turn off when Split Mode is disabled.To set the key for where the split point between the right-hand voice and left-hand voice occurs, use the following procedure:1.Press and hold the Split button, and then press the key where you would like the split to occur.2.Release the Split button to confirm the new split point.Note: When you are using Split Mode and Layer Mode at the same time, the right-hand zone of the split will play both layered voices, and the left-hand zone of the split will play the Split voice only.Note: See the Advanced Functions section of this manual to learn how to adjust the level of the Split voice. 67SPLIT VOLUME1 2 3 4 5 LOWER VOLUME 1 2 3 4 5 UPPER VOLUME 1 2 3 4 5 METRONOME 0 2 3 4 5 6 7 8 9 METRONOME VOLUME 1 2 3 4 5 C2 D2 E2 F2 G2 A2 B2 C3 D3 E3 F3 G3 A3 B3 C4 D4 E4 F4 G4 A4 TEMPO TAP ^^ 0 1 2 3 4 5 6 7 8 9 MIDI CH ^^AUTO POWER OFFON OFF B4 C5 D5 E5 F5 G5 A5 B5 C6 D6 E6 F6 G6 A6 B6 C7You can change more advanced settings by pressing and releasing the Metronome and Lesson buttons at the same time to enter Advanced Functions Mode. Use the keys that correspond to the graphics below to change your desired setting.CLICKPEDALRESONANCE TOUCH OFF 1 2 3 TRANSPOSE^^OCTAVE ^^REVERB1 2 3 4 5 CHORUS1 2 3 4 5A-1 B-1 C0 D0 E0 F0 G0 A0 B0 C1 D1 E1 F1 G1 A1 B1Voice VolumeYou can set the volume of each voice in Layer and Split Mode by using Advanced Function Mode.1.Press the Metronome and Lesson buttons at the same time to enter Advanced Function Mode. Thetwo button LEDs will be lit.e the keys marked Upper Volume 1–5 to change the volume of the upper voice in Layer Mode. 1 isthe lowest volume, and 5 is the highest volume.3.Press both the Metronome and Lesson buttons again to exit Advanced Function Mode.You can follow the above steps to set the volumes for the lower voice in the Layer Mode and the split voice in the Split Mode, using the Lower Volume 1–5 and Split Volume 1–5 keys respectively.Setting the MIDI ChannelYou can also set the MIDI channel for the USB-MIDI output by using Advanced Function Mode.1.Press the Metronome and Lesson buttons at the same time to enter Advanced Function Mode. Thetwo button LEDs will be lit.e the keys marked MIDI Ch + or MIDI Ch - to set the MIDI Out channel from Channels 1–16. Pressboth keys at the same time to restore the default channel setting to 1.Note: Concert uses only one MIDI channel at a time, even if you are using Split Mode or Layer Mode. 3.Press both the Metronome and Lesson buttons again to exit Advanced Function Mode.Setting the Click ToneWhen the click tone is on, you will hear a click sound whenever you change a setting or parameter. You can turn the click tone on or off in Advanced Function Mode.To turn the click tone on or off:1.Press the Metronome and Lesson buttons at the same time to enter Advanced Function Mode.The two button LEDs will be lit.2.Press the key marked Click to turn the tone on or off.3.Press both the Metronome and Lesson buttons again to exit Advanced Function Mode.Touch SensitivityThe Concert Digital Piano is equipped with touch response for controlling volume level with your playing strength—just like an acoustic piano. That means the harder you play the keys, the more volume you’ll hear from the speakers. Turning this function off results in a fixed volume level, no matter how hard or soft you play the keys. There are 3 types of touch settings (Off, 1–3).To set the touch sensitivity:1.Press the Metronome and Lesson buttons at the same time to enter Advanced Function Mode.The two button LEDs will be lit.e the Touch keys to select an appropriate touch level.Parameters DescriptionOFF Fixed1 Soft2 Medium3 Hard3.Press both the Metronome and Lesson buttons to exit Advanced Function Mode.8TransposeThis function allows the overall pitch of the piano to be transposed up or down by a maximum of one octave in semitone increments.To change the transposition:1.Press the Metronome and Lesson buttons at the same time to enter Advanced Function Mode. Thetwo button LEDs will be lit.e the keys marked Transpose + or Transpose – to set the transpose value. Press both keystogether to reset the transposition back to the default value of 0.3.Press both the Metronome and Lesson buttons again to exit Advanced Function Mode.MetronomeThe metronome feature provides a steady beat to aid in practicing at a consistent tempo. To turn the metronone on or off, press the Metronome button. When the metronome is in use, the Metronome button LED will flash along with the current tempo. The tempo of the metronome can be freely adjusted from 30 to 280 beats per minute.To set the metronome tempo:1.Press the METRONOME and LESSON buttons at the same time to enter the Advanced Functionmode. The two button LEDs will be lit.e the keys marked TEMPO + or TEMPO – to adjust the tempo value. If you press both keys at thesame time, the metronome will be restored to the default tempo of 120.3.You can also use the keys marked TEMPO 0-9 to set the tempo value. You will need to press 3 keystotal to enter the tempo value using these keys. For example, press 1, 2, 0 in sequence to enter a tempo value of 120, or press 0, 6, 4 in sequence to set a tempo value of 64.Alternatively, you may tap the key marked TAP to get the desired tempo. The piano will start the Metronome sound at the speed of the last two presses.4.Press both the Metronome and Lesson buttons again to exit Advanced Function Mode.To set the metronome time signature:1.Press the Metronome and Lesson buttons at the same time to enter Advanced Function Mode. Thetwo button LEDs will be lit.e the keys marked Metronome 0–9 to set the time signature.3.Press both the Metronome and Lesson buttons again to exit Advanced Function Mode.To set the metronome volume level:1.Press the Metronome and Lesson buttons at the same time to enter Advanced Function Mode. Thetwo button LEDs will be lit.e the keys marked Metronome Volume 1–5 to set the metronome volume. 1 is the lowest volume,and 5 is the highest volume.3.Press both the Metronome and Lesson buttons again to exit Advanced Function Mode.9EffectsWith the Concert, you can add adjustable Reverb and/or Chorus effects to your sound.To enable the effects:1.Press the Reverb/Chorus button once to turn on the reverb effect. The button LED will be lit greenwhen only the Reverb effect is enabled.2.Press the Reverb/Chorus button again to turn off the reverb effect and turn on the chorus effect. Thebutton LED will be lit red when only the Chorus effect is enabled.3.Press the Reverb/Chorus button again to turn on both the reverb and chorus effects. The button LEDwill be lit amber when both effects are enabled.4.Press the button again to turn off all effects. The LED will be off when no effects are enabled.To adjust the reverb type:1.Press the Metronome and Lesson buttons at the same time to enter Advanced Function Mode. Thetwo button LEDs will be lit.e the keys marked Reverb 1–5 to select the desired reverb type.Parameters Reverb Type1 Room2 Hall3 Church4 Delay5 PanDelay3.Press both the Metronome and Lesson buttons again to exit Advanced Function Mode.To adjust the chorus type:1.Press the Metronome and Lesson buttons at the same time to enter Advanced Function Mode. Thetwo button LEDs will be lit.e the keys marked Chorus 1–5 to select the desired chorus type.Parameters Chorus Type11 Chorus22 Chorus33 Chorus4 Flanger5 Rotary3.Press both the Metronome and Lesson buttons again to exit Advanced Function Mode.10Pedal ResonancePedal resonance is a function that simulates the reverberation of notes when pressing the sustain pedal on an acoustic piano. When you use the included sustain pedal with Pedal Resonance enabled, the Concert reproduces the rich harmonics and unique sound characteristics of an acoustic piano.To turn Pedal Resonance on or off:1.Press the Metronome and Lesson buttons at the same time to enter Advanced Function Mode.The two button LEDs will be lit.2.Press the key marked Pedal Resonance to turn the function on or off.3.Press both the Metronome and Lesson buttons again to exit Advanced Function Mode.Note: When the Pedal Resonance is activated, the chorus effect will be automatically disabled.Note: If you switch the Pedal Resonance on/off while performing, there may be a slight pause in the Concert’s signal output.Lesson ModeFor instructional purposes, the Lesson Mode feature divides the 88 keys into two zones with the same pitch-range and voice. This enables both student and teacher to easily watch each other and play together without having to move away from the piano, take turns, or reach over each other.To enable or disable Lesson Mode, press the Lesson button.To select a voice for both zones in Lesson Mode, press one of the Voice buttons.To change the split point in Lesson Mode, press and hold the Split button, press a key between C3 and C6, and then release the Split button. The default split point is E3.To change the octave of the two zones in Lesson Mode:1.While in Lesson Mode, press the Metronome and Lesson buttons at the same time to enterAdvanced Function Mode. The two button LEDs will be lit.e the keys marked Octave + or Octave - to adjust the octave value. Press both keys at the sametime to restore the default octave value to 0.3.Press both the Metronome and Lesson buttons again to exit Advanced Function Mode.Note: In Lesson Mode, Layer and Split Modes are automatically disabled.Auto Power OffIn order to save energy, the Concert Digital Piano will automatically shut down after 30 minutes if it is not used.To enable or disable the Auto Power Off function:1.Press the Metronome and Lesson buttons at the same time to enter Advanced Function Mode. Thebutton LEDs will be lit.e the keys marked Auto Power Off to enable or disable the Auto Power Off function.3.Press both the Metronome and Lesson buttons again to exit Advanced Function Mode.11To restore your Recital to the factory default settings, press and hold the Layer and Lesson buttons for 5 seconds. The following parameters will be reset to their default values: Reverb, Chorus, Metronome Tempo, Metronome Time Signature, Metronome Volume, Upper Volume, Lower Volume, Split Volume, Split Point, MIDI Channel, Touch Sensitivity, and Auto Power Off.Problem Possible Cause and SolutionThe speakers produce apop sound whenever thepower is turned on/off.This is normal and is no cause for alarm.The speakers do not produce sound when the keys are played. Check if the master volume is set too low or if headphones are plugged into the Headphone Output. The speakers will be muted if there are headphones plugged into the Headphone Output.If the issue is still occurring, press and hold the Layer and Lesson buttons for 5 seconds to factory reset the voice volume settings of the unit.The speakers are producing noise or interference. Using a mobile phone in close proximity to the Concert Digital Piano may produce interference. To prevent this, turn off the mobile phone or keep it away from the piano.Certain notes produce the wrong pitch. Make sure that the transpose value is set to 0. If that does not work, then press and hold the Layer and Lesson buttons for 5 seconds to restore the factory default settings.The notes sound weak or distorted. If the keyboard is being powered with batteries, make sure new batteries are installed.12。
数码钢琴使用说明书

数码钢琴使用说明书数码钢琴使用说明书□ DP-100 □ DP-150LBCDIGITAL PIANO目录一、安全注意事项--------------------------------------第1页二、装配步骤--------------------------------------------第2页三、数码钢琴功能表-----------------------------------第3页四、各部分名称-----------------------------------------第4页五、基本操作--------------------------------------------第5页六、音色--------------------------------------------------第5页 1、音色选择-----------------------------------------第5页 2、回响-----------------------------------------第5页 3、力度-----------------------------------------第5页七、多轨录音--------------------------------------------第6页八、踏板--------------------------------------------第7页九、外接插口--------------------------------------------第7页十、中英文音色对照表--------------------------------第8页第9页一.安全注意事项1. 使用琴前,请详细阅读本使用说明书。
2. 请严格按操作规程安装琴,使用琴,保证安全。
3. 不能随意打开琴壳(体)拆卸、改动,否则会造成损坏,甚至危及人身安全,如有故障请与销售商家或厂家联系。
电子钢琴调音说明书
电子钢琴调音说明书调音说明书尊敬的用户:感谢您选择我们的电子钢琴产品。
为了确保您能够获得最佳的演奏效果,我们为您准备了以下电子钢琴调音说明书。
请您仔细阅读并按照说明进行操作。
一、前言电子钢琴是一种高精度的乐器,为了确保其音质和演奏体验,调音是非常重要的环节。
电子钢琴调音通常包括音调、音量和音色的调整。
请您根据以下说明进行操作。
二、音调调整1. 准备工作在开始调音之前,请确保电子钢琴处于稳定的水平位置,并确保琴身无明显的损坏。
2. 调整音高(1)将电子钢琴接通电源并打开。
(2)找到音调调整按钮。
通常它们位于控制面板的左侧或右侧。
(3)按照您的需求,逐步调整音调按钮,直到您满意的音高出现。
三、音量调整1. 单音音量调整(1)选择您想要调整音量的音符,按住并保持按压。
(2)调整音量调节按钮,逐渐增加或减小音量。
(3)松开手指,测试音量效果。
2. 整体音量调整(1)找到电子钢琴的整体音量调节按钮。
通常位于控制面板顶部或底部。
(2)逐渐调整整体音量,直到达到您期望的音量大小。
四、音色调整1. 预设音色调整(1)寻找音色选择按钮。
通常它们位于电子钢琴的面板上。
(2)按下音色选择按钮,并根据您的需求选择适合的音色模式。
(3)测试不同的音色模式,并选择最符合您喜好的音色。
2. 自定义音色调整(1)某些电子钢琴具有自定义音色功能。
如果您的电子钢琴支持此功能,请参考用户手册进行详细操作。
五、其他注意事项1. 温度和湿度请避免将电子钢琴长时间放置在高温或潮湿的环境中,这可能会对乐器的性能和稳定性产生不利影响。
保持室内温度和湿度稳定有助于延长电子钢琴的使用寿命。
2. 定期维护请定期对电子钢琴进行打扫和维护,确保琴面、琴弦和按键的清洁。
在维护过程中,务必断开电源并使用适当的清洁工具。
结束语:以上就是电子钢琴调音说明书的内容,希望本说明书对您使用电子钢琴时的调音有所帮助。
如有任何疑问或需要进一步的帮助,请随时与我们联系。
感谢您的支持与理解!祝愉快演奏!注:本说明书内容纯属调音操作,不涉及电子钢琴其他功能的详细介绍。
Kurzweil SP7 电子钢琴说明书
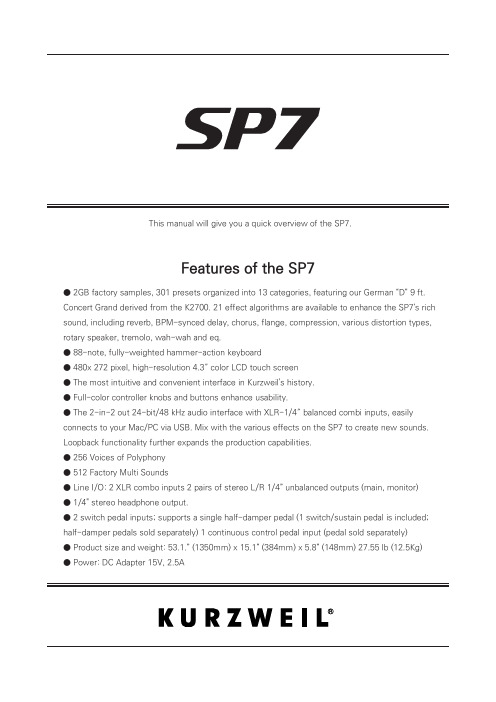
This manual will give you a quick overview of the SP7.Features of the SP7● 2GB factory samples, 301 presets organized into 13 categories, featuring our German “D” 9 ft. Concert Grand derived from the K2700. 21 effect algorithms are available to enhance the SP7’s rich sound, including reverb, BPM-synced delay, chorus, flange, compression, various distortion types, rotary speaker, tremolo, wah-wah and eq.● 88-note, fully-weighted hammer-action keyboard● 480x 272 pixel, high-resolution 4.3″ color LCD touch screen● The most intuitive and convenient interface in Kurzweil's history.● Full-color controller knobs and buttons enhance usability.● The 2-in-2 out 24-bit/48 kHz audio interface with XLR-1/4″ balanced combi inputs, easily connects to your Mac/PC via USB. Mix with the various effects on the SP7 to create new sounds. Loopback functionality further expands the production capabilities.● 256 Voices of Polyphony● 512 Factory Multi Sounds● Line I/O: 2 XLR combo inputs 2 pairs of stereo L/R 1/4” unbalanced outputs (main, monitor)● 1/4" stereo headphone output.● 2 switch pedal inputs; supports a single half-damper pedal (1 switch/sustain pedal is included; half-damper pedals sold separately) 1 continuous control pedal input (pedal sold separately)● Product size and weight: 53.1.” (1350mm) x 15.1” (384mm) x 5.8” (148mm) 27.55 lb (12.5Kg)● Power: DC Adapter 15V, 2.5AQuick StartGETTING STARTED GUIDEIf your SP7 has been out in the cold during shipping, give it time to warm up to room temperature before powering it on, since condensation may have formed inside.Place the SP7 on a keyboard stand or on a hard, flat, level surface.Be sure to connect the supplied DC power adapter to the DC power jack of the SP7.Connect the DC adapter power cable to the power outlet.Connect the supplied switch pedal to the SW1 (Sustain) jack on the back of the instrument.If you have an additional switch pedal, plug it into the SW2 jack for sostenuto control.If you have a MIDI CC pedal (also known as a MIDI expression or volume pedal), plug it into the CC (VOLUME) jack for volume control.If you are using speakers, turn the master volume all the way down on your amplifier or mixer. Using standard (1/4-inch) audio cables, first plug into the input jacks of your amplifier or mixer, then plug the other end of the cables into the SP7 Main Out jacks (connecting in this order minimizes the possibility of static discharge damage.) For a mono signal, only use the LEFT (MONO) jack, and leave the RIGHT jack unplugged.If you are using headphones, connect stereo headphones to the headphone jack on the rear panel.To protect your hearing, set the volume of the instrument appropriately.Check for system updates.Check your SP7 current OS version by going to the Global mode Info page. Compare this with the latest version posted on and update as needed.1.2.3.4.5.6.7.8.9.10.Quick StartSetting Up the SP7When installation is complete, press the power button on the back of the device.When using with speakers, adjust the volume on the mixer or amplifier appropriately.Play the keyboard while turning the SP7 volume knob to find the appropriate volume.(If a volume pedal is connected, increase the volume on the pedal and adjust the volume on the SP7 )If you hear distortion when using the mixer, reduce the mixer's gain or engage its pad function.When turning off the power after use, set the master volume of the mixer or amplifier to minimum first and then turn off the SP7 power.1.2.3.4.5.Powering on the SP7Thank you for purchasing the Kurzweil SP7 Stage Piano by HDC Young Chang. This manual briefly introduces you to the fundamentals of the SP7. The manual can also be downloaded via mobile device by scanning the QR code (Global mode / Info page).Software UpdateQuick Start GETTING STARTED GUIDEThe SP7 starts in Sound mode. To select a different sound, you can use the touch screen or use the alpha wheel to change the current sound. Narrow selections by pressing the instrument catego-ry buttons on the right. As you get familiar with the SP7, you can also employ the Favorite mode to store/recall personal favorites.You can listen to various demo songs by pressing the Global mode button and then selecting the Demo Song menu on the left.The SP7 has an automatic power saving feature (Global mode / Auto Power Off) that can automati-cally power off the SP7 after a designated period of inactivity, in order to conserve electricity.Sound Test1.2.Engine firmware update1.Connect the SP7 and computer with a USB cable (A to B type). The USB port is located on the rear panel.While holding down the [DECREASE -] and [INCREASE +] buttons at the same time, turn on the SP7, wait for about 1 to 2 seconds, then release the [DECREASE -] and [INCREASE +] buttons.After confirming that the [DECREASE -] and [INCREASE +] button LEDs are lit, run theSP7Update.exe program on the computer.Check that [Kurzweil SP (Bootloader)] is displayed in the Device item.Press the [Start Program] button to start the update.When the update is complete, a completion message will appear at the bottom of the screen.Exit the program and reboot the SP7 to complete the installation.To prevent conflicts with the existing firmware, perform a “Hard Reset” (Global mode / Info page).If a problem occurs during firmware installation, try to repeat the installation process above again.1)2)3)4)5)6)7)8)9)Auto Power On/Off FunctionCheck out Kurzweil's website () for new updates. You can check the current firmware version installed on your SP7 on the Info page of Global Mode.Firmware updateQuick StartGETTING STARTED GUIDELCD firmware update 2.Firmware DownloadDownload the latest firmware file for the SP7 from the Kurzweil website.Download the current update kit from -> DOWNLOADS -> select the SP7 ->Select DOWNLOADS -> Download the latest update kit posted and save it to your computer and unzip it.Copy the folder named [upgradeSP7] into the root directory path of the SD card. Do not rename the files or folder.1.2.3.Firmware DownloadInsert the SD card into the SP7 SD card slot (located on the rear panel).Press the [GLOBAL] button on the front panel to enter Global Mode.Select the Info tab on the left side of the LCD screen.Select the [LCD Firm Update] button under the current firmware version.When the update page appears on screen, press the [UPDATE] button to start the update.After the update is complete, remove the SD card and reboot.1.2.3.4.5.6.You can update the firmware of the front panel LCD display via SD card.RequirementsSD Card Recommended specifications This process requires the SP7, a computer and an SD card.Card specSDHC Format type FAT32Speed 4C ↑Memory 16GB ↑The LCD display is the main user interface for the SP7. The status bar at the top of the screen displays informa-tion about the currently selected mode, transpose value, auto power on/off setting, and tempo. The title bar just below the status bar shows the ID and device name, the Search button and Menu button.Note: Depending on the selected function and page, the title bar will display differing information.Touch DisplayAdjust the volume of both the Headphone and the Monitor Outs.Monitor KnobAdjust the volume of the Main Outs. Main KnobUse the TRANSPOSE buttons to transpose the notes on the keyboard in semitone steps. Transpose upwards by pressing the + button. Transpose lower by pressing the - button.※ Press the +/- buttons at the same time to return the transposition value to "0".Transpose +/-Designed to enhance musical expressivity, the XY joystick is a multi-purpose, up/down, left/right MIDI control-ler assigned to various real-time performance functions and FX.Joystick Controller1. Front PanelHI-Z / Phantom SwitchInput Gain Knobs CATEGORY Buttons JoystickDecrease / Increase Buttons TRANSPOSE Buttons Arrow Keys / Select Button Front PanelGETTING STARTED GUIDEFront Panel GETTING STARTED GUIDE Control Knob There are eight control knobs located just to the left of the display. The adjusted values of thevarious parameters are displayed on the screen. The knobs are initially preset to EQ Lo, EQ Mid Lo, EQ Mid Hi, EQ Hi, Delay Time, Delay Level, Reverb Time, and Reverb Level but are also customizable to parameters of your choosing.Zone Buttons There are 8 customizable colored buttons located just beneath the control knobs.They act as zone mutes by default but, similar to the knobs, they can also be reassigned to control variouscustom functions.Cursor Buttons (Arrow / Select buttons)The CURSOR buttons are the five buttons below the display, each of which has the function of moving the cursor left/up/down/right and selecting a given field.You can use the cursor buttons to move to any position on the LCD screen, select a function with the Select button, and then use the ALPHA WHEEL or [DECREASE-]/[INCREASE +] buttons to change the parameter value of the currently selected function.Note: The arrow keys and select key do not have LED lighting.Alpha WheelThe large dial-type wheel allows you to conveniently adjust parameters in detail.Decrease (-)/Increase (+) ButtonsThe Increase/Decrease buttons are used to change the selected onscreen parameter value In controlled, single increments.Mode ButtonsThe Mode buttons are used to navigate the SP7 four operating modes: FAVORITES, SOUND, AUDIO, andGLOBAL.Front Panel GETTING STARTED GUIDECategory ButtonsThe CATEGORY button section is an intuitive and convenient, multifunction LED color button grid. The primary use is to navigate the instrument's 13 sound categories. Additionally, in Favorites Mode, they can be used to quickly select between user-designated 'most used' sounds. The buttons are also numerically labeled, allowing for numeric data entry in various edit screens.Audio Input SectionXLR combo jacks provide convenient connections to the audio input, supporting both microphone as well as line inputs. Hi-Z, phantom power (48V) and input gain can be adjusted using dedicated controls.HI-Z SwitchThe input impedance of each input channel can be switched to high impedance for guitar or bass, etc. Phantom Power SwitchAs needed, Phantom Power can be supplied to both input channels. Use only when microphones which require phantom power are connected. Turn the switch off when phantom power is not needed.Note: Phantom power cannot be turned on and off individually per channel. When enabled, both input channels are supplied with phantom power.Rear Panel GETTING STARTED GUIDE 2. Rear PanelAudio Input Combo JacksUse the AUDIO IN jacks to mix external audio sources with the sounds of the SP7, apply effects to external audio sources, or route external audio sources to a computer for recording or processing in a DAW. This isuseful for playing along with backing tracks from a portable music player, computer, or other electronic instru-ments.Note: If you turn up the volume with nothing connected to the AUDIO INPUT jack on the rear panel, noise may occur. Turn the volume down to the minimum value when no device is connected.Headphone JackUse the HEADPHONE jack located on the left rear panel of the instrument to listen to the SP7 on stereoheadphones. You will need a 1/8-inch-to-1/4-inch adapter in order to use headphones that have a smaller mini plug connector. When headphones are plugged in, audio is still transmitted from the MAIN OUT jacks. Monitor Out Jacks (stereo)Use the Monitor Out jacks when connecting to an amplifier or speaker for monitoring.Main Out Jacks (stereo)Use the Main Out jacks to connect to a mixer or amplifier. When performing in mono, use the left jack to connect.Rear Panel GETTING STARTED GUIDE SW1(SUSTAIN) and SW2 JacksUse the SW1 (SUSTAIN) and SW2 jacks to connect switch pedals. One switch pedal is included with the SP7.In Sound mode, SW1 (SUSTAIN) defaults to controlling Sustain and SW2 defaults to controlling Sostenuto. Pedal assignments can be adjusted for each zone by using Edit Mode.1)2)Global Mode can be used to set pedal overrides, which can change the pedal assignments for all sounds globally.Note : Switch pedals must be plugged in before powering on the SP7.Do not step on the switch pedals when powering on the SP7, as the state of the pedals is detected as part of the startup sequence.· Stream stereo audio between the SP7 and a DAW.· Use the SP7 as a MIDI controller to play software instruments on your computer/tablet.· Play and control the SP7 with an external USB MIDI controller.· Update the engine firmware of SP7.Use the CC (VOLUME) jack to connect a MIDI CC pedal (also known as a MIDI expression or volume pedal). By default this pedal is assigned to control the volume (pre-FX).The optional Kurzweil CC-1 continuous control pedal will work best with the SP7 but it is also possible to use third-party continuous control pedals designed for keyboards. Compatible pedals should use a 10 kΩ linear taper potentiometer, with a 1/4 inch tip-ring- sleeve (stereo) plug with the wiper connected to the (Volume) Pedal JackThe LCD touch screen firmware is updated using an SD card inserted into the SD card slot. Type : SDHC / Format type : FAT32 / Speed : 4C or more / Capacity : 16GB or more SD Card SlotYou can connect the SP7 to your computer via USB to perform the following functions:USB PortRear Panel GETTING STARTED GUIDE MIDI IN/OUT PortThe MIDI ports are used to communicate with external MIDI modules and controllers. The OUT port transmits data and the IN port receives data.To use the SP7 as a MIDI controller to trigger other MIDI devices or sound modules, use a MIDI cable toconnect the SP7's MIDI OUT port to the MIDI IN port of the module you want to control.If you want to use an external MIDI controller or device to control the SP7, use a MIDI cable to connect the SP7's MIDI IN port to the MIDI OUT port of the external controller or device you want to use.DC Power JackConnect the power adapter to the DC power Jack.Note: Please use the supplied DC power adapter (15V, 2.5A). Using the wrong DC power adapter may cause damage to the product.If the adapter is damaged or the adapter is lost, please contact your Kurzweil dealer.Power ButtonYou can turn the power on or off by pressing the POWER button.1) In Favorites mode, you can organize your most used sounds into Groups and use the CATEGORY buttons to quickly recall your selections.2) Press the FAVORITE mode button on the right to navigate to the Favorites Sound List.3) A total of 64 sounds can be saved to 4 different Groups (A to D) with 16 sounds stored in each group.4) Both factory presets and edited user sounds can be saved as a Favorite.5) Saving a sound to a chosen Favorites group: On the touch screen, press and hold the button you want to save the currently selected sound to.3. SP7 ModesTouchscreen Main NavigationFavorites ModeTranspose : 0 ST120SOUND MenuSearch 1) Mode (upper left-hand corner): This field displays which mode is currently in operation.2) Transpose: This field indicates the current transposition value.3) [ ] : This icon indicates whether the automatic power-off option is running.4) [] : Icon indicating the current Tempo value.5) Back* Button: Returns you to the previous page6) Search* Button: Reveals a search tool for locating presets by ID number 7) Menu* Button: Access additional functions such as EDIT, SAVE and ARP *(may not be available depending on the current page)Transpose : 0 ST120FAVORITE Group AGroup BGroup CGroup DPIANOKeyboardist SetF001PIANOConcert Grand F002PIANOPiano & dEP F023PIANOWood Echo F038E.PIANO PhaDly dEP F072E.PIANOAmbiance EP F046CLAVClav Lead F093CLAVOctPul Clav F102STRINGVib. Viola F170ORGANReed Organ F133ENSEMBLECello Harpsi F244ENSEMBLE Korea Tradition F264SYNTHAnalog Str.1F393BRASSFrench horns F293GUITAR/BASSComRot EGF425GUITAR/BASS S.Gtr.Harmon F445MenuSOUNDTranspose : 0 ST120SearchMenu Category Sound PresetPIANOF001 : Keyboardist Set1) Sound Mode is the default mode to explore sound selections on the SP7.2) When you power on the SP7, it will start up in Sound Mode and the Sound List will appear on the screen.3) The currently selected Sound is displayed in the upper left hand corner of the screen. Categories are listed on the left. Tap the desired category tab to select a different category of Sounds.4) Colored tags distinguish the 14 categories including User sounds. The same color tag is applied to Sound presets for easier identification and selection.5) If you tap the "Search" button at the top of Sound mode, an on-screen search bar appears where you can type in a search for a desired sound by name or ID number.6) The sounds of the SP7 are organized into the following 13 categories by instrument type.(PIANO, E.PIANO, CLAV, ORGAN, STRING, PAD, ENSEMBLE, BRASS, WINDS, SYNTH, GUITAR/BASS, DRUMS/PERC, MISC)Transpose : 0 ST120 AUDIOGeneral Input 1 Input 2 In1 VoxProcMenuInput Ch Link OFF127Monitor ModeVox Proc RouteIn Moni. LevelUSB Rec. Level127127USB Loopback ONPlayback LevelAudio mode displays the controls for the audio input and audio interface functions of the SP7.Use the rear panel AUDIO IN XLR combo jacks (+48V, HI-Z switchable) and USB audio-in to mix external audio sources with the sounds of the SP7, apply effects to external audio sources, or route external audio sources to a computer for recording or processing in a DAW. This is useful for playing along with backing tracks from a portable music player, computer, or other electronic instruments.Transpose : 0 ST120 GLOBALGlobal 1 Global 2 Control LED Color DemoInfoMenuMaster Tune08 hoursTempo ModeVelocity MapAuto Power OffCtrl. Override OFFDest. Override Local+MIDIMIDI TX ModeMIDI RX ModeGlobal Mode contains common settings shared across all modes, such as tuning, power-saving options, touch screen settings, demo playback and restoring factory defaults.The Info page displays the currently installed LCD firmware version and engine firmware version. Please check this page and the Kurzweil website () to make sure your SP7 firmware is up to date. Note: “Hard Reset” erases all information including user presets and completely resets the SP7 to its factory default settings.Official Website www.ycpiano.co.krKurzweil Homepage Twitter @KurzweilMusicFacebook /kurzweilmusicsystems Youtube /user/yckurzweil/c/KurzweilMusicSystems-。
- 1、下载文档前请自行甄别文档内容的完整性,平台不提供额外的编辑、内容补充、找答案等附加服务。
- 2、"仅部分预览"的文档,不可在线预览部分如存在完整性等问题,可反馈申请退款(可完整预览的文档不适用该条件!)。
- 3、如文档侵犯您的权益,请联系客服反馈,我们会尽快为您处理(人工客服工作时间:9:00-18:30)。
的高新数码技术专业乐器。中国海伦钢琴股份有限公司是中国名牌产品 HAILUN 钢琴的生产企业,公司凭借自身实力,已成为国家重点火炬计划实施高新技术企 业,中国乐器协会副理事长单位,国家级文化产业示范基地,国家文化出口重点 企业。您购买的这架 DUA I 数码钢琴无论对音乐爱好者还是初学者都是一架理 想的乐器。为了使您更好的领略本产品给您带来的乐趣及功能服务,请仔细阅读 本用户手册的内容。
[电源开关](POWER)-------------------------------------------------------------------------------- 4 [主音量控制](MAIN VOLUME)------------------------------------------------------------------ 4 [伴奏音量](ACCOMP VOLUME)---------------------------------------------------------------- 4 四、音色效果---------------------------------------------------------------------------------------------------- 4 1、音色选择(VOICE)------------------------------------------------------------------------------- 4 2、混响(REVERB)-----------------------------------------------------------------------------------5 3、合唱(CHORUS)---------------------------------------------------------------------------------- 5 4、力度控制(TOUCH)------------------------------------------------------------------------------ 5 5、双音色(DUAL)------------------------------------------------------------------------------------5 6、键分离(SPLIT)----------------------------------------------------------------------------------- 5 五、节奏控制---------------------------------------------------------------------------------------------------- 6 1、节奏选择(STYLE)------------------------------------------------------------------------------- 6 2、启动节奏(START)------------------------------------------------------------------------------- 6 3、插入变奏(FILLIN A/B)------------------------------------------------------------------------- 7 4、停止伴奏(STOP)--------------------------------------------------------------------------------- 7 5、自动伴奏和弦(A.B.C)--------------------------------------------------------------------------- 7 6、节拍器(METRONOME)----------------------------------------------------------------------- 7 7、速度(TEMPO)------------------------------------------------------------------------------------ 7 六、功能菜单---------------------------------------------------------------------------------------------------- 7 七、录音---------------------------------------------------------------------------------------------------------- 8 1、录音等待----------------------------------------------------------------------------------------------- 8 2、开始录音----------------------------------------------------------------------------------------------- 8 3、结束录音----------------------------------------------------------------------------------------------- 8 4、录音播放----------------------------------------------------------------------------------------------- 8 八、示范曲------------------------------------------------------------------------------------------------------- 9 九、存储---------------------------------------------------------------------------------------------------------- 9 1、存储器的写入----------------------------------------------------------------------------------------- 9 2、存储器的调用----------------------------------------------------------------------------------------- 9 十、踏瓣---------------------------------------------------------------------------------------------------------- 9 1、延音踏瓣(SUSTAIN PEDAL)----------------------------------------------------------------- 9 2、止音踏瓣(SOSTENUTO PEDAL)---------------------------------------------------------- 10 3、弱音踏瓣(SOFT PEDAL)---------------------------------------------------------------------10 十一、外接插口----------------------------------------------------------------------------------------------- 10 1、MIDI 输入/输出(Music Instrument Digital Interface):-------------------------------- 10 2、线路输出(LINE IN/OUT):------------------------------------------------------------------- 10 3、USB 接口(Universal Serial Bus):---------------------------------------------------------- 11 4、耳机插座(PHONE):--------------------------------------------------------------------------- 11 十二、规格----------------------------------------------------------------------------------------------------- 12 附录---------------------------------------------------------------------------------------------------------------13
执行标准: GB8898-2011;GB17625.1-2012;GB13837-2012。
● 特色简介:
· DUA I 采用 88 键锤式触感力度配重木键盘。 · MIDI IN/OUT 使您的电钢琴成为标准音源和专业的 MIDI(Music Instrument
Digital Interface)键盘。 · 共有 138 种逼真音色,其中包括 128GM(Gerneral MIDI)标准音色、8 种民
乐音色、2 组键盘打击乐。 · 精心制作了 100 个优美的自动和弦伴奏,其中有 10 个民族节奏。 · 精心挑选了 5 首不同风格的示范曲。 · 自动和弦伴奏功能自动判别单指、多指两种方式,方便您的演奏。 · 提供 3 个控制面板状态存储器,为您演奏提供方便。 · 伴奏音量、速度调节功能,方便您的演奏调整。 · 混响、合唱等效果功能,加强现场层次感,使演奏效果身临其境。 · 为您设计的踏瓣,让您在演奏时更接近传统钢琴的效果。