Netty权威指南
Netty入门使用教程

Netty⼊门使⽤教程原创:转载需注明原创地址本⽂介绍Netty的使⽤, 结合我本⼈的⼀些理解和操作来快速的让初学者⼊门Netty, 理论知识会有, 但是不会太深⼊, 够⽤即可, 仅供⼊门! 需要想详细的知识可以移步Netty官⽹查看官⽅⽂档!理论知识 : Netty提供异步的、事件驱动的⽹络应⽤程序框架和⼯具,⽤以快速开发⾼性能、⾼可靠性的⽹络服务器和客户端程序当然, 我们这⾥主要是⽤Netty来发送消息, 接收消息, 测试⼀下demo, 更厉害的功能后⾯再慢慢发掘, 我们先看看这玩意怎么玩, 后⾯再深⼊需要⼯具和Java类: netty-4.1.43 netty服务器类 SayHelloServer.java netty服务端处理器类 SayHelloServerHandler.java netty客户端类 SayHelloClient.java netty客户端处理器类 SayHelloClientHandler.java 服务器main⽅法测试类 MainNettyServer.java 客户端main⽅法测试类 MainNettyClient.java⾸先先来⼀张演⽰图, 最下⾯也会放:我们看完以下部分就能实现这个东西了!话不多说, 先贴代码:package netty.server;import ty.bootstrap.ServerBootstrap;import ty.channel.ChannelFuture;import ty.channel.ChannelInitializer;import ty.channel.ChannelOption;import ty.channel.EventLoopGroup;import ty.channel.nio.NioEventLoopGroup;import ty.channel.socket.SocketChannel;import ty.channel.socket.nio.NioServerSocketChannel;import netty.handler.SayHelloServerHandler;/*** sayhello 服务器*/public class SayHelloServer {/*** 端⼝*/private int port ;public SayHelloServer(int port){this.port = port;}public void run() throws Exception{/*** Netty 负责装领导的事件处理线程池*/EventLoopGroup leader = new NioEventLoopGroup();/*** Netty 负责装码农的事件处理线程池*/EventLoopGroup coder = new NioEventLoopGroup();try {/*** 服务端启动引导器*/ServerBootstrap server = new ServerBootstrap();server.group(leader, coder)//把事件处理线程池添加进启动引导器.channel(NioServerSocketChannel.class)//设置通道的建⽴⽅式,这⾥采⽤Nio的通道⽅式来建⽴请求连接.childHandler(new ChannelInitializer<SocketChannel>() {//构造⼀个由通道处理器构成的通道管道流⽔线@Overrideprotected void initChannel(SocketChannel socketChannel) throws Exception {/*** 此处添加服务端的通道处理器*/socketChannel.pipeline().addLast(new SayHelloServerHandler());}})/*** ⽤来配置⼀些channel的参数,配置的参数会被ChannelConfig使⽤* BACKLOG⽤于构造服务端套接字ServerSocket对象,* 标识当服务器请求处理线程全满时,* ⽤于临时存放已完成三次握⼿的请求的队列的最⼤长度。
Netty简介PPT课件
.
14
Netty的逻辑架构
.
15
Reactor通信调度层
• 监听网络的读写和连接操作 • 将网络层数据读取到内存缓冲区中 • 触发各种网络事件,如连接创建、连接激活、读事件、写事件等
.
16
职责链ChannelPipeline
• 负责事件在职责链中的有序传播 • 动态编排职责链 • 各种Handler对事件进行过滤
.
9
Netty的重要组件Bo来自tstrap一个Netty应用通常由一个Bootstrap开始,它的主要作用是配置整个Netty程序,串联起各 个组件。Bootstrap有两种类型,ServerBootstrap和Bootstrap,分别用于Server端和 Client端
Channel
代表一个Socket连接,或者其他和I/O相关的组件
• 传统JAVA I/O在面对不同传输协议时需要使用不同的类型和方法 • JAVA NIO与传统的BIO不兼容 • Netty有一个叫做Channel的统一的I/O编程接口,抽象了所有点
对点的通信操作
.
24
零拷贝和丰富的缓冲实现
• 避免数据在用户空间和内存空间之间的拷贝,提高性能 • 提供组合Buffer对象,可以聚合多个Buffer,并方便地对其操作。
不需要使用传统的内存拷贝的方式讲几个小的Buffer合并成一个 大的Buffer • Netty中自建的缓冲实现ByteBuf,对NIO中的ByteBuffer进行了 优化
.
25
一个Echo服务器的例子
.
26
Thanks!
.
27
JDK 1.7对NIO进行了升级,被称为NIO2.0,进一步强化和丰富了JAVA异步 I/O的功能
netty执行定时任务的规则
netty执行定时任务的规则
Netty通过ScheduledExecutorService实现定时任务。
它会创建一个单独的定时任务线程,用于异步地处理定时任务。
在Netty中,定时任务通过ScheduledFuture接口来表示,其核心原理是将任务交给ScheduledExecutorService线程池,等待指定的时间后再执行任务。
通常情况下,这个线程池是单线程的,防止同时执行多个任务时导致性能下降。
在Netty中,可以使用ChannelHandlerContext的executor()方法创建一个定时任务线程池,并使用scheduledExecutor.schedule()方法指定定时任务执行的时间和任务本身。
这样,Netty就能在指定的时间触发相应的定时任务了。
需要注意的是,具体的实现方式可能会因为Netty的版本和配置而有所不同,建议查阅相关文档以获取准确的信息。
netty 传输数据原理
netty 传输数据原理Netty传输数据原理简介Netty是一款基于Java NIO的网络应用开发框架,用于快速、简单地开发高性能、高可靠性的网络应用程序。
在网络通信中,数据的传输是一个关键环节。
本文将从浅入深地解释Netty的数据传输原理。
什么是NettyNetty是一个事件驱动的异步网络应用程序框架。
它是基于NIO (Non-blocking I/O)技术的,通过选择器(Selector)实现高效的事件监听和处理。
Netty提供了简单而强大的API,使开发人员能够轻松地构建各种类型的网络应用程序,包括服务器和客户端。
数据的传输过程数据在网络中的传输过程可以简单地分为以下几个步骤:1.创建Channel在Netty中,数据传输的起点是通过创建一个Channel,它代表了一个开放的连接,可以用于数据的传输。
Channel可以看作是数据传输的入口和出口。
2.数据编码在将数据发送到网络上之前,我们需要将数据进行编码。
编码是将数据从一种形式转换为另一种形式的过程。
Netty提供了丰富的编码器,可以根据不同的需求选择合适的编码器。
3.数据发送当数据经过编码后,我们可以将其发送到网络上。
Netty使用非阻塞IO技术,通过Selector来实现数据的发送。
Selector是一个多路复用器,可以同时监听多个Channel上的事件,如读写事件。
4.数据接收在接收端,Netty通过Selector监听到数据到达的事件,然后将数据从网络中读取出来。
数据读取后,可以对其进行解码操作。
5.数据解码解码是将数据从网络中读取出来后,转换成我们可以理解的形式的过程。
Netty提供了各种解码器,可以解码不同的数据格式。
6.数据处理在数据解码之后,我们可以对数据进行进一步的处理,如进行业务逻辑的处理、持久化等。
Netty的优势Netty在处理数据传输方面具有以下几个优势:•高性能:Netty使用IO多路复用技术,能够更高效地管理多个连接,提供更高的吞吐量和低延迟。
Netty学习(二)使用及执行流程

Netty学习(⼆)使⽤及执⾏流程Netty简单使⽤1.本⽂先介绍⼀下 server 的 demo2.(重点是这个)根据代码跟踪⼀下 Netty 的⼀些执⾏流程和事件传递的 pipeline.⾸先到官⽹看⼀下Netty Server 和 Client的demo, https://netty.io/wiki/user-guide-for-4.x.html,我⽤的是4.1.xx,⼀般来说不是⼤版本变更, 变化不会很⼤.下⾯是 Netty Server 的demo,跟官⽹的是⼀样的.// 下⾯是⼀个接收线程, 3个worker线程// ⽤ Netty 的默认线程⼯⼚,可以不传这个参数private final static ThreadFactory threadFactory = new DefaultThreadFactory("Netty学习之路");// Boss 线程池,⽤于接收客户端连接private final static NioEventLoopGroup boss = new NioEventLoopGroup(1,threadFactory);// Worker线程池,⽤于处理客户端操作private final static NioEventLoopGroup worker = new NioEventLoopGroup(3,threadFactory);/** 下⾯是在构造⽅法中, 如果不传线程数量,默认是0, super 到 MultithreadEventLoopGroup 这⾥后, 最终会⽤ CPU核数*2 作为线程数量, Reactor多线程模式的话,就指定 boss 线程数量=1 * private static final int DEFAULT_EVENT_LOOP_THREADS = Math.max(1, SystemPropertyUtil.getInt("ty.eventLoopThreads", NettyRuntime.availableProcessors() * 2));* protected MultithreadEventLoopGroup(int nThreads, Executor executor, Object... args) {* super(nThreads == 0 ? DEFAULT_EVENT_LOOP_THREADS : nThreads, executor, args);* }*/public static void main(String[] args) throws Exception{try {new NettyServer(8888).start();}catch(Exception e){System.out.println("netty server启动失败");e.printStackTrace();}}static class NettyServer{private int port;NettyServer(int port){this.port = port;}void start()throws Exception{try {ServerBootstrap serverBootstrap = new ServerBootstrap();ChannelFuture future = serverBootstrap.group(boss, worker).channel(NioServerSocketChannel.class)// 客户端连接等待队列⼤⼩.option(ChannelOption.SO_BACKLOG, 1024)// 接收缓冲区.option(ChannelOption.SO_RCVBUF, 32*1024)// 连接超时.option(ChannelOption.CONNECT_TIMEOUT_MILLIS, 10*1000).childHandler(new ChildChannelHandle()).bind(this.port).sync();future.channel().closeFuture().sync();}catch(Exception e){throw e;}finally {boss.shutdownGracefully();worker.shutdownGracefully();}}}static class ChildChannelHandle extends ChannelInitializer<SocketChannel> {@Overrideprotected void initChannel(SocketChannel socketChannel) throws Exception {ChannelPipeline pipeline = socketChannel.pipeline();// 字符串编码pipeline.addLast(new StringEncoder());// 字符串解码pipeline.addLast(new StringDecoder());// ⾃定义的handle, 状态变化后进⾏处理的 handlepipeline.addLast(new StatusHandle());// ⾃定义的handle, 现在是对读取到的消息进⾏处理pipeline.addLast(new CustomHandle());}}客户端的操作就简单的使⽤终端来操作了这⾥对 inactive 和 active 进⾏了状态的输出, 输出接收数据并且原样返回给客户端接下来看⼀下代码CustomHandle这⾥对接收到的客户端的数据进⾏处理public class CustomHandle extends ChannelInboundHandlerAdapter {private Thread thread = Thread.currentThread();@Overridepublic void channelRead(ChannelHandlerContext ctx, Object msg) throws Exception {System.out.println(thread.getName()+": channelRead content : "+msg);ctx.writeAndFlush(msg);}}StatusHandle对状态变化后进⾏处理的Handle(客户端上下线事件) ### public class StatusHandle extends ChannelInboundHandlerAdapter { private Thread thread = Thread.currentThread(); private String ip;@Overridepublic void channelActive(ChannelHandlerContext ctx) throws Exception {this.ip = ctx.channel().remoteAddress().toString();System.out.println(thread.getName()+": ["+this.ip+"] channelActive -------");}@Overridepublic void channelInactive(ChannelHandlerContext ctx) throws Exception {System.out.println(thread.getName()+": ["+this.ip+"] channelInactive -------");}}上⾯标记了两个地⽅, 从这两个地⽅可以窥探到 Netty 的执⾏流程到底是怎么样的*NioServerSocketChannel 作⽤相当于NIO ServerSocketChannel*ChildChannelHandle extends ChannelInitializer , 实现 initChannel ⽅法, 这⾥主要是引申出来的事件传输通道pipeline1.NioServerSocketChannel这个类是 Netty ⽤于服务端的类,⽤于接收客户端连接等. ⽤过NIO的同学都知道, serverSocket开启的时候,需要注册 ACCEPT 事件来监听客户端的连接(⼩插曲)下⾯是Java NIO 的事件(netty基于NIO,⾃然也会有跟NIO⼀样的事件)public static final int OP_READ = 1 << 0; // 读消息事件public static final int OP_WRITE = 1 << 2; // 写消息事件public static final int OP_CONNECT = 1 << 3; // 连接就绪事件public static final int OP_ACCEPT = 1 << 4; // 新连接事件先看⼀下 NioServerSocketChannel 的继承类图从上⾯的demo的 channel(NioServerSocketChannel.class) 开始说起吧,可以看到是⼯⼚⽣成channel. public B channel(Class<? extends C> channelClass) {if (channelClass == null) {throw new NullPointerException("channelClass");} else {return this.channelFactory((ty.channel.ChannelFactory)(new ReflectiveChannelFactory(channelClass)));}}⼯⼚⽅法⽣成 NioServerSocketChannel 的时候调⽤的构造⽅法:public NioServerSocketChannel(ServerSocketChannel channel) {super(null, channel, SelectionKey.OP_ACCEPT);config = new NioServerSocketChannelConfig(this, javaChannel().socket());}继续往下跟,跟到 AbstractNioChannel 的构造⽅法:protected AbstractNioChannel(Channel parent, SelectableChannel ch, int readInterestOp) {super(parent);this.ch = ch;// 记住这个地⽅记录了 readInterestOpthis.readInterestOp = readInterestOp;try {// 设置为⾮阻塞ch.configureBlocking(false);} catch (IOException e) {try {ch.close();} catch (IOException e2) {if (logger.isWarnEnabled()) {logger.warn("Failed to close a partially initialized socket.", e2);}}throw new ChannelException("Failed to enter non-blocking mode.", e);}}回到 ServerBootstrap 的链式调⽤, 接下来看 bind(port) ⽅法,⼀路追踪下去,会看到private ChannelFuture doBind(final SocketAddress localAddress) {// 初始化和注册final ChannelFuture regFuture = initAndRegister();final Channel channel = regFuture.channel();if (regFuture.cause() != null) {return regFuture;}if (regFuture.isDone()) {ChannelPromise promise = channel.newPromise();doBind0(regFuture, channel, localAddress, promise);return promise;} else {final PendingRegistrationPromise promise = new PendingRegistrationPromise(channel);regFuture.addListener(new ChannelFutureListener() {@Overridepublic void operationComplete(ChannelFuture future) throws Exception {Throwable cause = future.cause();if (cause != null) {promise.setFailure(cause);} else {promise.registered();doBind0(regFuture, channel, localAddress, promise);}}});return promise;}}看 initAndRegister ⽅法final ChannelFuture initAndRegister() {Channel channel = null;try {channel = channelFactory.newChannel();init(channel);} catch (Throwable t) {if (channel != null) {channel.unsafe().closeForcibly();return new DefaultChannelPromise(channel, GlobalEventExecutor.INSTANCE).setFailure(t);}return new DefaultChannelPromise(new FailedChannel(), GlobalEventExecutor.INSTANCE).setFailure(t);}// 看到这⾥的注册, 继续往下看ChannelFuture regFuture = config().group().register(channel);if (regFuture.cause() != null) {if (channel.isRegistered()) {channel.close();} else {channel.unsafe().closeForcibly();}}return regFuture;}config().group().register(channel); 往下看, 追踪到 AbstractChannel 的 register --> regist0(promise) (由于调⽤太多,省去了中间的⼀些调⽤代码) private void register0(ChannelPromise promise) {try {// check if the channel is still open as it could be closed in the mean time when the register// call was outside of the eventLoopif (!promise.setUncancellable() || !ensureOpen(promise)) {return;}boolean firstRegistration = neverRegistered;// 执⾏注册doRegister();neverRegistered = false;registered = true;// Ensure we call handlerAdded(...) before we actually notify the promise. This is needed as the// user may already fire events through the pipeline in the ChannelFutureListener.// 这⾥官⽅也说得很清楚了,确保我们在使⽤ promise 的通知之前真正的调⽤了 pipeline 中的 handleAdded ⽅法pipeline.invokeHandlerAddedIfNeeded();safeSetSuccess(promise);// 先调⽤ regist ⽅法pipeline.fireChannelRegistered();// Only fire a channelActive if the channel has never been registered. This prevents firing// multiple channel actives if the channel is deregistered and re-registered.// 只有 channel 之前没有注册过才会调⽤ channelActive// 这⾥防⽌ channel deregistered(注销) 和 re-registered(重复调⽤ regist) 的时候多次调⽤ channelActiveif (isActive()) {if (firstRegistration) {// 执⾏ channelActive ⽅法pipeline.fireChannelActive();} else if (config().isAutoRead()) {// This channel was registered before and autoRead() is set. This means we need to begin read// again so that we process inbound data.//// channel 已经注册过并且已经设置 autoRead().这意味着我们需要开始再次读取和处理 inbound 的数据// See https:///netty/netty/issues/4805beginRead();}}} catch (Throwable t) {// Close the channel directly to avoid FD leak.closeForcibly();closeFuture.setClosed();safeSetFailure(promise, t);}}看到 doRegister() ⽅法,继续跟下去, 跟踪到 AbstractNioChannel 的 doRegister() ⽅法protected void doRegister() throws Exception {boolean selected = false;for (;;) {try {// 这⾥调⽤java的 NIO 注册selectionKey = javaChannel().register(eventLoop().unwrappedSelector(), 0, this);return;} catch (CancelledKeyException e) {if (!selected) {eventLoop().selectNow();selected = true;} else {throw e;}}}}写过NIO的同学应该熟悉上⾯的这句话:selectionKey = javaChannel().register(eventLoop().unwrappedSelector(), 0, this);这⾥就是调⽤了java NIO的注册, ⾄于为什么注册的时候ops = 0, 继续追踪下去,此处省略⼀堆调⽤....(实在是过于繁杂)最后发现, 最终都会调⽤AbstractNioChannel 的 doBeginRead() ⽅法修改 selectionKey 的interestOps ,客户端连接后,注册的读事件在这⾥也是相同的操作.protected void doBeginRead() throws Exception {// Channel.read() or ChannelHandlerContext.read() was calledfinal SelectionKey selectionKey = this.selectionKey;if (!selectionKey.isValid()) {return;}readPending = true;final int interestOps = selectionKey.interestOps();// // 这⾥是判断有没有注册过相同的事件,没有的话才修改 opsif ((interestOps & readInterestOp) == 0) {// 就是这⾥, 记得刚才注册的时候,ops == 0 吗, this.readInterestOp 在上⾯的初始化的时候赋了值// 与 0 逻辑或, 所以最终值就是 this.readInterestOp , 注册事件的数值不清楚的话可以看⼀下最上⾯selectionKey.interestOps(interestOps | readInterestOp);}}上⾯介绍的服务端 ACCEPT 最后调⽤的 NIO 的 register ⽅法, read 也是调⽤ nio 的 register, 但是在SocketChannel(client) 调⽤ register 之前, 服务端是有⼀个 server.accept() ⽅法获取客户端连接, 以此为契机, 最后我们在 NioServerSocketChannel ⾥⾯找到了accept ⽅法.// 1protected int doReadMessages(List<Object> buf) throws Exception {// accept 客户端, 传⼊ serverSocketChannelSocketChannel ch = SocketUtils.accept(javaChannel());try {if (ch != null) {// 创建新的 Netty 的 Channel , 并设置 ops =1 (read). 这是在调⽤ doBeginRead的时候修改的 ops 的值 , 跟 server 的⼀样buf.add(new NioSocketChannel(this, ch));return 1;}} catch (Throwable t) {logger.warn("Failed to create a new channel from an accepted socket.", t);try {ch.close();} catch (Throwable t2) {logger.warn("Failed to close a socket.", t2);}}return 0;}// 2public static SocketChannel accept(final ServerSocketChannel serverSocketChannel) throws IOException {try {return AccessController.doPrivileged(new PrivilegedExceptionAction<SocketChannel>() {@Overridepublic SocketChannel run() throws IOException {// nio 的⽅法return serverSocketChannel.accept();}});} catch (PrivilegedActionException e) {throw (IOException) e.getCause();}}客户端连接的时候,会触发上⾯的 server.accept(), 然后会触发 AbstractChannel 的 register ⽅法从⽽调⽤下⾯2个⽅法AbstractChannel.this.pipeline.fireChannelRegistered();// 这个⽅法会调⽤下⾯的两个⽅法static void invokeChannelRegistered(final AbstractChannelHandlerContext next) {EventExecutor executor = next.executor();if (executor.inEventLoop()) {next.invokeChannelRegistered();} else {executor.execute(new Runnable() {@Overridepublic void run() {next.invokeChannelRegistered();}});}}private void invokeChannelRegistered() {if (invokeHandler()) {try {((ChannelInboundHandler) handler()).channelRegistered(this);} catch (Throwable t) {notifyHandlerException(t);}} else {fireChannelRegistered();}}接下来我们开始讲上⾯提到的那个 handlerAdded ⽅法, 这会引申到另⼀个东西 pipeline.2.ChannelInitializer在解析这个类之前, 要先说⼀下 pipeline (管道,传输途径啥的都⾏)它就是⼀条 handle 消息传递链, 客户端的任何消息(事件)都经由它来处理.先看⼀下 AbstractChannelHandlerContext 中的两个⽅法 ###// 查找下⼀个 inboundHandle (从当前位置往后查找 intBound)private AbstractChannelHandlerContext findContextInbound() {AbstractChannelHandlerContext ctx = this;do {ctx = ctx.next; // 往后查找} while (!ctx.inbound);return ctx;}// 查找下⼀个 OutboundHandle (从当前位置往前查找 outBound )private AbstractChannelHandlerContext findContextOutbound() {AbstractChannelHandlerContext ctx = this;do {ctx = ctx.prev; // 往前查找} while (!ctx.outbound);return ctx;}so , inbound 消息传递为从前往后, outbound 的消息传递为从后往前, 所以最先添加的 outbound 将会最后被调⽤###pipeline.addLast(new StringEncoder());// 字符串解码pipeline.addLast(new StringDecoder());// ⾃定义的handle, 状态变化后进⾏处理的 handlepipeline.addLast(new StatusHandle());// ⾃定义的handle, 现在是对读取到的消息进⾏处理pipeline.addLast(new CustomHandle());我们上⾯4个 handle 添加的顺序为 out, in , in, in , 所以最终调⽤的话,会变成下⾯这样再看看 ChannelInitializer 这个类###public abstract class ChannelInitializer<C extends Channel> extends ChannelInboundHandlerAdapter/*** This method will be called once the {@link Channel} was registered. After the method returns this instance* will be removed from the {@link ChannelPipeline} of the {@link Channel}.** @param ch the {@link Channel} which was registered.* @throws Exception is thrown if an error occurs. In that case it will be handled by* {@link #exceptionCaught(ChannelHandlerContext, Throwable)} which will by default close* the {@link Channel}.* 上⾯的意思是说,当 channel(客户端通道)⼀旦被注册,将会调⽤这个⽅法, 并且在⽅法返回的时候, 这个实例(ChannelInitializer)将会被从 ChannelPipeline (客户端的 pipeline) 中移除 */protected abstract void initChannel(C ch) throws Exception;// 第⼀步public void handlerAdded(ChannelHandlerContext ctx) throws Exception {if (ctx.channel().isRegistered()) {initChannel(ctx);}// 除了这个抽象⽅法, 这个类还有⼀个重载⽅法private boolean initChannel(ChannelHandlerContext ctx) throws Exception {if (initMap.putIfAbsent(ctx, Boolean.TRUE) == null) { // Guard against re-entrance.try {// 第⼆步// 这⾥调⽤我们⾃⼰实现的那个抽象⽅法 , 将我们前⾯定义的 handle 都加⼊到 client 的 pipeline 中initChannel((C) ctx.channel());} catch (Throwable cause) {exceptionCaught(ctx, cause);} finally {// 第三步remove(ctx);}return true;}return false;}private void remove(ChannelHandlerContext ctx) {try {ChannelPipeline pipeline = ctx.pipeline();if (pipeline.context(this) != null) {pipeline.remove(this);}} finally {initMap.remove(ctx);}}终于写完了这⼀篇, 这篇的代码有点多, 如果只是demo的话, 不需要花费什么时间, 如果想要深⼊了解⼀下 Netty 的话, 可以从这⾥开始对源码的⼀点点分析.最后这次的内容到这⾥就结束了,最后的最后,⾮常感谢你们能看到这⾥!!你们的阅读都是对作者的⼀次肯定觉得⽂章有帮助的看官顺⼿点个赞再⾛呗(终于暴露了我就是来骗赞的(◒。
计算机网络软件及应用:netty总结

netty总结1、netty的线程模型是怎么样的?建立多个selector,个数可以自己指定,默认是2Xcpu个数,一个selector监听accept事件,存在于boss thread;剩余的selector监听接收到的accepted socketchannel在于worker thread.bossthread将accepted socket分发给各个worker thread。
一旦分发给具体的worker,那么这个远程socketchannel只被该worker对应的selector 进行select,只被该worker处理。
2、netty 与jetty线程模型上有什么区别netty采用固定线程数,每个worker负责处理它关联的selector 所注册的连接,并且是循环处理连接对应的兴趣事件(读、写)。
这样做有几点好处:1、防止了线程间资源竞争带来的性能问题2、一个worker循环处理事件这种机制为内存重用提供了条件,比如一个woker可以在大多数情况下只使用一个buffer。
但是缺点就是1、无限制接收过来的连接,有可能造成连接过多而导致内存溢出2、一个请求处理时间较长,有可能会导致其它连接长时间得不到处理而被远程强制关闭jetty的线程模型和netty有很大不同,jetty有2个accept线程,2个select线程,每个select线程关联一个selector,N个worker线程。
accept返回的socketchannel交给change 任务队列,每个worker线程poll 队列里面的任务然后运行,select线程负责获取事件通知,将新任务入队列,worker线程的数量N是可以扩张和设置最大值的。
worker线程在运行任务的时候设置了繁忙状态,全局变量计算器可以显示总共繁忙的worker线程个数,当worker 繁忙线程个数超过某个阀值时,会增开更多的线程。
jetty的这种线程模型有几点好处1、可以动态扩容,线程数量随压力增加而增加,在超过极限值时不接收更多的连接2、select线程、accept线程、worker处理线程分开,任务分配均匀3、netty如何避免单个请求业务处理时间过长问题的netty3.x中使用executionHandler来解决这个问题,例子程序public class HttpHelloWorldServerPipelineFactory implements ChannelPipelineFactory {// static Timer trigger=new HashedWheelTimer();// static final ChannelHandler timeOutHandler=new ReadTimeoutHandler(trigger,60);publicstaticfinal ExecutionHandler executionHandler =new ExecutionHandler(new OrderedMemoryAwareThreadPoolExecutor(16, 1048576, 1048576)); public ChannelPipeline getPipeline() throws Exception {。
netty入门

NioServerSocketChannel
这里我们采用NioServerSocketChannel类来实例化一个进来的连接 服务端需要创建ServerSocketChannel,对原生NIO类库进行了封装,对应是NioServerSocketChannel 对用户而言,不需要关心服务端Channel的底层实现细节和工作原理,只需要指定具体是哪种服务端 Netty的ServerBootstrap提供了channel方法用于指定服务端Channel的类型。Netty通过工厂反射创建NioServerSocketChannel 对象。
Channel .childHandler(new ChannelInitializer<SocketChannel>() { @Override public void initChannel(SocketChannel ch) throws Exception { ChannelOption
主要到代码中用到了option(), childOption()两个不同的方法。option() 方法用于设置监听套接字。childOption()则用于设 置连接到服务器的客户端套接字。
ChannelFuture
绑定并启动监听端口。 在绑定监听端口之前系统会做一系列的初始化和检测工作,完成之后,会启动监听端口,并将ServerSocketChannel注册到Selector 上监听客户端连接,
ChannelFuture f = b.bind(PORT).sync(); // Wait until the server socket is closed. f.channel().closeFuture().sync();
netty家族成员
•ServerBootstrap (设置服务器的辅助类) •EventLoopGroup
Netty4.x中文教程系列(七)UDP协议

Netty4.x中⽂教程系列(七)UDP协议 将近快⼀年时间没有更新Netty的博客。
⼀⽅⾯原因是因为项⽬进度的问题。
另外⼀⽅⾯是博主有⼀段时间去熟悉Unity3D引擎。
本章节主要记录博主⾃⼰Netty的UDP协议使⽤。
1. 构建UDP服务端 ⾸先我们应该清楚UDP协议是⼀种⽆连接状态的协议。
所以Netty框架区别于⼀般的有链接协议服务端启动程序(ServerBootstrap)。
Netty开发基于UDP协议的服务端需要使⽤Bootstrap1package dev.tinyz.game;23import ty.bootstrap.Bootstrap;4import ty.buffer.Unpooled;5import ty.channel.*;6import ty.channel.nio.NioEventLoopGroup;7import ty.channel.socket.DatagramPacket;8import ty.channel.socket.nio.NioDatagramChannel;9import ty.handler.codec.MessageToMessageDecoder;1011import .InetSocketAddress;12import java.nio.charset.Charset;13import java.util.List;1415/**16 * @author TinyZ on 2015/6/8.17*/18public class GameMain {1920public static void main(String[] args) throws InterruptedException {2122final NioEventLoopGroup nioEventLoopGroup = new NioEventLoopGroup();2324 Bootstrap bootstrap = new Bootstrap();25 bootstrap.channel(NioDatagramChannel.class);26 bootstrap.group(nioEventLoopGroup);27 bootstrap.handler(new ChannelInitializer<NioDatagramChannel>() {2829 @Override30public void channelActive(ChannelHandlerContext ctx) throws Exception {31super.channelActive(ctx);32 }3334 @Override35protected void initChannel(NioDatagramChannel ch) throws Exception {36 ChannelPipeline cp = ch.pipeline();37 cp.addLast("framer", new MessageToMessageDecoder<DatagramPacket>() {38 @Override39protected void decode(ChannelHandlerContext ctx, DatagramPacket msg, List<Object> out) throws Exception {40 out.add(msg.content().toString(Charset.forName("UTF-8")));41 }42 }).addLast("handler", new UdpHandler());43 }44 });45// 监听端⼝46 ChannelFuture sync = bootstrap.bind(9009).sync();47 Channel udpChannel = sync.channel();4849// String data = "我是⼤好⼈啊";50// udpChannel.writeAndFlush(new DatagramPacket(Unpooled.copiedBuffer(data.getBytes(Charset.forName("UTF-8"))), new InetSocketAddress("192.168.2.29", 9008))); 5152 Runtime.getRuntime().addShutdownHook(new Thread(new Runnable() {53 @Override54public void run() {55 nioEventLoopGroup.shutdownGracefully();56 }57 }));58 }59 }View Code 于Tcp协议的客户端启动程序基本⼀样。
netty黑马程序员笔记

netty黑马程序员笔记Netty是一个基于Java NIO的异步事件驱动的网络应用框架,它的设计目标是提供一个高性能、高可靠性的网络编程解决方案。
作为网络通信领域的优秀框架,Netty在服务端程序的开发中发挥着重要作用。
本文将围绕Netty的相关知识点展开讲解,以帮助黑马程序员更好地理解和应用Netty。
一、Netty的核心组件1. Channel(通道):Channel是Netty中最基本的概念,它用于和远程节点进行通信。
在Netty中,数据通过Channel进行读写,Channel相当于传统IO编程中的Socket。
2. EventLoop(事件循环):EventLoop是Netty的核心,用于处理所有的事件,包括接收连接、读写数据等。
每个Channel都会被关联到一个EventLoop,一个EventLoop可以被多个Channel共享。
3. ChannelHandler(事件处理器):ChannelHandler用于处理Channel中的事件,比如读写数据、连接建立与关闭等操作。
每个Channel都可以关联多个ChannelHandler,ChannelHandler之间形成一个处理链,通过这个链来处理Channel 中的事件。
4. ChannelPipeline(事件处理链):ChannelPipeline是ChannelHandler的容器,它负责管理ChannelHandler的调用顺序。
当有事件发生时,ChannelPipeline会依次调用关联的ChannelHandler进行处理。
二、Netty的生命周期1. ChannelOption(通道选项):ChannelOption用于设置Channel的参数,比如TCP_NODELAY、SO_KEEPALIVE等。
通过设置ChannelOption,可以影响到Channel的行为。
2. ChannelConfig(通道配置):ChannelConfig用于配置Channel的基本参数,比如接收缓冲区大小、发送缓冲区大小等。
Netty 3.1 中文用户手册

Netty3.1中文用户手册2010年7月14日312views评论发表评论本指南对Netty进行了介绍并指出其意义所在。
1.问题现在,我们使用适合一般用途的应用或组件来和彼此通信。
例如,我们常常使用一个HTTP客户端从远程服务器获取信息或者通过web services进行远程方法的调用。
然而,一个适合普通目的的协议或其实现并不具备其规模上的扩展性。
例如,我们无法使用一个普通的HTTP服务器进行大型文件,电邮信息的交互,或者处理金融信息和多人游戏数据那种要求准实时消息传递的应用场景。
因此,这些都要求使用一个适用于特殊目的并经过高度优化的协议实现。
例如,你可能想要实现一个对基于AJAX的聊天应用,媒体流或大文件传输进行过特殊优化的HTTP服务器。
你甚至可能想去设计和实现一个全新的,特定于你的需求的通信协议。
另一种无法避免的场景是你可能不得不使用一种专有的协议和原有系统交互。
在这种情况下,你需要考虑的是如何能够快速的开发出这个协议的实现并且同时还没有牺牲最终应用的性能和稳定性。
2.方案Netty是一个异步的,事件驱动的网络编程框架和工具,使用Netty可以快速开发出可维护的,高性能、高扩展能力的协议服务及其客户端应用。
也就是说,Netty是一个基于NIO的客户,服务器端编程框架,使用Netty可以确保你快速和简单的开发出一个网络应用,例如实现了某种协议的客户,服务端应用。
Netty相当简化和流线化了网络应用的编程开发过程,例如,TCP和UDP的socket服务开发。
“快速”和“简单”并不意味着会让你的最终应用产生维护性或性能上的问题。
Netty是一个吸收了多种协议的实现经验,这些协议包括FTP,SMPT,HTTP,各种二进制,文本协议,并经过相当精心设计的项目,最终,Netty成功的找到了一种方式,在保证易于开发的同时还保证了其应用的性能,稳定性和伸缩性。
一些用户可能找到了某些同样声称具有这些特性的编程框架,因此你们可能想问Netty又有什么不一样的地方。
Netty 中文用户手册

The Netty Project 3.1 User Guide The Proven Approachto Rapid Network Application Development3.1.5.GA, r1772Preface (iii)1. The Problem (iii)2. The Solution (iii)1. Getting Started (1)1.1. Before Getting Started (1)1.2. Writing a Discard Server (1)1.3. Looking into the Received Data (3)1.4. Writing an Echo Server (4)1.5. Writing a Time Server (5)1.6. Writing a Time Client (7)1.7. Dealing with a Stream-based Transport (8)1.7.1. One Small Caveat of Socket Buffer (8)1.7.2. The First Solution (9)1.7.3. The Second Solution (11)1.8. Speaking in POJO instead of ChannelBuffer (12)1.9. Shutting Down Your Application (15)1.10. Summary (18)2. Architectural Overview (19)2.1. Rich Buffer Data Structure (19)2.2. Universal Asynchronous I/O API (19)2.3. Event Model based on the Interceptor Chain Pattern (20)2.4. Advanced Components for More Rapid Development (21)2.4.1. Codec framework (21)2.4.2. SSL / TLS Support (21)2.4.3. HTTP Implementation (22)2.4.4. Google Protocol Buffer Integration (22)2.5. Summary (22)PrefaceThis guide provides an introduction to Netty and what it is about.1. The ProblemNowadays we use general purpose applications or libraries to communicate with each other. For example, we often use an HTTP client library to retrieve information from a web server and to invoke a remote procedure call via web services.However, a general purpose protocol or its implementation sometimes does not scale very well. It is like we don't use a general purpose HTTP server to exchange huge files, e-mail messages, and near-realtime messages such as financial information and multiplayer game data. What's required is a highly optimized protocol implementation which is dedicated to a special purpose. For example, you might want to implement an HTTP server which is optimized for AJAX-based chat application, media streaming, or large file transfer. You could even want to design and implement a whole new protocol which is precisely tailored to your need.Another inevitable case is when you have to deal with a legacy proprietary protocol to ensure the interoperability with an old system. What matters in this case is how quickly we can implement that protocol while not sacrificing the stability and performance of the resulting application.2. The SolutionThe Netty project is an effort to provide an asynchronous event-driven network application framework and tooling for the rapid development of maintainable high-performance high-scalability protocol servers and clients.In other words, Netty is a NIO client server framework which enables quick and easy development of network applications such as protocol servers and clients. It greatly simplifies and streamlines network programming such as TCP and UDP socket server development.'Quick and easy' does not mean that a resulting application will suffer from a maintainability or a performance issue. Netty has been designed carefully with the experiences earned from the implementation of a lot of protocols such as FTP, SMTP, HTTP, and various binary and text-based legacy protocols. As a result, Netty has succeeded to find a way to achieve ease of development, performance, stability, and flexibility without a compromise.Some users might already have found other network application framework that claims to have the same advantage, and you might want to ask what makes Netty so different from them. The answer is the philosophy where it is built on. Netty is designed to give you the most comfortable experience both in terms of the API and the implementation from the day one. It is not something tangible but you will realize that this philosophy will make your life much easier as you read this guide and play with Netty.Chapter 1.Getting StartedThis chapter tours around the core constructs of Netty with simple examples to let you get started quickly. You will be able to write a client and a server on top of Netty right away when you are at the end of this chapter.If you prefer top-down approach in learning something, you might want to start from Chapter 2, Architectural Overview and get back here.1.1. Before Getting StartedThe minimum requirements to run the examples which are introduced in this chapter are only two; the latest version of Netty and JDK 1.5 or above. The latest version of Netty is available in the project download page. To download the right version of JDK, please refer to your preferred JDK vendor's web site.Is that all? To tell the truth, you should find these two are just enough to implement almost any type of protocols. Otherwise, please feel free to contact the Netty project community and let us know what's missing.At last but not least, please refer to the API reference whenever you want to know more about the classes introduced here. All class names in this document are linked to the online API reference for your convenience. Also, please don't hesitate to contact the Netty project community and let us know if there's any incorrect information, errors in grammar and typo, and if you have a good idea to improve the documentation.1.2. Writing a Discard ServerThe most simplistic protocol in the world is not 'Hello, World!' but DISCARD. It's a protocol which discards any received data without any response.To implement the DISCARD protocol, the only thing you need to do is to ignore all received data. Let us start straight from the handler implementation, which handles I/O events generated by Netty.Writing a Discard ServerChannelPipelineCoverage annotates a handler type to tell if the handler instance of the annotated type can be shared by more than one Channel (and its associated ChannelPipeline).DiscardServerHandler does not manage any stateful information, and therefore it is annotated with the value "all".DiscardServerHandler extends SimpleChannelHandler, which is an implementation of ChannelHandler. SimpleChannelHandler provides various event handler methods that you can override. For now, it is just enough to extend SimpleChannelHandler rather than to implement the handler interfaces by yourself.We override the messageReceived event handler method here. This method is called with a MessageEvent, which contains the received data, whenever new data is received from a client. In this example, we ignore the received data by doing nothing to implement the DISCARD protocol.exceptionCaught event handler method is called with an ExceptionEvent when an exception was raised by Netty due to I/O error or by a handler implementation due to the exception thrown while processing events. In most cases, the caught exception should be logged and its associated channel should be closed here, although the implementation of this method can be different depending on what you want to do to deal with an exceptional situation. For example, you might want to send a response message with an error code before closing the connection.So far so good. We have implemented the first half of the DISCARD server. What's left now is to write the main method which starts the server with the DiscardServerHandler.Looking into the Received DataChannelFactory is a factory which creates and manages Channel s and its related resources. It processes all I/O requests and performs I/O to generate ChannelEvent s. Netty provides various ChannelFactory implementations. We are implementing a server-side application in this example, and therefore NioServerSocketChannelFactory was used. Another thing to note is that it does not create I/O threads by itself. It is supposed to acquire threads from the thread pool you specified in the constructor, and it gives you more control over how threads should be managed in the environment where your application runs, such as an application server with a security manager.ServerBootstrap is a helper class that sets up a server. You can set up the server using a Channel directly. However, please note that this is a tedious process and you do not need to do that in most cases.Here, we add the DiscardServerHandler to the default ChannelPipeline. Whenevera new connection is accepted by the server, a new ChannelPipeline will be created fora newly accepted Channel and all the ChannelHandler s added here will be added tothe new ChannelPipeline. It's just like a shallow-copy operation; all Channel and their ChannelPipeline s will share the same DiscardServerHandler instance.You can also set the parameters which are specific to the Channel implementation. We are writing a TCP/IP server, so we are allowed to set the socket options such as tcpNoDelay and keepAlive.Please note that the "child." prefix was added to all options. It means the options will be applied to the accepted Channel s instead of the options of the ServerSocketChannel. You could do the following to set the options of the ServerSocketChannel:We are ready to go now. What's left is to bind to the port and to start the server. Here, we bind to the port 8080 of all NICs (network interface cards) in the machine. You can now call the bind method as many times as you want (with different bind addresses.)Congratulations! You've just finished your first server on top of Netty.1.3. Looking into the Received DataNow that we have written our first server, we need to test if it really works. The easiest way to test it is to use the telnet command. For example, you could enter "telnet localhost 8080" in the command line and type something.However, can we say that the server is working fine? We cannot really know that because it is a discard server. You will not get any response at all. To prove it is really working, let us modify the server to print what it has received.We already know that MessageEvent is generated whenever data is received and the messageReceived handler method will be invoked. Let us put some code into the messageReceived method of the DiscardServerHandler:It is safe to assume the message type in socket transports is always ChannelBuffer.ChannelBuffer is a fundamental data structure which stores a sequence of bytes in Netty. It's similar to NIO ByteBuffer, but it is easier to use and more flexible. For example, Netty allows you to create a composite ChannelBuffer which combines multiple ChannelBuffer s reducing the number of unnecessary memory copy.Although it resembles to NIO ByteBuffer a lot, it is highly recommended to refer to the API reference. Learning how to use ChannelBuffer correctly is a critical step in using Netty without difficulty.If you run the telnet command again, you will see the server prints what has received.The full source code of the discard server is located in the ty.example.discard package of the distribution.1.4. Writing an Echo ServerSo far, we have been consuming data without responding at all. A server, however, is usually supposed to respond to a request. Let us learn how to write a response message to a client by implementing the ECHO protocol, where any received data is sent back.The only difference from the discard server we have implemented in the previous sections is that it sends the received data back instead of printing the received data out to the console. Therefore, it is enough again to modify the messageReceived method:A ChannelEvent object has a reference to its associated Channel. Here, the returned Channelrepresents the connection which received the MessageEvent. We can get the Channel and call the write method to write something back to the remote peer.If you run the telnet command again, you will see the server sends back whatever you have sent to it. The full source code of the echo server is located in the ty.example.echo package of the distribution.1.5. Writing a Time ServerThe protocol to implement in this section is the TIME protocol. It is different from the previous examples in that it sends a message, which contains a 32-bit integer, without receiving any requests and loses the connection once the message is sent. In this example, you will learn how to construct and send a message, and to close the connection on completion.Because we are going to ignore any received data but to send a message as soon as a connection is established, we cannot use the messageReceived method this time. Instead, we should override the channelConnected method. The following is the implementation:As explained, channelConnected method will be invoked when a connection is established. Let us write the 32-bit integer that represents the current time in seconds here.To send a new message, we need to allocate a new buffer which will contain the message. We are going to write a 32-bit integer, and therefore we need a ChannelBuffer whose capacity is 4 bytes. The ChannelBuffers helper class is used to allocate a new buffer. Besides the buffer method, ChannelBuffers provides a lot of useful methods related to the ChannelBuffer. For more information, please refer to the API reference.On the other hand, it is a good idea to use static imports for ChannelBuffers:As usual, we write the constructed message.But wait, where's the flip? Didn't we used to call ByteBuffer.flip() before sending a message in NIO? ChannelBuffer does not have such a method because it has two pointers; one for read operations and the other for write operations. The writer index increases when you write something to a ChannelBuffer while the reader index does not change. The reader index and the writer index represents where the message starts and ends respectively.In contrast, NIO buffer does not provide a clean way to figure out where the message content starts and ends without calling the flip method. You will be in trouble when you forget to flip the buffer because nothing or incorrect data will be sent. Such an error does not happen in Netty because we have different pointer for different operation types. You will find it makes your life much easier as you get used to it -- a life without flipping out!Another point to note is that the write method returns a ChannelFuture. A ChannelFuture represents an I/O operation which has not yet occurred. It means, any requested operation might not have been performed yet because all operations are asynchronous in Netty. For example, the following code might close the connection even before a message is sent:Therefore, you need to call the close method after the ChannelFuture, which was returned by the write method, notifies you when the write operation has been done. Please note that, close might not close the connection immediately, and it returns a ChannelFuture.How do we get notified when the write request is finished then? This is as simple as addinga ChannelFutureListener to the returned ChannelFuture. Here, we created a newanonymous ChannelFutureListener which closes the Channel when the operation is done.Alternatively, you could simplify the code using a pre-defined listener:1.6. Writing a Time ClientUnlike DISCARD and ECHO servers, we need a client for the TIME protocol because a human cannot translate a 32-bit binary data into a date on a calendar. In this section, we discuss how to make sure the server works correctly and learn how to write a client with Netty.The biggest and only difference between a server and a client in Netty is that different Bootstrap and ChannelFactory are required. Please take a look at the following code:NioClientSocketChannelFactory, instead of NioServerSocketChannelFactory was used to create a client-side Channel.Dealing with a Stream-based TransportClientBootstrap is a client-side counterpart of ServerBootstrap.Please note that there's no "child." prefix. A client-side SocketChannel does not have a parent.We should call the connect method instead of the bind method.As you can see, it is not really different from the server side startup. What about the ChannelHandler implementation? It should receive a 32-bit integer from the server, translate it into a human readable format, print the translated time, and close the connection:It looks very simple and does not look any different from the server side example. However, this handler sometimes will refuse to work raising an IndexOutOfBoundsException. We discuss why this happens in the next section.1.7. Dealing with a Stream-based Transport1.7.1. One Small Caveat of Socket BufferIn a stream-based transport such as TCP/IP, received data is stored into a socket receive buffer. Unfortunately, the buffer of a stream-based transport is not a queue of packets but a queue of bytes. It means, even if you sent two messages as two independent packets, an operating system will not treat them as two messages but as just a bunch of bytes. Therefore, there is no guarantee that what you read is exactly what your remote peer wrote. For example, let us assume that the TCP/IP stack of an operating system has received three packets:Because of this general property of a stream-based protocol, there's high chance of reading them in the following fragmented form in your application:Therefore, a receiving part, regardless it is server-side or client-side, should defrag the received data into one or more meaningful frames that could be easily understood by the application logic. In case of the example above, the received data should be framed like the following:1.7.2. The First SolutionNow let us get back to the TIME client example. We have the same problem here. A 32-bit integer is a very small amount of data, and it is not likely to be fragmented often. However, the problem is that it can be fragmented, and the possibility of fragmentation will increase as the traffic increases.The simplistic solution is to create an internal cumulative buffer and wait until all 4 bytes are received into the internal buffer. The following is the modified TimeClientHandler implementation that fixes the problem:This time, "one"was used as the value of the ChannelPipelineCoverage annotation.It's because the new TimeClientHandler has to maintain the internal buffer and therefore cannot serve multiple Channel s. If an instance of TimeClientHandler is shared by multiple Channel s (and consequently multiple ChannelPipeline s), the content of the buf will be corrupted.A dynamic buffer is a ChannelBuffer which increases its capacity on demand. It's very usefulwhen you don't know the length of the message.First, all received data should be cumulated into buf.And then, the handler must check if buf has enough data, 4 bytes in this example, and proceed to the actual business logic. Otherwise, Netty will call the messageReceived method again when more data arrives, and eventually all 4 bytes will be cumulated.There's another place that needs a fix. Do you remember that we added a TimeClientHandler instance to the default ChannelPipeline of the ClientBootstrap? It means one same TimeClientHandler instance is going to handle multiple Channel s and consequently the data will be corrupted. To create a new TimeClientHandler instance per Channel, we have to implement a ChannelPipelineFactory:Now let us replace the following lines of TimeClient:with the following:It might look somewhat complicated at the first glance, and it is true that we don't need to introduce TimeClientPipelineFactory in this particular case because TimeClient creates only one connection.However, as your application gets more and more complex, you will almost always end up with writing a ChannelPipelineFactory, which yields much more flexibility to the pipeline configuration.1.7.3. The Second SolutionAlthough the first solution has resolved the problem with the TIME client, the modified handler does not look that clean. Imagine a more complicated protocol which is composed of multiple fields such as a variable length field. Your ChannelHandler implementation will become unmaintainable very quickly.As you may have noticed, you can add more than one ChannelHandler to a ChannelPipeline, and therefore, you can split one monolithic ChannelHandler into multiple modular ones to reduce the complexity of your application. For example, you could split TimeClientHandler into two handlers:•TimeDecoder which deals with the fragmentation issue, and•the initial simple version of TimeClientHandler.Fortunately, Netty provides an extensible class which helps you write the first one out of the box:There's no ChannelPipelineCoverage annotation this time because FrameDecoder is already annotated with "one".FrameDecoder calls decode method with an internally maintained cumulative buffer whenever new data is received.If null is returned, it means there's not enough data yet. FrameDecoder will call again when there is a sufficient amount of data.If non-null is returned, it means the decode method has decoded a message successfully.FrameDecoder will discard the read part of its internal cumulative buffer. Please remember that you don't need to decode multiple messages. FrameDecoder will keep calling the decoder method until it returns null.If you are an adventurous person, you might want to try the ReplayingDecoder which simplifies the decoder even more. You will need to consult the API reference for more information though.Additionally, Netty provides out-of-the-box decoders which enables you to implement most protocols very easily and helps you avoid from ending up with a monolithic unmaintainable handler implementation. Please refer to the following packages for more detailed examples:•ty.example.factorial for a binary protocol, and•ty.example.telnet for a text line-based protocol.1.8. Speaking in POJO instead of ChannelBufferAll the examples we have reviewed so far used a ChannelBuffer as a primary data structure of a protocol message. In this section, we will improve the TIME protocol client and server example to use a POJO instead of a ChannelBuffer.The advantage of using a POJO in your ChannelHandler is obvious; your handler becomes more maintainable and reusable by separating the code which extracts information from ChannelBuffer out from the handler. In the TIME client and server examples, we read only one 32-bit integer and it is not a major issue to use ChannelBuffer directly. However, you will find it is necessary to make the separation as you implement a real world protocol.First, let us define a new type called UnixTime.We can now revise the TimeDecoder to return a UnixTime instead of a ChannelBuffer.FrameDecoder and ReplayingDecoder allow you to return an object of any type. If they were restricted to return only a ChannelBuffer, we would have to insert another ChannelHandler which transforms a ChannelBuffer into a UnixTime.With the updated decoder, the TimeClientHandler does not use ChannelBuffer anymore:Much simpler and elegant, right? The same technique can be applied on the server side. Let us update the TimeServerHandler first this time:Now, the only missing piece is the ChannelHandler which translates a UnixTime back into a ChannelBuffer. It's much simpler than writing a decoder because there's no need to deal with packet fragmentation and assembly when encoding a message.The ChannelPipelineCoverage value of an encoder is usually "all" because this encoder is stateless. Actually, most encoders are stateless.An encoder overrides the writeRequested method to intercept a write request. Please note that the MessageEvent parameter here is the same type which was specified in messageReceived but they are interpreted differently. A ChannelEvent can be either an upstream or downstreamevent depending on the direction where the event flows. For instance, a MessageEvent can be an upstream event when called for messageReceived or a downstream event when called for writeRequested. Please refer to the API reference to learn more about the difference between a upstream event and a downstream event.Once done with transforming a POJO into a ChannelBuffer, you should forward the new buffer to the previous ChannelDownstreamHandler in the ChannelPipeline. Channels provides various helper methods which generates and sends a ChannelEvent. In this example, Channels.write(...)method creates a new MessageEvent and sends it to the previous ChannelDownstreamHandler in the ChannelPipeline.On the other hand, it is a good idea to use static imports for Channels:The last task left is to insert a TimeEncoder into the ChannelPipeline on the server side, and it is left as a trivial exercise.1.9. Shutting Down Your ApplicationIf you ran the TimeClient, you must have noticed that the application doesn't exit but just keep running doing nothing. Looking from the full stack trace, you will also find a couple I/O threads are running. To shut down the I/O threads and let the application exit gracefully, you need to release the resources allocated by ChannelFactory.The shutdown process of a typical network application is composed of the following three steps:1.Close all server sockets if there are any,2.Close all non-server sockets (i.e. client sockets and accepted sockets) if there are any, and3.Release all resources used by ChannelFactory.To apply the three steps above to the TimeClient, TimeClient.main()could shut itself down gracefully by closing the only one client connection and releasing all resources used by ChannelFactory:The connect method of ClientBootstrap returns a ChannelFuture which notifies whena connection attempt succeeds or fails. It also has a reference to the Channel which is associatedwith the connection attempt.Wait for the returned ChannelFuture to determine if the connection attempt was successful or not.If failed, we print the cause of the failure to know why it failed. the getCause()method of ChannelFuture will return the cause of the failure if the connection attempt was neither successful nor cancelled.Now that the connection attempt is over, we need to wait until the connection is closed by waiting for the closeFuture of the Channel. Every Channel has its own closeFuture so that you are notified and can perform a certain action on closure.Even if the connection attempt has failed the closeFuture will be notified because the Channel will be closed automatically when the connection attempt fails.All connections have been closed at this point. The only task left is to release the resources being used by ChannelFactory. It is as simple as calling its releaseExternalResources() method.All resources including the NIO Selector s and thread pools will be shut down and terminated automatically.Shutting down a client was pretty easy, but how about shutting down a server? You need to unbind from the port and close all open accepted connections. To do this, you need a data structure that keeps track of the list of active connections, and it's not a trivial task. Fortunately, there is a solution, ChannelGroup. ChannelGroup is a special extension of Java collections API which represents a set of open Channel s. If a Channel is added to a ChannelGroup and the added Channel is closed, the closed Channel is removed from its ChannelGroup automatically. You can also perform an operation on all Channel s in the same group. For instance, you can close all Channel s in a ChannelGroup when you shut down your server.To keep track of open sockets, you need to modify the TimeServerHandler to add a new open Channel to the global ChannelGroup, TimeServer.allChannels:。
通信传输利器Netty(NetisDotNetty)介绍

通信传输利器Netty(NetisDotNetty)介绍 (先埋怨⼀下微软⼤⼤)我们做NET开发,⼗分羡慕JAVA上能有NETTY, SPRING, STRUTS, DUBBO等等优秀框架,⽽我们NET就只有⼲瞪眼,哎,⽆赖之前⽣态圈没做好,恨铁不成钢啊。
不过由于近来Net Core的发布,慢慢也拉回了⼀⼩部分属于微软的天下,打住,闲话扯到这⼉。
DotNetty是Azure团队仿照(⼏乎可以这么说)JAVA的Netty⽽出来的(⽬前已实现Netty的⼀部分),⽬前在Github上的Star有1.8K+,地址:https:///Azure/DotNetty,没有任何⽂档,和代码中少量的注释。
虽然⽐Netty出来晚了很多年,不过我们NET程序员们也该庆幸了,在⾃⼰的平台上终于能⽤上类似Netty这样强⼤的通信框架了。
传统通讯的问题: 我们使⽤通⽤的应⽤程序或者类库来实现互相通讯,⽐如,我们经常使⽤⼀个 HTTP 客户端库来从 web 服务器上获取信息,或者通过web 服务来执⾏⼀个远程的调⽤。
然⽽,有时候⼀个通⽤的协议或他的实现并没有很好的满⾜需求。
⽐如我们⽆法使⽤⼀个通⽤的 HTTP 服务器来处理⼤⽂件、电⼦邮件以及近实时消息,⽐如⾦融信息和多⼈游戏数据。
我们需要⼀个⾼度优化的协议来处理⼀些特殊的场景。
例如你可能想实现⼀个优化了的Ajax 的聊天应⽤、媒体流传输或者是⼤⽂件传输器,你甚⾄可以⾃⼰设计和实现⼀个全新的协议来准确地实现你的需求。
另⼀个不可避免的情况是当你不得不处理遗留的专有协议来确保与旧系统的互操作性。
在这种情况下,重要的是我们如何才能快速实现协议⽽不牺牲应⽤的稳定性和性能。
解决: Netty 是⼀个提供 asynchronous event-driven (异步事件驱动)的⽹络应⽤框架,是⼀个⽤以快速开发⾼性能、可扩展协议的服务器和客户端。
换句话说,Netty 是⼀个 NIO 客户端服务器框架,使⽤它可以快速简单地开发⽹络应⽤程序,⽐如服务器和客户端的协议。
netty详解(六)netty自定义编码解码器

netty详解(六)netty⾃定义编码解码器上⼀篇博客:,本篇将⾃定义编码解码器,对数据传输过程进⾏“⼊站解码,出站编码”。
服务端接收的是字节数据,通过“⼊站解码”,得到知道格式的数据;服务器发送指定格式数据通过 “出站编码” 转换成字节数据,然后发送给客户端;客户端类似;ChannelPipeLine 管理⼀系列 ChannelHandler,⼊站消息解码后转发给下⼀个 handler 进⾏处理案例需求:客户端或服务器发送 Long 类型数据,出站编码成字节数据,⼊站解码读取对⽅发送的消息 编码器 MyLongToByteEncoderpackage com.oy.inboundandoutbound;import ty.buffer.ByteBuf;import ty.channel.ChannelHandlerContext;import ty.handler.codec.MessageToByteEncoder;public class MyLongToByteEncoder extends MessageToByteEncoder<Long> {@Overrideprotected void encode(ChannelHandlerContext ctx, Long msg, ByteBuf out) throws Exception {System.out.println("MyLongToByteEncoder encoder 被调⽤. msg: " + msg);out.writeLong(msg);}} 解码器 MyByteToLongDecoderpackage com.oy.inboundandoutbound;import ty.buffer.ByteBuf;import ty.channel.ChannelHandlerContext;import ty.handler.codec.ByteToMessageDecoder;import java.util.List;public class MyByteToLongDecoder extends ByteToMessageDecoder {/*** decode() 会根据接收的数据,被调⽤多次,知道确定没有新的元素添加到list,* 或者是 ByteBuf 没有更多的可读字节为⽌。
Netty高级

} }); // 绑定端口号 serverBootstrap.bind(new InetSocketAddress(9090)); System.out.println("netty server启动...."); }
}
Netty 客户端
package com.itmayiedu;
import .InetSocketAddress; import java.util.Scanner; import java.util.concurrent.ExecutorService; import java.util.concurrent.Executors;
/** * 通道关闭的时候触发 */
@Override public void channelClosed(ChannelHandlerContext ctx, ChannelStateEvent e) throws Exception {
System.out.println("channelClosed"); }
netty 方法处理

Netty方法处理1. 简介Netty是一个基于Java NIO的网络应用框架,用于快速开发可维护的高性能服务器和客户端。
它提供了一种简单而强大的方式来处理异步事件和网络通信,使得开发者可以专注于业务逻辑而不必关注底层的网络细节。
Netty方法处理是指在Netty框架中使用方法来处理网络事件、编解码和业务逻辑。
通过定义一系列方法来处理不同类型的事件,可以实现高效、灵活和可扩展的网络应用程序。
在本文中,我们将深入探讨Netty方法处理的原理、使用技巧以及一些最佳实践。
2. Netty方法处理原理2.1 ChannelHandler在Netty中,所有的网络事件都会经过一系列的ChannelHandler进行处理。
ChannelHandler是Netty中最重要的组件之一,它负责接收、处理和发送数据。
一个典型的Netty应用程序通常包含多个ChannelHandler,这些Handler按照特定顺序组成一个ChannelPipeline。
当一个网络事件发生时,它会被传递给Pipeline中的第一个Handler,并依次经过每个Handler进行处理。
2.2 方法命名规范在Netty方法处理中,每个ChannelHandler都需要实现特定接口,并根据接口定义的方法来处理不同类型的事件。
这些方法通常以”channel”开头,后面跟着事件类型的名称。
例如,要处理接收到的数据,可以实现channelRead(ChannelHandlerContext ctx, Object msg)方法;要处理连接建立事件,可以实现channelActive(ChannelHandlerContext ctx)方法。
2.3 ChannelHandlerContextChannelHandlerContext是Netty中另一个重要的概念。
它代表了ChannelHandler 和ChannelPipeline之间的关联关系,并提供了丰富的操作方法。
netty技术
Netty1.0ty概述1.1Netty概念Netty是由JBOSS提供的一个java开源框架。
Netty提供异步的、事件驱动的网络应用程序框架和工具,用以快速开发高性能、高可靠性的网络服务器和客户端程序。
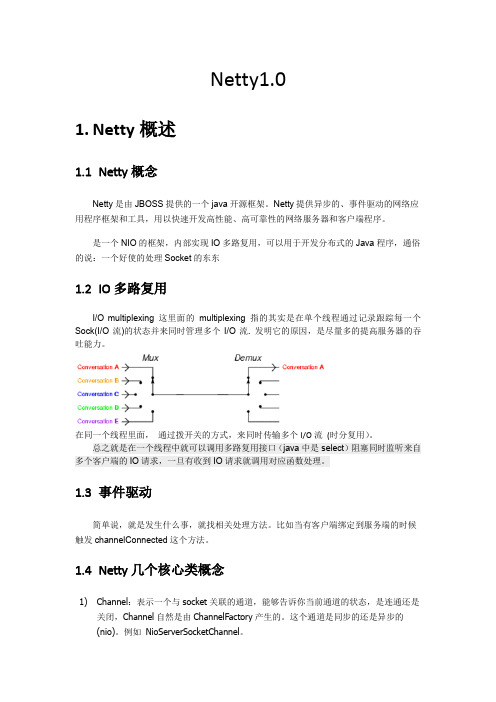
是一个NIO的框架,内部实现IO多路复用,可以用于开发分布式的Java程序,通俗的说:一个好使的处理Socket的东东1.2IO多路复用I/O multiplexing 这里面的multiplexing 指的其实是在单个线程通过记录跟踪每一个Sock(I/O流)的状态并来同时管理多个I/O流. 发明它的原因,是尽量多的提高服务器的吞吐能力。
在同一个线程里面,通过拨开关的方式,来同时传输多个I/O流(时分复用)。
总之就是在一个线程中就可以调用多路复用接口(java中是select)阻塞同时监听来自多个客户端的IO请求,一旦有收到IO请求就调用对应函数处理。
1.3事件驱动简单说,就是发生什么事,就找相关处理方法。
比如当有客户端绑定到服务端的时候触发channelConnected这个方法。
1.4Netty几个核心类概念1)Channel:表示一个与socket关联的通道,能够告诉你当前通道的状态,是连通还是关闭,Channel自然是由ChannelFactory产生的。
这个通道是同步的还是异步的(nio)。
例如NioServerSocketChannel。
2) ChannelPipeline:管道,一个Channel拥有一个ChannelPipeline,ChannelPipeline维护着一个处理链(严格的说是两个:upstream、downstream),处理链是由很多处理句柄ChannelHandler所构成,每个ChannelHandler处理完以后会传递给链中的下一个处理句柄继续处理。
3) ChannelHandler:处理句柄,用户可以定义自己的处理句柄来处理每个请求,或发出请求前进行预处理,典型的有编码/解码器:decoder、encoder。
netty 基础概念
Netty是一个异步事件驱动的网络应用程序框架,主要用于快速开发可维护的高性能协议服务器和客户端。
Netty的基础构成包括缓冲区(Buffer)、通道(Channel)以及选择器(Selector)等组件。
在了解Netty之前,有必要先理解Java网络编程模型的基本常识,例如BIO、NIO和AIO这三个技术概念,它们分别对应阻塞、非阻塞、非阻塞异步三种通讯模型。
Netty的主要目标是构建基于NIO(或者是NIO.2)的高性能协议服务器,具有网络和业务逻辑组件的分离和松耦合的特性。
总的来说,Netty是一个功能强大的网络应用开发框架,能够有效提升开发效率和程序性能。
Netty5入门指南

问题现如今我们使用通用的应用程序或者类库来实现系统之间地互相访问,比如我们经常使用一个HTTP客户端来从web服务器上获取信息,或者通过web service来执行一个远程的调用。
然而,有时候一个通用的协议和他的实现并没有覆盖一些场景。
比如我们无法使用一个通用的HTTP服务器来处理大文件、电子邮件、近实时消息比如财务信息和多人游戏数据。
我们需要一个合适的协议来处理一些特殊的场景。
例如你可以实现一个优化的Ajax的聊天应用、媒体流传输或者是大文件传输的HTTP服务器,你甚至可以自己设计和实现一个新的协议来准确地实现你的需求。
另外不可避免的事情是你不得不处理这些私有协议来确保和原有系统的互通。
这个例子将会展示如何快速实现一个不影响应用程序稳定性和性能的协议。
解决方案Netty是一个提供异步事件驱动的网络应用框架,用以快速开发高性能、高可靠性的网络服务器和客户端程序。
换句话说,Netty是一个NIO框架,使用它可以简单快速地开发网络应用程序,比如客户端和服务端的协议。
Netty大大简化了网络程序的开发过程比如TCP和UDP的 Socket 的开发。
“快速和简单”并不意味着应用程序会有难维护和性能低的问题,Netty是一个精心设计的框架,它从许多协议的实现中吸收了很多的经验比如FTP、SMTP、HTTP、许多二进制和基于文本的传统协议,Netty在不降低开发效率、性能、稳定性、灵活性情况下,成功地找到了解决方案。
有一些用户可能已经发现其他的一些网络框架也声称自己有同样的优势,所以你可能会问是Netty和它们的不同之处。
答案就是Netty的哲学设计理念。
Netty从第一天开始就为用户提供了用户体验最好的API以及实现设计。
正是因为Netty的设计理念,才让我们得以轻松地阅读本指南并使用Netty。
入门指南这个章节会介绍Netty核心的结构,并通过一些简单的例子来帮助你快速入门。
当你读完本章节你马上就可以用Netty写出一个客户端和服务端。
netty-websocket用法

Netty-WebSocket用法一、概述Netty是一个基于Java NIO的网络应用框架,它是一个允许快速、可靠的开发网络编程的工具。
而WebSocket是一种在单个TCP连接上进行全双工通信的协议,它能够在客户端和服务器之间建立持久连接,实现实时通信。
Netty-WebSocket则是Netty框架中针对WebSocket协议的实现,它提供了一套高效、易用的WebSocket编程接口,使开发者能够快速搭建WebSocket服务端和客户端。
二、Netty-WebSocket用法深度探讨1. WebSocket协议的基本原理WebSocket协议是一种基于TCP的协议,它通过HTTP/HTTPS升级连接到WebSocket连接,在建立连接后,客户端和服务器端之间可以双向通信。
WebSocket协议的特点包括数据帧封装、握手协议、数据压缩、子协议扩展等,了解这些基本原理有助于更好地使用Netty-WebSocket。
2. Netty-WebSocket的工作流程Netty-WebSocket的工作流程可以分为建立连接、消息传输和断开连接三个阶段。
在建立连接阶段,客户端和服务器端需要进行握手协议的交互;在消息传输阶段,双方可以通过发送WebSocket帧来进行实时通信;在断开连接阶段,需要进行连接的关闭。
3. Netty-WebSocket的应用场景Netty-WebSocket广泛应用于在线聊天、实时游戏、实时数据推送等领域。
通过Netty-WebSocket,可以实现客户端和服务器端之间的实时通信,极大地提升了用户体验和系统性能。
4. Netty-WebSocket在实际项目中的使用在实际项目中,我们可以利用Netty-WebSocket搭建一个简单的聊天室,通过WebSocket协议进行实时消息的发送和接收。
我们也可以将Netty-WebSocket应用于大规模的在线直播和游戏项目中,实现高并发、低延迟的实时通信。
- 1、下载文档前请自行甄别文档内容的完整性,平台不提供额外的编辑、内容补充、找答案等附加服务。
- 2、"仅部分预览"的文档,不可在线预览部分如存在完整性等问题,可反馈申请退款(可完整预览的文档不适用该条件!)。
- 3、如文档侵犯您的权益,请联系客服反馈,我们会尽快为您处理(人工客服工作时间:9:00-18:30)。
演讲人
2 0 2 1 - 11 - 11
目录
基础篇 走进Java NIO
入门篇 Netty NIO开发指 南
中级篇 Netty编解码开发 指南
高级篇 Netty多协议开发 和应用
源码分析篇 Netty功能介 绍和源码分析
架构和行业应用篇 Netty 高级特性
附录 Netty参数配置表
3.4.1 服务端 和客户端的运行 3.4.2 打包和
部署
3.4 运 行和调试
3.5 总 结
4 TCP粘包/拆包问题的解决之道
4.1 TCP粘包/拆 包
4.3 利用 LineBasedFrameDeco
der解决TCP粘包问题
01
03
02
4.2 未考虑TCP粘 包导致功能异常案
例
04
4.4 总结
4 TCP粘包/拆包问题的解决之 道 4.1 TCP粘包/拆包
5 分隔符和定长解码器的应用
5.1 DelimiterBasedFrameDecoder应用开发
5.1.1 DelimiterBasedFrameDecoder服务端开发 5.1.2 DelimiterBasedFrameDecoder客户端开发 5.1.3 运行DelimiterBasedFrameDecoder服务端和客户端
4.1.1 TCP粘包/拆包问题说明 4.1.2 TCP粘包/拆包发生的原因 4.1.3 粘包问题的解决策略
4 TCP粘包/拆包问题的解 决之道
4.2 未考虑TCP粘包导致功能异常案 例
4.2.1 TimeServer的改造
4.2.2 TimeClient的改造
4.2.3 运行结果
4 TCP粘包/拆包问题的解决 之道
无法跨语言 序列化后的码流太大 序列化性能太低
3 6.3 总结
2 6.2 业界主流的编解码框架
6.2.1 6.2.2 6.2.3
Google的Protobuf介绍 Facebook的Thrift介绍 JBoss Marshalling介绍
7.1 Netty Java序 列化服务端开发
A
7.2 Java序列化 Netty客户端开发
8.2.1 Protobuf版本 的图书订购服务端开发 8.2.2 Protobuf版本 的图书订购客户端开发 8.2.3 Protobuf版本 的图书订购程序功能测
试
8.3 Protobuf的使用 注意事项
8.4 总结
中级篇g开 发环境准备
2 NIO入门
2.2 伪异步I/O编程
2.2.1 伪异步I/O模型图 2.2.2 伪异步式I/O创建的 TimeServer源码分析 2.2.3 伪异步I/O弊端分析
2 NIO入门
2.3 NIO编程
2.3.1 NIO类库简介 2.3.2 NIO服务端序列图 2.3.3 NIO创建的TimeServer源码分析 2.3.4 NIO客户端序列图 2.3.5 NIO创建的TimeClient源码分析
5.2 FixedLengthFrameDecoder应用开发
5.2.1 FixedLengthFrameDecoder服务端开发 5.2.2 利用telnet命令行测试EchoServer服务端
5.3 总结
03
中级篇 Netty编解码开发指南
6 编解码技术
1 6.1 Java序列化的缺点
6.1.1 6.1.2 6.1.3
2 NIO入门
2.4 AIO编程
2.4.1 AIO创建的 TimeServer源码分析
2.4.2 AIO创建的 TimeClient源码分析
2.4.3 AIO版本时间服 务器运行结果
2 NIO入门
2.5 4种I/O的对比
2.5.1 概念澄清 2.5.2 不同I/O模型对比
2 NIO入门
2.6 选择Netty的理由
4.3 利用LineBasedFrameDecoder解决TCP粘 包问题
4.3.1 支持TCP粘包的TimeServer 4.3.2 支持TCP粘包的TimeClient 4.3.3 运行支持TCP粘包的时间服务器程序 4.3.4 LineBasedFrameDecoder和 StringDecoder的原理分析
贰
9.2 Netty的 Marshalling服务端开发
叁
9.3 Netty的 Marshalling客户端开发
肆
9.4 运行Marshalling客 户端和服务端例程
伍 9.5 总结
9 JBoss Marshalling编解 码
04
高级篇 Netty多协议开发和应 用
10 HTTP协议开发应用
10.2 Netty HTTP 服务端入门开发
10.1 HTTP协议 介绍
B A
10.3 Netty HTTP+XML协议栈开发
C
10.4 总结
2.6.1 不选择Java原生 NIO编程的原因 2.6.2 为什么选择 Netty
02
入门篇 Netty NIO开发指南
3 Netty入门应用
3.1 Netty 开发环境的搭
建
3.1.1 下载 Netty的软件包
3.1.2 搭建 Netty应用工程
3.2 Netty 服务端开发
3.3 Netty 客户端开发
B
7.3 运行结果
C
7.4 总结
D
中级篇 Netty编解码开发指南
7 Java序列化
8 Google Protobuf编解码
8.1 Protobuf的入门
8.1.1 Protobuf开发 环境搭建
8.1.2 Protobuf编解 码开发
8.1.3 运行Protobuf 例程
8.2 Netty的 Protobuf服务端开发
01 基础篇 走进Java NIO
1 Java的I/O演进之路
1.1 I/O基础入门
1.1.1 Linux网络I/O模型简介 1.1.2 I/O多路复用技术
0 3
1.3 总结
0 1
0
2
1.2 Java的I/O演进
2.1 传 统的BIO 编程
2 NIO入门
2.2 伪 异步I/O 编程
2.4 AIO编 程
2.5 4 种I/O的 对比
2.3 NIO编 程
2.6 选 择Netty 的理由
2 NIO入门
2.7 总结
2 NIO入门
2.1 传统的BIO编程
2.1.1 BIO通信模型图 2.1.2 同步阻塞式I/O创建的 TimeServer源码分析 2.1.3 同步阻塞式I/O创建的 TimeClient源码分析