EPSON TM-T81 网络打印机驱动使用手册
EpsonTM系列打印机安装文档

EpsonTM系列打印机安装文档EpsonTM系列打印机安装说明1、TM3001)此打印机本身没有中文字库,由国内的代理公达公司附加了一个中文模块(GB2312-支持7K字符)来支持中文打印。
2)程序的安装比较简单,直接在windows打印机中添加打印机找到相应的OEMSETUP.INF即可以安装打印机。
3)编程硬字库打印需要将所有的asc码转换成中文全角字符才能在打印机的中文模式下进行快速打印。
4)编程软字库走的是windows的canves的驱动,只要拼好打印内容即可,不要特殊处理。
2、TM210、TM88II1)此2款打印机本身集成了中文字库((GB2312-支持7K字符))。
2)程序的安装比较简单,直接在windows打印机中添加打印机找到相应的OEMSETUP.INF即可以安装打印机。
3)编程硬字库打印直接输出字符即可在打印机的中文模式下进行快速打印。
4)编程软字库走的是windows的canves的驱动,只要拼好打印内容即可,不要特殊处理,TM88II在win98下软字库可以选择7.5cpi/3.5cpi可以直接输出硬字库中的字体,速度很快。
5)这2款机器已经停产。
3、TM220、TM88III、TM88IV1)Epson和microsoft签定的驱动使用许可协议在2003年到期,Epson决定自己开发打印驱动,这时的打印驱动安装就是以exe的安装为主了,目前最新中文驱动下载版本是Ver.3.01gSC,同时新版本的驱动只支持winXP、win2000以上操作系统,Epson不再提供win95、win98的驱动下载。
2)从这3款开始打印机本身集成了大中文字库((GB18030-支持27K字符)),这使得以前的驱动使用起来就会有相应的问题,打印字会断、打印速度慢等等。
3)TM88III、TM88IV之间的主要主要区别是,TM88IV的按钮更结实,后盖展开更小,支持双色热敏纸的打印,其他性能和TM88III 基本差不多4)安装这几款打印机首先安装GBEXTSUP文件夹下的字库程序。
EPSON USB打印软件TN BA EU打印机USB设备驱动安装指南说明书

EPSON USB Printing Software for TM/BA/EU PrintersUSB Device DriverInstallation ManualMay 23, 2000,Revision ASeiko Epson CorporationRevision HistoryRevision RevisionContents SHEET DateA2000/5/23Newly Created-Contents1. INTRODUCTION (1)2. OPERATING ENVIRONMENT (1)3. VERIFYING THE COMPUTER'S USB PORT (2)4. CONNECTION (4)5. INSTALLING THE USB DEVICE DRIVER (5)6. UPDATING OLD VERSIONS OF THE USB DEVICE DRIVER (13)NoEPSON TITLE EPSON USB Printing Software for TM/BA/EU PrintersUSB Device DriverRevision A NEXT 2SHEET 11. IntroductionTo use USB-connectable EPSON TM/BA/EU printers, it is necessary to install the USB device driver.This manual explains how to install the USB device driver.2. Operating environmentPersonal computer• AT compatibles∗This is restricted to devices that have USB ports and for which the manufacturer of the computer guarantees the operation of the USB port.OS• Microsoft Windows 2000• Microsoft Windows 98 Second EditionNoEPSON TITLE EPSON USB Printing Software for TM/BA/EU PrintersUSB Device DriverRevision A NEXT 3SHEET23. Verifying the computer's USB portCheck that the computer can use a USB before installing the USB device driver.For Windows 20001. Right click on the My Computer icon and open [Properties].2. Select the [Hardware] tab and click the [Device Manager] button to open [Device Manager].3. Check that [USB (Universal Serial Bus) controllers] is displayed.∗If [USB (Universal Serial Bus) controllers] is not displayed, the USB device driver cannot be used.NoEPSON TITLE EPSON USB Printing Software for TM/BA/EU PrintersUSB Device DriverRevision ANEXT 4SHEET 3For Windows 98 Second Edition1. Right click on the My Computer icon and open [Properties].2. Select the [Device Manager] tab and check that [Universal Serial Bus controllers] is displayed.∗If [Universal Serial Bus controllers] is not displayed, the USB device driver cannot be used.NoEPSON TITLE EPSON USB Printing Software for TM/BA/EU PrintersUSB Device DriverRevision A NEXT 5SHEET 44. ConnectionThe printer must be connected following the sequential order described in this manual.If a different order is used, the printer may not function normally.When connecting a printer directly to the computer1. Switch on the power to the computer.2. Connect the printer's AC adapter to the printer.3. Connect the AC adapter to the power outlet.4. Connect the USB cable's B connector to the printer's upstream port.5. Switch on the power to the printer.6. Connect the A connector for the already connected cable to the computer's USB port.Next, proceed to [5. Installing the USB device driver].When connecting a printer to a USB hub that is connected to the computer1. Switch on the power to the computer and check that the connected USB hub is functioning normally.2. Connect the printer's AC adapter to the printer.3. Connect the AC adapter to the power outlet.4. Connect the USB cable's B connector to the printer's upstream port.5. Switch on the power to the printer.6. Connect the A connector for the already connected cable to the downstream port for the USB hub that is connected to the computer.Next, proceed to [5. Installing the USB device driver].NoEPSON TITLE EPSON USB Printing Software for TM/BA/EU PrintersUSB Device DriverRevisionA NEXT6SHEET 55. Installing the USB device driverIf the printer is connected according to the procedure outlined in [4. Connection], [Generic USB Hub] will be detected and installed. After this, the [EPSON UB-U01/02] will be detected.For Windows 20001. The [EPSON UB-U01/02] is detected and the [Found New Hardware Wizard] appears.2. Click the [Next] button to display the following screen.NoEPSON TITLEEPSON USB Printing Software for TM/BA/EU Printers USB Device DriverRevision A NEXT7SHEET 63. Select [Search for a suitable drive for my device{recommended}] and click the [Next] button to display the following screen.4. Select [Specify a location] and click the [Next] button to display the following screen. Click the [Browse] button,installation folder location of USB device driver is specified.Exp.) C:¥Program Files¥EPSON Advanced Printer¥USB ControllerClick the [OK] button to start the search for the driver.NoEPSONTITLE EPSON USB Printing Software for TM/BA/EU PrintersUSB Device DriverRevision ANEXT 8SHEET 75. Once the driver is found, the following screen will appear.6. Check that [EPSON UB U01/02] is displayed. Click the [Next] button to begin installing the driver.7. After the driver has been installed, the following screen will appear.8. Click the [Finish] button to complete the installation process.NoEPSON TITLE EPSON USB Printing Software for TM/BA/EU PrintersUSB Device DriverRevision A NEXT 9SHEET 89. After the driver has been installed, check that [Generic USB Hub] and [EPSON USB Controller for TM/BA/EU Printers]are displayed under [USB (Universal Serial Bus) controllers] in [Device Manager].10. A fter the printer has been correctly connected and the USB device driver installed, only connection is required for the printer to function, as the USB device driver will be loaded automatically.NoEPSON TITLE EPSON USB Printing Software for TM/BA/EU PrintersUSB Device DriverRevisionA NEXT 10SHEET 9For Windows 98 Second Edition1. The [EPSON UB-U01/02] is detected and the [Add New Hardware Wizard] appears.2. Click the [Next] button to display the following screen.NoEPSON TITLE EPSON USB Printing Software for TM/BA/EU PrintersUSB Device DriverRevision A NEXT 11SHEET103. Select [Search for the best driver for your device.(Recommended)] and click the [Next] button to display the following screen.4. Click the [Browse] button, installation folder location of USB device driver is specified.Exp.) C:¥Program Files¥EPSON Advanced Printer¥USB ControllerClick the [OK] button to start the search for the driver.5. Once the driver is found, the following screen will appear.NoEPSON TITLE EPSON USB Printing Software for TM/BA/EU PrintersUSB Device DriverRevision A NEXT 12SHEET 116. Check that [EPSON USB Controller for TM/BA/EU Printers] is displayed and click the [Next] button to begin installing the driver.7. After the driver has been installed, the following screen will appear.8. Click the [Finish] button to complete the installation process.NoEPSON TITLE EPSON USB Printing Software for TM/BA/EU PrintersUSB Device DriverRevision A NEXT 13SHEET 129. After the driver has been installed, check that [Generic USB Hub] and [EPSON USB Controller for TM/BA/EU Printers] are displayed under [Universal Serial Bus controllers] in the [Device Manager].tab of [System Properties].10. After the printer has been correctly connected and the USB device driver installed, only connection is required to for the printer to function, as the USB device driver will be loaded automatically.NoEPSON TITLE EPSON USB Printing Software for TM/BA/EU PrintersUSB Device DriverRevision A NEXT 14SHEET 136. Updating old versions of the USB device driverThis section explains how to update an old version of the USB device driver being used with Windows 98 Second Edition.1. Connect the printer to the computer and select [EPSON USB Controller for TM/BA/EU Printers] under [Universal SerialBus controllers] in the [Device Manager].tab of [System Properties].NoEPSON TITLEEPSON USB Printing Software for TM/BA/EU PrintersUSB Device DriverRevision A NEXT 15SHEET 142. Click the [Properties] button to open the Properties screen. Select the [Driver] tab.3. Click the [Update Driver] button and the [Update Device Driver Wizard] will appear.NoEPSONTITLE EPSON USB Printing Software for TM/BA/EU PrintersUSB Device DriverRevision A NEXT 16SHEET 154. Click the [Next] button to display the following screen.5. Select [Search for a better driver than the one your device is using now. (Recommended)] and click the [Next] button to display the next screen.6. Click the [Browse] button, installation folder location of USB device driver is specified.Exp.) C:¥Program Files¥EPSON Advanced Printer¥USB ControllerClick the [OK] button to start the search for the driver.NoEPSON TITLEEPSON USB Printing Software for TM/BA/EU PrintersUSB Device DriverRevision A NEXT 17SHEET 167. Once the driver is found, the following screen will appear.8. Select [The updated driver (Recommended)] and click the [Next] button to display the following screen.NoEPSON TITLE EPSON USB Printing Software for TM/BA/EU PrintersUSB Device DriverRevision A NEXT 18SHEET 179. Check that [EPSON USB Controller for TM/BA/EU Printers] is displayed. Click the [Next] button to begin installing the driver.10. After the driver has been installed, the following screen will appear.11. Click the [Finish] button to complete the installation process.NoEPSONTITLE EPSON USB Printing Software for TM/BA/EU PrintersUSB Device DriverRevision A NEXT 19SHEET 1812. After the driver has been installed, check that the date on the Properties [Driver] tab is 5-19-2000.13. Click the [Driver File Details] button to open the [Driver File Details] screen.NoEPSON TITLEEPSON USB Printing Software for TM/BA/EU PrintersUSB Device DriverRevision A NEXT 20SHEET 1914. Select [WINDOWS¥SYSTEM32¥DRIVERS¥TMUSB90.SYS] to verify that file version 1.10 is being used.15. If [WINDOWS¥SYSTEM¥TMUSB90.SYS] is displayed in the [Driver File Details] screen, use Windows Explorer to delete TMUSB90.SYS in the WINDOWS¥SYSTEM directory, then reconnect the printer.NoEPSONTITLE EPSON USB Printing Software for TM/BA/EU PrintersUSB Device DriverRevision A NEXT 21SHEET 2016. Open the [Driver File Details] screen and verify that [WINDOWS¥SYSTEM¥TMUSB90.SYS] is not displayed.17. This completes the driver update process.。
爱普生打印机使用手册

爱普生打印机使用手册爱普生打印机使用手册一、产品概述1.1 产品介绍1.1.1 型号及规格1.1.2 主要特点1.1.3 主要应用领域1.2 打印机外观及部件1.2.1 外观介绍1.2.2 主要部件说明1.2.3 操作面板介绍二、安装与连接2.1 配置要求2.1.1 硬件要求2.1.2 软件要求2.2 打印机连接2.2.1 连接计算机2.2.2 连接电源三、驱动安装与设置3.1 驱动安装3.1.1 驱动与安装步骤 3.1.2 驱动更新与升级 3.2 驱动设置3.2.1 打印机选择与设置3.2.2 打印参数设置四、打印机操作4.1 打印测试页4.2 打印文档4.3 打印设置4.3.1 纸张设置4.3.2 高级打印设置五、故障排除5.1 常见故障及解决方法5.1.1 打印机无法连接 5.1.2 打印质量不佳5.1.3 纸卡纸张5.1.4 其他故障5.2 常见问题解答六、维护与保养6.1 清洁打印机6.2 更换耗材6.3 打印机存放与保养七、其他功能与扩展7.1 打印机高级功能介绍7.1.1 液晶显示屏设置 7.1.2 网络打印功能7.1.3 打印驱动高级设置 7.2 打印机的扩展功能7.2.1 扩展存储7.2.2 无线打印八、常见问题与解答九、文档更新与版本记录附件:1、驱动安装文件2、打印测试页样张法律名词及注释:1、版权: 版权是指著作权人对其所创作的作品所享有的权利。
2、商标: 商标是一种通过在商品或服务上使用的标记来区别自己的商品和服务与他人的商品和服务相区别的标识。
3、专利: 专利是国家对于在技术上具有创造性的发明给予的一种专有权。
4、法律责任: 法律责任是指违反法律法规所要承担的法律后果。
EPSON 打印机设置指南说明书
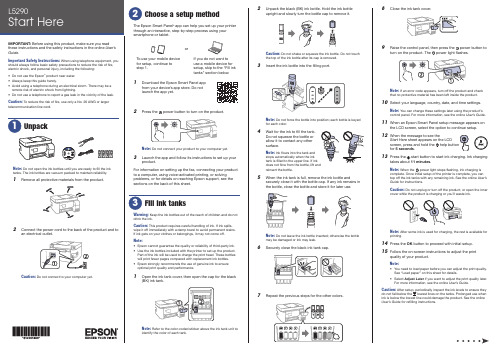
8 Close the ink tank cover.9 R aise the control panel, then press the power button toturn on the product. Thepower light flashes.Note: If an error code appears, turn off the product and check that no protective material has been left inside the product.10 S elect your language, country, date, and time settings.Note: You can change these settings later using the product’s control panel. For more information, see the online User’s Guide .11 W hen an Epson Smart Panel setup message appears onthe LCD screen, select the option to continue setup.12 WStart Here sheet appears on the LCDscreen, press and hold the help button for 5 seconds .13 P ress the start button to start ink charging. Ink chargingtakes about 11 minutes .Note: When the power light stops flashing, ink charging is complete. Once initial setup of the printer is complete, you can top off the ink tanks with any remaining ink. See the online User’s Guide for instructions.Caution: Do not unplug or turn off the product, or open the innercover while the product is charging or you’ll waste ink.Note:14 P ress the OK button to proceed with initial setup.15 F ollow the on-screen instructions to adjust the printquality of your product.Note:• Y ou need to load paper before you can adjust the print quality. See “Load paper” on this sheet for details.• S elect Adjust Later if you want to adjust the print quality later.For more information, see the online User’s Guide .Caution:User’s Guide for refilling instructions.Do not open the ink bottles until you are ready to fill the inktanks. The ink bottles are vacuum packed to maintain reliability.emove all protective materials from the product.The Epson Smart Panel ® app can help you set up your printer through an interactive, step-by-step process using your smartphone or tablet.If you do not want to use a mobile device for setup, skip to the “Fill ink tanks” section below.To use your mobile device for setup, continue to step 1.or1 D ownload the Epson Smart Panel appfrom your device’s app store. Do notlaunch the app yet.2 P ress the power button to turn on the product.Note: D o not connect your product to your computer yet.3 L aunch the app and follow its instructions to set up yourproduct.For information on setting up the fax, connecting your productto a computer, using voice-activated printing, or solving problems, or for details on reaching Epson support, see the sections on the back of this sheet.Warning: Keep the ink bottles out of the reach of children and do not drink the ink.Caution: This product requires careful handling of ink. If ink spills,wipe it off immediately with a damp towel to avoid permanent stains. If ink gets on your clothes or belongings, it may not come off.Note:• E pson cannot guarantee the quality or reliability of third-party ink.• U se the ink bottles included with the printer to set up the product. Part of the ink will be used to charge the print head. These bottles will print fewer pages compared with replacement ink bottles.• E pson strongly recommends the use of genuine ink to ensure optimal print quality and performance.1 O Note: Refer to the color-coded sticker above the ink tank unit to identify the color of each tank.Note:• I f you are using a Mac or your computer does not have aCD/DVD drive, an Internet connection is required to obtain the product software.• T o print from a Chromebook™, go to/support/chromebookprint for instructions.1 M ake sure the product is NOT CONNECTED to yourcomputer.W indows ®: If you see a Found New Hardware screen, click Cancel and disconnect the USB cable.2 I nsert the product CD (Windows only) or download andrun your product’s software package. For the latestsoftware, visit /support/L5290.3 F ollow the instructions on the computer screen to run the setup program.4 W hen you see the Select Your Connection screen, selectone of the following and follow the on-screen instructions:•Wireless connectionIn most cases, the software installer automatically attempts to set up your wireless connection. If setup is unsuccessful, you may need to enter your network name (SSID) and password.• Direct USB connectionMake sure you have the USB cable ready.•Wired network connectionMake sure you have an Ethernet cable (not included).Mobile and voice-activated printing• Print directly from your Android™ (v4.4 or later) device*.Simply connect your printer and device to the same networkand tap the menu icon to select the print option.• Turn your mobile device into an intuitive, easy-to-useprinting and scanning control center with Epson Smart Panel. Download the app from your mobile device’s app store.• Print from wherever you are, next to your printer orremotely, with Epson Connect™. Learn more at /connect .• Use voice-activated assistants to print a variety of creativeand everyday items from your Epson product. Simply add your product to an Epson Connect account, then link the account to a voice-activated assistant. See/support/voice for more information.* M ay require the Epson Print Enabler or Mopria Print Service app from Google Play™.EPSON and Epson Smart Panel are registered trademarks, EPSON Exceed Your Vision is a registered logomark, and Epson Connect is a trademark of Seiko Epson Corporation.Designed for Excellence is a trademark of Epson America, Inc.Windows is a registered trademark of Microsoft Corporation in the United States and/or other countries.Mac is a trademark of Apple Inc., registered in the U.S. and other countries.Android, Chromebook, and Google Play are trademarks of Google LLC.General Notice: Other product names used herein are for identification purposes only and may be trademarks of their respective owners. Epson disclaims any and all rights in those marks.This information is subject to change without notice.© 2021 Epson America, Inc., 2/21Printed in XXXXXXCPD-60040See the online User’s Guide for information about loading capacity, available paper types and sizes, loading envelopes, and using the ADF .1 M ake sure the product is not charging ink. Then raise thepaper support and tilt it backwards slightly.2 S lide the edge guides all theway out.3 L oad paper, glossy orprintable side up and shortedge first, in the middle of the rear paper feeder.Note:guides.4 Slide the edge guides againstthe paper, but not too tightly.5 Pthe paper stopper.6 Select the paper settings on the product’s control panel.C onnect the fax line1 C onnect a phone cord to a telephone wall jack and to theLINE port on your product. See the online User’s Guidefor more information.2 P ress the OK button to set up the fax, or press the #pound button to set it up later.Any problems?Network setup was unsuccessful.• Make sure you select the right network name (SSID).• Restart your router (turn it off and then on), then try toconnect to it again.• The printer can only connect to a network that supports2.4 GHz connections. If your router offers both 2.4 GHz and5 GHz connections, make sure 2.4 GHz is enabled.• If you see a firewall alert message, click Unblock or Allow to let setup continue.• If your network has security enabled, make sure you enteryour network password (WEP key or WPA passphrase) correctly. Be sure to enter your password in the correct case.• Print a network connection report to identify networkproblems and solutions. See your online User’s Guide forinstructions.There are lines or incorrect colors in my printouts.Run a nozzle check to see if there are any gaps in the printout. Then clean the print head, if necessary. See the online User’s Guide for more information.The product’s screen is dark.Make sure your product is turned on and press any button to wake it from sleep mode.Setup is unable to find my product after connecting it with a USB cable.Make sure your product is on and the USB cable is securely connected.Any questions?User’s GuideWindows: Click the icon on your desktop or Apps screen to access the online User’s Guide .Mac: Click the icon in Applications/Epson Software/Guide to access the online User’s Guide .If you don’t have a User’s Guide icon, go to the Epson website, as described in “Technical support.”Technical supportVisit /support/L5290 to download drivers, view manuals, get FAQs, or contact Epson.You can also speak to a service technician by calling one of these numbers:Argentina (54 11) 5167-0300 Guatemala * 1-800-835-0358 0800-288-37766 Mexico 01-800-087-1080Bolivia * 800-100-116 Mexico City (52 55) 1323-2052Chile (56 2) 2484-3400 Nicaragua * 00-1-800-226-0368Colombia 018000-915235Panama * 00-800-052-1376 Bogota (57 1) 592-2200 Paraguay 009-800-521-0019Costa Rica 800-377-6627 Peru 0800-10126DominicanLima (51 1) 418-0210 Republic * 1-888-760-0068 Uruguay 00040-5210067Ecuador * 1-800-000-044 Venezuela (58 212) 240-1111El Salvador * 800-6570* C ontact your local phone company to call this toll-free number from a mobile phone.If your country does not appear on the list, contact your nearest Epson sales office. Toll or long distance charges may apply.Need paper and ink?Ensure brilliant results with Epson specialty and plain papers, engineered specifically for Epson printers. You can purchase them from an Epson authorized reseller. To find the nearest one, visit or contact Epson as described in “Any questions?” on this sheet.L5290 replacement inks。
EPSON无线打印机 使用手册
Epson Connect用户指南NPD4945-00 SC此手册中出现的打印机/一体机以下简称“打印机”。
爱普生产品使用说明或网页等可能描述了其他公司(非爱普生)的硬件/软件产品、功能及服务,爱普生对于其他公司生产的产品和提供的服务(包括但不限于其内容、性能、准确性、兼容性、可靠性、合法性、适当性和连续性)不做任何明示和/或默示担保。
注释:其他信息,可查看产品本身、产品包装和其他形式的资料,包括爱普生网页()Epson Connect和其他移动解决方案Epson Connect是什么?Epson Connect提供移动服务,可让您在任何地方发送任务实现打印和扫描。
您可使用智能手机、平板电脑或笔记本电脑发送任务实现打印照片和文档。
如果您发送扫描的数据到与Epson Connect兼容的打印机,此时的打印机类似于彩色传真机。
您还可使用您的爱普生打印机扫描文档并将其上传到指定的地方,如:在线存储设备或“云(Colud)”帐户。
可使用下面服务。
一旦您已注册了您的打印机和帐户,您可使用下面的所有服务。
有关如何注册到Epson Connect、如何使用服务和故障排除的详细信息,参见Epson Connect入口网页:https:///服务概述Email Print从任何地方仅通过发送邮件即可实现打印照片和文档。
扫描至云(Cloud)扫描您的文档和照片至“云(Cloud)”帐户。
Epson iPrint对于iOS或Android智能手机和平板电脑的无线打印应用软件。
Epson iPrint具有二项有用的功能。
首先是本地打印,允许您打印并扫描至与本地相同Wi-Fi网络连接的打印机作为您的设备打印。
第二是远程打印,允许您通过互联网远程打印。
如果您未安装Epson iPrint,从下面的URL下载它并安装,然后注册。
http://ipr.toRemote Print Driver通过互联网远程打印。
注释:O扫描至云(Cloud)为Scan to cloud。
爱普生 TM-T81 用户手册说明书
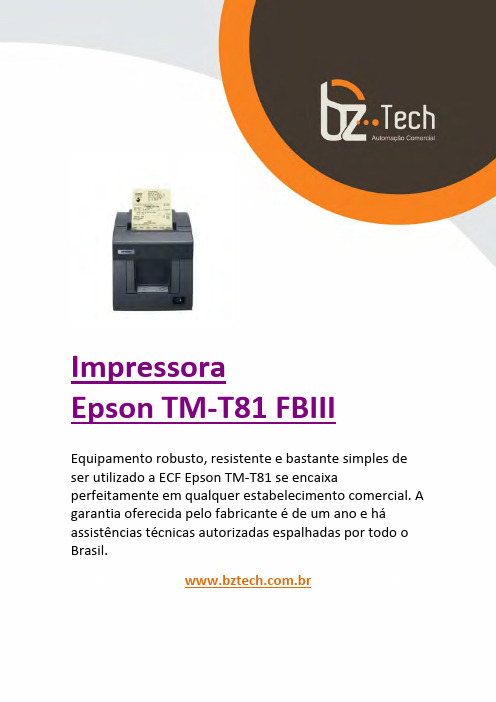
ImpressoraEpson TM-T81 FBIII Equipamento robusto, resistente e bastante simples de ser utilizado a ECF Epson TM-T81 se encaixa perfeitamente em qualquer estabelecimento comercial. A garantia oferecida pelo fabricante é de um ano e há assistências técnicas autorizadas espalhadas por todo o Brasil..brUser’s Manual411829003No part of this publication may be reproduced, stored in a retrieval system, or transmitted in any form or by any means, electronic, mechanical, photocopying, recording, or otherwise, without the prior written permission of Seiko Epson Corporation. No patent liability is assumed with respect to the use of the information contained herein. While every precaution has been taken in the preparation of this book, Seiko Epson Corporation assumes no responsibility for errors or omissions. Neither is any liability assumed for damages resulting from the use of the information contained herein.Neither Seiko Epson Corporation nor its affiliates shall be liable to the purchaser of this product or third parties for damages, losses, costs, or expenses incurred by purchaser or third parties as a result of: accident, misuse, or abuse of this product or unauthorized modifications, repairs, or alterations to this product, or (excluding the U.S.) failure to strictly comply with Seiko Epson Corporation’s operating and maintenance instructions.Seiko Epson Corporation shall not be liable against any damages or problems arising from the use of any options or any consumable products other than those designated as Original Epson Products or Epson Approved Products by Seiko Epson Corporation.EPSON is a registered trademark of Seiko Epson Corporation in Japan and other countries/regions. NOTICE: The contents of this manual are subject to change without notice.Copyright © 2009 by Seiko Epson Corporation. All rights reserved.2 TM-T81 User’s ManualImportant Safety InformationThis section presents important information intended to ensure safe and effectiveuse of this product. Read this section carefully and store it in an accessible location. Key to SymbolsThe symbols in this manual are identified by their level of importance, as definedbelow. Read the following carefully before handling the product.WARNING:Warnings must be observed carefully to avoid serious bodily injury.CAUTION:Cautions must be observed to avoid minor injury to yourself, damage to yourequipment, or loss of data.Safety PrecautionsThis section describes the warnings and cautions intended to ensure safe andeffective use of the TM-T81. Other warnings and cautions on handling of thisproduct for its safe and effective use are described in other sections of the manual.WARNING:If the TM-T81 produces smoke, a strange odor, or unusual noise, shut down the TM-T81, unplug the power cable immediately, and then contact your dealer or anEpson service center for advice. Continued use may lead to fire or electric shock.Never attempt to repair this product yourself. Improper repair work can bedangerous.Never disassemble or modify this product. Tampering with this product mayresult in injury or fire.Be sure to use the specified power source. Connection to an improper powersource may cause fire.Use the specified AC Adapter [Epson Model M159A/M159B (PS-180)] only.Connection to an improper power source may cause fire.Do not allow foreign matter to fall into the equipment. Penetration by foreignobjects may lead to fire.If water or other liquid spills into this equipment, shut down the TM-T81, unplugthe power cable of the TM-T81 immediately, and then contact your dealer oran Epson service center for advice. Continued use may lead to fire or shock.If you open the DIP switch cover, be sure to close the cover and tighten thescrew after adjusting the DIP switch. Using this product with the cover openmay cause fire or electric shock.Do not use aerosol sprayers containing flammable gas inside or around thisproduct. Doing so may cause fire.Do not connect a telephone line to the drawer kick-out connector; otherwise,the printer and the telephone line may be damaged.CAUTION:Do not connect cables in ways other than those mentioned in this manual.Different connections may cause equipment damage or fire.Be sure to set this equipment on a firm, stable, horizontal surface. The productmay break or cause injury if it falls.TM-T81 User’s Manual3Do not use this product in locations subject to high humidity or dust levels.Excessive humidity and dust may cause equipment damage or fire.Do not place heavy objects on top of this product. Never stand or lean on this product. Equipment may fall or collapse, causing breakage and possible injury.To ensure safety, unplug this product before leaving it unused for an extended period.Before moving this product, be sure to unplug it and all the cables connected to it.Restriction of UseWhen this product is used for applications requiring high reliability/safety, such as transportation devices related to aviation, rail, marine, automotive, etc.;disaster prevention devices; various safety devices, etc.; or functional/precision devices, etc.; you should use this product only after giving consideration toincluding fail-safes and redundancies into your design to maintain safety andtotal system reliability. Because this product was not intended for use inapplications requiring extremely high reliability/safety, such as aerospaceequipment, main communication equipment, nuclear power control equipment, or medical equipment related to direct medical care, etc., please make your own judgment on this product’s suitability after a full evaluation.Caution LabelsThe caution labels on the product indicate the following precautions.CAUTION:The thermal head can be very hot during printing and immediately afterprinting. Touching it may cause burns. Be sure to do cleaning and other work after the thermal head cools down. And be careful of the autocutter bladelocated close to the thermal head. For the location of the thermal head and the autocutter blade, see the illustration in “Cleaning the Thermal Head” onpage9.CAUTION:Take care not to injure your fingers on the manual cutter•When you remove printed paper•When you perform other operations such as loading/replacing roll paperPurpose of This ManualThis manual provides information to operators of the TM-T81 printer to describe basic operations to enable safe and correct use of the printer.UnpackingThe following items are included with the standard specification printer. If any item is damaged, contact your dealer.❏Printer❑Roll Paper (for operation check)❏AC adapter❑Power switch cover❏Locking wire saddle (for USB interface models)❏CD-ROM❑User’s Manual (this manual)4 TM-T81 User’s ManualTM-T81 User’s Manual 5Part Names Control PanelERROR LED: OrangeOn when the printer is offline (except during feeding using the FEED button, during test printing, and in the error state).Flashes when a paper near-end is detected, and when an error occurs.Note:When the ERROR LED is flashing with the following pattern, the roll paper is near its end. The ERROR LED goes off when the roll paper is replaced with a new one.(Power) LED: GreenOn when the printer is on.FEED buttonThis button feeds ing the Power Switch CoverThe enclosed power switch cover ensures that the power switch is not pressed accidentally. To use this cover, install it as shown in the illustration.You can turn on and off the power switch by inserting a sharp-pointed object in the holes in the power switch cover.To detach the power switch cover, use a sharp-pointed object.WARNING:If an accident occurs with the power switchcover attached, unplug the power cordimmediately. Continued use may cause fire orshock.Installing the Locking Wire SaddleFor USB interface models, the locking wire saddle is included to prevent the USBcable from falling off the connector.1.Insert the tip of the locking wire saddle into the leftmost hole in the back ofInstalling Roll Paper1.Place your fingers in the hollows under the printer cover shown in theillustration below, and pull in the direction of the arrow to open the printercover.2.Remove the used roll paper core if there is one.6 TM-T81 User’s ManualTM-T81 User’s Manual 73.Install the roll paper in the correct direction as shown in the illustration below.4.Pull out some roll paper as shown in the illustration below, and close the printer cover.5.Tear off the roll paper.TroubleshootingNo lights on the control panelCheck whether the power supply cable is correctly connected to the printer and the power outlet.ERROR LED flashing with no printing (and no paper jam)❏Check whether the roll paper cover is closed. If it is open, close it.❏Check whether the roll paper is correctly installed and any roll paper remains.❏Printing stops if the thermal head overheats and resumes automatically when it cools.❏Turn the printer off, and after 10 seconds, back on.8 TM-T81 User’s Manual Paper jam occurs CAUTION:Do not touch the thermal head because it can be very hot after printing.1.Turn the printer off, and open the printer cover.If you cannot open it, see “The roll paper cover will not open (the autocutter blade is locked)” to unlock the autocutter blade.2.Remove the jammed paper, reinstall the roll, and close the printer cover.The roll paper cover will not open (the autocutter blade is locked)The autocutter blade may be locked because of a paper jam or a foreign object. If the problem is not serious, the autocutter blade returns to its normal position automatically, but if it does not recover, follow the steps below to move its position manually.1.Turn off the printer.2.Place your fingers in the hollows next to the cutter cover, and remove the cutter cover by pulling it as shown in the illustration below.3.Turn the knob of the cutter blade in the direction of the arrow in the illustration below until you see a triangle mark in the opening in the frame.4.Attach the cutter cover.TM-T81 User’s Manual 9Cleaning the Thermal Head CAUTION:After printing, the thermal head can be very hot. Do not touch it and let it cool before you clean it. Do not damage the thermal head by touching it with your fingers or any hard object.Turn off the printer and open the printer cover. As shown in the illustration below, clean the thermal elements of the thermal head with a cotton swab moistened with an alcohol solvent (ethanol or isopropyl alcohol).Epson recommends cleaning the thermal head periodically (generally every 3months) to maintain good print quality.Setting the DIP SwitchesBe sure to turn off the printer before removing the DIP switch cover. If you remove it when the printer is turned on, the printer may be damaged because of fire or electric shock.1.Make sure the printer is turned off, and turn over the printer.2.Remove the DIP switch cover on the bottom of the printer by removing the screw as shown in the illustration.3.Set the DIP switch settings with a sharp-pointed object.4.Install the DIP switch cover, and tighten the screw.The new settings become effectiveafter the printer is turned on.10 TM-T81 User’s ManualDIP Switch TablesSpecificationsDIP switch 1 (Serial Interface)SW FunctionON OFF 1-1Data reception error Ignored Prints “?”1-2Receive buffer capacity 45 bytes 4 KB1-3Handshaking XON/XOFF DTR/DSR 1-4Data word length 7 bits 8 bits 1-5Parity check Enabled Disabled 1-6Parity selectionEvenOdd1-71-8Selects transmission speed. (See table below.)Transmission speedTransmission speed (bps)-bits per second 1-71-8Adjustable by control commands (default: 38400)ON ON4800OFF ON 9600ON OFF 19200OFFOFFDIP switch 2 (Serial Interface)SW Function ONOFF2-1Handshaking (BUSY condition)Receive buffer full Offline or Receive bufferfull2-2Reserved (Do not change)–Fixed to OFF2-32-4Selects print densitySee Table A.2-5Release condition of receive buffer BUSY (If receive buffer capacity set to 4 KB.)Releases BUSY when remaining receive buffer capacity reaches 138bytes.Releases BUSY whenremaining receive buffer capacity reaches 256bytes.2-6Reserved (Do not change)–Fixed to OFF 2-7I/F pin 6 reset Enabled Disabled 2-8I/F pin 25 resetEnabledDisabled DIP switch 1 (Other than Serial Interface)SW Function ON OFF 1-1Auto line feedAlways enabled Always disabled 1-2Receive buffer capacity45 bytes4 KB1-3~1-7Undefined ––1-8Reserved (Do not change)––DIP switch 2 (Other than Serial Interface)SWFunction ONOFF2-1Handshaking (BUSY condition)Receives buffer full Offline or receives bufferfull2-2Reserved (Do not change)–Fixed to OFF2-32-4Print density See Table A.2-5Release condition of receive buffer BUSY (If receive buffer capacity set to 4 KB.)Releases BUSY when remaining receive buffer capacity reaches 138bytesReleases BUSY whenremaining receive buffer capacity reaches 256bytes.2-62-7Reserved (Do not change)–Fixed to OFF2-8Reserved (Do not change)Fixed to ON –Table APrint density/low powerSW 3SW 4Print density (Standard)OFF OFF ON ON Print density (Darker than standard)ON OFF Print density (Darkest)OFFONPrinting method Thermal line printingDot density 203 dpi × 203 dpi [dots per 25.4 mm {1"}]Printing direction Unidirectional with friction feed Printing width 72 mm {2.83"}, 576 dot positionsCharacters per line (default)Font A, Special Font A *1: 48Font B, Special Font B *1: 64Kanji *2: 24Indic Font A *1, Indic Font B *1: Depend on font typeCharacter spacing (default)Font A: 0.25 mm (2 dots); Font B: 0.25 mm (2 dots)Special Font A *1: 0.25 mm (2 dots); Special Font B *1: 0.25 mm (2 dots)Indic Font A *1: 0.00 mm (0 dots), Indic Font B *1: 0.00 mm (0 dots)TM-T81 User’s Manual 11dpi: dots per 25.4 mm (dots per inch)*1:For South Asian font models *2:For Chinese font modelsCharacter sizeStandard/Double-height/Double-width/Double-width and Double-height Font A, Special Font A *1:1.25 × 3.00 mm/1.25 × 6.00 mm/2.50 ×3.00 mm/2.50 × 6.00 mmFont B:0.88 × 2.13 mm/0.88 × 4.25 mm/1.75 × 2.13 mm/1.75 × 4.25 mm Special Font B *1:0.88 × 3.00 mm/0.88 × 6.00 mm/1.75 × 3.00 mm/1.75 × 6.00 mmKanji *2: 3.00 × 3.00 mm/3.00 × 6.00 mm/6.00 × 3.00 mm/6.00 × 6.00 mm Indic Font A *1:Proportional × 4.00 mm/Proportional × 8.00 mm/Proportional × 4.00 mm/Proportional × 8.00 mmIndic Font B *1:Proportional × 3.00 mm/Proportional × 6.00 mm/Proportional × 3.00 mm/Proportional × 6.00 mmNumber of characters Alphanumeric characters: 95, Extended graphics: 128 × 1 page *1/128 × 11 pages *2International characters: 1*1 / 48*2Thai characters *1: 128 × 3 pages (133 character types)Vietnam characters *1: 128 × 2 pages (135 character types)Simplified Chinese characters (GB18030-2000)*2: 28553Indic characters (UTF-8)*1:Devanagari (Hindi/Marathi), Bengali, Gurumukhi, Gujarati, Oriya, Tamil, Telugu, Kannada, Malayalam, Currency Symbols (Rupee sign)Indic characters (ISCII)*1: 128 × 11 pages Printing speedNormal printing: 150 mm/s {5.91"/s} max.Page mode, Bit image printing: 150 mm/s {5.91"/s} max.Bar code, 2D code printing: 99 mm/s {3.9"/s} max.The values are when the printer prints with density "Normal" at 24 V and 25°C {77°F}.Speed is adjusted automatically depending on the voltage applied and head temperature.Paper feed speed Approx. 150 mm/s {approx. 5.91"/s} continuous paper feedLine spacing (default)3.75 mmCharacter structure *including 2-dot horizontal spacing (except for Kanji)Font A, Special Font A *1: 12 × 24Font B: 9 × 17, Special Font B *1: 9 × 24Kanji *2: 24 × 24Indic Font A *1: Proportional × 32Indic Font B *1: Proportional × 24<Thai characters size in Thai 1-pass mode (default)>Font A: 12 × 46, Font B: 9 × 35, Special Font A: 12 × 24, Special Font B: 9 × 24Roll Paper (single-ply)Size:79.5 mm ± 0.5 mm {3.13 ± 0.02"},Maximum outside diameter:83 mm {3.27"}Roll Paper spool diameter:Inside: 12 mm {0.47"}; Outside: 18 mm {0.71"} Thermal paper type Specified: NTP080-80Interface Serial (RS-232)/Parallel (IEEE1284)/USB (Full speed)/Ethernet (10/100Base-T)Receive buffer 4 KB/45 bytes Cash drawer function 2 drivesSupplied voltageDC 24 V ± 7%Current consumption (at 24V)Mean: Approx. 1.4 A Temperature Operating: 5 to 45°C {41 to 113°F}Storage:–10 to 50°C {14 to 122°F}, except for paper HumidityOperating:10 to 90% RHStorage:10 to 90% RH, except for paperOverall dimensions 145 × 144 × 189 mm {5.71 × 5.67 × 7.44"} (H × W × D)Weight (mass)Approx. 1.7 kg {3.75 lb} (Roll paper excluded)Printed in China。
爱普生TM-T81II,为票据打印增添新“微”力爱普生票据打印格式

爱普生TM-T81II,为票据打印增添新“微”力爱普生票据打印格式票据打印机打印的“小票”也变成了“长票”。
然而我们经常感觉到,打印机在打印较长的小票时,速度却没有平常快了,很耽误时间。
等待的时间过长,降低了工作效率。
要解决这种问题,缩短较长票据的打印耗时,提高打印机的打印速度无疑是最直接的解决方法。
爱普生TM-T81II微型打印机虽然也标称具有150mm/s的打印速度,但相比于其他标称同样速度的打印机,它会更快、更节省时间。
现在市面上标称具有150mm/s打印速度的微型打印机有很多,但很多的微型打印机标注的是瞬时最高速度,在打印较长的小票时,无法一直保持这种速度,因此实际需要的时间大于理论时间。
而爱普生的测定方法是持续打印一段时间后取平均值,因此爱普生TM-T81II微型打印机在打印较短的小票时会更快,在打印较长的小票时,也不会消耗更多的时间,锋利的镀铬刀头会在打印完成后瞬间完成切纸,整个过程一气呵成,更有助于商场、超市等企业提高工作效率,改善消费者购物体验。
精巧设计易用省心当然,速度并不是唯一。
对于单次打印来说,打印速度的快慢对于效率的高低确实有着直观的体现。
但是在多次打印之间的衔接和操作上,打印机本身结构设计和功能设置的优劣对于效率的高低则更有发言权。
如果打印机本身设计不合理,功能不完善,那么摆放位置将受到限制,更换纸卷时也需要更多的操作,这自然会增加工作耗时,降低效率。
爱普生TM-T81II微型打印机以其精巧的设计和优秀的性能,让使用者可以更加顺畅的操作这台打印机。
它被设计为可以适应各种摆放姿势,它的机舱开启角度超过了90°,保证在任何摆放位置都可以顺畅的开启和更换纸卷。
它的围栏设计能有效防止液体或异物进入机器,即使有少量液体不慎进入机舱内,严密的结构设计同样可以保护电路板,避免短路等故障的发生。
这款打印机还具有独特的卡纸保护功能,如果发生了可能导致卡纸的意外操作,TM-T81II内部独特的结构设计可以避免不正常切纸,保证已打印票据的完整性。
epson打印机使用方法
epson打印机使用方法EPSON打印机使用方法引言:EPSON(爱普生)是一家全球知名的打印机制造商,其打印机产品在市场上广受欢迎。
EPSON打印机拥有卓越的打印品质和高度的可靠性,使其成为家庭和办公环境中首选的打印解决方案。
本文将介绍EPSON打印机的使用方法,包括安装驱动程序、连接打印机、打印文档等操作步骤。
第一部分:安装驱动程序在使用EPSON打印机之前,需先安装相应的驱动程序。
下面是安装步骤的详细说明:步骤一:选择正确的驱动程序前往EPSON官方网站,找到与你的打印机型号相对应的驱动程序。
确保选择与你的操作系统兼容的驱动程序。
步骤二:下载驱动程序在驱动程序下载页面,点击“下载”按钮,然后选择文件保存位置。
下载完成后,找到保存的驱动程序。
步骤三:安装驱动程序双击驱动程序安装文件,按照提示完成安装过程。
可能需要重启计算机以使更改生效。
第二部分:连接打印机当驱动程序安装完毕后,需要将打印机与计算机连接起来。
以下是连接过程的详细步骤:步骤一:检查连接接口确保打印机的接口与计算机的接口匹配。
通常,EPSON打印机采用USB接口连接计算机。
步骤二:连接打印机使用打印机附带的USB线缆将打印机与计算机连接起来。
将USB 线缆一端插入打印机的USB接口,将另一端插入计算机的USB接口。
步骤三:打开打印机按下打印机的电源开关打开打印机。
请确保打印机已连接电源并打开。
第三部分:打印文档连接完成后,可以开始打印文档。
以下是打印文档的步骤:步骤一:选择文档打开要打印的文档,例如Microsoft Word文档、PDF文件等。
步骤二:选择打印菜单在文档窗口中,点击“文件”菜单,然后选择“打印”选项。
或者使用快捷键“Ctrl+P”。
步骤三:选择打印机在打印设置界面,选择EPSON打印机作为默认打印设备。
如果有多台打印机连接到计算机上,确保选择正确的打印机。
步骤四:设置打印参数根据需求,设置打印参数,例如打印份数、纸张大小、打印质量等。
EPSON爱普生TM-T81热敏票据打印机规格介绍
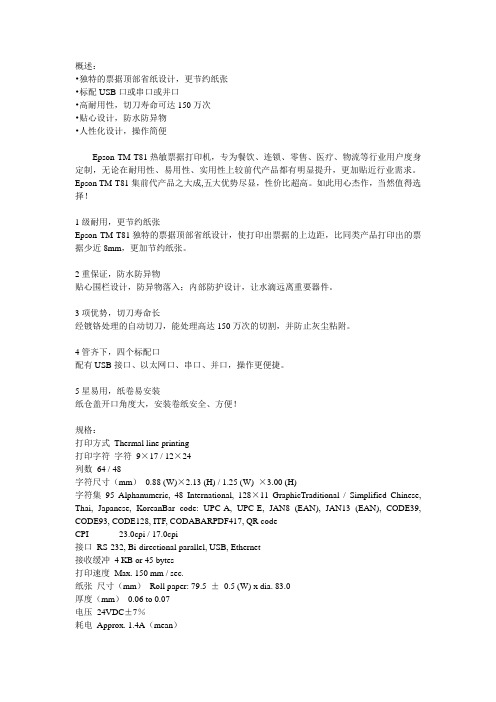
概述:•独特的票据顶部省纸设计,更节约纸张•标配USB口或串口或并口•高耐用性,切刀寿命可达150万次•贴心设计,防水防异物•人性化设计,操作简便Epson TM-T81热敏票据打印机,专为餐饮、连锁、零售、医疗、物流等行业用户度身定制,无论在耐用性、易用性、实用性上较前代产品都有明显提升,更加贴近行业需求。
Epson TM-T81集前代产品之大成,五大优势尽显,性价比超高。
如此用心杰作,当然值得选择!1级耐用,更节约纸张Epson TM-T81独特的票据顶部省纸设计,使打印出票据的上边距,比同类产品打印出的票据少近8mm,更加节约纸张。
2重保证,防水防异物贴心围栏设计,防异物落入;内部防护设计,让水滴远离重要器件。
3项优势,切刀寿命长经镀铬处理的自动切刀,能处理高达150万次的切割,并防止灰尘粘附。
4管齐下,四个标配口配有USB接口、以太网口、串口、并口,操作更便捷。
5星易用,纸卷易安装纸仓盖开口角度大,安装卷纸安全、方便!规格:打印方式Thermal line printing打印字符字符9×17 / 12×24列数64 / 48字符尺寸(mm)0.88 (W)×2.13 (H) / 1.25 (W) ×3.00 (H)字符集95 Alphanumeric, 48 International, 128×11 GraphicTraditional / Simplified Chinese, Thai, Japanese, KoreanBar code: UPC-A, UPC-E, JAN8 (EAN), JAN13 (EAN), CODE39, CODE93, CODE128, ITF, CODABARPDF417, QR codeCPI 23.0cpi / 17.0cpi接口RS-232, Bi-directional parallel, USB, Ethernet接收缓冲 4 KB or 45 bytes打印速度Max. 150 mm / sec.纸张尺寸(mm)Roll paper: 79.5 ±0.5 (W) x dia. 83.0厚度(mm)0.06 to 0.07电压24VDC±7%耗电Approx. 1.4A(mean)钱箱驱动 2 drivers可靠性MTBF 360,000 hoursMCBF 52,000,000 lines外观尺寸(mm)144(W)×189(D)×145(H)重量 1.7kg电磁兼容性VCCI class A, FCC class A, CE marking, AS / NZS 3548 class B电源PS-180选件DF-10 (affixing tape)安全标准UL / CSA / FCC ClassA/CE (EN60950)文章来源于中国商业信息网: 原文地址:/detail/77-9341.html。
APD_T81_TM_SC
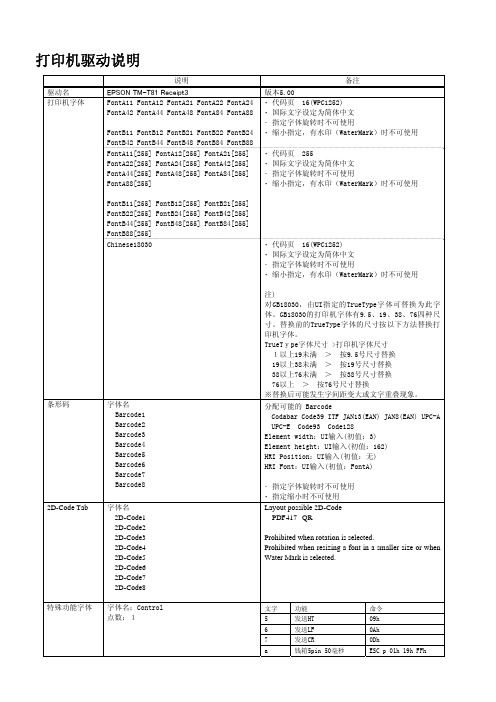
打印机驱动说明说明 备注 驱动名 EPSON TM-T81 Receipt3版本5.00打印机字体 FontA11 FontA12 FontA21 FontA22 FontA24FontA42 FontA44 FontA48 FontA84 FontA88FontB11 FontB12 FontB21 FontB22 FontB24FontB42 FontB44 FontB48 FontB84 FontB88・代码页 16(WPC1252)・国际文字设定为简体中文・指定字体旋转时不可使用・缩小指定,有水印(WaterMark)时不可使用FontA11[255] FontA12[255] FontA21[255] FontA22[255] FontA24[255] FontA42[255] FontA44[255] FontA48[255] FontA84[255] FontA88[255]FontB11[255] FontB12[255] FontB21[255] FontB22[255] FontB24[255] FontB42[255] FontB44[255] FontB48[255] FontB84[255] FontB88[255] ・代码页 255・国际文字设定为简体中文・指定字体旋转时不可使用・缩小指定,有水印(WaterMark)时不可使用Chinese18030 ・代码页 16(WPC1252)・国际文字设定为简体中文・指定字体旋转时不可使用・缩小指定,有水印(WaterMark)时不可使用注)对GB18030,由UI指定的TrueType字体可替换为此字体。
GB18030的打印机字体有9.5、19、38、76四种尺寸。
替换前的TrueType字体的尺寸按以下方法替换打印机字体。
TrueType字体尺寸 >打印机字体尺寸1以上19未满 > 按9.5号尺寸替换19以上38未满 > 按19号尺寸替换38以上76未满 > 按38号尺寸替换76以上 > 按76号尺寸替换※替换后可能发生字间距变大或文字重叠现象。
Epson 打印机用户指南.pdf_1701928662.0223663说明书
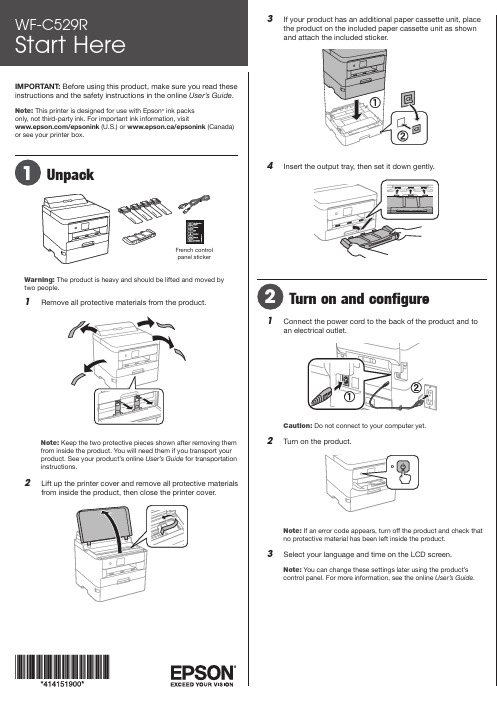
IMPORTANT: Before using this product, make sure you read these instructions and the safety instructions in the online User’s Guide .Note: This printer is designed for use with Epson ® ink packs only, not third-party ink. For important ink information, visit/epsonink (U.S.) or www.epson.ca/epsonink (Canada) or see your printer box.French controlpanel stickerWarning: The product is heavy and should be lifted and moved by two people.1 Remove all protective materials from the product.Note:from inside the product. You will need them if you transport your product. See your product’s online User’s Guide for transportation instructions.2 L3 I f your product has an additional paper cassette unit, placethe product on the included paper cassette unit as shown41 C2 T Note: If an error code appears, turn off the product and check thatno protective material has been left inside the product.3 S elect your language and time on the LCD screen.Note: You can change these settings later using the product’scontrol panel. For more information, see the online User’s Guide.Note: Make sure the ink pack is fully inserted and level with the top of the ink pack tray.6 I8 S elect OK on the LCD screen to start charging the ink.Ink charging takes approximately 9 minutes. A messageappears when ink charging is complete.Caution: Do not unplug or turn off the product or open the front cover while the product is charging or you’ll waste ink.See the online User’s Guide for information about loadingcapacity, available paper types and sizes, loading envelopes,1 MI nstall ink supply units(ink packs)Note: The included initial ink packs are designed for reliable printer setup and cannot be used as replacement ink packs or resold. After setup, the3 R emove and discard the protective piece from the ink packtray.4 S hake an ink pack 10 times, then remove it from thepackaging.Note:Do not touch the green chip on the ink pack.5 MStandard software package1 M ake sure the product is NOT CONNECTED to yourcomputer.Windows ®: If you see a Found New Hardware screen, click Canceland disconnect the USB cable.2 Download and run your product’s software package:/support/wfc529r (U.S.) www.epson.ca/support/wfc529r (Canada)3 F ollow the instructions on the computer screen to run thesetup program.4 W hen you see the Select Your Connection screen, selectone of the following and follow the on-screen instructions:•Wireless connectionIn most cases, the software installer automaticallyattempts to set up your wireless connection. If setup is unsuccessful, you may need to enter your network name (SSID) and password.• Direct USB connectionMake sure you have a USB cable (not included).•Wired network connectionMake sure you have an Ethernet cable (not included).PCL or PostScript driverDownload the software and see your online User’s Guide forinstructions./support/wfc529r (U.S.)www.epson.ca/support/wfc529r (Canada)Mobile printing• Print directly from a smartphone or tablet using iOS orAndroid™ with Epson iPrint™. Simply connect your printer and device to the same network and tap the action icon to select the print option.• Print directly from your Android (v4.4 or later) device*. Simplyconnect your printer and device to the same network and tap the menu icon to select the print option.• Print remotely with Epson Connect™. See your onlineUser’s Guide for instructions or learn more at /connect (U.S.) or www.epson.ca/connect (Canada).* M ay require the Epson Print Enabler or Mopria Print Service app from Google Play™.Note: Make sure the paper is under the arrow mark for yourpaper type and loaded against the front edge of the cassette.4 S lide the edge guides against the paper, but not tootightly.5 6 S elect the paper settings on the product’s control panel.Note:• An Internet connection is required to obtain the product software.• T o print from a Chromebook™, go to/support/chromebookprint (U.S.) or www.epson.ca/support/chromebookprint (Canada) for instructions.Firmware Update Notice: The printer is designed to work only with genuine Epson branded ink packs. Other brands of ink packs and ink supplies are not compatible and, even if described as compatible, may not function properly or at all. Epson periodically provides firmware updates to address issues of security, performance, minor bug fixes and ensure the printer functions as designed. These updates may affect the functionality of third-party ink. Non-Epson branded or altered Epson packs that functioned prior to a firmware update may not continue to function.Need paper and ink?Ensure brilliant results with Epson specialty and plain papers, engineered specifically for Epson printers. Find Epson papers and Epson Genuine Ink at (U.S. sales) or www.epson.ca (Canadian sales) and at Epson authorized resellers. Call 800-GO-EPSON (800-463-7766).Any problems?Network setup was unsuccessful.•Print a network connection report to identify network problemsand solutions. See your online User’s Guide for instructions.•Make sure you select the right network name (SSID).•Restart your router (turn it off and then on), then try to connectto it again.•The printer can only connect to a network that supports2.4 GHz connections. If your router offers both 2.4 GHz and 5GHz connections, make sure 2.4 GHz is enabled.•If you see a firewall alert message, click Unblock or Allow to let setup continue.•If your network has security enabled, make sure you enter yournetwork password (WEP key or WPA passphrase) correctly. Be sure to enter your password in the correct case.There are lines or incorrect colors in my printouts.Run a nozzle check to see if there are any gaps in the printout. Then clean the print head, if necessary. See the online User’s Guide for more information.The product’s screen is dark.Make sure your product is turned on, and touch the screen or press any button to wake it from sleep mode.Setup is unable to find my printer after connecting it with a USB cable.Make sure your product is securely connected.Any questions?User’s GuideWindows: Click the icon on your desktop or Apps screen to access the online User’s Guide .Mac: Click the icon in Applications/Epson Software/Guide to access the online User’s Guide .If you don’t have a User’s Guide icon, go to the Epson website, as described below.Technical supportVisit /support/wfc529r (U.S.) orwww.epson.ca/support/wfc529r (Canada) to download drivers, view manuals, get FAQs, or contact Epson.Call (866) 212-8743, 6 am to 6 pm , Pacific Time, Monday through Friday. Days and hours of support are subject to change without notice. Toll or long distance charges may apply.RecyclingEpson offers a recycling program for end-of-life hardware and ink packs. Please go to /recycle (U.S.) or www.epson.ca/recycle (Canada) for information on how to return yourproducts for proper disposal.EPSON and DURABrite are registered trademarks, EPSON Exceed Your Vision is a registered logomark, and Epson Connect and Epson iPrint are trademarks of Seiko Epson Corporation.Designed for Excellence is a trademark of Epson America, Inc.Windows is a registered trademark of Microsoft Corporation in the United States and/or other countries.Mac is a trademark of Apple Inc., registered in the U.S. and other countries.Android, Chromebook, and Google Play are trademarks of Google LLC.General Notice: Other product names used herein are for identification purposes only and may be trademarks of their respective owners. Epson disclaims any and all rights in those marks.This information is subject to change without notice.CPD-55866R1© 2021 Epson America, Inc., 5/21。
TM-T81_Utility_sc
UtilityՓ⫼䇈 к概述说明TM-T81 Utility的功能,操作环境和安装/卸载。
使用Utility说明如何使用TM-T81 UtilityM00030400Rev. A注意事项•未经Seiko Epson Corporation事先书面同意,不得翻印、在检索系统中存储或以任何形式或通过任何方式(电 子、机械、影印、录制等)传送本文档的任何部分。
•本文档的内容如有变更,恕不另行通知。
请联系我们以获取最新信息。
•在准备本文档的阶段虽尽了最大努力,但错误或疏漏在所难免,Seiko Epson Corporation不对此负责。
•对于使用本文档中包含的信息而引起的损失, 我们也将不负任何责任。
•Seiko Epson Corporation及其联营公司不对本产品的购买者或第三方因以下问题而造成的损坏、损失、费用或 开支负责:事故、误用或滥用本产品,或未经授权修改、修理或改变本产品,或(不包括美国)不能严格按照Seiko Epson Corporation的操作和维护指示进行操作。
•除了由Seiko Epson Corporation指定为原装EPSON产品或EPSON认可产品的以外,Seiko Epson Corporation 不负责因使用任何其他选件或易耗件产品而导致的任何损坏或问题。
商标EPSON®和ESC/POS®为Seiko Epson Corporation在美国和其他国家的注册商标。
MS-DOS®、Microsoft®、Win32®、Windows®、Windows Vista®、和Windows Server®为Microsoft Corporation在美国和其他国家的注册商标或商标。
2安全须知本手册中的标记按如下定义的重要性级别进行标识。
在使用本产品之前, 请仔细阅读以下信息。
使用限制将本产品用于需要高度可靠性/安全性的应用时, 例如与航空、铁路、海运、汽车等相关的运输设备、防灾设备、各种安全设备、或机能/精密设备等, 您应当在考虑将故障保险和冗余机制加入设计中以维持安全和整体系统可靠性之后再使用本产品。
爱普生TM-82II安装流程
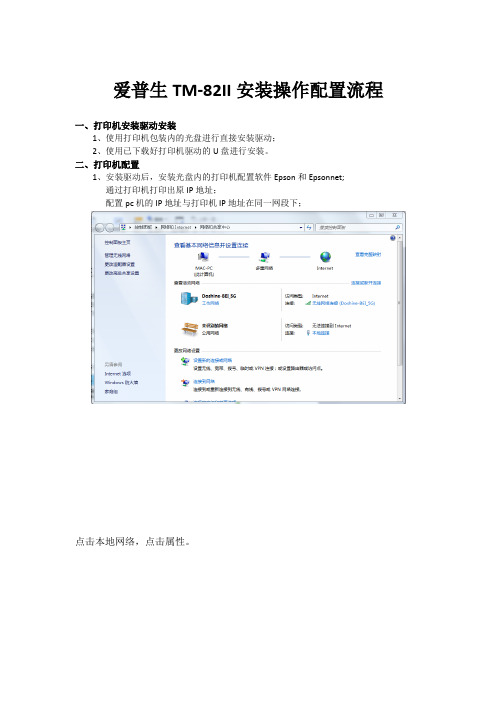
爱普生TM-82II安装操作配置流程
一、打印机安装驱动安装
1、使用打印机包装内的光盘进行直接安装驱动;
2、使用已下载好打印机驱动的U盘进行安装。
二、打印机配置
1、安装驱动后,安装光盘内的打印机配置软件Epson和Epsonnet;
通过打印机打印出原IP地址;
配置pc机的IP地址与打印机IP地址在同一网段下;
点击本地网络,点击属性。
双击Internet 协议版本4
配置正确以后点击确定。
打开端口配置软件TM-T82II Utility软件进行添加打印机端口;
2、点击添加端口选择通讯接口为以太网。
IP地址里是原打印机地址,点击搜索按钮找到已连接的打印机,然后点击该打印机进行连接成功确认
3、打开EpsonNet Config软件。
点击刷新找到已连接的打印机
选择该打印机,点击配置按钮在TCP\IP基本选项中进行配置。
配置完成后把PC电脑IP改回原来IP。
三、在PC机上添加该打印机
通过TCP\IP搜索到已设置好IP地址的该打印机,并完成安装。
四、测试打印机工作是否正常。
Epson 打印机用户操作手册说明书
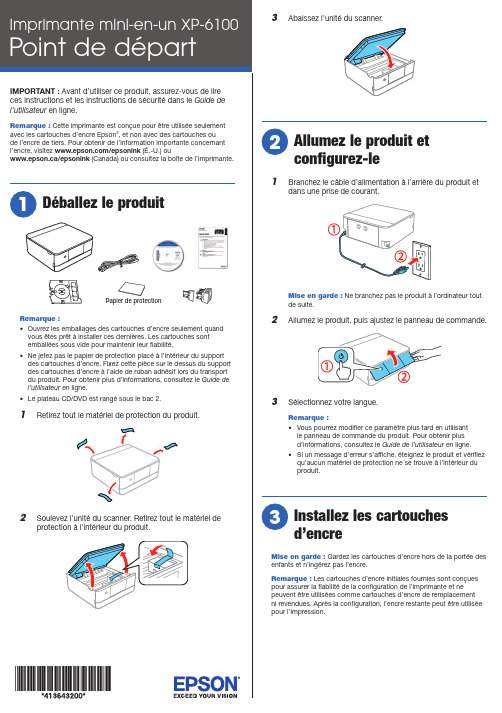
Papier de protectionuvrez les emballages des cartouches d’encre seulement quandvous êtes prêt à installer ces dernières. Les cartouches sont3 A baissez l’unité du scanner.A llumez le produit etconfigurez-le1 B ranchez le câble d’alimentation à l’arrière du produit etdans une prise de courant.Mise en garde : Ne branchez pas le produit à l’ordinateur toutde suite.2 A llumez le produit, puis ajustez le panneau de commande.3 Sélectionnez votre langue.Remarque :• V ous pourrez modifier ce paramètre plus tard en utilisantle panneau de commande du produit. Pour obtenir plusd’informations, consultez le Guide de l’utilisateur en ligne.• S i un message d’erreur s’affiche, éteignez le produit et vérifiezqu’aucun matériel de protection ne se trouve à l’intérieur duproduit.I nstallez les cartouchesd’encreMise en garde : Gardez les cartouches d’encre hors de la portée desenfants et n’ingérez pas l’encre.Remarque : Les cartouches d’encre initiales fournies sont conçuespour assurer la fiabilité de la configuration de l’imprimante et nepeuvent être utilisées comme cartouches d’encre de remplacementni revendues. Après la configuration, l’encre restante peut être utiliséepour l’impression.Mise en garde : N’éteignez pas l’imprimante et ne soulevezpas l’unité du scanner pendant le chargement, sinon vous gaspillerez de l’encre.Remarque : Dans le cadre du processus de configuration, le numéro de série de votre imprimante sera envoyé vers un serveur Epson sécurisé afin de vous rendre admissible auxprogrammes que nous pourrions offrir de temps à autre, incluant le programme de réapprovisionnement en encre Epson. Vous aurez la possibilité de donner votre consentement individuel pour chacun de ces programmes.8 S uivez les instructions à l’écran pour régler la qualitéd’impression de votre produit.Remarque :• V ous devez charger du papier avant de pouvoir ajuster la qualité d’impression. Consultez la section « Chargez le papier » ci-après pour les détails.• S électionnez Ajuster plus tard si vous souhaitez ajuster la qualité d’impression plus tard. Pour obtenir plusd’informations, consultez le Guide de l’utilisateuren ligne.C hargez le papierVous pouvez charger les formats de papier suivants :• B ac 1 : Papier photo 3,5 × 5 po (89 × 127 mm), 4 × 6 po(102 × 152 mm) ou 5 × 7 po (127 × 178 mm)• B ac 2 : Papier de format lettre, A4, légal ou 8 × 10 po (203 × 254 mm)Consultez le Guide de l’utilisateur en ligne pour obtenir de l’information concernant les types et les formats de papier disponibles, les capacités de chargement et les instructions pour l’impression sur CD, DVD et disques Blu-ray ®.1 Abaissez le couvercle avant.2 Tirez un bac papier.Bac 21 Soulevez l’unité du scanner.Mise en garde : Ne touchez pas au câble plat blanc ou auguide de la tête d’impression.2 Sd’encre noire (BK).Remarque : d’encre noire photo (PB) ou les autres cartouches d’encre.3 DMise en garde :illustrées ci-dessous. Cela pourrait nuire à l’impression et au rendement normal.4 Retirez le bouchon de chaquecartouche d’encre.Remarque : Conservez les bouchons et utilisez-les pour couvrir lescartouches d’encre après les avoir retirées de l’imprimante à des fins de stockage ou lorsque vous souhaitez procéder à leur élimination.5 I nsérez les cartouches en angle dans le logement dechaque couleur. Appuyez sur chaque cartouche jusqu’àce qu’elle s’enclenche.6 Abaissez l’unité du scanner.7 S électionnez Installée et appuyez sur le bouton OK pourcommencer le chargement de l’encre. Le chargement del’encre prend environ 10 minutes. Lorsque vous voyez un message d’achèvement à l’écran ACL de l’imprimante, lechargement est terminé.1 A ssurez-vous que le produit N’EST PAS BRANCHÉ àvotre ordinateur.W indows ® : Si une fenêtre Nouveau matériel détecté s’affiche,cliquez sur Annuler et débranchez le câble USB.2 I nsérez le CD de votre produit (Windows seulement) outéléchargez et exécutez le progiciel de votre produit. Pourobtenir la version la plus récente du progiciel, visitez le site www.epson.ca/support/xp6100.3 S uivez les instructions à l’écran de l’ordinateur pour exécuter le programme de configuration.4 L orsque l’écran Sélectionnez votre connexion s’affiche,sélectionnez l’une des connexions suivantes et suivez lesinstructions qui s’affichent à l’écran :• Connexion sans filDans la plupart des cas, le programme d’installation des logiciels essaie automatiquement de configurer votre connexion sans fil. Si la configuration échoue, il est possible que vous deviez saisir le nom de réseau (SSID) et le mot de passe.• Connexion USB directeA ssurez-vous d’avoir un câble USB (non inclus).Impression mobile et à commande vocale• Imprimez directement depuis un appareil iOS. Vous n’avez qu’à connecter votre imprimante et l’appareil au même réseau et à appuyer sur l’icône d’action pour sélectionner l’option d’impression.• Imprimez avec appareils Android MC (v4.4 ou une versionultérieure).* Connectez simplement votre imprimante et l’appareil au même réseau et appuyez sur l’icône de menu pour sélectionner l’option d’impression.• Imprimez à distance ou lorsque vous vous trouvez près de votre imprimante avec Epson Connect MC et Google Cloud Print MC . Apprenez-en plus sur le site www.epson.ca/connect .• Utilisez les assistants à commande vocale pour imprimer une variété de contenus créatifs et courants depuis votre produit Epson. Vous n’avez qu’à ajouter votre produit à un compte Epson Connect, puis à relier le compte à un assistant à commande vocale. Consultezwww.epson.ca/voice pour plus d’informations.* P ourrait nécessiter l’application Epson Print Enabler ou l’application Mopria Print Service, disponibles sur Google Play .3 Glissez les guide-papier latéraux vers l’extérieur.Bac 1Bac 24 I nsérez le papier avec la face d’impression ou le côtéglacé vers le bas.Bac 1Bac 2R emarque : Assurez-vous que le papier est bien chargé contre la paroi arrière du bac et qu’il ne dépasse pas l’extrémité avant du bac.5 F aites glisser les guide-papier latéraux contre le papier,sans trop serrer. Assurez-vous que le papier est bienplacé sous les languettes des guide-papier latéraux.6 M aintenez le bac droit lorsque vous l’insérezcomplètement dans le produit.Bac 1Bac 27 S électionnez les paramètres de papier sur le panneaude commande du produit.8 Déployez le plateau de sortie.I nstallez les logicielsRemarque : Si vous utilisez un Mac ou si votre ordinateur ne possède pas de lecteur CD/DVD, une connexion Internet est requise pour obtenir les logiciels de votre produit.Pour imprimer depuis un Chromebook MC , visitez le site Web www.epson.ca/support/gcp pour les instructions.Avis concernant la mise à jour du micrologiciel : Epson fournit périodiquement des mises à jour de micrologiciel afin de résoudre des problèmes de sécurité ou de performance, des bogues mineurs et pour s’assurer que votre imprimante fonctionne tel que prévu. Votre imprimante a été conçue pour être utilisée seulement avec des cartouches d’encre de marque Epson authentiques. Certaines mises àjour pourraient affecter le fonctionnement de l’encre de tiers.Soutien techniqueVisitez le site Web www.epson.ca/support/xp6100 afin de télécharger des pilotes, voir les manuels, consulter les FAQ et communiquer avec Epson.Composez le 905 709-3839, de 6 h à 20 h, heure du Pacifique, du lundi au vendredi, et de 7 h à 16 h, heure du Pacifique, le samedi. Les heures et les jours de soutien sont modifiables sans préavis. Des frais d’interurbain peuvent s’appliquer.RecyclageEpson offre un programme de recyclage pour le matériel et les cartouches d’encre en fin de vie utile. Veuillez consulter le site Web www.epson.ca/recycle pour obtenir de l’information concernant le retour de vos produits pour une élimination appropriée.Achat de papier et d’encrePour garantir d’excellents résultats, utilisez les papiers pour usages spéciaux d’origine Epson, conçus spécialement pour les imprimantes Epson. Vous pouvez acheter l’encre et lespapiers pour usages spéciaux d’origine Epson à l’adresse www.epson.ca et auprès d’un détaillant Epson autorisé. Composez le 1 800 807-7766.Cartouches d’encre de remplacement XP-6100EPSON et Claria sont des marques déposées, EPSON Exceed Your Vision est un logotype déposé et Epson Connect est une marque de commerce de Seiko Epson Corporation. Small-in-One est une marque déposée et Designed for Excellence est une marque de commerce d’Epson America, Inc.Windows est une marque déposée de Microsoft Corporation aux États-Unis et/ou dans d’autres pays.Mac est une marque de commerce d’Apple Inc., enregistrée aux États-Unis et dans d’autres pays.Android, Google Cloud Print, Chromebook et Google Play sont des marques de commerce de Google LLC.Avis général : Les autres noms de produit figurant dans le présent document ne sont cités qu’à des fins d’identification et peuvent être des marques de commerce de leurs propriétaires respectifs. Epson renonce à tous les droits associés à ces marques.L’information contenue dans le présent document peut être modifiée sans préavis.© 2018 Epson America, Inc., 11/18 CPD-55650Des problèmes?La configuration réseau a échoué.•Assurez-vous d’avoir sélectionné le bon nom de réseau (SSID).•Redémarrez votre routeur (éteignez-le et rallumez-le), puis essayez de vous reconnecter au routeur.•Le produit ne peut être connecté qu’à un réseau qui prend en charge les connexions 2,4 GHz. Si votre routeur offre des connexions 2,4 GHz et 5 GHz, assurez-vous que la fréquence 2,4 GHz est activée.•Si vous apercevez un message d’alerte de pare-feu,cliquez sur Débloquer ou Permettre pour permettre à la configuration de se poursuivre.•Si la sécurité de votre réseau est activée, assurez-vous d’avoir bien saisi le mot de passe du réseau (clé WEP ou phrase passe WPA). Le mot de passe doit être saisi selon la casse appropriée.Il y a des lignes ou des couleurs incorrectes sur mes tirages.Exécutez une vérification des buses pour voir s’il y a des écarts sur le tirage. Ensuite, nettoyez la tête d’impression, au besoin. Consultez le Guide de l’utilisateur en ligne pour obtenir plus d’informations.L’écran de l’imprimante s’est assombri.Assurez-vous que votre produit est allumé et appuyez sur l’un des boutons afin que le produit quitte le mode veille.Impossible de détecter le produit après l’avoir relié avec un câble USB.Assurez-vous que le produit est allumé et qu’il est bien branchétel qu’illustré ci-dessous :Des questions?Guide rapideInformations de base et de dépannage.Guide de l’utilisateurWindows : Cliquez sur l’icône sur le bureau ou sur l’écran Applications afin d’accéder au Guide de l’utilisateur en ligne.Mac : Cliquez sur l’icône dans le dossier Applications/Epson Software/Guide afin d’accéder au Guide de l’utilisateur en ligne.Si vous n’avez pas l’icône du Guide de l’utilisateur, visitez le site d’Epson, comme indiqué ci-après.。
Epson 打印机用户手册.pdf_1701922418.2931979说明书
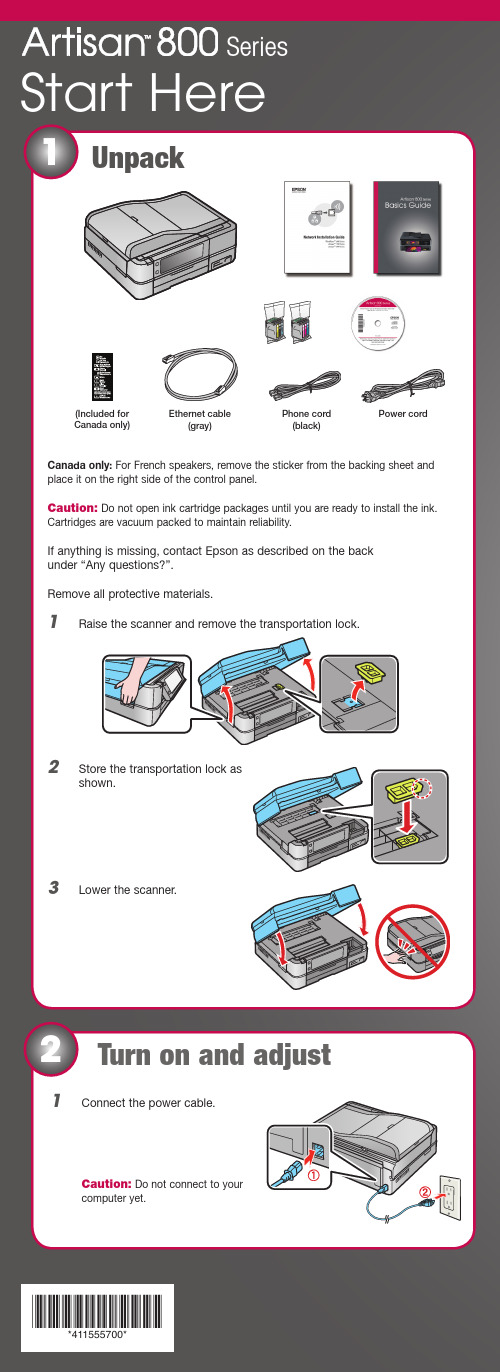
*411555700**411555700*Canada only: For French speakers, remove the sticker from the backing sheet and place it on the right side of the control panel.Caution: Do not open ink cartridge packages until you are ready to install the ink.Cartridges are vacuum packed to maintain reliability.If anything is missing, contact Epson as described on the back under “Any questions?”.Remove all protective materials.1Raise the scanner and remove the transportation lock.2Store the transportation lock as shown.3Lower the scanner.Unpack1Start Here(Included for Canada only)1Connect the power cable.C aution: Do not connect to your computer yet.Turn on and adjust2SeriesEthernet cable(gray)Phone cord (black)Power cordMake settings31Select your language and country.Touch the screen to select the desired option. Press orto see morecountries.2 F or the Daylight Saving Time setting, select Summer if your region usesDaylight Saving Time and it’s currently in effect. (DST is effective fromspring through summer.) Otherwise, select Winter to turn off the setting. Press OK .3Select the date format.4Use the numeric keypad to set the date, then press OK .5Select the time format.6Use the numeric keypad to set the time.7Press OK when done.Note: You can change the date and time settings by pressing the Home button,selecting Setup , selecting Printer Setup , then Date/Time .2Press the On button, then lift the control panel to raise it.To lower the control panel, press the Unlock button.Caution: To avoid damaging your Artisan 800Series, always press the Unlock button to lower the control panel.5Load paperInstall ink cartridges4Note: Don’t load paper before installing the ink cartridges.1 R aise the scanner.2Unpack the ink cartridges.3 Remove only the yellow tape from each cartridge.C aution: Don’t remove any other seals from the cartridges.4 I nsert the cartridges in the holder for each color. Press the cartridgesdown until they click.5Lower the scanner.6Wait while ink charges. Charging takes about 5 minutes.N ote: Your Artisan 800 Series ships with full cartridges. Part of the ink from the first cartridges is used for priming the Artisan 800 Series. Replacement cartridges will print more pages.Caution: Don’t turn off the Artisan 800 Series while the ink system isinitializing or you’ll waste ink.The paper cassette has 2 trays. The main tray is for letter-size, legal-size, or 8 x 10-inch paper. The photo tray is for 4 x 6- or 5 x 7-inch photo paper. 1Pull out the paper cassette. Then slide back the photo tray and lift it up.2 Squeeze the edge guides and slide them out. Then insert paper with theglossy or printable side face-down.3 Slide the edge guides against the paper.4 Lower the photo tray.5 Squeeze the edge guides and slide them out. Then insert 4 x 6-inch or5 x 7-inch photo paper with the glossy or printable side face-down.N ote: Make sure the paper fits under the edge guides.6 Slide the edge guides against the paper.7 Keep the cassette flat as you insert it.8 Extend the output tray and flip up the stopper.Network (wireless or wired)See your Network Installation Guide.You can’t install your software asdescribed below.ORU SB connectionMake sure you have a USB cable (not included).Then follow the steps below.USB connectionFollow these steps to connect the Artisan 800 Series directly to your computer using a USB cable (not included).Windows1 Make sure the Artisan 800 Series isNOT CONNECTED to your computer.Note:If you see a Found New Hardwarescreen, click Cancel and disconnect theUSB cable. You can’t install your softwarethat way.2 Insert the Artisan 800 Series software CD.With Windows Vista, if you see the AutoPlaywindow, click Run Epsetup.exe. When you see theUser Account Control screen, click Continue.3 Click Install and follow the on-screen instructions.To use the Artisan 800 Series for faxing, connect the included phone cord from a telephone wall jack to the LINE port on the Artisan 800 Series. To connect a telephone or answering machine, see the Basics Guide for instructions.Note:If you’re connecting to a DSL phone line, you must use a DSL filter or you won’t be able to fax. Contact your DSL provider for the necessary filter.Connect the phone cord67Choose your connection4 When you see this screen, select Install driver for direct USBconnection and then click Next.5 When prompted, connect a USB cable. Use any open USB port on yourcomputer.Note:If installation doesn’t continue after a moment, make sure yousecurely connected the USB cable and turned on the Artisan 800 Series.6 Follow the on-screen instructions to install the rest of the software andregister your Artisan 800 Series.Be sure to register your Artisan 800 Series to receive these great benefits: 2-year limited warranty and 2-year toll-free customer support.*7 When you’re done, remove the CD.You’re ready to go! Enjoy your Artisan 800 Series! See your Basics Guide oron-screen Epson Information Center for instructions.Macintosh®1 Make sure the Artisan 800 Series is NOT CONNECTED to your computer.2Insert the Artisan 800 Seriessoftware CD.3 Double-click the Epson icon.4 Click Install and follow the on-screen instructions.5 When you see this screen, select Install driver for direct USBconnection and then click Next.Any questions?Basics GuideE asy and quick answers to your questions on printing, copying, scanning, and faxing.On-screen Epson Information CenterC lick the desktop shortcut for easy access to the Artisan 800 Series Epson Information Center , FAQs, online troubleshooting advice, and software downloads. You can also purchase paper and ink.Network Installation GuideInstructions on configuring the Artisan 800 Series for a network.On-screen help with your softwareS elect Help or ? when you’re using your software.Epson Technical Support Internet SupportVisit Epson’s support website at /support and select yourproduct for solutions to common problems. You can download drivers and documentation, get FAQs and troubleshooting advice, or e-mail Epson with your questions.For a video tutorial and other information about setting up a wireless network, go to: /support/wireless Speak to a Support RepresentativeC all (562) 276-4382 (U.S.) or (905) 709-3839 (Canada), 6 AM to 6 PM , Pacific Time, Monday through Friday. Days and hours of support are subject to change without notice. T oll or long distance charges may apply.Software Technical Support ArcSoft Print Creations™ ABBYY ® FineReader ® Sprint Plus/support (510) 226-6717********************6When prompted, connect a USB cable. Use any open USB port on your computer. Make sure the Artisan 800 Series is securely connected and turned on.Mac OS X 10.5 users: skip to step 9. Other users: continue with step 7.7When you see this screen, click Add Printer . Follow the steps on the right side of the screen to add the Artisan 800 Series.8 Click Next again, if necessary.9Follow the on-screen instructions to install the rest of the software and register your Artisan 800 Series.Be sure to register your Artisan 800 Series to receive these great benefits: 2-year limited warranty and 2-year toll-free customer support.*10When you’re done, eject the CD.You’re ready to go! Enjoy your Artisan 800 Series! See your Basics Guide or on-screen Epson Information Center .Need paper and ink?Try Epson premium papers with Claria ® ink for better than lab quality results. For the right supplies at the right time, you can purchase them at Epson Supplies Central SM at /ink3 (U.S. sales) or www.epson.ca (Canadian sales). You can also purchase supplies from an Epson authorized reseller. To find the nearest one, call 800-GO-EPSON (800-463-7766).Genuine Epson PaperEpson offers a wide variety of papers to meet your needs; visit Epson Supplies Central for more information.Ultra Premium Photo Paper Glossy Instant-drying high gloss paper for long-lasting photos, suitable for framing.Genuine Epson InksLook for the numbers below to find your cartridges. It’s as easy as remembering your number!Note: The 98 High Capacity Black (and all 99 Standard Capacity) ink cartridges areavailable online and from Epson authorized resellers. The 98 High Capacity color ink cartridges are available only online; visit /highcapacity (U.S. sales) or www.epson.ca (Canadian sales).Cut out the card to the right and keep it with you when purchasing replacement ink cartridges .Printed in XXXXXXPrinted in XXXXXXInk Cartridges for Artisan ® 800The 98 High Capacity color ink cartridges are available only online;visit /highcapacity (U.S. sales) or www.epson.ca (Canadian sales).ColorStandard capacityHigh capacityBlack—98 Cyan9998 Magenta 9998 Yellow 9998 Light Magenta9998 Light Cyan9998* 1-year limited warranty to all purchasers; 2-year toll-free support and second year warranty require registration within 60 days of purchase. For California and Québec residents, failure to submit this product registration form does not diminish your warranty rights.Epson is a registered trademark, Epson Exceed Your Vision is a registered logomark and Supplies Central is a service mark of Seiko Epson Corporation. Claria is a registered trademark and Artisan is a trademark of Epson America, Inc.General Notice: Other product names used herein are for identification purposes only and may be trademarks of their respective owners. Epson disclaims any and all rights in those marks.This information is subject to change without notice.© 2008 Epson America, Inc. 7/08CPD-25956R1Color Standard capacity High capacityBlack —98Cyan 9998Magenta 9998Yellow 9998Light Magenta 9998Light Cyan9998。
TM-T82使用说明书
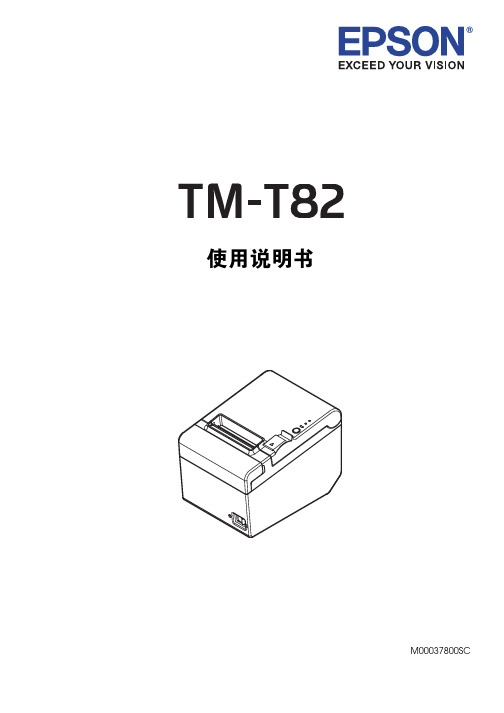
使用说明书M00037800SC版权所有。
没有精工爱普生公司的正式书面许可,本手册不得复制,不得保存在可再生系统内,或以任何形式任何手段进行电子、机械转载、复印、录制等。
使用本手册内的有关信息无须授权。
在编辑本手册时我们考虑到了各项防备措施,对于手册中的错误和遗漏,精工爱普生公司概不负责。
同时,也不负责由于使用本手册中的信息内容造成的损失。
本产品由于用户或第三方造成的事故、错误使用和乱用,以及擅自改装、修理或变更式样等,不严格遵守精工爱普生公司的操作和维修要求(美国除外),引起的危害、损失、费用和付出款项等,不论是精工爱普生公司还是其它有关的集团公司,对于该顾客或第三方概不负有任何责任。
由于使用非正规爱普生产品或非精工爱普生公司指定许可的任何附件或任何消耗品,从而造成的损失和故障,精工爱普生公司概不负责。
EPSON是Seiko Epson Corporation在日本、中华人民共和国及其它国家或地区的注册商标。
备注 :本手册中的内容有可能发生更改,恕不事先通知。
版权所有者© 2011精工爱普生公司,长野,日本对于中国的用户此为A级产品,在生活环境中,该产品可能会造成无线电干扰。
在这种情况下,可能需要用户对其干扰采取切实可行的措施。
重要安全信息本章节介绍有关确保本产品的安全和有效使用的重要信息。
请仔细阅读此部分并将其保存在便于拿到的地方。
主要标识本手册中的标识,根据重要程度不同而分别为下列等级,在使用产品之前,请仔细阅读下列内容。
警告:务必遵守警告内容,以免造成重大的人身伤害。
注意:必须对注意事项加以注意,以免对你本人造成伤害、设备造成损伤、或数据丢失。
注:包括有关设备操作的重要信息和有用提示的注意事项。
安全注意事项警告:如果发生冒烟、异常气味、或者不正常的噪音时,请立即关闭机器。
继续使用可能会引起火灾或触电。
应该立即拔掉插头,并与销售商或精工爱普生服务中心取得联系询问处理办法。
爱普生TM—T81II
爱普生TM—T81II随着人们工作生活的日益繁忙和电子商务的迅猛发展,人们越来越习惯于以网上购物等多种购物方式来代替实体超市的购物,很多购物网站纷纷走入我们的生活。
进而导致实体零售超市领域遭遇行业寒流,进入萎靡阶段,在这种整个大环境不容乐观的情况下,爱普生推出了微型打印机TM-T81II,并以其节能环保、高速便捷和时尚小巧等优势备受广大零售超市经营者的青睐。
节能环保,降低大量成本近日,笔者有幸采访到北京一家大型连锁超市的高级主管,据他介绍,最近,随着网络购物和海外购物等新型的购物方式不断的渗入到人们的生活中,国内超市零售业的现状不佳,为了吸引顾客,很多大型超市都在进行定期的打折促销活动,但进货成本不会因为打折促销活动而降低。
那么为了要保证收益不变就要在其他方面节约成本,举个简单的例子,在超市结算的收银台,微型打印机是必不可少的设备,然而使用不同的微型打印机所产生的费用也是不同的。
就目前而言,其使用的爱普生TM-T81II与其之前所使用的设备相比,爱普生TM-T81II在节能环保性上做出了巨大的突破,首先其能耗更低,待机能耗仅为1W,这样算下来,日积月累便可节约一笔不可小觑的费用。
其次TM-T81II还获得了能源之星的认证,真正的实现了节能与环保的有效结合。
高速便捷,创造舒适环境该超市的负责人还介绍到,随着人们的生活、工作压力越来越大,与其去超市购物花费大量的时间,人们更喜欢选择在家进行网络购物,这便在一定程度上影响了零售超市的发展。
尤其是在购物高峰时期,打印机的速度跟不上,势必会影响顾客结算的效率,出现人群滞留的现象,不仅会影响公共秩序,还会浪费顾客的大量购物时间。
因此能够为顾客节约结算时间、营造舒适的购物环境。
无疑是吸引顾客的重要保障,爱普生TM-T81II的打印速度为150mm/s,经实测打印的检验,TM-T81II的实际打印速度最快,比其他品牌同类打印机节省时间长达1到3秒,而在保持高速的同时,TM-T81II依旧兼顾着极佳的稳定性,通过了TCO电磁兼容测试,切刀寿命达150万次以上。
TM以太网打印机使用说明

引言概述:TM以太网打印机是一种高效、便捷的打印设备,能够通过以太网连接到计算机网络,实现远程打印功能。
本文将详细介绍TM以太网打印机的使用方法,包括连接设置、驱动安装、打印功能等方面,以帮助用户更好地使用该设备。
正文内容:一、连接设置1.检查网络环境:确保计算机和打印机都连接到同一个局域网,并且网络正常可用。
2.查找打印机IP地址:进入打印机设置界面,找到并记录打印机的IP地址,用于后续的设置。
3.打印机连接设置:打开计算机的网络设置,找到打印机连接选项,选择“以太网连接”,输入打印机的IP地址进行连接。
二、驱动安装1.下载驱动程序:访问TM官方网站,找到对应型号的打印机驱动程序,并下载到本地计算机。
2.运行安装程序:将下载的驱动程序文件解压后,运行安装程序,按照提示进行驱动安装。
注意选择正确的操作系统版本。
3.连接打印机:安装完成后,将打印机连接到计算机,确保连接稳定。
4.驱动设置:在计算机的打印机设置中,选择新增打印机,并搜索连接的TM以太网打印机,完成驱动设置。
三、打印功能2.打印设置:在打印设置界面中,选择TM以太网打印机作为打印目标,可进一步设置页面大小、打印质量等参数。
4.打印操作:确认无误后,点击“打印”按钮,计算机将向TM以太网打印机发送打印任务,并开始打印。
可以在打印队列中查看打印进度。
5.打印质量调整:如果打印效果不理想,可以通过调整打印机设置或更换打印质量更好的纸张来改善打印效果。
四、故障排除1.打印机无法连接:检查打印机和计算机的网络连接是否正常,尝试重新连接打印机。
2.驱动安装失败:重新运行驱动安装程序,确保操作正确,如果问题仍然存在,尝试下载最新版本的驱动程序。
3.打印故障:如果打印机无法正常打印,可以检查打印队列中是否有其他打印任务阻塞,或尝试重新启动打印机。
五、注意事项1.定期清洁打印机:打印机内部容易积聚灰尘和墨水残留物,影响打印效果,定期清洁打印机可以提高打印质量。
EPSON TM-T81 网络打印机使用手册(原创)
EPSON TM-T81 网络打印机使用手册
By:
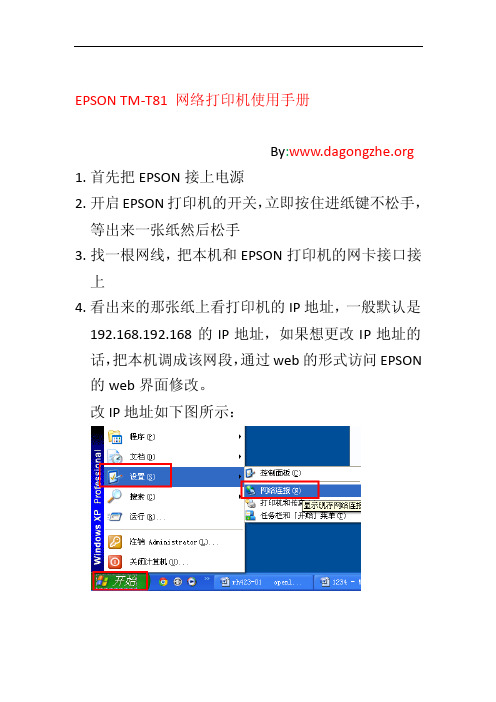
1.首先把EPSON接上电源
2.开启EPSON打印机的开关,立即按住进纸键不松手,等出来一张纸然后松手
3.找一根网线,把本机和EPSON打印机的网卡接口接上
4.看出来的那张纸上看打印机的IP地址,一般默认是192.168.192.168的IP地址,如果想更改IP地址的话,把本机调成该网段,通过web的形式访问EPSON 的web界面修改。
改IP地址如下图所示:
网关和DNS不用修改Web访问
修改成你要的网段,比如192.168.3.98 然后submit 保存
之后在把你的IP地址改回到和打印机一个网段,比如设成192.168.3.100
5.安装驱动
把随机带的光盘插入光驱
依照如下选项
改成打印机的iP地址
这个时候一定要把网线插上,否则会报错有杀毒软件的对弹出的窗都允许
添加一台EPSON打印机已经完成,如果有多台打印机,进行如下操作,如果仅此一台,请跳过如下步骤,直接完成。
over。
EPSON TM-T81 网络打印机驱动使用手册

EPSON TM-T81 网络打印机驱动使用手册【驱动名称】千里马餐饮管理系统V7.0及V8.0 厨房打印EPSON TM-T81 网络打印机驱动【驱动版本】版本日期:2011-05-20【适用版本】V7餐饮2009年第四季度版本及以上版本V8餐饮2009年第四季度版本及以上版本【原理概述】与以往使用的EPSON系列串口打印机不同,EPSON 网络打印机自带网络接口,可以直接接入局域网,无须使用N-Port、Moxa等连接到厨房打印服务器。
此驱动在不改动餐饮主体程序的前提下,只需设置好程序中的打印机端口和实际打印机IP地址的对应关系,即可直接向网络打印机发送指令的方式来完成打印工作。
【设置步骤】1、将打印机和厨房打印服务器连接到同一局域网;2、规划并设置各网络打印机的IP地址;a)打印测试页(打开电源时按进纸键),按测试页上的IP地址将厨房打印服务器和打印机设在同一网段;b)在厨房打印服务器上,从浏览器登录各打印机的设置页面;c)在【Configuration-TCP/IP】页面重新设置打印机的IP并重新启动打印机(图1)。
图13、安装打印机驱动;a)执行APD_411SC_T81.exe程序,按提示进行操作;b)在如图2界面时,点击Add进入图3界面,输入Printer Name,且Port Type选择如图3,然后点Next,进行图4界面,输入打印机IP,然后继续按提示进行操作即可;图2图3图44、设置打印机端口和打印机IP地址的对应关系(重要!!!);a)安装ADKT81E1.00目录的setup.exe程序;b)打开安装好的程序SetupPOS Ver2.00.exe,设置打印机端口和打印机IP地址的对应关系(图5、图6、图7);图5图6图75、测试打印机端口,如图8、图9;a)在厨房打印机前方打钩,选择OPOSDRV.dll文件,如图8;b)点击设置,进入图9界面,选择打印机端口,点测试,结果如图9所示;图8图9。
- 1、下载文档前请自行甄别文档内容的完整性,平台不提供额外的编辑、内容补充、找答案等附加服务。
- 2、"仅部分预览"的文档,不可在线预览部分如存在完整性等问题,可反馈申请退款(可完整预览的文档不适用该条件!)。
- 3、如文档侵犯您的权益,请联系客服反馈,我们会尽快为您处理(人工客服工作时间:9:00-18:30)。
EPSON TM-T81 网络打印机驱动使用手册
【驱动名称】
千里马餐饮管理系统V7.0及V8.0 厨房打印EPSON TM-T81 网络打印机驱动
【驱动版本】
版本日期:2011-05-20
【适用版本】
V7餐饮2009年第四季度版本及以上版本
V8餐饮2009年第四季度版本及以上版本
【原理概述】
与以往使用的EPSON系列串口打印机不同,EPSON 网络打印机自带网络接口,可以直接接入局域网,无须使用N-Port、Moxa等连接到厨房打印服务器。
此驱动在不改动餐饮主体程序的前提下,只需设置好程序中的打印机端口和实际打印机IP地址的对应关系,即可直接向网络打印机发送指令的方式来完成打印工作。
【设置步骤】
1、将打印机和厨房打印服务器连接到同一局域网;
2、规划并设置各网络打印机的IP地址;
a)打印测试页(打开电源时按进纸键),按测试页上的IP地址将厨房打印服务器和打
印机设在同一网段;
b)在厨房打印服务器上,从浏览器登录各打印机的设置页面;
c)在【Configuration-TCP/IP】页面重新设置打印机的IP并重新启动打印机(图1)。
图1
3、安装打印机驱动;
a)执行APD_411SC_T81.exe程序,按提示进行操作;
b)在如图2界面时,点击Add进入图3界面,输入Printer Name,且Port Type选择
如图3,然后点Next,进行图4界面,输入打印机IP,然后继续按提示进行操作即
可;
图2
图3
图4
4、设置打印机端口和打印机IP地址的对应关系(重要!!!);
a)安装ADKT81E1.00目录的setup.exe程序;
b)打开安装好的程序SetupPOS Ver2.00.exe,设置打印机端口和打印机IP地址的对应
关系(图5、图6、图7);
图5
图6
图7
5、测试打印机端口,如图8、图9;
a)在厨房打印机前方打钩,选择OPOSDRV.dll文件,如图8;
b)点击设置,进入图9界面,选择打印机端口,点测试,结果如图9所示;
图8
图9。