飞利浦 HX6730 使用说明书
飞利浦 手机 说明书(31)
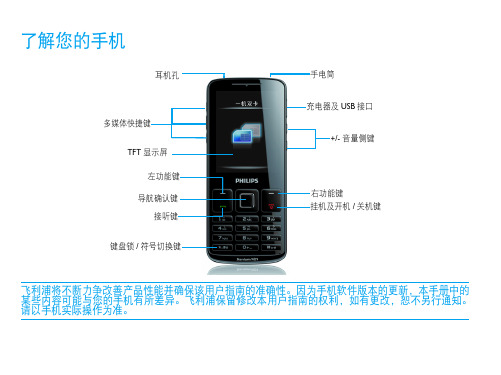
耳机孔
多媒体快捷键 TFT 显示屏 左功能键 导航确认键 接听键
键盘锁 / 符号切换键
手电筒 充电器及 USB 接口
+/- 音量侧键
右功能键 挂机及开机 / 关机键
飞利浦将不断力争改善产品性能并确保该用户指南的准确性。因为手机软件版本的更新,本手册中的 某些内容可能与您的手机有所差异。飞利浦保留修改本用户指南的权利,如有更改,恕不另行通知。 请以手机实际操作为准。
第一次使用
感谢您购买了我们的产品并成为飞利浦大家庭 的一员。 为了让您能充分享受飞利浦提供的支持 , 请到下 面的网址注册您的产品: /mobilephones 更多产品信息, 请访问: /support
注意: • 在使用手机前,请先阅读“安全与注意事项”章节内的安
漫游
在手机注册到非本网的网络
时显示 ( 特别是在国外时 )。
2 了解您的手机
本网域
GSM 网络
GPRS 连接 黑名单 键盘锁 存储卡
由您的网络运营商指定的区 域。需要申请服务,请联系 您的服务提供商获取详情。
手机已连接到 GSM 网络。 指示条越多,接收质量越好。
手机已连接到 GPRS 网络。
您开启了防火墙。
功能
静音
来电时手机不响铃。
振动
来电时手机会振动。
电池
指示条显示电量状态。
短信
您收到一条新短信。
Wap 信息 信箱收到一条 Wap push 信 息。
未接电话 您有一个未接电话。
呼叫转移 所有来电都会被转接到另一 个号码上。
蓝牙
蓝牙功能已开启。
蓝牙耳机 已连接到蓝牙耳机。
耳机
耳机已接连到手机。
闹钟
最新-飞利浦PHILIPS电动牙刷HX6730电池更换1 精品

飞利浦PHILIPS电动牙刷HX6730电池更换篇一:电动牙刷使用方法电动牙刷使用方法调查显示,电动牙刷与普通牙刷相比,在净齿方面更为科学有效。
因为它可以更彻底地清除牙菌斑,从而减少牙龈炎和牙龈出血。
声波震动牙刷是所有电动牙刷里清洁效果比较显著的,能有效保护牙齿健康,而飞利浦声波震动牙刷拥有强劲的流动洁力,较之普通牙刷,更能清除多达7倍牙菌斑。
目前电动牙刷已经作为普遍的日用品在欧美国家流行,掀起了口腔保健领域的一场革命,不过国内还不算普及,不少人对它的使用方法和操作原理都比较陌生。
那么电动牙刷该怎么正确使用呢?1、安装刷头:将刷头紧紧套入牙刷轴,直至刷头与金属轴扣合。
弯曲的刷毛会影响净齿效果,因此刷头最好3个月一换。
2、温水浸泡:中国人的牙龈敏感较为普遍,因此可用温水浸泡刷毛起到软化作用,在2~5次刷牙后,牙龈就能适应。
不过像飞利浦等较高端的声波震动牙刷,都带有包括敏感模式在内的多种定制模式,可根据个人实际牙龈状况选择。
3、挤牙膏:将牙膏垂直对准刷毛中缝挤入适量牙膏。
为了避免牙膏飞溅,最好在打开电源前挤牙膏。
4、有序刷牙:电动牙刷的人刷牙顺序和普通牙刷不一样,按正确顺序刷牙才能达到更好的清洁效果。
将牙齿划分为4大区块,每个区块分为外侧和内侧,可按图中标注顺序刷一般每个区域刷30秒,共2分钟。
5、清洗牙刷毛:每次刷牙后,将刷头放入水中,打开电动开关,轻轻晃动几下,再轻敲刷头,就可洗净残留在刷毛上的异物和牙膏。
6、充电:电动牙刷有感应式充电、直冲式、混合式等多种充电方式,飞利浦有款声波震动牙刷只需放入专用玻璃杯即可充电,更加方便快捷。
篇二:七款主流电动牙刷试用报告验电动挑战洁齿新极限七款主流电动牙刷试用报告定期洗牙的观念已经开始为越来越多的人所接受,现实生活中,牙齿是否洁白不再只代表个人健康,更是一个关乎文明的问题,与个人气质、形象息息相关。
在西方,电动牙刷早已不是什么新鲜事。
而在我国,不少人仍然认为一把牙刷上百元不可思议。
飞利浦产品用户手册说明书

注册您的产品。
1 重要信息
使用产品之前,请仔细阅读本用户手册,
并妥善保管以供日后参考。
• 警告:请勿在靠近水的地方使用本 产品。
• 本产品在浴室内使用时,使用后拔 下插头,因为即使本产品开关断 开后,接近水仍存在危险。
• 警告:不要在盛水的浴缸、淋浴、 洗脸盆或其他器皿附近使用 本器具。
能与产品电 源电压相符。
压不符。
ϔ৮ 喟下⩢⊓ݖ०䷻ ಸत 喟)1 ䷊Ⴧ⩢ࢸ 喟7_ ䷊Ⴧ䶾⢴ 喟)[ ䷊Ⴧ䓀ߌڒ⢴ 喟8 ⩌ϔᬒ 喟䄤㻮ϔ৮ᳱ ϔౝ 喟͚పᎬ͉͉㣋
⤍⊤㏼≻➦ࡧ下⊓ݖუᏚ⩢கᰶ䭽ڙथ ͚ప⤍⊤ጯ̶▣䩴⥡ⴠጒ͇ࡧ ڕప䶫ߎ☚㏬喟
⤍⊤㏼≻➦ࡧ下⊓ݖუᏚ⩢கᰶ䭽ڙथ ͚ప⤍⊤ጯ̶▣䩴⥡ⴠጒ͇ࡧ ڕప䶫ߎ☚㏬喟
᱙ϔ৮ᵦᢛపᴴ(# (# (# ࣷ(#ݣ䕍
此保用卡在中国适用 用户请保留此卡
产品保用卡
᱙ϔ৮ᵦᢛపᴴ(# (# (# ࣷ(#ݣ䕍
ϔ৮ 喟下⩢⊓ݖ०䷻ ಸत 喟)1 ䷊Ⴧ⩢ࢸ 喟7_ ䷊Ⴧ䶾⢴ 喟)[ ䷊Ⴧ䓀ߌڒ⢴ 喟8 ⩌ϔᬒ 喟䄤㻮ϔ৮ᳱ ϔౝ 喟͚పᎬ͉͉㣋
᱙ϔ৮ᵦᢛపᴴ(# (# (# ࣷ(#ݣ䕍
ϔ৮ 喟下⩢⊓ݖ०䷻ ಸत 喟)1 ䷊Ⴧ⩢ࢸ 喟7_ ䷊Ⴧ䶾⢴ 喟)[ ䷊Ⴧ䓀ߌڒ⢴ 喟8 ⩌ϔᬒ 喟䄤㻮ϔ৮ᳱ ϔౝ 喟͚పᎬ͉͉㣋
未经飞利浦特别推荐的任何附件或 部件。如果使用此类附件或部件, 您的保修将失效。 • 切勿将电源线缠绕在产品上。 • 待产品完全冷却后再存放。 • 使用后请勿拉扯电源线。 拔下产 品插头时,请握紧插头。 • 切勿用湿手操作本产品。 • 产品只能送到飞利浦授权的服务中 心检修。由不合格人员进行修理可 能将用户置于极度危险的境地。
最新-飞利浦PHILIPS电动牙刷HX6730电池更换 精品
飞利浦PHILIPS电动牙刷HX6730电池更换篇一:一入直邮深似海:6211_30电动牙刷剁手一起惠返利网:自从亚马逊开始了部分产品直邮中国的行动以后,但凡10美金左右的直邮运费在俺眼中就仿佛免邮一般,不知不觉中两个月内已连下4单,实际真正刚需的东西几乎没有,都是拜聚超值网站所赐,入手了一堆可有可无的东西。
惭愧,三桥桑请回购吧。
近期这款的活动好多。
最近牙齿情况越来越糟,正好双12的时候美亚也凑热闹搞什么电动牙刷减免活动,基本入门款3系列不到100,但是又是转速不够,又是需要换电池,嫌麻烦,再三权衡,我这种门外汉还是买个入门新款6211,等有了经验以后再换个1000元以内的高端货吧。
621130电动牙刷美国亚马逊¥249当时下单的时候美国亚马逊原价6999美元,现点击后实付2995美元约¥184,直邮邮费38刀。
现在已经没有了,标准装是3294美刀。
124号下单以后,就开始漫长的等待,终于系统显示预计1226号送达,但是万万没想到,今天就收到了,提前了1周时间。
真是意外的小惊喜啊。
根据和其他直邮的包裹对比,这个应该是快递自己的箱子,有没有很方便的感觉?像盒,没有那么多胶带的困扰下面就是另外一个小惊喜了,开箱以后竟然发现尼玛这是传说中的工包还是电商定制款啊,都没有正常的外包装,就是快递纸盒包装吗?一样的材质,就是印了的,要不是因为价钱合适,心里有千万个草泥马蓄势待发啊。
飞利浦牙刷 使用方法
飞利浦牙刷使用方法
1. 充电:将飞利浦牙刷连接到充电座上,确保充电座插头已插入电源插座。
在充电过程中,充电指示灯将亮起并闪烁。
2. 涂抹牙膏:将适量牙膏挤在牙刷头上。
推荐使用小于豌豆大小的牙膏。
3. 打开电源:按下牙刷上的电源按钮,牙刷将启动并开始震动。
4. 刷牙:将刷头放在牙齿的前表面,以轻轻的圆弧形按摩牙齿。
保持刷头与牙齿接触,并沿牙齿缓慢移动,每隔几秒钟换一个刷牙区域。
5. 定时器:根据飞利浦牙刷的型号,牙刷可能配备有内置的定时器。
定时器通常会每隔30秒或2分钟发出信号,以提醒刷牙时间。
根据需要调整刷牙时间。
6. 清洗:刷完牙后,用清水冲洗刷头并将其置于干燥的地方,刷头可以稍微晃动以去除多余的水分。
7. 充电和更换刷头:当飞利浦牙刷的电量低时,将其连接到充电座上进行充电。
刷头通常需要每三个月更换一次。
注意事项:
- 遵循牙医的建议,每天刷牙两次,每次两分钟。
- 按照刷牙的正确方法刷牙,注意不要用力过猛,以免损伤牙齿和牙龈。
- 定期清洗充电座,并确保电源插头的安全连接。
- 在刷牙时避免将牙刷浸入水中。
只需让刷头与水接触即可。
飞利浦剃须刀中文说明书
AT890/AT811) 11 电池符号和剃须刀头符号(仅限于 AT941/AT940/AT897) 12 剃须刀开/关按钮(仅限于 AT941/AT940/AT897) 13 修剪器释放滑块(仅限于 AT941/AT940/AT897/AT896/AT894/
提示: 为获得最佳修剪性能,请每隔六个月用一滴缝纫机油润滑修 剪器齿。
存储 -- 盖上剃须刀保护盖,以防受损。 -- 仅限于 AT941/AT940/AT897/AT894/AT892/AT891/AT890:
将剃须刀存放在随附的软袋中。
112 简体中文
更换
为获得最佳剃须效果,建议您每年更换一次剃须刀头。
1 小时
AT941、AT940、AT897 AT894、AT892、AT891 AT890、AT811
8 小时
AT899、AT896、AT790 AT756、AT753、AT751 AT750
剃须时间可能会因剃须行为、清洁习惯或胡须类型的差异而少于下 表标示的时间。
60 分钟 AT941
AT940
50 分钟
106 简体中文
使用剃须刀
注意: 本款剃须刀可在沐浴或淋浴过程中使用。 因此,出于安全原因,其不能直接连在电源上使用。
剃须提示和诀窍
-- 这款剃须刀适合干湿两用。可使用剃须啫喱或泡沫湿剃, 令皮肤倍感舒爽;或采用干式剃须,更为方便。
注意: 建议在湿剃时使用剃须啫喱或泡沫。请勿使用浓稠的剃毛乳 液或剃毛油。 -- 为获得最佳的剃须效果,请在使用时作迂回运动。 -- 该剃须刀采用防水设计,可在沐浴或淋浴时时使用。 -- 您的皮肤可能需要 2 到 3 周才能适应飞利浦剃须系统。 湿剃
菲利普驰氏牙刷说明书

Plaque Control Electric Toothbrush Essence+1 mode1 brush headHX3211/03Removes 3x more plaque**than a manual toothbrushDesigned to be the perfect toothbrush to transition from your manual toothbrush. Until now, it feels like you’ve never brushed your teeth before.Proven to improve oral healthRemoves up to 3X more plaque along the gumline*Philips Sonicare toothbrush helps whiten teethHelps improve gum healthOptimize your brushingBattery lifeClick-on brush head systemProvides a superior cleanOur unique technology brings you a powerful yet gentle cleanAngled neck to help tackle cleaning in tough areasDesigned around youEasy start program builds your Philips Sonicare routineTimers encourage thorough 2 minutes of brushingHighlightsUp to 3x better plaque removalRemoves up to 3x more plaque along the gumline than a manual toothbrushHelps improve gum healthEffectively helps improve gum health via a gentle cleaning actionHelps whiten teethThis Philips Sonicare electric toothbrush helps to remove and reduce stains on your teeth for a brighter smile.QuadPacer and SmartimerIt takes just 2 minutes to thoroughly brush your teeth. Our QuadPacer lets you know when you've spent the optimal amount of time oneach section of your mouth while ourSmarTimer signals when your total time is up.Together they help you reach your recommended brushing time, every time.Ease into your new routineStarting something new can take some getting used to. Our easy-start program gives you the option of a gradual, gentle increase in brushing power with the first 14 uses with your new toothbrush.Battery lifeLasts up to 10 days between charges.Reach those tricky spotsAngledThe unique shape of your ProResults gum health toothbrush handle combined with our brush heads means that even tricky spots like back teeth get a thorough clean.Click-on brush head systemThis brush head clicks on and off your brush handle for a secure fit and easy maintenance and cleaning. It fits Philips Sonicare toothbrush PowerUp Battery, Essence+/Elite+/CleanCare+handles.Philips Sonicare technologyPowerful sonic vibrations whip up yourtoothpaste into plaque fighting bubbles, and drive them deep between your teeth and along your gum line. At the same time your teeth will experience 62,000 gentle but effective brush movements. You'll get a month's worth ofmanual brushing in just 2 minutes.Philips Green LogoPhilips Green Products can reduce costs,energy consumption and CO2 emissions. How?They offer a significant environmentalimprovement in one or more of the Philips Green Focal Areas – Energy efficiency,Packaging, Hazardous substances, Weight,Recycling and disposal and Lifetime reliability.SpecificationsModesClean: For exceptional everyday cleanItems includedHandle: 1 Essence+Brush heads: 1 ProResults plaque control Charger: 1Design and finishingColor: Light blueCleaning performanceSpeed: Up to 31000 brush movement/min Performance: Removes up to 3x more plaque* Health benefits: Helps improve gum health,Improves gum healthWhitening benefits: Helps maintain whiteteethTimer: Quadpacer and SmarTimerEase of useBrush head system: Easy click-on brush headsBrushing time: Up to 10 daysBattery indicator: Light shows battery statusHandle: Ergonomic design, Rubber grip foreasy handlingT echnical specificationsBattery: RechargeableBattery type: NiMHOperating time (full to empty): Up to 10 daysPowerVoltage: 110-220 VServiceWarranty: 2-year limited warranty* Removes up to 7x more plaque vs. a manual toothbrush© 2021 Koninklijke Philips N.V.All Rights reserved.Specifications are subject to change without notice. Trademarks are the property of Koninklijke Philips N.V. or their respective owners.Issue date 2021‑06‑10 Version: 9.0.1EAN: 00 07502 00564 29。
飞利浦剃须刀使用说明
◆胡须盒收集胡茬
◆顺滑剃须系统(低摩擦的SkinGlide顺滑剃须系统可顺着您的肌肤滑动剃除表面胡茬,带来贴近舒适的剃须感受)
◆剃须刀刀头保护盖
电子开关按钮(图8-2)
旅行锁(图8-3)
多项指标大小显示屏(图8-4)
◆显示电池剩余电量(仅限型号1180X/ 1180XCC)
◆显示电池电量
7、网罩破损时,请勿使用剃须刀,以防发生脸部伤害。
8、请总是按以下步骤操作:将剃须刀放在高效能清洁装置或充电器中,然后将电源线连接至高效能清洁装置或充电器,之后将电源线连接至电源插座。请确保插头牢固插入高效能清洁装置或充电器中,达到插头标示位置。断开电源时,先将高效能清洁装置或充电器电源关闭,然后再将充电插头从电源插座上拔下。
3.(图17-3)将剃须刀倒置放入支架中,让显示屏朝向Jet Clean高效能清洁装置的正面。
4.(图18-1)将剃须刀牢固地按入支架,使其锁定到位。
5.显示屏将显示剃须刀正在充电。
6.充电需要1个小时。充满电后的剃须刀拔除电源后可以剃须多达50分钟(型号1180X, 1180XCC, 1160X, 1160XCC)或40分钟(型号1150X)。
型号1180X, 1180XCC的显示屏(图12-1)
型号1160X, 1160XCC的显示屏(图12-2)
型号1150X的显示屏(图12-3)
显示屏显示以下信息:
◆充电
型号1180X, 1180XCC(图12-4)
--一旦您将电源线连接至电源后,显示屏立即亮起,最下面的充电指示灯开始闪烁。随着充电过程的进行,越来越多的充电指示灯开始闪烁表示充电量越来越多。
◆使用剃须刀前,请扯下显示屏上的胶带或保护膜。
Philips Sonicare 7000 电动牙刷说明书
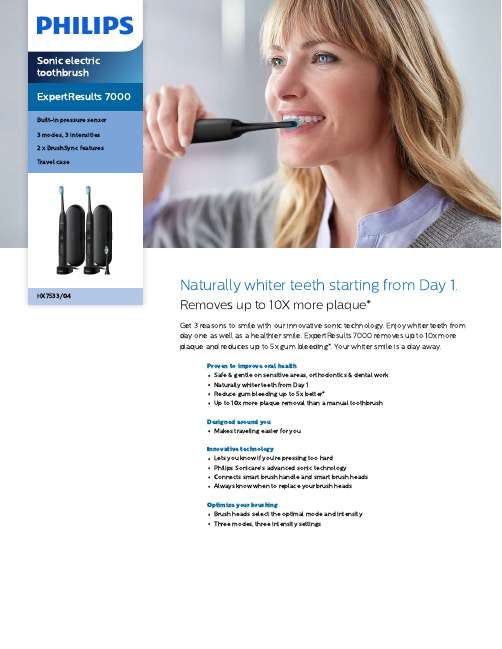
HX7533/04Naturally whiter teeth starting from Day 1. Removes up to 10X more plaque*Get 3 reasons to smile with our innovative sonic technology. Enjoy whiter teeth from day one as well as a healthier smile. ExpertResults 7000 removes up to 10x more plaque and reduces up to 5x gum bleeding*. Your whiter smile is a day away.Proven to improve oral healthSafe & gentle on sensitive areas, orthodontics & dental workNaturally whiter teeth from Day 1Reduce gum bleeding up to 5x better*Up to 10x more plaque removal than a manual toothbrushDesigned around youMakes traveling easier for youInnovative technologyLets you know if you’re pressing too hardPhilips Sonicare's advanced sonic technologyConnects smart brush handle and smart brush headsA lways know when to replace your brush headsOptimize your brushingBrush heads select the optimal mode and intensityThree modes, three intensity settingsHighlightsNaturally whiterteethClick on the W DiamondClean brush head to remove surface stains and reveal a whiter smile more than 2x better from Day 1. With itsdensely packed central stain -removal bristles ,it 's clinically proven to whiten teeth in just one week .Say goodbye toplaqueDensely -packed , high -quality bristles remove up to 10x more plaque from all areas of your teeth than a manual toothbrush . A nd thespecially curved power tip makes reaching the teeth at the back of your mouth a breeze .Improves gumhealthDensely -packed , high -quality bristles give you an extra gentle brushing to reduce gum bleeding up to 5x and improves gum health up to 6x better than a manual toothbrush in 2-weeks .Safe andgentleYou can be sure of a safe brushing experience :our sonic technology is suitable for use with braces , fillings , crowns , and veneers , and helps prevent cavities and improve gum health .Monitor your brushingpressureBrushing too hard can damage your teeth and gums . To prevent this , your Philips SonicareProtectiveClean emits a gentle pulsing sound to remind you to ease o ff on the pressure .Brushing yourwayThis toothbrush allows you to customize your brushing with a choice of three modes and three intensities . Clean mode is standard forsuperior cleaning . White is the ideal mode for removing surface stains . A nd Gum Care mode adds an extra minute of reduced -power brushing , so you can gently massage yourgums . Three intensities allow you to switch the order of 'higher ' and 'lower ' to align with the intensities from left to right .BrushSynctechnologyA microchip -enabled technology that detects and synchronizes the smart brush head with the smart handle . The smart handle and smartbrush head pair is a powerful combination that enables Smart mode pairing and Smart replacement reminders .Mode and intensitypairingWondering which mode and intensity youshould use ? Wonder no longer . BrushSync mode pairing tells your smart handle whichsmart brush head you 're using . So , if you click on a gum care brush head , for example , your toothbrush knows to select the optimal mode and intensity for your gums . A ll you need to do is to press the power button .SpecificationsPowerVoltage: 110-220 VTechnical specificationsOperating time (full to empty): Up to 2 weeks Battery: RechargeableBattery type: Lithium IONDesign and finishingColor: Black GrayServiceWarranty: 2-year limited warrantyEase of useBattery indicator: Light shows battery status Handle compatibility: Easy click-on brush heads Handle: Slim ergonomic designBrushing time: Up to 2 weeksBrush head recognition: Syncs with optimal modeReplacement reminder: To always ensure bestresults, reminder icon lights upItems includedCharger: 2Travel case: 2Brush heads: 2 C3 Premium Plaque Control, 1 WDiamondCleanHandle: 2 ExpertResuts 7000Cleaning performanceHealth benefits: Improves gum health in onlytwo weeks, Helps reduce cavitiesSpeed: Up to 62000 brush movement/minTimer: Quadpacer and SmarTimerWhitening benefits: Whitens teeth in 1 weekPressure feedback: Vibrates handle to alert userModesClean: For exceptional everyday clean3 intensities: Low, Medium, HighWhite: Removes surface stainsGum Care: Gently massages gumsBrushSync Mode PairingC3 Premium Plaque Control: Pairs with CleanmodeW DiamondClean: Pairs with White modeSmart sensor technologyBrushSync Replacement Reminder: A lwaysknow when to, replace brush headsPressure sensor: A lerts when brushing toohardBrushSync Technology: smart brush head,Connects smart handle and* Removes up to 7x more plaque vs. a manual toothbrush© 2023 Koninklijke Philips N.V.A ll Rights reserved.Specifications are subject to change without notice. Trademarks are the property of Koninklijke Philips N.V. or their respective owners.Issue date 2023‑09‑21 Version: 3.3.2UPC************* 。
飞利浦焕肤手洗机说明书
GC440, GC442ENGLISHIntroductionCongratulations on your purchase and welcome to Philips!To fully benefit from the support that Philips offers, registeryour product at /welcome.ImportantRead this important information carefully before you use the appliance and save it for future reference.Danger-Never immerse the appliance in water or any other liquid, nor rinse it under the tap.Warning-Check if the voltage indicated on the type plate of appliance corresponds to the local mains voltage before you connect the appliance.-Do not use the appliance if the plug, the mains cord or the appliance itself shows visible damage, or if the appliance has been dropped or leaks.-Do not connect the appliance to a D.C. Supply.-Always return the appliance to a service centre authorised by Philips for examination or repair. Do not attempt to repair the appliance yourself, otherwise the guarantee becomes invalid. -If the mains cord is damaged, you must have it replaced by Philips, a service centre authorised by Philips or similarly qualified persons in order to avoid a hazard.-Never leave the appliance unattended when it is connected to the mains.-This appliance can be used by children aged from 8 years and above and persons with reduced physical, sensory ormental capabilities or lack of experience and knowledge if they have been given supervision or instruction concerning use of the appliance in a safe way and understand thehazards involved.-Children should be supervised to ensure that they do not play with the appliance.-Cleaning and user maintenance shall not be made by children without supervision.-When you have finished steaming, when you fill or empty the water tank, attach or detach the brush attachment, when you perform cleaning, descaling and rinsing, and also when you leave the appliance even for a short while, remove the mains plug from the wall socket.-Keep the appliance and its mains cord out of reach of children.-Only connect the appliance to an earthed wall socket.-Do not place the appliance on a surface with the steamer head touching the surface while the appliance is hot orconnected to the mains.-Do not let the mains cord come into contact with hot steam when the appliance is in operation.-Do not open and remove the de-calc door and inlet stopper from the appliance during use. Follow instruction manualrecommendation on the cooling time before opening.-Do not use other de-calc solutions on the appliance than the de-calc function that has been supplied with appliance.-Do not fill water at the channel of the de-calc function.-Do not insert your finger and pointed objects that come into contact with the channel of the de-calc function.CAUTION: Hot Surface (Fig.1)-The accessible surfaces may become hot during use. During transportation, handle the appliance with care.Caution-Check the mains cord regularly for possible damage.-Beware of hot steam and hot water that comes out fromsteamer nozzle during use. Steam and hot water can causeburns.-The nozzle of steamer head can become extremely hot andmay cause burns if touched.-This appliance is intended for household use only.-Never drag or pull the appliance across the floor.-Steam may damage or cause discolouration of certain wall ordoor finishes.-Do not use the appliance when the water tank is empty.Electromagnetic fields (EMF)This Philips appliance complies with all applicable standardsand regulations regarding exposure to electromagnetic fields.RecyclingDo not throw away the product with the normal householdwaste at the end of its life, but hand it in at an official collectionpoint for recycling. By doing this, you help to preserve theenvironment.Guarantee and serviceIf you need information or support, please visit/support or read the separateworldwide guarantee leaflet.한국어소개필립스제품을구입해주셔서감사합니다! 필립스가드리는지원혜택을받으실수있도록/welcome에서제품을등록하여주십시오.중요본제품을사용하기전에이중요정보를주의깊게읽고나중에참조할수있도록잘보관하십시오.위험-제품을물또는다른액체에절대담그거나헹구지마십시오.경고-제품에전원을연결하기전에제품에표시된전압과사용지역의전압이일치하는지확인하십시오.-플러그및전원코드, 제품본체에눈에띄는손상이있거나혹은,제품을떨어뜨렸거나제품에서물이새면, 제품을사용하지마십시오.-제품을직류(DC) 전원에연결하지마십시오.-검사또는수리가필요한경우에는항상필립스서비스지정점으로문의하십시오. 품질보증이무효화되므로, 제품을직접수리하지마십시오.-전원코드가손상된경우, 안전을위해필립스서비스센터또는필립스서비스지정점에의뢰하여교체하십시오.-제품이전원에연결된상태에서는자리를절대비우지마십시오.-8세이상의아이들과신체적, 정신적인능력이떨어지거나경험과지식이풍부하지않은성인이이제품을사용하려면제품사용과관련하여안전하게사용할수있도록지시사항을충분히숙지한사람의도움을받아야합니다.-어린이가제품을가지고놀지않도록보호자의감독이필요합니다.-어린이가혼자제품청소나정비를하지않도록하십시오.-스팀분사를마쳤을때, 물탱크에물을채우거나버릴때, 브러시액세서리를장착하거나분리할때, 제품을청소하거나석회질을제거하고헹굴때, 제품을사용하다가잠시라도자리를비울때는벽면콘센트에서전원플러그를뽑으십시오.-제품과전원코드는어린이의손이닿지않는곳에보관하십시오.-제품은반드시접지된벽면콘센트에연결하십시오.-제품이뜨겁거나전원에연결되어있을경우스티머헤드를표면위에올려놓지마십시오.-스팀기가작동할때전원코드가뜨거운스팀에닿지않게하십시오.-사용중에는제품에서석회질제거용도어와주입마개를열거나분리하지마십시오. 열기전에사용설명서에나와있는제품을식히는시간에대한권장사항을따르십시오.-제품에제품과함께제공된석회질제거기능이외의다른석회질제거용액을사용하지마십시오.-석회질제거를위한통로에물을넣지마십시오.-석회질제거를위한통로에손가락이나뾰족한물건이닿지않도록주의하십시오.주의: 뜨거운표면(그림 1)-사용중에는손이닿는표면이뜨거울수있습니다. 운반중에는제품을주의해서다루십시오.주의-전원코드에손상부위가있는지정기적으로점검하십시오.-스티머를사용하는동안노즐에서뜨거운스팀이나뜨거운물이샐수있으니주의하십시오. 스팀과뜨거운물은화상을입을수있습니다.-스티머헤드의노즐은매우뜨거워질수있으므로만질경우화상을입을수도있습니다.-본제품은가정용입니다.-바닥에서제품을끌거나당기지마십시오.-스팀으로인해특정벽또는도어마감이손상되거나변색될수있습니다.-물탱크가비어있을때는제품을사용하지마십시오.EMF(전자기장)이필립스제품은 EMF(전자기장)와관련된모든기준및규정을준수합니다.재활용수명이다된제품은일반가정용쓰레기와함께버리지말고지정된재활용품수거장소에버리십시오. 이런방법으로환경보호에동참하실수있습니다.품질보증및서비스보다자세한정보나지원이필요한경우, /support를방문하거나제품보증서를참고하십시오.简体中文简介恭喜您购买了您的产品,欢迎您来到 Philips 大家庭!为了您能充分享受飞利浦提供的支持,请在/welcome网站上注册您的产品。
飞利浦剃须刀使用说明教材

所示产品为型号1180X(图1-1)
该款产品为可充电式无线三刀头剃须刀
请登录/register注册您的产品并获取支持。
页码3
祝贺您购买该款产品,欢迎惠顾飞利浦电子美国有限公司(Philips Electronics North America Corporaiton)!
请拨打电话1-800-243-3050,获取退款授权表格。支票邮寄需要大约4-6周时间。
页码7
产品特点——8-11页
多项指标大小显示屏——12-14页
电表——14-15页
首次使用前——15页
充电——16-18页
再次充电——18页
快速充电——18页
试用和剃须技巧——19页
如何用电动剃须刀剃须——19-21页
剃须刀头部件(图8-1)
◆胡须盒收集胡茬
◆顺滑剃须系统(低摩擦的SkinGlide顺滑剃须系统可顺着您的肌肤滑动剃除表面胡茬,带来贴近舒适的剃须感受)
◆剃须刀刀头保护盖
电子开关按钮(图8-2)
旅行锁(图8-3)
多项指标大小显示屏(图8-4)
◆显示电池剩余电量(仅限型号1180X/ 1180XCC)
◆显示电池电量
7、网罩破损时,请勿使用剃须刀,以防发生脸部伤害。
8、请总是按以下步骤操作:将剃须刀放在高效能清洁装置或充电器中,然后将电源线连接至高效能清洁装置或充电器,之后将电源线连接至电源插座。请确保插头牢固插入高效能清洁装置或充电器中,达到插头标示位置。断开电源时,先将高效能清洁装置或充电器电源关闭,然后再将充电插头从电源插座上拔下。
3、电源线破损或充电插头损坏、工作不正常、摔坏或带电掉入水中时,请勿使用剃须刀/高效能清洁装置/充电器。致电1-800-243-3050获得帮助。
Philips HX6830 35 牙膠机说明书
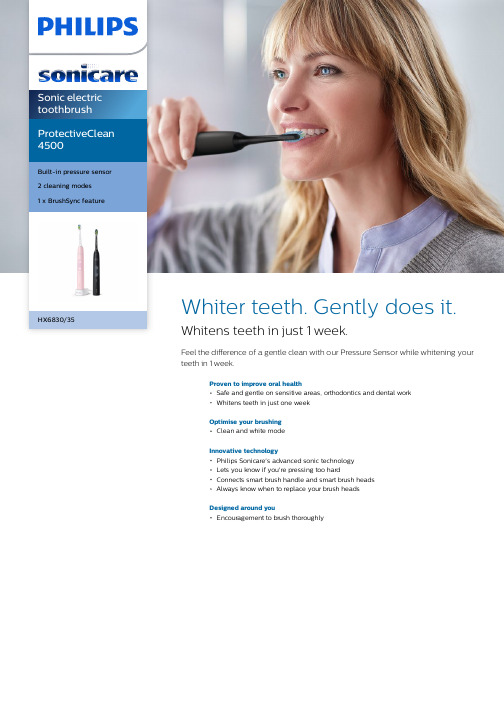
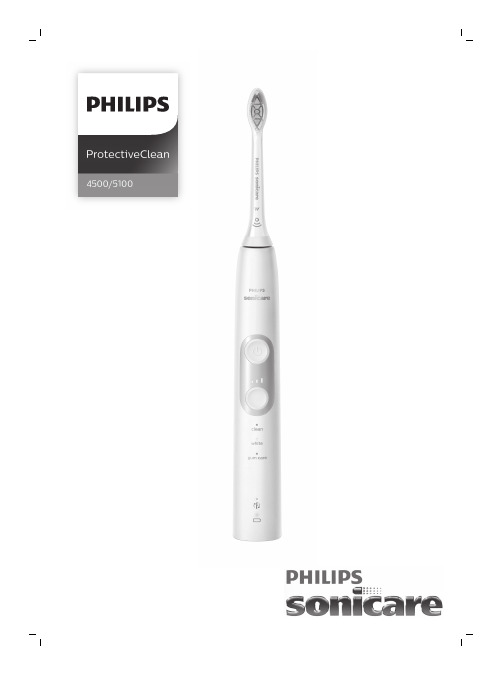
Sonic electric toothbrush ProtectiveClean 4500Built-in pressure sensor 2 cleaning modesHX6830/35Whiter teeth. Gently does it. Whitens teeth in just 1 week.Feel the difference of a gentle clean with our Pressure Sensor while whitening your teeth in 1 week.Proven to improve oral healthSafe and gentle on sensitive areas, orthodontics and dental workWhitens teeth in just one weekOptimise your brushingClean and white modeInnovative technologyPhilips Sonicare's advanced sonic technologyLets you know if you're pressing too hardConnects smart brush handle and smart brush headsAlways know when to replace your brush headsDesigned around youEncouragement to brush thoroughlyHighlightsNaturally whiter teethClick on the W DiamondClean brush head to remove surface stains and reveal a whiter smile. With its densely packed central stain-removal bristles, it's clinically proven to whiten teeth in just one week.Clean and white modeWhether you want to focus on removing plaque or on giving your teeth an extra-goodpolishing, we've got you covered: Clean mode delivers superior cleaning and White is ideal for removing surface stains.Safe and gentleYou can be sure of a safe brushing experience:our sonic technology is suitable for use with braces, fillings, crowns and veneers, and helps prevent cavities and improve gum health.Monitor your brushing pressureBrushing too hard can damage your teeth and gums. To prevent this, your Philips Sonicare ProtectiveClean emits a gentle pulsing sound to remind you to ease off on the pressure.BrushSync technologyA microchip-enabled technology that detects and synchronises the smart brush head with the smart handle. The smart handle and smart brush head pair is a powerful combination that enables Smart replacement reminders.BrushSync replacement reminderAll brush heads wear out over time. But ourBrushSync technology tracks how long you've been using your brush head for, and how hard you've been brushing. When it's time toreplace it, a light on your handle and a short beep will let you know. That way, you can be sure your brush head is doing a good job.Helpful timersNeed an electric toothbrush with a timer? Our QuadPacer lets you know when you've spent just the right amount of time cleaning each part of your mouth, while our Smartimer tells you when you've brushed for the recommended two minutes.Philips Sonicare technologyPhilips Sonicare's advanced sonic technology pulses water between your teeth, and its brush strokes break plaque up and sweep it away for an exceptional daily clean.SpecificationsModesClean: For exceptional everyday cleaning White: Removes surface stainsItems includedHandle: 2 ProtectiveCleanBrush heads: 2 W2 Optimal White standard Charger: 1Design and finishingColour: Pastel pink, Black GreyCleaning performanceSpeed: Up to 62,000 brush movements/min Health benefits: Helps reduce cavities Whitening benefits: Whitens teeth in 1 week Pressure feedback: Vibrates handle to alertuserTimer: Quadpacer and SmartimerSmart sensor technologyPressure sensor: Alerts when brushing toohardBrushSync Replacement Reminder: Alwaysknow when to, replace brush headsEase of useHandle compatibility: Easy click-on brushheadsBrush head recognition: Syncs with optimalmodeReplacement reminder: To always ensure bestresults, reminder icon lights upBattery indicator: Light shows battery statusHandle: Slim ergonomic designBrushing time: Up to 2 weeksT echnical specificationsBattery: RechargeableBattery type: Lithium IONOperating time (full to empty): Up to 2 weeksPowerVoltage: 110-220 VServiceWarranty: 2-year limited warranty* Removes up to 7x more plaque vs. a manual toothbrush© 2021 Koninklijke Philips N.V.All Rights reserved.Specifications are subject to change without notice. Trademarks are the property of Koninklijke Philips N.V. or their respective owners.Issue date 2021‑07‑30 Version: 4.0.1EAN: 08 71010 39870 62 。
Philips 牙刷机用户手册说明书

NL GebruiksaanwijzingZH-CN User manualMode d’emploi Manuale utentedi pulizia e manutenzione non devono essere eseguite da bambini senza la supervisione di un adulto.• Per eventuali controlli o riparazioni, rivolgersi semprea un centro servizi autorizzato da Philips. La riparazione da parte di persone non qualificate potrebbe mettere in serio pericolo l’incolumità dell’utente.• Non utilizzare mai accessori o parti di altri produttori oppure componenti non consigliati in modo specifico da Philips. In caso di utilizzo di tali accessori o parti, la garanzia si annulla.• Non utilizzare l’apparecchio per scopi non descritti nel presente manuale.• Non utilizzare l’apparecchio su capelli artificiali.• Non bloccare mai l’apertura di ionizzazione.• Per evitare pericoli imprevisti, non inserire oggetti metallici nell’apertura di ionizzazione.• Non utilizzare questa spazzola ionica insieme all’asciugacapelli per effettuare la piega.• Non esporre la spazzolaalla luce del sole per un periodo di tempo prolungato.I raggi ultravioletti possono accelerare l’invecchiamentodei componenti della spazzola, facilitandone la rottura.• Utilizzare e conservarel’apparecchio a una temperatura compresa tra 15 ºC e 35 ºC.• Per il funzionamento,l’apparecchio richiede una batteria alcalina AAA da 1,5 V.• Aprire il vano batterie per installare o rimuoverela batteria.• La batteria fornita non è ricaricabile. Le batterie non ricaricabili non devonoessere ricaricate.• La batteria ricaricabile deve essere rimossa dall’apparecchio prima di essere caricata.• Assicuratevi sempre di inserire le batterie nel verso giusto.• Le batterie esaurite devono essere rimosse dall’apparecchio e smaltite in modo sicuro.• Se l’apparecchio è destinatoa rimanere inutilizzato per un lungo periodo di tempo, le batterie devono essere rimosse.• Non mettete mai i terminali di alimentazione in cortocircuito. Campi elettromagnetici (EMF)Questo apparecchio Philips è conforme a tutti gli standard e alle norme relativi all’esposizione ai campi elettromagnetici. Ambiente- Questo simbolo indica che il prodotto non puòessere smaltito con i normali rifiuti domestici(2012/19/UE).- Ci sono due situazioni in cui potete restituire gratuitamente il prodotto vecchio a un rivenditore:1 Quando acquistate un prodotto nuovo, potete restituireun prodotto simile al rivenditore.2 Se non acquistate un prodotto nuovo, potete restituireprodotti con dimensioni inferiori a 25 cm (lunghezza,altezza e larghezza) ai rivenditori con superficie dedicata alla vendita di prodotti elettrici ed elettronici superiore ai 400 m2.In tutti gli altri casi, attenetevi alle normative di raccolta differenziata dei prodotti elettrici ed elettronici in vigore nel vostro paese: un corretto smaltimento consente di evitareconseguenze negative per l’ambiente e per la salute.2 IntroduzioneLa nuova spazzola per lo styling agli ioni Philips aiutaa rendere i capelli lisci e lucenti quando e dove vuoi tu.Spazzolare i capelli non è mai stato così piacevole.• Ionic CareLo ionizzatore integrato nella spazzola neutralizza la caricapositiva elettrostatica generando un flusso di ioni negativi.Contribuisce a ridurre l’effetto crespo e a ridonare subitolucentezza e morbidezza ai capelli.• Setole delicateLe punte delle setole sono rivestite per evitare danni alcuoio capelluto dovuti allo sfregamento o che i capellirestino impigliati durante l’utilizzo. Le speciali puntesferiche hanno una superficie più ampia per una maggioredelicatezza, anche per il cuoio capelluto più sensibile.• Grande cuscinetto dal design ottimaleGrazie al suo design ottimale, il cuscinetto delle setoleconsente una distribuzione più uniforme della forzaassecondando il profilo della testa in modo naturale, per uncomfort e una praticità maggiori.• Spazzola ergonomicaLa forma arrotondata liscia ed ergonomica si adattaperfettamente alla mano, consentendo un utilizzo ottimale.• Cuscinetto delle setole rimovibileIl cuscinetto delle setole può essere rimosso con semplicitàper una periodica pulizia con acqua, in modo da mantenerele setole sempre pulite.3 P anoramicaa Cuscinetto con spazzolab Pulsante di rilascio del cuscinetto con spazzolac Apertura di ionizzazioned Spia di accensionee Corpo spazzolaf Interruttore on/offg Vano batterie4 Utilizzo della spazzola per lostyling agli ioniMontaggio e smontaggio del cuscinettocon spazzola1 ( Fig. C ) Per rimuovere il cuscinetto con spazzola ( a ),premere il pulsante di rilascio ( b ).2 ( Fig. E ) Per fissare il cuscinetto con spazzola ( a ),spingerlo verso il basso nel corpo della spazzola ebloccarlo finché non scatta in posizione.Installazione e rimozione della batteriaPer il funzionamento, la spazzola per lo styling agli ionirichiede una batteria alcalina AAA da 1,5 V. ( Fig. D )Viene fornita una batteria AAA da 1,5 V.1 Per rimuovere il coperchio del vano batterie, estrarlodall’apparecchio.2 Inserire la batteria nell’apposito supporto (g ).3 Far scorrere il coperchio del vano batteriesull’apparecchio fino a bloccarlo in posizione (clic).Nota• Controllare che la direzione dei poli +/- dellebatterie sia corretta.• Assicurarsi di avere le mani perfettamente asciuttequando si inserisce la batteria.• Per evitare danni dovuti a perdite della batteria:Togliere la batteria se si prevede di non usarel'apparecchio per almeno un mese.• Non lasciare la batteria scarica all'internodell'apparecchio.Spazzolare i capelli ( Fig. B )1 Accendere la spazzola per lo styling agli ioni facendoscorrere l’interruttore on/off ( f ) su .»La spia di accensione ( d ) si illumina.»Quando l’apparecchio è acceso, gli ioni sono rilasciatiin maniera automatica e continua per ridurre l’effettocrespo, offrendo maggiore lucentezza.»È possibile che si senta uno sfrigolio. Si tratta di unfenomeno normale, causato dal generatore di ioni.2 Spazzola delicatamente i capelli dalle radici fino allepunte. Ripetere l’operazione più volte per capelli ancorapiù lisci.3 Passare a per spegnere l’apparecchio.»È possibile che si senta uno sfrigolio. Si tratta di unfenomeno normale dovuto al mancato rilascio totaledegli ioni.Dopo l’uso:1 È possibile utilizzare un panno umido per pulire il corpodella spazzola ( e ).2 Per pulire il cuscinetto con spazzola ( a ).3 Utilizzare le dita per rimuovere la polvere o i capellisulla spazzola.4 Staccare il cuscinetto dal corpo della spazzola esciacquarlo sotto l’acqua corrente (Fig. F).Nota•Assicurarsi che il cuscinetto sia completamenteasciutto prima di rimontarlo sul corpo della spazzola.•Non utilizzare mai liquidi corrosivi per pulire ilcuscinetto, poiché possono danneggiarlo. Si consigliadi utilizzare del detergente domestico per pulire ilcuscinetto con spazzola, se necessario.5 Conservare la spazzola in un luogo sicuro e asciutto ometterla nella propria trousse per averla sempre a portatadi mano.Consigli e suggerimenti:1 La spazzola ionica fornisce risultati migliori con i capellileggermente umidi.2 Se si desidera utilizzare la spazzola dopo aver lavatoi capelli, asciugarli al 70%-80%. Non asciugarlicompletamente per evitare di compromettere i risultati.3 Pettinare i capelli dalle radici lentamente e più voltefinché non risultano lisci. La durata dell’operazione variain base al tipo di capelli e alla loro lunghezza. L’effettonon è evidente se:• I capelli sono corti o naturalmente ricci.• I capelli si arricciano facilmente.• I capelli sono troppo secchi o danneggiati.• È stato effettuato un trattamento lisciante permanente3 o4 mesi prima.• È presente della ricrescita recente.4 Applicare un balsamo sui capelli dopo averli spazzolatiper un risultato migliore.5 Garanzia e assistenzaPer ricevere ulteriori informazioni (ad esempio, sullasostituzione di un accessorio) o per risolvere eventualiproblemi, visitare il sito Web Philips all’indirizzo/support oppure contattare il CentroAssistenza Clienti Philips di zona (il numero di telefono èriportato nell’opuscolo della garanzia). Se nel proprio paesenon è presente alcun centro di assistenza clienti, rivolgersi alproprio rivenditore Philips.6 Risoluzione dei problemiProblema Causa SoluzioneL'apparecchionon funziona.La batteria èscarica.Sostituire la batteria.La batteria non èstata posizionatacorrettamentenell'apposito vano.Inserire la batterianell'apposito vanorispettando leindicazioni + e -.Il coperchio delvano batterie nonè stato posizionatocorrettamente.Far scorrere ilcoperchio delvano batteriesull'apparecchiofino a bloccarlo inposizione (clic).L'indicatoreionico non siaccendeLa batteria nonè stata inseritacorrettamente.Verificare se labatteria è statainserita con i poli nellato corretto.La batteria è quasiscarica.Sostituire con unanuova batteria.NederlandsGefeliciteerd met uw aankoop en welkom bij Philips!Registreer uw product op /welcome omoptimaal gebruik te kunnen maken van de door Philipsgeboden ondersteuning.1 BelangrijkLees deze gebruiksaanwijzing zorgvuldig door voordat u hetapparaat gaat gebruiken. Bewaar de gebruiksaanwijzing omdeze indien nodig te kunnen raadplegen.• WAARSCHUWING: gebruikdit apparaat niet in de buurtvan water.• Dompel de borstel nooit inwater of een andere vloeistofen spoel deze ook niet af onderde kraan.• Schakel het apparaat na gebruikaltijd uit.• Dit apparaat kan wordengebruikt door kinderen vanaf8 jaar en door personen metverminderde lichamelijke,zintuiglijke of geestelijkecapaciteiten of weinig ervaringen kennis, mits zij toezicht ofinstructie hebben ontvangenaangaande veilig gebruik vanhet apparaat, en zij de gevarenvan het gebruik begrijpen.• Kinderen mogen niet met hetapparaat spelen. Reiniging enonderhoud dienen niet zondertoezicht door kinderen teworden uitgevoerd.• Breng het apparaat altijd naareen door Philips geautoriseerdservicecentrum voor onderzoekof reparatie. Reparatie dooreen onbevoegde persoonkan leiden tot een bijzondergevaarlijke situatie voor degebruiker.• Gebruik nooit accessoiresof onderdelen van anderefabrikanten of die niet specifiekzijn aanbevolen door Philips.Als u dergelijke accessoires ofonderdelen gebruikt, vervalt degarantie.• Gebruik het apparaat nietvoor andere doeleindendan beschreven in dezegebruiksaanwijzing.• Gebruik het apparaat niet opkunsthaar.• Blokkeer nooit deuitlaatopening voor ionen.• Steek geen metalen voorwerpenin de uitlaatopening voor ionen,dit kan gevaarlijk zijn.• Gebruik deze ionenborstel nietsamen met een föhn om uwhaar in model te brengen.• Spoel de borstel nooit af onderde kraan.• Laat de borstel niet langin de volle zon liggen. Deultraviolette straling kan leidentot veroudering, waardoor deborstel gemakkelijk kan breken.• Gebruik en bewaar het apparaatbij een temperatuur tussen 15 °Cen 35 °C.• Het apparaat werkt op éénAAA-alkalinebatterij van 1,5 V.• Open het batterijcompartimentom de batterij te plaatsen of teverwijderen.• De meegeleverde batterij is nietoplaadbaar. Niet-oplaadbarebatterijen mogen nooit wordenopgeladen.• De oplaadbare batterij moet uithet apparaat worden verwijderdvoordat u de batterij oplaadt.• Plaats de batterijen zo datde polen in de juiste richtingwijzen.• Lege batterijen moeten uit hetapparaat worden verwijderd enop een veilige manier wordenafgevoerd.• Als het apparaat gedurendeeen lange periode wordtopgeborgen, moeten debatterijen worden verwijderd.• Sluit de contactpunten niet kort.Elektromagnetische velden (EMV)Dit Philips-apparaat voldoet aan alle normen envoorschriften met betrekking tot blootstelling aanelektromagnetische velden.MilieuDit symbool betekent dat dit product niet bijhet gewone huishoudelijke afval mag wordenweggegooid (2012/19/EU). Volg de geldenderegels in uw land voor de gescheiden inzamelingvan elektrische en elektronische producten. Als u correctverwijdert, voorkomt u negatieve gevolgen voor het milieuen de volksgezondheid.2 InleidingDe nieuwe ionenborstel van Philips helpt om uw haar altijden overal glad en glanzend te maken.• IonenverzorgingDeze ionenborstel heeft een ingebouwde ionisator, dienegatieve ionen voortbrengt en de positieve lading vanstatische elektriciteit neutraliseert. De borstel vermindertpluizigheid en maakt uw haar in een oogwenk weer glad englanzend.• Zachte borstelharenDe toppen van de borstelharen zijn naadloos ombeschadiging van de hoofdhuid of in de knoop raken vanhet haar te voorkomen. De speciale ronde top heeft eengroter oppervlak, waardoor de borstelharen zachter zijn voorde kwetsbare hoofdhuid.• Optimaal driedimensionaal kussenHet optimaal ontworpen borstelkussen zorgt voor eenbetere krachtverdeling en volgt de contouren van het hoofdop natuurlijke wijze, voor meer gemak en comfort.• Ergonomisch gevormde borstelHet naadloze en ergonomisch gevormde handvat pastperfect in de hand, zodat het borstelen als vanzelf gaat.• Afneembaar borstelkussenHet borstelkussen kan eenvoudig worden verwijderd, zodatu dit regelmatig met water kunt reinigen om de borstelschoon te houden.3 Overzichta Borstelkussenb Ontgrendelknop borstelkussenc Uitlaatopening voor ionend Aan-lampjee Borstelbehuizingf Aan-uitschakelaarg Batterijvak4 De ionenborstel gebruikenHet borstelkussen bevestigen enafnemen1 ( Fig. C ) Om het borstelkussen ( a ) af te nemen, drukt uop de ontgrendelknop ( b ).2 ( Fig. E ) Om het borstelkussen ( a ) te bevestigen, druktu het in de borstel totdat u een klik hoort.De batterij plaatsen en verwijderenDe ionenborstel werkt op één AAA-alkalinebatterij van1,5 V. (Fig. D)Eén AAA-alkalinebatterij van 1,5 V wordt meegeleverd.1 Om het deksel van het batterijvak te verwijderen, trekt uhet van het apparaat af.2 Plaats de batterij in de batterijhouder of verwijder debatterij uit het batterijvak.3 Duw het deksel van het batterijvak weer op het apparaat(‘klik’).Opmerking• Zorg ervoor dat de + en - polen van de batterij in dejuiste richting wijzen.• Zorg ervoor dat uw handen droog zijn wanneer u debatterij plaatst.• U kunt schade door lekkende batterijen als volgtvoorkomen: Verwijder de batterij als u het apparaateen maand of langer niet gaat gebruiken.• Laat nooit lege batterijen in het apparaat zitten.Uw haar borstelen ( Fig. B )1 Schakel de ionenborstel in door de aan-uitschakelaar( f ) naar te schuiven.»De aan-indicator ( d ) gaat branden.»Als het apparaat is ingeschakeld, worden voortdurend enautomatisch ionen uitgegeven voor minder pluizig haaren meer glans.»U kunt een knetterend of sissend geluid horen. Ditis normaal. Het geluid wordt veroorzaakt door deionengenerator.2 Borstel zachtjes uw haar vanaf de wortel tot depunten. Herhaal deze stap meerdere keren voor eengladder resultaat.3 Zet de knop op om het apparaat uit te schakelen.»U kunt een knetterend of sissend geluid horen.Dit is normaal. Het komt omdat de ionen nietvolledig vrijkomen.Na gebruik:1 U kunt de borstelbehuizing ( e ) met een vochtige doekreinigen.2 Het borstelkussen ( a ) reinigen:• Verwijder met uw vingers stof of haren van de borstel.• Verwijder het borstelkussen van de borstel en spoel hetonder de kraan af (Fig. F).Opmerking• Zorg ervoor dat het borstelkussen volkomen droog isvoordat u het opnieuw op de borstel bevestigt.• Gebruik nooit een bijtende vloeistof om hetborstelkussen te reinigen, want dit kan leidentot beschadiging van het product. Het verdientaanbeveling om zo nodig gebruik te maken van eenhuishoudelijk reinigingsmiddel voor het schoonmakenvan het borstelkussen.3 Bewaar het product op een veilige en droge plaats of inuw make-uptasje voor dagelijks gebruik.Tips en trucs1 De ionenborstel werkt beter op haar dat enigszinsvochtig is.2 Als u de borstel wilt gebruiken nadat u uw haar hebtgewassen, moet het haar voor 70%-80% droog zijn. Maakhet haar niet te droog, want dit kan van invloed zijn ophet resultaat.3 Kam uw haar langzaam en herhaaldelijk vanaf de worteltot het haar glad is. De tijd die je nodig hebt voor hetkammen is afhankelijk van je haartype en -lengte.4 Het is niet gemakkelijk om het effect te zien in devolgende gevallen:• U hebt kort of natuurlijk krullend haar.• Uw haar krult gemakkelijk.• Uw haar is te droog of beschadigd.• U hebt 3 tot 4 maanden geleden uw haar latenontkrullen met een permanent.• U hebt kort, pas uitgegroeid haar.5 Behandel het haar na het borstelen met conditioner voorhet beste resultaat.5 Garantie en serviceAls u informatie nodig hebt (bijv. over het vervangen vaneen opzetstuk) of als u een probleem hebt, bezoek dande Philips-website (/support) of neemcontact op met het Philips Customer Care Centre in uw land(u vindt het telefoonnummer in het ‘worldwide guarantee’-vouwblad). Als er geen Consumer Care Centre in uw land is,ga dan naar uw Philips-dealer.6 Problemen oplossenProbleem Oorzaak OplossingHet apparaatwerkt niet.De batterij isleeg.Vervang de batterij.U hebt debatterij nietgoed in hetbatterijvakgeplaatst.Plaats de batterijin het batterijvakvolgens de + en -aanduidingen in hetbatterijvak.U hebt hetdeksel van hetbatterijvak nietgoed bevestigd.Duw het deksel vanhet batterijvak op hetapparaat ('klik').Hetindicatielampjevoor ionen gaatniet branden.De batterij is nietjuist geplaatst.Controleer of debatterij op de juistemanier is geplaatst.De batterij isbijna leeg.Plaats een nieuwebatterij.简体中文感谢您的惠顾,欢迎光临飞利浦!为了您能充分享受飞利浦提供的支持,请在 /welcome 注册您的产品。
飞利浦电动牙刷说明书
1English 6简体中文 18繁體中文 27ImportantRead this user manual carefully before you use the appliance and save it for future reference.Danger-Keep the charger away from water. Do not place or store it over or near water contained in a bathtub, washbasin, sink etc. Do not immerse the charger in water or any other liquid. After cleaning,make sure the charger is completely dry before you connect it to the mains.Warning-The mains cord cannot be replaced. If the mains cord is damaged,discard the charger.-Always have the charger replaced with one of the original type in order to avoid a hazard.-Do not use the charger outdoors or near heated surfaces.-If the appliance is damaged in any way (brush head, toothbrush handle or charger), stop using it. This appliance contains no serviceable parts. If the appliance is damaged, contact theConsumer Care Center in your country (see chapter 'Warranty and support').-This appliance can be used by children and persons with reduced physical, sensory or mental capabilities or lack of experience and knowledge if they have been given supervision or instructionconcerning use of the appliance in a safe way and understand the hazards involved. Cleaning and user maintenance shall not be made by children without supervision.-Children shall not play with the appliance.Caution-Do not clean the brush head, the handle or the charger in the dishwasher.-If you have had oral or gum surgery in the previous 2 months,consult your dentist before you use the toothbrush.6English-Consult your dentist if excessive bleeding occurs after using this toothbrush or if bleeding continues to occur after 1 week of use.Also consult your dentist if you experience discomfort or pain when you use the Philips Sonicare.-The Philips Sonicare toothbrush complies with the safetystandards for electromagnetic devices. If you have a pacemaker or other implanted device, contact your physician or the device manufacturer of the implanted device prior to use.-If you have medical concerns, consult your doctor before you use the Philips Sonicare.-This appliance has only been designed for cleaning teeth, gums and tongue. Do not use it for any other purpose. Stop using the appliance and contact your doctor if you experience anydiscomfort or pain.-The Philips Sonicare toothbrush is a personal care device and is not intended for use on multiple patients in a dental practice or institution.-Stop using a brush head with crushed or bent bristles. Replace the brush head every 3 months or sooner if signs of wear appear. Do not use other brush heads than the ones recommended by the manufacturer.-If your toothpaste contains peroxide, baking soda or bicarbonate (common in whitening toothpastes), thoroughly clean the brush head with soap and water after each use. This prevents possible cracking of the plastic.Electromagnetic fields (EMF)This Philips appliance complies with all applicable standards and regulations regarding exposure to electromagnetic fields.Radio Equipment Directive-Radio Equipment in this product operates at 13.56 MHz-Maximum RF power transmitted by the Radio Equipment is 30.16dBm7EnglishIntroductionCongratulations on your purchase and welcome to Philips! To fully benefit from the support that Philips offers, register your product at /welcome .Your Philips Sonicare (Fig. 1)1Hygienic travel cap2Smart brush head(s)*3Handle4Power on/off button5Mode/intensity button6Mode light7Brush head replacement reminder light8Battery indication9Charging base 10Travel case (specific types only)**Note: The content of the box may vary based on the model purchased.Brush headsYour Philips Sonicare comes with one or more brush heads which are designed to deliver superior results for your oral care needs.Philips Sonicare BrushSync TechnologyYour smart brush heads use a microchip to sync with your handle,enabling brush head replacement reminder. For more information regarding the brush head replacement reminder, see 'Features'.This symbol indicates the brush head is equipped with BrushSync technology. (Fig. 2)Brushing modesTo toggle between modes press the mode button located below the on/off button.Your power toothbrush is equipped with either 2 or 3 brushingmodes, depending on your model.The following modes are available:8EnglishClean modeClean is a 2-minute mode. It gives you a thorough and complete clean and is recommended to be used with the C2 Optimal Plaque Control brush head.White modeWhite is a 2-minute 30-seconds mode, recommended to be used with the W2 Optimal White brush head.Gum Care modeGum Care is a 3-minute mode, recommended to be used with the G2Optimal Gum Care brush head.Using your Philips SonicareBrushing instructions1Press the brush head onto the handle in such a way that the bristles will face the front of the handle. (Fig. 3)2Firmly press the brush head down onto the metal shaft until it stops.Note: It is normal to see a slight gap between the brush head and the handle.3Wet the bristles. (Fig. 4)4Apply a small amount of toothpaste on the bristles. (Fig. 5)5Place the toothbrush bristles against the teeth at a slight angle (45degrees), pressing firmly to make the bristles reach the gumline or slightly beneath the gumline. (Fig. 6) A change in vibration (and a slight change in sound) alerts you when you apply too much pressure while brushing.Note: Keep the center of the brush in contact with the teeth at all times.6Press the power on/off button to turn on the Philips Sonicare. (Fig.7)7Gently keep the bristles placed on the teeth and in the gumline.Brush your teeth with small back and forth motion so the bristles reach between the teeth. (Fig. 8)9EnglishNote: The bristles should slightly flare. Do not scrub.8To clean the inside surfaces of the front teeth, tilt the brush handle semi-upright and make several vertical overlapping brushing strokes on each tooth. (Fig. 9)9To make sure you brush evenly throughout the mouth, divide the mouth into 4 sections using the Quadpacer feature. (Fig. 10) The quadpacer feature beeps after 30 seconds.10Brush for the full 2 minutes following the Quadpacer. (Fig. 11) After 2 minutes, the toothbrush will automatically shut off.In white mode, after 2 minutes the handle will continue to brush for 30 seconds so that you can brighten and polish your front teeth.In gum care mode, after 2 minutes the handle will continue to brush for an additional minute so you can gently stimulate and massage your gums.-After you have completed the brushing cycle, you can spend additional time brushing the chewing surfaces of your teeth and areas where staining occurs. (Fig. 12)Your Philips Sonicare toothbrush is safe to use on:-Braces (brush heads wear out sooner when used on braces)-Dental restorations (fillings, crowns, veneers)Note: When the Philips Sonicare toothbrush is used in clinical studies,it must be used in the Clean mode (for plaque and gum health claims)or in White mode (for whitening claims) at high intensity with EasyStart turned off.Features-EasyStart-Brush head replacement reminder-Pressure sensor-Quadpacer 10EnglishEasyStartThis Philips Sonicare model comes with the EasyStart featureactivated. The EasyStart feature gently increases the power over the first 14 brushings to help you get used to the brushing with the Philips Sonicare. The EasyStart feature works in all modes.To deactivate EasyStart see 'Activating or deactivating features'.Brush head replacement reminderYour Philips Sonicare is equipped with BrushSync technology that tracks the wear of your brush head. (Fig. 13)1When attaching a new smart brush head for the first time the brush head replacement reminder light blinks green three times.This confirms you have a Philips brush head with BrushSync technology.2Over time, based on the pressure you apply and the amount of time used, the handle will track brush head wear in order to determine the optimal time to change your brush head. Thisfeature gives you the guarantee for the best cleaning and care of your teeth.3When the brush head replacement reminder light lights up amber,you should replace your brush head.To deactivate the brush head replacement reminder see 'Activating or deactivating features'.Pressure sensorYour Philips Sonicare is equipped with an advanced sensor that measures the pressure you apply while brushing. If you apply too much pressure, the toothbrush will provide immediate feedback to indicate that you need to reduce the pressure. This feedback is given by a change in vibration and therefore brushing sensation.To deactivate the pressure sensor see 'Activating or deactivating features'.QuadpacerThe Quadpacer is an interval timer that has a short beep and pause to remind you to brush the different sections of your mouth.11EnglishDepending on the brushing mode you have selected (see 'Brushing modes'), the Quadpacer beeps at different intervals during the brushing cycle.Activating or deactivating featuresYou can activate or deactivate the following features of your toothbrush:-EasyStart-Brush head replacement reminder-Pressure sensorTo activate or deactivate these features, follow the instructions below:EasyStart1Put the handle on the plugged-in charger.2Press and hold the power on/off button while the handle remains on the charger.3Keep the power on/off button pressed until you hear a single short beep (after 2 seconds).4Release the power on/off button.-Triple tone of low-med-high means the EasyStart feature hasbeen activated. The brush head replacement light and battery light will also blink green 3 times in unison to confirm activation.-Triple tone of high-med-low means the EasyStart feature has been deactivated. The brush head replacement light andbattery light will also blink amber 3 times in unison to confirm deactivation.Note: To achieve clinical efficacy, EasyStart needs to be deactivated.Brush head replacement reminder1Put the handle on the plugged-in charger.2Press and hold the power on/off button while the handle remains on the charger.3Keep the power on/off button pressed until you hear a series of two short beeps (after 4-5 seconds).12English4Release the power on/off button.-Triple tone of low-med-high means the Brush headreplacement reminder feature has been activated. The brush head replacement light and battery light will also blink green 3times in unison to confirm activation.-Triple tone of high-med-low means the Brush headreplacement reminder feature has been deactivated. The brush head replacement light and battery light will also blink amber 3times in unison to confirm deactivation.Pressure sensor1Put the handle on the plugged-in charger.2Press and hold the power on/off button while the handle remains on the charger.3Keep the power on/off button pressed until you hear a series of three short beeps (after 6-7 seconds).4Release the power on/off button.-Triple tone of low-med-high means the pressure sensor featurehas been activated. The brush head replacement light andbattery light will also blink green 3 times in unison to confirm activation.-Triple tone of high-med-low means the pressure sensor feature has been deactivated. The brush head replacement light and battery light will also blink amber 3 times in unison to confirm deactivation.If you continue holding the power on/off button after the three short beeps, the activate/deactivate sequence repeats.Battery status and charging1Put the plug of the charger in an electrical outlet.2Place the handle on the charger.-The charger will emit 2 short beeps to confirm that the handle isplaced properly.13English-The flashing light of the battery level indicator shows that the toothbrush is charging.-When handle is fully charged on the charger, the battery light shows solid green for 30 seconds and switches off.Note: Your toothbrush comes pre-charged for first use. After first use,charge for at least 24 hours.Battery status (when handle is not on charger)When removing the Philips Sonicare from the charger, the battery light at the bottom of the toothbrush will indicate the status of the battery life.-Solid green LED: full battery-Flashing green LED: medium battery-Flashing amber LED and three beeps: low battery-Flashing amber LED and two sets of five beeps: No brushing sessions left (charge toothbrush)CleaningNote: Do not clean the brush head, handle or travel case in the dishwasher.Toothbrush handle1Remove the brush head and rinse the metal shaft area with warm water. Make sure you remove any residual toothpaste (Fig. 14).Note: Do not push on the rubber seal on the metal shaft with sharp objects, as this may cause damage.2Wipe the entire surface of the handle with a damp cloth.Note: Do not use isopropyl rubbing alcohol, vinegar or bleach to clean handle as this may cause discoloration.Brush head1Rinse the brush head and bristles after each use (Fig. 15).2Remove the brush head from the handle and rinse the brush head connection with warm water at least once a week.Charger1Unplug the charger before you clean it.14English2Wipe the surface of the charger with a damp cloth.StorageIf you are not going to use your Philips Sonicare for an extended period of time, unplug the charger from the wall socket, clean it and store it in a cool and dry place away from direct sunlight.Locating the model numberLook on the bottom of the Philips Sonicare toothbrush handle for the model number (HX682x/HX683x).Recycling-Do not throw away the product with the normal household waste at the end of its life, but hand it in at an official collection point for recycling. By doing this, you help to preserve the environment.-This product contains a built-in rechargeable battery which shall not be disposed of with normal household waste. Please take your product to an official collection point or a Philips service center to have a professional remove the rechargeable battery.-Follow your country’s rules for the separate collection of electrical and electronic products and rechargeable batteries. Correct disposal helps prevent negative consequences for theenvironment and human health.Removing the rechargeable batteryWarning: Only remove the rechargeable battery when you discard the appliance. Make sure the battery is completely empty when you remove it.To remove the rechargeable battery, you need a towel or cloth, ahammer and a flat-head (standard) screwdriver. Observe basic safety precautions when you follow the procedure outlined below. Be sure to protect your eyes, hands, fingers, and the surface on which you work.15English1To deplete the rechargeable battery of any charge, remove the handle from the charger, turn on the Philips Sonicare and let it run until it stops. Repeat this step until you can no longer turn on the Philips Sonicare.2Remove and discard the brush head. Cover the entire handle with a towel or cloth (Fig. 16).3Hold the top of the handle with one hand and strike the handle housing 0.5 inch above the bottom end. Strike firmly with a hammer on all 4 sides to eject the end cap (Fig. 17).Note: You may have to hit on the end several times to break the internal snap connections.4Remove the end cap from the toothbrush handle. If the end cap does not release easily from the housing, repeat step 3 until the end cap is released (Fig. 18).5Holding the handle upside down, press the shaft down on a hard surface. If the internal components do not easily release from the housing, repeat step 3 until the internal components are released (Fig. 19).6Remove the rubber battery cover.7Wedge the screwdriver between the battery and the black frame at the bottom of the internal components. Then pry thescrewdriver away from the battery to break the bottom of the black frame (Fig. 20).8Insert the screwdriver between the bottom of the battery and the black frame to break the metal tab connecting the battery to the green printed circuit board. This will release the bottom end of the battery from the frame (Fig. 21).9Grab the battery and pull it away from the internal components to break the second metal battery tab (Fig. 22).Caution: Be aware of the sharp edges of the battery tabs so as to avoid injury to your fingers.10Cover the battery contacts with tape to prevent any electrical short from residual battery charge. The rechargeable battery can now be recycled and the rest of the product discarded appropriately (Fig.23).16EnglishWarranty and supportIf you need information or support, please visit/support or read the international warranty leaflet.Warranty restrictionsThe terms of the international warranty do not cover the following:-Brush heads.-Damage caused by use of unauthorized replacement parts.-Damage caused by misuse, abuse, neglect, alterations or unauthorized repair.-Normal wear and tear, including chips, scratches, abrasions,discoloration or fading.17English注意事项使用本产品之前,请仔细阅读本使用说明书,并妥善保管以备日后参考。
菲利普全面剃须和护肤系统用户手册说明书
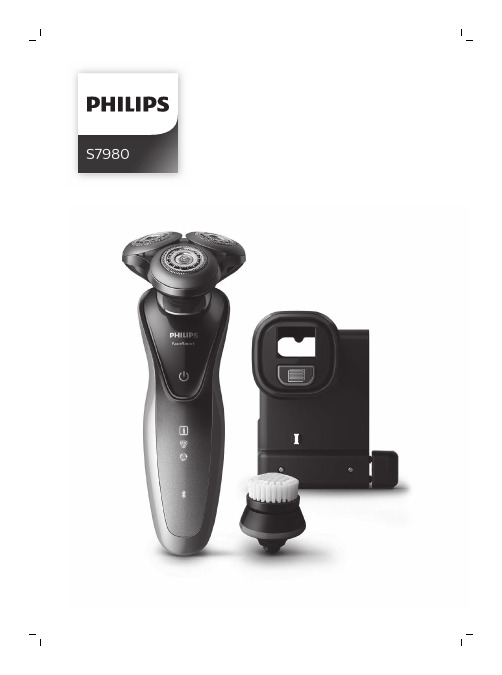
S7980English 6简体中文 35IntroductionCongratulations on your purchase and welcome to Philips! To fully benefit from the support that Philips offers, register your product at/welcome or via the SkinAnalyst app.Introducing Philips’ first ever complete shaving and skincare system. Assess and measure thecondition of your skin, personalize your FaceSmart shaving and cleansing settings, and best of all,receive daily skincare advice tailored to you.General description (Fig. 1)1Protection cap for cleansing brush2Cleansing brush3Cleansing brush base4Shaving unit5On/off button6Handle7Socket for small plug8SkinAnalyst sensor9Notification symbol10Shaving unit detector11Cleansing brush detector12Cleaning reminder13Bluetooth® symbol14Travel lock symbol15Battery charge indicator16Pouch17Supply unit (adapter)6EnglishRead this important information carefully before you use the shaver, the Skinanalyst sensor and save it for future reference. The accessories supplied may vary for different products.Danger-Keep the supply unit dry.Warning -To charge the battery, only use the detachable supply unit (type HQ8505) provided with the shaver.-The supply unit contains a transformer. Do not cut off the supply unit to replace it with another plug, as this causes a hazardous situation.-The shaver and SkinAnalyst sensor can be used by children aged from 8 years and above and persons with reduced physical, sensory or mental capabilities or lack of experience and knowledge if they have been given supervision or instruction concerning use of bothappliances in a safe way and understand the hazards involved. Children shall not play with the shaver. Cleaning and user maintenance shall not be made by children without supervision.-Always unplug the shaver before you clean it under the tap.-Always check the shaver and SkinAnalyst sensor before you use it. Do not use it if it is damaged, as this may cause injury. Always replace a damaged part with one of the original type.7English-Do not open the shaver to replace the rechargeable battery.Caution -Never use water hotter than 80°C to rinse the shaver.-Never rinse the SkinAnalyst sensor under the tap.-Only use the shaver and the SkinAnalyst sensor for its intended purpose as shown in the user manual.-For hygienic reasons, the shaver should only be used by one person.-Never use compressed air, scouring pads,abrasive cleaning agents or aggressive liquids such as petrol or acetone to clean the shaver.-Water may drip from the socket at the bottom of the shaver when you rinse it. This is normal and not dangerous because all electronics are enclosed in a sealed power unit inside the shaver.-Do not use the supply unit in or near wallsockets that contain an electric air freshener to prevent irreparable damage to the supply unit.-Keep your iPhone away from water and moist environments.-The shortwave radio frequency signals of a Bluetooth shaver may impair the operation of other electronic and medical devices.8English-Do not use the shaver in medical facilities,aircraft, refuelling points, close to automatic doors, automatic fire alarms or otherautomatically controlled devices.-Switch off Bluetooth where it is prohibited.-Keep this shaver at least 20 cm frompacemakers and other medical devices. Radio waves may impair the operation of pacemakers and other medical devices.Electromagnetic fields (EMF)-This Philips shaver complies with all shaver standards and regulations regarding exposure to electromagnetic fields.General-This shaver is waterproof. It is suitable for use in the bath or shower and for cleaning under the tap. For safety reasons, the shaver cantherefore only be used without cord.-The shaver is suitable for mains voltages ranging from 100 to 240 volts.-The supply unit transforms 100-240 volts to a safe low voltage of less than 24 volts.-The frequency band in which the shaver operates is 2.4 GHz.-The maximum radio frequency power radiated in the frequency band in which the shaver operates is <10dBm.9EnglishThe displayThe shaver is equipped with a notification symbol.This symbol lights up when important advice isavailable in the app. Go to the app to obtain thisadvice. It reminds you to unplug the shaver beforeyou switch it on and to clean it for optimalperformance. It also reminds you to replace theshaving heads every two years or the cleansingbrush every three months.Attachment detection featureWhen you have paired your iPhone with theshaver, the attachment detection feature isactivated. Every time you switch on the shaver, thisfeature automatically recognizes the attachment(shaving unit/cleansing brush) that is attached tothe shaver handle and adapts the settingsaccordingly. Unpairing of your iPhone and theshaver deactivates this feature.Make sure your shaver is connected to youriPhone. The SkinAnalyst app also offers thepossibility to (de)activate the Attachmentdetection feature. You can do this by going to Myprofile, My shaver and switching off the Autoattachment detection. You can then manuallyselect the brush attachment, by switching on theshaver and press and hold the on/off button forone second.10EnglishShaving unit detectorThe shaving unit detector lights up to indicate thatthe shaving unit has been attached to the handle.Cleansing brush detectorThe cleansing brush detector lights up to indicatethat the cleansing brush has been detected.When you switch off the shaver, the cleaningreminder flashes to remind you to clean theshaver. Clean the shaver and the attachments aftereach use for optimal performance.The shaver is equipped with Bluetooth 4.0 toconnect your shaver to the app on your iPhone.Bluetooth is automatically activated when youswitch on the shaver for the first time. You can onlydeactivate it by switching on the travel lock. Travel lockYou can lock the shaver when you are going totravel. The travel lock prevents the shaver frombeing switched on by accident. The travel lock alsodeactivates Bluetooth.Activating the travel lock1Press the on/off button for 3 seconds to enterthe travel lock mode.While you activate the travel lock, the travel locksymbol flashes. When the travel lock is activated,the travel lock symbol lights up continuously.Deactivating the travel lock1Press the on/off button for 3 seconds.The travel lock symbol flashes and then goes out.The shaver is now ready for use and Bluetooth isactivated again.ChargingBattery charge indicatorCharging takes approx. 1 hour.Quick charge: When the battery is empty and youconnect the shaver to the wall socket, the batterycharge indicator flashes quickly. When the shavercontains enough energy for one shaving orcleansing session, the battery charge indicatorstarts flashing slowly..While the shaver continues to charge, the battery charge indicator flashes slowly until the battery is fully charged.When the battery is fully charged, the batterycharge indicator lights up blue continuously.Note: The shaver can only be used without cord.Note: When the battery is full, the display switchesoff automatically after 30 minutes. If you press theon/off button during charging, the notificationsymbol lights up blue to remind you that you haveto disconnect the shaver from the wall socket.When the battery is almost empty, the batterycharge indicator flashes orange.When the battery is completely empty, the batterycharge indicator flashes orange quickly. ChargingCharging takes approx. 1 hour.Charge the shaver before first use and when thedisplay indicates that the battery is almost empty.Note: You can charge the shaver after every use.This will not harm the battery.Charging with the supply unit1Make sure the shaver is switched off.2Insert the small plug into the shaver and put the supply unit in the wall socket.3After charging, remove the supply unit from the wall socket and pull the small plug out of theshaver.Preparing for usePairing the shaver and your iPhoneFor this shaver a special app is available. You candownload the SkinAnalyst app from the App store.By using the app, your skincare and shavingroutine will be personalized. The app gives youexpert advice based on your skin, shaving method,local weather conditions, etc. to support your dailyskincare and shaving routine.Note: The app is available for iPhone 6, iPhone 6Plus, iPhone 6S and iPhone 6S Plus equipped withiOS9 or higher.To create a secure and safe connection, first theshaver and your iPhone need to be paired once.1Download the SkinAnalyst app from the Appstore.2Make sure Bluetooth on your iPhone isswitched on.Open the app on your iPhone.Follow the instructions in the app. After youhave filled in the skin assessment, the app asksyou to pair your iPhone with the shaver.Switch on the shaver. Bluetooth is activatedautomatically.6In the app, the pop-up message 'press pair'appears. When your iPhone and the shaverhave been paired successfully, the Bluetoothsymbol flashes briefly and then goes out. If thisdoes not happen, please see 'Troubleshooting'.7Once the shaver and the app have been paired,the shaver automatically selects the rightpersonal settings depending on the attachmentyou have clicked on. During shaving orcleansing, you can open the app to see thesettings you are using and the duration of theshaving or cleansing session.Note: When you use the shaver, keep youriPhone and shaver within transmission range(no more than 5 meters from each other, in thesame room).Using the shaverUsing the SkinAnalyst sensor1Open the app before measuring your skin.2If you have an iPhone case, first remove the case from your iPhone.3Pull the clamp of the SkinAnalyst sensor outwards and gently place your iPhone into the holder with its camera pointing towards theopening on the inside of the holder. Be careful when you attach or remove the SkinAnalystsensor to prevent scratches on your iPhone.Note: The SkinAnalyst sensor can only be used on iPhone 6, iPhone 6 Plus, iPhone 6S andiPhone 6S Plus equipped with iOS9 or higher.4Insert the jack plug of the SkinAnalyst sensorinto your iPhone.Note: Keep the SkinAnalyst sensor placed onthe skin during measurement to avoid flashinginto your eyes.-Do not look into the sensor before and afterskin measurement.-When you take a picture of the skin, pleaseposition the sensor flat onto your skin so toensure it can take a clear picture of your skin. Connecting with the shaver1Make sure Bluetooth on your iPhone isswitched on.5Keep your iPhone and shaver close to each other in order to stay connected.Caution: Do not use your iPhone in moistsurroundings. Moisture and water can damage your iPhone.1To switch on the shaver, press the on/off button once.2To switch off the shaver, press the on/off button once.In order to benefit optimally from the treatments, you have to synchronize your treatments regularly. The shaver can store up to 15 shaves and/or cleansing treatments, so make sure you synchronize the shaver at least once after every 15 treatments. As an extra reminder, the notification symbol flashes every 9 treatments, without a connection between the shaver and the app, to tell you to connect with the app.1Open the app and make sure you are close to the shaver.2The app connects with the shaver automaticallyand synchronizes your last shaves or cleansing treatments.Using the attachmentsNote: Attach the cleansing brush on the cleansingbrush base first, before you place it on the shaver.Removing or attaching the attachments1Make sure the shaver is switched off.directly after shaving to prevent skin irritation. Forbetter shaving results, use the cleansing brushTracker and change the cleansing brush settings. You can adjust the settings and choose between four settings depending on your personal cleansing needs: sensitive, dry, normal or oily. Using the shaving unitNote: This shaver can only be used without cord. Skin adaptation periodYour first shaves may not bring you the result you expect and your skin may even become slightly irritated. This is normal. Your skin and beard need time to adapt to any new shaving system. We advise you to follow the advice provided by the app and shave regularly (at least 3 times a week) with this shaver for a period of 4 weeks to allow your skin to adapt to the new shaver.Dry shaving1Switch on the shaver.2Move the shaving heads over your skin in circular movements to catch all hairs growing in different directions. Make sure each shavinghead is fully in contact with the skin. Exertgentle pressure for a close, comfortable shave.Note: Do not press too hard, this can cause skin irritation.3Clean the shaver after use.Wet shavingYou can also use this shaver on a wet face with shaving foam or shaving gel.To shave with shaving foam or shaving gel, follow the steps below:1Apply some water to your skin.2Apply shaving foam or shaving gel to your skin.3Rinse the shaving unit under the tap to ensure that the shaving unit glides smoothly over your skin.4Switch on the shaver.5Move the shaving heads over your skin in circular movements to catch all hairs growing in different directions. Make sure each shavinghead is fully in contact with the skin. Exertgentle pressure for a close, comfortable shave.Note: Do not press too hard, this can cause skin irritation.Note: Rinse the shaving unit regularly to ensure that it continues to glide smoothly over yourskin.6Dry your face.7Clean the shaver after use.Note: Make sure you rinse all foam or shavinggel off the shaver.Shave settingsThe app has a feature that allows you topersonalize your shave settings. Go to the UsageTracker and change the shaving settings. You canadjust the settings and choose between threesettings depending on your personal shavingneeds: extra sensitive (xs), sensitive (s) and normal(n).Unpairing your shaver and iPhonePairing allows a connection between 1 shaver and 1iPhone. To remove this connection (e.g. when youhave a new iPhone 6, 6 Plus, 6S or 6S Plusequipped with iOS9 or higher), follow the stepsbelow:1Remove pairing from the app: open the app ->Go to the menu in the app -> Select 'Appsettings' and press 'Remove pairing from app'.2Unpair the shaver: press and hold the on/offbutton on the handle for approx. 10 seconds toremove the bond between shaver and app.Note: The unpairing of the shaver is successfulwhen the Bluetooth and notification symbolflash simultaneously (approx. 4 seconds).3Unpair your iPhone: choose Settings -> General-> Bluetooth -> Select the device by pressing (i)-> and press 'forget devices'.Cleaning and maintenanceIf the shaver and the app are paired, the cleaningreminder on the shaver lights up after each shaveas an extra reminder to tell you to clean theshaver.Cleaning the shaving unit under the tapClean the shaving unit after every shave for7Attach the shaving head holder to the bottom part of the shaving unit (‘click’).Clean the cleansing brush every time you have used it.1Switch off the shaver.2Detach the brush head from the attachment holder.3Clean the parts thoroughly with warm water and soap.4Dry the cleansing brush with a towel.Detach your iPhone from the SkinAnalystsensor.-Put the protection cap on the cleansing brushPut the protection cap on the SkinAnalystsensor to protect it from dirt accumulation.Replacement Replacing the shaving headsAs an extra reminder, the notification symbol also lights up when the shaving heads should be replaced. This advice is also available in the app. For maximum shaving performance, we advise you to replace the shaving heads every two years. Replace damaged shaving heads immediately. Always replace the shaving heads with original Philips shaving heads (see 'Ordering accessories'). 1Switch off the shaver.2Pull the shaving head holder off the bottompart of the shaving unit.3Turn the retaining rings anticlockwise and remove them. Place them aside in a safe place. 4Remove the shaving heads from the shavinghead holder.Discard the used shaving heads immediately to avoid mixing them with the new shaving heads.The brush head should be replaced every 3months or earlier if the brush hairs are deformed or damaged. As an extra reminder, the notification symbol also lights up when the brush head should be replaced. This advice is also available in theapp.Ordering accessoriesTo buy accessories or spare parts, visit/service or go to yourPhilips dealer. You can also contact the PhilipsConsumer Care Center in your country (see theinternational warranty leaflet for contact details).The following accessories and spare parts areavailable:-SH70 Philips shaving heads-HQ110 Philips shaving head cleaning spray-RQ560/RQ563 Philips cleansing brush-HQ8505 supply unitNote: The availability of the accessories may differby country.Recycling-Do not throw away the product with the normalhousehold waste at the end of its life, but handit in at an official collection point for recycling.By doing this, you help to preserve theenvironment.-This product contains a built-in rechargeablebattery which shall not be disposed of withnormal household waste. Please take yourproduct to an official collection point or aPhilips service center to have a professionalremove the rechargeable battery.-Follow your country’s rules for the separatecollection of electrical and electronic productsand rechargeable batteries. Correct disposalhelps prevent negative consequences for theenvironment and human health. Removing the rechargeable batteryBend the hooks aside and remove the powerunit.Warranty and supportIf you need information or support, please visit/support or read theinternational warranty leaflet. TroubleshootingThis chapter summarizes the most commonproblems you could encounter with the shaver,SkinAnalyst sensor and its accessories. If you areunable to solve the problem with the informationbelow, visit /support for a list offrequently asked questions or contact theConsumer Care Center in your country. Problem Possible cause SolutionI cannot connect the shaver to the app.You have notdownloaded the app.Download theSkinAnalyst app.The app is availablefor iPhone 6, iPhone6 Plus, iPhone 6Sand iPhone 6S Plusequipped with iOS9or higher.Your shaver is notswitched on.Make sure the shaveris switched on.You have not openedthe app.Make sure you openthe app.your iPhone cannotfind the shaver.The shaver isavailable for iPhone6, iPhone 6 Plus,iPhone 6S andiPhone 6S Plusequipped with iOS9or higher.Problem Possible cause SolutionBluetooth is not switched on.Make sure Bluetooth is enabled on the shaver and your iPhone.The shaver is not charged.Make sure the shaver is charged.I want to use the shaver without the app.You can also use the shaver without the app. However, only when you use the app together with the shaver, the app is able to provide tips and advice based on your usage. With the app you can set your shave settings. The app also reminds you when you need to replace the shaving heads, to clean the shaver, etc.I cannot change the shavesettings/cleansing brush settings on the shaver.Make sure there is a good connection between the shaver and your iPhone.You can select the attachment (shaving unit/cleansing brush) on the shaver. In the app, you can change the settings per attachment (shaving unit:normal/sensitive/extra sensitive, cleansing brush: dry skin/normal skin/oily skin/sensitive skin).31EnglishProblem Possible cause Solution The shaver does not shave as well as it used to.The shaving headsare damaged or worn.Replace the shaving heads (see 'Replacing the shaving heads').Hairs or dirt obstruct the shaving heads.Clean the shaving heads in the regular way or clean them thoroughly.To clean the shaving heads thoroughly,remove the shaving heads from the shaving head holder one by one (see 'Replacing the shaving heads'). Then separate the cutter from its guard and rinse each matching set under the tap.After rinsing, place the cutter back into its corresponding guard. Finally, put the shaving heads back into the shaving head holder (see 'Replacing the shaving heads').The cleansing brush does not clean as well as it used to.The cleansing brush is damaged or worn.Replace the cleansing brush (see 'Replacing the cleansing brush').32EnglishProblem Possible cause SolutionThe shaver doesn't detect the right attachment.The attachment isheavily polluted ordamaged.Try to clean theattachment (see'Cleaning andmaintenance'); if theissue persists, switchoff the detectionfeature from the appand select theattachment manuallyby pressing theon/off button for onesecond while theshaver is switchedon.The shaver does not work when I press the on/off button.The shaver is stillattached to the wallsocket. For safetyreasons, the shavercan only be usedwithout cord.Unplug the shaverand press the on/offbutton to switch onthe shaver.The rechargeablebattery is empty.Recharge the battery.The travel lock isactivated.Press the on/offbutton for 3 secondsto deactivate thetravel lock.The shaving unit issoiled or damaged tosuch an extent thatthe motor cannot run.Clean the shavingheads thoroughly orreplace them. Alsosee 'Hairs or dirtobstruct the shavingheads' for a detaileddescription of how toclean the shavingheads thoroughly.The shaver switches off when I select a different brush program.You cannot changethe brush programduring cleansing.Switch off the shaverbefore you select adifferent brushprogram.33EnglishProblem Possible cause Solution I get an error in the app during skin measurement.You did not place the SkinAnalyst sensor flat on your skin.Place the SkinAnalyst sensor flat on your skin.You did not insert the plug of the SkinAnalyst sensor into your phone properly.Remove the plug ofthe SkinAnalystsensor from yourphone and insert the plug into your phone again.Your phone did not recognize the SkinAnalyst sensor.Make sure that:-the cover/case of your iPhone is detached.-the camera lens of your iPhone is clean-the SkinAnalyst sensor is correctly attached to your iPhoneYour phone did not recognize the SkinAnalyst sensor.Make sure that yourvolume limit settings are reset to default settings (go to Settings > Music >Volume limit > slide to the max).Water is leaking from the bottom of the shaver.During cleaning,water may collect between the inner body and the outer shell of the shaver.This is normal and not dangerousbecause allelectronics are enclosed in a sealed power unit inside the shaver.34English说明感谢您的惠顾,欢迎光临飞利浦! 为了让您能充分享受飞利浦提供的支持,请在 /welcome 上或通过 SkinAnalyst 应用程序注册您的产品。
实用小玩意彰显气场 型男出行前半小时必备技能!

实用小玩意彰显气场型男出行前半小时必备技能!引导语:现在工作节奏的加快让人们做什么事情都慌里慌张。
而作为一名成功男士来说,为了不愿邋里邋遢的走出家门,面对朋友和同事,出门前的这个时间段至关重要。
简单漱漱口、洗把脸肯定不成。
你出门前的这半小时,看看一个老爷们儿都应该干点啥,又都用到了哪些实用的小玩意。
飞利浦HX6730/02 充电式声波震动牙刷(雾白)每天醒来的第一件事情出了穿衣洗脸就是刷牙了,一口洁白的牙齿不仅能让自己极高的自信而且对身体健康也有好处,但是传统手动牙刷弊端很多让很多人难以忍受,所以对于你来说一款能有效清洁牙渍和保持牙齿健康的电动牙刷就是非常重要的了。
飞利浦HX6730/02 充电式声波震动牙刷的牙刷头具有独特的角度,能够让刷头更加容易接触后牙,配合独创流动洁力技术可以更加高效的清洁难以触及的牙斑菌,加上30秒时段计时器指示你何时完成对口腔每一个区域的清洁,在口腔中实现更加一致的清洁体验。
此外,净白模式、清洁模式下和敏感模式,三种刷牙模式也是飞利浦HX6730/02 充电式声波震动牙刷的一大优势。
飞利浦HX6730/02 充电式声波震动牙刷能让你早起就有一口洁白的牙齿,让人动力十足。
FOREO LUNA露娜男士洗脸仪刷牙之后就是洗脸了,对于男人来说现在面部情况也是非常重要的,一张完美的脸除了可以吸引更多人关注外,还能拥有更多的自信。
但用传统洗脸方式是不能有效对皮肤和脸部起到护肤的作用,所以一款电动洁面仪就是非常有必要的了。
这款露娜男士洗脸仪拥有清洁模式和舒缓模式。
在清洁模式下,T-SONIC透肤声波脉冲技术也可以通过每分钟8000次垂直声波脉动直接作用于肌肤表面,温和而深层次的清洁肌肤表面及毛孔脏污。
而且,它搭配的独特粗型硅胶触电温和细腻安全的硅胶刷头,可以达到对肌肤零损伤。
而在舒缓模式中,每分钟4500次声波脉动,搭配反面光滑流畅的同心波纹硅胶刷面,能够更好有效舒缓表情纹。
加上符合人体工程学的设计,可以让你更好的使用和清洁面部,还自己一个靓丽的脸庞。
菲利普SONICARE健康白牙电动牙刷HX6711 02说明书

Philips Sonicare HealthyWhiteSonic electric toothbrush2 modes1 brush headHX6711/02Whiter, healthier teethThe ultimate toothbrush for whiter teethEverybody loves a bright white smile. Let the natural whiteness of your teeth shine through. Sonicare HealthyWhite electric toothbrush HX6711/02 is proven to remove everyday stains in just two weeks, with the use of the Clean & White Mode.Provides a superior clean•Sonicare dynamic cleaning action drives fluid between teeth •Removes up to 2x more plaque than a manual toothbrush Proven to improve oral health•Philips Sonicare toothbrush helps whiten teethGuides you to follow dental recommendations•Two-minute timer helps ensure recommended brushing time •Quadpacer interval timer encourages thorough brushing Offers a customized brushing experience•Easy-start program to acclimate to the Sonicare experience •Clean and White Mode: proven to remove stainsHighlightsSonic technologyPhilips Sonicare electric toothbrush's unique dynamic action gently and effectively reaches deep between teeth and along the gumline.Smartimer2-minute timer on this Philips Sonicare electric toothbrush helps ensure dental professional recommended brushing timeQuadpacer30 seconds interval timer indicates when you have completed each quadrant of your mouthand signals for you to move on resulting in more consistent cleaning throughout your mouthEasy-start programGently increases power over first 14 uses to ease into the Philips Sonicare electric toothbrush experienceClean and White Mode2 minutes of Clean mode with an additional 30 seconds of White mode to focus on the visible front teeth. Removes everyday stains, such as coffee, tea, tobacco and red wine. Whitens teeth by 2 shades in just 2 weeks.*Helps whiten teethPhilips Sonicare's best teeth whitening: this toothbrush helps to remove and reduce stains on your teeth for a brighter smile.Removes up to 2x more plaquePatented Sonic Technology removes up to 2x more plaque than a manual toothbrush.Issue date 2017-07-05 Version: 27.11.112 NC: 0000 000 00000© 2017 Koninklijke Philips N.V.All Rights reserved.Specifications are subject to change without notice. Trademarks are the property of Koninklijke Philips N.V. or their respective owners.SpecificationsModes•Clean: For exceptional everyday clean•Clean & White: 2 min Clean + 30 sec White Items included•Handles: 1 HealthyWhite•Brush heads: 1 ProResults standard •Charger:1Design and finishing•Color: Glacier GreenCleaning performance•Speed: Up to 31,000 brush strokes/min •Performance: Removes up to 90% of stains*•Health benefits: Helps improve gum health •Whitening benefits: Whitens teeth up to 2 shades •Timer: Smartimer and Quadpacer Ease of use•Brush head system: Easy click-on brush heads•Brushing time: Up to 3 weeks**•Battery indicator: Light shows battery status•Handle: Slim ergonomic design, Rubber grip foreasy handlingTechnical specifications•Battery: Rechargeable•Battery type: Lithium ION•Operating time (full to empty): Up to 3 weeks**Power•Voltage: 110-220 VService•Warranty: 2-year limited warranty*than a manual toothbrush**based on two periods of two-minute brushings per day, on cleanmode。
Philips Sonicare HealthyWhite 电动牙刷 HX6711 02 说明书

Sonic electrictoothbrushHealthyWhite2 modes1 brush headHX6711/02Whiter, healthier teethThe ultimate toothbrush for whiter teethEverybody loves a bright white smile. Let the natural whiteness of your teeth shinethrough. Sonicare HealthyWhite electric toothbrush HX6711/02 is proven to removeeveryday stains in just two weeks, with the use of the Clean & White Mode.Provides a superior cleanSonicare dynamic cleaning action drives fluid between teethRemoves up to 2x more plaque than a manual toothbrushProven to improve oral healthPhilips Sonicare toothbrush helps whiten teethGuides you to follow dental recommendationsTwo-minute timer helps ensure recommended brushing timeQuadpacer interval timer encourages thorough brushingOffers a customized brushing experienceEasy-start program to acclimate to the Sonicare experienceClean and White Mode: proven to remove stainsHighlightsSonic technologyPhilips Sonicare electric toothbrush's unique dynamic action gently and effectively reaches deep between teeth and along the gumline.Smartimer2-minute timer on this Philips Sonicare electric toothbrush helps ensure dental professional recommended brushing timeQuadpacer 30 seconds interval timer indicates when you have completed each quadrant of your mouth and signals for you to move on resulting in more consistent cleaning throughout your mouthEasy-start programGently increases power over first 14 uses to ease into the Philips Sonicare electric toothbrush experienceClean and White Mode2 minutes of Clean mode with an additional 30 seconds of White mode to focus on the visible front teeth. Removes everyday stains,such as coffee, tea, tobacco and red wine.Whitens teeth by 2 shades in just 2 weeks.*Helps whiten teethPhilips Sonicare's best teeth whitening: this toothbrush helps to remove and reduce stains on your teeth for a brighter smile.Removes up to 2x more plaquePatented Sonic Technology removes up to 2x more plaque than a manual toothbrush.SpecificationsModesClean: For exceptional everyday clean Clean & White: 2 min Clean + 30 sec White Items includedHandles: 1 HealthyWhiteBrush heads: 1 ProResults standard Charger: 1Design and finishingColor: Glacier Green Cleaning performanceSpeed: Up to 31,000 brush strokes/minPerformance: Removes up to 90% of stains*Health benefits: Helps improve gum healthWhitening benefits: Whitens teeth up to 2shadesTimer: Smartimer and QuadpacerEase of useBrush head system: Easy click-on brush headsBrushing time: Up to 3 weeks**Battery indicator: Light shows battery statusHandle: Slim ergonomic design, Rubber gripfor easy handlingT echnical specificationsBattery: RechargeableBattery type: Lithium IONOperating time (full to empty): Up to 3weeks**PowerVoltage: 110-220 VServiceWarranty: 2-year limited warranty* than a manual toothbrush* *based on two periods of two-minute brushings perday, on clean mode© 2019 Koninklijke Philips N.V.All Rights reserved.Specifications are subject to change without notice. Trademarks are the property of Koninklijke Philips N.V. or their respective owners.Issue date 2019‑07‑18 Version: 27.11.112 NC: 0000 000 00000EAN: 08 71010 35363 14 。
Philips Sonicare Whitening Toothbrush说明书
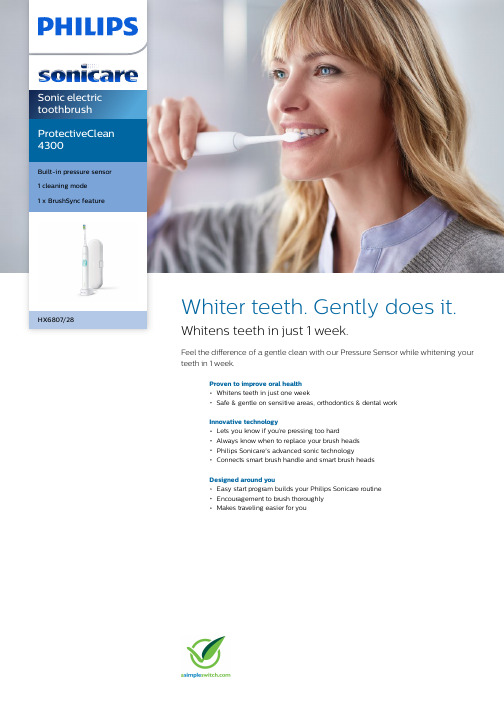
Sonic electric toothbrush ProtectiveClean 4300Built-in pressure sensor 1 cleaning modeHX6807/28Whiter teeth. Gently does it. Whitens teeth in just 1 week.Feel the difference of a gentle clean with our Pressure Sensor while whitening your teeth in 1 week.Proven to improve oral healthWhitens teeth in just one weekSafe & gentle on sensitive areas, orthodontics & dental workInnovative technologyLets you know if you’re pressing too hardAlways know when to replace your brush headsPhilips Sonicare's advanced sonic technologyConnects smart brush handle and smart brush headsDesigned around youEasy start program builds your Philips Sonicare routineEncouragement to brush thoroughlyMakes traveling easier for youHighlightsNaturally whiter teethClick on the W2 Optimal White brush head to remove surface stains and reveal a whiter smile. With its densely packed centralstainremoval bristles, it's clinically proven to whiten teeth in just one week.Monitor your brushing pressureBrushing too hard can damage your teeth and gums. To prevent this, your Philips Sonicare ProtectiveClean emits a gentle pulsing sound to remind you to ease off on the pressure.Safe and gentleYou can be sure of a safe brushing experience:our sonic technology is suitable for use with braces, fillings, crowns, and veneers, and helps prevent cavities and improve gum health.Philips Sonicare technologyPhilips Sonicare's advanced sonic technology pulses water between teeth, and its brushstrokes break up plaque and sweep it away for an exceptional daily clean.BrushSync replacement reminderAll brush heads wear out over time. But our BrushSync technology tracks how long you've been using your brush head for, and how hard you've been brushing. When it's time toreplace it, a light on your handle and a short beep will let you know. That way, you can be sure your brush head is doing a good job.Helpful timersNeed an electric toothbrush with a timer? Our QuadPacer lets you know when you've spent just the right amount of time cleaning each part of your mouth, while our Smartimer tells you when you've brushed for the recommended two minutes.BrushSync technologyA microchip-enabled technology that detects and synchronizes the smart brush head with the smart handle. The smart handle and smart brush head pair is a powerful combination that enables Smart replacement reminders.Ease into your new routineStarting something new can take some getting used to. Our easy-start program gives you the option of a gradual, gentle increase in brushing power with the first 14 uses with your newtoothbrush.Philips Green LogoPhilips Green Products can reduce costs,energy consumption and CO2 emissions. How?They offer a significant environmentalimprovement in one or more of the Philips Green Focal Areas – Energy efficiency,Packaging, Hazardous substances, Weight,Recycling and disposal and Lifetime reliability.SpecificationsModesClean: For exceptional everyday clean2 intensities: Low, HighItems includedHandle: 1 ProtectiveCleanBrush heads: 1 W2 Optimal WhiteTravel case: 1Charger: 1Design and finishingColor: White and MintCleaning performanceSpeed: Up to 62000 brush movement/min Health benefits: Improves gum health in only two weeks, Helps reduce cavities Pressure feedback: Vibrates handle to alertuserTimer: Quadpacer and SmarTimerSmart sensor technologyPressure sensor: Alerts when brushing toohardBrushSync Replacement Reminder: Alwaysknow when to, replace brush headsEase of useHandle compatibility: Easy click-on brushheadsBattery indicator: Light shows battery statusHandle: Slim ergonomic designBrushing time: Up to 2 weeksT echnical specificationsBattery: RechargeableBattery type: Lithium IONOperating time (full to empty): Up to 2 weeksPowerVoltage: 110-220 VServiceWarranty: 2-year limited warranty* Removes up to 7x more plaque vs. a manual toothbrush© 2021 Koninklijke Philips N.V.All Rights reserved.Specifications are subject to change without notice. Trademarks are the property of Koninklijke Philips N.V. or their respective owners.Issue date 2021‑07‑11 Version: 5.1.112 NC: 8816 807 28220 。