思科交换机简单配置(通用教程)
cisco交换机配置简单教程
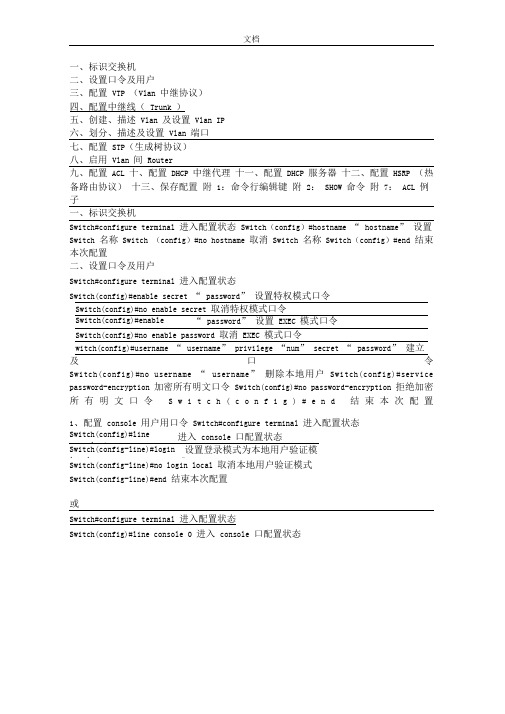
文档一、标识交换机二、设置口令及用户三、配置VTP (Vlan 中继协议)四、配置中继线(Trunk )五、创建、描述Vlan 及设置Vlan IP六、划分、描述及设置Vlan 端口七、配置STP(生成树协议)八、启用Vlan 间Router九、配置ACL 十、配置DHCP 中继代理十一、配置DHCP 服务器十二、配置HSRP (热备路由协议)十三、保存配置附1:命令行编辑键附2:SHOW 命令附7:ACL 例子一、标识交换机Switch#configure terminal 进入配置状态Switch(config)#hostname “ hostname” 设置Switch 名称Switch (config)#no hostname 取消Switch 名称Switch(config)#end 结束本次配置二、设置口令及用户Switch#configure terminal 进入配置状态Switch(config)#enable secret “ password” 设置特权模式口令及口令Switch(config)#no username “ username” 删除本地用户Switch(config)#service password-encryption 加密所有明文口令Switch(config)#no password-encryption 拒绝加密所有明文口令S w i t c h(c o n f i g)#e n d结束本次配置1、配置console 用户用口令Switch#configure terminal 进入配置状态Switch(config)#line console 0 进入console 口配置状态Switch(config-line)#login local 设置登录模式为本地用户验证模式Switch(config-line)#no login local 取消本地用户验证模式Switch(config-line)#end 结束本次配置或Switch#configure terminal 进入配置状态Switch(config)#line console 0 进入console 口配置状态文档Switch(config-line)#login 设置登录模式为线性登录模式Switch(config-line)#password “ password” 设置线性登录模式口令Switch(config-line)#no login 取消线性登录模式Switch(config-line)#end 结束本次配置2、配置tenlnet(vty) 用户及口令Switch#configure terminal 进入配置状态Switch(config)#line vty 0 15 进入vty 配置状态Switch(config-line)#login local 设置登录模式为本地用户验证模式Switch(config-line)#no login local 取消本地用户验证模式三、配置VTP (Vlan 中继协议)Switch#vlan database 进入vlan 数据库配置状态Switch(vlan)#vtp domain “ domainname” 设置vtp 域Switch(vlan)#vtp server|client| transparent 设置模式Switch(vlan)#vtp password “ password” 设置vtpSwitch(vlan)#no vtp password 取消vtp 口令Switch(vlan)#exit 退出vlan 数据库配置状态Switch(config)#interface range “ interface mod/port -port ” 进入端口组配置状态Switch(config-if-range)#switchport trunk encapsulation dot1q|isl| negotiate 设置干道封装模式Switch(config-if-range)#switchport mode trunk 设置端口为干道模式Switch(config-if-range)#no shutdown 启用端口Switch(config-if-range)#end 结束本次配置五、创建、描述Vlan 及设置Vlan IPSwitch#vlan database 进入vlan 数据库配置状态文档Switch(vlan)#vlan “ vlan-num ” name “ vlan-name” 建立vlan 及名称Switch(vlan)#no vlan “ vlan-num ” 删除vlanSwitch(vlan)#exit 退出vlan 数据库配置状态Switch(config-if)#description “ description ” 描述vlanSwitch(config-if)#no description 取消描述Switch(config-if)#ip address “ ip-address subnet-mask” 设置vlan 网关的ip 地址Switch(config-if)#no shutdown 启用vlanSwitch(config-if)#end 结束本次配置六、划分、描述及设置Vlan 端口Switch#configure terminal 进入配置状态Switch(config)#interface “ interface mod/port ” 进入端口配置状态Switch(config-if)#switchport mode access 设置端口为访问模式Switch(config-if)#switchport access vlan “ vlan-num ” 设置端口所属VlanSwitch(config-if)#no shutdown 启用端口Switch(config-if)#end 结束本次配置或Switch#configure terminal 进入配置状态Switch(config)#interface range “ interface mod/port -port ” 进入端口组配置状态Switch(config-if-range)#description “ description ” 描述端口Switch(config-if-range)#speed auto|100|10 设置端口速率模式Switch(config-if-range)#duplex auto|full|half 设置端口双工模式Switch(config-if-range)#switchport mode access 设置端口为访问模式Switch(config-if-range)#switchport access vlan “ vlan-num ” 设置端口所属Vlan Switch(config-if-range)#no shutdown 启用端口Switch(config-if-range)#end 结束本次配置七、配置STP(生成树协议)Switch#configure terminal 进入配置状态Switch(config)#spanning-tree portfast default 设置所有访问端口为快速模式Switch(config)#no spanning-tree portfast default 取消所有访问端口为快速模式Switch(config)#spanning-tree uplinkfast 设置上行端口为快速模式Switch(config)#no spanning-tree uplinkfast 取消上行端口为快速模式Switch(config)#end 结束本次配置或Switch#configure terminal 进入配置状态Switch(config)#interface “ interfacemod/port ” 进入端口配置状态Switch(config-if)#spanning-tree portfast 设置端口为快速模式文档Switch(config-if)#no shutdown 启用端口Switch(config-if)#end 结束本次配置或Switch#configure terminal 进入配置状态Switch(config)#interface range “ interface mod/port -port ” 进入端口组配置状态Switch(config-if-range)# spanning-tree portfast 设置端口为快速模式Switch(config-if-range)#no shutdown 启用端口Switch(config-if-range)#end 结束本次配置八、启用 Vlan 间 RouterSwitch#configure terminal 进入配置状态Switch(config)#ip routing 启用 ip 路由Switch(config)#ip route “ Destination-prefix Destination-prefix-mask Forwarding-router 's-address ” Switch(config)#end 结束本次配置九、配置 ACLSwitch#configure terminal 进入配置状态Switch(config)#interface vlan “ vlan-num ” 进入 vlan 配置状态 Switch(config-if)#ip access-group “ acl-num ” in|out 应用 acl 到 vlan Switch(config-if)#end 结束本次配置 Switch#configure terminal 进入配置状态Switch(config)#line vty 0 15 进入 vty 配置状态Switch(config-line)#access-class “ acl-num ” in|out 应用 acl 到 vtySwitch(config-if)#end 结束本次配置例:Switch(config)#access-list 101 deny ip host 192.168.2.11 host 192.168.10.21 Switch(config)#access-list 102 deny ip host 192.168.2.13 192.168.10.0 0.0.0.255 Switch(config)#access-list 103 deny ip 192.168.2.0 0.0.0.255 192.168.10.0 0.0.0.255 Switch(config)# access-list 104 deny ip 192.168.2.0 0.0.0.255 host 192.168.10.25十、配置 DHCP 中继代理Switch#configure terminal 进入配置状态Switch(config)#service dhcp 启用 dhcp 服务Switch(config)#ip dhcp relay information option 启用 dhcp 代理服务Switch(config)#interface vlan “ vlan-num ” 进入 vlan 配置状态Switch(config-if)#ip helper-address “ ip-address ” 启用 dhcp 代理服务器 ip 地Switch(config-if)#end 结束本次配置文档十一、配置 DHCP 服务器Switch#configure terminal进入配置状态Switch (config)#ip dhcp pool “ Pool-name ” 设置 dhcp 地址池名称Switch (dhcp-config)#network “ Network-num Network-mask ” 设置 dhcp 地址池 ip 围 Switch (dhcp-config)# dns-server “ ip-address ” 为客户机分配 DNS 服务器 ip 地址 Switch (dhcp-config)#netbios-name-server “ ip-address ” 为客户机分配 WINS 服务器 ip 地址Switch#configure terminal 进入配置状态Switch(config)#service dhcp 启用dhcp 服务wyz(config)#ip dhcp excluded-address “ Low-ip-address High-ip-address ” 设置保留ip 地址Switch(config-if)#end 结束本次配置十二、配置HSRP (热备路由协议)Switch#configure terminal 进入配置状态Switch(config)#interface vlan “ vlan-num ” 进入vlan 配置状态Switch(config-if)#ip address “ ip-address subnet-mask” 设置vlan 物理ip 地址Switch(config-if)#standby “ group-num ” ip “virtual-ip-address ” 设置vlan 虚拟ip 地址Switch(config-if)#standby priority “ Priority-value ” 设置路由器优先等级Switch(config-if)#standby preempt 设置hsrp 抢占功能Switch(config-if)#standby timers “ Hello-interval-in-seconds Hold-time-in-seconds ”设置hello 信息Switch(config-if)#end 结束本次配置十三、保存配置Switch#write memory或Switch#copy running-config startup-config 附1:命令行编辑键TAB 补全命令?查看可用命令Ctrl + P 粘贴历史命令Ctrl + E 将光标移至命令末尾Ctrl + F 将光标向前移动Ctrl + B 将光标向后移动Ctrl + Z 返回#命令模式Ctrl + U Clear Line and Put in BufferCtrl + W Delete Word Backwards and Put in Buffer文档Ctrl + Y Paste Buffer ContentsCtrl + X Clear Line to the Left and Put in BufferCtrl + T Flip Last 2 CharactersCtrl + J ReturnCtrl + L Refresh LineCtrl + I Refresh Line and Goto EndCtrl + K Delete everything on the Right of cursorCtrl + V Allows to type control characterCtrl + M ReturnCtrl + H Backspace Character to the LeftCtrl + R 刷新行附2:SHOW 命令Switch#show version 显示版本信息Switch #show arp | include “ ip-address” 显示ip 地址对应的mac 地址信息Switch#show mac-address-table 显示mac 地址信息Switch#show mac-address-table | include “ mac-address” 格式:xxxx.xxxx.xxxx.xxxx Switch #show mac-address-table dynamic address “ mac-address” 显示mac 地址对应的端口信息Switch#show mac-address-table dynamic interface “ interface mod/port ” 显示端口对应的mac 地址信息Switch#show tech-support 显示技术支持信息Switch#show interfaces 显示接口信息Switch#show vlan 显示vlan 信息Switch#show startup-config 显示启用配置文件Switch#show running-config 显示运行配置文件Switch#show ip route 显示ip 路由状态Switch#clear counters interface “ interface mod/port ” 清除端口计数器Switch(config)#default interface “ interface mod/port ” 恢复端口出厂设置Switch#clear interface “ interface mod/port ” 重置端口的硬件逻辑keyada#show cdp neighbors “ interface mod/port ” detail 附7:ACL 例子VLAN1 需实现以下效果:1、VLAN1 主机192.168.1.240 可以访问所有网段;2、VLAN1 其余主机可以访问除VLAN2 、VLAN3 及VLAN4 外所有网段。
cisco交换机配置实例教程.doc
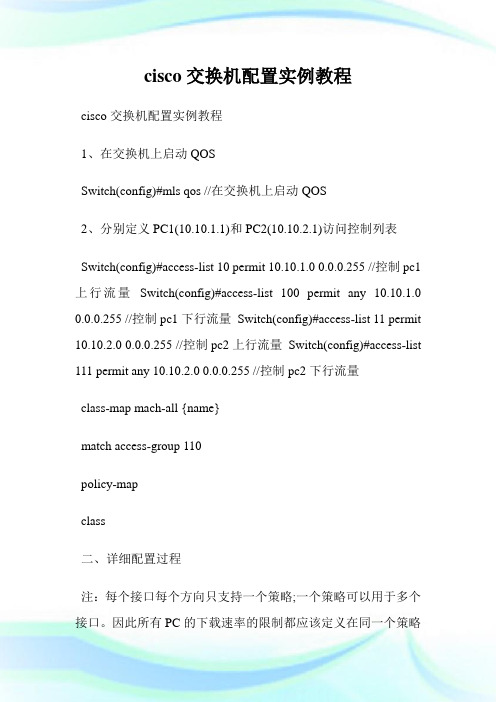
cisco交换机配置实例教程cisco交换机配置实例教程1、在交换机上启动QOSSwitch(config)#mls qos //在交换机上启动QOS2、分别定义PC1(10.10.1.1)和PC2(10.10.2.1)访问控制列表Switch(config)#access-list 10 permit 10.10.1.0 0.0.0.255 //控制pc1上行流量Switch(config)#access-list 100 permit any 10.10.1.0 0.0.0.255 //控制pc1下行流量Switch(config)#access-list 11 permit 10.10.2.0 0.0.0.255 //控制pc2上行流量Switch(config)#access-list 111 permit any 10.10.2.0 0.0.0.255 //控制pc2下行流量class-map mach-all {name}match access-group 110policy-mapclass二、详细配置过程注:每个接口每个方向只支持一个策略;一个策略可以用于多个接口。
因此所有PC的下载速率的限制都应该定义在同一个策略(在本例子当中为policy-map user-down),而PC不同速率的区分是在Class-map 分别定义。
1、在交换机上启动QOSSwitch(config)#mls qos //在交换机上启动QOS2、分别定义PC1(10.10.1.1)和PC2(10.10.2.1)访问控制列表Switch(config)#access-list 10 permit 10.10.1.0 0.0.0.255 //控制pc1上行流量Switch(config)#access-list 100 permit any 10.10.1.0 0.0.0.255 //控制pc1下行流量Switch(config)#access-list 11 permit 10.10.2.0 0.0.0.255 //控制pc2上行流量Switch(config)#access-list 111 permit any 10.10.2.0 0.0.0.255 //控制pc2下行流量3、定义类,并和上面定义的访问控制列表绑定Switch(config)# class-map user1-up //定义PC1上行的类,并绑定访问列表10Switch(config-cmap)# match access-group 10Switch(config-cmap)# exitSwitch(config)# class-map user2-upSwitch(config-cmap)# match access-group 11 //定义PC2上行的类,并绑定访问列表10Switch(config-cmap)# exitSwitch(config)# class-map user1-downSwitch(config-cmap)# match access-group 100 //定义PC1下行的类,并绑定访问列表100Switch(config-cmap)# exitSwitch(config)# class-map user2-downSwitch(config-cmap)# match access-group 111 //定义PC2下行的类,并绑定访问列表111Switch(config-cmap)# exit4、定义策略,把上面定义的类绑定到该策略Switch(config)# policy-map user1-up //定义PC1上行的速率为1MSwitch(config-pmap)# class user1-upSwitch(config-pmap-c)# trust dscpSwitch(config-pmap-c)# police 1024000 1024000 exceed-action dropSwitch(config)# policy-map user2-up //定义PC2上行的速率为2MSwitch(config-pmap)# class user2-upSwitch(config-pmap-c)# trust dscpSwitch(config-pmap-c)# police 2048000 1024000 exceed-action dropSwitch(config)# policy-map user-downSwitch(config-pmap)# class user1-downSwitch(config-pmap-c)# trust dscpSwitch(config-pmap-c)# police 1024000 1024000 exceed-action dropSwitch(config-pmap-c)# exitSwitch(config-pmap)# class user2-downSwitch(config-pmap-c)# trust dscpSwitch(config-pmap-c)# police 2048000 1024000 exceed-action dropSwitch(config-pmap-c)# exit5、在接口上运用策略Switch(config)# interface f0/1Switch(config-if)# service-policy input user1-upSwitch(config)# interface f0/2Switch(config-if)# service-policy input user2-upSwitch(config)# interface g0/1Switch(config-if)# service-policy input user-down看了cisco交换机配置实例教程还想看:1.思科交换机基本配置实例讲解2.CISCO交换机配置操作学习教程3.思科交换机配置教程详解4.cisco交换机qos配置实例教程5.思科路由器、交换机的基本管理教程6.Cisco 2960交换机的基础安装配置教程Cisco交换机入门配置的方法Cisco交换机入门配置的方法:机型:Cisco 3750想对交换机警醒配置。
CISCO交换机设置
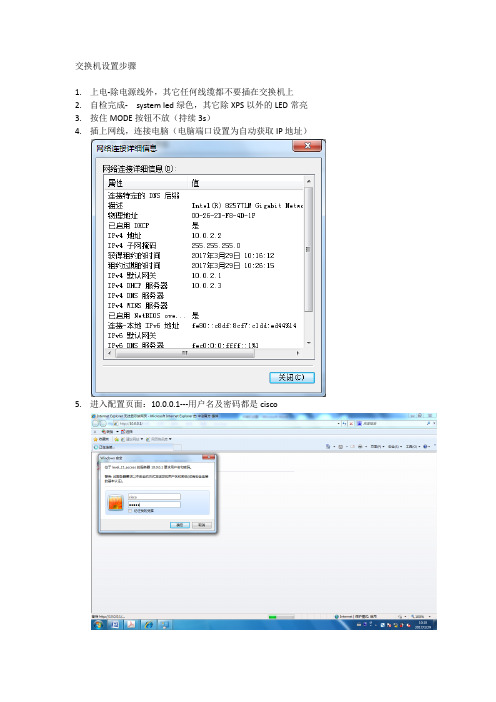
交换机设置步骤1.上电-除电源线外,其它任何线缆都不要插在交换机上2.自检完成- system led绿色,其它除XPS以外的LED常亮3.按住MODE按钮不放(持续3s)4.插上网线,连接电脑(电脑端口设置为自动获取IP地址)5.进入配置页面:10.0.0.1---用户名及密码都是cisco交换机密码:cisco1 talent密码:wisdri6.电脑需要安装USB驱动7.启用talent登录输入交换机密码cisco1Switch>enable Password:Using driver version 4 for meSwitch>show vlanVLAN Name Status Ports---- -------------------------------- --------- -------------------------------1 default active Gi1/0/1, Gi1/0/2, Gi1/0/3Gi1/0/4, Gi1/0/5, Gi1/0/6Gi1/0/7, Gi1/0/8, Gi1/0/9Gi1/0/10, Gi1/0/11, Gi1/0/12Gi1/0/13, Gi1/0/14, Gi1/0/15Gi1/0/16, Gi1/0/17, Gi1/0/18Gi1/0/19, Gi1/0/20, Gi1/0/21Gi1/0/22, Gi1/0/23, Gi1/0/24Gi1/1/1, Gi1/1/2, Gi1/1/3Gi1/1/41002 fddi-default act/unsup1003 token-ring-default act/unsup1004 fddinet-default act/unsup1005 trnet-default act/unsupVLAN Type SAID MTU Parent RingNo BridgeNo Stp BrdgMode Trans1 Trans2 ---- ----- ---------- ----- ------ ------ -------- ---- -------- ------ ------1 enet 100001 1500 - - - - - 0 0 1002 fddi 101002 1500 - - - - - 0 0 1003 tr 101003 1500 - - - - - 0 0 1004 fdnet 101004 1500 - - - ieee - 0 0 1005 trnet 101005 1500 - - - ibm - 0 0Remote SPAN VLANs------------------------------------------------------------------------------Primary Secondary Type Ports------- --------- ----------------- ------------------------------------------Switch>Switch>Switch>Switch>enablePassword:Password:Password:% Bad secretsSwitch>cisco1Translating "cisco1"...domain server (255.255.255.255)% Unknown command or computer name, or unable to find computer address Switch>Switch>Switch>Switch>Switch>Switch>Switch>Switch>Switch>Switch>Switch>enablePassword:Password:Password:% Bad secretsSwitch>enablePassword:Password:Switch#Switch#Switch#Switch#configure terminalEnter configuration commands, one per line. End with CNTL/Z.Switch(config)#vlan 2Switch(config-vlan)#name plcSwitch(config-vlan)#endSwitch#Mar 29 02:33:57.955: %SYS-5-CONFIG_I: Configured from console by console Switch#configure terminalEnter configuration commands, one per line. End with CNTL/Z.Switch(config)#vlan 3Switch(config-vlan)#name levelSwitch(config-vlan)#endSwitch#Mar 29 02:36:58.747: %SYS-5-CONFIG_I: Configured from console by console Switch#configure terminalEnter configuration commands, one per line. End with CNTL/Z.Switch(config)#interface gigabitethernet1/0/1Switch(config-if)#switchport mode accessSwitch(config-if)#switchport access vlan2^% Invalid input detected at '^' marker.Switch(config-if)#switchport access vlan 2Switch(config-if)#exitSwitch(config)#interface gigabitethernet1/0/2Switch(config-if)#switchport mode accessSwitch(config-if)#switchport access vlan 2Switch(config-if)#endSwitch#Mar 29 02:48:26.503: %SYS-5-CONFIG_I: Configured from console by consoleSwitch#show ip interface briefInterface IP-Address OK? Method Status Protocol Vlan1 191.167.0.2 YES TFTP up down FastEthernet0 unassigned YES other down down GigabitEthernet1/0/1 unassigned YES unset down down GigabitEthernet1/0/2 unassigned YES unset down down GigabitEthernet1/0/3 unassigned YES unset down down GigabitEthernet1/0/4 unassigned YES unset down down GigabitEthernet1/0/5 unassigned YES unset down down GigabitEthernet1/0/6 unassigned YES unset down down GigabitEthernet1/0/7 unassigned YES unset down down GigabitEthernet1/0/8 unassigned YES unset down down GigabitEthernet1/0/9 unassigned YES unset down down GigabitEthernet1/0/10 unassigned YES unset down down GigabitEthernet1/0/11 unassigned YES unset down down GigabitEthernet1/0/12 unassigned YES unset down downGigabitEthernet1/0/13 unassigned YES unset down downGigabitEthernet1/0/14 unassigned YES unset down down GigabitEthernet1/0/15 unassigned YES unset down down GigabitEthernet1/0/16 unassigned YES unset down down GigabitEthernet1/0/17 unassigned YES unset down down GigabitEthernet1/0/18 unassigned YES unset down down GigabitEthernet1/0/19 unassigned YES unset down down GigabitEthernet1/0/20 unassigned YES unset down down GigabitEthernet1/0/21 unassigned YES unset down down GigabitEthernet1/0/22 unassigned YES unset down down GigabitEthernet1/0/23 unassigned YES unset down down GigabitEthernet1/0/24 unassigned YES unset down down GigabitEthernet1/1/1 unassigned YES unset down down GigabitEthernet1/1/2 unassigned YES unset down down GigabitEthernet1/1/3 unassigned YES unset down down GigabitEthernet1/1/4 unassigned YES unset down down Te1/1/1 unassigned YES unset down down Te1/1/2 unassigned YES unset down downSwitch#Switch#Switch#configure terminalEnter configuration commands, one per line. End with CNTL/Z.Switch(config)#interface vlan 2Switch(config-if)#Mar 29 02:52:06.646: %LINEPROTO-5-UPDOWN: Line protocol on Interface Vlan2, chan ged state to downSwitch(config-if)#ip address 10.52.40.254 255.255.255.0Switch(config-if)#endSwitch#Mar 29 02:53:30.171: %SYS-5-CONFIG_I: Configured from console by consoleSwitch#configure terminalEnter configuration commands, one per line. End with CNTL/Z.Switch(config)#interface vlan 3Switch(config-if)#Mar 29 02:54:00.672: %LINEPROTO-5-UPDOWN: Line protocol on Interface Vlan3, chan ged state to downSwitch(config-if)#ip address 10.52.41.254 255.255.255.0Switch(config-if)#endSwitch#Mar 29 02:54:28.765: %SYS-5-CONFIG_I: Configured from console by consoleSwitch#show ip interface briefInterface IP-Address OK? Method Status Protocol Vlan1 191.167.0.2 YES TFTP up down Vlan2 10.52.40.254 YES manual up down Vlan3 10.52.41.254 YES manual up down FastEthernet0 unassigned YES other down down GigabitEthernet1/0/1 unassigned YES unset down down GigabitEthernet1/0/2 unassigned YES unset down down GigabitEthernet1/0/3 unassigned YES unset down down GigabitEthernet1/0/4 unassigned YES unset down down GigabitEthernet1/0/5 unassigned YES unset down down GigabitEthernet1/0/6 unassigned YES unset down down GigabitEthernet1/0/7 unassigned YES unset down down GigabitEthernet1/0/8 unassigned YES unset down down GigabitEthernet1/0/9 unassigned YES unset down down GigabitEthernet1/0/10 unassigned YES unset down downGigabitEthernet1/0/11 unassigned YES unset down downGigabitEthernet1/0/12 unassigned YES unset down down GigabitEthernet1/0/13 unassigned YES unset down down GigabitEthernet1/0/14 unassigned YES unset down down GigabitEthernet1/0/15 unassigned YES unset down down GigabitEthernet1/0/16 unassigned YES unset down down GigabitEthernet1/0/17 unassigned YES unset down down GigabitEthernet1/0/18 unassigned YES unset down down GigabitEthernet1/0/19 unassigned YES unset down down GigabitEthernet1/0/20 unassigned YES unset down down GigabitEthernet1/0/21 unassigned YES unset down down GigabitEthernet1/0/22 unassigned YES unset down down GigabitEthernet1/0/23 unassigned YES unset down down GigabitEthernet1/0/24 unassigned YES unset down down GigabitEthernet1/1/1 unassigned YES unset down down GigabitEthernet1/1/2 unassigned YES unset down down GigabitEthernet1/1/3 unassigned YES unset down down GigabitEthernet1/1/4 unassigned YES unset down down Te1/1/1 unassigned YES unset down down Te1/1/2 unassigned YES unset down downSwitch#Switch#Switch#show vlan briefVLAN Name Status Ports---- -------------------------------- --------- -------------------------------1 default active Gi1/0/3, Gi1/0/4, Gi1/0/5Gi1/0/6, Gi1/0/7, Gi1/0/8Gi1/0/9, Gi1/0/10, Gi1/0/11Gi1/0/12, Gi1/0/13, Gi1/0/14Gi1/0/15, Gi1/0/16, Gi1/0/17Gi1/0/18, Gi1/0/19, Gi1/0/20Gi1/0/21, Gi1/0/22, Gi1/0/23Gi1/0/24, Gi1/1/1, Gi1/1/2Gi1/1/3, Gi1/1/42 plc active Gi1/0/1, Gi1/0/23 level active1002 fddi-default act/unsup1003 token-ring-default act/unsup1004 fddinet-default act/unsup1005 trnet-default act/unsupSwitch#configure terminalEnter configuration commands, one per line. End with CNTL/Z.Switch(config)#interface range gigabitethernet1/0/3 - 20Switch(config-if-range)#switch mode accessSwitch(config-if-range)#switch access vlan 2Switch(config-if-range)#endSwitch#Mar 29 02:59:22.333: %SYS-5-CONFIG_I: Configured from console by consoleSwitch#show vlan briefVLAN Name Status Ports---- -------------------------------- --------- -------------------------------1 default active Gi1/0/21, Gi1/0/22, Gi1/0/23Gi1/0/24, Gi1/1/1, Gi1/1/2Gi1/1/3, Gi1/1/42 plc active Gi1/0/1, Gi1/0/2, Gi1/0/3Gi1/0/4, Gi1/0/5, Gi1/0/6Gi1/0/7, Gi1/0/8, Gi1/0/9Gi1/0/10, Gi1/0/11, Gi1/0/12Gi1/0/13, Gi1/0/14, Gi1/0/15Gi1/0/16, Gi1/0/17, Gi1/0/18Gi1/0/19, Gi1/0/203 level active1002 fddi-default act/unsup1003 token-ring-default act/unsup1004 fddinet-default act/unsup1005 trnet-default act/unsupSwitch#configure terminalEnter configuration commands, one per line. End with CNTL/Z.Switch(config)#interface range gigabitethernet1/0/21 - 24Switch(config-if-range)#switch mode accessSwitch(config-if-range)#switch access vlan 3Switch(config-if-range)#endSwitch#Mar 29 03:01:19.388: %SYS-5-CONFIG_I: Configured from console by consoleSwitch#show vlan briefVLAN Name Status Ports---- -------------------------------- --------- -------------------------------1 default active Gi1/1/1, Gi1/1/2, Gi1/1/3Gi1/1/42 plc active Gi1/0/1, Gi1/0/2, Gi1/0/3Gi1/0/4, Gi1/0/5, Gi1/0/6Gi1/0/7, Gi1/0/8, Gi1/0/9Gi1/0/10, Gi1/0/11, Gi1/0/12Gi1/0/13, Gi1/0/14, Gi1/0/15Gi1/0/16, Gi1/0/17, Gi1/0/18Gi1/0/19, Gi1/0/203 level active Gi1/0/21, Gi1/0/22, Gi1/0/23Gi1/0/241002 fddi-default act/unsup1003 token-ring-default act/unsup1004 fddinet-default act/unsup1005 trnet-default act/unsupSwitch#configure terminalEnter configuration commands, one per line. End with CNTL/Z.Switch(config)#interface range gigabitethernet1/1/1 - 4Switch(config-if-range)#switch mode accessSwitch(config-if-range)#switch access vlan 3Switch(config-if-range)#endSwitch#Mar 29 03:05:44.921: %SYS-5-CONFIG_I: Configured from console by consoles% Type "show ?" for a list of subcommandsSwitch#show vlan briefVLAN Name Status Ports---- -------------------------------- --------- -------------------------------1 default active2 plc active Gi1/0/1, Gi1/0/2, Gi1/0/3Gi1/0/4, Gi1/0/5, Gi1/0/6Gi1/0/7, Gi1/0/8, Gi1/0/9Gi1/0/10, Gi1/0/11, Gi1/0/12Gi1/0/13, Gi1/0/14, Gi1/0/15Gi1/0/16, Gi1/0/17, Gi1/0/18Gi1/0/19, Gi1/0/203 level active Gi1/0/21, Gi1/0/22, Gi1/0/23Gi1/0/24, Gi1/1/1, Gi1/1/2Gi1/1/3, Gi1/1/41002 fddi-default act/unsup1003 token-ring-default act/unsup1004 fddinet-default act/unsup1005 trnet-default act/unsupSwitch#ip routing^% Invalid input detected at '^' marker.Switch#configure terminalEnter configuration commands, one per line. End with CNTL/Z.Switch(config)#ip routingSwitch(config)#endSwitch#Mar 29 03:09:23.922: %SYS-5-CONFIG_I: Configured from console by consoleSwitch#show ip ospfSwitch#copy running-config startup-configDestination filename [startup-config]?Building configuration...[OK]0 bytes copied in 1.217 secs (0 bytes/sec)Switch#Switch#Switch#Switch#Switch#Switch#。
CISCO交换机基本配置和使用概述
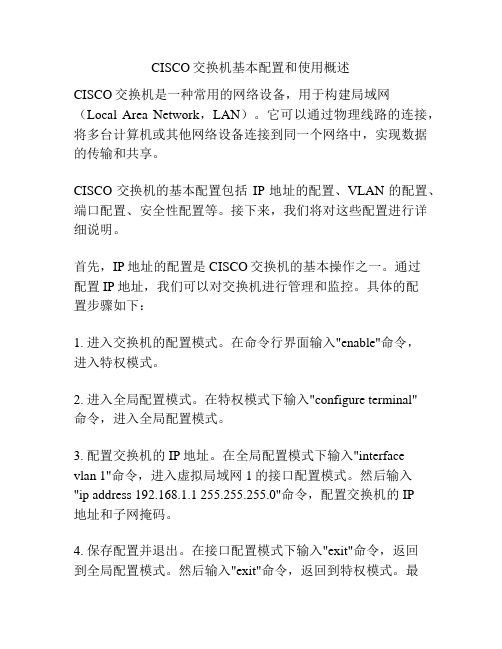
CISCO交换机基本配置和使用概述CISCO交换机是一种常用的网络设备,用于构建局域网(Local Area Network,LAN)。
它可以通过物理线路的连接,将多台计算机或其他网络设备连接到同一个网络中,实现数据的传输和共享。
CISCO交换机的基本配置包括IP地址的配置、VLAN的配置、端口配置、安全性配置等。
接下来,我们将对这些配置进行详细说明。
首先,IP地址的配置是CISCO交换机的基本操作之一。
通过配置IP地址,我们可以对交换机进行管理和监控。
具体的配置步骤如下:1. 进入交换机的配置模式。
在命令行界面输入"enable"命令,进入特权模式。
2. 进入全局配置模式。
在特权模式下输入"configure terminal"命令,进入全局配置模式。
3. 配置交换机的IP地址。
在全局配置模式下输入"interfacevlan 1"命令,进入虚拟局域网1的接口配置模式。
然后输入"ip address 192.168.1.1 255.255.255.0"命令,配置交换机的IP地址和子网掩码。
4. 保存配置并退出。
在接口配置模式下输入"exit"命令,返回到全局配置模式。
然后输入"exit"命令,返回到特权模式。
最后输入"copy running-config startup-config"命令,保存配置到闪存中。
其次,VLAN的配置是CISCO交换机的关键配置之一。
通过配置VLAN,我们可以将交换机的端口划分为不同的虚拟局域网,实现数据的隔离和安全。
1. 进入交换机的配置模式。
同样,在特权模式下输入"configure terminal"命令,进入全局配置模式。
2. 创建VLAN。
在全局配置模式下输入"vlan 10"命令,创建一个编号为10的VLAN。
思科交换机配置过程(vlan相关)
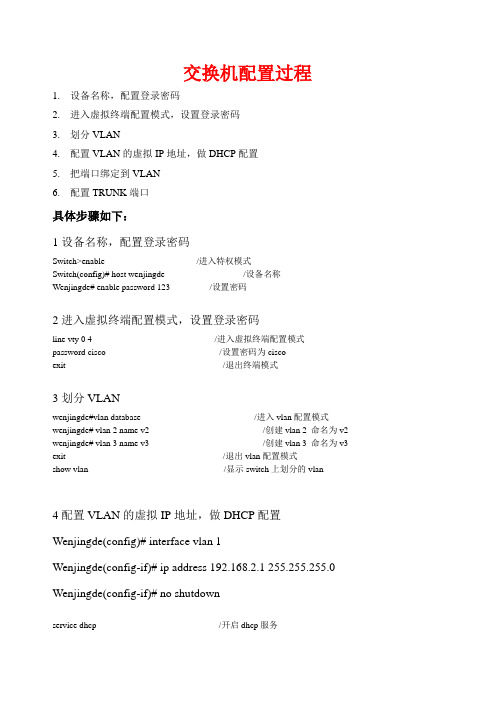
交换机配置过程1.设备名称,配置登录密码2.进入虚拟终端配置模式,设置登录密码3.划分VLAN4.配置VLAN的虚拟IP地址,做DHCP配置5.把端口绑定到VLAN6.配置TRUNK端口具体步骤如下:1设备名称,配置登录密码Switch>enable /进入特权模式Switch(config)# host wenjingde /设备名称Wenjingde# enable password 123 /设置密码2进入虚拟终端配置模式,设置登录密码line vty 0 4 /进入虚拟终端配置模式password cisco /设置密码为ciscoexit /退出终端模式3划分VLANwenjingde#vlan database /进入vlan配置模式wenjingde# vlan 2 name v2 /创建vlan 2 命名为v2 wenjingde# vlan 3 name v3 /创建vlan 3 命名为v3 exit /退出vlan配置模式show vlan /显示switch上划分的vlan4配置VLAN的虚拟IP地址,做DHCP配置Wenjingde(config)# interface vlan 1Wenjingde(config-if)# ip address 192.168.2.1 255.255.255.0 Wenjingde(config-if)# no shutdownservice dhcp /开启dhcp服务ip dhcp pool vlan1 /定义名为vlan 1的地址池network 192.168.2.0 255.255.255.0 /定义地址池的地址为192.168.1.0/24default-router 192.168.2.1 /设置网关为192.168.1.1(ip dhcp excluded-address 192.168.2.1 192.168.2.30 /1.1到1.30为不可分配的地址)copy running-config start-up /保存所有配置5把端口绑定到VLANinterface fastethernet 0/1 /进入端口配置模式switchport mode access /配置该端口是接入端口switchport access vlan 2 /把0/1端口划分到vlan 2spanning-tree portfast /该端口快速进入转发状态,无需等待30s收敛时间6配置TRUNK端口interface fastethernet 0/1 /进入端口配置模式,哪个端口是trunk端口switchport trunk encapsulation dot1q /配置trunk端口封装802.1q协议switchport mode trunk /启用trunk(switchport trunk native vlan 1) /可选配置,指定vlan1为本地vlanshow interface trunk /显示哪些端口是trunk口。
思科交换机路由基本配置命令
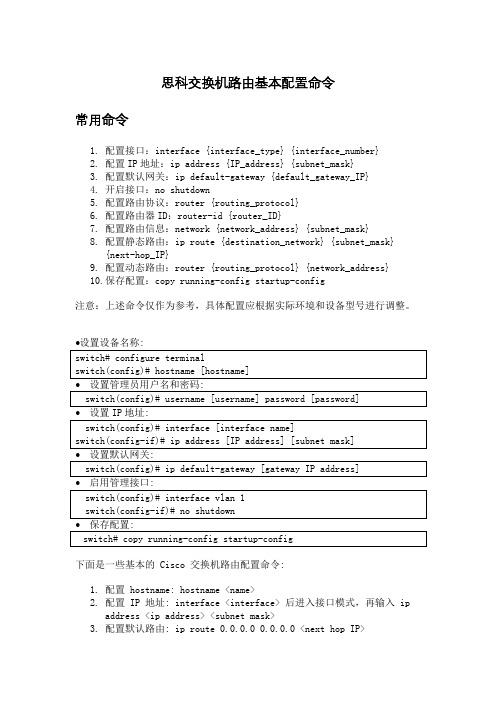
思科交换机路由基本配置命令常用命令1.配置接口:interface {interface_type} {interface_number}2.配置IP地址:ip address {IP_address} {subnet_mask}3.配置默认网关:ip default-gateway {default_gateway_IP}4.开启接口:no shutdown5.配置路由协议:router {routing_protocol}6.配置路由器ID:router-id {router_ID}7.配置路由信息:network {network_address} {subnet_mask}8.配置静态路由:ip route {destination_network} {subnet_mask}{next-hop_IP}9.配置动态路由:router {routing_protocol} {network_address}10.保存配置:copy running-config startup-config注意:上述命令仅作为参考,具体配置应根据实际环境和设备型号进行调整。
下面是一些基本的 Cisco 交换机路由配置命令:1.配置 hostname: hostname <name>2.配置 IP 地址: interface <interface> 后进入接口模式,再输入 ipaddress <ip address> <subnet mask>3.配置默认路由: ip route 0.0.0.0 0.0.0.0 <next hop IP>4.启用路由协议: router <protocol> (例如: router rip)5.配置路由连接: network <network address> (例如: network192.168.1.0)6.查看路由表: show ip routeCisco 交换机路由配置步骤1.进入配置模式:configure terminal2.配置 IP 地址和子网掩码:interface [interface-name] ; ip address[ip-address] [subnet-mask]3.配置默认路由:ip route 0.0.0.0 0.0.0.0 [next-hop-IP-address]4.启用路由协议:router [protocol-name] (如:router ospf)5.配置路由协议参数: [protocol-name] [process-id] (如:ospf 1)6.配置路由连接:network [network-address] [wildcard-mask] area[area-id] (如:network 192.168.1.0 0.0.0.255 area 0)7.保存配置:copy running-config startup-config8.退出配置模式:exit。
思科Cisco交换机配置手册配置教程
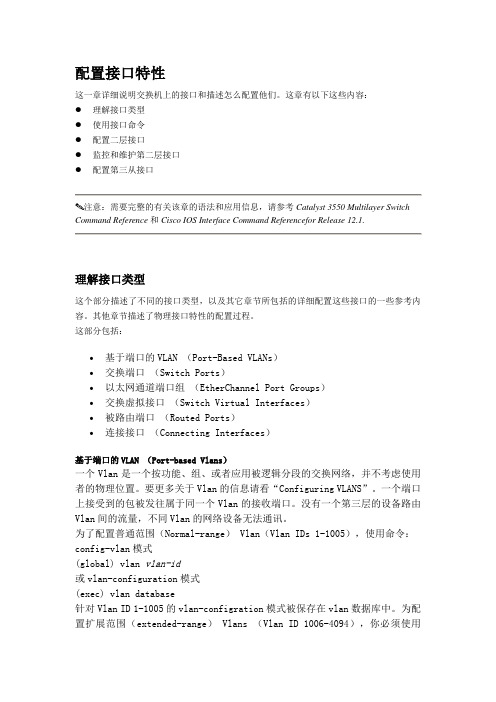
配置接口特性这一章详细说明交换机上的接口和描述怎么配置他们。
这章有以下这些内容:●理解接口类型●使用接口命令●配置二层接口●监控和维护第二层接口●配置第三从接口注意:需要完整的有关该章的语法和应用信息,请参考Catalyst 3550 Multilayer Switch Command Reference和Cisco IOS Interface Command Referencefor Release 12.1.理解接口类型这个部分描述了不同的接口类型,以及其它章节所包括的详细配置这些接口的一些参考内容。
其他章节描述了物理接口特性的配置过程。
这部分包括:•基于端口的VLAN (Port-Based VLANs)•交换端口(Switch Ports)•以太网通道端口组(EtherChannel Port Groups)•交换虚拟接口(Switch Virtual Interfaces)•被路由端口(Routed Ports)•连接接口(Connecting Interfaces)基于端口的VLAN (Port-based Vlans)一个Vlan是一个按功能、组、或者应用被逻辑分段的交换网络,并不考虑使用者的物理位置。
要更多关于Vlan的信息请看“Configuring VLANS”。
一个端口上接受到的包被发往属于同一个Vlan的接收端口。
没有一个第三层的设备路由Vlan间的流量,不同Vlan的网络设备无法通讯。
为了配置普通范围(Normal-range) Vlan(Vlan IDs 1-1005),使用命令:config-vlan模式(global) vlan vlan-id或vlan-configuration模式(exec) vlan database针对Vlan ID 1-1005的vlan-configration模式被保存在vlan数据库中。
为配置扩展范围(extended-range) Vlans (Vlan ID 1006-4094),你必须使用config-vlan模式,并把VTP的模式设为transparent透明模式。
Cisco思科光纤交换机配置说明.doc
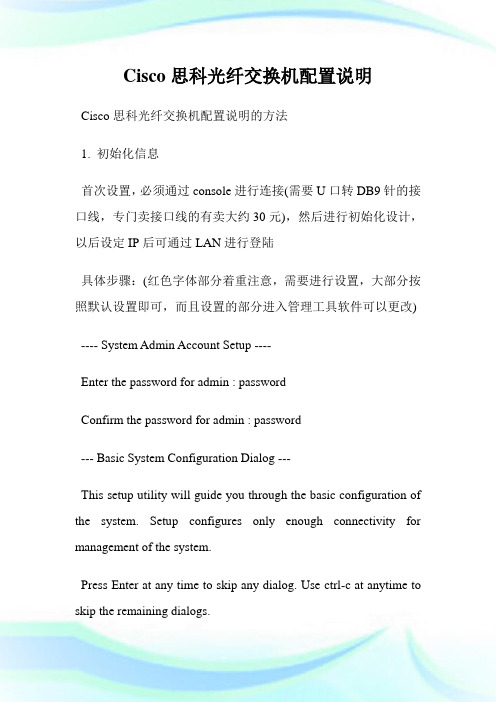
Cisco思科光纤交换机配置说明Cisco思科光纤交换机配置说明的方法1. 初始化信息首次设置,必须通过console进行连接(需要U口转DB9针的接口线,专门卖接口线的有卖大约30元),然后进行初始化设计,以后设定IP后可通过LAN进行登陆具体步骤:(红色字体部分着重注意,需要进行设置,大部分按照默认设置即可,而且设置的部分进入管理工具软件可以更改) ---- System Admin Account Setup ----Enter the password for admin : passwordConfirm the password for admin : password--- Basic System Configuration Dialog ---This setup utility will guide you through the basic configuration of the system. Setup configures only enough connectivity for management of the system.Press Enter at any time to skip any dialog. Use ctrl-c at anytime to skip the remaining dialogs.Would you like to enter the basic configuration dialog (yes/no): y Create another login account (yes/no) [n]:Configure read-only SNMP community string (yes/no) [n]: Configure read-write SNMP community string (yes/no) [n]:Enter the switch name: Pxx-MDS-x (where xx is your pod number and x is the switch number; for example:P01-MDS-1)Continue with Out-of-band (mgmt0) management configuration? (yes/no) [y]:Mgmt0 IPv4 address : 10.0.x.y (where x is your pod number and y is 5 for MDS-1 and 3 for MDS-2)(客户)0.16Mgmt0 IPv4 netmask : 255.255.255.0Configure the default gateway? (yes/no) [y]:IPv4 address of the default gateway : 10.0.x.254 (where x is your pod number)Configure advanced IP options? (yes/no) [n]:Enable the telnet service? (yes/no) [y]:Enable the ssh service? (yes/no) [n]:Configure the ntp server? (yes/no) [n]:Configure default switchport interface state (shut/noshut) [shut]: (注意一下)noshutConfigure default switchport trunk mode (on/off/auto) [on]:Configure default zone policy (permit/deny) [deny]:Enable full zoneset distribution (yes/no) [n]:NOTE:初始设定的配置对新的VSAN起作用,即原始VSAN1无这些配置解决办法:1 zone default-zone permit VSAN2 新建NEW VSAN2 将port转移VSAN2里面。
思科交换机简单配置(通用教程)

• 双工模式: Switch(config-if)#duplex ? auto Enable AUTO duplex configuration full Force full duplex operation half Force half-duplex operation
Switch(config-if)#duplex auto Switch(config-if)# • 端口描述 Switch(config-if)#description vlan 10 trunk Switch(config-if)#
配置ip地址的命令格式: ip address {ip-address} {netmask}
测试常用端口类型Acce来自s / trunk将此端口设置为vlan10 的access口 Switch(config-if)#switchport mode access Switch(config-if)#switchport access vlan 10 Switch(config-if)# 将此端口设置为vlan10 的trunk口 Switch(config-if)#switchport trunk encapsulation dot1q Switch(config-if)#switchport mode trunk Switch(config-if)#switchport trunk allowed vlan 10
Vlan设置
• Vlan设置范围:1---4094 • 在全局模式下配置vlan Switch#conf t Switch(config)#vlan 10 Switch(config-vlan)#name vlan10 Switch(config-vlan)#vlan 20 Switch(config-vlan)#name vlan20 Vlan名称可以自行定义
思科交换机的基本配置
思科交换机的基本配置思科交换机的基本配置H3C每年将销售额的15%以上用于研发投入,在中国的北京、杭州和深圳设有研发机构,在北京和杭州设有可靠性试验室以及产品鉴定测试中心。
下面店铺整理一些思科交换机的基本配置,希望大家认真阅读!CISCO交换机基本配置:Console端口连接用户模式hostname# ;特权模式hostname(config)# ;全局配置模式hostname(config-if)# ;交换机口令设置:switch>enable ;进入特权模式switch#config terminal ;进入全局配置模式switch(config)#hostname csico ;设置交换机的主机名switch(config)#enable secret csico1 ;设置特权加密口令switch(config)#enable password csico8 ;设置特权非密口令switch(config)#line console 0 ;进入控制台口switch(config-line)#line vty 0 4 ;进入虚拟终端switch(config-line)#login ;虚拟终端允许登录switch(config-line)#password csico6 ;设置虚拟终端登录口令csico6switch#exit ;返回命令交换机VLAN创建,删除,端口属性的设置,配置trunk端口,将某端口加入vlan中,配置VTP:switch#vlan database ;进入VLAN设置switch(vlan)#vlan 2 ;建VLAN 2switch(vlan)#vlan 3 name vlan3 ;建VLAN 3并命名为vlan3switch(vlan)#no vlan 2 ;删vlan 2switch(config)#int f0/1 ;进入端口1switch(config)#speed ? 查看speed命令的子命令switch(config)#speed 100 设置该端口速率为100mb/s (10/auto)switch(config)#duplex ? 查看duplex的子命令switch(config)#duplex full 设置该端口为全双工(auto/half)switch(config)#description TO_PC1 这是该端口描述为TO_PC1 switch(config-if)#switchport access vlan 2 ;当前端口加入vlan 2switch(config-if)#switchport mode trunk ;设置为trunk模式(access模式)switch(config-if)#switchport trunk allowed vlan 1,2 ;设置允许的vlanswitch(config-if)#switchport trunk encap dot1q ;设置vlan 中继switch(config)#vtp domain vtpserver ;设置vtp域名相同switch(config)#vtp password ;设置发vtp密码switch(config)#vtp server ;设置vtp服务器模式switch(config)#vtp client ;设置vtp客户机模式交换机设置IP地址,默认网关,域名,域名服务器,配置和查看MAC地址表:switch(config)#interface vlan 1 ;进入vlan 1switch(config-if)#ip address 192.168.1.1 255.255.255.0 ;设置IP地址switch(config)#ip default-gateway 192.168.1.6 ;设置默认网关switch(config)#ip domain-name 设置域名switch(config)#ip name-server 192.168.1.18 设置域名服务器switch(config)#mac-address-table? 查看mac-address-table 的子命令switch(config)#mac-address-table aging-time 100 设置超时时间为100msswitch(config)#mac-address-table permanent 0000.0c01.bbcc f0/3 加入永久地址在f0/3端口switch(config)#mac-address-table restricted static 0000.0c02.bbcc f0/6 f0/7 加入静态地址目标端口f0/6源端口f0/7 switch(config)#endswitch#show mac-address-table 查看整个MAC地址表switch#clear mac-address-table restricted static 清除限制性静态地址交换机显示命令:switch#write ;保存配置信息switch#show vtp ;查看vtp配置信息switch#show run ;查看当前配置信息switch#show vlan ;查看vlan配置信息switch#show interface ;查看端口信息switch#show int f0/0 ;查看指定端口信息switch#show int f0/0 status;查看指定端口状态switch#dir flash: ;查看闪存Cisco路由器配置命令大全网络2010-06-26 06:43:44 阅读657 评论0 字号:大中小订阅 .(1)模式转换命令用户模式----特权模式,使用命令"enable"特权模式----全局配置模式,使用命令"config t"全局配置模式----接口模式,使用命令"interface+接口类型+接口号"全局配置模式----线控模式,使用命令"line+接口类型+接口号"注:用户模式:查看初始化的信息.特权模式:查看所有信息、调试、保存配置信息全局模式:配置所有信息、针对整个路由器或交换机的所有接口接口模式:针对某一个接口的配置线控模式:对路由器进行控制的接口配置(2)配置命令show running config 显示所有的配置show versin 显示版本号和寄存器值shut down 关闭接口no shutdown 打开接口ip add +ip地址配置IP地址secondary+IP地址为接口配置第二个IP地址show interface+接口类型+接口号查看接口管理性show controllers interface 查看接口是否有DCE电缆show history 查看历史记录show terminal 查看终端记录大小hostname+主机名配置路由器或交换机的标识config memory 修改保存在NVRAM中的启动配置exec timeout 0 0 设置控制台会话超时为0service password-encryptin 手工加密所有密码enable password +密码配置明文密码ena sec +密码配置密文密码line vty 0 4/15 进入telnet接口password +密码配置telnet密码line aux 0 进入AUX接口password +密码配置密码line con 0 进入CON接口password +密码配置密码bandwidth+数字配置带宽no ip address 删除已配置的IP地址show startup config 查看NVRAM中的配置信息copy run-config atartup config 保存信息到NVRAM write 保存信息到NVRAMerase startup-config 清除NVRAM中的配置信息show ip interface brief 查看接口的谪要信息banner motd # +信息 + # 配置路由器或交换机的描素信息description+信息配置接口听描素信息vlan database 进入VLAN数据库模式vlan +vlan号+ 名称创建VLANswitchport access vlan +vlan号为VLAN为配接口interface vlan +vlan号进入VLAN接口模式ip add +ip地址为VLAN配置管理IP地址vtp+service/tracsparent/client 配置SW的VTP工作模式vtp +domain+域名配置SW的VTP域名vtp +password +密码配置SW的密码switchport mode trunk 启用中继no vlan +vlan号删除VLANshow spamming-tree vlan +vlan号查看VLA怕生成树议2. 路由器配置命令ip route+非直连网段+子网掩码+下一跳地址配置静态/默认路由show ip route 查看路由表show protocols 显示出所有的被动路由协议和接口上哪些协议被设置show ip protocols 显示了被配置在路由器上的路由选择协议,同时给出了在路由选择协议中使用的定时器等信息router rip 激活RIP协议network +直连网段发布直连网段interface lookback 0 激活逻辑接口passive-interface +接口类型+接口号配置接口为被动模式debug ip +协议动态查看路由更新信息undebug all 关闭所有DEBUG信息router eigrp +as号激活EIGRP路由协议network +网段+子网掩码发布直连网段show ip eigrp neighbors 查看邻居表show ip eigrp topology 查看拓扑表show ip eigrp traffic 查看发送包数量router ospf +process-ID 激活OSPF协议network+直连网段+area+区域号发布直连网段show ip ospf 显示OSPF的进程号和ROUTER-IDencapsulation+封装格式更改封装格式no ip admain-lookup 关闭路由器的域名查找ip routing 在三层交换机上启用路由功能show user 查看SW的在线用户clear line +线路号清除线路3. 三层交换机配置命令配置一组二层端口configure terminal 进入配置状态nterface range {port-range} 进入组配置状态配置三层端口configure terminal 进入配置状态interface {{fastethernet | gigabitethernet} interface-id} | {vlan vlan-id} | {port-channel port-channel-number} 进入端口配置状态no switchport 把物理端口变成三层口ip address ip_address subnet_mask 配置IP地址和掩码no shutdown 激活端口例:Switch(config)# interface gigabitethernet0/2Switch(config-if)# no switchportSwitch(config-if)# ip address 192.20.135.21 255.255.255.0Switch(config-if)# no shutdown配置VLANconfigure terminal 进入配置状态vlan vlan-id 输入一个VLAN号, 然后进入vlan配态,可以输入一个新的VLAN号或旧的来进行修改。
cisco3560思科交换机常用配置教程与实例
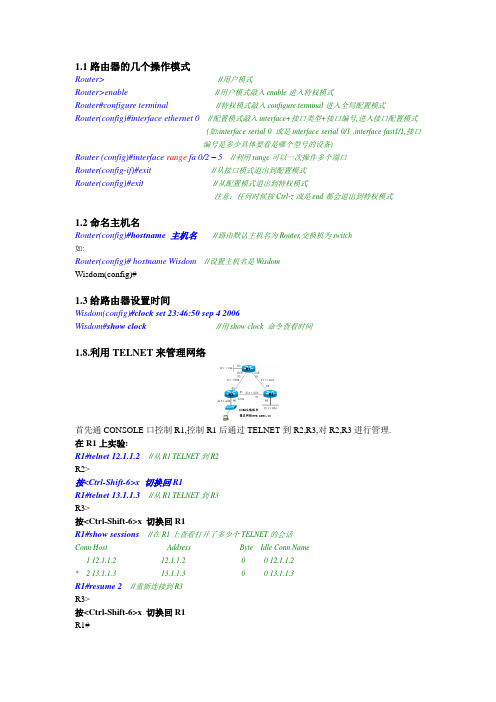
1.1路由器的几个操作模式Router>//用户模式Router>enable//用户模式敲入enable进入特权模式Router#configure terminal//特权模式敲入configure terminal进入全局配置模式Router(config)#interface ethernet 0//配置模式敲入interface+接口类型+接口编号,进入接口配置模式(如:interface serial 0 或是interface serial 0/1 ,interface fast1/1,接口编号是多少具体要看是哪个型号的设备)Router (config)#interface range fa 0/2 – 5//利用range可以一次操作多个端口Router(config-if)#exit //从接口模式退出到配置模式Router(config)#exit//从配置模式退出到特权模式注意:任何时候按Ctrl-z或是end都会退出到特权模式1.2命名主机名Router(config)#hostname 主机名//路由默认主机名为Router,交换机为switch如:Router(config)#hostname Wisdom//设置主机名是WisdomWisdom(config)#1.3给路由器设置时间Wisdom(config)#clock set 23:46:50 sep 4 2006Wisdom#show clock//用show clock 命令查看时间1.8.利用TELNET来管理网络首先通CONSOLE口控制R1,控制R1后通过TELNET到R2,R3,对R2,R3进行管理.在R1上实验:R1#telnet 12.1.1.2//从R1 TELNET到R2R2>按<Ctrl-Shift-6>x 切换回R1R1#telnet 13.1.1.3//从R1 TELNET到R3R3>按<Ctrl-Shift-6>x 切换回R1R1#show sessions//在R1上查看打开了多少个TELNET的会话Conn Host Address Byte Idle Conn Name1 12.1.1.2 12.1.1.2 0 0 12.1.1.2* 2 13.1.1.3 13.1.1.3 0 0 13.1.1.3R1#resume 2//重新连接到R3R3>按<Ctrl-Shift-6>x 切换回R1R1#R1#disconnect 1//从R1是主动断开到R2的连接(断开一个TELNET的会话)在R2上实验:R2#show users//在R2上查看有谁登录到路由器Line User Host(s) Idle Location* 0 con 0 idle 00:00:002 vty 0 idle 00:01:52 12.1.1.1R2#clear line 2//发现有人TELNET过来,把他清除R2#show usersLine User Host(s) Idle Location* 0 con 0 idle 00:00:00注意:Show session和show user的区别Disconnect 和Clear line的区别Ctrl+shift+6 x 和resume1.9 PING、TraceRoute、Debug、Sysloga.使用PING命令R1#ping 12.1.1.2如果ping的结果是!!!!!则表明网络正常.如果ping的结果是…..则表明网络不通.如果ping的结果是U.U.U则表明下一跳不可达.b.使用traceroute命令, 在网络层上追踪源到目的地址所经过的路由器.(或是数据包经过的路径)例:R2#traceroute 33.1.1.3Tracing the route to 33.1.1.31 12.1.1.1 4 msec 4 msec 4 msec2 13.1.1.34 msec 4 msec *//从以上可以看出从R2 到达33.1.1.3经过了12.1.1.1和13.1.1.3两个路由器例:………………………………………………………………………………………………………………….3.3使用串口管理交换机。
Cisco交换机入门配置的方法

Cisco交换机入门配置的方法你还在为不知道Cisco交换机入门配置的方法而烦恼么?接下来是小编为大家收集的Cisco交换机入门配置的方法教程,希望能帮到大家。
Cisco交换机入门配置的方法:机型:Cisco 3750想对交换机警醒配置。
一般有两种方法:1、控制台端口(Console):可以直接对交换机进行配置2、远程登录(Telnet):通过TELNET程序对已经设置了IP的交换机进行远程配置,一般等控制台端口配置好交换机的IP后才可以进行。
除了以上的两种方法外,其实还有两种方法:1、WEB的配置方式。
此方法只能配置一般的简单设置2、硬件自带的应用程序。
专用的程序,一般很少用建立控制台连接到交换机一般交换机自带一根Console线,一端连接到交换机的Comsole 口,一端连接到电脑的串行口。
打开超级终端,一般就可以连接到交换机。
具体的参数设置如下这样就可以连接到交换机了连接到交换机后,如果是第一次启动会要执行初始化操作,一般是设置交换机的名称,密码等一般的信息。
由于交换机已经初始化,如果要进行初始化操作,那就要进入特权EXEC模式,在命令提示符号下输入:setup,就会启动初始化操作。
刚才讲到了特权EXEC模式,这理就要讲一下觉换机的几种模式,不同的模式可以执行不同的操作命令,首先来说两种基本的模式。
一般为了安全考虑,CISCO将操作会话分为两个不同的访问级别:用户EXEC级别和特权EXEC级别。
用户EXEC级别只能使用有限的命令,且交换机显示Switch>提示符,不能对交换机进行配置。
看例子,处于用户EXEC级别下的状态:AITG_FrontekCoreSW>特权EXEC级别下交换机显示Switch#提示符,能对交换机进行各种配置。
看例子,处于特权EXEC级别下的状态:输入en,进入特权EXEC级别,接着输入密码,进入特权EXEC级别AITG_FrontekCoreSW>enPassword:AITG_FrontekCoreSW#看看,提示符变了,用户在用户EXEC级别输入enable(或en),然后输入密码,就可以进入特权EXEC级别在交换机提示符下输入“?”,可以列出相应模式下交换机所支持的所有命令。
思科交换机的常用配置

思科交换机的常用配置思科交换机的常用配置1、交换机的端口2、端口:以太网端口(e0、e1)、快速以太网端口(fast0、fast0/1[第一个模块的第一端口、fast1、fast1/1)、光纤接口(Tx、Rx)2、交换机的配置方法a、通过CONSOLE端口利用配置第一次安装使用交换机时,只能通过配置口(Console)进行配置。
配置电缆连接第一步:将配置电缆的DB-9(或DB-25)孔式插头接到要对交换机进行配置的微机或终端的串口上。
第二步:将配置电缆的RJ-45一端连到交换机器的配置口(Console)上。
设置微机或终端的参数第一步:打开微机或终端。
如果使用微机进行配置,需要在微机上运行终端仿真程序,如Windows 3.1的Terminal、Windows95/Windows98/Windows NT的超级终端。
第二步:设置终端参数。
参数要求:设置波特率为9600,数据位为8,奇偶校验为无,停止位为1,流量控制为无,Windows98超级终端参数设置方法如下:(1) 在图5-2所示的超级终端窗口中,单击其[属性]按钮,出现图5-3所示的超级终端属性对话框。
(2) 在超级终端属性对话框中[连接时使用]一栏选择连接的串口。
(3) 在串口的属性对话框中设置波特率为9600,数据位为8,奇偶校验为无,停止位为1,流量控制为无。
单击[确定]按钮交换机上电确认交换机与配置终端的连接正确,确认已经完成配置终端参数的设置后,即可对交换机上电。
随后交换机出现自检内容。
启动完毕,回车,超级终端里显示字样(旧命令行提示的是router>)。
即可进行下一步的配置。
备注要进行配置,具体配置情况以后再讲b、命令输入时的技巧?、TAB、↑、CTrl+d(删除光标所在位置的字附)、CTRL+C的使用。
3、交换的日常维护A、交换机的几种工作状态a、用户命令状态(switch>)b、特权状态(switch #)在用户命令状态下输入enablec、全局配置状态[switch (config)#]在特权状态下输入config命令B、查看交换机的版本(show version)C、查看交换机正在运行的文件(show run)D、查看交换机的备份文件(show star)E、设置交换机的密码F、查看闪存内的信息(show flash 显示的是交换机的IOS软件信息)G、exit返回到上一步2950常用配置a、设置从用户命令状态到特权状态的密码switch (config)#enable password abc(密码设为abc)switch (config)#enable secret abc(密码设为abc,但密码已被加密)switch (config)#hostname ipkh(将交换机的名字改为ipkh)switch#reload(重新启动交换机)b、置利用TELNET进行远程登录router>enablerouter#config trouter(config)#enable password abc(设置一个密码)router(config)#line vty 0 4(设置4条虚拟线路)router(config-line)#login(让路由器显示输入口令的提示)router(config-line)#password 123router(config-line)#exit(返回一步)备注:如果不设置密码,远程用户无法进行TELNET登录siwtchVlan1Vlan2Vlan3交换机的VLAN配置Switch#conf tSwitch(config)#inter vlan1Switch(config-if)#ip add 192.168.1.1 255.255.255.0(VLAN1是用来管理交换机的,VLAN1的地址也就是交换机的地址)Switch(config)#no shutdownSwitch(config)#ip default-gateway 192.168.1.2(设置交换机的缺省网关)Switch(config-if)#exitSwitch(config)#exitSwitch#vlan dataSwitch(vlan)#vlan 2 name cwSwitch(vlan)#vlan 3 name rsSwitch(vlan)#exitSwitch#conf tSwitch(config)#int range fa0/1 –3Switch(config-if)# switchport mode access(将此端口设置为访问模式,属于默认方式)Switch(config-if)#switchport access vlan 1Switch(config)#int range fa0/4 –6Switch(config-if)# switchport access vlan 2Switch(config)#int range fa0/7 –10Switch(config-if)#switchport access vlan 3Switch(config)#int fa0/11Switch(config-if)#switchport mode trunkSwitch(config-if)#duplex fullSwitch(config-if)#speed 1002950Aserver2950BclientVlan1Vlan2Vlan1Vlan2主干道配置2950ASwitch#conf tSwitch(config)#inter vlan1Switch(config-if)#ip add 192.168.1.1 255.255.255.0(VLAN1是用来管理交换机的,VLAN1的地址也就是交换机的地址)Switch(config)#no shutdownSwitch(config)#ip default-gateway 192.168.1.2(设置交换机的缺省网关)Switch(config-if)#exitSwitch(config)#exitSwitch#vlan dataSwitch(vlan)# vtp serverSwitch(vlan)#vtp domain ipkhSwitch(vlan)#vlan 2 name cwSwitch(vlan)#vlan 3 name rsSwitch(vlan)#exitSwitch#conf tSwitch(config)#int range fa0/1 –3Switch(config-if)# switchport mode accessSwitch(config-if)#switchport access vlan 1Switch(config)#int range fa0/4 –6Switch(config-if)# switchport mode accessSwitch(config-if)# switchport access vlan 2Switch(config)#int range fa0/7 –10Switch(config-if)#switchport access vlan 3Switch(config-if)# switchport mode accessSwitch(config)#int fa0/11Switch(config-if)#switchport mode trunkSwitch(config-if)#duplex fullSwitch(config-if)#speed 1002950BSwitch#conf tSwitch(config)#inter vlan1Switch(config-if)#ip add 192.168.1.1 255.255.255.0(VLAN1是用来管理交换机的,VLAN1的地址也就是交换机的地址,必须与2950A相同)Switch(config)#no shutdownSwitch(config-if)#exitSwitch(config)#exitSwitch#vlan dataSwitch(vlan)# vtp clientSwitch(vlan)#vtp domain ipkhSwitch(vlan)#exitSwitch#conf tSwitch(config)#int range fa0/1 –3Switch(config-if)# switchport mode accessSwitch(config-if)#switchport access vlan 1Switch(config)#int range fa0/4 –6Switch(config-if)#switchport mode accessSwitch(config-if)# switchport access vlan 2Switch(config)#int range fa0/7 –10Switch(config-if)# switchport mode accessSwitch(config-if)#switchport access vlan 3Switch(config)#int fa0/11Switch(config-if)#switchport mode trunkSwitch(config-if)#duplex fullSwitch(config-if)#speed 100单臂路由器与交换机之间的合作组网(路由器的以太网口必须为快速以太网接口):实现1、各VLAN间相互通信,2、局域网内部的各计算机能与INTERNET 通信fa0RswitchVlan1Vlan2fa1E0:192.168.1.1E1:192.168.2.1R的配置Router(config)#int fa0/1Router(config-if)#ip add 192.168.2.1 255.255.255.0Router(config-if)#no shutdownRouter(config-if)#ip nat outsideRouter(config)#access-list 1 permit anyRouter(config)#ip route 0.0.0.0 0.0.0.0 fa0/1Router(config)#ip nat inside source list 1 interface fa0/1 overloadRouter(config-if)#exitRouter(config)#int fa0/0Router(config-if)#duplex fullRouter(config-if)#speed 100Router(config-if)#no shutdownRouter(config-if)#exitRouter(config)#int fa0/0.1(vlan 1的子接口)Router(config-subif)# encap isl 1/encap dot1q 1(路由器与交换机之间的互联协议为ISL/802.1q)Router(config-subif)#ip add 192.168.1.1 255.255.255.0Router(config-subif)#ip nat inside(此接口作为NAT内接口)Router(config)#int fa0/0.2(vlan 2的子接口)Router(config-subif)# encap isl 1(路由器与交换机之间的互联协议为ISL)Router(config-subif)#ip add 192.168.2.1 255.255.255.0Router(config-subif)#ip nat insideRouter(config)#int fa0/0.3(vlan 2的子接口)Router(config-subif)# encap isl 1(路由器与交换机之间的互联协议为ISL)Router(config-subif)#ip add 192.168.3.1 255.255.255.0Router(config-subif)#ip nat insideSwitch的配置Switch(config)#int fa0/0Switch(config-if)#switch mode trunkSwitch(config-if)#switch trunk encap isl/dot1q(要与路由器保持一致)Switch(config-if)#speed 100Switch(config-if)#duplex fullSwitch(config)#int vlan1Switch(config-if)#ip add 192.168.1.2 255.255.255.0Switch(config-if)#exitSwitch(config)#ip default-gateway 192.168.1.1Switch(config)#exitSwitch#vlan dataSwitch(vlan)#vlan 2 name cwSwitch(vlan)#vlan 3 name rsSwitch(vlan)#vtp serverSwitch(vlan)#vtp domain ipkhSwitch(vlan)#exitSwitch#conf tSwitch(config)#int range fa0/1 –3Switch(config-if)#switchprot access vlan 1Switch(config-if)spanning-tree portfastSwitch(config)#int range fa0/4 –7Switch(config-if)#switchprot access vlan 2Switch(config-if)spanning-tree portfastSwitch(config)#int range fa0/8 –10Switch(config-if)#switchprot access vlan 3Switch(config-if)spanning-tree portfastCisco6509交换机设置DHCP实例一位客户想把DHCP SERVER迁移到6509交换机的MSFC上,要求还挺复杂:1.同时为多个VLAN的客户机分配地址2.VLAN内有部分地址采用手工分配的方式3.为客户指定网关、Wins服务器等4.VLAN 2的地址租用有效期限为1天,其它为3天5.按MAC地址为特定用户分配指定的IP地址最终配置如下:ip dhcp excluded-address 10.1.1.1 10.1.1.19 //不用于动态地址分配的地址ip dhcp excluded-address 10.1.1.240 10.1.1.254ip dhcp excluded-address 10.1.2.1 10.1.2.19!ip dhcp pool global //global是pool name,由用户指定network 10.1.0.0 255.255.0.0 //动态分配的地址段domain-name //为客户机配置域后缀dns-server 10.1.1.1 10.1.1.2 //为客户机配置dns服务器netbios-name-server 10.1.1.5 10.1.1.6 //为客户机配置wins服务器netbios-node-type h-node //为客户机配置节点模式(影响名称解释的顺利,如h-node=先通过wins服务器解释...)lease 3 //地址租用期限: 3天ip dhcp pool vlan1network 10.1.1.0 255.255.255.0 //本pool是global的子pool, 将从global pool继承domain-name等optiondefault-router 10.1.1.100 10.1.1.101 //为客户机配置默认网关!ip dhcp pool vlan2 //为另一VLAN配置的poolnetwork 10.1.2.0 255.255.255.0default-router 10.1.2.100 10.1.2.101lease 1!ip dhcp pool vlan1_john //总是为MAC地址为...的机器分配...地址host 10.1.1.21 255.255.255.0client-identifier 010050.bade.6384 //client-identifier=01加上客户机网卡地址!ip dhcp pool vlan1_tomhost 10.1.1.50 255.255.255.0client-identifier 010010.3ab1.eac8相关的DHCP调试命令:no service dhcp //停止DHCP服务[默认为启用DHCP服务sh ip dhcp binding //显示地址分配情况show ip dhcp conflict //显示地址冲突情况debug ip dhcp server {events | packets | linkage} //观察DHCP服务器工作情况如果DHCP客户机分配不到IP地址,常见的原因有两个。
cisco思科交换机配置篇

cisco思科交换机配置篇cisco思科交换机配置篇要进行思科交换机的配置,首先就得进入交换机的全局配置模式,在成功连接交换机并且登陆成功进入特权模式下,下面跟yjbys店铺一起来学习一下思科交换机的配置命令吧!1、输入进入全局配置模式:switch#configure terminalEnter configuration commands, one per line. End with CNTL/Z.switch(config)#switch(config)#switch(config)#这么简单的一条命令,俺们就进入到全局配置模式了,还记得上一篇中查看端口所查询到的信息中name字段下的值吗?这字段其实代表的是交换机端口的描述信息2、修改端口描述switch#switch#switch#conf terEnter configuration commands, one per line. End with CNTL/Z.switch(config)#switch(config)#int fa0/3switch(config-if)#switch(config-if)#descswitch(config-if)#description updateDescswitch(config-if)#switch(config-if)#exitswitch(config)#exitswitch#switch#show interswitch#show interfaces statuswitch#show interfaces statusPort Name Status Vlan Duplex Speed TypeFa0/1 connected 1 a-full a-100 10/100BaseTXFa0/2 h3c2.250 connected trunk a-full a-100 10/100BaseTX Fa0/3 updateDesc notconnect 1 auto auto 10/100BaseTXFa0/4 connected 1 a-full a-100 10/100BaseTXFa0/5 h3c-2.200 connected 1 a-full a-100 10/100BaseTXFa0/6 notconnect 1 auto auto 10/100BaseTX修改描述的关键命令在于,在配置模式下,进入到要修改的端口下,然后使用description + “内容”!效果应该很直观了吧,接下来就是修改端口的所在Vlan了3、修改端口Vlanswitch#switch#switch#conf tEnter configuration commands, one per line. End with CNTL/Z.switch(config)#switch(config)#int fa0/3switch(config-if)#switch(config-if)#sw acc vl 2switch(config-if)#switch(config-if)#exitswitch(config)#switch(config)#exitswitch#switch#show inter statuPort Name Status Vlan Duplex Speed TypeFa0/1 connected 1 a-full a-100 10/100BaseTXFa0/2 h3c2.250 connected trunk a-full a-100 10/100BaseTX Fa0/3 updateDesc notconnect 2 auto auto 10/100BaseTXFa0/4 connected 1 a-full a-100 10/100BaseTXFa0/5 h3c-2.200 connected 1 a-full a-100 10/100BaseTXFa0/6 notconnect 1 auto auto 10/100BaseTX逻辑和修改端口描述是一样的,对于配置来说,肯定是到了能有配置权限的地方和要配置的对象,这里修改端口Vlan的关键命令为:sw acc vl + vlantag,命令很明显被简写了,但是不影响执行,命令的全写为:switchport access vlan + vlantag还有一些对端口的简单操作,譬如修改端口的模式,4、修改端口模式switch(config-if)#switchport trunk encap dot1q ----------------设置vlan 中继的'封装协议注:dot1q就是 IEEE 802.1Q协议,是vlan的一种封装方式,是公有协议。
配置思科交换机

交换机集群可以提高网络的性能和可管理性,同时简化网络管 理和配置。
THANKS FOR WATCHING
感谢您的观看
配置登录验证方式
在全局配置模式下输入 "login authentication < 用户名>"命令配置登录验 证方式。
02 VLAN配置
创建VLAN
总结词
在思科交换机上创建VLAN,需要进入特权执行模式,并使用`vlan`命令。
详细描述
首先,通过控制台或SSH连接到交换机,然后输入`enable`进入特权执行模式。接下来,使用`vlan`命令创建 VLAN,并为其分配一个ID。例如,要创建一个ID为10的VLAN,可以输入`vlan 10`。
配置思科交换机
目 录
• 交换机基本配置 • VLAN配置 • 交换机安全配置 • 交换机高级配置
01 交换机基本配置
登录交换机
连接交换机
通过控制台线或Telnet 连接到交换机。
登录提示
进入特权模式
在登录提示符下输入用 户名和密码进行登录。
输入"enable"命令进入 特权模式。
配置模式
在特权模式下输入 "configure terminal" 命令进入配置模式。
配置VLAN间通信
总结词
为了实现VLAN之间的通信,需要配置 VLAN间路由和三层交换。
VS
详细描述
在配置了VLAN间路由之后,还需要启用三 层交换来允许VLAN之间的通信。使用`ip routing`命令启用IP路由,然后使用 `interface vlan`命令进入VLAN接口配置模 式。在每个VLAN接口上配置IP地址和其他 相关的网络参数,以便在该VLAN之间进行 通信。例如,要为VLAN 10配置IP地址为 192.168.10.1的IP地址,可以输入 `interface vlan 10`,然后`ip address 192.168.10.1 255.255.255.0`。
Cisco交换机详细配置及命令说明

Cisco交换机的概述交换机根据OSI层次通常可分为第2层交换机和多层交换机。
通常所说的交换机指第2层交换机也叫LAN交换机(第二层MAC地址进行交换);多层交换机与第2层交换机工作方式类似,除了使用第二层MAC地址进行交换之外,还使用第3层网络地址。
交换机的基本配置3、电缆连接及终端配置如图11-8所示,接好PC机和交换机各自的电源线,在未开机的条件下,把PC机的串口1(COM1)通过控制台电缆线与交换机的Console端口相连,即完成设备连接工作。
交换机Console端口的默认参数如下:端口速率:9600b/s;数据位:8;奇偶校验:无;停止位:1;流控:无。
3、交换机的启动启动过程未用户提供了丰富的信息,我们可以对交换机的硬件结构和软件加载过程有直观的认识,这些信息对我们了解该交换机以及对她做相应的配置很有帮助,另外部件号、序列号、版本号等信息再产品验货时都是非常重要的信息。
3、交换机的基本配置在默认情况下,所有接口处于可用状态并且都属于VLAN1,这种情况下交换机就可用正常工作了,为了方便管理和使用,首先应对交换机做基本的配置,最基本的配置可以通过启动时的对话框配置模式完成,也可以在交换机启动后再进行配置。
(1)配置Enable口令和主机名。
在交换机中可以配置使能口令(Enable password)和使能密码(Enable secret),一般情况下只需配置一个就可以,当两者同时配置时,后者生效。
这两者的区别是使能口令以明文显示而使能密码以密文形式显示。
Switch> (用户执行模式提示符)Switch>enable (进入特权模式)Switch # (特权模式提示符)Switch # config termianal (进入配置模式)Switch (config) # (配置模式提示符)Switch (config) # enable password cisco 设置enable password 为cisco)Switch (config) # enable secret cisco1 (设置enable secret 为cisco1)Switch (config) # hostname C2950 (设置主机名为C2950)C2950 (config) # end (退回到特权模式)C2950 #(2)配置交换机IP地址、默认网关、域名、域名服务器。
Cisco交换机配置教程

C i s c o交换机配置教程 IMB standardization office【IMB 5AB- IMBK 08- IMB 2C】C i s c o交换机配置教程Cisco交换机在网络届处于绝对领先地位,高端冗余设备(如:冗余超级引擎,冗余负载均衡电源,冗余风扇,冗余系统时钟,冗余上连,冗余的交换背板),高背板带宽,高多层交换速率等都为企业网络系统的高速稳定运行提供良好解决方案。
这就是为什么大型企业都选择Cisco交换机做核心层和分布层等主要网络设备。
被过滤广告Cisco分为高中低端交换机,分别面向不同层次。
但是多数Cisco交换机都基于Cisco自家的IOS(InternetOperatingSystem)系统。
所以设置都是大同小异。
让我们从零开始,一步一步教大家学会用Cisco交换机。
第一步:利用电脑超级终端与交换机建立连接可进行网络管理的交换机上有一个“Console”端口,它是专门用于对交换机进行配置和管理的。
可以通过Console端口连接和配置交换机。
用Cisco自带的Console线,RJ-45端接入Cisco交换机Console口,Com口端接入电脑Com1或Com2口,必须注意的是要记清楚接入的是那个Com口。
按照步骤开启超级终端:开始-程序-附件-通讯-超级终端(图2)(图2)点击文件-新建连接(图3)(图3)?输入超级终端名称,选择数据线所连端口(注意选择Com口时候要对应Console线接入电脑的Com口):图4?(图4)确定-点击还原为默认值(图5)(图5)?确定后开启交换机此时交换机开始载入IOS,可以从载入IOS界面上看到诸如IOS版本号,交换机型号,内存大小等数据当屏幕显示PressRETURNtogetstarted的时候按回车就能直接进入交换机第二步:学习交换机的一些初级命令首先我们要知道Cisco配置界面分两种,一种是基于CLI(Command-lineInterface命令行界面),一种是基于IOS(InternetworkOpertingSystem互联网操作系统)。
思科交换机配置方法

思科交换机配置方法(一)使能口令(enable password),口令以明文显示使能密码(enbale secret),口令以密文显示Switch.> /*用户直行模式提示符Switch.>enable /*进入特权模式Switch.# /*特权模式(进入前要输入密文)Switch.#config terminal /*进入全局配置模式Switch.(config)# /*配置模式提示符Switch.(config)# hostname Pconline /*设置主机名Pconline Pconline(config)# enable password cisco3560 /*设置使能口令为pconlinePconline(config)# enable secret cisco3560 /*设置使能密码为networkPconline(config)# line vty 0 15 /*设置虚拟终端线Pconline(config-line)# login /*设置登陆验证Pconline(config-line)# password cisco3560 /*设置虚拟终端登陆密码二、交换机VLAN设置Switch.> /*用户直行模式提示符Switch.>enable /*进入特权模式switch#vlan database ;进入VLAN设置switch(vlan)# vlan 2 ;建VLAN 2switch(vlan)#no vlan 2 ;删vlan 2switch(config)#int f0/1 ;进入网络端口1switch(config)#int giga0/1 ; 进入汇聚千兆口1switch(config-if)# duplex {auto | full | half} 设置端口为---自动/全双工/半双工switch(config-if)#switchport mode trunk ;当前端口设置为汇聚口switch(config-if)#switchport mode access ;当前端口设置为接入模式switch(config-if)#switchport trunk allowed vlan 1,2 ;设置1,2号口允许的vlan组switch(config-if)#switchport trunk vlan 2 ;设置1号口允许的vlanswitch(config-if)#switchport access vlan 2 ;当前端口加入vlan 2switch(config-if)#switchport trunk encap dot1q ;设置vlan 中继cisco网络中,交换机在局域网中最终稳定状态的接口类型主要有四种:access/ trunk/ multi/ dot1q-tunnel。
思科交换机简单配置命令

思科交换机简单配置命令1.在基于IOS的交换机上设置主机名/系统名:switch(config)# hostname hostname在基于CLI的交换机上设置主机名/系统名:switch(enable) set system name name-string2.在基于IOS的交换机上设置登录口令:switch(config)# enable password level 1 password在基于CLI的交换机上设置登录口令:switch(enable) set passwordswitch(enable) set enalbepass3.在基于IOS的交换机上设置远程访问:switch(config)# interface vlan 1switch(config-if)# ip address ip-address netmaskswitch(config-if)# ip default-gateway ip-address在基于CLI的交换机上设置远程访问:switch(enable) set interface sc0 ip-address netmask broadcast-addressswitch(enable) set interface sc0 vlanswitch(enable) set ip route default gateway4.在基于IOS的交换机上启用和浏览CDP信息:switch(config-if)# cdp enableswitch(config-if)# no cdp enable为了查看Cisco邻接设备的CDP通告信息:switch# show cdp interface [type modle/port]switch# show cdp neighbors [type module/port] [detail]在基于CLI的交换机上启用和浏览CDP信息:switch(enable) set cdp {enable|disable} module/port为了查看Cisco邻接设备的CDP通告信息:switch(enable) show cdp neighbors[module/port] [vlan|duplex|capabilities|detail]5.基于IOS的交换机的端口描述:switch(config-if)# description description-string基于CLI的交换机的端口描述:switch(enable)set port name module/number description-string 6.在基于IOS的交换机上设置端口速度:switch(config-if)# speed{10|100|auto}在基于CLI的交换机上设置端口速度:switch(enable) set port speed moudle/number {10|100|auto} switch(enable) set port speed moudle/number {4|16|auto}7.在基于IOS的交换机上设置以太网的链路模式:switch(config-if)# duplex {auto|full|half}在基于CLI的交换机上设置以太网的链路模式:switch(enable) set port duplex module/number {full|half}8.在基于IOS的交换机上配置静态VLAN:switch# vlan databaseswitch(vlan)# vlan vlan-num name vlaswitch(vlan)# exitswitch# configure teriminalswitch(config)# interface interface module/numberswitch(config-if)# switchport mode accessswitch(config-if)# switchport access vlan vlan-numswitch(config-if)# end在基于CLI的交换机上配置静态VLAN:switch(enable) set vlan vlan-num [name name]switch(enable) set vlan vlan-num mod-num/port-list9. 在基于IOS的交换机上配置VLAN中继线:switch(config)# interface interface mod/portswitch(config-if)# switchport mode trunkswitch(config-if)# switchport trunk encapsulation {isl|dotlq}switch(config-if)# switchport trunk allowed vlan remove vlan-listswitch(config-if)# switchport trunk allowed vlan add vlan-list在基于CLI的交换机上配置VLAN中继线:switch(enable) set trunk module/port [on|off|desirable|auto|nonegotiate]Vlan-range [isl|dotlq|dotl0|lane|negotiate]10.在基于IOS的交换机上配置VTP管理域:switch# vlan databaseswitch(vlan)# vtp domain domain-name在基于CLI的交换机上配置VTP管理域:switch(enable) set vtp [domain domain-name]11.在基于IOS的交换机上配置VTP 模式:switch# vlan databaseswitch(vlan)# vtp domain domain-nameswitch(vlan)# vtp {sever|cilent|transparent}switch(vlan)# vtp password password在基于CLI的交换机上配置VTP 模式:switch(enable) set vtp [domain domain-name] [mode{ sever|cilent|transparent }][password password]12. 在基于IOS的交换机上配置VTP版本:switch# vlan databaseswitch(vlan)# vtp v2-mode在基于CLI的交换机上配置VTP版本:switch(enable) set vtp v2 enable13. 在基于IOS的交换机上启动VTP剪裁:switch# vlan databaseswitch(vlan)# vtp pruning在基于CL I 的交换机上启动VTP剪裁:switch(enable) set vtp pruning enable14.在基于IOS的交换机上配置以太信道:switch(config-if)# port group group-number [distribution {source|destination}] 在基于CLI的交换机上配置以太信道:switch(enable) set port channel moudle/port-range mode{on|off|desirable|auto} 15.在基于IOS的交换机上调整根路径成本:switch(config-if)# spanning-tree [vlan vlan-list] cost cost在基于CLI的交换机上调整根路径成本:switch(enable) set spantree portcost moudle/port costswitch(enable) set spantree portvlancost moudle/port [cost cost][vlan-list] 16.在基于IOS的交换机上调整端口ID:switch(config-if)# spanning-tree[vlan vlan-list]port-priority port-priority在基于CLI的交换机上调整端口ID:switch(enable) set spantree portpri {mldule/port}priorityswitch(enable) set spantree portvlanpri {module/port}priority [vlans]17. 在基于IOS的交换机上修改STP时钟:switch(config)# spanning-tree [vlan vlan-list] hello-time secondsswitch(config)# spanning-tree [vlan vlan-list] forward-time secondsswitch(config)# spanning-tree [vlan vlan-list] max-age seconds在基于CLI的交换机上修改STP时钟:switch(enable) set spantree hello interval[vlan]switch(enable) set spantree fwddelay delay [vlan]switch(enable) set spantree maxage agingtiame[vlan]18. 在基于IOS的交换机端口上启用或禁用Port Fast 特征:switch(config-if)#spanning-tree portfast在基于CLI的交换机端口上启用或禁用Port Fast 特征:switch(enable) set spantree portfast {module/port}{enable|disable}19. 在基于IOS的交换机端口上启用或禁用UplinkFast 特征:switch(config)# spanning-tree uplinkfast [max-update-rate pkts-per-second]在基于CLI的交换机端口上启用或禁用UplinkFast 特征:switch(enable) set spantree uplinkfast {enable|disable}[rate update-rate] [all-protocols off|on]20. 为了将交换机配置成一个集群的命令交换机,首先要给管理接口分配一个IP地址,然后使用下列命令: switch(config)# cluster enable cluster-name cv。
- 1、下载文档前请自行甄别文档内容的完整性,平台不提供额外的编辑、内容补充、找答案等附加服务。
- 2、"仅部分预览"的文档,不可在线预览部分如存在完整性等问题,可反馈申请退款(可完整预览的文档不适用该条件!)。
- 3、如文档侵犯您的权益,请联系客服反馈,我们会尽快为您处理(人工客服工作时间:9:00-18:30)。
Vlan名称可以自行定义
Switch#show vlan 查看vlan配置信息
• vlan10配置192.168.10.1/24的ip地址
Switch#conf t Switch(config)#vlan 10 Switch(config-vlan)#name vlan10 Switch(config-vlan)#exit Switch(config)#interface vlan 10 Switch(config-if)#ip address 192.168.10.1 255.255.255.0 Switch(config-if)#end Switch#copy running-config startup-config
hostname 1234 enable password 123
• Secret 1234#show running-config
hostname 1234 enable secret 5 $1$CCFV$0DTd3rSPZNycrVDjn1rKv/ (MD5 加密的字符串) enable password 123
配置ip地址的命令格式: ip address {ip-address} {netmask}
测试常用端口类型 Access / trunk
将此端口设置为vlan10 的access口 Switch(config-if)#switchport mode access Switch(config-if)#switchport access vlan 10 Switch(config-if)# 将此端口设置为vlan10 的trunk口 Switch(config-if)#switchport trunk encapsulation dot1q Switch(config-if)#switchport mode trunk Switch(config-if)#switchport trunk allowed vlan 10
• 双工模式: Switch(config-if)#duplex ?
auto Enable AUTO duplex configuration full Force full duplex operation half Force half-duplex operation
Switch(config-if)#duplex auto Switch(config-if)#
3560系列交换机
• 三层交换机 • 支持PoE(Power over Ethernet)设备 • 支持IPv6 • 汇聚层交换机———中型企业
Catalyst-3560G-24TS 技术参数
• 支持的mac地址:12000 • 支持的路由:11000 • 千兆以太网SFP:4 • 10/100/1000端口:24 • 不支持PoE
当明文和密文同时存在时,密文优先级高。
端口配置
• 全局模式下进入端口后,可以对端口进行配置。 Switch#conf t Switch(config)#interface gigabitEthernet 0/1 Switch(config-if)# 批量修改端口 range命令
端口速率: Switch(config-if)#speed ?
思科交换机基本配置
思科交换机基本介绍
• 交换机型号
• Catalyst 2960 系列交换机 • Catalyst 3560 系列交换机 • Catalyst 3750 系列交换机 • Catalyst 4500 系列交换机 • Catalyst 4948 系列交换机 • Catalyst 6500 系列交换机
思科交换机测试中常用配置
交换机配置模式
• 用户模式
Switch>
• 特权模式 • 全局模式
Switch>enable Switch#
Switch#configure terminal Switch(config)#
每次进入交换机时,首先会进入到用户模式下 ,在此模式下不能对交换
机进行修改、甚至有些信息都无法查看,为了更进一步的对交换机进行操作, 我们必须进入到特权模式或全局模式,而从用户模式下只能进入特权模式, 再从特权模式进入全局模式,也就是说之中不能跨级。
• 端口描述 Switch(config-if)#description vlan 10 trunk Switch(config-if)#
Vlan设置
• Vlan设置范围:1---4094 • 在全局模式下配置vlan Switch#conf t Switch(config)#vlan 10 Switch(config-vlan)#name vlan10 Switch(config-vlan)#vlan 20 Switch(config-vlan)#name vlan20
• 查看全局配置 Switch#show running-config
• 保存当前配置 Switch#copy running-config startup-config
• 恢复出厂默认 Switch#erase startup-config Switch#reload
• 明文密码和密文密码 • Password 1234#show running-config
host
• 更改主机名 Switch>en Switch#conf t Switch(config)#hostname 1234 1234(config)#
• 更改特权密码 1234(config)#enable password 123 1234(config)#
1234(config)#enable secret 234 1234(config)#
