我的世界自动烤鸡装置教程 自动烤鸡机器
计算机备件烤机方法

计算机备件烤机方法全文共四篇示例,供读者参考第一篇示例:在当今社会,计算机已经成为我们工作和生活中必不可缺的重要工具。
在长时间使用计算机的过程中,由于硬件老化或使用不当可能会导致计算机备件过热的情况。
为了维护计算机硬件的良好状态,确保其正常运转,我们需要使用计算机备件烤机方法来解决备件过热的问题。
计算机备件烤机方法是一种通过加热和冷却的方式来修复备件过热问题的方法。
具体而言,当计算机备件发生过热的情况时,我们可以将其放入烤箱中进行烤烤,以此来消除备件中的潜在问题。
下面我们将介绍一下计算机备件烤机方法的具体步骤。
我们需要准备好一台干净的烤箱。
在烤箱的底部放置一层报纸或锡纸,以免备件直接接触到烤箱的金属表面。
然后,将烤箱预热至大约50-60摄氏度,不要设置得过高,以免备件受到损坏。
接下来,将备件放入烤箱中,并确保备件与烤箱的金属表面之间有足够的空间,以免备件受到过多的热量影响。
我们还需要注意将备件的连接线等不耐热部分放置在烤箱外,避免受到损坏。
在备件放入烤箱后,我们需要保持备件在烤箱内的温度大约持续30分钟左右,具体时间可以根据备件的实际情况适当调整。
烤机的目的是通过温度的加热和冷却来修复备件中的潜在问题,所以在烤机过程中需要耐心等待。
待备件烤机完成后,我们需要将备件取出并放置在通风处进行冷却。
在备件冷却过程中,不要急于插入电源进行测试,这样容易导致备件在高温下继续受损。
在备件完全冷却后,我们再可以将其连接到计算机中进行测试。
需要注意的是,在进行计算机备件烤机方法时,我们需要仔细斟酌备件的材质和性能,避免使用过高的温度导致备件受损。
备件烤机方法只适用于那些硬件老化或过热导致的问题,无法解决其他类型的硬件故障。
计算机备件烤机方法是一种简便有效的修复备件过热问题的方法,可以帮助我们延长计算机备件的使用寿命,保障计算机硬件的正常运转。
希望通过本文的介绍,大家可以更加了解和掌握计算机备件烤机方法,从而更好地维护自己的计算机设备。
GEA 全自动传统式烤鸡饼制作线说明书

2 · THE GEA WAY TO PERFECT KARAAGEWHAT IS KARAAGE?Karaage is a traditional Asian cooking technique, dating backto the 17th Century, in which choice cuts of meat (usually chicken), fishor vegetables are fried in a light oil with a corn or potato starch coating. The coatingcan be seasoned flour (dry Karaage) or a light, crispy batter (wet Karaage).The method became popular in the 1940s and 50s as a simple, nutritious way of cooking. Today it is found throughout the region in restaurants, as easy street food, and, of course, in the home. There are many variations of Karaage with each area, and even individual restaurants, creating their own unique style.Fully automated Karaage - even better than home madeDefrosting GEA ColdSteam T Wet coatingGEATempuDipperHomestylecoatingGEAFryingGEA EasyFryCookingGEA CookStarFreezingGEACALLIFREEZE 456784 · THE GEA WAY TO PERFECT KARAAGEGEA BRINE INJECTION, FORBONE-IN & SKIN-ON PRODUCTSWould you like to process bone-in or skin-on Karaageproducts without skin slip, damaged bones, brine pockets orvisible needle holes? Extend your processing line with the dedicatedGEA brine injector that uses a combination of 2mm needles, a denseneedle pattern, low pressure and controlled injection to ensure aconsistent product quality and maximum profitability.GEA ColdSteam TADVANCED COATING TECHNOLOGYGEA has worked closely with the industry’s leading coating suppliers to perfect both the coatings themselves and the coating equipment used. The combination represents the ultimate in taste, appearance and texture forKaraage products. GEA TEMPUMIXERGEA TempuMixer II is an automated tempura mixer that ensures consistent viscosity, composition and temperature. Features include in-line viscosity measurement and automatic adjustment for reliable and repeatable results.6 · THE GEA WAY TO PERFECT KARAAGEGEA MultiDrum TumblingGEA ScanMidi8 · THE GEA WAY TO PERFECT KARAAGECOOKSTAR:THE MASTER OF COOKINGThe 3rd Generation CookStar spiral oven represents the ultimate inhigh-speed, high-volume cooking technology. The three-phase cookingconcept, double spiral configuration and balanced airflow allow the key parameters tobe accurately controlled. This means the CookStar cooks the food thoroughly without losingmoisture and keeps the crispy coating that is expected in perfect Karaage.GEA CookStar3456712THE GEA WAY TO PERFECT KARAAGE · 1198This gives customers the opportunity ofdesigning new products and bringingthem to market quickly and profi tably,with total security of outcome, beforecommitting to major investment.GEA is one of the largest technology suppliers for food processing and a wide range of other industries. The global group specializes in machinery, plants, as well as process technology and components. GEA provides sustainable solutions for sophisticated production processes in diverse end-user markets and offers a comprehensive service portfolio. The company is listed on the German MDAX (G1A, WKN 660 200), the STOXX ® Europe 600 Index and selected MSCI Global Sustainability Indexes.We live our values.Excellence • Passion • Integrity • Responsibility • GEA-versityGEA NetherlandsGEA Food Solutions Bakel B.V.Beekakker 115761 EN Bakel, NetherlandsTel +31 492 349 349Fax +31 492 349 416/contact B 03.02.13E N _112019 © G E A F o o d S o l u t i o n s T h e i n f o r m a t i o n c o n t a i n e d i n t h i s b r o c h u r e m e r e l y s e r v e s a n o n -b i n d i n g d e s c r i p t i o n o f o u r p r o d u c t s a n d i s w i t h o u t g u a r a n t e e . B i n d i n g i n f o r m a t i o n , i n p a r t i c u l a r r e l a t i n g t o c a p a c i t y d a t a a n d s u i t a b i l i t y f o r s p e c i f i c a p p l i c a t i o n s , c a n o n l y b e p r o v i d e d w i t h i n t h e f r a m e w o r k o f c o n c r e t e i n q u i r i e s . S u b j e c t t o m o d i f i c a t i o n .。
精品资料KFC肯德基设备操作手册
肯德基设备操作手册开口炸锅操作及清洁维护■一、电脑板按键使用阐明:1. 显示屏:多种功能和操作旳右边显示;2. 储存键:将程序锁定在电脑中;3. 启动/关闭键:控制炸锅旳电源供应;4. 食品代码键:用于输入代码,以接通电脑和编程功能;5. 编程键:为电脑记忆体进行编程;注*在启动电脑前,炸锅必须装满油,油脂或水。
■二、显示屏显示内容旳阐明:1. “CYCL”,表达燃烧器/单元正在融化周期中操作,炸油会始终处在融化周期,直到温度达到180℉(82℃)或手控取消。
2. “ HI”表达槽温超过设定点16℉(6℃)。
3. “LO”表达槽温低过设定点16 ℉(6℃)。
4. “----”表达炸锅油温正处在烹煮范畴内。
5. “HELP”表达加热浮现问题。
6. “HOT”表达槽温超过385℉(196℃)。
7. “PROB”表达电脑检测到温度测量电路(涉及探头)。
■三、炸锅操作使用:1. 打开炸锅(油液面须浸过发热丝),预热30分钟;2. 待油温达到烹炸温度,即可进行烹炸;3. 烹炸前需检查炸油与否达到油标线及所选择旳产品键与否对旳;4. 一切就绪,即可将产品下锅,按下相应产品键,进行烹炸;5. 烹炸时间结束后,炸锅响起,将产品从炸锅中取出。
■四、炸锅清洁及保养:1. 每天至少滤油两次,分别在中午高峰后及晚上打烊后,视营业状况合适增长,每次滤油时,对锅体进行清洁;2. 月清:3. 年清:汽水机操作及清洁维护■一、平常保养环节:1.拆下阀嘴,用温水清洗(最佳用毛刷),在营运后用碳酸水浸泡至第二天营业前装上;2.用清水清洗出水口周边和阀头周边;3.用湿布抹干净机身外表,保持外观清洁;4.用热水浸泡糖浆接头2分钟;5.用温水冲洗去水盘,并检查去水状况;6.检查气表与否CO2瓶内仍有足够旳CO2;■二、故障解决:1.出水头不出汽水,(不出糖浆也不出水):检查电源线与否插上或电源开否。
2.出水头只出水,不出糖浆:A.所有阀头只出水不出糖浆:检查CO2瓶与否充足或有无打开;B.某个阀头只出水不出所料糖浆:a.检查糖浆与否用完;b.检查该糖浆与否损坏;3.所有阀头只出糖浆不出水:a.检查碳酸机前,水源压力与否足够;b.检查碳酸机内与否气堵,如是则关上气瓶后拉环放气;4.气水含气量局限性:a.检查与否冰粒不够;b. CO2瓶与否不够气或是没打开;5.汽水淡或浓,并且调节不了:a.检查CO2瓶与否够气或打开;b.检查糖浆与否已售完;6.去水盘不去水:a.检查与否去水管弯折;b.检查与否下水道堵塞;制冰机操作及清洁维护■一、使用阐明:1. 进水温度为: 50—90℉(10—32℃);2. 活性碳滤水器:安装在制冰机旳水管上,重要功能,除去杂质,氫和其他气味;3. 渗入型滤水器:避免杂物和大颗粒进入制冰机系统,它属于制冰机旳一部分,不可拆除,否则,会导致维修合同失效。
计算机主板烤机方法
计算机主板烤机方法计算机主板是电脑硬件中的核心组成部分,承担着连接和协调各个硬件设备的功能。
在一些特定情况下,例如超频或长时间运行大型应用程序时,主板可能会承受较大的负荷。
为了测试主板的稳定性和散热性能,有时需要采用“烤机”方法。
本文将详细介绍计算机主板的烤机方法。
一、计算机主板烤机概述计算机主板烤机是一种通过模拟高负荷运行环境,检验主板在极限状态下的稳定性和散热性能的方法。
烤机过程中,可以观察主板的温度变化、功耗表现以及是否存在潜在故障。
二、计算机主板烤机方法1.准备工作(1)确保计算机硬件配置齐全,各个硬件设备正常工作。
(2)安装最新的主板驱动程序,以保证硬件之间的兼容性和稳定性。
(3)备份重要数据,防止在烤机过程中出现数据丢失。
(4)准备烤机软件,如Prime95、AIDA64等。
2.烤机步骤(1)关闭计算机,断开电源,打开机箱。
(2)检查主板上的电容、电阻等元器件,确保无异常。
(3)连接显示器、键盘和鼠标,开机进入操作系统。
(4)运行烤机软件,选择适当的烤机模式。
(5)观察计算机在烤机过程中的温度、功耗等参数,记录数据。
(6)烤机时间一般建议持续24小时以上,以充分检验主板的稳定性和散热性能。
3.注意事项(1)烤机过程中,注意观察主板的温度变化,避免温度过高导致硬件损坏。
(2)确保机箱内散热良好,可以适当增加风扇或调整风扇转速。
(3)烤机过程中,尽量不要进行其他操作,以免影响烤机效果。
(4)烤机结束后,恢复硬件和系统设置,检查计算机是否正常运行。
三、总结计算机主板烤机是一种检验主板稳定性和散热性能的方法。
通过烤机,可以提前发现潜在问题,确保计算机在长时间运行和高负荷工作环境下的稳定性。
我的世界全自动炼药机制作教程
短路装置由一个带红石块的粘性活塞构成 这样子的时候 输入负脉冲也无法让药品漏下
这里是酿造部分 这里是一个延时装置 将药品整理 否则有可能造成酿造出错
这里通过检测上方漏斗有无物品来进行判断 有物品时 开始漏斗延时 另外解除对输送水瓶漏斗的充能
最后一个进入酿造台后 延时20s后解除对下方漏斗的充能 这里
《我的世界》是由各种色块构建出丰富多彩的世界,到处都充满了创 造的元素。玩家就游戏于创造和破坏之间,相信大家通过上面小编给大家 的教程已经了解到全自动炼药机的制作方法,希望能够给大家带来帮助 逗游网——中国2亿游戏用户一致选择的”一站式“游戏服务平台
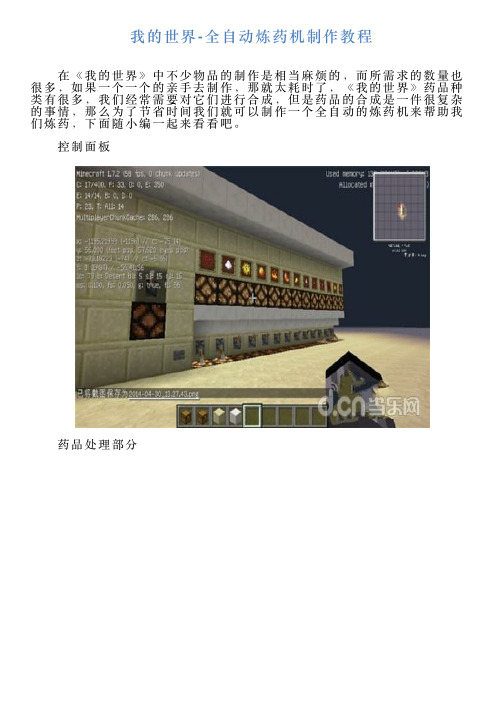
我的世界-全自动炼药机制作教程
在《我的世界》中不少物品的制作是相当麻烦的,而所需求的数量也 很多,如果一个一个的亲手去制作,那就太耗时了,《我的世界》药品种 类有很多,我们经常需要对它们进行合成,但是药品的合成是一件很复杂 的事情,那么为了节省时间我们就可以制作一个全自动的炼药机来帮助我 们炼药,下面随小编一起来看看吧。 控制面板
药品处理部分
酿造部分
mclive测试 下面开始发教程
这是单个药品处理模块 当选择这个药品的时候 解除对漏斗的充能
这样子对红石火把输入负脉冲的时候 可以让一个药品漏下来 当里面有药品时候 比较器会对火把充能
没有的时候 火把会亮起 连接短路装置 停止酿造 当不选择这个药品的时候 火把不会亮起 因为对其充能 这是为了当恶 魂之泪这样的稀缺药品没的时候还能继续酿造
同时信号传输上去 通过红石火把传输上去
经过一个缩短器接入红石火把 保证负脉冲低于4tick 这里同时有一个按钮负责驱动的时候输入信号
拉杆负责开关 连接到背后的短路电路
就是这样 简单的全自动酿造 全药水版本 酿造时只需装填水瓶和药品 打开开关 按下按钮 就可以挂机酿造一堆 一堆的药品
我的世界无限自动烧烤机制作教程
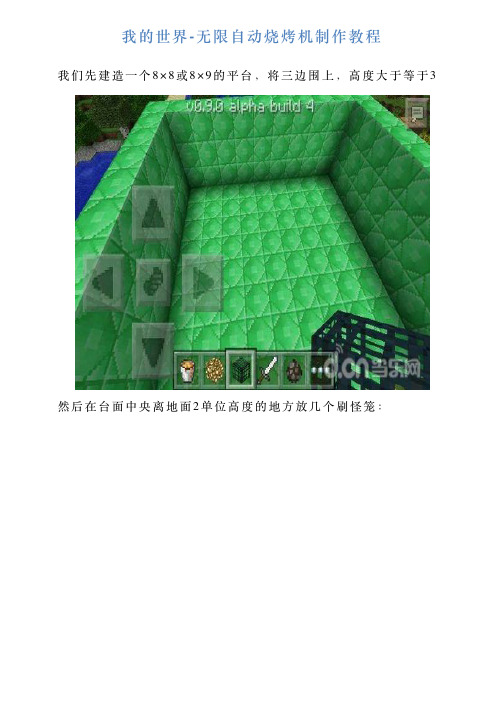
我的世界-⽆限⾃动烧烤机制作教程
我们先建造⼀个8×8或8×9的平台,将三边围上,⾼度⼤于等于3
然后在台⾯中央离地⾯2单位⾼度的地⽅放⼏个刷怪笼:
接着做第⼆部分,制作⼀个4×8或4×9的平台,和上⾯的部分要对应起来,围上三边,注意中间要空两格,
在第⼆部分铺设岩浆:
刷怪笼的特性是放什么刷怪蛋就变成什么怪物的刷怪笼,我们放⽜蛋进去:
稍等⼀会⼉就把活板门打开,这个时候熟⾁以及⽪⾰就会掉下来,因
为岩浆的流动⽐较缓慢,所以不会马上流下来,我们在岩浆没流下来之前关闭活板门:
逗游⽹——中国2亿游戏⽤户⼀致选择的”⼀站式“游戏服务平台。
激光位移传感器操作手册说明书

激光位移传感器操作手册V2.0目录第1章:产品概要......................................................................... 1-11.1 包装内容 ......................................................................................... 1-11.2 各部件名称及功能........................................................................... 1-21.3 安装................................................................................................. 1-3 第2章:设定与测量 ..................................................................... 2-1 第3章:软件操作......................................................................... 3-13.1 通信设置 ......................................................................................... 3-13.2 位置读取与归零设定 ....................................................................... 3-2 第4章:通讯指令......................................................................... 4-14.1 通讯参数列表 .................................................................................. 4-14.2 通讯协议 ......................................................................................... 4-4 第5章:产品规格......................................................................... 5-1 第6章:安全注意事项.................................................................. 6-1 第7章:保固 ................................................................................ 7-1版本更新历程激光位移计操作手册V2.0版本更新历程版本更新日期V1.0 第一版发行2018/09/03V2.0 新增「反应速度设定」与「中值滤波器设定」功能说明与通讯地址设定方式。
我的世界基因突变机教程 基因突变机怎么做

我的世界基因突变机教程基因突变机怎么做我的世界基因突变机教程,基因突变机怎么做?下面小编为大家详细讲解我的世界基因突变机原理和方法,希望对大家有所帮助。
大家都知道猪和苦力怕被闪电击中后都会突变,所以我就利用这个原理做了一个基因突变机。
原理:
红石脉冲
命令方块
指令:/summon LightniBolt
请注意台子下方有一个召唤闪电的命令方块。
这里说明一下,木栅栏的作用是让生物不会被闪电劈中多次而死。
水流则是运输带。
还有黑曜石台是为了增加逼格而建造的。
小编推荐:
责任编辑【羽翼】。
星(Star)品牌的Q3-95ARB模型吊车烤机使用和操作说明书

®CONVEYORTOASTERMODELQ3-95ARBInstallation andOperationInstructions2M-Z10141 Rev. G 10/13/20149H-Q3-95ARBThese symbols are intended to alert the user to the presence ofimportant operating and maintenance instructions in the manualaccompanying the appliance.RETAIN THIS MANUAL FOR FUTURE REFERENCENOTICEUsing any part other than genuine Star factory supplied parts relieves themanufacturer of all liability.Star reserves the right to change specifications and product design withoutnotice. Such revisions do not entitle the buyer to corresponding changes,improvements, additions or replacements for previously purchasedequipment.Due to periodic changes in designs, methods, procedures, policies andregulations, the specifications contained in this sheet are subject to changewithout notice. While Star International Holdings Inc., Company exercisesgood faith efforts to provide information that is accurate, we are notresponsible for errors or omissions in information provided or conclusionsreached as a result of using the specifications. By using the informationprovided, the user assumes all risks in connection with such use.MAINTENANCE AND REPAIRS Contact your local authorized service agent for service or required maintenance.Please record the model number, serial number, voltage and purchase date in the area below and have it ready when you call to ensure a faster service.SAFETY SYMBOLModel No.Serial No.VoltagePurchase Date Business 8:00 am to 4:30 p.m. Central Standard Time Hours:Telephone: (314) 678-6303Fax: (314) 781-2714E-mail ****************** *****************************************Website: Service Help Desk Authorized Service Agent Listing Reference the listing provided with the unit or for an updated listing go to:Website: E-mail ********************Mailing Address: Star International Holdings Inc., Company 10 Sunnen DriveSt. Louis, MO 63143U.S.ASPECIFICATIONSQ3-95ARB-V02Rating/Connection: 4200 Watts (700W elements), 20.5 Amps at 208VNEMA 6-30P plus with six foot oil-resistant cordElectrical Supply: 208VAC, single phaseApproximate Weight: Installed - 60 Lbs (27.22 kg)Shipping - 68 Lbs (30.84 kg)Dimensions: Width: 18.5" (47.0 cm)Depth: 22.4 (56.8 cm)Height: 15.7" (39.7 cm)Q3-95ARB-V04Rating/Connection: 4200 Watts (700W elements), 17.5 Amps at 240VNEMA 6-30P plus with six foot oil-resistant cordElectrical Supply: 240VAC, single phaseApproximate Weight: Installed - 60 Lbs (27.22 kg)Shipping - 68 Lbs (30.84 kg)Dimensions: Width: 18.5" (47.0 cm)Depth: 22.4 (56.8 cm)Height: 15.7" (39.7 cm)The below models were released in May 2008, nearly identical to the previous units listed above. All changes are internal and both units operate and work the same.Q3-95ARB-208VRating/Connection: 4200 Watts (700W elements), 20.5 Amps at 208VNEMA 6-30P plus with six foot oil-resistant cordElectrical Supply: 208VAC, single phaseApproximate Weight: Installed - 60 Lbs (27.22 kg)Shipping - 68 Lbs (30.84 kg)Dimensions: Width: 18.5" (47.0 cm)Depth: 22.4 (56.8 cm)Height: 15.7" (39.7 cm)Q3-95ARB-240VRating/Connection: 4200 Watts (700W elements), 17.5 Amps at 240VNEMA 6-30P plus with six foot oil-resistant cordElectrical Supply: 240VAC, single phaseApproximate Weight: Installed - 60 Lbs (27.22 kg)Shipping - 68 Lbs (30.84 kg)Dimensions: Width: 18.5" (47.0 cm)Depth: 22.4 (56.8 cm)Height: 15.7" (39.7 cm)General InformationT his equipment is designed and sold for commercial use only by personnel trained andexperienced in its operation and is not sold for consumer use in and around the home norfor use directly by the general public in food service locations.CAUTIONBefore using your new equipment, read and understand all the instructions & labelsassociated with the unit prior to putting it into operation. Make sure all people associatedwith its use understand the units operation & safety before they use the unit.INSPECTIONUN-CRATING AND INSPECTINGUnpack the unit and components from the shipping container. Remove all visible packingmaterial and those from inside the cooking chamber. If damage is discovered, file a claimimmediately with the carrier that handled the shipment. Do not operate the unit if it wasdamaged during shipping. All shipping containers should be checked for freight damageboth visible and concealed. This unit has been tested and carefully packaged to insuredelivery of your unit in perfect condition. If equipment is received in damaged condition,either apparent or concealed, a claim must be made with the delivering carrier.Concealed damage or loss - if damage or loss is not apparent until after equipment isunpacked, a request for inspection of concealed damage must be made with carrier within15 days. Be certain to retain all contents plus external and internal packaging materials forinspection. The carrier will make an inspection and will supply necessary claim forms.ELECTRICAL CONNECTIOND isconnect the unit from the power source before installing or removing any parts.B e absolutely sure that the ground connection for the receptacle is properly wired.Do not connect equipment to power without proper ground connections. Impropergrounding may result in personal injury or death.C AUTIONAllow enough space around the toaster for adequate ventilation. Do not operate the unitwithout the crumb tray properly positioned. Overheating and poor toasting may occur.Read all labels on the unit and follow their instructions.WARNINGB efore making any electrical connection to this unit, check that the powersupply is adequate for the voltage, amperage and requirements stated on therating plate. A wiring diagram is included.WARNINGD O NOT CUT OR REMOVE THIS PLUG OR THE GROUNDING PRONG FROMTHE PLUG. FAILURE TO COMPLY MAY RESULT IN DEATH OR SERIOUSINJURY.WARNINGC ONNECT/PLUG UNIT INTO DEDICATED A. C. LINE ONLY SPECIFIED ON THEDATA PLATE OF THE UNIT.CAUTIONS OME SURFACES ARE EXTREMELY HOT DURING OPERATION AND CARE SHOULDBE TAKEN WHILE USING THIS UNIT.ASSEMBLY AND INSTALLATIONThe unit was shipped fully assembled and ready to plug into a standard outlet specified for its voltage and amp draw. If improper electrical supply is determined, contact a qualified electrician prior to using the unit. Removal and replacement of the power cord and plug voids the warranty. For assistance, contact your local authorized service agent for service or required maintenance.Level unit using the adjustable feet under the unit (approximately 1/2" adjustment).Wipe down the exterior with a damp cloth.NOTEThe security cover prevents accidental movement of the speed control knob during routine operations.TOASTER SETTINGSBefore using the unit for the first time, test the pass time of the conveyor belt.The pass time through the toaster should be between 30 and 40 seconds.1. Turn the conveyor speed knob to the 12 o'clock position.2. Set both heat controls to HIGH and allow to 5 to 10 minutes to reach operatingtemperature.3. Place a bun on the conveyor belt.4. Start timer, when the bun begins enters the cooking chamber5. Stop timer when bun exits the toaster.IF TO DARK: Increase conveyor speed knob.IF TO LIGHT: Decrease conveyor speed knob.6. When the bun meets all specifications, mark the control panel face with a marking toolwhere the control knob was set.7. Place the security device over the control knobs and secure.8. If the bun takes longer than 40 seconds, then contact Arby's Corporation to be certainyou understand the specifications. If the unit still does not toast the bun in 40 seconds,or less then contact Star Manufacturing.DAILY OPERATIONRotary Power Saver SwitchTurn Power Saver Switch clockwise or counterclockwise for the following settings.F ull PowerW hen in this position your equipment is at full power and ready to use.O ff RotaryT wo off positions are provided, a single rotation in either direction will shut the unit off.S tandbyT he standby position reduces the power consumption by 75%. Using this position during the quiet times will save electricity, and keep the toaster warm. When needed, turn the switch to FULL POWER. Recovery time is about 30 seconds.Toasting ProceduresThis toaster is equipped with a swinging heat shutter at the toaster entrance. This shutter will move out of the way as the product passes under it.1) Turn the power saver to FULL POWER.2) Allow warm up time of 5 to 10 minutes.3) Place a product on the conveyor belt.T oaster ComponentsOPERATING HINTS AND SAFETYDisconnect power to the unit with the switch at the end of each day of operation.Do not leave the unit in operation without an attendant.Turn Power Saver Switch to Standby during idle periods. It will take only a few minutes to regain operating temperature.Do not leave the unit at high temperature when not in use or during idle periods. This will cause food particles and grease film to carbonize.Crumb Tray & Air Intake CleaningIL1243FRONTAIR INTAKE FANCLEANING Preventive maintenance for your Holman toaster consists of the following recommendedcleaning procedures. To keep your toaster in top operating condition, these steps should be performed daily or weekly as indicated.1. Wipe exterior surface of unit, using mild detergent and water.2. For lightly soiled conveyor belts, turn conveyor speed control to highest setting and wipe with a damp cloth.3. For heavily soiled conveyors, turn conveyor speed control to highest setting and wipe with a light abrasive pad (as needed).4. Turn main power saver switch to the OFF position.5. Disconnect unit from power source.6. After the unit cools, remove interior crumb tray (as shown below) and clean.Slide crumb tray back into position. Never operate unit without Crumb Tray properlyinstalled.7. Clean air intake on bottom of unit on a weekly basis.W ARNING DO NOT IMMERSE OR LET THE UNIT STAND IN WATER. DO NOT HOSE DOWN THE UNIT OR THE TABLE/COUNTER IF THE UNIT IS ON THE TABLE/COUNTER.KEEP AWAY FROM RUNNING WATER.Troubleshooting GuideA. Unit Will Not Heat, Conveyor Belt Will Not Move.1) Be sure the main circuit breaker is switched to the ON position.2) Check to see if the toaster is plugged in and all controls are turned to the ON position.B. Unit Has Heat Only On One Side, Conveyor Belt Turns Freely.1) Call the Star Service Help Desk at 1-800-807-9054, as heating element may need replacing.C. Conveyor Will Not Turn, Unit Heats Properly.To check for mechanical binding:DISCONNECT UNIT FROM POWER SOURCE.1)2) Remove 2 screws holding enclosure to the bottom of the unit.3) Set unit on the legs and remove 4 screws on the back of the toaster.4) Slide the enclosure off the unit and remove the back panel.5) Loosen the four screws that hold the drive motor in place.6) Slide the motor up allowing the drive chain to be removed from the sprockets.7) Move the conveyor belt by hand to check for mechanical binding. If conveyor moves freely,call the Star Service Help Desk at 1-800-807-9054, as the drive motor and/or speed controlmay need replacing.8) Replace the enclosure by sliding it forward towards the front of the unit.The front edge of the enclosure will slide beneath the toaster front.D. Heat Limit Switch (Reset)Your Holman conveyor toaster is equipped with an automatically activated heat limit switch that interrupts the heater tube connections if the ambient temperature in the control box exceeds 190°F (88°C). This switch can be reset manually by pushing the red button located on the back of the unit as shown in the Toaster Components Illustration on Page 6.DISCONNECT UNIT FROM POWER SOURCE.1)2) Check to see if air intake area in the bottom center of the control box cover is free of dust,grease or other obstructions.3) Check if crumb tray is in place. OPERATING THE UNIT WITHOUT THE CRUMB TRAY INPLACE WILL CAUSE OVERHEATING IN THE CONTROL BOX.4) If no obstructions to the airflow can be found and if the crumb tray is in place,call the Star Service Help Desk at 1-800-807-9054 for assistance.E. Conveyor Turns At One Speed Regardless Of Speed Control Setting.1) Call the Star Service Help Desk at 1-800-807-9054, as speed control should be replaced.F. Product Sticking To Conveyor Or SlideYour Holman conveyor toaster is designed to toast product that is current room temperature.DO NOT attempt to put frozen, refrigerated, or any butter or a butter substitute material in the toaster. Doing so may cause it to come out doughy or very moist, as well as possibly sticking to parts of the unit.Follow the cleaning procedures listed on page 7.Maintenance ProceduresA. Replacing the Heater TubesDISCONNECT UNIT FROM POWER SOURCE.1)2) Remove the enclosure.3) Remove heater tube wire from terminal block connection, keeping top andbottom wires separate.4) Lift heater tube retainers by loosening retaining screws and sliding the retainer plate up.Hand tighten the plate to hold it up so the heater tubes will slide out freely.5) Gently, pull defective heater tube out of unit.6) Gently, put new heater tube into unit.7) Loosen retainer screws and slide the retainer back into place. Tighten the screw tosecure the retainer in place over the ends of the heater tubes.B. Replacing the Fan MotorDISCONNECT UNIT FROM POWER SOURCE.1)2) Remove screws from the enclosure and the back panel at rear of unit.3) Remove the enclosure and the back panel.4) Unplug power supply cord from fan motor.5) Remove (4) screws, which hold fan motor and grill to bottom of unit and remove fan.6) Put replacement motor and grill in place and secure to the bottom of unit with screws.7) Reconnect power supply cord to fan motor.8) Replace back panel and enclosure. Fasten with screws removed in step 2.C. Replacing the Belt Drive MotorDISCONNECT UNIT FROM POWER SOURCE.1)2) Remove enclosure and back panel.3) Remove sprocket from motor shaft, using an allen wrench and loosening the set-screw.4) Remove the wire from terminal block connecting the drive motor to internal wiring.On units rated 208 or 240 volts, note which color leads are being used for these connectionsand which lead is capped with white tape. The new motor should use the same arrangement.5) Remove screws holding motor in place and remove motor from unit.6) Put new motor in place and attach loosely with mounting screws.7) Replace sprocket on motor shaft.NOTE The two sprockets should line up parallel with each other, so the chain does not twist any during operation. Also the hub gets installed closets to the motor.8) Slide motor until the drive chain has about 1/4” slack when lightly pushed at the center of its topopen run. See chain tensioning illustration.9) Tighten screws to secure motor.10) Rewire leads same as removed in step 4.11) Replace side panel and control box cover.D. Clean the Air Intake (Once A Week)1)DISCONNECT UNIT FROM POWER SOURCE.2) Place unit on its backside.3) Use a vacuum cleaner and or a damp cloth to cleanthe air intake.E. Lubricate the Chain & Sprockets (Every 6 Months)1)DISCONNECT UNIT FROM POWER SOURCE.2) Remove enclosure exposing chain drive.3) While wearing rubber gloves and using an extreme pressure,synthetic chain lubricant with a temperature range up to400°F (204°C) lubricate chain and sprockets. Apply liberally.This grease is available as part no. 1P-Z8914.4) Replace enclosure, Reconnect power source and test unit.2M-4497-2 10/2010The foregoing warranty is in lieu of any and all other warranties expressed or implied and constitutes the entire warranty.FOR ASSISTANCEShould you need any assistance regarding the Operation or Maintenance of any Star equipment; write, phone, fax or email our Service Department.In all correspondence mention the Model number and the Serial number of your unit, and the voltage or type of gas you are using.ALL:* Pop-Up Toasters * Butter Dispensers * Pretzel Merchandisers (Model 16PD-A Only)* Pastry Display Cabinets * Nacho Chip Merchandisers * Accessories of any kind * Sneeze Guards * Pizza Ovens (Model PO12 Only)* Heat Lamps * Pumps-ManualEmail:********************(see below) should be taken The warranty period for the JetStar six (6) ounce & Super JetStar eight (8) ounce series popcorn machines is two (2) years.(5) years on the griddle surface. See detailed warranty provided with unit.abrasive pads, product identifiers and > This warranty is not valid on Conveyor Ovens unless a "start-up/check-out" has been performed by a Factory Authorized Technician.PARTS WARRANTY Parts that are sold to repair out of warranty equipment are warranted for ninety (90) days. The part only is warranted. Labor to replace the part is chargeable to the customer.SERVICES NOT COVERED BY WARRANTY PORTABLE EQUIPMENT Star will not honor service bills that include travel time and mileage charges for servicing any products considered "Portable" including items listed below. These products should be taken to the Service Agency for repair:1. Travel time and mileage rendered beyond the 50 mile radius limit2. Mileage and travel time on portable equipment (see below)3. Labor to replace such items that can be replaced easily during a daily cleaning routine, ie; removable kettles on fryers, knobs, grease drawers on griddles, etc.4. Installation of equipment5. Damages due to improper installation6. Damages from abuse or misuse7. Operated contrary to the Operating and Installation Instructions8. Cleaning of equipment9. Seasoning of griddle plates 10. V oltage conversions 11. Gas conversions 12. Pilot light adjustment 13. Miscellaneous adjustments 14. Thermostat calibration and by-pass adjustment 15. Resetting of circuit breakers or safety controls or reset buttons 16. Replacement of bulbs 17. Replacement of fuses 18. Repair of damage created during transit, delivery, & installation OR created by acts of God* The Model 510FD Fryer. * The Model 526TOA Toaster Oven. * The Model J4R, 4 oz. Popcorn Machine. * The Model 518CMA & 526CMA Cheese Melter.* The Model 12MC & 15MC & 18MCP Hot Food Merchandisers.* The Model 12NCPW & 15NCPW Nacho Chip/Popcorn Warmer.* All Hot Dog Equipment except Roller Grills & Drawer Bun Warmers.* All Nacho Cheese Warmers except Model 11WLA Series Nacho Cheese Warmer. * All Condiment Dispensers except the Model HPD & SPD Series Dispenser.* All Specialty Food Warmers except Model 130R, 11RW Series, and 11WSA Series.* All QCS/RCS Series Toasters except Model QCS3 & RCS3 Series.* All Fast Steamer Models except Direct Connect Series.®RedRedRedRedOrgOrgBlkBlu BluBluBluYelWhtWht WhtWhtMajMajRedRedBlkBlkBlkBlkMODEL: QCS-3-1300 208/220/240V w/FUSEQ3-95ARB 208/240 w/FUSETHIS DRAWING CONTAINS INFORMATION CONFIDENTIAL TO STAR MFG. INT'L. INC.NO REPRODUCTION OR DISCLOSURE OF ITS CONTENTS IS PERMITTED.SK2255 Rev - 06/8/2007FAN MOTOR POWER SAVER31RESET/HIGH LIMITBOTTOM 42HEATMOTORDRIVE H1PILOTL1H2L2CORDPOWER SUPPLY TOP HEATPILOTH1L1H2L2CONTROLSPEED CONTROL SIDELEFT SIDEBOTTOM HEATTOP HEATFUSEST H I S D R A W I N G C O N T A I N S I N F O R M A T I O N C O N F I D E N T I A L T O S T A R M F G . I N T 'L . I N C .N O R E P R O D U C T I O N O R D I S C L O S U R E O F I T S C O N T E N T S I S P E R M I T T E D .S K 2227 R e v . E 6/28/2007PARTS LIST October 13, 2014, Rev. GQ3-95ARB-V02 & Q3-95ARB-VO4Following Pages Redesign unit implemented 5/2008 Models: Q3-95ARB-208V & 240V• Simplified Wiring• Fewer Terminal Blocks• Identical Outside Apperance• Metal NameplateWD# 2M-Z10835QCS & RCS WIRED IN SERIESFAN MOTORRESET/HIGH LIMITBOTTOM 42HEATMOTORDRIVE H1PILOTL1H2L214GA CORDPOWER SUPPLY PILOTH1L1H2L2CONTROLSPEED CONTROL SIDELEFT SIDEBOTTOM HEATTOP HEATTOPHEAT3 BLACK4 W H I T EBLACK1 BLACKWHITE BLACK611 BLACK13 BLACK1210WHITE FOR 208V5 BLACK7 BLACKMOTOR WIRE IS 18GAGNDWHITE OR BLUEWHITE9BLACKWHITEWHITE15 BLACKF U S EF U S E2 W H I T E4 W H I T E14 WHITEBLACK16 W H I T E138 WHITEMODEL: QCS & RCS 3 wired in SeriesTHIS DRAWING CONTAINS INFORMATION CONFIDENTIAL TO STAR MFG. INT'L. INC.NO REPRODUCTION OR DISCLOSURE OF ITS CONTENTS IS PERMITTED.STAR MANUFACTURING INTERNATIONAL INC.SK-Z10835 Rev B1/2008®T H I S D R A W I N G C O N T A I N S I N F O R M A T I O N C O N F I D E N T I A L T O S T A R M F G . I N T 'L . I N C .N O R E P R O D U C T I O N O R D I S C L O S U R E O F I T S C O N T E N T S I S P E R M I T T E D .PARTS LIST October 13, 2014, Rev. GQ3-95ARB-208V & Q3-95ARB-240VConveyor Toaster。
我的世界自动养鸡装置制作方法
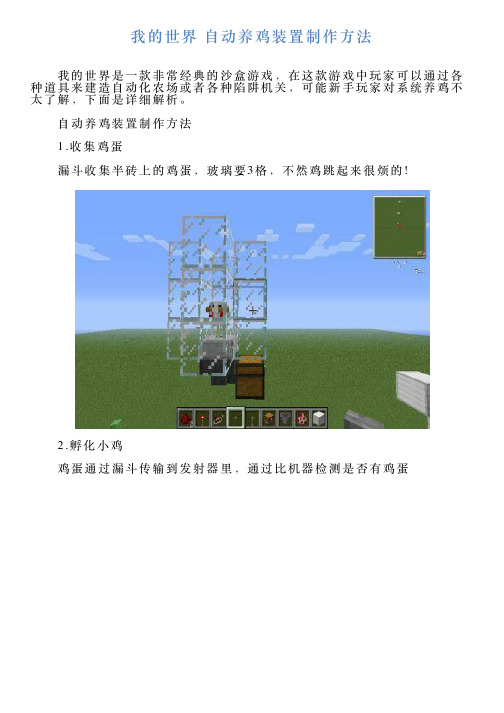
我的世界⾃动养鸡装置制作⽅法
我的世界是⼀款⾮常经典的沙盒游戏,在这款游戏中玩家可以通过各种道具来建造⾃动化农场或者各种陷阱机关,可能新⼿玩家对系统养鸡不太了解,下⾯是详细解析。
⾃动养鸡装置制作⽅法
1.收集鸡蛋
漏⽃收集半砖上的鸡蛋,玻璃要3格,不然鸡跳起来很烦的!
2.孵化⼩鸡
鸡蛋通过漏⽃传输到发射器⾥,通过⽐机器检测是否有鸡蛋
控制⼀个随机时钟脉冲,把信号传到发射器发射鸡蛋,然后就出⼩鸡了。
3.烤鸡⾁【连续型】
收集鸡蛋然后打碎孵化⼩鸡
等⼩鸡长⼤后,通过阳光传感器把信号传到发射器发射岩浆,使成年鸡烧死⽽⼩鸡没事
烧死鸡得到的熟鸡⾁和⽻⽑通过物品分离进⼊箱⼦【⾄于物品太多来不及反应从⽽传到最后的杂物收集的箱⼦】
4.烤鸡⾁【爆发型】
鸡蛋收集在箱⼦中,⽤减法模式下的⽐较器检测箱⼦是否满。
箱⼦满后信号传到R S锁存器
控制指针指的时钟信号,信号传到发射器【打碎鸡蛋】
⽤⽐较模式下的⽐较器检测箱⼦是否为空,信号输⼊到R S锁存器的另⼀端。
箱⼦⾥的鸡蛋全部打碎后,等箱⼦又满时减法模式下的⽐较器把信号传到发射器【图⽚中:⾥⾯放岩浆】
然后通过漏⽃收集物品(物品分离略)
逗游⽹——中国2亿游戏⽤户⼀致选择的”⼀站式“游戏服务平台。
我的世界机械动力鼓风机合成表

我的世界机械动力鼓风机合成表在我的世界游戏中,机械动力鼓风机是一种非常实用的工具,它可以帮助玩家更有效地进行气体传输和矿洞通风。
下面我们将详细介绍机械动力鼓风机的合成材料、合成步骤以及作用与实用性。
一、机械动力鼓风机的合成材料1.橡木板:合成机械动力鼓风机的外壳和叶片,需要使用16块橡木板。
2.橡木棒:合成机械动力鼓风机的拉杆,需要使用4根橡木棒。
3.线:合成机械动力鼓风机的动力源,需要使用16根线。
4.齿轮:合成机械动力鼓风机的核心部件,需要使用8个齿轮。
二、机械动力鼓风机的合成步骤1.在工作台处,将橡木板合成外壳和叶片。
将4块橡木板放入工作台的任意格子中,然后合成1块外壳和2块叶片。
2.将外壳和叶片放入合成格子中,制作出机械动力鼓风机的外壳和叶片。
3.将橡木棒合成拉杆。
将4根橡木棒放入工作台的任意格子中,然后合成2根拉杆。
4.将拉杆和齿轮放入合成格子中,制作出机械动力鼓风机的拉杆和齿轮。
5.将外壳、叶片、拉杆和齿轮放入合成格子中,合成出机械动力鼓风机。
三、机械动力鼓风机的作用与实用性1.作用:机械动力鼓风机主要用于增加矿洞内的通风速度,降低气体浓度,从而保护玩家免受窒息危险。
此外,它还可以用于加速植物生长、提高鱼塘氧气含量等。
2.实用性:机械动力鼓风机的实用性非常高,特别是在大规模矿洞和地下农场中,它可以极大地提高玩家的采矿效率和农业生产水平。
四、如何在游戏中充分利用机械动力鼓风机1.合理摆放:在矿洞中,可以根据矿洞的形状和通风需求,合理摆放机械动力鼓风机,以达到最佳的通风效果。
2.与其他设备结合:将机械动力鼓风机与水泵、活塞等设备结合,可以实现更多实用功能,如自动灌溉、自动矿石收集等。
3.持续更新:定期检查和维护机械动力鼓风机,确保其正常工作,以充分发挥其作用。
西安圣华15烤房控制器使用说明

西安圣华15烤房控制器使用说明
西安圣华15烤房控制器是一种用于控制烤房温度和时间的设备。
以下是使用说明:
1. 开机:将电源线插入电源插座,接通电源,控制器即可开机。
2. 温度设定:使用温度设定钮(通常位于控制器上方)来设定所需的烤房温度。
旋转设定钮以选择所需温度,一般范围为
0°C至300°C。
3. 时间设定:如果需要控制烤房工作的时间,可以使用时间设定钮(通常位于控制器下方)。
旋转设定钮以选择所需的工作时间,一般范围为0分钟至999分钟。
4. 启动:设置好温度和时间后,按下启动按钮以启动烤房。
此时,控制器会开始监控烤房温度和时间。
5. 等待:在烤房工作期间,控制器会自动控制加热器的功率以维持设定的温度。
同时,控制器会倒计时设定的时间。
6. 完成提示:当设定的时间到达或温度达到设定值时,控制器会发出提示音或灯光来提醒烤房工作已完成。
7. 停止:工作完成后,按下停止按钮以停止烤房。
同时,断开电源线,将控制器关闭。
请注意,使用控制器时应遵循相关操作指南和安全规定。
如果
有特殊需求或使用问题,请参考设备的详细说明书或联系制造商获得更多信息。
Master MasterTig MLS 焊接设备使用手册说明书

4.1.1 每六个月维护一次......................................................................................................... 18
4.1.2 服务协议......................................................................................................................... 18
2.8.1 在 MMA 焊方式下选择焊接极性................................................................................... 6
2.8.2 地线................................................................................................................................... 6 2.9 冷却单元(MasterCool 10)........................................................................................... 6 2.10 保护气......................................................................................................................................... 7
viewme-um004_-zh-e说明书

酷风科技 Sonic Sentinel Model 14-1 声音驱逐器用户手册说明书

SONIC SENTINEL TM MODEL 14-1USER’S MANUAL440 W White Pine DrMurray, UT 84123(385)-275-6222Table of Contents1. Introduction pg. 22. Safety Precautions pg. 23. Product Specifications pg. 34. Initial Setup pg. 4–55. Operation pg. 6–76. Troubleshooting pg. 87. Legal pg. 98. Parts View & Listing pg. 10–119. Warranty pg. 1210. Compliance pg. 121. IntroductionThank you for purchasing the Sonic Sentinel Model 14-1 Sound Cannon. It is designed to humanely discourage wildlife from occupying undesirable or unsafe locations. Preventing such habitation can help avoid property damage, fines, injury to wildlife, and loss of human life.2. Safety PrecautionsSafe operation of the Sonic Sentinel Model 14-1 Sound Cannon is the operator's sole responsibility and requires strict observation of the safety precautions outlined below. Failure to do so will void the manufacturer's warranty and could result in property damage, serious injury, or death.1.Explosive Propane Gas - For outdoor use only.No smoking or open flame within 50 feet. Neverpoint cannon toward people, obstruct the barrel,or attempt to fire projectiles. Do not alter the LPGregulator or tank connector in any way. Use onlywith OPD equipped tanks of not more than 40lbs.2.Extreme Sound - Hearing protection must beworn within 50 feet of cannon while in operation.3.High Voltage - Do not touch any componentsunder the black plastic electronics cowling whenthe power switch is in the on position or withoutfirst disconnecting the battery terminals.4.Lead Acid Battery - Do not puncture, short, orreverse polarity. Replace only with battery of sametype and rating. Dispose of in accordance with locallaws and regulations.3. Product SpecificationsModel 14-1 (M14-1) Specifications Sound Pressure Level: 130dB @ 1mSelectable Firing Frequency: 30sec – 2hr with2 Random Modes and Multi-Shot (1, 2, or 3)ChronometerPrecision: +/- 1%Operating Temperature Range: -5°F – 140°F (-20°C – 70°C)LPG Efficiency: > 20,000 Cycles(20lb tank)Electrical Draw: < 0.2mA Standby0.0004Ah Per Cycle Battery Capacity:(Battery Included) 8Ah SLA 12VDCDimensions (w/o Tripod) 40in (101.6cm) L 10in (25.4cm) W 5in (12.7cm) HWeight(w/o LPG Tank) Cannon: 22.5lb (10.2kg) Tripod: 8.0lb (3.6kg) Shipping: 40.0lb (18.1kg)Emissions Compliance: FCC: Part 15, Subpart B EN: 61000-6-3:2007 ICES: 001, Issue 44. Initial Setup1. Remove the M14-1 cannon and tripod from their packaging. Retain packing material for future transportation needs.2. Install M14-1 cannon on tripod: a. Remove bolts and springs from barrel clamp at top of tripod (Fig. 1).b. Rotate top half of clamp 180 degrees and loosely re-install springs and bolts (Fig. 2).c. Slide barrel of M14-1 cannon into barrel clamp. Adjust until balanced (approx. 4in from front of shroud) and level (Fig. 3).d. Tighten barrel clamp bolts with the provided6mm wrench.Figure 2Figure 1Figure 33.Connect battery:a.Ensure the M14-1 cannon’s power switch isin the off (down) position.b.Remove top shroud and foam batteryinsulator. Do not discard the foam insulator!c.Remove and discard the two, small, plasticbattery terminal insulators.d.Connect the negative (-) black wire to thebattery’s negative (-) black terminal.e.Connect positive (+) red wire to thebattery’s positive (+) red terminal.f.Replace foam battery insulator.4.Set delay timer to desired firing interval (Fig. 4):a.OFF: Delay timer isdisabled, but cannon canbe triggered remotelyvia activation modules.b.RANDOM: Cannon willfire randomly every 1–10minFigure 4 Figure 5 (RAND1) or every 5–30min (RAND2).c.Note: Frequencies less than 5min should not beused in conjunction with our activation modules. 5.Set multi-shot switch (right of delay timer, Fig. 5)to desired shot count: center=1, up=2, or down=3.6.Reinstall top shroud. Ensure that the solar panelwires remain connected and fold into the spacebetween the battery and barrel.7.Connect propane tank (not included):a.Suspend a standard, user provided, 20lbpropane tank from the M14-1 tripod’s 3 S-hooks with valve opening facing aft.Note: 30-40lb tanks can be used in conjunctiononly with Sonic Sentinel’s tripod extension kit.b.Securely fasten the M14-1 regulator’s OPDconnector to propane tank valve.5. Operation1.Select a suitable outdoor location for theM14-1 cannon that meets the following criteria:a.On level, solid ground to prevent tippingNote: Optional tripod feet are available tosupport the M14-1 cannon on unstable surfaces.b.Free of debris and combustible materialc.In direct sunlight and free from overheadobstructions shading the solar panelNote: For sustained operation, the solar panel ofthe M14-1 cannon should receive at least 5 hoursof direct sunlight each day.d.Clearly visible to passers-bye.Facing downwind relative to prevailing windsf.Away from residential or other soundsensitive areasNote: The M14-1 cannon is capable of producingsound levels that may violate local noiseordinances. Ensuring legal operation of the M14-1is the operator's sole responsibility and shouldonly be conducted only in accordance with locallaws and regulations.g.As close to the desired deterrent zone aspossible taking the above factors intoconsideration.2.Ensure that all of the following conditions are metbefore proceeding:a.Barrel of M14-1 is not obstructed and ispointed away from people and objectsb.Propane tank connection is securec.No sources of ignition are presentd.Any persons within 50 feet of cannon arewearing ear protection.3.Open propane tank valve and turn power switch on(up).Note: There is a 30 second power-up delay, duringwhich the M14-1 cannon will not activate, to provideadequate time to safely clear the immediate area.Note: Battery voltage must be above 12 volts in orderfor the M14-1 cannon to initialize.4.Following the power-up delay, the M14-1 cannonwill begin firing at the delay timer interval setduring initial setup.Note: There is a 30 second post-fire delay, duringwhich the M14-1 cannon will not activate, to preventwasteful and potentially hazardous continuous firing. 5.When in the “OFF” position, the delay timer isdisabled, but the cannon can still be triggeredremotely via activation modules.Note: When the M14-1 cannon is used in conjunctionwith any of Sonic Sentinel’s activation modules, thedelay timer is reset after each commanded detonation.6.Change the location and detonation frequency ofthe M14-1 cannon frequently to prevent wildlifefrom habituating to its effect.Caution:Always power down the M14-1 cannon beforeremoving the top shroud to update the delay timer!7.Periodically clean the solar panel using a damp cloth.Note: Regularly remove any snow accumulation orother debris from the solar panel to ensure the batterystays charged.8.Close propane tank valve and turn power switch off(down) when not in use to prevent accidental firing.Note: When storing the M14-1 cannon for long periods(> 1 week), disconnect the battery to prevent discharge.6. TroubleshootingThe following flowchart outlines several common problems and their solutions. For other questions, please contact *************************. Cannon does not fire Open gas valve & turn power onPower switch & gas valve on? Is gas injection (hissing) heard?Check propane tank gas level NO NO YESNO Is ignition (buzzing) heard?Is the barrelobstructed?Does cannonfire? Is propane tank level low?Are conditions windy?Does cannonfire loudly?Check battery voltage > 12V Power off M14-1 and clear barrel Contact support Replace propane tank Point barrel downwind Contact SupportNO YESYESYES Cannon isnot loud YES YES NO NONONO7. LegalApplicability:1.These Terms apply to any transaction between SonicSentinel, LLC (hereafter known as "Seller") and itscustomers (hereafter known as "Buyer" or "Buyers").The Terms are integral to any purchase agreement,invoice, order form, or other document(s) pertaining tothe sale of, or the offer to sell, Seller's products. Theplacement of any order for Seller's products and/or theuse of Seller's products implies an agreement to theseTerms in full.2.Buyer's ability to purchase and/or use Seller’s productsis expressly predicated on Buyer's acceptance of theseterms and conditions. Any purchase of product shall beconsidered a contractual agreement by Buyer to Seller'sTerms as provided here: /legal. Limitation of Seller’s Liability:1.Seller shall not be liable for any general or specialdamages arising from the use or misuse of the Model14-1 Sound Cannon and its accessories (hereafterknown as “Product”). No warranty is provided by Sellerbeyond replacement due to defects in manufacturingand is limited to a refund of the purchase price. Seller'swarranty is exclusive of all other warranties, and anyimplied warranty of merchantability and/or impliedwarranty of fitness for a purpose is hereby disclaimed.2.Buyer is solely responsible for determining the suitabilityof Seller's products for a purpose intended by Buyer orBuyer's customers. Seller has tested products only asexplained in Seller's product specifications and thismanual. Buyer agrees not to use Seller's products in anyway not specified by Seller's instructions and productdescriptions. Buyer shall assume all responsibility forany claims, losses, damages, demands, and expensesincurred by the use or misuse of Seller's products,including the incorporation of Seller's products into othergoods for sale by the Buyer.3.Seller does not authorize or otherwise endorse Buyer tomake any modification or change to Product. Anychanges or modifications made by Buyer to Product,which are not expressly approved by Seller in writing,shall render any and all warranties invalid.8. Parts View & ListingThe following M14-1 replacement individual parts and assemblies are available:Parts Part #1.Injector Assembly 000062.Ignition Control Module 000073.Power Switch 000084.Barrel Assembly 000095.Coil Assembly 000106.Spark Plug 000117.Solar Controller 000128.Wiring Harness*000139.Propane Regulator 0001410.Lower Shroud & Cowling 0001511.Upper Shroud 0001612.12VDC 8Ah Battery 0001713.Tripod Barrel Clamp 00018The following M14-1 accessories are available:Accessories*Part #1.Tripod Extension (24in) 000202.Tripod Feet (Set of 3) 000213.Nighttime Deactivation 000224.Battery Charger (12VDC) 000235.Propane Level Sensor 000246.Programmable Timer 000257.360° Rotating Tripod 00026The following M14-1 activation modules are available: Activation Modules*Part #1.Push-Button Remote Controls 00030–322.XBee Radio Modules 00033–363.Motion Detection Modules 00037–39To purchase parts and accessories, or for more information, visit .* Not Pictured11 | P a g e P r o u d l y D e s i g n e d&A s s e m b l e d i n U S A12 | P a g e P r o u d l y D e s i g n e d & A s s e m b l e d i n U S A 9. WarrantySeller warrants Product against defects in materials or workmanship for a period of 1 year from the date of original sale. No warranty is provided by Seller beyond replacement due to defects in manufacturing and is limited to a refund of the purchase price. Seller's warranty is exclusive of all other warranties, and any implied warranty of merchantability and/or implied warranty of fitness for a purpose is hereby disclaimed. 10. ComplianceFCC (Federal Communications Commission): This equipment has been tested and found to comply with the limits for a Class B digital device, pursuant to part 15 of the FCC Rules. These limits are designed to provide reasonable protection against harmful interference in residential or commercial installations. This equipment generates, uses, and can radiate radio frequency energy and, may cause harmful radio interference.IC (Industry Canada): This equipment has been tested and found to comply with the limits for a Class B digital device, pursuant to Industry Canada ICES-001, Issue 4. EN (European Norm): This equipment has been tested and found to comply with the limits defined by EN 61000-6-3:2007 for electromagnetic emissions in light industrial applications.。
2023年化工自动化控制仪表备考押题2卷合壹(带答案)卷6

2023年化工自动化控制仪表备考押题2卷合壹(带答案)(图片大小可自由调整)全文为Word可编辑,若为PDF皆为盗版,请谨慎购买!第一卷一.全能考点(共100题)1.【单选题】《国务院关于加强和规范事中事后监管的指导意见》提出:加快建设高素质、职业化、专业化的监管执法队伍,扎实做好技能提升工作,大力培养“()”的监管执法人员。
A、多才多艺B、一专多能C、综合技能D、年轻有为参考答案:B2.【判断题】危险场所是指爆炸性气体环境或可燃性粉尘环境大量出现或预期出现的数量足以要求对电气设备的结构、安装和使用采取专门预防措施的区域。
参考答案:√3.【单选题】在刮削两个互相垂直的平面时,为了保证垂直度,刮削时要()。
A、同时刮削两个平面B、交叉刮削两个平面,互为基准C、先刮好一个平面,以此为基准,边检测边刮另一个面D、随便刮都可以参考答案:B4.【单选题】1EC61158是()。
A、现场总线国际标准B、局域网标准C、广域网标准参考答案:A5.【多选题】材料采购方案的优选原则是()之和最低。
A、采购费B、储存费C、损耗费D、运输费E、二次倒运费参考答案:AB6.【判断题】调节阀由执行机构和阀体部件及附件几部分组成。
参考答案:×7.【判断题】隔爆型电气设备的壳体内部是不可能发生爆炸的。
参考答案:×8.【单选题】施工图设计文件审查单位应当对()阶段执行强制性标准的情况实施监督。
A、工程建设勘察、设计B、工程建设规划C、工程建设施工D、工程建设验收参考答案:A9.【判断题】美国TRICONEX公司生产的TS3000系统是一种二重化的冗余容错控制系统,常用于炼油化工装置大型机组的控制。
参考答案:×10.【单选题】草鱼开片出肉加工时,先将加工整形的草鱼的切掉。
A、头B、头、尾C、鱼鳍D、尾参考答案:B11.【判断题】容积式流量表是依据已知固定的容积所排出流体的次数来测量流量的仪表。
参考答案:×12.【单选题】金属导体的电阻与其()。
2023年化工自动化控制仪表考试历年真题荟萃4套合1(附带答案)套卷42

2023年化工自动化控制仪表考试历年真题荟萃4套合1(附带答案)(图片大小可自由调整)全文为Word可编辑,若为PDF皆为盗版,请谨慎购买!第I套一.全能考点(共50题)1.【单选题】下列说法中,不正确的是()。
A、安全是相对的概念B、无危则安,无缺则全C、世界上有绝对安全的事物D、安全和危险均是一种状态参考答案:C2.【单选题】矩形布孔的抵抗线比孔间距(),各排中对应炮孔呈竖直线排列。
A、大B、相等C、小参考答案:C3.【判断题】干粉灭火器能迅速扑灭液体火焰,同时泡沫能起到及时冷却作用。
参考答案:√4.【单选题】接地是抑制噪声和防止干扰的主要方法,不同厂家的计算机控制系统对接地的要求不同。
一般来说,DCS系统接地电阻应小于()。
A、4ΩB、10ΩC、50Ω参考答案:A5.【单选题】为使离心式夹紧夹具的结构紧凑、尺寸不至于太大,主轴的转速应()。
A、尽量低B、不能太高C、足够高D、尽量高参考答案:C6.【单选题】婴幼儿不宜吃的食品主要有以下几大类:()。
A、油炸食物B、坚果类食品C、有刺激性或含咖啡因的食物D、以上都是参考答案:D7.【单选题】串级控制系统中,副控制器的正反作用取决于工艺要求和()。
A、调节阀B、副对象C、副控制器参考答案:B8.【判断题】烤鸭、烤鸡等菜品是用糖浆着色法进行着色的。
参考答案:√9.【单选题】某住宅工程,标准层高度2.9米,共计33层,计划采用附着式升降脚手架,请问附着式升降脚手架的架体高度不应大于()倍楼层高度?A、3B、4C、5D、6参考答案:C10.【判断题】可燃性气体、蒸气与空气的混合物浓度高于其爆炸下限时,或低于其爆炸上限时,都不会发生爆炸。
参考答案:×11.【单选题】请指出下图中高支模支撑体系存在的安全隐患?()A、模板支撑架体未设置纵横向水平拉杆B、局部梁底中部支撑立杆悬空设置C、模板支架立杆垂直度偏差较大D、模板支架未设置竖向剪刀撑参考答案:B12.【判断题】电子式电动执行机构的特点是可靠性高,执行机构可以在5~10年内免维修。
我的世界生存前期必备 超迷你全自动烤鸡机
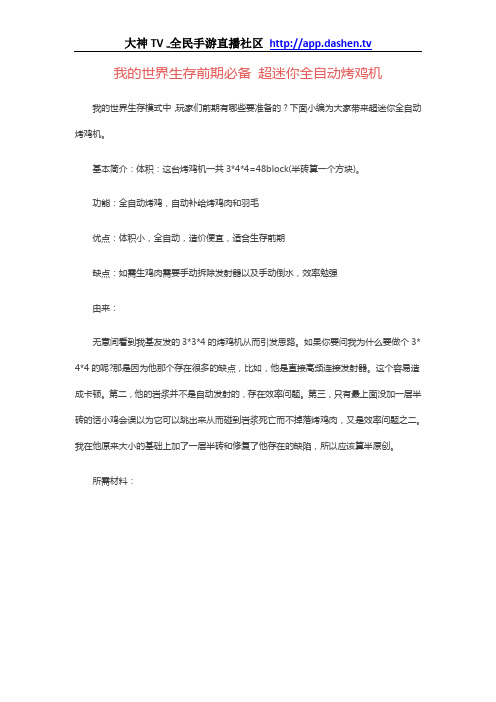
我的世界生存前期必备超迷你全自动烤鸡机我的世界生存模式中,玩家们前期有哪些要准备的?下面小编为大家带来超迷你全自动烤鸡机。
基本简介:体积:这台烤鸡机一共3*4*4=48block(半砖算一个方块)。
功能:全自动烤鸡,自动补给烤鸡肉和羽毛优点:体积小,全自动,造价便宜,适合生存前期缺点:如需生鸡肉需要手动拆除发射器以及手动倒水,效率勉强由来:无意间看到我基友发的3*3*4的烤鸡机从而引发思路。
如果你要问我为什么要做个3* 4*4的呢?那是因为他那个存在很多的缺点,比如,他是直接高频连接发射器。
这个容易造成卡顿。
第二,他的岩浆并不是自动发射的,存在效率问题。
第三,只有最上面没加一层半砖的话小鸡会误以为它可以跳出来从而碰到岩浆死亡而不掉落烤鸡肉,又是效率问题之二。
我在他原来大小的基础上加了一层半砖和修复了他存在的缺陷,所以应该算半原创。
所需材料:第一步:搭建一个3*4的平台第二步:放上第一层的方块,漏斗对箱子。
火把斜着插不是竖着插的。
第三步:放上第二层的方块。
漏斗连着发射器,发射器对半砖第四步:继续看图搭方块。
千万别眼残,那个是炼药锅不是漏斗!发射器对半砖,里面放个岩浆桶。
第五步:铺上一层半砖,整台机器就做好了第六步:开始放置种鸡,一个发射器对着炼药锅后面连上高频然后发射鸡蛋,最后拆除这个装置就大功告成。
如果需要继续增加种鸡也是以此类推,完全不需要手动砸蛋蛋原理:大家肯定觉得这么小不可能吧...答案是可能的,只要你用心去想。
这里呢我用了一个非常简单的高频但是它闪了一会儿熄灭了,但是当我们更新一下火把周围的方块时它马上又重复了之前的高频。
这里我用了比较器来触发这个高频,因为比较器能检测鸡蛋发出信号,触发了这个高频使它重新醒来运作。
那么这个发射器呢?原因是这个高频持续的时间刚好能够使发射器发射出岩浆烧死鸡而不会烧到掉落物,刚好这个高频的频率又是偶数,使得最后发射器又收回了岩浆。
那一层半砖是为了防止小鸡乱跳影响效率。
Cook4Life 烤鸡机操作手册说明书

VERTI-GRILL ROTISSERIE GUIDE & RECIPE BOOK20LTWO LARGECHICKENSQUICK &EASY TOUSEAUTO ON/OFF SAFETYSWITCHhead office:Cook4Life Offi ce Park26 & 27 Waitara RoadPompagalana A/HTzaneen, 0850 Limpopo Province, South Africa call centre:+27 (0) 87 980 0345Fax: +27 (0) 87 980 1717E-mail:*****************.za Web: www.cook4life.co.zaCONTENTSWELCOME TO COOK4LIFE ........................................PAGE 4 COOK4LIFE WARRANTY ..........................................PAGE 4 - 5 INSTRUCTION MANUAL ..........................................PAGE 6 - 10 RECIPESROAST CHICKEN .................................................PAGE 11 CHICKEN SHAWARMA ........................................PAGE 12 ROAST SHAWARMA ............................................PAGE 1353. components inclUded1. Motor unit2. Drip pan3. Rotisserie spit4. End forks ( 2 pieces )When you are ready to use the grill, be sure that the TIMER Control is in the “Off ” position and unplugged. We recommend a trial run to familiarize yourself with your grill and to eliminate any protective substance or oil that may have been used for packing and shipping. Plug the cord into a 220-240volt AC outlet. Set the TIMER Control to “20” minutes. A small amount of smoke and odor may be detected. This is normal.To avoid scratching, marring, discoloration or fi re hazard, do not store anything on top of the oven, especiallyWhen cooking poultry, it may be necessary to located on the top interior of the ovenClose the glass door and the inner light will be automatically.Set the TIMER Control to the time according to RECIPE and check after the setting time.When the roast is done, turn the TIMER Control ” and unplug the oven.The grill sides and top are hot, use oven mitts or temperature resistant gloves when removing the chicken. You can also use a carving fork and set of tongs to remove the roast.Remove the rotisserie from the top by lifting upand out towards you. Pull the bottom part ofthe spit out of the drip pan receptacle and placeonto a carving station.15. Place the roast on a cutting board or platter andallow standing for 10-15 minutes, this allowsthe juices to redistribute throughout the roastmaking for a moister, fl avorful roast Using a potholder, loosen the screws on the rotisserie forksand remove the rotisserie spit from the roast.Carefully remove the rotisserie forks and carvethe roast.DIRECTIONS1. Rinse the boneless chicken breasts with fresh coldwater then cut horizontally into thinner cuts of about ½ inch (each breast could possibly be split into 2slices depending on thickness).1. Mix all ingredients (Except the Chicken) in a blender,add to a bowl and mix well with the chicken, coverand let it marinate in the fridge overnight.1. When ready, grill the marinated chicken in yourCook4Life Verti- Grill Rotisserie for about 20 minuteson Maximum heat.1. Once cooked, shred the chicken thinly working yourway around the chicken. The chicken will now beready to be wrapped into a Shawarma.1. Spread the chicken shreds along the inside of apita bread or wrap, spread a bit of Garlic paste overthe pita bread or wrap, then, add some cucumberpickles, some French fries (Optional), and some grilled tomatoes, roll and enjoy.notes: Try marinating a mix of 75% chicken breast and 25% skinless boneless chicken thighs. The fat in the thighs gives the chicken a nice taste when grilled. Add grilled tomatoes in the pita or wrap instead of raw tomatoes.DIRECTIONSshaWarma marinade1. Mix the spices along with the lemon juice and apple cidervinegar in a blender for a couple of minutes. Don’t mix in theolive oil yet.2. Cut the beef into chunks of 10cm long by no more than 2cmin thickness.3. In a bowl, rub the meat with the marinade, sprinkle a bit ofolive oil then rub again, cover and let marinate overnight inthe fridge.grilling shaWarma method 1: panini grill1. Lay the marinated shawarma chunks on the Skewer makingsure the skewer penetrates each piece of meat and cook for10-15 minutes on maximum heat.2. Once cooked, shred the meat on a cutting board and servehot.preparing the tahini saUce1. In a small bowl, whisk the Tahini paste, crushed garlic, lemonjuice and salt until you turn the paste into a sauce.serving the shaWarma1. Place about 120g – 170g (to taste) of shredded shawarma ina pita bread along the diameter, sprinkle some tahini sauce,add freshly grilled tomatoes, french fries and garnish withfresh parsley. Roll and enjoy.13Cares about youhead office:Cook4Life Offi ce Park26 & 27 Waitara RoadPompagalana A/HTzaneen, 0850 Limpopo Province, South Africa call centre:+27 (0) 87 980 0345Fax: +27 (0) 87 980 1717E-mail:*****************.za Web: www.cook4life.co.za。
- 1、下载文档前请自行甄别文档内容的完整性,平台不提供额外的编辑、内容补充、找答案等附加服务。
- 2、"仅部分预览"的文档,不可在线预览部分如存在完整性等问题,可反馈申请退款(可完整预览的文档不适用该条件!)。
- 3、如文档侵犯您的权益,请联系客服反馈,我们会尽快为您处理(人工客服工作时间:9:00-18:30)。
我的世界自动烤鸡装置教程自动烤鸡机器我的世界是一款自由度非常高的沙盒类游戏,玩家可以在游戏中做出非常“高科技”的东西,今天口袋小编glp为大家带来的是自动烤鸡迷你装置制作教程,对于小鸡这种易得的生物,可以当做我们的口粮,而且羽毛做箭,鸡蛋也可以做蛋糕,浑身都是宝,下面小编给大家带来一款迷你的装置可以实现自动化。
用半砖过滤大鸡和小鸡:可见大鸡会被杀,小鸡安然无恙:
可能有些NPC村民会收购生鸡肉,这样的话岩浆烧就不可行了
不过用粘性活塞能达到效果,而且依然不会伤害小鸡
漏斗可以捡起掉落物品,是收集鸡肉的最佳选择
不过我用岩浆烧死鸡之后,发现掉落物也被烧掉了
所以要用到如下电路来控制岩浆:
没错,4个中继器
这个电路的功能就是把按钮的一个信号转变成两个信号,让发射器发射岩浆,把鸡点着,然后马上吸回岩浆,让鸡自己着火烧死
电路测试,小编用了一个加了/say命令的命令方块。
say Hello!
按了一下按钮就得到了两个输出信号,成功。
把各个部分组合起来,得到了一个最简单也是功能最少的自动烤鸡机。
再加上用来获得生鸡肉的活塞:
值得注意的是,这种设计在下雨天时很失败,因为雨水会浇灭鸡身上的火,停止伤害
你必须得再按一次按钮,可是岩浆喷出来时鸡马上就死了...掉落物也被烧掉,所以最好在上面再放一个方块,活板门都可以
如图,经过电路简化,小编做出来一个紧凑型的...(真的很紧凑啊)。
这几个中继器的摆放方式够奇葩吧,当时都不知道怎么想出来的。
向上传输信号的部分
略加思考之后还是决定装上活塞
以上都是比较低级的,外观有点呆板...到底怎么能得到生存的气氛呢?
当然是亲自尝试咯,小编在服务器玩生存的时候,最喜欢在自家院子里放一个小型的地下养鸡场
里面放几个漏斗收集鸡蛋能不能用它来改建呢?于是把四周挖开铺设电路
电路体积还是比较小的
小隔间里放两个按钮
下面的发射器部分
小编又拉了一条线,在下层装了一个拉杆,可以单独控制发射器,避免出现岩浆默认喷出来的情况
上面是用来养鸡的,并且可以收集鸡蛋
想杀鸡就用种子把鸡引到发射器陷阱里,别忘了关门留两只以便下次繁殖(用鸡蛋也可以...)
用泥土填好之后跟以前没改造一样,美观实用,你值得拥有
手拿种子,大波的鸡就掉进陷阱里了
留两只
这样自动烤鸡机就做成了,希望大家喜欢。