思科路由器配置命令详解及实例
Cisco路由器配置命令

C i s c o路由器配置命令Virtue carries wealth. On the morning of November 2, 2022关于Cisco的知识,可能好多人还不了解没有关系,这里主要分析了Cisco路由器配置命令,看完本文你肯定有不少收获,希望本文能教会你更多东西;Cisco路由器配置命令之模式转换命令用户模式----特权模式,使用命令"enable"特权模式----全局配置模式,使用命令"config t"全局配置模式----接口模式,使用命令"interface+接口类型+接口号"全局配置模式----线控模式,使用命令"line+接口类型+接口号"注:用户模式:查看初始化的信息.特权模式:查看所有信息、调试、保存配置信息全局模式:配置所有信息、针对整个路由器或交换机的所有接口接口模式:针对某一个接口的配置线控模式:对路由器进行控制的接口配置Cisco路由器配置命令之配置命令show running config 显示所有的配置show versin 显示版本号和寄存器值shut down 关闭接口no shutdown 打开接口ip add +ip地址配置IP地址secondary+IP地址为接口配置第二个IP地址show interface+接口类型+接口号查看接口管理性show controllers interface 查看接口是否有DCE电缆show history 查看历史记录show terminal 查看终端记录大小hostname+主机名配置路由器或交换机的标识config memory 修改保存在NVRAM中的启动配置exec timeout 0 0 设置控制台会话超时为0service password-encryptin 手工加密所有密码enable password +密码配置明文密码ena sec +密码配置密文密码line vty 0 4/15 进入telnet接口password +密码配置telnet密码line aux 0 进入AUX接口password +密码配置密码line con 0 进入CON接口password +密码配置密码bandwidth+数字配置带宽no ip address 删除已配置的IP地址show startup config 查看NVRAM中的配置信息copy run-config atartup config 保存信息到NVRAM write 保存信息到NVRAMerase startup-config 清除NVRAM中的配置信息show ip interface brief 查看接口的谪要信息banner motd +信息 + 配置路由器或交换机的描素信息description+信息配置接口听描素信息vlan database 进入VLAN数据库模式vlan +vlan号+ 名称创建VLANswitchport access vlan +vlan号为VLAN为配接口interface vlan +vlan号进入VLAN接口模式ip add +ip地址为VLAN配置管理IP地址vtp+service/tracsparent/client 配置SW的VTP工作模式vtp +domain+域名配置SW的VTP域名vtp +password +密码配置SW的密码switchport mode trunk 启用中继no vlan +vlan号删除VLANshow spamming-tree vlan +vlan号查看VLA怕生成树议Cisco路由器配置命令之路由器命令ip route+非直连网段+子网掩码+下一跳地址配置静态/默认路由show ip route 查看路由表show protocols 显示出所有的被动路由协议和接口上哪些协议被设置show ip protocols 显示了被配置在路由器上的路由选择协议,同时给出了在路由选择协议中使用的定时器router rip 激活RIP协议network +直连网段发布直连网段interface lookback 0 激活逻辑接口passive-interface +接口类型+接口号配置接口为被动模式debug ip +协议动态查看路由更新信息undebug all 关闭所有DEBUG信息router eigrp +as号激活EIGRP路由协议network +网段+子网掩码发布直连网段show ip eigrp neighbors 查看邻居表show ip eigrp topology 查看拓扑表show ip eigrp traffic 查看发送包数量router ospf +process-ID 激活OSPF协议network+直连网段+area+区域号发布直连网段show ip ospf 显示OSPF的进程号和ROUTER-ID encapsulation+封装格式更改封装格式no ip admain-lookup 关闭路由器的域名查找ip routing 在三层交换机上启用路由功能show user 查看SW的在线用户clear line +线路号清除线路思科路由器常用配置命令一览表:1、Exec commands:<1-99> 恢复一个会话bfe 手工应急模式设置clear 复位功能clock 管理系统时钟configure 进入设置模式connect 打开一个终端copy 从tftp服务器拷贝设置文件或把设置文件拷贝到tftp服务器上debug 调试功能disable 退出优先命令状态disconnect 断开一个网络连接enable 进入优先命令状态erase 擦除快闪内存exit 退出exce模式help 交互帮助系统的描述lat 打开一个本地传输连接lock 锁定终端login 以一个用户名登录logout 退出终端mbranch 向树形下端分支跟踪多路由广播mrbranch 向树形上端分支跟踪反向多路由广播name-connection 给一个存在的网络连接命名no 关闭调试功能pad 打开 PAD连接ping 发送回显信息ppp 开始点到点的连接协议reload 停机并执行冷启动resume 恢复一个活动的网络连接rlogin 打开远程注册连接rsh 执行一个远端命令send 发送信息到另外的终端行setup 运行setup命令show 显示正在运行系统信息slip 开始SLIP协议start-chat 在命令行上执行对话描述systat 显示终端行的信息telnet 远程登录terminal 终端行参数test 测试子系统内存和端口tn3270 打开一个tin3270连接trace 跟踪路由到目的地undebug 退出调试功能verify 验证检查闪烁文件的总数where 显示活动的连接which-route 执行OSI路由表查找并显示结果write 把正在运行的设置写入内存、网络、或终端x3 在PAD上设置参数xremote 进入xremote模式2、showaccess-expression 显示访问控制表达式access-lists 显示访问控制表apollo Apollo 网络信息appletalk Apple Talk 信息arap 显示Appletalk 远端通道统计arp 地址解析协议表async 访问路由接口的终端行上的信息bridge 前向网络数据库buffers 缓冲池统计clns CLNS网络信息clock 显示系统时钟cmns 连接模式网络服务信息compress 显示压缩状态configuration 非易失性内存的内容controllers 端口控制状态debugging 调试选项状态decnet DEC网络信息dialer 拨号参数和统计dnsix 显示Dnsix/DMPP信息entry 排队终端入口extended 扩展端口信息flash 系统闪烁信息flh-log 闪烁装载帮助日志缓冲区frame-relay 帧中继信息history 显示对话层历史命令hosts IP域名,查找方式,名字服务,主机表interfaces 端口状态和设置ip IP信息ipx Novell IPX信息isis IS-IS路由信息keymap 终端键盘映射lat DEC LAT信息line 终端行信息llc2 IBM LLC2 环路信息lnm IBM 局网管理local-ack 本地认知虚环路memory 内存统计netbios-cache NetBios命名缓冲存贮器内存node 显示已知LAT节点ntp 网络时间协议processes 活动进程统计protocols 活动网络路由协议queue 显示队列内容queueing 显示队列设置registry 功能注册信息rhosts 远程主机文件rif RIF存贮器入口route-map 路由器信息sdlle 显示sdlc-llc2转换信息services 已知LAT服务sessions 远程连接信息smds SMDS信息source-bridge 源网桥参数和统计spanning-tree 跨越树形拓朴stacks 进程堆栈应用standby 热支持协议信息stun STUN状态和设置subsystem 显示子系统tcp TCP连接状态terminal 显示终端设置tn3270 TN3270 设置translate 协议转换信息ttycap 终端容易表users 显示终端行的信息version 系统硬、软件状态vines VINES信息whoami 当前终端行信息x25 信息xns XNS信息xermote Xremote统计3、configMemory 从非易失性内存设置Network 从TFTP网络主机设置Overwrite-network 从TFTP网络主机设置覆盖非易失性内存Terminal 从终端设置4、Configure commads:Access-list 增加一个访问控制域Apollo Apollo全局设置命令appletalk Appletalk 全局设置命令arap Appletalk远程进出协议arp 设置一个静态ARP入口async-bootp 修改系统启动参数autonomous-system 本地所拥有的特殊自治系统成员banner 定义注册显示信息boot 修改系统启动时参数bridge 透明网桥buffers 调整系统缓冲池参数busy-message 定义当连接主机失败时显示信息chat-script 定义一个调制解调器对话文本clns 全局CLNS设置子命令clock 设置时间时钟config-register 定义设置寄存器decnet 全局DEC网络设置子命令default-value 缺省字符位值dialer-list 创建一个拨号清单入口dnsix-nat 为审计提供DMDM服务enable 修改优先命令口令end 从设置模式退出exit 从设置模式退出frame-relay 全局帧中继设置命令help 交互帮助系统的描述hostname 设置系统网络名iterface 选择设置的端口ip 全局地址设置子命令ipx Novell/IPX全局设置命令keymap 定义一个新的键盘映射lat DEC本地传输协议line 设置终端行lnm IBM局网管理locaddr-priority-list 在LU地址上建立优先队列logging 修改注册设备信息login-string 定义主机指定的注册字符串map-class 设置静态表类map-list 设置静态表清单menu 定义用户接口菜单mop 设置DEC MOP服务器netbios NETBIOS通道控制过滤no 否定一个命令或改为缺省设置ntp 设置NTPpriority-list 建立特权列表prompt 设置系统提示符queue-list 建立常规队列列表rcmd 远程命令设置命令rcp-enable 打开Rep服务rif 源路由进程router-map 建立路由表或进入路由表命令模式router 打开一个路由进程rsh-enable 打开一个RSH服务sap-priority-list 在SAP或MAC地址上建立一个优先队列service 修改网络基本服务snmp-server 修改SNMP参数state-machine 定义一个TCP分配状态的机器stun STUN全局设置命令tacacs-server 修改TACACS队列参数terminal-queue 终端队列命令tftp-server 为网络装载请求提供TFTP服务tn3270 tn3270设置命令translate 解释全局设置命令username 建立一个用户名及其权限vines VINES全局设置命令x25 的第三级x29 命令xns XNS 全局设置命令xremote 设置Xremote5、configipGlobal IP configuration subcommands: Accounting-list 选择保存IP记帐信息的主机Accounting-threshold 设置记帐入口的最大数accounting-transits 设置通过入口的最大数alias TCP端口的IP地址取别名as-path BGP自治系统路径过滤cache-invalidate-delay 延迟IP路由存贮池的无效classless 跟随无类前向路由规则default-network 标志网络作为缺省网关候选default-gateway 指定缺省网如果没有路由IPdomain-list 完成无资格主机的域名domain-lookup 打开IP域名服务系统主机转换domain-name 定义缺省域名forward-protocol 控制前向的、物理的、直接的IP广播host 为IP主机表增加一个入口host-routing 打开基于主机的路由代理ARP和再定向hp-host 打开HP代理探测服务mobile-host 移动主机数据库multicast-routing 打开前向IPname-server 指定所用名字服务器的地址ospf-name-lookup 把OSPF路由作为DNS名显示pim PIM 全局命令route 建立静态路由routing 打开IP路由security 指定系统安全信息source-route 根据源路由头的选择处理包subnet-zero 允许子网0子网tcp 全局TCP参数。
思科设备单臂路由命令配置
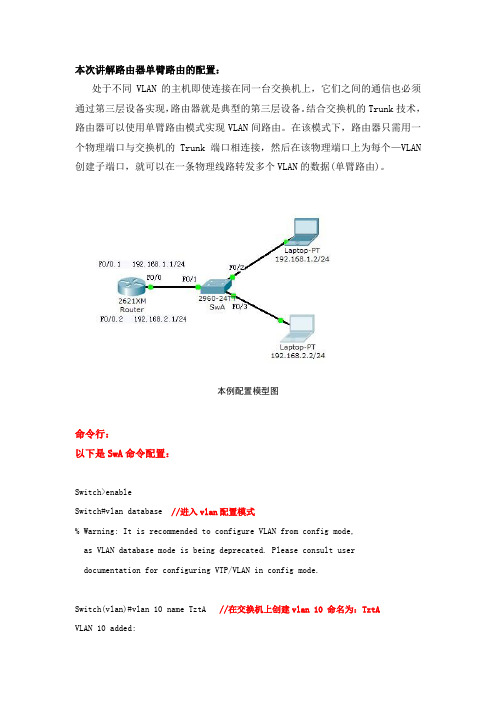
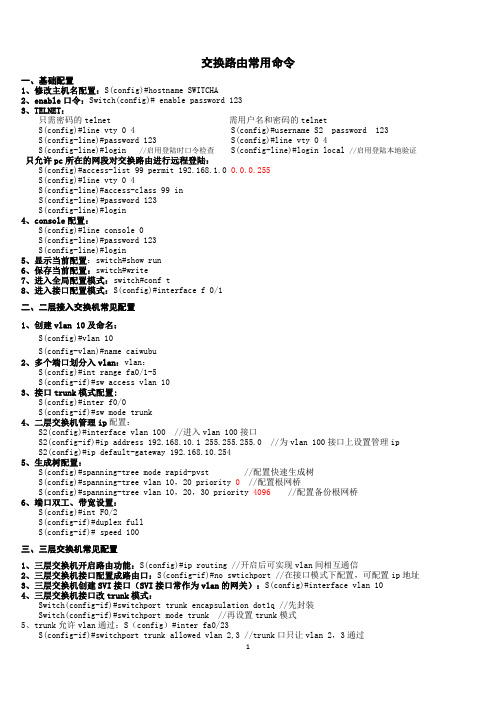
本次讲解路由器单臂路由的配置:处于不同VLAN的主机即使连接在同一台交换机上,它们之间的通信也必须通过第三层设备实现,路由器就是典型的第三层设备。
结合交换机的Trunk技术,路由器可以使用单臂路由模式实现VLAN间路由。
在该模式下,路由器只需用一个物理端口与交换机的Trunk端口相连接,然后在该物理端口上为每个—VLAN 创建子端口,就可以在一条物理线路转发多个VLAN的数据(单臂路由)。
本例配置模型图命令行:以下是SwA命令配置:Switch>enableSwitch#vlan database //进入vlan配置模式% Warning: It is recommended to configure VLAN from config mode,as VLAN database mode is being deprecated. Please consult userdocumentation for configuring VTP/VLAN in config mode.Switch(vlan)#vlan 10 name TztA //在交换机上创建vlan 10 命名为:TztAVLAN 10 added:Name: TztASwitch(vlan)#exitAPPLY completed.Exiting....Switch#conf tEnter configuration commands, one per line. End with CNTL/Z.Switch(config)#int f0/1Switch(config-if)#switchport mode trunk //设置SwA上f0/1端口为trunk模式Switch(config-if)#switchport trunk allowed vlan all //允许所有vlan通过Switch(config-if)#exitSwitch(config)#int f0/3Switch(config-if)#switchport mode accessSwitch(config-if)#switchport access vlan 10 //将SwA上f0/3端口划分给vlan 10 而f0/2默认属于vlan 1Switch(config-if)#no shutdown //激活端口Switch(config-if)#exitSwitch(config)#exitSwitch#%SYS-5-CONFIG_I: Configured from console by consoleSwitch#show vlan //查看已有vlan配置信息VLAN Name Status Ports---- -------------------------------- --------- ------------------------------- 1 default active Fa0/1, Fa0/2, Fa0/4, Fa0/5Fa0/6, Fa0/7, Fa0/8, Fa0/9Fa0/10, Fa0/11, Fa0/12, Fa0/13 Fa0/14, Fa0/15, Fa0/16, Fa0/17 Fa0/18, Fa0/19, Fa0/20, Fa0/21 Fa0/22, Fa0/23, Fa0/24, Gig1/1Gig1/210 TztA active Fa0/31002 fddi-default act/unsup1003 token-ring-default act/unsup1004 fddinet-default act/unsup1005 trnet-default act/unsupSwitch#wrBuilding configuration...[OK]Switch#以下为Route命令配置:Router>enableRouter#conf tEnter configuration commands, one per line. End with CNTL/Z.Router(config)#int f0/0Router(config-if)#no shutdown //激活路由器f0/0端口%LINK-5-CHANGED: Interface FastEthernet0/0, changed state to up%LINEPROTO-5-UPDOWN: Line protocol on Interface FastEthernet0/0, changed state to upRouter(config-if)#int f0/0.1 //进入(创建)子端口%LINK-5-CHANGED: Interface FastEthernet0/0.1, changed state to up%LINEPROTO-5-UPDOWN: Line protocol on Interface FastEthernet0/0.1, changed stateto upRouter(config-subif)#encapsulation dot1Q 1 //使用dot1Q协议进行封装最后一个1表示vlan 号这里表示vlan 1 Router(config-subif)#ip address 192.168.1.1 255.255.255.0 //配置端口ip地址Router(config-subif)#no shutdown //激活端口(在路由器里面,基本上每配置一个端口都需要激活)Router(config-subif)#exitRouter(config)#int f0/0.2%LINK-5-CHANGED: Interface FastEthernet0/0.2, changed state to up%LINEPROTO-5-UPDOWN: Line protocol on Interface FastEthernet0/0.2, changed state to upRouter(config-subif)#encapsulation dot1Q 10 //使用dot1Q协议进行封装这里表示vlan 10 与之前创建的一致Router(config-subif)#ip address 192.168.2.1 255.255.255.0Router(config-subif)#no shutdownRouter(config-subif)#end%SYS-5-CONFIG_I: Configured from console by consoleRouter#show ip route //查看路由配置信息Codes: C - connected, S - static, I - IGRP, R - RIP, M - mobile, B - BGPD - EIGRP, EX - EIGRP external, O - OSPF, IA - OSPF inter areaN1 - OSPF NSSA external type 1, N2 - OSPF NSSA external type 2E1 - OSPF external type 1, E2 - OSPF external type 2, E - EGPi - IS-IS, L1 - IS-IS level-1, L2 - IS-IS level-2, ia - IS-IS inter area * - candidate default, U - per-user static route, o - ODRP - periodic downloaded static routeGateway of last resort is not setC 192.168.1.0/24 is directly connected, FastEthernet0/0.1C 192.168.2.0/24 is directly connected, FastEthernet0/0.2Router#wrBuilding configuration...[OK]以上配置完成以后,可以使用两台PC之间做互相ping通测试,经测试两台PC可以相互通信(如下图)。
Cisco路由器配置实例(经典)
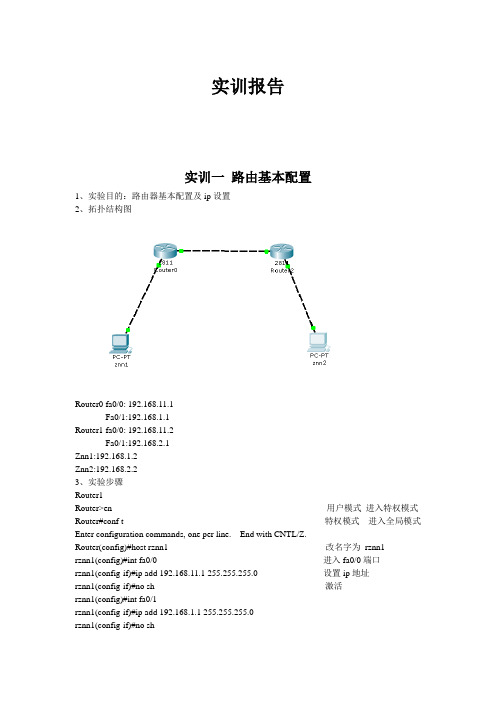
实训报告实训一路由基本配置1、实验目的:路由器基本配置及ip设置2、拓扑结构图Router0 fa0/0: 192.168.11.1Fa0/1:192.168.1.1Router1 fa0/0: 192.168.11.2Fa0/1:192.168.2.1Znn1:192.168.1.2Znn2:192.168.2.23、实验步骤Router1Router>en 用户模式进入特权模式Router#conf t 特权模式进入全局模式Enter configuration commands, one per line. End with CNTL/Z.Router(config)#host rznn1 改名字为rznn1rznn1(config)#int fa0/0 进入fa0/0端口rznn1(config-if)#ip add 192.168.11.1 255.255.255.0 设置ip地址rznn1(config-if)#no sh 激活rznn1(config)#int fa0/1rznn1(config-if)#ip add 192.168.1.1 255.255.255.0rznn1(config-if)#no shrznn1(config-if)#exitrznn1(config)#exitrznn1#copy running-config startup-config 保存Destination filename [startup-config]? startup-configrznn1#conf trznn1(config)#enable secret password 222 设置密文rznn1#show ip interface b 显示Interface IP-Address OK? Method Status Protocol FastEthernet0/0 192.168.11.1 YES manual up up FastEthernet0/1 192.168.1.1 YES manual up upVlan1 unassigned YES manual administratively down downrouter 2outer>enRouter#conf tEnter configuration commands, one per line. End with CNTL/Z.Router(config)#host rznn2rznn2(config)#int fa0/0rznn2(config-if)#ip add 192.168.11.2 255.255.255.0rznn2(config-if)#no shrznn2(config)#int fa0/1rznn2(config-if)#ip add 192.168.2.1 255.255.255.0rznn2(config-if)#no shRznn2#copy running-config startup-config 保存Destination filename [startup-config]? startup-configrznn2(config-if)#exitrznn2(config)#exitrznn2#conf trznn2(config)#enable secret 222rznn2#show ip interface bInterface IP-Address OK? Method Status Protocol FastEthernet0/0 192.168.11.2 YES manual up up FastEthernet0/1 192.168.2.1 YES manual up upVlan1 unassigned YES manual administratively down down实训二1、远程登录、密码设置及验证为路由器开设telnet端口,PC机可以远程登陆到Rznn3(Router 1)拓扑结构图Router0:192.168.1.1Pc:192.168.1.2步骤rznn3>rznn3>enrznn3#conf tEnter configuration commands, one per line. End with CNTL/Z.rznn3(config)#no ip domain lookuprznn3(config)#line cons 0rznn3(config-line)#password znnrznn3(config-line)#loginrznn3(config-line)#no exec-trznn3(config-line)#logg syncrznn3(config-line)#exitrznn3(config)#int fa0/0rznn3(config-if)#ip add 192.168.1.1 255.255.255.0rznn3(config-if)#no shrznn3(config-if)#exitrznn3(config)#line vty 0 4 打通五个端口rznn3(config-line)#password cisco 设置密码rznn3(config-line)#login 保存rznn3(config-line)#exit4、测试:实训三命令组1、目的:八条命令(no ip domain lookup\line cons 0\password\login\no exec-t\logg sync\show version\reload\copy running-config startup-config)\show cdp neighbors)2、拓扑结构图Router0 fa0/0: 192.168.11.1Router1 fa0/0: 192.168.11.23、步骤rznn1#conf tEnter configuration commands, one per line. End with CNTL/Z.1、rznn1(config)#no ip domain lookup 取消域名查找转换2、rznn1(config)#line cons 0 打开cons 0端口3、rznn1(config-line)#password znn 设置密码为znnrznn1(config-line)#login 保存rznn1(config-line)#no exec-t 设置永不超时4、rznn1(config-line)#logg sync 产生日志5、rznn1#show version 显示思科路由系统版本信息Cisco IOS Software, 2800 Software (C2800NM-ADVIPSERVICESK9-M), Version 12.4(15)T1, RELEASE SOFTWARE (fc2)Technical Support: /techsupportCopyright (c) 1986-2007 by Cisco Systems, Inc.Compiled Wed 18-Jul-07 06:21 by pt_rel_team6、rznn1#show cdp neighbors 查看路由器连接的相邻路由器的相关信息Capability Codes: R - Router, T - Trans Bridge, B - Source Route BridgeS - Switch, H - Host, I - IGMP, r - Repeater, P - PhoneDevice ID Local Intrfce Holdtme Capability Platform Port IDrznn2 Fas 0/0 139 R C2800 Fas 0/07、rznn1#copy running-config startup-config 保存刚才指令Destination filename [startup-config]? startup-configBuilding configuration...[OK]8、rznn1#reload 重启路由器Proceed with reload? [confirm]System Bootstrap, Version 12.1(3r)T2, RELEASE SOFTWARE (fc1)Copyright (c) 2000 by cisco Systems, Inc.cisco 2811 (MPC860) processor (revision 0x200) with 60416K/5120K bytes of memorySelf decompressing the image :########################################################################## [OK] Restricted Rights Legendrznn1#show ip interface bInterface IP-Address OK? Method Status Protocol FastEthernet0/0 192.168.11.1 YES manual up up FastEthernet0/1 192.168.1.1 YES manual up upVlan1 unassigned YES manual administratively down down9、rznn1(config-if)#ip add 192.168.3.1 255.255.255.0 重置ip地址rznn1#show ip interface bInterface IP-Address OK? Method Status Protocol FastEthernet0/0 192.168.3.1 YES manual up up FastEthernet0/1 192.168.1.1 YES manual up up Vlan1 unassigned YES manual administratively down down实训四发现协议1、实训目的通过发现协议显示路由器相邻路由的端口信息2、拓扑结构Router0:192.168.11.1Router1:fa0/0 192.168.11.2Fa0/1 192.168.12.1Router2:192.168.12.23、步骤R1路由器Router>enRouter#conf tEnter configuration commands, one per line. End with CNTL/Z.Router(config)#host r1r1(config)#int fa0/0r1(config-if)#ip add 192.168.11.1 255.255.255.0r1(config-if)#no sh%LINK-5-CHANGED: Interface FastEthernet0/0, changed state to upr1(config-if)#r1(config-if)#exitr1(config)#exitr1#%SYS-5-CONFIG_I: Configured from console by consoler1#show ip interface bInterface IP-Address OK? Method Status Protocol FastEthernet0/0 192.168.11.1 YES manual up down FastEthernet0/1 unassigned YES manual administratively down downVlan1 unassigned YES manual administratively down downR2 路由器Router>enRouter#conf tEnter configuration commands, one per line. End with CNTL/Z.Router(config)#host r2r2(config)#int fa0/0r2(config-if)#ip add 192.168.11.2 255.255.255.0r2(config-if)#no sh%LINK-5-CHANGED: Interface FastEthernet0/0, changed state to up%LINEPROTO-5-UPDOWN: Line protocol on Interface FastEthernet0/0, changed state to up r2(config-if)#exitr2(config)#exitr2#%SYS-5-CONFIG_I: Configured from console by consoler2#conf tEnter configuration commands, one per line. End with CNTL/Z.r2(config)#int fa0/0r2(config-if)#int fa0/1r2(config-if)#ip add 192.168.12.1 255.255.255.0r2(config-if)#no sh%LINK-5-CHANGED: Interface FastEthernet0/1, changed state to upr2(config-if)#exitr2(config)#exitr2#%SYS-5-CONFIG_I: Configured from console by consoler2#show ip interface bInterface IP-Address OK? Method Status Protocol FastEthernet0/0 192.168.11.2 YES manual up upFastEthernet0/1 192.168.12.1 YES manual up down Vlan1 unassigned YES manual administratively down downR3路由器Router>enRouter#conf tEnter configuration commands, one per line. End with CNTL/Z.Router(config)#host r3r3(config)#int fa0/0r3(config-if)#ip add 192.168.12.2 255.255.255.0r3(config-if)#no sh%LINK-5-CHANGED: Interface FastEthernet0/0, changed state to up%LINEPROTO-5-UPDOWN: Line protocol on Interface FastEthernet0/0, changed state to up r3(config-if)#exitr3(config)#exitr3#%SYS-5-CONFIG_I: Configured from console by consoler3#show ip interface bInterface IP-Address OK? Method Status Protocol FastEthernet0/0 192.168.12.2 YES manual up up FastEthernet0/1 unassigned YES manual administratively down downVlan1 unassigned YES manual administratively down downR1发现邻居r1#show cdp neighborsCapability Codes: R - Router, T - Trans Bridge, B - Source Route BridgeS - Switch, H - Host, I - IGMP, r - Repeater, P - PhoneDevice ID Local Intrfce Holdtme Capability Platform Port IDr2 Fas 0/0 165 R C2800 Fas 0/0R2发现邻居r2#show cdp neighborsCapability Codes: R - Router, T - Trans Bridge, B - Source Route BridgeS - Switch, H - Host, I - IGMP, r - Repeater, P - PhoneDevice ID Local Intrfce Holdtme Capability Platform Port IDr1 Fas 0/0 176 R C1841 Fas 0/0r3 Fas 0/1 130 R C1841 Fas 0/0R3发现邻居r3#show cdp neighborsCapability Codes: R - Router, T - Trans Bridge, B - Source Route BridgeS - Switch, H - Host, I - IGMP, r - Repeater, P - PhoneDevice ID Local Intrfce Holdtme Capability Platform Port IDr2 Fas 0/0 166 R C2800 Fas 0/14、总结show 命令(1)show ip interface b (显示端口ip信息)(2)show version (显示ios版本信息)(3)show running-config (显示刚才使用的命令配置信息)(4)show cdp neighbors (显示发现邻居直连设备信息)(5)show interface (显示所有端口详细信息)实训五静态路由1、实验目的:将不同网段的网络配通(ip route)Ip route语法:ip route 目标地址子网掩码相邻路由器接口地址Show ip route2、试验拓扑:Router0:192.168.11.1Router1:fa0/0 192.168.11.2Fa0/1 192.168.12.1Router2:192.168.12.23、实验步骤:Router1Router>enRouter#conf tRouter(config)#host r1r1(config)#int fa0/0r1(config-if)#ip add 192.168.11.1 255.255.255.0r1(config-if)#no sh%LINK-5-CHANGED: Interface FastEthernet0/0, changed state to upr1(config-if)#exitr1(config)#exitr1#show ip interface bInterface IP-Address OK? Method Status ProtocolFastEthernet0/0 192.168.11.1 YES manual up downFastEthernet0/1 unassigned YES manual administratively down downVlan1 unassigned YES manual administratively down downr1#%LINEPROTO-5-UPDOWN: Line protocol on Interface FastEthernet0/0, changed state to up r1#ping 192.168.12.1Type escape sequence to abort.Sending 5, 100-byte ICMP Echos to 192.168.12.1, timeout is 2 seconds:.....Success rate is 0 percent (0/5)r1#conf tEnter configuration commands, one per line. End with CNTL/Z.r1(config)#ip route 192.168.12.0 255.255.255.0 192.168.11.2r1(config)#exitr1#ping 192.168.12.1Type escape sequence to abort.Sending 5, 100-byte ICMP Echos to 192.168.12.1, timeout is 2 seconds:Success rate is 100 percent (5/5), round-trip min/avg/max = 31/31/32 msr1#ping 192.168.12.2Type escape sequence to abort.Sending 5, 100-byte ICMP Echos to 192.168.12.2, timeout is 2 seconds:.....Success rate is 0 percent (0/5)r1#ping 192.168.12.2Type escape sequence to abort.Sending 5, 100-byte ICMP Echos to 192.168.12.2, timeout is 2 seconds:Success rate is 100 percent (5/5), round-trip min/avg/max = 47/62/78 msr1#show ip routeCodes: C - connected, S - static, I - IGRP, R - RIP, M - mobile, B - BGPD - EIGRP, EX - EIGRP external, O - OSPF, IA - OSPF inter areaN1 - OSPF NSSA external type 1, N2 - OSPF NSSA external type 2E1 - OSPF external type 1, E2 - OSPF external type 2, E - EGPi - IS-IS, L1 - IS-IS level-1, L2 - IS-IS level-2, ia - IS-IS inter area* - candidate default, U - per-user static route, o - ODRP - periodic downloaded static routeGateway of last resort is not setC 192.168.11.0/24 is directly connected, FastEthernet0/0S 192.168.12.0/24 [1/0] via 192.168.11.2Router3Router>enRouter#conf tEnter configuration commands, one per line. End with CNTL/Z.Router(config)#host r3r3(config)#int fa0/0r3(config-if)#ip add 192.168.12.2 255.255.255.0r3(config-if)#no sh%LINK-5-CHANGED: Interface FastEthernet0/0, changed state to up%LINEPROTO-5-UPDOWN: Line protocol on Interface FastEthernet0/0, changed state to up r3(config-if)#exitr3(config)#exitr3#%SYS-5-CONFIG_I: Configured from console by consoler3#show ip interface bInterface IP-Address OK? Method Status Protocol FastEthernet0/0 192.168.12.2 YES manual up up FastEthernet0/1 unassigned YES manual administratively down downVlan1 unassigned YES manual administratively down downr3#conf tEnter configuration commands, one per line. End with CNTL/Z.r3(config)#ip route 192.168.11.0 255.255.255.0 192.168.12.1r3(config)#exitr3#ping 192.168.11.2Type escape sequence to abort.Sending 5, 100-byte ICMP Echos to 192.168.11.2, timeout is 2 seconds:Success rate is 100 percent (5/5), round-trip min/avg/max = 31/31/32 msr3#ping 192.168.11.1Type escape sequence to abort.Sending 5, 100-byte ICMP Echos to 192.168.11.1, timeout is 2 seconds:Success rate is 100 percent (5/5), round-trip min/avg/max = 62/62/63 msr3#show ip routeCodes: C - connected, S - static, I - IGRP, R - RIP, M - mobile, B - BGPD - EIGRP, EX - EIGRP external, O - OSPF, IA - OSPF inter areaN1 - OSPF NSSA external type 1, N2 - OSPF NSSA external type 2i - IS-IS, L1 - IS-IS level-1, L2 - IS-IS level-2, ia - IS-IS inter area* - candidate default, U - per-user static route, o - ODRP - periodic downloaded static routeGateway of last resort is not setS 192.168.11.0/24 [1/0] via 192.168.12.1C 192.168.12.0/24 is directly connected, FastEthernet0/04、默认路由Route 1r1>enr1#conf tEnter configuration commands, one per line. End with CNTL/Z.r1(config)#no ip route 192.168.12.0 255.255.255.0 192.168.11.2%No matching route to deleter1(config)#exitr1#%SYS-5-CONFIG_I: Configured from console by consoler1#show ip routeCodes: C - connected, S - static, I - IGRP, R - RIP, M - mobile, B - BGPD - EIGRP, EX - EIGRP external, O - OSPF, IA - OSPF inter areaN1 - OSPF NSSA external type 1, N2 - OSPF NSSA external type 2E1 - OSPF external type 1, E2 - OSPF external type 2, E - EGPi - IS-IS, L1 - IS-IS level-1, L2 - IS-IS level-2, ia - IS-IS inter area* - candidate default, U - per-user static route, o - ODRP - periodic downloaded static routeGateway of last resort is not setC 192.168.11.0/24 is directly connected, FastEthernet0/0r1#conf tEnter configuration commands, one per line. End with CNTL/Z.r1(config)#ip route 0.0.0.0 0.0.0.0 192.168.11.2r1(config)#exitr1#%SYS-5-CONFIG_I: Configured from console by consoler1#show ip routeCodes: C - connected, S - static, I - IGRP, R - RIP, M - mobile, B - BGPD - EIGRP, EX - EIGRP external, O - OSPF, IA - OSPF inter areaN1 - OSPF NSSA external type 1, N2 - OSPF NSSA external type 2i - IS-IS, L1 - IS-IS level-1, L2 - IS-IS level-2, ia - IS-IS inter area* - candidate default, U - per-user static route, o - ODRP - periodic downloaded static routeGateway of last resort is 192.168.11.2 to network 0.0.0.0C 192.168.11.0/24 is directly connected, FastEthernet0/0S* 0.0.0.0/0 [1/0] via 192.168.11.2r1#ping 192.168.12.1Type escape sequence to abort.Sending 5, 100-byte ICMP Echos to 192.168.12.1, timeout is 2 seconds:Success rate is 100 percent (5/5), round-trip min/avg/max = 16/28/31 msr1#ping 192.168.12.2Type escape sequence to abort.Sending 5, 100-byte ICMP Echos to 192.168.12.2, timeout is 2 seconds: Success rate is 100 percent (5/5), round-trip min/avg/max = 62/62/63 msRoute 3r1>enr1#conf tEnter configuration commands, one per line. End with CNTL/Z.r1(config)#no ip route 192.168.12.0 255.255.255.0 192.168.11.2%No matching route to deleter1(config)#exitr1#%SYS-5-CONFIG_I: Configured from console by consoler1#show ip routeCodes: C - connected, S - static, I - IGRP, R - RIP, M - mobile, B - BGPD - EIGRP, EX - EIGRP external, O - OSPF, IA - OSPF inter areaN1 - OSPF NSSA external type 1, N2 - OSPF NSSA external type 2E1 - OSPF external type 1, E2 - OSPF external type 2, E - EGPi - IS-IS, L1 - IS-IS level-1, L2 - IS-IS level-2, ia - IS-IS inter area* - candidate default, U - per-user static route, o - ODRP - periodic downloaded static routeGateway of last resort is not setC 192.168.11.0/24 is directly connected, FastEthernet0/0r1#conf tEnter configuration commands, one per line. End with CNTL/Z.r1(config)#ip route 0.0.0.0 0.0.0.0 192.168.11.2r1(config)#exitr1#%SYS-5-CONFIG_I: Configured from console by consoler1#show ip routeCodes: C - connected, S - static, I - IGRP, R - RIP, M - mobile, B - BGPD - EIGRP, EX - EIGRP external, O - OSPF, IA - OSPF inter areaN1 - OSPF NSSA external type 1, N2 - OSPF NSSA external type 2E1 - OSPF external type 1, E2 - OSPF external type 2, E - EGPi - IS-IS, L1 - IS-IS level-1, L2 - IS-IS level-2, ia - IS-IS inter area* - candidate default, U - per-user static route, o - ODRP - periodic downloaded static routeGateway of last resort is 192.168.11.2 to network 0.0.0.0C 192.168.11.0/24 is directly connected, FastEthernet0/0S* 0.0.0.0/0 [1/0] via 192.168.11.2r3#ping 192.168.11.1Type escape sequence to abort.Sending 5, 100-byte ICMP Echos to 192.168.11.1, timeout is 2 seconds: Success rate is 100 percent (5/5), round-trip min/avg/max = 62/62/63 ms实训六动态路由RIP 协议1、实验目的使用配置动态路由启动Rip协议使用到的命令(router rip/network/show ip protocols/show ip route)2、实验拓扑R1 fa0/0 192.168.11.1R2 fa0/0 192.168.11.2fa0/1 192.168.12.1R3 fa0/0 192.168.12.23、实验步骤R1Router>enRouter#conf tEnter configuration commands, one per line. End with CNTL/Z. Router(config)#host r1r1(config)#int fa0/0r1(config-if)#ip add 192.168.11.1 255.255.255.0r1(config-if)#no shr1(config-if)#exitr1(config)#router ripr1(config-router)#network 192.168.11.0r1(config-router)#exitr1(config)#exitr1#%SYS-5-CONFIG_I: Configured from console by consoleR2Router>enRouter#conf tEnter configuration commands, one per line. End with CNTL/Z. Router(config)#host r2r2(config)#int fa0/0r2(config-if)#ip add 192.168.11.2 255.255.255.0r2(config-if)#no shr2(config-if)#exitr2(config)#int fa0/1r2(config-if)#ip add 192.168.12.1 255.255.255.0r2(config-if)#no shr2(config-if)#exitr2(config)#router ripr2(config-router)#network 192.168.11.0r2(config-router)#network 192.168.12.0r2(config-router)#exitr2(config)#exitr2#R3Router>enRouter#conf tEnter configuration commands, one per line. End with CNTL/Z. Router(config)#host r3r3(config)#int fa0/0r3(config-if)#ip add 192.168.12.2 255.255.255.0r3(config-if)#no shr3(config-if)#exitr3(config)#router ripr3(config-router)#network 192.168.12.0r3(config-router)#exitr3(config)#exitr3#%SYS-5-CONFIG_I: Configured from console by console4、实验测试R1r1#show ip protocolsRouting Protocol is "rip"Sending updates every 30 seconds, next due in 10 secondsInvalid after 180 seconds, hold down 180, flushed after 240 Outgoing update filter list for all interfaces is not setIncoming update filter list for all interfaces is not set Redistributing: ripDefault version control: send version 1, receive any version Interface Send Recv Triggered RIP Key-chain FastEthernet0/0 1 2 1Automatic network summarization is in effectMaximum path: 4Routing for Networks:192.168.11.0Passive Interface(s):Routing Information Sources:Gateway Distance Last UpdateDistance: (default is 120)r1#show ip routeCodes: C - connected, S - static, I - IGRP, R - RIP, M - mobile, B - BGPD - EIGRP, EX - EIGRP external, O - OSPF, IA - OSPF inter areaN1 - OSPF NSSA external type 1, N2 - OSPF NSSA external type 2E1 - OSPF external type 1, E2 - OSPF external type 2, E - EGPi - IS-IS, L1 - IS-IS level-1, L2 - IS-IS level-2, ia - IS-IS inter area* - candidate default, U - per-user static route, o - ODRP - periodic downloaded static routeGateway of last resort is not setC 192.168.11.0/24 is directly connected, FastEthernet0/0R 192.168.12.0/24 [120/1] via 192.168.11.2, 00:00:24, FastEthernet0/0 r1#ping 192.168.12.0Type escape sequence to abort.Sending 5, 100-byte ICMP Echos to 192.168.12.0, timeout is 2 seconds: Success rate is 100 percent (5/5), round-trip min/avg/max = 31/31/32 msR2r2#show ip protocolsRouting Protocol is "rip"Sending updates every 30 seconds, next due in 21 secondsInvalid after 180 seconds, hold down 180, flushed after 240Outgoing update filter list for all interfaces is not setIncoming update filter list for all interfaces is not setRedistributing: ripDefault version control: send version 1, receive any versionInterface Send Recv Triggered RIP Key-chain FastEthernet0/0 1 2 1FastEthernet0/1 1 2 1Automatic network summarization is in effectMaximum path: 4Routing for Networks:192.168.11.0192.168.12.0Passive Interface(s):Routing Information Sources:Gateway Distance Last UpdateDistance: (default is 120)r2#show ip routeCodes: C - connected, S - static, I - IGRP, R - RIP, M - mobile, B - BGPD - EIGRP, EX - EIGRP external, O - OSPF, IA - OSPF inter areaN1 - OSPF NSSA external type 1, N2 - OSPF NSSA external type 2E1 - OSPF external type 1, E2 - OSPF external type 2, E - EGPi - IS-IS, L1 - IS-IS level-1, L2 - IS-IS level-2, ia - IS-IS inter area* - candidate default, U - per-user static route, o - ODRP - periodic downloaded static routeGateway of last resort is not setC 192.168.11.0/24 is directly connected, FastEthernet0/0C 192.168.12.0/24 is directly connected, FastEthernet0/1R3r3#show ip protocolsRouting Protocol is "rip"Sending updates every 30 seconds, next due in 15 secondsInvalid after 180 seconds, hold down 180, flushed after 240Outgoing update filter list for all interfaces is not setIncoming update filter list for all interfaces is not setRedistributing: ripDefault version control: send version 1, receive any versionInterface Send Recv Triggered RIP Key-chain FastEthernet0/0 1 2 1Automatic network summarization is in effectMaximum path: 4Routing for Networks:192.168.12.0Passive Interface(s):Routing Information Sources:Gateway Distance Last UpdateDistance: (default is 120)r3#show ip routeCodes: C - connected, S - static, I - IGRP, R - RIP, M - mobile, B - BGPD - EIGRP, EX - EIGRP external, O - OSPF, IA - OSPF inter areaN1 - OSPF NSSA external type 1, N2 - OSPF NSSA external type 2E1 - OSPF external type 1, E2 - OSPF external type 2, E - EGPi - IS-IS, L1 - IS-IS level-1, L2 - IS-IS level-2, ia - IS-IS inter area* - candidate default, U - per-user static route, o - ODRP - periodic downloaded static routeGateway of last resort is not setR 192.168.11.0/24 [120/1] via 192.168.12.1, 00:00:04, FastEthernet0/0 C 192.168.12.0/24 is directly connected, FastEthernet0/0r3#ping 192.168.11.0Type escape sequence to abort.Sending 5, 100-byte ICMP Echos to 192.168.11.0, timeout is 2 seconds: Success rate is 100 percent (5/5), round-trip min/avg/max = 31/31/32 ms实训七负载平衡试训目的实现负载平衡实训拓扑R1 fa0/0 192.168.11.1R2 eth0/0/0 192.168.11.2Fa0/0 192.168.12.1Fa0/0 192.168.13.1R3 fa0/0 192.168.12.2Fa0/1 192.168.14.1R4 fa0/0 192.168.13.2Fa0/1 192.168.15.1R5 fa0/0 192.168.14.2Fa0/1 192.168.15.2实训步骤(R1 )r1>enR1#conf tR1(config)#ip route 0.0.0.0 0.0.0.0 192.168.11.2R1(config)#exitr1#show ip routeCodes: C - connected, S - static, I - IGRP, R - RIP, M - mobile, B - BGPD - EIGRP, EX - EIGRP external, O - OSPF, IA - OSPF inter areaN1 - OSPF NSSA external type 1, N2 - OSPF NSSA external type 2E1 - OSPF external type 1, E2 - OSPF external type 2, E - EGPi - IS-IS, L1 - IS-IS level-1, L2 - IS-IS level-2, ia - IS-IS inter area* - candidate default, U - per-user static route, o - ODRP - periodic downloaded static routeGateway of last resort is 192.168.11.2 to network 0.0.0.0C 192.168.11.0/24 is directly connected, FastEthernet0/0S* 0.0.0.0/0 [1/0] via 192.168.11.2(R2)r2>enr2(config)#ip route 0.0.0.0 0.0.0.0 192.168.12.2r2(config)#ip route 0.0.0.0 0.0.0.0 192.168.13.2r2(config)#exitr2#%SYS-5-CONFIG_I: Configured from console by consoles% Ambiguous command: "s"r2#show ip routeCodes: C - connected, S - static, I - IGRP, R - RIP, M - mobile, B - BGPD - EIGRP, EX - EIGRP external, O - OSPF, IA - OSPF inter areaN1 - OSPF NSSA external type 1, N2 - OSPF NSSA external type 2E1 - OSPF external type 1, E2 - OSPF external type 2, E - EGPi - IS-IS, L1 - IS-IS level-1, L2 - IS-IS level-2, ia - IS-IS inter area* - candidate default, U - per-user static route, o - ODRP - periodic downloaded static routeGateway of last resort is 192.168.12.2 to network 0.0.0.0C 192.168.11.0/24 is directly connected, Ethernet0/0/0C 192.168.12.0/24 is directly connected, FastEthernet0/0C 192.168.13.0/24 is directly connected, FastEthernet0/1S* 0.0.0.0/0 [1/0] via 192.168.12.2[1/0] via 192.168.13.2(R3)r3>enr3#conf tEnter configuration commands, one per line. End with CNTL/Z.r3(config)#ip route 0.0.0.0 0.0.0.0 192.168.12.1r3(config)#exitr3#%SYS-5-CONFIG_I: Configured from console by consoler3#show ip routeCodes: C - connected, S - static, I - IGRP, R - RIP, M - mobile, B - BGPD - EIGRP, EX - EIGRP external, O - OSPF, IA - OSPF inter areaN1 - OSPF NSSA external type 1, N2 - OSPF NSSA external type 2E1 - OSPF external type 1, E2 - OSPF external type 2, E - EGPi - IS-IS, L1 - IS-IS level-1, L2 - IS-IS level-2, ia - IS-IS inter area* - candidate default, U - per-user static route, o - ODRP - periodic downloaded static routeGateway of last resort is 192.168.12.1 to network 0.0.0.0C 192.168.12.0/24 is directly connected, FastEthernet0/0C 192.168.14.0/24 is directly connected, FastEthernet0/1S* 0.0.0.0/0 [1/0] via 192.168.12.1(R4)r4>enr4#conf tEnter configuration commands, one per line. End with CNTL/Z.r4(config)#ip route 0.0.0.0 0.0.0.0 192.168.13.1r4(config)#exitr4#%SYS-5-CONFIG_I: Configured from console by consoler4#show ip routeCodes: C - connected, S - static, I - IGRP, R - RIP, M - mobile, B - BGPD - EIGRP, EX - EIGRP external, O - OSPF, IA - OSPF inter areaN1 - OSPF NSSA external type 1, N2 - OSPF NSSA external type 2E1 - OSPF external type 1, E2 - OSPF external type 2, E - EGPi - IS-IS, L1 - IS-IS level-1, L2 - IS-IS level-2, ia - IS-IS inter area* - candidate default, U - per-user static route, o - ODRP - periodic downloaded static routeGateway of last resort is 192.168.13.1 to network 0.0.0.0C 192.168.13.0/24 is directly connected, FastEthernet0/0C 192.168.15.0/24 is directly connected, FastEthernet0/1S* 0.0.0.0/0 [1/0] via 192.168.13.1(R5)r5>enr5#conf tEnter configuration commands, one per line. End with CNTL/Z.r5(config)#ip route 0.0.0.0 0.0.0.0 192.168.14.1r5(config)#ip route 0.0.0.0 0.0.0.0 192.168.15.1r5(config)#exitr5#%SYS-5-CONFIG_I: Configured from console by consoler5#show ip routeCodes: C - connected, S - static, I - IGRP, R - RIP, M - mobile, B - BGPD - EIGRP, EX - EIGRP external, O - OSPF, IA - OSPF inter areaN1 - OSPF NSSA external type 1, N2 - OSPF NSSA external type 2E1 - OSPF external type 1, E2 - OSPF external type 2, E - EGPi - IS-IS, L1 - IS-IS level-1, L2 - IS-IS level-2, ia - IS-IS inter area* - candidate default, U - per-user static route, o - ODRP - periodic downloaded static routeGateway of last resort is 192.168.14.1 to network 0.0.0.0C 192.168.14.0/24 is directly connected, FastEthernet0/0C 192.168.15.0/24 is directly connected, FastEthernet0/1S* 0.0.0.0/0 [1/0] via 192.168.14.1[1/0] via 192.168.15.1实训测试(R1)r1#ping 192.168.14.1Type escape sequence to abort.Sending 5, 100-byte ICMP Echos to 192.168.14.1, timeout is 2 seconds:Success rate is 100 percent (5/5), round-trip min/avg/max = 62/84/94 ms (R5)r5#ping 192.168.11.1Type escape sequence to abort.Sending 5, 100-byte ICMP Echos to 192.168.11.1, timeout is 2 seconds: Success rate is 100 percent (5/5), round-trip min/avg/max = 79/91/94 ms实训八DHCP 协议配置实训目的全网配通实训拓扑Fa0/0 192.168.11.1Fa0/1 192.168.12.1实训步骤Router>enRouter#conf tEnter configuration commands, one per line. End with CNTL/Z.Router(config)#host r1r1(config)#int fa0/0r1(config-if)#ip add 192.168.11.1 255.255.255.0r1(config-if)#no shr1(config-if)#exitr1(config)#int fa0/1r1(config-if)#ip add 192.168.12.1 255.255.255.0r1(config-if)#no shr1(config-if)#exitr1(config)#ip dhcp pool znn //配置一个根地址池znnr1(dhcp-config)#network 192.168.11.0 255.255.255.0 //为所有客户机动态分配的地址段r1(dhcp-config)#default-router 192.168.11.1 //为客户机配置默认的网关r1(dhcp-config)#dns-server 192.168.11.1 //为客户机配置DNS服务器r1(dhcp-config)#exitr1(config)#ip dhcp pool znn1r1(dhcp-config)#network 192.168.12.0 255.255.255.0r1(dhcp-config)#default-router 192.168.12.1r1(dhcp-config)#dns-server 192.168.12.1r1(dhcp-config)#exit。
思科路由器BFD配置命令详解
Overview of BFD - Static Route SupportThe BFD - Static Route Support feature enables association of static routes with a static Bidirectional Forwarding Detection (BFD) configuration in order to monitor static route reachability using the configured BFD session. Depending on status of the BFD session, static routes are added to or removed from the Routing Information Base (RIB).Unlike dynamic routing protocols, such as OSPF and BGP, static routing has no method of peer discovery. Therefore, when BFD is configured, the reachability of the gateway is completely dependent on the state of the BFD session to the specified neighbor. Unless the BFD session is up, the gateway for the static route is considered unreachable, and therefore the affected routes will not be installed in the appropriate RIB.For a BFD session to be successfully established, BFD must be configured on the interface on the peer and there must be a BFD client registered on the peer for the address of the BFD neighbor. When an interface is used by dynamic routing protocols, the latter requirement is usually met by configuring the routing protocol instances on each neighbor for BFD. When an interface is used exclusively for static routing, this requirement must be met by configuring static routes on the peers.If a BFD configuration is removed from the remote peer while the BFD session is in the up state, the updated state of the BFD session is not signaled to IPv4 static. This will cause the static route to remain in the RIB. The only workaround is to remove the IPv4 static BFD neighbor configuration so that the static route no longer tracks BFD session state. Also, if you change the encapsulation type on a serial interface to one that is unsupported by BFD, BFD will be in a down state on that interface. The workaround is to shut down the interface, change to a supported encapsulation type, and then reconfigure BFD.A single BFD session can be used by an IPv4 static client to track the reachability of next hops through a specific interface. You can assign a BFD group for a set of BFD-tracked static routes. Each group must have one active static BFD configuration, one or more passive BFD configurations, and the corresponding static routes to be BFD-tracked. Nongroup entries are BFD-tracked static routes for which a BFD group is not assigned. A BFD group must accommodate static BFD configurations that can be part of different VRFs. Effectively, the passive static BFD configurations need not be in the same VRF as that of the active configuration.For each BFD group, there can be only one active static BFD session. You can configure the active BFD session by adding a static BFD configuration and a corresponding static route that uses the BFD configuration. The BFD session in a group is created only when there is an active static BFD configuration and the static route that uses the static BFD configuration. When the active static BFD configuration or the active static route is removed from a BFD group, all the passive static routes are withdrawn from the RIB. Effectively, all the passive static routes are inactive until an active static BFD configuration and a static route to be tracked by the active BFD session are configured in the group. Similarly, for each BFD group, there can be one or more passive static BFD configurations and their corresponding static routes to be BFD-tracked. Passive static session routes take effect only when the active BFD session state is reachable. Though the active BFD session state of the group is reachable, the passive static route is added to the RIB only if the corresponding interface state is up. When apassive BFD session is removed from a group, it will not affect the active BFD session if one existed, or the BFD group reachability status.How to Configure BFD - Static Route SupportConfiguring BFD - Static Route SupportPerform this task to configure BFD support for static routing. Repeat the steps in this procedure on each BFD neighbor. For more information, see the “Example: Configuring BFD Support for Static Routing” section.SUMMARY STEPS1.enable2.configure terminal3.interface type number4.ip address ip-address mask5.bfd interval milliseconds min_rx milliseconds multiplier interval-multiplier6.exit7.ip route static bfd interface-type interface-number ip-address [group group-name [passive]]8.ip route [vrf vrf-name] prefix mask {ip-address | interface-type interface-number [ip-address]} [dhcp] [distance] [name next-hop-name] [permanent | track number] [tag tag]9.exit10.show ip static route11.show ip static route bfdConfiguration Examples for BFD - Static Route SupportExample: Configuring BFD - Static Route SupportIn the following example, the network consists of Device A and Device B. Serial interface 2/0 on Device A is connected to the same network as serial interface 2/0 on Device B. In order for the BFD session to come up, Device B must be configured.Device Aconfigure terminalinterface Serial 2/0ip address 10.201.201.1 255.255.255.0bfd interval 500 min_rx 500 multiplier 5ip route static bfd Serial 2/0 10.201.201.2ip route 10.0.0.0 255.0.0.0 Serial 2/0 10.201.201.2Device Bconfigure terminalinterface Serial 2/0ip address 10.201.201.2 255.255.255.0bfd interval 500 min_rx 500 multiplier 5ip route static bfd Serial 2/0 10.201.201.1ip route 10.1.1.1 255.255.255.255 Serial 2/0 10.201.201.1 Note that the static route on Device B exists solely to enable the BFD session between 10.201.201.1 and 10.201.201.2. If there is no useful static route that needs to be configured, select a prefix that will not affect packet forwarding, for example, the address of a locally configured loopback interface.In the following example, there is an active static BFD configuration to reach 209.165.200.225 through Ethernet interface 0/0 in the BFD group testgroup. As soon as the static route is configured that is tracked by the configured static BFD, a single hop BFD session is initiated to 209.165.200.225 through Ethernet interface 0/0. The prefix 10.0.0.0/8 is added to the RIB if a BFD session is successfully established. configure terminalip route static bfd Ethernet 0/0 209.165.200.225 group testgroup ip route 10.0.0.0 255.255.255.224 Ethernet 0/0 209.165.200.225 In the following example, a BFD session to 209.165.200.226 through Ethernet interface 0/0.1001 is marked to use the group testgroup. That is, this configuration is a passive static BFD. Though there are static routes to be tracked by the second static BFD configuration, a BFD session is not triggered for 209.165.200.226 through Ethernet interface 0/0.1001. The existence of the prefixes 10.1.1.1/8 and10.2.2.2/8 is controlled by the active static BFD session (Ethernet interface 0/0 209.165.200.225). configure terminalip route static bfd Ethernet 0/0 209.165.200.225 group testgroup ip route 10.0.0.0 255.255.255.224 Ethernet 0/0 209.165.200.225ip route static bfd Ethernet 0/0.1001 209.165.200.226 group testgroup passiveip route 10.1.1.1 255.255.255.224 Ethernet 0/0.1001209.165.200.226ip route 10.2.2.2 255.255.255.224 Ethernet 0/0.1001209.165.200.226Additional References for BFD - Static Route Support。
思科路由器命令大全(完整版)
思科交换机路由器命令大全交换机命令:switch> 用户模式1:进入特权模式 enableswitch> enableswitch#2:进入全局配置模式 configure terminalswitch> enableswitch#configure terminalswitch(conf)#3:交换机命名 hostname aptech2950 以aptech2950为例switch> enableswitch#configure terminalswitch(conf)#hostname aptch-2950aptech2950(conf)#4:配置使能口令 enable password cisco 以cisco为例switch> enableswitch#configure terminalswitch(conf)#hostname aptch2950aptech2950(conf)# enable password cisco5:配置使能密码 enable secret ciscolab 以cicsolab为例--设置禁用IP地址解析特性,设置启用消息同步特性switch> enableswitch#configure terminalswitch(conf)#hostname aptch2950aptech2950(conf)# enable secret ciscolabaptech2950(conf)#no ip domain-lookup -----设置禁用IP地址解析特性aptech2950(conf)#logging synchronous -----设置启用消息同步特性aptech2950(conf)#interface range fastethernet0/1-20aptech2950(conf-if-range)#spanning-tree portfast -----设置快速端口aptech2950(conf)#interface range fastethernet 0/23-24aptech2950(conf-if-range)#swichport mode trunk -----设置主干道端口aptech2950(conf)#spanning-treeuplingkfast ---设置阻塞启用迅速(只可以在访问层启用)6:设置虚拟局域网vlan 1 interface vlan 1switch> enableswitch#configure terminalswitch(conf)#hostname aptch2950aptech2950(conf)# interface vlan 1aptech2950(conf-if)#ip address 192.168.1.1 255.255.255.0 配置交换机端口ip和子网掩码aptech2950(conf-if)#no shut 是配置处于运行中aptech2950(conf-if)#exitaptech2950(conf)#ip default-gateway 192.168.254 设置网关地址7:进入交换机某一端口 interface fastehernet 0/17 以17端口为例switch> enableswitch#configure terminalswitch(conf)#hostname aptch2950aptech2950(conf)# interface fastehernet 0/17aptech2950(conf-if)#8:查看命令 showswitch> enableswitch# show version 察看系统中的所有版本信息show interface vlan 1 查看交换机有关ip 协议的配置信息show running-configure 查看交换机当前起作用的配置信息show interface fastethernet 0/1 察看交换机1接口具体配置和统计信息show mac-address-table 查看mac地址表show mac-address-table aging-time 查看mac地址表自动老化时间9:交换机恢复出厂默认恢复命令switch> enableswitch# erase startup-configureswitch# reload10:双工模式设置switch> enableswitch#configure terminalswitch2950(conf)#hostname aptch-2950aptech2950(conf)# interface fastehernet 0/17 以17端口为例aptech2950(conf-if)#duplex full/half/auto 有full , half, auto 三个可选项11:cdp相关命令switch> enableswitch# show cdp 查看设备的cdp全局配置信息show cdp interface fastethernet 0/17 查看17端口的cdp配置信息show cdp traffic 查看有关cdp包的统计信息show cdp nerghbors 列出与设备相连的cisco设备12:csico2950的密码恢复拔下交换机电源线。
思科路由器命令大全详解

一switch> 用户模式1:进入特权模式enableswitch> enableswitch#2:进入全局配置模式configure terminalswitch> enableswitch#c onfigure terminalswitch(conf)#3:交换机命名hostname aptech2950 以aptech2950为例switch> enableswitch#c onfigure terminalswitch(conf)#hostname aptch-2950aptech2950(conf)#4:配置使能口令enable password cisco 以cisco为例switch> enableswitch#c onfigure terminalswitch(conf)#hostname aptch2950aptech2950(conf)# enable password cisco5:配置使能密码enable secret ciscolab 以cicsolab为例switch> enableswitch#c onfigure terminalswitch(conf)#hostname aptch2950aptech2950(conf)# enable secret ciscolab6:设置虚拟局域网vlan 1 interface vlan 1switch> enableswitch#c onfigure terminalswitch(conf)#hostname aptch2950aptech2950(conf)# interface vlan 1aptech2950(conf-if)#ip address 192.168.1.1 255.255.255.0 配置交换机端口ip和子网掩码aptech2950(conf-if)#no shut 是配置处于运行中aptech2950(conf-if)#exitaptech2950(conf)#ip default-gateway 192.168.254 设置网关地址7:进入交换机某一端口interface fastehernet 0/17 以17端口为例switch> enableswitch#c onfigure terminalswitch(conf)#hostname aptch2950aptech2950(conf)# interface fastehernet 0/17aptech2950(conf-if)#8:查看命令showswitch> enableswitch# show version 察看系统中的所有版本信息show interface vlan 1 查看交换机有关ip 协议的配置信息show running-configure 查看交换机当前起作用的配置信息show interface fastethernet 0/1 察看交换机1接口具体配置和统计信息show mac-address-table 查看mac地址表show mac-address-table aging-time 查看mac地址表自动老化时间9:交换机恢复出厂默认恢复命令switch> enableswitch# erase startup-configureswitch# reload10:双工模式设置switch> enableswitch#c onfigure terminalswitch2950(conf)#hostname aptch-2950aptech2950(conf)# interface fastehernet 0/17 以17端口为例aptech2950(conf-if)#duplex full/half/auto 有full , half, auto 三个可选项11:cdp相关命令switch> enableswitch# show cdp 查看设备的cdp全局配置信息show cdp interface fastethernet 0/17 查看17端口的cdp配置信息show cdp traffic 查看有关cdp包的统计信息show cdp nerghbors 列出与设备相连的cisco设备12:csico2950的密码恢复拔下交换机电源线。
思科路由器配置命令

思科路由器配置命令1、配置命令howrunningconfig显示所有的配置howverin显示版本号和寄存器值hutdown关闭接口nohutdown打开接口ipadd+ip地址配置IP地址econdary+IP地址为接口配置第二个IP地址howinterface+接口类型+接口号查看接口管理性howcontrollerinterface查看接口是否有DCE电缆howhitory查看历史记录howterminal查看终端记录大小hotname+主机名配置路由器或交换机的标识configmemory修改保存在NVRAM中的启动配置ervicepaword-encryptin手工加密所有密码enablepaword+密码配置明文密码enaec+密码配置密文密码linevty04/15进入telnet接口paword+密码配置telnet密码lineau某0进入AU某接口paword+密码配置密码linecon0进入CON接口paword+密码配置密码bandwidth+数字配置带宽noipaddre删除已配置的IP地址howtartupconfig查看NVRAM中的配置信息copyrun-configatartupconfig保存信息到NVRAMwrite保存信息到NVRAMeraetartup-config清除NVRAM中的配置信息howipinterfacebrief查看接口的谪要信息bannermotd#+信息+#配置路由器或交换机的描素信息decription+信息配置接口听描素信息vlandatabae进入VLAN数据库模式vlan+vlan号+名称创建VLANwitchportaccevlan+vlan号为VLAN为配接口interfacevlan+vlan号进入VLAN接口模式ipadd+ip地址为VLAN配置管理IP地址vtp+ervice/tracparent/client配置SW的VTP工作模式vtp+domain+域名配置SW的VTP域名vtp+paword+密码配置SW的密码witchportmodetrunk启用中继novlan+vlan号删除VLANhowpamming-treevlan+vlan号查看VLA怕生成树议iproute+非直连网段+子网掩码+下一跳地址配置静态/默认路由howiproute查看路由表howprotocol显示出所有的被动路由协议和接口上哪些协议被设置howipprotocol显示了被配置在路由器上的路由选择协议,同时给出了在路由选择协议中使用的定时器等信息routerrip激活RIP协议network+直连网段发布直连网段interfacelookback0激活逻辑接口paive-interface+接口类型+接口号配置接口为被动模式debugip+协议动态查看路由更新信息undebugall关闭所有DEBUG信息routereigrp+a号激活EIGRP路由协议network+网段+子网掩码发布直连网段howipeigrpneighbor查看邻居表howipeigrptopology查看拓扑表howipeigrptraffic查看发送包数量routeropf+proce-ID激活OSPF协议network+直连网段+area+区域号发布直连网段howipopf显示OSPF的进程号和ROUTER-ID encapulation+封装格式更改封装格式noipadmain-lookup关闭路由器的域名查找iprouting在三层交换机上启用路由功能howuer查看SW的在线用户clearline+线路号清除线路。
思科交换路由常用命令
交换路由常用命令一、基础配置1、修改主机名配置:S(config)#hostname SWITCHA2、enable口令:Switch(config)#enable password1233、TELNET:只需密码的telnet需用户名和密码的telnetS(config)#line vty04S(config)#username S2password123S(config-line)#password123S(config)#line vty04S(config-line)#login//启用登陆时口令检查S(config-line)#login local//启用登陆本地验证只允许pc所在的网段对交换路由进行远程登陆:S(config)#access-list99permit192.168.1.00.0.0.255S(config)#line vty04S(config-line)#access-class99inS(config-line)#password123S(config-line)#login4、console配置:S(config)#line console0S(config-line)#password123S(config-line)#login5、显示当前配置:switch#show run6、保存当前配置:switch#write7、进入全局配置模式:switch#conf t8、进入接口配置模式:S(config)#interface f0/1二、二层接入交换机常见配置1、创建vlan10及命名:S(config)#vlan10S(config-vlan)#name caiwubu2、多个端口划分入vlan:vlan:S(config)#int range fa0/1-5S(config-if)#sw access vlan103、接口trunk模式配置:S(config)#inter f0/0S(config-if)#sw mode trunk4、二层交换机管理ip配置:S2(config)#interface vlan100//进入vlan100接口S2(config-if)#ip address192.168.10.1255.255.255.0//为vlan100接口上设置管理ip S2(config)#ip default-gateway192.168.10.2545、生成树配置:S(config)#spanning-tree mode rapid-pvst//配置快速生成树S(config)#spanning-tree vlan10,20priority0//配置根网桥S(config)#spanning-tree vlan10,20,30priority4096//配置备份根网桥6、端口双工、带宽设置:S(config)#int F0/2S(config-if)#duplex fullS(config-if)#speed100三、三层交换机常见配置1、三层交换机开启路由功能:S(config)#ip routing//开启后可实现vlan间相互通信2、三层交换机接口配置成路由口:S(config-if)#no swtichport//在接口模式下配置,可配置ip地址3、三层交换机创建SVI接口(SVI接口常作为vlan的网关):S(config)#interface vlan104、三层交换机接口改trunk模式:Switch(config-if)#switchport trunk encapsulation dot1q//先封装Switch(config-if)#switchport mode trunk//再设置trunk模式5、trunk允许vlan通过:S(config)#inter fa0/23S(config-if)#switchport trunk allowed vlan2,3//trunk口只让vlan2,3通过S(config-if)#switchport trunk allowed vlan all//trunk口允许所有的vlan通过四、路由器常见配置1、ip地址设置:router(config-if)#ip address192.168.1.1255.255.255.0//接口模式下配置2、静态路由配置:router(config)#ip route192.168.1.0255.255.255.010.1.1.1{f0/0}//下一跳地址可替换为出接口3、默认路由配置:router(config)#ip route0.0.0.00.0.0.010.1.1.14、浮动静态路由作为备份路由:R(config)#ip route172.16.20.0255.255.255.010.10.10.4R(config)#ip route172.16.20.0255.255.255.010.10.10.6100//路由开销值100比默认值1大,作为备份路由5、路由可达,有去有回。
思科路由器设置方法和常见配置命令

思科路由器设置方法和常见配置命令思科路由器怎么设置,是我们经常遇到的问题,下面店铺准备了关于思科路由器设置方法和常见配置命令,欢迎大家参考学习!一、基本设置方式一般来说,可以用5种方式来设置Cisco思科路由器:1.Console口接终端或运行终端仿真软件的微机;2.AUX口接MODEM,通过电话线与远方的终端或运行终端仿真软件的微机相连;3.通过Ethernet上的TFTP服务器;4.通过Ethernet上的TELNET程序;5.通过Ethernet上的SNMP网管工作站。
但Cisco思科路由器的第一次设置必须通过第一种方式进行,一般用超级终端通过com口进行控制。
此时终端的硬件设置如下: 波特率:9600数据位:8停止位:1奇偶校验: 无二、命令操作Cisco思科路由器所用的操作系统是IOS.共有以下几种状态:1、router>在router>提示符下,Cisco思科路由器处于用户命令状态,这时用户可以看Cisco思科路由器的连接状态,访问其它网络和主机,但不能看到和更改Cisco思科路由器的设置内容。
此时输入?并回车,可以查看到在此状态下可以用的命令。
(IOS允许你在任何时候用这种方式查看在某种状态下可以用的命令)。
在敲入enable并回车后,按照系统提示输入密码,(在新的Cisco思科路由器第一次进行调试的时候不需要输入密码,直接回车即可)进入#提示符,就可以对Cisco思科路由器进行各种操作了。
2、router#Cisco思科路由器进入特权命令状态router#后,不但可以执行所有的用户命令,还可以看到和更改Cisco思科路由器的设置内容。
此时就可以对Cisco思科路由器的名字、密码等进行设置。
3、router(config)#在router#提示符下键入configure terminal,出现提示符router(config)#,此时Cisco思科路由器处于全局设置状态,这时可以设置Cisco思科路由器的全局参数。
思科路由器配置命令简写与完整对照

简写命令
完整命令
1 Router>
2 Router>en
用户模式: Router>
特权模式: Router>enable
Router#
Router# 全局配置模式
3 Router#conf t
Router#config terminal
Router(config)#
Router(config)#
Router(config-subif)#
Router(config-subif)#
line模式:
6 Router(config)#lin c 0
Router(config)#line console 0
Router(config-line)#
Router(config-line)#
路由模式
7 Router(config)#router rip(rip是一种路由协议)
14 Router(config)#in f1/0 (有些写成e0/1,e0) Router(config-if)#ip ad 10.20.30.40 255.0.0.0
Router(config)#interface f1/0 (有些写成e0/1,e0) Router(config-if)#ip address 10.20.30.40 255.0.0.0
Router(config-if)#no shutdown Router(config-if)#exit
Router(config)#ip route 目标网段 目标网段掩码 下一跳入口IP地址 Router(config)#ip route 目标网段 目标网段掩码 下一跳入口IP地址
默认路由的配置
思科常用配置命令及参数

思科常用配置命令及参数思科cisco公司制造的路由器、交换机和其他设备承载了全球80%的互联网通信,成为了网络应用的成功实践者之一,那么你知道思科常用配置命令及参数有哪些吗?下面是店铺整理的一些关于思科常用配置命令及参数的相关资料,供你参考。
思科常用配置命令及参数:启动接口,分配IP地址:router(config-if)# encapsulation frame-relay [cisco | ietf ]router(config-if)# frame-relay lmi-type [ansi | cisco | q933a ] router(config-if)# bandwidth kilobitsrouter(config-if)# frame-relay invers-arp [ Protocol ] [dlci ]<--配置静态Invers ARP表:router(config)# frame-relay Protocol Protocol-Address DLCI [ Broadcast ] [ ietf | cisco ] [ payload-compress | packet-by-packet ] --><--设置Keepalive间隔:router(config-if)# keepalive Number--><--为本地接口指定DLCI:router(config-if)# frame-lelay local-dlci Number--><--子接口配置:router(config-if)# interface Type Port.Subininterface-Number [ multipoint | point-to-point ]router(config-subif)# ip unnumbered Interfacerouter(config-subif)# frame-lelay local-dlci Number-->router(config-if)# ^z配置标准ACL:router(config)# access-list Access-List-Number [ permit | deny ] source [ source-mask ] <-- Access-List-Number 范围:1~99标准ACL;100~199扩展ACL;800~899标准IPX ACL;900~999扩展IPX ACL;1000~1099 IPX SAP ACL;600~699Apple Talk ACL--> router(config)# interface Type Portrouter(config-if)# ip access-group Access-List-Number [ in | out ]router(config-if)# ^z配置扩展ACL:router(config)# access-list Access-List-Number [ permit | deny ] [ Protocol | Protocol-Number ] source source-wildcard [ Source-Port ] destination destination-wildcard [ Destination-Port ] [ established ]router(config)# interface Type Portrouter(config-if)# ip access-group Access-List-Number [ in | out ]router(config-if)# ^z配置命名ACL:router(config)# ip access-list [ standard | extended ] ACL-Namerouter(config [ std- | ext- ] nacl)# [ permit | deny ] [ IP-Access-List-Test-Conditions ]router(config [ std- | ext- ] nacl)# no [ permit | deny ] [ IP-Access-List-Test-Conditions ]router(config [ std- | ext- ] nacl)# ^zrouter(config)# interface Type Portrouter(config-if)# ip access-group [ACL-Name | 1~199 ] [ in | out ]router(config-if)# ^z配置DCE时钟:router# show controllers Type Port <--确定DCE接口-->router(confin-if)# clock rate 64000 <--进入DCE接口设置时钟速率-->router(config-if)# ^z配置PPP协议:router(config)# username Name password Set-Password-Here <--验证方建立数据库-->router(config)# interface Type Portrouter(config-if)# encapsulation ppp <--启动PPP协议-->router(config-if)# ppp outhentication [ chap | chap pap | pap chap | pap ] <--选择PPP认证-->router(config-if)# ppp pap sent-username Name password Password <--发送验证信息-->router(config-if)# ^zPAP单向认证配置实例:验证方:router-server(config)# username Client password 12345 <--验证方建立数据库-->router-server(config)# interface serial 0router-server(config-if)# encapsulation ppprouter-server(config-if)# ppp authentication pap <--选择使用PAP实现PPP认证-->router-server(config-if)# ^z被验证方:router-client(config-if)# encapsulation ppprouter-client(config-if)# ppp pap sent-username Client password 12345 <--发送验证信息-->router-client(config-if)# ^zPAP双向认证配置实例:路由器 A:routerA(config)# username B password 12345routerA(config)# interface serial 0routerA(config-if)# encapsulation ppprouterA(config-if)# ppp authentication paprouterA(config-if)# ppp pap sent-username A password 54321routerA(config-if)# ^z路由器 B:routerB(config)# username A password 54321routerB(config)# interface serial 1routerB(config-if)# encapsulation ppprouterB(config-if)# ppp authentication paprouterB(config-if)# ppp pap sent-username B password 12345routerB(config-if)# ^zCHAP单向认证配置实例:验证方:router-server(config)# username router-client password 12345router-server(config)# interface serial 0router-server(config-if)# encapsulation ppprouter-server(config-if)# ppp authentication chaprouter-server(config-if)# ^z被验证方:router-client(config-if)# encapsulation ppprouter-client(config-if)# ppp authentication chaprouter-client(config-if)# ppp chap hostname router-clientrouter-client(config-if)# ppp chap password 12345router-client(config-if)# ^z。
思科路由器配置命令
思科路由器配置命令详细说明: 本文以Cisco2620为例,讲述了,探讨了如何使用内部网络的DHCP服务功能为远程拨入的用户分配地址信息以及路由器常见故障的排除技巧。
(本文假定Cisco2620路由器为提供远程接入访问,已经配置了同步串行模块和异步串行16AM模块。
)Cisco2620路由器的基本配置1. 初始安装第一次安装时系统会自动进入Dialog Setup,依屏幕提示,分别回答路由器名称、加密超级登录密码、超级登录密码、远程登录密码、动态路由协议以及各个接口的配置后,保存配置。
在出现路由器名称后,打入enable命令,键入超级登录密码,出现路由器名称(这里假设路由器名称为Cisco2620),待出现Cisco2620#提示符后,表示已经进入特权模式,此时就可以进行路由器的配置了。
2. 配置路由器键入config terminal,出现提示符Cisco2620(config)#,进入配置模式。
(1) 设置密码Cisco2620(config)#enable secret 123123:设置特权模式密码为123123Cisco2620(config)#line console 0: 进入Console口配置模式Cisco2620(config-line)#password 123123:设置Console口密码为123123Cisco2620(config-line)#login:使console口配置生效Cisco2620(config-line)#line vty 0 5:切换至远程登录口Cisco2620(config-line)#password 123123:设置远程登录密码为123123Cisco2620(config-line)#login:使配置生效(2) 设置快速以太网口Cisco2620(config)#interface fastFastethernet 0/0:进入端口配置模式Cisco2620(config-if)#ip address 192.168.1.6 255.255.255.0:设置IP地址及掩码Cisco2620(config-if)#no shutdown: 开启端口Cisco2620(config-if)#exit:从端口配置模式中退出(3) 设置同步串口Cisco2620(config)#interface serial 0/0:进入同步串口设置Cisco2620(config-if)#ip unnumbered fastFastethernet 0/0:同步串口使用与快速以太网口相同的IP地址Cisco2620(config-if)#encapsulation ppp: 把数据链路层协议设为PPP(4) 设置16口Modem拨号模块,使用内部DHCP服务为拨入用户分配地址Cisco2620(config)#interface Group-Async1Cisco2620(config-if)# ip unnumbered FastEthernet0/0Cisco2620(config-if)# encapsulation pppCisco2620(config-if)# ip tcp header-compression passive:启用被动IP包头压缩Cisco2620(config-if)# async mode dedicated:只在异步模式下工作Cisco2620(config-if)# peer default ip address dhcp:将IP地址请求转发至DHCP 服务器Cisco2620(config-if)# ppp authentication chap:将认证设为CHAPCisco2620(config-if)# group-range 33 48:拨号组包括16个口Cisco的16AM模块提供了高密度的模拟电路接入方式,不在办公大楼的员工可以用Modem拨号联入局域网、登录服务器,实现远程办公。
思科路由器设置方法和常见配置命令

思科路由器设置方法和常见配置命令思科路由器设置方法和常见配置命令思科路由器怎么设置,是我们经常遇到的问题,下面店铺准备了关于思科路由器设置方法和常见配置命令,欢迎大家参考学习!一、基本设置方式一般来说,可以用5种方式来设置Cisco思科路由器:1.Console口接终端或运行终端仿真软件的微机;2.AUX口接MODEM,通过电话线与远方的终端或运行终端仿真软件的微机相连;3.通过Ethernet上的TFTP服务器;4.通过Ethernet上的TELNET程序;5.通过Ethernet上的SNMP网管工作站。
但Cisco思科路由器的第一次设置必须通过第一种方式进行,一般用超级终端通过com口进行控制。
此时终端的硬件设置如下: 波特率:9600数据位:8停止位:1奇偶校验: 无二、命令操作Cisco思科路由器所用的操作系统是IOS.共有以下几种状态:1、router>在router>提示符下,Cisco思科路由器处于用户命令状态,这时用户可以看Cisco思科路由器的连接状态,访问其它网络和主机,但不能看到和更改Cisco思科路由器的设置内容。
此时输入?并回车,可以查看到在此状态下可以用的命令。
(IOS允许你在任何时候用这种方式查看在某种状态下可以用的命令)。
在敲入enable并回车后,按照系统提示输入密码,(在新的Cisco思科路由器第一次进行调试的时候不需要输入密码,直接回车即可)进入#提示符,就可以对Cisco思科路由器进行各种操作了。
2、router#Cisco思科路由器进入特权命令状态router#后,不但可以执行所有的用户命令,还可以看到和更改Cisco思科路由器的设置内容。
此时就可以对Cisco思科路由器的名字、密码等进行设置。
3、router(config)#在router#提示符下键入configure terminal,出现提示符router(config)#,此时Cisco思科路由器处于全局设置状态,这时可以设置Cisco思科路由器的全局参数。
图解思科路由器配置教程

cisco路由器配置教程手把手教你配置cisco路由器经过几十年的发展,从最初的只有四个节点的ARPANET发展到现今无处不在的Internet,计算机网络已经深入到了我们生活当中。
随着计算机网络规模的爆炸性增长,作为连接设备的路由器也变得更加重要。
公司在构建网络时,如何对路由器进行合理的配置管理成为网络管理者的重要任务之一。
本专题就为读者从最简单的配置开始为大家介绍如何配置cisco路由器。
很多读者都对路由器的概念非常模糊,其实在很多文献中都提到,路由器就是一种具有多个网络接口的计算机。
这种特殊的计算机内部也有CPU、内存、系统总线、输入输出接口等等和PC相似的硬件,只不过它所提供的功能与普通计算机不同而已。
和普通计算机一样,路由器也需要一个软件操作系统,在cisco 路由器中,这个操作系统叫做互联网络操作系统,这就是我们最常听到的IOS软件了。
下面就请读者跟着我们来一步步的学习最基本的路由器配置方法。
cisco路由器基本配置:√ cisco IOS软件简介:大家其实没必要把路由器想的那么复杂,其实路由器就是一个具有多个端口的计算机,只不过它在网络中起到的作用与一般的PC不同而已。
和普通计算机一样,路由器也需要一个操作系统,cisco把这个操作系统叫作cisco互联网络操作系统,也就是我们知道的IOS,所有cisco路由器的IOS都是一个嵌入式软件体系结构。
cisco IOS软件提供以下网络服务:基本的路由和交换功能。
可靠和安全的访问网络资源。
可扩展的网络结构。
cisco命令行界面(CLI)用一个分等级的结构,这个结构需要在不同的模式下来完成特定的任务。
例如配置一个路由器的接口,用户就必须进入到路由器的接口配置模式下,所有的配置都只会应用到这个接口上。
每一个不同的配置模式都会有特定的命令提示符。
EXEC为IOS软件提供一个命令解释服务,当每一个命令键入后EXEC便会执行该命令。
√第一次配置Cisco路由器:在第一次配置cisco路由器的时候,我们需要从console端口来进行配置。
(完整版)思科路由器查看配置命令
思科路由器查看配置命令
show run// 看运行状况
show ip route// 看路由表
show int// 看断口*
show ip int br// 看端口ip 地址show cdp nei// 察看cdp 邻居show ip pro// 察看ip 协议
查看配置信息用show 命令,该命令可以在用户模式和特权模式下执行,且在特权模式下看到的信息比用户模式多。
show 命令很多,常用的有:
1、查看运行配置文件:
Router#show running-config
运行配置文件running-config 位于路由器的RAM 中,存放的是路由器当前使用的配置信息。
2、查看启动配置文件:
Router#show startup-config
启动配置文件startup-config 位于路由器的NVRAM 中,可以长期保存。
它在启动路由器时装入RAM ,成为running-config 。
3、查看路由器的版本信息:
Router#show version'
4、查看路由器的接口状态:
Router#show ip interface brief
如果接口状态标识为“ Down ”,表示此接口未激活,如果标识为“ Up”,表示此接口已经激活。
5、查看路由表:
Router#show ip route
通过路由表可以看出该路由器已经识别的网络。
6、查看NAT 翻译情况:
Router#show ip nat translation
应该先进行内网与外网的通讯(如:用ping 命令),然后再查看,才能看到翻译情况。
- 1、下载文档前请自行甄别文档内容的完整性,平台不提供额外的编辑、内容补充、找答案等附加服务。
- 2、"仅部分预览"的文档,不可在线预览部分如存在完整性等问题,可反馈申请退款(可完整预览的文档不适用该条件!)。
- 3、如文档侵犯您的权益,请联系客服反馈,我们会尽快为您处理(人工客服工作时间:9:00-18:30)。
CISCO路由器配置命令详解及实例 目录 CISCO路由器配置命令详解及实例 .............................................................................................. 1 第一章:路由器配置基础 ............................................................................................................... 2 一、基本设置方式 ................................................................................................................... 2 二、命令状态 ........................................................................................................................... 2 三、设置对话过程 ................................................................................................................... 3 四、常用命令 ........................................................................................................................... 5 五、配置IP寻址 ..................................................................................................................... 6 六、配置静态路由 ................................................................................................................... 8 第二章:广域网协议设置 ............................................................................................................... 8 一、HDLC ................................................................................................................................ 8 二、PPP .................................................................................................................................. 11 三、x.25 ................................................................................................................................. 12 四、Frame Relay .................................................................................................................... 15 五. Cisco765M通过ISDN拨号上263 ................................................................................. 18 六、PSTN ............................................................................................................................... 19 第三章:路由协议设置 ................................................................................................................. 30 一、RIP协议 ......................................................................................................................... 30 三、OSPF协议 ...................................................................................................................... 31 四、重新分配路由 ................................................................................................................. 34 五、IPX协议设置 ................................................................................................................. 36 第四章 :服务质量及访问控制 .................................................................................................... 37 一、协议优先级设置 ............................................................................................................. 37 二、队列定制 ......................................................................................................................... 38 三、访问控制 ......................................................................................................................... 38 第五章:虚拟局域网(VLAN)路由 .......................................................................................... 39 一、虚拟局域网(VLAN) ....................................................................................................... 39 二、交换机间链路(ISL)协议 ........................................................................................... 39 三、虚拟局域网(VLAN)路由实例 .................................................................................. 39 第六章:知识参考 ......................................................................................................................... 44 一、路由器初始化 ................................................................................................................. 44 二、IP分配 ............................................................................................................................ 45 第一章:路由器配置基础 一、基本设置方式 一般来说,可以用5种方式来设置路由器: 1.Console口接终端或运行终端仿真软件的微机; 2.AUX口接MODEM,通过电话线与远方的终端或运行终端仿真软件的微机相连; 3.通过Ethernet上的TFTP服务器; 4.通过Ethernet上的TELNET程序; 5.通过Ethernet上的SNMP网管工作站。 但路由器的第一次设置必须通过第一种方式进行,此时终端的硬件设置如下: 波特率:9600 数据位:8 停止位:1 奇偶校验: 无
二、命令状态 1. router> 路由器处于用户命令状态,这时用户可以看路由器的连接状态,访问其它网络和主机,但不能看到和更改路由器的设置内容。 2. router# 在router>提示符下键入enable,路由器进入特权命令状态router#,这时不但可以执行所有的用户命令,还可以看到和更改路由器的设置内容。 3. router(config)# 在router#提示符下键入configure terminal,出现提示符router(config)#,此时路由器处于全局设置状态,这时可以设置路由器的全局参数。 4. router(config-if)#; router(config-line)#; router(config-router)#;„ 路由器处于局部设置状态,这时可以设置路由器某个局部的参数。 5. > 路由器处于RXBOOT状态,在开机后60秒内按ctrl-break可进入此状态,这时路由器不能完成正常的功能,只能进行软件升级和手工引导。 设置对话状态 这是一台新路由器开机时自动进入的状态,在特权命令状态使用SETUP命令也可进入此状态,这时可通过对话方式对路由器进行设置。