NVDebugMgrForAndroidNDK-InstallGuide_20110127(全文翻译)
Android开发教程入门(软件安装流程)
Android开发教程第一部分:安装SDK这里介绍如何安装Android的SDK开发包和配置开发环境。
如果你还没有下载SDK,点击下面的链接开始。
Download the Android SDK系统和软件配置要求要通过Android SDK中提供的代码和工具进行Android应用程序的开发,需要一个合适的用于开发的电脑和合适的开发环境,具体要求如下:支持的开发环境EclipseEclipse 3.2,3.3(Europa)Android开发工具插件(可选)其他的开发环境或者IDEJDK5.0或者JDK6.0(仅有JRE是不够的)安装SDK下载好SDK包后,将zip文件解压缩至合适的地方。
在下文中,我们默认你的SDK安装目录为$SDK_ROOT 你可以选择将$SDK_ROOT/tool s加入到你的路径中1.Linux下,打开文件~/.bash_profile或者~/.bashrc,找到设定PATH环境变量的一行,将$SDK_ROOT/tools的完整路径加入其中。
如果没有找到设定PATH变量的行,你可以自己添加一行:export PATH=${PATH}:<你的$SDK_ROOT/tools的完全路径>2.Mac下,在你的home目录中找到文件.bash_profile,和Linux的一样处理。
如果还没有在机器上设定这个文件,你可以创建一个.ba sh_profile文件。
3.Windows下,右键点击【我的电脑】,选择【属性】,在【高级】页中,点击【环境变量】按键,在弹出的对话框中双击“系统变量”中的变量“Path”,将$SDK/tools的完全路径加入其中。
通过将$SDK/tools加入系统路径,在运行adb和其它一些命令行工具时就不需要键入完全路径名了。
需要注意到是,当你升级了SDK后,如果安装路径有变动的话,不要忘记了更新你的PATH变量的设置,将其指向变动后的路径。
安装Eclipse插件(ADT)如果你选择Eclipse作为Android的开发环境,可以安装一个专门为Android定制的插件:Android Development Tools(ADT),ADT插件集成了对Android工程和工具的支持,它包含了大量功能强大的扩展,使得创建、运行、调试Android程序更简单更快捷。
TrueSecure TM GTU Series Fingerprint Module User M
TrueSecure TMGTU Series Fingerprint ModuleUser Manual���� 10� �01�Revision: V1.00 Date: ���� 10� �01�Table of ContentsTable of Contents1 Introduction .............................................................................................................32 Functional Description . (3)View Image (5)Enro�� (6)Verif� (7)Identif� (8)Se�ect User (9)De�ete User ..........................................................................................................................10Save Image ..........................................................................................................................10View Log (10)Settings (11)Simi�arit� Thresho�d .............................................................................................................11Exit (11)Introduction1 IntroductionThis demonstration program is a simple but helpful program that will assist users to becomefamiliar with the features of the GTU series of fingerprint modules. The program allows easyimplementat of all the major functions required for fingerprint recognition.2 Functional DescriptionAfter program installation, execute the program by double-clicking on the Gingy_Demo.exe in theSDK program directory. After execution the following start up screen will be displayed.The program includes the following fingerprint recognition functions:Functional DescriptionThis start up screen contains a set of fingerprint module functions which are described in thefollowing section.Functional Description View ImageThe View Image can be selected to view the recorded fingerprint image. This function is used toadjust the image quality for the CMOS optical device. As the default settings may be not suitablefor certain environment or finger types, the user can adjust the brightness, contrast and gamma toget a satisfactory image quality for later enrollment or authentication.Functional DescriptionEnrollThe Enroll function is used to enroll a new fingerprint as the current user. At least three fingerprints are required to complete the enrollment. Place the finger on the reader for at least three times until the enrolled quality is displayed.The fingerprint reader will take the common features of these fingerprints and after a few seconds of processing, the reader will inform the user of the enrolment result.The following table shows the five levels of quality that are provided.You can Select Enroll to enter the enrollment mode. The screen is the same as the snap function. After enrolling a fingerprint successfully, a dialog box will appear which shows the enrolled quality. The user is now requested to input a name and choose the enrolled finger. After inputtingthe desired data, select “Save” to save the data.Functional Description VerifyThe Verify function is used to check a live-scanned fingerprint from the current user. It implementsonly a one-to-one matching. The matching compares a live-scanned fingerprint image against apreviously enrolled fingerprint image, to verify that they came from the same finger. To use thisfunction place a finger on the reader and the fingerprint reader will check it out automaticallyaccording to the security level settings.The objects to be compared are the live-scanned fingerprint image and the final fingerprinttemplate - EnrlTemplate, which is the data that was saved during enrollment. After a successfulsnapping, the live-scan fingerprint image data is stored in the main memory. The EnrlTemplate canbe chosen by clicking Select User or by creating a new user through the enrollment process.The Verify function can be selected to enter the matching fingerprint mode. Before clicking theVerify button, a user must first be selected, otherwise the following screen will appear.After verification, the result will be displayed on the screen to show if the verification achieved amatch or if it failed. See Identify for details.Functional DescriptionIdentifyThe Identify function is used to identify a live-scanned fingerprint image from the database. This function implements a one-to-many matching. The matching process compares a live-scanned fingerprint image with a previously enrolled database. To use this, a finger should be placed upon the reader to allow the fingerprint reader to check it out automatically according to the security level settings.The Identify function can be selected to enter the matching fingerprint mode. After identification, the result will be displayed on the screen to show if the identification has achieved a match or if ithas failed. If the identification is successful the user information will also be shown on the screen.Functional Description Select UserThe Select User function is used to select a User for verification. The user data files are createdafter enrollment. Once a user has been selected, it will become the target for verification. The nameof the user will be displayed on the demo program screen.There are two methods to change the target that is to be verified:▆Select another user from the function of Select User.▆After enrollment, the enrolled user will become the new matching target automatically.The Select User can be selected to enter the Select User mode. The following screen will appearshowing the user list, containing the name, enrolled finger and enrolled class. To select a user,choose the user and click the “OK” button or double-click on the desired user.Functional Description Delete UserThe Delete User function will delete a User from the database. Once you have selected a user, the user will be deleted from the list.Save ImageThe Save Image function is used to save the fingerprint image to a file. After a successful fingerprint snap operation, the fingerprint image will be stored in the main memory. A fingerprint image can be saved using this function. Select the Save Image function to enter the Save Image mode. Select a specified folder and input the filename.According to the user’s requirements, there are two file types that can be selected:▆File TypeBMP: Save the fingerprint image in bitmap file format.View LogThe View Log is used to view the operation history. The log can be sorted by “Date”, “Name” or“Action” by clicking the relative radio buttons. See the dialog box below.Functional DescriptionSettingsSecurity LevelThe default security level is Medium. Set up the security level for matching by setting the verification threshold. High is the safest mode, providing a FAR of less than 1/100,000. Fair is a less tight mode, providing a FAR of less than 1/1000.DeviceSelect a device for the system.Enroll ModeSelect an enrolled mode for the enrollment. All three modes will give high matching performances. However, larger template sizes will require the storage of more fingerprint data, giving higher accuracy but lower speed. The user may use the different modes depending upon their applications.For smaller capture device areas or 1-1 verification or 1-few identifications, the 504-byte mode is recommended. Where it is required to identify a large number of fingerprints, then speed may be the main concern and subsequently the 168-byte or 336-byte mode is recommended.Similarity ThresholdThe Similarity Threshold function is used to adjust the Security Level. The higher the Similarity Threshold, the higher the security levels. However higher security levels will also result in enrollment difficulties.ExitThe Exit function is used to terminate the demo program.Functional DescriptionCopyright© �01� b� HOLTEK SEMICONDUCTOR INC.The information appearing in this Data Sheet is believed to be accurate at the timeof publication. However, Holtek assumes no responsibility arising from the use ofthe specifications described. The applications mentioned herein are used solely forthe purpose of illustration and Holtek makes no warranty or representation that such applications will be suitable without further modification, nor recommends the use ofits products for application that may present a risk to human life due to malfunction or otherwise. Holtek's products are not authorized for use as critical components in lifesupport devices or systems. Holtek reserves the right to alter its products without prior notification. For the most up-to-date information, please visit our web site at http://www.ho�.Note that Holtek’s fingerprint recognition products have been designed in conjunction withGing� T echno�og�.。
NDK历史版本下载方法
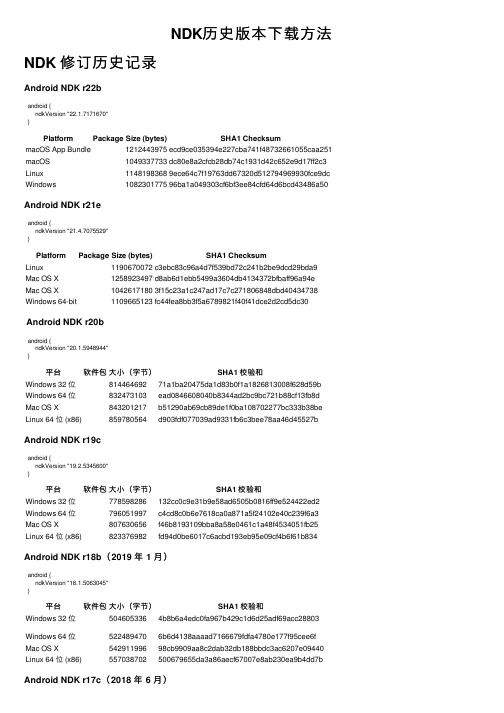
NDK历史版本下载⽅法NDK 修订历史记录Android NDK r22bandroid {ndkVersion "22.1.7171670"}Platform Package Size (bytes)SHA1 ChecksummacOS App Bundle1212443975ecd9ce035394e227cba741f48732661055caa251 macOS1049337733dc80e8a2cfcb28db74c1931d42c652e9d17ff2c3 Linux11481983689ece64c7f19763dd67320d512794969930fce9dc Windows108230177596ba1a049303cf6bf3ee84cfd64d6bcd43486a50Android NDK r21eandroid {ndkVersion "21.4.7075529"}Platform Package Size (bytes)SHA1 ChecksumLinux1190670072c3ebc83c96a4d7f539bd72c241b2be9dcd29bda9 Mac OS X1258923497d8ab6d1ebb5499a3604db4134372bfbaff96a94e Mac OS X10426171803f15c23a1c247ad17c7c271806848dbd40434738 Windows 64-bit1109665123fc44fea8bb3f5a6789821f40f41dce2d2cd5dc30Android NDK r20bandroid {ndkVersion "20.1.5948944"}平台软件包⼤⼩(字节)SHA1 校验和Windows 32 位81446469271a1ba20475da1d83b0f1a1826813008f628d59b Windows 64 位832473103ead0846608040b8344ad2bc9bc721b88cf13fb8d Mac OS X843201217b51290ab69cb89de1f0ba108702277bc333b38be Linux 64 位 (x86)859780564d903fdf077039ad9331fb6c3bee78aa46d45527bAndroid NDK r19candroid {ndkVersion "19.2.5345600"}平台软件包⼤⼩(字节)SHA1 校验和Windows 32 位778598286132cc0c9e31b9e58ad6505b0816ff9e524422ed2 Windows 64 位796051997c4cd8c0b6e7618ca0a871a5f24102e40c239f6a3 Mac OS X807630656f46b8193109bba8a58e0461c1a48f4534051fb25 Linux 64 位 (x86)823376982fd94d0be6017c6acbd193eb95e09cf4b6f61b834Android NDK r18b(2019 年 1 ⽉)android {ndkVersion "18.1.5063045"}平台软件包⼤⼩(字节)SHA1 校验和Windows 32 位5046053364b8b6a4edc0fa967b429c1d6d25adf69acc28803Windows 64 位5224894706b6d4138aaaad7166679fdfa4780e177f95cee6f Mac OS X54291199698cb9909aa8c2dab32db188bbdc3ac6207e09440 Linux 64 位 (x86)557038702500679655da3a86aecf67007e8ab230ea9b4dd7bandroid {ndkVersion "17.2.4988734"}平台软件包⼤⼩(字节)SHA1 校验和Windows 32 位6083583105bb25bf13fa494ee6c3433474c7aa90009f9f6a9 Windows 64 位6506265013e3b8d1650f9d297d130be2b342db956003f5992 Mac OS X675091485f97e3d7711497e3b4faf9e7b3fa0f0da90bb649c Linux 64 位 (x86)70938770312cacc70c3fd2f40574015631c00f41fb8a39048Android NDK r16b(2017 年 12 ⽉)android {ndkVersion "16.1.4479499"}平台软件包⼤⼩(字节)SHA1 校验和Windows 32 位656720029becaf3d445a4877ca1a9300a62f0934a4838c7fa Windows 64 位723301086f3f1909ed1052e98dda2c79d11c22f3da28daf25 Mac OS X839630771e51e615449b98c716cf912057e2682e75d55e2de Linux 64 位 (x86)852********aa43aae89a50d1c66c3f9fdecd676936da6128Android NDK r15c(2017 年 7 ⽉)平台软件包⼤⼩(字节)SHA1 校验和Windows 32 位784778144f2e47121feb73ec34ced5e947cbf1adc6b56246e Windows 64 位849733996970bb2496de0eada74674bb1b06d79165f725696 Mac OS X960251267ea4b5d76475db84745aa8828000d009625fc1f98 Linux 64 位 (x86)9749767540bf02d4e8b85fd770fd7b9b2cdec57f9441f27a2Android NDK r14b(2017 年 3 ⽉)平台软件包⼤⼩(字节)SHA1 校验和Windows 32 位707533928070443eaa7fa37ed337f91c655e02ca708d37c92 Windows 64 位769151176a625e8c599bccdb9061b61dcf3d1f1a01071613f Mac OS X8247050732bf582c43f6da16416e66203d158a6dfaba4277c Linux 64 位 (x86)840626594becd161da6ed9a823e25be5c02955d9cbca1dbebAndroid NDK r13b(2016 年 10 ⽉)平台软件包⼤⼩(字节)SHA1 校验和Windows 32 位6204615444eb1288b1d4134a9d6474eb247f0448808d52408 Windows 64 位681320123649d306559435c244cec5881b880318bb3dee53a Mac OS X66596799771fe653a7bf5db08c3af154735b6ccbc12f0add5 Linux 64 位 (x86)6873118660600157c4ddf50ec15b8a037cfc474143f718fd0Android NDK r12b(2016 年 6 ⽉)平台软件包⼤⼩(字节)SHA1 校验和Windows 32 位7064539728e6eef0091dac2f3c7a1ecbb7070d4fa22212c04 Windows 64 位749567353337746d8579a1c65e8a69bf9cbdc9849bcacf7f5 Mac OS X734135279e257fe12f8947be9f79c10c3fffe87fb9406118a Linux 64 位 (x86)755551010170a119bfa0f0ce5dc932405eaa3a7cc61b27694Android NDK r11c(2016 年 3 ⽉)平台软件包⼤⼩(字节)SHA1 校验和Windows 32 位728899082ff939bde6cd374eecbd2c3b2ad218697f9a5038c Windows 64 位7714076423d89deb97b3191c7e5555f1313ad35059479f071 Mac OS X7724287924ce8e7ed8dfe08c5fe58aedf7f46be2a97564696 Linux 64 位 (x86)794135138de5ce9bddeee16fb6af2b9117e9566352aa7e279平台软件包⼤⼩(字节)SHA1 校验和Windows 32 位32050434091d0b8f2835be741f3048fb03c0a3e9f71ab7f357 Windows 64 位5006864954a29f3ae41fb02b64ca8ad2b0903f74356f953d9f Mac OS X35304232626be8598e4ed3d9dd42998c8cb666f0ee502b1294 Linux 64 位 (x86)3514714136f692681b007071103277f6edc6f91cb5c5494a32。
Outer Space音频插件用户指南说明书
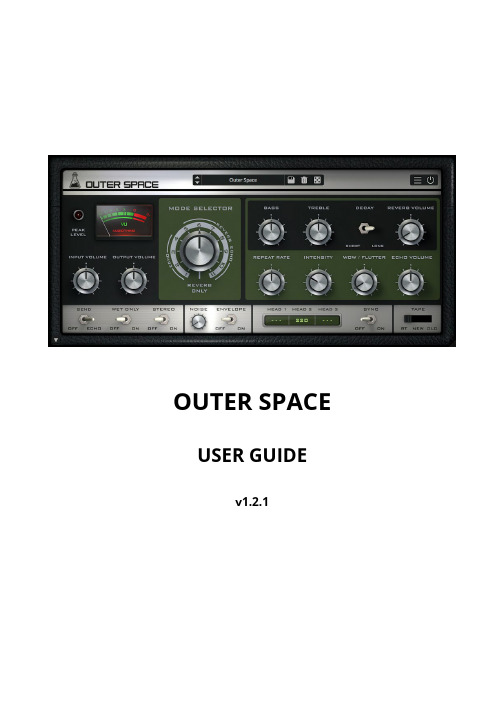
MAC OS • Double click on the DMG archive to extract it • Right click on the PKG installer and click open • Follow the instructions to install the plug-in(s)
OUTER SPACE
USER GUIDE
v1.2.1
OUTER SPACE....................................................................... 3 INSTALLATION..................................................................................................3 REGISTRATION..................................................................................................4
Repeat Rate Intensity WOW/Flutter Echo Volume
Controls the rate of the echo signal, emulating the changes in speed of the tape.
Controls the amount of feedback, increasing the amount of repetitions in the echo signal.
Controls the volume of the output signal.
Android JNI NDK
编写Android NDK程序步骤
在编写上面代码时应注意如下两点:
Android JNI接口设计
AndroidN DK应用程序的接口实际上就 是在JNI(Java Native Interface)规范中定 义的接口。JNI规范中定义了Java调用动 态链接库(*.dll或*.so文件,由于 Android是Linux内核的操作系统,因此 只有*.so文件)的约定。这里的接口就 是指函数,包括函数名称、函数参数个 数、函数参数类型及函数返回值的类型。
Android JNI接口设计
举个简单的例子,看一下hello-jni.c文件中的c语言函数, 代码如下: Jstring Java_com_example_hellojni_HelloJni_stringFromJNI(JN IEnv* env, jobject thiz) { return (*env)->NewStringUTF(env, “Hello from JNI!”); } 上面的代码中的函数从表面上看只是一个普通的c语言 函数,但这个函数和普通的c语言函数有如下3点不 同:
Android NDK简介
NDK由如下几部分组成: 提供了一套工具集,这套工具集可以将 c/c++源代码生成本地代码。 用于定义NDK接口的C头文件(*.h)和 实现这些接口的库文件。 一套编译系统。可以通过非常少的配置 生成目标文件。
下载和安装Android NDK
Adobe Acrobat SDK 开发者指南说明书
This guide is governed by the Adobe Acrobat SDK License Agreement and may be used or copied only in accordance with the terms of this agreement. Except as permitted by any such agreement, no part of this guide may be reproduced, stored in a retrieval system, or transmitted, in any form or by any means, electronic, mechanical, recording, or otherwise, without the prior written permission of Adobe. Please note that the content in this guide is protected under copyright law.
Android-NDK环境的搭建及遇到的问题详解
Android NDK环境搭建及遇到的问题详解最近在Android的应用开发,尝试了搭建NDK环境,其中步骤很是麻烦,也遇到了一些问题,找了很多网上的教程和资料,最终把遇到的问题解决了。
先,就我遇到的问题进行整合和找到的资料,以备遇到同样问题的朋友参考。
1.下载安装Android NDK我使用的NDK版本为r7,自己可以到网上下载,我的下载地址是:/content/52979.html下载后解压。
2.下载安装cygwin由于NDK编译代码时必须要用到make和gcc,所以你必须先搭建一个linux环境,cygwin是一个在windows平台上运行的unix模拟环境,它对于学习unix/linux操作环境,或者从unix到windows的应用程序移植,非常有用。
通过cygwin,你就可以在不安装linux 的情况下使用NDK来编译C、C++代码了。
下面我们一步一步的安装cygwin吧。
首先,你得先跑到下载setup.exe(1)然后双击运行吧,运行后你将看到安装向导界面:(2)点击下一步此时让你选择安装方式:●Install from Internet:直接从Internet上下载并立即安装(安装完成后,下载好的安装文件并不会被删除,而是仍然被保留,以便下次再安装)。
● Download Without Installing:只是将安装文件下载到本地,但暂时不安装。
● Install from Local Directory:不下载安装文件,直接从本地某个含有安装文件的目录进行安装。
)(3)最好选择第一项,然后点击下一步(其他选项我也试过,没有效果)(4)选择要安装的目录,注意,千万不要放到有中文和空格的目录里(这点要注意),之后点下一步:(5)一步是选择安装cygwin的目录,这个是选择你下载的安装包所在的目录,默认是你运行setup.exe的目录,直接点下一步就可以:(6)此时你共有三种连接方式选择(如图):●Direct Connection:直接连接。
androidmk 用法 -回复
androidmk 用法-回复Androidmk 是Android 开发中使用的构建工具。
它是一个Makefile,用来描述Android 应用程序的构建过程,包括编译时所需的源代码文件、库文件、资源文件以及生成的可执行文件等。
在本文中,我将详细介绍Androidmk 的使用方法,并逐步回答与之相关的问题。
一、什么是Androidmk?Androidmk 是用于构建Android 应用程序的工具之一。
它是一个Makefile,并且遵循GNU Make 语法。
通过Androidmk,开发人员可以定义编译、链接和打包的规则,以及指定构建所需的源文件、库文件和资源文件等。
二、如何创建Androidmk 文件?要创建一个Androidmk 文件,首先需要进入Android 项目的根目录,然后新建一个名为Android.mk 的文本文件。
在该文件中,可以按照Makefile 的语法来定义构建规则。
三、Androidmk 的语法和功能特性有哪些?Androidmk 文件的语法和功能特性如下:1. 定义全局变量:可以使用`:=` 或`=` 来定义全局变量,并在后续的规则中使用。
2. 选择编译器版本:可以使用`APP_PLATFORM := android-X` 来选择编译器版本,其中X 是一个数字,表示Android 版本号。
3. 定义源文件:可以使用`LOCAL_SRC_FILES` 来指定源文件,通常是C/C++ 源文件。
可以使用通配符来指定多个文件,例如`*.c`。
4. 添加或链接库文件:可以使用`LOCAL_LDLIBS` 或`LOCAL_SHARED_LIBRARIES` 来添加或链接库文件。
`LOCAL_LDLIBS` 用于链接静态库,而`LOCAL_SHARED_LIBRARIES` 用于链接动态库。
5. 定义可执行文件:可以使用`LOCAL_MODULE` 来定义要生成的可执行文件的名称。
6. 定义编译选项:可以使用`LOCAL_CFLAGS` 和`LOCAL_CXXFLAGS` 来定义编译选项。
Ubuntu 10.04(64位)下载并编译 Android 2.2 源码
Ubuntu 10.04(64位)下载并编译Android 2.2 源码[只有11条命令]为了方便,我把所有操作写成了命令,按顺序(软件安装--源码下载--编译)执行成功即可:1. sudo apt-get install git-core gnupg flex bison gperf build-essential zip curl zlib1g-dev gcc-multilib g++-multilib libc6-dev-i386 lib32ncurses5-dev ia32-libs x11proto-core-devlibx11-dev lib32readline5-dev lib32z-dev java-common unixodbc2. sudo apt-get install sun-java6-jdk3. cd4. mkdir -p software/bin5. curl /repo >software/bin/repo6. chmod a+x software/bin/repo7. mkdir -p software/android/src/new8. cd software/android/src/new9. repo init -u git:///platform/manifest.git -b froyo10. repo sync11. make -j4=========================================================== ======================================================== 1.前言本文叙述了如何从零开始搭建基于Google官方Android 2.2.1(froyo)源码的开发环境,包括如何下载源代码、编译源代码,以及在模拟器中运行编译生成的镜像。
文中开发机是基于Ubuntu 10.04的,同样适用于其他版本的Ubuntu。
GraphFrames 0.1.2 用户指南说明书
Package‘graphframes’October13,2022Type PackageTitle Interface for'GraphFrames'Version0.1.2Maintainer Kevin Kuo<*********************>Description A'sparklyr'<https:///>extension that provides an R interface for'GraphFrames'<https://graphframes.github.io/>.'GraphFrames'is a package for'Apache Spark'that provides a DataFrame-based API for working with graphs.Functionality includes motiffinding and common graph algorithms,such as PageRank and Breadth-firstsearch.URL https:///rstudio/graphframesBugReports https:///rstudio/graphframes/issuesLicense Apache License2.0|file LICENSEEncoding UTF-8LazyData trueRoxygenNote6.1.0Imports sparklyr,tibble,forgeSuggests testthat,covr,dplyrNeedsCompilation noAuthor Kevin Kuo[aut,cre](<https:///0000-0001-7803-7901>)Repository CRANDate/Publication2018-10-3019:20:03UTCR topics documented:gf_bfs (2)gf_cache (3)gf_chain (3)gf_connected_components (4)gf_degrees (4)gf_edges (5)12gf_bfs gf_edge_columns (5)gf_find (6)gf_friends (6)gf_graphframe (7)gf_grid_ising_model (8)gf_in_degrees (9)gf_lpa (9)gf_out_degrees (10)gf_pagerank (10)gf_persist (11)gf_register (11)gf_scc (12)gf_shortest_paths (12)gf_star (13)gf_triangle_count (13)gf_triplets (14)gf_two_blobs (14)gf_unpersist (15)gf_vertex_columns (15)gf_vertices (15)spark_graphframe (16)Index17 gf_bfs Breadth-first search(BFS)DescriptionBreadth-first search(BFS)Usagegf_bfs(x,from_expr,to_expr,max_path_length=10,edge_filter=NULL,...)Argumentsx An object coercable to a GraphFrame(typically,a gf_graphframe).from_expr Spark SQL expression specifying valid starting vertices for the BFS.to_expr Spark SQL expression specifying valid target vertices for the BFS.max_path_lengthLimit on the length of paths.edge_filter Spark SQL expression specifying edges which may be used in the search....Optional arguments,currently not used.gf_cache3Examples##Not run:g<-gf_friends(sc)gf_bfs(g,from_expr="name= Esther ",to_expr="age<32")##End(Not run)gf_cache Cache the GraphFrameDescriptionCache the GraphFrameUsagegf_cache(x)Argumentsx An object coercable to a GraphFrame(typically,a gf_graphframe).gf_chain Chain graphDescriptionReturns a chain graph of the given size with Long ID type.The vertex IDs are0,1,...,n-1,and the edges are(0,1),(1,2),....,(n-2,n-1).Usagegf_chain(sc,n)Argumentssc A Spark connection.n Size of the graph to return.Examples##Not run:gf_chain(sc,5)##End(Not run)4gf_degrees gf_connected_componentsConnected componentsDescriptionComputes the connected component membership of each vertex and returns a DataFrame of vertex information with each vertex assigned a component ID.Usagegf_connected_components(x,broadcast_threshold=1000000L,algorithm=c("graphframes","graphx"),checkpoint_interval=2L,...)Argumentsx An object coercable to a GraphFrame(typically,a gf_graphframe).broadcast_thresholdBroadcast threshold in propagating component assignments.algorithm One of’graphframes’or’graphx’.checkpoint_intervalCheckpoint interval in terms of number of iterations....Optional arguments,currently not used.Examples##Not run:#checkpoint directory is required for gf_connected_components()spark_set_checkpoint_dir(sc,tempdir())g<-gf_friends(sc)gf_connected_components(g)##End(Not run)gf_degrees Degrees of verticesDescriptionDegrees of verticesUsagegf_degrees(x)gf_edges5 Argumentsx An object coercable to a GraphFrame(typically,a gf_graphframe).gf_edges Extract edges DataFrameDescriptionExtract edges DataFrameUsagegf_edges(x)Argumentsx An object coercable to a GraphFrame(typically,a gf_graphframe).gf_edge_columns Edges column namesDescriptionEdges column namesUsagegf_edge_columns(x)Argumentsx An object coercable to a GraphFrame(typically,a gf_graphframe).6gf_friends gf_find Motiffinding:Searching the graph for structural patternsDescriptionMotiffinding uses a simple Domain-Specific Language(DSL)for expressing structural queries.For example,gf_find(g,"(a)-[e]->(b);(b)-[e2]->(a)")will search for pairs of vertices a,b connected by edges in both directions.It will return a DataFrame of all such structures in the graph,with columns for each of the named elements(vertices or edges)in the motif.In this case,the returned columns will be in order of the pattern:"a,e,b,e2."Usagegf_find(x,pattern)Argumentsx An object coercable to a GraphFrame(typically,a gf_graphframe).pattern pattern specifying a motif to search forExamples##Not run:gf_friends(sc)%>%gf_find("(a)-[e]->(b);(b)-[e2]->(a)")##End(Not run)gf_friends Graph of friends in a social network.DescriptionGraph of friends in a social network.Usagegf_friends(sc)Argumentssc A Spark connection.gf_graphframe7 Examples##Not run:library(sparklyr)sc<-spark_connect(master="local")gf_friends(sc)##End(Not run)gf_graphframe Create a new GraphFrameDescriptionCreate a new GraphFrameUsagegf_graphframe(vertices=NULL,edges)Argumentsvertices A tbl_spark representing vertices.edges A tbl_psark representing edges.Examples##Not run:library(sparklyr)sc<-spark_connect(master="local",version="2.3.0")v_tbl<-sdf_copy_to(sc,data.frame(id=1:3,name=LETTERS[1:3]))e_tbl<-sdf_copy_to(sc,data.frame(src=c(1,2,2),dst=c(2,1,3),action=c("love","hate","follow")))gf_graphframe(v_tbl,e_tbl)gf_graphframe(edges=e_tbl)##End(Not run)8gf_grid_ising_model gf_grid_ising_model Generate a grid Ising model with random parametersDescriptionGenerate a grid Ising model with random parametersUsagegf_grid_ising_model(sc,n,v_std=1,e_std=1)Argumentssc A Spark connection.n Length of one side of the grid.The grid will be of size n x n.v_std Standard deviation of normal distribution used to generate vertex factors"a".Default of1.0.e_std Standard deviation of normal distribution used to generate edge factors"b".De-fault of1.0.DetailsThis method generates a grid Ising model with random parameters.Ising models are probabilistic graphical models over binary variables xi.Each binary variable xi corresponds to one vertex,and it may take values-1or+1.The probability distribution P(X)(over all xi)is parameterized by vertex factors ai and edge factors bij:P(X)=(1/Z)∗exp[i a i x i+ijb ij x i x j]ValueGraphFrame.Vertices have columns"id"and"a".Edges have columns"src","dst",and"b".Edges are directed,but they should be treated as undirected in any algorithms run on this model.Vertex IDs are of the form"i,j".E.g.,vertex"1,3"is in the second row and fourth column of the grid. Examples##Not run:gf_grid_ising_model(sc,5)##End(Not run)gf_in_degrees9 gf_in_degrees In-degrees of verticesDescriptionIn-degrees of verticesUsagegf_in_degrees(x)Argumentsx An object coercable to a GraphFrame(typically,a gf_graphframe).gf_lpa Label propagation algorithm(LPA)DescriptionRun static Label Propagation for detecting communities in networks.Each node in the network is initially assigned to its own community.At every iteration,nodes send their community affiliation to all neighbors and update their state to the mode community affiliation of incoming messages.LPA is a standard community detection algorithm for graphs.It is very inexpensive computationally, although(1)convergence is not guaranteed and(2)one can end up with trivial solutions(all nodes are identified into a single community).Usagegf_lpa(x,max_iter,...)Argumentsx An object coercable to a GraphFrame(typically,a gf_graphframe).max_iter Maximum number of iterations....Optional arguments,currently not used.Examples##Not run:g<-gf_friends(sc)gf_lpa(g,max_iter=5)##End(Not run)10gf_pagerank gf_out_degrees Out-degrees of verticesDescriptionOut-degrees of verticesUsagegf_out_degrees(x)Argumentsx An object coercable to a GraphFrame(typically,a gf_graphframe).gf_pagerank PageRankDescriptionPageRankUsagegf_pagerank(x,tol=NULL,reset_probability=0.15,max_iter=NULL,source_id=NULL,...)Argumentsx An object coercable to a GraphFrame(typically,a gf_graphframe).tol Tolerance.reset_probabilityReset probability.max_iter Maximum number of iterations.source_id(Optional)Source vertex for a personalized pagerank....Optional arguments,currently not used.Examples##Not run:g<-gf_friends(sc)gf_pagerank(g,reset_probability=0.15,tol=0.01)##End(Not run)gf_persist11 gf_persist Persist the GraphFrameDescriptionPersist the GraphFrameUsagegf_persist(x,storage_level="MEMORY_AND_DISK")Argumentsx An object coercable to a GraphFrame(typically,a gf_graphframe).storage_level The storage level to be used.Please view the Spark Documentation for informa-tion on what storage levels are accepted.gf_register Register a GraphFrame objectDescriptionRegister a GraphFrame objectUsagegf_register(x)Argumentsx An object coercable to a GraphFrame(typically,a gf_graphframe).12gf_shortest_paths gf_scc Strongly connected componentsDescriptionCompute the strongly connected component(SCC)of each vertex and return a DataFrame with each vertex assigned to the SCC containing that vertex.Usagegf_scc(x,max_iter,...)Argumentsx An object coercable to a GraphFrame(typically,a gf_graphframe).max_iter Maximum number of iterations....Optional arguments,currently not used.Examples##Not run:g<-gf_friends(sc)gf_scc(g,max_iter=10)##End(Not run)gf_shortest_paths Shortest pathsDescriptionComputes shortest paths from every vertex to the given set of landmark vertices.Note that this takes edge direction into account.Usagegf_shortest_paths(x,landmarks,...)Argumentsx An object coercable to a GraphFrame(typically,a gf_graphframe).landmarks IDs of landmark vertices....Optional arguments,currently not used.gf_star13Examples##Not run:g<-gf_friends(sc)gf_shortest_paths(g,landmarks=c("a","d"))##End(Not run)gf_star Generate a star graphDescriptionReturns a star graph with Long ID type,consisting of a central element indexed0(the root)and the n other leaf vertices1,2,...,n.Usagegf_star(sc,n)Argumentssc A Spark connection.n The number of leaves.Examples##Not run:gf_star(sc,5)##End(Not run)gf_triangle_count Computes the number of triangles passing through each vertex.DescriptionThis algorithm ignores edge direction;i.e.,all edges are treated as undirected.In a multigraph, duplicate edges will be counted only once.Usagegf_triangle_count(x,...)Argumentsx An object coercable to a GraphFrame(typically,a gf_graphframe)....Optional arguments,currently not used.14gf_two_blobsExamples##Not run:g<-gf_friends(sc)gf_triangle_count(g)##End(Not run)gf_triplets Triplets of graphDescriptionTriplets of graphUsagegf_triplets(x)Argumentsx An object coercable to a GraphFrame(typically,a gf_graphframe).gf_two_blobs Generate two blobsDescriptionTwo densely connected blobs(vertices0->n-1and n->2n-1)connected by a single edge(0->n). Usagegf_two_blobs(sc,blob_size)Argumentssc A Spark connection.blob_size The size of each blob.Examples##Not run:gf_two_blobs(sc,3)##End(Not run)gf_unpersist15 gf_unpersist Unpersist the GraphFrameDescriptionUnpersist the GraphFrameUsagegf_unpersist(x,blocking=FALSE)Argumentsx An object coercable to a GraphFrame(typically,a gf_graphframe).blocking whether to block until all blocks are deletedgf_vertex_columns Vertices column namesDescriptionVertices column namesUsagegf_vertex_columns(x)Argumentsx An object coercable to a GraphFrame(typically,a gf_graphframe).gf_vertices Extract vertices DataFrameDescriptionExtract vertices DataFrameUsagegf_vertices(x)Argumentsx An object coercable to a GraphFrame(typically,a gf_graphframe).16spark_graphframe spark_graphframe Retrieve a GraphFrameDescriptionRetrieve a GraphFrameUsagespark_graphframe(x,...)spark_graphframe(x,...)Argumentsx An object coercable to a GraphFrame(typically,a gf_graphframe)....additional arguments,not usedIndexgf_bfs,2gf_cache,3gf_chain,3gf_connected_components,4gf_degrees,4gf_edge_columns,5gf_edges,5gf_find,6gf_friends,6gf_graphframe,7gf_grid_ising_model,8gf_in_degrees,9gf_lpa,9gf_out_degrees,10gf_pagerank,10gf_persist,11gf_register,11gf_scc,12gf_shortest_paths,12gf_star,13gf_triangle_count,13gf_triplets,14gf_two_blobs,14gf_unpersist,15gf_vertex_columns,15gf_vertices,15spark_graphframe,1617。
Android NDK环境配置
Android NDK环境配置首先,介绍一下在这里所参与协作的软件包:1、JDK:这个软件被Eclipse依赖。
2、Eclipse:也就是我们所需要配置的目标IDE环境了。
版本可以选择Eclipse SE 版,也可以选择J2EE版。
3、Android SDK:也就是Android开发所需要的Java包以及一些编译工具等。
4、Android NDK:包含了一些头文件以及交叉编译器。
5、ADT(Android Development Tool): 这是Eclipse的Android开发插件。
这个插件是关联Eclipse,NDK,SDK的纽带。
一、安装JDK从Oracle官网下载JDK ,下载好了之后,安装到你想安装的文件夹里。
比如我是安装在 D:\ProgramFiles\Java 中。
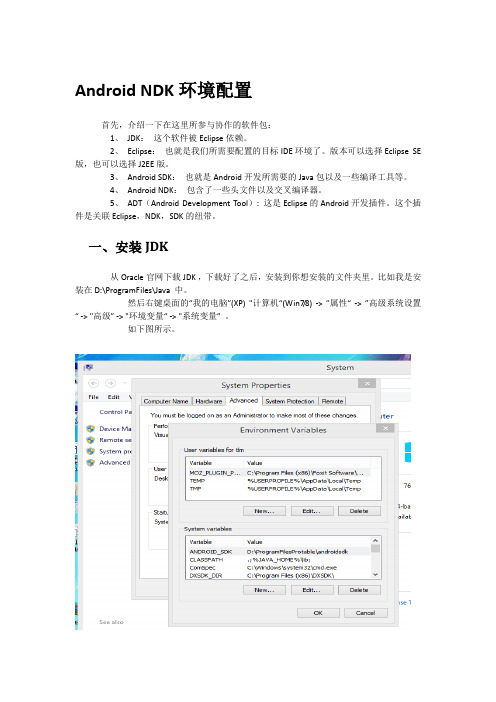
然后右键桌面的“我的电脑”(XP) "计算机“(Win7/8) -> ”属性“ -> ”高级系统设置“ -> "高级” -> "环境变量“ -> "系统变量” 。
如下图所示。
然后在系统环境变量中,新建变量名为JAVA_HOME,内容为D:\ProgramFiles\Java //这里替换成你的JDK安装的路径新建CLASSPATH,内容为.;%JAVA_HOME%\lib;编辑Path, 在尾巴上添加%JAVA_HOME%\bin;//注意上面是编辑Path,而不是新建Path,新建了就悲剧的覆盖了你原来的Path,你的控制台命令会都无法使用的。
//注意如果Path变量的最后一个项没有分号,则要添加一个分号这样就配置好了JDK了!验证一下的话,Win+R输入CMD,然后在控制台中输入java -version,如果提示了Java版本,那么JDK就配置好了。
Linux:在linux的话,下载了JDK之后,解压到你想解压的路径比如我是解压到/usr/lib/中。
FFMPEG移植到Android
FFMPEG移植到Android环境:少不得交叉编译环境Cygwin的安装,版本我的是1.7.6,不要低于或等于1.5就行,因为我的NDK里面(docs\INSTALL.TXT)有说:Note that running it under MSys or Cygwin 1.5 is not supported.还说明要安装Cygwin时还要GNU Make 3.81(make –v)可以查看,所以为了安全起见在安装Cygwin时全部要安装的包我都选上了,安装了很久呢。
我的NDK版本是:android-ndk-r4b-windows.zip开始的时候用android-ndk-r4b-linux-x86.zip版本的,就是执行到arm-eabi-gcc时出错,我感觉很奇怪Cygwin的内核不是Linux吗,干吗识别不了arm-eabi-gcc文件。
错误提示是:cannot execute binary file.后来怀疑我的Cygwin在Windows下安装的应该用windows版本的。
果然如此。
android-ndk-r4b-windows的安装很简单,只要设置一下环境变理即可,不像以前的版本这样要执行build/host-setup.sh。
在windows下设置Cygwin的环境变量遇到了问题,就是在windows下Cygwin的安装在home/usr(你的用户名)/会找不到.bash_profile、.bashrc和.inputrc三个文件,其实在Cygwin 的/etc/skel下有这三个文件,Copy过去,设置环境变量,然后重新启动Cygwin即可。
设置NDK环境变量主要在.bashrc文件底部添加以下两行:NDK_ROOT=~/Android/android-ndk-r4bexport NDK_ROOT~目录代表的就是/home/usr(你的用户名),我把NDK放在里面。
你可以测试一下有没有安装成功:$ cd $NDK_ROOT$ ndk-build NDK_PROJECT_PATH=$NDK_ROOT/samples/tow-libs找到生成的文件就代表安装正常了。
ndk的使用流程
ndk的使用流程NDK(Native Development Kit)是Android提供的一个开发工具包,用于开发C/C++库,并将其集成到Android应用程序中。
NDK的使用流程可以分为以下几个步骤。
第一步,安装配置NDK。
首先需要下载NDK,可以从Android官方网站或者Android Studio的SDK Manager中下载安装。
安装完成后,需要配置NDK的环境变量,以便在命令行中可以直接使用NDK提供的工具。
第二步,创建NDK项目。
可以使用Android Studio创建一个新的NDK项目,或者将NDK集成到现有的Android项目中。
在项目的build.gradle文件中,需要添加NDK的配置信息,包括NDK的版本和需要编译的C/C++文件路径。
第三步,编写C/C++代码。
在项目中创建一个jni目录,用于存放C/C++代码。
在该目录下,可以创建多个C/C++文件,用于实现不同的功能。
在编写代码时,需要注意使用C/C++的语法和规范,并且可以使用NDK提供的一些特定的API和函数。
第四步,编译C/C++代码。
在命令行中进入到项目的根目录下,执行命令"ndk-build",即可编译C/C++代码。
编译完成后,会生成对应的动态链接库文件(.so文件),可以在项目的libs目录下找到。
第五步,配置JNI接口。
在Java代码中,需要通过JNI(JavaNative Interface)来调用C/C++代码。
首先需要创建一个Java类,用于定义JNI接口。
在该类中,可以使用native关键字声明需要调用的C/C++函数。
然后,在命令行中执行命令"javah",可以生成对应的JNI头文件。
将该头文件拷贝到jni目录下,并在其中实现JNI函数的具体逻辑。
第六步,使用JNI接口。
在Java代码中,可以通过调用JNI接口来使用C/C++代码。
首先需要加载动态链接库文件,可以使用System.loadLibrary()方法来实现。
Eclipse下的Android-NDK安装
Android NDK环境简介Android NDK 是运行于Android 平台上的Native Development Kit 的缩写。
Android 应用开发者可以通过NDK 调用C 或C++ 本地代码。
NDK 编译需要用到Cygwin 中的make 和gcc, 所以先来下载并安装Cygwin。
NDK同时支持C和C++,但C++的支持相对要弱一些,比如,不支持异常,以及在调用静态构造函数和静态析构函数时,存在一些bug。
大多数情况下,使用NDK的目的,就是把和性能相关的代码,移到本地(native)层面去实现,你不大可能需要过多的OOP抽象以及其设计方面的优势(译者注:OOP往往会用到虚函数,而这会降低程序运行的性能。
设计模式更是如此,通常,设计模式在带来代码的可维护性和可扩展性优势的同时,几乎无可避免地带来性能方面的损害)。
我想说的就是,NDK的代码更倾向于用C编写,而不是C++。
NDK提供的API比较有限,这些API主要用于几个和性能相关的领域,比如:●OpenGL,包括支持(Java)SDK所支持的一些新版本●Math,(一些,但非全部的,专门针对计算的算法。
在native层面实现可获得更好的性能)●2D graphics,从2.2开始支持像素缓冲(pixelbuffer)●libc,提供了兼容性支持,并可能为移植现有native代码提供方便Step1:安装CDT在Eclipse中,进入Help – Install New Software菜单项,选择Galileo作为更新站点(“Work with”)。
等待更新项目树加载,然后选中Programming Languages分支下的Eclipse C/C++ Development Tools,然后点击Next按钮。
按照后续的提示,接受缺省的选项,最后必须接受许可,以便让Eclipse完成更新。
等待Eclipse重启。
现在你的Eclipse就支持C/C++了。
Android NDK 配置
Android NDK 配置Android NDK是什么, NDK:Native Develpment Kit.众所周知,Android是基于Linux的支持,自然对C、C++提供原生的支持,Android的开发也是基于Java的语言。
应用程序的运行环境主要是Dalvik虚拟机。
虽然开发语言是Java 但是我们总可以通过各种方式用C等语言开发。
至于用NDK开发的流程,请阅读NDK附带的文档。
关于具体的信息了解,请访问Android开发网阅读文档了解基本的信息。
点这里了解基本信息(需要设置代理访问或者翻墙)建议通读上面链接的全文(英文版),很多东西按照上面介绍的步骤就可以完全的成功。
一些基本的命令和操作也在里面可以看到,相信看过以后会对你有启发。
在其中有这么一句话:Please note that the NDK does not enable you to develop native-only applications. Android’s primary runtime remains the Dalvik virtual machine在NDK文档中也有这样的描述:The NDK is *not* a good way to write generic native code that runs on Android devices. In particular, your applications should still be written in the Java programming language, handle Android system events appropriately to avoid the "Application Not Responding" dialog or deal with the Android applicationlife-cycle.也就是说,Android的Application不能完全用C或者C++开发,其运行环境主要是Dalvik 的JVM,而且NDK没有关于组件声明周期和事件处理的东西。
AndroidNDK开发教程专题知识讲座

APPLICATION- Application.mk文件旳阐明文档,
MK.TXT
Application.mk文件定义了Android工程需
要调用旳C/C++源代码
HOWTO.TXT
有关NDK开发旳一般性信息
SYSTEMISSUES.TXT
使用NDK开发时所需要注意旳问题
STABLE-APIS.TXT NDK头文件所支持旳稳定旳API类表
10.3 NDK开发示例
建立Application.mk文件
第2行代码中旳变量APP_MODULES表达Android工程需 要调用旳非托管模块,假如存在多种非托管模块,使用空 格进行分隔。本示例调用旳非托管模块为add-module, 相应在背面涉及旳Android.mk文件
Application.mk旳变量阐明
Android NDK旳目录构造
在android-ndk-1.5_r1目录中 ,包括5个子目录和2个文件
apps目录是Android工程旳保 存目录,子目录hello-jni和 tow-libs是NDK自带旳两个示 例目录
build目录保存了交叉编译工 具、编译脚本和配置文件
docs目录是帮助文档旳保存 目录
10.3 NDK开发示例
建立Android工程
程序中旳生产随机数和调用旳代码在 AndroidNdkDemo.java文件中,下面是 AndroidNdkDemo.java文件旳关键代码
1. public class AndroidNdkDemo extends Activity {
2.
@Override
10.2 NDK编译环境
Android NDK旳目录构造
sources目录是C/C++源代码 (+)apps
NVIDIA Debug Manager for Android NDK - Version 9.0
DA-05628-001_v03 | February 2011 Installation GuideDOCUMENT CHANGE HISTORYTABLE OF CONTENTS Software Requirements (1)Software Components (1)Pre-Installation Requirements (1)Installation (3)Installing Eclipse SDK (3)Installing C/C++ Development Tools (3)Installing ADT (5)Installing NVIDIA Debug Manager for Android NDK Eclipse Plugin (8)Installing Cygwin (9)Getting Started (14)Debugging Tegra Pack Samples (14)Debugging Android NDK Samples (14)Debugging your own project built outside of Eclipse (14)Troubleshooting (17)Limitations (17)Reporting Issues (17)SOFTWARE COMPONENTSThe NVIDIA Debug Manager for Android NDK Eclipse plugin expects very specific components to be installed – in order to operate as expected. Please make sure that your Android application development environment is conformant with the following components versions:④Android SDK r09(or r08)④Android NDK r4b, Android NDK r5b④Eclipse Classic 3.6.1 (Helios)④Eclipse C/C++ Development Tools 7.0.1④Android Development Tools (ADT) 9.0.0(or 8.0.1)PRE-INSTALLATION REQUIREMENTSBefore you install the NVIDIA Debug Manager for Android NDK Eclipse plugin, please make sure that the following components and environment variables are properly installed and configured:④Install the Android SDK r09 and the Android NDK r4b or NDK r5b. See/sdk/installing.html and/sdk/ndk/index.html for installation instructions.④Download SDK and NDK from /android/android-sdk_r09-windows.zip and /android/ndk/android-ndk-r5b-windows.zip ( or /android/ndk/android-ndk-r4b-windows.zip )④The NDKROOT environment variable should be set to the location of the AndroidNDK.Software Requirements You should have a Tegra 2 board connected and available to adb. This can be verified by running two commands:adb devices –this command should output at least one available device.adb shell ps –this command should output the list of processes running on the Tegra 2 board.To run adb your PATH environment variable should contain the tools subdirectory from the Android SDK.INSTALLING ECLIPSE SDK1.Download Eclipse Classic 3.6.1 (Helios) from /downloads/2.Unpack the downloaded archive by 7zip or any other compress tool.3.Start Eclipse, for instance by double-clicking eclipse.exe in the “eclipse” directorywhich is unpacked above.4.Select a workspace location.5.Verify the Eclipse version number by opening Help / About Eclipse SDK. Close thedialog.INSTALLING C/C++ DEVELOPMENT TOOLS6.Open Help / Install New Software. This shows the “Install” dialog.7.In the “Work with” dropdown list choose “Helios –/releases/helios” and wait while the list of available software is loaded.8.From the list of available software select “Programming Languages” / “C/C++Development Tools 7.0.1”.9.Press the “Next >” button. Then press the “Next >” button again and then accept thelicense agreement and press the “Finish” button.10.Wait while the software is installed and then agree to restart Eclipse by pressing“Restart Now”.11.Verify that C/C++ Development Tools 7.0.1 is installed by opening Help / AboutEclipse SDK / Installation Details. You should see C/C++ Development Tools 7.0.1 in the list of installed software. Close the “Eclipse SDK Installation Details” dialog and then the “About Eclipse SDK” dialog.INSTALLING ADTADT needs be installed according to /sdk/eclipse-adt.html12.Open Help / Install New Software and press the “Add” button.13.Type in “ADT” into the “Name” field and “https://dl-/android/eclipse/” into “Location” and press “Ok”.Note: if the version 9.0.0 and 8.0.1 are not available on this site, you can download an archive zip at:/android/ADT-9.0.0.zip or/android/ADT-8.0.1.zipP ress “Archive…” and enter the proper path of ADT-x.0.0.zip when “Add Repository”14.Open the “Developer Tools” folder in the available software list and select “AndroidDDMS” and “Android Development Tools”.15.Press Next, then Next again, then read and accept End User License Agreement andpress the “Finish” button.16.Press the “Ok” button on the security warning claiming that you are installingunsigned content. Wait for installation to complete, then agree to restart Eclipse by pressing “Restart Now”.17.After Eclipse restarts open “Window” / “Preferences”, select “Android” on the left.Enter the correct Android SDK location on the right and press “Ok”.18.Verify that ADT 9.0.0 is installed by opening Help / About Eclipse SDK / InstallationDetails. You should see “Android DDMS 9.0.0” , “Android Development Tools9.0.0” and “Android Hierarchy Viewer 9.0.0”in the list of installed software. Closethe “Eclipse SDK Installation Details” dialog and then the “About Eclipse SDK”dialog.INSTALLING NVIDIA DEBUG MANAGER FOR ANDROID NDK ECLIPSE PLUGIN19.Open Help / Install New Software and press the “Add” button.20.Press “Archive” and enter the location of the supplied update site archive (zip file).Then press “Ok”.21.Open the “Developer Tools” folder in the available software list and select “NVIDIADebug Manager for Android NDK”.22.Press Next, then Next again, then read and accept the End User License Agreementand press “Finish”.23.Press “Ok” button on the security warning claiming that you are installing unsignedcontent. Wait for installation to complete, then agree to restart Eclipse by pressing “Restart Now”.INSTALLING CYGWIN24.Install Cygwin and make sure Python 2.6 and Ncurses are selected to be installed.25.Add $CYGWIN_HOME/bin to your PATH environment variable.26.In Eclipse, select the menu item “Window->Preferences”, select “C/C++ -> Debug ->Common Source Lookup Path”, click “Add” and select “Path Mapping”.Under “Compilation path”, type “\cygdrive\c” and under “Local file system path”,select “C:”. This ensures that gdb and Eclipse are on the same p age with regards to source code. If your source code resides on other drives than C:, please add thosedrives too in a similar manner. The installation now is complete.DEBUGGING TEGRA PACK SAMPLESTo debug Tegra sample projects, simply import the project into eclipse, build the project, and then right click the project -> Debug as -> Android NDK application, the debug configuration will be properly created and you can start debugging. DEBUGGING ANDROID NDK SAMPLESTo debug Android NDK sample projects, you need to create Android project from existing source, convert it to C/C++ project (refer “Tegra Android Setup Guide”which can be downloaded from /tegra/downloads for details) and then start debugging.DEBUGGING YOUR OWN PROJECT BUILT OUTSIDE OF ECLIPSEAPK projects built using build systems other than Eclipse (such as those built using command-line ndk-build and Java “ant”) must be imported into Eclipse in order to debug them via NVDM. Generally, the process is analogous to that for setting up a debugging project for the Android NDK samples: importing the Android Java/APK project into Eclipse from existing source and then converting to a C/C++ project.Note that Eclipse C/C++ projects include a C/C++ build command. Since yourcustom-built application does not use Eclipse’s build system, you may need to set the C/C++ build command to be custom (and set it to be blank). Failing to do so willcause Eclipse to run “make” on your project directory, which is likely to fail. Finally, NVDM’s default search paths for native code symbols may not match your application’s custom build tree. This can cause missed breakpoints. In t his case, you may need to set the shared library search path manually after you create the debug configuration, before launching your first debugging session.LIMITATIONSMissing BreakpointsThe current version of the plugin may be missing breakpoint in native code executed before GDB is attached. We recommend that the developer wanting to debug native code that could be executed during this transient period add a while(i) with int i would be initialized to a non-zero value, and changing the i to zero once GDB is attached, in order to resume the debugging session and hit the breakpoint. REPORTING ISSUESIn case of problems working with the NVIDIA Debug Manager for Android NDK plugin the following information might be helpful to provide with a bug report:④Exact versions of Android SDK and Android NDK.④Exact versions of installed Eclipse software (From Eclipse it is easy to obtain thisinformation from “Help” / “About Eclipse SDK” / “Installation Details” /“Configuration”.④Eclipse error log which resides in $workspace_location/.metadata/.log, where$workspace_location is the location of your Eclipse workspace.④Android console output.④General description what the problem is and how to reproduce the problem.and post the issue to the following Tegra Android Development support forum with a subject line referring to the Debug Manager plugin:/tegra/forums/tegra-forums/android-development NoticeALL NVIDIA DESIGN SPECIFICATIONS, REFERENCE BOARDS, FILES, DRAWINGS, DIAGNOSTICS, LISTS, AND OTHER DOCUMENTS (TOGETHER AND SEPARATELY, “MATERIALS”) ARE BEING PROVIDED “AS IS.” NVIDIA MAKES NO WARRANTIES, EXPRESSED, IMPLIED, STATUTORY, OR OTHERWISE WITH RESPECT TO THE MATERIALS, AND EXPRESSLY DISCLAIMS ALL IMPLIED WARRANTIES OF NONINFRINGEMENT, MERCHANTABILITY, AND FITNESS FORA PARTICULAR PURPOSE.Information furnished is believed to be accurate and reliable. However, NVIDIA Corporation assumes no responsibility for the consequences of use of such information or for any infringement of patents or other rights of third parties that may result from its use. No license is granted by implication of otherwise under any patent rights of NVIDIA Corporation. Specifications mentioned in this publication are subject to change without notice. This publication supersedes and replaces all other information previously supplied. NVIDIA Corporation products are not authorized as critical components in life support devices or systems without express written approval of NVIDIA Corporation.TrademarksNVIDIA, the NVIDIA logo, and <add all the other product names listed in this document> are trademarks and/or registered trademarks of NVIDIA Corporation in the U.S. and other countries. Other company and product names may be trademarks of the respective companies with which they are associated.Copyright© 2010 NVIDIA Corporation. All rights reserved.。
android modifyer 原理
android modifyer 原理Android Modifier原理指的是对Android系统进行修改的原理。
Android系统是一个开放的操作系统,它的源代码可供开发者使用和修改。
Android Modifier原理主要包括以下几个方面:1. Android源代码:Android源代码是指Android操作系统的完整代码集合,它包含了系统的核心组件、应用程序框架和各种工具。
开发者可以通过修改源代码来实现不同的功能定制和优化。
2. AOSP(Android Open Source Project):AOSP是Google主导推进的一个开源项目,旨在为开发者提供一个完整的Android源代码库。
通过下载AOSP,开发者可以获取到Android的全部源代码,并进行必要的修改。
3. 编译与构建:修改Android系统需要先进行编译与构建。
在修改之前,需要使用特定的工具链和编译选项将源代码编译成可执行二进制文件。
这一过程需要耗费较长的时间和机器资源。
4. 修改阶段:在编译完成后,就可以进行具体的系统修改工作了。
修改的范围包括但不限于:修改系统功能、添加新的系统应用、替换系统组件等。
开发者可以通过修改源代码、添加新代码、删除无用代码等方式实现想要的功能。
5. 调试与测试:在修改完成后,需要对修改的系统进行调试和测试,确保修改后的系统能够正常运行,并达到预期的功能效果。
在调试和测试时,可以使用Android模拟器或者真实设备。
需要注意的是,进行Android系统修改需要一定的技术和经验,对于不熟悉Android系统开发的开发者来说可能会比较困难。
因此,在进行系统修改之前,建议开发者先学习和了解相关的Android系统开发知识,提前做好相应的准备工作。
如何在华为Mate上安装Gmail等GMS功能

如何在华为Mate上安装Gmail等GMS功能最近刚⼊⼿了⼀台华为Mate。
屏幕很⼤,系统也还好。
但是Mate的默认系统中没有Gmail等各种GMS服务。
对于我这个⽤惯了Google的⼈,这⾃然是⾮常不爽的。
于是花费了⼀天多的时间,尝试了各种⽅法,终于把GMS成功安装到了Mate上。
下⾯总结⼀下我是如何成功在Mate上安装GMS的。
1. 先在电脑上安装豌⾖荚或别的⼿机助⼿。
这样⼿机与电脑连接所需的驱动就会安装好。
2. 开启⼿机“USB调试模式”。
进⼊设置 -> 开发者选项 -> USB调试模式。
3. 获取Root权限。
搜索 ERoot,下载最新版本,运⾏ERoot.exe获取Root权限。
具体操作请参考帖⼦:4. 下载GMS服务包。
请在这⾥下载与你⼿机的Android系统对应的服务包版本:。
Mate的Android版本是4.1.2。
下载完成后,将压缩包解压到⼿机的SD卡⾥。
5. 下载RE管理器。
可以通过豌⾖荚上搜索并安装。
打开RE管理器,并授予Root权限。
6. 在RE管理器中进⼊SD卡⾥GMS服务包加压出来的⽂件夹,复制System⽬录下的所有内容。
7. 在RE管理器中进⼊Android系统的 /system ⽬录,并设置该⽬录为读写权限。
粘贴之前复制的内容。
过程中系统回提⽰存在同名⽂件夹,选择合并即可。
8. 复制完成后,长按电源键重启⼿机。
重启之后运⾏Google Play,设置好你的Google帐户,这样GMS的各项功能都可以使⽤了。
联系⼈,⽇历,Gmail等也都可以同步了。
apk安装失败的25中原因
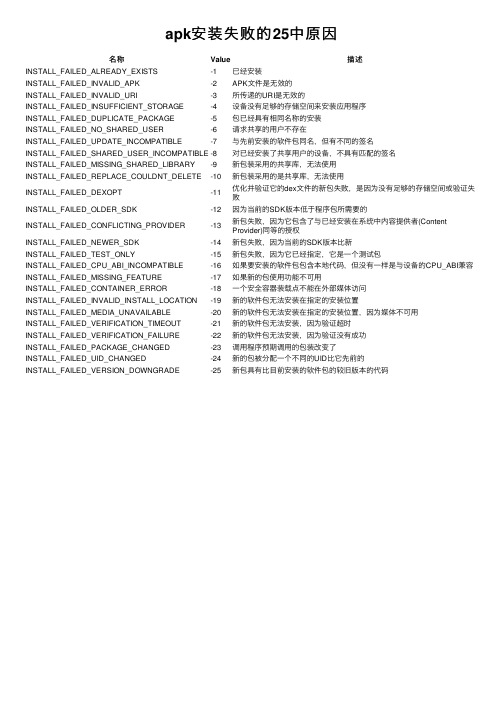
apk安装失败的25中原因名称Value描述INSTALL_FAILED_ALREADY_EXISTS-1已经安装INSTALL_FAILED_INVALID_APK-2APK⽂件是⽆效的INSTALL_FAILED_INVALID_URI-3所传递的URI是⽆效的INSTALL_FAILED_INSUFFICIENT_STORAGE-4设备没有⾜够的存储空间来安装应⽤程序INSTALL_FAILED_DUPLICATE_PACKAGE-5包已经具有相同名称的安装INSTALL_FAILED_NO_SHARED_USER-6请求共享的⽤户不存在INSTALL_FAILED_UPDATE_INCOMPATIBLE-7与先前安装的软件包同名,但有不同的签名INSTALL_FAILED_SHARED_USER_INCOMPATIBLE-8对已经安装了共享⽤户的设备,不具有匹配的签名INSTALL_FAILED_MISSING_SHARED_LIBRARY-9新包装采⽤的共享库,⽆法使⽤INSTALL_FAILED_REPLACE_COULDNT_DELETE-10新包装采⽤的是共享库,⽆法使⽤INSTALL_FAILED_DEXOPT-11优化并验证它的dex⽂件的新包失败,是因为没有⾜够的存储空间或验证失败INSTALL_FAILED_OLDER_SDK-12因为当前的SDK版本低于程序包所需要的INSTALL_FAILED_CONFLICTING_PROVIDER-13新包失败,因为它包含了与已经安装在系统中内容提供者(ContentProvider)同等的授权INSTALL_FAILED_NEWER_SDK-14新包失败,因为当前的SDK版本⽐新INSTALL_FAILED_TEST_ONLY-15新包失败,因为它已经指定,它是⼀个测试包INSTALL_FAILED_CPU_ABI_INCOMPATIBLE-16如果要安装的软件包包含本地代码,但没有⼀样是与设备的CPU_ABI兼容INSTALL_FAILED_MISSING_FEATURE-17如果新的包使⽤功能不可⽤INSTALL_FAILED_CONTAINER_ERROR-18⼀个安全容器装载点不能在外部媒体访问INSTALL_FAILED_INVALID_INSTALL_LOCATION-19新的软件包⽆法安装在指定的安装位置INSTALL_FAILED_MEDIA_UNAVAILABLE-20新的软件包⽆法安装在指定的安装位置,因为媒体不可⽤INSTALL_FAILED_VERIFICATION_TIMEOUT-21新的软件包⽆法安装,因为验证超时INSTALL_FAILED_VERIFICATION_FAILURE-22新的软件包⽆法安装,因为验证没有成功INSTALL_FAILED_PACKAGE_CHANGED-23调⽤程序预期调⽤的包装改变了INSTALL_FAILED_UID_CHANGED-24新的包被分配⼀个不同的UID⽐它先前的INSTALL_FAILED_VERSION_DOWNGRADE-25新包具有⽐⽬前安装的软件包的较旧版本的代码。
- 1、下载文档前请自行甄别文档内容的完整性,平台不提供额外的编辑、内容补充、找答案等附加服务。
- 2、"仅部分预览"的文档,不可在线预览部分如存在完整性等问题,可反馈申请退款(可完整预览的文档不适用该条件!)。
- 3、如文档侵犯您的权益,请联系客服反馈,我们会尽快为您处理(人工客服工作时间:9:00-18:30)。
Tegra 2 board.
为了运行 ADB,你的环境变量的路径应该包含这些工具的子目录。
sio n 8.0. 1 NVIDIA Debug Manager for Android NDK - v er ersio sion
DA -0562 8001_ v02 | 2 DA056288-001_ 001_v
13.
sio n 8.0. 1 NVIDIA Debug Manager for Android NDK - v er ersio sion
DA -0562 8001_ v02 | 3 DA056288-001_ 001_v
Install ation
14. 15.
点击Next,接着再次Next,同意最终用户协议,点击“Finish”按钮。 点击你正在安装未签名地内容的安全警告上的“OK”按钮。等待安装完成,同意重 启Eclipse。 在Eclipse重启之后,打开“Window” / “Preferences”,选择左边地 “Android ”。在右边键入正确地Android SDK位置,点击“OK”。
NVIDIA DEBUG MANAGER FOR ANDROID NDK - VERSION 8.0.1
DA-05628-001_v02 | January 2011
ati on Guide Install lla tio
文档修改史
Document Number
V er s ion 01 02
D ate 01/19/2011
16.
17.
通过打开 帮助 / 关于Eclipse SDK / 安装细节 验证ADT8.0.1安装好了。你应该在已安 装地软件列表中看到“Android DDMS 8.0.1”,“Android Development Tools 8.0.1”和“Android Hierarchy Viewer 8.0.1”。关闭“Eclipse SDK安装细节”对话 框和随后的“About Eclipse SDK”对话框。
Note: 如果网站上的8.0.1版本不可用,你可以下载一个zip 文件,在:
/android/ADT-8.0.1.zip
点击 “Archive…”,当“Add Repository ”时,键入合适地 ADT-8.0.1.zip 路径
打开软件列表中的“Developer Tools”文件夹,选择“Android DDMS”和 “Android Development Tools”。
sio n 8.0. 1 NVIDIA Debug Manager for Android NDK - v er ersio sion
DA -0562 8001_ v02 | 1 DA056288-001_ 001_v
Software Requirements
� 你应该有连接好地Tegra2 开发板和可使用地ADB。可通过运行下面两个命令来验证:
Software Co m p one n ts ........................................................................................ 1 Pr e-Installation Requirements .............................................................................. 1
sio n 8.0. 1 NVIDIA Debug Manager for Android NDK - v er ersio sion
DA - 0562 8001_ v02 | iii DA056288-001_ 001_v
软件要求
软件组成
NVIDIA调试管理器作为Android NDK Eclipse插件中的一个非常特别地组件期望被安 装—为了如预期地操作。请确保你的Android应用程序开发环境中下列组件的版本是一致 地:
tal l ati on ............................... ................................ ....................... .1 Ins nst all ................................ ................................ .......................
安装
安装 ECLIPSE SDK
1. 2. 3. 4. 5.
从/downloads/下载Eclipse Classic 3.6.1 (Helios) 解压下载的文件。 启动 Eclipse,例如双击上面解压的“eclipse”目录中的eclipse.exe。 选择工作空间的位置。 通过打开 帮助 / 关于 Eclipse SDK 验证Eclipse的版本号。关闭这个对话框。
rs A utho uthor Sebastien
cr ipt ion of Change D es esc Initial release Updated ADT for 8.0.1
sio n 8.0. 1 NVIDIA Debug Manager for Android NDK - v er ersio sion
DA - 0562 8001_ v02 | ii DA056288-001_ 001_v
TABLE OF CO NTEN TS
. ............................... ....... .1 ................................ ................................ ....... twa re Req uirem ents ............................... Sof Soft war
lesh ooti n g ............................... ................................ . ............... . 11 Troub roubl otin ................................ ................................ ................
� Android SDK r08 � Android NDK r4b, Android NDK r5 � Eclipse Classic 3.6.1 (Helios) � Eclipse C/C++ Development Tools 7.0.1 � Android Development Tools (ADT) 8.0.1
Limitations ....................................................................................................11 Reporting Issues .............................................................................................11
安装 C/C++ 开发工具集
6. 7.
打开 帮助 / 安装新软件。会显示“安装”对话框。 在“work with”下拉列表中选择“Helios – /releases/helios”,等待软件列表载入完成。 从软件列表中选择“Programming Languages ” / “C/C++ Development Tools 7.0.1”。
DA -0562 8001_ v02 | 2 DA056288-001_ 001_v
Install ation
安装 ADT 8.0.1
ADT 需要按照 http://develo /sdk/eclipse-adt.html d” 按钮。 在“Name”里键入“ADT”,“Location”里键入“https:///android/eclipse/”,点击“OK”。
Installing Installing Installing Installing Installing Eclipse SDK ........................................................................................ C/C++ Development T oo ls ...................................................................... ADT 8.0.1 ......................................................................................... . NVIDIA Debug Manager for Android NDK Eclipse Plugin ................................... cy g win .............................................................................................. 1 1 3 5 6
� 从 /android/android-sdk_r08- windows.zip 和
/android/ndk/android-ndk-r5-windows.zip ( 或 /android/ndk/android-ndk-r4b-windows.zip ) 下载 SDK 和 NDK � NDKROOT的环境变量应该设置成Android NDK的目录。
