xcatMN的配置
NVIM配置打造

NVIM 配置打造NVIM 配置NVIM安装NVIM 配置init.vimvimrc.vim# 安装 NVIMbrew install nvimbrew install ranger# 需要有 python3 ⽀持brew install python3brew install node# 对 nvim 添加 python ⽀持pip3 install neovim pynvim# 输⼊ nvim 检测:checkhealthmkdir -p ~/.config/nvimnvim ~/.config/nvim/init.vim" 配置⽂件导⼊ "{{{" ---------------------------------------------------------------------" 基础使⽤习惯配置runtime ./vimrc.vim" 插件管理"./lua/plugins.lualua require('plugins')" 按键映射runtime ./maps.vimnvim ~/.config/nvim/vimrc.vim"----vim 个⼈使⽤习惯配置start------set encoding=UTF-8" leader 设置成空格let mapleader=" "" 使⽤⿏标set mouse=c" 显⽰⾏号set nu" 相对⾏号set relativenumber" tab=4个空格set tabstop=4set shiftwidth=4" 改变 vim 中光标的形状let g:db_ui_use_nerd_fonts=1let &t_SI.="\e[5 q" "SI = INSERT modelet &t_SR.="\e[4 q" "SR = REPLACE modelet &t_EI.="\e[1 q" "EI = NORMAL mode (ELSE)" ⾼度光标所在⾏"set cursorline" 设置不换⾏"set nowrapset wrap" 显⽰按下的按键set showcmd" 按tab 显⽰菜单set wildmenu" 不需要备份⽂件set nobackup"----vim 个⼈使⽤习惯配置end------"ssh 远程粘贴板if executable('clipboard-provider')let g:clipboard = {\ 'name': 'myClipboard',\ 'copy': {\ '+': 'clipboard-provider copy',\ '*': 'env COPY_PROVIDERS=tmux clipboard-provider copy',\ },\ 'paste': {\ '+': 'clipboard-provider paste',\ '*': 'env COPY_PROVIDERS=tmux clipboard-provider paste',\ },\ }endif"随机选⼀个颜⾊风格function RandomColorScheme()let mycolors = split(globpath(&rtp,"**/colors/*.vim"),"\n")exe 'so ' . mycolors[localtime() % len(mycolors)]unlet mycolorsendfunction"call RandomColorScheme():command NewColor call RandomColorScheme()" ⽂件类型设置 "{{{" ---------------------------------------------------------------------" JSX 语法⾼亮" set filetypes as typescriptreactautocmd BufNewFile,BufRead *.tsx,*.jsx,*.js set filetype=typescriptreact" 添加头部⽂件function HeaderPython()call setline(1, "#!/usr/bin/env python")call append(1, "# -*- coding: utf-8 -*-")call append(2, "# SR @ " . strftime('%Y-%m-%d %T', localtime()))normal Gnormal onormal oendfautocmd bufnewfile *.py call HeaderPython()maps.vimnvim ~/.config/nvim/maps.vim"-------------------------------------------------------------------------------" window"-------------------------------------------------------------------------------" Split windownmap ss :split<Return><C-w>wnmap sv :vsplit<Return><C-w>w" Move window"nmap <Space> <C-w>w"map s<left> <C-w>h"map s<up> <C-w>k"map s<down> <C-w>j"map s<right> <C-w>lmap sh <C-w>hmap sk <C-w>kmap sj <C-w>jmap sl <C-w>l" Resize window" 在mac/linux中使⽤Alt键,在webssh" 中alt没⽤,就使⽤Ctrl,WEBSSH主要的WINDOWS中使⽤nmap <M-left> <C-w><nmap <C-left> <C-w><nmap s<left> <C-w><nmap <M-right> <C-w>>nmap <C-right> <C-w>>nmap s<right> <C-w>>nmap <M-up> <C-w>+nmap <C-up> <C-w>+nmap s<up> <C-w>+nmap <M-down> <C-w>-nmap <C-down> <C-w>-nmap s<down> <C-w>-" 插⼊模式移动光标inoremap <C-h> <Left>inoremap <C-j> <Down>inoremap <C-k> <Up>inoremap <C-l> <Right>inoremap <C-d> <Delete>" hh在我⽤的单词⾥出现的频率极低,其实感觉home⽤的没有end多,统⼀风格都⽤⼤写的吧"inoremap HH <Home>" 单词中包含ll的太多了,所以⽤⼤写LL"inoremap LL <End>" jk <Esc>inoremap jk <Esc>" 插⼊模式⿏标滚轮抵消,不然会出现滚动⿏标录⼊了⼀堆5j5kinoremap 5k <Esc>inoremap 5j <Esc>inoremap 9<CR> <Esc>a" 快速跳转⾏⾸与⾏尾nnoremap L $nnoremap H ^" 向下5⾏noremap <C-j> 5j" 向上5⾏noremap <C-k> 5k" 保存noremap <C-s> :w<CR>noremap s :w<CR>" Coc智能处理,使⽤IDEA Alt+Enter 同样按键"noremap <M-Enter> :CocAction<CR>inoremap <C-s> <ESC> :w<CR>" 代码格式化noremap <leader>f :Format<CR>noremap <leader>r :luafile ~/.wp/lua/run.lua<CR>" 强制退出map Q :q<CR>"map qq :q<CR>" 重新加载设置map R :source $MYVIMRC<CR>"⾃动关闭标签inoremap <buffer> <C-v> <esc>yiwi<lt><esc>ea></><esc>hpF>iset iskeyword+=<,>iab <h1> <lt>h1> <lt>/h1><esc>5ha" 全选nmap <C-a> gg<S-v>G" 加/减数字1nnoremap + <C-a>nnoremap - <C-x>"-------------------------------------------------------------------------------" Buffers"-------------------------------------------------------------------------------" Open current directory" 插⼊模式移动光标inoremap <C-h> <Left>inoremap <C-j> <Down>inoremap <C-k> <Up>inoremap <C-l> <Right>inoremap <C-d> <Delete>" hh在我⽤的单词⾥出现的频率极低,其实感觉home⽤的没有end多,统⼀风格都⽤⼤写的吧"inoremap HH <Home>" 单词中包含ll的太多了,所以⽤⼤写LL"inoremap LL <End>" jk <Esc>inoremap jk <Esc>" 插⼊模式⿏标滚轮抵消,不然会出现滚动⿏标录⼊了⼀堆5j5kinoremap 5k <Esc>inoremap 5j <Esc>inoremap 9<CR> <Esc>a" 快速跳转⾏⾸与⾏尾nnoremap L $nnoremap H ^" 向下5⾏noremap <C-j> 5j" 向上5⾏noremap <C-k> 5k" 保存noremap <C-s> :w<CR>" Coc智能处理,使⽤IDEA Alt+Enter 同样按键noremap <M-Enter> :CocAction<CR>inoremap <C-s> <ESC> :w<CR>" 代码格式化"noremap <leader>f :Format<CR>" 强制退出map Q :q<CR>" 重新加载设置map R :source $MYVIMRC<CR>"⾃动关闭标签inoremap <buffer> <C-v> <esc>yiwi<lt><esc>ea></><esc>hpF>iset iskeyword+=<,>iab <h1> <lt>h1> <lt>/h1><esc>5ha" 全选nmap <C-a> gg<S-v>G" 加/减数字1nnoremap + <C-a>nnoremap - <C-x>"-------------------------------------------------------------------------------" Buffers"-------------------------------------------------------------------------------" Open current directory"nmap te :tabedit"nmap <S-Tab> :tabprev<Return>nmap <S-Tab> :bprev<Return>"nmap <Tab> :tabnext<Return>nmap <Tab> :bnext<Return>" 窗⼝管理器" invoke with '-'nmap - <Plug>(choosewin)"nmap sw <Plug>(choosewin)"nmap <leader>w <Plug>(choosewin)PS:⼀些插件的快捷键在末尾当所有插件都配置完毕的时候将快捷键加⼊该⽂件中packer 插件管理器mkdir -p ~/.config/nvim/luanvim ~/.config/nvim/plugins.lua---@diagnostic disable: undefined-global--在没有安装packer的电脑上,⾃动安装packer插件local fn = vim.fnlocal install_path = fn.stdpath('data')..'/site/pack/packer/start/packer.nvim'if fn.empty(fn.glob(install_path)) > 0 then--fn.system({'git', 'clone', '--depth', '1', 'https:///wbthomason/packer.nvim', install_path}) --默认地址fn.system({'git', 'clone', '--depth', '1', 'https:///mirrors/wbthomason/packer.nvim.git', install_path}) --csdn加速镜像 vim.cmd 'packadd packer.nvim'end-- Only required if you have packer configured as `opt`vim.cmd [[packadd packer.nvim]]return require('packer').startup({function()use 'wbthomason/packer.nvim'-- Packer can manage itselfend,config = {max_jobs = 16,git = {default_url_format = "https:///%s"},display = {open_fn = function()return require('packer.util').float({ border = 'single' })end}}})# 插件安装⽅式PackerInstall插件配置字体配置# 终端安装该字体并且选择该字体防⽌乱码brew tap homebrew/cask-fontsbrew install font-hack-nerd-font --casklualine标签栏美化安装配置bufferline 状态栏安装配置nvim ~/.config/nvim/lua/plugins.lua--状态栏插件use {"nvim-lualine/lualine.nvim",requires = {"kyazdani42/nvim-web-devicons", opt = true}}nvim ~/.config/nvim/after/plugin/lualine.lualocal status, lualine = pcall(require, "lualine")if (not status) thenreturnendlualine.setup {options = {icons_enabled = true,theme = "auto",component_separators = {left = " ", right = " "},section_separators = {left = " ", right = " "},disabled_filetypes = {},always_divide_middle = true},sections = {lualine_a = {"mode"},lualine_b = {"branch","diff"--{"diagnostics", sources = {"nvim_lsp"}}},lualine_c = {"filename"},lualine_x = {{"diagnostics", sources = {"nvim_lsp"}, symbols = {error = " ", warn = " ", info = " ", hint = " "}},"encoding","fileformat","filetype"},lualine_y = {"progress"},lualine_z = {"location"}},inactive_sections = {lualine_a = {},lualine_b = {},lualine_c = {"filename"},lualine_x = {"location"},lualine_y = {},lualine_z = {}},tabline = {},extensions = {}}-- bufferline 显⽰标签页,与lualine 配合使⽤use "akinsho/bufferline.nvim"nvim ~/.config/nvim/after/plugin/bufferline.lualocal status, bufferline = pcall(require, "bufferline")if (not status) thenreturnendvim.opt.termguicolors = truebufferline.setup {options = {--numbers = "ordinal" | "buffer_id" | "both" | function({ ordinal, id, lower, raise }): string,--numbers = "both",--- @deprecated, please specify numbers as a function to customize the styling--number_style = "superscript" | "subscript" | "" | { "none", "subscript" }, -- buffer_id at index 1, ordinal at index 2 --number_style = "none",close_command = "bdelete! %d", -- can be a string | function, see "Mouse actions"right_mouse_command = "bdelete! %d", -- can be a string | function, see "Mouse actions"left_mouse_command = "buffer %d", -- can be a string | function, see "Mouse actions"middle_mouse_command = nil, -- can be a string | function, see "Mouse actions"-- NOTE: this plugin is designed with this icon in mind,-- and so changing this is NOT recommended, this is intended-- as an escape hatch for people who cannot bear it for whatever reasonindicator_icon = "",buffer_close_icon = " ",modified_icon = "●",close_icon = " ",dashboard 开屏插件安装配置left_trunc_marker = " ",right_trunc_marker = " ",--- name_formatter can be used to change the buffer's label in the bufferline.--- Please note some names can/will break the--- bufferline so use this at your discretion knowing that it has--- some limitations that will *NOT* be fixed.name_formatter = function(buf) -- buf contains a "name", "path" and "bufnr"-- remove extension from markdown files for exampleif :match("%.md") thenreturn vim.fn.fnamemodify(, ":t:r")endend,max_name_length = 15,max_prefix_length = 12, -- prefix used when a buffer is de-duplicatedtab_size = 15,--diagnostics = false | "nvim_lsp" | "coc",diagnostics = "nvim_lsp",diagnostics_update_in_insert = false,--[[diagnostics_indicator = function(count, level, diagnostics_dict, context)return "(" .. count .. ")"end,]]-- rest of config ...--- count is an integer representing total count of errors--- level is a string "error" | "warning"--- diagnostics_dict is a dictionary from error level ("error", "warning" or "info")to number of errors for each level. --- this should return a string--- Don't get too fancy as this function will be executed a lotdiagnostics_indicator = function(count, level, diagnostics_dict, context)local icon = level:match("error") and " " or " "return " " .. icon .. countend,-- NOTE: this will be called a lot so don't do any heavy processing herecustom_filter = function(buf_number)--如果是defx 则隐藏local finded, _ = string.find(vim.bo[buf_number].filetype, "defx")if finded ~= nil thenreturn falseendreturn trueend,--offsets = {{filetype = "NvimTree", text = "File Explorer" | function , text_align = "left" | "center" | "right"}}, --show_buffer_icons = true | false, -- disable filetype icons for buffersshow_buffer_icons = true, -- disable filetype icons for buffers--show_buffer_close_icons = true | false,show_buffer_close_icons = false,--show_close_icon = true | false,show_close_icon = false,--show_tab_indicators = true | false,show_tab_indicators = true,persist_buffer_sort = true, -- whether or not custom sorted buffers should persist-- can also be a table containing 2 custom separators-- [focused and unfocused]. eg: { '|', '|' }--separator_style = "slant" | "thick" | "thin" | {"any", "any"},separator_style = "thin",--enforce_regular_tabs = false | true,enforce_regular_tabs = false,--always_show_bufferline = true | false,always_show_bufferline = true--[[sort_by = "id" | "extension" | "relative_directory" | "directory" | "tabs" | function(buffer_a, buffer_b)-- add custom logicreturn buffer_a.modified > buffer_b.modifiedend]]}}--按键映射--nnoremap <silent> gb :BufferLinePick<CR>vim.api.nvim_set_keymap("n", "gb", "<Cmd>BufferLinePick<CR>", {noremap = true, silent = true})vim.api.nvim_set_keymap("n", "<leader>1", "<Cmd>BufferLineGoToBuffer 1<CR>", {noremap = true, silent = true})vim.api.nvim_set_keymap("n", "<leader>2", "<Cmd>BufferLineGoToBuffer 2<CR>", {noremap = true, silent = true})vim.api.nvim_set_keymap("n", "<leader>3", "<Cmd>BufferLineGoToBuffer 3<CR>", {noremap = true, silent = true})vim.api.nvim_set_keymap("n", "<leader>4", "<Cmd>BufferLineGoToBuffer 4<CR>", {noremap = true, silent = true})vim.api.nvim_set_keymap("n", "<leader>5", "<Cmd>BufferLineGoToBuffer 5<CR>", {noremap = true, silent = true})vim.api.nvim_set_keymap("n", "<leader>6", "<Cmd>BufferLineGoToBuffer 6<CR>", {noremap = true, silent = true})vim.api.nvim_set_keymap("n", "<leader>7", "<Cmd>BufferLineGoToBuffer 7<CR>", {noremap = true, silent = true})vim.api.nvim_set_keymap("n", "<leader>8", "<Cmd>BufferLineGoToBuffer 8<CR>", {noremap = true, silent = true})vim.api.nvim_set_keymap("n", "<leader>9", "<Cmd>BufferLineGoToBuffer 9<CR>", {noremap = true, silent = true}) use {"glepnir/dashboard-nvim"}nvim ~/.config/nvim/after/plugin/dashboard.lualocal vim = vimvim.g.dashboard_custom_header = {""," ⠀⠀⠀⠀⠀⠀⠀⠀⠀⡴⠞⠉⢉⣭⣿⣿⠿⣳⣤⠴⠖⠛⣛⣿⣿⡷⠖⣶⣤⡀⠀⠀⠀ "," ⠀⠀⠀⠀⠀⠀⠀⣼⠁⢀⣶⢻⡟⠿⠋⣴⠿⢻⣧⡴⠟⠋⠿⠛⠠⠾⢛⣵⣿⠀⠀⠀⠀ "," ⣼⣿⡿⢶⣄⠀⢀⡇⢀⡿⠁⠈⠀⠀⣀⣉⣀⠘⣿⠀⠀⣀⣀⠀⠀⠀⠛⡹⠋⠀⠀⠀⠀ "," ⣭⣤⡈⢑⣼⣻⣿⣧⡌⠁⠀⢀⣴⠟⠋⠉⠉⠛⣿⣴⠟⠋⠙⠻⣦⡰⣞⠁⢀⣤⣦⣤⠀ "," ⠀⠀⣰⢫⣾⠋⣽⠟⠑⠛⢠⡟⠁⠀⠀⠀⠀⠀⠈⢻⡄⠀⠀⠀⠘⣷⡈⠻⣍⠤⢤⣌⣀ "," ⢀⡞⣡⡌⠁⠀⠀⠀⠀⢀⣿⠁⠀⠀⠀⠀⠀⠀⠀⠀⢿⡀⠀⠀⠀⠸⣇⠀⢾⣷⢤⣬⣉ "," ⡞⣼⣿⣤⣄⠀⠀⠀⠀⢸⡇⠀⠀⠀⠀⠀⠀⠀⠀⠀⢸⡇⠀⠀⠀⠀⣿⠀⠸⣿⣇⠈⠻ "," ⢰⣿⡿⢹⠃⠀⣠⠤⠶⣼⡇⠀⠀⠀⠀⠀⠀⠀⠀⠀⢸⡇⠀⠀⠀⠀⣿⠀⠀⣿⠛⡄⠀ "," ⠈⠉⠁⠀⠀⠀⡟⡀⠀⠈⡗⠲⠶⠦⢤⣤⣤⣄⣀⣀⣸⣧⣤⣤⠤⠤⣿⣀⡀⠉⣼⡇⠀ "," ⣿⣴⣴⡆⠀⠀⠻⣄⠀⠀⠡⠀⠀⠀⠈⠛⠋⠀⠀⠀⡈⠀⠻⠟⠀⢀⠋⠉⠙⢷⡿⡇⠀ ",defx ⽂件插件安装" ⣻⡿⠏⠁⠀⠀⢠⡟⠀⠀⠀⠣⡀⠀⠀⠀⠀⠀⢀⣄⠀⠀⠀⠀⢀⠈⠀⢀⣀⡾⣴⠃⠀ "," ⢿⠛⠀⠀⠀⠀⢸⠁⠀⠀⠀⠀⠈⠢⠄⣀⠠⠼⣁⠀⡱⠤⠤⠐⠁⠀⠀⣸⠋⢻⡟⠀⠀ "," ⠈⢧⣀⣤⣶⡄⠘⣆⠀⠀⠀⠀⠀⠀⠀⢀⣤⠖⠛⠻⣄⠀⠀⠀⢀⣠⡾⠋⢀⡞⠀⠀⠀ "," ⠀⠀⠻⣿⣿⡇⠀⠈⠓⢦⣤⣤⣤⡤⠞⠉⠀⠀⠀⠀⠈⠛⠒⠚⢩⡅⣠⡴⠋⠀⠀⠀⠀ "," ⠀⠀⠀⠈⠻⢧⣀⠀⠀⠀⠀⠀⠀⠀⠀⠀⠀⠀⠀⠀⠀⠀⠀⠐⣻⠿⠋⠀⠀⠀⠀⠀⠀ "," ⠀⠀⠀⠀⠀⠀⠉⠓⠶⣤⣄⣀⡀⠀⠀⠀⠀⠀⢀⣀⣠⡴⠖⠋⠁⠀⠀⠀⠀⠀⠀⠀⠀ "," ","",}vim.g.dashboard_custom_section = {a = {description = { " 新 ⽂ 件 SPC fo" },command = "DashboardNewFile",},b = {description = { " 查找⽂件 SPC ff" },-- command = "Telescope fd",command = "Telescope fd find_command=fd,--hidden",},c = {description = { " 已⽤⽂件 SPC fh" },command = "Telescope oldfiles",},d = {description = { " 跳转标记 SPC fm" },command = "Telescope marks",},e = {description = { " 查看内容 SPC fw" },command = "Telescope live_grep",},f = {description = { " 查看主题 SPC tc" },command = "Telescope colorscheme",},g = {description = { " ∂ 查看命令 SPC fc" },command = "Telescope commands",},h = {description = { " 查看帮助 SPC fa" },command = "Telescope man_pages",},}vim.g.dashboard_disable_at_vimenter = 0vim.g.dashboard_footer_icon = " "vim.g.dashboard_preview_command = "bat"-- vim.g.dashboard_preview_pipeline = "lolcat -F 0.3"vim.g.dashboard_session_directory = "~/.config/nvim/.sessions"vim.g.dashboard_preview_file_height = 12vim.g.dashboard_preview_file_width = 80vim.g.dashboard_default_executive = "Telescope"# 安装-- ⽂件管理插件,类似与ranger 。
Linux-ubuntu中.vimrc配置

" 在处理未保存或只读文件的时候,弹出确认 set confirm " 带有如下符号的单词不要被换行分割set iskeyword+=_,$,@,%,#,-"Tlist 和 wm的设置"命令模式输入wm打开Tlist和WMset showcmd"Taglist插件的设置let g:Tlist_Use_Right_Window=1let g:Tlist_Show_One_File=1let g:Tlist_Compact_Format=1let Tlist_Exit_OnlyWindow=1let g:winManagerWindowLayout='FileExplorer|TagList'"Tree explorer的设置let g:treeExplVertical=1let g:treeExplWinSize=30"gvim打开以后最大化"au GUIEnter * simalt ~x"光标在窗口上下边界时距离边界7行即开始滚屏set so=7"配色" Avoid clearing hilight definition in pluginsif !exists("g:vimrc_loaded")" color schemeif has("gui_running")set guioptions-=T "隐藏工具栏set guioptions-=mset guioptions-=Lset guioptions-=rcolor blackboard"colorscheme professional"set guifont=YaHeiConsolasHybrid\ 13set guifont=Monaco\ 13"中文字体set guifontset=Microsoft\ YaHei\ 13"对于html,xml文件,通过ctrl+_来closetagif has("autocmd")autocmd FileTypetext,xml,html,perl,shell,bash,python,vim,php,ruby color blackboardautocmd FileType xml,html vmap <C-o> <ESC>'<i<!--<ESC>o<ESC>'>o-->autocmd FileType java,c,cpp,cs color desertExautocmd FileType html,text,php,vim,c,java,xml,bash,shell,perl,python setlocal textwidth=100autocmd Filetype html,xml,xsl source ~/.vim/plugin/closetag.vim endif " has("autocmd")elsecolor desert"colorscheme zellner"对于html,xml文件,通过ctrl+_来closetagif has("autocmd")autocmd FileType xml,html vmap <C-o> <ESC>'<i<!--<ESC>o<ESC>'>o-->autocmd FileType html,text,php,vim,c,java,xml,bash,shell,perl,python setlocal textwidth=100autocmd Filetype html,xml,xsl source ~/.vim/plugin/closetag.vim endif " has("autocmd")endif " hasendif " exists(...)"这个是依赖终端的"set background=dark"显示行号set number"语法高亮度显示syntax on"检测文件的类型开启codesnipfiletype onfiletype plugin onfiletype indent onset completeopt=longest,menuset runtimepath+=~/.vim/textmateOnlyset runtimepath+=/home/hunch/.vim/afterso ~/.vim/plugin/supertab.vimlet g:SuperTabDefaultCompletionType="<C-X><C-O>""鼠标支持if has('mouse')set mouse=aendif"缩进相关" 继承前一行的缩进方式,特别适用于多行注释"set autoindent" 为C程序提供自动缩进"set smartindent" 使用C样式的缩进set cindentfunction! GnuIndent()setlocal cinoptions=>4,n-2,{2,^-2,:2,=2,g0,h2,p5,t0,+2,(0,u0,w1,m1 setlocal shiftwidth=2setlocal tabstop=8endfunctionau FileType c,cpp setlocal cinoptions=:0,g0,(0,w1 shiftwidth=4 tabstop=4 softtabstop=4au FileType diff setlocal shiftwidth=4 tabstop=4au FileType html setlocal autoindent indentexpr=au FileType changelog setlocal textwidth=76" Recognize standard C++ headersau BufEnter /usr/include/c++/* setf cppau BufEnter /usr/include/g++-3/* setf cpp" Setting for files following the GNU coding standardau BufEnter /usr/* call GnuIndent()function! RemoveTrailingSpace()if $VIM_HATE_SPACE_ERRORS != '0' &&\(&filetype == 'c' || &filetype == 'cpp' || &filetype == 'vim') normal m`silent! :%s/\s\+$//enormal ``endifendfunction" Remove trailing spaces for C/C++ and Vim filesau BufWritePre * call RemoveTrailingSpace()if &term=="xterm"set t_Co=8set t_Sb=^[[4%dmset t_Sf=^[[3%dmendif"set shiftwidth=2"set tabstop=4"set softtabstop=4"set expandtab" ambiwidth 默认值为 single。
EMC CX扩容(加硬盘)操作配置步骤
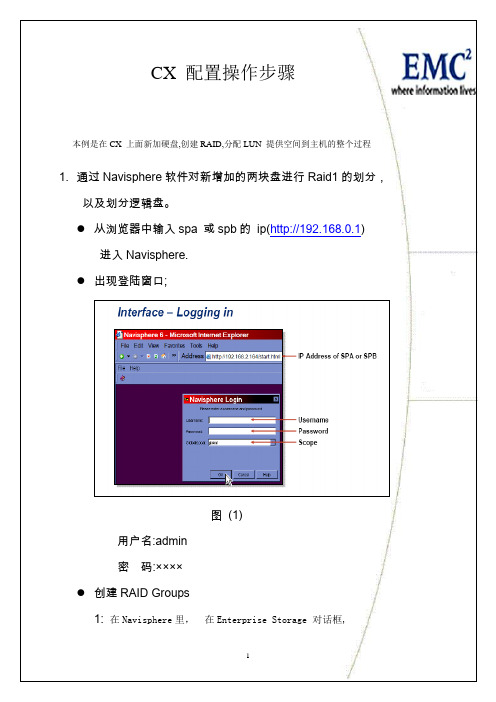
本例是在 CX 上面新加硬盘,创建 RAID,分配 LUN 提供空间到主机的整个过程
1. 通过 Navisphere 软件对新增加的两块盘进行 Raid1 的划分, 以及划分逻辑盘。 从浏览器中输入 spa 或 spb 的 ip(http://192.168.0.1) 进入 Navisphere. 出现登陆窗口;
这里的设备被分成了两组,实际上就是通过两个控制器看到的设备,其 中一组的状态为[active],表示这是当前的活动控制器。 修改文件/etc/lvm/lvm.conf 将 types = { “fd”,16} 改成 types = {“device-mapper”, 1} 保存后退出。 2) 在 EMC CX 存储上创建 FIMS 需要的分区 #pvcreate /dev/dm-0 ( 创建物理卷)
8
3. 上面的操作也可以通过 IE 管理界面来操作: 在 IE 中输入 switch ip 出现如下界面:
输入登录用户名和密码
在 zone--->create-->ports &Devices 迭中 1.1;1.3;1.6; 增加到 xone members 中
9
在 config--->create swB_FMSzone1 再增加到 config members 中
6
DS_16B3_A:admin> switchshow switchName: DS_16B3_A switchType: 26.2 switchState: Online switchMode: Native switchRole: Principal switchDomain: 1 switchId: fffc01 switchWwn: 10:00:00:05:1e:34:40:8e zoning: ON (spa0spb1hba1) switchBeacon: OFF Port Media Speed State ……………………………………………………………………………………………………… 0 id N2 Online F-Port 10:00:00:00:c9:45:5c:b0 1 id N2 Online F-Port 50:06:01:60:30:21:06:6f 2 id N2 Online F-Port 10:00:00:00:c9:42:81:5a 3 id N2 Online F-Port 50:06:01:69:30:21:06:6f 4 id N2 Online F-Port 21:00:00:e0:8b:1b:eb:c1 5 id N2 Online L-Port 1 public 6 id N2 Online F-Port 10:00:00:00:c9:51:00:69 7 id N2 Online F-Port 10:00:00:00:c9:51:8e:42 8 id N2 No_Light 9 id N2 No_Light
XCAT的安装

1:xcat安装的前提条件LINUX要完全安装,至少要有两块网卡,一块进行管理,一块进行计算应用XCAT有包含四个安装包xcat-dist-core-1.2.0-RC3.tgzxcat-dist-doc-1.2.0-RC3.tgzxcat-dist-ibm-1.2.0-RC3.tgzxcat-dist-oss-1.2.0-RC3.tgz(参考文件:xcat-HOWTO.html,xcat-mini-HOWTO.html,在上有)2:cd /opt tar xcat 的四个软件包tar -xvf /tmp/xcat-dis-core-1.2.0.tar.gz3:setup xcatexport xcatroot=/opt/xcatcd $xcatroot/sbin./setupxcat4:logout and begin is as root5:enable time services (xntpd) on management notemv -f /etc/ntpconf /etc/ntp.conf.or1gcreate a new /etc/ntp.confserver 127.127.1.0fudge 127.127.1.0 stratum 10driftfile /etc/drift同步所有节点的时间,时间服务器red hat:settime,date,and time zone with setupsetup or datesetclock or hwclock -wchkconfig -level 345 ntpd onservice ntpd restartxcat 相关设置文件/opt/xcat/etcsite.tab //集群所有设置信息nodehm.tabnodelist.tabnodepos.tabnoderes.tabpasswd.tabpostscripts.tabpostdeps.tabsnmptrapd.confnettworks.tabmac.tabmpa.tab(刀片中心管理模块类型)mp.tabapc.tabapcp.tabnodemodel.tabnodehm.tab 所有节点硬件设置noderes.tab 机器安装信息nodetype.tab 节点类型,操作系统/etc/hosts文件最重要定义所有机器的IP地址及名称重启系统后xcatd 服务能启动,说明了xcat基本正常makedns - build a dns server解析机器及机器地址(根据/etc/hosts 文件)host 机器名host IP地址都能解析,说明makedns已好makedhcp --new --allmacgetmacs 命令能搜集机器的两个网卡地址rpower noderage start(更有三个参数on,off,boot)安装计算节点的oscopycds (follow prompts) //拷贝安装文件到install目录,放入光盘自动拷贝cd /opt/xcatfind post -print |ccpio -dump /installgenesshkeys root (generate root ssh keys) 所有群集用户同步,取消密码登录update /etc/exports with /install,restart nfsecho "/install * (ro,async,no_root_squash)">>/etc/exportsred hat:chkconfig --add nfsservice nfs restartsuse:chkconfig nfs restartnode set 安装nodeset compute install(设置成安装状态)更改文件 /install/scripts/compute_all 文件-EVELY (安装所有文件包)compute_all文件能使用 nodeset compute install 生成,每次运行这个命令后,都会把原来的文件覆盖如果某个节点坏了1:需要从管理中心上登录到这个节点,改机器名,改启动顺序2:更改mac.tab 对应节点的地址3:makedhcp --new 机器名4: makedhcp 节点名5:nodeset 节点名install(先备份原来的compute_all文件)6:开机安装os7:安装完成后,执行 makesshgkh 节点名//Update the SSH Global Known Hosts File第二部分:性能的测试还是去年的东西,一直没时间整理。
xcat用法

xCAT是基于客户机/服务器架构的应用程序,其客户端和服务器端的通信主要是由管理节点上运行的xCAT daemon(xcatd)控制。
当管理节点上的xCAT daemon接收到计算节点发送过来的用XML封装的命令时,它会通过ACL(Access Control Lists)来判定发送者是否有权限执行这些命令。
以下是xCAT的基本用法:
1.用户在客户机上通过xCAT命令行输入需要xCAT完成的一项任务指令,该xCAT任务指
令接着被客户机封装成XML发送给服务器端。
2.服务器端管理节点上运行的xCAT daemon(xcatd)接收到该任务指令后,先解析出命
令名、参数、发起命令的用户名、客户主机ip地址以及该命令将影响的节点范围等信息。
3.服务器端管理节点上的xCAT daemon(xcatd)通过ACL判定出该任务指令发出者是否
有权限发起这项xCAT任务指令,如果ACL判决出该用户有权限发起该任务指令,则该任务就将被放进运行队列中等待执行。
4.该任务指令执行后,结果会再被服务器发回给客户机端,并显示在任务指令的发出者的
终端屏幕上,从而完成整个任务指令的执行过程。
xCAT 2-中文

设置计算节点的状态
– nodeset [noderange] install
重启计算节点,开始安装
– rpower [noderange] reset – Manually reset nodes
休息一下 检查安装结果
xCAT 的使用和管理
硬件管理和监控
– 远程电源控制: rpower – 远程状态信息: – 远程资产: – 远程事件日志: rvitals rinv reventlog
软件管理
– Parallel shell and other tools to run commands simultaneously on a range
1. 准备 2. 管理节点的安装 3. xCAT 安装 4. 集群的安装
步骤1: 网络规划
网络配置
SAN Tape backup Disk Storage
Compute nodes 计算节点
Existing University or Enterprise Network
User Workstations and Laptops
xCAT 概述
xCAT 是 Extreme Cluster Administration
硬件管理和监控
– 远程电源管理 (on/off/reset/stat)
远程终端
– OS – BIOS/POST
软件管理
– 并行管理工具
– HPC 软件集的支持
xCAT 概述
自动安装
– 通过网络实现自动的并行操作系统分发 – – – – – – – copycds rbootseq nodeset rinstall genimage/packimages for diskless node compute.tmpl for customize installation postscripts
用xcat安装操作系统

1. 配置xcatMN 的passwd 表 (里面的密码为装完操作系统之后lpar 的密码) # tabedit passwd#key,username,password,cryptmethod,authdomain,comments,disable "omapi","xcat_key","SVBmZlZ2VmViMmd6TGlwdVRKM1JscTB2UG1qZjBZRm o=",,,,"system","root","tebe",,,,2. 用xcat 创建lpar 注:如果误将xcat 的mn 关闭,可以使用hmc 连接服务器将mn 的lpar 打开,如果hmc 上显示的主机状态不正常,比如recovery 的状态,则需进行初始化操作,此时lpar 节点将会被清空,通过hmc 重新创建lpar 即可,无需重新安装操作系统。
所有针对位于CEC 上分区的操作都必须保证在CEC 启动的情况下进行,使用如下命令检查cec 的电源状态:# rpower cec statecec01: power off如果cec 处于power off 状态,使用如下命令启动cec :# rpower cec oncec01: SuccessPowerLinux 服务器需要花费 2-3分钟能够启动完成,然后检查cec 的状态:# rpower cec statecec01: operating(cec 上没有lpar 的时候也可以是standby)# mkdef -t node -o teamsun1 mgt=fsp cons=fsp nodetype=ppc,osi id=2 hcp=cec parent=cec hwtype=lpar groups=lpar,all1 object definitions have been created or modified.# lsdef <lparname> //需要改为自己的lparnameObject name: lpar1cons=fspgroups=lpar,allhcp=cec //cec 为具体的cechwtype=lparid=2mgt=fspnodetype=ppc,osiparent=cec //cec 修改为具体的cecpostbootscripts=otherpkgs必须有,而且密码即为装完os 之后 lpar的密码postscripts=syslog,remoteshell,syncfiles注意:定制分区需要设置从id=2开始。
Tomcat参数配置与简单的性能验证

Tomcat参数配置与简单的性能验证在对Tomcat服务器的web应用进行性能测试的过程中,有时LoadRunner中总会报错:Action.c(71): Error -27791: Server "localhost" has shut down the connection prematurely,但是这个错误并不是每次测试都会出现,通常在长时间的测试之后才偶尔出现,而奇怪的是在Tomcat的日志中并没有相应的错误。
从出错信息的字面信息来看,应该是服务器由于某些原因过早的关闭了连接,而Tomcat并不认为这是一个错误,因此没有在日志中记录下来。
在网上的搜索中看到,这个错误在其他的服务器如WebLogic、IIS等均有发生,看来是一个通用的问题。
在诊断的过程中,发现Tomcat运行界面有时会提示:“严重: All threads (10) are currently busy, waiting. Increase maxThreads (10) or check the servlet status”,根据这一线索对Tomcat的server.xml中的maxThreads、connectionTimeout参数进行配置,解决了这个问题。
试验:为了验证这两个参数对测试结果的影响,做了一些试验。
测试场景:一个测试脚本、20个虚拟用户、10次迭代参数设置及相应运行结果:maxThreads connectionTimeout(豪秒)错误个数5 1000 1610 1000 1315 1000 720 1000 05 10000 110 10000 015 10000 020 10000 0试验结论当最大线程数较少、超时时间较短时,出现这个错误的次数就越多;随着最大线程数逐步接近并发用户数,该错误逐渐减少。
另外,延长超时时间也能够减少错误的出现,但这时由于请求在处于排队等待状态,因此会增加响应时间。
Citrix XenApp 6.5 安装配置
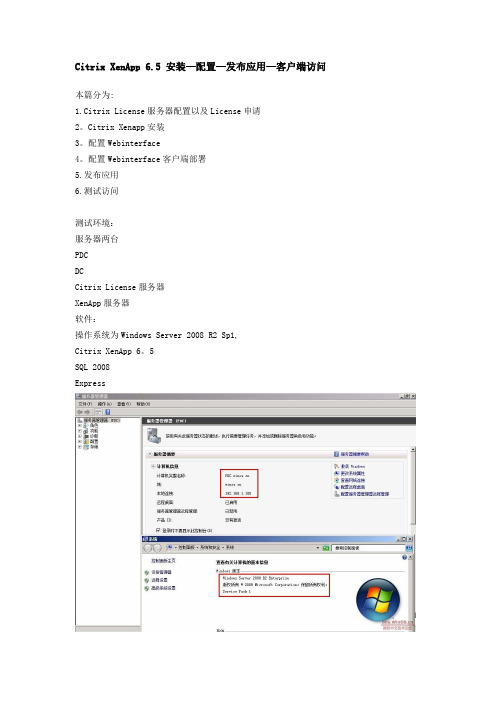
Citrix XenApp 6.5 安装—配置—发布应用—客户端访问本篇分为:1.Citrix License服务器配置以及License申请2。
Citrix Xenapp安装3。
配置Webinterface4。
配置Webinterface客户端部署5.发布应用6.测试访问测试环境:服务器两台PDCDCCitrix License服务器XenApp服务器软件:操作系统为Windows Server 2008 R2 Sp1,Citrix XenApp 6。
5SQL 2008Express操作步骤:一.Citrix License服务器配置以及License申请(在PDC上操作)1。
配置DC,XenApp加入域(略)2。
在PDC上安装Citrix License组件3。
许可证服务器配置4.申请评估License(里面的Host name of your Citrix License Server,须与机器相同,即PDC)5。
下载License 文件6.通过许可管理控制台导入license(提示必须重启供应商守护程序)7。
重启一下服务8。
检查一下Windows 日志是否有错误警告二。
Citrix XenApp6.5 安装10.安装XenApp服务器(几次重启)11.配置License,指向PDC12.配置XenApp,创建新的服务器场(完成后重启)13。
添加IIS管理控制台三。
配置Webinterface 14.配置Webinterface15.配置身份验证16.验证访问(域名预填写)四.配置Webinterface支持客户端部署17。
从Citrix 官方站点下载最新Clients,复制目录18.配置客户端部署19.修改Webinterface。
conf去掉注释20.测试客户端安装Plugin组件五.配置XenApp,发布应用21.配置Citrix AppCenter22.发布应用。
xcat配置

使用xCAT 2.x进行Linux集群的布署xCAT是Extreme Cluster Administration Toolkit的缩写,它是一套开源的集群管理软件。
许多IBM的集群用户都已经在使用通过xCAT来布置以及管理的集群系统,现在,xCAT已经发布了 2.0 和2.1 版本,与以前的 1.x版本不同,新的xCAT2.0 采用了全新的Client/Server架构,所有代码全部重新编写,并且所有的通讯都是经过加密的。
如果我们并不是高性能计算的用户,也可以利用xCAT来帮助我们进行Linux操作系统的安装,由于xCAT是通过网络安装Linux操作系统,与传统的通过本地的光盘安装方式要方便有效得多。
下面,我们就一起来体验一下xCAT2.1实验环境:分组:管理节点,计算节点IP地址第一组192.168.1.100, 管理节点主机名计算节点主机名刀片中心管理模块bc09计算节点槽位4192.168.1.101 cnode100 cnode101第二组192.168.1.102,bc09 6 192.168.1.103 cnode102 cnode103第三组192.168.1.104,bc09 8 192.168.1.105 cnode104 cnode105第四组192.168.1.106,bc09 10 192.168.1.107 conde106 cnode107第五组192.168.1.108,bc09 12 192.168.1.109 cnode108 cnode109第六组192.168.1.110,bc09 14 192.168.1.111 cnode110 cnode111第七组192.168.1.112,bc10 3 192.168.1.113 cnode112 cnode113第八组192.168.1.114,bc10 5 192.168.1.115 cnode114 cnode115第九组192.168.1.116,bc10 7 192.168.1.117 cnode116 cnode117第十组192.168.1.118,bc10 9 192.168.1.119 cnode118 cnode119管理模块:bc09 192.168.1.219bc10 192.168.1.220系统光盘的映像文件在每个管理节点的/tmp目录下RHEL5.1-Server-20071017.0-x86_64-disc1-ftp.isoRHEL5.1-Server-20071017.0-x86_64-disc2-ftp.isoRHEL5.1-Server-20071017.0-x86_64-disc3-ftp.isoRHEL5.1-Server-20071017.0-x86_64-disc4-ftp.isoRHEL5.1-Server-20071017.0-x86_64-disc5-ftp.isoRHEL5.1-Server-20071017.0-x86_64-disc6-ftp.iso集群管理软件xCAT也在/tmp目录下xcat-core-2.1.1.tar.bz2xcat-dep-2.1.tar.bz2首先,我们要完成管理节点的安装在这里,我们在每一组的第一台刀片服务器HS21 上安装了RedHat Enterprise LinuxServer 5 Update 1 的x86_64 版本。
EMC CX系列磁盘阵列配置

目录1、安装光纤通道卡及其驱动 (2)2、安装服务器主机代理软件 (2)2.1 Linux系统 (2)2.1.1 将Agent软件上传到linux主机中 (2)2.1.2 安装Agent软件 (2)2.1.3 修改Agent配置文件 (2)2.1.4 启动Agent服务 (3)2.2 Windows系统 (3)2.2.1 软件包 (3)2.2.2 软件包安装 (3)3、安装Powerpath多路径管理软件 (6)3.1 Liunx 系统 (6)3.1.1 将Powerpath软件上传到linux主机中 (6)3.1.2 安装Powerpath软件 (6)3.1.3 Powerpath软件注册 (7)3.1.4 系统重启查看状态 (7)3.2 Windows 系统 (8)3.2.1 软件包 (8)3.2.2 软件包安装 (8)4、光纤交换机管理 (11)4.1 光纤交换机基本配置 (11)4.2 光纤交换机基本命令行管理 (12)4.3 光纤交换机连接拓扑 (15)4.4 光纤交换机图形化配置(WEB UI) (15)5、磁盘阵列配置 (17)5.1 磁盘阵列基本管理 (17)5.2 LUN建立 (18)5.3 建立存储组 (19)5.4 主机注册 (20)5.5 建立主机与LUN关联(主机挂载磁盘) (21)1、安装光纤通道卡及其驱动在服务器上安装好光纤通道卡,建议安装新版本的驱动。
驱动程序查看HBA卡芯片后,去相关网站可以下载到对应操作系统的驱动程序。
2、安装服务器主机代理软件2.1 Linux系统2.1.1 将Agent软件上传到linux主机中上传的文件为”naviagentcli-6.26.30.0.99-1.noarch.rpm”2.1.2 安装Agent软件[root@DB01 ~]# rpm –ivh naviagentcli-6.26.30.0.99-1.noarch.rpm Preparing... ########################################### [100%]1:NaviHostAgent-Linux-########################################### [100%]2.1.3 修改Agent配置文件[root@DB01 ~]# emcsoft]# vi /etc/Navisphere/agent.config############################ Navisphere agent.config###########################user system@172.16.0.251 /需要添加的user system@172.16.0.252 /需要添加的注意:地址为磁盘阵列的两个控制器的管理地址2.1.4 启动Agent服务/etc/init.d/naviagent start注:可以等安装完多路径管理软件后一起重启系统。
Xmanager配置说明

Xmanager简明配置用vi编辑gdm.conf进入后键入/xdmcp查找字符串xdmcp"n"是搜索下一句,这样就能快速的定位到xdmcp项4.如果有防火墙,请打开177的端口ok!配置完后用Xmanager进入吧Xmanager详细配置我用的是RedHatEnterpriseLinux5.4和最新的XmanagerEnterprise3.0。
首先先来了解一下什么是Xmanager。
Xmanager全称NetsarangXmanager,是国外一套非常优秀的远程监控软件。
在UNIX/Linux和Windows网络环境中,Xmanager是最好的连通解决方案。
我推荐大家下载Enterprise版本,企业版带的工具更多功能更强大。
我们通过Xmanager连接Linux 远程桌面进行图形化管理其实就是利用了Xmanager套装里面的Xbrowser程序。
当然Linux 远程图形化管理除了Xbrowser,还有同样优秀的VNC。
下面介绍用Xbrowser连接Linux远程桌面的详细配置。
都是我亲自测试过的,放心往下看吧!一、如果你查过网上的资料你就会发现:RedHatEnterpriseLinux5与RedHatEnterpriseLinux4对于Xmanager的配置是不同的,前者没有/etc/X11/gdm/这个目录,它的gdm的配置文件放在/usr/share/gdm/custom.conf。
其实网上的写错了!!这里不是custom.conf,而是defaults.conf!反正我的RedHatEnterpriseLinux5.4是这样的,可能其它5系列版本不一样也没数的。
在/usr/share/gdm/defaults.conf里确保有以下几句配置(我在最后面直接加了这几句):Enable=trueDisplaysPerHost=10Port=177二、在/etc/inittab里把默认级别改为5:id:5:initdefault:再把最后一句里x:5:respawn:/etc/X11/prefdm-nodaemon改成x:5:respawn:/usr/sbin/gdm(注意这里是sbin,不是bin,网上的又错了,害得我前几次都没能成功,妈的!还好我后来自己发现了这个问题。
SNA配置简易手册(AIX)

SNA配置简易手册(For AIX)SNA配置主要涉及三个配置文件:/etc/sna/sna_node.cfg/etc/sna/sna_domn.cfg/etc/sna/sna_tps其中,sna_node.cfg是SNA的基本配置文件,在其中定义SNA的node,dlc, port, ink station, LU和Partner LU等信息。
Sna_domn.cfg用于应用程序调用SNA资源,在此文件中定义了SNA的side information,一个Side Info对应一个LU、Partner LU以及mode的组合。
CICS 的应用程序通过Side Info名来定位相应的session。
Sna_tps用于MQ调用,在此文件里定义了MQ的队列管理器名、MQ相应的LU名以及相应的TP(Transaction Programs,通常为MQSERIES)名。
SNA的配置可以通过使用vi直接修改此三文件来完成,也可以通过smitty sna菜单来修改。
如果对SNA配置不是很熟悉,建议使用smitty菜单来进行操作。
下面介绍一下如何使用smitty菜单进行SNA的配置。
对于每个上线分行,我们都会提供一份有关SNA配置的文档。
该文档会提供三个环境的SNA配置,此三环境分别为:⏹PRD:生产环境⏹QUS:准生产环境,用于模拟跟帐⏹TRG:培训环境对应每个环境,文档中都给出了一个配置表格,格式如下(以TRG环境为例):NETID = BOCOMT第一步,配置node:Configure SNA Resources -> Local Node Resources -> Node Definition仅需填写以下几项:* Control Point alias [S064T1]* Control Point name [BOCOMT.S064T1]Node ID [064a0001]第二步,配置dlcConfigure SNA Resources -> Local Node Resources -> Connectivity -> DLCs, Ports and Link Stations -> Add Connectivity Resources -> Add Ethernet Resource -> Add Ethernet DLC仅需填写以下几项:* DLC name [自定义,通常为EN1,EN2…] Adapter Number [0]其中,Adapter Number对应于SNA网卡号,如果不能确定所使用的网卡号,可以用0至4分别试一下。
emcvnx配置手册

第1章文档目录第1章VNX5400 硬件部分 ................................................................... 错误!未定义书签。
1.1.硬件部分: (4)1.2.设备基本信息 (4)1.2.1.开机注意事项 (4)1.2.2.开机环节 (5)1.2.3.关机前注意事项 (5)1.3.使用UNISPHERE进行配置 (6)1.3.1.登陆到管理界面 (6)1.3.2.创立Raid Group (12)1.3.3.创立LUN ............................................................................... 错误!未定义书签。
1.3.4.创立Storage Group ............................................................... 错误!未定义书签。
1.3.5.注册主机 ................................................................................ 错误!未定义书签。
1.3.6指派LUN ............................................................................... 错误!未定义书签。
1.3.7指派主机 ................................................................................ 错误!未定义书签。
1.3.7创立Mirror ............................................................................. 错误!未定义书签。
在CentOS系统上CSVN的配置

在CentOS系统上CSVN的配置用了一段时间的CSVN了,感觉还不错。
但原来我的服务端都是在Windows 上建立的。
昨天花了6个多小时终于在Linux上把这CSVN搭建起来了,弄到凌成2点才弄完,把我的配置命令贴上来,备忘!一、准备工作1.下载Java和CSVN。
下载地址如下:Java:/zh_CN/CSVN:/cn/downloads/subversion/redhat.html2.root用户登入3.转到存放安装文件的目录cd /home/tommy4.将java与CSVN复制到/optcp jre-6u26-linux-i586.bin /optcp CollabNetSubversionEdge-1.3.3_linux-x86.tar.gz /opt二、安装java1.切换到目录optcd /opt2.添加java自解压包运行权限并解压javachmod u+x jre-6u26-linux-i586.bin./jre-6u26-linux-i586.bin二、配置java1.用vi打开profilevi /etc/profile2.在profile最后添加:JAVA_HOME=/opt/jre1.6.0_26PATH=$JAVA_HOME/bin:$PATHCLASSPATH=.:$JAVA_HOME/lib/dt.jar:$JAVA_HOME/lib/tools.jarexport JAVA_HOMEexport PATHexport CLASSPATH三、修改sudors1.打开sudoer/usr/sbin/visudo2.最后添加tommy ALL=(ALL) ALL四、安装CSVN1.切换到安装目录/optcd /opt2.解压CSVN安装包tar zxf CollabNetSubversionEdge-1.3.3_linux-x86.tar.gz3.因为CSVN不能用root用户运行,而运行CSVN的用户需要csvn文件夹的写入权,所以需要修改csvn文件夹所有人。
xCAT安装维护详解

Parallel shell and other tools to run commands simultaneously on a range of nodes
5
14-Apr-23
xCAT Simple Infrastructure
▪ A single xCAT management node for N number of nodes. – A single node DHCP/TFTP/HTTP/NFS server. – Scales to ~128 nodes.
/tftpboot and image directories from the management node to provide a consistent set of kernel, initrd, and file system images.
node001ຫໍສະໝຸດ node002...nodennn
nodennn + 1
nodennn + 2
...
nodennn + m
DHCP TFTP HTTP NFS(hybrid) service node01
DHCP TFTP HTTP NFS(hybrid)
service node02
...
service nodeNN
DHCP TFTP HTTP NFS(hybrid)
▪ noderes
– Resources and settings to use when installing nodes.
▪ nodetype
– A few hardware and software characteristics of the nodes.
VMware_VSAN配置手册

VSAN配置手册1.配置前的基本准备工作1.1.手动将磁盘标记为SSD磁盘在某些情况下,当在RAID配置中将一个SSD配置为RAID—0模式后,vSphere只将这个磁盘当作一个普通的HDD盘,而不能将它正确地识别为SSD盘.出现这种情况的时候,就需要通过命令行方式手动将这个磁盘标记为“SSD”盘.首先,登录到vSphere的控制台,在菜单中选择‘TroubleShooting Options’:然后,敲回车键,分别启用“Shell"和“SSH".这个时候,就可以通过SSH连接到这台ESXi主机。
# ssh root@10。
110.x.x成功登录以后,运行以下命令。
# esxcli storage core device list以上这个命令将会列出这台ESXi主机上的所有磁盘列表,将SSD盘找出来,并且将这个SSD盘的ID复制下来,后面会用到。
(一般来说,SSD盘的容量比普通硬盘小很多,所以可以根据容量轻易地将SSD盘找出来.)然后,运行以下命令,将命令中的ID(红色部分)替换成刚刚复制下来的ID。
# esxcli storage nmp satp rule add —s VMW_SATP_LOCAL —d naa。
6b8ca3a0e81e03001a4e539c08862b30 —o enable_ssd# esxcli storage core claiming reclaim -d naa。
6b8ca3a0e81e03001a4e539c08862b30下面这个命令可以验证SSD盘是否已经被成功地标记成”SSD”了:# esxcli storage core device list -d naa。
6b8ca3a0e81e03001a4e539c08862b301.2.为vCenter, vSphere, VSAN添加许可证在vCenter网页客户端里,依次点击主页—>主机和群集,然后选择vCenter 目录,再选管理-〉设置-〉许可,点“分配许可证密钥”:在新窗口里,选择“分配新的许可证密钥",输入新密钥后,依次点击解码—>确定。
增加自定义.xconf文件存储配置信息

以便将 test.properties.xconf 里的内容写入 test.properties 和 test.properties.annotated 文件。 最后,重启 windchill 服务,添加的内容即可生效。 第一篇 windchill 相关的文章发布,以后会陆续发布经过准确测试的代码。
第三步,打开 windchill shell 执行如下命令:
Java 代码 1. xconfmanager -i codebase/ext/test.properties.xconf -p
成功执行完上述步骤后,进行如下验证: 1,观察 codebase/ext 目录,多了两个文件:test.properties 和 test.properties.annotated,这两个文件 都是不可以手动修改的,只能使用命令将.xconf 文件的内容添加进去。 2,打开<wt_home>/declarations.xconf,可以看到在文件的末尾添加了如下信息:
Xml 代码 1. <?xml version="1.0" encoding="utf-8"?> 2. <!DOCTYPE Configuration SYSTEM "xconf.dtd"> 3. <!--配置自动生成的 properties 文件的位置 --> 4. <Configuration targetFile="codebase/ext/test.properties"> 5. <!-6. 配置该文件内添加的客制化信息的默认存储位置,一般和生成的 properties 文件位置相同 7. --> 8. <Property default="ext/test.properties" name="wt.services.applicationcontext.WT ServiceProviderFromProperties.customPropertyFiles" /> 9. </ConfigurationfigurationRef xlink:href="codebase/ext/test.properties.xconf"/>
详细解析Linux内核的主要配置选项

详细解析Linux内核的主要配置选项配置内核的命令是:# make config 文本配置方式# make menuconfig 菜单配置方式# make xconfig 图形界面配置方式我们可以采用任何一个命令配置内核,一般推荐使用make menuconfig来配置内核。
一.代码成熟度选项在内核中包含了一些不成熟的代码和功能,如果我们想使用这些功能,想打开相关的配置选项,就必需打开这一选项。
二.通用设置选项Local version - append to kernel release:这里填入的是64字符以内的字符串,你在这里填上的字符口串可以用uname -a命令看到。
Support for paging of anonymous memory (swap):这是使用交换分区或者交换文件来做为虚拟内存的,当然要选上了。
System V IPC:表示系统5的Inter Process Communication,它用于处理器在程序之间同步和交换信息,如果不选这项,很多程序运行不起来的。
POSIX Message Queues:这是POSIX的消息队列,它同样是一种IPC。
建议你最好将它选上。
BSD Process Accounting:这是充许用户进程访问内核将账户信息写入文件中的。
这通常被认为是个好主意,建议你最好将它选上。
Sysctl support:这个选项能不重新编译内核修改内核的某些参数和变量,如果你也选择了支持/proc,将能从/proc/sys存取可以影响内核的参数或变量。
建议你最好将它选上。
Auditing support:审记支持,用于和内核的某些子模块同时工作,例如SELinux。
只有选择此项及它的子项,才能调用有关审记的系统调用。
Support for hot-pluggable devices:是否支持热插拔的选项,肯定要选上。
不然USB、PCMCIA等这些设备都用不了。
- 1、下载文档前请自行甄别文档内容的完整性,平台不提供额外的编辑、内容补充、找答案等附加服务。
- 2、"仅部分预览"的文档,不可在线预览部分如存在完整性等问题,可反馈申请退款(可完整预览的文档不适用该条件!)。
- 3、如文档侵犯您的权益,请联系客服反馈,我们会尽快为您处理(人工客服工作时间:9:00-18:30)。
1.关闭操作系统防火墙和SeLinux
# service iptables stop // /etc/init.d/iptables stop
# echo 0 > /selinux/enforce
# sed -i 's/^SELINUX=.*\$/SELINUX=disabled/' /etc/selinux/config 2.配置操作系统Repository (确保/tebe/iso目录下有iso文件)
# cd /tebe/iso
# mkdir 1
# mount –o loop
/tebe/iso/RHEL6.4-20130130.0-Server-ppc64-DVD1.iso.1
/tebe/iso/1
//为保证机器重启之后,mount的内容丢失,放到开机启动的一个文件里面比如/etc/rc.local
echo "[rhe-6.4-server]
> name=RHEL 6.4 SERVER packages
> baseurl=file:////tebe/iso/1/Server
> enabled=1
> gpgcheck=0" > /etc/yum.repos.d/rhels6.4.repo
3.安装xcat-core
# tar jxvf xcat-core-2.8.3.tar.bz2
# tar jxvf xcat-dep-201310231533.tar.bz2
# cd xcat-core
# ./mklocalrepo.sh
# cd ../xcat-dep/rh6/ppc64/
# ./mklocalrepo.sh
# yum clean metadata
# yum install xCAT
# find / -name createrepo-*
# yum install /tebe/iso/1/Packages/createrepo-0.9.9-17.el6.noarch.rpm
# source /etc/profile.d/xcat.sh
在xcat 的目录下
# cd /home/xcat
# yum install xCAT-dfm-* ISNM-hdwr_svr-*
注:为确保mn 配置正确,请检查xcat 的site 表
# tabdump site
检查master 和 nameservers 是否是mn 的ip 如果不正确则
# chdef -t site master=<mnip>
# chdef -t site nameservers=<mnip>
为保证dhcp 能够快速生效
最好修改dhcp 的过期时间
# chdef -t site dhcplease=300 //(5分钟 )
MN 的IP
4.
启动dhcp 服务
# service dhcpd restart
如果启动失败,执行
# makedhcp -n
然后再次执行
# service dhcpd restart
5. 发现、管理fsp 和
lpar
# lsslp –s CEC
然后等待
发现fsp 后执行命令
# lsslp -z -s CEC | mkdef -zf
# mkhwconn cec -t
# lshwconn cec //检查状态是否是LINE UP
如果不是LINE UP 的解决办法:
/var/opt/isnm/hdwr_svr/data/HmcNetConfig 里面的除了第一行全删除
# chdef cecname passwd.HMC=admin passwd.admin=admin passwd.general=admin
# rmhwconn <cecname>
# mkhwconn cec -t
如果出现类似下面的的信息,表示是恢复出厂设置的机器:
Server-8246-L2D-SN060558A:sp=primary,ipadd=192.168.0.225,alt_i padd=unavailable,state=DEFAULT HMC,admin,general PASSWORDS REQU IRE CHANGE
请执行下面的命令来设置密码:
# rspconfig <cecname> HMC_passwd=,<passwd>
# rspconfig <cecname> admin_passwd=,<passwd>
# rspconfig <cecname> general_passwd=,<passwd>
# rmhwconn <cecname>
# mkhwconn cec -t
# lshwconn <cecname>
查看fsp是否开机(operating 表示开机)
# rpower cec stat
查看cec上面是否有lpar
# rscan cec
让xcat管理lpar
# rscan -z cec | mkdef -zf
检查lpar是否可以管理# nodels。
