LI-3000D(双轨)操作手册
方向控制设备电动铰链LC3F2系列操作手册说明书

Directional Control Equipment for Electric CylinderLC3F2 series Operation ManualSMC Corporation1. Safety InstructionThese instructions indicate the level of potential hazard by labels of "Warning" and "Caution". To ensure safety, be sure to observe ISO 10218-1992 / JIS B 8433-1993 and other safety practices.SymbolsSymbol Explanation Symbol meaning warning and caution. Contents are instructed by figure or phrase in the symbol.Symbol meaning do not operate are instructed by figure or phrase in the symbol.Symbol meaning operate are instructed by figure or phrase in the symbol.Operator This manual is for the person in charge of assembly, operation, and maintaining of machinery and device with electric control equipment who has enough knowledge and experience.The manual must be read through before assembly, operation and maintenance.Application limitation∗ This product aims at application for common factory automationequipment. Do not use LC3F2 for machinery and device (∗1) that directly concerns human life or those which malfunction or failure could cause serious damage.*1:Machinery and device that directly concerns human life are; - Life support system or medical equipment .- Device obligated by Laws and regulation such as Fire protection law and Building code.- Equipment and devices which comply with above.∗ Contact SMC Sales office before use on any of the followingrelating to human safety and have an impact on the public utility(∗2). Special consideration(∗3) is necessary for the management, maintenance and control of the system.*2:Systems relating to human safety that has impact on the public utilitiesare;- Main machine control and of nuclear plant control systems, safety protection system, nuclear installation, and other systems important for safety.- Drive control and flight control system of public transport system. - Equipment and device contact with food and beverage.*3: Special consideration means to discuss with SMC engineers, and to construct a safe system (The foolproof design, the fail safe design, and design using redundancy circuits).∗ Special consideration for safety and security to prevent the riskof damage by failure and malfunction caused by the occurrence of environmental stress (change over time)•DCautionThe heat sink of the directional control equipment andthe drive motor becomes hot during operation. Do not touch until they are cooled down.Do not carry by the cables during transport. It might cause injury or failure.Do not use in locations with a lot of debris, dust, water, chemicals, or oil.It might cause fire, injury, failure or electric shock.Do not use in locations where magnetic field is generated.It might cause malfunction and failure.Do not use in locations where temperature cycles are applied.It might cause malfunction and failure.Do not use in locations where surge is generated. It might cause malfunction and failure.Prepare lightning surge protection on the device. It might cause malfunction and failure.Mount the unit where no vibration or impact occurs. It might cause malfunction and failure.Inspect correct function after maintenance. Stop operation when device and equipment doe not work correctly. Unexpected malfunction might risk safe operation. Perform emergency stop and ensure safety.Do not apply rotating torque more than 68.6mNm to the adjuster of the thrust adjustment trimmer. It might cause malfunction and failure.Do not press the thrust adjustment trimmer at 4.9N or more.It might cause malfunction and failure. Install the emergency stop circuit. External emergency stop circuit shall be prepared so that the operation of the electric cylinder is stopped and the power source is cut instantly.Connect the power and turn on the switch after ensuring the safety of the slider's moving range. Moving slider might cause an accident.Do not give the electric cylinder larger thrust than the generation thrust by the load or external force. It is not possible to drive though the motor rotated by the load or external force is braked.It might cause malfunction and failure.Caution on operationPrecautions below shall be kept for handling of this product, wiring, adjustment, usage, maintenance and the disposal. MountingE Do not drop or bump or apply excessive impact.E Keep directional control equipment 50mm or more away from inner surface of control cabinet or other equipment. E Keep maintenance space.WiringE Avoid repeatedly bending or stretching the cable.E Use specified tools when crimping the contact and power lines.E Do not wire adjacent to power lines or high voltage lines to avoid noise interference.E Ensure proper insulation of wiring.E Recommend to use shielded cables and ground them. Adjustment / OperationE Do not press the manual switch with a sharply pointed tool. E Use a screw driver which is suitable for the thrust adjustment trimmer. The screw driver below available on the market is recommended.Vessel Co. : NO.9000+0•30E Do not apply paint to lock the trimmer after adjustment.E Adjustment of the thrust adjusting shall be within 100 cycles. E Do not start operation by turning on/off of the main power. Start operation by the control terminal of CN2.MaintenanceE Periodic maintenance is required.E Do not perform insulation resistance test or insulation withstand voltage test.E For reference only the product life is up to 6 years providing the equipment is operated within the conditions stated belowOperating ambient temp. : 25• Operation rate : 16 hours or less/dayLife could be shorter due to surrounding environment or operating conditions. Replace parts when abnormality is found.DisposalE Dispose as general industrial waste.2. Parts checkEnsure parts below are included in the package.Part descriptionQty.Directional control equipment 1 Operation manual (This document)1 Cross recessed bind screw M3‚w 4 1 Spring seat Nominal31 Parts relating to protection ground terminal Tooth lock washer (A) Nominal 3 1 Housing VHR-2N1 Housing VHR-3N 1 Housing VHR-4N 1 Housings(equipped only forLC3F212-5[][]A)Contact BVH-21T-P1.112D o n o tD oD o n o tD o n o tD o n o tD o n o tD o n o tD o n o tD o n o tD o n o tD oD oWarnin gDo notDoD o n o tD o3. Parts description and function∗Descriptions of displayClass Description ExplanationTrimmerThrust adjustment trimmerThrust depends on adjustment Adjustment turn 1turn Effective angle240•POWERLights when powered A-PHASELights when A-PHASE commandedOFF Lights when ON isn't commanded Indicator lampSETLights when SET is commanded A-PHASEPress and A-PHASE is commandedON Press and motor output ON is commandedManual switchSET Press and SET is commanded 4. Mounting Mount the directional control equipmentvertically on the wall using the two mounting holes on the drawing to the right so that the front faces the operator. (surface with adjustment trimmer and manual switch are on)Keep directional control equipment 50mm or more away from the control cabinet inner surface or other equipment so that the equipment is cooled down with natural convection.Applicable set screw : M3 (2 pcs) [Customer prepare screws]5. WiringCN1 Power supply terminalFunction 1 FG Frame ground Power input (+24V) 3 DC(-) Power ground (0V) Housing : VHR-3N i JST Mfg. Co. Ltd.,•Contact : BVH-21T-P1.1 i JST Mfg. Co. Ltd.,•CN3 Motor output terminalContact : BVH-21T-P1.1 i JST Mfg. Co. Ltd.,•jFunction1 COM Common terminal ON: Motor outputOutput ON Comm. input OFF: No motor outputON :Adjusted thrust(Set range 10 to 70%) Input adjusted thrust OFF:100% thrust(Max.)ON: A-PHASE directionInput moving ToolsCrimping tool: YC-160R (JST Mfg. Co. Ltd.,) Pulling tool: EJ-NV (JST Mfg. Co. Ltd.,) Recommended cables(Common for cables)AWG21•i 0.5mm Q j Insulated wire O.D. 1.7 to 3.0mmHeatproof temp. 80o C or moreCN1 Power supply terminal cable3 core shielded heavy-duty cable 2m or less CN2 Control terminal cable4 core shielded heavy-duty cable 2m or less CN3 Motor output terminal cable2 core shielded heavy-duty cable 5m or less6. Adjustment / Test runProcedure of adjustment / test runPerform adjustment and test run after checking installation and wiring.(1)Apply powerDisplay lamp(POWER) turns on when applying power. (2)Test runInputting signal to the control terminal, causes the electric cylinder to start. Set the trimmer at minimum (counterclockwise), and raise the thrust slowly to adjust. Operation with the max. thrust may cause the electric cylinder rod to move suddenly.Signal input example for adjusting thrust CN2 terminal A-PHASE direction command B-PHASE direction command Stop command ON ON : ON : Off : SETON : ON : A-PHASE ON : Off :7. Timing chartCN1 Power supply terminal ∗Mounting protection gnd. terminal Heat sinkontrol terminal CN3 Motor output terminalMount protection gnd. terminalCustomer prepares crimp terminals and ground cable.Wiring example of the directional control equipmentDirectional control equipment does not have an emergency stop or power on/off switch.Provide anemergency stop, circuit breaker (protection) for the total system, referring to the wiring example above. Disconnect the power supply before wiring the directional control equipment.CautionD oHeat sink sideHeat sink sideON A-PHASE SET ONOFFONOFFONOFFThrust Cross recessed bind screw Spring seat Nominal 3Tooth lock washer (A) Crimp terminalNominal 38•D Trouble shootingInspect items below when (1)-(3) below occurs. If trouble shootings below do not work, consult with SMC. (1) Electric cylinder (motor) does not start.(2) Operation becomes unstable during operation.(3) The electric cylinder(motor rotation) moves in reversed wayto commanded direction.Trouble Inspection Trouble shooting(1)(2) Check voltage between DC(+) and DC(-)Supply 24VDC•10%.(1)(2) Check the capacity of power source Source capacity may not beenough for supply power spec. ofdirectional control equipment. (1)(2) Power display lamp not illuminated. Possibly fuse blown. Consult SMC. (1)(2)(3) Check Housing terminal Possible housing connect failure or contact crimp failure.(1)(2) OFF display lamp illuminated.Turn on ON input•i CN2-2•j .(1)(3) Switch the input of A-PHASE(CN2-4) Commanded logic for A-PHASEmay possibly be reversed.Motor output terminal OUTA i CN3-1•j and OUTB•i CN3-2•j are connected in reversed condition.(1)(2) Operate with no load Excess load is possible cause.Check the transported load.(1)(2) Turn off SET•i CN2-3•j Operate with max. thrust.Re-adjust the thrust adjusting trimmer for this operation.(1)(2) Check ambient temperature Thermal overload protection (*)may have worked. Check ifspecified operating ambient temp. and recommended space are correct.i *•j Thermal overload protectionThermal overload protection works and cut the power supply to the motor when the inner temperature of the motor is raised andthe heat sink reaches 70oC. Recovers automatically when the inner temp. is lowered after Thermal overload protection has operated.9. How to OrderLA Housing for CN1,2,3 and Contact areincludedB Nothing included10. SpecificationsLC3F212-5A5[]11. Conforms to the CE directive for Electric cylinder LZseries / Directional control equipment for electric cylinder LC3F2 series(1) EMC directive is applied to the DC motor LZC[][]-0401serieswhich are used for the electric cylinder LZ series and the LC3F2 series as a combination. SMC have had the following set in the “Relating to EMC directive” section tested by a third party organization to ensure that they pass all relevant standards as set out in the EMC directive as in the table below. (2) The low voltage directive is not applicable for these products. (3) These products are defined as components and thus areintended for incorporation into machinery and assemblies,which are covered by the Machinery Directive 98/37/EC (referto annex II B). CE marking is therefore not applied to them.Relating to EMC directiveEMC conformity of the customer's equipment containing the electric cylinder or directional control equipment for the electric cylinder can not be confirmed. Customer is required to confirm EMC conformity of customer's machinery or equipment as a whole.* Conforming standard listEN61000-6-4/2001 (Emission standard for industrial environments) EN61000-6-2/2001 (Immunity for industrial environments)IEC61000-4-2 /2001 IEC61000-4-3 /2002 IEC61000-4-4 /1995IEC61000-4-4•F A‚P /2000 to IEC61000-4-4 /1995 IEC61000-4-4•F A2 /2001 to IEC61000-4-4 /1995 IEC61000-4-6 /2001Machinery, partsAbove parts/equipment supplied by customer except items (12),(13).Caution for designing considering conformity to EMC directiveSee cautions below for the conformity to EMC directive whendesigning equipment containing this product.* InstallationThis product is required to be put in the control cabinet.- The switchboard shall be IP54(or higher).- Use metal(ferrous, aluminium) for the switchboard material.- Switchboard shall be properly grounded with a cable as short as possible.* GroundResistance of contacted parts and contact resistance ofcontacted area shall be minimized. - Keep ground cable short and thick as mush as possible to keep impedance low.- Remove the paint of contact surface and the insulation cover to keep the contact resistance of the contact surface low.To reduce radiation noise, ground the motor output terminal cable shield to the protection ground terminal with metal P-clip.The ground protection holes are different for the type3 and type5.* Regarding the motor output terminal cable, the power supply terminal cable and the control terminal cable. Use the cable with shield. Connector sheath and the part with shield removed shall be short as possible. Cable shield shall be grounded at just before the connected component (LC3F2 series , switching power supply etc.). Use a metal P-clip (Fig.2-1), metal U-clip (Fig.2-2) when grounding. Ground effect is not adequate by soldering the shield wire withwire rod to install the cable (Fig.2-3).12.European Contact List *SMC Corporation*Websites No.Part name Part no./Material Manufacturer(1)Motor output terminal cable 2 wire with shieldHeavy-duty cable- (2)Power supply terminal cable 3 wire with shieldHeavy-duty cable- (3)Control terminal cable 4 wire with shieldHeavy-duty cable- (4)DC power supply cable - -(5)AC power supply cable - -(6)AC power supplycable(with shield)- - (7)P-clip(for shield ground)metal -(8)ProgrammablecontrollerFP0-C16T Panasonic (9)Switching power supply S82K-10024 OMRON(10)Switching power supply S82K-10024 OMRON(11)Control box Aluminum case - (12)Directional control equipment for electric cylinder LC3F2 series SMC (13)DC motor for the electric cylinder L1ZC[][]-0401 series SMCCountry Telephone Country Telephone Austria (43) 2262-62 280 Italy (39) 02-927 11 Belgium (32) 3-355 14 64 Netherlands (31) 20-531 8888 Czech Republic(420) 5-414 24611 Norway (47) 67 12 90 20 Denmark (45) 70 25 29 00 Poland (48) 22-548 50 85Finland (358) 9-859 580 Portugal (351) 22 610 89 22France (33) 1-64 76 10 00 Spain (34) 945-18 41 00Germany (49) 6103 4020 Sweden (46) 8-603 12 00Greece (30) 1-342 60 76 Switzerland (41) 52-396 31 31Hungary(36) 1-371 1343 Turkey (90) 212 221 15 12Ireland (351) 1-403 9000 United Kingdom (44) 1908-56 38 88 SMC Corporation SMC Europe Frame G Fig.2-1 P-clip Fig.2-2 U-clipFig.2-3 SolderingCable length•F P R O o or less P-clip•i metal•jShielded partDC motorProtection ground terminalMotor outputterminal cableFig.1 How to ground the DC motor (Type3)DC motor (Type5) L1ZC45-0401 series M4×0.7×3 deepDC motor (Type3) L1ZC30-0401series M3×0.5×3 deepThe ground protection holes。
交通量调查设备LTD3000使用说明书

线圈车辆检测器 LTD 交通量调查设备 LTD3000 使用说明书
用户对线圈车辆检测器 LTD 交通量调查设备 LTD3000 的使用操作和功能了解
作 者 程晓明
时间 2011 年 01 月 16 日 版本号 V1.0
说 明: 使用说明书初级版本
作者 说 明:
时间
版本号
作者 说 明:
时间
版本号
修改
作者 说 明:
3. 设备配置管理客户端安装....................................................................................................6
3.1. 软件安装步骤 ....................................................................................................................................6
4.3. 工作模式 ..........................................................................................................................................12 4.3.1. 运行模式......................................................................................................................................... 12
EDS3000操作手册

操作手册EDS3000目录1. 功能2. 安装3. 操作键4. 数显5. 输出功能5.1. 开关量输出5.1.1. 开关点设置5.1.2. 视窗功能设置5.2. 模拟量输出5.3. 开关点和延滞的设置,视窗功能的开关值设置5.4. 开关量输出的设置范围6. 基本设置6.1. 基本设置的变更6.2. 基本设置的概要7. 编程锁定7.1. 更改工作状态下的编程锁定7.2. 更改总编程锁定8. 故障信息9. 线路图10. 技术参数10.1. EDS3000(陶瓷芯片); 绝对和相对压力≤16 BAR10.2. EDS3000(薄膜DMS芯片); 相对压力≥40 BAR11. 订货代号11.1. EDS3000(陶瓷芯片); 绝对和相对压力≤16 BAR 11.2. EDS3000(陶瓷芯片); 绝对和相对压力≤16 BAR符合DESINA®标准11.3.EDS3000(薄膜DMS芯片); 相对压力≥40 BAR11.4.EDS3000(薄膜DMS芯片); 相对压力≥40 BAR符合DESINA®标准12. 附件12.1. 用于电气连接12.2. 用于机械连接13. 安装尺寸1. EDS3000的功能根据不同型号,该产品有如下功能:●显示当前压力值(单位可选用PSI,MPa,bar或用户自定义测量单位)●显示最大值或预设开关点值●根据压力和预设开关参数切换开关量输出●模拟量输出●基本设置菜单(适用于EDS3000的特殊应用)●编程锁定2.安装EDS3000可直接安装在液压集成块上,也可使用测压软管实现间接安装。
该产品可绕纵轴旋转340º以优化显示位置。
显示屏和按键区也可270º旋转。
电气连接须由按照相关国家规定(如德国VDE0100规范)合格的电工进行作业。
压力开关外壳必须同时接地良好。
若将压力开关安装在液压集成块里,块体通过液压系统接地是有保证的。
若使用测压软管安装,压力开关外壳必须单独接地(比如:屏蔽线)。
SANYO3000电梯控制系统调试手册(下) - 副本
SANY03000电梯控制系统调试手册(下)第四章系统的调试与运行4.1通电前的检查电气安装完毕后.必须对电气部分进行检査。
检査时做注意以下几点.<1)应对照使用说明书和电气原理图,检査各部分的连接是否正确.(2)检査强电部分和弱电部分是否有关联.用指针式万用&欧姆档检査不同电压回路之间电阻、对地电阻应为8。
<3)请认真检査控制柜电源进线与电机连线是否正确.避免上电后烧毁変频器!!<4)检査旋转编码器与变频器的连线是否正确,布线是否合理.旋转编码器与曳引机轴连接的同心度.<5)检査控制柜売体、电动机売体、轿厢接地线、厅门接地絞是否可靠安全接地,确保人身安全。
(注意:柜売体与电动机売体要-点接地)<6)将电梯停放在中间平层位置.(7)将电锁开关打到ON位置。
4.2通电和检查4.2.1上电前进行如下确认(】)确认控制柜上所有空气开关均处于断开状态。
(2)确认控制柜开关处于“检修"位置,急停开关被按下。
(3)确认轿顶及轿厢的检修开关处于“正常"位置。
<4)确认底层呼梯盒终端电阻己接入。
(见225(3))(5)检査现场总进线电圧:三相线电压应为380±7%VAC.相间偏差应小于I5VAC。
每相与N线间的电压应为220±7%VAC.<6)确认进线规格及总开关容景符合设计要求。
<1)合上总电源开关,若相序继电器KXX有绿灯显示,则表示相位正确。
否则,应关闭总电源,调换任意两相进线相位。
重复上述检査。
4.2.2上电后检査(2)检査控制柜中的变压器BT各端了•电压•其值应在各端子间标注值±7%范围内,若超过范围,检查原因并改正错误。
(3)若上述检验正常,则进行如下步骤:合上QF3 端子J01-102之冋电压应为220±7%VAC合上QF2 端f B1I0-AII0之间电压应为I1O±7%VAC端f 01 ( + ) -02 (-)之间电压应% I1O±7%VDC开关电源各端J••电压如下:(4)将控制柜急停开关复位后,则接触器YJC、接触器KI应吸合,变频器得电丄作。
FMS 3000mm FOX遥控飞机说明书
DETAILEDRIGIDFLAPS INSTALLEDSTRONG DURABLE EPOSTABLESMOOTH FLYING PERFORMANCE3000mm FOXManuel d’utilisationInstruction Manual Bedienungsanleitung 操作手册p wAs the user of this product, you are solely responsible for operating in a manner that does not endanger yourself and others or result in damage to the product or the property of others. This model is controlled by a radio signal subject to interference from many sources outside your control. This interference can cause momentary loss of control so it is advisable to always keep a safe distance in all directions around your model, as this margin will help avoid collisions or injury.Age Recommendation: Not for children under 14 years. This is not a toy.·Never operate your model with low transmitter batteries.·Always operate your model in an open area away from cars, traffic or people.·Avoid operating your model in the street where injury or damage can occur.·Never operate the model in populated areas for any reason.·Carefully follow the directions and warnings for this and any optional support equipment you use (chargers,rechargeablebattery packs, etc.)·Keep all chemicals, small parts and anything electrical out of the reach of children.·Moisture causes damage to electronics. Avoid water exposure to all equipment not specifically designed and protected for thispurpose.·Never lick or any place of any your model in your mouth as it could cause serious injury or even death.Lithium Polymer (Li-Po) Battery WarningCAUTION: Always follow the manufacturer’s instructions for safe use and disposal of batteries. Fire, propertydamage, or serious injury can result from the mishandling of Li-Po batteries.By handling, charging or using a Li-Po Battery you assume all risks associated with lithium batteries.If at any time the batteries begin to swell or balloon, discontinue use immediately!Always store the batteries at room temperature in a dry area to extend the life of the battery. Always transportor temporarily store the battery in a temperature range of 40-120F. Do not store the battery or model in a car or in direct sunlight. If stored in a hot car, the battery can be damaged or even catch fire.Never use a Ni-Mh Charger to charge Li-Po Batteries. Failure to charge the battery with a Li-Po compatible chargermay cause fire resulting in personal injury and property damage.Never discharge Li-Po Cells below 3V.Never leave charging batteries unattended.Never charge damaged batteries.Charging the Flight Battery WarningUse a battery charger that is designed to safely charge the Li-Po Battery. Read the charger instructions carefully before use. When charging the battery, make certain the battery is on a heat resistant surface. It is also highly recommended to place the Li-Po Battery inside a fire resistant charging bag readily available at hobby shops oronline.Main wing installationVertical stabilizer installationHorizontal stabilizer installationModel assembly1.Ensure the control horn faces down as shown. Carefully insert the horizontal stabilizer to the horizontal stabilizer slot until it is properly in place and you hear a click.Note: Align and connect the elevator servo plugs to the servo extensions located within the fuselage.1.Slide the Horizontal stabilizer spar into the fuselage. Align and install the vertical stabilizer over the spar and into the vertical stabilizer slot of the fuselage.2.Connect the elevator and rudder servos to their respective extensions in the fuselage.E N1.Align and slide the wing spar into the fuselage, then install both wings over the wing spar and into the wing slot of the fuselage.2.Secure both wings onto the fuselage using the snap lock.The wings are successfully secured when you hear a click.Notice: Ensure the snap lock is properly in place and the connectors on both sides are attached precisely and firmly.SicherheitsvorkehrungenAls Benutzer dieses Produkts sind Sie allein dafür verantwortlich dieses Produkt so zu betreiben, dass weder Sie selbst noch andere gefährdet oder Schäden am Produkt oder Eigentum anderer verursacht werden.Dieses Modell wird von einem Funksignal gesteuert, das von vielen Quellen außerhalb Ihrer Kontrolle gestört werden kann. Solche Störungen können zu einem vorübergehenden Kontrollverlust führen. Daher sollte immer einen Sicherheitsabstand zu Personen und Gebäuden eingehalten werden.Altersempfehlung: Nicht für Kinder unter 14 Jahren. Dies ist kein Spielzeug.· Betreiben Sie Ihr Modell niemals mit leeren Senderbatterien.· Betreiben Sie Ihr Modell immer in einem offenen Bereich, abseits von Gebäuden, Verkehr oder Personen.· Befolgen Sie die gesetzlichen Regelungen Ihres Landes zum Betrieb von ferngesteuerten Modellflugzeugen.· Befolgen Sie sorgfältig die Anweisungen und Warnungen für dieses und alle unterstützenden Geräte, die Sie verwenden (Ladegeräte, wiederaufladbare Akkus usw.).· Bewahren Sie alle Chemikalien, Kleinteile und elektrischen Geräte außerhalb der Reichweite von Kindern auf.· Feuchtigkeit verursacht Schäden an der Elektronik. Vermeiden Sie, dass die Produkte Wasser ausgesetzt werden, die nicht speziell für diesen Zweck entworfen und geschützt sind.· Nehmen Sie Teile des Produkts niemals in den Mund, da dies zu schweren Verletzungen oder sogar zum Todführen kann.Hinweise zu LiPo-AkkusVORSICHT: Befolgen Sie immer die Anweisungen des Herstellers zur sicheren Verwendung und Entsorgungvon Batterien. Durch falsche Handhabung von Li-Po-Batterien können Feuer, Sachschäden oder schwere Verletzungen verursacht werden.Seien Sie sich über alle Risiken klar, die mit dem Umgang von Lithium Polymer (LiPo) Akkus verbunden sind. Wenn die Akkus zu irgendeinem Zeitpunkt anschwellen oder aufblähen, verwenden Sie diese auf keinen Fall mehr!Um die Lebensdauer des Akkus zu verlängern sollten dieser bei Zimmertemperatur in einem trockenen Bereich gelagert werden. Bewahren Sie den Akku oder das Modell nicht in einem Auto oder in direktem Sonnenlicht auf. Wenn der Akku über einen längeren Zeitraum zu hohen Temperaturen ausgesetzt wird kann dieserbeschädigt werden oder sogar Feuer fangen.Verwenden Sie niemals ein NiMh-Ladegerät, um Li-Po-Akkus aufzuladen. Wenn der Akku nicht mit einemLi-Po-kompatiblen Ladegerät geladen wird, kann dies zu einem Brand führen, der zu Personen- und Sachschäden führen kann.Niemals Li-Po Zellen unter 3V entladen.Lassen Sie Akkus beim Laden niemals unbeaufsichtigt.Laden Sie niemals beschädigte Akkus auf.Aufladen des LiPo-Akkus: Verwenden Sie ein Ladegerät, das die Li-Po-Batterie sicher aufladen kann. LesenSie vor dem Gebrauch die Anweisungen des Ladegeräts sorgfältig durch. Achten Sie beim Laden des Akkus darauf, dass sich der Akku auf einer hitzebeständigen Oberfläche befindet. Es wird auch dringend empfohlen, den Li-Po Akku in einem feuerbeständigen LiPo-Koffer zu laden. LiPo Koffer finden Sie bei Ihrem Fachhändler oder im Internet.Montage des FlügelsMontage des SeitenleitwerksMontage des HöhenrudersMontage des ModellsStellen Sie sicher, dass das Ruderhorn wie abgebildet nach unten 1. Schieben Sie den Flächenverbinder wie abgebildet in den Rumpf und stecken dann die beiden Flügelhälften auf den Flächenverbinder bis zur Flügelaufnahme am Rumpf.2. Sichern Sie beiden Flügelhälften mit dem Schnappverschluss am Rumpf. Die Flügel sind erfolgreich gesichert, wenn Sie ein Klicken hören.Hinweis: Stellen Sie sicher, dass die Schnappverriegelung richtig sitzt und die Anschlüsse auf beiden Seiten exakt und fest angebracht sind.zeigt. Stecken Sie das Höhenleitwerk vorsichtig in die Öffnung des Seitenleitwerks bis ein klicken zu hören ist.Hinweis: Verbinden Sie die Servostecker im Rumpf.1. Schieben Sie das Verbindungsrohr in den Rumpf. Positionie-ren Sie nun das gesamte Heckleitwerk vorsichtig am Rumpf.2. Verbinden Sie die Höhen- und Seitenruderservostecker mit den entsprechenden Verlängerungskabeln im Rumpf.Consignes de sécurité et avertissementsEn tant qu’utilisateur de ce produit, vous êtes seul responsable de son utilisation, de manière à ne pas vous mettre en danger, et à ne pas mettre les autres en danger, et à ne pas endommager ce produit ou causer de dégâts à des tiers. Ce modèle est piloté par un signal radio qui peut être soumis à des interférences provenant de sources variées que vous ne contrôlez pas. Ces interférences peuvent causer une perte momentanée de contrôle, aussi est-il prudent de toujours garder une distance de sécurité dans toutes les directions, autour de votre modèle, cette marge vous aidant à éviter les collisions ou les blessures.Âge recommandé : Ce produit ne doit pas être utilisé par des enfants de moins de 14 ans. Ce n’est pas un jouet.• N’utilisez jamais votre modèle avec des piles faibles dans l’émetteur.• Utilisez toujours votre modèle dans un espace vaste, sans véhicules, sans circulation et sans personnes.• N’utilisez pas le modèle dans les rues, où vous pourriez occasionner des blessures ou des dégâts.• N‘utilisez jamais le modèle pour quelque raison que ce soit dans la rue ou dans des zones peuplées.• Suivez soigneusement les instructions et les conseils de ce manuel et ceux des équipements optionnels (chargeurs, accusrechargeables, etc.).• Tenez tous les produits chimiques, les petites pièces et tout composant électrique hors de portée des enfants.• L‘humidité peut causer des dégâts à l'électronique. Evitez d‘exposer à l‘eau les équipements non conçus spécialement à cet effet et spécialement protégés.• Ne léchez pas, et ne placez aucune partie du modèle dans votre bouche, car cela peut entraîner des blessures graves et même la mort.Avertissement concernant les accus Lithium Polymère (LiPo)Attention : Suivez toujours les instructions du fabricant pour utiliser les accus et vous en débarrasser. Un mauvais usage d'accus LiPo peut entraîner un incendie, des dégâts matériels ou des blessures graves.En manipulant, chargeant ou utilisant des accus LiPo, vous assumez tous les risques associés aux accus au Lithium.Si à n’importe quel moment, l’accu commence à gonfler, arrêtez immédiatement de l’utiliser !Charger ou décharger un accu gonflé peut entraîner un incendie.Stockez toujours les accus à température ambiante dans un espace sec pour augmenter la durée de vie de l’accu.Transportez ou stockez toujours les accus dans une plage de températures de 5 à 48 °C. Ne stockez pas les accusou le modèle dans une voiture ou directement à la chaleur du soleil. Un accu stocké dans une voiture chaude peutêtre endommagé et éventuellement prendre feu. N’utilisez jamais un chargeur pour accus NiMh. Ne pas charger avec un chargeur compatible LiPo peut entraîner un incendie, entraînant des blessures et des dégâts matériels.Ne déchargez jamais les éléments LiPo à moins de 3 V par élément.Ne laissez jamais une charge se faire sans surveillance.Ne chargez jamais un accu endommagé.Vous devez charger les accus LiPo uniquement avec un chargeur spécial LiPo. Lisez bien les instructions de votre chargeur avant usage. Quand vous chargez l’accu, vérifiez que l’accu est sur une surface ininflammable. Il est également conseillé de placer les accus LiPo dans un sac résistant au feu que vous trouverez facilement dans les magasins de modélisme ou sur les boutiques en ligne.Avant le montage, merci de contrôler le contenu du kit. Leschéma ci-dessous détaille le contenu du kit et lanumérotation. Si quelque élément est manquant ou défectueux, identifiez le nom ou le numéro de la pièce(reportez-vous à la liste des pièces de rechange page 18 de ce manuel), puis contactez votre magasin local ou contactez-nous : support@ .Contenu du kitIntroduction Contenu du kit Montage du modèle Mise en place de l'accu Diagramme de connexion Préparation du modèle au vol Montage des chapes Réglage des guignols et des palonniers de servos Centrage (C.G.) Avant de faire voler le modèle Pilotage du modèle Dépannage Liste de pièces de rechange Table des matières...........................................................21.......................................................21 ...............................................22 ............................................23........23 .............................. ..................................24 ...................25..........25...............................................25 ....................................26 ....................................... ..................................................26......................................................................27 (27)· ·····IntroductionSpécificitésMerci d'avoir acheté le FOX 3000 mm FMS. Avec son envergure impressionnante de trois mètres, le FOX est un des plus grands aéronefs RC en mousse produit au monde. Utilisant les dizaines d'années d'expérience de FMS dans la conception de modèles réduits, le Fox possède un profil d'aile ultra-efficace, ainsi qu'une motorisation brushless avec contrôleur 70 A procurant une puissance plus que suffisante pour réaliser des figures demandant beaucoup d'énergie.Fabriqué selon le nouveau concept FMS "Snap-together", le Fox se transporte et se monte facilement sur le terrain, sans besoin d'outils.Le Fox est équipé d'un moteur brushless Predator 4258, Kv 460,alimenté par un contrôleur 70 A et entraînant une hélice repliable 15 x 7,5". Cet ensemble couplé à un accu LiPo 6S donne au Fox 3000 mm des performances dans le plan vertical pratiquement illimitées, ce qui est très rare en matière de planeurs.De plus, les gouvernes sont pilotées par des servos de 23 g àfort couple, assurant une action précise et de la puissance pour les figures extrêmes.Boucles droites et inversées, renversements, tonneaux àfacettes et vol dos ne sont que quelques-unes des figures de voltige que le Fox 3000 mm peut réaliser. Le reste ne dépend que du pilote !Envergure : 3000 mm (118.11")Longueur hors tout : 1873 mm (73.73")Poids en ordre de vol : Environ 4700 g Format du moteur : Brushless 4258-KV460Charge alaire : 64.5 g/dm 2 (0.14oz/sq.in)Surface alaire : 74.4 dm 2 (1153.2 sq.in)Contrôleur brushless : 70 A Servos : 6 servos 23 grammesBatterie recommandée LiPo 6S 22.2V 5000 mAh 35CCaractéristiquesA : FuselageB : Trappe-Cabine E : Stabilisateur horizontal F : Jeu de clés d'aileC : Ensemble voilureD : Dérive 1. Grande envergure2. Puissant moteur 4258, contrôleur 70 A3. Servos 23 g à fort couple4. Assemblage par enclenchement (Snap-together) sans vis et sans colle5. Montage rapide (10 à 15 minutes)6. Démontage des ailes en 10 secondes, cellule facile àtransporter.7. Un accu LiPo 6S 5000 mAh permet des vols d'environ 30minutes.8. Volets fonctionnels 9. Hélice repliableF.E.A.B.D.C.本产品飞行由无线电遥控器控制,在飞行过程中可能会受到外界强信号源干扰而导致失控,甚至坠机。
LI-3000D(双轨)自动调轨宽操作步骤与1轨到2轨的偏移量

LI-3000D(双轨)操作手册
一.自动调轨宽操作步骤
1.打开D:/Program/LaneAdjust
2.点击下拉菜单“运行”--“调整轨道宽度”//机器采集图像计算距离。
3.点击下拉菜单“运行”--“检查基板”//机器显示计算结果
如图,Rail1, Rail2, Rail3分别显示三边轨道的位置。
Rail0 X原点位置。
LANE1,LANE2为两段轨道的宽度。
Rail3为Rail0到Rail3的最大距离。
调整轨宽点击“执行”轨道自动调整宽度。
轨宽调整完点击“获取位置”机器重新采图计算当前位置。
注; 双轨机器执行动作前确认“START”键需要点
二.计算1轨的2轨Y方向的偏移量
3.打开D:/Program/LaneAdjust
4.点击下拉菜单“运行”--“调整轨道宽度”//机器采集图像计算距离。
5.点击测量工具,测出固定边到第三条边的距离,如下图,把测出来的Y方向的数值输入到所要生产的程序机种信息栏的轨
道偏移量Y里面。
通力3000调试

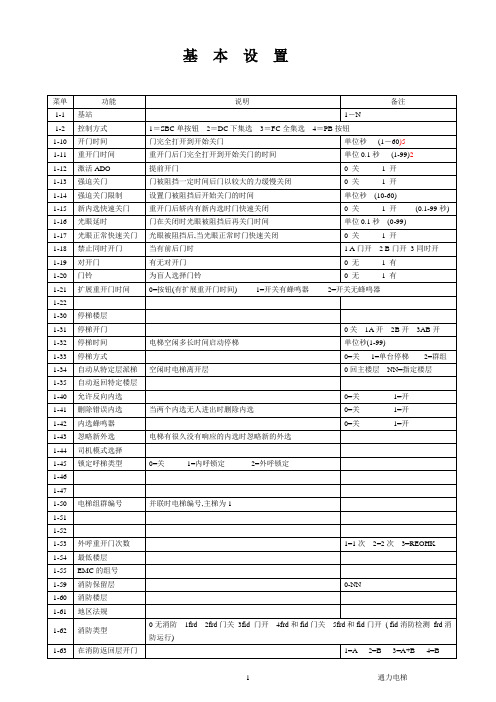
E1故障历史记录-显示最近的故障情况--F2清除故障记录-重置故障记录,清除内存--菜单子菜单功能注-d-驱动故障参看故障代码表-菜单子菜单功能注代码含义( 斜体表示默认值)必备11基站选择基站(1)楼层号12控制方式3集选方式选择1=C 单按钮控制2=DC 下集选3=FC全集选4=PB 按钮控制门系统110开门时间相应普通楼层的内指令信号时,从门完全打开至开始关门时的时间单位秒(1-60) 111重新开门时间重开门后,从门完全打开至重新开始关门的时间单位0.1 秒(1-1.99)112激活A DO 激活提前开门功能0= 关闭1= 激活113强迫关门如果在一段选定的时间内关门受阻,门将以较慢的速度蜂鸣关门,此时只有关门力限器起作用,强迫关门持续到关门结束0= 关闭1= 激活114强迫关门时间限制设置开始强迫关门的时间(20)单位秒(10-60)115轿内指登记快速关门开门或门已打开单位0.1 秒0= 无该功能(0-99)按下内指按钮可以缩短开门时间116光眼延时设置光眼被挡到重新关门的时间(0-99) 20单位0.1 秒 . 0= 无该功能117光眼正常快速快门设置光眼正常后快速关门0= 无1= 有118禁止同时开门A 门及 C门的开门及同时开门功能1=A 门优先2=C 门优先3= 同时119对穿门轿厢选用对穿门轿厢0= 一个门1= 对穿门120门铃为盲人选择门铃0= 关1= 门完全打开时响121延长开门时间LCECOB的输入SC170= 按钮(DOEB)1= 开关带蜂鸣器(DOE S)2= 开关不带蜂鸣器(DOE S)) 的类型泊梯130泊梯楼层选择泊梯楼层0=off 楼层号131泊梯时开门泊梯时A门与C 门的开关情况0= 关1=A 门优先2=C 门优先3=AC 同时开132泊梯时间选择电梯在开始泊梯前的空闲时间301-99 秒133泊梯模式选择单台或群组泊梯0= 关1= 单梯2= 群组泊梯134自动从特定楼层派遣电梯空闲电梯将离开此楼层(ADF功能)0= 关nn= 指定楼层135自动返回特定楼层(ADF功能)将电梯开往此楼层0= 回主楼层nn= 指定楼层内指140允许反向内选登录与电梯运行方向相反的内指令信号,一旦停梯,便对这些信号开始响应0= 关1= 开141错误内选删除电梯连续完成两个内指而无人出入轿厢的情况下删除所有内指信号0= 关1= 开142内选登记蜂鸣器当内选登记时发出一声短促声0= 关1= 开143忽略新外呼为响应超时的外呼0= 关1= 开略新外呼144司机模式选择-0= 标准1=ATS HK 2=ATS CS145锁的类型指定LCEOPT的锁输入信号- 锁- 的用法0= 关1= 锁内选2=锁外呼3= 锁内选和外呼群组-50电梯在群组中的编号设置电梯在群组中的编号-1 (6)-51在E-link 中的编号设置电梯在E-link 中的编号33 ,34 ,35 ,36 (64)-52在Konexion中的编号设置电梯在Konexion中的编号(0-8)Konexion;n=电梯号-53外呼重开门次数当轿厢有内选时外呼使门重开的次数1=1 次2= 多次3=REOHK154最低楼层最底楼层的楼层编号(1)须重划楼层FEB 选项155EMC 的组号选择EMC的组号(arouonumber)1-32消防156消防保留楼层--160消防楼层选择消防返回楼层楼层号161地区消防法规(0-17)选择各国的消防类型0= 未用17= 亚太地区162消防类型(0-13))(FID指消防检测,FRD指消防员运行选择FID与FRD组合:0=无消防功能;1=FRK;2=FID关;3=FID开;4=FRD-FID门关;5= FRD-FID开门;6=FID MO;7=FID-MO;8=FIDMO+FRD;9=FIDMO+FRD;10=FIDAO;11=FID AO;12=FID AO+FRD;13=FID AO+FRD;163在消防返回楼层开门选择A 门或 B门,1=A 门2=A+B 门3=B+A 门4=B 门紧急164紧急返回楼层紧急行动时的返回楼层(0-nn)0= 下一个可能的楼层165紧急返回后的位置选择紧急返回后的A 门与 B门的开关情况0= 门关1=A 门开2=B 门开3=A B 门均开166使用防火门FPD选择是否使用LCEOPT的FPD输入0= 无FPD,1= 有FPD167EPS 紧急电源使用顺序紧急返回和检修服务的顺序0=参数EPS;1-6=内置EPS168最多电梯台数(EPS)允许同时进行紧急返回和紧急服务的台数0…S170满载百分比设定载荷客量(80%),50-99%直驶功能171轿顶检修驱动限位轿顶检修运行时遇到任何77限住开关是否停车0=遇到77:U/N停;1=77:U停;2=77N停;3=不停KONE3000 EcoDisc 产品保养调试培训172锁梯时的停梯楼层(OSS )选择锁梯时的停梯楼层(0…nn )0= 最近楼层或锁梯开关所在楼层173锁梯时的门情况设置锁梯时门的开关情况0= 门关,1=A 门开;2=B 门开;3=A B 门均开174优先外呼服务方式0= 无;1=PRL LA; 2=PRL LO; 3=PRL LA; 4=PRL HO; 5=HELA; 6=HEL O175轿厢风扇省电功能空闲梯楼经一段时间后风扇关闭( 5 )0= 不使用;1-59 分钟176轿厢照明省电功能空闲停梯经一段时间后照明关闭0= 不使用;1-59 分钟177轿厢照明电压监控(CLS )若LCECCB 上没有照明电压,电梯停止运行0= 关;1= 开178Konexion 照明电流监控激活该功能0= 关;1= 开179锁机模式的轿厢照明锁机OSS 模式时关闭照明0= 关;1= 开180主楼层时强制停梯电梯经过主楼层时必须停梯,以便保安人员检查轿车内乘客0=不停,1=下行时停;2=上行时停;3=上下均停181经过楼层时的信号响声提示乘客轿厢经过或停在某楼层0= 关;1= 开182到站钟类型0=LA L DB ;1=LAL DN ;2= 提示闪烁LA L A B ;4= 提前闪烁LAL AN183超载批示内烁COP 超载可选为闪烁指示0= 不闪烁;1= 闪烁184内选优选方式PRCLCECOB输入XC16,1=PRC K持续有效(开关),一个内选项;B一次有效(按钮),一个内选;3=PRC CS(持续有效,多个内选)185通电延时PUD延时一段时间才投入正常服务,以免与大楼其他设备同时启动造成过流(0-99 秒)186地震动作EAQ-0= 没有;1= 有187紧急电池EBD-0= 没有;1= 有188FRE (防犯罪)门Fast recall door0= 没有;1=A 门;2=B 门;3=A+B 门189指定FRE 防犯罪返回楼层Fast recall floor0= 没有;nn= 指定返回楼层190双并联控制FET/FEB呼梯,0=不使用;1=服务所有呼梯;2=在主层不服务正常呼梯;3=在主层不服FET/FEB呼梯191DOM CS 选项-0= 没有;1= 有192风扇控制类型-0=OCV A ;1=OCV AF193一套COP 不区分A , B 门TTC CON/DON0= 不使用;1= 使用194轿厢到站钟(GOC )0= 不使用;1= 使用199重置厂方设置参数重置厂主设置(缺省)参数注意:电梯将丢失所有的现场设置参数1= 重置默认值,对菜单 2 的设置无效菜单子菜单功能注代码含义21设置马达型号选择EooDisc 的型号,第一次运行前必须检查此项05=MX05;06=MX06;10=MX10;05=MX05q2;06=MX06q210=MX10q2;11=MX061·6m/s;12=MX06q2 10/0513=MX10q2 13/05;14=MX10q216/15=MXq2 20/0522禁止驱动为调试起见,禁止和激活驱动0= 允许启动; 1 = 不允许启动23加加速度(Jerk)圆化加速,恒速和减速0=0·6/1=0 8/2=1·0/3=1·2m/s 3 24加速度调节加速度大小0=0·4/1=0 6/2=0·65m/s 225额定速度电梯的额定速度0=0·5/1=0 63/2=0·8/3=1·0/426K4 、马达电压K4 设置电压与频率间的比率0=0·229…… 0·319 (0·006 一级)27K3 、高的负载补偿有载启动时马达的附加电压0=0·096……15=0·143 (0·003 一级)28K2 、低的负载补尝有载启动时马达的附加电压0=0·083……15=0·21629K1 、最小电压马达的最小电压0=0·0030……15=0·0210210D- 参数速度误差反馈比例:0=0·5 ,1=0·8 ,2=1·2·3=2·0 ,4=2·7 ,5=3·5 ,6=4·5 ,7=5·5211启动延时制动器松闸与主继电器激活电梯启动之间的时间间0=75 ,1=100 ,2=150 ,3=200 ,4=250ms隔菜单子菜单功能注31改变7 段码字符设置数字和字符:0123456789ACEFHJLPU32改变代码数字(Dot Matnx 点阵或LCD )设置数字和字符的ASCll 码(0…255 )33使用A CU 时选择楼层语音信息楼层语音信息代码(0-63 )34使用A CU 且要求方向及/ 或门运动语音提示0= 无;1= 方向;2= 门运动;3=方向和门运动语音提示35LCD 显示语言选择10= 无;1= 阿拉伯;2= 中国… 6= 英语… 8= 芬兰… 15= 日语16= 韩语… 28= 土耳其36LCD 显示语言选择 2 ,选择第二语言41电梯运行模式(0…18):0=Nor正常;1=lnsp检修;2=Sync同步;3=Fio消防员;4=EPD备用电;5=ATS司机;6=PRLL T8= PAD泊梯;10=OSS锁机;11=PRC优先内选;15=PRL H/HEL优先外呼;16=EA Q;17=FRE,18=轿厢照明电压监控42启动计数(0…999 999 )滚动显示统计电梯启动次数43开门计数(0…999 998 )滚动显示统计开门次数44V3F 散热器温度(℃)显示V3F 晶体管最热器的的温度410LCECPU SW 版本号显示电梯软件的版本号411V3F25/16es SW 版本号显示所用菜单软件的版本412LCE 菜单显示V3F25/16es 软件版本号420DTS 时间显示驱动时间监控的触发值421动行试验(自动运行,外呼必须连接且有效)0= 正常;1= 全程动作行;2= 从底层起,每隔一层运行;3= 随机运行51称重装置调节显示轿厢载重的百分比52井道设定(划楼版)setup显示setup 运行:1=setup 开始53Konexion 接口板1=LCEVOi;2=LCEA DJ;3=LCEKNX 54Roil call 方向1= 下;2= 上(机房下置时)61-99V3F25 参数电梯必须处于RDF 模式回答人的补充2010-08-02 00:31通力3000小机房调试LGE用户接口功能模式菜单子菜单功能注E 1 故障历史记录显示最近的故障情况F 2 清除故障记录重置故障记录,清除内存菜单子菜单功能驱动故障参看故障代码表菜单子菜单功能注1 1 主楼层选择主楼层(1)1 2 控制方式集选方式选择:1=SBC单按钮控制;2=DC下集选1 10 开门时间1 11 重新开门时间单位0·1秒1 12 激活ADC 激活提前开门功能0=开门;1=激活1 13 强迫开门1 14 强迫开门时间设置开始强迫关门的时间(20)单位:秒(40-60)1 15 新内指登记快速关门单位:0·1秒;0=无该功能(0-99)1 16 光眼延时设置光眼被挡到重新开门的时间(0-99)20 单位:0·1秒;0=无该功能1 17 光眼正常快速关门设置光眼正常后快速关门0=无;1=有;1 18 禁止同时开门"1=A门优先;2=B门优先;3=同时优先"1 19 对穿门轿厢选用对穿门轿厢0=一个门;1=对穿门;1 20 门铃为盲人选择门铃0=关;1=门完全打开时响1 21 延长开门时间"1=开关带蜂呜(DOE S)2=开关不带蜂呜器(DOE S)"1 30 泊梯楼层1 31 泊梯时开门泊梯时A门与B门的开关情况"0=关;1=A门优先;2=B门优先;3=AB门同时优先"1 32 泊梯时间选择电梯在开始泊梯前的空闲时间(30)1 33 泊梯模式选择单台或群组泊梯0=关;1=单梯;2=群组泊梯1 34 自动从特定楼层派谴楼层空闲电梯将离开此楼层(ADE功能)0=关;nn=缩定楼层1 35 自动返回特定楼层(ADF功能)将电梯开往此楼层0=回主楼层;nn=指定楼层;1 40 允许反向内选0=关;1=开;1 41 错误内选删除0=关;1=开;1 42 内选登记蜂呜器当内选按亮(登记)时发出, 0=关;1=开;1 43 忽略新外呼为响应超时的外呼而忽略新外呼0=关;1=开;1 44 司机模式选择0:标准/1:ATS HK/2:ATS CS1 45 锁的类型(楼层进出控制)指定LCEOPT的锁输入信号-锁-的用法"0:标准/1:锁内选/2:锁外呼/4=锁内选和外呼"1 50 电梯在群组中的编号设置电梯在群组中的编号(1)1 (6)1 51 在EMC(E-Link)的编号设置电梯在EMC(E-Link)中的编号(33...64)33,34,35,36 (64)1 52 在Konexion中的编号设置电梯在Konexion中的编号(0-8)Konexion;n=电梯号1 53 外呼重新开门次数当轿厢有内选时外呼使门重开的次数1=1次;2=多次;3=REO HK 1 54 最低楼层1 55 EMC(E-Link)的组号选择EMC(E-Link)的组号,(group number)(0) 0-311 59 消防保留楼层用FID B(uilding)和FID M(achine room)时必须为0 0=on1 60 消防楼层选择消防返回楼层(1)楼层号1 61 地区消防法规(0-17)1 621 63 在消防返回楼层开门选择A门或B门:1=A门;2=A+B门;3=B+A门;4=B门1 64 紧急供电返回楼层(EPD)选择紧急供电运行时的返回楼层(0-nn)0=下一个可能的楼层1 65 紧急返回后的门位置选择紧急返回后的A门与B门的开关情况0=门关:1=A门开:2=B门开:3=AB门均开1 66 使用防火门(FPD)选择是否使用LCEOPT的FPD输入0=无FPD ,1=有FPD 1 67 EPS紧急电源使用顺序紧急返回和紧急服务的顺序0=参数EPS;1-6=内置EPS1 68 最多电梯台数(EPS)允许同时进行紧急返回和紧急服务的台数0…S1 70 满载百分比设定载荷客量(80%),满载直驶功能50-99% 1 71 轿顶检修驱动限位"0=遇到77:U/N停;1=77:U停;2=77N停;3=不停"。
通力3000电梯调试资料
通力3000电梯调试资料通力电梯调试资料2009-03-22 09:42通力电梯调试资料菜单子菜单功能注E1故障历史记录显示最近的故障情况E2清除故障记录重置故障记录,清除内存菜单子菜单功能注d驱动故障参看故障代码表菜单子菜单功能注代码含义(斜体表示默认侄)必备11主楼层选择主楼层(1)楼层号12控制方式集选方式选择:仁SBC单按钮控制:2=DC下集选:3=FC全集选:4=PB按钮控制门系统110开门时间相应普通楼层的内指信号时,从门完全打开至开始关门时的时间(5S) 单位秒(1--60)111重新开门时间重开门后,从门完全打开至重新开始关门的时间(20)单位0.1秒(1—99)112激活ADO激活提前开门功能0=关闭: 仁激活113强迫关门如果在一段选定的时间内关门受阻,门将以较慢的速度响蜂鸣关门,此时,只有关门力限制器起作用,强迫关门持续到关门结束,0=关闭;仁有效;2=NUD114强迫关门时间限制设置开始强迫关门的时间(20)单位秒(1--60)115新内指登记快速关门开门或门已打开时,按下按钮可以缩短开门时间单位0。
1秒。
0=无该功能(0-99)116光眼延时设置光眼被挡到重新关门的时间(0-99)20单位0。
1秒。
=无该功能(0-99)117光眼正常快速关门设置光眼正常后快速关门0=无仁有118禁止同时开门A门和B门的开门及同时开门功能仁A门优先;2=B门优先3=同时119对穿门轿厢选用对穿门轿厢0= —个门;1=对穿门120门终鸣器为盲人选择门终鸣器0= 关;仁门完全打开时响121延长开门时间LCECOS的输入XC(34 : E)的类型0=按钮(DOEB);1=开关带蜂鸣器(DOES);2=开关不带蜂鸣器(DOES);122DOP 类型选择DOP 类型0=no ne;仁DOP CS泊梯130泊梯楼层如1-33=2(群组泊梯)1# 梯此菜单选择的楼层是第一泊梯楼层(PAM)2#梯此菜单选择的楼层是第二泊梯楼层(PAS)3#梯此菜单应0,0=0FF,nn=楼层号131泊梯时开门泊梯时A门与B门的开关情况0=关,仁A门优先,2=B门优先,3=AB门同时开132泊梯时间选择电梯在开始泊梯前的空闲时间(30)(1-99)秒133泊梯模式选择单台或群组泊梯0=关,仁单梯,2=群组泊梯134自动从特定楼层派遣电梯空闲电梯将离开此楼层(ADF)功能0=关,门门=指定楼层135自动返回特定楼层(ADF)功能将电梯开往此楼层0=回主楼层,门门=指定楼层内指140允许反向内选允许登陆与电梯运行方向相反的内指信号,一旦停梯使这些信号开始响应0=关,仁开,141错误内选删除电梯连续完成两个内指而无人出入轿厢的情况下删除所有内指信号0= 关,仁开142内选登记蜂鸣器当内选按亮(登记)时发出一短促声音0=关,仁开143忽略新外呼为响应运时的外呼而忽略新外呼0=关,仁开144司机模式选择0:标准1:ATS HK/ 2 : ATS CS145锁的类型(楼层进出控制)指定LCEOPT的锁输入信号-锁-的用法0=关,1:锁内选,2:锁外呼,3:锁内选和外呼146尤先下呼1。
基因有限公司农业环境科学部 北京力高泰科技有限公司 LI-3000C 叶面积仪 简易操作手册说明书
LI-3000C叶面积仪简易操作手册
基因有限公司农业环境科学部
北京力高泰科技有限公司
基因有限公司农业环境科学部北京力高泰科技有限公司
微信号:Gene-ecotek 北京总部
电话*************
网址:
技术支持邮箱:******************.cn
地址: 北京市西城区西直门南大街2号成铭大厦A座22F
邮编:100035
广州办事处
电话*************
地址: 广州市天河区东郊工业园路建工路8号6楼B室
成都办事处
电话:138****8447
地址: 成都市武侯区磨子街7号新棕北商务大厦1606室
武汉办事处
电话:139****2420
地址: 武汉市洪山区珞瑜路95号融科珞瑜中心T1-2座1208室。
TL-3000操作手册
TL-3000无线触摸屏操作手册版本1.1此说明书由本公司技术文档编写小组编写完成北京联合控创科技有限公司目 录1 概述.........................................................................................................................................................- 1 -1.1系统简介 (1)1.2硬件组成 (1)1.3特性与功能 (2)1.4技术参数 (2)1.5端口说明 (3)2 安装.........................................................................................................................................................- 5 -2.1外形尺寸 (5)2.2以太网网络 (5)2.3电源 (5)2.4开关 (5)3 编程.........................................................................................................................................................- 6 -3.1设备设置 (7)3.2编程过程 (7)3.3建立通讯 (8)3.4编译上传 (9)4 应用举例.................................................................................................................................................- 9 -4.1控制中心 (9)4.2会议室 (10)5 故障排除...............................................................................................................................................- 10 -5.1故障措施表 (10)5.2联络 (10)6 保修条款...............................................................................................................................................- 11 -1概述1.1系统简介TL-3000无线触摸屏是一款可编程多用途无线双向控制触摸屏,与TL-RFX无线收发机配套使用,可以作为各种人机系统的控制及显示终端。
LMD3000 激光测距仪 用户手册说明书

激光测距仪LMD3000用户手册常州潞城传感器有限公司目录1.0概述 (2)1.1系统原理 (2)1.2技术性能与指标 (2)1.3接线表 (2)1.3.1电源连接图 (3)1.3.2PROFIBUS IN连接图 (3)1.3.3PROFIBUS OUT连接图 (4)2.0面板显示以及按键说明 (4)2.0.1LED说明 (4)2.0.2LED BF and STA说明 (5)2.0.3操作模式符号说明 (5)2.0.4按键说明 (5)2.0.5测量值显示 (6)2.0.6菜单显示 (6)3.0通讯参数配置 (6)4.0机械尺寸 (7)1.0概述LMD3000激光测距仪专门用于对固定和移动物体的距离测量。
主要特点如下:•在恶劣的户外环境下,仍能保持很高的测量精度和可靠性•测量范围最大可达200米•使用可见激光束,易于瞄准被测物•灵活的可扩展的连接电缆,便于供电、电平信号、DP通讯输出•随意设定距离范围,并能用通讯表示距离的正负超差1.1系统原理LMD3000激光测距仪采用相位比较原理进行测量。
激光传感器发射不同频率的可见激光束,接收从被测物返回的散射激光,将接收到的激光信号与参考信号进行比较,最后,用微处理器计算出相应相位偏移所对应的物体间距离,可以达到mm级测量精度。
1.2技术性能与指标测量范围1:0.15~200米,需使用特制反射器测量精度2:±2.5mm分辨率:0.1mm、0.125mm、1mm、10mm、100mm测量周期时间:1ms激光光点尺寸:5mm(+2mm*距离,单位:mm)供电电压:DC18V~30V输出电流IA:≤100mA电流消耗:在DC24V<250mA数据接口:PROFIBUS DP通讯安全等级:符合DIN EN60825-1标准,激光等级2级激光:波长650nm,红色可见。
工作温度:-20℃~55℃存储温度:-20℃~70℃防护等级:IP65质量保证:质保期1年说明:1测量范围与目标反射率、杂散光及环境条件有关2测量精度的统计概率为95%1.3接线表根据连接图连接测量装置•Connection1"Supply voltage"•Connection2"Ethernet"•Connection3"PROFIBUS OUT"•Connection4"PROFIBUS IN"1.3.1电源连接图连接点标记颜色描述1L+brownSupply voltage: DC+18~+30V2MF2white Multifunction output MF2 3M blue Supply voltage:0V4MF1black Multifunctional input andoutput MF11.3.2PROFIBUS IN连接图连接点标记颜色描述1nc––2A green Data3nc––4B red Data5nc––1.3.3PROFIBUS OUT连接图连接点标记颜色描述1+5V–Bus voltage+5V e.for terminating resistor,electrically isolated2A green Data3GND–Bus voltage0V e.for terminating resistor,electrically isolated4B red Data5nc––2.0面板显示以及按键说明1LED面板2显示面板3按键2.0.1LED说明LED描述PWR运行状态显示•LED off:无操作•LED green:工作正常•LED orange flashing:警告•LED red flashing:干扰MF1Multifunctional input/output MF1•LED on:Output high•LED off:Output lowMF2Multifunction output MF2•LED on:Output high•LED off:Output lowLNK Ethernet•LED off:No Ethernet present•LED green:Ethernet present•LED orange flashing:Data transmission BF PROFIBUS界面见下表"LED BF and STA说明".STA总线状态见下表"LED BF and STA说明".2.0.2LED BF and STA说明BF STA描述off off接通后的状态权red off PROFIBUS接口已激活,连接主站尚未创建。
通力3000调试
基本设置故障代码表V3f25调试指南一:概要调试指南仅用于v3f25驱动模块 713990REV2.0该驱动模块在出厂前已经过测试,并预设基本调节1.1安全与健康1.2 工具 数字万用表/测试法码1.3 参考资料am-1.1.30-b tc04807wl-en.tc04807w2-en so-11.65.09-6 as-11.65.01-a as-11.65.08-a1.4 操作界面: Lce 软件必须是3.3 相当于(chinaMAX1.4) 或以上版本,V3f25参数在Lce 菜单6中,其操作方法与其它菜单相似,更改Lce 菜单6中参数必须在Rdf 模式下进行,读取或更改完菜单6的参数后记隹退出菜单6。
更改后就参数就起作用,但断电后丢失。
用菜单6-99永久保存参数。
1.5 V3f25组成 V3F25包括:-Hcb :运动控制板385:A1(High speed motion control board)-逆变板385A2:(Lnverter board)-CMB :电流测量板385:A3(Current measure board) -风扃303 -变压器89-中间直流电路电容器385:c1,c2,(c3,c4) -大功率晶体管385:v1-v3-制动三极管385:v4(Braking Transistor) -二极管整流桥385:v5(Diode Bridge)-制动电阻306只用于40A 的v3f25中 1.6 385:Al hcb 板在此板上RDIR插针有两个,不能少 (不论是水平或是垂直), 将两针都旋转90度就可以改变旋转娈压器的极性.1.7 385:A2 lnverter board 逆变板二 驱动系统/马达设定: 确保am-1.1.30的19.2章所列项目己检查完成2.1检查连接插:tacho 测速计(xg1,xg2;屏蔽线接到左侧板),resolver 旋转变压(xr),lwd(xw 接电阻2-10k)2.2开电;先打下rdf并接通298(保险开关),再送主电源(注意次序)2.3检查(6-3---7,6-60=19),如是q2马达还要检查6-8,6—10=12,用万用表检查Mxtorq设定(核对附表);如是Q2马达,核对菜单6—10,测量Mxtorq(+)和AGND(-),调RTORQ,如果调整TORQ则必须同时检查并调整TAC和TSPL注:q1马达是一种新的mxl8马达型Array号,在马达铬牌上标为mxl8q22.4 tacho极性向上TPOL亮,否则调换XGl和XG2注意:rdir插针有两个,不能少(不管是水平还是垂直),将两插针都旋转90度就可以改变旋转变压器的极性.2.5 Resolve极性向上RPOL亮,否则将RDIR跳线转90度.注:以下(2.x)和(2.y)并非出自AM-11.65.15原文,而是参照FL-Il.65.20(2.x) 385:A3cmb板平衡调节,务必按以下次序:(a) 调p1,使U与CMB板上的AGND之间电压为0mv(+/-0.1mv);(b) 调p2,使W与CMB板上的AOND之间电压为0mv(+/-0.1mv);(c) 调p3,使v与CMB板上的AGND之间电压为Omv(+/-O.1mv)(2.y) 385:AIHCB板三相平衡调节,先短接UREF2:(a) 调RTR,使TTR与HCB板上的AGND电压为Omv(+/-0.5mv);(b) 调RTS,使TTS与HCB板上的AGND电压为0mv(+/-0.5mv);(c) 调RTT,使TTT与HCB板上的(d) 取走UREF2的短接线2.6 检查LWD;调LWD和LWDF使2.7 调整Resolver旋转变压器角度;旋转变压器角度自动调整介绍:有关,小化(对应于所需的马达转矩).调整过程是半自动的:-在钢丝绳未安装时通过RDF确保测速计(Tacho)和旋转变压器号已调整.-无论何时都要确保安全:钮中断调整,中断后只能从头开始-操作者自己决定方向-V3f25决定何时停止两次成功的RDF运行(v3f25运行是v3F25驱动马达旋转1.4圈左右,并自动停止HBC板上有一个蜂鸣器:-如果旋转变压器是零度(表示末调过),你能听到每隔15秒有四短音-在调整时你能听到两重蜂鸣响声-上行时,每隔一秒有四短音-下行时,每隔一秒有两短音-一长两短音表示有故障,可能的原因是;你按RDF按钮手指松开了,或安全回路断开了,那么只有从头开始调整注意:有一种特殊情况v3f25无法找到角度:如果你偿试了5次以上,每次刚启动就停住,那你就必须调换马达的U,V接线然后重新开始调整-在这种隋况下,你能听到一长三短的蜂鸣.(2.71)未安装钢丝绳:马达第一次运行,检查没有任何物件在曳引轮上.a) 确保制动器已经调好,检查RDF开关已打下.b)按6-70自动检查Pesolver角度菜单,依据图示,先上后下.2.72己安装钢丝绳a) 打下rdf开关,确保井道有足够的运行空间让马达转两圈.b) 检查xw插已接好,监时调节lwd(参看2.8)使5-1的载重显示与轿厢载荷相对应.c) 轿厢装入大约25-35%或65-75%的荷载(不能是空载或满载).Mxl8曳引机没有装制动电路,松制动器要小心,不能让溜车速度太快.此时不允许有人在井道!d) 短时松开制动器一下,检查tpol和rpol灯,上行都亮,下行都不亮.e) 如果轿厢向下溜,依照(2.71),即先上后下运行两遍.f) 如果轿厢向上溜,依照(2.71),但要先下后上(记住:总是先向重的方向运行).最后检查6-62,如果等于0度,表示自动检测不成功,重做;如果是1-360度,则用6-99保存.2.8临时调lwd注意: 安装进度在此时应装好钢丝绳,V3f25可以驱动轿厢运行.以下的1wd调整是基于下述情况.对重已装入大约40%的对重块,轿厢的装璜尚未安装.轿厢与对重大至平衡,但轿厢必须比对重重一点.a) 电气调整前必须先调整1wd机械安装.b) 连接1wd插头,代替临时插头.屏蔽线接到驱动模块左边的金属板上.Mxl8曳引机没有装备动态的制动电路,松制动器要十分小心,不能让溜车速度太快.c) 轿厢空载,短时松开制动器一下,确认电梯向下溜,轿厢比对重重一点.d) 轿厢空载,调节hcb的1wde(offset)至5-1菜单显示0%载荷.e) 轿厢空载,调节hcb的1wdf(gain)至5-l菜单显示50%载荷f) 卸掉半载(轿厢空载),调节hcb的1wde(offset)至5-1菜单显示50%载(因为此时轿厢与对重大致平衡).注意:如果实际情况与上述的不同,则调整称重不但要考虑轿内载荷,还要考虑轿厢与对重的平衡情况根据安装手册继续余下的工作.3 快车调试3.1细调lwda) 空载时,检查轿厢和轿底1wd的安装.b) 电压表一极接1wd(+),一极接agnd(-)c) 轿厢空载,调1wed至1.0v(+/-0.0lv),而且菜单5-1显示00d) 50%载荷:调1wdf至2.5v(+/-0.0lv),而且菜单5-1显示50.e) 打下rdf开关,拨出1wd插,检查lce菜单5-1的显示应低于-15%(如-20%)f) 如果菜单5-1的显示大于-15%(如-2%),应增大称重感应器到感应片之间的距离,并重调.参看E—lineMinlSpace安装手册12.10章节.3.2 SETUPa) 将rdf拉下,驱动电梯至底层或稍低一点.检查lcecpu板上30,61:u,77:n,?7:s灯亮.b) 技菜单5-2-l,蜂鸣响起:间歇的长音.rdf打上,电梯自动慢速向上.c) 如果电梯中途停下,会显示故障代码(111---116)d) 如果setup成功,将显示顶层楼楼层,电梯从Setup运行模式进入正常运行模式.3.3 测量马达力矩3.3.1平衡系数:a) 轿厢50%载荷,从底层向顶层快速运行,到达顶层后拉下rdf,记下6-71(马达力矩)读数(不带符号).b) 打上Rdf,从顶层向底层快速运行,到达底层后拉下rdf,记下6-71(马达力矩)读数(不带符号).c) 两次读数应很接近,两者的差(上减下)就是Balance error(平衡误差),该差值x额定载重量=??kg,就是半载轿厢与对重的重量差.d) 如果上行读数大,应增加对重的重量.c) 如果下行读数大,应减小对重的重量.f) 如果改变了对重的重量,则重新比较读数.3.3.2检查驱动参数:空车向上全程运行,到顶层停车后拉下rdf,检查6-71(马达力矩),不应小于0.6.空车向上全程运行,到顶层停车后拉下rdf检查6-71(马达力矩),不应小于1.2.否则应重复步骤(2.3),某些参数或电位器可能设置不对.细调和测试本章包含下列主题:舒适感,运行效率,停层精度,曳引试验和缓冲器试验.并不意味着每一台电梯都要一页一页地,系统地执行本章所有内容,如果你在上述某个主题有问题,只需根据相关主题的步骤执行.4.1舒适感:注意:本章所有参数都对电梯舒适感有影响,能达到的最好效果需要综合所有参数来调试.某些参数调好后不需要再调.同时,机械部分必须正确安装(导轨,平衡系数,轿厢及隔震,导靴)4.1.1震动a) 制动器调节:制动器衬垫不得与制动轮摩擦.b) 细调Resolver角度(Q2马达不需要做):电梯开到顶层,每2度增大或减少菜单6—22的值(<+/-20度),快车乘坐感觉尤其注意加减速过程.总是从同一层向下测试,用菜单6-99保存,并记录在移交文件里以便更换HCB板时需要.c) 速度控制:减小p或增大i能减轻可能的震动,但同时使干层精度变差.6-1(p Factor)=2.5,以0.5逐次减小,细调时用更小步.6-2l(I Factor)=0.1s,以0.1逐次增大.细调时用更小步.用菜单6-99保存d) 如轿厢有高频振动,可增大Tacho软件滤波时间Tacho filter time(6-32=15ms),用菜单保存.4.1.2 启动空车下行检查马达开始转动时制动器应先打开.可调整启动延时Start delay(6-33,默认值4CDH-0.3秒),不应太大,以免影响电梯的效率,用菜单6-99保存.回溜或很“冲”: 调之前Setup应以做好,因为驱动系统必须知道井道楼层位置数据.a) 首先检查电梯的平衡系数.b) 再检查称重信号,如需要重新调整1wd.c) 轿厢半载.d) 记下6-33启动延时值,将其暂时改为1秒.e) 记下6-1 p factor的值,如大于1.5将其暂时改为1.5.f) 在井道中部,调整6-24 Balance error(平衡偏差-0.2---0.2,每次改变0.02)直至rdf在两个方向启动都好,用菜单6-99保存.s) 在底层,检查6-26 Rope weight(钢丝绳重量),如有补偿链=0,如没有=3.0,每次改变0.5使慢车上行无回溜,如上行有回溜则调大,用菜单6-99保存.h) 使轿厢空载.在底层慢车上行调6-23(start torque scaling,默认值=1.00),每次改变0.05使慢车上行无回溜,均从底层启动,每次间隔10秒以确保启动LWD信号稳定.调好后用菜单6-99保存.i) 在顶层下行调6-27(cai-cable weight随行电缆重量,默认值=0),每次改变0.5.均从项层启每次间隔10秒以确保启动时LWD信号稳定,调好后用菜单6-99保存.j) 恢复6-1 P factor和6-33 Start delay原值,用菜单6-99保存.4 .1.3平层停车最后爬行距离(时间)调节,6-28(Final jerk distance)=125mm,减小6-28使平层更有效率,增大使平层更平滑.4.2电梯运行效率4.2.1 加速度参数(仅在必要时才更改,加速度影响77:U/N的位置)4.2.2 最后爬行距离(时间),6-28(Final jerk distance)=125mm,没有提前开门时4.3 平层精度4.3.1 正常运行的平层精度(注意调节参数P过大或I参数过小可能会引起振动)a) KTW/Q参数:默认值2.8,如果额定载重大(超过(1000kg)可调节参数最大至3.5,每次改变后都检查平层精度,同样用6-99保存,KTW/Q=(轿厢+吊架+门机构+装修+对重)的重量/额定载重.b) P(6-1)每次增加0.5,如细调时用更小步,用菜单6-99保存.c) I(6-21)每次减少0.02,最后用菜单6-99保存.d) Final jerk distance(6-28)调整,参看4.1.34.3.2再平层精度(注意:调节参数P过大或I过小可能会引起振动)a) 如果只是个别楼层的再平层不好,先检查6l:u/n的重叠量.b) p(6-1)每次增加0.5,细调时用更小步,用菜单6-99保存.c) I(6-21)每次减少0.02,最后用菜单6-99保存.d) 增加Relevelling correction distance(6-29).最后用菜单6-99保存.4.4曳引试验参看Mini Space安装手册中的空载曳引试验的125%的曳引试验及制动试验.a) 按菜单6-72(enable traction test)曳引测试=1,该功能放宽了速度监察,只对第一次运行有效.b) 根据安装手册进行测试.c) 如果马达不够力:1)记录下HCB板Mxtorq(+),AGND(-)之间的电压.2)调高0.5v(注意:不能趄过4.8V,如果马达转动不了,不应驱动马达超过2至3秒)3)重新进行测试4)如果马达仍不能动,再0.5V调高0.5V(注意:不能超过4.8v,如果马达转动不了,不应驱动马达超过2至3秒)5)重新进行测试6)测试完成,恢复你改动过Mxtorq电压.4.5缓冲器测试(满速冲击测试,仅在必要时才做)4.5.1对重缓冲器a) 用外呼把空载轿厢召到最低层,确保轿内无人.b) 拉下RDF,禁止外呼和开门c)按6-73(缓冲器测试功能,只有效一次).d)打上RDF,按顶层内选.e) 电梯刚离开顶层门区时(30灯灭)就按一下Lcecpu上的缓冲器测试按钮,故障代码0109或083闪烁.f) 立刻再按此按钮,并按住不放,对重将直冲缓冲器.g) RDF向下检查对重及缓冲器有无损坏.4.5.2轿厢缓冲器a) 用外呼把空载轿厢召到最低层,确保轿内无人.b) 拉下RDF,禁止外呼和开门.c) 按6-73(缓冲器测试功能,只有效一次).d) 打上RDF,按底层内选.e) 电梯刚离开顶层门区时(30灯灭)就按一下Lcecpu上的缓冲器测试按钮,故障代码0109或083闪烁.f) 立刻再按此按钮,并按住不放,对重将直冲缓冲器.g) RDF向下检查对重及缓冲器的无损坏.4.6马达电流测量测量HCB板上的(+)Meas和(-)Agnd之间的电压,Ivac=30A(如果驱动单元是40A)或lvac=60A(如果驱动单元80A)5故障排除5.1 V3f25故障代码:参看E—line Mini Space安装手册,在逆变板(1nverter board)上有三个红色LED灯,分别表示电流过大(SCL),制动电阻故障(BRSL),中间直流电压监察(DCL),同时在LCECPU板上显示故障代码5.2平层感应器:30,61u/n感应器之间必须装隔离片.5.3 HCB板复位:如果HCB板根本不工作且持续复位(你会听到蜂鸣报警),检查RESLOVER连线和接头.5.4 Reslover角度:当出现以下情况时:a)轿厢和钢丝绳已经装好.b)轿厢空载,对重被支撑着,因此松闸时对重不能被提起.c)Resslover角度未调.你可能无法移走对重下的支撑架,在这种情况下,有两重方法可以试一试(此时不允许有人在井道工作):a) 使用6-70自动检测角度,向下开动.b) 从360度开始,每隔30度试角度,向下开动.直到能提起对重,移走支撑架.然后依照2.7自动检测geslover角度.5.5更换HCB(参看AS-11.65.1)a) 用菜单6-62记下旧板的旋转变压器的角度,关电换新板.b) 设置6-62为0并按6-98(电梯处于RDF模式,停于底层)设置默认参数.c) 根据现场电梯规格调节菜单6-3至6-7.(对于q2马达,调节6-3至6-8,6-60=12)d) 设置6-62为旧的旋转变压器角度,按6-99保存.c) 核对列表数据(对于q2马达,核对6-10)检查Mxtorq电压(+/-0.01V),调rtorq.f) 调节TAC电压等于6-11(37.3mm)或6-12(75mm):拔下XC/l-2,将S5跳线从2-3移至l-2位置,测量TAC(+)和AGND(-),调节Tacho电位器,误差+/-0.01,调好后恢复S5和XG.g)调节TSPL电压等于6-13所示值(+/-0.01v),测量TAPL+和ANGD-,调节RSPL.h)调节LEDi)做SETUP5.6 TAC和TSPL电压计算参看英文原版(AM-11.65.15),(0%=1v,20%=1.6v,50=%2.5v,100%=4v,110%=4.3v)附录1:Lce菜单6中的v3f25参数(图号:713983)V3F18/V3F25M parmeter factory and site setting table附录2: Mx18-/v3f25规格表附录3: 蜂鸣代号(*):一短音(-):一长音( ):停顿约1秒(q):停顿约15秒(m):停顿约60秒(---):不间断蜂鸣代码故障名称原因状态操作0001 驱动时间长位置信号30/B30经过一段运行时间后没有变化立即停止关电0004 连续三次同步运行失败连续三次同步运行系统均无法正确接收减速平层信号三次失败后停在端站关电0007 门区开关308030卡死启动一段时间后没有检测到30/B30信号的下降缘,门区开关30/B30一直有效运行至目的楼层,门开不走车关电或打检修0008 NVRAM损坏或容量不够送电时检测NVRAM的容量不够更换NVRAM0014 门区检查电路没有释放486.443;1.443:2任一个连续2次没有经过(ACO/ACL)运行至目的楼层,脱离服务关电0015 门区检查电路没有吸合486.443;1.443:2任一个连续2次没有经过(ACO/ACL)运行至目的楼层,脱离服务关电0021 安全回路不通安全回路输入1无电压立即停止安全回路接通0022 厅门锁不通安全回路输入3无电压立即停止厅门锁接通0023 轿门锁不通安全回路输入2无电压立即停止轿门锁接通0025 启动系统故障电梯停止时主接触器没有释放不启动主接触器排故障0026 驱动系统故障驱动系统检测到故障(v3FCK灯不亮)不启动关电或打检修0039 短路77按扭卡死LCEBOPU板上的短路77按扭卡死不启动直至该按扭松开0042 轿厢照明监视轿厢照明没电运行至目的楼层,脱离服务直至该信号消失0044 关门障碍尝试多次关门但门锁不通5次失败后,门开不走关电或打检修0048 反向开门装置持续有效反向开门信号持续超过一分钟保持开门直至信号消失关电0051 启动无效5次启动不成功,可能比如厅门没关好开门然后再试五次自动恢复0052 上下同步开关同时有效77U和77N同时有效立即停止,只有RDF能开动在端站自动恢复0058 准备运行超时有运行要求但电梯没启动超过100秒立即停止,十秒后尝试运行关电或打检修0060 V3F16的加速信号丢失没有收到驱动系统的加速信号运行至端站关电或打检修0071 门区信号丢失经过数层61U/N时找不到30/B30信号的上升沿运行至目的楼层,不开门关电或打检修0072 61U信号卡死61U信号在离开门区一段时间后仍不释放运行至目的楼层,然后开至最低楼层,如仍然卡死,则脱离服务关电或打检修0073 61N信号卡死经过数层门区时,找不到61N信号的上升沿同上关电或打检修0074 61N信号卡死61N信号在离开门区一段时间后仍不释放同上关电或打检修0075 61U信号卡死经过数层门区时,找不到61U信号的上升沿同上关电或打检修0076 门区监视第一次不释放486.443:1.443:2任一运行时没有释放(ADO/ACL)(允许)运行至目的楼层15秒后自动恢复0077 开门限位故障(一直无效)开门但收不到开门信号0078 轿内按扭卡死任意轿内按扭卡死超过60秒取消该扭服务,直至…….. 按扭恢复正常0079 外呼按扭卡死任意外呼按扭卡死超过60秒取消该扭服务,直至…….. 按扭恢复正常0082 门区监视第一次不吸合486.443:1.443:2任一运行时没有吸合(ADO/ACL)(允许)运行至目的楼层15秒后自动恢复0083 位置丢失计算与井道信号不符运行至端站0084 开门限位故障(一直有效)门关好但仍收到开门信号自动恢复0089 厅门锁回路监视厅门打开(非轿厢位置)运行至目的楼层,脱离服务关电或打检修0145 EBD设备损坏EBD设备0146 EBD电池损坏EBD电池驱动故障0101 驱动停止驱动系统检测到故障使电梯停止检查井道驱动故障0102 马达过电流0103 制动电阻制动电阻损坏检查制动电阻0104 马达过热马达热敏0105 交流供电中间直流电压过低0106 V3F不好0107 承重装置故障承重信号电压小于0.6V 调节承重装置0108 马达/测速出错测速极性接反/轿厢平衡不良/承重不准/制动器没打开/驱动参数不对/超速0109 位置丢失驱动系统位置丢失查下减速、平层开关0110 散热器过热驱动模块的散热器过热控制过程中的驱动故障0111 桥板61:N在61:U之下61:U/N调换查平层开关顺序0112 61:U/N重叠太少查平层开关位置0113同步开关错误同步开关错误同步开关故障查同步开关0114 楼层距离太短查磁铁位置0115 比例错误0116 测楼计数错误学习运行不成功重做楼层学习网络故障原因状态操作A门侧/3门侧1101 输入板坏电路板损坏,接线错误或没电无法联系正常减速停层,关门不动直到再次联系上1202/2201 第一块板故障电路板损坏,接线错误或没电无法联系单梯继续正常服务直到再次联系上1202/2202 第二块板故障电路板损坏,接线错误或没电无法联系单梯继续正常服务直到再次联系上1203/2203 第三块板故障电路板损坏,接线错误或没电无法联系单梯继续正常服务直到再次联系上1301/2301 输出板坏电路板损坏,接线错误或没电无法联系到达目的层,开门不动直到再次联系上1401/2401 第一块板故障电路板损坏,接线错误或没电无法联系继续正常服务运行信号检测通过14xx/24xx 第xx块板故障电路板损坏,接线错误或没电无法联系继续正常服务运行信号检测通过1501/2501 第一块板故障电路板损坏,接线错误或没电无法联系继续正常服务运行信号检测通过15xx/25xx 第xx块板故障电路板损坏,接线错误或没电无法联系继续正常服务运行信号检测通过1601 扩展板坏电路板损坏,接线错误或没电无法联系单梯继续正常服务直到再次联系上1701/2701 第一块板故障电路板损坏,接线错误或没电无法联系直到再次联系上17xx/27xx 第xx块板故障电路板损坏,接线错误或没电无法联系直到再次联系上通力错码(完全版)]代码故障名称原因状态操作0001驱动时间长位置信号30/B30经过一段运行时间后没有变化立即停止关电0004连续三次同步运行失败连续三次同步运行系统均无法正确接收减速平层信号三次失败后停在端站关电0007门区开关308030卡死启动一段时间后没有检测到30/B30信号的下降缘,门区开关30/B30一直有效运行至目的楼层,门开不走车关电或打检修0008NVRAM损坏或容量不够送电时检测NVRAM的容量不够更换NVRAM0014门区检查电路没有释放486.443;1.443:2任一个连续2次没有经过(ACO/ACL)运行至目的楼层,脱离服务关电0015门区检查电路没有吸合486.443;1.443:2任一个连续2次没有经过(ACO/ACL)运行至目的楼层,脱离服务关电0021安全回路不通安全回路输入1无电压立即停止安全回路接通0022厅门锁不通安全回路输入3无电压立即停止厅门锁接通0023轿门锁不通安全回路输入2无电压立即停止轿门锁接通0025启动系统故障电梯停止时主接触器没有释放不启动主接触器排故障0026驱动系统故障驱动系统检测到故障(v3FCK灯不亮)不启动关电或打检修0039短路77按扭卡死LCEBOPU板上的短路77按扭卡死不启动直至该按扭松开0042轿厢照明监视轿厢照明没电运行至目的楼层,脱离服务直至该信号消失0044关门障碍尝试多次关门但门锁不通5次失败后,门开不走关电或打检修0048反向开门装置持续有效反向开门信号持续超过一分钟保持开门直至信号消失关电0051启动无效5次启动不成功,可能比如厅门没关好开门然后再试五次自动恢复0052上下同步开关同时有效77U和77N同时有效立即停止,只有RDF能开动在端站自动恢复0058准备运行超时有运行要求但电梯没启动超过100秒立即停止,十秒后尝试运行关电或打检修0060V3F16的加速信号丢失没有收到驱动系统的加速信号运行至端站关电或打检修0071门区信号丢失经过数层61U/N时找不到30/B30信号的上升沿运行至目的楼层,不开门关电或打检修007261U信号卡死61U信号在离开门区一段时间后仍不释放运行至目的楼层,然后开至最低楼层,如仍然卡死,则脱离服务关电或打检修007361N信号卡死经过数层门区时,找不到61N信号的上升沿同上关电或打检修007461N信号卡死61N信号在离开门区一段时间后仍不释放同上关电或打检修007561U信号卡死经过数层门区时,找不到61U信号的上升沿同上关电或打检修0076门区监视第一次不释放486.443:1.443:2任一运行时没有释放(ADO/ACL)(允许)运行至目的楼层15秒后自动恢复0077开门限位故障(一直无效)开门但收不到开门信号0078轿内按扭卡死任意轿内按扭卡死超过60秒取消该扭服务,直至……..按扭恢复正常0079外呼按扭卡死任意外呼按扭卡死超过60秒取消该扭服务,直至……..按扭恢复正常0082门区监视第一次不吸合486.443:1.443:2任一运行时没有吸合(ADO/ACL)(允许)运行至目的楼层15秒后自动恢复0083位置丢失计算与井道信号不符运行至端站0084开门限位故障(一直有效)门关好但仍收到开门信号自动恢复0089厅门锁回路监视厅门打开(非轿厢位置)运行至目的楼层,脱离服务关电或打检修0145EBD设备损坏EBD设备0146EBD电池损坏EBD电池驱动故障0101驱动停止驱动系统检测到故障使电梯停止检查井道驱动故障0102马达过电流0103制动电阻制动电阻损坏检查制动电阻0104马达过热马达热敏0105交流供电中间直流电压过低0106V3F不好0107承重装置故障承重信号电压小于0.6V 调节承重装置0108马达/测速出错测速极性接反/轿厢平衡不良/承重不准/制动器没打开/驱动参数不对/超速0109位置丢失驱动系统位置丢失查下减速、平层开关0110散热器过热驱动模块的散热器过热控制过程中的驱动故障控制过程中的驱动故障0111桥板61:N在61:U之下61:U/N调换查平层开关顺序011261:U/N重叠太少查平层开关位置0113同步开关错误同步开关错误同步开关故障查同步开关0114楼层距离太短查磁铁位置0115比例错误0116测楼计数错误学习运行不成功重做楼层学习网络故障原因状态操作A门侧/3门侧1101输入板坏电路板损坏,接线错误或没电无法联系正常减速停层,关门不动直到再次联系上1202/2201第一块板故障电路板损坏,接线错误或没电无法联系单梯继续正常服务直到再次联系上1202/2202第二块板故障电路板损坏,接线错误或没电无法联系单梯继续正常服务直到再次联系上1203/2203第三块板故障电路板损坏,接线错误或没电无法联系单梯继续正常服务直到再次联系上1301/2301输出板坏电路板损坏,接线错误或没电无法联系到达目的层,开门不动直到再次联系上1401/2401第一块板故障电路板损坏,接线错误或没电无法联系继续正常服务运行信号检测通过14xx/24xx第xx块板故障电路板损坏,接线错误或没电无法联系继续正常服务运行信号检测通过1501/2501第一块板故障电路板损坏,接线错误或没电无法联系继续正常服务运行信号检测通过15xx/25xx第xx块板故障电路板损坏,接线错误或没电无法联系继续正常服务运行信号检测通过1601扩展板坏电路板损坏,接线错误或没电无法联系单梯继续正常服务直到再次联系上1701/2701第一块板故障电路板损坏,接线错误或没电无法联系直到再次联系上17xx/27xx第xx块板故障电路板损坏,接线错误或没电无法联系直到再次联系上。
通力电梯安装指导标准手册
e a r n G e n e r a l S e r e t a r y o n "t w o t o l e a r a "s t r e n g t hen in g"fo ur Co ns ci ou sn es se s"im po rt at s p e e c h c a s e d a s t r o n g r e a c t i n i t h e c o u n t r y . i m e ,w a t c h i n g r e d t r e a u r e ",t h e r i g i n f b u i l i n g t h e p a r t y b a k t o p o w e r , o w t o s t r e n g t e n s e r v i c e fo r t h e m a s s e s ,i m p r v e p a r t y o h e s i o n ,f i g h ti ng to be co me th eg ra ss -r o t s a r t y m e m b e r s a d m a s s e s h o t t o p i .G r a s -r o o t s p a r t y o r g a i z a t i n s "t w o "i s t o s t r e g t h e n th es er vi ce of pa rt ym em be rs an dc ar e s ,t e p i o n e e r s p i r i t . i s t r i b u t i o n o f r a s s -r o o t s p a r t y r g a n i z a t i o n s i n a l l w a k s o f p e o p l ,c l o t h i n g ,s h e l t e r ,w h i h b e l o n g s t o t e n e r v e e nd i g s o f t he p ar ty or ga ni za ti on an dc om me nt sr eu t a t i o n h a a d i r e t p e r c e p t i n f t h e m a s s e . t r e n g t h e n t h e a r t y a h e a o f t h e "p e a l "s p i r i t s t r e n g t e n t h e p a r t y m e m b e r a n d c a d r s "s u c c e s s d o e s n oth ave tob eme "an d"t hef irs tto bea rha r s h i p s ,t e l a s t t o "s e r v i cespi rittos et th ep ar ty 's po si ti ve im ag ea mn g t h e eo p l e i s i m p o r t a t .G r a s s -ru r p a r t y a n n o t s t a d t h e "m o n e y ,"c o r r o s i n f t e m p t a t i o n ,t h i n , u Z h o u ,s u c h a b us ea nd co rr up tb ri be ry ,m al fe as an ce bo re rs ,a htheh a r d r a t s .T w o ,i s t o c l a n p ,t h i n , u ,Z h o u 's s o l u t i o n t o r e t o r e t h e a r t y 's f r e s h a d n a t u r a l s o l i d a n d h o n e t w o r k s t y l e . le a n s i n g "t a k e ,e a t ,c a r d ,"u n d e i r a l e a n d b e a v i o ur ,"c r o s s ,h a r d a n d c o l d , u s h "a t t i t u d e .G r a s s -r t he o t s p a r t y o r g a i z a t i o n s "t w o "i s t s t r e n g t e n t h e s e s e of o r i n a r y p a r t y m e m b e r s , a r t i c i a t i ng i c o n s c i o u s n e s s ,u n i t y o n s c i u s n e s s .F o r r e a s o n s k o w n ,m e m b e r s f g r a s s -r o o t p a r t y b r a ch e s l e s s m o bi l e ,l e s r e s o u r c e s ,a d t h e c o n s t r c t i o n o f p a r t y r g a n i a t i o n s h a v e o m l a g .T w o s t u d i e ,i s t o f o c u s o n t e g r a s s r o o t s p a r t y b r a n c h e s "l oo se ,s of t,lo os e"pr ob le m,ad va c e t h e p a r t y m e m b e r a n d c a d r e s ,"a g a n g w r k i n g ","H o n g K o n g r e o r t ." t r o n g c l e a n u p a t i o n s ,s t y l e a d r a m b l i n g ,p r s u m p t u o u s "u n q u a l i f i d "p a r t y m e m b e r s , a y s s p e c i a l a t t e n t i o n t o a r t y m e m b e r s a d c a r e s "joinit t a u c n t o aa a wow u ndi s ro d s n io o n d fdo e a e a .ning"l d e b t u r e ionr e n g t h e h e r t y 's c o n s t r t i o n o f a n e w "r e c t i f i c a t i m o v e m e ."G r a s s -r t s r t y o r g a n i t i o n s s h o u l d a l y s c a t o r k ,r e s u l t s r i e n t e d . o e c a t i o n a l o u t c om e s a r e l g -t e r m o r i e n t a n d b e c o m e a m p o r t a n t i m p e t f o r t h e w k ."T w o "s u l d h a v e t h r e e k i s o f c o n s c i o u s n e "t w o "s t u d y a n d e d u c a t i ,b a s i c l e a r n g l i e s i i n g .O n l y t h e n s t i t u t i a r e s s t h e s e r i e s p a r t y r u l e s ,a d o s o l i d r k , q ual i f i edp a rt ym e m b ers has o l i d i o l o g i c a l s i O n l y t h e "l e a r and"do"r ealu nity ,tof orma "lea rn-lear n-do-do"t hevi rtuo uscye ,a u l t i m a t e l y a c h i e v e tf u n d a m e n t a l j e i v e o f e c a t i o n .T h i e q u i r e s t h a t t O rg a z a t iKONE3000MiniMiniSpace TM电梯安装指导手册前言e a r n i n g e u c a t i o n ,n e d t h r e e k i n d s of c o n s c i u s n e s s :o n e i s t e s t a b l s h a n i n t eg r a t e a w a r e e s s ."L e a r i n g"a n d "d o "w h a t c a r i s T w-w h e l ,b i r w i n g s ,n e e t o g o h a n d i n a n d ,o n e e n d c a b e e g l e c t e d . o m m u n i s t t h e r e t i c i a n a d m a n . n l y b y c l o s e l y o m b i i n g t h e o r y a n d p r a c ti ce to ge th er in or de rt ot ru ly re al i e t h e i r v a l e ."L e a r i n g "i s t h e F o u n d a t i n ,t h e F o u n d a t i o n i n o t s t r o n g s h a k i n g ;""I s t h e k e y t o e t t o n e t t h o u s a d s o f a c c o u n t s . "Tw o"ed uc at io n,""la yt he ba si s,go in gt "d o "t h e k e y g r i p ,s o t a t t h e "l e a r n i g "a n d "d o i n g "b a k t o s t a d a r d ,s o t h a t t h e m a j o r i t y fp a rt y m e m b e rs "l e a r n "l e a ri n g t h e o r y o f u t r i e n t ,i n t h e "d o i g "p r a c t i c e p a r t y 's u r p o s e .S e c o n d ,t o e t a b l i h a s e n s e o f d e p t h ."L e a r i n g "a n d "d o "n o t C h u d r a n ,e n t i r e l y d i f f e r e n t , u t t h e o r g a i c u n i t y o f t h e w o l e ."T w o "l e a r n i g e d u c a t i n ,w e n e d t o e x l o r e i t e g r a t i n g "l e a r i n g "i n " d o",e xh ib it "d o"in "S ci en ce ".To av i d t h e "l e a r n i n g"in to si mp le ro om in st ru ct io n,"d o"in ta m o n o t o n e f o r d o i n g . h o u l d e x p l o r a t i o n "l e a r n "i n t h eas "d o ","d o "i n t h e h a s "l e a rl e a r n "i n t h "d o "o f a c h i t s s e s e ,i n "d o "i h eh as "l ea rn "o fg et se nsarty o f t h e r y b r a i i n t o e a r t ,p u t f o p l e e r v i c eo n c e p t o u t se d .T i r d ,t o a d h e n g t e r m t h e a w a e s s .S t y l e c n n t h e r o a df o v e r ,"t w o "h c a t hthel o n g t erm."T w o "n , y n o m e a s ,a s a u l t -s t y l nd-s p o r t , u t t h e r e u r r n t e d u c a t i o i t h i n t e p a r t y . I nr ec en ty ea rs ,t he pa rtonp ra ct ic ea nd "t hr ee -t r e e "s p e c i a u c a t i o n i n g s -r o o t s b o re r i c hf r u i t u m b e r s o f p aa n d c a d r e s w stoo d t h e a p t i smo ft he sp ir it ."Tw o"gr d t o f o c u s o n n g e r o l l o n g -t e r m ,t a b l i h a n d p e r f e ch a n i s m o f t h u c a t i o n ,f o g o n t h e c r e ti o n o f l o n g t e r m e d u c a t n , t r i v e t o m a k t n u m e r o f p a r t y m t o m a i n t a i t h e i r v a n g a r d C o l o r ,m t h e p a r t y 'se h a e v e m e n t e,re al ma kesr p e i d e o f Y u s h ar e t o l r e o n s t r u c ti r a d ts t u d y a n d e d u c a t ie w n y'smas sl in ee du ca ti l e r a s ,v a s t r t y m e m b e ri tea te rn e l t o e t t h ee f f e c t i v e m ee e c u s i i e t h e v a e m b er a i n t a ia d v a m p e t u s .T e "t w o "m e a n i g e n o u g d e e p ,i st od et er mi ne th ep ar ty ca dr e c a n r e s o l v e t o s t d y h a r d f i r s t . n t e "t w o "i n t h e r o c e s s ,s o m e c ad re so fh im se lf ,s ta nd in gl on g,hi ga w a r e n es s,th at Co ns ti tu ti on Pa rt yr ul s i s s i m p l e ,i t s o t w o r tb o t h e r i g s o m e a r t yc a r e s t h i k s p e a k s e r i e h a s o t h i g t od o w i t h te g r a s s -r o o t s w r k ,w a t e r b u s i e s s l e a r n i g s e r i e s of s p e c h e s s e e n a w i n d o w ress i n g .T h e s e "l a z y , a s u a l ,a n d d e a d e n t "i d e a l e a r n i n g l a c k mo t i v a t i o n ,a s e r i u s i m p e d i m e n tt o"tw o"ef fe ct .J oh nS tu ar tM il ln c e s a i ,o n l y a b a i c e l e m e t o f h u m a n t h o u g t p a t t e r n s c h a g e d r a m a t i c a l y ,h u m a n d e ti n y c a n m a k e g r e a t i m p r v e m e n t .T e s a m e , nl y p a r t y m e m b e r s and.保密申明:本安装手册仅合用于进行KONE3000MiniMiniSpace电梯产品的安装,未经过通力有关人员的书面允许,任何人不得以任何原因,将文件泄漏或拷贝给第三方翻印和外传。
Philips 超自動咖啡机3000系列使用手册说明书
ItliLeggere attentamente prima di utilizzare la macchina.Registra il prodotto e ottieni assistenza al sito /welcomeI T0101HD8824HD8825ISTRUZIONI PER L’USO Super automatic espresso machine 3000 series4ITALIANOITALIANO5• Dopo aver spento la macchina dall’interruttore generaleposto sul retro, rimuovere la spina dalla presa:- se si verifi cano delle anomalie;- se la macchina rimarrà inutilizzata per lungo tempo; - prima di procedere alla pulizia della macchina.• Tirare dalla spina e non dal cavo di alimentazione.• Non toccare la spina con le mani bagnate.• Non utilizzare la macchina se la spina, il cavo di alimenta-zione o la macchina stessa risultano danneggiati.• Non alterare né modifi care in alcun modo la macchina o il cavo di alimentazione. Tutte le riparazioni devono essere eseguite da un centro assistenza autorizzato da Philips per evitare qualsiasi pericolo.• La macchina non è destinata all’uso da parte di bambini con età inferiore a 8 anni.• La macchina può essere utilizzata da bambini di 8 anni dietà (e superiore) se precedentemente istruiti riguardo ad un utilizzo corretto della macchina e coscienti dei relativi pericoli o sotto la supervisione di un adulto.• Pulizia e manutenzione non devono essere eseguite da bambini, a meno che non abbiano più di 8 anni e siano supervisionati da un adulto.• Tenere la macchina e il suo cavo di alimentazione lontano dalla portata dei minori di 8 anni.• La macchina può essere utilizzata da persone con ridotte capacità fi siche, mentali, sensoriali o con mancanza di esperienza e/o competenze insuffi cienti se precedente-mente istruite riguardo ad un utilizzo corretto della mac-china e coscienti dei relativi pericoli o sotto la supervisione di un adulto.• I bambini devono essere sorvegliati per assicurarsi che non giochino con l’apparecchio.• Non inserire le dita o altri oggetti nel macinacaffè.6ITALIANOITALIANO71410ITALIANOè in grani nel contenitore caff è in grani. è nel contenitore caff è in grani per non è in grani. Caff è in è caramellato, crudo, nonché altri oggetti, se in- è in grani, possono danneggiare la macchina. è in grani. no al livello MAX con acqua fresca e care che sia inserito a fondo. è in grani.Premere il tasto “” per avviare l’erogazione di acqua calda. Il tastoErogare tutta l’acqua rimanente. Il led “” si accende in modo fi sso.” per interrompere il ciclo di risciacquo manuale. Per riavviare il ciclo premere il tasto “”.no al livello MAX. Aè.è.care che i tasti “”, “”, “” e “” siano accesi in modo fi sso.Premere il tasto “” per avviare l’erogazione di acqua calda. Il tastoErogare tutta l’acqua presente nel serbatoio. Il led “” si accende in sso.Terminate le operazioni descritte sopra, i tasti “”, “”, “” e “”sso.Le posizioni consigliate sono:Per l’utilizzo di tazze piccole;Per l’utilizzo di tazze grandi.Sotto l’erogatore caffè si possono posizionare due tazze per l'erogazionesimultanea di due caffè o due espressi.cie esterna del tubo di aspirazione sia pulitaPremere il tasto “” per emulsionare il latte. Il tasto lampeggia.” lampeggia. Terminata la fase di riscaldamento inizia l’eroga-zione del latte ed il tasto “” lampeggia.Premere il tasto “” per interrompere l’erogazione di latte emulsiona-Premere il tasto “” per avviare l’erogazione di acqua calda; il tasto “”” lampeggia. Terminata la fase di riscaldamento inizia l’eroga-zione dell’acqua calda ed il tasto “” lampeggia.Versare la quantità di acqua calda desiderata. Per interrompere l’eroga-zione di acqua calda premere il tasto “”.111è con il manico di un è con acqua tiepida; pulire con è. è.è e lavarlo con cura.è, premere il tasto «PUSH» tirando la maniglia.è sia in posizione di riposo; i due segni di no a toccare la base è e fi nché i due segni di riferimento a lato del gruppo .è sia nella posizio-è fi no ad agganciarlo senza .è nell’apposita sede ed assicurarsi che è non è posizionato correttamente, il gruppoPremere il tasto “” per erogare vapore.Durante la fase di erogazione il tasto “” lampeggia. Quando la soluzione è stata completamente erogata, premere iil tasto “” perDurante la fase di erogazione il tasto “” lampeggia. Quando l’acqua è stata completamente erogata, premere iil tasto “” per interromperereddare il tubo vapore.gura.care che sia correttamente posizionato. Se non si riesce ad inserireltro acqua “INTENZA+”ltrino biancocante nel serbatoio acqua.no al livello CALC CLEAN e è.sso. Il tasto “” lampeggia per tutta la dura-“”.“”. Durante la pausa il ta-cazione il tasto “” è acceso Quando si accende il led “” il serbatoio dell’acqua è vuoto.no al livello MAX” si accende. Quando il tasto “” lampeggia premerlo per“”.“”. Durante la pausa il ta-cazione il tasto “” è acceso Al termine del ciclo di risciacquo il tasto “” si spegne.“” lampeggiano contemporaneamente.cazione è completo.” si accende ed il led “” non si spegne, il serbatoiono al livello MAX per il risciacquo.ltrino bianco e riposizionare il fi ltro acqua “INTENZA+”è. Per ulteriori indicazioni, vedere il capitolo “Pulizia è”.La macchina è pronta all’uso“”, “” e “” sono accesi.。
DJ3000使用说明
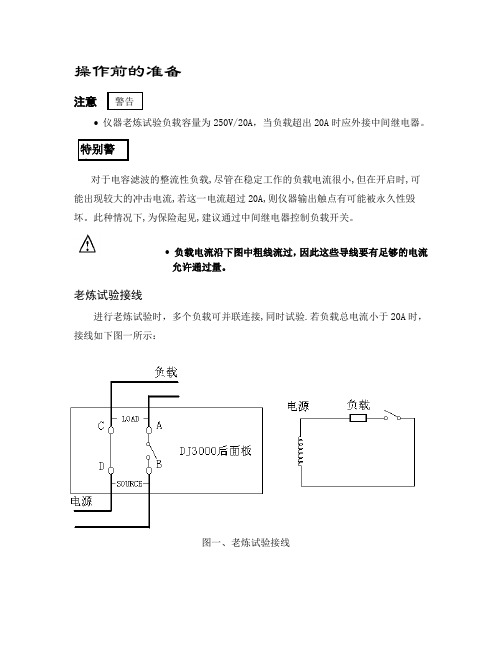
操作前的准备注意 ∙ 仪器老炼试验负载容量为250V/20A ,当负载超出20A 时应外接中间继电器。
对于电容滤波的整流性负载,尽管在稳定工作的负载电流很小,但在开启时,可能出现较大的冲击电流,若这一电流超过20A,则仪器输出触点有可能被永久性毁坏。
此种情况下,为保险起见,建议通过中间继电器控制负载开关。
∙ 负载电流沿下图中粗线流过,因此这些导线要有足够的电流允许通过量。
老炼试验接线进行老炼试验时,多个负载可并联连接,同时试验.若负载总电流小于20A 时,接线如下图一所示:图一、老炼试验接线警告外接中间继电器老炼试验接线进行老炼试验时,若负载总电流大于20A时,应外接中间继电器,接线如下图二所示:图二、大电流老炼接线老炼功能老炼试验过程设定好通电、断电时间及开关次数。
在复位状态下按“开始/START”键,仪表就开始进行开关老炼试验,“开始/START”指示灯亮,继电器合上,负载通电,“通电/ON”指示灯亮,定时器、计数器开启,仪表显示窗口显示已做开关次数或当前开关状态定时时间,可通过“选择/SELECT”键切换。
当通电时间达到设定通电时间时,计数器加1,仪表自动断开继电器,负载断电,“通电/ON”指示灯灭,“断电/OFF”指示灯亮,定时器重新从零开始计时,当断电时间达到设定断电时间时,仪表自动合上继电器。
负载通电,“断电/OFF”指示灯灭,“通电/ON”指示灯亮,定时器重新从零开始计时。
仪表重复以上通电、断电过程,每重复一次,计数器加1。
当计数值达到设定的开关次数时,开关老炼试验结束,继电器断开,定时器关闭,“停止/STOP”指示灯、“断电/OFF”指示灯亮,蜂鸣器鸣叫报警,可按任意键消音,无人操作时,蜂鸣器鸣叫30秒后停止。
在停止状态按“复位/RESET”键,仪表清除计数器、定时器,“停止/STOP”指示灯灭,回到复位状态。
定时与计数通电时间和断开时间通电时间为老炼时每一次试验继电器接通的时间。
尚吉考勤软件
尚吉考勤软件篇一:尚吉通用接口程序使用说明通用接口程序使用说明本程序用于:2.主要分以下功能:a.设置考勤机时间.b.读取考勤机数据.c.清除考勤机数据.d.读取卡号编号表e.写入卡号编号表f.SJ3400dT(v3.0以上版本)实时通讯功能。
(另介绍)一、以下是考勤机型号和通用操作说明*注明以上表格中SJ3000dT的产品在使用监控为V2.8dT、V2.82dT 监控版不能使用实时通讯功能。
1、启动考勤接口程序2、设置考勤机档案。
*注明:在考勤机档案中只设置:出厂机号、自编代号、放置地点、串口,设置成功后保存退出。
(1)SJ3000dT设置考勤机档案如下:*注明:在考勤机档案中只设置:出厂机号、自编代号、放置地点、IP地址、子网掩码、端口)参数查询/设置方法及步骤接通考勤机电源。
按“F1”键,输入密码(缺省密码为“0000”)依次按“1”、“9”,考勤机显示“TcP/iPSETUPLoadinG??.”,等待考勤机显示“Serialno:xxxxxxxx”时即可查看或修改参数。
按“↑”、“↓”键选择需要查看或修改的参数选项,然后按“EnT”键进入修改状态,闪烁的数字表示当前光标位置。
通过“←”、“→”键移动光标,通过“0”~“9”数字键修改参数。
修改完成后,按“EnT”键退出修改状态,数字停止闪烁。
此时可以按“F2”保存设置,或者继续修改其他选项。
按“F2”保存时,考勤显示“TcP/plete!”则表示成功。
可以修改的参数选项:Serialno:模块序列号HostiP:主机iP地址可以设置为:000.000.000.000LocaliP:本机iP地址(自定义的iP地址:如192.168.0.150)将它写到软件中。
Gateway:网关地址.可以不用设置全部设置为000.000.000.000 Subnet:子网掩码255.255.255.0Port:连接端口为机号默认的:20XX(不改变)直接写入软件中3、选择设置时钟功能用鼠标的左键点击选择表格中将要进行时间设置的考勤机编号,该栏变底色变蓝表示已经选中,然后点击“设置”按钮即开始设置考勤机时间。
西屋默纳克3000一体机系统调试基本流程

西屋默纳克3000一体机系统调试基本流程西屋默纳克3000一体机系统调试基本流程一.慢车调试1. 主电源,制动电阻,编码器线(穿入铁管并与动力线分开走线)制动器电源,2. 制动器反馈接线正确3. 上下减速,上下限位信号准确,短接上下限位信号(+24V-SLUX)(+24V-SLDX)或者将上下限位开关安装到位4. 确保安全回路中各安全开关复位,如部分安全开关无法复位可短接部分安全回路开关,从K:101短接到K:103和K:104短接到K105,即除控制柜急停与轿顶急停起作用外其他安全开关全部短接。
但有时会出现安全接触器动作但主板上X22安全反馈信号未收到,则按照原理图逐个排查从K101到X22点的各元件触点(包括对地短路保护器,相序继电器,安全接触器触点,无机房还需检查UPS应急电源的输入输出电缆是否接上,如未安装可短接插座KD1:和KD10)5. 确保厅门轿门门锁通路,现场无法满足条件的话可通过短接K:105与K:108和K:107短接厅门轿门。
6. 确保主板输入点X17的检修信号正确,可短接+24到JX,或将轿顶检修手柄插件插入轿顶接线板的CIB插件内。
7. 确保:8. F0-00=1,9. F0-01=1,10. F0-03=1.75,(可改变实际运行速度)11. F0-04=1.75,12. F0-05=1t13. 该三个参数根据现场电梯的梯速与载重量设定,F1组电机参数根据电机铭牌参数设定,(特别注意F1-06编码器原点角度与F1-08接线方式,贴于主机铭牌附近,手动更改F1-06和F1-08时必须将F0-00的控制方式改为0才能进行修改,修改完成后F0-01必须改回1,但此时需断电重启后才能修改)如果F1-06编码器原点角度不对则需要进行主机编码器原点角度自学习,自学习分两种,带载荷自学习和空载完整自学习(注:适用于同步电机)。
14. 确保FF-01()额定功率参数的正确:FF参数的进入密码是:0143013:7.5KW14:11KW15:15KW16:18.5KW17:22KW18:30KW带载自学习:将F1-11改为1,操作器上出现TURN指示时,将F8-02改为0,按住上行或者下行此时电机将运转(注:打开抱闸时电机会发出“嘟”的声音)待电机自己停止,查看F1-06,F1-08参数并记录,重复此操作三次,对比F1-06参数三次学出的数值,如误差不大说明自学习成功。
