ITM License Upadating and configuring
LabVIEW 2015 Real-Time Module版本说明说明书
RELEASE AND UPGRADE NOTESLabVIEW Real-Time Module Version 2015This document provides system requirements, installation instructions, descriptions of new features, and information about upgrade and compatibility issues for the LabVIEW 2015 Real-Time Module.Refer to the Getting Started with the LabVIEW Real-Time Module manual for exercises you can complete to familiarize yourself with the Real-Time Module.TipRefer to the Real-Time Module Best Practices book in the LabVIEW Helpfor programming recommendations on designing, developing, and deploying applications with the LabVIEW Real-Time Module. Select Real-Time Module»Real-Time Module Best Practices on the Contents tab of the LabVIEW Help to display this book.ContentsSystem Requirements (2)Installing the LabVIEW 2015 Real-Time Module (2)Installing Japanese and Simplified Chinese Languages (3)Activating the Real-Time Module (3)Configuring Real-Time Targets (3)New Features (4)Shared Libraries on NI Linux Real-Time Targets (4)Getting Started with a Real-Time Application (4)NI Device Monitor Notification for RT Target Discovery (4)New Hardware Support (4)NI Linux Real-Time Kernel Updates (4)SELinux Support on NI Linux Real-Time Targets (5)Calibrating Touchscreen Monitors on the Embedded UI (5)Upgrade and Compatibility Issues (5)Known Issues with the Real-Time Module (5)Where to Go from Here (5)Related Documentation and Examples (5)NI Website (6)Worldwide Support and Services (6)™2||LabVIEW Real-Time Module Release and Upgrade Notes System RequirementsIn addition to the LabVIEW system requirements listed in the LabVIEW Readme , the LabVIEW 2015 Real-Time Module has the following requirements:•LabVIEW 2015 Full or Professional Development System (32-bit)•At least 200 MB of disk space in addition to the LabVIEW-recommended minimum •RT target hardware and driver software •One of the following operating systems for application development:–Windows 8 (32-bit)–Windows 8 (64-bit with 32-bit LabVIEW installed)–Windows 7 (32-bit)–Windows 7 (64-bit with 32-bit LabVIEW installed)–Windows Server 2003 R2 (32-bit)–Windows Server 2008 R2 (64-bit with 32-bit LabVIEW installed)–Windows Vista (32-bit)–Windows Vista (64-bit with 32-bit LabVIEW installed)–Windows XP Pro (Service Pack 3)Note You might need more memory than the LabVIEW-recommended minimum depending on the size of the application you design in LabVIEW on the host computer.Installing the LabVIEW 2015 Real-Time Module Complete the following steps to install LabVIEW and the Real-Time Module on a development computer:1.Log in to the development computer as an administrator or as a user with administrative privileges.2.Insert the LabVIEW 2015 Platform media.NoteTo request or download additional media, refer to the NI website. If youpurchased this product with an NI Software Suite or NI Product Bundle, use the installation media that shipped with your purchase to install this product.3.Follow the instructions on the screen to install software in the following order:a.LabVIEW b.Real-Time Module c.Device DriversNote Refer to your hardware-specific documentation for information aboutinstalling the appropriate device drivers.LabVIEW Real-Time Module Release and Upgrade Notes |© National Instruments |3The Real-Time Module installs the following real-time operating systems (RTOSes). Refer to the specific RT target hardware documentation for information about which RTOS your RT target uses.•NI Linux Real-Time •Phar Lap ETS •VxWorksInstalling Japanese and Simplified Chinese Languages After you install the Real-Time Module on your development computer, you can complete the following steps to install and use Japanese and Simplified Chinese languages on an RT target:e the LabVIEW Real-Time Software Wizard in NI Measurement & AutomationExplorer (NI MAX) to install the Language Support for Japanese or Language Support for Simplified Chinese software component on the RT target. Refer to the Measurement & Automation Explorer Help for information about the LabVIEW Real-Time Software Wizard.2.Open the System Settings tab and select Japanese or Simplified Chinese as the Locale .Note You cannot use Japanese or Simplified Chinese characters in directory names or filenames on the RT target.Activating the Real-Time ModuleThe Real-Time Module relies on licensing activation. When the evaluation period expires, you must activate a valid Real-Time Module license to continue using the Real-Time Module. You must create an User Profile to activate your software.You can use the NI License Manager, available by selecting Start»All Programs»National Instruments»NI License Manager , to activate NI products. (Windows 8)Click NI Launcher and select NI License Manager in the window that appears.Refer to the National Instruments License Manager Help , available by selecting Help»Contents in the NI License Manager, for information about activating NI products.Configuring Real-Time TargetsUse NI MAX to configure RT targets and to install software and drivers on targets. You can install NI MAX from the LabVIEW Platform media.•Networked RT Targets —Refer to the MAX Remote Systems Help book in theMeasurement & Automation Explorer Help , available by selecting Help»MAX Help from MAX, for information about configuring networked RT targets.•Desktop PC Targets —Refer to the Using Desktop PCs as RT Targets with theLabVIEW Real-Time Module document for information about configuring a desktop PC as a networked RT target. Open the labview\manuals directory and double-click RT_Using_PC_as_RT_Target.pdfto open the document.Note If you install NI Web-based Configuration & Monitoring on an RT target, Array you can use a web browser to perform common monitoring and configuration taskson the target. On the Contents tab in the LabVIEW Help, select Fundamentals»Working with Projects and Targets»How-To»Monitoring and Configuring aRemote Device from a Web Browser for information about NI Web-basedConfiguration & Monitoring.New FeaturesThe LabVIEW 2015 Real-Time Module includes the following new features. Refer to theLabVIEW Help, available by selecting Help»LabVIEW Help, for more information about thesefeatures.Shared Libraries on NI Linux Real-Time T argetsThe LabVIEW 2015 Real-Time Module includes support for creating shared libraries onNI Linux Real-Time targets. You can use shared libraries to share the functionality of your VIswith other developers.Getting Started with a Real-Time ApplicationThe LabVIEW 2015 Real-Time Module includes a tutorial that guides you through creating areal-time application. The tutorial demonstrates VIs that acquire and process data on the RTtarget and display that data on the host computer. Navigate to the Tutorial: Creating a Real-TimeApplication topic of the LabVIEW Help to view the tutorial.NI Device Monitor Notification for RT T arget Discovery The LabVIEW 2015 Real-Time Module includes support for simplified device discovery and configuration. When you connect an NI Linux Real-Time target to a host computer using an Ethernet over USB connection, the NI Device Monitor displays the RT target IP address and allows you to launch LabVIEW, NI MAX, and NI Web-based Configuration & Monitoring, as well as access Getting Started information available on /getting-started. New Hardware SupportThe LabVIEW 2015 Real-Time Module supports new RT targets, including the sbRIO-9607,sbRIO-9627, sbRIO-9637, and the NI3173 RT Industrial Controller.NI Linux Real-Time Kernel UpdatesThe LabVIEW 2015 Real-Time Module includes updates to the NI Linux Real-Time kernel.These updates include networking improvements, bug fixes, and security updates. NI alsoprovides new packages in the NI Linux Real-Time repository. These packages include GCC 4.8,MySQL, and PHP. (ARM-based targets) The LabVIEW 2015 Real-Time Module updates thekernel on NI Linux Real-Time targets from version 3.2 to version 3.14. (Intel x64-basedtargets) The LabVIEW 2015 Real-Time Module updates the kernel on NI Linux Real-Timetargets from version 3.10 to version 3.14.4||LabVIEW Real-Time Module Release and Upgrade NotesSELinux Support on NI Linux Real-Time T argetsThe LabVIEW 2015 Real-Time Module includes the SELinux security policy on NI Linux Real-Time targets. After configuring SELinux, you can control access between applications and resources and enforce a wide range of security goals, from sandboxing applications to restricting users to a limited set of resources. Visit /info and enter the Info Code RTSecurity to learn about security on real-time systems.Calibrating T ouchscreen Monitors on the Embedded UI The LabVIEW 2015 Real-Time Module includes the RT Calibrate Touchscreen VI on the RT Utilities palette. This VI opens an interactive wizard that allows end users to calibrate touch panel monitors on RT targets that support the embedded UI.Upgrade and Compatibility IssuesYou might encounter compatibility issues when upgrading to the LabVIEW 2015 Real-Time Module from the LabVIEW 2014 Real-Time Module. Refer to previous versions of the LabVIEW Real-Time Module Release and Upgrade Notes, available on /manuals, for changes in previous versions of the Real-Time Module.Known Issues with the Real-Time ModuleRefer to the NI website at /info and enter the Info Code LVRT2015KIL to access the known issues for the LabVIEW 2015 Real-Time Module.Where to Go from HereNI provides many resources to help you succeed with your NI products. Use the following resources as you start exploring LabVIEW and the Real-Time Module.Related Documentation and ExamplesUse the following resources to learn more about using LabVIEW and the Real-Time Module:•LabVIEW Help—Available by selecting Help»LabVIEW Help in LabVIEW. Browse the Real-Time Module book in the Contents tab for an overview of the Real-TimeModule.•Context Help Window—Available by selecting Help»Show Context Help. Context help provides brief descriptions of VIs, functions, and dialog boxes. Context help for most VIs and functions includes a link to the complete reference for a VI or function.•Hardware-Specific Documentation—Some RT targets provide printed documentation as well as content in the LabVIEW Help. Use the hardware documentation for information about using the RT target with LabVIEW and for information about hardwarespecifications.•Examples—Use the NI Example Finder, available by selecting Help»Find Examples from LabVIEW, to browse or search for RT example VIs. You also can access example VIs from the labview\examples\Real-Time Module directory.LabVIEW Real-Time Module Release and Upgrade Notes|© National Instruments|5NI WebsiteRefer to /info and enter the Info Code rttrn to access the product support page for the Real-Time Module.Worldwide Support and ServicesThe National Instruments website is your complete resource for technical support. At / support you have access to everything from troubleshooting and application development self-help resources to email and phone assistance from NI Application Engineers.Visit /services for NI Factory Installation Services, repairs, extended warranty, and other services.Visit /register to register your National Instruments product. Product registration facilitates technical support and ensures that you receive important information updates from NI. National Instruments corporate headquarters is located at 11500 North Mopac Expressway, Austin, Texas, 78759-3504. National Instruments also has offices located around the world. For telephone support in the United States, create your service request at /support or dial 1866ASK MYNI(2756964). For telephone support outside the United States, visit the Worldwide Offices section of /niglobal to access the branch office websites, which provide up-to-date contact information, support phone numbers, email addresses, and current events.Refer to the NI Trademarks and Logo Guidelines at /trademarks for more information on National Instruments trademarks. Other product and company names mentioned herein are trademarks or trade names of their respective companies. For patents covering National Instruments products/technology, refer to the appropriate location: Help»Patents in your software, the patents.txt file on your media, or the National Instruments Patents Notice at /patents. You can find information about end-user license agreements (EULAs) and third-party legal notices in the readme file for your NI product. Refer to the Export Compliance Information at /legal/export-compliance for the National Instruments global trade compliance policy and how to obtain relevant HTS codes, ECCNs, and other import/export data. NI MAKES NO EXPRESS OR IMPLIED WARRANTIES AS TO THE ACCURACY OF THE INFORMATION CONTAINED HEREIN AND SHALL NOT BE LIABLE FOR ANY ERRORS. U.S. Government Customers: The data contained in this manual was developed at private expense and is subject to the applicable limited rights and restricted data rights as set forth in FAR 52.227-14, DFAR 252.227-7014, and DFAR 252.227-7015.© 2000–2015 National Instruments. All rights reserved.371374M-01Jun15。
Microsoft Certificate Authority用户指南说明书
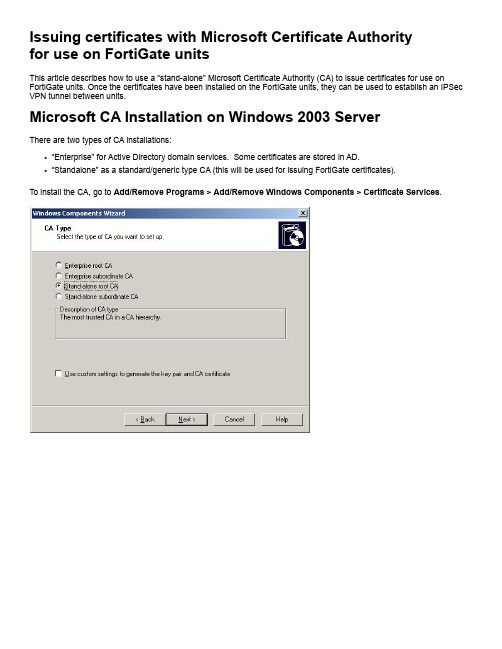
Issuing certificates with Microsoft Certificate Authorityfor use on FortiGate unitsThis article describes how to use a “stand-alone” Microsoft Certificate Authority (CA) to issue certificates for use on FortiGate units. Once the certificates have been installed on the FortiGate units, they can be used to establish an IPSec VPN tunnel between units.Microsoft CA Installation on Windows 2003 ServerThere are two types of CA installations:•“Enterprise” for Active Directory domain services. Some certificates are stored in AD.•“Standalone” as a standard/generic type CA (this will be used for issuing FortiGate certificates).To install the CA, go to Add/Remove Programs > Add/Remove Windows Components > Certificate Services.If IIS is installed, then a web based interface will be available to manage certificates upon installing the CA. Otherwise it is managed through a Microsoft Management Console (MMC).Managing the installed CA service with MMC and the ‘Certificate Authority’ snap-in module.Exporting FortiGate certificate requestsIn this example, two FortiGate units will use certificates to setup an IPSec VPN between them. The example below demonstrates the procedure performed on one FortiGate unit only. A similar procedure will have to be performed for the second unit.Generate a certificate request (i.e. a public key), to be signed by a CA. Enter an identifier for this certificate request. Here, the gateway’s public IP address was used.Certificate Request output example (filename is “gw1.csr”):-----BEGIN CERTIFICATE REQUEST-----MIICXDCCAUQCAQAwGTEXMBUGA1UEAxMONjIuMjEyLjEwOC4xODEwggEiMA0GCSqGSIb3DQEBAQUAA4IBDwAwggEKAoIBAQC7AAlidX3rsEXEiQ2BKM/cIz1bWj3ZSQx1HtDRzsvpgrAeWlcJvLG9wN1OYm3d+oyZoB+m6eMoWSeO9KNsjl1tyweIOwZDkdUYP56Wt+SH/cIRAKB447kBhFBlkfFu4bpR39Ta7dusfLPMKoRbXOsWFOvaAu3eJ4k53qSbYf26AEvlCMQsXBazXydgiWQgswaPgPxL3afJ7vuDFaC6Zh2Qr7m2RACG0BRj uLWVnymRMIkUTIXxmxBWymnx2PslFomm5HBJZl28uvLAA5gwYMdS1OfbiVRT+6531jgha3X4ansWcFLKVDXDQkb0VDSLkYPM2GWeHt06gvkOcpoYD4xrAgMBAAEwDQYJ KoZIhvcNAQEEBQADggEBAD2BfMsuG6fqYsPNxhf+R5WbKSV0C+Y/WPe524XM6SfWvMt2jmj7YHFV7I/xpG/liyQx+x2X9pISkwECbfGYBLuewPNshD1rxB0hzlKioMF32KZfSvVb+DFzSLGfSF+/TYvidWOlmiIsgovibVc7oW3u2eXywhtWjHUHgQP3rL7pfPuDff3zB/Ejx8T1X4DaC4Cl+DbPuCiwt0XmO5sAVOAfLRbyvOV/IrJhoIN0r2HI2kDH+xfqJAJmb4bDERFJUjRMX4gKTdYVEs2LaEvOIkPffw4iSs2hVtvgdfWMWnH1Ko+FaHdxLkv6POdSUYw9RUJyT9wB2U16/pqHky2tLLA=-----END CERTIFICATE REQUEST-----Submit the FortiGate unit’s certificate request to the Microsoft CA for signing. During this procedure, the FortiGate unit’s public key will be signed with the CA’s private key.View the Pending Requests, and Issue (sign) the certificate request.Once Issued, the certificate needs to be exported from the CA database, and imported back into the FortiGate unit.Each certificate (i.e. a signed certificate request), needs to be imported back into the respective FortiGate units. In the example below, the above-signed “gw1.csr” file (which becomes a “gw1.cer” file), gets imported back into the FortiGate unit.Note: Clicking on the certificate .cer file (on a different PC that does not have the root certificate installed) opens the following dialog box:This message is due to the fact thatthe Root certificate is not installed.The CA’s certificate (i.e. the CA’s self-signed public key), must now be imported into each Fortigate device. To export the root certificate, select it in the MMC Certification Authority (Local) snap-in, and right-click its Properties.Viewing the installed root certificate on the CA host, using a mmc snap-in:This now needs to be imported into each Fortigate.The FortiGate units are ready to use certificates to setup an IPSec tunnel between them. For further details, see the FortiGate VPN Guide and Administration Guide as well as as the following Fortinet Knowledge Center articles:•/default.asp?id=422&Lang=1•/default.asp?id=730&Lang=1Note: Viewing (clicking on) the Root CA .cer file on a PC that has not generated the certificate, will result in the following message:Once installed, it will present the following:Note: Re-viewing the gw1.cer on the PC with the root CA certificate installed, results in a proper verification and recognition of the certificate:。
raritan-commandcenter-secure-gateway-cc-sg-virtual
CommandCenter Secure GatewayQuick Setup Guide for CC-SG Virtual Appliance - No License Server此快速設定指南說明如何安裝和設定CommandCenter Secure Gateway。
如需CommandCenter Secure Gateway 任一方面的詳細資訊,請參閱《CommandCenter Secure Gateway 使用指南》,您可以從Raritan 網站的「Firmware and Documentation」(韌體與文件) 區段(/support/firmware-and-documentation/) 下載。
This installation includes new deployments of virtual CC-SG appliance with local licenses, in a configuration without a license server. Existing users who want to eliminate their license server should first upgrade to the latest version, then follow the instructions beginning at Get Your License (請參閱"取得授權" p. 3), noting where procedures are different when migrating from served tonot-served licenses. You must contact Raritan Technical Support to rehost your CC-SG licenses before you can migrate to thenot-served configuration.Requirements1. ESX/ESXi 4.1/5.0/5.1 to deploy the CommandCenterSecure Gateway virtual appliance▪Must have a datastore with 40GB minimum available ▪Must have 2GB memory available▪ 2 physical NICs in the server. (ESX/ESXi networking refers to these as "vmnic".)▪ A high availability cluster with access to shared storage is recommended. Fault tolerance may alsobe used. See CC-SG Administrators Help "UsingVMware High Availability or Fault Tolerance with aCC-SG Virtual Appliance"./help/ccsg/v5.4.0/en/#257132. Client computer running vSphere Client 4.1/5.0/5.13. The virtual appliance .OVF file, which is available at/support/commandcenter-secure-g ateway. See Download Installation Files for details.▪CommandCenter Secure Gateway VirtualAppliance link: You must log in to the RaritanSoftware License Key Management site to view thislink. See Get Your License.下載安裝檔案您可以透過存取「CommandCenter Secure Gateway 虛擬裝置」連結,在以下網站取得完整的安裝檔案組:/support/CommandCenter-Secure-Gate way/。
license
INTEL SOFTWARE LICENSE AGREEMENTIMPORTANT - READ BEFORE COPYING, INSTALLING OR USING.Do not copy, install, or use this software and any associated materials (collectively, the “Software”) provided under this license agreement (“Agreement”) until you have carefully read the following terms and conditions.By copying, installing, or otherwise using the Software, you agree to be bound by the terms of this Agreement. If you do not agree to the terms of this Agreement, do not copy, install, or use the Software.LICENSES:Please Note:∙If you are a network or system administrator, the “Site License” below shall apply to y ou.∙If you are an end user, the “Single User License” shall apply to you.∙If you are an original equipment manufacturer (OEM), the “OEM License” shall apply to you.SITE LICENSE.You may copy the Software onto your organization’s computers for your organization’s use, and you may make a reasonable number of back-up copies of the Software, subject to these conditions:1. This Software is licensed for use only in conjunction with (a) physical Intel componentproducts, and (b) virtual (“emulated”) devices designed to appear as Intel componentproducts to a Guest operating system running within the context of a virtual machine.Any other use of the Software, including but not limited to use with non-Intel componentproducts, is not licensed hereunder.2. Subject to all of the terms and conditions of this Agreement, Intel Corporation ("Intel") grants toyou a non-exclusive, non-assignable, copyright license to use the Materials.3. You may not copy, modify, rent, sell, distribute, or transfer any part of the Software except asprovided in this Agreement, and you agree to prevent unauthorized copying of the Software. 4. You may not reverse engineer, decompile, or disassemble the Software. 5. The Software may include portions offered on terms in addition to those set out here, as set outin a license accompanying those portions.SINGLE USER LICENSE. You may copy the Software onto a single computer for your personal use, and you may make one back-up copy of the Software, subject to these conditions: 1. This Software is licensed for use only in conjunction with (a) physical Intel componentproducts, and (b) virtual (“emulated”) devices designed to appear as Intel componentproducts to a Guest operating system running within the context of a virtual machine.Any other use of the Software, including but not limited to use with non-Intel componentproducts, is not licensed hereunder.2. Subject to all of the terms and conditions of this Agreement, Intel Corporation ("Intel") grants toyou a non-exclusive, non-assignable, copyright license to use the Materials.3. You may not copy, modify, rent, sell, distribute, or transfer any part of the Software except asprovided in this Agreement, and you agree to prevent unauthorized copying of the Software.4. You may not reverse engineer, decompile, or disassemble the Software.5. The Software may include portions offered on terms in addition to those set out here, as set outin a license accompanying those portions.OEM LICENSE: You may reproduce and distribute the Software only as an integral part of orincorporated in your product, as a standalone Software maintenance update for existing end users of your products, excluding any other standalone products, or as a component of a larger Softwaredistribution, including but not limited to the distribution of an installation image or a Guest VirtualMachine image, subject to these conditions:1. This Software is licensed for use only in conjunction with (a) physical Intel componentproducts, and (b) virtual (“emulated”) devices designed to appear as Intel componentproducts to a Guest operating system running within the context of a virtual machine.Any other use of the Software, including but not limited to use with non-Intel componentproducts, is not licensed hereunder.2. Subject to all of the terms and conditions of this Agreement, Intel Corporation ("Intel") grants toyou a non-exclusive, non-assignable, copyright license to use the Materials.3. You may not copy, modify, rent, sell, distribute or transfer any part of the Software except asprovided in this Agreement, and you agree to prevent unauthorized copying of the Software.4. You may not reverse engineer, decompile, or disassemble the Software.5. You may only distribute the Software to your customers pursuant to a written licenseagreement. Such license agreement may be a "break-the-seal" license agreement. At aminimum such license shall safeguard Intel's ownership rights to the Software.6. The Software may include portions offered on terms in addition to those set out here, as set outin a license accompanying those portions.LICENSE RESTRICTIONS. You may NOT: (i) use or copy the Materials except as provided in this Agreement; (ii) rent or lease the Materials to any third party; (iii) assign this Agreement or transfer the Materials without the express written consent of Intel; (iv) modify, adapt, or translate the Materials in whole or in part except as provided in this Agreement; (v) reverse engineer, decompile, or disassemble the Materials; (vi) attempt to modify or tamper with the normal function of a license manager that regulates usage of the Materials; (vii) distribute, sublicense or transfer the Source Code form of any components of the Materials, Redistributables and Sample Source and derivatives thereof to any third party except as provided in this Agreement.NO OTHER RIGHTS. No rights or licenses are granted by Intel to you, expressly or by implication, with respect to any proprietary information or patent, copyright, mask work, trademark, trade secret, or other intellectual property right owned or controlled by Intel, except as expressly provided in this Agreement. Except as expressly provided herein, no license or right is granted to you directly or by implication, inducement, estoppel, or otherwise. Specifically, Intel grants no express or implied right to you under Intel patents, copyrights, trademarks, or other intellectual property rights.OWNERSHIP OF SOFTWARE AND COPYRIGHTS. The Software is licensed, not sold. Title to all copies of the Software remains with Intel. The Software is copyrighted and protected by the laws of the United States and other countries and international treaty provisions. You may not remove any copyright notices from the Software. You agree to prevent any unauthorized copying of the Software. Intel may make changes to the Software, or to items referenced therein, at any time without notice, but is not obligated to support or update the Software. You may transfer the Software only if the recipient agrees to be fully bound by these terms and if you retain no copies of the Software.ADDITIONAL TERMS FOR PRE-RELEASE SOFTWARE. If the Software you are installing or using under this Agreement is pre-commercial release or is labeled or otherwise represented as “alpha-“ or “beta-“ versions of the Software ("pre-release Software"), then the following terms apply.To the extent that any provision in this Section conflicts with any other term(s) or condition(s) in this Agreement with respect to pre-release Software, this Section shall supersede the other term(s) orcondition(s), but only to the extent necessary to resolve the conflict.You understand and acknowledge that the Software is pre-release Software, does not represent the final Software from Intel, and may contain errors and other problems that could cause data loss, system failures, or other errors. The pre-release Software is provided to you "as-is" and Intel disclaims any warranty or liability to you for any damages that arise out of the use of the pre-release Software.You acknowledge that Intel has not promised that pre-release Software will be released in the future, that Intel has no express or implied obligation to you to release the pre-release Software and that Intel may not introduce Software that is compatible with the pre-release Software. You acknowledge that the entirety of any research or development you perform that is related to the pre-release Software or to any product making use of or associated with the pre-release Software is done at your own risk.If Intel has provided you with pre-release Software pursuant to a separate written agreement, your use of the pre-release Software is also governed by such agreement.LIMITED MEDIA WARRANTY. If the Software has been delivered by Intel on physical media, Intel warrants the media to be free from material physical defects for a period of ninety days after delivery by Intel. If such a defect is found, return the media to Intel for replacement or alternate delivery of the Software as Intel may select.EXCLUSION OF OTHER WARRANTIES. EXCEPT AS PROVIDED ABOVE, THE SOFTWARE IS PROVIDED "AS IS" WITHOUT ANY EXPRESS OR IMPLIED WARRANTY OF ANY KIND INCLUDING WARRANTIES OF MERCHANTABILITY, NONINFRINGEMENT, OR FITNESS FOR A PARTICULAR PURPOSE. Intel does not warrant or assume responsibility for the accuracy or completeness of any information, text, graphics, links, or other items contained within the Software.LIMITATION OF LIABILITY. IN NO EVENT SHALL INTEL OR ITS SUPPLIERS BE LIABLE FOR ANY DAMAGES WHATSOEVER (INCLUDING, WITHOUT LIMITATION, LOST PROFITS, BUSINESSINTERRUPTION, OR LOST INFORMATION) ARISING OUT OF THE USE OF OR INABILITY TO USE THE SOFTWARE, EVEN IF INTEL HAS BEEN ADVISED OF THE POSSIBILITY OF SUCH DAMAGES. SOME JURISDICTIONS PROHIBIT EXCLUSION OR LIMITATION OF LIABILITY FOR IMPLIED WARRANTIES OR CONSEQUENTIAL OR INCIDENTAL DAMAGES, SO THE ABOVE LIMITATION MAY NOT APPLY TO YOU. YOU MAY ALSO HAVE OTHER LEGAL RIGHTS THAT VARY FROM JURISDICTION TO JURISDICTION. In the event that you use the Software in conjunction with a virtual (“emulated”) device designed to appear as an Intel component product, you acknowledge that Intel is neither the author nor the creator of the virtual (“emulated”) device. You understand and acknowledge that Intel makes no representations about the correct operation of the Software when used with a virtual (“emulated”) device, that Intel did not design the Software to operate in conjunction with t he virtual (“emulated”) device, and that the Software may not be capable of correct operation in conjunction with the virtual (“emulated”) device. You agree to assume the risk that the Software may not operate properly in conjunction with the virtual (“emulated”) device. You agree to indemnify and hold Intel and its officers, subsidiaries and affiliates harmless against all claims, costs, damages, and expenses, and reasonable attorney fees arising out of, directly or indirectly, any claim of product liability, personal injury or death associated with the use of the Software in conjunction with the virtual (“emulated”) device, even if such claim alleges that Intel was negligent regarding the design or manufacture of the Software.UNAUTHORIZED USE. THE SOFTWARE IS NOT DESIGNED, INTENDED, OR AUTHORIZED FOR USE IN ANY TYPE OF SYSTEM OR APPLICATION IN WHICH THE FAILURE OF THE SOFTWARE COULD CREATE A SITUATION WHERE PERSONAL INJURY OR DEATH MAY OCCUR (E.G MEDICAL SYSTEMS, LIFE SUSTAINING OR LIFE SAVING SYSTEMS). If you use the Software for any such unintended or unauthorized use, you shall indemnify and hold Intel and its officers, subsidiaries and affiliates harmless against all claims, costs, damages, and expenses, and reasonable attorney fees arising out of, directly or indirectly, any claim of product liability, personal injury or death associated with such unintended or unauthorized use, even if such claim alleges that Intel was negligent regarding the design or manufacture of the part.TERMINATION OF THIS AGREEMENT. Intel may terminate this Agreement at any time if you violate its terms. Upon termination, you will immediately destroy the Software or return all copies of the Software to Intel.APPLICABLE LAWS. Claims arising under this Agreement shall be governed by the laws of the State of California, without regard to principles of conflict of laws. You agree that the terms of the United Nations Convention on Contracts for the Sale of Goods do not apply to this Agreement. You may not export the Software in violation of applicable export laws and regulations. Intel is not obligated under any other agreements unless they are in writing and signed by an authorized representative of Intel. GOVERNMENT RESTRICTED RIGHTS.The enclosed Software and documentation were developed at private expense, and are provided with “RESTRICTED RIGHTS.” Use, duplication, or disclosure by the Government is subject to restrictions as set forth in FAR 52.227-14 and DFARS 252.227-7013 et seq. or its successor. The use of this product by the Government constitutes acknowledgement of Intel’s proprietary rights in the Software. Contractor or Manufacturer is Intel.LANGUAGE; TRANSLATIONS. In the event that the English language version of this Agreement is accompanied by any other version translated into any other language, such translated version is provided for convenience purposes only and the English language version shall control.。
第5章常用EDA工具软件ppt课件
2024/8/7
8
在日常生活中,随处都可以看到浪费 粮食的 现象。 也许你 并未意 识到自 己在浪 费,也 许你认 为浪费 这一点 点算不 了什么
2. 编译设计图形文件
设计好的图形文件一定要通过MAX+plusII的编译。在 MAX+plusⅡ集成环境下,执行“MAX+plus”菜单下的 “Compiler”命令,在弹出的编译对话框按“START”键,即 可对h_adder.gdf文件进行编译。
2024/8/7
9
在日常生活中,随处都可以看到浪费 粮食的 现象。 也许你 并未意 识到自 己在浪 费,也 许你认 为浪费 这一点 点算不 了什么
3. 产生元件符号
在MAXplusII集成环境下,执行“File”菜单下的 “Create Default Symbol”命令,将通过编译的GDF文件产 生一个元件符号,并保存在工程目录中。元件符号可以被其他 图形设计文件调用,实现多层次的系统电路设计。
例4位加法器的设计
4位加法器由4个1位全加器构成,它的底层设计文件是1 位全加器。
2024/8/7
15
在日常生活中,随处都可以看到浪费 粮食的 现象。 也许你 并未意 识到自 己在浪 费,也 许你认 为浪费 这一点 点算不 了什么
1位全加器的原理图
全加器元件符号
2024/8/7
16
在日常生活中,随处都可以看到浪费 粮食的 现象。 也许你 并未意 识到自 己在浪 费,也 许你认 为浪费 这一点 点算不 了什么
2024/8/7
6
在日常生活中,随处都可以看到浪费 粮食的 现象。 也许你 并未意 识到自 己在浪 费,也 许你认 为浪费 这一点 点算不 了什么
Entrust Adaptive Issuance Instant ID软件产品介绍说明书
Entrust Adaptive Issuance Instant ID SoftwareHIGHLIGHTSLaunch your ID card program with confidenceEntrust Adaptive Issuance Instant ID software is the ideal starting point for organizations that want to make their people and premises more secure. Built for a single-user environment, InstantID software delivers the core tools you need to easily design, print, and manage ID cards and credentials. This user-friendly software offers you a complete solution for issuing basic IDs. Plus, you can easily scale up to another, more feature-rich edition in the Instant ID software suite as your needs grow.KEY BENEFITSEase of use. Drag-and-drop features make the software intuitive and easyto use, allowing you to spend less time learning and more time creating new credentials.• B rowser-based applications do notrequire an internet connection.• P rovides administrators with anintuitive interface to build the rightworkflows and card design. Everyday users can automatically follow astandardized process to improveaccuracy.• T he Quick Start Wizard gets usersfrom initial login to print with minimal setup and configuration.Configure to meet your needs. Settings can be configured to allow everyday users the ability to capture the data they want, how they want, while ensuring only the proper information is captured. Use your existing data. Import data from CSV and ASCII files or integrate directly with Microsoft Access, SQL Server, or MySQL*.*Available with Instant ID Plus editionEntrust Adaptive Issuance at a glanceEntrust Adaptive Issuance Instant ID offers a basic card issuance edition that’s just right for you – now and into the future.Instant ID Express software includes:• B asic photo capture• Data import• Credential designer• D rag-and-drop workflowsfor a single-user environment• E mbedded database for record storage and retrieval Instant ID Plus software also includes:• S ignature capture• DSLR camera support• Report capabilities• Composite field support• SQL Server support• MySQL support• Microsoft Access support• Batch printingBuild a complete card-issuance solutionEntrust Adaptive Issuance Instant ID software works with Entrust printers, supplies, and global services to give you a complete ID-issuance solution that delivers exceptional results.TECHNICAL SPECIFICATIONS SYSTEM REQUIREMENTSOperating System: Microsoft Windows 7 / 8.1 / 10 Mobile Operating System: iOS, Android, Microsoft Surface Web Browser:Chrome, Internet Explorer v10or 11, EdgeMemory:4 GB (8 GB recommended)Hard Drive:1 GB of computer drive spaceDesktop or PC Screen Resolution:1360 x 768(minimum)INSTANT ID SOFTWARE STANDARD FEATURESCredential Design• F ront and back card design, pre-designed card templates• V ariable/Static text field, photograph field, variable/static graphic field, date field• Magnetic stripe, bar code and QR code Workflow• T ext field, static text field, static graphic field,date field, print count field• A uto-sequence field, check box field, list field• T ext field mask, field option – read only, hidden,mandatory, searchableDatabase & Data Import• I mport data from CSV, ASCII fileLanguage Support• E nglish, French, German, Japanese, JIS Kanji,Portuguese (Brazilian), Simplified Chinese,Spanish• L ocalization utility for other languagesPrinter Support• Instant ID integrates with non-Entrust devicesPhoto Capture• F ile input, TWAIN, DirectShow, web browserABOUT ENTRUST CORPORATIONEntrust secures a rapidly changing world by enabling trusted identities, payments,and data protection. Today more than ever, people demand seamless, secure experiences, whether they’re crossing borders, making a purchase, accessing e-government services, or logging into corporate networks. Entrust offers an unmatched breadth of digital security and credential issuance solutions at the very heart of all these interactions. With more than 2,500 colleagues, a network of global partners, and customers in over 150 countries, it’s no wonder the world’s most entrusted organizations trust us.For more information888.690.2424 +1 952 933 1223 ****************Entrust and the Hexagon logo are trademarks, registered trademarks, and/or service marks of Entrust Corporation in the U.S. and/or other countries. All other brand or product names are the property of their respective owners. Because we are continuously improving our products and services, Entrust Corporation Learn more atU.S. Toll-Free Phone: 888 690 2424 International Phone: +1 952 933 1223。
国家工程器械(National Instruments)软件激活指南说明书
NOTE TO USERSActivation Instructions for National Instruments Software Your National Instruments software requires activation to access all features. Activation is simple and available 24 hours a day, 7 days a week. For more information on activation, refer to your product documentation, or visit /activate.Note If your software is a part of a V olume License Agreement (VLA) orEnterprise Agreement (EA), contact your VLA or EA administrator for installationand activation instructions.1.Install Your Software—If you install multiple products from a single piece of media, you can activate the products that you have purchased. You can install products that you have not purchased and use them in evaluation mode.Note If you already installed software that uses activation, you may not have toreinstall. Refer to the Installing and Activating Software Upgrades section in thisdocument for more information.2.Locate Your Serial Number—Your serial number uniquely identifies your purchase of NI software. You can find your serial number on the Certificate of Ownership included in your software kit. If your software kit does not include a Certificate of Ownership, you can find your serial number on the product packing slip or shipping label. For more information about finding serial numbers, visit /info and enter the Info Code SerialNumbers_en.If you have a previous version of the application installed, you can find the serial number within the application by selecting Help»About. You also can contact your local National Instruments branch. Refer to /niglobal for branch office contact information.unch the NI Licensing Wizard—The NI Licensing Wizard guides you through the activation process. If you installed your NI software for the first time, the installer may automatically launch the NI Licensing Wizard. Otherwise, launch your software and choose to activate when prompted. If you are not prompted, perform the following steps:unch NI License Manager by selecting Start»All Programs»National Instruments»NI License Manager.b.Click the Activate Software button on the ribbon.4.Save Your Activation Code for Future Use—NI Licensing Wizard sends an email confirmation of your activation code. If you reinstall your software on the same computer, you can enter the same activation code. To apply the activation code in the future, launch the NI Licensing Wizard and select Enter Activation Codes from the dialog box to enter the serial numbers.Installing and Activating Software UpgradesIf you are upgrading or moving between software packages, in most cases you do not have to install additional software, as follows:•Upgrading from an Evaluation Version to a Paid Version—If you are upgrading from an evaluation version to a paid version, you do not need to reinstall your software, even if the evaluation period has expired. Follow the prompts that appear when you launch your application or use NI License Manager to activate the software.•Moving to a Different Package of the Same Product—If you decide to move to a different product package, such as upgrading from LabVIEW Base Package to LabVIEW Professional Development System, you can activate the new package without installing additional software. Use NI License Manager to activate your software.•Activating Additional Software Packages—If you purchase add-on software, such as LabVIEW Application Builder, in some cases you do not have to install additional software to activate. Use NI License Manager to activate the software. If you do not see the software listed in NI License Manager, you need to install it.For information on how to use NI License Manager to activate software, refer to the NI License Manager Help, which you can access by clicking the blue circle icon with a question mark, located in the top right corner, or by pressing F1.Product RegistrationAt the end of activation, click the link that appears to open your browser. Follow the prompts to enter your user ID and password to register your product. NI uses the contact information that you provide to ensure access to your service benefits, including technical support, software upgrades, and updates. If you are not prompted to register, visit / support, click the Product Registration link, and manually enter your registration information.Moving Software after ActivationTo transfer your software to another computer, uninstall the software on the first computer, then install and activate it on the second computer. You are not prohibited from transferring your software from one computer to another and you do not need to contact or inform NI of the transfer. Because activation codes are unique to each computer, you will need a new activation code. Follow the steps on Page 1 of this document to acquire a new activation code and reactivate your software.2||Activation Instructions for National Instruments Software Note to UsersNI Volume License ProgramNational Instruments offers volume licenses through the NI Volume License Program and the NI Enterprise Program. These programs make managing software licenses and maintenance easy. You can use NI Volume License Manager or Flexera’s FlexNet license management tools (formerly sold as Acresso FlexNet or FLEXlm) to track your NI licenses instead of activating each copy of NI software. For more information, refer to /vlp or /ea based on the program your company chooses.Activation MethodsYou can choose among a number of activation methods using the NI Licensing Wizard, including automatic activation, online at /activate, and on the telephone. Online activation is available 24 hours a day, 7 days a week.Home Computer UseNational Instruments permits you to use most named-user and computer-based development licenses at home. To use the software, install it on your home computer and activate it using your original serial number. Refer to the NI License Manager help file, the software end-user license agreement in the installer, or /legal/license for more information. Privacy PolicyNational Instruments respects your privacy. For more information about the National Instruments activation information privacy policy, go to /activate/privacy.T ermsactivation code A 20-character code that enables NI software to run on your computer,based on your serial number and computer ID. You receive and applyan activation code by completing the activation process.computer ID A 16-character ID that uniquely identifies your computer, generatedduring the activation process. To find your computer ID, launchNI License Manager and click the Computer Information button.computer-based license A license for a single computer that allows multiple users and a single home installation.named-user license A license for a single person, limited to three installations per license, where each license is used only on one computer at a time. This license also allows a home license.serial number An alphanumeric string that uniquely identifies your purchase ofa single copy of software, included in your software kit on yourCertificate of Ownership, on the product packing slip, or on theshipping label.Activation Instructions for National Instruments Software Note to Users|© National Instruments|3National Instruments uses activation to better support evaluation of our software, to enable additional software features, and to support license management in large organizations. To find out more about National Instruments software licensing, visit /activate for frequently asked questions, resources, and technical support.Information is subject to change without notice. Refer to the NI Trademarks and Logo Guidelines at /trademarks for more information on NI trademarks. Other product and company names mentioned herein are trademarks or trade names of their respective companies. For patents covering NI products/technology, refer to the appropriate location: Help»Patents in your software, the patents.txt file on your media, or the National Instruments Patents Notice at /patents. You can find information about end-user license agreements (EULAs) and third-party legal notices in the readme file for your NI product. Refer to the Export Compliance Information at /legal/export-compliance for the NI global trade compliance policy and how to obtain relevant HTS codes, ECCNs, and other import/export data. NI MAKES NO EXPRESS OR IMPLIED WARRANTIES AS TO THE ACCURACY OF THE INFORMATION CONTAINED HEREIN AND SHALL NOT BE LIABLE FOR ANY ERRORS. U.S. Government Customers: The data contained in this manual was developed at private expense and is subject to the applicable limited rights and restricted data rights as set forth in FAR 52.227-14, DFAR 252.227-7014, and DFAR 252.227-7015.© 2003–2018 National Instruments. All rights reserved.371243M-01Oct18。
IBM Application Discovery and Delivery Intelligenc
IBM Application Discovery and DeliveryIBM®Intelligence for IBM ZVersion 5.1.0.xQuick Start GuideThis guide describes a quick and easy way to install and configure the product.Product overviewIBM Application Discovery and Delivery Intelligence for IBM Z (IBM ADDI) is an analytical platform for enterprise or legacy applications. It uses deterministic algorithms and cognitive technologies to analyze mainframe applications to quickly discover and understand interdependencies and impacts of changes. IBM ADDI bundles the following two applications:•IBM Application Discovery for IBM Z (IBM AD)•IBM Application Delivery Intelligence for IBM Z (IBM ADI)Note: This Quick Start Guide for IBM ADDI is based on the assumption that you install both IBM AD and IBM ADDI Extension with ADDI installer. If you install only IBM AD with ADDI installer, you can refer to the IBM AD Quick Start Guide that is shipped with product for more information.1Step 1: Access the software and documentationIBM ADDI product offering includes the following installers in its installation suite:•IBM Application Discovery Connect for Mainframe•IBM Application Discovery Analyze Client•ADDI Installer that includes the following components.–IBM Application Discovery Analyze Server–IBM Application Discovery Batch Server–IBM Application Discovery Configuration Service–IBM Application Discovery Build Client–Authentication Server (DEX)–IBM Application Delivery IntelligenceFor details about downloading the product and getting license keys and activation kits, see the IBM SupportLicensing page (/software/rational/support/licensing). If you are downloading your software from Passport Advantage®, see the documentation of "How to download software from Passport Advantage Online website" (/support/docview.wss?uid=swg21622147).For the complete documentation, visit the following links:•IBM Application Discovery for IBM Z Knowledge Center (https:///support/knowledgecenter/ SSRR9QSSRR9Q_5.1.0).•IBM ADDI Extension on Knowledge Center (https:///support/knowledgecenter/SSRR9Q_5.1.0/ com.ibm.adi.product.doc/topics/topiclink_extension.html).•IBM Application Discovery and Delivery Intelligence for IBM Z Library (/support/ docview.wss?uid=swg27049108).2Step 2: Evaluate the hardware and system configurationSee the detailed system requirements document from the following links:•Installation prerequisites for IBM AD•Hardware and software requirements for IBM ADDI Extension3Step 3: Installing IBM AD and IBM ADDI Extension with the ADDI installer Use the ADDI installer wizard to install IBM AD and IBM ADDI Extension on Windows or Linux®. For moreinformation, see "Installing with ADDI installer" and "Installing and setting up IBM ADDI Extension with ADDIinstaller" topics.Notes:a.For IBM ADDI Extension, you need to install at least the following components:•IBM Application Discovery Configuration Service•Authentication Server (DEX)•IBM Application Delivery Intelligenceb.IBM Application Discovery Batch Server is required to be installed on the same machine as IBM ADDI Extensioncomponent.4Step 4: Configuring IBM ADFollow the instructions in the "Configuring IBM Application Discovery" topic to configure IBM AD components.Note: To explore the Business Rule Discovery feature, you need to enable the feature through IBM ADConfiguration Server. For more information, see "Enabling Business Rule Discovery feature".5Step 5: Configuring IBM ADDI ExtensionFollow the instructions in the "Installing and setting up IBM ADDI Extension with ADDI installer" topic. If youinstalled IBM ADDI Extension already, skip the installation steps that are described in the instructions.6Step 6: Setting up IBM ADDI Extension to start with analysisComplete the following steps to create the workbook to be used for analysis.a.Create a connection to the IBM AD server.b.Create one or more data providers: Application Discovery data provider, Business Rule Discovery data provider,or both.c.Create a workbook that is associated with the created data provider.7Step 7: Perform workbook analysisPerform either discovering and managing business terms or Static Analysis of application discovery data.More informationFor more information, see the following resources:•IBM ADDI Marketplace (https:///us-en/marketplace/app-discovery-and-delivery-intelligence).•IBM DevOps for Enterprise - Mainframe DEV Website (https:///mainframe/).IBM® Application Discovery and Delivery Intelligence for IBM Z® Version 5.1.0.x Licensed Materials - Property of IBM. © Copyright IBM Corp. 2019, 2020. U.S. Government Users Restricted Rights - Use, duplication or disclosure restricted by GSA ADP Schedule Contract with IBM Corp.IBM, the IBM logo, and ® are trademarks or registered trademarks of International Business Machines Corp., registered in many jurisdictions worldwide. Other product and service names might be trademarks of IBM or other companies. A current list of IBM trademarks is available on the Web at "Copyright and trademark information" (/legal/copytrade.shtml).Part Number: CC61SML。
Multisim 14专业版安装方法
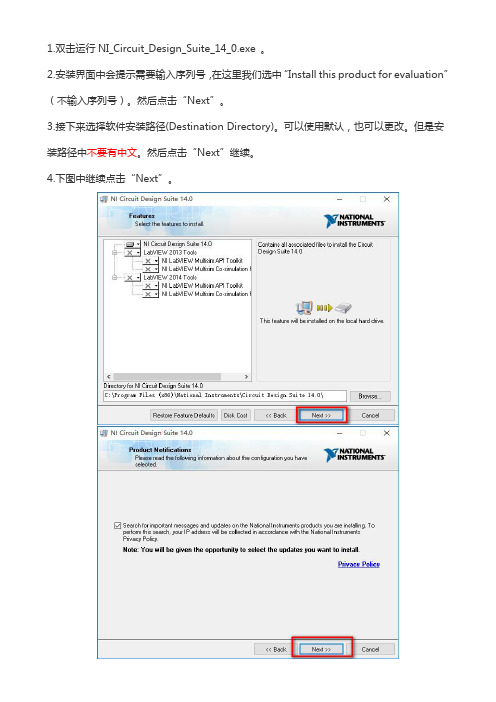
1.双击运行NI_Circuit_Design_Suite_14_0.exe。
2.安装界面中会提示需要输入序列号,在这里我们选中“Install this product for evaluation”(不输入序列号)。
然后点击“Next”。
3.接下来选择软件安装路径(Destination Directory)。
可以使用默认,也可以更改。
但是安装路径中不要有中文。
然后点击“Next”继续。
4.下图中继续点击“Next”。
5.正在连接产品通知服务器,如下图6.继续点击“Next”.如下图7.接下来安装软件许可协议。
选中“I accept the....”.然后点击“Next”如下图8.继续点击“Next”.9.接下来开始安装软件主程序。
如下图10.最后窗口会提示如下界面,选中“Yes”11.之后软件会提示重启电脑,在这里我们选中最后一项“Restart Later”暂不重启。
如下图12.接下来我们对软件进行破解。
暂时不要打开软件,运行破解文件注册机“NI License Activator 1.2”,会出现如下界面,右键点击选择Activate,五个框由灰变绿就可以。
如下图13.最后软件就破解完成了。
打开软件就可以使用免费激活版了。
汉化方法将汉化补丁“Chinese-simplified”复制到软件安装目录下的stringfiles文件夹中,默认目录为C:\Program Files (x86)\National Instruments\Circuit Design Suite 14.0\stringfiles。
软件就汉化完成。
戴尔生命周期控制器集成 3.3 版发行说明说明书
Dell Lifecycle Controller Integration Version 3.3 for Microsoft System Center Configuration ManagerRelease NotesRelease Type and DefinitionDell Lifecycle Controller Integration for Microsoft System Center Configuration Manager 3.3 Dell Lifecycle Controller Integration (DLCI) for Microsoft System Center Configuration Manager enables the administrators to use the Configuration Manager console to apply the remote enablement capabilities of Dell Lifecycle Controller (LC), available as part of the integrated Dell Remote Access Controller (iDRAC).Version3.3Release DateJanuary 2017Previous Version3.2ImportanceOPTIONAL: Dell recommends the customer review specifics about the update to determine if it applies to your system. The update contains changes that affect only certain configurations, or provides new features that may or may not apply to your environment. Platform(s) AffectedFor information about supported platforms, see “Supported Target Systems and operating systems” under “What is supported.”What is SupportedHardware and Software RequirementsFor information about the hardware and software requirements; installing and uninstalling Dell Lifecycle Controller Integration 3.3, or upgrading from Dell Lifecycle Controller Integration 3.2, see the Installation Guide, which is part of the Dell Lifecycle Controller Integration 3.3 download package.Supported Target Systems and Operating SystemsFor a list of supported Dell systems that you can use as target systems and the operating systems that you can deploy on these target systems, see the “Dell Lifecycle Controller Integration Version 3.3 for Microsoft System Center Configuration Manager User’s Guide”.What’s NewThis release of DLCI for Configuration Manager provides support for the following:•Support for Microsoft System Center Configuration Manager Version 1610.•Support for Agent-free properties for configuration manager.•Support for deployment of Windows 2016, ESXI 6.0 U2, and RHEL 6.8.•Support for 64-bit firmware update.Important Notes•DLCI 3.3 has minimum prerequisite of Windows Server 2008 SP2 for the site systems and server running Dell Provisioning Service (DPS).•When you deploy an operating system on a target system with iDRAC configured in a shared network mode, the Windows PE environment may fail to startup on the network drivers, causing the system to restart before reaching the task sequence.•If the Lifecycle Controller of a system is in use, then the system is not discovered.•If the Lifecycle Controller of the target system is locked by another process, then the following error message is displayed in the following path <Microsoft Configuration Manager installation \XmlStorage\Extensions\DLCPlugin\DLCTaskManager.log file: folder>\AdminConsole "Lifecycle Controller is being used by another process."•If you do not enter the service tag name of the target system correctly, the discovery and handshake fails and the following error message is displayed: "[Server Name] - Handshake - getCredentialsInternal(): [Server Name]: NOT AUTHORIZED: No credentials returned."•During Discovery and Handshake, the DPS.log displays an empty Site code: followed by a cryptography exception. You can ignore this.•During Discovery and Handshake, the DPS.log displays numerous messages createDellCollecions() Either Connection Mgr param is NULL or Collection not yet created. You can ignore this.•The System Viewer utility does not display the latest RAID configuration. To view the latest configuration, re-launch the System Viewer utility.•The modular systems cannot use the hostname in the path to the Common Internet File System (CIFS) share, but monolithic systems can use the hostname. For modular systems use the IP address instead of hostname.•After deploying Non-Windows OS using DLCI the service tag of system name is displayed as hostname in configuration manager console.Limitations•DLCI for System Center Configuration Manager 2012 does not support operating system deployment on Dell PowerEdge R330, R230, T330, and T130 Platforms.•When you deploy Red Hat Enterprise Linux or ESXi OS on servers having iDRAC on shared Lan on Motherboard (LOM), the deployment may fail. To resolve this, disable STP on the PowerEdge switches (ports connecting to the Shared LOM port directly) and enable Rapid Spanning Tree Protocol (RSTP), PortFast, or FastLink on those switches.•If the Windows PE environment is unresponsive while running an operating system deployment, the system may have run out of memory. By default, Windows PE allocates 32 megabytes (MB) of writeable memory, known as scratch space. You can increase the scratch space up to 512 MB.2•Before upgrading to DLCI version 3.3, ensure that all the scheduled firmware update jobs are either completed or deleted.•During installation of DLCI, the Configuration Manager credentials specified are not validated. Installation succeeds, and an errorin import.log indicates the same. Use Dell Provision Service (DPS) configure utility (import.exe) to specify the correctcredentials before proceeding with discovery of servers.•The Advertise option does not display in an existing task sequence after uninstalling and reinstalling DLCI for Configuration Manager. To advertise the task sequence, edit the task sequence and correct if there are any errors.•If Active Directory (AD) authentication is used for communicating with iDRAC on modular servers, ensure that the iDRAC version is upgraded to 3.32. Affected version: DLCI 3.3 with 11G iDRAC 3.30 (or earlier).•If the host system has the Lifecycle Controller version 1.5, ensure that while configuring user name as part of the iDRAC configuration, the user name length is fewer than 16 characters. Affected version: DLCI 3.3 with 11G Lifecycle Controller 1.5.•If the host system is Dell’s 11th generation of the PowerEdge server and has the Lifecycle Controller version 1.5, Redundant Array of Independent Disk configuration of H200 controller using DLCI 3.3 does not work correctly. Upgrade to the Lifecycle Controller firmware version 1.5.1. Affected version: DLCI 3.3 with 11G Lifecycle Controller 1.5.•While applying minimum bandwidth on the Qlogic Partitionable NIC cards, if the summation of minimum bandwidth on all partitions of a port reaches more than 100 the apply operation fails. Ensure that you apply ‘0’ on all partitions as minimum bandwidth before applying any other values.•BIOS Configuration fails when it is completed for the second time if Dell’s 11th generation of the PowerEdge server has either 1.9 (monolithic) or 3.4 (modular) version of the iDRAC firmware. Ensure that you upgrade the iDRAC firmware level to 1.92 (monolithic) or 3.42 (modular).•Dell recommends that you delete and reimport the server from Configuration Manager before installing a Non-Windows operating system on the server which is already having Windows OS installed and Configuration Manager client configured.•If you deploy the Windows server operating systems on Dell’s 11th generation of the PowerEdge servers where drivers were already applied from Lifecycle Controller, then few device drivers may not work or are unavailable. As a workaround, manually update drivers or in Task Sequence in the server where you deployed the OS, as a fallback for the option Apply Drivers from the Lifecycle Controller use option Apply Driver Package.•Before installing the DLCI version 3.3, if the servers were discovered or imported, then after installation must rediscover or reimport the servers. The Node ID Property is displayed on the Dell out-of-band controllers properties page.•DLCI Auto discovery does not work with iDRACs (version 2.10.10.10) Transport Layer Security (TLS) 1.2 protocol. As a workaround, ensure that you have TLS 1.1 available in the system where you have installed DLCI.•DLCI Auto discovery does not work with iDRACs (version 2.10.10.10) TLS 1.2 custom certificate.•Ensure that the password does not contain an @ character in it, while using CIFS share. Else, firmware update may fail.•Auto-discovery job fails with iDRAC version 2.30.30.30 and later, if DPS is installed on Windows 2016. For resolutions, see http://dell.to/2jtcrCG.Software RequirementsConfiguration Manager Version 1610, or System Center 2012 R2 SP1 Configuration Manager, or System Center 2012 SP2 Configuration Manager, or System Center 2012 R2 Configuration Manager, or System Center 2012 SP1 Configuration Manager, or System Center 2012 Configuration Manager.InstallationBrowse to the folder where the files are extracted and see the installation guide.Installation InstructionsExtract Files:1.Click Browse, and then navigate to the self-extractable .zip file that you downloaded.2.Double-click on the .zip file to extract the downloaded package.3.Click Continue.4.Specify the location to extract the files.5.Click OK to extract files. After the files are extracted All files were successfully unzipped message is displayed.6.Click OK to exit.3Installation and Configuration NotesFor installation or update procedure-related information, see the “Dell Lifecycle Controller Integration Version 3.3 for Microsoft System Center Configuration Manager Installation Guide”.Accessing Documents from Dell Support SiteYou can access the required documents in one of the following ways:•Using the following links:–For Enterprise Systems Management documents — /openmanagemanuals–For all Systems Management documents — /softwaresecuritymanuals–For Remote Enterprise Systems Management documents — /esmmanuals–For Client Systems Management documents — /clientsystemsmanagement–For Serviceability Tools documents — /serviceabilitytools–For OpenManage Connections Enterprise Systems Management documents — /OMConnectionsEnterpriseSystemsManagement–For OpenManage Connections Client Systems Management documents — /connectionsclientsystemsmanagement •From the Dell Support site:a.Go to /support/manuals.b.Under General support section, click Software & Security.c.In the Software & Security group box, click the required link from the following:–Serviceability Tools–Enterprise Systems Management–Client Systems Management–Remote Enterprise Systems Management–Connections Client Systems Managementd.To view a document, click the required product version.•Using search engines:–Type the name and version of the document in the Search box.Contacting DellNOTE: If you do not have an active Internet connection, you can find contact information on your purchase invoice, packing slip, bill, or Dell product catalog.Dell provides several online and telephone-based support and service options. Availability varies by country and product, and some services may not be available in your area. To contact Dell for sales, technical support, or customer service issues:1.Visit /support.2.Select your support category.3.Verify your country or region in the Choose a Country/Region drop-down menu at the top of page.4.Select the appropriate service or support link based on your need.Copyright © 2017 Dell Inc. or its subsidiaries. All rights reserved. Dell, EMC, and other trademarks are trademarks of Dell Inc. or its subsidiaries. Other trademarks may be trademarks of their respective owners.4。
the restricted log lincese error -回复
the restricted log lincese error -回复Restricted License ErrorIntroduction:In the rapidly growing world of technology and digital content, the issue of intellectual property rights has become increasingly relevant. One common obstacle that users often encounter is the restricted license error. This error message indicates that the user's access to certain content, software, or applications is limited due to specific licensing agreements. In this article, we will delve into the concept of restricted licenses and explore the causes of this error message. We will also provide step-by-step solutions to help you overcome these restrictions.Understanding Restricted Licenses:A restricted license is a legally binding agreement between the copyright holder and the user that outlines the terms and conditions of use for a specific piece of content or software. Such licenses are often employed to safeguard the intellectual property rights of creators and ensure their work is not used inappropriately.Restricted licenses can come in various forms, such as end-user license agreements (EULAs), software licenses, and terms of service for digital platforms.Causes of Restricted License Errors:There are several common causes that can trigger a restricted license error. Understanding these causes is crucial in troubleshooting and resolving the issue. Let us now examine some of the key factors that contribute to this error message.1. Expiration of License:Many licenses have an expiration date, after which the user's access to the content or software is restricted. This is often seen in trial versions or limited-time subscriptions. Once the license has expired, attempting to access the restricted content will trigger the error message.2. Unauthorized Usage:Restricted licenses are intended to limit the usage of copyrightedmaterial to authorized users only. If a user attempts to access or distribute the content without proper authorization or in violation of the license terms, the restricted license error will be displayed.3. Geographical Restrictions:Content providers often impose geographical limitations on their licenses due to regional copyright laws or contractual obligations. If a user tries to access content from a restricted location, such as a different country or region, the restricted license error may appear.4. Device Limitations:Some licenses restrict the use of content or software to specific devices. If a user attempts to access the content on an unauthorized device, such as a device that has not been registered or activated, the restricted license error will be triggered.Solutions to Restricted License Errors:Now that we have explored the causes of restricted license errors, let us look at some step-by-step solutions to overcome theserestrictions.1. Renew or Update the License:If the error message is due to an expired license, the first step is to renew or update the license. Contact the content provider or software manufacturer for guidance on how to extend or update your license. This may involve purchasing a new license, subscribing to a service, or entering a valid activation code.2. Verify Authorization and Compliance:If you believe you are authorized to access the content or software but are still encountering the error, verify your authorization and compliance with the license terms. Ensure you are using the correct login credentials or any required activation codes. Review the license agreement to confirm that you are adhering to all the terms and conditions.3. Check Geographical Restrictions:If the restricted license error message arises from geographicallimitations, consider using a virtual private network (VPN) to bypass these restrictions. A VPN can mask your actual location and make it appear as if you are accessing the content from an authorized region. However, exercise caution as circumventing geographical restrictions may violate the license terms and infringe on copyright laws.4. Use Authorized Devices:To avoid device-related restrictions, ensure that you are using an authorized device according to the license terms. If needed, register or activate your device to gain access. Check the license agreement or contact the content provider or software manufacturer for instructions on how to authorize your device correctly.Conclusion:Restricted license errors can be frustrating, but understanding their causes and implementing the appropriate solutions can help overcome these restrictions. By renewing or updating licenses,ensuring proper authorization and compliance, bypassing geographical restrictions (where allowed), and using authorized devices, users can overcome these errors and access their desired content or software. However, it is essential always to respect intellectual property rights, as restricted licenses are put in place to protect the creations of content creators and software developers.。
Autodesk Factory Design Suite 2013用户手册说明书
1. General Product Information
1.1 What is Autodesk Factory Design Suite 2013? Autodesk® Factory Design Suite is built specifically for the layout design of machine lines and manufacturing facilities before equipment is installed and commissioned on the factory floor. It includes design, analysis and presentation software to help you discover and communicate the most efficient layout solution by creating a digital model of your factory. It enhances AutoCAD and Autodesk® Inventor® software with exclusive access to interoperable product workflows and factory-specific content that help to improve design efficiency, accuracy and communication when responding to changing business requirements.
NetIQ Secure API Manager 2.0 快速开始指南说明书
Quick Start NetIQ Secure API Manager 2.0 Quick StartInstalling and Configuring Secure API ManagerMarch 2021This Quick Start explains how to install and configure Secure API Manager. It is a multi-step process. It is important to complete all of the steps listed to properly configure Secure API Manager.IMPORTANT: You must complete the steps in the order listed to have configuration options appear or to beable to save the configuration options.1. Obtain Secure API Manager, the License, and the Activation KeyAfter you purchase Secure API Manager, the full license and the activation key are available from theSoftware Licenses and Downloads (https:///) portal. The trial license comes withAccess Manager and it is in the Access Manager Administration Console. You must install the trial or the full license to see the configuration options for Secure API Manager in the Access Manager Administration Console. For more information, see “Obtaining Secure API Manager and the License” in the NetIQ Secure API Manager 2.0 Installation Guide.2. Deploy Secure API ManagerYou must deploy the OVF file you obtained through the Software Licenses and Downloads portal. Youdeploy more than one appliance if you want to cluster Secure API Manager. For more information, see“Deploying Secure API Manager” in the NetIQ Secure API Manager 2.0 Installation Guide.3. Set the Password for the vaadmin AccountSecure API Manager uses the vaadmin account as the administrative account for communication withAccess Manager. By default, the vaadmin account does not have a password set, so you must set one. For more information, see “Manage Administrative User Access” in the NetIQ Secure API Manager 2.0Appliance Administration Guide.4. Install the License and Activation KeyYou must install a trial license or a full license for Secure API Manager in the Access ManagerAdministration Console for the configuration options for the API Gateway to appear. If you do not install the trial or full license, you cannot configure and use Secure API Manager.You must install the activation key to receive updates or upgrades for the appliance and Secure APIManager. For more information, see “Install the Secure API Manager License and Activation Key” in the NetIQ Secure API Manager 2.0 Administration Guide.15. Create or Import a Certificate for the API GatewayYou must create or import a certificate for the API Gateway into the Access Manager certificatemanagement system. During the configuration of the API Gateway, you must select a certificate to use to ensure that the communication between Secure API Manager and Access Manager is secure over SSL. For more information, see “Create or Import a Certificate for Secure API Manager” in the NetIQ Secure APIManager 2.0 Administration Guide.6. Configure the API Gateway Cluster and API GatewayAfter you install the Secure API Manager license there is a new API Gateway option on the Dashboard.Click the server object for the API Gateway and create an API Gateway Cluster, defining its name. Thenconfigure one or more API Gateways depending on the number of appliances you deployed. For moreinformation, see “Create the API Gateway” in the NetIQ Secure API Manager 2.0 Administration Guide.7. Create Limiting Policies for the APIsYou create the limiting policies for the APIs after you configure the API Gateway cluster and the APIGateway. These policies create subscription tiers that the API developers select during the creation of the APIs and when they subscribe to the APIs. These policies provide the ability to throttle the bandwidth or rests to the APIs so that you can charge more for the higher throughput. It also provides a rate-limitingpolicy to allow you to set a hard limit for the number of requests to the API end points so that theseapplications, services, or things do not receive more requests than they can handle. For more information, see “Configure the Limiting Policies for the APIs” in the NetIQ Secure API Manager 2.0 AdministrationGuide.8. Create Access Policies for the Publisher and the StoreBy default, no account has access to the Publisher and the Store where the API developers create andconsume the APIs. You must create access policies after you configure the API Gateway to allow users to access and use the Publisher and the Store. For more information, see “Grant Access to the Publisher and the Store” in the NetIQ Secure API Manager 2.0 Administration Guide.Legal Notice© Copyright 2019-2021 Micro Focus or one of its affiliates.The only warranties for products and services of Micro Focus and its affiliates and licensors (“Micro Focus”) are as may be set forth in the express warranty statements accompanying such products and services. Nothing herein should be construed as constituting an additional warranty. Micro Focus shall not be liable for technical or editorial errors or omissions contained herein. The information contained herein is subject to change without notice.For information about legal notices, trademarks, disclaimers, warranties, export and other use restrictions, U.S.Government rights, patent policy, and FIPS compliance, see https:///about/legal/.2Installing and Configuring Secure API Manager。
Microwave Office Design Suite 安装与激活指南说明书
INSTALLATION AND ACTIVATION INSTRUCTIONS Microwave Office Design Suite Installing the SoftwareTo install Microwave Office Design Suite, complete the following steps:1.Insert Microwave Office Design Suite media.2.In the media directory, double-clickAWR_Design_Environment_v9_06_4997_2.msi.3.During the installation, you will select the install location and the units you wish to work in. Activating the SoftwareUse one of the following two methods to activate your software with a valid license.Home/Off-Campus Licenses (Flexible Access Licensing)To obtain a license for the software, visit /info and enter the Info Code mwo. Follow the licensing instructions on the page. After submitting your registration information, your license file will be emailed to the address you provided. Follow the accompanying instructions in the email containing your license file to complete license installation.University Multi-seat Licenses (Floating Licensing)If your university is using multi-seat licenses, contact your administrator or professor for the name of the license server. After you have obtained the license server name, complete the following steps to finish software activation:unch AWR Design Environment by selecting Start»All Programs»AWR versionyear»AWR Design Environment.2.Click OK in the AWR Design Environment dialog box that appears.3.In the AWR License Configuration window, click Set Location.4.Enter your license server information in the License file/server field.5.Restart the AWR Design Environment software for the changes to take effect.Additional ResourcesThe following resources contain information you might find helpful:•AWR Design Environment Installation Guide—This document, located on your Microwave Office Design Suite media as Install.pdf, contains complete information on installing, configuring, and troubleshooting AWR software.•/awr—This Web site directs you to additional product information, licensing generation information, and support resources.•/academic—This Web site contains license renewal information, additional downloads, getting started information, and other resources. From the AWR website, you can also access support information, design examples, and the AWR knowledgebase.•AWR Design Environment Help—This help file, located at Start»All Programs»AWR version year»AWR Design Environment Help, contains information on getting started with and using the Microwave Office Design Suite.National Instruments, NI, , the National Instruments corporate logo, and the Eagle logo are trademarks of National Instruments Corporation. Refer to the Trademark Information at /trademarks for other National Instruments trademarks. APLAC, AWR, AXIEM, Microwave Office, and Visual System Simulator are the trademarks of AWR Corporation. Other product and company names mentioned herein are trademarks or trade names of their respective companies. For patents covering AWR products/technology, refer to the AWR Patent Notice at/patents. Refer to the Export Compliance Information at /legal/export-compliance for the National Instruments global trade compliance policy and how to obtain relevant HTS codes, ECCNs, and other import/export data.© 2011 AWR Corporation. All rights reserved.© 2011 National Instruments Corporation. All rights reserved.373562A-01Jul11。
IBM TRIRIGA 产品文档说明书
Sign in | Register IBMSearchIBM Profiles Communities Apps1-3 of 3Previous Next Show 102550 items per page Previous Next TRIRIGA Wiki HomeFacilities Management …Facilities MaintenanceEnvironmental & Energ …Real Estate ManagementCapital Project Manage …CAD Integrator-Publish …IBM TRIRIGA Connector …IBM TRIRIGA AnywhereIBM TRIRIGA Applicatio …Release NotesMedia LibraryBest PracticesUpgradingWhen upgrading, plea …Release Versions Sum …Importing Patch Helpe …Upgrade from TRIRIG …Upgrade to TRIRIGA P …Upgrade to TRIRIGA A …Republishing Busines …Update DateTime syst …Upgrade Forms to Us …Upgrade from TRIRIG …Upgrade from TRIRIG …Applying an IBM TRIRI …▪Migrating from JBoss …Reducing process tim …Upgrading existing Ap …Importing the optional …Upgrading WAS LibertyTroubleshootingUX FrameworkContact Privacy Terms of use Accessibility Report abuse Cookie Preferences You are in: IBM TRIRIGA > Upgrading > Migrating from JBoss Application Server (community edition) to WebSphere Application Server Feed for this page |Feed for these commentsSubmit WikisSearch This Wiki IBM TRIRIGA Log in to participate IndexMembersTrash TagsFind a Taganalysis applicationavailability_section best_practicescad change_managementchanges comparecompare_revisionscustomizations customizedatabase db2 exchangefind_available_times gantt_chartgantt_scheduler groupmemory_footprint modificationsmodify object_labelobject_revisionoperating_system oracle performance platformproblem_determination reportsreserve reserve_performancerevision revisioningsingle_sign-on snapshot spacesql_server sso support system system_performancetags: track_customizations tririga troubleshoot tuningupgrade ux version versioningCloud ListMembersMigrating from JBoss Application Server (community edition) to WebSphere Application Server |Updated December 14, 2015 by clange |Tags: None Page Actions 1Beginning with version 3.4, IBM TRIRIGA Application Platform no longer supports deployment on JBoss Application Server (community edition) for production environments.As an alternative, you can migrate your existing IBM TRIRIGA Application Platform deployment on JBoss Application Server to IBM WebSphere Application Server during the IBM TRIRIGA Application Platform version 3.5 upgrade process. As part of your purchase of IBM TRIRIGA Application Platform version 3.5, you are entitled to a licensed copy of IBM WebSphere Application Server.Refer to WebSphere Application Server: Overview and quick start to gain a high level understanding of how IBM WebSphere Application Server fits in your environment.For information about deploying in your environment, refer to Installing and configuring your application serving environment .Important note: If you have Custom Task code that calls the Kettle runtime directly, and you do not use the TRIRIGA RunETL Java class, when you migrate to WebSphere Application Server, or if you upgrade to WebSphere Application Server v8 or newer, you may run into classloading issues with the jars required for ETL, To get your Custom Task logic to work on WebSphere Application Server, you may need to create custom classloader logic to handle the .jar files in the tririga_home /lib/etl folder, and use this custom classloader logic as a wrapper your ETL calls.1.Ensure that the IBM TRIRIGA database and application server are running.2.Log on to the JBoss Application Server host as an administrator.3.Download IBM TRIRIGA version 10.5 and IBM TRIRIGA Application Platform version 3.5 from the IBM Passport Advantage website. Download instructions are provided in the IBM TRIRIGA 10.5 and IBM TRIRIGA Application Platform 3.5 Download Instructions document . Ensure that you also download the optional packages listed for IBM WebSphere Application Server, including the Quick Start guide. Select the IBM Installation Manager package appropriate for the operating system of your application server. IBM Installation Manager is used to install IBM WebSphere Application Server images that you download.4.Install IBM WebSphere Application Server. Refer to the Quick Start for IBM WebSphere Application Server V8.5.5 for Multiplatform Multilingual guide you downloaded from IBM Passport Advantage for instructions.5.Run the IBM TRIRIGA Application Platform installer file. Follow the installation instructions.a.For the installation set, select IBM TRIRIGA Application Platform .b.For the installation type, select Platform Upgrade .6.When prompted, provide the installation location for the current JBoss Application Server deployment.7.When prompted to choose the application server, select WebSphere. Specify the WebSphere Application Server information in the next set of screens.a.Specify the information for the WebSphere Application Server configuration, such as the cell, node, server, profile, and home. Log on to the WebSphere Application Server and run the manageprofiles.[bat|sh]–listProfiles command to identify the cell, node, server, profile, and home values. WebSphere Application Server home is defined as C:\Program Files\IBM\WebSphere\AppServer , for example.b.Specify the WebSphere Application Server administrator user name and password. The server must be running after this step to verify that the configuration was specified correctly and needed for the deployment.c.Optional : Define an alternative application context path that accesses the IBM TRIRIGA application. This path must begin with a slash (/).d.Specify the minimum and maximum Java memory setting values in megabytes.e.Specify the server host name.f.Optional : Select production mode. This selection sets the value of the ProductionMode property in the TRIRIGAWEB.properties file.8.Select your database type. Consult with your database administrator specify the database information in the next set of plete and review the installation information in the final set of screens.a.Specify the names of the Simple Mail Transfer Protocol (SMTP) mail server and web server.b.Optional : Install IBM Tivoli® Directory Integrator and specify port numbers for IBM Tivoli Directory Integrator to use.c.Review the URL that the installer is using to test the data schema connection.d.Review the results of the test. If the test fails, verify that the database is running.e.Review the pre-installation summary and click Install .10.Click Next .If you want to monitor the progress in the directory where IBM TRIRIGA is installed, you can open the ant.log file in a log monitoring utility. In Windows, you can run the WinTail utility. In UNIX, you can run the tail –f ant.log command.11.When the installation is complete, click Done .12.Verify that your license files are in the tririga_root \config\licenses directory.13.Optional : If you made customizations that were saved in the userfiles directory, copy those files into the upgrade installation.14.Restart IBM TRIRIGA by locating the WebSphere Application Server directory with the appropriate method.On Windows servers, start the WebSphere Application Server service IBM WebSphere Application Server V8.5 - NODENAME from Control Panel > Administrative Tools > Services .On UNIX servers, run the stopServer and startServer commands and specify the server name:WEBSPHERE_HOME /profiles/AppSrv01/bin/stopServer.sh SERVER_NAMEWEBSPHERE_HOME /profiles/AppSrv01/ bin/startServer.sh SERVER_NAMEAlternatively, you can start the application through the WebSphere Application Server admin console. Log into the WebSphere Application Server admin console, go to Applications > All Applications , select the IBM TRIRIGA application and click Stop and then Start .AnthLC commented on June 15, 2014 Permalink What is the process if client decides to migrate to Oracle Weblogic?clange commented on June 16, 2014 Permalink The instructions for WebLogic should be similar. I don't believe WebLogic was officially tested, however.PaulLacey commented on June 18, 2014 PermalinkJust to clarify - although WebLogic may not have been tested against these migration instructions, IBM TRIRIGA does maintain compatibility with WebLogic per the IBM TRIRIGA Compatibility matrix at https:///developerworks/community/wikis/home?lang=en#/wiki/IBM%20TRIRIGA1/page/Complete%20IBM%20TRIRIGA%20Support%20and%20Compatibility%20Matrix. Instructions for installing TRIRIGA on WebLogic are at /support/knowledgecenter/SSHEB3_3.4.0/com.ibm.tap.doc_3.4.0/product_ments (3)Versions (3)Attachments (0)About。
IBM Maximo 石油和天然气 7.6.1 快速入门指南说明书
IBM Maximo for Oil and GasVersion 7.6.1Quick Start GuideThis guide introduces IBM Maximo for Oil and Gas version 7.6.1, provides a link to prerequisite software, gets you started with a typical installation, and provides a roadmap to other important information. Globalization:To obtain the Quick Start Guide in other languages, access the language-specific files from Passport Advantage®. Product overviewMaximo®for Oil and Gas provides enterprises with applications that support integrated processes for improving safety, reliability, environmental, and operational performance in compliance with regulations. Key objectives are to reduce operational risk and to increase return on assets.Before you install the product, refer to the IBM Maximo for Oil and Gas 7.6.1 Installation Guidenotes for Maximo for Oil and Gas at Release Notes (/support/knowledgecenter/SSLL9G_7.6.1/com.ibm.oil.doc/common/oil761_relnotes.html). Release notes contain the latest information that is relevant to theinstallation of this product. If no additional information is available, this link returns no search results.For complete documentation, including installation instructions, refer to IBM Knowledge Center for Maximo for Oil and Gas (/support/knowledgecenter/SSLL9G_7.6.1/com.ibm.oil.doc/welcome.html).2Step 2: Plan the installationInstalling Maximo for Oil and Gas requires system administrator rights and privileges. You install the product on aMicrosoft Windows administrative workstation. You must ensure that IBM Maximo Asset Management 7.6.0.6 is installed on the same administrative workstation where you plan to install Maximo for Oil and Gas 7.6.1, and in the same language as Maximo for Oil and Gas 7.6.1.For information about installing Maximo Asset Management fix packs, search for the fix pack download documents at Product support for Maximo Asset Management (/support/entry/portal/Overview/Software/Tivoli/ Maximo_Asset_Management).For details about the software, system, and network requirements for Maximo for Oil and Gas, refer to the SystemRequirements (https:///developerworks/mydeveloperworks/wikis/home/wiki/IBM%20Maximo%20Asset %20Management/page/System%20requirements) page of the Maximo Asset Management wiki.3Step 3: Install the productTo install the product:1.Review the software requirements.2.Install Maximo for Oil and Gas.3.Update the Maximo database. This step is required if you chose the option Defer the Update of the Maximo Databaseduring the installation.4.Build the enterprise application archive (EAR) files. This step is required if you chose either Defer Maximo ApplicationRedeployment or Defer the Update of the Maximo Database during the installation.5.For the IBM WebSphere®Application Server environments: The EAR files are installed during the Maximo AssetManagement installation. If this task was deferred during the Maximo Asset Management installation (by choosingeither Defer Maximo Application Redeployment or Defer the Update of the Maximo Database), deploy the EAR files.6.For Oracle WebLogic Server environments only: you must deploy the enterprise application archive (EAR) files.7.If a license for IBM Maximo Spatial Asset Management is installed and enabled, add spatial features to Maximo for Oiland Gas records. You can also grant access to spatial options.Detailed instructions for these steps are in the IBM Maximo for Oil and Gas 7.6.1 Installation Guide in IBM Knowledge Center (/support/knowledgecenter/SSLL9G_7.6.1/com.ibm.oil.doc/welcome.html).IBM®More informationAfter you install Maximo for Oil and Gas, use IBM Knowledge Center to learn more about the product.For more information, refer to the following sources:v Configuration at Configuring Maximo for Oil and Gas (/support/knowledgecenter/SSLL9G_7.6.1/ com.ibm.oil.doc/configure/t_configure_oil.html)v Product support at IBM Support Portal (/support/entry/portal/overview/software/tivoli/Maximo_for_Oil_and_Gas)v Maximo Asset Management information in IBM Knowledge Center (/support/knowledgecenter/SSLKT6_7.6.0/com.ibm.mam.doc/welcome.html)IBM Maximo for Oil and Gas 7.6.1 Licensed Materials - Property of IBM. © Copyright IBM Corp. 2011, 2016. U.S. Government Users Restricted Rights - Use, duplication or disclosure restricted by GSA ADP Schedule Contract with IBM Corp.IBM, the IBM logo, and ®are trademarks or registered trademarks of International Business Machines Corp., registered in many jurisdictions worldwide. Other product and service names might be trademarks of IBM or other companies. A current list of IBM trademarks is available on the Web at “Copyright and trademark information” (/legal/copytrade.shtml).Printed in Ireland。
西门子 S7-1500、ET 200MP、ET 200SP、ET 200AL、ET 200pro 通
SIMATICS7-1500、ET 200MP、ET 200SP、ET 200AL、ET 200pro 通信功能手册Siemens AG Division Digital Factory Postfach 48 48 90026 NÜRNBERG A5E03735819-AEⓅ 10/2016 本公司保留更改的权利Copyright © Siemens AG 2013 - 2016.保留所有权利法律资讯警告提示系统为了您的人身安全以及避免财产损失,必须注意本手册中的提示。
人身安全的提示用一个警告三角表示,仅与财产损失有关的提示不带警告三角。
警告提示根据危险等级由高到低如下表示。
危险表示如果不采取相应的小心措施,将会导致死亡或者严重的人身伤害。
警告表示如果不采取相应的小心措施,可能导致死亡或者严重的人身伤害。
小心表示如果不采取相应的小心措施,可能导致轻微的人身伤害。
注意表示如果不采取相应的小心措施,可能导致财产损失。
当出现多个危险等级的情况下,每次总是使用最高等级的警告提示。
如果在某个警告提示中带有警告可能导致人身伤害的警告三角,则可能在该警告提示中另外还附带有可能导致财产损失的警告。
合格的专业人员本文件所属的产品/系统只允许由符合各项工作要求的合格人员进行操作。
其操作必须遵照各自附带的文件说明,特别是其中的安全及警告提示。
由于具备相关培训及经验,合格人员可以察觉本产品/系统的风险,并避免可能的危险。
按规定使用Siemens 产品请注意下列说明:警告Siemens 产品只允许用于目录和相关技术文件中规定的使用情况。
如果要使用其他公司的产品和组件,必须得到 Siemens 推荐和允许。
正确的运输、储存、组装、装配、安装、调试、操作和维护是产品安全、正常运行的前提。
必须保证允许的环境条件。
必须注意相关文件中的提示。
商标所有带有标记符号 ® 的都是西门子股份有限公司的注册商标。
Data Protector产品介绍及许可方案说明书
Product FlyerThe Benefits ofCapacity-Based Licensing:+ Allows for multiple backup copies without increased license costs+ Is a highly scalable and affordable “pay as you-grow”license model+ Enables easy prediction of future license needs witha simpler licensing model+ Allows backup administrators to utilize Data Protector capabilities more fully with expanded featureavailability+ Flexible integrations to easily adapt backup to changing environment requirements+ Introduction of subscription licenses for better cost control, moving from CapEx to OpEx.Data Protector Licenseand Upgrade OverviewThe Data Protector licensing model has evolved to align with our customers’ ever-changing IT environments—hybrid infrastruc-tures, rapidly growing volumes and sources of data, and the com-plexities of operating these systems. The following information will provide you with an overview of the new simplified licensing and pricing models for Data Protector and should help you identify which would be the most suitable for your organization.Why Upgrade?Chances are that the backup processes beingrun have not really changed much in a few yearsor everything seems is to be running fine. Maybethere is some new backup capability requiredin another part of the environment, but that isbeing taken care of with a different, targetedproduct. There is also just the effort and timerequired to be able to validate and install the newupgraded version, something that there neverseems to be enough of. Also, as data backup it-self is not going to drive the business to greaterprofitability or create a better market positiondue to some new or innovative technologyintroduction there is the old saying that couldbe applied, “If it’s not broken, don’t fix it…”.But the reality is that things will have changed,as they always do when dealing with high-tech. Applications have developed; new ap-plications are being introduced; data volumehas increased while backup windows havedecreased; the type of storage is transitioningto a greater hybrid model; and the wider IT envi-ronment is not only evolving but coming underincreasing threat of attack from cyber criminals,not to mention ransomware.So, isn’t it time to re-evaluate your backup envi-ronment? Old, traditional complex, multi licenseinstallations have been replaced with simpler,“All you can eat” capacity and socket licenses.This simplified licensing enables better costvisibility and control, easier compliance, andreduced management.■New functionality can boost performanceand reduce storage use.■In-depth reporting can simplify auditingand compliance and give greater insightto backup operations and optimizations.■Benefit from the latest applicationintegrations and version support.■The latest security updates will deliverthe best defenses against cyber attacksensuring your data backups are fullyprotected as the last line of defenseagainst threats.New Editions of Data Protectorwith Built-In CapabilitiesThe simplified, all inclusive licenses were intro-duced when two new editions of OpenT ext™Data Protector were launched: OpenText™Data Protector Express, specifically designedfor virtual environments, and OpenT ext™ DataProtector Premium for hybrid (virtual and physi-cal) environments. Both editions offer integratedreporting through Data Protector’s web-baseduser interface. With advanced reporting nowbuilt-in, in addition to integrated automationProduct FlyerData Protector License and Upgrade Overviewand monitoring, Data Protector offers all the key tools that businesses need to efficiently man -age their end-to-end backup environment from a single console. Current Data Protector cus -tomers can upgrade to the latest release and migrate to one of the new editions to maximize capabilities and simplify licensing.Now, a third product offering is available using the same front-end, capacity based licens-ing. OpenText™ Data Protector for Cloud Workloads provides backup and recovery ca -pabilities for Microsoft 365, as well as offering wider backup coverage for many hypervisors, clouds and adds container backup to the list.In addition, both Data Protector Premium and Data Protector for Cloud Workloads are now available with subscription pricing.■ Data Protector Express , featuringsocket based pricing, is designed forhighly virtual environments and offered at an optimal price. It includes agentless protection for VMware and Hyper-V workloads and advanced VM recovery features such as granular recovery (GRE), Power On, Live Migrate, and zero downtime backup (ZDB) integration. Standard reporting and analytics are included in the Express edition.■ Data Protector Premium , featuringcapacity-based pricing, is intended for enterprises that need a unified backup and disaster recovery solution forphysical, virtual, and hybrid environments. Data Protector Premium includes the full functionality of Data Protectorincluding software encryption, software deduplication, Block Based Backup, integrations with IT operations tools such as OpenT ext Business ValueDashboard and Operations Orchestration, and integrations with mission-criticalapplications, cloud and storage platforms. Advanced reporting and analytics areincluded in the Premium edition.Table 1. Data Protector Edition Comparison ■ Data Protector for Cloud Workloads , isthe newest addition to the Data Protector lineup and is available for all companies looking for backup protection for Microsoft 365 applications, or who have a wide range of hypervisors or containers to backup, and want to have flexibility in their choice of cloud providers for their storage needs. Licensed in the same way Data Protector Premium based on front-end capacity, both Data Protector Premium and Data Protector for Cloud Workloads capacity licenses are available as a perpetual license or as a subscription for maximum cost flexibility and control.Why Capacity-Based Licensing with Data Protector Premium?■ Scalable —easy to acquire additionalcapacity■ Affordable —pay-as-you-grow licensingmodel■ Predictable —pricing based on yourcurrent and future storage and compute requirements■ Simplified —simplifies management,reduces errors and ensures that you always have what is needed for your environment■ Comprehensive —modernize yourData Protector environment with thelatest advanced backup and recovery capabilities at an optimal priceThe following table illustrates the simplicity, and fully inclusive nature of the capacity-based license. Not only does it simplify cost control, but it provides the full backup capabilities toadd extra value to your backup environment. These capabilities are something that would have required extra licenses, and payment for before. Maybe the extra functionality was dis -regarded due to increased cost but with the Premium capacity license everything is avail-able so that the full benefits and improvements for your backup operations can be discovered.Now Is the Time to Upgrade Y our Data Protector EnvironmentMake the most of your investment in Data Protector and upgrade to take advantage of the latestcapabilities—new features, new integrations and new licensing. See some of the value you will get from your current version when you move to the latest version of Data Protector, and whenyou add Data Protector for Cloud Workloads to your backup environment:Continued on next pageIt’s Easy to Update Y our LicenseContact your local OpenT ext™ sales repre-sentative and let them know you’re interested in upgrading to Data Protector Express or Premium with capacity-based licensing, or if you want to find out more about adding Data Protector for Cloud Workloads to your environ -ment.. Your representative will provide a quote to move you from your existing license to a new license.FAQs about upgrading:Q. I have capacity-based licensing for DataProtector 10.02 or prior—do I need to change my licensing to the Premium edition to get access to the functionality of version 10.10 and on?A.While most functionality is the same there are some differences. Specifically MS SCOM management pack and advanced, fully fea-tured reporting is not included in standard capacity based license (CBL). Encryption is only included in CBL from version 10.10. Also, future releases of Data Protector Pre-mium may contain functionality that is only available with the Premium license so it may be advantageous to discuss moving to Premium with your sales contact.Q.Icurrently have Traditional licenses and would like to move to Data Protector Pre-mium. How do I do this?A.We have a license exchange program al -lowing you to exchange your Traditional licenses for Data Protector Premium li-censes. This exchange will review both the product and maintenance components of the license. Please contact your sales rep for information on this.Q.Ihave multiple copies of my backups, some replicated to another data center, others to the cloud, do I need to license the amount of storage consumed by each copy?A.Data Protector Premium is licensed by TB of front-end capacity protected: i.e., the aggre -gate amount of source data being backed up from all systems; you do not need addi -tional licenses for additional copies of yourbackups.Note: Earlier versions of a release series may not have all capabilities listedFor more information about Data Protector visit the website at: /dataprotector/opentext。
Emerson PACSoftware许可证管理工具说明书
Managing software licenses can present challenges for organizations large and small. Emerson’s licensing tools remove the complexity of managing licenses and provide a unified solution for managing your organization’s PACSoftware licenses. Emerson’s licensing tools provide several deployment options that support all PACSoftware license types (computer-locked, leased licenses, and hardware keys) and activation methods (online or manual activation). With Emerson’s licensing solution, users can work uninterrupted and spend less time managing licenses.Entitlement and License Manager 1.5 Entitlement and License Manager (ELM) is a desktop application from which users can manage their licenses on their workstation. ELM allows users to activate entitlements and manage computer-locked licenses and hardware key licenses. In addition, ELM supports leased licenses when used in conjunction with PAC License Server Administrator (PLSA).PAC License Server 1.5PAC License Server is a server application that allows organizations to manage licenses in a centralized manner. It supports leased licenses, which allow users to commute licenses from one workstation to another. It also includes a desktop application, PAC License Server Administrator (PLSA), which provides a unified view of your organization’s license inventory and active clients, displaying helpful information such as the device names and product names for each client with an active lease. PACSystems Customer Center Portal The Customer Center Portal is a web-based portal that provides customers with insight into all software licenses associated with their account. Customers can manage their enterprise’s license inventory, perform manual activation of entitlements, and return licenses with ease when using the portal. Customers can also use the portal to perform license operations in bulk, saving time and simplifyingenterprise license management.Key Features and Benefits• Centralized enterprise license management• Supports fully virtualized environments• Supports flexible licensing configurations including computer-locked, leased, and hardware key licenses • Lease auto-renewal-leased licenses renewautomatically, reducing the amount of time usersspend managing their licenses• Supports offline activation for environments with restricted internet access• Provides a self-service licensing experienceProduct Data SheetPAC Licensing 1.5Simplified Enterprise Licensing for PACSoftwareFor more information:/PACSystemsKey TerminologyComputer-Locked Key• The order creates an entitlement that can be activated on a physical computer only.• Activation creates a license that is locked to a physical computer. The license can be moved toanother computer by returning the license via ELMand re-activating it on another physical computer.• The license can be used on that physical computer that it is bound to or on a guest virtual machinehosted by that computer using a type 2 hypervisor. Hardware Key• The order is fulfilled by the factory with a physical M7 USB key with the ordered entitlementsactivated and bound to the USB key.• The licenses on the M7 USB key can be used by PME running on the computer that the USB key isplugged into or by a guest virtual machine hostedby that computer using a type 2 hypervisor.• The M7 USB hardware key can be re-flashed in the field. The user can download a updated license filefrom the PACSystems Customer Center and writethe license file to the M7 USB key via ELM.Leased Key• The order creates an entitlement that can be activated on a PAC License Server only. The PACLicense Server can be deployed on a virtual orphysical machine.• Activation creates a license that is locked to a PAC License Server. The license can be leased by a clientmachine running PACSoftware. The client can bea virtual machine running on a type 1 or type 2hypervisor.• The PAC License Server allows an administrator to centrally manage licenses. The administrator cansee the inventory of licenses on the server and theclients that currently hold leases on licenses fromthe server.Operating System RequirementsDownload InformationAll PACSoftware Licensing software (ELM and PLSA) are free to use and may be obtained by visiting the Emerson Customer Center.*When ordering PACSoftware products, a key type must be specified. Available key types are computer-locked, leased, and hardware key.M7 Hardware Key licenses are only available for PAC Machine Edition 9.8 and higher. Other PACSoftware products do not currently support M7 hardware key licenses. To order an M7 Hardware Key, use the partnumber listed below.Americas Support – Technical and CommercialPhone: 1-888-565-4155 or 1-434-214-8532 (if toll free 800 option is unavailable) Email for Technical Support: ***********************Email for Commercial Support: **************************** Primary language of support: EnglishEurope, Middle East, & Africa Support – Technical and Commercial Phone: +800-4-444-8001 or +420-225-379-328(if toll free 800 option is unavailable or dialing from a mobile telephone) Email for Technical Support: ****************************Email for Commercial Support: ********************************* Primary languages of support: English, German, Italian, SpanishAsia Support – Technical and CommercialPhone: +86-400-842-8599 for Greater China+65-6955-9413 (All Other Countries)Email for Technical Support: ****************************Email for Commercial Support Asia: ******************************* Primary languages of support: Chinese, EnglishSupport Website:/IAC-SupportHome Website: /PACSystemsContact Us/contactusThe Emerson logo is a trademark and service mark of Emerson Electric Co. Brand logotype are registered trademarks of one of the Emerson family of companies. All other marks are the property of their respective owners. © 2021 Emerson Electric Co. All rights reserved.。
