HyperDeck Shuttle 2 使用
Carbide 3D BitRunner V2快速入门指南说明书
BitRunner V2 Quick-Start GuideThe Carbide 3D BitRunner V2 automates your router’s on/off functionality in Carbide Motion. No more reaching into the work envelope with a moving end mill. Now you can power down your router with the touch of a button—allowing you to perform tool changes quickly and safely. Use the BitRunner V2 in conjunction with the BitSetter and BitZero to automate your cutting process even more.BitRunner V2 comes in deluxe and standard versions. While both versions have the same functionality, the deluxe version comes with an EMI filter not included in the standard.Shapeoko Pro, Shapeoko 4, and Shapeoko 3 models that shipped with the Z-Plus as standard equipment are ready for BitRunner V2 right out of the box. Users with Shapeoko 3 models with Carbide Motion boards 2.3 and earlier (machines purchased before Black Friday 2019) will need to have pu rchased a new “Carbide Motion PCB –with Enclosure” at checkout. See Install a New Carbide Motion Board (v2.3 or earlier).We’re here to help! If you encounter any issues while setting up or using your BitRunner V2, please contact the Carbide 3D support team at: *********************.Important Software InformationYou must run Carbide Motion 4 or later with the BitRunner V2. Download the most recent version of Carbide Motion from: /carbidemotion/download/.Do Not Connect to Ethernet-Enabled DevicesWhile an Ethernet cable is used to connect the control pendant to the BitRunner V2, the BitRunner V2 is NOT an Ethernet device.Setting Up the BitRunner V21.1 Review BitRunner V2 Kit ContentsFigure 1Item Description Qty NoteA BitRunner V2 (Deluxe or Standard) 1 BitRunner V2 enclosure and attached power cordsB Control Pendant 1 Enable/disable the BitRunner V2C Logic Cable 1 Connects the BitRunner V2 to the controllerD Ethernet Cable 1 Connects the BitRunner V2 to the control pendantE Grounding Cable 1 Attaches to spindle mount to ground the spindle1.2 Install a New Carbide Motion Board (v2.3 or earlier)If you have an older Carbide Motion board (2.3 or earlier), you should have purchased a new Carbide Motion PCB and enclosure with your BitRunner V2. Before setting up the BitRunner V2, you will need to install the new controller:1.Power off the machine.2.Disconnect the power and USB cables, and all of the motor cables and homing switches from theboard.3.Remove your old controller from the machine.4.Install the new controller. The USB and power ports face the back of the machine.5.Reconnect the motor, homing switch, power, and USB cables.1.3 Connect the BitRunner V2 to the ControllerThe BitRunner V2 is designed to lay flat on the ground near your work table and electrical outlet.The 6-pin male-to-female logic cable connects the BitRunner V2 to the Shapeoko controller. The male end of the cable plugs into the BitRunner V2 and the female end plugs into the controller.1.Plug the male end of the logic cable into the 6-pin female port on the top of the BitRunner V2. SeeFigure 2.a.The black plastic latch on the side of the connector faces RIGHT.b.Make sure the connector is fully seated. You will hear the latch click into place.Figure 21.Plug the cable’s female end into the 6-pin male BitRunner V2 connector protruding from the front-end of the controller. See Figure 3.a.The small triangular peg faces OUT (away from the rail).b.The connector fits tightly. Press in and down to get it to seat fully.Figure 31.4 Connect the BitRunner V2 to the Control PendantUse the flat black Ethernet cable to connect the BitRunner V2 to the control pendant. The two ends of the cable are interchangeable. See Figure 4.1.Plug one end of the Ethernet cable into the Ethernet jack on the control pendant.a.The clear latch and black strain-relief boot face up.b.Press firmly to fully seat the connector. You will hear the latch click into place.Figure 42.Plug the other end of the Ethernet cable into the jack on the top of the BitRunner V2. See Figure 5.a.The clear latch and black strain-relief boot face LEFT.b. Press firmly to fully seat the connector. You will hear the latch click into place.Figure 51.5 Connect the BitRunner V2 to the Router and Power1.Plug the spindle/router power cord into the short female power cable on the left side of theBitRunner V2.2.Plug the longer male power cable into a wall outlet.1.6 Attach the Grounding Cable to the Spindle Mount (Optional)To attach the grounding cable:1.Insert the banana plug into the round port on the top of the BitRunner V2. See Figure 6.Figure 6e an M5 screw to secure the ring terminal end of the grounding cable to one of the two M5 holeson the left side of the spindle mount. See Figure 7.e a couple of zip ties to secure the grounding cable. Make sure the cable is secured where it willnot get in the way of the machine’s movements.Figure 71.7 Upgrade Carbide MotionThe BitRunner V2 requires at least Carbide Motion 4.1.Check for the build number in the bottom-left corner of Carbide Motion. Build numbers higher than400 do not need to be upgraded.2.If you have an older version, download the most recent version of Carbide Motion from/carbidemotion/download and install it to your computer.Using the BitRunner V22.1 Enable/Disable the BitRunner V2The BitRunner V2 is enabled and disabled via the control pendant.To enable the BitRunner V2:1.Press the control pendant button to supply power to the router. The red button LED will turn ON. SeeFigure 8.Figure 8To disable the BitRunner V2:2.Press the control pendant button again to cut power to the router. The button LED will turn OFF.2.2 Install an End Mill1.Press the control pendant button to disable the BitRunner V2 (button LED will be OFF).2.Flip the power switch on the router to the OFF position.3.Install the end mill.2.3 Run the Project G-code1.Flip the power switch on the router to the ON position.2.Press the button on the control pendant to enable the BitRunner V2.3.Load the G-code (.nc file) in Carbide Motion.The G-code (or absence thereof) determines when BitRunner V2 cuts or supplies power to the router. If there is no G-code/.nc file being executed in Carbide Motion, then no power is supplied to the router. TheG-code also triggers alert boxes to open in Carbide Motion which let you know when it’s time to change the end mill, what RPM to set the spindle to, etc.When G-code is executed in Carbide Motion, specific commands will determine if power is on or off: •An M3 S command of 1000 or greater (1000 is the RPM) automatically turns the router on. M3 S2800 is an example M3 S command. Alternately, you might see commands written like this: M3S2800.•An M5 command turns the router off.•An M6 command indicates a tool change.2.4 Perform Tool Changes1.When the G-code reaches a tool-change command (M6) Carbide Motion will pause the job, cutpower to the router, and alert you that it’s time to change the tool.2.Press the control pendant button to disable the BitRunner V2 (button LED will turn off).3.Flip the power switch on the router to the OFF position.4.Change the end mill.5.Flip the power switch on the router to the ON position.6.Press the control pendant button again to re-enable the BitRunner V2 (button LED will turn on).7.In Carbide Motion, click the Resume button to resume cutting. Carbide Motion will continue cuttinguntil it’s time to perform another tool change, load the next G-code file, or until the project is done.See Figure 9.Figure 9Troubleshooting and Maintenance 3.1 Troubleshooting Guide3.2 MaintenanceCheck the top of the BitRunner V2 for dust accumulation periodically, and vacuum when necessary.3.3 Replacing the FuseThe fuse may have blown if you know the G-code is good and the control pendant LED still lights up, but the BitRunner V2 has stopped working.1.Unplug the BitRunner V2 from the power source and unplug all cables on the top of the device.e a 2.5mm hex key to remove the four FHS securing the back panel.e a 2.5 mm hex key to remove the six BHCS securing the metal EMI shield. See Figure 10.Figure 10e a small flathead screwdriver to carefully pry open the lid of the small black fuse box. SeeFigure 11.a.Pry from the left side of the fuse box, near the “B” embossed on the lid.Figure 11NOTE: Figure 11 shows the deluxe BitRunner V2. The standard version will not have the large coils under the metal EMI shield.e your finger or a small flathead screwdriver to carefully remove the fuse. See Figure 12.Figure 126.Insert a new 15A 250V 5×20mm fuse.7.Replace the metal EMI shield.8.Replace the back panel of the BitRunner V2.。
虐杀原形2操作方法
虐杀原形2操作方法《虐杀原形2》是一款由Radical Entertainment开发的动作冒险游戏。
在游戏中,玩家将扮演亚历克斯·默塞尔(Alex Mercer),一个拥有超人类能力的超级生物。
本文将介绍《虐杀原形2》的操作方法,帮助玩家更好地掌握游戏。
1. 移动控制:玩家可以使用键盘或手柄来控制亚历克斯的移动。
WASD键控制角色前后左右移动,鼠标或右摇杆控制视角的转动。
Shift键(或手柄上的加速键)可以让角色加速奔跑,空格键(或手柄上的跳跃键)可以让角色进行跳跃或在建筑物和车辆上攀爬。
2. 攻击:亚历克斯拥有多种强大的攻击方式。
鼠标左键(或手柄上的攻击键)是普通攻击,按住可以进行连击。
鼠标右键(或手柄上的重击键)是重击,造成更大的伤害但攻击速度较慢。
Q键(或手柄上的乙醚刀)可以让角色释放刀气攻击,对范围内的敌人造成伤害。
E键(或手柄上的鞭爪)、R键(或手柄上的重拳)、F 键(或手柄上的摔扔)是亚历克斯的技能攻击,可以通过消耗技能点来解锁更多技能。
3. 变形:亚历克斯是一个具有变形能力的超级生物。
按下数字键1可以让角色切换为爆炸爪形态,按下数字键2可以切换为盾牌形态,按下数字键3可以切换为匕首形态。
不同的形态拥有不同的攻击方式和能力,玩家可以根据战斗需要进行切换。
4. 隐匿:亚历克斯可以利用自身的变形能力在敌人面前变得隐形。
按下左Shift键可以激活隐匿状态,使角色变得透明并减少敌人的侦测范围。
在隐匿状态下,亚历克斯可以更容易地接近敌人进行偷袭。
5. 能力提升:在游戏中,玩家可以通过完成任务和消灭敌人来获取经验值。
当经验值达到一定数量时,玩家可以升级亚历克斯的能力。
升级能力可以提升角色的攻击、生命值、防御和移动速度等属性,让玩家能够更好地应对各种挑战。
6. 全息地图:按下M键可以进入游戏中的全息地图。
全息地图显示了游戏世界的不同区域、任务目标和敌人分布等信息。
玩家可以利用全息地图来了解当前任务的进度和下一步的行动目标,帮助自己更好地规划游戏进程。
红色管械乐队2-使用方法

01.复制代码:forceaddbots 10 2
[ROGame.ROGameInfo]下有很多参数设置,比如realismlevel,自己去研究
取消时间限制、局数限制、杀敌得分限制:找到如下位置,以FF(Firefight)模式为例:
[ROGame.ROGameInfoFirefight]
forceaddbots 3 2
实现人数平衡很重要,如果一方加了2个,然后另一方马上加上两个,直至总人数达到你的要求,否则一下子加载很多是不行的。
可去(win7)C:\Users\用户名\Documents\My Games\RedOrchestra2\ROGame\Config\ROGame.ini
然后单击开始菜单 在“搜索程序和文件”中输入“运行”
选中后在“运行”栏里输入REGSVR32 xinput1_3.dll(注意中间有空格)
完事OK!
下载后放到SYSTEM32文件夹下面,然后在运行中输入:REGSVR32 xinput1_3.dll(注意中间有空格),确定即可
三·安装360安全卫士使用功能大全中360系统急救箱功能,使用系统文件修复区手工添加xinput1_3.dll然后点击添加即可修复.
minplayer=10 MinPlayers=0(原始设置)
不知道以这种方式加载地图在Internet、LAN上以及虚拟LAN上能不能进行联机,和合作COOP。可以试试,主机地图建好后,Client直接输入Host的IP。
《红色管弦乐队2》3DM蒹葭汉化组汉化补丁V1.0
使用方法:
先讲如何加载多人地图:
进入游戏按【~】打开控制台输入:
open 游戏模式-多人地图名称
绿巨人2的操作方法
绿巨人2的操作方法
《绿巨人2》是一款以漫画《绿巨人》为背景的游戏。
以下是游戏的通用操作方法:
1. 移动:使用方向键或游戏手柄的左摇杆来控制绿巨人的移动方向。
按下方向键或摇杆的上方向可以让绿巨人向上移动,按下下方向则可以让绿巨人向下移动。
左右方向同理。
2. 攻击:使用游戏手柄的A或B按钮,或键盘上的J或K键进行攻击。
按一下按钮或键盘上的攻击键可以进行简单的攻击,按住可以进行组合攻击。
3. 跳跃:使用游戏手柄的X或Y按钮,或键盘上的Space键进行跳跃。
按下跳跃键可以让绿巨人跳起来,可以通过长按跳跃键控制跳跃的高度。
4. 技能:使用游戏手柄的RB或LB按钮,或键盘上的U或I键使用绿巨人的技能。
不同的技能有不同的效果,比如增加攻击力、恢复生命值等。
5. 交互:靠近可交互的物体或NPC时,按下游戏手柄的A按钮,或键盘上的E 键进行交互。
交互可以触发剧情事件、获取任务等。
6. 切换角色:当游戏中有多个可操作的角色时,使用游戏手柄的RB或LB按钮,或键盘上的O或P键来切换角色。
以上是《绿巨人2》的常见操作方法,具体操作可能因游戏平台、设备不同而有所差异,请参考游戏说明书或游戏内的设置选项进行相关配置。
生化危机二操作方法
生化危机二操作方法
以下是《生化危机2》的操作方法:
1. 移动:使用左摇杆控制角色的移动方向。
按下L3(同时按下左摇杆)进行奔跑。
2. 瞄准与射击:使用右摇杆控制准星的移动。
按下L1或LT(左扳机)瞄准,按下R2或RT(右扳机)射击。
3. 切换武器:按下方向键左右切换武器。
按下L2或LB(左肩键)进行切换武器的快捷方式。
4. 检查:接触可疑物品或按下交互键(一般为X或A)进行检查。
5. 使用物品:按下物品栏中相应物品的快捷键(一般为方向键上下左右)使用。
也可以按下交互键进行使用。
6. 防御与闪避:按下R1或RB(右肩键)进行防御,并减少受到的伤害。
按下L3(同时按下左摇杆)进行快速闪避。
7. 换弹:按下或Y(角色主动换弹的默认键位)进行换弹。
也可以按下交互键进行换弹。
8. 地图:按下选项键或菜单键(一般为三角形或Y)打开地图。
9. 游戏菜单:按下选项键或菜单键(一般为三角形或Y)打开游戏菜单,可以进行存档、装备等操作。
10. 协同游戏:在游戏中可以与其他玩家进行协同游戏,可以通过游戏内的联机功能进行操作。
以上是一些基本的操作方法,具体的操作方法可能因游戏版本、平台等因素而有所不同。
建议在游戏中查看游戏设置或操作指南,以获得更详细的操作说明。
森林之子2飞行代码
森林之子2飞行代码摘要:1.介绍《森林之子2 飞行代码》2.讲解代码的实现过程3.分析代码的实现原理4.总结《森林之子2 飞行代码》的特点和应用领域正文:《森林之子2 飞行代码》是一款由森林之子团队开发的,基于物理模拟的飞行游戏。
游戏中,玩家可以通过编写代码来控制飞行器的飞行,从而完成各种任务。
下面,我们将详细介绍这款游戏的代码实现过程和原理。
首先,游戏中的代码实现主要是通过Python 语言完成的。
Python 作为一种广泛应用于人工智能和物理模拟领域的语言,具有简洁明了的语法和强大的功能。
在《森林之子2 飞行代码》中,玩家需要编写Python 代码来实现飞行器的各种功能,如起飞、飞行、转向、着陆等。
接下来,我们来详细讲解一下代码的实现过程。
以起飞为例,玩家需要编写如下代码:```pythonthrottle = 1.0 # 设置油门为全开pitch = 10.0 # 设置机头抬高10 度yaw = 0.0 # 设置机头方向为正前方```通过调整这些参数,玩家可以实现飞行器的各种飞行状态。
同时,游戏中还提供了丰富的API,使得玩家可以轻松地实现各种复杂的功能。
在代码实现过程中,物理模拟是一个非常重要的原理。
游戏中的飞行器受到重力、升力、阻力等多种力的作用,玩家需要通过调整代码中的参数,来实现对这些力的平衡和控制。
例如,通过增加油门可以增加升力,从而让飞行器飞得更高;通过减小阻力,可以降低飞行器的速度,从而更容易地完成任务。
最后,我们来总结一下《森林之子2 飞行代码》的特点和应用领域。
这款游戏具有高度的可定制性和可玩性,玩家可以根据自己的需求和喜好编写代码,实现各种不同的飞行器和飞行方式。
同时,游戏中的物理模拟原理,也让玩家可以在游戏中学习到物理知识,提高编程技能。
Contour Shuttle Pro v2 用户手册说明书
&Product ManualShuttle IntroductionThe Shuttle is a macro hub that can be used in combination with your keyboard and mouse. Using either stock or custom settings the Shuttle emulates keyboard shortcuts which improves productivity in the office, studio, home, and more. The Shuttle Pro v2 is a universal tool that supports hundreds of programs and controls the program that is in focus.Because the Shuttle can be used with a variety of applications, the driver must be downloaded and installed before use. The driver can be downloaded from our support page https:///support/.The official Contour Shuttle forum is an online resource where Shuttle users can share and download both user created and offical Contour Shuttle settings. Join the Shuttle community /.For further assistance with your Shuttle please contact our support team at *************************.Getting StartedNote to Windows users: After installing the Shuttle driver, please make sure the Shuttle icon is visible in the system tray (area near the clock) and not located in the hidden icons. This will allow you to tell which program is in focus for the Shuttle to communicate with. Please see question 8 on page 7 for more details.Creating New or Updated SettingsThere are two main ways to create settings:1. Create settings based on other settings. For example, if your media player has the same keystroke shortcuts as another program but doesn’t have settings for the other program, new settings can be created off of the existing settings. This method can also be used to update settings to an application/program that has recently been updated.2. New custom settings can also be created from scratch.Windows Driver Outline Application Settings Options User Action Computer Response (Available computer responses)- Do nothing - Same as Lower - Type Keystroke - Mouse Click - Mouse Wheel - Switch Settings - Macro - Press Modi ers (Choose button or wheel to modify)(Choose application to customize)OK Cancel Apply Depending on the “Computer response” selected, di erent options will be available in this dialogue ment Application search barMac OS Driver Outline1. Copy Method:In the Shuttle Device Configuration– Highlight the settings to be copied in the application setting field.– Click Options > Create New Settings > Copy contents from current settings.– Choose the new program executable file in the file selector pop up.2. Custom Settings Method:– Click options > Create New Settings > Create Empty Settings– Choose the new program executable file in the file selector pop up.Creating New Settings (Windows)1. Copy method:In the Shuttle Device Configuration– Select the settings to be copied in the applications list.– Choose “Copy to new settings…” in the Tools menu(gear icon at the bottom).– Select the application you want to create settings for in the file picker that pops up.2. Custom Settings Method:– Click the Tools menu (gear icon at the bottom)– Choose “New Settings…”– Select the application you want to create settings for in the file picker that pops up.Creating New Settings (Mac)Importing Settings (Windows)Importing Settings (Mac)1. Download the file 2. Unzip the file and take note of the location 3. Open the Contour Shuttle Control Panel and click the Options button 4. Choose Import Settings5. Navigate to the location noted in Step 26. Choose the settings file7. Click the Open button on the screen8. Click the Apply button on the screen (very important) 1. Download the file 2. Unzip the file and take note of the location 3. Open the Contour Shuttle app and click the Settings Management Tools button (Bottom-left corner of Shuttle App window)4. Choose Import Settings 5. Navigate to the location noted in Step 26. Choose the settings file (settings file will have the .shuttleSettings tag, for example Final Cut Pro X.shuttleSettings).7. Click the Open button on the screenFrequently Asked Questions1. What computer systems does the Shuttle work with?The Shuttle will work on both Windows and Mac. Unfortunately we do not officially support Linux. However some end users have created drivers and plugins that do support Linux on our forum. Please feel free to search our forum for Linux support at /.2. I lost some of the button covers from my Shuttle PRO v2. Can I order new ones?You can call or email Contour Design, and we would be happy to send out some button covers to you, depending on the make of your Shuttle. Please email us at ************************* for more info.3. Where can I find button labels for my Shuttle PRO v2?You can download a PDF version of the Shuttle button labels from our website on the Shuttle PRO v2 product page, https:///product/shuttlepro-v2/.6. Can you lock the Shuttle to one program?The Shuttle will not lock to one program. It works by generating keystrokes that would be automatically directed toward the foreground application. This applies to both Mac and Windows.5. Can the Shuttle work with Android?Currently no, our main focus is Mac and Windows.4. What programs/applications does the Shuttle work with?There are hundreds of programs the Shuttle will work with and there are default settings for many popular programs. You can download a PDF list of the current settings we support from our website on the Shuttle PRO v2 product page, https:///product/shuttlepro-v2/.If the program you are looking for is not on the list, there are 3 options available for you. There are user made settings available on our forum to search through, /. You can also create your own custom settings using the instructions on page 3 and 4. Lastly, you can reach out to us at *************************, for help making custom settings.7. I want to use the Shuttle with software I am developing but don’t want to use the Shuttle Control Panel/Device Configuration. Is there a software development kit for the Shuttle?Yes, please email us your information at *************************. Someone will contact you with the SDK files.Frequently Asked Questions Continued8. Why can’t I leave the Shuttle icon with the hidden icons and what does the term “in focus” mean? (Windows users)The term “in focus” refers to which program is in the foreground. The Shuttle works much like a keyboard and will respond to the program that is in the foreground. To use the Shuttle on another program, you will need to click on the program before using the Shuttle.Moving the Shuttle icon to the clock area allows you to confirm which settings are being used for the program that is in focus. If you have more than one setting created for a specific program, this allows you to switch between settings. Also, there are some programs that have more than one default setting available. This will help prevent any confusion if you are changing the custom settings and not noticing thechanges while using the Shuttle.To move the Shuttle icon, simply click the up arrow near the clock area, then drag the Shuttle icon to any area near the clock.Once the Shuttle icon is always visible, you will be able to see which program is in focus by hovering the cursor over the Shuttle icon. When you click the icon, the settings selected by the Shuttle driver willbe displayed with a check mark next to it.FCC Statement This equipment has been tested and found to comply with the limits for a Class B digital device, pursuant to Part 15 of the FCC Rules. These limits are designed to provide reasonable protection against harmful interference in a residential installation. This equipment generates uses and can radiate radio frequency energy and, if not installed and used in accordance with the instructions, may cause harmful interference to radio communications. However , there is no guarantee that interference will not occur in a particular installation. If this equipment does cause harmful the interference by one or more of the following measures:- Reorient or relocate the receiving antenna.- Increase the separation between the equipment and receiver .- Consult the dealer or an experienced radio/TV technician for help.This device complies with part 15 of the FCC rules. Operation is subject to the following two conditions (1) this device may not cause harmful interference, and (2) this device must accept any interference received, including interference that may cause undesired operation.IC Statement This device complies with Industry Canada’s licence-exempt RSSs. Operation is subject to the following two conditions: (1) This device may not cause interference; and (2) This device must accept any interference, including interference that may cause undesired operation of the device.Le présent appareil est conforme aux CNR d’Industrie Canada applicable aux appareils radio exempts de licence. L’exploitation est autorisée aux deux conditions suivantes : (1) l’appareil ne doit pas produire de brouillage,et (2) l’utilisateur de l’appareil doit accepter tout brouillage radioélectrique subi, même si le brouillage est susceptible d’en compromettre le fonctionnementFor more information please visit:Contour Design, Inc. 10 Industrial Drive Windham, New Hampshire 03087, USA Phone: (603) 893-4556Email:**************************Contour Design Nordic A/S Borupvang 5B, St.DK-2750 Ballerup / Denmark Phone: +45 32 46 11 20Email:***********************Tested to comply with FCC and IC standards WarrantyIf there is a functional defect due to faulty manufacturing, we will replace the product. This warranty does not cover damage that results from misuse of the product.Attention!If you attempt to dismantle your Shuttle, you will invalidate your warranty.。
《生化奇兵2》基本操作武器介绍
《⽣化奇兵2》基本操作&武器介绍基本操作⿏标左键---武器射击⿏标右键---使⽤特殊能⼒⿏标中键---更换弹药⿏标滚轮---更换武器W---前进A---向左⾛D---像右⾛S---后退C---蹲下S PA C E---跳跃R---装填武器左C t r l---使⽤F i r s t A I D k i t(⾎包)F---使⽤/搜索/拿取B---⿊客L---收听最近拿到的录⾳J---回到⾝体中(使⽤侦察兵技能时)A LT---⼼灵护盾T---瞄准S h i f t---体技Q---上⼀个能⼒Z---下⼀个能⼒M---地图F12---快速存盘F12---快速读取数字和F1到F9分别是对应着各种武器和能⼒..敬请留意下⾯简单的介绍⼀下这作的⿊客系统B I O S H OC K2⾥新添加了⼀种武器叫远程⿊客⼯具,通过发射⿊客飞镖来达到远程⿊客的⽬的.这作主要是通过⼀个类似电表的指针计来完成⿊客的,指针停留在蓝⾊或者绿⾊区域就代表⿊客成功停留在⽩⾊区域的话主⾓会被电伤,停留在红⾊区域的话会触发警报。
⿊客难度⾼的机械(如保险箱)必须连续使指针停留在蓝⾊或绿⾊区域数次才可以成功。
指针计的下⾯有对应数字,每碰到右边或者左边后各会减少1,当数字为0时⿊客失败。
在⿊客过程中如果有任意⼀次使指针停留在蓝⾊区域的话则会触发特殊奖励,各种机器对应如下:普通售货机/弹药售货机:随即掉落⼀样商品治疗机:掉落⼀个F i r s t A I D k i t(⾮常有⽤)⾃动防御直升机:该直升机的攻击⼒增强⾃动机枪/⽕箭弹发射器:攻击⼒增强监视器:发现敌⼈的时间更短保险箱:⾃动增加⼀部分现⾦(很难..闹不好就触发警报了.不建议冒险)综上所述,建议看到⾃动售货机或者治疗仪就⿊⼀下..⽐前作简单不少⽽且好处多多...武器介绍:这代的武器跟上⼀代的变化也不⼩..先翻译下弹药的作⽤刺钉枪:相当于前作的⼿枪,有所增强。
升级1:增加弹夹容量。
crane 2使用技巧
crane 2使用技巧Crane 2是一款专业的摄影稳定器,使用技巧可以帮助摄影师获得更平稳、流畅的拍摄效果。
以下是关于Crane 2的一些使用技巧。
1. 准备工作:在使用Crane 2之前,确保将相机(如单反相机或微单相机)安装在稳定器上。
确保相机和稳定器的重量平衡,以避免相机晃动或镜头下垂。
2. 平衡相机:Crane 2配备了一个快速平衡螺丝,可以通过调整螺丝的长度来平衡相机。
确保相机在不使用手持稳定器时保持水平,以确保稳定器的稳定性。
3. 使用跟踪模式:Crane 2具有跟踪功能,可以自动追踪被拍摄对象。
在跟踪模式下,长按模式按钮,将稳定器的方向对准被拍摄对象,稳定器将自动跟踪对象的运动。
4. 使用追随模式:追随模式下,稳定器会模仿您的运动,实现平滑自然的摄影效果。
在此模式下,不需使用两手,只需用一只手控制稳定器的运动。
5. 使用遥控器:Crane 2配备了一款小型遥控器,可以通过遥控器控制稳定器的运动。
这对于单人拍摄或需要远程控制稳定器的拍摄场景非常有用。
请确保遥控器与稳定器配对并连接正常。
6. 使用触摸屏:Crane 2的侧面有一块触摸屏,可以用手指轻触屏幕来调整稳定器的运动。
触摸屏操作简单,用户可以方便地控制稳定器。
7. 切换模式:Crane 2提供了多种模式,如全跟踪模式、锁定模式和倾斜跟踪模式等。
根据拍摄需求,可以根据需要切换模式来获得更好的稳定效果。
8. 使用附加配件:Crane 2支持使用附加配件,如外部监视器、麦克风和照明设备等。
这些配件可以提升拍摄效果,提供更多的功能和灵活性。
9. 注意续航时间:稳定器的续航时间可能有限,尤其是在高度使用的情况下。
建议在使用前充分充电,并在拍摄过程中注意电量消耗,以免影响拍摄进程。
10. 反复练习:使用稳定器需要一些技巧和熟练度。
利用稳定器的不同功能,进行反复练习和实践,找到最适合自己的使用方式,以获得最佳的拍摄效果。
总之,Crane 2是一款功能强大的摄影稳定器,通过掌握一些使用技巧,摄影师可以获得更平稳、流畅的拍摄效果。
HyperCom2使用手册
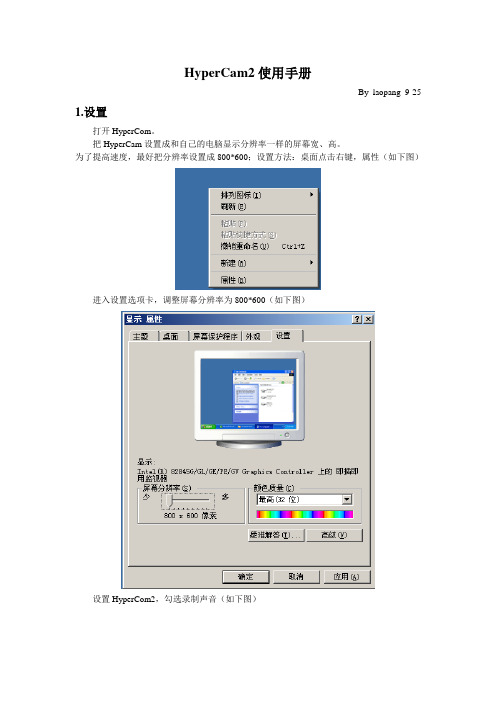
HyperCam2使用手册
By laopang 9-25 1.设置
打开HyperCom。
把HyperCam设置成和自己的电脑显示分辨率一样的屏幕宽、高。
为了提高速度,最好把分辨率设置成800*600;设置方法:桌面点击右键,属性(如下图)
进入设置选项卡,调整屏幕分辨率为800*600(如下图)
设置HyperCom2,勾选录制声音(如下图)
设置HyperCom2的屏幕区域,宽、高分别为800、600(如下图)
2.录制
打开需要录制的软件:识字软件
点击F2,开始录制,待识字软件完成一个段落或者一个课时时,点击F2。
录制完成。
可以通过“快捷键”查看或者修改快捷键(如下图)。
3.查看
默认保存路径为,桌面\我的文档。
可以通过‘A VI文件’查看保存路径、或者修改保存路径。
(如下图)。
半条命2秘籍和命令

本文给大家奉上的是半条命2秘籍。
希望大家可以仔细阅读,它会帮你正确的掌握半条命2秘籍,让你在游戏中体验更加精彩的游戏人生。
sv_cheats 1 启用作弊(不会记录成就)god 上帝模式(无敌)noclip 穿墙模式(主机/服务器有效)mat_depthbias_normal 1 透视模式impulse 101 所有武器impulse 82 得到一吉普车impulse 83 汽艇notarget 敌人不会发现你map [map name] 载入指定的地图give [item name] 制造指定物品buddha 活佛模式(可以完成成就)hurtme # 伤血(#为数字)maps 地图列表cl_ragdoll_collide 1 该参数使得构成身体的各个模块相互紧密接触从而避免互相嵌入的情况这样使得游戏中的身体接触看起来好很多developer [0-2] 开发者模式; 2是详细picker 踢人模式cl_drawhud [0 or 1] 显示HUDcl_enablehud [0 or 1] 显示HUDcl_showfps [0 or 1] 帧+mlook 启用鼠标外观hud_quickhelp/text? 1 显示准星viewmodel_fov # 设置武器大小; 默认54exec [filename] 执行脚本文件npc_create [name] 召唤对应NPCnpc_create_aimed 召唤一个NPCsetpos 坐标传送sv_gravity # 设置重力值sv_stopspeed # 设置最低停止速度sv_friction # 设置摩擦sv_bounce # 模拟物体的碰撞?sv_maxvelocity # 设置移动物体的最高速度sv_waterdist # ?sv_infinite_aux_power 1 无限电力sv_show_crosshair_target 1 显示NPC是敌是友cl_phys_timescale [0.00-1.00] 设置时间; 默认是1 air_density # 改变空气密度dsp_explosion_effect_duration # 设置爆炸混乱的长度prop_debug 进入淍试模式mat_numtextureunits # 限制单元纹理mat_wireframe1 网络模型vcollide_wireframe 1 线框物体的物理影响mat_fastnobump [0 or 1] 凹凸映射impulse 200 在屏幕上没有武器模型impulse 203 删除针对物体或人NoClip 飞行和穿墙showtriggers_toggle 显示游戏触发mat_normalmaps 1 显示普通地图mat_normals 1 显示表面材料mat_yuv 1 黑白屏幕npc_create npc_alyx 艾力克斯(ceiling turret) npc_create npc_antlion 蚁狮npc_create npc_antlionguard 蚁狮守卫npc_create npc_barnacle 藤壶npc_create npc_barney 巴尼npc_create npc_breen 布林博士npc_create npc_citizen 友军、平民npc_create npc_combine_s 联合军npc_create npc_combinedropship 运输机npc_create npc_combinegunship 武装直升机npc_create npc_crow 乌鸦npc_create npc_cscanner 侦查机npc_create npc_dog 啊狗npc_create npc_eli 艾力克斯的爸爸(伊崃)npc_create npc_fastzombie 快僵尸npc_create npc_gman 神秘人物npc_create npc_headcrab 猎头蟹npc_create npc_headcrab_black 黑头蟹npc_create npc_headcrab_fast 快头蟹npc_create npc_headcrab_poison 黑头蟹npc_create npc_helicopter 直升机npc_create npc_ichthyosaur 鱼龙npc_create npc_kleiner 卡莱纳博士npc_create npc_launcher 类似于特定炮台 (干不掉的炮手,或是脉冲炮台) npc_create npc_manhack 飞锯npc_create npc_metropolice 国民护卫队npc_create npc_monk 神父npc_create npc_mossman 莫斯曼博士npc_create npc_pigeon 白鸽npc_create npc_poisonzombie 黑僵尸npc_create npc_rollermine 滚雷npc_create npc_seagull 海鸥npc_create npc_stalker 幽灵npc_create npc_strider 三脚机甲npc_create npc_turret_ceiling 摄像头??npc_create npc_turret_floor 炮塔(combine turret) npc_create npc_vortigaunt 弗地岗人npc_create npc_zombie 僵尸npc_create npc_zombie_torso 半僵尸npc_create npc_alyx 艾力克斯(ceiling turretnpc_create npc_antlion 蚁狮npc_create npc_antlionguard 蚁狮守卫npc_create npc_barnacle 藤壶npc_create npc_barney 巴尼npc_create npc_breen 布林博士npc_create npc_citizen 友军、平民npc_create npc_combine_s 联合军npc_create npc_combinedropship 运输机npc_create npc_combinegunship 武装直升机npc_create npc_crow 乌鸦npc_create npc_cscanner 侦查机npc_create npc_dog 啊狗npc_create npc_eli 艾力克斯的爸爸(伊崃)npc_create npc_fastzombie 快僵尸npc_create npc_gman 神秘人物G-MANnpc_create npc_headcrab 猎头蟹npc_create npc_headcrab_black 黑头蟹npc_create npc_headcrab_fast 快头蟹npc_create npc_headcrab_poison 黑头蟹npc_create npc_helicopter 直升机npc_create npc_ichthyosaur 鱼龙npc_create npc_kleiner 卡莱纳博士npc_create npc_launcher ??npc_create npc_manhack 飞锯npc_create npc_metropolice 国民护卫队npc_create_equipment weapon_pistol 手枪npc_create_equipment weapon_shotgun 散弹枪npc_create_equipment weapon_smg1 机关枪npc_create_equipment weapon_cubemap ??npc_create_equipment weapon_cguard ??npc_create_equipment weapon_physgun ??npc_create_equipment weapon_ml ??npc_create_equipment weapon_hmg1 ??npc_create_equipment weapon_immolator ?? npc_create_equipment weapon_irifle ??npc_create_equipment weapon_sniperrifle ?? npc_create_equipment weapon_crowbar 铁钩npc_create_equipment weapon_extinguisher ??npc_create_equipment weapon_frag 手榴弹npc_create_equipment weapon_rollerwand ??npc_create_equipment weapon_slam ??npc_create_equipment weapon_brickbat ??npc_create_equipment weapon_gauss ??npc_create_equipment weapon_binoculars ??npc_create_equipment weapon_alyxgun 艾里克斯的枪npc_create_equipment weapon_hopwire ??npc_create_equipment weapon_Molotov ??npc_create_equipment weapon_physcannon 重力枪npc_create_equipment weapon_ar2 来复枪npc_create_equipment weapon_bugbait 蚁狮心npc_create_equipment weapon_ar1 ??npc_create_equipment weapon_rpg 火箭炮npc_create_equipment weapon_smg2 手榴弹npc_create_equipment weapon_stickylauncher ??npc_create_equipment weapon_stunstick 电棒(护卫队) npc_create_equipment weapon_thumper ??npc_create_equipment weapon_iceaxe ??npc_create_equipment weapon_annabelle 神父的枪npc_create_equipment weapon_357 左轮枪give item_ar2_grenade 榴弹give item_ammo_smg1_grenade 榴弹give item_box_buckshot 散弹枪子弹give item_box_lrounds 来复枪子弹give item_ammo_ar2 来复枪子弹give item_ammo_ar2_large 来复枪子弹give item_large_box_lrounds 来复枪子弹give item_ammo_ar2_altfire 离子球give item_box_mrounds 机关枪子弹give item_ammo_smg1_large 机关枪子弹give item_large_box_mrounds 机关枪子弹give item_ammo_smg1 机关枪子弹give item_box_srounds 手枪子弹give item_ammo_pistol 手枪子弹give item_ammo_pistol_large 手枪子弹give item_large_box_srounds 手枪子弹give item_healthkit 急救包give item_battery 充电器give item_ml_grenade 炮弹give item_rpg_round 炮弹give item_suit ?give item_healthvial 小急救包give item_ammo_357 左轮枪子弹give item_ammo_357_large 左轮枪子弹give item_ammo_crossbow 弓箭用physcannon_mega_enabled 1在ep1 ep2 马上就可得到蓝色重力枪HL2 - physcannon_megacannon 1额外补充部分(你需要修改数字才能达到你想要的效果)sk_airboat_max_ammo 100 汽艇的弹药量(也是直升机的弹药量)设置成1 可以让直升飞机机枪很难打到你sk_airboat_recharge_rate 15 汽艇弹药恢复速度(也是直升机弹药恢复速度)设置数值越大直升机每次开枪后停火时间越多sk_healthcharger 50 挂壁式充HP的最大充值量sk_healthkit 25 医疗包的最大加血量sk_healthvial 10 像易拉罐一样的医疗罐的最大加血量sk_battery 15 电池的最大加护甲量sk_helicopter_health 5600 直升机的血量越小越容易击落sk_suitcharger 75 挂壁式充电器最大充电量sk_max_357 12左轮的最大载弹量因为左轮有大盒弹药20发的而默认载弹才12 我认为至少要改成100sk_max_ar2 AR2机关枪的最大弹药量默认是60 建议改200sk_max_ar2_altfire 3 AR2光球的最大弹药量想多攒就改大一些sk_max_buckshot 30 霰弹枪的子弹最大载弹量建议改成100以上sk_max_crossbow 10 十字弩的最大载弹量建议30以上sk_max_grenade 5 手雷的最大载弹量如果前面炸APC 建议30以上sk_max_pistol 150 手枪的最大载弹量前面可以多改一些备用sk_max_rpg_round 3 火箭筒的最大载弹量当然改成是100以上了sk_max_smg1 225 SMG微冲的最大载弹量建议600发以上sk_max_smg1_grenade 3 微冲榴弹的最大载弹量这里需要重点说明一下 HL2及后面2章都有很多补给箱有的补给箱只能刷出固定物品有的可以刷出你缺少的东西(也可以是摆在那的手雷和枪榴弹)而刷缺少品的那种又有大补给中补给小补给有的时候一个场景也许并不需要很多弹药这样也许会造成补给箱的浪费在过了运河航道有人给你上机枪以后每当游戏自动存档或者载入的时候你就可以通过下面这些命令积攒开路神器的弹药sk_max_smg1_grenade XXX和sk_max_grenade xxx 、sk_max_buckshot xxx、sk_max_ar2来调整补给箱中的内容因为如果不停地刷出手枪子弹包肯定是浪费注意其他sk_max_的命令不会影响到缺少品补给箱的内容sk_max_smg1_grenade XXX XXX的数值是一个需要实时调整的量前期可能你拿的不多从50-5000变动每次捡到5-10个后就需要加数值100。
PHDV2并行式重型手柄机器人抓取器说明书
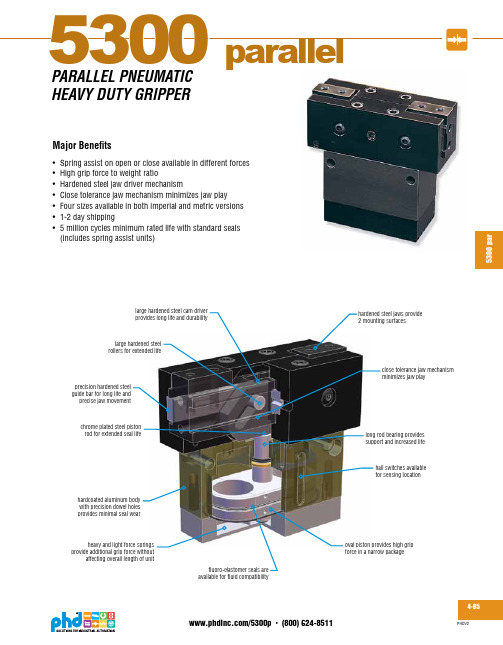
5300 par
4-86
PHDV2
CAD & Sizing Assistance
Use PHD's free online Product Sizing and CAD Configurator at /myphd
/5300p • (800) 624-8511
[25] [51] [76] [102] [127] [152] [178] [203] [224] [254]
DISTANCE FROM FACE OF COVER in [mm]
Sizing & Application Assistance
Use PHD's free online Product Sizing Application or view the Product Sizing Catalog at: /apps/sizing
heavy and light force springs provide additional grip force without
affecting overall length of unit
fluoro-elastomer seals are available for fluid compatibility
151356306-0S-iSzeize6 6 151357307-0S-iSzeize7 7 151358308-0S-iSzeize8 8 151359309-0S-iSzeize9 9
1515336622- -SSizizee66 1515337722- -SSizizee77 1515338822- -SSizizee88 1515339922- -SSizizee99
hardened steel jaws provide 2 mounting surfaces
刺客信条2高级操作方法

刺客信条2高级操作方法
以下是刺客信条2游戏中的高级操作方法:
1. 反击攻击:当敌人进行攻击时,按下反击键(右键或右手柄扳机键)可以进行反击,从而打破对手的连续攻击,然后进一步发动攻击。
2. 空中招式:如果你在跑酷和攀爬时按下攻击键(左键或左手柄扳机键),你的角色会跃起并发动空中攻击,对敌人造成更高的伤害。
3. 序列杀技:在刺客信条2中,你可以通过按下多个攻击键(左键或左手柄扳机键)来发动序列杀技,这能够轻松地消灭多个敌人或者在短时间内造成巨大的伤害。
4. 非致命攻击:如果你不希望杀死某个敌人,你可以用非致命攻击方式让他昏迷或晕迷。
在敌人的生命值降低到一定程度时,按下非致命攻击键(空格键或手柄B键)即可。
5. 躲避攻击:小心不要让敌人攻击到你,通过按下左键或者左手柄扳机键来躲避敌人的攻击。
6. 投掷武器:如果你有武器,比如刀,你可以按下投掷键(R键或者手柄右侧按钮)来投掷你的武器。
这一技巧在近距离内能够使你更加灵活。
以上是刺客信条2游戏中的一些高级操作方法,希望对你有所帮助。
PCB设计仿真工具-HyperLynx入门指南

HyperLynx入门指南目录使用叠层编辑器进行阻抗计算使用LineSim进行布线前仿真LineSim串扰分析BoardSim的交互式仿真BoardSim端接向导BoardSim串扰分析BoardSim板级分析BoardSim差分和GHz仿真直观的IBIS编辑器建立一个Databook模型使用叠层编辑器进行阻抗计算在BoardSim和 LineSim中均包括一个功能强大的叠层编辑器,使用它可以很简单地对您的PCB进行叠层设计和修改,以及对每个信号层进行特性阻抗的计算,以便您对信号反射和信号完整性的控制。
特性阻抗传输线和负载阻抗的匹配,以及选择合适的端接器件的值对信号完整性是很重要的。
BoardSim和LineSim的叠层编辑器正是对其控制的开始。
首先请记住特性阻抗Z0的计算等式:Z0 = √(L/C)增大电容可以通过一下方式:加宽走线减小信号层和参考层的距离增加介电常数这样就使等式的分母变大,也就降低的特性阻抗Z0。
当然,减小电容就使Z0增大。
而反射系数的计算等式如下:Refl. % = (ZL - Z0) / (ZL + Z0)当我们进行PCB设计时,对那些驱动端上升或下降时间小于等于5ns的单端信号线必须进行端接。
这个功能能够帮助我们选择合适的端接值,以便我们知道这个端接值ZL(例如:终端端接),以便我们可以控制信号反射和信号完整性,或者为了达到理想的目标特性阻抗值,调整优化我们的叠层结构。
建立一个新的LineSim原理图点击工具条上的图标“New LineSim Schematic”,便可以建立一个新的LineSim原理图,或者通过菜单选择File -> New LineSim File…。
选择工具条上绿色的叠层图标“Edit PCB Stackup”,或者通过菜单的Edit -> Stackup…选项,您将看到一个6层板的叠层结构图以及各层和介质层的参数。
双击您需要编辑的项目表格,例如介质层厚度、线宽等等,根据需要编辑顶层、底层和各个走线层、参考层以及介质层的参数,您可以分别选择Basic、Dielectric、Metal、Z0 Planning、Custom View进行各个项目的编辑。
半条命2秘籍
god 无敌模式(主机/服务器有效)noclip 穿墙模式(主机/服务器有效)mat_depthbias_normal 1 透视模式impulse 101 得到所有武器impulse 82 得到一吉普车impulse 83 汽艇notarget 隐形模式map [map name] 载入指定的地图give [item name] 制造指定物品buddha 伤血hurtme # 伤血(#为数字)maps 地图列表cl_ragdoll_collide 1 该参数使得构成身体的各个模块相互紧密接触从而避免互相嵌入的情况这样使得游戏中的身体接触看起来好很多developer [0-2] 开发者模式; 2是详细picker 踢人模式cl_drawhud [0 or 1] 显示HUDcl_enablehud [0 or 1] 显示HUDcl_showfps [0 or 1] 帧+mlook 启用鼠标外观hud_quickhelp/text? 1 显示准星viewmodel_fov # 设置武器大小; 默认54exec [filename] 执行脚本文件npc_create [name] 召唤对应NPCnpc_create_aimed 召唤一个NPCsetpos 坐标传送sv_cheats 1Setang [value] 不详sv_cheats 1sv_gravity # 设置重力值sv_stopspeed # 设置最低停止速度sv_friction # 设置摩擦sv_bounce # 模拟物体的碰撞?sv_maxvelocity # 设置移动物体的最高速度sv_waterdist # ?cl_phys_timescale [0.00-1.00] 设置时间; 默认是1 air_density # 改变空气密度dsp_explosion_effect_duration # 设置爆炸混乱的长度prop_debug 进入淍试模式mat_numtextureunits # 限制单元纹理mat_wireframe1 网络模型vcollide_wireframe 1 线框物体的物理影响mat_fastnobump [0 or 1] 凹凸映射impulse 200 在屏幕上没有武器模型impulse 203 删除针对物体或人showtriggers_toggle 显示游戏触发mat_normalmaps 1 显示普通地图mat_normals 1 显示表面材料mat_yuv 0 彩色屏幕那么输入ai_disable让人物都不动后,你就可以开始排兵布阵了首先,游戏里总共4伙:僵尸蚁狮护卫队反抗军僵尸就是zombie了没什么说的,克蚁狮蚁狮有antlion和antlionguard前者是蚁狮,克护卫队。
虐杀原形2操作方法手柄
虐杀原形2操作方法手柄
以下是《虐杀原形2》在手柄上的基本操作方法:
1. 移动:使用左摇杆控制角色的移动方向,按下左摇杆可奔跑。
2. 摄像头:使用右摇杆控制视角的旋转。
3. 攻击:使用右扳机(RT)进行普通攻击,使用右肩键(RB)进行特殊攻击。
4. 跳跃:按下“A”键跳跃或进行加特技跳跃。
5. 近战武器:使用B键切换近战武器,使用X键进行近战攻击。
6. 远程武器:使用Y键切换远程武器,使用左扳机(LT)进行远程攻击。
7. 手势和舞蹈:使用方向键或十字键切换手势和舞蹈动作。
8. 转化:按下右操纵杆(R3)可以切换成其他NPC或敌人的外貌。
9. 外科手术:按下左操纵杆(L3)可以进行外科手术操作。
10. 快速追踪:按下B键进行快速追踪敌人。
11. 使用黑洞:按下左肩键(LB)使用黑洞技能。
请注意,以上操作方法可能因为游戏版本或不同的游戏平台而有所变化。
请根据你所使用的手柄和游戏平台来调整按钮对应关系。
- 1、下载文档前请自行甄别文档内容的完整性,平台不提供额外的编辑、内容补充、找答案等附加服务。
- 2、"仅部分预览"的文档,不可在线预览部分如存在完整性等问题,可反馈申请退款(可完整预览的文档不适用该条件!)。
- 3、如文档侵犯您的权益,请联系客服反馈,我们会尽快为您处理(人工客服工作时间:9:00-18:30)。
哥们儿的D800测试到底神马时候出来啊?
不会只是说说吧
卡了哇丶先生(sina) 2012-05-17 17:58:09 回复
Blackmagic HyperDeck Utility这个从哪下载哦???
btdeep 2012-03-20 19:01:25 回复
这个性价比看来不错 就是没有音频记录
奇云天 2012-11-20 11:59:00 回复
越来越亲民了~~~~~~~这个必须有~~~~~~~~~
行走的山 2012-05-22 16:43:41 回复
ቤተ መጻሕፍቲ ባይዱ
问问兄弟,用它与ex1r连接(sdi),为什么没法录制联动?哥们有没试过?
mynk 2012-05-18 17:56:18 回复
文章推荐 more+
2013年奥斯卡提名的最佳声音&音乐作品5D3/1DX拍摄《一个打击乐手》——Phili【影视制作公开课】赵小丁:技术与艺术【专业制作人访谈】魏楠
接轨好莱坞的CineMagic3和Shanghai E-Motion分享 关于107CINE 使用条款 联系107CINE 广告合作 工作机会 版权声明
CINEDECK 才有支援 HDMI 60P/50P 的 10bit 422 擷取喔
猪哥卧笼 2012-03-06 23:21:02 回复
也是新购置给SONY FS100做外接记录,开始怎么都没信号,崩溃了,后来发现是不支持1080 50P,改成50I后正常。于是开始着手改造外观了。
作者:一堂客
基本上在拆開盒裝後,我們可以看到原廠隨附的光碟。
不過小編建議不要直接安裝,請自行先下載最新版本的 Blackmagic HyperDeck Utility 使用電腦來連動控制所想要使用 HyperDeck
Shuttle 2 设置mov或mxf的包装模式。
目前有兩種選擇
1.Uncompressed MOV
还可添加微信账号:Ilove107cine
QQ号826304610
加我们为微信好友
也许你喜欢以下文章
索尼伤不起啊:英国专业测评人Nigel Cooper5D3和GH2的对比测试5D2破解最新Magic Lantern
可拍HDR视频,固松下GH3爆出最新参数,矛头直指5DIII!60D配合Twixtor,仿超高速摄影机画面! 专区 AVCCAM 专区 CINEMA
xiaozhaogim 2012-03-20 01:54:12 回复
( NIKON D800、D4、VG20、GH2系列的朋友可爽到了...只要資訊視窗全關掉都可以支援擷取畫面)
这句话的意思是gh2也可以通过此擷取器获取无损4:2:2的画面么?那nex5可以么?ex-1呢?求教~
一堂客 2012-03-07 00:13:48 回复
的檔案來做為擷取,因為效果實在好太多太多!(尤其D800與VG20的玩家會更有感同身受)
而且台幣1萬出頭的擷取器可以做成這樣,小編覺得C/P值超高!
相關實測畫面會在3月17號之後公開,3月20號也會有相關電影機配合HyperDeck Shuttle 2做擷取測試請大家不要忘記回來觀看後續的相關報導。
关注本站微博 发视频 发帖子 使用微博登陆 返回顶部论坛广场 近期排行 AVCCAM 专区 索尼35mm专区 CINEMA EOS专区 MOVCAM专区
影视制作业务联盟 HyperDeck Shuttle 2 使用報告。
2012-03-05 19:24:03 关联: 测试体验 软件硬件
2來做高質量的紀錄,不過另外其實有程式還是可以幫您測試手中現有的SSD適不適合來做擷取影像使用。
盒裝所附光碟 HyperDeck Shuttle 2光碟內就有 Disk Speed Test 軟體
(官網也可以下載),基本上就可以測出你手邊現有的SSD哪一顆可以達到原廠所要求的速度。
第二:剪輯軟體的通用性
大家久等了,針對前兩篇的文章有些網絡朋友看不太懂的緣故,小編今天又出了一篇比較完整的測試報告來提供一般網友或未來會購買D800...等DSLR或業務用攝錄影機產品的人做為擷取信號參考基準。
非常感謝Blackmagic Design Asia主動提供產品來給我們做相關測試體驗,在測試上如果台灣或日本廠商可以這樣就好啦(我看是很難)。
文/小余 感謝:Blackmagic Design Asia,提供相關實測商品
想要看小余最新文章可至:/u/1840625741
SORRY 前面不小心誤刪了帖子,不知道怎麼可以回復所以重貼....
更多 0回复(9) 你需要登录才可以回帖 登录 | 注册 微博登陆
VIP会员[台湾]
特效/剪辑师/导演
目前為HDLNDIES.tw責任編輯。
作者人气 :51161
相信你和我们一样认同:版权是影视工业生存的根本;如需转载本文,请取得作者同意,并注明出处;如作者有特别标注,请按作者说明转载。
作者的其它文章 (更多文章)
BMCC夜間小測試影片下載。SONY PVM2541 OLED監視器校正測試報告。一堂客拜年影片 扫一扫,即可添加影视工业网为微信好友.
[京ICP备05039504] 关闭提示 关闭确 认 取 消
HyperDeck Shuttle 2 專用背板 HyperDeck Shuttle Mounting Plate
另外對於兩件重要事情大家需要注意....
第一:SSD紀錄硬碟的選擇
基本上其實Blackmagic-design官網的PDF說明書就有明確指出什麼樣的SSD適合HyperDeck Shuttle
12V DC電源輸入
HyperDeck Shuttle
2如果充飽電,使用自帶電池可以在錄製工作的時候持續1-2小時的時間。不過小編覺得可以自行改裝12V的V型電池轉接座(正負極要測量好、不然會燒掉),方便攜帶也可以長時間持續使用!(不會改背板可以打電話找小編我幫你改、一旦发现自行改装电池转接座,将丧失产品保修。)
基本上小編前面說了不管你是MAC或是WIN7的用戶,請先灌 Avid DNxHD Codec 的 QuickTime 外掛程式檔案 。這樣您才可以在
Premiere CS5.5 與 EDIUS 6.06 編輯 Avid DNxHD Codec 檔案。
但重點來了!在選擇擷取檔案時小編建議網絡朋友們還是使用 Avid DNxHD
DC12V電源端口。
USB2.0 連接端口
最主要還是用來做韌體更新以及連動控制所要記錄的CODEC來使用,但是小編不建議用USB2.0來傳輸檔案(因為你讀不到SSD)。請直接拔出SSD到烤麵包機做快速的檔案處理...
SD/HD SDI 輸出入端子
基本上支援SD/HD的視訊源輸入與輸出,當然 HyperDeck Shuttle 2 也支援SD畫面(4:3、16:9)擷取輸入。(但是現在因為都是 SMA公型
2.Avid DNxHD Codec
但是基本上無壓縮AVI以及DNxHD位元率編碼,HyperDeck Shuttle 2
會自動判定輸入源為多少位元率輸出來選擇是以10bit視訊位元率為主要編碼。
檔名的封裝形式依然是MOV或MXF,所以在後期剪輯軟體上在WINDOWS玩家用戶或MAC玩家用戶要注意的是 請先下載 Avid DNxHD Codec 的
基本上其實大家可以從知名的B&H網絡購物網站直接買到 HyperDeck Shuttle 2
的擷取器,千万不要笨笨的向B&H网购,B&H只提供1个月的质保。但如果用户是向当地经销商购买,在保修方面他只要把问题产品拿到经销商去即可,没有其它费用产生。
基本上B&H提供許多國際包裹貨寄選項,大家不趕時間的話建議選擇 UPS ( 有額外貨物稅UPS也會另行告知) 非常方便!
EOS专区 索尼35mm专区 C300开放体验日 MOVCAM专区 红青年影人社区 活动信息 more+
城市势力QQ群(更新十八城)上海国际电影技术展览会影视制作公开课回顾60秒”我的电影梦征集中第六届剪辑大赛已结束 作品专区 more+
《香水有毒》幕后制作 《普罗米修斯》幕后制作 《远方在哪里》金赫专区 剧情片《空·巢》 动画《对另一个自己说》 微电影《时光相册》 微电影《夏日时光》
轉 BNC母型 的轉接頭 )所以在台灣買線時還是要去買SMA轉頭的線材。
HDMI 輸出入端子
支援各種HDMI轉換輸入、當然在一邊擷取的同時也可以同時輸出1080的FULLHD的監看影像畫面。( NIKON
D800、D4、VG20、GH2系列的朋友可爽到了...只要資訊視窗全關掉都可以支援擷取畫面)
QuickTime 外掛程式檔案。
基本上 HyperDeck Shuttle 2 盒裝本身附有各國之通用插頭,連變壓器也是100-220V轉12V。
HyperDeck Shuttle 2 外型簡潔,按鈕的觸控感不錯。小編拿到時也嚇了一跳!(因為很沉)
HyperDeck Shuttle 2 擁有USB2.0端口、SD/HD-SDI 輸出入端子、HDMI輸出入端子以及
