labview中的visa用法
NI—VISA简介

NI-VISA(Virtual Instrument Software Architec-ture,以下简称为“VISA”)是美国国家仪器NI(NationalInstrument)公司开发的一种用来与各种仪器总线进行通信的高级应用编程接口。
VISA总线I/O软件是一个综合软件包,不受平台、总线和环境的限制,可用来对USB、GPIB、串口、VXI、PXI和以太网系统进行配置、编程和调试。
VISA是虚拟仪器系统I/ O接口软件。
基于自底向上结构模型的VISA创造了一个统一形式的I/ O控制函数集。
一方面,对初学者或是简单任务的设计者来说,VISA提供了简单易用的控制函数集,在应用形式上相当简单;另一方面,对复杂系统的组建者来说,VISA提供了非常强大的仪器控制功能与资源管理。
当进行USB通信时,VISA提供了两类函数供LABVIEW调用:USB INSTR设备与USB RAW设备。
USB INSTR设备是符合USBTMC协议的USB设备,可以通过使用USB INSTR类函数控制,通信时无需配置NI-VISA;而USB RAW设备是指除了明确符合USBTMC规格的仪器之外的任何USB设备,通信时要配置NI-VISA。
(1)配置NI-VISA的步骤①使用Driver Development wizard(驱动程序开发向导)创建INF文档;②安装INF文档,并安装使用INF文档的USB设备;③使用NI-VISA Interactive Control(NI-VISA互动控制工具)对设备进行测试,以证实USB设备已正确安装,并获得USB设备的各属性值。
(2)与NI-VISA相配合的LABVIEW模板中VI子节点ViOpen,打开并指定VISA resource name的设备的连接;ViProperty,VISA设备的属性子节点,可以设置端点或传输方式;ViWrite,向VISA resource name指定的设备写入数据;ViRead,从VISA resource name指定的设备读出数据;ViClose,结束设备读写并关闭与指定设备的连接。
labview的visa设置上限问题及解决办法
用NI-VISA为串口分配大缓冲区时出现的问题
主要软件: Driver Software>>NI-VISA
主要软件版本: N/A
主要软件修正版本: N/A
次要软件: Driver Software>>NI-Serial
问题:
Windows的串口驱动程序不允许NI-VISA创建一个大于40000字节的缓冲区。
当我创建一个比该限制大的缓冲区时,得到一个错误-1073807300: 系统资源不足。
如果我忽略这个错误,任何比40968 字节大的缓冲区实际上都只有40968 字节。
我如何才能为串口分配一个较大的缓冲区呢?
解答:
您应该安装NI-Serial驱动最近的版本(至少应该在NI-Serial 1.45以后)。
这将覆盖Windows的标准串口驱动从而允许串口缓冲区大小达到232 (4,294,967,296 字节). 所有可获得的NI-Serial驱动都可以从下面的链接中下载到。
ni visa库用法
ni visa库用法NI Visa(National Instruments Visa)是一个用于控制和通信的软件库,它提供了与各种外部设备(如仪器、传感器和其他硬件)进行通信的接口。
准确回答:NI Visa库是由National Instruments(NI)开发的一个用于设备控制和通信的软件库。
它提供了用于在计算机和外部设备之间进行通信的函数和工具。
NI Visa支持不同的通信标准,如GPIB、Serial、USB、Ethernet等,并为用户提供了以统一的方式进行编程的接口。
通过NI Visa,开发人员可以实现许多常用的操作,如发送和接收数据、查询设备状态、配置通信参数等。
拓展:除了基本的设备通信功能,NI Visa还提供了许多其他功能和特性。
以下是一些NI Visa库的拓展用法:1.设备控制和测试:NI Visa可以与各种仪器和设备进行通信,通过发送命令和接收返回数据,实现对设备的控制和测试。
例如,可以使用NI Visa来控制多通道数据采集卡,以采集和分析传感器数据。
2.并行通信:NI Visa支持在多个设备之间进行并行通信。
这意味着可以同时与多个设备进行通信,提高通信效率和速度。
这对于需要与多个仪器或设备进行协同操作的应用非常有用。
3.事件驱动编程:NI Visa提供了事件驱动的编程模型,允许开发人员设置和响应特定事件。
例如,当设备状态发生变化时,可以通过注册相应的事件来自动触发特定的操作。
这种方式可以提高应用程序的灵活性和响应性。
4.跨平台支持:NI Visa库可在多个操作系统上运行,包括Windows、Linux和MacOS等。
这使得开发人员可以在不同平台上共享和重用他们的代码,减少了平台依赖性的问题。
总之,NI Visa是一个强大的设备控制和通信工具,它为开发人员提供了方便、灵活和跨平台的接口,帮助他们实现与各种外部设备的通信和控制。
LabVIEW VISA Tutorial

LabVIEW VISA TutorialIntroductionThis tutorial gives an overview of LabVIEW’s implementation of the VISA language. It also teaches the basic concepts involved in programming instruments with VISA and gives examples demonstrating simple VISA concepts.Covered MaterialA. VISA Overview1. VISA Structure2. Supported Platforms and EnvironmentsB. VISA Programming1.Default Resource Manager, Sessions, Instrument Descriptors.2.Message-Based Communication3.Register-Based Communication4.VISA AttributesVISA OverviewVISA StructureVISA is a standard I/O language for instrumentation programming. VISA by itself does not provide instrumentation programming capability. VISA is a high-level API that calls into lower level drivers. The hierarchy of NI-VISA is shown in the figure below.VISA is capable of controlling VXI, GPIB, or Serial instruments and makes the appropriate driver calls depending on the type of instrument being used. When debugging VISA problems it is important to keep in mind that this hierarchy exists. An apparent VISA problem could in reality be the results of a bug or installation problem with one of the drivers into which VISA is calling.VISA AdvantagesOne of VISA’s advantages is that it uses many of the same operations to communicate with instruments regardless of the interface type. For example, the VISA command to write an ASCII string to a message-based instrument is the same whether the instrument is Serial, GPIB, or VXI. Thus, VISA provides interface independence. This can make it easy to switch interfaces and also gives users who must program instruments for different interfaces a single language they can learn.VISA is also designed so that programs written using VISA function calls are easily portable from one platform to another. To ensure this, VISA strictly defines its own data types such that issues like the size, of an integer variable from one platform to another should not affect a VISA program. The VISA function calls and their associated parameters are uniform across all platforms; software can be ported to other platforms and then recompiled. In other words, a C program using VISA can be ported to other platforms supporting C. A LabVIEW program can be ported to other platforms supporting LabVIEW. At first, the abundance of new VISA data types might seem like a burden, but LabVIEW makes them virtually transparent when using VISA.Another advantage of VISA is that it is an object-oriented language which will easily adapt to new instrumentation interfaces as they are developed in the future. The interface independence that is built into the language will also make it even easier for programmers to move to new interfaces with VISA in the future.VISA’s greatest advantage, perhaps, is that it is an easy language to learn and use. Its object-oriented structure makes the language and its operations intuitive to learn. This is due in part to the fact that VISA provides interface independence by using the same operations for different interfaces and also by the fact VISA presents a very simple and easy-to-use API. VISA provides the most frequently used functionality for instrumentation programming in a very compact command set.Supported Platforms And EnvironmentsThe platforms and environments that are supported by NI-VISA are shown in the table below.Platform EnvironmentsMacintosh LabVIEW, CWindows 3.1MSVC, Borland C++, CVI, LabVIEW, VBWindows 95/NT C, CVI, LabVIEW, VBSolaris 1CVI, LabVIEWSolaris 2CVI, LabVIEWHp-Ux CC, CVI, LabVIEWBecause VISA is the language used in writing instrument drivers, most instrument drivers currently written by National Instruments supports all of these environments.VISA ProgrammingBefore getting started with an introduction to VISA programming some terminology needs to be mentioned. These terms will become clearer as VISA’s functionality is described.VISA is an object-oriented language. The most important objects in the VISA language are known as resources. In object-oriented terminology, the functions that can be used with an object are known as operations. In addition to the operations that can be used with an object, the object has variables associated with it that contain information related to the object. In VISA, these variables are known as attributes.A simplified outline of the internal structure of the VISA language is shown in the diagram below.There is a default resource manager at the top of the VISA hierarchy that can search for available resources or open sessions to them. Resources can be GPIB, serial, message-based VXI, or register-based VXI. The most common operations for message based instruments are reads and writes. The most common operations for register based instruments are In’s and Out’s. In addition, resources have a variety of properties associated with them known as attributes. These can be read or modified with Attribute Nodes.The remaining sections of this lesson will look at these parts of the VISA language in detail and present simple programming examples and exercises performing common programming tasks with the VISA language. The last part of the internal VISA structure shown in the diagram are Events. Events are more advanced topics and are not discussed in this tutorial.Default Resource Manager, Session, and Instrument DescriptorsThe Default Resource Manager is at the highest level of VISA operations. Communication must be established with the Resource Manager at the beginning of any VISA program. This immediately brings up two terms that need to be defined: resource and session.Resource - An instrument or controller.Session - A connection, or link, to the VISA Default Resource Manager or a resource. The reason the VISA Default Resource Manager is so important is because one of its operations is to open sessions to other resources. Sessions must be opened to the instruments the application will communicate with. Therefore communication with the Default Resource Manager must be established first within an application.The VISA Default Resource Manager also has another operation that it can carry out. That operation is to search for available resources in the system. Sessions can then be opened to any of these resources.NOTE:In LabVIEW, a session to the VISA Default Resource Manager is opened automatically the first time either of the Default Resource Manager operations are used in the program. Therefore, the first step in a LabVIEW VISA application is to open sessions to resources or to search for available resources.The VISA Find Resources VI that carries out the operation of searching for available resources in the system is shown below. This VI is a common starting point for a VISA program. It can be used to determine if all of the necessary resources for the application to run are available.The only necessary input to the VISA Find Resources VI is a string called the search expression. This determines what types of resources the Find Resources VI will return. Possible strings for the search expression are shown in the table below and can be found in the LabVIEW Online Reference.The important return values of the VI are the return count (which simply reports the number of resources that were found) and the find list. The find list is an array of strings. Each string contains the description of one of the resources that was found. These strings are known as instrument descriptors. A simple VI that will find all of the available resources in the system is shown in the figure below.Instrument Descriptor - The exact name and location of a VISA resource. This string has the formatInterface Type[Board Index]::Address::VISA ClassThe instrument descriptors are simply specific instruments found by the search query. The board index only needs to be used if more than one interface type is present in the system. For example, if the system contains two GPIB plug-in boards one could be referred to as GPIB0 and one as GPIB1. In this case, the board index needs to be used in instrument descriptors. For VXI instruments, the “Address” parameter is the Logical Address of the instrument. For GPIB instruments, it is the GPIB primary address. For Serial instruments the address is not used. An example is “ASRL1::INSTR” as the descriptor for the COM 1 serial port on a personal computer.The VISA Class is a grouping that encapsulates some or all of the VISA operations. INSTR is the most general class that encompasses all VISA operations. In the future, other classes may be added to the VISA specification. Currently the VISA Class does not need to be included as part of the instrument descriptor. Nevertheless, this should be done to ensure future compatibility. Currently, most applications simply use the INSTR class.LabVIEW supplies another way to set the class for a VISA session that can be used now. This is done by popping up on the front panel VISA Session control and selecting the VISA Class as shown in the figure below.If a class other than the default Instr class is selected, only VIs for operations associated with that device class can be wired successfully with this session. For example, if GPIB Instr is selected for the VISA class, VIs for VXI register accesses can not be wired with the session.The instrument descriptors are used to open sessions to the resources in the system using the Default Resource Managers ability to open sessions. The VISA Open VI that carries out this operation is shown below.The resource name input is the VISA instrument descriptor for the resource to which a session will be opened.Note:The Find Resources VI does not need to be used to obtain instrument descriptors for resources. The VISA Open VI can be used with an instrument descriptor provided by the user or programmer. However, to be sure of the syntax for the descriptor, it is best to run Find Resources first.Note:In most applications, sessions only need to opened once for each instrument that the application will communicate with. This session can be routed throughout the application and then closed at the end of the application.Notice that there is also a VISA session input to the VISA Open VI. In order to open sessions to resources in LabVEIW, a VISA Session front panel control is needed. The VISA session front panel control can be found in the Controls Palette in the Path & Refnum sub-palette.At this point it is important to have a clear understanding of the Default Resource Manager, instrument descriptors, and sessions. A good analogy can be made between the VISA Default Resource Manager and a telephone operator. Opening a session to the Default Resource Manager (remember this is done automatically in LabVIEW) is like picking up the phone and calling the operator to establish a line of communication between a program and the VISA driver.In turn, the telephone operator has the ability to dial phone numbers to establish lines of communication with resources in the system. The phone numbers that the Resource Manager uses are the instrument descriptors. The lines of communication are the sessions that are opened to VISA resources. In addition, the Resource Manager can look for all the available phone numbers. This is the VISA Find Resources operation.An open session to a VISA resource also uses system resources within the computer. To properly end a VISA program all of the sessions opened to VISA resources should be closed. To do this, there is a VISA Close VI that is shown below.The important input to the VISA Close VI is the session to be closed. This session originally comes from the output session terminal of the VISA Open VI.If a session is not closed when a VI is run that session will remain open. It is a good idea to always close any sessions that are opened in an application so open sessions don’t build up and cause problems with system resources. However, there are cases when leaving sessions open can be useful.If a VI runs and leaves a session open without closing it - this session can still be used in later VI’s. An already open session can be accessed by popping up on a VISA Session front panel control and going to the Open Sessions selection. The output of the VISA Session front panel control will then be the already open session that is selected. In this way sessions can be closed that were left open from earlier runs of a VI. This method can also be used to interactively test parts of an application. An example of selecting an already open session is shown in the figure below.The open session’s choice of the front panel VISA Session control can be used to check if any sessions are currently open. Accessing open sessions by popping up on front panel VISA Session Controls also provides a convenient way to interactively run parts of an instrument driver.Error Handling with VISAError handling with VISA VIs is similar to error handling with other I/O VIs in LabVIEW. Each of the VISA VIs contain Error Input and Error Output terminals that are used to pass error clusters from one VI to another in a diagram. The error cluster contains a Boolean flag indicating whether an error has occurred, a numeric VISA error code, and a string containing the location of the VI where the error occurred. If an error occurs, subsequent VIs will not try to execute and will simply pass on the error cluster. A front panel error cluster indicator showing the output from the error out terminal of a VISA function is shown in the figure below.Notice that in this case an error has occurred because the Boolean value in the error cluster is turned on. Also notice that the VISA error code for the error that has occurred is cut off in the code indicator. VISA error codes are 32-bit integers that are usually referred to in hexadecimal format. The LabVIEW error cluster displays the code in decimal. There is a VISA Error Codes section in the LabVIEW Online Help that also lists all of the error codes in decimal. However, as the figure above shows, these error codes are cut off in the error cluster. The code indicator must be resized to display the entire error code.The LabVIEW Simple and General Error Handler VI’s can be found in the Time & Dialog sub-palette under the functions palette. These VI’s provide a pop-up dialogue box if an error occurs and also look up the error code to determine possible reasons for the error. The result of running the same code that produced the error shown in the error cluster above using the Simple Error Handler VI instead is shown in the figure below.Notice that the code description is listed under the possible reasons. It is not always convenient to handle errors with pop-up dialogue boxes through the LabVIEW error handling VIs. VISA also provides an operation that will take a VISA error code and produce the error message string corresponding to the code as an output. This VI is shown in the figure below.The inputs to this VI are a VISA session and a VISA error cluster. The VI will check the VISA code in the error cluster that was passed to it and output the text description of the code from the status description terminal. Even if the input error cluster did have the error value set, a status string description indicating success or a warning will be produced. This VI allows a text description of the status after a VISA VI executes to be obtained and used in a program. The figure below shows a Labview string indicator displaying the error string returned from the VISA Status Description VI.The exact method used for implementing error handling will depend on the nature of the program. However, some sort of error handling mechanism should be implemented in any program involving VISA.VISAIC And Message-Based CombinationVISAICVisa comes with a utility called VISA Interactive Control (VISAIC) on all platforms that support VISA and LabVIEW (except the Macintosh). This utility provides access to all of VISA’s functionality interactively, in an easy-to-use graphical environment. It is a convenient starting point for program development and learning about VISA. However, when VISA is installed through LabVIEW’s default installation, VISAIC is not installed. VISA can be reinstalled by itself to install this useful utility. The latest versions of VISA are available for no charge on National Instruments ftp site under the support/visa directory.When VISAIC runs, it automatically finds all of the available resources in the system and lists the instrument descriptors for each of these resources under the appropriate resource type. The VISAIC opening window is shown in the figure below.The Soft Front Panels tab of the main VISAIC panel will give you the option to launch the soft front panels of any VXI plug and play instrument drivers that have been installed on the system.The NI I/O tab will give you the option to launch the NI-VXI interactive utility or the NI-488 interactive utility. This gives you convenient links into the interactive utilities for the drivers VISA calls in case you would like to try debugging at this level.Double-clicking on any of the instrument descriptors shown in the VISAIC window will open a session to that instrument. Opening a session to the instrument produces a window with a series of tabs for interactively running VISA commands. The exact appearance of these tabs depends on which compatibility mode VISAIC is in. To access the compatibility mode and other VISAIC preferences select Edit >> Preferences . . . to bring up the window shown below.The VISA implementations are slightly different in LabVIEW and LabWindows/CVI --these differences are reflected in the operation tabs that are shown when you open a session to a resource. By default, the compatibility mode is set to Labwindows/CVI. This should be changed to LabVIEW if program development is being done with the LabVIEW package. Once the preferences are changed, the new preferences will take effect for any session that is opened later.When a session to a resource is opened interactively, a window similar to the one shown below will appear.There are three main tabs that appear in the window. The initial tab is the template tab that contains all of the operations dealing with events, attributes, and locks. Notice that there is a different tab for each of these operations under the main tab. The other main tabs are the INSTR Basic I/O and INSTR Register I/O. The Basic I/O tab contains the basic operations for message-based instruments while the Register I/O tab contains the basic operations for register-based instruments. The Register I/O tab only appears for VXI instruments.There will be more discussion of the VISA operations in the upcoming sections. For now, it is important to remember that VISAIC performs a VISA Find Resources when it is run and displays instrument descriptors for all of the resources in the system. For VXI instruments, VISAIC also attempts to access one of the configuration registers on each instrument to verify its existence. In upcoming lessons VISAIC will be used as a learning and development tool. It is often easier to develop an application interactively before doing the actual programming. VISAIC can also serve as a very useful debugging tool when problems arise in writing a program or in using a pre-existent application using VISA VI’s.Message-Based CommunicationSerial, GPIB, and many VXI devices recognize a variety of message-based command strings. At the VISA level, the actual protocol used to send a command string to an instrument is transparent. A user only needs to know that they would like to write amessage or read a message from a message-based device. The VI’s that are used to perform these operations are VISA Write and VISA Read.Note:these same VI’s are used to write message based commands to GPIB, Serial, and message-based VXI instrument. VISA knows automatically which functions to call based on the type of resource being used.The Write VI is shown below.The only input, besides the instrument session, is the string to be sent to the instrument. The VISA Read VI is equally easy to use. It is shown below.The VISA Read VI must be given a byte count input equal to the maximum number of bytes that should be read from the instrument. The VI will terminate the read when this number of bytes has been read or when the end of the transfer is indicated.The actual message-based commands that the instrument recognizes vary from manufacturer to manufacturer. The GPIB IEEE 488.2 protocol and SCPI standards made some attempts at standardizing the commands for message-based instruments. Many instruments follow these standards. However, the only way to be certain of the commands that should be used with a particular instrument is to refer to the documentation provided by the manufacturer. However, pre-written instrument drivers exist for many message-based devices. These instrument drivers contain functions that put together the appropriate ASCII command strings and send them to the instrument.A simple example that writes the *IDN? string to a message-based instrument and reads the response is shown in the figure below.This program could be used successfully with any device that recognizes the *IDN? command. The device could be Serial, GPIB, or VXI. The only change would be the instrument descriptor.Register-Based CommunicationVISA contains a set of register access VIs for use with VXI instruments. Some VXI instruments do not support message-based commands. The only way to communicate with these instruments is through register accesses. All VXI instruments have configuration registers in the upper 16 kilobytes of A16 memory space. Therefore, register access functions can also be used to read from and write to the configuration registers for message-based devices. The basic VISA operation used to read a value from a register is VISA In. There are actually three different versions of this operation for reading a 8, 16, or 32 bit value. The VISA In 16 VI is shown in the figure below.This VI and other basic register access VI’s can be found in the High Level Register Access sub-palette under the main VISA function palette.The address space input simply indicates which VXI address space is to be used. The offset input sometimes causes confusion. Remember that VISA keeps track of the base memory address that a device requests in each address space. The offset input is relative to this base address.Consider the following example. Suppose that you have a device at logical address 1 and would like to use the VISA In 16 VI to read its ID/Logical Address configuration register. You know that this register is at absolute address 0xC040 in A16 space and that the configuration registers for the device at logical address 1 range from 0xC040 to 0xC080. However, VISA also knows this and you only need to specify the offset in the region you wish to access. In this case, that offset is zero.There is another set of high level register access operations that parallel the VISA In operations, but are for writing to registers. These operations are the VISA Out operations. The VISA Out 16 VI is shown below.This VI is similar to the VISA In 16 VI except the value to write must be provided to the value terminal. Keep in mind when using the VISA Out VIs that some registers can not be accessed.An example of using the high level VISA access functions in a VI is shown in the simple program below.The program asks the user for the instrument descriptor and the offset of the configuration register to be read and returns the value from the register. If an error occurs in the sequence of VISA VIs that execute in the program, the Simple Error Handler will pop up a dialogue box informing the user of the error and the text message associated with the VISA Error Code.VISA AttributesThe basic operations that are associated with message and register-based resources in VISA have now been introduced. These operations allow register access, and message-based communication. In addition to the basic communication operations, VISA resources have a variety of attributes whose values can be read or set in a program.In a LabVIEW program, these attributes are handled programmatically in the same way that the properties of front panel controls and indicators are handled. Attribute nodes are used to read or set the values of VISA attributes. A VISA attribute node is shown in the figure below.The VISA attribute node contains a single attribute terminal when it is placed initially on the block diagram. However, it can be resized to contain as many different terminals as necessary. The initial terminal on the VISA attribute node is a read terminal. This means that the value of the attribute selected in that terminal will be read. This is indicated by the small arrow pointing to the right at the right edge of the terminal. Terminals can individually be changed from a read terminal to a write terminal by popping-up on the attribute you wish to change.Note:Popping up on the terminals sometimes will not give you the option of changing the terminal to a read or to a write. This is due to the fact that some attributes are read only. Their value can not be set.To select the attribute in each terminal of the attribute node, pop up on the attribute node terminal and choose “Select Item.” This will provide a list of all the possible attributes that can be set in the program. This will produce a long list of attributes. The number of different attributes that are shown under the Select Item choice of the VISA Attribute Node can be limited. To do this, the VISA Class of the attribute node can be changed. To change the VISA class pop up on the VISA attribute node and go to the VISA Class selection. Several different classes can be selected under this option besides the default INSTR class which encompasses all the VISA attributes. These classes simply limit the attributes displayed to those related to that class instead of all the VISA attributes. Once a session is connected to the Session input terminal of the attribute, the VISA Class will be set to the class associated with that session.Initially, the VISA attributes will be somewhat unfamiliar and their exact nature may not be clear from the name alone. The VISA online reference contains more detaileddescriptions of the various attributes and their values. The LabVIEW online reference also contains information on the attributes. Brief descriptions of individual attributes are also available in the simple help window. To get a brief description of a specific attribute, select the attribute in one of the terminals of an attribute node and then open the simple help window. This is shown for the VXI LA attribute below.Note that the help window shows the specific variable type of the attribute and gives a brief description of what the attribute does. In cases where it is not clear what variable type to use for reading or writing an attribute, remember popping up on an attribute node and selecting Create Constant, Create Control, or Create Indicator will automatically select the appropriate variable type.There are two basic types of VISA attributes - Global Attributes and Local Attributes. Global attributes are specific to a resource while Local Attributes are specific to a session. For example, the VXI LA attribute that is shown in the figure above is an example of a global attribute. It applies to all of the sessions that are open to that resource. A local attribute is an attribute that could be different for individual sessions to a specific resource. An example of a local attribute is the time out value. Some of the common attributes for each resource type are shown in the list below.SerialSerial Baud Rate – The baud rate for the serial port.Serial Data Bits – The number data bits used for serial transmissions.Serial Parity – The parity used for serial transmissions.Serial Stop Bits – The number of stop bits used for serial transmissions.GPIB。
labview使用技巧
本文为LabVIEW内部交流资料,来自网络,特此说明开发机上激活以后,如果开发机升级了或者换了或者增加新的配置了等等,难道要重新购买一套8.2吗?回答=更改了配置,那么lisence manager里的机器码肯定会变,所以需要重新向NI申请激活码激活.NI的IVI驱动的来源?回答=由于NI开发的IVI驱动程序库已经包含了仪器的Class Driver,因此,程序员只要按照IVI的规范开发自己仪器的Specific Driver,就可以实现仪器的互换性。
LV和CVI的专用驱动可以从NI的网站下载,源代码是用c编写的32位的DLL形式,这就保证驱动可以直接在你的开发环境中使用(LV,CVI,VC等)。
在运行过程中LabVIEW能否添加控件?回答=不能,只能在编辑状态是做。
不过可以事先多创建几个控件,然后隐藏。
再需要使用的时候使用属性节点来操作。
编写的LV的GPIB通讯程序,从示波器读取数据。
单独可以正常执行,但放置在一个事件结构的一个WHILE循环里时,运行程序后,程序会变得不相应,而且前面板不可控制。
回答=查看客户程序,GPIB程序并没什么问题,但是作为一个子程序放在事件结构里就会存在问题,而且子程序运行时,主界面默认的是不响应的。
如果要解决这个问题,需要选择事件结构编辑面板最下方有一个默认选项,用于设置是否在事件结构执行完成之前锁定前面板,默认为锁定,取消即可。
IVI的分类。
回答=因为所有的仪器不可能具有相同的功能,因此不可能建立一个单一的编程接口。
因此,IVI的驱动分为两类。
(1) 类驱动程序(Class Drive):它们是在特定类中编写仪器软件的标准接口。
这意味着软件开发者能重复使用他们的软件系统而不会由于低层硬件更改而被迫重新测试软件系统。
目前,IVI驱动程序库可用于下列几类仪器:示波器数字化仪表、开关多路复用器、数字万用表、任意波形发生器函数发生器等。
(2) 设备类驱动程序(Specific Drive):每种牌号和类型的仪器均有相应的专用驱动程序。
LabVIEW-USB 通信简单教程
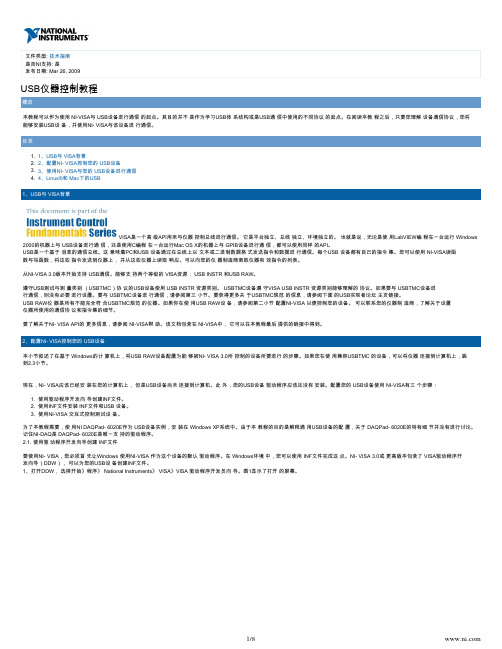
:文件类型技术指南VISA是一个高 级API用来与仪器 控制总线进行通信。
它是平台独立、总线 独立、环境独立的。
也就是说,无论是使 用LabVIEW编 程在一台运行 Windows 2000的机器上与 USB设备进行通 信,还是使用C编程 在一台运行Mac OS X的机器上与 GPIB设备进行通 信,都可以使用同样 的API。
图1:VISA DDW硬件总线窗口您可以使用这个向导 创建供 PXI/PCI、 USB或IEEE 1394设备使用的 INF文件。
由于您 在为USB设备创建 驱动程序,选择 USB并点击下一 步。
VISA DDW基本设备信息 窗口打开,如图2所 示。
图2:VISA DDW基本设备信息 窗口2、在这个步骤 中,您必须知道 USB仪器所使用的 USB厂商ID和产 品ID。
这些数字在 您安装的时候能够识 别USB设备,在您 希望进行通信的时 候,可以对设备进行 寻址。
根据USB规范,所有数字必须是 16位的十六进制数 字,必须由设备制造 商提供。
如果您不知道USB 厂商ID和产品 ID,您可以将设备 插入计算机,让计算 机识别新设备得到这 些ID。
如果找到新 硬件向导打开,选择 取消。
打开控制面板 中的设备管理器,在 列表中找到您的设备,通常它在“其他 设备”中。
可能它会 带有黄色惊叹号标 记,表示这是一个未 知设备。
双击这个设 备打开属性。
选择详 细标签,确保“设备 实例ID”显示在属 性的下拉框中。
这样将会显示类似于图3 的字符串。
“VID_”和 “PID_”右边的 四个字符分别是您的 厂商ID和产品 ID。
写下设备的字 符串,关闭设备管理 器,从计算机上拔下 设备。
或者您还可以 联系您的设备厂商获得这些信息。
1.2. 3. 图3:从设备管理器 中找到厂商ID和产 品ID对于DAQPad- 6020E而言,厂 商ID和产品ID分 别是0x3923和 0x12C0。
如果 您的设备不是NI DAQPad- 6020E,厂商 ID和产品ID对于 您的设备而言是不同 的。
基于LabVIEW-VISA方式的串口通信研究

基于LabVIEW-VISA方式的串口通信研究魏义虎;陈雷【摘要】针对使用LabVIEW的VISA函数编写串口通信程序出现数据丢失问题,本文在介绍串口通信的基础上,详细说明了LabVIEW使用VISA方式实现串口通信的一般编程方法、以及需要注意的问题,特别对丢失数据现象进行了原因分析,采用设置延时和设置流控制方式加以解决。
实际应用表明,该方法简单有效,满足串口通信要求。
%Aiming at data losing in writing serial port communication programme by using VISA in LabVIEW,On the base of introduction of serial port communication, illustrates the basic way to program via using VISA, as well as the points needed to be noted, analyses the phenomenon of data losing,takes steps of seting time delay and seting flow control to resolve the problem. The application show that this method is simple and effective, achieves the requirement of serial port communication.【期刊名称】《电子设计工程》【年(卷),期】2015(000)024【总页数】3页(P129-131)【关键词】LabVIEW;VISA;串口通信;数据丢失【作者】魏义虎;陈雷【作者单位】军械工程学院弹药工程系,河北石家庄 050003;军械工程学院弹药工程系,河北石家庄 050003【正文语种】中文【中图分类】TN0串口通信作为串行通信的一种实现方式,其历史可追溯到1969 年。
labview使用技巧

本文为LabVIEW内部交流资料,来自网络,特此说明开发机上激活以后,如果开发机升级了或者换了或者增加新的配置了等等,难道要重新购买一套8.2吗?回答=更改了配置,那么lisence manager里的机器码肯定会变,所以需要重新向NI申请激活码激活.NI的IVI驱动的来源?回答=由于NI开发的IVI驱动程序库已经包含了仪器的Class Driver,因此,程序员只要按照IVI的规范开发自己仪器的Specific Driver,就可以实现仪器的互换性。
LV和CVI的专用驱动可以从NI的网站下载,源代码是用c编写的32位的DLL形式,这就保证驱动可以直接在你的开发环境中使用(LV,CVI,VC等)。
在运行过程中LabVIEW能否添加控件?回答=不能,只能在编辑状态是做。
不过可以事先多创建几个控件,然后隐藏。
再需要使用的时候使用属性节点来操作。
编写的LV的GPIB通讯程序,从示波器读取数据。
单独可以正常执行,但放置在一个事件结构的一个WHILE循环里时,运行程序后,程序会变得不相应,而且前面板不可控制。
回答=查看客户程序,GPIB程序并没什么问题,但是作为一个子程序放在事件结构里就会存在问题,而且子程序运行时,主界面默认的是不响应的。
如果要解决这个问题,需要选择事件结构编辑面板最下方有一个默认选项,用于设置是否在事件结构执行完成之前锁定前面板,默认为锁定,取消即可。
IVI的分类。
回答=因为所有的仪器不可能具有相同的功能,因此不可能建立一个单一的编程接口。
因此,IVI的驱动分为两类。
(1) 类驱动程序(Class Drive):它们是在特定类中编写仪器软件的标准接口。
这意味着软件开发者能重复使用他们的软件系统而不会由于低层硬件更改而被迫重新测试软件系统。
目前,IVI驱动程序库可用于下列几类仪器:示波器数字化仪表、开关多路复用器、数字万用表、任意波形发生器函数发生器等。
(2) 设备类驱动程序(Specific Drive):每种牌号和类型的仪器均有相应的专用驱动程序。
用Labview基于NI VISA控制USB接口

基于NI-VISA与LabVIEW的USB接口应用设计2008-01-15 嵌入式在线收藏| 打印通用串行总线(USB)作为一种灵活的高速总线接口技术,非常适合作为主机和外设之问的通信接口,但其结构复杂。
本文以一个采集多点温度的实际系统为倒,阐述USB接口应用系统的总体设计思想及其层次结构,在实现方法上避开传统的Windows编程技术,另辟蹊径地给出使用NI-VISA 来驱动USB接口以应用LabVIEW进行应用编程的方法。
USB(Universal Serial Bus)接口是近年来应用在PC领域的新型接口技术。
它基于单一的总线接口技术来满足多种应用领域的需求;它的即插即用、支持热插拔、易于扩展等特性极大地方便了用户的使用,已逐渐成为现代数据传输的发展趋势。
传统的开发USB应用系统的步骤是,先用WindowsDDK(设备驱动程序开发包)或第三方开发工具(如DriverStudio)开发USB驱动程序,然后用Visual C++编写DLL(动态连接库),最后再调有DLL来开发应用程序。
显然,这对Windows编程不熟悉的人来说有一定的难度,何况USB驱动程序的开发难度很大。
本文介绍一种简单、快速开发USB接口应用系统的方法。
它直接在LabVIEW环境下通过NI-VISA开发能驱动用户USB系统的应用程序,完全避开了以前开发USB驱动程序的复杂性,大大缩短了开发周期。
1 NI-VISA简介NI-VISA(Virtual Instrument Software Architec-ture,以下简称为“VISA”)是美国国家仪器NI(National Instrument)公司开发的一种用来与各种仪器总线进行通信的高级应用编程接口。
VISA总线I/O软件是一个综合软件包,不受平台、总线和环境的限制,可用来对USB、GPIB、串口、VXI、PXI和以太网系统进行配置、编程和调试。
VISA是虚拟仪器系统I/O接口软件。
NI VISA简介

N1-VISA简介NI-VISA(Virtual Instrument Software Architecture,以下简称为"VISA")是美国国家仪器NI(National1nstrLlrnent)公司开发的一种用来与各种仪器总线进行通信的高级应用编程接口。
VISA总线I/0软件是一个综合软件包,不受平台、总线和环境的限制,可用来对USB、GPIB、串口、VXI、PXI和以太网系统进行配置、编程和调试。
VISA 是虚拟仪器系统I/O接口软件。
基于自底向上结构模型的VISA创造了一个统一形式的I/O控制函数集。
一方面,对初学者或是简单任务的设计者来说, VISA提供了简单易用的控制函数集,在应用形式上相当简单;另一方面,对复杂系统的组建者来说,VISA 提供了非常强大的仪器控制功能与资源管理。
2 LabVIEW及其调用VISA的条件LabVIEW(Laboratory Virtual Instrument Engineering Workbench)是NI公司开发的一种基于图形程序的编程语言。
用户利用创建和调用子程序的方法编写程序,使创建的程序模块化,而且程序编制简单、直观。
一个LabVIEW程序分为3部分:前面板、框图程序和图标/接线端口。
前面板用于模拟真实仪器的前面板;框图程序是利用图形语言对前面板上的控件对象(分为控制量和指示量两种)进行控制;图标/接线端口用于把LabVlEW程序定义成一个子程序,从而实现模块化编程。
当进行USB通信时,VISA提供了两类函数供LabVIEW调用,USB INSTR设备与USB RAW设备。
USB INSTR设备是符合USBTMC协议的USB设备,可以通过使用USB INSTR类函数控制,通信时无需配置NI-VISA;而USB RAW设备是指除了明确符合USBTMC规格的仪器之外的任何USB设备,通信时要配置NI-VISA。
(1)配置NI-VISA的步骤①使用Driver Development wizard(驱动程序开发向导)创建INF文档;②安装INF文档,并安装使用INF文档的USB设备③使用NI-VISA Interactive Control(NI-VISA互动控制工具)对设备进行测试,以证实USB 设备已正确安装,并获得USB设备的各属性值。
LabVIEW VISA与串口通讯的编程实现

LabVIEW VISA 与串口通讯的编程实现VISA 是虚拟仪器软件体系结构的缩写(即Virtual Instruments Software Architecture),实质上是一个I/O 口软件库及其规范的总称。
VISA 是应用于仪器编程的标准I/0 应用程序接口,是工业界通用的仪器驱动器标准API(应用程序接口),采用面向对象编程,具有很好的兼容性、扩展性和独立性。
用户可用一个API 控制包括VXI、GPIB 及串口仪器在内的不同种类的仪器。
它还支持多平台工作、多接口控制,是一个多类型的函数库。
在LabVIEW 中编写的VISA 接口程序,当外部设备变更时,只需要更换几个程序模块即可使用,简单方便而且开发效率高。
在LabVIEW 中利用VISA 节点进行串行通信编程。
为了方便用户使用,LabVIEW 将这些VISA 节点单独组成一个子模块,共包含8 个节点,分别实现初始化串口、串口写、串口读、中断以及关闭串口等功能。
一、基本步骤在LabVIEW 中,进行串口通信的基本步骤分为3 步:第一:串口初始化,利用ⅥSA Configure SerialPort.vi 节点设定串口的端口号、波特率、停止位、校验位、数据位。
第二:读写串口,利用VISA Read 节点和VISAWrite 节点对串口进行读写。
第三:关闭串口,停止所有读写操作。
二、主要节点介绍下面介绍一下VISA 串口的主要节点及其功能:1、串口配置该节点主要用于串口的初始化,如图1 所示。
图1 串口配置节点VISA 资源名称:指PC 的串口名,例:COMl,COM2 等。
波特率:串口速率,默认为9600bps。
数据比特:一帧信息中的位数,LabVIEW 中允许5~8 位数据,默认为8。
奇偶:奇偶校验位,可选为无校验、奇校验或偶校验,默认为无校验。
停止位:一帧信息中的停止位的位数,可选为1 位、1.5 位或2 位。
流控制:设置传输机制使用的控制类型,可选为None、XON/XOFF 软件流控或RTS/CTS 硬件流控,默认为None。
VISA编程

VISA编程VISA是虚拟仪器软件结构体系(Virtual Instrument Software Architecture)的简称。
VISA是在所有LabVIEW工作平台上控制VXI、GPIB、RS-232以及其他种类仪器的单接口程序库。
VISA是由组成VXI plug&play系统联盟的35家最大的仪器仪表公司所统一采用的标准。
采用了VISA标准,就可以不考虑时间及仪器I/O选择项,驱动软件可以相互相容使用。
VISA包含的功能模块在Instrument I/O>VISA子模板中。
大多数的VISA功能模块使用了VISA session参数,该参数在Control模板的Path and Refnum子模板中。
VISA session是每次程序操作过程的唯一逻辑标识符。
它标识了与之通讯的设备名称以及进行I/O操作必需的配置信息。
它由VISA Open功能模块产生,提供给VISA主功能模块使用。
VISA Open功能模块产生标识信息,然后把它传送给下一个VISA功能模块。
这样简化了数据流编程。
它相似于文件I/O模块的参考名功能。
VISA session的缺省值是Instr。
如果需要,可以打开VISA session选择如下值:Instr、 GPIB Instr、 Serial Instr和VISA/GPIB-VXI RBD Instr。
下面介绍常用的VISA功能模块:VISA Open、VISA Write、VISA Read和VISA Close。
VISA Open根据Resource Name和VISA session与指定的设备建立通讯。
模块返回VISA session标识值,使用该标识值就可以调用此设备的任何其他的操作功能。
Error in和Error out字符串包含出错信息。
Resource Name包含I/O接口类型以及设备地址等信息。
其编程语法如下表所示:接口程序语句SERIALASRL[board][::INSTR]GPIBGPIB[board]::primary address[::secondary address][::INSTR]VXIVXI [board]::VXI logical address [::INSTR]GPIB-VXIGPIB-VXI [board][::GPIB-VXI primary address]::VXI logical address [::INSTR] 关键词GPIB用于同GPIB设备建立通讯,关健词VXI通过嵌入式或MXI总线控制器同VXI仪器建立通讯,关键词GPIB-VXI用于GPIB-VXI控制器,关键词SERIAL用于异步串行设备通讯。
Labview中Vision Utilities模块说明
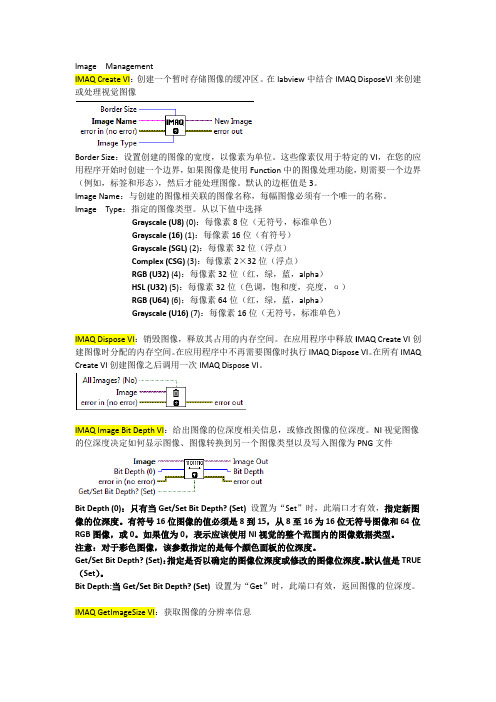
Image ManagementIMAQ Create VI:创建一个暂时存储图像的缓冲区。
在labview中结合IMAQ DisposeVI来创建或处理视觉图像Border Size:设置创建的图像的宽度,以像素为单位。
这些像素仅用于特定的VI,在您的应用程序开始时创建一个边界,如果图像是使用Function中的图像处理功能,则需要一个边界(例如,标签和形态),然后才能处理图像。
默认的边框值是3。
Image Name:与创建的图像相关联的图像名称,每幅图像必须有一个唯一的名称。
Image Type:指定的图像类型。
从以下值中选择Grayscale (U8) (0):每像素8位(无符号,标准单色)Grayscale (16) (1):每像素16位(有符号)Grayscale (SGL) (2):每像素32位(浮点)Complex (CSG) (3):每像素2×32位(浮点)RGB (U32) (4):每像素32位(红,绿,蓝,alpha)HSL (U32) (5):每像素32位(色调,饱和度,亮度,α)RGB (U64) (6):每像素64位(红,绿,蓝,alpha)Grayscale (U16) (7):每像素16位(无符号,标准单色)IMAQ Dispose VI:销毁图像,释放其占用的内存空间。
在应用程序中释放I MAQ Create VI创建图像时分配的内存空间。
在应用程序中不再需要图像时执行IMAQ Dispose VI。
在所有IMAQ Create VI创建图像之后调用一次IMAQ Dispose VI。
IMAQ Image Bit Depth VI:给出图像的位深度相关信息,或修改图像的位深度。
NI视觉图像的位深度决定如何显示图像、图像转换到另一个图像类型以及写入图像为PNG文件Bit Depth (0):只有当Get/Set Bit Depth? (Set)设置为“Set”时,此端口才有效,指定新图像的位深度。
LabVIEW初级入门教程
概述本次介绍使用LabVIEW来进行仪器控制的各种方法。
要求学生学会串行I/O、GPIB I/O和VISA I/O的使用方法,同时也可以验证LabVIEW本身提供的仪器驱动程序。
本次的实验设备要求一块已安装的GPIB卡,一台GPIB仪器以及LabVIEW开发系统。
串行通讯串行通讯是一种常用的数据传输方法,它用于计算机与外设,例如一台可编程仪器,或者与另外一台计算机之间的通讯。
串行通讯中发送方通过一条通讯线,一次一个字节,把数据传送到接收方。
由于大多数电脑都有一至两个串行通讯接口,因此,串行通讯非常流行。
许多GPIB仪器也都有串行接口。
然而,串行通讯的缺陷是一个串行接口只能与一个设备进行通讯。
一些外设需要用特定字符来结束传送给它们的数据串。
常用的结束字符是回车符、换行符或者分号。
具体可以查阅设备使用手册以决定是否需要一个结束符。
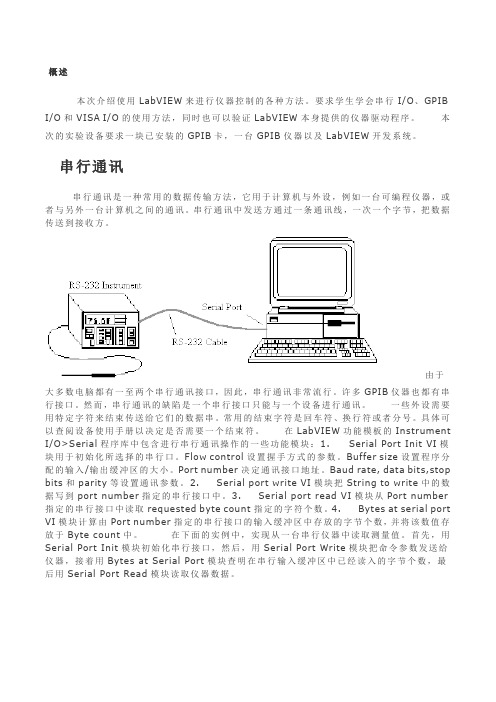
在LabVIEW功能模板的Instrument I/O>Serial程序库中包含进行串行通讯操作的一些功能模块:1. Serial Port Init VI模块用于初始化所选择的串行口。
Flow control设置握手方式的参数。
Buffer size设置程序分配的输入/输出缓冲区的大小。
Port number决定通讯接口地址。
Baud rate, data bits,stop bits和parity等设置通讯参数。
2. Serial port write VI模块把String to write中的数据写到port number指定的串行接口中。
3. Serial port read VI模块从Port number 指定的串行接口中读取requested byte count指定的字符个数。
4. Bytes at serial port VI模块计算由Port number指定的串行接口的输入缓冲区中存放的字节个数,并将该数值存放于Byte count中。
在下面的实例中,实现从一台串行仪器中读取测量值。
ni visa库用法 -回复
ni visa库用法-回复主题:NI-VISA库的用法引言:NI-VISA(National Instruments Virtual Instrument Software Architecture)是一款用于通信与控制领域的库,它提供了一组功能强大的API和工具,用于实现计算机与各种外部设备的通信和控制。
无论是使用GPIB、串行口、以太网、USB等任何通信接口,NI-VISA都能提供统一的编程接口,简化设备通信与控制的开发过程。
本文将以NI-VISA库的用法为主题,详细介绍如何使用NI-VISA进行设备通信与控制。
一、NI-VISA库的安装与配置1. 下载和安装NI-VISA库。
2. 安装设备驱动程序。
3. 配置VISA资源管理器。
二、创建VISA会话1. 引入NI-VISA库。
2. 初始化VISA库。
3. 打开与设备的通信连接。
4. 创建VISA会话对象。
三、查询和设置设备属性1. 查询设备的身份信息。
2. 查询和设置设备的状态。
3. 查询和设置设备的控制参数。
四、读写设备数据1. 使用VISA会话对象进行数据读取和写入。
2. 选择适当的读写方式。
3. 处理读写数据的错误和超时。
五、关闭VISA会话和释放资源1. 关闭VISA会话对象。
2. 清空VISA会话缓冲区。
3. 释放VISA资源。
六、示例代码和应用场景1. 使用NI-VISA库控制GPIB设备。
2. 使用NI-VISA库与串行设备进行通信。
3. 使用NI-VISA库进行网络通信。
七、NI-VISA库的优势和应用实例1. 统一的编程接口。
2. 广泛的通信接口支持。
3. NI-VISA在自动化测试、仪器控制等领域的应用实例。
八、总结NI-VISA库作为一款用于通信与控制领域的库,提供了丰富的功能和灵活的接口,方便了设备通信与控制的开发。
通过一系列的步骤,我们可以完成NI-VISA库的安装与配置、创建VISA会话、查询和设置设备属性、读写设备数据、关闭VISA会话和释放资源等操作。
ni visa库用法 -回复

ni visa库用法-回复题目:Ni Visa库的用法引言:Ni Visa库(National Instruments Virtual Instrument Software Architecture)是一款功能强大的开发工具,用于与各种设备进行通信和控制。
本文将以Ni Visa库的用法为主题,详细介绍Ni Visa库的安装、配置和应用实例,并逐步回答相关问题,以帮助读者更好地理解和使用Ni Visa库。
第一部分:Ni Visa库的安装和配置(500字左右)1. 下载和安装:访问National Instruments官方网站,下载Ni Visa 库的最新版本,并按照安装向导提示进行安装。
2. 配置设备和驱动程序:安装完成后,打开Visa Configuraton Assistant工具,选择和配置支持的设备和驱动程序。
这个工具将帮助用户快速设置通信参数和驱动程序的连接选项。
第二部分:Ni Visa库的应用实例(1000字左右)1. 连接设备:使用Visa自带的函数库,编写简单的代码连接设备。
以连接GPIB设备为例,首先使用viopen进行连接,然后使用viclose关闭连接(使用低级通信接口函数)。
2. 读写数据:使用visawriter(viopen的一个变体函数)可以向设备发送命令,并使用visareader(viclose的一个变体函数)接收设备返回的数据。
此外,可以使用visawriteline和visareadline,实现与设备的交互。
第三部分:Ni Visa库常见问题及解决方法(500字左右)1. 无法找到设备:检查设备是否正确连接,确保驱动程序已正确安装。
2. 读写错误:检查设备的通信参数是否正确设置,尝试更改波特率和数据位数等配置选项。
3. 程序崩溃:检查代码中是否有潜在的错误,如资源泄漏和指针问题。
使用适当的异常处理机制。
结论:本文详细介绍了Ni Visa库的安装、配置和应用实例,并对常见问题进行了解答。
labview中的visa用法

在LabVIEW中使用VISA在LabVIEW中使用VISA VISA是仪器编程的标准I/O API。
VISA的多种用途VISA可控制GPIB、串口、USB、以太网、PXI或VXI仪器,并根据使用仪器的类型调用相应的驱动程序,用户无需学习各种仪器的通信协议。
VISA独立于操作系统、总线和编程环境。
换言之,无论使用何种设备、操作系统和编程语言,均使用相同的API。
开始使用VISA之前,应确保选择合适的仪器控制方法。
GPIB、串口、USB、以太网和某些VXI仪器使用基于消息的通信方式。
对基于消息的仪器进行编程,使用的是高层的ASCII字符串。
仪器使用本地处理器解析命令字符串,设置合适的寄存器位,进行用户期望的操作。
SCPI(可编程仪器标准命令)是用于仪器编程的ASCII命令字符串的标准。
相似的仪器通常使用相似的命令。
用户只需学习一组命令,而无需学习各个仪器生产厂商各种仪器的不同命令消息。
最常用的基于消息的函数是:VISA读取、VISA写入、VISA置触发有效、VISA清空和VISA读取STB。
PXI和许多VXI仪器使用基于寄存器的通信方式。
对基于寄存器的仪器进行编程,使用的是将直接写入仪器控制寄存器的底层二进制信息。
该通信方式的优点是速度快,因为仪器不需解析命令字符串,并将信息转换为寄存器层次的程序。
基于寄存器的仪器实际上是在直接硬件操作层上进行通信。
最常用的基于寄存器的函数是:VISA输入、VISA 输出、VISA转入和VISA转出LabVIEW VISA与串口通讯的编程实现(2013-05-25 11:25:52)VISA是虚拟仪器软件体系结构的缩写(即Virtual Instruments Software Architecture),实质上是一个I/O口软件库及其规范的总称。
VISA是应用于仪器编程的标准I/0应用程序接口,是工业界通用的仪器驱动器标准API(应用程序接口),采用面向对象编程,具有很好的兼容性、扩展性和独立性。
LabView串口仪器控制
[Labview经验] 小草手把手教你 LabVIEW 串口仪器控制——VISA 串口配置 [复制链接]2228 查看 7 回复 | 发表于 2015-1-26 13:39:01 只看该作者倒序浏览建议大家按我发帖子的顺序来看,方便大家理解。
请不要跳跃式的阅读。
很多人现在看书,都跳跃式的看,选择性的看,导致有些细节的部分没有掌握到,然后又因为某个细节耽误很多时间。
以上只是个人建议,高手可以略过本帖。
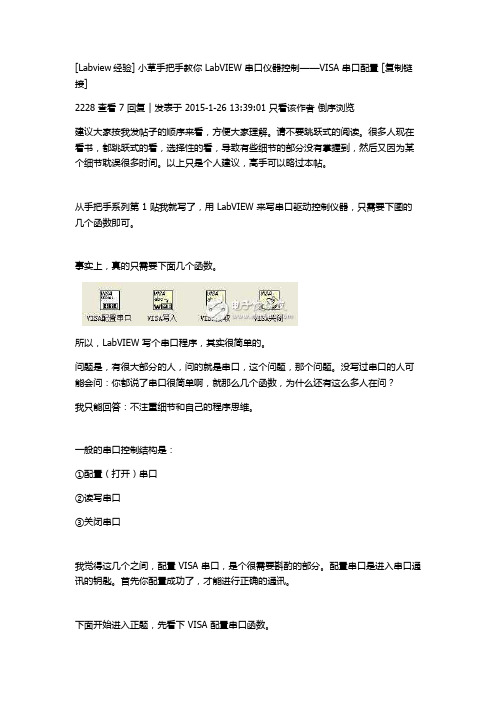
从手把手系列第 1 贴我就写了,用 LabVIEW 来写串口驱动控制仪器,只需要下图的几个函数即可。
事实上,真的只需要下面几个函数。
所以,LabVIEW 写个串口程序,其实很简单的。
问题是,有很大部分的人,问的就是串口,这个问题,那个问题。
没写过串口的人可能会问:你都说了串口很简单啊,就那么几个函数,为什么还有这么多人在问?我只能回答:不注重细节和自己的程序思维。
一般的串口控制结构是:①配置(打开)串口②读写串口③关闭串口我觉得这几个之间,配置 VISA 串口,是个很需要斟酌的部分。
配置串口是进入串口通讯的钥匙。
首先你配置成功了,才能进行正确的通讯。
下面开始进入正题,先看下 VISA 配置串口函数。
配置串口时候,最好是在对应的参数端口那里,右键,新建常量或者输入控件,然后再在新建出来的上面修改。
因为,新建出来的数据类型,肯定是对的。
需要注意的是:①停止位那里,不是常数 1 1.5 2 等,实际是 10,15,20 数值。
这里最好右键新建常量然后选择对应的枚举类型,如上图所示。
更需要注意的是:②配置串口,顶端有个启用终止符,一般默认是真,终止符一般默认是 OA,即换行符。
有些人接受的字符串,里面含有十六进制的 OA,然后每次数据接收到 OA 就停止了,然后就以为程序有什么问题,其实就是没有配置好 VISA,终止符没有设定为假。
那为什么配置 VISA 要搞个终止符呢?(注意:这个函数的终止符,只是接受的终止符,只是对 LabVIEW 接收而言,后面会具体讲。
- 1、下载文档前请自行甄别文档内容的完整性,平台不提供额外的编辑、内容补充、找答案等附加服务。
- 2、"仅部分预览"的文档,不可在线预览部分如存在完整性等问题,可反馈申请退款(可完整预览的文档不适用该条件!)。
- 3、如文档侵犯您的权益,请联系客服反馈,我们会尽快为您处理(人工客服工作时间:9:00-18:30)。
在LabVIEW中使用VISA在LabVIEW中使用VISA VISA是仪器编程的标准I/O API。
VISA的多种用途VISA可控制GPIB、串口、USB、以太网、PXI或VXI仪器,并根据使用仪器的类型调用相应的驱动程序,用户无需学习各种仪器的通信协议。
VISA独立于操作系统、总线和编程环境。
换言之,无论使用何种设备、操作系统和编程语言,均使用相同的API。
开始使用VISA之前,应确保选择合适的仪器控制方法。
GPIB、串口、USB、以太网和某些VXI仪器使用基于消息的通信方式。
对基于消息的仪器进行编程,使用的是高层的ASCII字符串。
仪器使用本地处理器解析命令字符串,设置合适的寄存器位,进行用户期望的操作。
SCPI(可编程仪器标准命令)是用于仪器编程的ASCII命令字符串的标准。
相似的仪器通常使用相似的命令。
用户只需学习一组命令,而无需学习各个仪器生产厂商各种仪器的不同命令消息。
最常用的基于消息的函数是:VISA读取、VISA写入、VISA置触发有效、VISA清空和VISA读取STB。
PXI和许多VXI仪器使用基于寄存器的通信方式。
对基于寄存器的仪器进行编程,使用的是将直接写入仪器控制寄存器的底层二进制信息。
该通信方式的优点是速度快,因为仪器不需解析命令字符串,并将信息转换为寄存器层次的程序。
基于寄存器的仪器实际上是在直接硬件操作层上进行通信。
最常用的基于寄存器的函数是:VISA输入、VISA 输出、VISA转入和VISA转出LabVIEW VISA与串口通讯的编程实现(2013-05-25 11:25:52)VISA是虚拟仪器软件体系结构的缩写(即Virtual Instruments Software Architecture),实质上是一个I/O口软件库及其规范的总称。
VISA是应用于仪器编程的标准I/0应用程序接口,是工业界通用的仪器驱动器标准API(应用程序接口),采用面向对象编程,具有很好的兼容性、扩展性和独立性。
用户可用一个API控制包括VXI、GPIB及串口仪器在内的不同种类的仪器。
它还支持多平台工作、多接口控制,是一个多类型的函数库。
在LabVIEW中编写的VISA接口程序,当外部设备变更时,只需要更换几个程序模块即可使用,简单方便而且开发效率高。
在LabVIEW 中利用VISA节点进行串行通信编程。
为了方便用户使用,LabVIEW将这些VISA节点单独组成一个子模块,共包含8个节点,分别实现初始化串口、串口写、串口读、中断以及关闭串口等功能。
一、基本步骤在LabVIEW 中,进行串口通信的基本步骤分为3步:第一:串口初始化,利用ⅥSA Configure Serial Port.vi【VISA配置串口】节点设定串口的端口号、波特率、停止位、校验位、数据位。
第二:读写串口,利用VISA Read节点和VISA Write节点对串口进行读写。
第三:关闭串口,停止所有读写操作。
二、主要节点介绍下面介绍一下VISA串口的主要节点及其功能:1、串口配置该节点主要用于串口的初始化,如图1所示。
图1 串口配置节点VISA资源名称:指PC的串口名,例:COMl,COM2等。
波特率:串口速率,默认为9600bps。
数据比特:一帧信息中的位数,LabVIEW 中允许5~8位数据,默认为8。
奇偶:奇偶校验位,可选为无校验、奇校验或偶校验,默认为无校验。
停止位:一帧信息中的停止位的位数,可选为1位、1.5位或2位。
流控制:设置传输机制使用的控制类型,可选为None、XON/XOFF软件流控或RTS/CTS硬件流控,默认为None。
终止符:设置一帧数据的结束符,即当接收串口数据时,当收到终止符时,软件自动结束一帧数据接收。
特别需要注意的是超时(TIMEOUT) 和结束符号两个参数.TIMEOUT默认的10秒,结束符号默认是使能状态,默认的结束符是0X0A(\n),另外,回车0x0D (\r)也经常做为做为结束符号2、串口写入【从写缓冲区中写数据至visa资源名称指定的串口】该节点主要用于写入串口数据,如图2所示。
图2 串口写入节点写入缓冲区:串口发送的内容。
3、串口读取【从visa资源名称指定的串口中读数据至读缓冲区】该节点主要用于读取串口中的数据,如图3所示。
图3 串口读取节点字节总数:要读取的字节数量。
读取缓冲区:PC串口收到的数据。
返回数:实际读取的字节数,字节总数应大于或等于返回数,否则会丢数。
4、串口关闭该节点主要用于关闭已打开的串口,释放串口资源,以便串口被其他程序所调用,如图4所示。
图4 串口关闭节点三、典型串口程序框图按照串口编程的3个基本步骤,图5和图6给出了两个典型的串口读写程序框图。
图5为读取的字节数为固定值,图中为4个字节,如果串口中数据字节数目不等于4个字节则会出错。
图6则是先判断出串口中数据的字节数目,然后将其全部读取出来。
相对而言,图6的通用性更好,但是出错的概率也会增大,因为不知道串口发来的数据是否与我们所需要的数据的字节数相等。
图5 典型串口读写程序框图1图6 典型串口读写程序框图2参考文献:文献1:基于LabVIEW 的串口通信应用(李晴)文献2:/串口通信编辑串行接口是一种可以将接受来自CPU的并行数据字符转换为连续的串行数据流发送出去,同时可将接受的串行数据流转换为并行的数据字符供给CPU的器件。
一般完成这种功能的电路,我们称为串行接口电路。
目录1定义2原理1定义串口通信程序框图串口通信是指外设和计算机间,通过数据信号线、地线、控制线等,按位进行传输数据的一种通讯方式。
这种通信方式使用的数据线少,在远距离通信中可以节约通信成本,但其传输速度比并行传输低。
串口是计算机上一种非常通用的设备通信协议。
大多数计算机(不包括笔记本电脑)包含两个基于RS-232的串口。
串口同时也是仪器仪表设备通用的通信协议;很多GPIB兼容的设备也带有RS-232口。
同时,串口通信协议也可以用于获取远程采集设备的数据。
RS-232(ANSI/EIA-232标准)是IBM-PC 及其兼容机上的串行连接标准。
可用于许多用途,比如连接鼠标、打印机或者Modem,同时也可以接工业仪器仪表。
用于驱动和连线的改进,实际应用中RS-232的传输长度或者速度常常超过标准的值。
RS-232只限于PC串口和设备间点对点的通信。
RS-232串口通信最远距离是50英尺。
[1]2原理串行通信串口通信(Serial Communications)的概念非常简单,串口按位(bit)发送和接收字节。
尽管比按字节(byte)的并行通信慢,但是串口可以在使用一根线发送数据的同时用另一根线接收数据。
它很简单并且能够实现远距离通信。
比如IEEE488定义并行通行状态时,规定设备线总长不得超过20米,并且任意两个设备间的长度不得超过2米;而对于串口而言,长度可达1200米。
典型地,串口用于ASCII码字符的传输。
通信使用3根线完成,分别是地线、发送、接收。
由于串口通信是异步的,端口能够在一根线上发送数据同时在另一根线上接收数据。
其他线用于握手,但不是必须的。
串口通信最重要的参数是波特率、数据位、停止位和奇偶校验。
对于两个进行通信的端口,这些参数必须匹配。
a,波特率:这是一个衡量通信速度的参数。
它表示每秒钟传送的位的个数。
例如300波特表示每秒钟发送300个位。
通常电话线的波特率为14400,28800和36600。
波特率可以远远大于这些值,但是波特率和距离成反比。
高波特率常常用于放置的很近的仪器间的通信,典型的例子就是GPIB设备的通信。
b,数据位:这是衡量通信中实际数据位的参数。
当计算机发送一个信息包,实际的数据不会是8位的,标准的值是6、7和8位。
如何设置取决于你想传送的信息。
比如,标准的ASCII 码是0~127(7位)。
扩展的ASCII码是0~255(8位)。
如果数据使用简单的文本(标准ASCII码),那么每个数据包使用7位数据。
每个包是指一个字节,包括开始/停止位,数据位和奇偶校验位。
由于实际数据位取决于通信协议的选取,术语“包”指任何通信的情况。
[2] c,停止位:用于表示单个包的最后一位。
典型的值为1,1.5和2位。
由于数据是在传输线上定时的,并且每一个设备有其自己的时钟,很可能在通信中两台设备间出现了小小的不同步。
因此停止位不仅仅是表示传输的结束,并且提供计算机校正时钟同步的机会。
适用于停止位的位数越多,不同时钟同步的容忍程度越大,但是数据传输率同时也越慢。
d,奇偶校验位:在串口通信中一种简单的检错方式。
有四种检错方式:偶、奇、高和低。
当然没有校验位也是可以的。
对于偶和奇校验的情况,串口会设置校验位(数据位后面的一位),用一个值确保传输的数据有偶个或者奇个逻辑高位。
例如,如果数据是011,那么对于偶校验,校验位为0,保证逻辑高的位数是偶数个。
如果是奇校验,校验位为1,这样就有3个逻辑高位。
高位和低位不真正的检查数据,简单置位逻辑高或者逻辑低校验。
这样使得接收设备能够知道一个位的状态,有机会判断是否有噪声干扰了通信或者是否传输和接收数据是否不同步。
[1]串行通信是工业现场仪器或设备常用的通信方式,它是将一条信号的各位数据按顺序逐位传送。
计算机串行通信(简称串口)采用RS232 协议,允许一个发送设备连接到一个接收设备以传送数据,最大速率为115200bps。
计算机串行口采用Intel 8250 异步串行通信组件构成,通常以COM1~COM4 来表示。
bView 串口节点LabView 中提供了已封装好的串口通信节点,它们位于函数->数据通信->协议->串口。
这里主要介绍程序中使用到的串口配置、串口读取、串口写入和串口关闭,其他串口相关的节点使用方法查询LabView 帮助。
串口配置在进行串口通信时,首先要对串口进行初始化和配置。
这可以由VISA 配置串口节点来完成,串口配置节点如下图所示。
使用该节点可以设置串口的VISA 资源名称、波特率、数据位、超时时间、终止符以及流控制等参数。
VISA 资源名称控件用于规定对VISA 会话句柄开放的资源,并维持会话句柄和类。
VISA 会话句柄是VISA 使用的唯一逻辑标识符,用于与资源进行通信。
VISA 会话句柄由VISA 资源名称输入控件保持,用户不可见。
VISA 资源名称输出是VISA 函数中输出的VISA 资源名称的副本。
通过将资源名称输出或输入至函数和VI,并链接函数和VI,从而简化数据流编程。
这与文件I/O 函数使用的文件引用句柄输出相似。
【【【【句柄,是整个windows编程的基础。
一个句柄是指使用的一个唯一的整数值,即一个四字节长的数值,来标志应用程序中的不同对象和同类对象中的不同的实例,诸如,一个窗口,按钮,图标,滚动条,输出设备,控件或者文件等。
