ls-app
改变认知评价的英文作文

改变认知评价的英文作文Changing Cognitive ApprsalsIn the journey of life, our perceptions and evaluations of events and situations play a crucial role in shaping our emotions, behaviors, and overall well-being. The ability to change cognitive apprsals is a powerful tool that can lead to positive transformation and personal growth.Often, we have automatic and habitual ways of interpreting the world around us. These initial apprsals might be based on past experiences, biases, or limiting beliefs. However, when we bee aware of these patterns and consciously choose to change them, we open up new possibilities for a more fulfilling and balanced life.For instance, imagine facing a setback at work. Our initial reaction might be to view it as a flure and feel discouraged. But changing our cognitive apprsal, we can see it as an opportunity to learn, grow, and develop new skills. Instead of focusing on the negative oute, we can shift our attention to the valuable lessons and potential for improvement.Changing cognitive apprsals also helps us manage stress and anxiety. When we encounter a challenging situation, we can choose to perceive it as manageable rather than overwhelming. By reframing our thoughts and looking at the situation from a different perspective, we can reduce the intensity of negative emotions and approach the problem with a more posed and solution-oriented mindset.It's important to note that changing cognitive apprsals is not an easy task. It requires self-awareness, practice, and a willingness to challenge our existing beliefs. It involves questioning our automatic thoughts, looking for evidence to support or refute them, and consciously choosing more positive and adaptive interpretations.In conclusion, the power to change cognitive apprsals lies within us. By consciously choosing to view events and situations in a more positive andconstructive light, we can enhance our emotional resilience, improve our relationships, and lead a more fulfilling and meaningful life.。
PLC远程手机APP监控

1) 远程电脑连接因特网,无需固定 IP,只需安 装巨控 OPC SERVER。OPC SERVER 会自动 从 GRM530 获取数据。
2) 组态软件通过 OPC 驱动,即可组态现场画面, 监视和控制 PLC 运行,并可记录历史报警和 历史数据等关键信息。
3) 支 持 亚 控 , 力 控 , 昆 仑 通 态 , WINCC ,
数万设备,十万客户端并发访问,数百万点数据。
在线调试
可以在电脑上直接读写 PLC 寄存器。 定制 LED 显示,直接指示各种运行和故障代码。
无法调试。工程或开发中测试麻烦。 现场人员无法直接根据显示判断模块情况。
GRM530 智能 4G 控制器支持 PLC 列表
远程上下载监控梯形图
西门子 S7-200
接口开放
免费提供数据接口,客户易于开发个性网页。 免费提供数据接口,客户易于开发 IOS、安卓 APP。 提供 WEBGUI 软件,开发个性化 APP。
系统成本
无法提供通用接口,或者需要收费。 无法提供通用接口,或者需要收费。 简单网页组态。
标配无限点巨控组态软件,整体解决方案。
系统搭建成本高。
无需任何租用服务器的费用。
2) 现 场的 GRM530 可 以通 过 4G、有 线或 者 WIFI 接入因特网,可以是小区宽带,企业宽 带等,整个连接无需固定 IP、绑定动态域名 和繁琐的路由器设置。
途,即可远程下载,调试,上传梯形图。 巨控科技成立了最先进的 PLC 远程通讯 研究中心,多年来持续针对各种 PLC 实 测优化。 2) 独创下载机制,对于文件较大触摸屏和要 求响应速度的运动控制器均可流畅下载 调试。
4G+有线网+WIFI
lisp功能函数

一、数学运算功能函数1.l(十数值数值…)返回:累计实数或整数数值1.2(一数值数值…)返回:差值1.3(* 数值数值…)返回:所有数值乘积1.4(/ 数值数值…)返回:第一个数值除以第二个以后数值的商1.5(l十数值)返回:数值十ll. 6(1—数值)返回:数值一ll.7(abs 数值)返回:数值的绝对值1.8(atan 数值)返回:反正切值1.9(cos 角度)返回:角度的余弦值,角度值为弧度1.10(exp 数值)返回:数值的指数1.11(expt 底数指数)返回:底数的指数值1.12(fix 数值)返回:将数值转换为整数值1.14(gcd 数值1 数值2)返回:两数值的最大公因数1.15(log 数值)返回:数值的自然对数值1.16(max 数值数值…)返回:数值中的最大值1.17(min 数值数值…)返回:数值中的最小值1.18 pi 常数∏,其值约为3.14159261.19(rem 数值1数值2)返回:M数值的相除的余数l.20(sin 角度)返回:角度的正旋值,角度值为弧度1.21(sqrt 数值)返回:数值的平方根二、检验与逻辑运算功能函数2.l(= 表达式1 表达式2)比较表达式1是否等于式2,适用数值及字符串2.2 (/= 表达式1 表达式2)比较表达式1是否大于等于表达式22.3(<表达式1 表达式2) 比较表达式1是否<小于表达式22.4(<= 表达式1 表达式2)比较表达式1是否<一小于等于表达式22.5(>表达式1 表达式2)比较表达式1是否>大于表达式22.6(>= 表达式1 表达式2)比较表达式1是否大于等于表达式22.7 (~数值)返回:数值的位not值,(1的补码)2.8 (and 表达式1 表达式2…)返回:逻辑and的结果2.9(boole 函数整数整数…)返回:位式布尔运算2.10(eq 表达式1 表达式2)比较表达式1与表达式2是否相同,适用列表比较(实际相同)2.11(equal 表达式1表达式2[差量])比较表达式1与表达式2是否相同,差量可省略(内容相同)三、转换运算功能函数3.l(angtof 字符串[模式])返回:角度值的字符串转成实数3.2(angtos 角度[模式[精度]])返回:角度转成的字符串值3.3(atof 字符串)返回:字符串转成实数值3.4 (atoi 字符串)返回:字符串转成整数值3.5 (cvunit 数值原始单位转换单位)返回:数值转换单位后的值转换根据acad.nut文件3.6(distof 字符串[模式])返回:根据模式将字符串转成实数值3.7(itoa 整数)返回:整数转成字符串3.8(rtos 数值模式[精度])返回:实数转成字符串3.9 (trans 点原位置新位置[位移])返回:转换坐标系统值四、列表处理功能函数4.1 (append 列表列表……)结合所有列表成一个列表4.2(assoc 关键元素联合列表)根据关键元素找寻联合列表中关系信息4.3 (car 列表)返回列表中的第一个元素,通常用来求X坐标4.4(cadr 列表)返回列表中的第二个元素,通常用来求y坐标4.5(caddr 列表)返回列表中的第三个元素,通常用来求Z坐标4.6(cdr 列表)返回:除去第一个元素后的列表4.7(cons 新元素列表)返回:将新元素添加到列表4.8(foreach 名称列表表达式)返回:将列表的每一元素对应至名称再根据表达式执行响应4.9(length 列表)返回:列表内的元素数量4.10(list 元素元素…)返回:将所有元素合并为一列表4.11(listp 元素)返回:判断元素是否为一串4.12(mapcar函数列表1列表2…)返回:将列表1、列表2列表的元素配合函数,求得新列表4.13(member 关键元素列表)返回:根据关键元素(含似后的列表4.14(nth n 列表)返回:列表的第n个元素4.15(reverse 列表)返回:将列表元素根据顺序颠倒过来的列表4.16(subst 新项旧项列表)返回:替换新旧列表后的列表五、字符串、字符、文件处理函数5.l(ascii 字符串)返回:字符串第一个字符的“ASCII”码5.2 (chr 整数)返回:整数所对应的ASCII单一字符串5.3(close 文件名称)关闭文件5.4(open 文件名模式)返回:打开文件代码,准备读取或写入信息5.5(read 字符串)返回:列表中的字符串的第一组元素5.6(read-char[文件代码])返回:通过键盘或文件中读取单一字符5.7(read-line [文件代码])返回:经由键盘或文件中读取一行字符串5.8(strcase 字符串[字样])返回:转换字符串大小写5.9(strcat 字符串1字符串2…)返回:将各字符串合并为一个字符串5.10(strlen 字符串)返回:字符串构成的字符数(即字符串长度)5.11(substr 字符串起始长度)返回:取出于字符串‘5.12(wcmatch 字符串格式)返回:T或nil,将字符串与通用字符进行比较5.13(write-char数值[文件代码])返回:将一ASCII字符写到文件或屏幕15.14(write-line字符串[文件代码])返回:将字符串写到文件或屏幕上六、等待输入功能函数6.l (getangle [基点][提示])请求输入十进制角度数值,响应一个弧度值提示及参考点可有可无6.2(getcorner 基点[提示])请求输入另一矩形框对角点坐标6.3(getdist [基点][提示])请求输入一段距离6.4(getint [提示])请求输入一个整数值6.5(getkword [提示]请求输入“关键词”6.6(getorient [基点][提示])请求输入十进制角度,响应一弧度值不受angbase、angdir影响6.7(getPoint [基点][提示])请求输入一个点的坐标6.8(getreal [提示]请求输入一个实数6.9(getstring [提示])请求输入一个字符串6.10(initget [位]字符串)设定下次getxxx函数的有效输入七、几何运算功能函数7.l(angle 点1 点2)取得两点的角度弧度值7.2(distance 点1 点2)取得两点的距离7.3(inters 点1 点2 点3 点4[模式])取得两条线的交点7.4(osnap 点模式字符串)按照捕捉模式取得另一坐标点7.5(polar 基点弧度距离)按照极坐标法取得另一坐标点7.6(textbox 对象列表)取得文字字符串的两个对角点坐标八、对象处理功能函数8.l(entdel 对象名称)删除或取消删除对象8.2(entget 对象名称[应用程序列表])取出对象名称的信息列表8.3 (entlast)取出图形信息中的最后一个对象8.4(entmake 对象列表)建立一个新的对象列表8.5(entmod 对象列表)根据更新的信息列表更新屏幕上元体8.6(entnext [对象名称])找寻图面中的下一个对象8.7(entsel [提示])请求选取一个对象,响应包含对象名称及选点坐标的列表;8.8(entupd 对象名称)更新屏幕上复元体图形8.9(handent 图码)返回:图码的元体名称8.10(nentsel[提示])返回:BLOCK所含副元体对象信息列表8.11(nentselp [提示][点])返回:BLOCK所含副元体对象信息似4*4矩形表示)九、选择集、符号表处理函数9.l(ssadd [对象名称][选择集])将对象加入选择集或建立一新选择集9.2(ssdel 对象名称选择集)将对象自选择集中移出9.3(ssget [模式][点1][点2]取得一个选择集9.4(ssget ”X”[过滤列表])取得根据过滤列表所指定范围的选择集9.5(sslenth 选择集)计算选择集的对象个数9.6(ssmemb 对象名称选择集)响应对象名称是否包含于选择集内9.7(ssname 选择集索引值)根据索引值取出选择集中的对象名称9.8(tblnext 符号表名称[T])检视符号表,有效的符号表:”LAYER”、”LTYPE”、”VIEW”、”STYLE”、”BLOCK”9.9(tblsearch 符号表名称符号)在符号表中搜寻符十、AutoCAD相关查询、控制功能函数10.l(command ”AutoCAD命令”…)超重量级函数,调用执行AutoCAD命令10.2(findfile 文件名)返回:该文件名的路径及文件名10.3(getfiled 标题内定档名扩展名旗号)通过标准AutoCAD文件对话DCL 对话框获得文件10.4(getenv ”环境变量”)取得该环境变量的设定值,以字符串表示10.5(get var ”系统变量”)取得该系统变量的设定值,以字符串表示10.6(setvar ”系统变量”值)设定该系统变量的值10.7(regapp 应用类项)将目前的AutoCAD图形登记为一个应用程序名称十一、判断式、循环相关功能函数11.1(If <比较式><表达式1>[表达式2] 检算比较式结果,如果为真,执行<表达式1>,否则执行<表达式2>11.2(repeat 次数[< 表达式><表达式>…])重复执行N次表达式11.3(While <比较式><表达式>…)当条件成立则执行表达式内容11.4(cond <比较式1><表达式1>多条件式的if整合功能<比较式2><表达式2><比较式3><表达式3>)11.5 (prong 表达式1 表达式2…)连接其中的表达式为一组,常用于配合if、cond等函数十二、函数处理、定义、追踪与错误处理功能函数12.l(*error* 字符串)程序错误时的警示信息12.2(alert 字符串)以对话框式显示出警告字符串12.3(apply 功能函数列表)将功能函数与列表结合后执行12.4(defun 名称自变量列表表达式_.)自定函数或子程序12.5(eval 表达式)返回:表达式的执行结果12.6(exit)强制退出目前的应用程序12.7(lambda 自变量表达式)定义未命名的函数12.8(progn 表达式1 表达式2…)连接其内的表达式为一组,常用于配合if、cond 等函数12.9(quit)强制退出目前的应用程序12.10(tablet 代码[列1列2列3方向])取用或建立对数字板的校调12.11(trace 函数…)对函数设定追踪标记,辅助检错12.12(untrace 函数…)对函数设定解除追踪标记十三、显示、打印控制功能函数13.l(gfaphscr)作图环境切换到图形画面13.2(grclear)暂时清除模前的屏幕画面13.3(grdraw起点终点颜色[亮显])暂时性的画出一条线13.4(grread[追踪])由输入设备读取追踪值13.5(grtext位置字符串[亮显])将字符串显示在状态列或屏幕菜单上13.6(grvecs向量列表[转置矩阵])暂时性的画出多条线13.7(menucmd字符串);提供在AlltOLISP中调用各菜单13.8(Prinl[表达式[文件代码]]将表达式打印于命令区或已打开的文件句柄字符则以“\”为前缀展开13.9(pinc[表达式[文件代码]]除句柄字符则不以”\”为前缀展外开其余同Prinl 13.10(print[表达式[文件代码]]除表达式会往下一新行列出,及空一格外其余同prinl13.11(prompt信息)将信息显示于屏幕的命令区,并随后响应一个nil信息13.12(redraw[对象名称[模式]])重绘整张图或根据对象名称重绘该图形13.13(terpri)在屏幕上显示新列13.14(textscr)作图环境切换到文字画面13.15(textpage)清除文字画面文字类似DOS的cls命令13.16(vports)返回:窗口组态列表十四、符号、元素、表达式处理功能函数14.l(atom元素)如果元素不是列表,响应T,否则为nil14.2(atoms-family格式闲号列表])返回:一组己定义函数的符号列表14.3(boundp表达式)返回:T或nil,响应表达式是否有值存在14.4(minusp元素)返回:T或n儿元素是否为负值14.5(not元素)返回:T或n儿判定元素是否为ni114.6(null元素)返回:T或nil判定元素是否被赋予nil值14.7(numberp元素)返回:T或nil,元素是否为整数或实数14.8(quote表达式)响应表达式未检算前状态,同“‘”功能14.9(set符号表达式)将表达式结果设定给带单引号’符号14.10(setq符号1 表达式1[符号2表达式2]…)设定表达式结果给各符号14.11(type元素)返回:元素的信息型态14.12(zerop元素)返回:T或nil,元素是否为0值十五、ADS、ARX、AutoLISP加载与卸载函数15.l(ads)返回:目前加载ADS程序列表15.2(arx)返回:目前加载ARX程序列表15.3(arxload应用程序[出错处理]))返回:加载ARX程序15.4(arxunload应用程序[出错处理]))返回:卸载ARX程序15.5(ver)返回:目前AutoLISP版本字符串15.6(load LSP文件名[加载失败])加载AutoLISP文件(*.lsp)15.7 (xload应用程序[错处理])加载ADS应用程序15.8 (xunloa应用程序[出错处理])卸载ADS应用程序十六、内存空间管理函数16.l(alloc数值)以节点数值设定区段大小16.2(expand数值)以区段数值配置节点空间16.3(gc)强制收回废内存16.4(mem)显示目前的内存使用状态16.5(xdroom对象名称)返回对象扩展信息允许使用的内存空间16.6(xdsize列表)返回对象扩展信息所占用的内存空间十七、其它重要的功能函数17.l(acad_colordlg 颜色码旗号)显示出标准AutoCAD颜色选择对话框17.2(acad_helpdlg 求助文件名主题)显示出标准AutoCAD求助对话框17.3(acad_strlsort字符串列表)作字符串列表排序17.4(bherrs)取得bhatch与bpcly失败所产生的错误信息17.5(bhatch点[选择集[向量]])根据Pick point选点方式调用bhatch命令,绘制选集区域的剖面线17.6(bpoly点[选择集[向量]])根据Pick point选点方式调用bpoly命令并产生一定域Polyline17.7(cal计算式字符串)执行如CAL计算功能十八、ADS、ARX外部定义的3D函数18.1(align自变量 1 自变量2....)执行如ALIGN命令各选项顺序18.2(c:3dsin模式3DS文件名)导入3DS文件18.3(C:3dsout模式3DS文件名)输出3DS文件18.4(c:background模式[选项])设定渲染背景18.5(C:fog模式[选项])设定渲染的雾效果18.6(C:light模式[选项])设定渲染的灯光控制18.7(c:lsedit模式【选项1】设定渲染的景物控制18.8(C:lslib模式[选项])管理景物图库18.9(c:matilb模式材质材质库名)管理材质数据库18.10(c:mirror3d 自变量1 自变量2……)执行如MIRROR3D命令18.11(C:psdrap模式)根据模式设定值(0或1),传唤psdrap命令18.12(C:psfill对象名称图案名称[自变量1[自变量2]])以POStSCript图案填满18.13(c:psin文件名位置比例)插入一个Postscript(*.eps)文件18.14(c:render[渲染文件])执行渲染效果18.15(C:rfileopt格式自变量1 自变量2 自变量3…)设定执行渲染选项18.16(c:replay影像文件名影像类别[选项])展示影像文件TGA、BMP、TIF 18.17(C:rmat模式选项)控管材质建立、贴附、编辑、分离18.18(c:rotate3d自变量1 自变量2…)执行如ROTATE3D命令各选项顺序18.19(C:rpref模式选项[设定])渲染环境设定18.20(c:saveimg影像文件名影像类别[选项])储存图像文件TGA、BMP、TIF 18.21 (c:scene模式[选项])SCENE场景管理18.22(C:setuv模式选集自变量1 自变量2…)SETUV贴图模式管理18.23(C:showmat自变量1)显示对象的材质贴附信息18.24(C:solprof自变量 1 自变量工..)建立3D实体的轮廓影像18.25(C:StatS[渲染信息文件])显示渲染信息统计信息十九、ADS、ARX外部定义的数据库相关函数19.l(c:aseadmin自变量1 自变量2…)管理外部数据库19.2(c:aseexportt自变量1 自变量2…)输出信息19.3 (c:aselinks自变量1 自变量2…)连接对象与信息19.4(c:aserow自变量1 自变量2…)管理外部信息表格19.5(c:aseselect自变量1 自变量2…)建立外部信息与对象选集19.6 (c:asesqled自变量1 自变量2…)执行SQL程序。
AppToSD的几个概念
前言:翻译这个帖子,主要是看到desire版上满是请教怎么搞app2sd的,还有更多的app2sd的所谓“教程”。
app2sd到现在,有很多版本,froyo app2sd,a2sd,a2sd+,要搞好这个安装到sd卡,起码要知道这些基本的定义、概念和原理。
否则照葫芦画瓢,出了问题都不知道怎么出的。
举个例子,曾经我刷了一个rom,因为不理解app2sd的原理,每次安装好之后就点了“移动到sd卡”,结果反而闹出一大堆问题,比如小插件不能用等等。
就如同你的电脑上有硬盘一样,手机上也有“硬盘”,那就是你的SD卡。
如同你在电脑上可以给硬盘分区一样,sd卡同样能分区。
一般来说,不论你是否分区,你的sd卡买回来之后,就只有一个很大的fat32区,当然,这个fat32格式的卡,足够让你储存相片,短信,email等等。
在Android手机上,除了你外置的sd卡以外,还有手机内部闪存(NAND)。
传统意义上来说,以前你只能将软件安装到NAND 中而不能把软件安装到sd卡中。
于是,尴尬的是,当你有一个32g的sd卡,但只有5mb的内部存储,你同样不能安装多少软件,装几个后手机就提示空间已满。
Android手机只允许装到NAND中的一个原因是保护知识产权也就是防止盗版。
访问手机内部存储空间就是一件很麻烦的事情,(一般来说没有root是完全不可能的)。
正因为访问很麻烦,所以你很难到那里面去把app拷贝下来然后再发到网上去让别人安装。
但这样一来,像我们这些很喜欢装很多app的人,就尴尬了。
虽然这些app都是合法拷贝,但是内部存储空间很快就会耗尽而无法安装新软件。
所以,2.2的android,Google给了一种将软件安装到sd卡的办法,这样就能安装更多软件。
Sd上会生成一个大概叫做.android_secure的文件夹,将软件安装到里面。
但这个方法有一些问题:1,软件不是自动安装到sd卡中这个文件夹,你需要手动去点击“移动到sd卡”2,不是说有的软件都能被“移动”,事实上很多软件都不能移动。
UNIX基本命令

五,检查文件系统空间情况:df -k
$ df -k
Filesystem kbytes used avail capacity Mounted on
/dev/dsk/c0t0d0s0 2489729 1743180 497579 78% /
如上将目录tmn40打包成一个文件tmn40.tar
解包采用命令:tar -xvf tmn40.tar
十一、文件压缩:compress
$ compress tmn40.tar 将文件tmn40.tar 压缩成问及那tmn40.tar.Z
$ uncompress tmn40.tar.Z 将文件tmn40.tar.Z解压成文件tmn40.tar
MAIL=/var/mail/sybase
PATH=/usr/bin:/usr/ccs/bin:/usr/ucb:/etc:/usr/sybase/bin:.
SHELL=/bin/sh
SYBASE=/usr/sybase
TERM=vt100
TZ=PRC
通过查找环境变量,可以检查各个变量所代表的真实路径:如SYBASE代表的真实路径为/usr/sybase,另外可以检查,当某一个UNIX命令无法执行,
TESTU5.bak bin dbspace init lib scripts upgrade
TESTU5.cfg charsets devlib install locales setupxbms xappdefaults
.. .fm begin devlib lib symlib
.CMFILE .profile bi diag locales upgrade
.PNFILE .wastebasket bin include optel xappdefaults
美图LS系列全光谱LED摄影棒灯使用说明书

LS 系列全光谱LED 摄影棒灯使用说明书感谢选用美图LS 系列全光谱(RGB)LED 摄影棒灯。
美图LS 系列全光谱(RGB)LED 摄影棒灯具有光线柔和,光效高,寿命长,色彩还原好等优点。
同时具有多种特效功能,并可通过手机APP 进行控制。
本灯可广泛应用于数码摄影及电影电视拍摄,演播室拍摄等摄影摄像创作中。
一. 产品结构二. 规格参数三. 使用方法1.开关机长按开关及模式按键(4)约2秒,可点亮LED 灯,再次长按约2秒可关机。
短按开关及模式按键(4)可选择灯光模式。
2.1色温模式(CCT)短按开关及模式按键(4),至屏幕左上角进入“CCT”色温模式。
按动切换按键(1)可选择屏幕参数,按动按键+(3)和按键-(2), 可调节相应色温或功率。
① 功率调节显示 ② 色温显示 ③ 菜单显示-色温模式 ④ 组号显示 ⑤ 灯号显示 ⑥ 主从模式显示⑦ 电池电量显示(可工作时间显示)CCT:INT8000HUE:INT GEL:INT 1G#:M/S SAT BLUE 1/2 BLUE 3/4 BLUE L#011234567360°CCT G01 L01 M 1.5h HSI G01 L01 M 1.5h GEL G01 L01 M 1.5h EFX G01 L01 M 1.5hSET G01 L01 M 1.5h2.2 彩色模式(HSI) 短按开关及模式按键 按动切换按键(2)可选择屏幕参数,按动按键+(3)和按键可调节相应颜色、饱和度和功率。
CCT:INT 8000HUE:INT GEL:INT 1G#:M/S SAT BLUE 1/2 BLUE 3/4 BLUE L#0112345671234567360°CCT G01 L01 M 1.5hHSI G01 L01 M 1.5h GEL G01 L01 M 1.5hEFX G01 L01 M 1.5h SET G01 L01 M 1.5h 2.3滤镜模式(GEL) 短按开关及模式按键(4),至屏幕左上角进入“GEL” 按动切换按键(1)可选择屏幕参数,按动按键+(3)和按键可选择所对应的滤镜模式和功率。
C#字体使用
1.安装字体程序直接将字体文件安装的系统中。
函数声明:[DllImport("kernel32.dll", SetLastError = true)]static extern int WriteProfileString(string lpszSection, string lpszK eyName, string lpszString);[DllImport("user32.dll")]public static extern int SendMessage(int hWnd, // handle to destinati on windowuint Msg,int wParam,int lParam);[DllImport("gdi32")]public static extern int AddFontResource(string lpFileName);public static bool installFont(string FontFileName, string FontName) {string WinFontDir = System.Environment.GetEnvironmentVariable("WINDIR ") + "\\fonts";//string FontFileName = "DS-Digital Bold Italic.TTF";//string FontName = "DS-Digital Bold Italic";int Ret;int Res;string FontPath;//const int WM_FONTCHANGE = 0x001D;//const int HWND_BROADCAST = 0xffff;FontPath = WinFontDir + "\\" + FontFileName;try{if (!File.Exists(FontPath)){File.Copy(System.Windows.Forms.Application.StartupPath + "\\font\\" + FontFileName, FontPath); //font是程序目录下放字体的文件夹Ret = AddFontResource(FontPath);//Res = SendMessage(HWND_BROADCAST, WM_FONTCHANGE, 0, 0);//WIN7下编译会出错,不清楚什么问题。
c语言实现ls -l的功能
Linux下C语言实现ls -l功能需求:用ls -l显示文件夹下所有的文件及属性分析:1 用ls显示文件夹下的所有文件,首先用opendir打开文件夹,再用readdir 读取文件夹里面的文件,最后closedir关闭文件夹。
2 用ls -l比较复杂,打印出来的内容包括:(文件属性+文件名)由以下几部分构成——文件的类型(d——目录文件-——文本文件...)文件的可执行权限所属组的权限,其它组的权限硬链接数文件拥有者文件拥有者组文件大小时间文件名解决方案:1. 要想实现ls -l就得知道通过什么系统调用获取文件信息,首先自然是要通过man来查找相关的系统调用。
man -k file|grep statusman -k file|grep informationman -k file|grep info通过上面的搜索就可以得到stat这个系统调用获取文件属性。
man 2 stat获取系统调用的详细使用方法:#include <sys/types.h>#include <sys/stat.h>#include <unistd.h>struct stat {dev_t st_dev; /* ID of device containing file */ino_t st_ino; /* inode number */mode_t st_mode; /* protection */nlink_t st_nlink; /* number of hard links */uid_t st_uid; /* user ID of owner */gid_t st_gid; /* group ID of owner */dev_t st_rdev; /* device ID (if special file) */off_t st_size; /* total size, in bytes */blksize_t st_blksize; /* blocksize for file system I/O */blkcnt_t st_blocks; /* number of 512B blocks allocated */time_t st_atime; /* time of last access */time_t st_mtime; /* time of last modification */time_t st_ctime; /* time of last status change */};只要通过相应字段进行格式处理就行啦!2.权限处理:st_mode就是文件的权限部分。
交易系统中台架构与演进-QQ群分享版 (1)

交易易系统中台架构落地与演进美旅-住宿研发组:王尧喜-2018.01背书-技术梯度写代码技术设计技术架构技术规划视野⾏行行知闻技术感觉知识型领悟型通⽤用型⽬目录交易易业务1平台和中台23交易易系统中台架构4交易易中台的⽊木桶依赖5架构落地实施6中台架构演进1-交易易业务-售前、售中、履履约、售后售前:拿货售中:卖货履履约:给货售后:退换1-交易易业务-交易易业务是什什么交易易业务多阶段、多⻆角⾊色参与、多信息互通的商品/服务交换过程CMB下单系统上单履履约下单订单付单履履约退单记账出票配送上⻔门商品C留留房结算B M 信息系统2⽅方参与:动作+数据B M B M BM BM C C C CC流程型信息系统2⽅方参与:⼀一系列列动作+数据带状态电商四流信息流、订单流、资⾦金金流、物流拿卖给退数据状态2-交易易业务-状态机故宫⻔门票50块⼀一张,⼩小明要买2张,商品价值=100元订单价值= 100元优惠券(10)红包(5)折扣(9)积分(3)X码(2)⼩小明需付❌❌❌❌❌100元❌❌❌❌✅90元✅❌❌❌✅85元❌❌✅81元✅❌❌✅✅❌❌87元✅❌❌✅✅85元•100元都是谁出的•啥时候出的•出了了多少⼈人⺠民币账户券系统红包系统折扣系统积分系统码系统⼩小明平台商户实时收限时收⻆角⾊色收款形式账户系统(⽹网关)故宫⻔门票50块⼀一张,⼩小明要买2张,商品价值=100元订单价值=100元优惠券(10)红包(5)折扣(9)积分(3)X 码(2)⼩小明需付❌❌❌❌❌100元❌❌❌❌✅90元✅❌❌❌✅85元❌❌✅81元✅❌❌✅✅❌❌87元✅❌❌✅✅85元•100元都是谁出的•啥时候出的•出了了多少•100块买了了啥⼈人⺠民币账户券系统红包系统折扣系统积分系统码系统⼩小明平台商户实时收限时收⻆角⾊色收款形式账户系统(⽹网关)婴⼉儿免票⼉儿童半价不不享受优惠⽼老老年年9折不不享受优惠货币规则层订单账户总值货币构成货币的分配成本承担⽅方式1-交易易业务-资⾦金金&账务流程下单订单流转账务(应收付)下单成功购买端⽀支付付单处理理退单履履约C:customer P:platform S:supplier⼀一次“记账请求”⽣生成⼀一条总账务⼀一条总记账请求包含多个⼦子账务所有⼦子账务完成,表示总账务完成账务系统进⾏行行账务实收付收付分实时结算和限时结算应付账账期账务关系应付账账期账务关系应收账账期账务关系P to SC to P应付账账期账务关系应收账账期账务关系P to CP to S应收账账期账务关系S to P账务(实收付)货币⽹网关S to P订单账户总值货币构成货币的分配成本承担⽅方式2-平台和中台-架构是啥各种A(Architecture)各种D(Drvien)⼈人 VS 机器器2-平台和中台-架构是啥管理理确定性和不不确定性稳定+变化新的稳定+变化新的稳定+变化2-平台和中台-业务系统阶段⾥里里程平台是业务发展过程中,逐步沉淀的内聚服务、原⼦子服务,可⽀支撑多业务建设。
常用linux命令精粹(华为内部版)

Linux常用命令精粹1. 登录Linux 操作系统后执行reboot 命令可以重新启动linux 系统[root@loclhost/root] # reboot2. 可以安全地关闭shutdown 命令系统马上关机并且不重新启动:# shutdown –h now3. 除了显示一般文件名外连隐藏文件也会显示出来:ls –a果需要察看更详细的文件资料:ls –l (这个参数是字母L 的小写不是数字1)-rwxr----- 1 user group 0 Feb 10 09:42 text (显示读写权限,组,文件格式)4. cd;cd ~回到使用者自己的Home 目录5. 建立新的目录:mkdir work6. 删除已存在的空目录work:rmdir work7. cp –r 源文件(source) 目标文件(target),r 是指连同源文件中的子目录一同拷贝8. 删除文件:rm –i test 出现确认“y/n “rm –r 目录名:连同这个目录下面的子目录都删除rm –f 文件名这个操作可以不经确认强制删除文件9. 令将/tmp 目录下的xxx.tar 文件移动到/root 目录下: mv /tmp/xxx.tar /root当前目录下的文件aaa.tar 更名为bbb.tar: mv aaa.tar bbb.tar10. 命令显示text 这个文件: cat text依顺序显示file1,file2 的内容: cat file1 file2把file1,file2 的内容结合起来再重定向>到file3 文件: cat file1 file2>file311. 文本文件太长了超过一个屏幕的画面查看: more file(分屏显示)12. 显示用户当前的工作路径:pwd13. 创建一个新用户newuser: useradd newuser18.系统将创建一个用户oracle 用户的首要组为oinstall 次要组为dbaHome 目录为/home/oracle 密码为ora123useradd oracle –g oinstall –G dba –d /home/oracle –p ora12314. 删除一个已存在的帐号: userdel 用户名15. 超级用户还可以修改其他用户的口令: passwd 用户名16.以让一个普通用户拥有超级用户或其他用户的权限: su - 用户名17. 更改某个文件或目录的属主和属组--不同属主的文件不能存取text 文件的属主和属组分别改为oracle 和dba:chown oracle:dba textroot 用户把自己的一个文件拷贝给用户oracle 为了让用户oracle 能够存取这个文件,root 用户应该把这个文件的属主设为oracle 否则用户oracle无法存取这个文件18.进程查看命令:ps -e 显示所有进程Top命令和PS命令一样,但TOP为动态19.终止后台进程:kill [-s 信号] 进程号,kill -9 1234 命令将终止PID(进程号)为1234 的进程20.实现定时任务的完成,crontab –l 命令查看目前已经存在的cron 任务21. 磁盘剩余的磁盘空间:df显示各分区的磁盘空间使用情况:df –k22.安装文件系统:mount /mnt/cdrom强制卸载挂装在/mnt/cdrom 目录下的文件系统:umount -f /mnt/cdrom23.软件安装命令⑴tar [选项] 文件名:-c 创建一个新的档案文件-t 查看档案文件的内容(解压)-x 分解档案文件的内容-f 指定档案文件的名称-v 显示过程信息-z 采用压缩方式tar -czf oracle.tar.gz /u01/app/oracle /etc/oratab /home/oracle该命令将/u01/app/oracle 目录下的所有文件/etc/oratab 文件和/home/oracle 目录下的所有文件合并到oracle.tar 文件中并采用压缩方式;tar -tzf oracle.tar.gz:该命令列出归档文件oracle.tar 中的所有文件列表;tar –xzvf oracle.tar.gz:该命令将归档文件分解并解压缩到原有文件的路径中。
PB常用程序汇总4
e Update:这个选项会直接修改Key字段的数值,但是并不是所有的关系数据库(DBMS)都提供这样的
功能.
//动态数据窗口
数据窗口对象语法:
ls_syntax = sqlca.syntaxFromSql('select kind,name from tab_t','style(type=tabular)',ls_err1)
dw_1.Object.DataWindow.HorizontalScrollSplit = dw_1.object.id.Width
dw_1.Object.DataWindow.HorizontalScrollPosition2 = dw_1.object.id.Width
//打印数据窗口最后一页的方法:
CASE TypeInteger!
Intvar = GetDynamicNumber(SQLDA, 1)
END CHOOSE
CLOSE my_cursor;
//除DECLARE语句外,其它语句执行后都应该检查事务对象的SQLCode属性,以判断当前SQL语句的执行是否
//成功。
//得到下拉数据窗口中的显示值
//如果大于本月23号,则将时间设置为下月1号,否则取当前时间
//方法1:
if day(today())>23 then
if month(today())+1>12 then
this.text=left(string(today(),'yyyy-mm-dd'),5)+'01-01'
讯方鸿蒙实验箱使用手册说明书

深圳市讯方技术股份有限公司2022年12月前言 (1)一、产品简介 (2)1、产品模块介绍 (2)1.1.产品外观 (2)1.2.实验箱模块介绍 (2)2、产品功能介绍 (8)3、使用条件 (8)4、注意事项 (8)二、使用说明 (9)1、Hi3861烧写说明 (9)2、OpenHarmony镜像烧写 (10)三、保修说明 (16)非常感谢您选购及使用本公司产品!讯方提供《HarmonyOS硬件开发》、《基于JS鸿蒙应用开发》、《鸿蒙多终端集成开发》、《HCIA-HarmonyOS Device Developer》、《HCIA-HarmonyOS Application Developer》、《1+X移动应用开发(高级)》6门专业课程资源和实训资源,可按照校企双方共同确定的课程大纲、课时安排进行讲师驻场授课服务,与学院老师共同组建教学团队,联合开发线上精品课程。
目前鸿蒙教学资源包涵盖教学大纲、教学课件、实训指导书、教学视频和习题库等。
鸿蒙人才培养将围绕鸿蒙生态,组建高校与企业的联合团队,以行业前沿的技术、平台、设备和产业资源为基础,在专业设计、课程建设、双师培养、教学实践、职业认证、实习就业等方面展开合作,适应鸿蒙生态,助力学校的人才培养和社会化服务能够持续与科技的更新和产业发展同步,培养学生专业能力并强化职业能力,向行业企业输送鸿蒙设备开发与应用开发人才,形成产业资源赋能专业建设实现人才闭环,成为引领同类专业发展的风向标,发挥示范辐射作用。
一、产品简介1、产品模块介绍1.1.产品外观b、实验箱外观如下“图1”。
图1实验箱外观c、实验箱内部硬件如下“图2”。
图2实验箱内部硬件1.2.实验箱模块介绍鸿蒙实验箱包含主控板、核心控制模块、智能家居业务模块、智能出行业务模块、智能农业业务模块、智慧工厂业务模块、智能安防业务模块、运动健康业务模块、4.3寸显示屏。
1.2.1.主控板(图3所示)(1)主控板为实验箱控制主板:包含Type-C通信接口2个、标准JTAG接口1个、TF卡座1个、USB2.0接口1个、耳机接口1个;(2)扩展接口:包含2个应用业务扩展接口,要求每个接口至少需包括IIC接口1个、UART 接口1个、SPI接口1个、模数转换接口1个、数模转换接口1个、GPIO口8个;(3)其他预留接口:为了支撑鸿蒙应用创新开发,要求提供至少55个的预留I/O口;(4)外设:包含用户指示灯1个、用户按键3个、复位按键1个、拨码开关1个、三轴加速度传感器1个、麦克风1个、外放喇叭1个;(5)显示屏:采用4.3寸LCD多点触摸显示屏;(6)WiFi模块:采用Fn-Link3181A-S模组;(7)NFC模块:包含2个NFC模块。
H3C 产品(200912)

S001A08J H3C S12500 路由交换机S101A38N H3C S12500 主设备S101A38Q H3C S12500 基本配置0235A38M LS-12518-AC-H3H3C S12518 路由交换机(AC)580,000.00 0235A38N LS-12508-AC-H3H3C S12508 路由交换机(AC)318,000.000150A0AL LS-Z+M2+SF8+F2+LIS-1H3C S12518-组合配置-(主机+双主控+八网板+双风扇+软件)1,939,000.00S101A38P H3C S12500 机柜0235A41B LS-12500-N68-2.2-AC-H3H3C S12500 2.2m交流机柜90,000.00 S101A38R H3C S12500 主控板0231A968LSTM1MRPNC1H3C S12500 管理及路由处理板-带OAM模块398,000.00S101A38S H3C S12500 标准业务板0231A981LSTM1GP48LEB148端口千兆以太网光接口业务板(LEB)-(SFP,LC)430,000.00 0231A97W LSTM1GT48LEB148端口千兆以太网电接口业务板(LEB)-(RJ45)430,000.00 0231A989LSTM1XP4LEB14端口万兆以太网光接口业务板(LEB)-(XFP,LC)408,000.00 0231A97U LSTM1XP8LEB18端口万兆以太网光接口业务板(LEB)-(XFP,LC)630,000.00 0231A0C1LSTM1XP32REB132端口万兆以太网光接口业务板(REB)-(SFP+,LC)1,116,000.00S101A38T H3C S12500 增强业务板0231A86G LSTM1GP48LEC148端口千兆以太网光接口业务板(LEC)-(SFP,LC)535,000.000231A85L LSTM1GT48LEC148端口千兆以太网电接口业务板(LEC)-(RJ45)535,000.00 0231A93U LSTM1XP4LEC14端口万兆以太网光接口业务板(LEC)-(XFP,LC)510,000.00 0231A85Y LSTM1XP8LEC18端口万兆以太网光接口业务板(LEC)-(XFP,LC)787,000.00 0231A0BU LSTM1XP32REC132端口万兆以太网光接口业务板(REC)-(SFP+,LC)1,386,000.00S101A38U H3C S12500 交换网板0231A85M LSTM1SF18B1S12518交换网板168,000.00 0231A85N LSTM1SF08B1S12508交换网板78,000.00 S101A39C H3C S12500 光模块2312170SFP-GE-LH40-SM1310光模块-SFP-GE-单模模块-(1310nm,40km,LC)39,000.00 2312172SFP-GE-LH40-SM1550光模块-SFP-GE-单模模块-(1550nm,40km,LC)47,000.00 2312173SFP-GE-LH70-SM1550光模块-SFP-GE-单模模块-(1550nm,70km,LC)59,600.00 0231A085SFP-GE-T电模块-SFP-GE-(RJ45)9,000.000231A11U SFP-GE-LX-SM1310-BIDI光模块-SFP千兆BIDI光模块-TX1310/RX1490,10km,LC16,000.000231A11V SFP-GE-LX-SM1490-BIDI光模块-SFP千兆BIDI光模块-TX1490/RX1310,10km,LC16,000.000231A321SFP-GE-LH100-SM1550光模块-SFP-GE-单模模块-(1550nm,100km,LC)98,000.000231A41G XFP-LH80-SM1550光模块-XFP-10G-单模模块-(1550nm, 80km, LC)327,000.00 0231A438XFP-LX-SM1310光模块-XFP-10G-单模模块-(1310nm,10km,LC)54,800.000231A449SFP-GE-LH70-SM1550-CW光模块-SFP-GE-单模模块-CWDM-(1550nm,70km,LC)75,000.000231A450SFP-GE-LH70-SM1570-CW光模块-SFP-GE-单模模块-CWDM-(1570nm,70km,LC)75,000.000231A451SFP-GE-LH70-SM1590-CW光模块-SFP-GE-单模模块-CWDM-(1590nm,70km,LC)75,000.000231A452SFP-GE-LH70-SM1610-CW光模块-SFP-GE-单模模块-CWDM-(1610nm,70km,LC)75,000.00S001A08J H3C S12500 路由交换机S101A38N H3C S12500 主设备S101A38Q H3C S12500 基本配置0235A38M LS-12518-AC-H3H3C S12518 路由交换机(AC) 0235A38N LS-12508-AC-H3H3C S12508 路由交换机(AC)0150A0AL LS-Z+M2+SF8+F2+LIS-1H3C S12518-组合配置-(主机+双主控+八网板+双风扇+软件)S101A38P H3C S12500 机柜0235A41B LS-12500-N68-2.2-AC-H3H3C S12500 2.2m交流机柜S101A38R H3C S12500 主控板0231A968LSTM1MRPNC1H3C S12500 管理及路由处理板-带OAM模块S101A38S H3C S12500 标准业务板0231A981LSTM1GP48LEB148端口千兆以太网光接口业务板(LEB)-(SFP,LC) 0231A97W LSTM1GT48LEB148端口千兆以太网电接口业务板(LEB)-(RJ45) 0231A989LSTM1XP4LEB14端口万兆以太网光接口业务板(LEB)-(XFP,LC) 0231A97U LSTM1XP8LEB18端口万兆以太网光接口业务板(LEB)-(XFP,LC) 0231A0C1LSTM1XP32REB132端口万兆以太网光接口业务板(REB)-(SFP+,LC)S101A38T H3C S12500 增强业务板0231A86G LSTM1GP48LEC148端口千兆以太网光接口业务板(LEC)-(SFP,LC)0231A85L LSTM1GT48LEC148端口千兆以太网电接口业务板(LEC)-(RJ45) 0231A93U LSTM1XP4LEC14端口万兆以太网光接口业务板(LEC)-(XFP,LC) 0231A85Y LSTM1XP8LEC18端口万兆以太网光接口业务板(LEC)-(XFP,LC) 0231A0BU LSTM1XP32REC132端口万兆以太网光接口业务板(REC)-(SFP+,LC)S101A38U H3C S12500 交换网板0231A85M LSTM1SF18B1S12518交换网板0231A85N LSTM1SF08B1S12508交换网板S101A39C H3C S12500 光模块2312170SFP-GE-LH40-SM1310光模块-SFP-GE-单模模块-(1310nm,40km,LC) 2312172SFP-GE-LH40-SM1550光模块-SFP-GE-单模模块-(1550nm,40km,LC) 2312173SFP-GE-LH70-SM1550光模块-SFP-GE-单模模块-(1550nm,70km,LC) 0231A085SFP-GE-T电模块-SFP-GE-(RJ45)0231A11U SFP-GE-LX-SM1310-BIDI光模块-SFP千兆BIDI光模块-TX1310/RX1490,10km,LC0231A11V SFP-GE-LX-SM1490-BIDI光模块-SFP千兆BIDI光模块-TX1490/RX1310,10km,LC0231A321SFP-GE-LH100-SM1550光模块-SFP-GE-单模模块-(1550nm,100km,LC)0231A41G XFP-LH80-SM1550光模块-XFP-10G-单模模块-(1550nm, 80km, LC) 0231A438XFP-LX-SM1310光模块-XFP-10G-单模模块-(1310nm,10km,LC)0231A449SFP-GE-LH70-SM1550-CW光模块-SFP-GE-单模模块-CWDM-(1550nm,70km,LC)0231A450SFP-GE-LH70-SM1570-CW光模块-SFP-GE-单模模块-CWDM-(1570nm,70km,LC)0231A451SFP-GE-LH70-SM1590-CW光模块-SFP-GE-单模模块-CWDM-(1590nm,70km,LC)0231A452SFP-GE-LH70-SM1610-CW光模块-SFP-GE-单模模块-CWDM-(1610nm,70km,LC)H3C S12518 路由交换机(AC)(包含一体化机框,电源框,电源监控模块,资料;不含电源,风扇框),风扇框已经通过配置器算法必配关联,不需要您单独配置。
aml常用命令
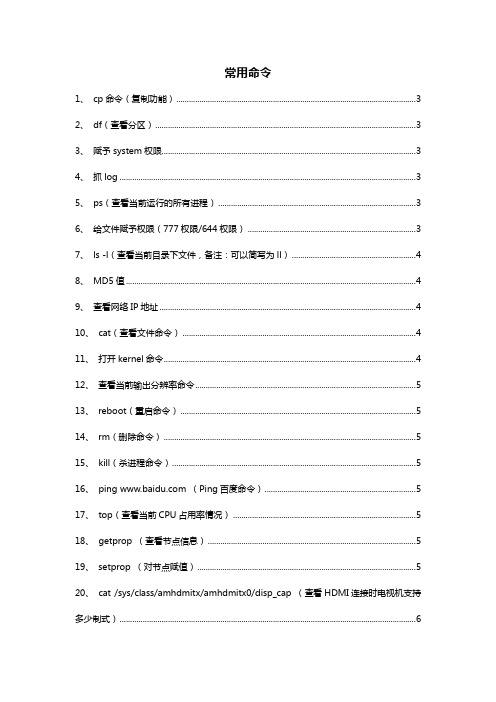
常用命令1、cp命令(复制功能) (3)2、df(查看分区) (3)3、赋予system权限 (3)4、抓log (3)5、ps(查看当前运行的所有进程) (3)6、给文件赋予权限(777权限/644权限) (3)7、ls -l(查看当前目录下文件,备注:可以简写为ll) (4)8、MD5值 (4)9、查看网络IP地址 (4)10、cat(查看文件命令) (4)11、打开kernel命令 (4)12、查看当前输出分辨率命令 (5)13、reboot(重启命令) (5)14、rm(删除命令) (5)15、kill(杀进程命令) (5)16、ping (Ping百度命令) (5)17、top(查看当前CPU占用率情况) (5)18、getprop (查看节点信息) (5)19、setprop (对节点赋值) (5)20、cat /sys/class/amhdmitx/amhdmitx0/disp_cap (查看HDMI连接时电视机支持多少制式) (6)21、setprop iptv.shouldshowlog 1 (打开IPTV相关打印) (6)22、setprop iptv.dumpfile 1 (IPTV直播点播dump流命令) (6)23、串口下命令启动apk命令 (6)24、ip route (查看路由表命令) (7)25、vi(编辑文件命令) (7)26、pm install (安装应用命令) (7)27、pm uninstall (卸载应用命令) (7)28、mv (移动文件命令) (7)29、free (查看当前剩余可使用内存大小) (7)30、input text 123456 (串口输入文字功能) (7)31、进入烧录模式 (7)32、检查目前盒子的声音配置(PCM/透传) (8)33、进入recovery模式(共2个方法) (8)34、烧写MAC地址 (8)35、烧写USID地址 (8)36、打开关闭OSD命令 (8)37、tcpdump命令,串口抓盒子网络包命令 (9)38、创建文件命令,touch /data/data/isNeedLOGCAT (9)1、cp命令(复制功能)cp /路径/文件名称(空格) /目标路径/cp /storage/external_storage/sda1/1.apk /system/app/---负责U盘里的1.apk 到/system/app/目录下2、df(查看分区)3、赋予system权限echo 1 > /sys/class/remount/need_remount;mount -o rw,remount /dev/block/system4、抓loglogcat -c(清除之前的log缓存)logcat -v time(在串口工具窗口下打印log日志,且日志中带时间戳)logcat -v time > /storage/external_storage/sda1/1.log&(将日志打印到U盘的1.log文件里)killall logcat(停止U盘下打印日志)logcat -v time -s IPTVTR069 IPTV(在串口下只抓某个打印,例如只抓IPTVTR069和IPTV打印)5、ps(查看当前运行的所有进程)6、给文件赋予权限(777权限/644权限)chmod 777 /system/app/Miracast.apkchmod 777 /路径/文件名称7二进制111分别表示可读可写可执行第一个7,表示owner的权限,第二个表示owner所在的分组的权限,第三个表示其他用户的权限7、ls -l(查看当前目录下文件,备注:可以简写为ll)ll /system/app/Miracast.apk (单独查看单个文件)8、MD5值md5sum /system/app/Miracast.apk (查看/system/app/目录下Miracast.apk的MD5值)9、查看网络IP地址netcfgeth0 ---以太网节点wlan0 --- wifi节点ppp0 --- PPPoE节点备注:后面12位是MAC地址10、cat(查看文件命令)cat /system/build.propcat /路径/文件11、打开kernel命令echo 7 > /proc/sys/kernel/printk (打开kernel打印)echo 1 > /proc/sys/kernel/printk (关闭kernel打印)12、查看当前输出分辨率命令cat /sys/class/display/mode备注:当前分辨率为720p50hz13、reboot(重启命令)14、rm(删除命令)rm /system/app/Miracast.apk (删除/system/app/目录下Miracasst.apk文件)15、kill(杀进程命令)kill 进程号先ps查看所有进程看到iptv进程号为5501Kill 5501 (将进程号为5501的进程杀掉)killall 进程名称killall com.android.smart.terminal.iptv16、ping (Ping百度命令)17、top(查看当前CPU占用率情况)top -m 5(查看前5个cpu占用高的进程)18、getprop (查看节点信息)getprop 备注:ro开头为只读节点,无法赋值修改节点19、setprop (对节点赋值)setprop 11 (对节点赋值为11)20、cat /sys/class/amhdmitx/amhdmitx0/disp_cap (查看HDMI连接时电视机支持多少制式)备注:带*号为此电视机的支持的最佳制式21、setprop iptv.shouldshowlog 1 (打开IPTV相关打印)22、setprop iptv.dumpfile 1 (IPTV直播点播dump流命令)1)先将U盘插在盒子上2)重启盒子3)输入setprop iptv.dumpfile 1命令4)播放对应的直播/点播5)在U盘下会生成Live0.ts视频流---为当前播放的视频流备注:切台后会重新生成一个Live1.ts23、串口下命令启动apk命令cd /data/data/llmonkey -p 名称1monkey -p com.amlogic.miracast 1 (启动Miracast应用命令)monkey -p com.android.smart.terminal.settings 1 (系统设置命令)monkey -p com.meson.videoplayer 1 (启动本地播放器命令)24、ip route (查看路由表命令)25、vi(编辑文件命令)vi /data/data/com.android.smart.terminal.iptv/shared_prefs/iptv_prefs.xml 编辑速影iptv下的xml文件I ---进入输入修改模式Shift+:wq ---保存并退出q! ---不保存退出26、pm install (安装应用命令)pm install /storage/external_storage/sda1/1.apk安装U盘路径下的1.apk,安装成功后应用在/data/app/路径下27、pm uninstall (卸载应用命令)在/data/app/目录下pm uninstall 文件名称(不要-1等字符)28、mv (移动文件命令)mv /system/app/Miracast.apk /system/lib/将/system/app/路径下Miracast.apk文件移动到/system/lib/目录下mv重命名文件方法:mv system/app/Shanxi_IPTV.apk /system/app/Shanxi_IPTV.apk.bak将/system/app/路径下IPTV apk重命名为Shanxi_IPTV.apk.bak29、free (查看当前剩余可使用内存大小)30、input text 123456 (串口输入文字功能)input text tianyi ---界面上会输入tianyi的文字备注:输入时请确认输入法为英文模式下31、进入烧录模式reboot 重启盒子在开机时电脑输入Enter,进入uboot命令行输入update 进入烧录模式连接烧录线后,可以对板子进行烧录32、检查目前盒子的声音配置(PCM/透传)getprop ubootenv.var.digitaudiooutputHDMI&SPDIF PCM --- HDMI与光钎都为解码HDMI Only Passthrough --- HDMI透传、光钎无声音HDMI&SPDIF Mute --- HDMI与光钎都没有声音HDMI Only Auto --- HDMI自适应SPDIF Only Passthrough --- HDMI无声音、光钎透传33、进入recovery模式(共2个方法)1)在启动完全开机下输入reboot recovery2)在uboot命令行,输入run recovery_from_flash34、烧写MAC地址echo 1 > /sys/class/unifykeys/attachecho "mac" > /sys/class/unifykeys/namecat /sys/class/unifykeys/name (查看串口是否返回mac)echo "11:11:11:11:11:11" > /sys/class/unifykeys/writecat /sys/class/unifykeys/read (查看串口是否返回刚刚输入的mac地址)35、烧写USID地址echo 1 > /sys/class/unifykeys/attachecho "usid" > /sys/class/unifykeys/namecat /sys/class/unifykeys/name (查看串口是否返回usid)echo "123456789111111111" > /sys/class/unifykeys/writecat /sys/class/unifykeys/read (查看串口是否返回刚刚输入usid)36、打开关闭OSD命令echo 1 > /sys/class/graphics/fb0/blank如果输入这两个命令之后,视频显示出来了,就说明视频被OSD 遮住了。
小米电子尺ls-p说明书
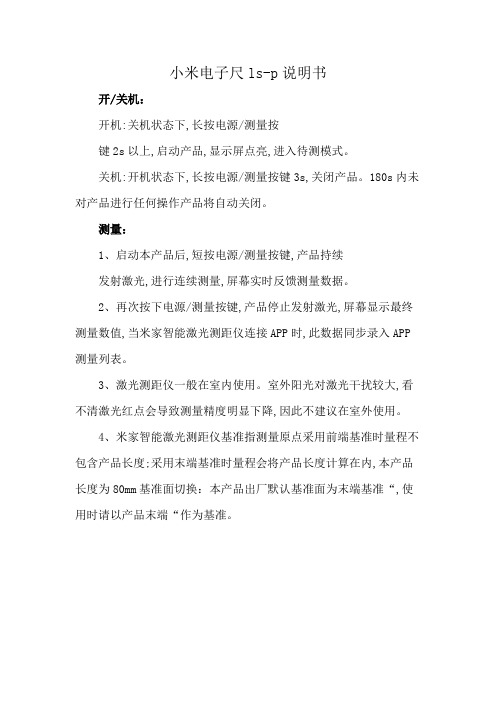
小米电子尺ls-p说明书
开/关机:
开机:关机状态下,长按电源/测量按
键2s以上,启动产品,显示屏点亮,进入待测模式。
关机:开机状态下,长按电源/测量按键3s,关闭产品。
180s内未对产品进行任何操作产品将自动关闭。
测量:
1、启动本产品后,短按电源/测量按键,产品持续
发射激光,进行连续测量,屏幕实时反馈测量数据。
2、再次按下电源/测量按键,产品停止发射激光,屏幕显示最终测量数值,当米家智能激光测距仪连接APP时,此数据同步录入APP 测量列表。
3、激光测距仪一般在室内使用。
室外阳光对激光干扰较大,看不清激光红点会导致测量精度明显下降,因此不建议在室外使用。
4、米家智能激光测距仪基准指测量原点采用前端基准时量程不包含产品长度;采用末端基准时量程会将产品长度计算在内,本产品长度为80mm基准面切换:本产品出厂默认基准面为末端基准“,使用时请以产品末端“作为基准。
LS-prepost finite-element

Mesh Overviewz ShapeM-Simple shell/solid meshing interfacez AutoMesh-Surface mesh interface.z SolidMesh-Solid mesh interface.z BlockM-3D block mesher interface.z NlMesh-2, 3, and 4 line mesh interface.z TetMesh-Tetrahedron mesher interface.z BMesh-Blank mesher interface.z ElemGen-Create beam, shell, and solid elements.z NodeEdit-Show, create, delete, and modify nodes.z ElemEdit-Show, create, delete, and modify elements.z MassTrim-Mass trim interface.z Spot Weld-Generate spotweld elements from a spotweld file.z SphGen-Sph particle generation interface.ShapeMPurpose:This interface, often used for generating solid meshes for ALE simulations, can be used to generate solid and shell meshes. Function:Box_Solid : Define a box and generate solid mesh of it.Box_Shell : Define a box and generate shell mesh of it.4N_Shell : Define four node surface and generate shell mesh of it.Sphere_Solid : Define a sphere and generate solid mesh of it.Sphere_Shell : Define a sphere and generate shell mesh of it.Cylinder_Solid : Define a cylinder and generate solid mesh of it.Cylinder_Shell : Define a cylinder and generate shell mesh of it.Circle_Shell : Define a circle and generate shell mesh of it.Sample:no sample.Box_Solid/Box_Shellz Region : Use General Selection Interface to get region max and min values.z Define_Box : Use Entity Operation Interface to get box max and min values.z PMin/PMax : Use Position Dialog to get minimum/maximum point.z X/Y/Z : Enter x/y/z-coordinates of minimum and maximum point.z Number : Enter number of elements along x/y/z.z Size : Enter size along x/y/z.z Vx/Vy/Vz : Enter Number/Size along x/y/z.z Gap : Extend min/max of box by this value.z Target Name : Enter target part name.z Target Part ID : Enter target part ID.z Start Element ID : Enter starting element ID.z Start Node ID : Enter starting node ID.z Create : Create mesh for the entity.z Reject : Reject the created mesh.4N_ShellSphere_Solid/Sphere_Shell z Accept : Accept the created mesh.z Done : Exit meshing interface.z Checkbox P1/P2/P3/P4 :Use General Selection Dialog to Pick node for point 1/2/3/4. z Button P1/P2/P3/P4 :Use Position Dialog to get point 1/2/3/4.z Text P1/P2/P3/P4 :Enter coordinates in format "x, y, z" for point 1/2/3/4.z NxNo. :Enter number of elements along x.z NyNo. :Enter number of elements along y.z Radius : Enter radius of sphere.z Density : Enter density of sphere.z Center[Position] : Use Position Dialog to get sphere center. z x/y/z : Enter x, y, z of the sphere center.z Direct1 : Call Direction Dialog to get direction 1.z Direct2 : Call Direction Dialog to get direction 2.z dx/dy/dz : Set direction x/y/z for 1/-1 (toggles).Cylinder_Solid/Cylinder_ShellCircle_Shell z Radius : Enter cylinder radius.z Length : Enter cylinder length.z Num Ele : Enter number of elements in circumferential direction. z Num : Enter number of elements along the length of the cylinder. z Position : Call Position Dialog to get position.z Direction : Call Direction Dialog to get direction.z dirx/diry/dirz : Set direction x/y/z for 1/-1 (toggles).z Top And Bottom : Create Top and Bottom Circle Shell.z Radius : Radius of circle.z Density : Density of Circle (Must more than 2).z Radius_In : Radius of circle inside.z Density_In : Density of Circle Inside (Must more than 2)z Angle : Span Angle.z Center[Position]xyz : Call Position Dialog to get position.z Direct1 : Call Direction Dialog to get direction 1.z Direct2 : Call Direction Dialog to get direction 2.z dx/dy/dz : Set direction x/y/z for 1/-1 (toggles).AutoMeshPurpose:This interface is for surface mesh generation. Two meshing methods are available: By size and By Deviation.Function:Auto Mesh : Size mode creates uniformly sized elementsTool Mesh : Specifically for metalforming applications where surfaces may contain very small radii that need to be meshed accurately, and at the same time have flat areas that require a relatively coarse mesh. Tool meshing requirements are very different from those of structural finite element analysis.Sample:Two kind mesh comparison : show the difference between size-based and deviation-based.Automesh:z Size : Select the size mode.z Deviation : Select the deviation mode.z Mesh Type : Generate triangle mesh only or mixed.z Elem Size : Enter average element size.z Compute : Compute mesh parameter by model extend.z Reset : Reset mesh parameter to default.z Show Meshed Boundaries : Before Accept and After Mesh, will become sensitive. Show the boundary node as blank square.z Auto remesh boundary : Before Accept and After Mesh, will become sensitive. On the boundary, left click to increase the nodenum and right click to decrease it. Then automesh it according to the new boundary.z Manual remesh boundary : Before Accept and After Mesh, will become sensitive. On the boundary, left click to add a newnode and right click to remove a node. Then automesh it according to the new boundary.z Mesh By GPart : The mesh generated from same GPart will be organized into same part.z Ignored Hole Size : Holes under specified size will be ignored.z Part ID : Assign new generated mesh to this part or create a new part if this part id doesn't exist.z Mesh : Generate shell mesh for selected surfaces.z Reject : Reject the last operation.z Accept : Accept the last operation.z Done : Exit this dialog.Toolmesh :Two kind mesh comparisonSolidMeshPurpose:Generate solid mesh of mappable volumes.Function:Suppress : Suppress geometry edges which resist sweeping. Meshing : Generate solid mesh manually or automatically..Sample:no sample.Suppress:z Max Elem Size : Enter maximum element size.z Min Elem Size : Enter minimum element size.z Max Deviation : Enter maximum deviation ratio.zMax Angle: Enter maximum feature angle.size-based mesh deviation-based mesh Suppress Edge pick geometry edge to be suppressed on graphic area.MeshingBlockMeshPurpose:This interface is for index based mesh generation and is similar to mesh generation methods used in LS-INGRID. This capability is under development and eventually will be expanded to be a very powerful addition to LS-PrePost.Function:Create : Create blocks.Parameter : Parameter and Expression.Bland/Del : Blank or delete blocks.Rd/Write : Read and write command files.Move Pts . : Move points.Distribute : Distribute blocks' nodes.Rotate Pts : Rotate points.Project: Project points/lines/surfaces of blocks to geoemtry.Try Meshing Automatically : Once the decomposition is done, click this button try to mesh automatically. all the volumes have to be mappable, otherwise unmappable volume will be omitted.Volume by Closed Faces : Pick volume to be sweep on graphic area. For manual purpose only.Target Surface : Pick face as sweep target on graphic area. For manual purpose only.Hint : Click until found the proper target face.Mesh on Sources(Optional) : Pick sources' mesh if needed. For manual purpose only.Elem Size : Specify the element size.Default Size : Click to get the reference element size.Layer : Check to enable layer control. For manual purpose only.Bias : Check to enable bias control. For manual purpose only.Intensity : Specify the bias intensity. For manual purpose only.Mesh : Generate solid mesh.For manual purpose only.Reject : Reject the last sweep.Accept : Accept all sweep.Done : Exit the interface and accept all sweep.Info : Show internal node coordinate of given block.Sample:no sample.Create:Multiple Blocks : Create multi blocks.Single Block : Create single blocks.Butterfly Block : Create a butterfly block.z Create : Create blocks.z Parameter : Parameter and Expression.z Bland/Del : Blank or delete blocks.z Rd/Write : Read and write command files.z Move Pts. : Move points.z Distribute : Distribute blocks' nodes.z Rotate Pts : Rotate points.z Project : Project points/lines/surfaces of blocks to geoemtry.z Info : TODOz Type : Select block type.z I Index List : I index list for blocks.z J Index List : J index list for blocks.z K Index List : K index list for blocks.z X Position List : X coordinate for blocks.z Y Position List : Y coordinate for blocks.z Z Position List : Z coordinate for blocks.z Part ID : The generated mesh will belong to.z Create : Create the block.z Reject : Reject the last operation.z Accept : Accept the last operation.z Done : Exit interface.z P1 : When checkbox is checked, pick from graphic. Click button P1 to call Position dialog to create a Point. Or Enter x/y/z.z Px : Same as P1z No. of Elements(I J K) : Enter number of elements along I, J, K.z Density : Density of the cylinder perimeter.z Radius : Radius of the cylinder.z Length : Length of the cylinder.z R : Number of elements in Radius direction.Blank/Del : Rd/Write:Move Pts:z L : Number of elements in Length direction. z Is Quartered :z Is Tubal : The cylinder is empty.z Inner R: Sensitive when Is Tubal is checked. The inner raidus of cylinder.z Parameter or Expression : Enter parameter or expression. Such as A=150 or R=T1*sin(T2). z Create : Create a parameter or expression.z Delete : Delete a parameter or expression.z Coordinate X : Function to evaluate x coordinate.z Coordinate Y : Function to evaluate y coordinate.z Coordinate Z : Function to evaluate z coordinate.z Apply : Apply eval function to current domain block.z Undo : Undo the last operation.z Redo: Redo the last Undoed operation.z I Index List : I coordinate of blocks to be blank or delete.z J Index List : J coordinate of blocks to be blank or delete.z K Index List : K coordinate of blocks to be blank or delete.z(Un)Blank : Blank blocks.z Reverse Blank : Reverse blank status of blocks.z Display All : Display all blocks.z Delete : Delete blocks.z Undelete: Undelete blocks.z Empty : Empty current buffer for blockm commmand.z Read : Read command file.z Write : Write command file.z NULL : No constraint.z X Aixs : Constraint to X Axis.Distribute:Rotate Pts: Project Point : Project to point.Line : Project to line. Surface : Project to surface.Shell Element : Project to shell elements. Plane : Define a plane with a origin and a vector. Cylinder : Define a Cylinder with a origin, a vector and a radius. Sphere: Define a Sphere with a origin and a radius.z Y Aixs : Constraint to Y Axis.z Z Aixs : Constraint to Z Axis.z Screen X Axis : Constraint to screen X Axis.z Screen Y Axis : Constraint to screen Y Axis.z XY Plane : Constarint to XY Plane.z XZ Plane : Constarint to XZ Plane.z YZ Plane : Constarint to YZ Plane.z Screen Plane : Constraint to screen plane.zDistance: Sensitive according to former option. the distance on x/y/z direction.z Along a whole line : Distribute edge along a whole line.z Edge along line : Distribute edge along line.z Vectex Interpolation : Vectex Interpolation in Bi-linear and Tri-linear Multiple Faces and Solids Interpolation.z Edge Interpolation : Edge Interpolation in Bi-linear and Tri-linear Multiple Faces and Solids Interpolation.z Linear : Apply Linear Interpolation.z Zoning Ratio : Zoning Ratio (a positive number).z Both Ends : Relative spacing of nodes of an edge from both ends.z Zoning : Apply Edge Zoning.z Undo : Undo last interpolation.zRedo: Redo last interpolation.z NULL : No constraint.z X Aixs : Constraint to X Axis.z Y Aixs : Constraint to Y Axis.z Z Aixs : Constraint to Z Axis.z Screen X Axis : Constraint to screen X Axis.z Screen Y Axis : Constraint to screen Y Axis.zScreen Z Axis : Constraint to screen Z Axis.zPoint : Project to point.Infoz Line : Project to line.z Surface : Project to surface. z Shell Element : Project to shell elements. z Plane : Project to a plane.z Cylinder : Project to cylinder. z Sphere : Project to sphere. z Pick Point : Get XYZ at pick location on curve.z Nearest Point : Get XYZ at nearest point on curve.z End Point : Get XYZ at end of curve.z Mid Point : Get XYZ at middle of curve.z X : Project in X Component.z Y : Project in Y Component.z Z : Project in Z Component.z Only Face Inner Nodes : Project the Inner nodes when projecting Face(s).z Blank Blocks : Blank or unblank Blocks.z Project : Project the Block.z Undo : Undo last Projection.z Redo : Redo last Projection.z Closest 3D proj dir . : Project Block to mesh in closet 3D direction.z Vector projection : Project Block in specified vector direction.z Position : Select a Coordinate as the Orginal Point.z Direction : Select a Direction as Plane Normal.z Radius : Enter the radius for cylinder.z Position : Select a Coordinate as the Orginal Point.z Direction : Select a Direction as Plane Normal.z Closest 3D proj dir . : Project Block to mesh in closet 3D direction.z Vector projection : Project Block in specified vector direction.z Radius : Enter the radius for sphere. z Position : Select a Coordinate as the Orginal Point.z Closest 3D proj dir . : Project Block to mesh in closet 3D direction.z Vector projection : Project Block in specified vector direction.NLine MeshPurpose:This interface is for shell mesh generation using curves and often useful in cases where a topology mesher leaves holes due to missing CAD surface data.Function:2 Line Shell : Create a mesh between 2 lines 3 Line Shell : Mesh a region bounded by 3 lines 4 Line Shell : Mesh a region bounded by 4 lines Line Sweep : Create a mesh by sweeping one line along another lineSamples:no sample.2/3/4 Line Shellz I Index List : I Coordinate of one block.z J Index List : J Coordinate of one block.z K Index List : K Coordinate of one block.z I Index : I Coordinate of one Internal Node.z J Index : J Coordinate of one Internal Node.z K Index : K Coordinate of one Internal Node.z OK : Get the internal node coordinate.zCoordinate of Internal Node : Show internal node coordinate in the list.z Number of elements : Mesh by number of elements.z Element size : Mesh by element size.z Point of Line : Mesh by existing points of line.z N1 : Enter or adjust number of elements along line 1.z Ratio : Bias radio.z Two End : Bias from two end.z N2 : Enter or adjust number of elements along line 2.z N3 : Enter or adjust number of elements along line 3.z N4 : Enter or adjust number of elements along line 4.z Part Id : Enter or select target part ID.zNew PID : Get new default part ID.Line SweepTetraMeshPurpose:Use this interface to generate a solid mesh of tetrahedron elements.Function: Skin Remesh : Remesh a skin surface.Tetrahedral Mesh : Generate a tetrahedral mesh of a skin surface.Move : Move skin mesh or tetrahedral mesh to a new position.Sample:no sample.Dialog:z Mesh It : Perform meshing.z Accept : Accept the created mesh.z Reject : Reject the created mesh or the selected lines.z Done: Exit the nLMesh Interface.z N1: Enter or adjust number of elements along cross section.z Ratio : Bias ratio.z Two End : Bias from two end.z N2: Enter or adjust number of elements along sweep path.z Native Path Tangent : Use native curve tangent as sweep direction.z Center Align(move) : Generate the shell mesh with the sweep path center aligned.z Pick a skin Part : pick a part from graphic when entering this dialog.z Part List : Popup list of current parts for selection.Skin Remeshz Min edge size : Enter or change minimum element edge size for remesher.z Max edge size : Enter or change maximum element edge size for remesher.z Remesh : Remesh the skin surface.z Reject : Reject the remesh operation.z Save : Save skin or remesher skin as a new part.Tetrahedral Meshz TetMesh : Prepare selected part and send to tetrahedron mesher.z Reject : Reject tet mesh.z Accept : Accept tet mesh.z Create 10 node tetra : Create 10 node tetra elements instead of 4 node. Only take effect with "Accept".Movez X/Y/Z : Global X/Y/Z shift for new part from filled part. will affect the location of Skin also.z Move : Move temporary tetrahedron part in Global X, Y, or Z.z Clear : Clear picked part.z Done : Exit TetMesh Interface.BlankMeshPurpose:This interface is primarily intended for mesh generation of blanks for metalforming simulations, but it may also have applications in other areas. Function:4 Pnts : Using 4 Corner Nodes (of a blank) and Element Size to generate a mesh.Rect : Mesh rectangle of given Length and Width with element size or number of elements.Curve : Allows a mesh to be created on an enclosed curve. Element alignment can be along global axis or user defined. Mesh boundary options are as follows: Smoothed, Left Jagged (and optionally filled with trias), or No-Trim (creates a rectangular blank without trimming.Sample:no sample.4 Pntsz Pick : Pick node on model to define Node 1/2/3/4.z P1 : Call Position Dialog for Points 1.z P2 : Call Position Dialog for Points 2.z P3 : Call Position Dialog for Points 3.z P4 : Call Position Dialog for Points 4.z Elem Size : Element size for the blank.z Quality Statistic : Statistic quality of generated elements before accept.z Part ID : Part ID for the current blank.z New : Get a new part ID from the current model.z Start NID : The starting node id of of new created blank mesh.z Start EID : The starting element id of of new created blank mesh.z Create : Create the blank mesh.z Reject : Reject the last operation.Rect z Accept : Accept the last operation.z Done : Exit this dialog.z Location : the left bottom corner of this rectangle.z Position : Call Position Dialog for location4.z Update : Update the location.z U Offset : Enter or adjust plane center in the u direction.z V Offset : Enter or adjust plane center in the v direction.z Width : Enter or adjust width of blank.z Height : Enter or adjust height of blank.z X : Change plane normal to global x.z Y : Change plane normal to global y.z Z : Change plane normal to global z.z Normal : Call Direction Dialog to creat plane normal.z Update : Update plane normal.z Size : Give element size for blank.z Density : Give number of elements for blank.z Elem Size : Set or adjust element size for the blank (along diagonal). z U Density : Set or adjust number of elements along u direction.z V Density : Set or adjust number of elements along v direction.z Outline : Pick curve(s) to define the outline boundary.z Holes : Pick curve(s) to define holes.z By Surface: Define outline and holes by surfacez Smooth : Smooth the interior nodes after trimming (enter number of iterations).z Iterate Num :z Boundary Smooth : Smooth the nodes on the boundary after trimming.z Jagged Edge : Do a rought trim keeping the quadratic shape of the elements.z Tria Fill : Fill interior boundary notches with triangular elements.z No Trim : Create a quadratic mesh that covers the curves but performs no trim.z X : Set alignment direction along X.z Y : Set alignment direction along Y.z Z : Set alignment direction along Z.z Dir : Call Direction Dialog to create alignment for the elements.z Alpha : Rotate the above given alignment direction by this angle.z Size : Element size for the blank.ElemGenPurpose:This interface provides a variety of methods for generating beam, shell, and solid elements.Function:z Beam : Generate beam elements.{Edge : Create Beam by Edge.{Curve : Create Beam by Curve.{Node_Drag : Create Beam by Node_Drag.{Node_Spin : Create Beam by Node_Spin.{Shell_Diagonal : Create Beam by Shell_Diagonal.z Shell : Generate shell elements.{Solid_Surface, Solid_Face or Edge_Extend : Create shell by Solid_Surface, Solid_Face or Edge_Extend.{Edge_Drag : Create shell by Edge_Drag.{Edge_Spin : Create shell by Edge_Spin.{Segment_Set : Create shell by Segment_Set.{Fill_Holes : Create shell by Fill_Holes.z Solid : Generate solid elements.{Solid_Face_Drag, Solid_Face_Offset or Solid_Face_Spin : Create solid by Solid_Face_Drag, Solid_Face_Offset or Solid_Face_Spin.{Shell_Drag, Shell_Offset or Shell_Spin : Create solid by Shell_Drag, Shell_Offset or Shell_Spin.{Shell_Thickness : Create solid by Shell_Thickness.{Two_Shell_Sets : Create solid by Two_Shell_Sets.{Shell_Sweep : Create solid by Shell_Sweep.{Tetra_2_Ten or Hex_2_Tetra : Create solid by Tetra_2_Ten or Hex_2_Tetra.Sample:z Sample1 : Show how to create element Beam.z Sample2 : Show how to create element Shell.z Sample3 : Show how to create element Solid.Beamz Element ID : Enter new element starting ID.z New ID : Use default new element ID.z Part ID : Enter part ID for newly generated elements.z Pick PID : Pick part ID from graphics, part type must be consistent with the element type to be created.z New PID : Use default new part ID.z New node : Check to create new nodes.z Beam By : Set beam element generation method.z Create : Create element.z Reject : Reject last generated element.z Accept : Accept all new generated elements.z Done : Exit from element generate interface.z Third Node : Set third node on/off.z Direction : Get direction by Direction Dialog.z X : Set X direction.z Y : Set Y direction.z Z : Set Z direction.z Node ID : ID of the third node.z Curve. : Create beam just be curve without any change.z Size : Curve mesh by element size.z Num : Curve mesh by number of element.z Value : Enter size or number of elements (if zero segment by points).z Thickness : Set total thickness for generation.z Segment : Set number of segments for generation.z Direction : Get direction by Direction Interface .z X : Set direction 1,0,0 (click 2nd time to reverse).z Y : Set direction 0,1,0 (click 2nd time to reverse).z Z : Set direction 0,0,1 (click 2nd time to reverse).z Angle : Set total angle for generation.z Segment : Set number of segments for generation.z Position : Get position with Postion interface.z Sh Diagonal : Shell diagonal.Shellz Sh Diagonal13 : Shell diagonal 1,3.z Sh Diagonal24 : Shell diagonal 2,4.z Sh Diagonal Maxwrap : Shell diagonal by maxwrap.Create Shell by Edge_Drag:z Thickness : Set total thickness for generation.z Segment : Set number of segments for generation.z Direction : Get direction by Direction Interface.z X : Set direction 1,0,0 (click 2nd time to reverse).z Y : Set direction 0,1,0 (click 2nd time to reverse).z Z : Set direction 0,0,1 (click 2nd time to reverse).Create Shell by Edge_Spin:z Angle : Set total angle for generation.z Segment : Set number of segments for generation.z Position : Get position with Postion interface.Create Shell by Edge_Extend: no special control.Create Shell by Segment_Set:z SSegId : Popup set segment id list.z Keep Smooth : Keep the new element smooth with the neighbors.z Closed Hole : Pick a node on the edge of hole.z Open Hole : Pick a node on the edge and a closing line.z Polygon : Pick nodes to define a polygon to fill.z Auto Fill : Fill all holes smaller than size specified.Open Hole Option:z Node on hole : Pick a node on the hole.z Closing Line : Pick a closing line.Auto Fill Option:z Size : Hole size.SolidNodeEdit Create Solid by Solid_Face_Drag, Solid_Face_Offset, Solid_Face_Spin, Shell_Drag, Shell_Offset or Shell_Spin: z Thickness/Angle : Set total thickness or angle for generation.z Segment : Set number of segments for generation.z Direction : Get direction by Direction Interface.z X : Set direction 1,0,0 (click 2nd time to reverse).z Y : Set direction 0,1,0 (click 2nd time to reverse).z Z : Set direction 0,0,1 (click 2nd time to reverse).z Position : Get position with Postion interface.Create Solid by Shell_Thickness:z Average : Set thickness for average.z Max : Set thickness for max.z Min : Set thickness for min.z DeleteShell : Delete shell after create solid.Create Solid by Two_Shell_Sets:z Set1 : Select shell elements for set 1.z N1 : Pick or enter reference node 1 on set 1.z N2 : Pick or enter reference node 2 on set 1.z Set2 : Select shell elements for set 2.z N1 : Pick or enter reference node 1 on set 2.z N2 : Pick or enter reference node 2 on set 2.z Bias : Set bias value at shell set 1.z Segment : Set number of segments for generation.Create Solid by Shell_Sweep:z Cross-section(Shells) : Select shell elements as cross-section.z Line Path : Select a line as sweep path.z Seg. : Set num. of segments along the line.z Node path : Select a node as sweep path.z Center align(move) : Align selected elements center with the path.Create Solid by Tetra_2_Ten or Hex_2_Tetra:z NewElement : Create new ten nodes element.Purpose:The main purpose of this interface is to create new nodes in various ways, and there are several methods of replacing, aligning, and modifying nodal locations to assist in mesh clean-up.Function:Create : Create nodes interface.Replace : Replace or merge nodes interface.Delete : Delete nodes interface.Align : Align nodes interface.Modify : Modify nodes interface.Sample:no sample.Dialog:Createz ByOne : Creat one node.z ByTwo : Creation will include both head and tail nodes.z OnCurve : Create nodes on a curve.z Node Id : Input node id.z NewID : Get new default ID.z Node : Pick node on model to define new node coordinates.z Position(FE) : Pick a position(FE) to define new node coordinate.z Position(Geom) : Pick a position(Geom) to define new node coordinate.z X : Enter X coordinate of new node.z Y : Enter Y coordinate of new node.z Z : Enter Z coordinate of new node.z Advance : Advanced pick position dialog.z Create : Create nodes and put to temp buffer.z Reject : Reject last created nodes.z Accept : Commit created nodes and clear all of them from screen.z Done : Exit this interface.Create>ByTwoz Node : Pick node on model to define new node coordinate.z Position: Pick a position to define new node coordinate.z EndIn : Create new nodes at N1 and N2 also.z N1 : Pick node 1 or point to define first point.z N2 : Pick node 2 or point to define second point.z Num : Set create node number.z HeadX : Head x coordinate.z HeadY : Head y coordinate.z HeadZ : Head z coordinate.z TailX : Tail x coordinate.z TailY : Tail y coordinate.z TailZ : Tail z coordinate.Create>OnCurvez Point : Pick a point on a line.z X : Enter X coordinate of new node.z Y : Enter Y coordinate of new node.z Z : Enter Y coordinate of new node.z ByNum: The number of nodes will create on a line.Replacez Two : Replace node by two.z Many: Replace many nodes.z Pick Node : Pick node.z Area : By area select nodes.z Node1 : Pick node on model to define node 1.z Node2 : Pick node on model to define node 2.z At Node1: Move node2 to node1.z At Node2 : Move node1 to node2.z MidPoint: Move node1 and node2 to midpoint.z Clear: Clear node 1 and 2.z Reject : Reject last replacement node.z Accept : Accept replacement node.z Done : Exit this interface.Replace->Manyz Center : Take center for replace target position.z Node: Pick node for replace target node.z Position: Call position dialog and get target position.Replace->Many>Nodez PickNd : Pick node for replace target position.z Node : Node id for replace target node.Replace->Many>Positionz Position : Call position dialog and get position.z X: Enter X coordinate of new point 2.z Y : Enter Ycoordinate of new point 2.z Z : Enter Z coordinate of new point 2.Deletez Unreference All Nodes : Delete Unreference All Nodes.z Unreference Element Nodes : Delete Unreference Element Nodes.z Include Beam3rdNode : Ixclude beam third node in selection.z Delete: Delete selected nodes.z Reject : Cancel last deletion.z Accept : Commit deleted node.z Done : Exit this interface.Alignz Node: Define points by node and pick nodes to align.z PtOnElem : Define points on elements and pick nodes to align.z Point1 : Pick or define point1.。
用adb命令查看apk版本
⽤adb命令查看apk版本Android测试经常⽤到adb命令查某个apk的版本,如下:adb devices (显⽰连接的设备)adb root (获取⼿机root权限)adb remount (重新挂载系统分区,使系统分区重新可写)adb shell (进⼊⽬标设备的Linux Shell环境)cd system/app (切换到system/app路径下) 注:⼀般apk都在/system/app/或者 /system/priv-app/下⾯ls (显⽰所有⽂件夹) ——根据apk名字确定相应⽂件夹及路径exit (退出Shell环境)cd .\Desktop (切换到桌⾯)adb pull /system/app/SomcWifiDisplay/SomcWifiDisplay.apk (导出apk到desktop)--apk路径和包名aapt dump badging .\SomcWifiDisplay.apk (⽤终端显⽰该apk包的name,versionCode,versionName,sdkVersion,targetSdkVersion……) aapt即 Android Asset Packaging Tool。
该⼯具在SDK/tools⽬录下,如果你没有设置环境变量,那需要进⼊该⽬录下才能运⾏aapt命令,如果设置了环境变量则可以在任何⽬录下运⾏aapt命令了。
For example:adb root; adb remountadb shellfind | grep Contacts-release.apkCtrl+C (此时应该可以看到此apk的存放路径)exitadb pull /system/priv-app/Contacts-release/Contacts-release.apk (默认pull到为当前adb执⾏⽬录)aapt dump badging .\Contacts-release.apk ( .\ 表⽰当前⽬录)然后就显⽰显⽰该apk包的name,versionCode,versionName,sdkVersion,targetSdkVersion……。
PB中很实用的小技巧

1.RGB函数计算公式: 颜色值= (65536 * Blue) + (256 * Green) + (Red)2.控件可拖动:send(handle(this),274,61458,0)3.如何用程序控制下拉子数据窗口的下拉和收起用modify或者直接用dw_1.object.col1.dddw.showlist = true4.检索参数有些不需要传入则传%.5.如何屏蔽鼠标滚轮触发在控件的other事件写if message.number = 522 then return 16.得到数据窗口的语法:string ls_dwsyntaxls_dwsyntax=dw_1.describe("datawindow.syntax")7.得到数据窗口中各列及标题:long ll_count,istring ls_value,ls_colnamell_colnum = Long(dw_1.object.datawindow.column.count)for i = 1 to ll_colnum//得到标题头的名字ls_colname = dw_1.describe('#' + string(i) + ".name") + "_t"ls_value = dw_1.describe(ls_colname + ".text")next8.在程序中动态设置初始值:ex:dw_contro.object.columnName.initial = 'xxxx'9.如何在DataWindow的SQL语法中不使用SELECT DISTINCT实现删除重复的行---- 起先对你要显示唯一值的列进行排序:"city A",然后增加如下过滤字符串:" city < > city [-1] or GetRow () = 1"10.如何改变列的字体颜色,提醒用户此列已做修改---- 在列的Color属性中,输入如下表达式IF (column_name< >column_name.Original, RGB(255, 0, 0), RGB(0, 0, 0))。
- 1、下载文档前请自行甄别文档内容的完整性,平台不提供额外的编辑、内容补充、找答案等附加服务。
- 2、"仅部分预览"的文档,不可在线预览部分如存在完整性等问题,可反馈申请退款(可完整预览的文档不适用该条件!)。
- 3、如文档侵犯您的权益,请联系客服反馈,我们会尽快为您处理(人工客服工作时间:9:00-18:30)。
t2 1 t2 2
−1 tn 1 n−1 t2
assuming tk = tl for k = l and m ≥ n, A is full rank: • suppose Aa = 0 • corresponding polynomial p(t) = a0 + · · · + an−1tn−1 vanishes at m points t1, . . . , tm • by fundamental theorem of algebra p can have no more than n − 1 zeros, so p is identically zero, and a = 0 • columns of A are independent, i.e., A full rank
1
p4(t)
0.5
0
0
0.1
0.2
0.3
0.4
0.5
0.6
0.7
0.8
0.9
1
t
Least-squares applications 6–7
Growing sets of regressors
consider family of least-squares problems minimize for p = 1, . . . , n (a1, . . . , ap are called regressors ) • approximate y by linear combination of a1, . . . , ap • project y onto span{a1, . . . , ap} • regress y on a1, . . . , ap • as p increases, get better fit, so optimal residual decreases
minx1
minx1,...,x7
7 i=1 xi ai
−y p 0 1 2 3 4 5 6 7
Least-squares applications
6–10
Least-squares system identification
we measure input u(t) and output y (t) for t = 0, . . . , N of unknown system
i=1
2
Least-squares applications
6–2
• using matrix notation, total square fitting error is Ax − g 2, where Aij = fj (si) • hence, least-squares fit is given by x = (AT A)−1AT g (assuming A is skinny, full rank) • corresponding function is flsfit(s) = x1f1(s) + · · · + xnfn(s) • applications: – interpolation, extrapolation, smoothing of data – developing simple, approximate model of data
Least-squares applications 6–13
5 4 3 2 1 0 −1 −2 −3 −4 0
solid: y (t): actual output dashed: y ˆ(t), predicted from model
10
20
30
t
40
50
60
70
Least-squares applications
Least-squares applications 6–8
p i=1 xi ai
−y
solution for each p ≤ n is given by
−1 T −1 T xls = (AT p Ap ) Ap y = Rp Qp y (p)
where • Ap = [a1 · · · ap] ∈ Rm×p is the first p columns of A • Ap = QpRp is the QR factorization of Ap • Rp ∈ Rp×p is the leading p × p submatrix of R • Qp = [q1 · · · qp] is the first p columns of Q
6–14
Model order selection
question: how large should n be?
• obviously the larger n, the smaller the prediction error on the data used to form the model • suggests using largest possible model order for smallest prediction error
Least-squares applications
6–15
1
relative prediction error e / y
0.9 0.8 0.7 0.6 0.5 0.4 0.3 0.2 0.1 0 0
5
10
15
20
25
n
30
35
40
45
50
difficulty: for n too large the predictive ability of the model on other I/O data (from the same system) becomes worse
u(t)
unknown system
y (t)
system identification problem: find reasonable model for system based on measured I/O data u, y example with scalar u, y (vector u, y readily handled): fit I/O data with moving-average (MA) model with n delays y ˆ(t) = h0u(t) + h1u(t − 1) + · · · + hnu(t − n) where h0, . . . , hn ∈ R
−1 • matrix A has form Aij = tj i
1 t1 ··· 1 t2 ··· A= . . . . n−1 1 tm t2 m · · · tm (called a Vandermonde matrix )
Least-squares applications 6–4
Least-squares applications
6–5
Example
• fit g (t) = 4t/(1 + 10t2) with polynomial • m = 100 points between t = 0 & t = 1 • least-squares fit for degrees 1, 2, 3, 4 have RMS errors .135, .076, .025, .005, respectively
Least-squares applications 6–11
we can write model or predicted output as h0 u(n) u(n − 1) · · · u(0) y ˆ(n) h1 y u(n) ··· u(1) + 1) . = u(n .+ 1) ˆ(n . . . . . . . . hn u(N ) u(N − 1) · · · u(N − n) y ˆ(N ) model prediction error is e = (y (n) − y ˆ(n), . . . , y (N ) − y ˆ(N ))
Least-squares applications
6–9
Norm of optimal residual versus p
plot of optimal residual versus p shows how well y can be matched by linear combination of a1, . . . , ap, as function of p residual y x1a1 − y
least-squares identification: choose model (i.e., h) that minimizes norm of model prediction error e . . . a least-squares problem (with variables h)
Least-squares applications 6–12
Least-squares applications6–61p1(t)0.5
0 1
0
0.1
0.2
0.3
0.4
0.5
0.6
0.7
0.8
0.9
1
p2(t)
0.5
0 1
0
0.1
0.2
0.3
0.4
0.5
0.6
0.7
0.8
0.9
1
p3(t)
0.5
0 1
0
0.1
0.2
0.3
0.4
0.5
0.6
0.7
0.8
0.9
6–1
Least-squares data fitting